

Page 1

Libretto d’istruzioni
User’s Guide
Bedienungsanleitung
Manuel d’utilisation
Manual de instrucciones
Manual de instruções
TUTOR
Page 2

HTM SPORT S.p.A.- Salita Bonsen, 4 - 16035 RAPALLO - ITALY - Ph. + 39 0185 2011 - Fax +39 0185 669984
http://www.htmsport.com
cod. 172257 - Printed by A.L.G.- 2.000/09.99
ABK 234/99
Page 3

1
ITALIANO
COMPUTER TUTOR
INDICE GENERALE:
Introduzione pag. 2
Regole del subacqueo responsabile pag. 2
Avvertenze e norme di sicurezza pag. 3
Caratteristiche tecniche e funzionali pag. 6
Self check pag. 7
Battery check pag. 7
Autospegnimento pag. 7
Dive-funzioni di immersione pag. 7
Immersione in curva pag. 8
Immersione fuori curva pag. 8
Risalita pag. 8
Pallonata pag. 9
Affioramento pag. 9
Funzioni in superficie (surf time) pag. 9
Tabella tempi di desaturazione e tempo "NO FLY" pag. 10
Simul pag. 10
Blocco pag. 11
Pianificatore d'immersione (plan) pag. 11
Log book pag. 11
Setup pag. 12
-set1-orologio pag. 12
-set 2-altitudine pag. 12
-set 3-unità di misura temperatura pag. 12
-set 4-unità di misura profondità pag. 12
-set 5-pallonata pag. 12
-set 6-azzeramento memoria d'azoto. pag. 13
Collegamento con <PC pag. 13
Dopo immersione pag. 14
Segnalazione degli errori uba-system pag. 14
Cura e manutenzione pag. 14
Sostituzione della batteria pag. 14
Simboli e termini tecnici pag. 15
Page 4

COMPUTER DA IMMERSIONE TUTOR
Complimenti. Il computer da immersione che avete acquistato è frutto della più moderna tecnologia elaborata
da Mares, progettato per garantirvi la massima sicurezza, efficienza, affidabilità e durata nel tempo.In questo
manuale troverete tutte le istruzioni per il suo funzionamento e l'uso delle sue funzioni.Mares vi ringrazia per
la scelta e vi raccomanda di seguire sempre le sue indicazioni nell'osservanza della massima prudenza e
senso di responsabilità.
Le regole del subacqueo responsabile
• Pianificare ogni immersione
• Non spingersi mai oltre i limiti della propria preparazione ed esperienza
• Iniziare l'immersione portandosi subito alla quota più profonda programmata.
• Consultare spesso il computer nel corso dell'immersione
• Rispettare la velocità di risalita richiesta dal computer
• Effettuare sempre una sosta prudenziale di almeno 3' ad una quota compresa tra i -5 e i -3 metri
• Risalire molto lentamente in superficie dopo la sosta di decompressione
• Evitare le immersione a yo-yo
• Evitare sforzi in immersione e nella prima mezz'ora successiva alla risalita
• In acque fredde, o a seguito di sforzi in immersione, risalire prima di raggiungere i limiti di nondecompressione. Nell'eventualità di immersioni fuori curva di sicurezza, prolungare la tappa di
decompressione più vicina alla superficie
• Alternare le immersioni con un adeguato intervallo in superficie, mai inferiore alle 2 ore
• L'immersione più profonda deve essere la prima della giornata
• Evitare di immergersi fino a quando il computer non si è azzerato a seguito dell'immersione del giorno
precedente
• Effettuando immersioni giornaliere ripetute, osservare almeno un giorno di riposo alla settimana. Se le
immersioni hanno richiesto tappe di decompressione, è consigliabile effettuare un giorno di riposo ogni tre
giorni d'immersione.
• Evitare le immersioni fuori curva e le immersioni a profondità superiori a 40 metri (130 piedi) senza una
preparazione professionale specifica per questo tipo di immersioni.
• Evitare ripetute "immersioni quadre" (immersioni a quota unica) a profondità superiori a 18 metri.
• Osservare sempre un periodo di riposo di almeno 12 ore e preferibilmente 24 ore, prima di volare dopo
un'immersione, in conformità con il Divers' Alert Network.
• Ogni immersione comporta un minimo di rischio di malattia da decompressione. Nessun tipo di computer,
neanche il TUTOR, può completamente eliminare il rischio di malattia da decompressione, anche se si
osservano tutte le procedure di sicurezza.
• Immergersi sempre entro i limiti della curva di sicurezza segnalati dal TUTOR, se non esper ti in questo tipo
d'immersione professionale.
• Effettuare la risalita alcuni minuti prima di raggiungere i limiti di immersione fuori curva, lasciando un
ulteriore margine di tempo in caso d'immersioni in acque fredde, immersioni ripetute a profondità maggiori
di 18 metri, oppure in caso d'immersioni che richiedono notevole sforzo fisico, per evitare che aumenti il
rischio di malattia da decompressione.
• Iniziare ogni immersione portandosi subito alla quota più profonda programmata, ed effettuando una
risalita graduale nel corso dell'immersione, per evitare che aumenti il rischio di malattia da
decompressione.
2
Page 5
ATTENZIONE! AVVERTENZE E NORME DI SICUREZZA:
Prima dell'immersione assicuratevi di avere letto e compreso totalmente il manuale d'istruzioni.
La sicurezza di un'immersione può essere garantita solo da un'accurata preparazione.
La Mares raccomanda di non affidarsi al computer subacqueo senza prima avere frequentato un corso
presso una scuola d'immersione.
Le immersioni sportive devono essere condotte entro la curva di sicurezza ed alla profondità massima di 40
metri. La Mares raccomanda di non superare mai i limiti previsti dal proprio brevetto.Le immersioni entro i 40
metri o al di fuori della curva di sicurezza accrescono notevolmente i rischi di incidenti di decompressione.
Mares raccomanda lo scrupoloso rispetto delle semplici regole di comportamento ricordate nel paragrafo
"regole del subacqueo responsabile".
Non comprimere il TUTOR in camere iperbariche. Lo strumento può danneggiarsi gravemente se non è
immerso in acqua.
!!
ATTENZIONE
Non volare nelle 24 ore successive all'ultima immersione, o attendere comunque che si spenga
l'icona <aereo> del TUTOR.
!!
ATTENZIONE
Non immergersi in laghi di montagna senza avere prima controllato che sia attivo il programma
per l'altitudine alla quale ci si trova.
!!
ATTENZIONE
Non immergersi se l'icona <batteria> del TUTOR indica una scarsa carica residua. Sostituire la
batteria. Non immergersi se le indicazioni dello strumento appaiono irregolari o poco chiare.
!!
ATTENZIONE
Oltre al computer usate anche il profondimetro, il manometro, il timer o l'orologio e le tabelle di
decompressione.
!!
ATTENZIONE
Il TUTOR è indirizzato esclusivamente a un uso ricreativo e sportivo e non a impieghi di
carattere professionale.
!!
ATTENZIONE
Il computer non previene possibili problemi di decompressione.
Il computer non può tenere conto delle condizioni fisiche di ogni singolo subacqueo, che da un
giorno all'altro possono essere soggette a mutamenti. Per la vostra sicurezza, prima di
affrontare un'immersione sottoponetevi a una visita di controllo generale.
3
ITALIANO
Page 6

!!
ATTENZIONE
NON usare il TUTOR se non si è in possesso di regolare brevetto e senza aver letto e compreso
il manuale d'istruzioni. L'uso appropriato del TUTOR può ridurre il rischio di malattia da
decompressione, nonostante tale rischio non possa essere completamente eliminato da
qualsiasi computer.
!!
ATTENZIONE
Effettuare SEMPRE una sosta prudenziale di 3/5 minuti ad una quota compresa tra i 5 ed i 7
metri dopo ogni immersioni, nonostante le informazioni fornite dal TUTOR. Questa pratica
riduce il rischio di malattia da decompressione.
!!
ATTENZIONE
NON usare MAI il TUTOR per le immersioni a "yo-yo" (risalite e discese ripetute) a causa del
rischio di malattia da decompressione, nonostante le informazioni fornite dal TUTOR.
!!
ATTENZIONE
NON usare MAI il TUTOR, o qualsiasi altro computer da immersioni, per ripetute immersioni
quadre (immersioni a quota di profondità identica o simile) oltre i 18 metri.Tali immersioni sono
ad elevato rischio e possono causare l'insorgere di malattia da decompressione nonostante le
informazioni fornite dal TUTOR.
!!
ATTENZIONE
NON IMMERGERSI MAI a profondità superiori ai 40 metri e non programmare immersioni fuori
curva di sicurezza con il TUTOR se non si è in possesso del brevetto professionale (IANTD,TDI,
ANDI, PSA, eccetera), a perfetta conoscenza dei rischi e delle capacità necessarie alle
immersioni ARA ed in possesso del brevetto specifico per le immersioni profonde ARA a quote
maggiori di 40 metri. Questo tipo d'immersione, infatti, comporta un alto rischio di malattia da
decompressione, anche per i sub più qualificati ed esperti, e nonostante la strumentazione o
computer utilizzati. Prima di cimentarsi in tali immersioni, bisogna essere perfettamente a
conoscenza dei rischi che esse comportano.
!!
ATTENZIONE
Non utilizzare il TUTOR per le immersioni effettuate con gas respiratori diversi dall'aria
atmosferica.
4
Page 7
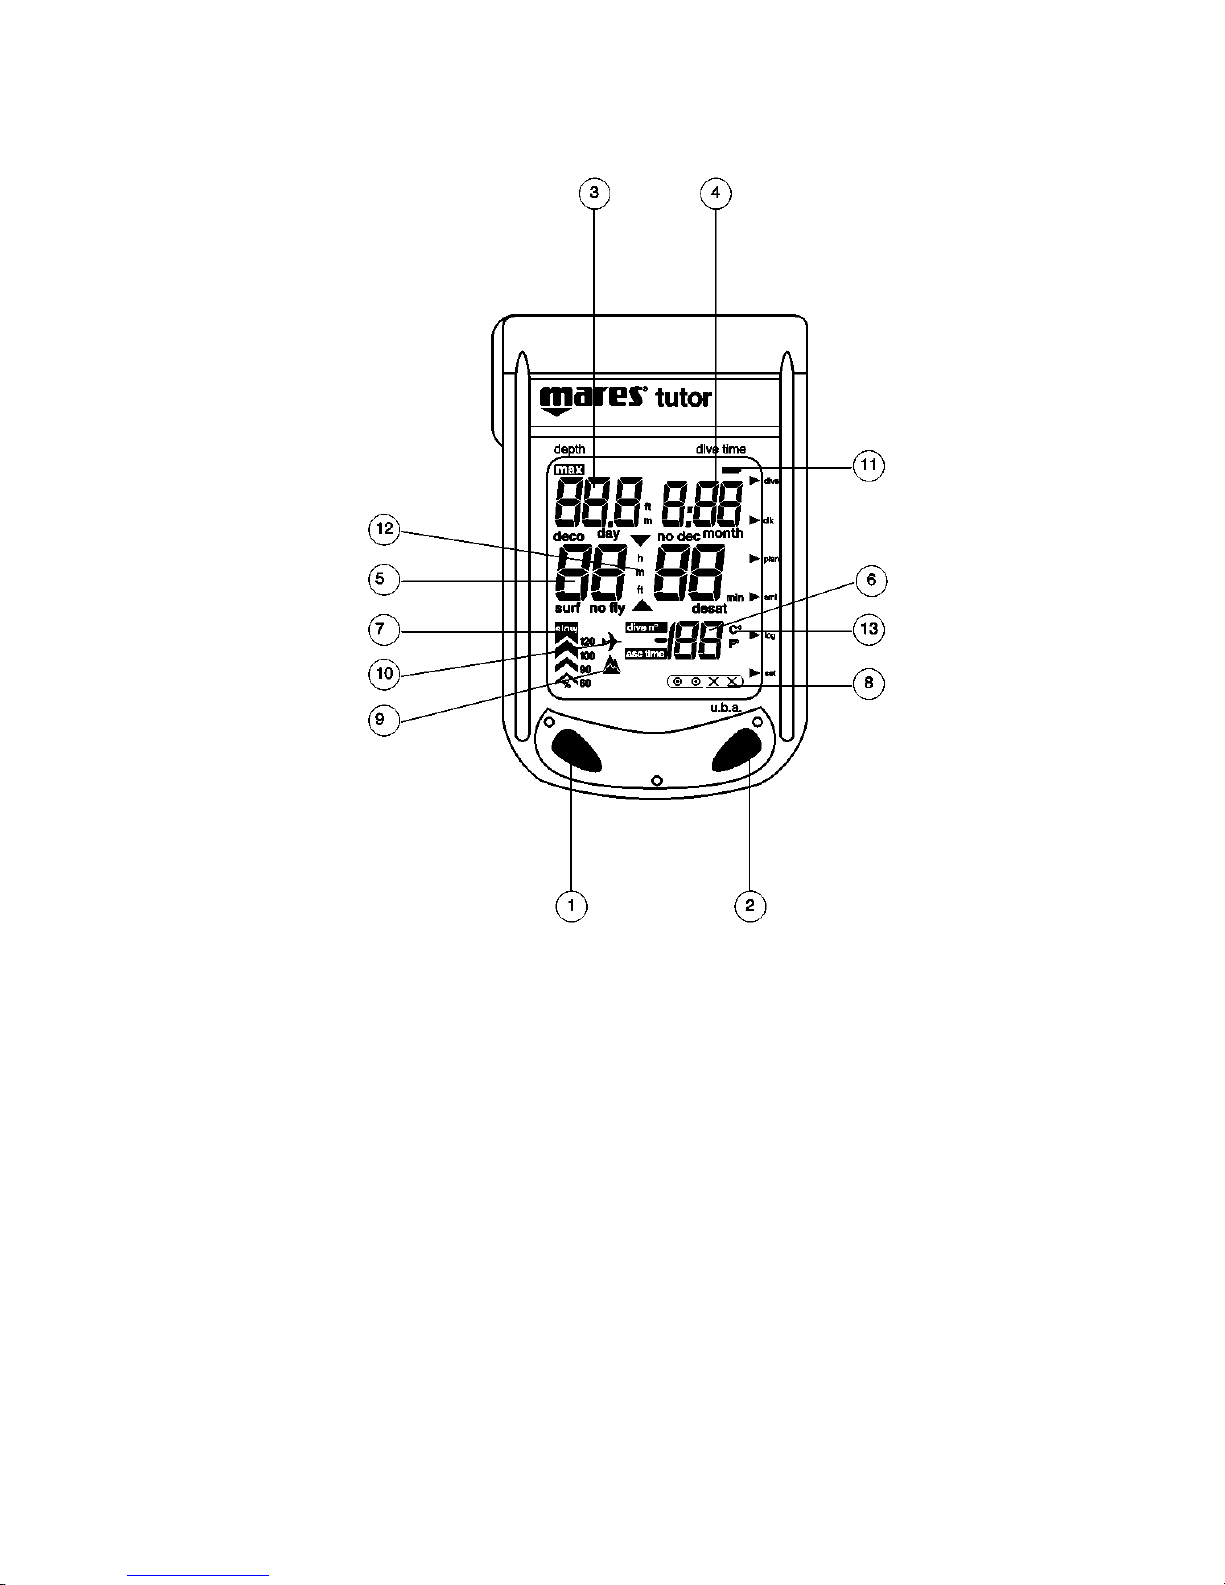
1 = Tasto <MODE>
2 = Tasto <->
3 = Profondità attuale
Profondità Max raggiunta
Giorno (
funzione clock
)
Set (
funzione set
)
4 = Tempo immersione
Mese (funzione clock)
5 = tempo no dec
Deco stops
Ora (
funzione clock
)
Tempo di superficie
Tempo “no fly”
Tempo desaturazione
6 = Temperature (
per immersioni no dec
)
Tempo totale di risalita
(
per immersioni con decompresssione
)
N° immersioni (
in funzione log book
)
Anno (
in funzione clock
)
7 = % velocità di risalita
8 = Sistema UBA
9 = Livello altitudine
10 = Spia “no fly”
11 = Spia batteria scarica
12 = Unità di misura profondità
13 = Unità di misura temperatura
5
ITALIANO
Page 8

Caratteristiche tecniche e funzionali
• Algoritmo Haldane Modificato
• Numero tessuti 9
• Tempi di emisaturazione da 2.5 a 480 minuti
• Profondità Max 99 metri (325 feet)
• Risoluzione 0.1 m
• Taratura (prof) acqua dolce
• Programmi altitudine 3. P0 (0-700m), P1 (700-1500m),
P2 (1500-2400)
• Soste di decompressione fino a 24 metri
• Velocità di risalita da 10 a 18 m/min.
• Allarmi acustici low battery
violazione quota di tappa
velocità di risalita eccessiva
uscita dalla curva
• Memoria storica Totale immersioni eseguite
Ore totali di immersione
Profondità max raggiunta
• Immersioni in log book 20
• Dati archiviati Anno, mese, giorno, ora immersione
durata
profondità max
programma altitudine
violazione tappa
dec/nodec
violazione max velocità di risalita
UBA
temperatura minima
• Profilo immersioni 10 immersioni
• Dati archiviati per ogni punto profondità massima raggiunta in ogni minuto
violazione della velocità di risalita
violazione di tappa
• Scrolling curva di sicurezza da 12 a 48 metri
• Possibilità interfaccia PC Con adattatore seriale RS232
• Parametri settabili dall'utente regolazione orologio
° C / F
metri / feet
programma altitudine
controllo pallonata (Si/No)
azzeramento memoria azoto
• Alimentazione 1 batteria alkalina 1.5 V (tipo AAA)
• Autonomia circa 3 mesi o 50 ore di immersione
6
Page 9

SELF CHECK
Il TUTOR si attiva sia tramite pulsanti che, automaticamente, quando si bagnano i contatti in caso di
immersione
Quando si attiva per mezzo dei pulsanti, o in seguito alla sostituzione della batteria, lo strumento esegue
l'autozero (taratura automatica), il controllo Low-battery e vengono accese tutte le indicazioni del
visualizzatore per due secondi (fig.1); se tutto funziona correttamente, il dispositivo si predispone in modo dive-.
Quando è attivato bagnando i contatti TUTOR tiene conto dei dati più recenti dall'ultimo autozero (ultima
misurazione della pressione ambientale) e si predispone poi in modo -Dive-. L'autozero è eseguito
automaticamente ogni 2 minuti anche a dispositivo spento.
BATTERY CHECK
Nel caso venga riscontrato un basso livello di batteria, livello 1, l'icona della batteria si illumina; è comunque
possibile effettuare ancora due immersioni. Se le batterie sono scar iche fino al livello 2 invece compare la
scritta -LO- e tutte le funzione risultano disattivate.(fig.2)
AUTOSPEGNIMENTO
Quando non è in immersione con funzione -Dive-, in qualsiasi altro modo operativo, dopo 3 minuti TUTOR si
porta automaticamente in -off- e il display si spegne. Nel modo -simul- ciò avviene dopo 30 minuti (vedi
"simulazione d'immersione").
DIVE
Il modo -Dive- si seleziona premendo il tasto <mode> o bagnando i contatti esterni.Comprende 2 diversi stati
operativi che sono:
Attesa per inizio immersione: attivando il modo -Dive- viene visualizzata la fig.3; se entro 3 minuti non viene
misurata una profondità effettiva di almeno 1,5 metri e se i contatti non sono immersi in acqua lo strumento si
spegne.
Immersione: superando 1,5 metri di profondità effettiva l'immersione ha inizio e il cronometro inizia a
misurarne il tempo.Vengono visualizzate le seguenti funzioni (fig. 4):
-depth-: Valore della profondità effettiva, in metri (m) o in piedi (FT).
-max depth-: Valore della profondità massima raggiunta. È visualizzato per circa 3
secondi a seguito della pressione sul tasto "Mode".
!!
ATTENZIONE
La durata della batteria alkalina è di circa 3 mesi o 50 ore di immersione, comunque, anche se il
Computer non viene utilizzato, sarà necessario sostituire la batteria almeno ogni 6 mesi. I dati
in memoria vengono conservati anche a seguito di sostituzione della batteria. Per le modalità di
sostituzione batteria vedi istruzioni a pag. 18.
!!
ATTENZIONE
Quando si maneggia il computer per consultazione, porre particolare attenzione a non toccare
contemporaneamente con le mani i contatti umidi posti sul fianco del computer. In questo caso
il computer passerà infatti in modo <dive> rendendo impossibile la consultazione delle altre
funzioni.
7
ITALIANO
Page 10

-temp-: Valore della temperatura misurata, in °C o °F.
-dive time-: Durata dell'immersione, espressa in minuti.
La memorizzazione dei dati relativi all'immersione inizia solo dopo una permanenza sott'acqua alla profondità
di 1,5 m per almeno un minuto.
IMMERSIONE IN CURVA
Quando l'immersione permane all'interno della curva di sicurezza ciò è segnalato dalla scritta -no dec(no decompressione). Il display (fig.4) presenterà quindi il valore di tempo residuo di non decompressione
con la scritta -min- alla profondità visualizzata in -depth-; quando il tempo residuo sarà di 1 minuto verrà
attivato un segnale acustico. In questo tipo di immersione, se la profondità raggiunta supera i 10 metri si
attiverà il "Safety Stop" in risalita: il TUTOR suggerirà allora un sosta di sicurezza nel campo di profondità
compreso tra -3.5 e -5 metri e il tempo di no dec sarà sostituito da "St (stop) 3 min" (fig. 5). Se si esce dal
campo di profondità sopra indicato ricompare il tempo di no-decompressione, mentre il tempo relativo al
safety stop si blocca.Rientrando nel campo del safety stop il tempo della sosta di sicurezza riparte dal punto
in cui il conteggio si era interrotto. Se si torna a una profondità superiore ai 10 metri, il safety stop non tiene
conto della sosta effettuata e riparte dai 3 minuti.
IMMERSIONE FUORI CURVA
Dopo l'attivazione dell'allarme, se la profondità non diminuisce, ha inizio l'immersione fuori curva, che viene
segnalata con la scritta -dec- e un'allarme acustico. Il display sostituirà le informazioni del tempo residuo con
profondità -m- e durata -min- della prima tappa di decompressione; il valore -asc time- indicherà inoltre il tempo
totale previsto per la risalita (fig. 6) che comprende tempo di risalita e tempi alle profondità delle tappe da osservare.
TUTOR verificherà anche il rispetto delle tappe di decompressione; due icone tra i valori di profondità -m- e durata min- della tappa di decompressione segnaleranno graficamente il comportamento da tenere indicando:
2 triangoli = Corretta profondità per decompressione (fig.8).
Triangolo verso l'alto = Quota di decompressione non raggiunta, risalire (fig.9).
Triangolo verso il basso = Quota di decompressione superata, ridiscendere! (fig.10)
Le ultime due condizioni provocano un allarme acustico che permane fino al rientro in condizioni normali.
Se l'entità del superamento della quota di tappa è maggiore di 1 metro e dura più di 3 minuti si attiva la
modalità SALTO TAPPA e si accenderà il primo aster isco principale. A immersione terminata, se si volesse
eseguirne un'altra, TUTOR funzionerà solo come profondimetro e il display segnalerà la scritta STOP. Questa
condizione permarrà per 24 ore.
RISALITA
Durante la risalita, sul display compare un'indicazione grafica con 4 valori percentuali (%) di velocità (
60,90,100,120) e la scritta <slow>. Ciascun valore indica la percentuale di velocità attuale rispetto alla
velocità prevista.Le velocità massime di risalita impostate sul TUTOR sono le seguenti:
da -99 m a -20 m=18 metri/minuto
da -20 m a -10 m=12 metri/minuto
da -10 m alla superficie=10 metri/minuto
Ad esempio, se alla profondità di 9 m si risale a 6 m/min anziché a 10 m/min si evidenzia il valore 60, ad
indicare che la velocità è pari al 60% di quella massima consentita. Se la velocità di risalita è superiore del
20% a quella consentita si evidenziano i valori fino al 120%, compare la scritta <slow> e si attiva l'allarme
acustico (fig7).
8
Page 11

"Pallonata"
La cosiddetta "pallonata" si verifica quando si risale verso la superficie troppo in fretta, senza quindi
rispettare la velocità di risalita. Questa condizione è annunciata da un allarme acustico e dalla scritta -slow-,
ossia "rallentare". Il TUTOR considera "pallonata" una risalita condotta a velocità superiore al 20% della
massima prevista per quella quota e protratta per almeno due terzi della profondità da cui inizia l'allarme
acustico.
Questo criterio è valido solo per allarmi attivati al di sotto di una profondità che varia secondo l'immersione:
Prima immersione:
Profondità maggiore di 12 metri; se la profondità è compresa tra 8 e 12 metri si attiverà la "pallonata" solo se
il dive time è maggiore di 60 minuti.
Immersioni successive:
Profondità maggiore di 8 metri.
Se la risalita veloce viene effettuata solamente tra -8 m e la superficie, non viene considerata "pallonata". Se
si diminuisce la velocità di risalita fino al cessare dell'allarme acustico, il sistema U.B.A. non considera la
risalita come "pallonata".
In caso di "pallonata", ad immersione completata sul display sarà visualizzata la scritta STOP e, se si
volesse eseguirne un'altra, il computer funzionerà solo da profondimetro per le prossime 24 ore.
L'avvenuta "pallonata" verrà segnalata anche dall'accensione dell'asterisco principale.
È possibile disattivare il controllo della "pallonata" attraverso il modo <set>.
AFFIORAMENTO
L'immersione viene sospesa e il valore -dive time- fermato quando la profondità è inferiore a 1 metro. Se
entro 10 minuti non si scende a più di un metro e mezzo TUTOR considera l'immersione terminata e
provvede a registrarla nel log book.Altrimenti prosegue riprendendo il conteggio.
A immersione terminata TUTOR passa dalla funzione -dive- a -off- visualizzando (fig.11):
- Icona aereo lampeggiante fino a che il tempo di no fly, in cui non si deve volare, non risulti azzerato.
- Tempo di desaturazione, fino a che questo non risulti azzerato.
- UBA, barra di visualizzazione errori commessi.
FUNZIONI IN SUPERFICIE (SURF TIME)
Dal modo -dive- premendo il tasto <mode> lo strumento si predispone per la funzione di superficie (fig. 12).
Tale stato permane fino a quando l'indicazione di non volo è attiva.
I dati che si visualizzeranno sono:
-h- e -min- Intervallo di superficie in ore e minuti.
-temp- Visualizza la temperatura corrente nell'unità prescelta.
-Uba- Barra di visualizzazione errori commessi.
-Icona aereo- Divieto di volare
-Desat- Premendo il tasto <-> l'informazione relativa al tempo di superficie viene
sostituita con il tempo residuo (se questo esiste) per la desaturazione dei
tessuti segnalato appunto da -Desat-.
-No fly- Premendo ancora il tasto <-> sarà visualizzato il tempo restante di non volo.
9
ITALIANO
Page 12

TABELLA TEMPI DI DESATURAZIONE E TEMPO "NO FLY"
Non sempre alla desaturazione completa segnalata dal computer ed effettuata con un calcolo matematico,
sia pure conservativo, corrisponde la certezza che non vi siano microbolle in circolazione. Di conseguenza è
buona norma attenersi ai tempi di "non volo" suggeriti dal computer.
I tempi di "non volo" dati dal TUTOR sono coerenti con le direttive delle più importanti associazioni didattiche
mondiali e sono riportati nella tabella allegata, in funzione del tipo di immersione effettuata e dei relativi tempi
di desaturazione.
COMPUTER TUTOR
La successiva pressione del tasto <-> riporta nella condizione iniziale con visualizzazione dell'intervallo di
superficie.
Orologio
Si accede alla funzione -clock- premendo il tasto <mode> dallo stato -dive- oppure dal -surf time- se questo è
attivo. Il display (fig.13) mostrerà anno, giorno, mese ora e minuti.
La funzione orologio non può essere attivata durante l'immersione o quando i contatti umidi siano attivati.
SIMUL
Dal modo -clock-, premendo <mode> si accede al modo -simul- con cui si possono simulare delle immersioni
tenendo conto del livello di saturazione residua dei tessuti. Se si vuole passare al modo successivo (plan)
senza entrare in "simul", azionare il tasto <mode>.Le fasi sono:
Preimmersione
Funzione tasti:
Premere il tasto <-> per lo start .
Immersione:
Funzione tasti:
Premendo ancora il tasto <-> si inizierà a simulare un'immersione. Premendo il tasto <-> ad impulsi, si
scenderà di1 metro per ogni impulso.Premendolo a impulsi successivi sarà possibile simulare una velocità di
discesa di 12 m/minuto.Mantenendolo invece premuto, si scenderà con una velocità di 24 m/min. Premendo
il tasto <mode> ad impulsi, si salirà di 1 metro per ogni impulso. Premendolo ad impulsi successivi, si potrà
simulare una velocità di risalita di 12 m/min.Tenendo invece premuto il tasto <mode>, si risalirà a 18 m/min.
ENOIZARUTASEDIDOPMET"YLFON"OPMET
enoisremmI
,"cedon"
avititepirnon
ero21÷0ero21
ero21>enoizarutasedidopmeT=
"evidced"
o
evititepirinoisremmi
ero42÷0ero42
ero42>enoizarutasedidopmeT=
10
Page 13

Il computer inizierà quindi a visualizzare i tempi di immersione in funzione dell'aumento o della diminuzione
della profondità.
<mode> e <-> contemporaneamente premuti faranno uscire dal modo simul.
Il computer considera un rapporto di tempo di 5 secondi reali = 1 secondo del simulatore.
Emersione (quando la profondità è inferiore a un metro il computer si considera in superficie).
<mode> e <-> contemporaneamente premuti fanno uscire dal modo simul.
Superficie
Quando, terminata la simulazione dell'immersione, si torna in superficie, il tempo scorrerà più velocemente,
con il rapporto 12 minuti reali = 1 minuto e il computer mostrerà, per circa 1 minuto, la profondità massima
raggiunta e il tempo d'immersione. Trascorso questo tempo, verrà visualizzato il "surf-time"( tempo di
superficie). Premendo <-> si passa alla visualizzazione del "desat time" (tempo di desaturazione) e del "no fly
time" (tempo di non volo).
Per effettuare la simulazione di un'immersione successiva, attendere il tempo necessario per avere il "surftime" desiderato, quindi premere il tasto <mode> una sola volta e procedere come per la prima immersione,
premendo il tasto <-> per iniziare la nuova discesa.
Per uscire dal modo "simul", premere <mode> e <-> contemporaneamente.
BLOCCO
Nel caso di salto di tappa o pallonata durante l'immersione il simulatore si porta nello stato di blocco
visualizzando la scritta STOP.
Per uscire dallo stato di blocco, premere contemporaneamente <mode> e <->.
Qualora la funzione "pallonata" sia stata disattivata (vedi "set 5" pag.15), il simulatore non andrà in blocco e
non visualizzerà la scritta STOP.
PIANIFICATORE D'IMMERSIONE (PLAN)
Dal modo -simul- premendo <mode> si accede alla funzione -plan- (fig.14).
In questo modo è possibile fare lo scrolling della curva di sicurezza tenendo automaticamente conto
dell'eventuale livello di saturazione residua dei tessuti dovuto a una precedente immersione.
Premendo il tasto <-> si attiva lo scrolling della curva e si avrà:
-depth- = premendo il tasto <-> la profondità effettiva avanzerà a passi di tre metri fino a 48 m.
-no dec- = Per ogni valore di profondità verrà visualizzato il corrispondente valore di tempo per cui è
possibile sostare senza bisogno di successiva decompressione.
Non possono essere pianificate immersioni ripetitive con decompressione.
LOG BOOK
Dal modo -plan- si accede a quello-log book- che mostra i dati di memoria storica, ovvero il totale delle
immersioni eseguite, la temperatura minima mai registrata in immersione (che si alterneranno), le ore totali di
immersione e la profondità massima raggiunta (fig.15).
Premendo il tasto <-> il display si presenterà come in figura 16, presentando la prima pagina dell'ultima
immersione. Le pagine arrivano a 20. Nella prima pagina saranno indicati il numero progressivo delle
immersioni (n°1=ultima immersione eseguita), il giorno, mese e l'ora di immersione.Premendo <-> si accede
11
ITALIANO
Page 14

alla seconda pagina (fig.17). In essa sarà indicata la profondità massima raggiunta nell'immersione, la durata
complessiva, la barra UBA, la massima velocità di risalita raggiunta, la violazione delle tappe di
decompressione, -no dec- per immersioni in curva, -deco- per quelle fuori curva, temperatura minima
dell'immersione. Per le ultime dieci immersioni è possibile avere un profilo completo. Premendo il tasto <->
per due secondi si attiva la modalità di visione del profilo dell'immersione desiderata. A ogni pressione del
tasto <-> scorre il tempo dell'immersione con la relativa profondità. Per interrompere la visione e passare
all'immersione successiva basta premere il tasto <mode>.
SETUP
-set 1- orologio
-set 2- altitudine
-set 3- unità di misura temperatura
-set 4- unità di misura profondità
-set 5- pallonata
-set 6- azzeramento memoria d'azoto.
Dal -log book- premendo il tasto <mode> viene attivata la funzione SETUP (fig. 18). Se si vuole entrare in
questa funzione, premere ancora il pulsante <mode> per circa due secondi fino a che non compare la scritta
-set 1- che indica la funzione orologio. Per andare invece alla funzione successiva (modo "dive") si dovrà
ripremere il tasto <mode> e rilasciarlo subito. Le possibilità operative del modo -set- sono:
-set 1- Setup orologio e data (fig. 19).
Premere il pulsante <mode> per circa due secondi.
Una volta aperta la funzione orologio appariranno la data, l'ora e i minuti, che lampeggeranno a
intermittenza. Premendo il tasto <-> la cifra lampeggiante sarà incrementata. Quando si è raggiunto il dato
corretto il tasto <mode> lo memorizzerà e il lampeggio passerà alle cifre indicanti le ore e così via. Dopo aver
programmato anche l'orologio la pressione sul tasto <mode> porterà al set successivo.
-set 2- Setup Altitudine (fig. 20).
All'attivazione verrà visualizzata la scritta -set2- e l'altitudine attualmente selezionata (PO, P1, P2). Premendo
il tasto <-> si abiliterà il valore di altitudine successivo a quello attuale.La pressione sul tasto <mode> porterà
al set successivo.
-set 3- Setup unità di misura temperatura (fig. 21).
All'attivazione verrà visualizzata l'indicazione di temperatura attualmente selezionata, utilizzate il tasto <->
per modificare il tipo di unità di misura (°C o °F).
-set 4- Setup unità di misura profondità (fig. 22).
All'attivazione verrà visualizzata l'indicazione di profondità attualmente selezionata; utilizzate il tasto <-> per
modificare l'unità di misura (m.o ft.).
Per modificare i valori che appaiono lampeggiando, basta premere il tasto <->. La pressione sul tasto
<mode> porterà al set successivo.
-set 5- Setup di stop a seguito pallonata (fig. 23).
All'attivazione verrà indicata la scelta attuale per il controllo della pallonata. Se il controllo è abilitato si
leggerà "on", altrimenti "off". Questa particolare funzione permette di disattivare lo "stop" in caso di
"pallonata" (pag. 10) e può essere utilizzato, per esempio, nel caso di esercizi di risalite d'emergenza.
12
Page 15

Per modificare la scelta premere il tasto <->.La pressione sul tasto <mode> porterà al set successivo.
-set 6- Azzeramento memoria azoto (fig. 24).
Per azzerare il contenuto premere per più di 3 secondi il tasto <-> fino a quando apparirà la scritta 0000. La
conclusione della fase Setup e il passaggio alla successiva modalità operativa (modo "dive") avverrà per
effetto dell'operazione precedente oppure premendo <mode> (uscita senza azzeramento azoto).
COLLEGAMENTO CON PC
Per mezzo di una interfaccia apposita è possibile il trasferimento dei dati dalla memoria storica del Dive
Computer ad un personal computer dotato di sistema operativo Windows. Il software di interfaccia guiderà
l'utente nella attivazione del collegamento tra TUTOR e PC.
In particolare l'inser imento del TUTOR nell'apposita scatola di interfacciamento dovrà avvenire solo dopo la
segnalazione del programma. Se l'inser imento avvenisse prima, il computer subacqueo andrebbe in modo
<dive> e non in modo PC.
L'evidenza della modalità PC si ha attraverso la scritta PC nella par te centrale sinistra del display e da un bip
contemporaneo all'apparizione della scritta.
Durante lo scarico dei dati l'utente vedrà dei numeri (ad es. 84) sul display; questi numeri sono codici di
comando.
!!
ATTENZIONE
Prima di inserire il computer nel supporto di interfaccia, pulire bene i contatti.
!!
ATTENZIONE
Questa funzione può essere usata solo da subacquei esperti. L'utente che azzera la memoria
d'azoto residuo non può usare lo strumento per immersioni ripetute. Non immergersi con il
TUTOR azzerato se si sono effettuate immersioni nelle 24 ore precedenti.
!!
ATTENZIONE
Questa funzione può essere usata solo da subacquei particolarmente esperti, che si assumono
la totale responsabilità della disattivazione dello "stop" a seguito di pallonata.
13
ITALIANO
Page 16

DOPO IMMERSIONE
SEGNALAZIONE DEGLI ERRORI UBA-SISTEM
Per la vostra sicurezza, il display di TUTOR è dotato di una barra grafica che informa di eventuali errori
commessi o di comportamenti potenzialmente a rischio durante l'immersione. Gli errori sono segnalati da
asterischi e rimangono visualizzati fino all'immersione successiva.
Asterischi principali (errori gravi) (fig.25):
salto tappa, pallonata.
Asterischi secondari-comportamenti sconsigliati al sub sportivo-(fig. 26):
ripetitiva a meno di due ore dalla precedente, deco dive, profondità maggiore di 40 metri, ripetitiva più
profonda della precedente, profondità della ripetitiva maggiore di 30 metri, eccessiva velocità di risalita. Per
sapere quale è l'errore commesso, consultare il log-book.
CURA E MANUTENZIONE
Il TUTOR è uno strumento par ticolarmente robusto, realizzato per poter sopportare senza problemi i normali
strapazzi dell'attività subacquea. È comunque buona norma dedicargli l'attenzione che meritano tutti gli
strumenti di precisione, evitandogli urti violenti, lunghe esposizioni al sole, contatti con oggetti acuminati. Per
la sua normale manutenzione è sufficiente un risciacquo in acqua dolce al termine di ogni immersione. In
caso di necessità, lavarlo con sapone neutro. Non utilizzare detersivi, alcool, benzina, spray.
I pulsanti non necessitano di particolare manutenzione: non lubrificare con oli o spray.
Qualora si presentino anomalie di qualsiasi genere, evitare di utilizzare lo strumento in immersione e portarlo
per un controllo a un centro di assistenza autorizzato MARES.
SOSTITUZIONE DELLA BATTERIA
La sostituzione è un'operazione molto semplice, che non richiede l'intervento di personale specializzato.
Svitare con una moneta il coperchio a tenuta e sostituire la batteria facendo attenzione ad inserirla nella
giusta polarità. Il vano in cui è alloggiata è stagno e non è in comunicazione con il cuore dello strumento.
Se dovesse entrarvi acqua, sarà sufficiente asciugarlo accuratamente da ogni traccia di umidità prima di
installare nuovamente la batteria.
Prima di richiudere il coperchio controllare il buono stato della guarnizione, verificare che sia perfettamente
pulita e passarvi un velo di grasso al silicone.Non gettare in mare le batterie esaurite.
!!
ATTENZIONE
Non sostituire la batteria nei primi 10 minuti successivi all'immersione. La sostituzione
anticipata fa perdere la memoria dei dati dell'immersione appena conclusasi.
Ricordarsi comunque che, a seguito della sostituzione della batteria, si perdono le informazioni
relative all'azoto residuo, al tempo di desaturazione ed al tempo di non volo. Sarà quindi
opportuno prendere nota di questi dati prima di sostituire la batteria. Non sostituite la batteria
nel corso di immersione ripetitiva.
14
Page 17

SIMBOLI E TERMINI TECNICI
°C gradi centigradi o Celsius
°F gradi Fahrenheit (100°C = 212°F)
% percentuale velocità di risalita
min minuti primi
' minuti primi
" minuti secondi
hora
m metro
FT feet = piedi (1 piede = 30,48 cm.)
LO low = basso (riferito alla carica residua delle batterie)
PC Personal Computer
asc time tempo totale di risalita
U.B.A. (Underwater Behaviour Analysys = analisi del comportamento in immersione)
ceiling tetto (profondità minima da non superare in decompressione)
clock orologio
dec, deco decompressione
desat desaturazione
depth profondità
display quadrante
dive immersione
dive time tempo d'immersione
log book registro delle immersioni
max depth profondità massima raggiunta
mode modo, modo operativo
no dec non decompressione
no fly non volare
plan pianificatore
scrolling visualizzazione della curva di sicurezza
set, setup regolare, tarare
simul simulatore
slow adagio
surf superficie
surf time tempo in superficie
temp temperatura
time tempo
yo-yo profilo d'immersione con notevoli sbalzi di quota
15
ITALIANO
Page 18

TUTOR DIVE COMPUTER
USER'S GUIDE
CONTENTS1
Introduction page 17
Rules for Safe Diving page 17
Warnings and Safety Rules page 18
Technical Specifications and Functional Characteristics page 21
Self Check page 22
Battery Check page 22
Automatic Switch-off page 22
Dive Functions page 22
NO DEC dives page 23
DEC dives page 23
Ascent page 23
Uncontrolled Ascent page 24
Surfacing page 24
Surface Functions (surf time) page 24
Simul page 25
Stop page 26
Dive Planning (plan) page 26
Log Book page 26
Setup page 26
- set 1 - clock page 27
- set 2 - altitude page 27
- set 3 - temperature unit page 27
- set 4 - depth unit page 27
- set 5 - uncontrolled ascent page 27
- set 6 - residual nitrogen memory reset page 27
PC interfacing page 28
After the Dive page 28
Error Signaling UBA-System page 28
Maintenance and Care page 29
Battery replacement page 29
Symbols and T echnical Terms page 30
16
Page 19

TUTOR DIVE COMPUTER
MARES is proud to introduce its TUTOR dive computer, a high-tech instrument based on the most recent
scientific research. The TUTOR dive computer is designed to guarantee the maximum safety, efficiency,
reliability and long life. In this manual, you will find all the instructions regarding its operation and functions.
MARES thanks you for choosing this sophisticated instrument and recommends that you follow the strictest
diving criteria in terms of safety and caution in order to fully enjoy your diving experience.
Rules for safe diving
• Plan every dive and dive your plan
• Never exceed the limits of your skill and experience
• Start every dive by reaching your deepest planned depth first
• Check your computer readings often during your dive
• Comply with the ascent rate shown by the computer
• Always stop for at least 3 minutes at a depth of 15 to 20 feet (3 to 5 meters)
• After the safety stop, ascend very slowly to the surface
• Avoid yo-yo dives (repeated ascending and descending underwater)
• Avoid strenuous activity during your dive and for half an hour after ascending
• When diving in cold water or with any dive involving strenuous activity, start ascending well before reaching
the NO DEC limits. For every dive involving decompression, prolong the decompression stop nearest to the
surface by several minutes
• Surface intervals between your dives should never be shorter than 2 hours
• The deepest dive should be the first of the day
• Dive only after the computer has zeroed from any previous day's dive
• When making multiple dives over a number of days, take at least one day of rest with no diving per week. If
decompression stops were necessary during the dives, it is recommended to take a day of rest with no
diving every three days of diving
• Avoid planned decompression dives and do not dive deeper than 130 feet (40 meters) unless you have
been specifically trained in this type of technical diving.
• Avoid repetitive "square profile" dives (dives to a single depth) deeper than 60 feet (18 meters)
• Always wait as long as possible before flying after a dive (at least 12 and preferably 24 hours), in
accordance with the recommendations of the Divers' Alert Network.
• Every dive involves some degree of risk of decompression sickness. Even if it is used carefully and all safe
diving practices are followed, neither the TUTOR nor any other dive computer can entirely eliminate the risk
of decompression sickness
• Always dive well within the NO DEC limits of your TUTOR dive computer, unless you have been specially
trained in this type of technical diving
• Always ascend several minutes before going into DEC mode, and allow yourself even more time in the
case of cold water conditions, repetitive dives deeper than 60 feet (18m), or for any dive involving unusually
high exertion.Failure to do this will increase your risk of decompression sickness
• Always start each dive by descending to the deepest planned depth of your dive first, and then gradually
ascending during the course of the dive.Failure to do this will increase your risk of decompression sickness
17
ENGLISH
Page 20

WARNINGS AND SAFETY RULES
Safe diving can only be guaranteed by accurate training.
Mares recommends to dive with a dive computer only after attending a specialized course at a diving school.
Sport dives must be conducted no deeper than 130' (40 m). Diving deeper than 130' (40 m) is considered
technical diving and should never be attempted by divers not specifically trained for such diving. Such diving
greatly increases the risk of decompression sickness.
A good diver is a responsible diver. You must strictly comply with all warnings in this manual and with the
simple rules listed at the beginning of this guide to avoid increasing your risk of decompression sickness.
Do not compress your TUTOR in a hyperbaric chamber or "pressure pot" type testing device.The instrument
may be seriously damaged if not immersed completely in water.
!!
WARNING
NEVER dive deeper than 130 feet (40m) or do planned decompression dives with the TUTOR
unless you are a trained and certified technical diver (IANTD,TDI, ANDI, PSA, etc.) familiar with
the skills and risks of deep air diving, and licensed at least to the level of Deep Air diving for
depths beyond 130 feet (40m). Even with this level of certification and experience, this type of
technical dive entails a much higher risk of DCS, regardless of the dive table or computer used.
You must be aware of and willing to accept these risks before attempting such a dive.
!!
WARNING
In addition to the computer, divers should also use a depth gauge, a pressure gauge, a timer or
clock and the decompression tables.
!!
WARNING
The TUTOR dive computer is designed for recreational and sport diving only. It must not be
used for professional diving..
!!
WARNING
Every dive involves some degree of risk of decompression sickness. Even if used carefully and
all safe diving practices are followed, neither the TUTOR nor any other diving computer can
eliminate the risk of decompression sickness.The dive computer cannot take into account the
ever-changing physical conditions of every diver. For your safety, undergo a complete check-up
examination before diving
!!
WARNING
For the correct use of any dive computer, the diver must acquire an in-depth knowledge of all its
features. Before diving with the TUTOR, read this instruction manual carefully and entirely to
learn how it works.
18
Page 21

!!
WARNING
DO NOT attempt to use the TUTOR unless you are certified diver and have read and understood
the instruction manual. Proper use of the TUTOR will reduce your risk of decompression
sickness, but no computer or dive table can entirely eliminate that risk.
!!
WARNING
ALWAYS make a 3- to 5-minute "safety" stop at 15-20 feet (5-7 m) after every dive, regardless of
what your TUTOR reads.This will further reduce your risk of decompression sickness
!!
WARNING
NEVER use your TUTOR for "yo-yo" dives (repeatedly ascending and descending underwater)
as this will greatly increase your risk of DCS,regardless of what your TUTOR reads.
!!
WARNING
NEVER use your TUTOR or any other dive computer for repetitive "square profile" dives (dives
to the same or nearly the same depth) deeper than 60 feet (18 m). This is an unsafe diving
practice which will greatly increase your risk of DCS,regardless of what your TUTOR reads.
19
ENGLISH
Page 22

1 = <mode> button
2 = <->button
3 = Current depth
Max depth
Day (clock function)
Set (set function)
4 = Dive time
Month (clock function)
5 = No dec time
deco stops
Time (clocl function)
Surface time
“No fly” time
Desaturation time
6 = Temperature (for no dec dives)
N° of dives (Log book function)
Year (clock function)
7 = Ascent rate
8 = UBA System
9 = Altitude level
10 = “No fly” warning
11 = Low battery warning
12 = Unit of measure of depht
13 = Unit of measure of temperature
20
Page 23

Technical specifications and functional characteristics
• Algorithm type modified Haldane
• Number of sample tissues 9
• Half-saturation times 2.5 to 480 minutes
• Maximum operating depth 325 feet (99 meters)
• Resolution 0.1 m
• Calibration (depth) fresh water
• Altitude operation 3 levels - P0:0-700 m (0-2300 ft);
P1: 700-1500 m (2300-4900ft);
P2: 1500-2400 m (4900-7900 ft)
• Maximum decompression stop 90 feet (24 meters)
• Ascent rate 10 to 18 m/min.
• Audible alarms low battery
decompression stop violated
excessive ascent rate
NO DEC limits violated
• History memory Total number of dives
Total dive hours
Maximum depth reached
Minimum temperature
• Dives stored in log book 20
• Stored data year, month, day and time of the dive
length of the dive
maximum depth
altitude program
decompression stop violation
DEC/NO DEC dive
maximum ascent rate violated
UBA
minimum temperature
• Dive profile 10 dives
• Data stored for every profile point maximum depth reached at every minute
violation of ascent rate
violation of decompression stop
• Scrolling of NO DEC limits 12 to 48 m
• PC interface with RS232 serial adapter
• User-selectable parameters clock adjustment
°C/°F
meters/feet
altitude program
uncontrolled ascent control (Yes/No)
residual nitrogen memory reset
• Power supply one AAA alkaline 1.5 V battery
• Battery life 3 months or 50 dive hours
21
ENGLISH
Page 24

SELF CHECK
The TUTOR dive computer can be switched on either by pressing the buttons or automatically, when the unit
is in the water (wet contacts).
When switched on manually or after replacing the battery, the instrument carries out the autozero procedure
(automatic calibration) and the low battery check; all the data shown on the display goes on for two seconds
(fig. 1). The computer then carries out a self check and goes to Dive mode.
When switched on by wetting the contacts, the TUTOR keeps into account the most recent data of the last
automatic calibration (last measurement of ambient pressure). It then goes to Dive mode. An automatic
calibration is carried out automatically every two minutes also when the instrument is off.
BATTERY CHECK
If the battery is getting low (level 1), the battery icon goes on; however, it is still possible to conduct two dives.
If the battery is as low as level 2, <LO> is displayed and all the functions are disabled (fig. 2).
AUTOMATIC SWITCH-OFF
When the TUTOR is not in Dive mode but in any of the other operating modes, the instrument and the display
go <off> if no buttons are pushed for three minutes. When in <Simul> mode, switch-off takes place after 30
minutes (see "Dive Simulation").
DIVE
The Dive mode is selected by pressing the <mode> button once or by wetting the external contacts. This
mode consists of the following 2 operating statuses:
Wait status before the dive: when in Dive mode, the display shown in fig. 3 appears. If the computer, with dry
contacts, is not taken to an actual depth of 4 feet (1.5 meters) minimum within 3 minutes, the unit goes off.
Dive status: after going beyond a depth of 4 feet (1.5 meters), the dive time chronometer starts counting.The
display will show the following data (fig. 4):
<depth> Value of actual depth (in "m" or "ft.")
<max. depth> Value of the maximum depth reached. It is displayed for
approximately 3 seconds after pressing the <mode> button.
!!
WARNING
The alkaline battery life is approximately 3 months or 50 diving hours. However, if the dive
computer is not used, the battery must be replaced at least every 6 months.
The stored data is kept in the computer memory even after battery replacement.
For battery replacement instructions, refer to page 37.
!!
WARNING
When handling your computer dive computer for surface consultation, take particular care not
to simultaneously touch the wet contacts situated on the side of the computer. In fact this will
cause computer to switch into <dive> mode, making it impossible to access its other functions.
22
Page 25

<temp> Value of water temperature measured (in °C or °F)
<dive time> Time elapsed from the beginning of the dive, in minutes
The dive data starts being stored only after the diver has remained at a depth of 4 feet (1.5 meters) for 1
minute.
NO DEC Dive
When the diver remains within the NO DEC limits, <NO DEC> (no decompression) is displayed. The
remaining no decompression time will thus be displayed (fig.4) in <min> at the displayed <depth>.When the
remaining NO DEC time is one minute, an audible signal is triggered.In this type of dive, if the depth reached
exceeds 10 meters, the "Safety Stop" will be activated during ascent: the TUTOR will then recommend to
perform a safety stop in the -3.5 m to -5 m depth range and the NO DEC time will be replaced by "St (stop) 3
min" (fig. 5). If the diver leaves the above mentioned depth range, the NO DEC time is displayed again, while
the safety stop time count is stopped. When the diver goes back to the safety stop depth range, the safety
stop count is resumed. If the diver then goes back below 10 meters, the safety stop does not consider the
previous stop and starts counting down from 3 minutes again.
DEC Dive
If the diver does not ascend to a shallower depth when the NO DEC time has elapsed, an audible alarm is
triggered and the <DEC> message is displayed. Instead of the remaining time, the display now shows the
depth ("m") and the first decompression stop in minutes ("min"), as well as the total time expected for
ascending ("asc time") (fig. 6).This value includes the ascent time and the times of the decompression stops
to be performed at the various depths.TUTOR will also check that the decompression stops are not violated.
Two icons, shown between the depth <m> and the decompression stop time <min>, will graphically display
the next steps to be taken:
2 triangles = appropriate depth for decompression (fig.8)
upward triangle = decompression stop depth not reached:ascend! (fig. 9)
downward triangle = decompression stop depth exceeded:descend! (fig. 10)
This condition triggers an audible alarm which will go off only when the normal conditions are restored.
If the decompression stop depth is exceeded by more than 1 m and lasts for more than 3 minutes, the STOP
VIOLATION mode will be entered and the first main aster isk will go on. If, after surfacing, the diver intends to
conduct another dive, the TUTOR will only operate as a depth gauge and the STOP message will be
displayed.This status will continue for 24 hours.
ASCENT
During the ascent, the display shows 4 percentage (%) rate values (60, 90, 100, 120) and the message
<slow>.Each value indicates the current rate compared to the expected ascent rate.
The TUTOR provides four maximum ascent rates depending on depth:
60'/min. - 18 m/min from the -99 m to -20 m (65 ft.)
40'/min. - 12 m/min. -20 m to -10 m (65 to 33 ft.)
33'/min. - 10 m/min. -10 m (33 ft.) to the surface
For instance, if at a depth of 9 m (30 ft.) the diver ascends at 6 m/min.(20 ft./min.), the first value is displayed
to indicate that the current rate is equal to 60% of the maximum allowed ascent rate. If the latter is exceeded
by more than 20%, the values up to "120" are displayed as well as the message <slow>, and the audible
alarm is triggered (Fig. 7).The
23
ENGLISH
Page 26

UNCONTROLLED ASCENT
An "uncontrolled ascent" is any ascent conducted at a very fast rate, hence violating the prescribed ascent
rate.This condition is signaled by an audible alarm and by the <slow> message.The TUTOR considers any
ascent which exceeds by 20% the maximum ascent rate set for that depth and continued at least for 2/3 of
the depth at which the audible alarm is triggered to be an uncontrolled ascent.
This only applies to the alarms triggered below a given depth, the value of which depends on the dive:
First dive:
Depth greater than 12 m (40 feet); if the depth is between 8 m and 12 m (26' and 40'), the uncontrolled
ascent will occur only if the dive time exceeds 60 minutes.
Repetitive dives:
Depth greater than 8 m (26').
If the rapid ascent takes place only between 26' (-8 m) and the surface, this is not considered an
"uncontrolled ascent", although it is highly recommended that your ascent be very slow for these last 26 feet
(8 meters). If the ascent rate decreases and the audible alarm goes out, the U.B.A. system will not consider
your ascent as an "uncontrolled ascent".
In case of an "uncontrolled ascent", the STOP message will be displayed after surfacing. If the diver intends
to conduct another dive, the computer will only work as a depth gauge over the next 24 hours.
An uncontrolled ascent will also be signaled by the main asterisk being displayed.
The uncontrolled ascent control can be barred by modifying the setting in the <set> mode.
SURFACING
When the depth is shallower than 4 feet (1 m), the <dive time> is interrupted and the dive is over. If the diver
does not descend below 5 feet (1.5 m) within 10 minutes, the TUTOR considers the dive to be terminated and
its data can be read in the <log book>. Conversely, if the diver descends back beyond that depth, the "dive
time" count is resumed and the calculation regarding the dive continues.
When the dive is over, the TUTOR switches from the <dive> function to <off> and displays the f ollo wing (fig.11):
- blinking airplane icon until the no fly time goes to zero
- "desat time" until the desaturation time goes to zero
- graphic U.B.A. bar with the indication of any errors made.
SURFACE FUNCTIONS (SURF TIME)
Press <mode> to switch the computer from <dive> to the surface functions (fig. 12). This status will remain
active as long as the no fly indication is displayed.
The following is displayed:
<h><min> Surface interval in hours and minutes
<temp> Current air temperature in the selected unit
(in C or °F)
<U.B.A.> Indication of any errors made during the dive on the graphic bar.
<airplane icon> Flying is forbidden
<desat> Push the <-> button to replace the information regarding surface time with
the indication of the remaining desaturation time (<desat>)
<no fly> Press <-> again to display the remaining no fly time.
24
Page 27

Even though the desaturation time has completely elapsed - as signaled by the computer based on a
mathematical conservative calculation - the diver cannot be sure that there are no microbubbles in circulation.
Consequently, it is recommended to comply with the "no fly" times indicated by the computer.
The "no fly" times given by the Tutor are consistent with the guidelines of the major teaching associations of
the world and are listed in the attached table. They depend on the type of dive conducted and on the
desaturation times.
Press <-> to restore the initial surface time display.
Clock
From <-dive> or <surf time> (if the latter is active), press <mode> to access the <clock> function. The year,
day, month, hour and minutes will be displayed (fig. 13).The clock function cannot be activated during a dive
or when the wet contacts are activated.
SIMUL
From the <clock> mode, press <mode> to access the <simul> mode. In this mode, it is possible to simulate
dives keeping into account the remaining tissue saturation level. Press <mode> if you wish to switch to the
next mode (<plan>) and to skip <simul>.The following steps are provided:
Before the dive:
Key functions:
Press <-> to start.
During the dive:
Key functions:
Press <-> again to start a dive simulation. Toggle on the <-> key; each toggle corresponds to a descent of 1
meter. Press it at short intervals to simulate a descent rate of 12 m/min. (39 ft./min.). Keep it pressed to
descend at a rate of 24 m/min. (40 ft./min.). Toggle on the <mode> key to ascend 1 meter (3 ft) each toggle
toggling at short inter vals to ascend at a rate of 12 m/min. (39 ft./min.). Keep <mode> pressed to ascend at a
rate of 18 m/min. (60 ft./min.). The computer will thus display the dive times depending on the increase or
decrease in depth.
Press <mode> and <-> simultaneously to quit the <simul> mode.
The computer simulation time ratio is 5 to 1 (5 actual seconds correspond to 1 second in the simulation).
Surfacing (when the depth is less than 1 meter, the computer considers that the diver has reached the
surface).
EMITNOITARUTASEDEMIT"YLFON"
"cedoN"
evidevititepernon
ero21÷0ero21
ero21>emitnoitarutaseD=
"evidced"
ro
evidevititeper
ero42÷0ero42
ero42>emitnoitarutaseD=
25
ENGLISH
Page 28

Surface
When the simulated dive is over, time elapses more rapidly, based on a 12 minutes to 1 minute ratio. For
approximately 1 minute, the computer will display the maximum depth reached and the dive time.The <surf
time> (surface time) will then be displayed. Press <-> to display the <desat time> (desaturation time) and the
<no fly time>.
To simulate a repetitive dive, wait until you reach the desired <surf time>, then press <mode> once and follow
the same procedure as for the first dive, pressing <-> to start the new descent.
Press <mode> and <-> simultaneously to quit the <simul> mode.
STOP
If, during the dive, a safety stop is violated or an uncontrolled ascent occurs, the simulator is interlocked:
STOP will be displayed.
To exit the interlock status, press <mode> and <-> simultaneously.
If the "uncontrolled ascent" function is disabled (see "set 5", page 33), the simulator will not be interlocked
and the STOP message will not be displayed.
DIVE PLANNING (PLAN)
From <simul>, press <mode> to access the <plan> function (fig.14).
It will then be possible to proceed to the no-stop planning of the dive which will automatically account for any
residual nitrogen still contained in the diver's tissues from a previous dive.
Press <-> to scroll the no-stop dive date, i.e.
<depth> press <-> to cause actual depth to increase by three meter steps to 48 m.
<no dec> For each depth value, the time allowed before decompression is required will be displayed.
You cannot plan repetitive <DECO> dives.
LOOG BOOK
From the <plan> mode you can access the <log book> mode to display the history data, i.e., alternating, the
total dives conducted and the minimum temperature reached at any time during a dive, the total dive hours
and the maximum depth reached (fig.15).
Press <-> to display the page shown in fig. 16 regarding your last dive. Twenty pages are provided. The first
page will show the progressive dive number (n. 1 is the last dive conducted) and the day, month and time of
the dive. Press <-> to go the second page (fig. 17). This page shows the maximum depth reached during the
dive, its total duration, the UBA bar, the maximum ascent rate reached, any decompression stop violation,
<no dec> for NO DEC dives and <deco> for DEC dives and the minimum dive temperature. A complete
profile of the last ten dives can be obtained. Keep <-> pressed for two seconds to view the profile of any dive
you wish. Press <-> repeatedly to scroll the dive time and the related depth. To stop viewing this data and
switch to the next dive, simply press <mode>.
SETUP
- set 1 - clock
- set 2 - altitude
- set 3 - temperature unit
- set 4 - depth unit
- set 5 - uncontrolled ascent
- set 6 - residual nitrogen memory reset
26
Page 29

From <log book>, press <mode> to activate the SETUP function (fig. 18). If you wish to enter this function,
press <mode> again for approximately two seconds until <set 1> is displayed, which indicates the clock
function.To go to the next function (<dive> mode), press <mode> again and release the key immediately.The
<set> mode provides the following operating options:
<set1> Clock and date setup (fig. 19).
Press <mode> for approximately two seconds.
When the clock function is entered, the date, hour and minutes will be displayed and blink alternatively. Press
<-> to increase the blinking digit. When you have reached the desired digit, press <mode> to store it. The
digits indicating the hours will start blinking and the same procedure will have to be followed. After
programming the clock, press <mode> to go to the next setting.
<set2> Altitude setup (fig. 20).
Upon activation, <set2> is displayed together with the currently selected altitude P0: 0-700 m (0-2300 ft) - P1:
700-1500 m (2300-4900 ft) - P2: 1500-2400 (4900-7900 ft). Press <-> to enable the next altitude value. Press
<mode> to go to the next setting.
<set3> Temperature unit setup (fig.21).
Upon activation, the currently selected temperature unit will be displa y ed.Press <-> to change the unit (°C or °F).
<set4> Depth unit setup (fig. 22).
Upon activation, the currently selected depth unit will be displayed.
Press <-> to change the blinking digits (m.or ft.). Press <mode> to go to the next setting.
<set5> Stop after an uncontrolled ascent setting (fig. 23).
Upon activation, the current selection for uncontrolled ascent control will be displayed. If the control is
enabled, <on> will be displayed; otherwise, you will see <off>. This particular function allows to disable the
<stop> function in case of an "uncontrolled ascent" (see page 29) and can be used, for instance, for
emergency ascent training purposes.
Press <-> to change function. Press <mode> to access next function.
<set6> Remaining nitrogen memory reset (fig. 24).
To reset this value, keep <-> pressed for more than 3 seconds, until 0000 is displayed. When resetting the
nitrogen memory, the <Setup> mode is exited and the next mode is accessed. You can quit the <Setup>
mode and access the next mode (<dive>) by pressing <mode>.
!!
WARNING
This function should only be used by trained and expert divers.The diver who uses the residual
nitrogen memory reset function cannot use the instrument for repetitive dives. Do not dive after
resetting the Tutor if you have conducted any dives within the previous 24 hours.
!!
WARNING
This function should only be used by extremely well trained and expert divers who will be totally
liable for disabling the <stop> function after an uncontrolled ascent.
27
ENGLISH
Page 30

PC INTERFACING
Data may be transferred through the apposite interface (MK2131) from the Dive Computer memory to a PC
with Windows operating system. The interface software will guide the user in the connection between the
TUTOR and the PC. The TUTOR must be connected to the interface box only after the software has given
this instruction. Should the TUTOR be connected before this happens, the underwater computer shall switch
to <dive> mode and not interface with the PC. PC mode is signalled by the word "PC" appearing in the centre
left of the display and by a tone signal.
Some numbers shall appear on the display during data transfer (e.g. 84); these are control codes.
AFTER THE DIVE
ERROR SIGNALING UBA-SYSTEM
For your safety, the TUTOR's display features a graphic bar containing some asterisks.These correspond to
specific diving errors.When the dive is over, the asterisks referring to any errors made are activated and are
displayed until the next dive.
Main asterisks (referring to particularly serious errors) (fig.25):
decompression stop violated, uncontrolled ascent.
Secondary asterisks (referring to unsafe practices for sport divers) (fig. 26):
repetitive dive conducted less than two hours after the previous dive, DEC dive, depth greater than 40 m
(130'), repetitive dive deeper than the previous dive, repetitive dive with depth greater than 30 m (100'),
excessive ascent rate.The log book will tell you which error you have made.
!!
WARNING
Clean the contacts carefully, before putting the computer into the interface support.
28
Page 31

MAINTENANCE AND CARE
TUTOR is a particularly rugged instrument, designed to withstand the ordinary wear and tear of diving
without problem. However, it should be given the usual attention deserved by precision instruments, including
avoiding violent shocks, long exposure to sunlight and contact with sharp objects. For ordinary maintenance,
just rinse it with fresh water at the end of every dive. If necessary, wash it with a neutral pH soap. Do not use
detergents, alcohol, gasoline or sprayed compounds.
The pushbuttons need no special maintenance:do not lubricate them with oils or sprayed compounds.
If any malfunction occurs, do not use the instrument for diving and have it checked by an authorized MARES
service center.
BATTERY REPLACEMENT
Battery replacement is a very simple operation which does not require the intervention of specialized
personnel. Use a coin to unscrew the watertight cover and replace the battery. Be careful to insert it with the
correct polarity. The battery compartment is watertight and does not communicate with the core of the
instrument. If water leaks inside it, just dry it carefully to get rid of moisture before installing the battery. Before
closing the battery cover, make sure that the O-ring is in good condition. Check that the O-ring is perfectly
clean and grease it slightly with silicone grease.Do not throw the old batteries away at sea!
!!
CAUTION
Do not replace the battery during the first 10 minutes after the dive. If the battery is replaced
before that time, the data regarding this last dive will be lost. Remember that, after battery
replacement, the information regarding residual nitrogen, desaturation time and no-fly time is
lost. It is therefore reccomended to write down this data before replacing the battery. Do not
replace the battery between repetitive dives!
!!
WARNING
DO NOT use your TUTOR if any malfunction occurs. Failure to follow this warning may greatly
increase your risk of decompression sickness.
29
ENGLISH
Page 32

Symbols and Technical Words
°C degrees Celsius
°F degrees Fahrenheit (100 °C = 212 °F)
% ascent rate percentage
min minutes
sec seconds
h hour
m meter
FT feet (1 foot = 30.48 cm)
LO low (referring to the residual battery charge)
PC Personal Computer
asc time total ascent time
U.B.A. underwater behavior analysis
ceiling ceiling (minimum depth not to be exceeded during decompression)
dec, deco decompression
desat desaturation
log book dive book
max depth maximum depth reached
mode mode, operating mode
no dec no decompression
scrolling displaying the NO DEC limits
set - set up to set, calibrate
simul simulator
slow slow down
surf surface
surf time surface time
temp temperature
yo-yo dive profile with considerable depth differences
30
Page 33

TUTOR T AUCHCOMPUTER
BEDIENUNGSANLEITUNG
Inhalt
Einleitung Seite 32
Regeln für sicheres Tauchen Seite 32
Warnungen und Sicherheitsregeln Seite 33
Technische Daten und Funktionen Seite 37
Selbsttest Seite 38
Batterietest Seite 38
Automatische Abschaltung Seite 38
Funktionen im Tauchgangsmodus Seite 38
Nullzeittauchgänge Seite 39
Dekompressionstauchgänge Seite 39
Aufstieg Seite 39
Unkontrollierte Aufstiege Seite 40
Oberfläche Seite 40
Funktionen im Oberflächenmodus (Oberflächenpause) Seite 41
Tauchgangssimulation Seite 41
Stop Seite 42
Tauchgangsplanung Seite 42
Logbuchfunktion Seite 42
Einstellungen (Setup) Seite 43
- set 1 - Uhr Seite 43
- set 2 - Höhenlage Seite 43
- set 3 - Temperatureinheit Seite 43
- set 4 - Tiefeneinheit Seite 43
- set 5 - unkontrollierter Aufstieg Seite 43
- set 6 - Löschen des Reststickstoffspeichers Seite 44
Anschluss An Den PC Seite 44
Nach dem Tauchgang Seite 44
Fehlermeldungen - UBA System Seite 44
Wartung und Pflege Seite 45
Batteriewechsel Seite 45
Symbole und Fachbegriffe Seite 46
31
DEUTSCH
Page 34

TUTOR T A UCHCOMPUTER
MARES ist stolz, Ihnen den Tauchcomputer TUTOR vorstellen zu können - ein high-tech Instrument, in dem
neueste wissenschaftliche Forschungen umgesetzt und verwirklicht wurden. Der TUTOR Tauchcomputer
wurde so gebaut, daß er Ihnen maximale Sicherheit, Effizienz, Zuverlässigkeit und Lebensdauer bietet. In
diesem Handbuch finden Sie alle Informationen über seine Funktionen und Bedienung.Wir möchten uns bei
Ihnen für Ihre gute Wahl bedanken. Damit Sie das Tauchen stets in vollen Zügen genießen können, sollten
Sie in Bezug auf Sicherheit und Vorsicht immer die striktesten taucherischen Kriterien anwenden.
REGELN FÜR SICHERES TAUCHEN
• Planen Sie jeden Tauchgang und tauchen Sie nach diesem Plan
•Überschreiten Sie niemals die Grenzen Ihres eigenen Könnens und Ihrer Erfahrung
• Suchen Sie die tiefste geplante Tiefe immer zu Beginn des Tauchgangs auf
•Überprüfen Sie während des Tauchgangs häufig die Anzeige Ihres Computers
• Halten Sie die vom Computer angegebene Aufstiegsgeschwindigkeit ein
• Führen Sie am Ende jedes Tauchgangs einen mindestens 3-minütigen Sicherheitsstop auf 3 bis 5 Metern
Tiefe durch
• Steigen Sie nach dem Sicherheitsstop sehr langsam zur Oberfläche auf
• Vermeiden Sie Jo-Jo-Tauchgänge (mehrfache Auf- und Abstiege unter Wasser)
• Vermeiden Sie während des Tauchens und in der ersten halben Stunde nach Beendigung des Tauchgangs
alle anstrengenden Tätigkeiten
• Beginnen Sie den Aufstieg bei Tauchgängen in kaltem Wasser oder anstrengenden Tauchgängen reichlich
vor Ablauf der Nullzeit (NO DEC).Verlängern Sie bei dekompressionspflichtigen Tauchgängen in solchen
Fällen den flachsten Dekompressionsstop um mehrere Minuten
• Die Oberflächenpause zwischen zwei Tauchgängen sollte immer mindestens zwei Stunden betragen
• Wiederholungstauchgänge müssen immer flacher sein als der vorangegangene Tauchgang
• Tauchen Sie nicht, wenn der Computer noch eine Restsättigung vom Vortag anzeigt
• Planen Sie pro Woche wenigstens einen tauchfreien Tag.Werden ein oder mehrere dekompressionspflichtige
Tauchgänge in einer Woche durchgeführt, sollten Sie alle drei Tage einen tauchfreien Ruhetag haben.
• Dekompressionspflichtige Tauchgänge und Tauchgänge auf Tiefen von mehr als 40 Metern (130 Fuß) dürfen
nur von speziell für diese Art des technischen Tauchens ausgebildeten Tauchern durchgeführt werden.
• Vermeiden Sie Wiederholungstauchgänge mit "Rechteckprofil" (Tauchgänge auf eine konstante Tiefe) mit
Maximaltiefen von mehr als 18 Metern (60 Fuß).
• Beachten Sie die Empfehlungen des Divers Alert Network (DAN) zum Fliegen nach dem Tauchen und
warten Sie vor einem Flug immer so lange wie möglich (mindestens 12, besser 24 Stunden)
• Jeder Tauchgang birgt ein gewisses DCS-Risiko. Auch bei sorgfältigster Verwendung des Computers und
Einhaltung aller Regeln der Tauchsicherheit kann das Risiko, eine Dekompressionskrankheit zu erleiden,
weder durch den TUTOR, noch durch irgend einen anderen Tauchcomputer vollständig ausgeschlossen
werden.
• Tauchen Sie stets reichlich innerhalb der Nullzeitgrenzen Ihres TUTOR Tauchcomputers. Nur speziell
ausgebildete Tech-T aucher dürfen die Nullzeitgrenzen überschreiten.
• Beginnen Sie den Aufstieg immer mehrere Minuten vor Ablauf der Nullzeit. Verlängern Sie diese
Sicherheitsspanne zusätzlich, wenn Sie in kaltem Wasser tauchen, bei Wiederholungstauchgängen auf
über 18 Meter (60 Fuß) Tiefe und bei jedem Tauchgang, bei dem Sie sich mehr als üblich anstrengen.
Andernfalls erhöht sich Ihr Dekompressionsrisiko.
• Suchen Sie die tiefste geplante Tiefe immer zu Beginn des Tauchgangs auf und tauchen Sie im weiteren
Verlauf allmählich immer weiter auf. Andernfalls erhöht sich Ihr Dekompressionsrisiko.
32
Page 35

WARNUNGEN UND SICHERHEITSREGELN
Sicheres Tauchen kann nur durch eine gute Ausbildung gewährleistet werden.
Mares empfiehlt, erst nach der Teilnahme an einem speziellen Kurs in einer Tauchschule mit einem
Tauchcomputer zu tauchen.
Sporttauchgänge dürfen nur bis zu einer Maximaltiefe von 40 m (130 Fuß) durchgeführt werden. Tiefere
Tauchgänge gelten als technisches Tauchen und sollten keinesfalls von Tauchern unter nommen werden, die
nicht speziell für solche Tauchgänge ausgebildet sind. Solche Tauchgänge vergrößern das Risiko einer
Dekompressionskrankheit immens.
Tragen Sie den TUTOR nicht in einer Druckkammer. Das Instrument kann stark beschädigt werden, wenn es
außerhalb des Wassers unter Druck gesetzt wird.
!!
WARNUNG
Tauchen Sie nicht, wenn das Batteriesymbol <battery> anzeigt, daß die Batterie zu Ende geht,
sondern wechseln Sie die Batterien aus. Tauchen Sie nicht, wenn ungewöhnliche oder unklare
Warnhinweise erscheinen.
!!
WARNUNG
Zusätzlich zum Computer sollten auch Tiefenmesser, Finimeter, Divetimer bzw. Uhr und
Austauchtabellen verwendet werden.
!!
WARNUNG
Der TUTOR Tauchcomputer ist ausschließlich für das Freizeit- und Sporttauchen ausgelegt. Er
darf nicht für das Berufstauchen eingesetzt werden.
!!
WARNUNG
Jeder Tauchgang birgt ein gewisses Risiko, eine Dekompressionskrankheit zu erleiden. Auch
bei korrekter Benutzung und Einhaltung aller Sicherheitsregeln kann weder mit dem TUTOR
noch mit irgend einem anderen Tauchcomputer das Risiko einer Dekompressionskrankheit
vollständig ausgeschlossen werden. Der Tauchcomputer kann nicht die unterschiedliche
körperliche Verfassung aller Taucher berücksichtigen. Zu Ihrer eigenen Sicherheit sollten Sie
sich vor dem Tauchen umfassend untersuchen lassen.
!!
WARNUNG
Um einen Tauchcomputer korrekt benutzen zu können, müssen Sie sich mit allen seinen
Eigenschaften vertraut machen. Lesen Sie diese Bedienungsanleitung bitte vor Ihrem ersten
Tauchgang mit dem TUTOR aufmerksam und vollständig durch und machen Sie sich mit seinen
Funktionen vertraut.
33
DEUTSCH
Page 36

!!
WARNUNG
Verwenden Sie Ihren TUTOR KEINESFALLS für „Jo-Jo" Tauchgänge (wiederholte Auf- und
Abstiege unter Wasser), da sich, unabhängig von der Anzeige Ihres TUTOR, das DCS-Risiko
dadurch deutlich erhöht.
!!
WARNUNG
Verwenden Sie KEINESFALLS Ihren TUTOR oder irgend einen anderen Tauchcomputer für
Wiederholungstauchgänge mit "Rechteckprofil" (Tauchgänge auf eine konstante oder
annähernd konstante Tiefe) auf über 18 Meter (60 Fuß), da sich durch solch unsicheres
Tauchverhalten, unabhängig von der Anzeige Ihres TUTOR, das DCS-Risiko deutlich erhöht.
!!
WARNUNG
Benutzen Sie den TUTOR KEINESFALLS für Tauchgänge auf Tiefen über 40 m (130 ft.) oder für
dekompressionspflichtige T auchgänge, wenn Sie nicht als technischer Taucher ausgebildet und
brevetiert sind (IANTD,TDI, ANDI, PSA, etc.), mit den erforderlichen Fertigkeiten und den Risiken
tiefer Lufttauchgänge absolut vertraut sind und mindestens als Deep Air Diver für Tiefen von
über 40 Metern (130 Fuß) brevetiert sind. Auch wenn Sie über die entsprechende Ausbildung
und Erfahrung verfügen, ist das DCS-Risiko bei solchen technischen Tauchgängen deutlich
erhöht, egal welche Tabelle oder welchen Computer Sie verwenden. Deshalb müssen Sie diese
Risiken, bevor Sie einen solchen Tauchgang unternehmen,kennen und bewußt eingehen.
!!
WARNUNG
Benutzen Sie den TUTOR keinesfalls für T auchgänge mit anderen Atemgasen als Luft.
!!
WARNUNG
Fliegen Sie innerhalb von 24 Stunden nach Ihrem letzten Tauchgang nicht; warten Sie
mindestens bis das Flugzeugsymbol auf Ihrem TUTOR erlischt.
!!
WARNUNG
Tauchen Sie nur in Bergseen, wenn Sie überprüft haben, daß das korrekte Bergseeprogramm
eingeschaltet ist.
34
Page 37

!!
WARNUNG
Verwenden Sie den TUTOR NUR, wenn Sie brevetierter Taucher sind und die
Bedienungsanleitung vollständig gelesen und verstanden haben. Die sachgemäße Verwendung
des TUTOR senkt Ihr DCS-Risiko, aber kein Tauchcomputer und keine Tabelle können dieses
Risiko vollständig ausschließen.
!!
WARNUNG
Führen Sie zur weiteren Verringerung des DCS-Risikos nach JEDEM Tauchgang, unabhängig
von der Anzeige Ihres TUTOR, einen drei- bis fünfminütig en Sicherheitsstop auf 5 - 7 Metern (15
- 20 Fuß) Tiefe durch.
35
DEUTSCH
Page 38

1 = <mode> Taste
2 = <-> Taste
3 = Aktuelle Tiefe
Maximaltiefe
Tag (
Uhrmodus <clock>
)
Set (
Modus Einstellungen <set>
)
4 = Monat
(Uhrmodus <clock>)
5 = Nullzeit (<no dec>)
Dekompressionsstop (<deco>)
Uhrzeit (Uhrmodus <clock>)
Oberflächenpause
Dauer des Flugverbots
Restsättigungszeit
6 = Temperatur (
bei Nullzeittauchgängen
)
Gesamtaufstiegszeit (bei
dekompressionspflichtigen Tauchgängen)
Gesamtzahl der Tauchgänge
(
Logbuchmodus
)
Jahr (
Uhrmodus <clock>
)
7 = prozentuale Aufstiegsgeschwindigkeit
8 = UBA System
9 = gewählte Bergseestufe
10 = Flugverbot
11 = Batteriewarnung
12 = Tiefeneinheit
13 = Temperatureinheit
36
Page 39

TECHNISCHE DATEN UND FUNKTIONEN
• Algorithmus modifizierter Haldane
• Gewebezahl (Kompartimente) 9
• Halbsättigungszeiten 2,5 bis 480 Minuten
• Maximale Betriebstiefe 99 Meter (325 Fuß)
• Auflösung 0,1 m
• Kalibrierung (Tiefe) Süßwasser
• Bergseemodus 3 Stufen - P0:0-700 m; P1: 700-1500 m;
P2: 1500-2400 m
• Tiefster Dekompressionsstop 24 m (90 Fuß)
• Aufstiegsgeschwindigkeit 10 bis 18 m/min
• Akustischer Alarm Batteriewarnung
Mißachtung der Dekompressionspflicht
Überschreiten der Aufstiegsgeschwindigkeit
Überschreiten der Nullzeit
• Speicher Gesamttauchgangszahl
Gesamttauchzeit
erreichte Maximaltiefe
Minimaltemperatur
• Logbuch 20 Tauchgänge
• Gespeicherte Daten Jahr, Monat, Tag und Uhrzeit des Tauchgangs
Tauchgangsdauer
Maximaltiefe
Bergseeprogramm
Mißachtung eines Dekompressionsstops
NO DEC / DECO Tauchgang
(Nullzeit/dekompressionspflichtig)
Überschreiten der maximal zulässigen
Aufstiegsgeschwindigkeit
UBA
Minimaltemperatur
• Tauchgangsprofile 10 T auchgänge
• Für jeden Profilpunkt gespeicherte Daten pro Minute erreichte Maximaltiefe
Überschreiten der Aufstiegsgeschwindigkeit
Mißachtung eines Dekompressionsstops
• Rollierende Nullzeiten 12 bis 48 m
• PC Interface mit serieller Schnittstelle RS232
• Vom Benutzer einstellbare Parameter Uhreinstellung
°C/°F
Meter/Fuß
Bergseeprogramm
Überwachung unkontrollierter Aufstiege (ein/aus)
Löschen des Reststickstoffspeichers
• Stromversorgung eine 1,5 V AAA Alkalibatterie
• Lebensdauer der Batterie 3 Monate oder 60 Tauchstunden
37
DEUTSCH
Page 40

SELBSTTEST
Der TUTOR Tauchcomputer kann entweder manuell durch Tastendruck eingeschaltet werden oder er schaltet
sich im Wasser automatisch ein (nasse Kontakte). Nach dem manuellen Einschalten und nach einem
Batteriewechsel wird die Funktion "Autozero" (automatische Kalibrierung) und ein Batterietest durchgeführt;
alle Displaysegmente leuchten zwei Sekunden lang auf (Abb. 1). Anschließend führt der Computer einen
Selbsttest durch und geht in den Dive (Tauchgangs-) Modus. Wird der TUTOR durch Anfeuchten der
Kontakte eingeschaltet, benutzt er die bei der letzten automatischen Kalibrierung (letzten Messung des
Umgebungsdrucks) ermittelten Daten und geht anschließend in den Dive Modus. Eine automatische
Kalibrierung erfolgt auch bei ausgeschaltetem Gerät einmal pro Minute.
BATTERIETEST
Wird die Batterie schwach (Stufe 1), erscheint das Batteriesymbol; nun können noch zwei Tauchgänge
unternommen werden. Sinkt die Batterieleistung auf Stufe 2 ab, wird das Symbol <LO> angezeigt und alle
Funktionen werden gesperrt (Abb.2).
AUTOMATISCHE ABSCHALTUNG
In jedem anderen Betriebsmodus als dem Tauchgangsmodus schaltet sich der TUTOR (Gerät und Display)
automatisch ab, wenn drei Minuten lang keine Taste gedrückt wird. Im Simulationsmodus <sim> erfolgt die
Abschaltung nach 30 Minuten (siehe "Tauchgangssimulation").
TAUCHGANGSMODUS <DIVE>
Sie gelangen in den <dive> Modus, indem Sie einmal die Taste <mode> drücken oder die Außenkontakte
anfeuchten.Dieser Modus umfaßt die folgenden vier Betriebsarten:
Wartestatus <wait> vor dem Tauchgang: nach dem Einschalten des Tauchgangsmodus erscheint das in Abb.
3 gezeigte Display. Wird der Computer (mit trockenen Kontakten) daraufhin nicht innerhalb von 3 Minuten auf
eine Tiefe von mindestens 1,5 m (4 Fuß) gebracht, schaltet er sich aus <off>.
!!
WARNUNG
Die Alkalibatterie hat eine Lebensdauer von etwa drei Monaten oder 60 Tauchstunden.Wird der
Tauchcomputer nicht benutzt, muß die Batterie mindestens alle sechs Monate ausgetauscht
werden.
Die gespeicherten Daten bleiben auch nach einem Batteriewechsel erhalten.
Weitere Hinweise zum Batteriewechsel siehe Seite 52.
!!
WARNUNG
Wenn Sie an Oberfläche Informationen aus Ihrem computer Tauchcomputer abrufen möchten,
achten Sie bitte darauf daß Sie die beiden seitlichen naßkontakte nicht gleichzeitig berühren.
Dadurch würde der computer in den <dive> Modus (Tauchgangsmodus) schalten, so daß seine
sonstigen Funktionen nicht zur Verfügung stehen.
38
Page 41

Tauchstatus <dive>: sobald mehr als 1,5 m (4 Fuß) Tiefe erreicht sind, beginnt die Messung der Tauchzeit.
Auf dem Display erscheinen die folgenden Angaben (Abb.4):
<depth> aktuelle Tauchtiefe (in "m" oder "ft.")
<max. depth> bisher während des Tauchgangs erreichte Maximaltiefe.Diese Anzeige
erscheint nach dem Drücken der <mode> Taste für etwa drei Sekunden
<temp> Wassertemperatur (in °C oder °F)
<dive time> bisher verstrichene Tauchzeit seit Beginn des Tauchgangs (in Minuten)
Die Speicherung der Tauchgangsdaten beginnt erst, wenn sich der Taucher eine Minute lang auf einer Tiefe
von mindestens 1,5 m aufgehalten hat.
Nullzeittauchgang <NO DEC>
Solange der Taucher innerhalb der Nullzeit bleibt, wird <NO DEC> (no decompression) angezeigt.Die auf der
angezeigten Tiefe <depth> verbleibende Nullzeit wird in <min> angegeben (Abb. 4). Sinkt die verbleibende
Nullzeit auf eine Minute ab, ertönt ein Warnsignal. Bei Nullzeittauchgängen auf Tiefen über 10 m wird
während des Aufstiegs die Funktion "Safety Stop" (Sicherheitsstop) aktiviert: der TUTOR empfiehlt Ihnen
damit, einen Sicherheitsstop auf einer Tiefe zwischen 3,5 und 5 m durchzuführen. Die Anzeige der Nullzeit
<NO DEC> wird dann durch "St (stop) 3 min" ersetzt (Abb. 5). Verläßt der Taucher den oben angegebenen
Tiefenbereich, erscheint wieder die NO DEC Anzeige und die Zeitmessung des Sicherheitsstops wird
angehalten. Begibt sich der Taucher wieder in den Tiefenbereich des Sicherheitsstops, wird diese fortgesetzt.
Sucht der Taucher aber anschließend eine Tiefe von mehr als 10 Metern auf, wird die Dauer dieses
Sicherheitsstops nicht mehr berücksichtigt, sondern beginnt wieder bei drei Minuten.
Dekompressionstauchgänge <DECO>
Begibt sich der Taucher nach Ablauf der Nullzeit nicht auf eine flachere Tiefe, ertönt ein Warnsignal und es
erscheint die Anzeige <DEC>. Anstelle der verbleibenden Nullzeit werden dann Tiefe (in m) und Dauer (in
min) des ersten Dekompressionsstops und die erwartete Gesamtaufstiegszeit <asc time> angezeigt (Abb. 6).
Dieser Wert beinhaltet die Aufstiegszeit und die Zeiten für die einzelnen Dekompressionsstops auf den
verschiedenen Tiefen. Der TUTOR überwacht auch die Einhaltung eventueller Dekompressionsstops.
Zwischen der Tiefe <m> und der Dauer <min> des Dekompressionsstops erscheinen zwei Symbole, die
anzeigen, was als nächstes getan werden muß:
2 Dreiecke = korrekte Dekompressionstiefe (Abb.8)
nach oben zeigendes Dreieck = Dekompressionstiefe noch nicht erreicht:aufsteigen! (Abb.9)
nach unten zeigendes Dreieck = Dekompressionstiefe überschritten: absteigen! (Abb. 10)
Dieser Status (Abb. 9 bzw. 10) löst solange einen akustischen Alarm aus bis die vorgeschriebene Tiefe
wieder erreicht wird.
Wird mehr als 3 Minuten lang um mehr als 1 m flacher getaucht als die vorgeschriebene
Dekompressionstiefe, schaltet der TUTOR in den Modus STOP VIOLATION (Dekompressionsstop mißachtet)
und zeigt den ersten Haupt-Stern an. Will der Taucher nach dem Erreichen der Oberfläche einen weiteren
Tauchgang unter nehmen, arbeitet der TUTOR nur als Tiefenmesser und zeigt die Meldung STOP an. Dieser
Status wird 24 Stunden lang beibehalten.
Aufstieg
Während des Aufstiegs wird einer der vier Prozentwerte (60, 90, 100, 120 %) oder <slow> angezeigt. Die
Prozentwerte geben dabei wieder, wie sich die tatsächliche zur zulässigen Aufstiegsgeschwindigkeit verhält.
39
DEUTSCH
Page 42

Der TUTOR gibt tiefenabhängig gestaffelte Aufstiegsgeschwindigkeiten vor:
18 m (60 ft.)/min vom Grund bis 20 m (65 ft.) Tiefe
12 m (40 ft.)/min 20 m bis 10 m (65 bis 33 ft.) Tiefe
10 m (33 ft.)/min 10 m (33 ft.) Tiefe bis zur Oberfläche
Steigen Sie z.B. bei 9 m (30 ft.) Tiefe mit einer Geschwindigkeit von 6 m/min (20 ft./min.) auf, wird auf dem
Display angezeigt, daß Ihre momentane Aufstiegsgeschwindigkeit 60 % der maximal zulässigen
Aufstiegsgeschwindigkeit beträgt. Wird die maximal zulässige Aufstiegsgeschwindigkeit um mehr als 20 %
überschritten, erscheinen auf dem Display alle Werte bis "120" und die Warnung <slow>. Zusätzlich er tönt
die akustische Warnung (Abb.7).
UNKONTROLLIERTER AUFSTIEG
Als "unkontrollierter Aufstieg" gilt jeder schnelle Aufstieg, bei dem die für die jeweilige Tiefe maximal
zulässige Aufstiegsgeschwindigkeit um 20 % überschritten wird und mindestens für 2/3 der Tiefe, auf der die
<slow> Warnung zum ersten Mal erscheint, so fortgesetzt wird.
Dies gilt nur für Warnsignale, die auf einer größeren als einer bestimmten Mindesttiefe ausgelöst wurden.
Diese Mindesttiefe ist von der Art des Tauchgangs abhängig:
Erster Tauchgang:
Tiefe über 12 m (40 Fuß); bei Tiefen zwischen 8 m und 12 m (26 und 40 Fuß) wertet der TUTOR einen
schnellen Aufstieg nur als unkontrollierten Aufstieg, wenn die Tauchgangsdauer 60 Minuten übersteigt.
Wiederholungstauchgänge:
Tiefe über 8 m (26 Fuß).
Wenn der Aufstieg nur zwischen 8 m (26 Fuß) Tiefe und der Oberfläche zu schnell ist, gilt dies nicht als
"unkontrollierter Aufstieg" - obwohl dringend empfohlen wird, gerade auf den letzten 8 Metern besonders
langsam aufzusteigen. Wird die Aufstiegsgeschwindigkeit so weit verlangsamt, daß der akustische Alarm
verstummt, wertet das UBA System Ihren Aufstieg nicht als "unkontrollierten Aufstieg".
Im Falle eines "unkontrollier ten Aufstiegs" erscheint nach dem Erreichen der Oberfläche die Meldung STOP.
Will der Taucher einen weiteren Tauchgang unternehmen, arbeitet der TUTOR für die nächsten 24 Stunden
nur als Tiefenmesser.
Ein "unkontrollierter Aufstieg" wird auch durch die Anzeige des Haupt-Sterns signalisiert.
Die Überwachung für unkontrollierte Aufstiege kann durch Veränderung der Einstellung im Modus <set>
gesperrt werden.
OBERFLÄCHE
Bei flacheren Tiefen als 1 m (4 Fuß) wird die Messung der Tauchzeit unterbrochen und der Tauchgang gilt als
beendet.Wird nicht innerhalb von 10 Minuten tiefer als 1,5 m (5 Fuß) abgetaucht, betrachtet der TUTOR den
Tauchgang als beendet und die Daten können im Logbuch abgerufen werden.Wird innerhalb dieser Zeit aber
wieder tiefer getaucht, wird die Zeitmessung wieder aufgenommen und die Berechnung des Tauchgangs
fortgesetzt.
Nach Beendigung des Tauchgangs schaltet der TUTOR vom <dive> Modus auf <off> und zeigt das Folgende
an (Abb.11):
- blinkendes Flugzeugsymbol für die Dauer des Flugv erbotes
- <desat time> für die Restsättigungszeit
- UBA Balken mit grafischer Anzeige von Tauchfehlern
40
Page 43

FUNKTIONEN AN DER OBERFLÄCHE (OBERFLÄCHENPAUSE)
Durch Drücken der Taste <mode> gelangen Sie vom Modus <dive> zu den Funktionen des
Oberflächenmodus (Abb.12). Dieser Status bleibt aktiv bis das Flugverbotsymbol erlischt.
Es erscheinen folgende Anzeigen:
<h><min>: Oberflächenpause in Stunden und Minuten
<temp>: Lufttemperatur (in °C oder °F)
<UBA>: Anzeige während des Tauchgangs gemachter Fehler auf dem grafischen Balken
<Flugzeug>: Das Flugzeugsymbol wird bis zum Ablauf der Flugverbotsdauer angezeigt
<desat>: Durch Drücken der <-> Taste können Sie von der Anzeige der Oberflächenzeit
zur Anzeige der Restsättigungszeit (<desat>) umschalten
<no fly>: Nach nochmaligem Drücken der <-> Taste erscheint die Dauer des Flugverbots.
Auch wenn die gesamte Restsättigungszeit abgelaufen ist - wie vom Computer mit Hilfe eines konser vativen
Rechenmodells ermittelt - kann nicht ausgeschlossen werden, daß noch Mikrobläschen vorhanden sind.
Beachten Sie daher bitte unbedingt die angegebene Dauer des Flugverbots.
Die vom TUTOR angegebenen Flugverbotszeiten entsprechen den Richtlinien der wichtigsten
Ausbildungsverbände der Welt und sind in der nachfolgenden Tabelle aufgelistet. Die jeweilige Dauer richtet
sich nach der Art des durchgeführten Tauchgangs und der jeweiligen Restsättigungszeit.
TUTOR DIVE COMPUTER
Drücken Sie die <-> Taste nochmals, um zur ursprünglichen Anzeige der Oberflächenzeit zurückzukehren.
UHR <CLOCK>
Sie gelangen in den <clock> Modus, indem Sie im Modus <dive> oder <surf time> (wenn dieser aktiv ist) die
Taste <mode> drücken. Es werden daraufhin Jahr, Tag, Monat, Stunden und Minuten angezeigt (Abb. 13).Die
Uhr-Funktion kann mit nassen Kontakten und während des Tauchens nicht eingeschaltet werden.
TAUCHGANGSSIMULATION <SIM>
Drücken Sie die Taste <mode> um vom <clock> Modus in den <sim> Modus zu wechseln. In diesem Modus
können Tauchgänge unter Berücksichtigung der bestehenden Gewebesättigung simuliert werden. Durch
nochmaliges Drücken der Taste <mode> überspringen Sie den Modus <sim> und gelangen in den nächsten
Modus (<plan>). Die folgenden Funktionen stehen zur Verfügung:
Drücken Sie zum Starten der Tauchgangssimulation die Taste <->. Drücken Sie wiederholt die <-> Taste: jedes
Drücken entspricht 1 m Abtauchen.Drücken Sie die Taste in kurzen Intervallen, um eine Abstiegsgeschwindigkeit
von 12 m/min zu simulieren. Halten Sie die Taste gedrückt, um eine Abstiegsgeschwindigkeit von 24 m/min zu
GNUGITTÄSTSERTOBREVGULF
)"cedon"(gnaghcuattiezlluN
gnaghcuatsgnulohredeiWniek
ero21÷0dtS21
ero21>tiezsgnugittästseR=
regithcilfpsnoisserpmoked
redo)"ced"(gnaghcuaT
gnaghcuatsgnulohredeiW
ero42÷0dtS42
ero42>tiezsgnugittästseR=
41
DEUTSCH
Page 44

simulieren. Das Drücken der Taste <mode> in kurzen Inter vallen simuliert eine Aufstiegsgeschwindigkeit von 12
m/min.Halten Sie die Taste <mode> gedrückt, um eine Aufstiegsgeschwindigkeit v on 18 m/min zu sim ulieren.Der
Computer wird daraufhin die Tauchzeiten entsprechend der Zu- oder Abnahme der Tiefe anzeigen.Zum Beenden
des Planungsmodus drücken Sie gleichzeitig die Tasten <mode> und <->. Die Tauchgangsplanung läuft in einem
Zeitverhältnis v on 5 zu 1 ab (d.h.fünf tatsächliche Sekunden entsprechen einer Sekunde in der Simulation).
Erreichen der Oberfläche: beträgt die Tiefe weniger als 1 Meter, geht der Computer davon aus, daß der
Taucher die Oberfläche erreicht hat.
Oberfläche
Nach Beendigung des simulierten Tauchgangs läuft die Zeitsimulation schneller, im Verhältnis 12 zu 1 ab (d.h.
zwölf tatsächliche Minuten entsprechen einer Minute in der Simulation). Der Computer zeigt etwa eine Minute
lang die erreichte Maximaltiefe und die Tauchzeit an. Anschließend wird die Dauer der Oberflächenpause (<surf
time>) angezeigt. Durch Drücken der Taste <-> erscheint die Restsättigungszeit (<desat time>), durch
nochmaliges Drücken die Dauer des Flugverbots (<no fly time>). Möchten Sie einen Wiederholungstauchgang
simulieren, warten Sie, bis die gewünschte Oberflächenpause verstrichen ist, drück en Sie dann einmal die Taste
<mode> und fahren Sie fort wie für den ersten Tauchgang beschrieben (Drücken der Taste <-> startet den
neuen Abstieg). Zum Beenden des Simulationsmodus drücken Sie gleichzeitig die Tasten <mode> und <->.
STOP
Wird während des simulierten Tauchgangs ein Sicherheitsstop mißachtet, oder kommt es zu einem
unkontrollierten Aufstieg, wird die Simulation abgebrochen und es erscheint die Anzeige STOP. Drücken Sie
gleichzeitig die Tasten <mode> und <->, um diesen gesperrten Status zu beenden. Wurde die
Überwachungsfunktion für den "unkontrollierten Aufstieg" ausgeschaltet (siehe set 5, Seite 50), wird die
Simulation nicht abgebrochen und die Anzeige STOP erscheint nicht.
TAUCHGANGSPLANUNG <PLAN>
Durch Drücken der Taste <mode> gelangen Sie vom Simulationsmodus in den Planungsmodus <plan>, in
dem nacheinander die jeweils gültigen Nullzeiten abgerufen werden können. Durch Drücken der Taste <->
erhöht sich die Tiefe (beginnend bei 12 m) um jeweils 3 Meter.
Die Planung dekompressionspflichtiger Wiederholungstauchgänge ist nicht möglich.
LOGBUCHMODUS <LOG>
Durch erneutes Drücken der Taste <mode> schalten Sie vom Modus <plan> in den Logbuch-Modus <log>, in dem Sie die
gespeicherten Tauchgangsdaten abrufen können, also abwechselnd die Gesamtzahl der durchgeführten Tauchgänge und
die niedrigste, während eines Tauchgangs erreichte Temperatur, die Gesamtdauer der durchgeführten Tauchgänge und die
maximal erreichte Tiefe (Abb. 15). Durch Drücken der Taste <-> erscheint die in Abb. 16 gezeigte Seite mit den Daten Ihres
letzten Tauchgangs. Es stehen zwanzig Seiten zur Verfügung. Die erste Seite zeigt die fortlaufende Tauchgangsnummer (Nr. 1
ist der zuletzt durchgeführte Tauchgang) und Tag, Monat und Uhrzeit des Tauchgangs. Durch Drücken der Taste <-> gelangen
Sie zur zweiten Seite (Abb. 17). Auf dieser sehen Sie die Maximaltiefe, die Gesamtdauer, den UBA Balken, die maximal
erreichte Aufstiegsgeschwindigkeit, eine eventuelle Verletzung der Dekompressionspflicht, die Anzeige <no dec> für
Nullzeittauchgänge bzw. <deco> für Dekompressionstauchgänge und die Minimaltemperatur des Tauchgangs. Auch ist das
komplette Profil der letzten zehn Tauchgänge abrufbar. Wählen Sie die zweite Seite des betreffenden Tauchgangs. Halten Sie
zum Betrachten des Profils die Taste <-> zwei Sekunden lang gedrückt. Das Display wechselt zur Profilanzeige. Durch kurzes
Drücken der Taste <-> können Sie zum jeweils nächsten Profilpunkt (Tauchzeit mit entsprechender Tiefe) blättern. Durch
einmaliges Drücken der Taste <mode> verlassen Sie diesen (Tauchgangs-) Datensatz und schalten zum nächsten
Tauchgang. Durch nochmaliges Drücken der Taste <mode> gelangen Sie wieder in das Hauptmenü zum Menüpunkt <set>.
42
Page 45

EINSTELLUNGEN (SETUP)
- set 1 - Uhr (clock)
- set 2 - Höhenlage (altitude)
- set 3 - Temperatureinheit (temperature unit)
- set 4 - Tiefeneinheit (depth unit)
- set 5 - unkontrollierter Aufstieg (uncontrolled ascent)
- set 6 - Löschen des Reststickstoffspeichers (residual nitrogen memory reset)
Durch Drücken der Taste <mode> im Logbuchmodus gelangen Sie zur SETUP Funktion (Abb. 18). Wenn Sie
hier Einstellungen vornehmen möchten, halten Sie die Taste <mode> etwa zwei Sekunden lang gedrückt, bis
auf dem Display <set 1> (zum Einstellen der Uhr) erscheint. Um zum nächsten Hauptmenüpunkt
(Tauchgangsmodus <dive>) weiterzuschalten, drücken Sie die Taste <mode> einmal kurz.
Im Modus <set> stehen die folgenden Einstellmöglichkeiten zur Verfügung:
<set1> Einstellen von Uhr und Datum (Abb. 19).
Halten Sie die Taste <mode> etwa zwei Sekunden lang gedrückt.
In der Funktion <clock> sehen Sie Datum, Stunde und Minute.Die jeweils einstellbare Zahl blinkt. Stellen Sie
diese Zahl durch Drücken der Taste <-> ein. Ist das gewünschte Datum eingestellt, drücken Sie zur
Speicherung die Taste <mode>. Nun beginnen die Stunden zu blinken. Stellen Sie diese wie oben
beschrieben ein. Sind Datum und Uhrzeit korrekt eingestellt, drücken Sie erneut die Taste <mode> um zur
nächsten Einstellung zu gelangen.
<set2> Höhenlage (Abb. 20).
Nach dem Aktivieren sehen Sie auf dem Display <set2> und die momentan eingestellte Höhenlage (P0, P1
oder P2). Zum Einstellen der gewünschten Höhenlage drücken Sie die Taste <->. Durch Drücken der Taste
<mode> gelangen Sie zur nächsten Einstellung.
<set3> Temperatureinheit (Abb. 21).
Nach dem Aktivieren erscheint die momentan eingestellte Temperatureinheit auf dem Display. Zum Einstellen
der gewünschten Temperatureinheit drücken Sie die Taste <->. Durch Drücken der Taste <mode> gelangen
Sie zur nächsten Einstellung.
<set4> Tiefeneinheit (Abb. 22).
Nach dem Aktivieren erscheint die momentan eingestellte Tiefeneinheit auf dem Display. Zum Einstellen der
gewünschten Tiefeneinheit drücken Sie die Taste <->.
Durch Drücken der Taste <mode> gelangen Sie zur nächsten Einstellung.
<set5> Anzeige von STOP nach einem unkontrollierten Aufstieg (Abb. 23).
Nach dem Aktivieren erscheint die momentan gewählte Einstellung auf dem Display. Ist die Überwachung
eingeschaltet, erscheint <on>, andernfalls <off>. Diese Einstellung ermöglicht das Abschalten der <stop>
Funktion bei unkontrollierten Aufstiegen (siehe Seite 46), z.B.für Notaufstiegsübungen.
!!
WARNUNG
Diese Funktion sollte nur von äußerst gut ausgebildeten und sachkundigen Tauchern
ausgeschaltet werden. Sie tragen die alleinige Verantwortung für jegliche Folgen des
Abschaltens der STOP Funktion für unkontrollierte Aufstiege.
43
DEUTSCH
Page 46

<set6> Löschen des Reststickstoffspeichers (Abb.24).
Zum Löschen des Reststickstoffspeichers halten Sie die Taste <-> mindestens drei Sekunden lang gedrückt,
bis 0000 auf dem Display angezeigt wird. Nach dem Löschen des Reststickstoffspeichers wird der <setup>
Modus beendet und in den nächsten Modus geschaltet. Durch Drücken der Taste <mode> können Sie den
<setup> Modus auch manuell beenden und in den nächsten Modus (<dive>) schalten.
ANSCHLUSS AN DEN PC
Mit Hilfe des entsprechenden Interface Gerätes (MK2131) können Daten aus dem Speicher des Tauchcomputers
auf einen PC mit Windows Betriebssystem übertragen werden. Die Interface Software führt den Benutzer durch
den Verbindungsvorgang zwischen TUTOR und PC. Der TUTOR darf erst an die Interface Box angeschlossen
werden, wenn die Software dazu auffordert.Wird der TUTOR vorher angeschlossen, schaltet der Tauchcomputer
in den <dive> Modus, statt die Verbindung mit dem PC herzustellen. Der PC Modus wird durch Anzeige des
Wortes "PC" links in der Mitte des Displays und durch einen Ton signalisiert. Während des Datentransfers
erscheinen auf dem Display verschiedene Zahlen (z.B .84), bei denen es sich um Steuercodes handelt.
NACH DEM TAUCHGANG
FEHLERMELDUNGEN - UBA SYSTEM
Zu Ihrer Sicherheit gibt es auf dem Display des TUTOR einen Balken - das UBA (Underwater Behavior
Analysis) System. Jedes der vier möglichen Anzeige-Elemente entspricht einem bestimmten Tauchfehler.
Nach Beendigung eines Tauchganges werden ggf. die entsprechenden Sternchen bis zum nächsten
Tauchgang angezeigt.
Haupt-Elemente für schwerwiegende Tauchfehler (Abb. 25):
Mißachtung der Dekompressionspflicht, Unkontrollierter Aufstieg
Neben-Elemente für unsicheres Verhalten im Rahmen des Sporttauchens (Abb. 26):
Wiederholungstauchgang nach weniger als zwei Stunden Oberflächenpause, dekompressionspflichtiger
Tauchgang, Tiefe über 40 m, Wiederholungstauchgang tiefer als vorangegangener Tauchgang,
Wiederholungstauchgang tiefer als 30 m, Überschreiten der Aufstiegsgeschwindigkeit. Welche Art von Fehler
begangen wurde, kann aus dem Logbuch ersehen werden.
!!
WARNUNG
V or dem Einlegen des Computers in das Interfacegerät müssen die Kontakte sorgfältig gereinigt werden.
!!
WARNUNG
Diese Funktion sollte nur von ausgebildeten und sachkundigen Tauchern benutzt werden. Nach
dem Löschen des Reststickstoffspeichers darf der Taucher keinen Wiederholungstauchgang
durchführen.Tauchen Sie nach dem Löschen des Reststickstoffspeichers des Tutor nicht, wenn
Sie innerhalb der letzten 24 Stunden getaucht haben.
44
Page 47

WARTUNG UND PFLEGE
Der TUTOR ist ein besonders robustes Instrument, für das die normalen Beanspruchungen des Tauchens
kein Problem darstellen. Dennoch sollten Sie dem TUTOR die Pflege angedeihen lassen, die einem
Präzisionsinstrument angemessen ist. Vermeiden Sie starke Stöße und Schläge, längere
Sonnenbestrahlung, Hitze und Kontakt mit scharfen und spitzen Gegenständen. Zur allgemeinen Pflege
reicht Spülen in klarem Süßwasser nach jedem Tauchgang aus. Wenn nötig, waschen Sie den Computer mit
einer ph-neutralen Seife ab.Verwenden Sie keine Reinigungsmittel, Alkohol, Benzin oder Sprays.
Sollten irgendwelche Fehlfunktionen auftreten, benutzen Sie das Instrument nicht zum Tauchen, sondern
lassen Sie es in einem autorisierten MARES Service Center überprüfen.
BATTERIEWECHSEL
Der Batteriewechsel ist denkbar einfach und muß nicht von speziell ausgebildeten Personen vorgenommen
werden. Lösen Sie die Schraube des wasserdichten Deckels mit einer Münze und tauschen Sie die Batterie
aus. Achten Sie darauf, sie richtig herum einzusetzen. Das Batteriefach ist wasserdicht und hat keine
Verbindung mit dem eigentlichen Instrument. Selbst wenn einmal Wasser in das Batteriefach eindringen
sollte, müssen Sie es nur sorgfältig trocknen, so daß beim Einsetzen der neuen Batterie keine Feuchtigkeit
vorhanden ist. Vergewissern Sie sich, ob die Dichtung in einwandfreiem Zustand und absolut sauber ist.
Fetten Sie sie dünn mit etwas Silikonfett ein und schließen Sie dann das Batteriefach. Werfen Sie die
verbrauchte Batterie keinesfalls auf See weg!
!!
VORSICHT
Wechseln Sie die Batterie nicht innerhalb der ersten 10 Minuten nach einem Tauchgang. Werden
die Batterien vor Ablauf dieser Zeit gewechselt, gehen die Daten des letzten Tauchgangs
verloren. Berücksichtigen Sie bitte, daß durch den Batteriewechsel die Daten über Ihre
Restsättigung, die Entsättigungszeit und die Dauer des Flugverbots verloren gehen. Notieren
Sie sich diese Informationen also gegebenenfalls vor dem Herausnehmen der alten Batterie.
Wechseln Sie die Batterie nicht zwischen zwei Wiederholungstauchgängen!
!!
WARNUNG
Benutzen Sie den TUTOR NICHT, wenn irgendwelche Fehlfunktionen auftreten. Das
Nichtbeachten dieser Warnung kann zu einem unberechenbaren DCS-Risiko führen.
45
DEUTSCH
Page 48

SYMBOLE UND FACHBEGRIFFE
°C Grad Celsius
°F Grad Fahrenheit (100 °C = 212 °F)
% prozentuale Aufstiegsgeschwindigkeit
min Minuten
sec Sekunden
h Stunden
m Meter
ft Fuß (1 Fuß = 30,48 cm)
LO low (schwach - in Bezug auf den Ladezustand der Batterie)
PC Personal Computer - Heimcomputer
asc time Gesamtaufstiegszeit
UBA Underwater Behaviour Analysis (Tauchgangsanalyse)
ceiling Dekompressionsceiling (Tiefe, bis zu der während der
Dekompression maximal aufgestiegen werden darf)
dec, deco Dekompression
desat Entsättigung
log Logbuch
max depth Maximaltiefe
mode Betriebsmodus
no dec Nullzeit
rollieren Anzeige der Nullzeiten
set - setup Einstellungen vornehmen, kalibrieren
sim Tauchgangssimulator
slow Aufstieg verlangsamen
surf Oberfläche
surf time Oberflächenpause
temp Temperatur
Jo-Jo Tauchgangsprofil mit wiederholten Auf- und Abstiegen und
beträchtlichen Tiefenunterschieden
46
Page 49

47
ORDINATEUR DE PLONGEE TUTOR
TABLE DES MATIERES
Introduction page 48
Règles de sécurité élémentaires page 48
Aver tissements et nor mes de sécurité page 49
Caractéristiques techniques et fonctionnelles page 52
Autodiagnostic page 53
Contrôle de la pile page 53
Extinction automatique page 53
Fonctions plongée page 53
Plongées sans décompression page 54
Plongées avec décompression page 54
Remontée page 54
Remontée incontrôlée page 55
Arrivée en surface page 55
Fonctions surface (surf time) page 55
Table temps de désaturation et interdiction de vol page 56
Simulateur de plongée(simul) page 56
Verrouillage (Stop) page 57
Planning (plan) page 57
Mémoire (log book) page 58
Réglage (setup) page 58
- set 1 - horloge page 58
- set 2 - altitude page 58
- set 3 - unités de mesure de la température page 58
- set 4 - unités de mesure de la profondeur page 58
- set 5 - détection de remontée incontrôlée page 59
- set 6 - remise à zéro de l'azote résiduel page 59
Interfaçage a un PC page 59
Après la plongée page 60
Signalisation des erreurs - Système UBA page 60
Entretien page 61
Remplacement de la pile page 61
Symboles et termes techniques page 62
FRANÇAIS
Page 50

ORDINATEUR DE PLONGEE TUTOR
Félicitations. Vous avez choisi un ordinateur de plongée de haute technologie, fruit des plus récentes
recherches et conçu par Mares pour garantir le maximum de sécurité, d'efficacité, de fiabilité et de durabilité.
Vous trouverez dans ce manuel toutes les informations concernant son fonctionnement et son utilisation.
Mares vous remercie d'avoir choisi cet instrument et vous recommande de toujours observer ses recommandations et d'agir avec la plus extrême prudence et le sens des responsabilités.
REGLES ELEMENTAIRES DE SECURITE
• Planifier chaque plongée.
• Ne jamais outrepasser ses limites personnelles.
• Descendre à la profondeur maximum prévue dans les premières minutes de l'immersion.
• Consulter souvent l'ordinateur en cours de plongée.
• Respecter scrupuleusement la vitesse de remontée indiquée par l'ordinateur.
• Effectuer un palier de sécurité de 3 minutes à une profondeur comprise entre 5 et 3 m.
• Remonter très lentement à la surface après le palier de décompression.
• Eviter les plongées yo-yo.
• Eviter les efforts en plongée et durant la demi-heure qui suit l'arrivée en surface.
• Lors de plongées en eaux froides ou avec efforts, remonter avant l'expiration du temps autorisé sans
décompression. En cas de plongée avec décompression, prolonger le palier le plus proche de la surface.
• Respecter un intervalle surface de deux heures minimum entre les plongées.
• Toujours effectuer la plongée la plus profonde d'une journée en premier.
• Eviter de plonger si l'ordinateur n'est pas encore revenu à zéro après une plongée de la veille.
• En cas d'immersions journalières répétées, observer au moins un jour de repos par semaine. Si les
plongées ont nécessité des paliers de décompression, il est recommandé de prendre un jour de repos tous
les trois jours.
• Eviter les plongées avec décompression et se limiter à la profondeur de 40 m à moins d'avoir suivi une
formation spécifique à la plongée tech.
• Eviter les plongées successives à profil "carré" (plongées à profondeur unique) au-delà de 18 m.
• Toujours attendre le plus longtemps possible avant de prendre l'avion après une plongée (au moins 12
heures et de préférence 24) et suivre les recommandations du D.A.N. (Diver's Alert Network).
• Toute plongée induit un certain risque d'accident de décompression.
• Même s'il est utilisé correctement et que toutes les mesures de sécurité sont respectées, cet ordinateur de
plongée, ni aucun autre, ne peut éliminer les risques d'accident de décompression.
• Toujours plonger largement à l'intér ieur de la courbe de sécurité de l'ordinateur de plongée à moins d'avoir
suivi une formation spécifique à la plongée tech.
• Toujours remonter plusieurs minutes avant d'entrer en mode DEC et se ménager une marge de sécurité
encore plus grande en cas de plongées en eaux froides, successives au-delà de 18 m ou nécessitant une
dépense physique exceptionnelle. Le non-respect de ces recommandations accroît le risque d'accident de
décompression.
• Toujours commencer chaque plongée en descendant d'abord à la profondeur maximum prévue et remonter
ensuite progressivement au cours de l'immersion. Le non-respect de ces recommandations accroît le
risque d'accident de décompression.
48
Page 51

AVERTISSEMENTS ET NORMES DE SECURITE
L'utilisation correcte de tout ordinateur de plongée implique une connaissance approfondie de toutes ses
fonctions. Lire attentivement ce manuel d'utilisation dans sa totalité avant toute plongée avec l'ordinateur
TUTOR pour savoir comment il fonctionne.
Seul un entraînement sérieux peut garantir la sécurité en plongée.
Mares recommande de n'utiliser un ordinateur de plongée qu'après avoir suivi une formation spécifique dans
un centre de plongée.
Les plongées de type loisir doivent être effectuées dans les limites de la courbe de sécurité et à des
profondeurs inférieure à 40 m. Mares recommande de ne jamais dépasser la profondeur limite autorisée par
son niveau de formation.Les plongées en-dehors de la courbe de sécurité ou à des profondeurs supérieures
à 40 m accroissent considérablement le risque d'accident de décompression.
Un bon plongeur est un plongeur responsable. Mares recommande de respecter scr upuleusement les règles
élémentaires de sécurité citées au début de ce manuel.
Ne jamais mettre sous pression l'ordinateur TUTOR en chambre hyperbare ou en caisson d'essai sans
l'immerger totalement au risque de l'endommager de façon irrémédiable.
!!
ATTENTION
Ne jamais effectuer de plongée en altitude sans avoir vérifier que l'ordinateur est réglé sur le
programme d'altitude correct.
!!
ATTENTION
Ne jamais plonger si l'icône <pile> du TUTOR indique que la pile est trop faible. Ne pas plonger
si les indications de l'écran sont irrégulières et peu claires.
!!
ATTENTION
En plus de l'ordinateur de plongée, l'utilisateur doit avoir à sa disposition un profondimètre, un
manomètre immergeable, une montre ou un chronomètre et une table de plongée.
!!
ATTENTION
L'ordinateur de plongée TUTOR est conçu exclusivement pour la plongée loisir. Il ne doit pas
être utilisé pour la plongée professionnelle.
!!
ATTENTION
Toute plongée comporte un risque d'accident de décompression même si l'ordinateur est
utilisé correctement et les règles de sécurité élémentaires respectées. Le TUTOR ni aucun autre
ordinateur de plongée n'élimine les risques d'accident de décompression.
L'ordinateur de plongée ne peut prendre en compte la condition physique d'un plongeur en
particulier, celle-ci pouvant varier d'un jour à l'autre. Pour votre sécurité, effectuer une visite
médicale de contrôle avant la plongée.
49
FRANÇAIS
Page 52

!!
ATTENTION
Cet ordinateur est destiné aux plongeurs confirmés. Ne pas utiliser l'instrument avant d'avoir lu
et compris le manuel d'utilisation. Une utilisation correcte de l'ordinateur permet de réduire le
risque d'accident de décompression, mais aucun ordinateur ni aucune table n'élimine
totalement ce risque.
!!
ATTENTION
Toujours effectuer un palier de sécurité de 3 à 5 minutes entre 7 et 5 m à la fin de chaque
plongée, quelles que soient les indications affichées par l'ordinateur. Cette précaution réduit le
risque d'accident de décompression.
!!
ATTENTION
Ne jamais utiliser cet ordinateur de plongée pour faire des plongées "Yo-Yo" (remontées et
descentes répétées) car elles augmentent considérablement le risque d'accident de
décompression, quelles que soient les indications affichées par l'ordinateur.
!!
ATTENTION
Ne jamais utiliser cet ordinateur de plongée ou un autre pour faire des plongées successives à
profil "carré" (plongées à la même profondeur ou à des profondeurs approchantes) au-delà de
18 m. Cette pratique est considérée comme dangereuse et augmente considérablement le
risque d'accident de décompression, quelles que soient les indications affichées par
l'ordinateur.
!!
ATTENTION
Ne jamais plonger au-delà de 40 m ni planifier des plongées avec décompression avec
l'ordinateur à moins d'avoir suivi une formation spécifique à la plongée tech, de bien connaître
les techniques et les risques de la plongée profonde à l'air et d'être un plongeur confirmé au
moins du niveau plongée à l'air au-delà de 40 m. Même avec un tel niveau et une telle
expérience, les risques d'accident de décompression sont plus grands dans ces plongées tech
quels que soient la table ou l'ordinateur utilisés et le plongeur doit en être conscient et les
accepter avant d'entreprendre ce type de plongée.
!!
ATTENTION
Ne jamais utiliser le TUTOR pour plonger avec d'autres mélanges de gaz que l'air respirable.
!!
ATTENTION
Ne pas prendre l'avion dans les 24 heures qui suivent la dernière plongée ou tant que le TUTOR
affiche l'icône <avion>.
50
Page 53

1 = Bouton <mode>
2 = Bouton <->
3 = Profondeur
Profondeur maximum
Jour (
fonction clock
)
Réglage (
fonction set
)
4 = Temps d’immersion
Mois (fonction clock)
5 = Temps sans décompression
Paliers de décompression
Heure (
fonction clock
)
Intervalle surface
Interdiction de vol “no fly”
Temps de désaturation
6 = Température
(pour plongées sans décompression)
Durée totale de remontée
(pour plongées avec décompression)
Numéro de plongées (fonction log book)
Année (fonction clock)
7 = % vitesse de remontée
8 = Système UBA
9 = Réglage d’altitude
10 = Indicateur “no fly”
11 = Indicateur de changement de pile
12 = Unité de mesure de la profondeur
13 = Unité de mesure de la température
51
FRANÇAIS
Page 54

Caractéristiques techniques et fonctionnelles
• Algorithme Haldane modifié
• Nombre de tissus 9
• Périodes 2,5 à 480 minutes
• Profondeur maximum d'utilisation 99 m
• Résolution 0,1 m
• Etalonnage (prof) eau douce
• Programmes altitude 3 niveaux - P0 (0-700m); P1 (700-1 500 m)
P2 (1 500-2 000m)
• Profondeur de palier maximum 24 m
• Vitesse de remontée 10 à 18 m/min
• Alarmes sonores changement de pile
palier non respecté
vitesse de remontée excessive
sortie de la courbe de sécurité
• Mémoire historique nombre total de plongées
nombre total d'heures de plongées
Profondeur maximum atteinte
• Capacité mémoire 20 plongées
• Paramètres enregistrés année, mois, jour et heure de départ
temps d'immersion
profondeur maximum
programme d'altitude
violation de palier
plongée sans ou avec décompression
vitesse de remontée maximum non
respectée
UBA
température minimum
• Capacité mémoire de profil 10 plongées
• Paramètres enregistrés/point profondeur maximum à chaque minute
vitesse de remontée excessive
palier non respecté
• Profondeurs planning 12 à 48 m
• Interface PC avec adaptateur série RS 232
• Réglages horloge
°C/°F
mètres/pieds
programme d'altitude
détection de remontée incontrôlée
(oui/non)
remise à zéro de l'azote résiduel
• Alimentation une pile alcaline 1,5 V LR03 (AAA)
• Autonomie environ 3 mois ou 50 heures de plongée
52
Page 55

AUTODIAGNOSTIC
L'ordinateur de plongée TUTOR peut être mis en marche manuellement avec les boutons-poussoir ou
automatiquement en l'immergeant (contacts humides).
Lors de la mise en marche manuelle ou après le remplacement de la pile, l'ordinateur s'initialise
automatiquement et contrôle l'état de la pile; tous les paramètres de l'affichage apparaissent pendant deux
secondes (fig. 1). Si tout se déroule correctement, il passe en mode Plongée (Dive).
Lors de l'activation automatique par immersion, le TUTOR prend en compte les paramètres de la précédente
initialisation automatique (dernière mesure de la pression ambiante). Il passe ensuite en mode Plongée
(Dive). L'initialisation automatique s'effectue systématiquement toutes les deux minutes même lorsque
l'ordinateur est éteint.
CONTROLE DE LA PILE
Lorsque la pile faiblit (niveau 1), l'icône pile s'affiche. Il est encore possible d'effectuer deux plongées. Si la
pile est très faible (niveau 2), l'indication <LO> s'affiche et toutes les fonctions sont désactivées (fig. 2).
EXTINCTION AUTOMATIQUE
Lorsque le TUTOR est sur tout autre mode que le mode plongée (Dive), si aucun bouton n'est sollicité, au
bout de trois minutes l'instrument passe automatiquement sur la position arrêt <off> et l'affichage s'éteint. En
mode simulation <Simul>, l'extinction automatique intervient au bout de 30 minutes (voir "Simulateur de
plongée").
PLONGEE (DIVE)
La sélection du mode plongée <Dive> s'effectue en appuyant une fois sur le bouton <mode> ou en
humidifiant les contacts externes.
Ce mode comprend deux phases opératoires différentes:
Attente en surface : en mode plongée <Dive>, l'affichage de la figure 3 apparaît. Si les contacts externes
restent secs et que l'ordinateur n'est pas descendu à une profondeur de 1,5 mètres dans les 3 minutes, il
passe en position arrêt <off>.
Plongée: passé la profondeur de 1,5 mètres, le chronomètre d'immersion se déclenche. L'écran affiche les
paramètres suivants :
<depth> Valeur de la profondeur actuelle (en "m" ou "ft")
<max depth> Valeur de la profondeur maximum atteinte.Affichée pendant environ
trois secondes après avoir appuyé sur le bouton <mode>.
!!
ATTENTION
L'autonomie de la pile alcaline est d'environ 3 mois ou 50 heures de plongée. Cependant si
l'ordinateur n'est pas utilisé, la pile devra être remplacée au moins tous les six mois. Les
données en mémoire sont conservées même après un changement de pile.
Pour le remplacement de la pile, se reporter à la page 18.
!!
ATTENTION
Pour consulter l’ordinateur computer en surface, le manipuler en faisant attention de ne pas
toucher simultanément les contacts humides situés sur le côté de l’instrument au risque de le
faire passer en mode plongée <dive> interdisant ainsi l’accès aux autres fonctions.
53
FRANÇAIS
Page 56

<temp> Valeur de la température mesurée (en °C ou °F)
<dive time> Temps en minutes écoulé depuis le début de l'immersion
La mémorisation des paramètres de plongée commence seulement quand le plongeur reste plus d'une
minute à la profondeur de 1,5 m.
PLONGEE SANS DECOMPRESSION
Quand la plongée s'effectue dans la courbe de sécurité (sans décompression), l'inscription <NO DEC> (no
decompression) est présente à l'écran. Le temps encore disponible avant décompression à la profondeur
affichée <depth> est alors visible près de l'abréviation <min> (fig. 4). Quand ce temps n'est plus que de 1
minute, une alarme sonore se déclenche.Dans ce type de plongée, si la profondeur atteinte dépasse 10 m, à
la remontée le Tutor active le "Safety Stop" (palier de sécurité) et recommande d'effectuer un palier de
sécurité dans la zone de profondeur comprise entre 3,5 et 5 m. Le temps restant sans décompression NO
DEC est alors remplacé par "St (stop) 3 min" (fig. 5). Si le plongeur quitte la zone de profondeur de palier de
sécurité, le temps restant sans décompression NO DEC s'affiche à nouveau et le décompte du temps de
palier de sécurité s'interrompt. Quand le plongeur réintègre la zone de profondeur du palier de sécurité, le
décompte du temps de palier reprend là où il s'était arrêté. Si alors le plongeur redescend en dessous de 10
m, le premier palier de sécurité interrompu n'est pas pris en compte et le nouveau reprend à 3 minutes.
PLONGEE AVEC DECOMPRESSION
Si le plongeur ne remonte pas lorsque le temps sans décompression NO DEC est écoulé, une alarme retentit
et l'inscription <DEC> s'affiche. A la place du temps restant, l'affichage indique maintenant la profondeur
("m") et le temps ("min") du premier palier de décompression ainsi que la durée totale de remontée prévue
("asc time")(fig.6) qui comprend le temps de remontée au premier palier et celui de tous les paliers. Le
TUTOR vérifie aussi le respect des paliers de décompression. Deux icônes apparaissant entre la profondeur
<m> et le temps <min> du palier de décompression indiquent graphiquement la conduite à tenir :
deux triangles = la profondeur de décompression est correcte (fig.8)
un triangle vers le haut = trop bas:remonter! (fig. 9)
un triangle vers le bas = trop haut : redescendre! (fig. 10)
Cette dernière situation déclenche une alarme sonore qui s'arrête seulement après le retour aux conditions
normales.
Si le plongeur remonte à plus d'un mètre au-dessus de la profondeur de palier et y reste plus de trois
minutes, l'ordinateur entre en mode VIOLATION DE PALIER et le premier astér isque principal s'allume. Une
fois en surface, si le TUTOR est utilisé pour une autre plongée, il affiche en permanence le message STOP
et n'indique que la profondeur. L'ordinateur reste dans ce mode pendant 24 heures.
REMONTEE
Pendant la remontée, l'écran affiche 4 valeurs de pourcentages (%) de vitesse (60, 90, 100 et 120) et le
message <slow>.Chaque valeur indique la vitesse de remontée en pourcentage de la vitesse prévue.
Le TUTOR utilise quatre vitesses de remontée maximum en fonction de la profondeur :
18 m/min de 99 m à 20 m
12 m/min de 20 m à 10 m
10 m/min de 10 m à la surface
Par exemple, si à une profondeur de 9 m le plongeur remonte à 6 m/min, la valeur 60 s'affiche pour indiquer
que la vitesse est égale à 60% de la vitesse maximale autorisée (10 m/min). Si la vitesse de remontée est
54
Page 57

dépassée de plus de 20%, les valeurs jusqu'à "120" apparaissent accompagnées du message <slow> et
l'alarme sonore retentit (fig. 7).
REMONTEE INCONTROLEE
Une "remontée incontrôlée" est une remontée effectuée à une vitesse très rapide et supérieure à celle
prescrite. Cette situation est signalée par une alarme sonore et le message ralentir <slow>. Le TUTOR
considère comme "remontée incontrôlée" toute remontée dont la vitesse est supérieure de 20% à la vitesse
maximum autorisée pour cette profondeur sur au moins les 2/3 de la profondeur à laquelle s'est déclenchée
l'alarme sonore.
Ceci ne s'applique qu'aux alarmes déclenchées en dessous d'une profondeur donnée dont la valeur est
fonction de la plongée:
Première plongée:
Profondeur supérieure à 12 m; si la profondeur se situe entre 12 m et 8 m, le signal de remontée incontrôlée
se déclenche seulement si le temps d'immersion dépasse 60 minutes.
Plongées successives:
Profondeur supérieure à 8 m
Si la remontée rapide se produit seulement entre 8 m et la surface, l'ordinateur ne la considère pas comme
"remontée incontrôlée". Par conséquent, il est fortement recommandé de remonter très lentement pendant
ces huit derniers mètres. Si la vitesse de remontée diminue de telle sorte que l'alarme sonore s'arrête, le
système U.B.A.ne considère pas la remontée comme une "remontée incontrôlée".
En cas de "remontée incontrôlée", le message STOP s'affiche à l'arrivée en surface. Si le plongeur
entreprend une autre plongée, l'ordinateur ne fonctionne plus qu'en mode profondimètre pendant les 24
heures suivantes.
Une remontée incontrôlée est aussi signalée par l'affichage de l'astérisque principal.
La détection de "remontée incontrôlée" peut être désactivée au moyen du mode <set>.
ARRIVEE EN SURFACE
Dès que la profondeur est inférieure à 1 m, le temps d'immersion <dive time> s'interrompt. Si le plongeur ne
redescend pas en dessous de 1,5 m dans les 10 minutes, le TUTOR considère la plongée comme terminée
et ses paramètres sont mémorisés dans le carnet de plongée <log book>. Par contre, si le plongeur
redescend au-delà de cette profondeur, le chronométrage du temps d'immersion <dive time> reprend et le
calcul de la plongée continue.
Lorsque la plongée est terminée, le TUTOR passe du mode plongée <Dive> au mode <Off> et affiche les
paramètres suivants (fig.11):
-l'îcone "avion" qui clignote tant que l'interdiction de vol n'est pas à zéro,
- le temps de désaturation tant qu'il n'est pas à zéro,
- la barre graphique U.B.A. visualisant les erreurs commises.
FONCTIONS SURFACE (SURF TIME)
En appuyant sur le bouton <mode> l'ordinateur passe du mode <dive> au mode surface (fig. 12). Ce dernier
reste activé tant que le message d'interdiction de vol est présent. Dans ce mode, l'ordinateur affiche les
paramètres suivants :
<h><min> Intervalle surface en heures et minutes
<temp> Température ambiante dans l'unité choisie (°C ou °F)
<U.B.A.> Indication sur la barre graphique des éventuelles erreurs
commises pendant la plongée.
55
FRANÇAIS
Page 58
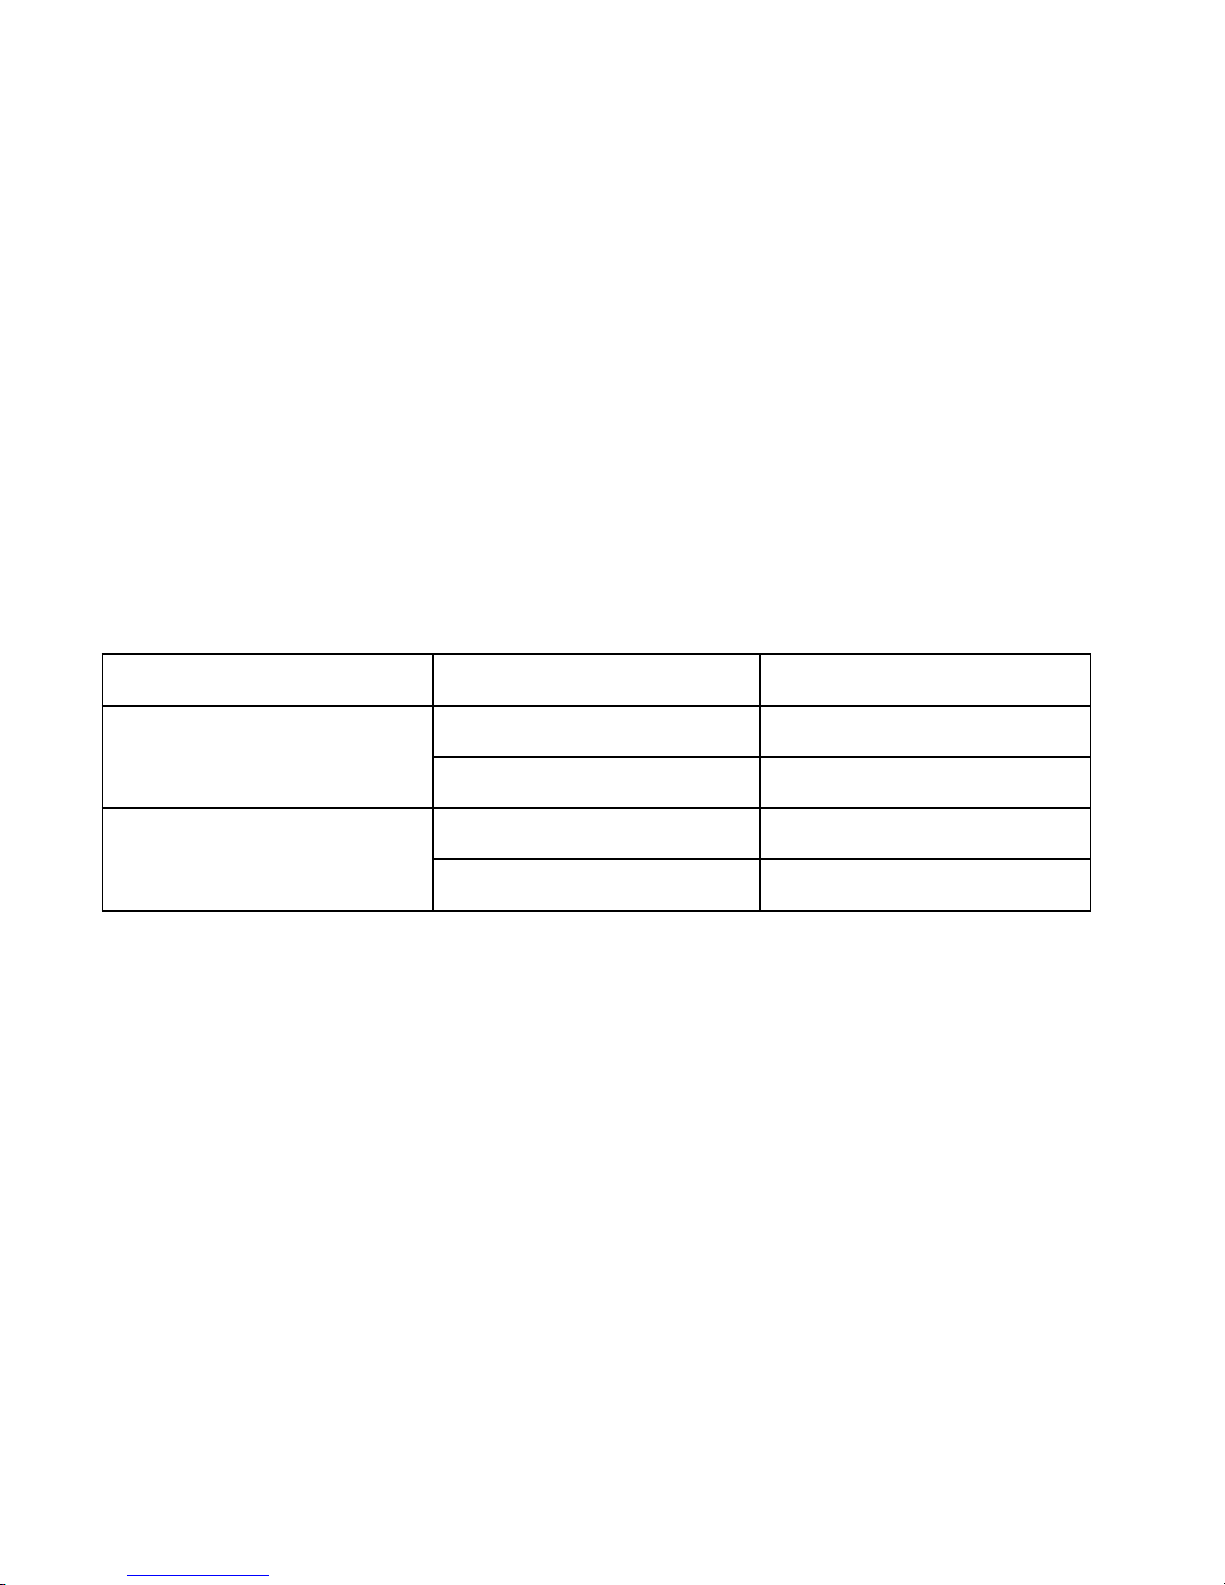
<avion> L'icône "avion" reste affichée jusqu'à ce que l'interdiction de
vol soit levée.
<desat> Appuyer sur le bouton <-> pour afficher le temps de désaturation
<desat> à la place de l'intervalle surface.
<no fly> Appuyer à nouveau sur le bouton <-> pour avoir le temps
d'interdiction de vol.
TEMPS DE DESATURATION ET INTERDICTION DE VOL
Même si, suite à un calcul mathématique très conservateur, l'ordinateur indique que le temps de désaturation
est totalement écoulé, cela ne signifie pas qu'il n'y pas de microbulles circulantes. Par conséquent, il est
recommandé de respecter le temps d'interdiction de vol indiqué par l'ordinateur.
Les temps d'interdiction de vol donnés par le TUTOR et figurant dans le tableau ci-dessous sont en accord
avec les directives des principales écoles inter nationales. Ils sont fonction du type de plongée réalisée et des
temps de désaturation.
ORDINATEUR DE PLONGÉE TUTOR
Appuyer sur <-> pour revenir à l'affichage de l'intervalle surface initial.
Horloge
A partir des modes <dive> ou <surf time>, appuyer sur le bouton <mode> pour accéder au mode horloge
<clock>. L'ordinateur affiche l'année, le jour, le mois, les heures et les minutes (fig. 13). Le mode horloge
n'est pas accessible en plongée ou quand les contacts humides sont activés.
SIMULATEUR DE PLONGEE (SIMUL)
A partir du mode <clock>, appuyer sur le bouton <mode> pour accéder au mode simulateur <simul>. Il
permet de simuler des plongées en tenant compte du niveau de saturation résiduel. Appuyer sur <mode>
pour aller au mode suivant (planning <plan>) sans entrer dans le mode <simul>.Le simulateur fonctionne de
la façon suivante:
Avant la plongée
Fonctions clé
Appuyer sur <-> pour démarrer.
NOITARUTASEDEDSPMETLOVEDNOITCIDRETNI
noisserpmocédsnaseégnolP
evisseccusnonte
serueh21÷0serueh21
serueh21>noitarutasédedspmeT=
noisserpmocédcevaeégnolP
evisseccusuo
serueh42÷0serueh42
serueh42>noitarutasédedspmeT=
56
Page 59

Immersion
Fonctions clé
Appuyer une nouvelle fois sur <-> pour commencer la simulation d'une plongée. Chaque impulsion suivante
sur le bouton <-> permet de descendre de 1 m. Donner des impulsions successives permet de descendre à
une vitesse de 12 m/min. Une pression continue sur le bouton <-> permet de descendre à une vitesse de 24
m/min. Pour remonter, appuyer sur <mode>.Chaque impulsion sur le bouton <mode> permet de remonter de
1 m. Donner des impulsions successives permet de remonter à une vitesse de 12 m/min. Une pression
continue sur le bouton <mode> permet de remonter à une vitesse de 18 m/min. L'ordinateur affiche alors les
temps de plongée en fonction des profondeurs.
Pour quitter le mode simulateur, appuyer simultanément sur les boutons <mode> et <->.
Lors de l'immersion, le simulateur fonctionne en vitesse accélérée par 5 (1 seconde de simulation correspond
à 5 secondes réelles).
Arrivée en surface (quand la profondeur est inférieure à 1 m, l'ordinateur considère que la surface est
atteinte).
Surface
Quand la plongée simulée est terminée, le temps est accéléré par 12 (1 minute de simulation correspond à
12 minutes réelles). Pendant approximativement 1 minute, l'ordinateur affiche la profondeur maximum
atteinte et le temps d'immersion. L'intervalle surface <surf time> apparaît ensuite. Appuyer sur <-> pour
obtenir le temps de désaturation <desat time> et le temps d'interdiction de vol <no fly time>.
Pour simuler une plongée successive, attendre que l'intervalle surface <surf time> désiré apparaisse à
l'écran, puis appuyer une fois sur le bouton <mode> et recommencer la procédure utilisée pour la première
plongée en appuyant sur <-> pour amorcer la nouvelle descente.
Pour quitter le mode simulateur, appuyer simultanément sur les boutons <mode> et <->.
VERROUILLAGE (STOP)
Pendant la plongée, si un palier n'est pas respecté ou si la remontée est incontrôlée, le simulateur se
verrouille et l'indication STOP s'affiche.Pour sortir du mode de verrouillage, appuyer simultanément sur les
boutons <mode> et <->. Si la fonction détection de remontée incontrôlée est désactivée (voir "set 5",
page 70), le simulateur ne se verrouille pas et l'indication STOP ne s'affiche pas.
PLANNING (PLAN)
A partir du mode <simul>, appuyer sur le bouton <mode> pour accéder au mode planning <plan> (fig. 14).
Ce mode permet de faire défiler les profondeurs et les temps sans décompression correspondants (courbe
de sécurité) en tenant compte de l'éventuelle majoration due à l'azote résiduel de la plongée précédente.
Appuyer sur le bouton <-> pour commander le défilement des paramètres suivants:
<depth> = appuyer sur le bouton <-> pour faire défiler les profondeurs par intervalles
de 3 m jusqu'à 48 m.
<no dec> = le temps de plongée maximum réalisable sans décompression s'affiche
pour chaque profondeur.
Le mode planning n'autorise pas les plongées successives avec décompression.
57
FRANÇAIS
Page 60

MEMOIRE (LOG BOOK)
A partir du mode <plan>, on peut accéder au mode mémoire <log book> dont la par tie historique donne le
nombre total de plongées effectuées en alternance avec la température minimum enregistrée en immersion,
ainsi que le nombre total d'heures de plongée et la profondeur maximale atteinte (fig.15).
Appuyer sur le bouton <-> pour afficher la première page de mémoire de la dernière plongée (fig. 16). La
mémoire comporte 20 pages. La première affiche le numéro d'ordre de la plongée (la plus récente est notée
n°1), le jour, le mois et l'heure de départ. Appuyer sur <-> pour faire apparaître la deuxième page (fig. 17) qui
donne la profondeur maximum, le temps total d'immersion, la barre UBA, la vitesse maximum de remontée,
toute violation du palier, les indications <no dec> (pour une plongée sans décompression) ou <deco> (pour
une plongée avec décompression) et la température minimale de la plongée. Le profil complet des dix
dernières plongées est aussi disponible. Appuyer deux secondes sur <-> pour visualiser le profil de la
plongée désirée. Chaque pression sur le bouton <-> fait apparaître le temps d'immersion et la profondeur
correspondante.Pour passer à la plongée suivante, appuyer simplement sur <mode>.
REGLAGE (SETUP)
<set 1> horloge
<set 2> altitude
<set 3> unité de mesure de température
<set 4> unité de mesure de profondeur
<set 5> détection de remontée incontrôlée
<set 6> remise à zéro de la mémoire de l'azote résiduel
A partir du mode <log book>, appuyer sur le bouton <mode> permet de passer au mode réglage <SETUP>
(fig. 18). Pour ouvrir le mode réglage, appuyer à nouveau sur le bouton <mode> pendant environ deux
secondes jusqu'à ce que l'inscription <set 1>, qui correspond à l'horloge, s'affiche. Pour passer au mode
suivant <dive>, appuyer à nouveau brièvement sur le bouton <mode>.Les possibilités de réglage <set> sont
<set 1> Réglage de l'heure et de la date (fig. 19).
Appuyer sur <mode> pendant environ deux secondes.
Une fois sur la fonction horloge, la date, les heures et les minutes s'affichent et clignotent alternativement.
Appuyer sur le bouton <-> pour augmenter la valeur de l'indication clignotante. Une fois la valeur désirée
atteinte, appuyer sur le bouton <mode> pour l'enregistrer. Le paramètre suivant se met à clignoter et il suffit
de répéter l'opération précédente. Une fois le réglage de l'horloge effectué, appuyer sur le bouton <mode>
pour passer au réglage suivant.
<set 2> Réglage de l'altitude (fig. 20).
Une fois sur la position réglage d'altitude, l'indication <set 2> s'affiche avec le programme d'altitude
actuellement pris en compte (P0, P1, P2). Appuyer sur le bouton <-> pour passer à la valeur suivante.
Appuyer sur <mode> pour aller au réglage suivant.
<set 3> Réglage de l'unité de mesure température (fig. 21).
Une fois sur cette position de réglage, l'unité de mesure de température actuellement utilisée s'affiche.
Appuyer sur le bouton <-> pour la changer.
<set 4> Réglage de l'unité de mesure de profondeur (fig. 22).
Une fois sur cette position de réglage, l'unité de mesure de profondeur actuellement utilisée s'affiche.
Appuyer sur le bouton <-> pour la changer.
58
Page 61

Appuyer sur le bouton <-> pour modifier la valeur clignotante. Appuyer sur <mode> pour aller au réglage
suivant.
<set 5> Réglage de la détection de remontée incontrôlée (fig. 23).
Une fois sur cette position, le réglage actuellement pris en compte s'affiche. L'indication <on> est affichée si
la détection est activée et <off> dans le cas inverse.Cette fonction particulière permet de désactiver le mode
de verrouillage <stop> en cas de remontée incontrôlée (voir page 65) par exemple pour les exercices
d'entraînement aux remontées d'urgence.
Appuyer sur le bouton <-> pour modifier la valeur clignotante. Appuyer sur <mode> pour aller au réglage
suivant.
<set 6> Remise à zéro de la mémoire de l'azote résiduel (fig. 24).
Pour remettre à zéro cette valeur, appuyer sur le bouton <-> pendant plus de trois secondes, jusqu'à ce que
l'affichage indique 0000. Cette opération entraîne la sortie du mode réglage <Setup> et le passage au mode
suivant <dive> (plongée). Pour sor tir du mode réglage et passer au suivant sans effectuer la remise à zéro,
appuyer sur le bouton <mode>.
INTERFAÇAGE A UN PC
L'interface spécifique (MK2131) permet le transfert du contenu de la mémoire de l'ordinateur de plongée sur
un ordinateur personnel fonctionnant sous Windows. Le logiciel de l'interface guide l'utilisateur lors de la
procédure de connexion du TUTOR au PC.
Veiller, en particulier, à ne placer le TUTOR dans le boîtier d'interface qu'après y avoir été invité par le
logiciel. L'introduction prématurée de l'ordinateur de plongée provoque son passage en mode plongée <dive>
au lieu du mode PC. Quand l'ordinateur de plongée passe en mode PC, le message "PC" s'affiche sur la
partie centrale gauche de son écran et un bip sonore retentit simultanément. Pendant le transfert des
données, des nombres (par exemple 84) apparaissent sur l'écran; ce sont des codes de commande.
!!
ATTENTION
Nettoyer soigneusement les contracts avant de mettre l’ordinateur dans le support d’interface.
59
FRANÇAIS
Page 62

APRES LA PLONGEE
SIGNALISATION DES ERREURS - SYSTEME UBA
Pour votre sécurité, l'affichage du TUTOR possède une barre graphique comportant plusieurs astérisques qui
correspondent à des erreurs de procédure particulières potentiellement dangereuses. Quand la plongée est
terminée, les astérisques correspondant aux erreurs commises en plongée s'allument et restent affichés
jusqu'à la prochaine plongée.
Astérisques principaux (erreurs particulièrement graves) (fig.25)
Palier non respecté, remontée incontrôlée.
Astérisques secondaires (comportement imprudent) (fig. 26)
Plongée successive avec inter valle surface inférieur à 2 heures, plongées avec décompression, profondeur
supérieure à 40 m, plongée successive plus profonde que la première plongée, profondeur de la plongée
successive supérieure à 30 m, vitesse de remontée excessive. Pour plus de précision sur l'erreur commise,
consulter la mémoire.
60
Page 63

ENTRETIEN
Le TUTOR est un instrument particulièrement robuste conçu pour supporter les rigueurs ordinaires de la
plongée. Cependant, il est normal de lui accorder toute l'attention que requiert un instr ument de précision et
de lui éviter les chocs violents, les longues expositions au soleil et les contacts avec des objets coupants.
Pour l'entretien courant, rincer simplement l'instrument à l'eau douce après chaque plongée.Si nécessaire, le
laver avec un savon à pH neutre.Ne pas utiliser de détergent, d'alcool, d'essence ni de produits en bombe.
Les boutons-poussoirs ne nécessitent pas d'entretien particulier, ne pas les lubrifier avec de l'huile ou un
aérosol.
En cas d'anomalie de fonctionnement, ne pas utiliser l'instrument en plongée et le retourner à un centre
technique Mares agréé pour vérification.
REMPLACEMENT DE LA PILE
Le remplacement de la pile est une opération très simple qui ne nécessite pas l'intervention d'un personnel
spécialisé. Utiliser une pièce de monnaie pour dévisser le couvercle étanche et remplacer la pile en
respectant la polarité. Le compartiment pile est étanche et ne communique pas avec le reste de l'instrument.
En cas de fuite, le sécher soigneusement pour éliminer toute trace d'humidité avant d'introduire une nouvelle
pile.
Avant de refermer le couvercle du compartiment pile, s'assurer que le joint torique est propre et en bon état.
Le graisser légèrement à la graisse silicone.Ne pas jeter l'ancienne pile à la mer!
!!
ATTENTION
Ne jamais remplacer la pile dans les 10 premières minutes qui suivent une plongée au risque
de perdre les informations concernant cette plongée.
!!
ATTENTION
NE JAMAIS utiliser le TUTOR après avoir constaté une anomalie de fonctionnement. Le nonrespect de cette mise en garde peut accroître considérablement le risque d'accident de
décompression.
61
FRANÇAIS
Page 64

SYMBOLES ET TERMES TECHNIQUES
°C degrés centigrades ou Celsius
°F degrés Fahrenheit (100°C = 212°F)
% pourcentage de vitesse de remontée
min minutes
sec secondes
h heures
mmètres
FT. feet = pieds (1 pied = 30,48 cm)
LO low = faible (en référence à la puissance de la pile)
PC Personal Computer = ordinateur personnel
asc time ascent time = durée totale de remontée
U.B.A. underwater behaviour analysis =
analyse du comportement en immersion
ceiling profondeur plafond (profondeur minimale à ne pas
dépasser pendant la décompression)
clock horloge
dec,deco décompression
desat désaturation
depth profondeur
dive plongée
dive n. dive number = numéro de la plongée
dive time temps d'immersion
log book carnet de plongée
max depth profondeur maximum
mode mode de fonctionnement
no dec no decompression = sans décompression
no fly interdiction de vol
plan planning
set, setup régler, réglage
simul simulateur
slow ralentir
surf surface
surf time intervalle surface
temp température
time temps, durée
yo-yo profil d'immersion comportant d'importantes variations
de profondeur
62
Page 65

63
COMPUT ADOR TUTOR
ÍNDICE GENERAL
Introducción pág. 64
Las reglas del submarinista responsable pág. 64
Advertencias y Normas de Seguridad pág. 65
Características técnicas y funcionales pág. 68
Self check pág. 69
Battery check pág. 69
Apagado automático pág. 69
Dive-funciones durante la inmersión pág. 69
Inmersiones dentro de la curva de seguridad pág. 70
Inmersiones fuera de la curva de seguridad pág. 70
Ascenso pág. 70
Globazo pág. 71
Emersiónpág. 71
Funciones en la superficie (Surf time) pág. 71
Tabla de los tiempos de desaturacióny tiempo “NO FLY” pág. 72
Simulador pág. 72
Bloqueo pág. 73
Planificador de inmersión (plan) pág. 73
Log book pág. 73
Setup pág. 74
- set -1 - reloj pág. 74
- set -2 - altura pág. 74
- set -3 - unidad de medida temperatura pág. 74
- set -4 - unidad de medida profundidad pág. 74
- set -5 - globazo pág. 75
- set -6 - puesta a cero de la memoria de la reserva de nitrógeno pág. 75
Conexión con PC pág. 75
Después de la inmersión pág. 76
Señalización de errores uba system pág. 76
Cuidado y mantenimiento pág. 76
Sustitución de las pilas pág. 76
Símbolos y términos técnicos pág. 77
ESPAÑOL
Page 66

COMPUTADOR DE INMERSIÓN TUT OR
Nuestra enhorabuena. El computador de inmersión que usted acaba de comprar es fruto de la tecnología
puntera elaborada por Mares. Ha sido proyectado para garantizar la máxima seguridad, eficiencia, fiabilidad
y duración.
En este manual Ud. encontrará todas las instr ucciones para su funcionamiento y el uso de sus funciones.
Mares agradece su elección, le recomienda seguir siempre sus indicaciones y actuar con prudencia y sentido
de responsabilidad.
Las reglas del submarinista responsable.
• Planificar cada inmersión.
• No sobrepasar nunca los límites de su propia preparación y experiencia.
• Iniciar la inmersión alcanzando inmediatamente la cota más profunda que ha programado.
• Consultar a menudo el computador durante la inmersión.
• Respetar la velocidad de ascenso que indica el computador.
• Como precaución, efectuar siempre una parada de 3’por lo menos entre los 5 y 3 metros de cota.
• Ascender muy lentamente a la superficie después de la parada de descompresión.
• Evitar las inmersiones tipo yoyó.
• Evitar esfuerzos durante la inmersión y en la primera media hora después del ascenso.
• En aguas frías, o después de un esfuerzo durante la inmersión, ascender antes de llegar al límite de no-
descompresión. En los casos de inmersiones fuera de la curva de seguridad, prolongar la etapa de
descompresión más cercana a la superficie.
• Alternar las inmersiones con un intervalo adecuado en la superficie que nunca debe ser inferior a las 2
horas.
• La inmersión más profunda debe ser la primera de la jornada.
• No efectuar la inmersión hasta que el computador no se haya puesto a cero después de la inmersión del
día anterior.
• Si efectúa inmersiones diarias repetidas, guarde por lo menos un día de reposo a la semana. Si las
inmersiones efectuadas han requerido etapas de descompresión se aconseja guardar un día de reposo
cada tres días de inmersión.
• Evite las inmersiones fuera de la curva y las inmersiones a profundidades superiores a los 40 metros (130
pies) sin una preparación profesional específica para este tipo de inmersiones.
• Evite las "inmersiones a una cota idéntica o similar" repetidas a profundidades superiores a los 18 metros.
• Observe siempre un período de reposo de 12 horas por lo menos y si es posible de 24 horas, antes de
volar después de una inmersión, conforme a lo dispuesto por el Divers' Alert Network.
• Cada inmersión conlleva un mínimo de riesgo de enfermedad de descompresión. Ningún tipo de
computador, ni siquiera el TUTOR, puede eliminar completamente el riesgo de enfermedad de
descompresión, aunque respete todos los procedimientos de seguridad.
• Sumérjase siempre dentro de los límites de la curva de seguridad señalados por el TUTOR, si usted no es
experto en este tipo de inmersión profesional.
• Ascienda algunos minutos antes de alcanzar los límites de inmersión fuera de la curva, dejando un
margen de tiempo mayor en caso de inmersiones en aguas frías, inmersiones repetidas a profundidades
superiores a los 18 metros, o bien inmersiones que requieren un gran esfuerzo físico, para evitar que
aumente el riesgo de enfermedad de descompresión.
• Inicie cada inmersión dirigiéndose inmediatamente a la cota más profunda que ha programado, y
efectuando un ascenso gradual en el curso de la inmersión, para evitar que aumente el riesgo de
enfermedad por descompresión.
64
Page 67

ATENCIÓN! ADVERTENCIAS Y NORMAS DE SEGURIDAD
Antes de la inmersión es indispensable leer con atención y comprender cabalmente el presente manual de
instrucciones.
Una preparación adecuada es la mejor garantía de una inmersión segura.
MARES recomienda no usar el computador de inmersión sin antes haber asistido a un curso en una escuela
de inmersión.
Las inmersiones deportivas deben conducirse dentro de la curva de seguridad y a la profundidad máxima de
40 metros. MARES recomienda no superar nunca los límites previstos por la titulación de cada submarinista.
Las inmersiones de más de 40 metros o fuera de la curva de seguridad, aumentan notablemente los riesgos
de accidentes por descompresión.
MARES recomienda respetar escrupulosamente las sencillas reglas de comportamiento ilustradas en el
párrafo “reglas del submarinista responsable”.
No comprimir TUTOR en cámaras hiperbáricas. El instrumento puede averiarse gravemente si no está
sumergido en agua.
!!
ATENCIÓN
No tomar el avión en las 24 horas sucesivas a la última inmersión, o en todo caso esperar que
se apague el icono <avión> de TUTOR.
!!
ATENCIÓN
No efectuar inmersiones en lagos de montaña sin antes haber controlado que esté activo el
programa adecuado a la altura a la cual Ud. se encuentra.
!!
ATENCIÓN
No efectuar la inmersión si el icono <pilas> de TUTOR indica que hay escasa reserva; sustituir
las pilas. No efectuar la inmersión si las indicaciones del instrumento aparecen irregulares o
poco claras.
!!
ATENCIÓN
Además del computador use el profundímetro, el manómetro, el timer o el reloj y las tablas de
descompresión.
!!
ATENCIÓN
El TUTOR está destinado exclusivamente a un uso recreativo y deportivo y no a un uso de
carácter profesional.
!!
ATENCIÓN
El computador no previene posibles problemas de descompresión.
El computador no puede tomar en cuenta las condiciones físicas de cada submarinista en
particular, que pueden cambiar de un día a otro.
Para mayor seguridad, antes de efectuar una inmersión sométase a una visita médica de
control general.
65
ESPAÑOL
Page 68

!!
ATENCIÓN
NO use el TUTOR si no posee la titulación correspondiente y si no ha leído y comprendido el
manual de instrucciones. El uso correcto del TUTOR puede reducir el riesgo de enfermedad de
descompresión, pero ningún computador puede eliminarlo por completo.
!!
ATENCIÓN
Por prudencia, efectúe SIEMPRE una parada de 3/5 minutos a una cota incluida entre los 5 y
los 7 metros después de cada inmersión, a pesar de las informaciones proporcionadas por el
COMPUTADOR. Esta precaución reduce el riesgo de enfermedad de descompresión.
!!
ATENCIÓN
NO use NUNCA el COMPUTADOR para las inmersiones de "yo-yo" (ascensos y descensos
repetidos) debido al riesgo de enfermedad de descompresión, a pesar de las informaciones
proporcionadas por el COMPUTADOR.
!!
ATENCIÓN
NO use NUNCA el TUTOR, o cualquier otro computador para inmersiones, en las inmersiones
repetidas a una cota de profundidad idéntica o similar, más allá de los 18 metros. Dichas
inmersiones son de riesgo elevado y pueden provocar la enfermedad de descompresión a
pesar de las informaciones proporcionadas por el TUTOR.
!!
ATENCIÓN
NO SE SUMERJA NUNCA a profundidades superiores a los 40 metros y no programe
inmersiones fuera de la curva de seguridad con el TUTOR si no tiene la titulación profesional
(IANTD, TDI, ANDI, PSA, etcétera), no conoce perfectamente los riesgos y las capacidades
necesarias para las inmersiones ARA y no posee la titulación específica para las inmersiones
profundas ARA a cotas superiores a los 40 metros. Este tipo de inmersión, en efecto, conlleva
un elevado riesgo de enfermedad por descompresión, incluso para los submarinistas más
calificados y expertos, a pesar de los instrumentos o computadores utilizados. Antes de
intentar estas inmersiones, debe conocer perfectamente los riesgos que corre.
!!
ATENCIÓN
No usar TUTOR para inmersiones con gases respiratorios diferentes del aire atmosférico
66
Page 69

1 = Bouton <mode>
2 = Bouton <->
3 = Profondeur
Profondeur maximum
Jour (
fonction clock
)
Réglage (
fonction set
)
4 = Temps d’immersion
Mois (fonction clock)
5 = Temps sans décompression
Paliers de décompression
Heure (
fonction clock
)
Intervalle surface
Interdiction de vol “no fly”
Temps de désaturation
6 = Température
(pour plongées sans décompression)
Durée totale de remontée
(pour plongées avec décompression)
Numéro de plongées (fonction log book)
Année (fonction clock)
7 = % vitesse de remontée
8 = Système UBA
9 = Réglage d’altitude
10 = Indicateur “no fly”
11 = Indicateur de changement de pile
12 = Unité de mesure de la profondeur
13 = Unité de mesure de la température
67
ESPAÑOL
Page 70

Características técnicas y funcionales.
• Algoritmo: Haldane modificado.
• Número de los tejidos: 9
• Tiempos de hemisaturación: de 2,5 a 480 minutos.
• Máxima profundidad: 99 metros (325 feet)
• Resolución: 0.1 metros.
• Ajuste (depth): agua dulce
• Programas de altura: 3 P0 (0-700 m),
P1(700-1500m),
P2 (1500 m. - 2400 m)
• Paradas de descompresión: hasta 24 metros.
• Velocidad de ascenso: de 10 a 18 m/min.
• Alarmas acústicas: low battery
violación de la cota de la etapa de descompresión.
velocidad de ascenso excesiva.
violación de la curva de seguridad.
• Memoria cronológica: Total de las inmersiones efectuadas.
Horas totales de inmersión.
Profundidad máxima alcanzada.
• Inmersiones en log book: 20
• Datos archivados: Año, mes, día, hora de la inmersión.
duración.
profundidad máxima.
programa de altura.
violación de etapa.
dec/no dec.
violación máx.velocidad de ascenso
UBA
temperatura mínima.
• Perfil Inmersiones 10 inmersiones.
• Datos archivados en cada punto profundidad máxima al canzada
en cada minuto.
violación de la velocidad de ascenso.
violación de etapa.
• Scrolling curva de seguridad de 12 a 48 metros
• Posibilidad de Interface con PC: serial con adaptador RS 232.
• Parámetros implementables por el usuario: Regulación del reloj
°C/F
metros/feet.
programas de altura
control/globazo.(Si/No)
Puesta a cero de la memoria del Nitrógeno.
• Alimentación: 1 pila alcalina 1.5 V(tipo AAA)
• Autonomía: 3 meses aprox.o 50 horas de inmersión.
68
Page 71

SELF CHECK
El TUTOR se activa con los pulsadores o bien automáticamente, cuando se mojan los contactos en caso de
inmersión.
Cuando se activa con los pulsadores, o bien después de la sustitución de las pilas, el instrumento ejecuta el
ajuste automático, el control Low battery y se encienden todas las indicaciones del visualizador durante 2
segundos (fig.1); si todo funciona correctamente, el dispositivo se predispone en el modo - dive -.
Cuando se activa mojando los contactos TUTOR toma como referencia los datos más recientes desde el
último ajuste automático (última medición de la presión ambiental) y se predispone luego en el modo -dive-.
El ajuste automático se realiza cada dos minutos automáticamente incluso con el dispositivo apagado.
BATTERY CHECK
Si las pilas están agotadas hasta el nivel 1, el icono de las pilas se ilumina, pero aún es posible efectuar 2
inmersiones.
Si las pilas están agotadas hasta el nivel 2, aparece escrito - LO - y todas las funciones se desactivan (fig.2).
APAGADO AUTOMÁTICO.
En cualquier modo operativo que no sea una inmersión con función <Dive>, después de tres min utos TUTOR
se coloca en - off- y el display se apaga. En el modo <Simul> el apagado se produce después de 30’.(ver
“simulación de inmersión”).
DIVE
Se selecciona el modo Dive, presionando el pulsador <mode> o mojando los contactos externos.
Este modo comprende cuatro estados operativos que son:
Espera para el inicio de la inmersión: activando el modo - Dive - se visualiza la figura 3. Si en el plazo de 3
minutos no se mide una profundidad efectiva de 1,5 metros por lo menos y si los contactos no están
sumergidos en agua el instrumento se apaga.
Inmersión: cuando se superan 1,5 metros de profundidad efectiva, comienza la inmersión y el cronómetro
inicia a medir el tiempo de ésta. Se visualizan las siguientes funciones:
- depth-: Valor de la profundidad efectiva, en metros (m) o en pies (feet).
- máx depth-: Valor de la profundidad máxima alcanzada. Se visualiza por 3 segundos,
presionando la tecla “Mode”.
- temp-: Valor de la temperatura medida en °C o °F.
- dive time-: Duración de la inmersión, expresada en minutos.
!!
ATENCIÓN
La duración de la pila alcalina es de 3 meses o 50 horas de inmersión aproximadamente,
aunque no use su computador, debe substituir las pilas por lo menos cada 6 meses. Los datos
memorizados se conservan incluso después de la substitución de las pilas.
Vea las instrucciones para substituir las pilas en la pág.92.
!!
ATENCIÓN
Cuando maneja el computador para consultarlo, ponga particular atención en no tocar
simultáneamente con las manos los contactos húmedos ubicados en el costado del computador.
Pues en este caso el computador pasa al modo “dive” impidiendo consultar las demás funciones.
69
ESPAÑOL
Page 72

La memorización de los datos relativos a la inmersión inicia sólo después de haber permanecido por 1 minuto
a una profundidad de 1,5 m.
INMERSIÓN EN LA CURVA DE SEGURIDAD
Cuando la inmersión se mantiene en el interior de la curva de seguridad esto es señalado por la leyenda - no
dec- (no descompresión). El display (fig.4) presenta el valor de tiempo residual de no descompresión con la
leyenda - min- a la profundidad visualizada en - depth-;cuando el tiempo residual es 1 min se activa una señal
acústica. En este tipo de inmersión, si la profundidad alcanzada supera los 10 metros se activa el “Safety
Stop” en el ascenso.TUTOR sugiere una parada de seguridad entre los -3,5 y - 5 metros y el tiempo de “no
dec” es sustituido por “St (stop) 3 min”. (fig.5). Si Ud. sale del campo de profundidad indicado, vuelve a
aparecer el tiempo de “no descompresión” y el tiempo relativo al safety stop se bloquea. Al volver al campo
del safety stop el tiempo de la parada de seguridad parte nuevamente desde el punto en que el cómputo se
había interrumpido. Si usted vuelve a una profundidad superior a los 10 metros, el safety stop no toma en
cuenta la parada efectuada y parte nuevamente desde los 3 minutos.
INMERSIÓN FUERA DE LA CURVA DE SEGURIDAD.
Después de la activación de la alarma, si la profundidad no disminuye, comienza la inmersión fuera de la
curva de seguridad, señalada con la leyenda - no dec- y una alarma acústica. El display substituye las
informaciones referentes al tiempo residual con la profundidad -m- y la duración -min- de la primera etapa de
descompresión; además el valor asc time - indica el tiempo total previsto para el ascenso (fig.6) que
comprende el tiempo de ascenso y los tiempos que hay que respetar en cada etapa de descompresión.
TUTOR controla también que se respeten las etapas de descompresión; dos iconos entre los valores de
profundidad -m- y duración - min- de la etapa de descompresión señalan gráficamente el comportamiento
correcto de la siguiente manera:
2 triángulos= Correcta profundidad para descompresión (fig.8)
Triángulo hacia arriba= Cota de descompresión no alcanzada, ascender (fig.9)
Triángulo hacia abajo= Cota de descompresión superada, descender! (fig.10)
Esta condición provoca una alarma acústica que permanece hasta que se recuperan las condiciones
normales.
Si se supera la etapa en más de un metro y durante más de 3 minutos se activa la modalidad SALTO DE
ETAPA y se enciende el primer aster isco principal. Si después de haber ter minado la inmersión, se desea
efectuar otra inmersión, TUTOR funcionará sólo como profundímetro y el display señalará STOP. Esta
condición permanece por 24 horas.
ASCENSO
Durante el ascenso, en el display aparece una indicación gráfica con 4 valores porcentuales (%) de velocidad
(60, 90, 100, 120) y la leyenda <slow>. Cada valor indica el porcentaje de velocidad actual respecto a la
velocidad prevista.
Las velocidades máximas de ascenso planteadas en TUTOR son las siguientes:
de 99 m a 20 m= 18 metros/minuto
de 20 m a 10 m= 12 metros/minuto
de 10 m a la superficie= 10 metros/minuto
Por ejemplo, si a la profundidad de 9 metros se asciende a una velocidad de 6 m/min en vez de 10 m/min, se
evidencia el valor 60, que indica que la velocidad equivale al 60% de la velocidad máxima admitida. Si la
70
Page 73

velocidad de ascenso es superior en un 20% a la velocidad admitida se evidencian los valores hasta el “120”,
aparece la leyenda <slow> y se activa la alarma acústica. (fig.7)
“Globazo”
El “Globazo”, se produce cuando se asciende demasiado rápidamente, por lo tanto sin respetar la velocidad
de ascenso. Esta condición es señalada por una alar ma acústica y la leyenda <slow>, es decir, “disminuir la
velocidad”.TUTOR considera “globazo” un ascenso conducido a una velocidad superior al 20% de la máxima
velocidad prevista para esa cota y mantenida por lo menos dos tercios de la profundidad desde la cual inicia
la alarma acústica.
Este criterio vale sólo para las alarmas activadas por debajo de una profundidad que varía según la inmersión:
Primera inmersión:
Profundidad superior a los 12 metros; si la profundidad está comprendida entre 8 y 12 metros se activa el
“globazo” sólo si el dive time es superior a los 60 minutos.
Inmersiones sucesivas:
Profundidad superior a los 8 metros.
Si el ascenso veloz se efectúa solamente entre -8 m y la superficie, no se considera “globazo”.Si se disminuye la
velocidad de ascenso hasta que cesa la alarma acústica, el sistema U .B .A no considera el ascenso como “globaz o”.
En caso de “globazo”, al terminar la inmersión aparece en el display la leyenda STOP y si se desea efectuar
otra inmersión el computador funcionará sólo como profundímetro en las próximas 24 horas.
El “globazo” es señalado por el encendido del asterisco principal.
Se puede desactivar el control del “globazo” a través del modo <set>.
EMERSIÓN
La inmersión se suspende y el valor -dive time- se detiene cuando la profundidad es inferior a 1 m. Si en el
plazo de 10 minutos no se baja a más de 1,5 m, TUTOR considera la inmersión concluida y registra sus datos
en el <log book>.
De otro modo reanuda el cómputo.
Una vez terminada la inmersión, TUTOR pasa de la función - dive - a - off- visualizando (Fig.11):
- Icono avión intermitente hasta que el tiempo de no fly, durante el cual no se debe volar, no llega a cero.
- Tiempo de desaturación, hasta que éste no llega a cero.
- UBA, barra de visualización de los errores cometidos.
FUNCIONES EN LA SUPERFICIE (SURF TIME)
Presionando la tecla <mode> en el modo - dive- el instrumento se predispone para las funciones de superficie
(fig.12) dicho estado permanece mientras que la indicación de “no vuelo” está activa .
Los datos que se visualizan son:
- h- y -min- Intervalo de superficie en horas y minutos.
- temp- Visualiza la temperatura corriente en la unidad seleccionada.
- Uba- Barra de visualización de los errores cometidos
- Icono avión - Prohibición de volar.
- Desat- Presionando el pulsador <-> se substituye la información corre
spondiente al tiempo de superficie con la indicación del tiempo de reserva(si existe)
para la desaturación de los tejidos indicado por (“Desat”).
- No fly-: Presionando nuevamente el pulsador <-> se visualiza el tiempo restante sin volar.
71
ESPAÑOL
Page 74

TABLA DE LOS TIEMPOS DE DESATURACIÓN Y TIEMPO “NO FLY”
No siempre la desaturación completa indicada por el computador y efectuada con un cálculo matemático
garantiza que no hay burbujas en circulación. Por consiguiente le aconsejamos respetar los tiempos de “no
vuelo” sugeridos por el computador.
Los tiempos de “no vuelo” indicados por TUTOR son coherentes con las directivas de las asociaciones
didácticas mundiales más importantes y se indican en la tabla que se anexa, considerando el tipo de
inmersión efectuada y los tiempos correspondientes de desaturación:
COMPUT ADOR TUTOR
La sucesiva presión de la tecla <-> hace regresar a la condición inicial con visualización del intervalo de
superficie.
Reloj
Se accede a la función -clock- presionando la tecla <mode> en el estado -dive- o bien en el - surf time- si éste
está activo. El display (fig.13) muestra el año, mes, hora y minutos.
La función reloj no puede activarse durante la inmersión o cuando los contactos húmedos estén activados.
SIMULADOR
Presionando <mode> en el modo -clock- se accede al modo -simul- con el cual se pueden simular
inmersiones teniendo en cuenta el nivel de saturación residual de los tejidos. Si se desea pasar al modo
sucesivo (plan) sin entrar en “simul” presionar la tecla <mode>. Las fases son:
Preinmersión
Función teclas:
Presionar la tecla <-> para el start.
Inmersión:
Función teclas:
Presionando nuevamente la tecla <-> se comienza a simular una inmersión. Presionando la tecla <-> con
impulsos, se baja un metro por cada impulso.Presionándola con impulsos sucesivos es posible simular una
velocidad de descenso de 12 m/minutos. En cambio manteniendo presionada la tecla se baja con una
velocidad de 24 m/min. Presionando la tecla <mode> con impulsos, se asciende 1 metro por cada impulso.
Presionando con impulsos sucesivos, se puede simular una velocidad de ascenso de 12 m/min. En cambio,
NÓICARUTASEDEDOPMEIT"YLFON"OPMEIT
avititeperon"cedon"nóisremnI
saroh21÷0saroh21
saroh21>nóicarutasededopmeiT=
senoisremnio"evidced"
savititeper
saroh42÷0saroh42
saroh42>nóicarutasededopmeiT=
72
Page 75

manteniendo presionada la tecla <mode>, se asciende a 18 m/min. El computador comienza a visualizar los
tiempos de inmersión según el aumento o la disminución de la profundidad.
<mode> y <-> presionados simultáneamente permiten salir del modo simul.
El computador considera la relación de tiempo de 5 segundos reales = 1 segundo del simulador.
Emersión (cuando la profundidad es inferior a un metro el computador se considera en la superficie)
<mode> y <-> presionados simultáneamente permiten salir del modo simul.
Superficie
Cuando después de terminar la simulación de la inmersión, se vuelve a la superficie, el tiempo transcurre
más rápidamente, con una relación 12 minutos reales= 1 minuto y el computador muestra por 1 minuto
aproximadamente, la profundidad máxima alcanzada y el tiempo de inmersión. Una vez transcurrido este
tiempo, se visualiza el “surf -time” (tiempo de superficie). Presionando <-> se pasa a la visualización del
“desat time” (tiempo de desaturación) y del “no fly time”(tiempo de no vuelo).
Para efectuar la simulación de una inmersión sucesiva, esperar el tiempo necesario para llegar al “surf-time”
deseado, luego presionar la tecla <mode> una sola vez y proceder igual que en la primera inmersión,
presionando la tecla <-> para iniciar el nuevo descenso.
Para salir del modo “simul”, presionar <mode> y <-> simultáneamente.
BLOQUEO
En caso de salto de etapa o globazo durante la inmersión, el simulador pasa al estado de bloqueo
visualizando la leyenda STOP.
Para salir del estado de bloqueo, presionar simultáneamente <mode> y <->.
Si la función “globazo” ha sido desactivada (ver “set 5” pág 90), el simulador no se bloquea y no visualiza la
leyenda STOP.
PLANIFICADOR DE INMERSIÓN (PLAN)
Presionando <mode> en el modo <Simul> se accede a la función - plan- (fig.14).
En este modo es posible hacer el scrolling de la curva de seguridad tomando en cuenta automáticamente el
nivel de saturación residual de los tejidos debido a una inmersión precedente.
Presionando la tecla <-> se activa el scrolling de la curva y tendremos:
- depth-= presionando la tecla <-> la profundidad efectiva avanza con pasos de 3 metros
hasta 48 metros.
-no dec-= En cada valor de profundidad se visualiza el valor correspondiente de tiempo
durante el cual es posible parar, sin necesidad de una descompresión sucesiva.
No pueden planificarse inmersiones repetitivas con descompresión.
LOG BOOK
Del modo -plan- se accede al modo - log book - que muestra los datos de memoria cronológica, es decir el
total de las inmersiones efectuadas, la temperatura mínima registrada en la inmersión (en forma alternada),
las horas totales de inmersión y la profundidad máxima alcanzada. (fig.15)
73
ESPAÑOL
Page 76

Presionando la tecla <-> el display se presenta como en la figura 16, presentando la primera página de la
última inmersión. Las páginas llegan a 20. En la primera página se indica el número progresivo de las
inmersiones (Nº1=última inmersión efectuada), el día el mes y la hora de la inmersión. Presionando <-> se
accede a la segunda página (fig.17)
En ésta se indica la profundidad máxima alcanzada en la inmersión, la duración global, la barra UBA, la
máxima velocidad de ascenso alcanzada, la violación de las etapas de descompresión, - no dec- para las
inmersiones dentro de la curva de seguridad , - dec- para las inmersiones fuera de la curva de seguridad y
temperatura mínima de la inmersión.
Es posible obtener un perfil completo de las últimas 10 inmersiones.
Presionando 2 segundos la tecla <-> se activa la modalidad de visión del perfil de la inmersión deseada.Cada
presión de la tecla <-> hace avanzar el tiempo de la inmersión con su respectiv a profundidad.P ara interrumpir
la visualización y pasar a la inmersión sucesiva basta presionar la tecla <mode>.
SETUP
- set 1- reloj
- set 2- altura
- set 3- unidad de medida temperatura
- set 4- unidad de medida profundidad
- set 5- globazo
- set 6- puesta a cero de la memoria de Nitrógeno
Se accede a SETUP (fig.18) presionando la tecla <mode> en el modo -log book -. Si desea entrar en esta
función, presione nuevamente el pulsador <mode> por 2 segundos hasta que aparece la leyenda - set 1- que
indica la función reloj. Para pasar a la función sucesiva (modo “dive”) debe presionar nuevamente la tecla
<mode> y soltarla enseguida. Las posibilidades operativas del modo - set - son:
- set 1 - Setup reloj y fecha (fig.19)
Presione el pulsador <mode> por 2 segundos.
Al abrir la función reloj aparecen la fecha la hora y los minutos, que encenderán de forma intermitente.
Presionando la tecla <-> la cifra intermitente aumentará. Cuando se ha alcanzado el dato correcto la tecla
<mode> lo memoriza y la intermitencia pasa a las cifras que indican las horas y así sucesivamente.Después
de haber programado también el reloj, presionando la tecla <mode> se pasa al set sucesivo.
- Set 2- Setup Altura (fig.20)
Al activar esta función se visualiza la leyenda -set2- y la altura actualmente seleccionada (PO,P1,P2).
Presionando la tecla <-> se habilita el valor de altura sucesivo al actual.
La presión de la tecla <mode> lleva al set sucesivo.
- set 3- Setup unidad de medida temperatura (fig.21)
Al activar esta función se visualiza la indicación de temperatura actualmente seleccionada use la tecla <->
para modificar el tipo de unidad de medida.
- set 4- Setup unidad de medida de profundidad (fig.22).
Al activar esta función se visualiza la indicación de profundidad actualmente seleccionada, use la tecla <->
para modificar la unidad de medida.
Para modificar los valores que aparecen intermitentes, basta presionar la tecla <->. Presionando la tecla
<mode> se pasa al set sucesivo.
74
Page 77

- set 5 - Setup después de un globazo (fig.23)
Al activar esta función se visualiza la selección actual para el control del globazo. Si el control está habilitado
aparece “on” si no lo está aparece “off”. Esta función particular permite desactivar el “stop” en caso de
globazo” (pág.84) y puede usarse, por ejemplo, para los ejercicios de ascenso de emergencia.
Para modificar la selección presionar la tecla <->.Presionando la tecla <mode> se pasa al set sucesivo.
- set 6- Puesta a cero de la memoria del Nitrógeno.(fig.24).
Para poner a cero el contenido presionar por más de 3 segundos la tecla <-> hasta que aparece la leyenda
0000. La conclusión de la fase Setup y el paso a la modalidad operativa sucesiva (modo <dive>) se producirá
por efecto de la operación precedente o presionando <mode>(salida sin puesta a cero del Nitrógeno).
CONEXIÓN CON PC
Mediante una interface específica (MK2131) es posible transferir los datos desde la memoria cronológica del
Dive Computer a un personal computer dotado de sistema operativo Windows. El software de interface guía
al usuario para la activación de la conexión entre TUTOR y PC. La introducción de TUTOR en la caja
específica de interface debe producirse sólo después de la señalización del programa. Si la introducción se
produce antes, el computador de submarinismo pasar al modo dive y no al modo PC. Estamos en la
modalidad PC cuando aparece escrito PC en la parte central izquierda del display y se escucha
simultáneamente un bip al aparecer la leyenda. Durante la descarga de los datos el usuario ve unos
números (por ej. 84) en el display; estos números son códigos de mando.
!!
ATENCIÓN
Antes de conectar el computador al soporte de interface limpiar bien los contactos.
!!
ATENCIÓN
Esta función pueden usarla sólo los submarinistas expertos. El usuario que usa la función de
puesta en cero de la memoria del Nitrógeno residual no puede usar el instrumento para
inmersiones repetidas. No sumergirse con TUTOR puesto a cero si se han efectuado
inmersiones en las 24 horas precedentes.
!!
ATENCIÓN
Esta función pueden usarla sólo los submarinistas particularmente expertos, que se asumen la
responsabilidad total por la desactivación del "stop"
75
ESPAÑOL
Page 78

DESPUES DE LA INMERSION
SEÑALIZACIÓN DE LOS ERRORES UBA SYSTEM
Para su seguridad, el display de TUTOR está dotado de una barra gráfica que informa sobre los errores
cometidos o sobre los comportamientos potencialmente peligrosos durante la inmersión. Los errores son
señalados por asteriscos y permanecen visualizados hasta la inmersión sucesiva.
Asteriscos principales (errores graves) (fig.25)
Salto de etapa, globazo.
Asteriscos secundarios - comportamientos prohibidos para el submarinista deportivo (fig.26):
Inmersión repetida a menos de dos horas de la precedente, deco dive, profundidad superior a los 40 metros,
inmersión repetida más profunda que la precedente, profundidad de la inmersión repetida superior a los 30
metros, velocidad de ascenso excesiva. Para saber cuál es el error cometido, consultar el log-book.
CUIDADO Y MANTENIMIENTO
El TUTOR es un instrumento par ticularmente robusto, ha sido proyectado para soportar sin problemas los
esfuerzos normales de la actividad de submarinismo. En todo caso conviene someterlo a los cuidados que
merecen todos los instrumentos de precisión, evitando golpes violentos, exposiciones prolongadas al sol,
contacto con objetos puntiagudos. Para su mantenimiento normal basta enjuagar lo en agua dulce al final de
cada inmersión. Si es necesario, lávelo con jabón neutro. No use detergentes, alcohol, gasolina o spray.
Los pulsadores no necesitan mantenimiento particular ; no los lubrique con aceites o spray.
Si se presentan anomalías de cualquier tipo, no use el instrumento y llévelo para un control a un centro de
asistencia autorizado MARES.
SUSTITUCIÓN DE LA PILA
La sustitución de la pila es una operación muy sencilla, que no necesita la intervención de personal
especializado. Desator nille con una moneda el tapón hermético y sustituya la pila cuidando, al colocar la
nueva pila, que ésta quede dispuesta con la polaridad correcta. El alojamiento de la pila es estanco y no está
en comunicación con el corazón del instrumento. Si entra agua accidentalmente, basta secarlo
cuidadosamente, eliminando cualquier huella de humedad antes de colocar nuevamente la pila.
Antes de volver a cerrar la tapa del alojamiento de la pila, controle el buen estado de la guarnición, controle
que esté perfectamente limpia y aplique una película de grasa de silicona.
No tire al mar las baterías agotadas!
!!
ATENCIÓN
No sustituya la pilas en los primeros 5 minutos sucesivos a la inmersión. La sustitución anticipada
cancela la memoria de los datos de la inmersión que se acaba de concluir.
Recuerde, entodo caso, que después de la sustitución de la pila,se pierden las informaciones relativ as
al nitrogeno residual, al tiempo de desaturación y al tiempo de no vuelo. Por lo tanto hay que tomar
nota de estos datos antes de sustituir la pila.No sustituya la pila durante las inmersiones repetitiv as.
76
Page 79

SÍMBOLOS Y TÉRMINOS TÉCNICOS.
°C Grados centígrados o Celsius
°F Grados Farenheit (100°C - 212°F)
% Porcentaje de la velocidad de ascenso
min Minutos
‘ Minutos
“ Segundos
hHora
m Metro
FT feet = pie (1 pie = 30,48 cm)
LO Low = bajo (se refiere a la reserva de las pilas)
PC Personal Computer
asc time Tiempo total de ascenso
U.B.A. Underwater behaviour analysys (análisis del comportamiento durante la inmersión)
cieling Techo (profundidad mínima que no se debe superar en la descompresión)
clock Reloj
dec Descompresión
deco Descompresión
desat Desaturación
depth Profundidad
display Pantalla
dive Inmersión
dive time Tiempo de inmersión
log book Registro de las inmersiones
max depth Profundidad máxima alcanzada
mode Modo, modo operativo
no dec No descompresión
no fly No volar
plan Planificador
scrolling Visualización de la curva de seguridad
set-set up: Regular, ajustar
simul Simulador
slow Despacio
surf Superficie
surf time Tiempo en superficie
temp Temperatura
time Tiempo
yoyó Perfil de inmersión con notables saltos de cota.
77
ESPAÑOL
Page 80

78
COMPUT ADOR TUTOR
ÍNDICE GERAL
Introduçãopág. 79
Regras do mergulhador responsável pág. 79
Advertências e Normas de Segurançapág. 80
Características técnicas e funcionamento pág. 83
Teste automático pág. 84
Teste da bater ia pág. 84
Desligamento automático pág. 84
Mergulho pág. 84
Mergulho na curva de segurança pág. 85
Mergulho fora da curva de segurança pág. 85
Subida pág. 85
Subida com velocidade não controlada pág. 86
Emersão pág. 86
Funções em superfície (Surf time) pág. 86
Tabela tempos de dessaturação e tempo "no fly" pág. 87
Simulador de mergulho (Simul) pág. 87
Bloqueio pág. 88
Planejador de mergulhos (Plan) pág. 88
Memória (Log book) pág. 88
Regulagem (Setup) pág. 89
-set1-relógio pág. 89
-set2-altitude pág. 89
-set3-unidade de medida da temperatura pág. 89
-set4-unidade de medida da profundidade pág. 89
-set5-subida com velocidade não controlada pág. 89
-set6-função "reset" da memória de nitrogênio pág. 90
Interface com o micro pág. 90
Depois do mergulho pág. 91
Sinalização de erros - sistema U.B.A. pág. 91
Manutençãopág. 92
Substituição da bateria pág. 92
Símbolos e termos técnicos pág. 93
Page 81

COMPUTADOR DE MERGULHO TUTOR
Parabéns. Seu novo computador de mergulho é fruto da mais moderna tecnologia processada pela Mares,
projetado para lhes garantir a máxima segurança, eficiência, confiança e durabilidade. Este manual possui
todas as instruções para seu funcionamento e o uso de suas funções. A Mares agradece pela confiança
recebida com a escolha deste instrumento e recomenda a qualquer mergulhador o respeito de suas
indicações e um comportamento responsável e cauteloso.
Regras do mergulhador responsável
• Planejar cada mergulho
• Nunca ir além dos próprios limites e da própria preparação e experiência
• Iniciar cada mergulho atingindo logo a maior profundidade programada
• Consultar com freqüência o computador durante o mergulho
• Respeitar a velocidade de subida pedida pelo computador
• Efetuar sempre uma parada prudencial de pelo menos 3' a uma profundidade entre -5 e -3 metros
• Subir muito devagar à superfície depois da parada de descompressão
• Evitar os mergulhos tipo io-io (subidas e descidas repetidas)
• Evitar esforços durante o mergulho e na primeira meia hora após a subida
• Em águas frias, ou depois de esforços em imersão, subir antes de alcançar os limites de não
descompressão. No caso de mergulhos fora da curva de segurança estender a etapa de descompressão
mais perto da superfície
• Alternar os mergulhos com intervalos de superfície sempre superiores à duas horas
• O mergulho mais profundo deve ser o primeiro do dia
• Evitar mergulhar antes de usar a função “reset”do computador depois do mergulho do dia anterior
• Em caso de mergulhos diários repetidos, respeitar pelo menos um dia de descanso por semana. Em caso
de mergulhos com etapas de descompressão, é aconselhável efetuar um dia de descanso a cada três dias
de mergulhos.
• Não mergulhar fora da curva e além de -40 metros (-130 pés) sem treinamento profissional específico para
este tipo de mergulho.
• Não efetuar "mergulhos quadrados" repetidos (mergulhos à mesma cota) além de 18 metros de
profundidade.
• Depois de um mergulho, respeitar sempre um período de descanso de pelo menos 12 horas ou melhor de
24 horas antes de voar, em conformidade com o Divers' Alert Network.
• Cada mergulho provoca um risco de dores de descompressão mínimo. Nenhum tipo de computador, nem
o TUTOR, pode eliminar completamente o risco de dores de descompressão, at é no respeito de todas as
operações de segurança.
• Os mergulhadores inexperientes neste tipo de mergulho profissional devem mergulhar sempre dentro dos
limites da curva de segurança indicados pelo TUTOR.
• Efetuar a subida alguns minutos antes de alcançar os limites de mergulho fora da curva, mantendo uma
margem de tempo suplementar em caso de mergulhos em águas fr ias, mergulhos repetidos a
profundidades além de 18 metros, ou em caso de mergulhos que necessitam de um esforço físico
considerável, para evitar que aumente o risco de dores de descompressão.
• Iniciar cada mergulho à cota mais profunda programada e efetuar uma subida gradual durante o mergulho,
para evitar que aumente o risco de dores de descompressão.
79
PORTUGUÊS
Page 82

ADVERTÊNCIAS E NORMAS DE SEGURANÇA
Antes de mergulhar é indispensável a leitura deste manual com muita atenção para conhecer o
funcionamento de seu equipamento e poder efetuar testes.
A segurança durante o mergulho pode ser garantida somente por uma preparação adequada.
A MARES recomenda a utilização de um computador somente após ter freqüentado um curso em uma escola
de mergulho.
Os mergulhos esportivos devem ser ef etuados dentro da curva de segur ança e à profundidade máxima de 40
metros. A MARES recomenda o respeito dos limites de profundidade do próprio nível de formação. Os
mergulhos além de 40 metros ou fora da curva de segurança aumentam consideravelmente os riscos de
acidentes de descompressão.
A MARES recomenda o respeito cauteloso das simples regras de comportamento especificadas na seção
"Regras do mergulhador responsável".
Não comprimir o TUTOR em câmaras hiperbáricas. O instrumento pode danificar-se gravemente quando não
estiver imerso em água
!!
ADVERTÊNCIA
Não voar nas 24 horas sucessivas ao último mergulho e, de qualquer forma, esperar até o
desaparecimento do ícone <avião> do TUTOR.
!!
ADVERTÊNCIA
Mergulhar em lagoas de montanha somente depois de ter ajustado o programa para a altitude
atual.
!!
ADVERTÊNCIA
Não mergulhar quando o ícone <bateria> do TUTOR indicar uma baixa carga residual.
Substituir as baterias. Não mergulhar quando as indicações do instrumento estiverem
irregulares e pouco claras.
!!
ADVERTÊNCIA
Além do computador, devem ser utilizados também um profundímetro, um manômetro, um
cronômetro, um relógio e as tabelas de descompressão.
!!
ADVERTÊNCIA
O TUTOR pode ser utilizado somente por mergulhos esportivos e recreativos. Não deve ser
utilizado para operações de caráter profissional.
!!
ADVERTÊNCIA
O computador não previne eventuais problemas de descompressão.
O computador não pode considerar as condições físicas individuais de cada mergulhador que,
de um dia para outro, podem ser diferentes. Para sua segurança, efetuar um controle geral de
seu estado de saúde antes de mergulhar.
80
Page 83

!!
ADVERTÊNCIA
NÃO utilizar o TUTOR se não possuir a licença e sem ter antes lido e compreendido o manual
de operações. O uso correto do TUTOR pode reduzir o risco de dores de descompressão, mas
nenhum computador pode eliminar completamente este risco.
!!
ADVERTÊNCIA
Efetuar SEMPRE uma parada prudencial de 3/5 minutos a uma cota entre 5 e 7 metros depois
de cada mergulho, independentemente das informações fornecidas pelo TUTOR. Esta parada
reduz o risco de dores de descompressão.
!!
ADVERTÊNCIA
NUNCA utilizar o TUTOR para mergulhos tipo "io-io" (subidas e descidas repetidas) pois
podem provocar dores de descompressão, independentemente das informações fornecidas
pelo TUTOR.
!!
ADVERTÊNCIA
NUNCA utilizar o TUTOR, ou qualquer outro computador de mergulho, para mergulhos
quadrados repetidos (mergulhos a cotas de profundidades idênticas ou parecidas) além de 18
metros. Estes mergulhos apresentam muitos riscos e podem provocar dores de
descompressão independentemente das informações fornecidas pelo TUTOR.
!!
ADVERTÊNCIA
NUNCA MERGULHAR além de -40 metros e nunca programar mergulhos fora da curva de
segurança com o TUTOR sem possuir a licença de mergulhador profissional (IANTD,TDI, ANDI,
PSA, etc.), o perfeito conhecimento dos riscos e das capacidades necessárias para os
mergulhos ARA e a licença específica para os mergulhos em profundidade ARA além de -40
metros. Este tipo de mergulho apresenta um grande risco de dores de descompressão até para
os mergulhadores mais qualificados e experientes, mesmo utilizando instrumentos ou
computadores específicos.
Antes de efetuar este tipo de mergulho, é necessário conhecer perfeitamente os riscos
envolvidos.
!!
ADVERTÊNCIA
Não utilizar o TUTOR para mergulhos efetuados com gases respiratórios diferentes do ar
atmosférico.
81
PORTUGUÊS
Page 84

1 = Pulsador <mode>
2 = Pulsador <->
3 = Profundidad actual
Profundidad máxima
Día (
función clock
)
Set (
función set
)
4 = Tiempo de inmersión
Mes (función clock)
5 = Tiempo no dec
Deco stops
Hora (
función clock
)
Tiempo de superficie
Tiempo “no fly”
Tiempo de desaturación
6 = Temperatura (
para inmersiones no dec
)
Tiempo total de ascenso
(
para inmersiones con descompesión
)
N° inmersiones (
función log book
)
Año (
función clock
)
7 = % velocidad de ascenso
8 = Sistema UBA
9 = Nivel de altura
10 = Luz testigo “no fly”
11 = Luz testigo pilas agotadas
12 = Unidad de medida de profundidad
13 = Unidad de medida de temperatura
82
Page 85

Características técnicas e funcionais
• Algoritmo Haldane Modificado
• Número de tecidos 9
• Tempos de hemisaturação de 2,5 até 480 minutos
• Profundidade Máxima 99 metros (325 pés)
• Resolução 0,1 m
• Calibragem (prof) água doce
• Programas altitude três, P0 (0-700 m.), P1 (700- 1500 m.),
P2 (1500-2400 m.)
• Paradas de descompressãoaté 24 metros
• Velocidade de subida de 10 até 18 m/min.
• Alarmes sonoros bateria fraca
etapa de descompressão violada
velocidade de subida excessiva
saída da curva
• Memória histórica Número de mergulhos efetuados
Horas de mergulho efetuadas
Profundidade máxima alcançada
• Mergulhos no log book 20
• Dados armazenados Ano, mês, dia, hora do mergulho
duração
profundidade máxima
programa altitude
violação da etapa
desc/não desc
violação velocidade máx. de subida
UBA
temperatura mínima
• Perfil de mergulhos 10 mergulhos
• Dados armazenados para cada ponto profundidade máxima alcançada por minuto
velocidade de subida violada
etapa violada
• Paginação (scrolling) curva de segurança de 12 até 48 metros
• Interface com PC/Windows com adaptador serial RS 232
• Parâmetros reguláveis pelo usuário relógio
°C/°F
metros/pés
programa altitude
velocidade de subida não controlada (sim/não)
função reset da memória de nitrogênio
• Alimentação 1 bateria alcalina 1,5V (tipo AAA)
• Autonomia aproximadamente 3 meses ou 60 horas
83
PORTUGUÊS
Page 86

TESTE AUTOMÁTICO (SELF CHECK)
O TUTOR pode ser ligado através dos botões ou, automaticamente, ao entrar na água (molhando-se os
contatos).
Ao utilizar os botões, ou depois da substituição da bateria, o instrumento efetua o diagnóstico automático, o
controle bateria-fraca e todas as indicações da tela iluminam-se por dois segundos (fig.1); quando tudo
funciona corretamente, o dispositivo se estabelece automaticamente no modo DIVE.
Ao utilizar o instrumento automaticamente, o TUTOR considera os dados mais recentes obtidos durante a
leitura anterior (Autozero-última leitura da pressão ambiente) e passa diretamente ao modo DIVE.O autozero
é efetuado automaticamente cada 2 minutos mesmo com o dispositivo desligado.
CONTROLE DA BATERIA (BATTERY CHECK)
Em caso de bateria fraca, nível 1, o ícone da bateria fica iluminado.Com este sinal, ainda é possível realizar
dois mergulhos. No entanto, se as baterias estão no nível 2, as letras -LO- aparecem na tela e todas as
funções são desativadas (fig. 2).
DESLIGAMENTO AUTOMÁTICO
Quando o computador não estiver imerso, em modo DIVE ou em qualquer outro modo oper acional, o TUTOR
passa automaticamente ao modo <OFF> e a tela se desliga após três minutos. No modo <simul> o
instrumento se apaga depois de 30' (vide "simulador de mergulho").
MERGULHO (DIVE)
Para selecionar o modo DIVE, apertar uma vez a botão <MODE> ou molhar os contatos exter nos. Assim, o
TUTOR passa pelos seguintes modos operacionais:
Tempo de espera até o início do mergulho: ao ativar o modo –DIVE– (fig. 3) o instrumento desliga-se
automaticamente após 3 minutos caso não seja levado até uma profundidade mínima de 1,5 m. ou se os
contatos não forem imersos em água.
Mergulho: após a profundidade de 1,5 m., o cronômetro é acionado e começa a marcar o tempo de
mergulho.Na tela visualizam-se as seguintes indicações:
<depth> valor da profundidade efetiva em metros (m.) ou em pés (ft)
<max depth> valor da profundidade máxima alcançada. Apertar o botão <mode> para
visualizar este valor por aproximadamente 3 segundos.
<temp> valor da temperatura, em °C ou em F
<dive time> duração do mergulho em minutos.
!!
ADVERTÊNCIA
A duração da bateria alcalina é de aproximadamente 3 meses ou 60 horas de mergulho.Mesmo
sem utilização contínua, é necessário substituir a bateria do computador a cada 6 meses. Os
dados armazenados na memória serão conservados mesmo depois da troca da bateria. Para
informações sobre a substituição da bateria vide instruções especificadas na pág. 101.
!!
ADVERTÊNCIA
Se, ao astudar o funcionamento do computador, acontecer de você tocar acidentalmente os
contatos localizados na parte lateral do computador, o computador assumirá o modo <dive>,
tornando impossível a consulta de outras funções.
84
Page 87

Os dados começam a ser armazenados na memória após a permanência de um minuto à uma profundidade
superior a 1,5 m.
MERGULHO NA CURVA DE SEGURANÇA
Quando o mergulho permanece no interior da cur va de segurança, a tela mostra a mensagem -no dec- (não
descompressão). A tela (fig. 4) apresenta o valor de tempo residual de não descompressão com as letras min-; a profundidade é visualizada em -depth-; quando o tempo residual for 1 minuto ativa-se um alarme
sonoro. Neste tipo de mergulho, se a profundidade alcançada supera os 10 metros, ativa-se o "Safety Stop"
(parada de segurança) durante a subida, o TUTOR sugere uma parada de segurança à uma profundidade
entre -3,5 e -5 metros e a mensagem de não descompressão é substituída por "St (stop) 3 min" (fig. 5). Ao
sair do campo de profundidade acima indicado, aparece novamente o tempo de não-descompressão,
enquanto o tempo relativo à parada de segurança bloqueia-se. Entrando novamente no campo da parada de
segurança, o tempo da parada de segurança começa novamente do ponto de interrupção. Ao exceder
novamente uma profundidade de 10 metros, a parada de segurança não considera a parada efetuada e
recomeça em 3 minutos.
MERGULHO FORA DA CURVA DE SEGURANÇA
Se, depois da ativação do alarme, o mergulhador não subir até uma profundidade menor, inicia-se o
mergulho fora da curva de segurança. A mensagem -no dec- desaparece e um alarme sonoro é acionado.
Na tela, no lugar da indicação de tempo residual, aparece a profundidade -m- e a duração -min- da primeira
etapa de descompressão junto com o valor -asc time- (fig.6) que inclui o tempo total previsto para a subida e
os tempos que devem ser observados às profundidades das etapas. O TUTOR também verifica as etapas de
descompressão: dois ícones entre os valores de profundidade -m- e duração -min- da etapa de
descompressão assinalam graficamente o comportamento necessário, indicando:
2 triângulos = profundidade correta para descompressão (fig. 8)
triângulo para cima = cota de descompressão não alcançada, subir novamente (fig. 9)
triângulo para baixo = cota de descompressão superada, descer! (fig. 10)
Esta condição provoca um alarme sonoro que permanece acionado até voltar às condições normais.
Se o valor da superação da cota de descompressão f or superior a 1 metro e durar por mais de 3 minutos ativase o modo "COTA EXCEDIDA" e acende-se o primeiro asterisco principal. Ter minado o mergulho, querendo
fazer outro mergulho, o TUTOR funcionará somente como profundímetro e na tela aparecerá a palavra STOP.
Esta condição permanece por 24 horas.
SUBIDA
Durante a subida, aparece na tela uma indicação gráfica com 4 valores percentuais (%) de velocidade (60,
90, 100, 120) e a palavra <slow>.Cada valor indica a porcentagem de subida atual em relação à velocidade
prevista.
As velocidades máximas de subida previstas pelo TUTOR são as seguintes:
de 99 m. a 20 m. = 18 m./min.
de 20 m. a 10 m. = 12 m./min.
de 10 m. até a superfície = 10 m./min.
Por exemplo, se à uma profundidade de 9 m. subirmos à 6 m./min. e não à 10 m./min., o primeiro valor se
destaca, para indicar que a velocidade atual é igual a 60% da velocidade máxima permitida.Se a velocidade
de subida é superada de mais de 20%, se destacam os valores até "120", a palavra <slow> aparece e ativase o alarme sonoro (fig. 7).
85
PORTUGUÊS
Page 88

SUBIDA COM VELOCIDADE NÃO CONTROLADA
A "subida com velocidade não controlada" ocorre quando não é respeitada a velocidade de subida. Esta
condição é assinalada por um alarme sonoro e pela palavra -slow-, ou seja "reduzir a velocidade".O TUTOR
considera "subida com velocidade não controlada" uma subida efetuada com velocidade superior a 20% da
velocidade máxima prevista para aquela faixa de profundidade e estendida por pelo menos os 2/3 da
profundidade, quando aciona o alarme sonoro.
Este critério é valido somente para alar mes ativados abaixo de uma profundidade que varia de acordo com o
mergulho.
Primeiro mergulho:
Profundidade maior que 12 metros; se a profundidade está entre 8 e 12 metros ativa-se a "subida com
velocidade não controlada" somente se o tempo de mergulho (dive time) for superior a 60 minutos.
Mergulhos sucessivos:
Profundidade maior que 8 metros.
Em caso de subida rápida entre -8 m.e a superfície, o TUT OR não a considera como "subida com velocidade
não controlada". Se a velocidade de subida diminuir até o alarme sonoro parar, o sistema U.B.A. não
considera a subida como "subida com velocidade não controlada".
Em caso de "subida com velocidade não controlada", acabado o mergulho, a palavra STOP aparece na tela
e, se desejar mergulhar novamente nas 24 horas sucessivas, o computador funcionará somente como
profundímetro.
Em caso de "subida com velocidade não controlada", visualiza-se o asterisco principal.
É possível desativar o controle da "subida com velocidade não controlada" através do modo <set>.
EMERSÃO
O mergulho e o valor -dive time- são interrompidos à profundidade de 1 m. Se, dentro de 10 minutos o
mergulhador não voltar a descer a -1,5 m., o TUTOR considera o mergulho terminado e armazena os dados
no log book. Em caso contrário, o mergulho prossegue e o TUTOR continua a contagem.
Ter minado o mergulho, o TUTOR passa da função -dive- à função -off- e na tela aparecem os seguintes
dados (fig. 11):
- ícone aéreo intermitente até que o tempo no fly (tempo em que não se deve voar) for zero;
- tempo de dessaturação até que este seja zero;
- UBA, barra de visualização dos erros cometidos.
AS FUNÇÕES EM SUPERFÍCIE (SURF TIME)
Quando apertar o botão <mode> com o TUTOR em modo -dive-, o instrumento passa automaticamente para
as funções em superfície (fig.12). Este modo permanece ativado até o desaparecimento da indicação "no fly"
(não vôo). Os dados visualizados são os seguintes:
<h> e <min> inter valo de superfície em horas e minutos
<temp> visualiza a temperatura atual na unidade de medida escolhida
<U.B.A.> barra de visualização dos erros cometidos.
<ícone aéreo> proibido voar
<desat> apertar o botão <-> para substituir a informação relativa ao intervalo de superfície
com a indicação do tempo residual (se existir) para a dessaturação dos tecidos
assinalada pelo valor de -Desat-.
<no fly> aper tar novamente o botão <-> para visualizar o tempo de “não vôo”
86
Page 89

TABELA TEMPOS DE DESSATURAÇÃO E TEMPO "NO FLY
A dessaturação completa assinalada pelo computador e efetuada com cálculo matemático nem sempre
corresponde à certeza de ausência de microbolhas em circulação. Por conseguinte, é aconselhável respeitar
os tempos de "proibido voar" sugeridos pelo computador.
Os tempos de "no fly" indicados pelo TUTOR correspondem às normas das associações didáticas mais
importantes a nível mundial e são indicados na tabela abaixo, em função do tipo de mergulho efetuado e dos
relativos tempos de dessaturação.
COMPUT ADOR TUTOR
Para visualizar a condição inicial do intervalo de superfície, apertar repetidamente o botão <->.
Relógio
Apertar o botão <MODE> para passar do modo <dive> ou <surf time> ao modo <Clock>. A tela (fig. 13)
visualiza o ano, o dia, o mês, as horas e os minutos.
SIMULADOR DE MERGULHO (SIMUL)
Apertar o botão <MODE> para passar do modo <clock> ao modo <simul> para simular mergulhos
considerando o nível de saturação residual dos tecidos. Apertar o botão <MODE> para passar do modo
<clock> ao modo sucessivo <plan> sem entrar no modo <simul>. As fases são as seguintes:
Antes do mergulho
Função dos botões:
Apertar o botão <-> para iniciar.
Mergulho
Função dos botões:
Apertar novamente o botão <-> para iniciar a simulação de um mergulho. Aper tar o botão <-> com impulsos
repetidos:cada impulso corresponde a 1 metro de descida.Apertar o botão <-> com impulsos sucessivos para
simular uma velocidade de descida de 12 m/minuto. Apertar o botão com continuidade para descer a uma
velocidade de 24 m/minuto. Apertar a tecla <mode> com impulsos repetidos, para subir de 1 metro para cada
impulso. Aper tar com impulsos sucessivos para simular uma velocidade de subida de 12 m/min. Aper tar o
botão <mode> para subir a 18 m/min.O computador inicia a visualização dos tempos de mergulho em função
do aumento ou da diminuição de profundidade.
OÃÇARUTASSEDEDOPMET"YLFON"OPMET
oditeperoãn"cedon"ohlugreM
saroh21÷0saroh21
saroh21>oãçarutassededopmeT=
soditepersohlugremuo"evidced"
saroh42÷0saroh42
saroh42>oãçarutassededopmeT=
87
PORTUGUÊS
Page 90

Apertar simultaneamente os botões <mode> e <-> para sair do modo <simul>.
O computador considera a relação 5 segundos reais = 1 segundo do simulador.
Emersão (o computador considera a profundidade inferior a um metro como superfície)
Apertar ao mesmo tempo os botões <mode> e <-> para sair do modo simul.
Superfície
Em superfície, uma vez terminada a simulação do mergulho, o tempo passa mais rapidamente com uma
relação de 12 minutos reais = 1 minuto do simulador e o computador mostra, por aproximadamente 1 minuto,
a profundidade máxima alcançada e o tempo de mergulho. Em seguida, o "surf-time" (tempo de superfície)
aparece na tela. Apertar o botão <-> para passar à visualização do "desat time" (tempo de dessaturação) e
do "no fly time" (tempo em que é proibido voar).
Para efetuar outra simulação de mergulho, esperar o tempo necessário para obter o "surf-time" desejado,
apertar o botão <mode> uma vez e efetuar as mesmas operações do primeiro mergulho, apertando a tecla
<-> para iniciar um novo mergulho.
Apertar os botões <mode> e <-> ao mesmo tempo para sair do modo "simul".
BLOQUEIO
Em caso de pulo de faixa ou de "subida com velocidade não controlada" durante o mergulho, o simulador
bloqueia-se e a palavra STOP aparece na tela.
Apertar ao mesmo tempo <mode> e <-> para desbloquear o instrumento.
Em caso de desativação da função "subida com velocidade não controlada" (vide "set 5" pág. 108), o
simulador não fica bloqueado e a palavra STOP não aparece.
PLANEJADOR DE MERGULHOS (PLAN)
Apertar o botão <mode> para passar do modo <Simul> ao modo <Plan> (fig. 14).No modo <plan> é possível
efetuar a paginação (scrolling) da curva de segurança considerando automaticamente a eventual saturação
residual dos tecidos depois de um mergulho anterior.
Apertar o botão <-> para ativar a paginação da curva e ter os seguintes valores:
-depth- = apertar o botão <-> para avançar a profundidade efetiva de três em três metros até 48 m.
-no dec- = para cada valor da profundidade, visualiza-se o correspondente valor de tempo para o qual é
possível parar sem a necessidade de uma descompressão sucessiva.
MEMÓRIA (LOG BOOK)
É possível passar do modo -plan- ao modo -log book- que mostra os dados da memória histórica, ou seja o
número total dos mergulhos efetuados, a temperatura mínima nunca registrada durante o mergulho (que se
alternam), as horas totais de mergulho e a profundidade máxima alcançada (fig. 15).
Quando apertar o botão <->, a tela apresenta-se como na figura 16, visualizando a primeira página do último
mergulho.As páginas chegam a 20.Os mergulhos são indicados em ordem regressiva (n.1 = último mergulho
efetuado), o dia, o mês e a hora de mergulho. Apertar <-> para passar à segunda página (fig. 17). Nela será
indicada a profundidade máxima alcançada durante o mergulho, a duração total, a barra UBA, a velocidade
máxima de subida alcançada, a violação das etapas de descompressão, -no dec- para mergulhos em curva,
-deco- para os mergulhos fora da curva, a temperatura mínima de mergulho. Para os últimos dez mergulhos
é possível ter um perfil completo. Aper tar o botão <-> por dois segundos para ativar o modo de visualização
do perfil do mergulho desejado. Apertar o botão <-> para passar ao tempo do mergulho com a relativa
profundidade. Para interromper esta visualização e passar ao mergulho sucessivo basta apertar o botão
<mode>.
88
Page 91

REGULAÇÃO (SETUP)
-set 1- relógio
-set 2- altitude
-set 3- unidade de medida da temperatura
-set 4- unidade de medida da profundidade
-set 5- subida com velocidade não controlada
-set 6- função "reset" da memória de nitrogênio
Do -log book- apertar o botão <mode> para ativar a função SETUP (fig. 18).Para entrar nesta função apertar
o botão <mode> mais uma vez por aproximadamente dois segundos até o aparecimento da palavra -set 1que indica a função relógio.Para passar à função sucessiva (modo "dive") é necessário apertar novamente o
botão <mode> e liberá-lo.As possibilidades operacionais do modo -set- são as seguintes:
-set 1- Ajuste do relógio e da data (fig. 19)
Apertar o botão <mode> por aproximadamente dois segundos.
Com a função relógio ativada, aparecem a data, a hora e os minutos que ficam piscando. Apertar o botão <> para aumentar o valor que está piscando .Quando for alcançado o dado correto, o botão <mode> armazena
o valor e passa para aos valores das horas e assim em diante.Terminada a programação do relógio, apertar
o botão <mode> passando para o próximo ajuste.
-set 2- Ajuste da altitude (fig. 20)
Com a função altitude ativada, visualiza-se a palavra -set2- e a altitude atualmente selecionada (P0, P1, P2).
Apertar o botão <-> para passar ao valor de altitude sucessivo àquele atual. Apertar o botão <mode>
passando para o ajuste seguinte.
-set 3- Ajuste da unidade de medida da temperatura (fig. 21)
Com a função altitude ativada, visualiza-se a indicação da unidade de temperatura atualmente selecionada.
Utilizar o botão <-> para modificar o tipo de unidade de medida.
-set 4- Ajuste da unidade de medida da profundidade (fig. 22)
Com a função profundidade ativada, visualiza-se a indicação da unidade atualmente selecionada. Utilizar o
botão <-> para modificar o tipo de unidade de medida.
Para modificar os valores que estão piscando, é suficiente apertar o botão <->. Apertar o botão <mode> para
passar ao ajuste seguinte.
-set 5- Ajuste da subida com velocidade não controlada (fig. 23)
Com a função ativada, visualiza-se a escolha atual para o controle da subida com velocidade não controlada.
Se o controle for ativado, a palavra "on" aparece, ao contrário, aparece a palavra "off". Esta função especial
permite desativar o "bloqueio" em caso de subida com velocidade não controlada (pág. 103) e pode ser
utilizada, por exemplo, em caso de exercícios de subidas de emergência.
Para modificar a escolha, apertar o botão <->. Apertar o botão <mode> para passar ao ajuste seguinte.
!!
ADVERTÊNCIA
Esta função pode ser utilizada somente por mergulhadores experientes, que assumem a total
responsabilidade da desativação do "bloqueio" em caso de subida com velocidade não
controlada
89
PORTUGUÊS
Page 92

-set 6- função "reset" da memória de nitrogênio (fig. 24)
Para levar a zero o conteúdo, apertar por mais de 3 segundos o botão <-> até o aparecimento das números
0000. A conclusão da fase de Setup e a passagem ao modo operacional sucessivo (modo "dive") ocorre por
efeito da operação anterior ou apertando o botão <mode> (saída sem a função reset do nitrogênio).
INTERFACE COM O MICRO
É possível armazenar os dados da memória histórica do TUTOR em um Micro Computador (PC) com
sistema operacional Windows. O software de interface é interativo e orienta o usuário auxiliando-o a
estabelecer a conecção entre o computador e o micro. A conecção do TUTOR à interface deve ocorrer
somente no momento em que o programa sugerir esta ação.Caso contrário, o TUTOR passará para o modo
dive e não PC, conforme desejado. As letras PC devem aparecer na parte central esquerda da tela
juntamente com um "bip" sonoro. Os números (por exemplo 84) que aparecem na tela durante a
transferência de dados são códigos de comando.
!!
ADVERTÊNCIA
Limpar bem os contatos do computador,antes de inseri-lo no suporte da interface.
!!
ADVERTÊNCIA
Esta função pode ser utilizada somente por mergulhadores experientes. O mergulhador que
efetuar a função reset do nitrogênio residual não pode utilizar o instrumento para mergulhos
sucessivos. Não mergulhar com os valores do TUTOR anulados (0000) quando tiver
mergulhado nas 24 horas anteriores.
90
Page 93

DEPOIS DO MERGULHO
SINALIZAÇÃO DE ERROS (SISTEMA U.B.A.)
Para maior segurança, o vídeo do TUTOR possui uma barra gráfica que assinala erros cometidos e
comportamentos a risco durante o mergulho.Os erros cometidos são assinalados por asteriscos e podem ser
visualizados até o mergulho sucessivo.
Asteriscos principais (erros graves)(fig. 25):
Pulo de etapa de descompressão, subida com velocidade não controlada.
Asteriscos secundários - comportamentos não aconselhados ao mergulhador
esportivo (fig. 26):
Mergulho repetido com um intervalo inferior às duas horas do anterior, "deco dive", profundidade máxima
superior a 40 m, mergulho repetido mais profundo que o anterior, mergulho repetido com profundidade
máxima além dos 30 m, velocidade de subida excessivamente rápida. Para saber qual foi o erro cometido,
consultar o log-book.
91
PORTUGUÊS
Page 94

MANUTENÇÃO
O TUTOR é um instrumento especialmente robusto, produzido para suportar as atividades movimentadas dos
mergulhos sem apresentar problemas.Mesmo assim, é importante tomar todos os cuidados que merecem os
instrumentos de precisão, evitando choques violentos, exposição prolongada ao sol, contato com objetos
pontiagudos. Para sua manutenção ordinária é necessário enxaguar sempre com água doce após cada
mergulho. Se necessário, é possível lavá-lo com sabão neutro. Não utilize detergentes, álcool, gasolina ou
spray.
Os botões de pressão não necessitam de manutenção especial:não lubrifique com óleos nem spray.Em caso
de anomalias de qualquer tipo, e vite usar o instrumento durante o mergulho e le ve-o par a controle a um centro
de assistência autorizado MARES.
SUBSTITUIÇÃO DA BATERIA
A substituição é uma operação muito simples , que não necessita de pessoal especializado .Afrouxar com uma
moeda a tampa estanque e trocar a bateria tomando cuidado para introduzi-la com a polaridade correta. O
assento onde está alojada a bateria é estanque e não se comunica com o coração do instrumento.
Em caso de contato com a água, secá-la adequadamente para retirar qualquer sinal de umidade antes de
instalar a bateria.
Antes de fechar novamente a tampa, verificar o bom estado do o’ring, verificar se está perfeitamente limpo e
passar um pouco de lubrificante de silicone. Não jogar na água a bateria antiga.
!!
ADVERTÊNCIA
Após um mergulho, aguarde 10 minutos para substituir a bateria. Se esta regra não for
seguida, os dados do último mergulho serão cancelados.
É importante ressaltar que, após a substituição da bateria, as informações relativas ao
nitrogênio residual, ao tempo de dessaturação e ao tempo remanescente antes de voar serão
apagadas. Portanto, é necessário anotar estes dados antes da substituição da bateria.
92
Page 95

SÍMBOLOS E TERMOS TÉCNICOS
°C graus centígrados ou Celsius
°F graus Fahrenheit (100°C = 212°F)
% porcentagem velocidade de subida
min minutos primos
' minutos primos
" minutos segundos
h hora
m. metro
ft feet = pés (1 pé=30,48 cm)
LO low = baixo (refere-se à carga das baterias)
PC/micro microcomputador
Asc time tempo total de subida
U.B.A. (Underwater Behaviour Analysis) Análise do Comportamento em Imersão
Ceiling teto (profundidade mínima limite durante a descompressão)
Clock relógio
Dec., deco descompressão
Desat dessaturação
Depth profundidade
Video vídeo
Dive mergulho
Dive time tempo de mergulho
Log book registo dos mergulhos
Max depth profundidade máxima alcançada
Mode modo, modo operacional
No dec não descompressão
No fly não voar
Plan planejador
Scrolling visualização da curva de segurança
Set, setup regular, calibrar
Simul simulador
Slow devagar
Surf superfície
Surf time tempo em superfície
Temp temperatura
Time tempo
Yo-yo perfil de mergulho com diferenças de cota consideráveis
93
PORTUGUÊS
Page 96

TUTOR FIGURES
Page 97

1 2 3
4 5 6
7 8 9
10 11 12
13 14 15
Page 98

16 17 18
19 20 21
22 23 24
25 26
 Loading...