

Page 1
Page 2

CONTENTS
M1 DIVE COMPUTER 24
WARNINGS, CAUTIONS AND SAFETY RULES 24
QUICK GUIDE 27
TECHNICAL/FUNCTIONAL CHARACTERISTICS 28
T
ECHNICAL CHARACTERISTICS 28
F
UNCTIONAL CHARACTERISTICS 28
O
PERATING MODES 29
U
TILITY FUNCTIONS 29
M
ONITORING OF THE BATTERY POWER LEVEL 29
A
UTOMATIC SWITCH-OFF 29
D
ISPLAY BACKLIGHT 29
SETUP OF TECHNICAL PARAMETERS 30
DIVING WITH THE M1 33
A
CTIVATING DIVE MODE 33
A
IR DIVE 33
"N
ITROX" DIVE 37
"B
OTTOM TIME"39
SURFACE MODE 39
POST DIVE SURFACE TIME 39
C
ALENDAR AND CLOCK 40
S
CROLLING OF NO DECOMPRESSION LIMITS 40
D
IVE SIMULATOR 41
L
OGBOOK 41
I
NTERFACING TO A PC 43
FAQ 43
MAINTENANCE 44
R
EPLACING THE BATTERIES 44
DIVE COMPUTER
23
ENGLISH
M1 RGBM.qxd 06/10/2005 15.12 Pagina 23
Page 3
24
M1 DIVE COMPUTER
Congratulations. The dive computer which you have
purchased is the result of the latest MARES technology,
and has been designed to ensure maximum safety,
efficiency, reliability and long life.
This computer is further enhanced by certain innovative
features, which place it at the top of the MARES
product range.
New RGBM Mares-Wienke decompression
algorithm with deep stop option.
Operating modes: "Air", "Nitrox", "Bottom Time".
"Bottom Time" with seconds display.
Optical port for uploading data to a PC.
Increased Logbook capacity (approximately 38
hours of profiles, with points at 20 sec intervals).
Timer-controlled or permanent backlighting.
In this manual you will discover all the other functions
that make M1 one of the most complete computers
available on the market today. You will find all the
instructions for learning how to use the M1 computer
and its functions.
MARES thanks you for your choice and urges you to
always practice safe and responsible diving.
WARNINGS, CAUTIONS
AND SAFETY RULES
Important:
Any critical information or warnings that might
affect the performance or result in the injury of the
technician, COMPUTER M1 owner, or other persons
are highlighted with the following symbols:
Before diving, make sure you have read and understood
the entire instruction manual.
!
WARNING
Do not dive in mountain lakes without
having first checked that the appropriate
altitude program is enabled.
!
WARNING
Check the battery power level before
starting your dive.
Do not dive if the <battery> icon indicates
that the battery is low. Replace the batteries.
!
WARNING
Do not dive if the instrument display seems
anomalous or unclear.
!
WARNING
Before the dive, check that the units of
measurement have been set correctly.
Incorrect settings might cause confusion
resulting in underwater behavior errors.
!
WARNING
In addition to the dive computer, also use a
depth gauge, a submersible pressure gauge,
a timer or watch, and dive tables.
!
WARNING
The dive computer cannot prevent possible
decompression problems.
The dive computer cannot take into account
the physical conditions of the individual diver,
which may vary from one day to the next.
For your safety, have a general medical
check-up before undertaking a dive.
!
WARNING
The M1 computer is designed exclusively
for recreational sports use and not for
professional applications.
!
DANGER
Indicates an imminently hazardous situation
which, if not avoided, will result in death or
serious injury.
!
WARNING
Indicates a potentially hazardous situation
which, if not avoided, could result in death
or serious injury.
!
CAUTION
Indicates a potentially hazardous situation
which, if not avoided, may result in minor
or moderate injury. It may also be used to
alert against unsafe practices.
M1 RGBM.qxd 06/10/2005 15.12 Pagina 24
Page 4
The safety of a dive can only be assured by adequate
preparation.
MARES recommends taking a specialist training
course before diving with a dive computer.
MARES recommends scrupulous observance of the
simple safe diving rules set out in the paragraph on
"responsible diving practices".
RESPONSIBLE DIVING PRACTICES
Always plan your dives in advance.
Never exceed the limits of your skill and experience.
Go to the deepest planned depth at the beginning
of the dive.
Check your computer frequently during the dive
Comply with the ascent rate indicated by the
computer.
Always do a safety stop at 10 - 16 feet (3 - 5
meters) for at least 3 minutes.
After the safety stop, ascend very slowly to the
surface.
Avoid yo-yo dives (repeatedly ascending and
descending underwater).
Avoid strenuous activity during the dive and for
half an hour after surfacing.
When diving in cold water or in the case of a
strenuous dive, start ascending well before
reaching the NO DEC limits.
If it is a decompression dive, prolong the
decompression stop nearest to the surface by
several minutes.
Repetitive dives should be separated by a
surface interval of at least 2 hours.
Your deepest dive should be the first one of the
day.
Avoid diving until the computer memory has
cleared from the preceding day's dive.
When doing repetitive dives for several consecutive
days, take at least one day off from diving every
week. In the case of decompression-stop diving, it
is recommended to take one day off from diving
every three days.
Avoid planned decompression dives and do not
dive deeper than 130 feet (40 meters) unless
you have been specifically trained in this type of
technical diving.
Avoid repetitive "square profile" dives (dives to a
single depth) deeper than 60 feet (18 meters).
Always wait as long as possible before flying after
a dive (at least 12 and preferably 24 hours), in
accordance with the recommendations of the
Divers' Alert Network.
MARES recommends that divers never exceed the
maximum permitted depth for their qualification.
Diving below 130 feet (40 meters) or outside the nodecompression limits significantly increases the risk
of decompression sickness.
Always ascend several minutes before going into DEC
mode, and allow yourself even more time in the case of
cold water conditions, repetitive dives deeper than 60
feet (18 m), or for any dive involving unusually high
exertion. Failure to do this will increase your risk of
decompression sickness.
!
WARNING
Recreational divers should NOT dive deeper
than 40m (130 ft). Although this computer
will continue to provide information for
compressed-air dives deeper than 40m
(130 ft.), the risk of nitrogen narcosis and
decompression sickness (DCS) is greatly
increased; therefore this information
should be treated as only approximate.
!
WARNING
Before starting a "Nitrox" dive, check that
the dive computer is set to "Nitrox" mode,
then check the composition of the
breathing mix you will be using and enter
its oxygen percentage in the appropriate
SET function.
Entering an incorrect oxygen percentage
will lead to errors in the readouts for:
- no-decompression time remaining;
- decompression stop times;
- alarm for exceeding the maximum
permitted O
2 partial pressure.
!
WARNING
The use of oxygen-rich mixtures exposes the
diver to different hazards from those
associated with compressed air. The diver
must be aware of these risks and understand
how to avoid them.
!
WARNING
M1 may be used with oxygen-rich
mixtures (nitrox) ONLY by suitably trained
and certified divers. Attempting to dive
without adequate nitrox training might
result in serious injury.
DIVE COMPUTER
25
ENGLISH
M1 RGBM.qxd 06/10/2005 15.12 Pagina 25
Page 5

26
Do not compress your M1 computer in a hyperbaric
chamber. The instrument can be seriously damaged
if it is not submerged in water.
!
WARNING
Never fly within 24 hours of your last dive,
or in any case wait until the M1 <no-fly>
indication disappears.
!
WARNING
NEVER use your COMPUTER or any other
dive computer for repetitive "square profile"
dives (dives to the same or nearly the same
depth) deeper than 60 feet (18 m). This is
an unsafe diving practice which will greatly
increase your risk of DCS, regardless of what
your COMPUTER reads.
!
WARNING
NEVER dive alone. M1 cannot replace the
assistance provided by a diving buddy.
!
WARNING
NEVER dive deeper than 130 feet (40 m) or
do planned decompression dives with the
COMPUTER unless you are a trained and
certified technical diver (IANTD, TDI, ANDI,
PSA, etc.) familiar with the skills and risks of
deep air diving, and licensed at least to the
level of Deep Air diving for depths beyond
130 feet (40 m). Even with this level of
certification and experience, this type of
technical dive entails a much higher risk of
DCS, regardless of the dive table or
computer used. You must be aware of and
willing to accept these risks before
attempting such a dive.
M1 RGBM.qxd 06/10/2005 15.12 Pagina 26
Page 6
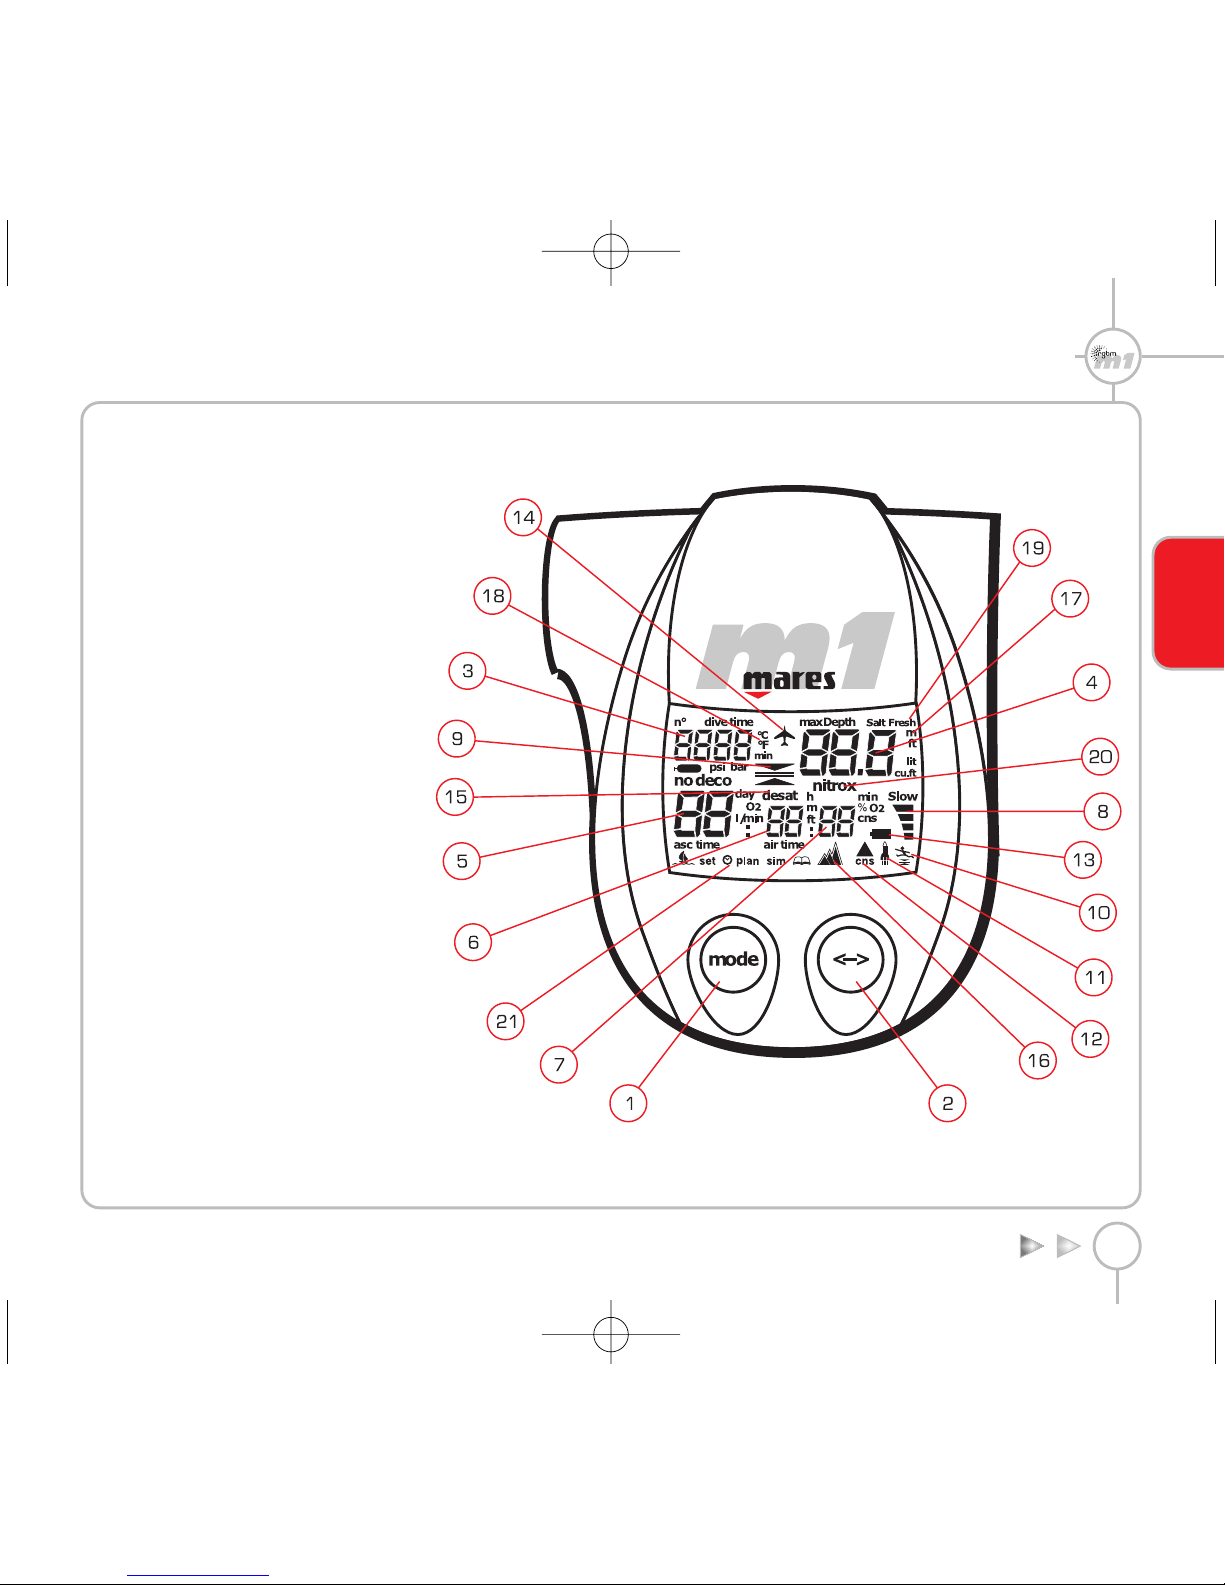
QUICK GUIDE
1 <MODE> BUTTON.
2 <-> BUTTON.
3 DIVE - dive time.
DIVE - temperature.
CLOCK - year.
LOGBOOK - dive n°.
4 DIVE - depth.
DIVE - maximum depth.
CLOCK - month.
5 DIVE - no decompression time remaining.
DIVE - duration of the specified.
decompression stop.
DIVE - total ascent time.
CLOCK - date.
Bottom Time indicator, "Bt".
6 Decompression stop depth.
CLOCK - hour.
7 DIVE - % CNS O
2.
DIVE - % O
2.
CLOCK - minutes.
6+7 SURF - surface time.
SURF - "no fly" time.
SURF - desaturation time.
Stop Mode indication, "StoP".
8 % ascent rate.
9 Decompression stop depth indicators.
10 Omitted decompression stop indicator.
11 Uncontrolled ascent indicator.
12 Max % CNS O
2 error indicator.
13 Low battery indicator.
14 "No fly" indicator.
15 "Desat" indicator.
16 Altitude level.
17 Unit of depth measurement.
18 Unit of temperature measurement.
19 Fresh / seawater program selection.
20 Nitrox dive indicator.
21 Active mode indicator.
DIVE COMPUTER
27
ENGLISH
M1 RGBM.qxd 06/10/2005 15.12 Pagina 27
Page 7
28
TECHNICAL/FUNCTIONAL
CHARACTERISTICS
TECHNICAL
CHARACTERISTICS
DEPTH MEASUREMENT:
Maximum displayed depth: 150 m (495 ft).
Measurement resolution: 10 cm in the 0-100 m
range / 1 m in the 100-150 m range.
Temperature compensation of the measurement.
Measurement accuracy: from 0 to 80 m, ±1% of
full scale.
Calibration in fresh water.
Difference in sea water: 2.5%.
TEMPERATURE MEASUREMENT:
Measurement range: -10 / +50 °C (14/122°F).
Measurement resolution: 1°C.
Measurement accuracy: ±2°C (±2°F).
ALGORITHM:
RGBM Mares-Wienke , the result of a collaboration
between Dr. Bruce R. Wienke and the MARES
research and development center.
10 tissue compartments
Reduction of permissible gradient (M factors) in
case of repetitive dives, deeper-than-previous
dives or multi-day diving.
Deep stop.
10 m/min ascent rate.
Display backlight: timer-controlled and permanent
Power supply: 2 alkaline 1.5 V batteries (type AAA)
easily replaceable by the user.
Battery life:
Approximately 12 months with 50 dives and
occasional use of the backlight.
Approximately 10 dives with the backlight
always on.
Operating temperature: from -10 to +50°C
(14/122°F).
Storage temperature: from -20 to +70°C
(-4 /+158°F).
FUNCTIONAL
CHARACTERISTICS
Operating modes:
“Air”.
"Nitrox".
"Bottom Time".
Stop Mode: lockout in case of omitted stop and/or
uncontrolled ascent (unless disabled by the user).
Depth display: meters/feet.
Temperature display: °C/°F.
Fresh/sea water selection: manual.
Altitude programs:
P0 (0-700 m) (0-2300 ft).
P1 (700-1500 m) (2300-4900 ft).
P2 (1500-2400) (4900-7900 ft).
P3 (2400-3700 m / 7900- 12100 ft).
Decompression stops: up to 24 meters (79 feet).
Audible alarms, which can be disabled:
Low battery.
Deco stop depth violation.
Excessive ascent rate.
No decompression limits reached.
Maximum permitted depth for the
programmed value of max PPO2.
Simulator mode.
Scrolling of no-decompression limits: from 12 to
48 meters (39 to 157 feet).
Calendar clock: Year, month, date, hour, minutes
(leap year management).
PC Interface: Optical, with RS232 serial adapter.
User programmable parameters (via the buttons or
the PC interface):
"Air"/"Nitrox"/"Bottom Time".
Percentage Oxygen in Breathing Mix (from
21% to 50% in increments of 1%).
Max PPO2 (from 1.2 to 1.6 bar) (from 17.4 to
23.2 psi).
Altitude program.
Temperature measurement unit: °C / F.
Depth measurement unit: meters / feet.
Fresh/sea water.
Audible alarms (on/off).
Stop mode on uncontrolled ascent (on/off).
Calendar clock settings.
Clear residual nitrogen memory.
History:
Total number of dives logged.
Total dive hours and minutes logged.
Greatest depth logged.
Coldest temperature logged.
Dives stored in logbook: 50 with profile for a
maximum of approximately 38 hours.
Profile point interval: 20 Sec.
Data stored in logbook:
Start date and time of the dive (year, month,
date, hour and min).
Dive settings:
Operating mode: "Air", "Nitrox", "Bottom
Time".
Salt/Fresh.
Altitude program.
% O2 in the breathing mix.
Maximum permitted O2 partial pressure
setting (PPO2 max).
M1 RGBM.qxd 06/10/2005 15.12 Pagina 28
Page 8
Technical data:
Dive duration.
Max depth (resolution 10 cm).
Min temperature.
% CNS O2 at start of dive.
% CNS O2 at end of dive.
Underwater behavior errors:
Temporary overshoot of deco stop.
Omitted deco stop.
Excessive ascent rate.
Uncontrolled ascent.
Exceeded maximum permitted partial
pressure of O2.
Exceeded max permitted % CNS O2.
Profile points at 20 second intervals:
max depth reached within each interval
(resolution 10 cm).
excessive ascent rate.
omitted deco stop.
Deco / no deco.
OPERATING MODES
The nine operating modes of the M1 dive computer
are listed below:
1. OFF mode.
2. DIVE mode.
3. SURF mode.
4. SET mode.
5. CLOCK mode.
6. PLAN mode.
7. SIMUL mode.
8. LOGBOOK mode.
9. PC mode.
As shown in Fig. A, it is possible to advance from
one mode to the next by pressing <Mode>, or to go
back to the preceding mode by pressing <->.
UTILITY FUNCTIONS
M
ONITORING OF THE BATTERY
POWER LEVEL
The M1 periodically monitors the battery power level.
If the battery power is found to be low (level 1), an
audible alarm is sounded, the battery icon appears
and the display backlight function is disabled.
If battery power level 1 is reached during a dive, the
battery icon appears but the audible alarm is
inhibited.
From the time when the battery icon first appears, it
is possible to do 5 more dives (see chapter FAQ).
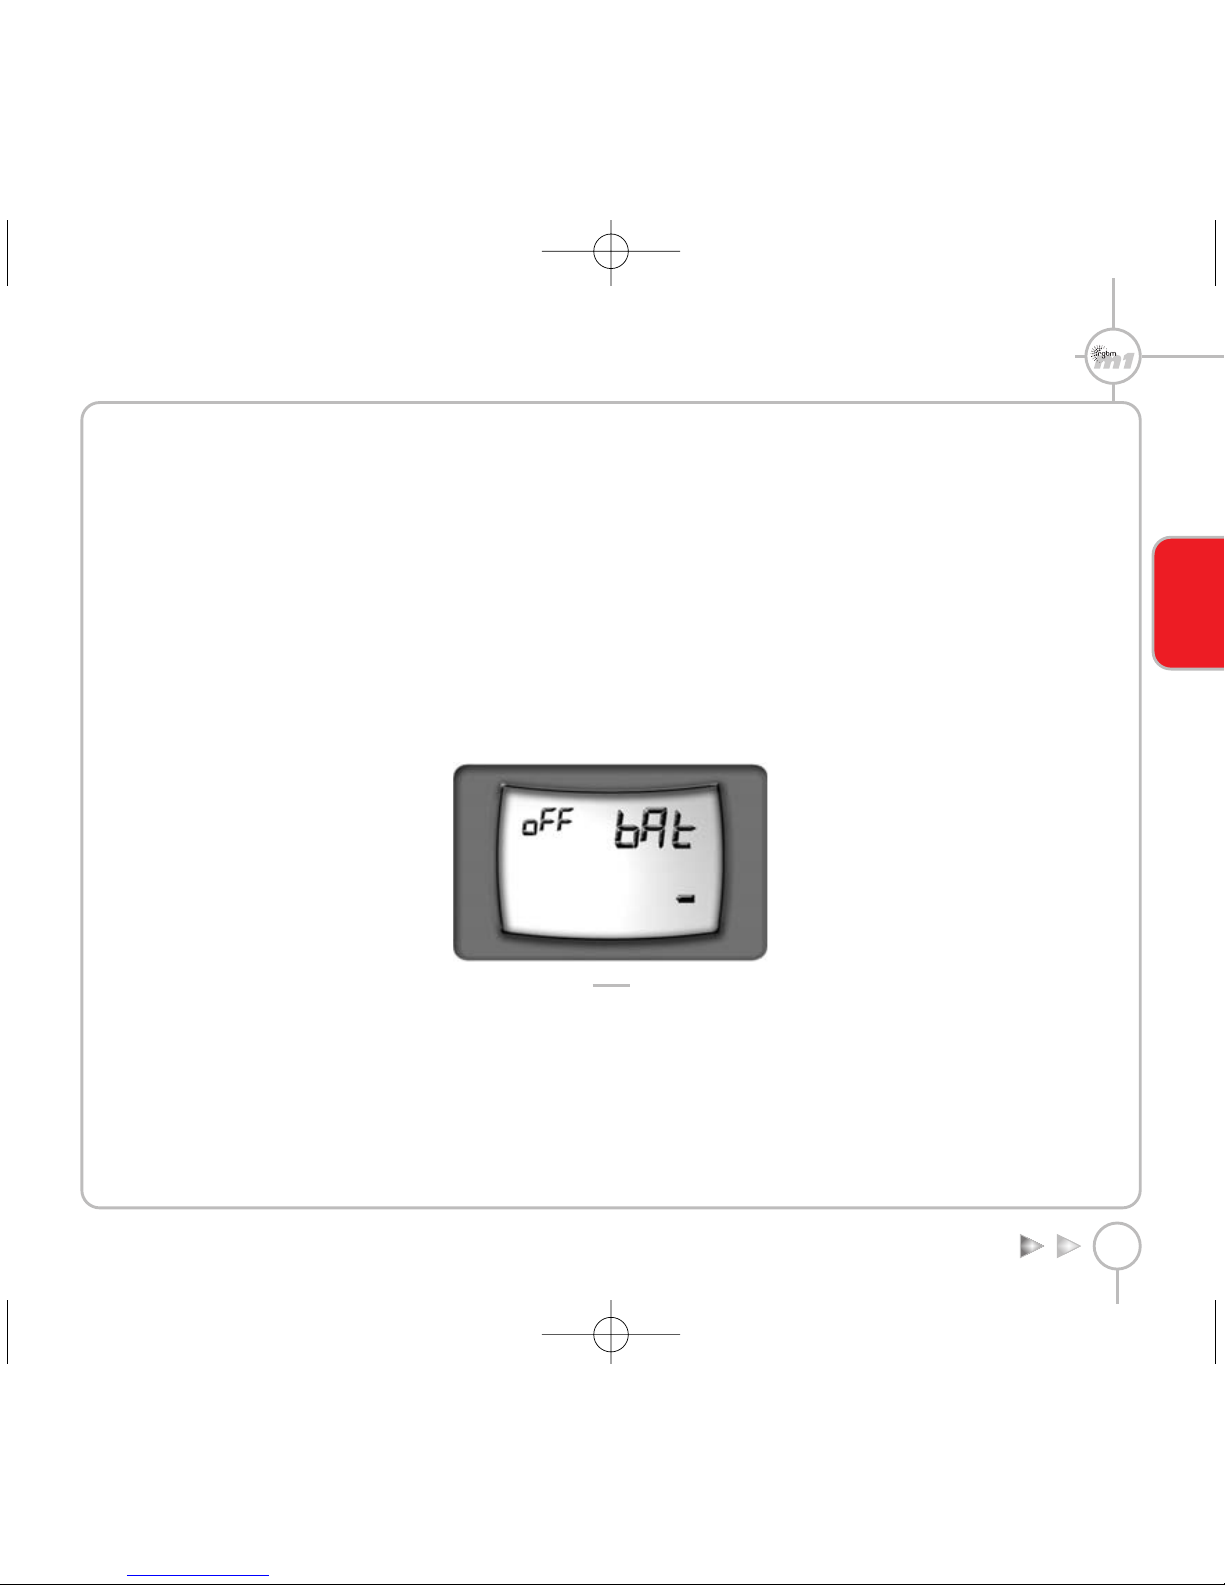
When the battery reaches its lowest power level
(level 2), the "off bAt" message appears, Fig. 1, and
the M1 is disabled.
FIG. 1
Even if the dive computer is not used, the batteries
should be replaced at least every 12 months.
AUTOMATIC SWITCH-OFF
If the M1 is ON but no buttons are pressed for a
certain amount of time, it will automatically switch
itself OFF. The delay before automatic switch-off varies
depending on the current operating mode.
DIVE - PreDive 10 min
DIVE - Dive NEVER
SIMUL - Dive, PostDive and Surface 15 min
LOGBOOK - automatic scrolling of the profile 10 min
Under all other conditions 3 min
The switch-off delay timer is cleared whenever a
button is pressed, and in PC mode it is cleared at each
transmission.
After a dive, if the no-fly time is not zero, the M1
switches to OFF mode but the display remains active,
showing some information. When the no-fly time goes
to zero the display switches off.
DISPLAY BACKLIGHT
The illumination of the backlight is enabled in DIVE
Mode and can be activated in two ways:
PREDIVE
15 sec timer-controlled: press the <-> button for
approximately 2 sec.
DIVE
15 sec timer-controlled: press and release the
<-> button.
Always on: press the <-> button for approximately
2 sec; the backlight can then be switched off by
pressing the <-> button again.
DIVE COMPUTER
29
ENGLISH
M1 RGBM.qxd 06/10/2005 15.12 Pagina 29
Page 9
30
SETUP OF TECHNICAL
PARAMETERS
SET mode can be accessed, as shown in Fig. A, by
pressing the <Mode> button from DIVE or SURF mode,
or by pressing the <-> button from CLOCK mode.
SET mode is subdivided into five function groups,
SET1.... SET5, as shown in Fig. B. It is possible to
navigate through the different SET function groups in
the following manner:
To enter a given SET function group, press the
<Mode> button for approximately 2 sec.
Alternatively, press and immediately release the
<Mode> button to skip to the next SET function.
Press and immediately release the <-> button to
go back to the preceding SET function.
From SET5, pressing the <Mode> button saves any
changes made to the settings and goes on to CLOCK
mode. The parameters within a given SET function
group are modified using the <-> button.
SET 1 - SETUP OF "AIR", "NITROX",
"BOTTOM TIME" OPERATING
MODE AND ASSOCIATED
PARAMETERS
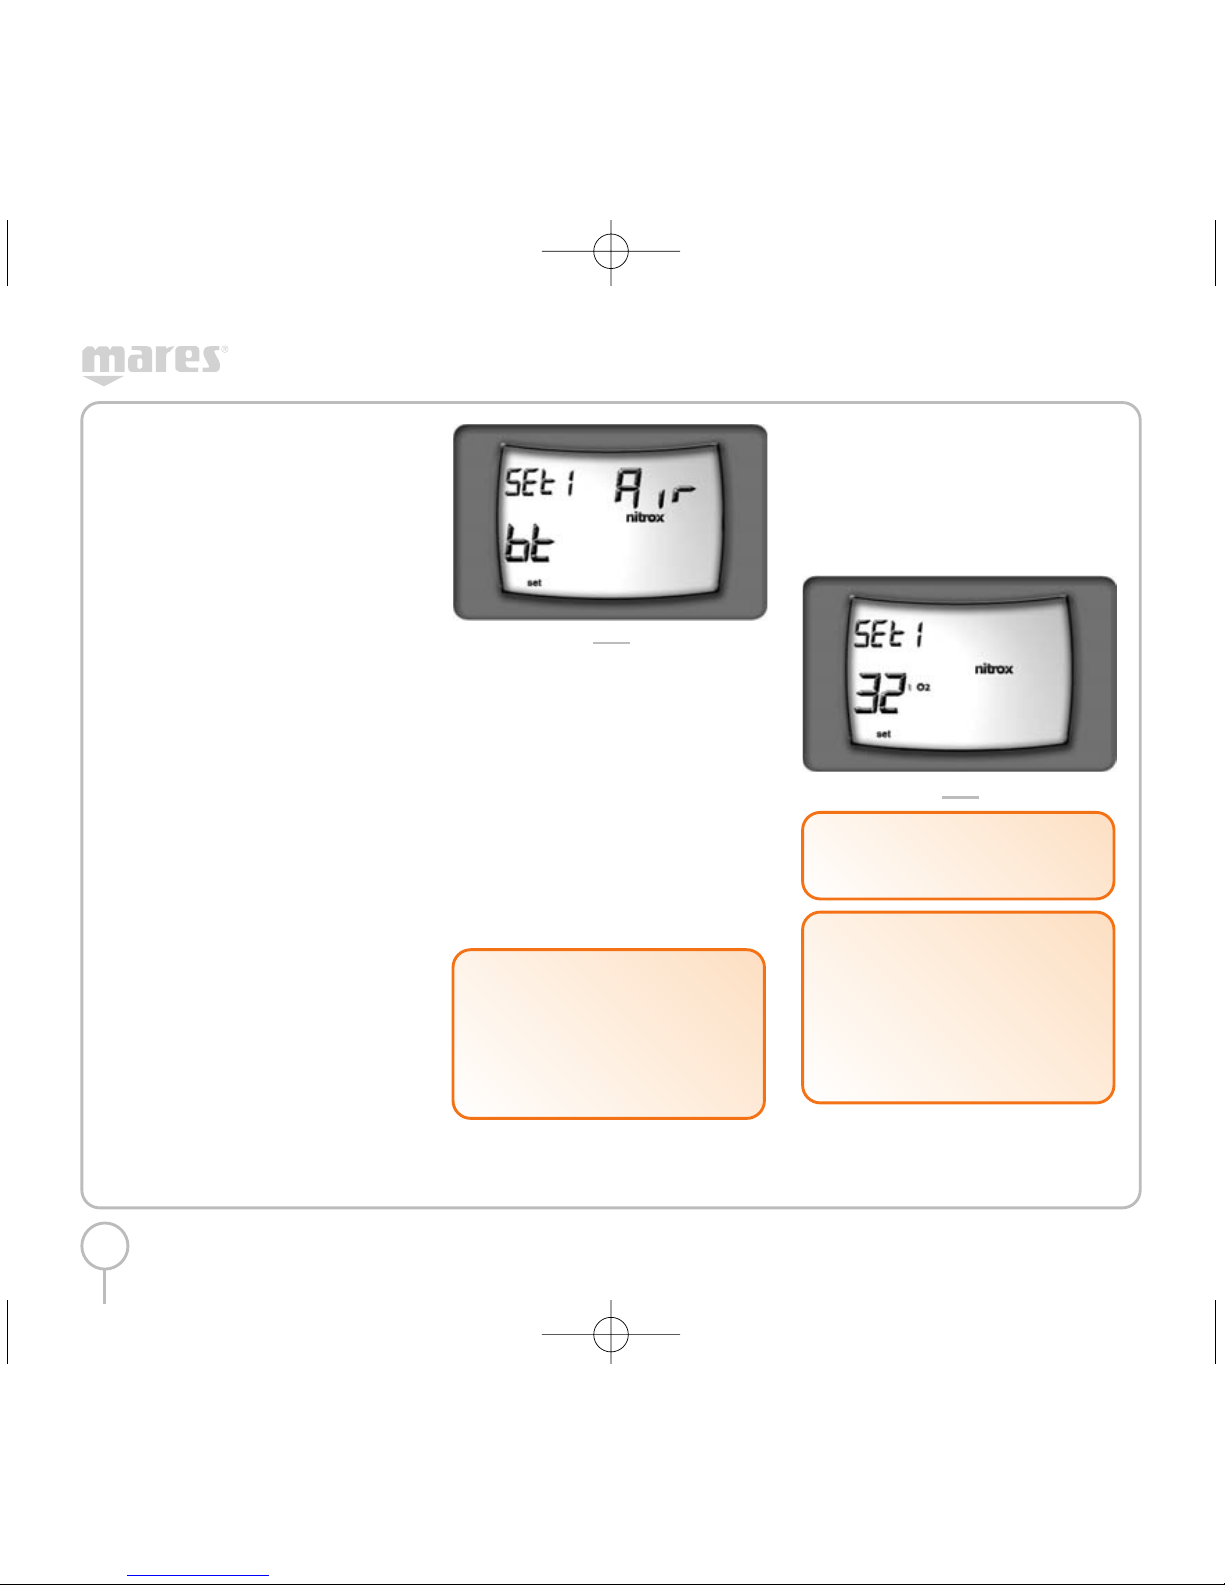
The display initially shows the following parameters,
(fig. 2):
"Nitrox" icon.
"Air".
"Bt".
FIG. 2
To enter SET1 press the < Mode > button for
approximately 2 sec.
Alternatively, to advance to SET2, press and immediately
release the <Mode> button .
OPERATING MODE SETUP: "AIR",
"NITROX", "BOTTOMTIME"
The display shows the currently active operating
mode. Press the <-> button to change the setting.
If 'Nitrox' mode is selected, pressing the <Mode>
button will advance to the setup of % O2 and
then of max PPO2. Otherwise, if "Air" or "Bt"
mode is selected, pressing the <Mode> button
advances to SET2.
"NITROX" BREATHING MIX SETUP
The percentage of O2 in the breathing mix can be
entered in the range between 21% - 50%, in
increments of 1% (fig. 3). Press the <-> button to
increase the percentage. Press the <Mode> button
to save the percentage value and advance to the
next parameter.
FIG. 3
!
WARNING
It is essential to correctly set the oxygen
percentage in the breathing mix to ensure
correct readouts of:
- no decompression time remaining;
- decompression stop times;
- alarm for exceeding maximum permitted
PPO
2.
!
WARNING
Do not use mixes with an O2% greater
than 50%.
!
WARNING
If you have completed a NITROX dive and
are planning a repetitive dive using
compressed air, set your dive computer for
NITROX mode with a % O2 of 21%. In this
way, the monitoring of the % CNS O
2 will
remain active.
M1 RGBM.qxd 06/10/2005 15.12 Pagina 30
Page 10
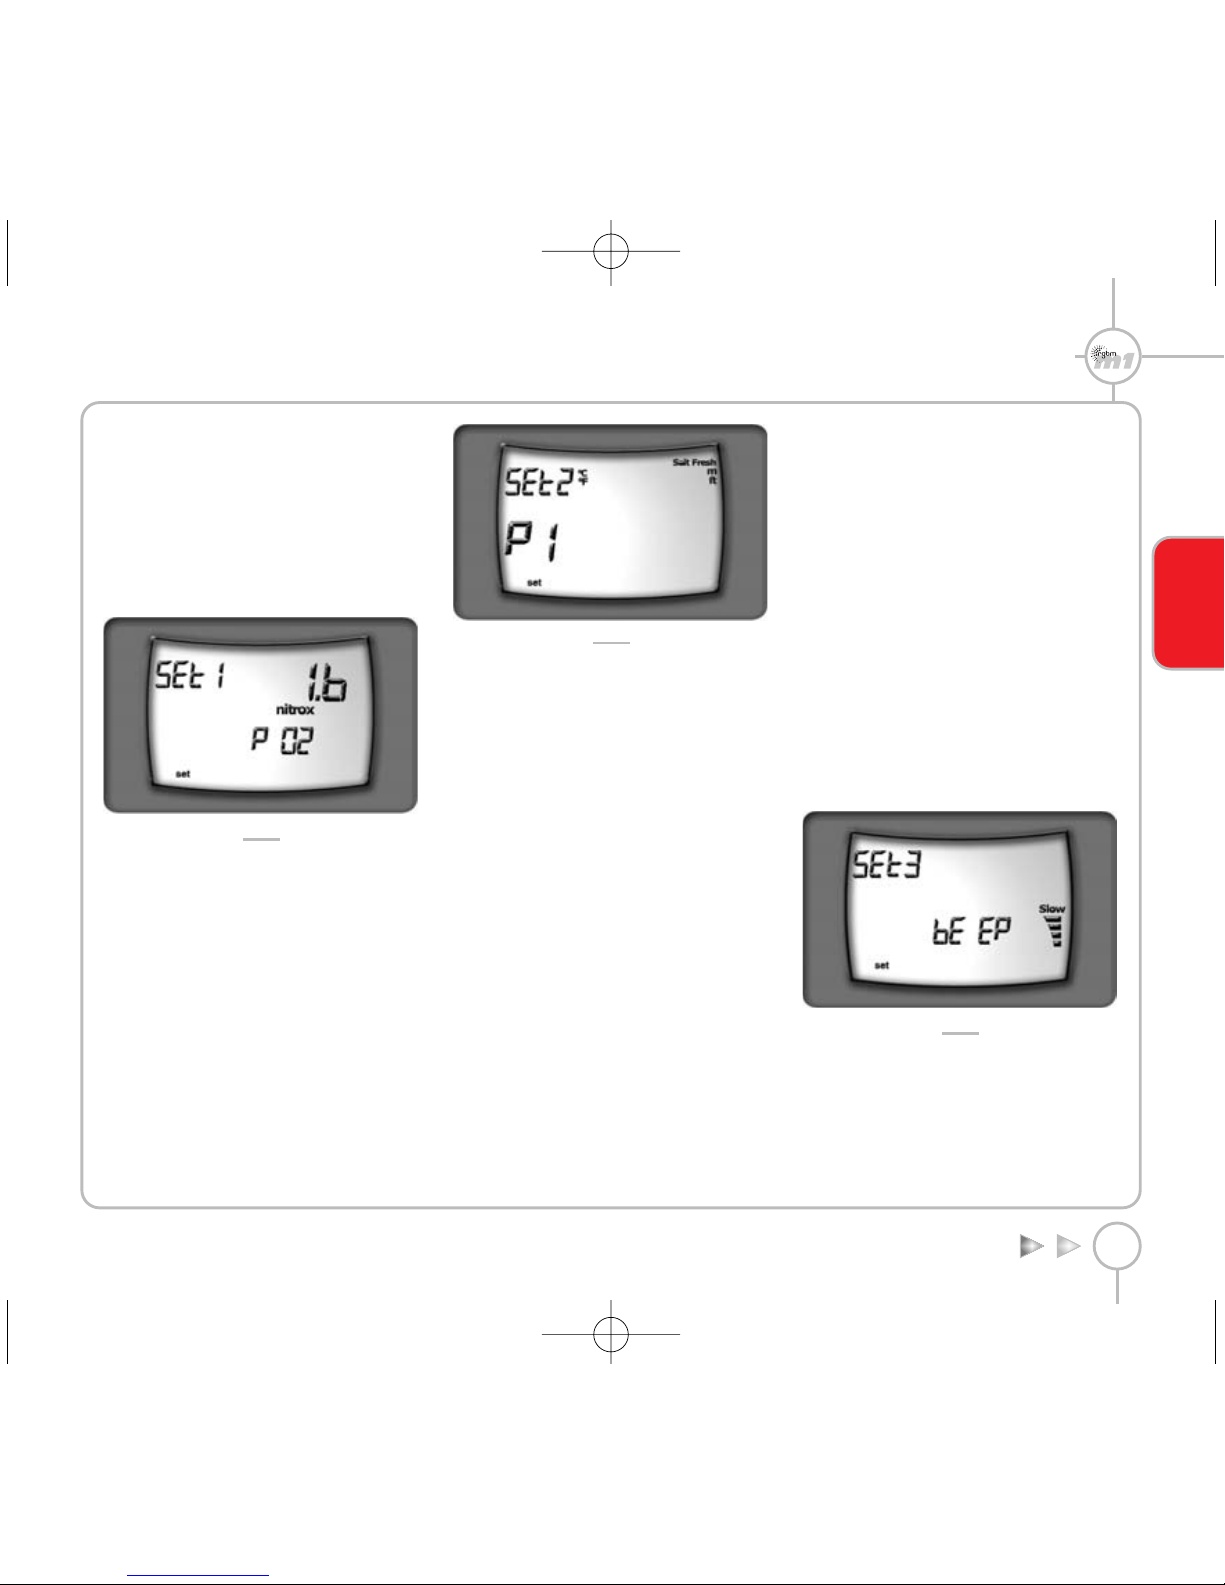
MAXIMUM O2 PARTIAL PRESSURE SETUP
The maximum partial pressure of O2, which
triggers an alarm if exceeded, can be
programmed between a minimum of 1.2 bar (17.4
psi) and a maximum of 1.6 bar (23.2 psi) in
increments of 0.1 bar (1.45 psi) (fig. 4).
Increase the value by pressing the <-> button.
Press the <Mode> button to save the changes
made and advance to SET2.
FIG. 4
SET 2 - MAIN PARAMETER SETUP
The display initially shows the various parameters
which can be programmed in the SET2 function group
(fig. 5):
Altitude program.
"°C" or "°F" temperature units.
"m" or "ft" depth units.
"salt" or "fresh" water.
FIG. 5
To enter SET2 press the < Mode > button for
approximately 2 sec.
To skip to SET3 press and immediately release the
<Mode> button.
To go back to SET1 press and immediately release
the <-> button.
ALTITUDE PROGRAM
On entering this setup, the currently selected
altitude program (P0, P1, P2, P3) is displayed;
press the <-> button to select the next altitude
program. Press the <Mode> button to skip to
the next parameter.
TEMPERATURE UNIT SETUP
On entering this setup, the currently selected unit
of measurement will start blinking; use the <->
button to change the setting. Press the <Mode>
button to skip to the next parameter.
DEPTH UNIT SETUP
On entering this setup, the currently selected unit
of measurement will start blinking; use the <->
button to change the setting. Press the <Mode>
button to skip to the next parameter.
FRESH/SEA WATER SETUP
On entering this setup, the currently selected
option (fresh or seawater) will start blinking. Use
the <-> button to change the setting. Press the
<Mode> button to skip to SET3.
SET 3 - OPTIONAL PARAMETER SETUP
The display initially shows the indications of the
parameters which can be programmed in the SET3
function group (fig. 6):
"BEEP".
Ascent rate icons.
To enter SET3, press the <Mode> button for
approximately 2 sec.
To skip to SET4, press and immediately release the
<Mode> button.
To go back to SET2, press and immediately release
the <-> button.
FIG. 6
BEEPER SETUP
This function is used for inhibiting or enabling
the audible alarms.
On entering this setup, the 'beep' message appears
together with the current setting (ON or OFF).
DIVE COMPUTER
31
ENGLISH
M1 RGBM.qxd 06/10/2005 15.12 Pagina 31
Page 11

32
Press the <-> button to change the setting.
Press the <Mode> button to skip to the
uncontrolled ascent setup.
UNCONTROLLED ASCENT SETUP
This function disables or enables the "stop" in
case of uncontrolled ascent. It can be useful for
instructors when practicing emergency ascents,
to prevent the dive computer from locking out.
On entering this setup, the ascent rate indicator
and the currently selected option (ON or OFF)
will appear. Press <-> to change the setting.
Press <Mode> to skip to SET4.
SET 4 - CALENDAR CLOCK SETUP
The display initially shows the various parameters
which can be programmed in the SET4 function
group (fig. 7):
"Clock" icon.
FIG. 7
To enter SET4, press <Mode> for approximately 2 sec.
To skip to SET5, press and immediately release the
<Mode> button.
To go back to SET3, press and immediately release
the <-> button.
The display shows the current date and time, with
the date digits blinking. The blinking value can be
incremented by pressing <-> (hold down the button
for rapid increment); when the desired value is
reached, press <Mode> to save the new setting and
go on to the next value (month). After setting the
minutes, M1 checks the compatibility of the date
and month settings, taking leap years into account.
If the date and month are incompatible with each
other, pressing the <Mode> button returns to the
date setting instead of advancing to SET5,
prompting the user to correct the date. In this way it
is not possible to enter inexistent dates such as April
31 or February 29 2001.
SET 5 - CLEAR RESIDUAL NITROGEN
MEMORY
This set function is used for clearing the residual
nitrogen memory.
The display initially shows the "desat" icon.
To enter SET5, press the <Mode> button for
approximately 2 sec (fig. 8).
FIG. 8
Alternatively, to exit SET mode and advance to CLOCK
mode, press and immediately release the <Mode>
button. To go back to SET4, press and immediately
release the <-> button.
To clear the residual nitrogen memory, press and
hold down the <-> button for at least 6 seconds.
The clearing of the nitrogen memory is confirmed as
shown in fig. 9.
FIG. 9
!
WARNING
This function should only be used by
highly experienced divers who take full
responsibility for the consequences of
disabling the "stop" in case of
uncontrolled ascent.
!
WARNING
The audible alarms should only be disabled
by expert divers who take full
responsibility for the consequences of this
operation.
M1 RGBM.qxd 06/10/2005 15.12 Pagina 32
Page 12

DIVING WITH THE M1
ACTIVATING DIVE MODE
DIVE mode is activated by means of the buttons.
When the <Mode> button is pressed in OFF mode,
the M1 performs the autozero procedure (depth
calibration) and the low battery check. Then it
illuminates the display and backlight for
approximately 2 seconds and, if everything is working
correctly, the instrument goes into PreDive mode.
If a dive is started with the M1 in OFF mode, or in
any state other than DIVE mode, the periodic
monitoring of ambient pressure will automatically
activate DIVE mode within a maximum delay of 30
sec after the diver has descended below 1.5 meters.
If, during the first few meters of a descent, the diver
notices that the M1 is off, he can press the <Mode>
button to switch it on, pre-empting the automatic
switch-on which would in any case take place after
a maximum delay of 30 sec.
If, during the first few meters of the descent, the
user notices that the M1 is in some mode other than
DIVE, he can use the buttons to activate DIVE mode,
pre-empting the automatic switch to DIVE mode
which would in any case take place after a
maximum delay of 30 sec.
In dives with very rapid descents it is preferable to
switch on the computer using the buttons.
AIR DIVE
The various operating phases of DIVE mode are
described below:
DIVE - WAITING TO START DIVE, PREDIVE
(FIG. 10)
This phase persists until the depth reading exceeds
1.5 m (4.9 ft). If the PreDive state lasts longer than
15 min without any button being pressed, the M1
switches to OFF mode.
FIG. 10
DIVE - "NO DECOMPRESSION" DIVE
When the depth reading exceeds 1.5 m (4.9 ft), the dive
begins and the dive timer starts measuring its duration.
Recording of the dive data in memory (LogBook) begins
if this phases persists for more than 20 seconds.
The dive parameters are shown in two display
layouts: WIN1 and WIN2.
WIN1 shows the following parameters (fig. 11):
Sea/fresh.
No deco icon.
current depth (in "m" or "ft").
Duration of the dive in minutes.
No decompression time remaining in minutes.
FIG. 11
Pressing the <Mode> button switches over, for
approximately 8 seconds, to the WIN2 display layout
which shows (fig. 12):
Salt/fresh.
No deco icon.
Maximum depth reached (in "m" or "ft").
Water temperature (in °C or °F).
No decompression time remaining expressed in
minutes.
After 8 seconds, or when the <Mode> button is pressed,
the display automatically reverts to the WIN1 layout.
FIG. 12
!
WARNING
This function should only be used by
expert divers. A diver who clears the
residual nitrogen memory cannot use the
instrument for repetitive dives. After
clearing the residual nitrogen memory,
wait at least 24 hours after your last dive
before using the M1 again.
DIVE COMPUTER
33
ENGLISH
M1 RGBM.qxd 06/10/2005 15.12 Pagina 33
Page 13

34
When the no decompression time remaining is 1 min,
an audible alarm is sounded to indicate that the
diver is about to exceed the no decompression limits.
DIVE - "DECOMPRESSION STOP" DIVE
If the diver does not ascend when the above alarm is
sounded, the M1 will start calculating a "decompression
stop" dive, indicated by the appearance of the "deco"
message and an audible alarm.
The dive parameters are displayed in the WIN1 and
WIN2 layouts as follows:
WIN1 shows the following information (fig. 13):
Sea/fresh.
"Deco" icon.
Current depth (in "m" or "ft").
Duration of the dive expressed in minutes.
Depth of deepest decompression stop.
Duration of the decompression stop in question.
FIG. 13
Pressing the <Mode> button switches over, for
approximately 8 seconds, to the WIN2 layout which
shows (fig. 14):
Salt/fresh.
"Deco" icon.
maximum depth reached (in "m" or "ft").
measured temperature (in °C or °F).
ascent time, i.e. the total time necessary for
surfacing.
FIG. 14
After the 8 seconds have elapsed, or when the
<Mode> button is pressed, the display automatically
reverts to the WIN1 layout.
The ascent time is given by the sum of:
the durations of the various decompression stops.
the time required to ascend at an average speed
of 10 m/min (33ft/min).
Deep stop option.
The M1 will also check that the decompression stops
are performed correctly; two icons (fig. 15), graphically
indicate what action the diver should take:
2 triangles: correct decompression stop depth;
upward triangle: diver below decompression stop
depth, ascend;
downward triangle: diver has ascended above
decompression stop depth, descend!!
FIG. 15
If the diver overshoots the decompression stop
depth by more than 30 cm (11.8 in), the "downward
triangle" icon starts blinking; if the overshoot
exceeds 1 m (3.28 ft), an audible alarm is sounded in
addition to the blinking icon. These warnings remain
active until normal conditions are restored.
If the decompression stop overshoot exceeds 1
meter (3.28 ft) and lasts more than 3 minutes, the
computer switches to Omitted Stop mode.
In this case, the corresponding icon appears (fig. 16).
!
WARNING
When the omitted deco stop alarms are
triggered, desaturation of the simulated
tissues is halted; it resumes when the
diver returns to the correct decompression
stop depth.
!
WARNING
Never ascend above the correct
decompression stop depth.
M1 RGBM.qxd 06/10/2005 15.12 Pagina 34
Page 14

FIG. 16
If, after surfacing, the diver attempts a repetitive dive,
the M1 will function only as a depth gauge (Stop Mode).
DIVE - DEEP STOP
To minimize the likelihood of critical bubble seed
formation, the M1 prompts for a one-minute deep
stop in case of decompression dives or dives close to
the no-decompression limit.
When the diver approaches the deep stop depth, M1
sounds an audible alarm and displays the message
"St 1min", (fig. 17).
FIG. 17
The deep stop depth is determined by an algorithm
which takes into account the average pressure to which
the diver was exposed during the dive, and the depth to
which he must ascend for any decompression stops.
DIVE - ASCENDING
On detecting a reduction in depth, the M1 activates
an ascent rate monitoring algorithm. It computes
the value of the ascent rate as a percentage of the
optimal 10 m/min rate.
If this value exceeds 60% of the maximum permitted
rate, the ascent rate bar graph indicator appears.
The correspondence between the bars and the
percentage of the optimal ascent rate is as follows:
1 bar (14.5 psi) 60 < % speed < 80
2 bars (29 psi) 80 < % speed < 95
3 bars (43.5 psi) 95 < % speed < 105
4 bars (58 psi) 105 < % speed < 120
4 bars (58 psi) + "Slow" % speed > 120
If the "Slow" message appears, an audible alarm is
sounded which persists until the diver's speed of
ascent drops below 120%.
If the diver's ascent rate is sufficiently fast to trigger
the audible alarm, the computer begins monitoring
an uncontrolled ascent.
An ascent is considered to be "uncontrolled" when
the maximum ascent rate is exceeded (SLOW with
audible alarm) for a stretch equal to at least 2/3 of
the depth at which the audible alarm started
sounding. This criterion only applies to alarms
triggered below a depth of 12 meters (39.4 feet).
In the event of an uncontrolled ascent (fig. 18), if the
user attempts a repetitive dive after surfacing, the
M1 will function only as a depth gauge (Stop Mode).
The "STOP after uncontrolled ascent" function can
be disabled in SET3.
FIG. 18
DIVE - SAFETY STOP
If the maximum depth of a dive exceeds 10 meters
(32.8 feet) a "Safety Stop" is activated for the ascent;
the M1 will then suggest a 3 minute safety stop at a
depth between -2.5 and -5 meters (-8.2 and -16.4
feet), replacing the no-dec time of 99 min with the
message "St 3 min…2min…1min" (Fig. 19). If the
diver moves outside the above mentioned depth
range, the no-dec time reappears on the display, and
the safety stop timer is stopped. When the diver reenters the safety stop depth range, the safety stop
timer resumes from where it left off. If the diver
returns below 10 meters (32.8 feet), the safety stop
timer ignores the aborted stop and will subsequently
start counting down from 3 minutes again.
In the case of decompression-stop dives, the computer
will extend the duration of the stop at 3 meters
!
WARNING
The above option is intended only for highly
experienced divers, who take full
responsibility for the consequences of
disabling the function which locks out the
computer in case of an uncontrolled ascent.
!
DANGER
An excessive speed of ascent increases the
risk of decompression sickness.
DIVE COMPUTER
35
ENGLISH
M1 RGBM.qxd 06/10/2005 15.12 Pagina 35
Page 15

36
(9.8 feet) by an additional 3 minutes, displaying the
safety stop information as described above.
FIG. 19
DIVE - SURFACING
When the measured depth is less than 1 meter (3.28
feet), the dive is suspended and the dive timer is
stopped. If the diver does not return below 1.5
meters (4.9 feet) within the next 3 minutes, the M1
considers dive to be completed and records its data
in the LogBook; otherwise the dive continues and
the M1 resumes the dive timer count.
The display shows (Fig. 20):
Duration of the dive.
Maximum depth.
FIG. 20
After 3 minutes, the M1 switches from DIVE mode to
OFF mode, and shows the following data (Fig. 21):
The airplane icon until the no-fly time goes to
zero;
Desaturation time and icon, until the
desaturation time goes to zero;
Any icons for underwater behavior errors
(omitted stop, uncontrolled ascent).
FIG. 21
DIVE - STOP MODE
In the event of an omitted stop and/or uncontrolled
ascent, the M1 will lock out and function only as a
depth gauge for any subsequent dives.
The WIN1 display shows (Fig. 22):
Depth.
Dive time.
"Stop".
FIG. 22
Pressing the <Mode> button switches over, for
approximately 8 sec, to the WIN2 display which
shows (Fig. 23):
Maximum depth of the dive which triggered
Stop Mode.
Duration of the dive which triggered Stop Mode.
"Attn".
FIG. 23
After the 8 seconds have elapsed, or when the
<Mode> button is pressed, the computer
automatically reverts to the WIN1 display.
If the user attempts to dive while the computer is in
Stop Mode, the profile will nevertheless be recorded in
the logbook.
!
WARNING
Do not fly while the no-fly icon is
illuminated.
M1 RGBM.qxd 06/10/2005 15.12 Pagina 36
Page 16

Stop Mode lasts for 24 hours. The M1 can be released
from this condition by clearing the residual nitrogen
memory.
"NITROX" DIVE
Due to the lower percentage of nitrogen in the
breathing mix, diving with oxygen-rich mixtures
carries a lower risk of decompression sickness than
diving with compressed air. However,
the higher oxygen content of the mix exposes the
diver to oxygen toxicity hazards which do not
generally occur in recreational diving with compressed
air. The M1 monitors the dive time and depth and, on
the basis of the oxygen percentage entered in the SET
function, provides indications which allow the diver to
remain within the safety limits for oxygen exposure.
To do a Nitrox dive, it is necessary to choose the
NITROX option in SET1.
The M1 handles "Nitrox" dives in a similar manner to
compressed air dives, with the same phases and
procedures for activating DIVE mode. The only
differences between compressed-air and Nitrox dives
concerns the monitoring of critical "Nitrox" dive
parameters, and the display of these parameters in
addition to the normal air dive parameters (described
in the preceding chapter).
The following section describes the critical "Nitrox"
dive parameters monitored by the M1, and the
differences in the data display layouts.
CHECKING THE CRITICAL NITROX DIVE
PARAMETERS
OXYGEN PARTIAL PRESSURE
When the diver reaches a depth at which the PPO2
exceeds the maximum permitted value entered in
the corresponding SET, (from 1.2 to 1.6 ATM), an
alarm condition is triggered indicated by:
Blinking depth indication.
Audible alarm.
The alarm persists until the diver ascends sufficiently
for the oxygen partial pressure to return within the
acceptable limits.
EFFECTS ON THE CENTRAL NERVOUS SYSTEM
Oxygen toxicity exposure is monitored by means of a
CNS (Central System Calculation), based on
currently accepted recommendations for exposure
limits. This toxicity is expressed as a percentage
value, % CNS O
2, ranging from 0% to 120%. The
percentage value of CNS O2 is shown on the display,
and an alarm is triggered when it exceeds 75%,
signaled by blinking of the value.
Fig. 24-30 show the data that is displayed during
the various phases of the dive:
Fig. 24 - PreDive, on activating DIVE mode, the
display shows the % O
2 and the % CNS O2 if it is
greater than zero.
!
WARNING
When this alarm occurs, ascend immediately
until the alarm condition ceases.
!
WARNING
Before reading the "Nitrox Dive" chapter,
the user is advised to carefully read the
"Air Dive" chapter.
!
WARNING
Correctly setting the percentage of oxygen
in the breathing mix is indispensable for
ensuring correct readouts of:
- no decompression time remaining;
- decompression stop times;
- alarm for exceeding the maximum
permitted PPO
2.
!
WARNING
Do not use breathing mixes with % of O2
higher than 50%
!
WARNING
Before the dive, check that the Nitrox dive
parameters have been correctly set up:
the percentage of oxygen in the mix and
the partial pressure of oxygen partial
pressure which determines the maximum
permitted depth for the dive.
!
WARNING
This function should only be used by highly
experienced divers. Users who clear the
residual nitrogen memory cannot use the
instrument for repetitive dives. Do not dive
with the M1 after clearing the nitrogen
memory if you have already dived within
the previous 24 hours.
DIVE COMPUTER
37
ENGLISH
M1 RGBM.qxd 06/10/2005 15.12 Pagina 37
Page 17

38
FIG. 24
Fig. 25 - "No decompression" dive, the WIN1 display
layout shows:
Nitrox icon.
Sea/fresh.
No deco icon.
Current depth (in "m" or "ft").
Dive duration in minutes.
No decompression time remaining in minutes.
% CNS O
2.
FIG. 25
Fig. 26 - Pressing the <Mode> button switches, for
approximately 8 seconds, to the WIN2 display layout
which shows:
Nitrox icon.
Sea/fresh.
No deco icon.
Maximum depth (in "m" or "ft").
Measured temperature (in °C or °F).
No decompression time remaining expressed in
minutes.
Value entered for % O
2 in the breathing mix.
After the 8 sec have elapsed, or when the <Mode> is
pressed, the display automatically reverts to the WIN1
layout.
FIG. 26
Fig. 27 - "Decompression stop" dive, the WIN1
display layout shows:
Nitrox icon.
Sea/fresh.
"Deco" icon.
Current depth (in "m" or "ft").
Dive duration expressed in minutes.
Depth of deepest decompression stop.
Duration of the decompression stop in question.
% CNS O
2.
FIG. 27
Fig. 28 - Pressing the <Mode> button switches, for
approximately 8 seconds, to the WIN2 display layout
which shows:
Nitrox icon.
Salt/fresh.
"Deco" icon.
Maximum depth reached (in "m" or "ft").
Measured temperature (in °C or °F).
Ascent time, i.e. the total time required to return
to the surface.
Programmed value of % O
2 in the breathing mix.
After the 8 sec have elapsed, or when the <Mode> is
pressed, the display automatically reverts to the
WIN1 layout.
FIG. 28
M1 RGBM.qxd 06/10/2005 15.12 Pagina 38
Page 18

Fig. 29- Surfacing, the display shows:
the duration of the dive.
the maximum depth.
% CNS O
2.
% O
2.
FIG. 29
Fig. 30 - After 3 minutes M1 switches from DIVE
mode to OFF mode, and shows:
Blinking airplane icon until the no-fly time goes
to zero.
Desaturation time and icon until the
desaturation time goes to zero.
% CNS O
2.
Icons for any underwater behavior errors
(omitted stop, uncontrolled ascent, % CNS O
2).
FIG. 30
"BOTTOM TIME"
Only the dive timer (with seconds display) and depth
gauge functions are active.
WIN1 shows the following information (Fig. 31):
Depth.
Dive time in minutes and seconds.
"Bt" message.
FIG. 31
Pressing the <Mode> button switches, for
approximately 8 seconds, to the WIN2 layout which
shows:
Maximum depth.
Measured temperature (in °C or °F).
"Bt" message.
After the 8 seconds have elapsed, or when the
<Mode> button is pressed, the display automatically
reverts to the WIN1 layout.
The profiles of any dives in "bottom time" mode will be
stored in the logbook together with the other dives.
If, after a "Bt" dive, the user attempts to set "Air" or
"Nitrox" mode using SET1, the M1 will lock out in
Stop Mode for the next 24 hours.
SURFACE MODE
POST DIVE SURFACE TIME
Fig. A shows the different ways for accessing SURF
mode, i.e by pressing the <Mode> button from DIVE
mode or by pressing the <-> button from SET mode.
M1 keeps SURF mode visible for as long as the no-fly
icon is active.
To enter SURF mode, press the <Mode> button for 2
seconds (fig. C).
The display shows the surface time in hours and
minutes (Fig. 32). In the case of a "Nitrox" dive,
the displayed value is replaced for approximately 3
sec by the value of % CNS O
2.
FIG. 32
Pressing the <-> button displays the desat time.
Pressing the <-> button again switches displaying to
the no-fly time.
Pressing the <-> button again reverts to showing the
surface time.
Pressing the <Mode> button exits SURF mode and
goes on to SET mode.
DIVE COMPUTER
39
ENGLISH
M1 RGBM.qxd 06/10/2005 15.12 Pagina 39
Page 19

40
RELATIONSHIP BETWEEN DESATURATION TIME AND
NO-FLY TIME
CALENDAR AND CLOCK
Fig. A shows the different ways for accessing SURF
mode, i.e by pressing the <Mode> button from SET
mode or by pressing the <-> button from PLAN mode.
The display (Fig. 33) shows:
Year (4 digits).
Date.
Month.
Hour and minutes (in 24 h format).
FIG. 33
SCROLLING OF NO
DECOMPRESSION LIMITS
Fig. A shows the different ways for accessing SURF
mode, i.e by pressing the <Mode> button from CLOCK
mode or by pressing the <-> button from SIMUL mode.
This function allows the user to scroll through the no
decompression limits, automatically taking into account
the current residual saturation of his body tissues from
the preceding dive.
If a "Nitrox" dive is selected, the computer also takes
into account the percentage of O
2 and the max PPO2
settings.
To enter PLAN mode, press the <Mode> button for 2
seconds (fig. D).
Scrolling is started by pressing the <Mode> button,
the computer displays (Fig. 34):
Depth.
No decompression time remaining expressed in
minutes.
FIG. 34
Repeatedly press and release the <-> button to
increase the depth by three meters (9.8 feet) each time,
up to a maximum of 48 m (157.4 ft). For each depth,
the display shows the corresponding no decompression
time remaining expressed in minutes.
Instead, if the two buttons are pressed simultaneously,
the computer exits PLAN mode.
If "Nitrox" mode is active, the display shows the
programmed % of O
2 (Fig. 35).
FIG. 35
The maximum permitted depth will vary depending
on the values entered for % O2 and maximum PPO2.
In "Bottom Time" mode, scrolling of the no
decompression limits is inhibited (Fig. 36).
FIG. 36
In "Air" or "Nitrox" mode, scrolling of the no
decompression limits is inhibited if the Stop condition is
active (Fig. 37).
NOITARUTASED
EMIT
EMITYLF-ON
evititepernoN
noisserpmocedon
evid
sruoh21÷0 sruoh21
sruoh21>
noitarutaseD=
emit
noisserpmoceD
roevidpots
evidevititeper
sruoh42÷0 sruoh42
sruoh42>
noitarutaseD=
emit
M1 RGBM.qxd 06/10/2005 15.12 Pagina 40
Page 20

FIG. 37
DIVE SIMULATOR
Fig. A shows the different ways for accessing SURF
mode, i.e by pressing the <Mode> button from PLAN
mode or by pressing the <-> button from LOG mode.
The M1 can simulate dives taking into account the
current residual saturation of the diver's tissues. In the
case of "Nitrox" dives, the simulation also takes into
account the settings for % O
2 in the breathing mix
and for maximum PPO2.
If the M1 is in "Bottom Time" mode, the dive
simulator function is inhibited. In "Air" or "Nitrox"
mode, the dive simulator function is inhibited if the
Stop condition is active.
To enter SIMUL mode, press the <Mode> button for
2 seconds (fig. E). This simulation mode phases are:
SIMUL - WAITING TO START DIVE (FIG. 38)
Press the <-> button to start simulating the dive.
FIG. 38
SIMUL - DIVE
The simulation time runs 5 times faster than real time. In
other words, after 12 seconds of real time, one minute
will have passed in the simulated dive. The M1 displays
the data in the same way as for a real dive, again dividing
it into two display layouts. At approximately 20 seconds
intervals, the WIN1 display layout is replaced by the
WIN2 which shows the maximum depth and the ascent
time; after approximately 4 seconds the display reverts
to showing the WIN1 layout.
Button functions:
Press and release the <-> button to increase the
depth by 1 meter (3.28 feet) each time. Repeatedly
press and release this button to simulate a descent
rate of 12 m/minute (39.3 ft/minute). Keep it pressed
to simulate a descent rate of 24 m/min (78.7 ft/min).
By pressing the <Mode> button it is possible to
simulate an ascent rate of 10 m/min.
Press <Mode> and <-> simultaneously to exit SIMUL
mode.
SIMUL - SURFACING
When the depth is less than one meter (3.28 feet), the
M1 considers the diver to be at the surface. The
display shows the maximum depth reached and the
duration of the simulated dive.
Press the <-> button to resume the dive.
Press <Mode> and <-> simultaneously to exit SIMUL
mode.
SIMUL - POST DIVE SURFACE TIME
On surfacing from the simulated dive, the M1 switches
to surface mode and displays the surface time. This value
increases quickly because the simulation time runs even
faster than during dive mode (one real-time second =
one minute in the simulated surface time). Press
<Mode> to switch to a display of the "desat time".
LOGBOOK
LOGBOOK mode enables the user to view the data
recorded for the last 50 dives, organized like the pages of
a "logbook", with the number "1" assigned to the most
recent dive, "2" to the preceding dive, and so forth up to
dive number "50". For the 50 most recent dives, and with
a maximum limit of approximately 38 hours, it is possible
to view the individual profile points of each recorded
dive. When the LogBook memory is full and the user dives
again, the oldest dive record is deleted to free up memory
for the new data.
Fig. A shows the different ways for accessing SURF
mode, i.e by pressing the <Mode> button from SIMUL
mode or by pressing the <-> button from PC mode.
The display shows the history data (Fig. 39), i.e.:
Total number of logged dives.
Total dive hours logged.
Maximum logged depth.
DIVE COMPUTER
41
ENGLISH
M1 RGBM.qxd 06/10/2005 15.12 Pagina 41
Page 21

42
FIG. 39
Pressing the <Mode> button for approximately 2 minutes
(fig. F), activates scrolling of the dives. The display shows
the following details for the most recent dive (fig. 39):
Sequential number of the dive (1 = most recent).
Start dive date and time.
FIG. 40
Pressing the <Mode> button scrolls through the
dives in memory.
Pressing the <-> button displays page 2, which
contains the summary details of the currently selected
dive. These are:
Dive mode: Air (Fig. 41), "Nitrox" (Fig. 42) or
"Bottom Time" (Fig. 43).
FIG. 41
FIG. 42
FIG. 43
Indication of "Stop Mode" dive.
Fresh or Sea water.
In case of a "Nitrox" dive.
Percentage of O
2 in the breathing mix.
% CNS O
2 Max setting.
Maximum logged depth during the dive.
Total duration of the dive.
Maximum ascent rate reached.
Decompression stop violation.
"No deco" icon for no decompression dive.
"Deco" icon for decompression-stop dive.
To exit LOGBOOK mode, press the <Mode> and <->
buttons simultaneously.
Pressing the <Mode> button for 2 seconds enters
profile viewing mode. There are three ways for
scrolling through the profile points:
Press and release the <Mode> button to scroll
through the profile points one at a time.
Press <Mode> for 2 seconds and then release it to
activate automatic scrolling of the profile points.
Press and hold down the <Mode> button to
activate automatic scrolling three time faster
than above.
During automatic scrolling of the profile points, press
<Mode> to revert to scrolling the points one at a time.
During viewing of the profile points, the display
shows the following information (Fig. 44):
Depth.
Interval (20 Sec) to which the depth is referred.
Speed of ascent, if any.
Decompression stop violation, if any.
"Deco" or "no deco" icon.
"Nitrox" - indication in any intervals where the
max PPO
2 was exceeded.
M1 RGBM.qxd 06/10/2005 15.12 Pagina 42
Page 22

FIG. 44
To exit the profile viewing mode, press the <Mode>
and <-> buttons simultaneously. The display will go
back to the preceding general data view.
INTERFACING TO A PC
Using a special interface unit and a dedicated
Windows software application, it is possible to
transfer data from the LogBook of an M1 to a personal
computer, and to configure the various SET parameters
from a personal computer.
The communication between the M1 and the PC is
optical, and takes place via an RS232 serial port of the
PC and the special interface unit which converts the
optical signals into electrical signals and vice versa.
The data transfer procedure is as follows:
The user selects PC mode (Fig. 45). In this condition,
the transmission will be managed by the interface
program running on the personal computer.
Fig. A shows the different ways for accessing PC
mode:
By pressing the <Mode> button from LOGBOOK
mode.
By pressing the <-> button from OFF mode.
By pressing the <-> button from DIVE mode.
FIG. 45
FAQ
Q: If the level 1 low-battery indication appears (i.e.
the battery icon illuminates) when the computer
is in use, for example during a dive: how many
dives can I still do before replacing the
batteries?
A: Approximately 5 dives. However it is good
practice to replace the batteries as soon as
possible.
Q: If the level 1 low-battery indication appears (i.e.
low battery icon and audible alarm) when the
computer is switched on after it has not been
used for some time, how many dives can I still
do before replacing the batteries?
A: Because the computer has not been used for
some time, it is impossible to know when the
battery charge first dropped below level. Replace
the batteries before your next dive.
Q: When I replace the batteries, will my LogBook
dive data be lost?
A: No.
Q: When I replace the batteries, will I lose the data
of my last dive?
A: No, provided you do NOT replace the batteries
within the 10 minutes after the end of your dive.
Q: What happens if I replace the batteries after a dive,
before the desaturation time has gone to zero?
A: The tissue desaturation calculation will be
aborted, and when you put in the new batteries
the tissues will be completely desaturated. Do
not use the computer for at least 24 hours.
Q: How do I use the backlight when I am on the
surface?
A: From DIVE mode, press the <-> button for
approximately 2 seconds. The backlight will
illuminate in timer-controlled mode.
Q: What happens if I start a dive with the M1 switched
off or in some mode other than DIVE mode?
A: The M1 will switch to DIVE mode and indicate the
correct depth, automatically within 30 seconds,
or immediately on pressing the buttons.
Q: If I select "Air" or "Nitrox" mode after completing
a dive in "Bottom Time" mode, how will the dive
be managed?
A: M1 does not allow you to do an "Air" or "Nitrox"
dive within the 24 hours immediately following
a "Bottom Time" dive. In this case, the M1 will
switch to "stop mode".
Q: After replacing the batteries, the display illuminates
and some numbers appear: what do they mean?
A: They are the serial number.
DIVE COMPUTER
43
ENGLISH
M1 RGBM.qxd 06/10/2005 15.12 Pagina 43
Page 23

44
MAINTENANCE
REPLACING THE BATTERIES
Replacing the batteries is a very simple operation
which can be performed directly by the user. Unscrew
the water-tight cover by rotating it through a ¼ turn
in the anticlockwise direction and replace the
batteries, being careful to insert them with the
correct polarity.
The correct polarity is indicated on the back of the
instrument.
The battery compartment is watertight and noncommunicating with the core of the instrument.
If water leaks inside the battery compartment, just
dry it carefully to remove all moisture before reinstalling the batteries.
Do not throw the old batteries away at sea!
You can adapt the length of the strap to your wrist,
by cutting it to size along the special grooves,
(fig. 46).
FIG. 46
!
CAUTION
Do not replace the battery within the 10
minutes immediately following a dive.
Replacing the battery too soon after the dive
will result in loss of the data for that dive.
In any case, remember that replacing the
battery causes the residual nitrogen,
desaturation time and no-fly time data to
be lost. It is therefore advisable to make a
note of this information before replacing
the battery. Do not replace the battery
between repetitive dives.
!
WARNING
TO CLOSE THE COVER AGAIN, FIRST PUSH
IT ALL THE WAY IN, THEN ROTATE THE
COVER BY A ¼ TURN IN THE CLOCKWISE
DIRECTION. WARNING: BEFORE ROTATING
THE COVER TO LOCK IT IN THE CLOSED
POSITION, MAKE SURE IT HAS BEEN
PUSHED ALL THE WAY IN, COMPLETELY
UP AGAINST THE COMPUTER BODY.
AFTER CLOSING THE BATTERY
COMPARTMENT, DOUBLE-CHECK THAT THE
COVER HAS BEEN CLOSED CORRECTLY,
AND IS PERFECTLY INSERTED IN ITS SEAT.
!
WARNING
BEFORE CLOSING THE BATTERY COVER,
CHECK THE CONDITION OF THE O-RING,
MAKE SURE IT IS PERFECTLY CLEAN AND
CORRECTLY POSITIONED WITHIN ITS SEAT
IN THE COVER, AND LUBRICATE LIGHTLY
WITH SILICONE GREASE.
M1 RGBM.qxd 06/10/2005 15.12 Pagina 44
Page 24

210
1542-01-M1-RGBM-ung.indd Sez1:2081542-01-M1-RGBM-ung.indd Sez1:208 06/10/2005 15.32.3506/10/2005 15.32.35
Page 25

211
FIGURES
A
1542-01-M1-RGBM-ung.indd Sez1:2091542-01-M1-RGBM-ung.indd Sez1:209 06/10/2005 15.32.3506/10/2005 15.32.35
Page 26

212
1542-01-M1-RGBM-ung.indd Sez1:2101542-01-M1-RGBM-ung.indd Sez1:210 06/10/2005 15.32.3606/10/2005 15.32.36
Page 27

213
FIGURES
Β
1542-01-M1-RGBM-ung.indd Sez1:2111542-01-M1-RGBM-ung.indd Sez1:211 06/10/2005 15.32.3706/10/2005 15.32.37
Page 28

214
C
1542-01-M1-RGBM-ung.indd Sez1:2121542-01-M1-RGBM-ung.indd Sez1:212 06/10/2005 15.32.3806/10/2005 15.32.38
Page 29

215
FIGURES
D
1542-01-M1-RGBM-ung.indd Sez1:2131542-01-M1-RGBM-ung.indd Sez1:213 06/10/2005 15.32.3906/10/2005 15.32.39
Page 30

216
E
1542-01-M1-RGBM-ung.indd Sez1:2141542-01-M1-RGBM-ung.indd Sez1:214 06/10/2005 15.32.4006/10/2005 15.32.40
Page 31

217
FIGURES
F
Page 32

1542-COVER-definitiva.indd 11542-COVER-definitiva.indd 1 06/10/2005 15.43.0706/10/2005 15.43.07
 Loading...