

Marco Polo Navigator 7 User Manual

User Manual
Marco Polo Navigator 7
FMI_3537 Revised: July 2008

2
About Us
Falk Marco Polo Interactive GmbH
Marco-Polo-Str.1
73760 Ostfildern
Falk Marco Polo Interactive GmbH reserves the right to change the
information and details given in this manual without prior notice being
given. No part of these documents may be reproduced or transferred for
any purpose whatsoever without the express written permission of Falk
Marco Polo Interactive GmbH, irrespective of by which manner or by
which means this takes place.
All of the trademarks and symbols mentioned in this manual are the sole
property of their respective owners and may therefore not be used for
commercial or any other purposes.
As in spite of every effort being made it is never possible to completely
prevent all errors and mistakes, no liability is accepted for the content in
this manual being correct. We are always grateful to receive notification of
any errors or mistakes.
© 2008 Falk Marco Polo Interactive GmbH, Ostfildern. All rights reserved.

3
Table of contents
1 Introduction.......................................................................................................5
1.1 About this handbook................................................................................. 5
1.2 Safety Notices.......................................................................................... 6
2 The first trip.......................................................................................................8
3 Navigation screen...........................................................................................15
3.1 Overview ................................................................................................ 15
3.2 Rapid access menu functions................................................................. 22
3.2.1 Split Screen: options ....................................................................... 23
3.2.1.1 GPS............................................................................................. 24
3.2.1.2 2D/3D view.................................................................................. 25
3.2.1.3 Loudspeaker................................................................................ 25
3.2.1.4 Special destinations..................................................................... 25
3.2.1.5 Brightness ................................................................................... 25
3.2.1.6 Detours........................................................................................ 26
3.2.1.7 Next destination........................................................................... 26
3.2.1.8 Save your position....................................................................... 26
3.2.2 Split Screen: map (128 MB device only) ......................................... 26
3.2.3 TMC list........................................................................................... 27
4 Marco Polo Navigator function overview ........................................................30
4.1 Destination entry .................................................................................... 30
4.1.1 Entering an address........................................................................ 31
4.1.1.1 Selection from the map view ....................................................... 32
4.1.1.2 Selecting a special destination (POI) in the address input screen32
4.1.2 Selecting a favourite........................................................................ 35
4.1.3 Selecting a recent destination......................................................... 36
4.1.4 Selecting the home address............................................................ 36
4.1.5 Selecting a special destination in the destination entry screen ....... 37
4.1.6 Selecting a Travel Guide destination............................................... 40
4.1.7 Entering a destination using geo-coordinates ................................. 41
4.2 Route options......................................................................................... 43
4.3 “My Location” function............................................................................ 45
4.4 Travel Guide........................................................................................... 46
4.5 Settings .................................................................................................. 46
4.6 Route planner......................................................................................... 46
4.7 Tours...................................................................................................... 48
4.7.1 Creating a new tour......................................................................... 49
4.7.2 Tour options.................................................................................... 50
4.7.3 Selecting and editing an existing tour.............................................. 51
4.8 Next destination...................................................................................... 52
4.9 Route info............................................................................................... 53
4.10 Circumvent section................................................................................. 53
4.11 Save position.......................................................................................... 54
4.12 Favourites............................................................................................... 54
4.13 Delete route / manual mode................................................................... 56
5 Travel Guide...................................................................................................57
5.1 Establishing a starting point.................................................................... 57

4
5.2 Selecting a theme category .................................................................... 58
5.2.1 Top Highlights..................................................................................59
5.2.2 Campsites........................................................................................60
5.2.3 Attractions........................................................................................62
5.2.4 Museums.........................................................................................64
5.2.5 Eating & Drinking.............................................................................66
5.2.6 Shopping ......................................................................................... 68
5.2.7 Overnight Accommodation .............................................................. 70
5.2.8 In the Evening..................................................................................72
5.2.9 Trade Fairs & Transport...................................................................74
5.2.10 Art & Culture....................................................................................76
5.2.11 All Categories.................................................................................. 78
5.3 Detailed view of a special destination.....................................................79
6 Settings.......................................................................................................... 83
6.1 Map display ............................................................................................ 84
6.1.1 2D/3D view...................................................................................... 84
6.1.2 2D help on/off.................................................................................. 84
6.1.3 Auto-zoom on/off............................................................................. 85
6.1.4 POI display...................................................................................... 85
6.2 Adjusting the volume .............................................................................. 85
6.3 Adjusting the brightness ......................................................................... 87
6.4 Checking the battery status .................................................................... 87
6.5 Speed camera detector .......................................................................... 88
6.6 Day/night mode.......................................................................................89
6.7 Setting/changing the home address ....................................................... 89
6.8 Establishing special destination categories ............................................90
6.9 Speed warning........................................................................................92
6.10 Ascertaining route options......................................................................93
6.11 Street names (128 MB device only)........................................................94
6.12 Language................................................................................................94
6.13 TMC messages.......................................................................................94
6.14 Clear history............................................................................................95
6.15 Select unit of distance.............................................................................95
6.16 Time........................................................................................................96
6.17 GPS info.................................................................................................96
6.18 Calibrating the screen.............................................................................97
6.19 Displaying system Information................................................................97
6.20 Displaying copyright information.............................................................97
Additional Information.......................................................... 98
A) Inserting a memory card................................................................................... 99
B) Service & Support .......................................................................................... 100
C) Glossary......................................................................................................... 101

5
1 Introduction
Congratulations on your purchase of a navigation device with the new Marco Polo
Navigator 7.
With the Marco Polo Navigator, you have purchased a product that was developed
and tested with due care; therefore, it meets the highest functionality and operating
requirements. Should you have any suggestions or comments that would allow us to
make our products even better, we would be glad to hear from you. Before you start
using your navigation software, please read this manual to become familiar with the
functions it offers and to exclude the possibility of improper use.
We wish you lots of enjoyment, a good trip, and safe arrival with your navigator.
1.1 About this handbook
The functions of your Marco Polo Navigator navigation software are described in
detail in the following chapters of this handbook.
The following notation is used in this handbook to improve legibility and
comprehensibility:
Bold Important text sections or terms that are used in the navigator program
interface in the form of labels for the corresponding icons.
Note Notes are used repeatedly in order to identify important or essential
information.
In order to ensure you understand the description of the Marco Polo Navigator
properly and to avoid misunderstandings, frequently used terms are explained in
detail below.
Icon: The main menu and the settings menu consist of icons. An icon is a symbol on
the display; icons are used to navigate the Marco Polo Navigator menu. The
graphical symbols are always identified with a label for more information.
Buttons: Buttons are fields which are mainly used to enter destinations. Symbols are
rarely used in this case; instead, text fields such as the “Back”, “Map”, or “PC”
buttons are used.
Screen: “Screen” refers to the contents of the Marco Polo Navigator display. Screen
= display
Note: The screens used in this document show all of the options available.
In the case of products which do not feature all of the functions, these functions are
not displayed on the navigation screen or in the blue bar at the top of the menu. For
6
this reason, the screens used in the document may differ from those in your
navigation system.
1.2 Safety Notices
Please establish the required settings and enter the desired destination before you
leave. Never operate your navigation device while driving, since this could distract
you from the traffic situation and cause an accident.
Road traffic regulations always take precedence over the instructions provided by the
Marco Polo Navigator. Should this require you to leave the route suggested by your
navigation device, the Marco Polo Navigator will recalculate the possibilities and lead
you to your destination along an alternative route.
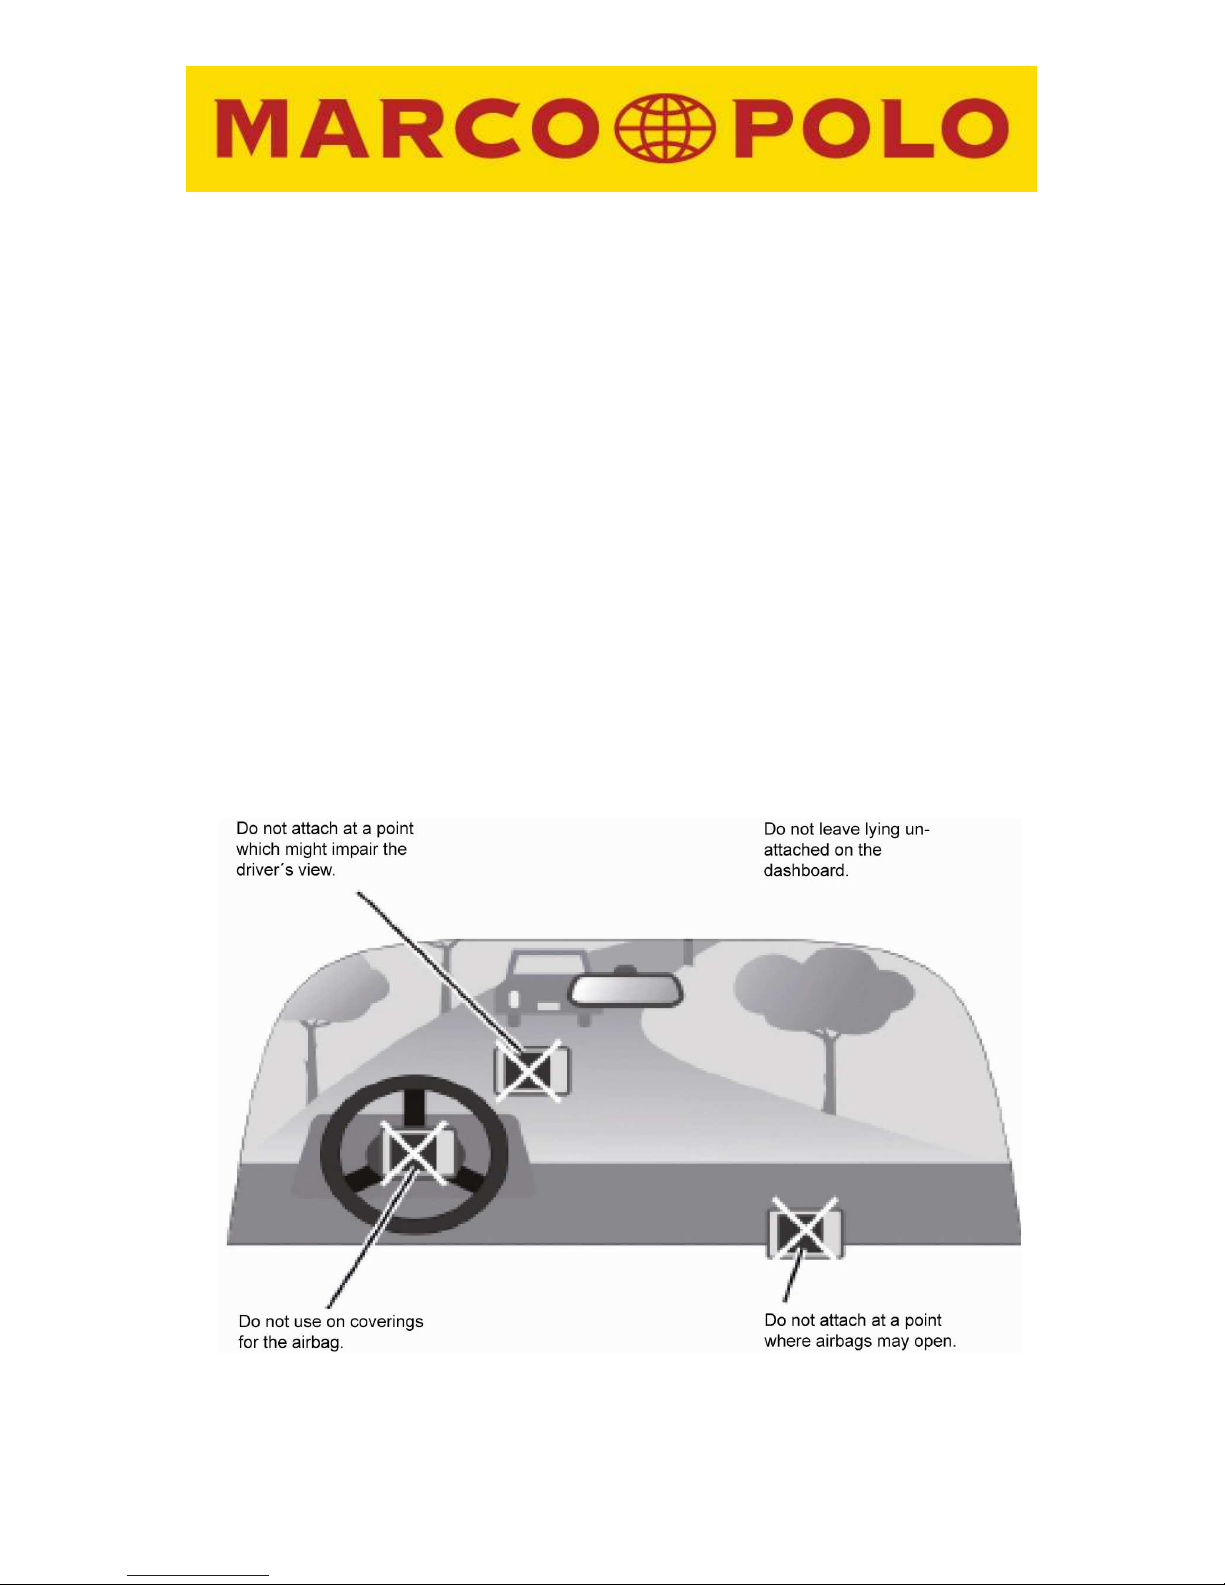
Always attach your navigation device in your vehicle using the retaining system
which is provided for this purpose in order to ensure that, even in a critical driving
situation such as emergency braking, the device does not pose any hazard to the
vehicle or any of the passengers in the vehicle. Ensure that the effectiveness of
passive vehicle safety systems such as airbags cannot be impaired by the
installation of the device.
Note:
Marco Polo navigation software depends on the Global Positioning System (GPS).
The operation of GPS is controlled by the United States of America. This means the

7
USA bears the sole responsibility for the availability and accuracy of the satellite
system. Environmental conditions and changes to the availability and accuracy of
GPS can affect the operation of your device. Therefore, FMI cannot assume any
responsibility for GPS availability and accuracy.
8
2 The first trip
You would like to enter your first destination into the navigation device and head out
as soon as possible? This chapter allows you to enter the world of mobile navigation
as quickly as possible. All of the steps required are described using an example. You
will learn the simplest way to enter and reach your desired destination from your
current location.
The destination for the navigation example is Berlin, the capital of Germany. We take
to you the following address: Unter den Linden 6.
1. Switch on your device and start the Marco Polo Navigator. A road traffic
regulation notification appears; after a few seconds, the Marco Polo Navigator
program interface is displayed. You are greeted by the welcome screen the
first time you turn the device on, and also after a hard reset (see the Quick
Start Guide).
Note: The first time you turn the device on, you are prompted to select the menu
language, speaker, preferred map, date, and time. You can subsequently modify
all of these settings in the settings menu.
2. Select Destination entry in the program interface.
3. Select Addresses entry in the “Enter Destination” screen.
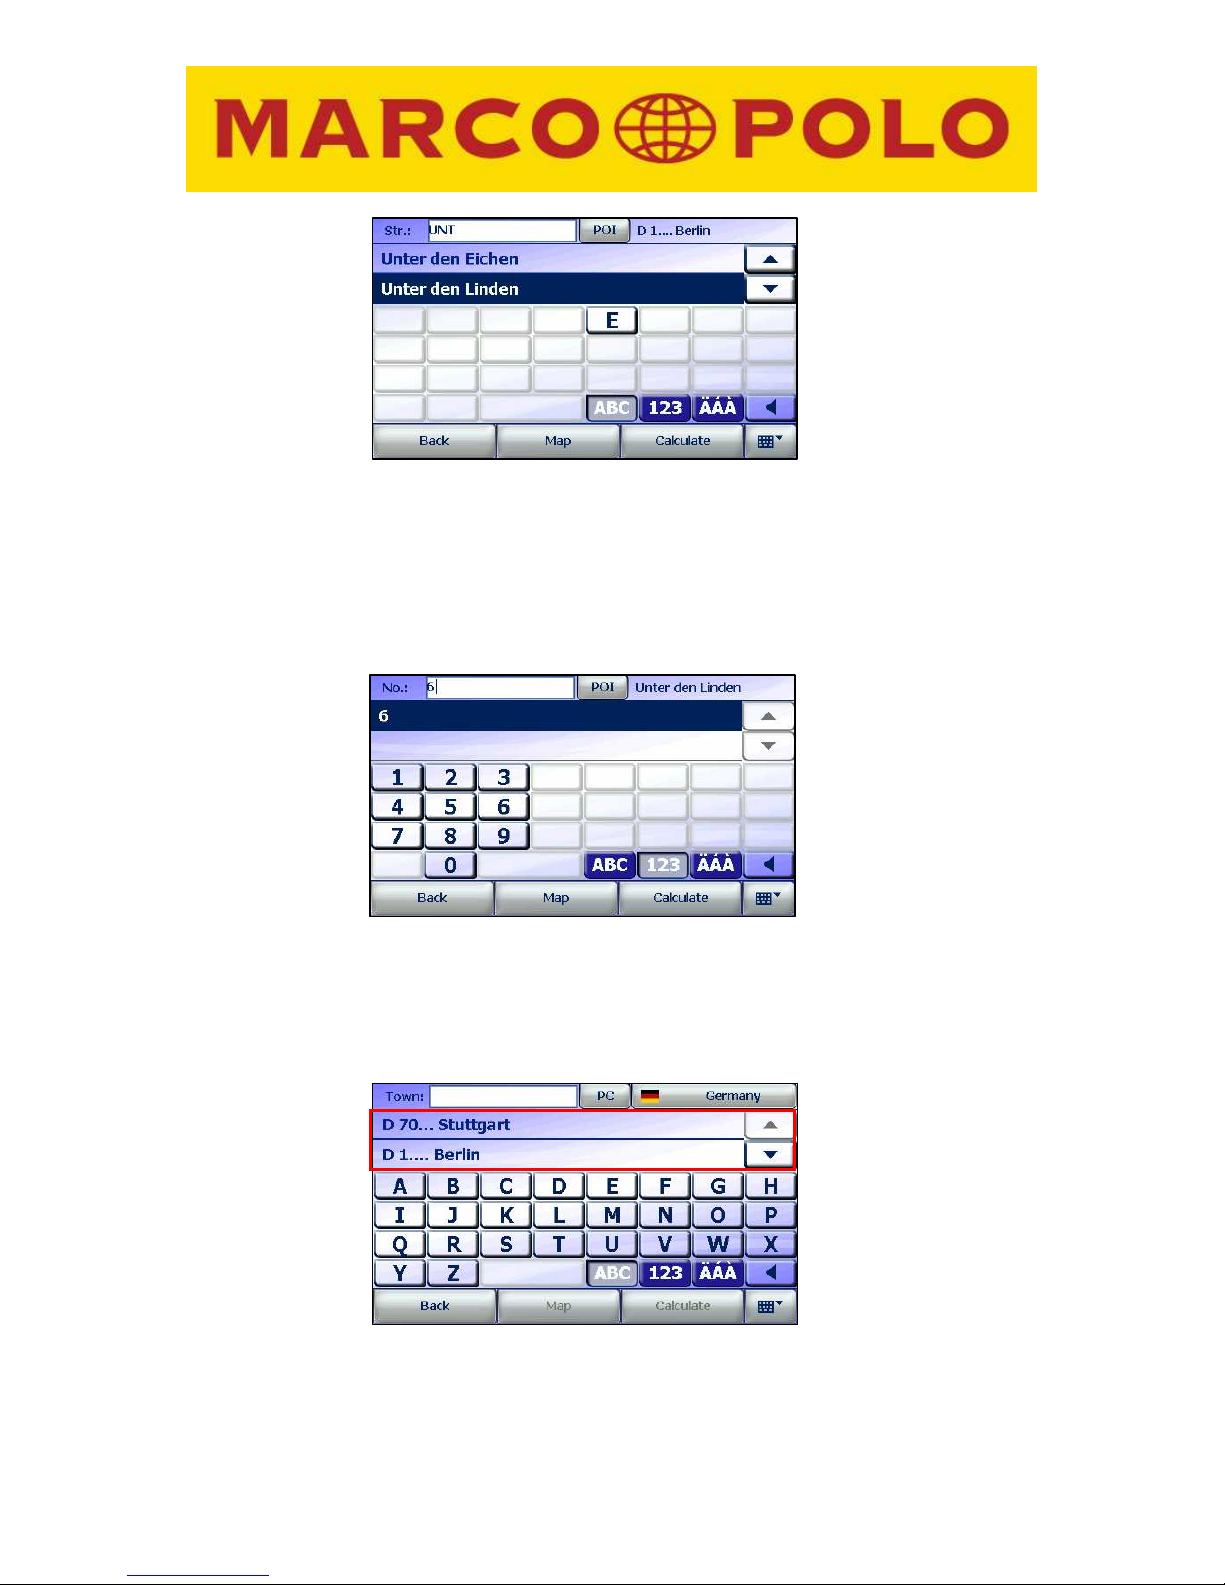
4. An input screen used to enter the desired address is displayed.

9
Before you enter the sample destination city “Berlin”, ensure that Germany is
selected as the destination country. The currently selected country appears in
the top-right corner of the screen and is identified by the corresponding
national flag and the country name. Tap the button in order to select a
different country.
The Choose country screen is displayed. The installed national maps are
listed in alphabetical order. All maps with a detailed road network are grouped
at the top of the list. The lower part of the list contains additional countries
covered by the network of major European trunk roads. These countries are
identified by a motorway symbol. Use the arrow keys to scroll through the list
of countries.
Country map with detailed road network
Country for which only a network of major trunk roads is available
Note: You can only enter a destination if a map for the destination country is
installed on your navigation device. For countries in which only the network of
main trunk roads is available, the destination selection screen will only show
destinations located on the main trunk roads.
Note:For cross-national route calculations, you must have the country maps
for the destination country as well as the countries which you must travel
through along your route. If you do not have all of the country maps for the
10
countries in between, the European network of main trunk roads must be
installed in order that you can reach your destination country.
You can obtain additional, current country maps in the Falk Shop on the
internet.
If you would like to head for a destination located in a country outside Europe,
you should tap the World regions button. All available world regions will be
shown in the form of a list. Tapping an entry in the list selects that entry. You
can then confirm your selection by tapping Ok.
Important: Appropriate mapping material must be pre-installed on the device.
You can obtain maps for destinations outside Europe in the Falk Online Shop
for example.
Note: If you do not have any maps of countries outside Europe installed on
your device, the World regions button will not be shown.
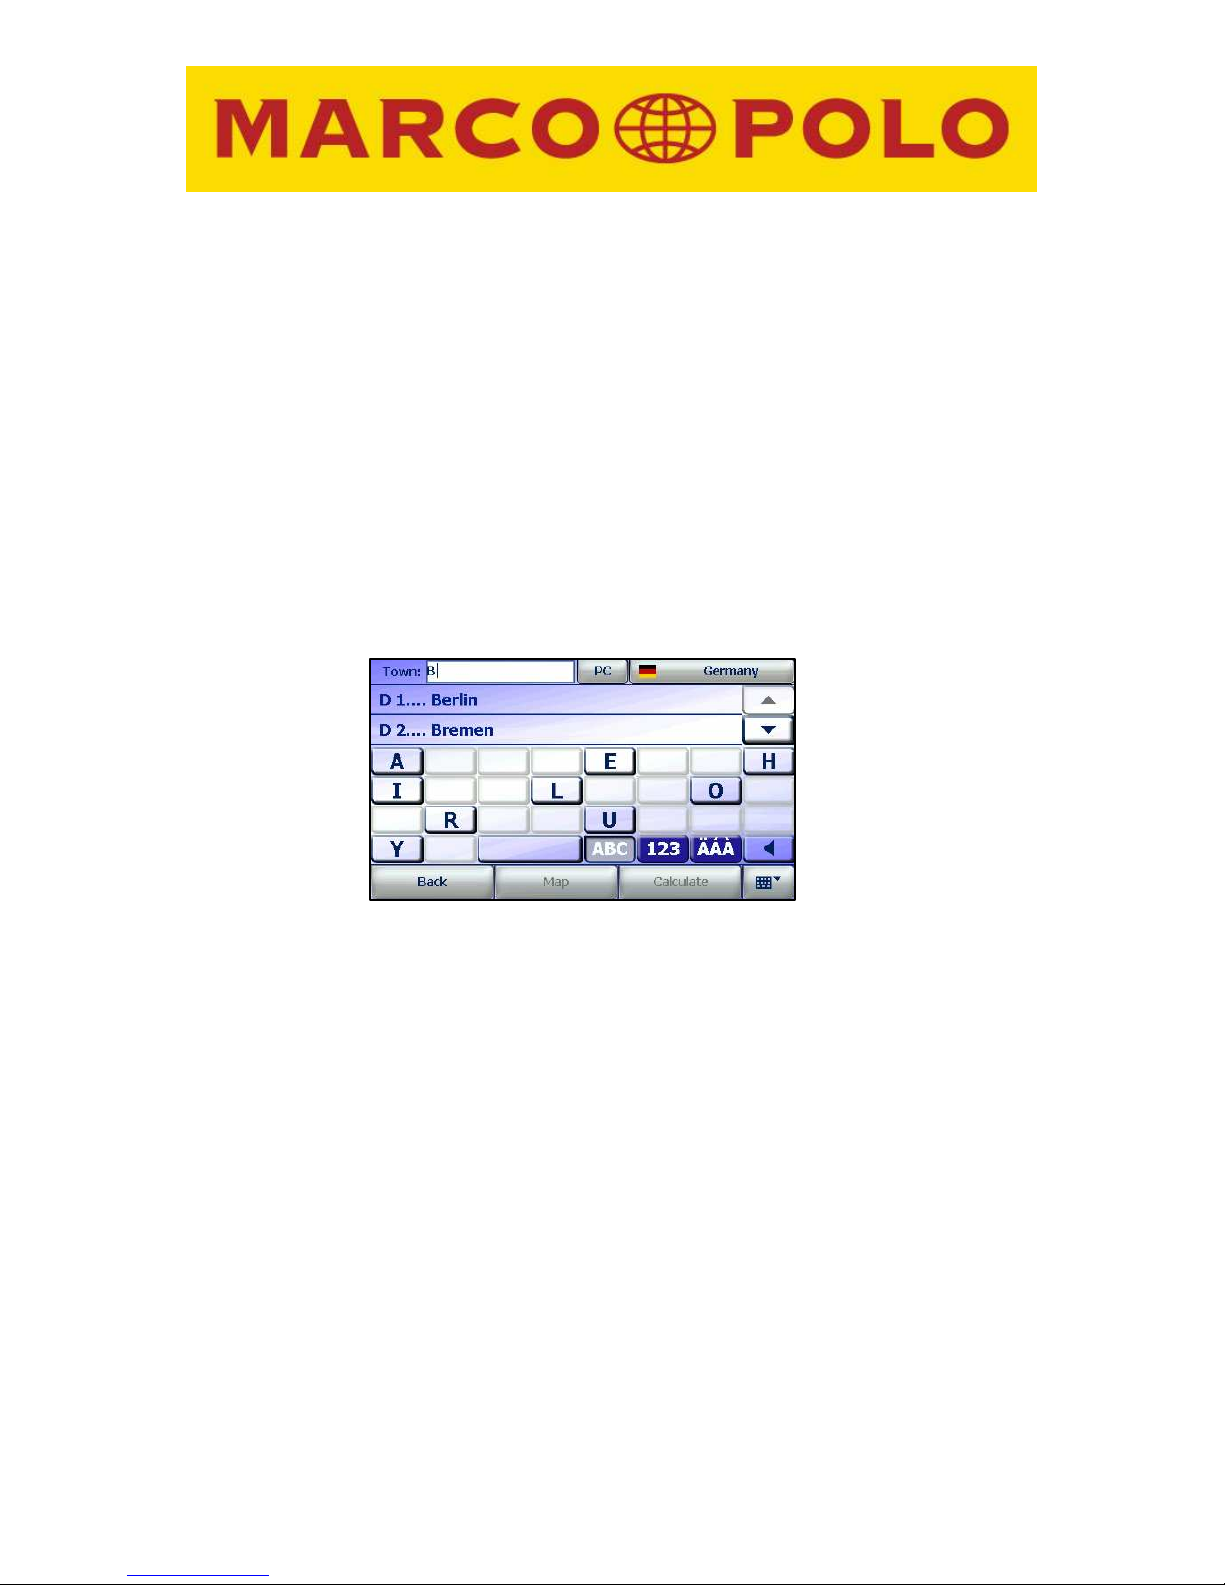
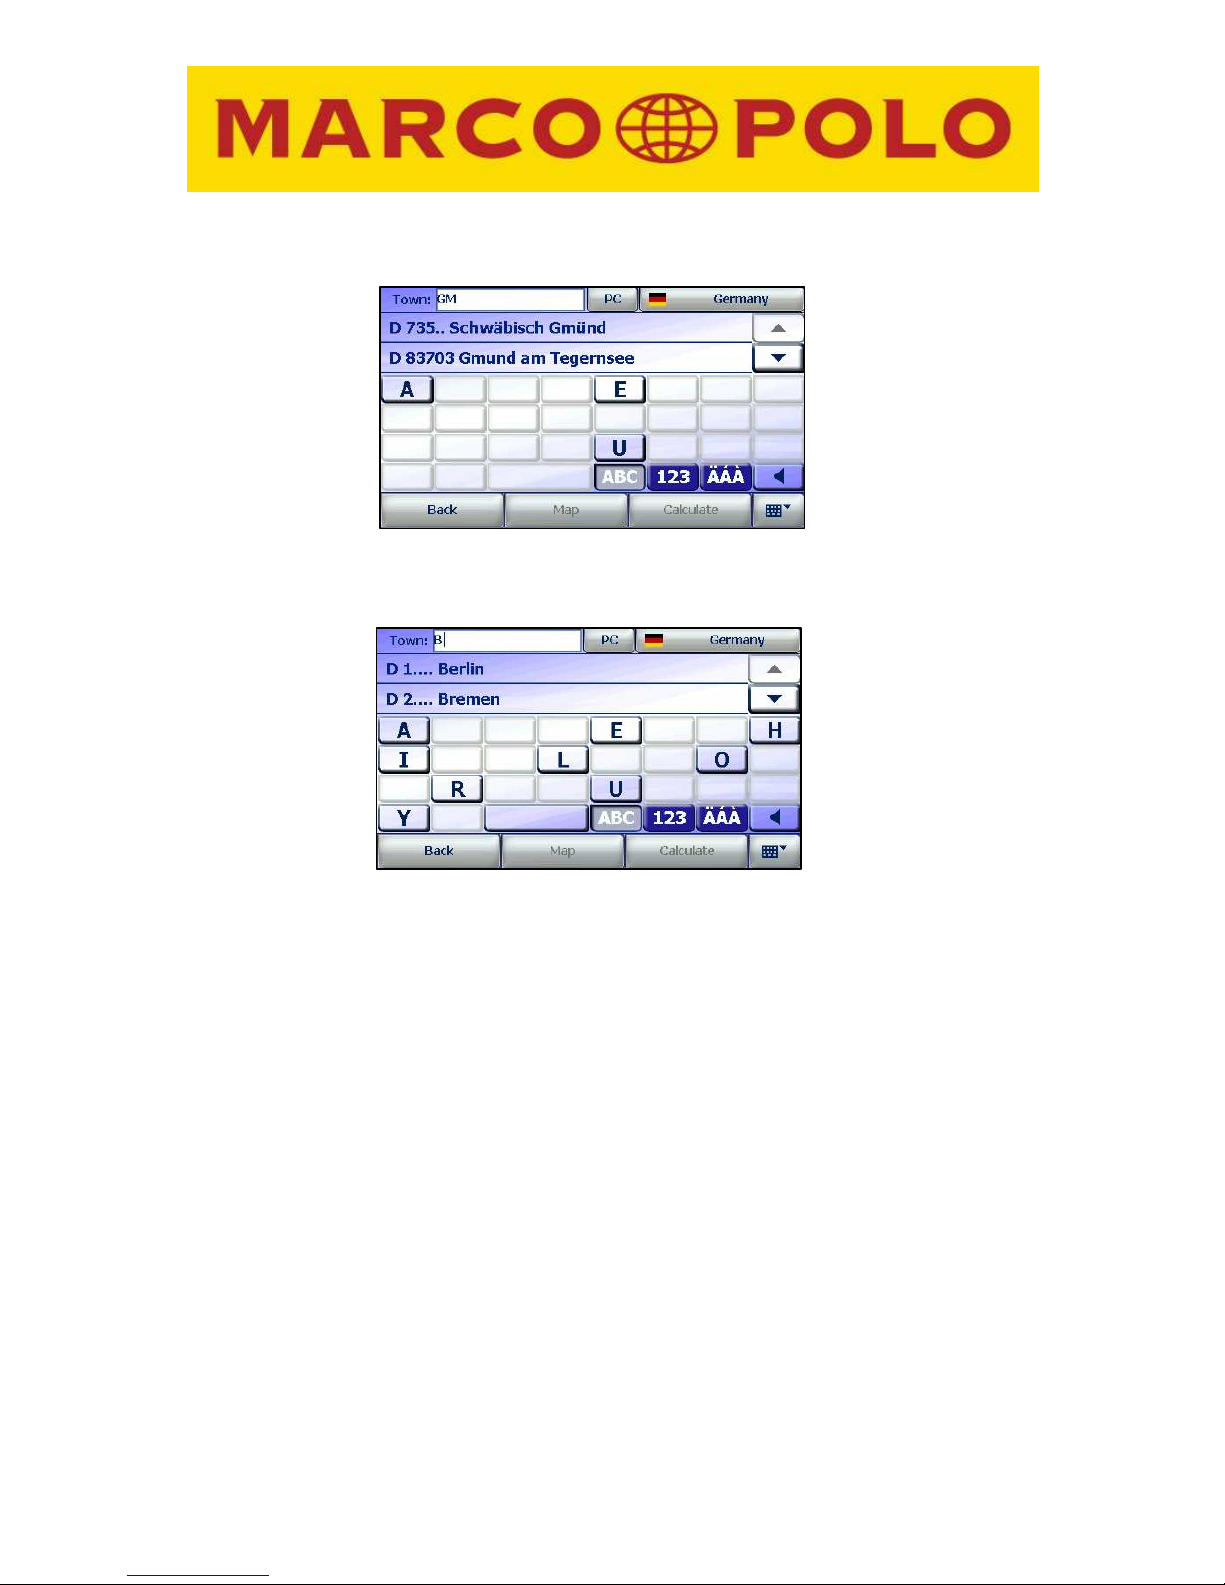
5. Once you have selected the destination country, enter Berlin as the
destination town/city using the on-screen keypad; depending on the type of
input box, the keypad automatically switches between letters, numbers, and
special characters.
You can also switch between these views using the buttons below the keypad.
Please note that some special characters may be included on the number pad
for space reasons.
An automatic word recognition function (look-ahead function) is available to
you when you enter information; it makes data entry quick and easy.
The Marco Polo Navigator has a stored list of possible place names. This list
is filtered according to the letters you have entered. Letters that are no longer
applicable are hidden. Usually, you do not have to enter the entire place
name.
The integrated partial word search ensures that, for composite street names, a
search is also performed for text strings that are not at the beginning of the
street name. For example, entering “Gmünd” is sufficient when you are
searching for “Schwäbisch Gmünd”. Combined with the look-ahead function
and the ability to enter disintegrated umlauts, this example displays the
desired result once "Gmu" has been entered.
11
You can scroll through the list of search results using the arrow keys.
Once you find the desired destination town/city, confirm your selection by
tapping the place name.
Alternatively, the address can be entered using the postal code. To do so,
select the PC button at the top of the screen.
Note:If you do not wish to further restrict your search by selecting a street and
/ or street address but simply want to navigate to the centre of the destination
town/city, simply tap the Calculate button after you select the place name.
Before you tap Calculate, you can also tap the Map button in order to view
the destination address on the map. Tapping the +/- buttons in the map view
will bring up a scroll bar and a knob. You can use the scroll bar to enlarge or
reduce the map section. You can rotate the map using the knob.
6. Enter “Unter den Linden” as the destination street. Proceed the same way you
did when entering the place name. For longer composite street names, part of
the name is usually sufficient. The alternatives that match your search criteria
are displayed in a list. Confirm the street name by tapping the correct item in
the list.
12
7. Enter "6" for the street address. Confirm your selection by tapping the number
or the Calculate button. The route is calculated.
If you accidentally enter a non-existent street address, the look-ahead function
provides you with a choice of valid selections.
Note: When town/city and street names are entered for the first time, they are
stored and displayed at the top of the list the next time you enter a destination.
You can use the arrow keys to navigate through the displayed list. You can
erase the items on this list by selecting "Clear history" in the settings menu.
Note: If the destination you have entered is not unique because there are
multiple occurrences of the address in the destination town/city, another
screen is displayed prior to route calculation. This screen displays a list of all
choices that match the information you have entered; they are identified with

13
their postal code and the name of the district. You can tap the Map button in
order to preview the destination in the map view.
Tap Calculate in order to calculate the route to the selected destination
town/city.
Before the route is calculated, you are given the option of changing the current
route options. To do so, the navigation device will ask you whether you would
like to change your profile (e.g. switch from car to pedestrian), optimise the
route according to various criteria or avoid certain sections of road (e.g. toll
roads). If you do not wish to change these settings, you can begin calculating
your route straight away.
Important: The option Ascertain route options must be activated in the
settings menu.
Depending on the distance to the selected destination, route calculation may
take several seconds; a bar indicates the progress made. The complete
destination address you have entered is shown at the top of the route
calculation screen.
8. You can use the Route button to display the calculated route and the
estimated travel time.
9. Launch the navigation program by tapping the Navigation button.
14
10. All navigation programs require sufficient satellite coverage in order to
continuously determine your current location using a GPS (Global Positioning
System) signal.
To learn how to verify the GPS status for your device, please see Chapter 3.2.1.1
and 6.17.
The first time the device is turned on, it may take a few minutes to recognise the
GPS position so that the Marco Polo Navigator knows its current location. Your
position will be recognised more quickly when the device is turned on on
subsequent occasions.
If you accidentally miss a turnoff or take an incorrect turn, a new route is
calculated automatically. You are safely guided to your desired destination by
navigation announcements; the screen also displays your current position and the
route you need to take.
12. Even if you are not heading for a particular destination and would just like to
explore the local area, you can nevertheless have the navigation screen show
your current position at all times. You will automatically be in free driving mode
unless you are heading for a particular destination or are in simulation mode.

15
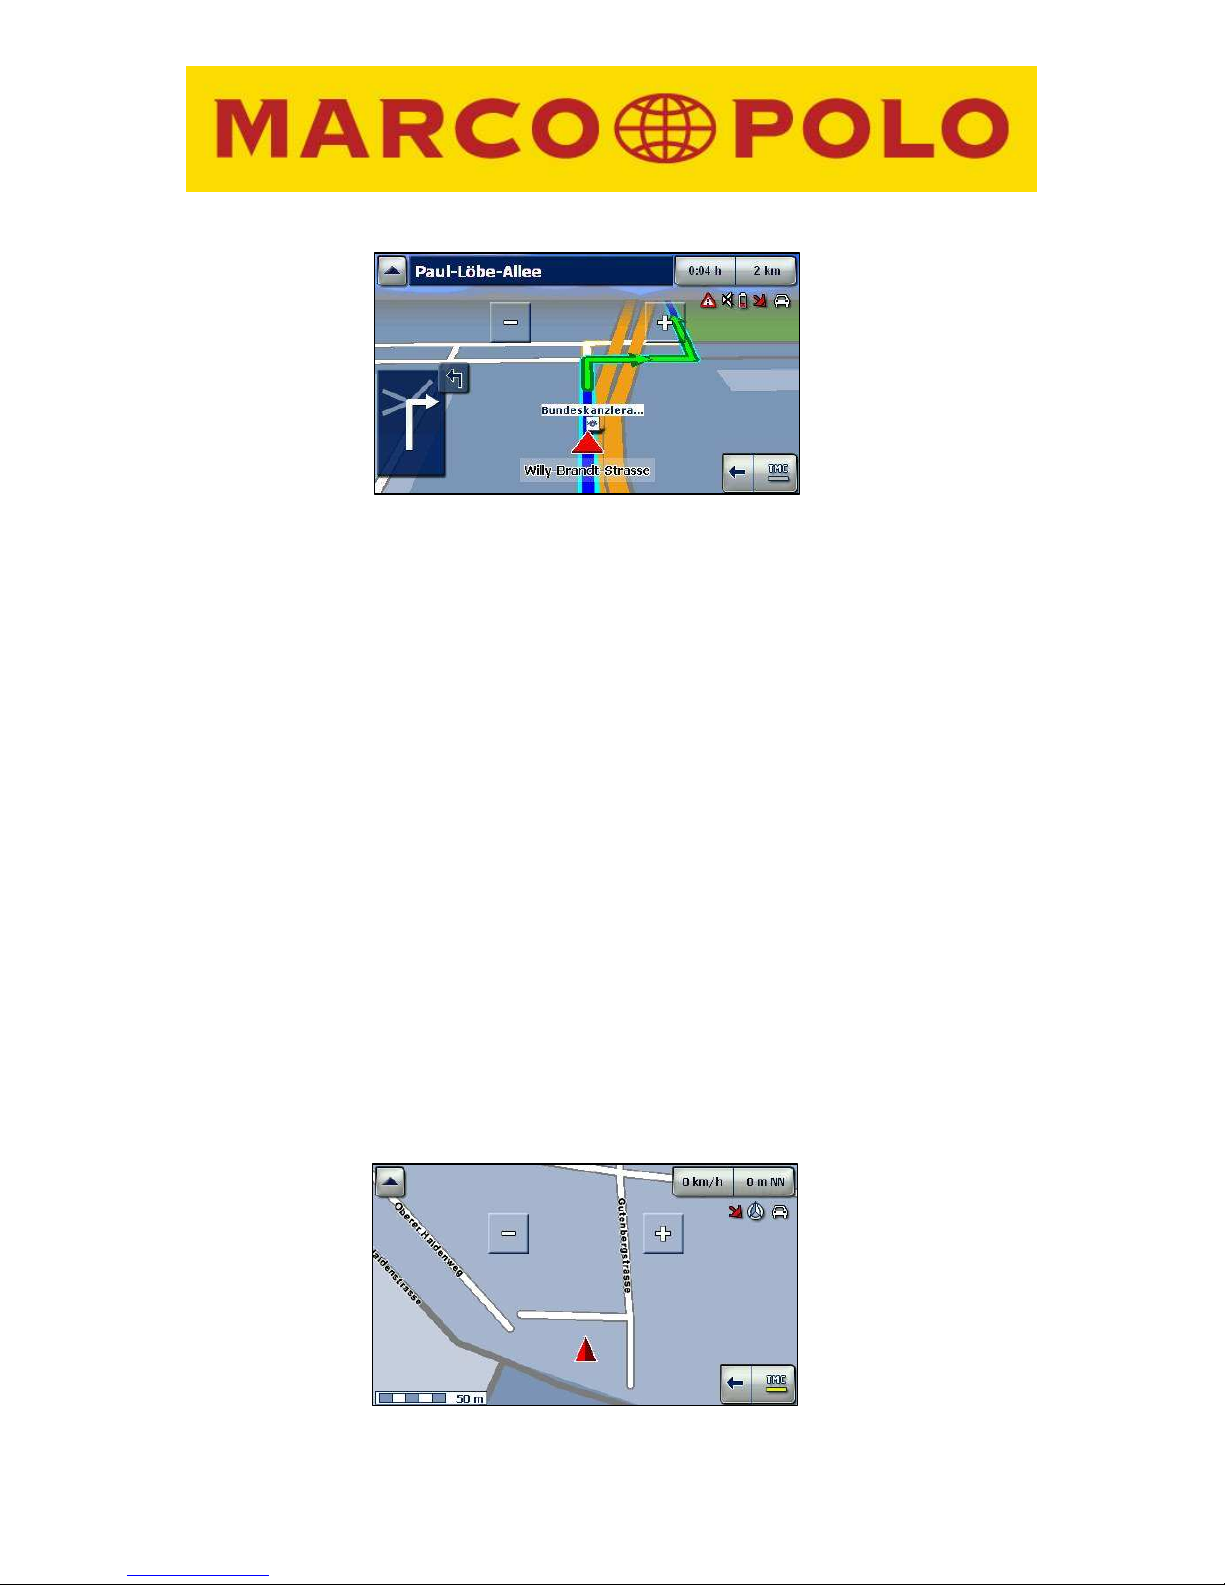
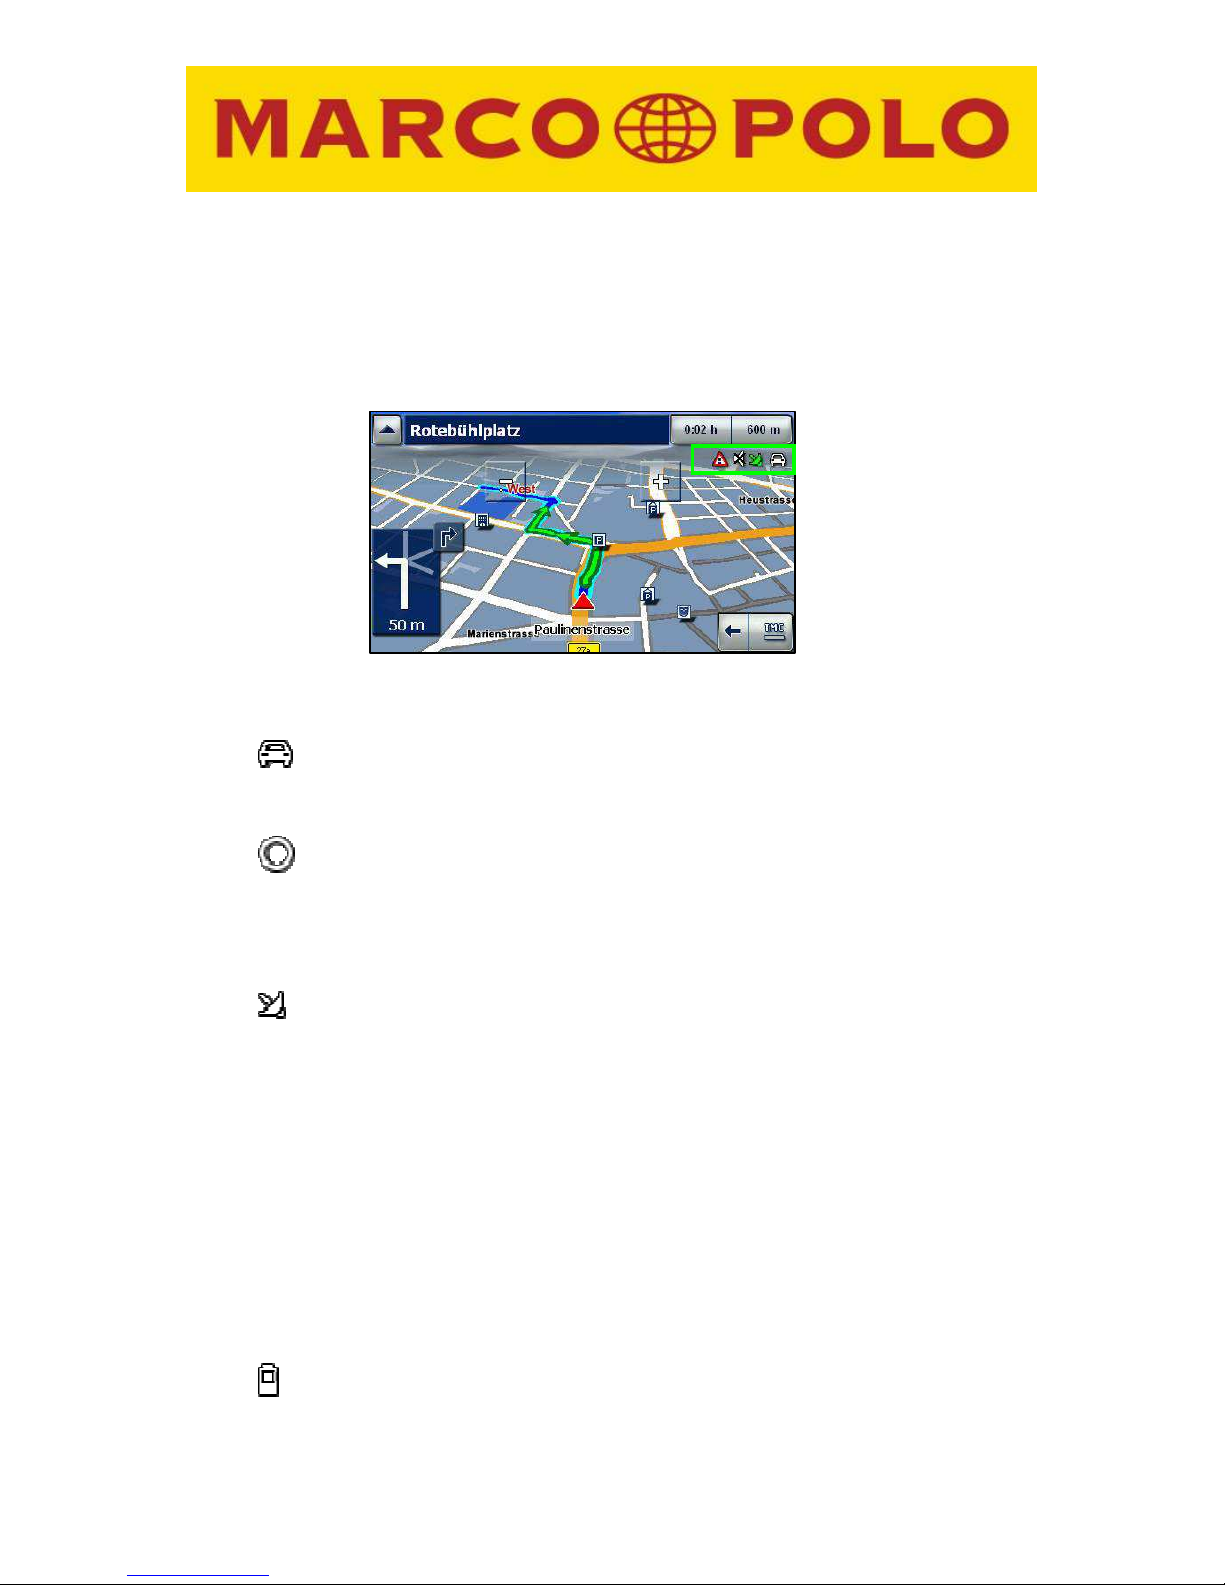
3 Navigation screen
In order to provide you with as much information as possible in addition to the
navigation announcements, several useful information bars and symbols were placed
on the navigation screen.
Note: To avoid being distracted from the traffic situation and therefore causing an
accident, you should bring your vehicle to a stop at a safe location before looking at
the map.
The information on the navigation screen is constantly updated as your position
changes and the information amended accordingly.
You current position is indicated by a 2-dimensional arrow (2D display) or a 3dimensional arrow (3D display) in the map view.
The route calculated by Marco Polo Navigator is highlighted in blue in the map view.
Thus you can preview the calculated route.
The navigation settings can be modified from the navigation screen by tapping a
quick-access menu or under Settings in the main menu (e.g. main menu > settings >
map view > 2D/3D without interrupting navigation).
You can quickly and easily switch to the main application menu by briefly tapping any
point on the map or the button with the finger or a blunt object.
3.1 Overview
The individual functions of the navigation screen are described in this section.
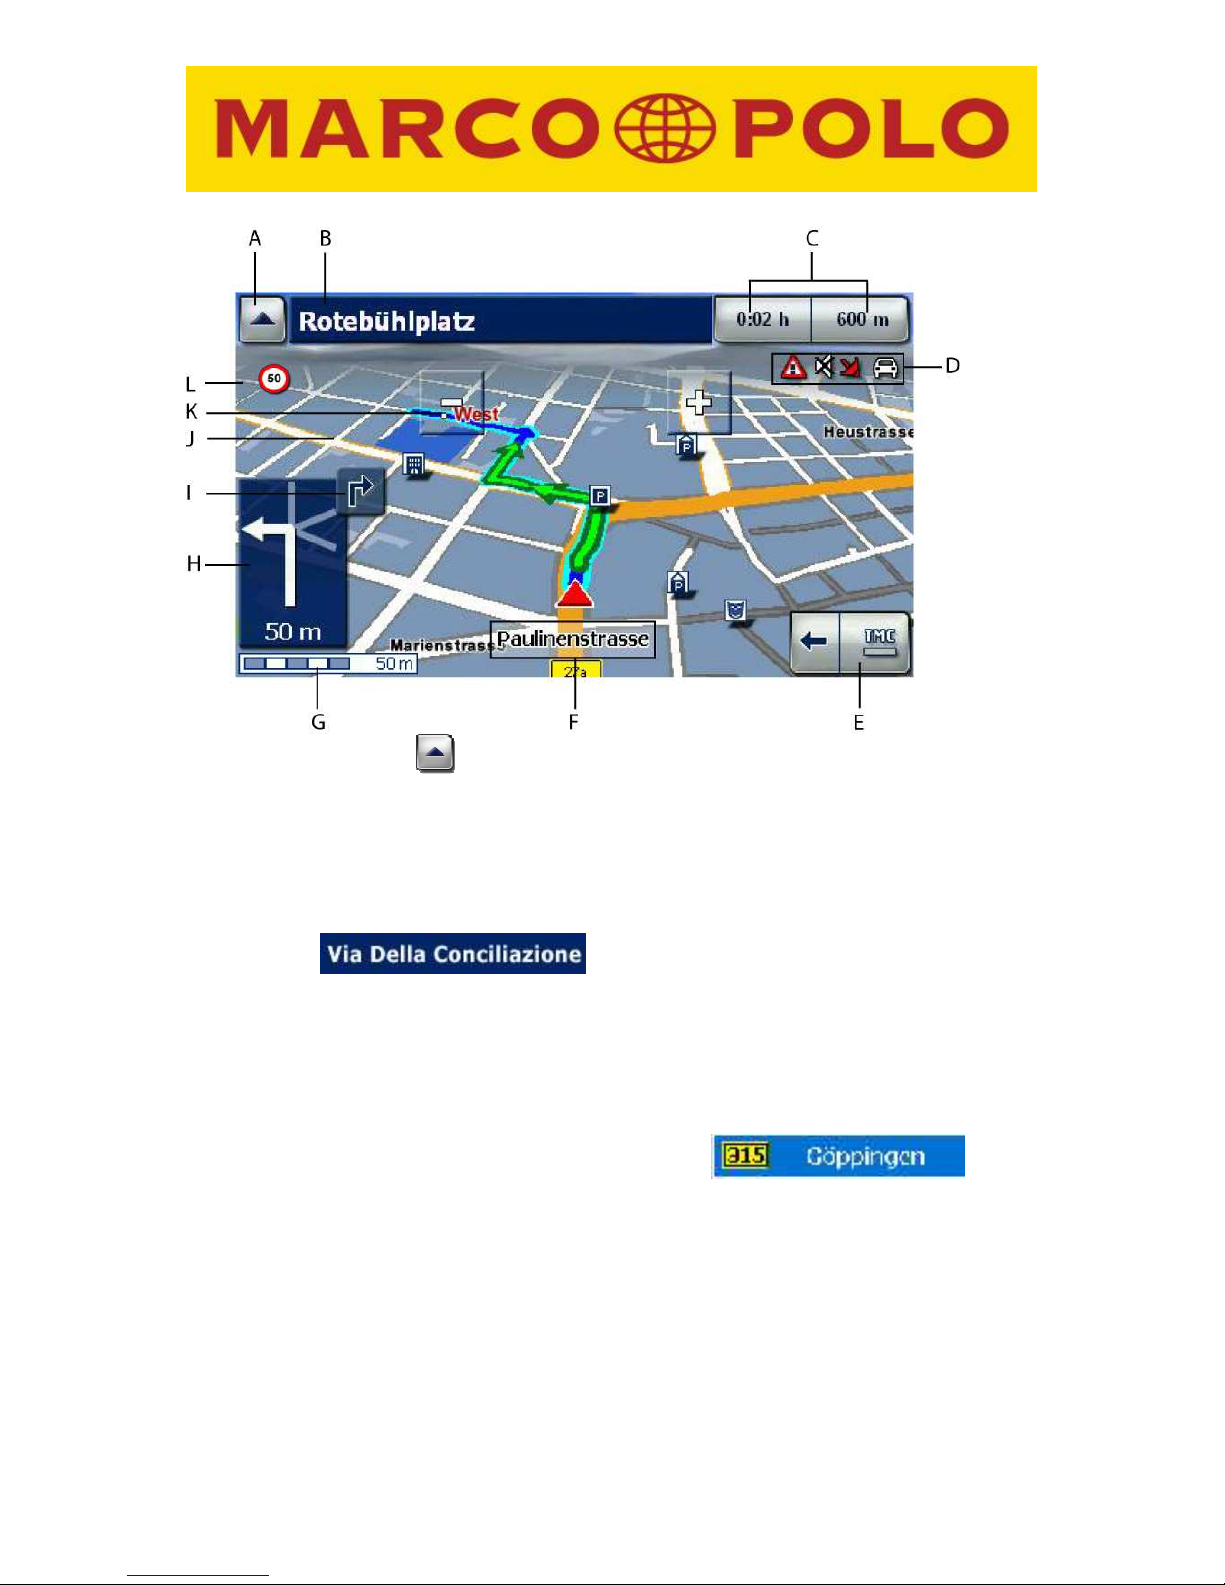
Examination of the navigation screen begins in the top left corner.
All function fields are denoted by a letter.
16
A. Main menu button
Tapping this button returns you to the main menu.
Clicking in the map is another way of returning to the main menu.
B. Information bar
The information bar shows the next street name and, when relevant, the associated
road number .
When you are on a main road or motorway, additional direction indicators are
displayed before a turnoff. This means that you are informed about the main road or
motorway number you will take next. This number is displayed in conjunction with a
corresponding symbol. A place name is also displayed as a direction indicator. For
example, if “315 Göppingen” is displayed, this means that you should turn onto the
“B315” towards Göppingen at your next manoeuvre. The
information that is displayed helps you navigate and corresponds to the actual
signage.
Note: if your next manoeuvre is more than 5 km away, the information bar is hidden.
Note: if you are in manual mode, the information bar is automatically hidden.
Note: if you click on the information bar, the system will repeat the next manoeuvre
command.
17
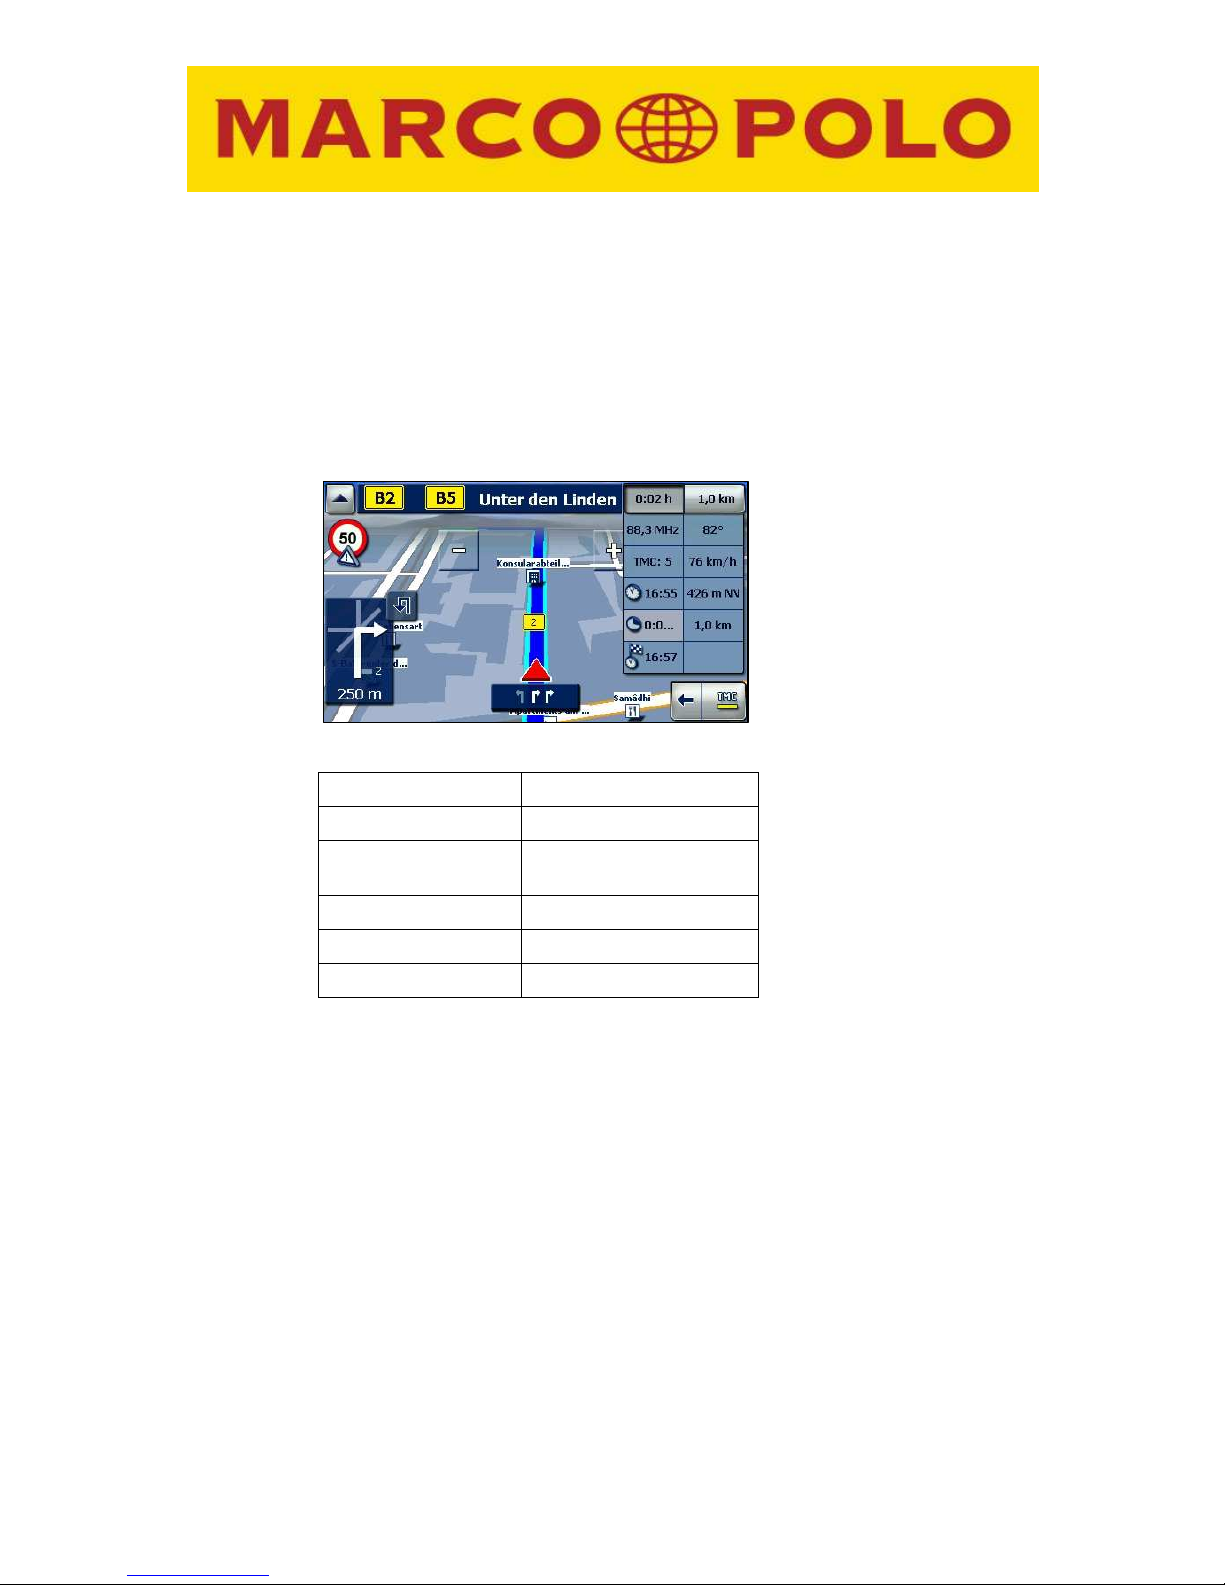
C Status display
2 buttons – the status displays – are located in the top right corner. You can use
these to obtain a variety of travel information.
If you wish to see all available travel information or alter the information which is
available via the two buttons, tap on one of the two buttons.
The following information can then be selected:
Clicking on the information option you require in the drop-down menus determines
the information to be shown in the two displays. The menu is then automatically
closed.
If you do not amend the information shown in the status displays, the display is
automatically closed after a short time..
If you select a field by tapping on it, the relevant information is automatically shown in
the status display. The menu is automatically closed.
If you do not select a field, the menu is automatically closed after a specific time.
Note: the route-related information categories are hidden when driving in manual
mode. .
Left column Right column
- TMC frequency - Direction
- Number of TMC
messages
- Current speed
- Time - Elevation
- Total duration - Total distance
- Arrival time
18
D. Display area
Information can be obtained via the icons under the status displays. Which icons are
displayed depend on the settings and the current conditions. This means that some
icons are only displayed temporarily.
The following icons are shown:
Profile: the car, motor home and bicycle icons show you the profile you
have currently set.
Compass: The compass icon which is used to display the direction in
which you are travelling is only displayed if you have selected the 2D view and
have activated the 2D assistant in the settings menu. When you activate the
2D assistant a scale is also displayed in the navigation screen.
GPS quality: the satellite symbol shows the GPS quality currently
available.
• Red: Insufficient GPS signal to determine your position. Signals are being
received from fewer than 3 satellites.
• Yellow: The GPS signal is sufficient to determine your position, but not
sufficient to determine elevation. Signals are being received from 3
satellites.
• Green: You are receiving a high-quality GPS signal that allows your
elevation to be determined. Signals are being received from at least 4
satellites.
• White (optional): A GPS signal is not available (e.g. in a tunnel).
Battery: The battery indicator shows the remaining battery capacity for the
device. It is first shown on the navigation screen when the remaining capacity
falls to less than 30%.
19
Once the remaining capacity falls below 15%, the battery indicator is shown in
red. When the battery capacity drops below 10%, a prompt is displayed on the
screen asking you to connect your device to a power supply.
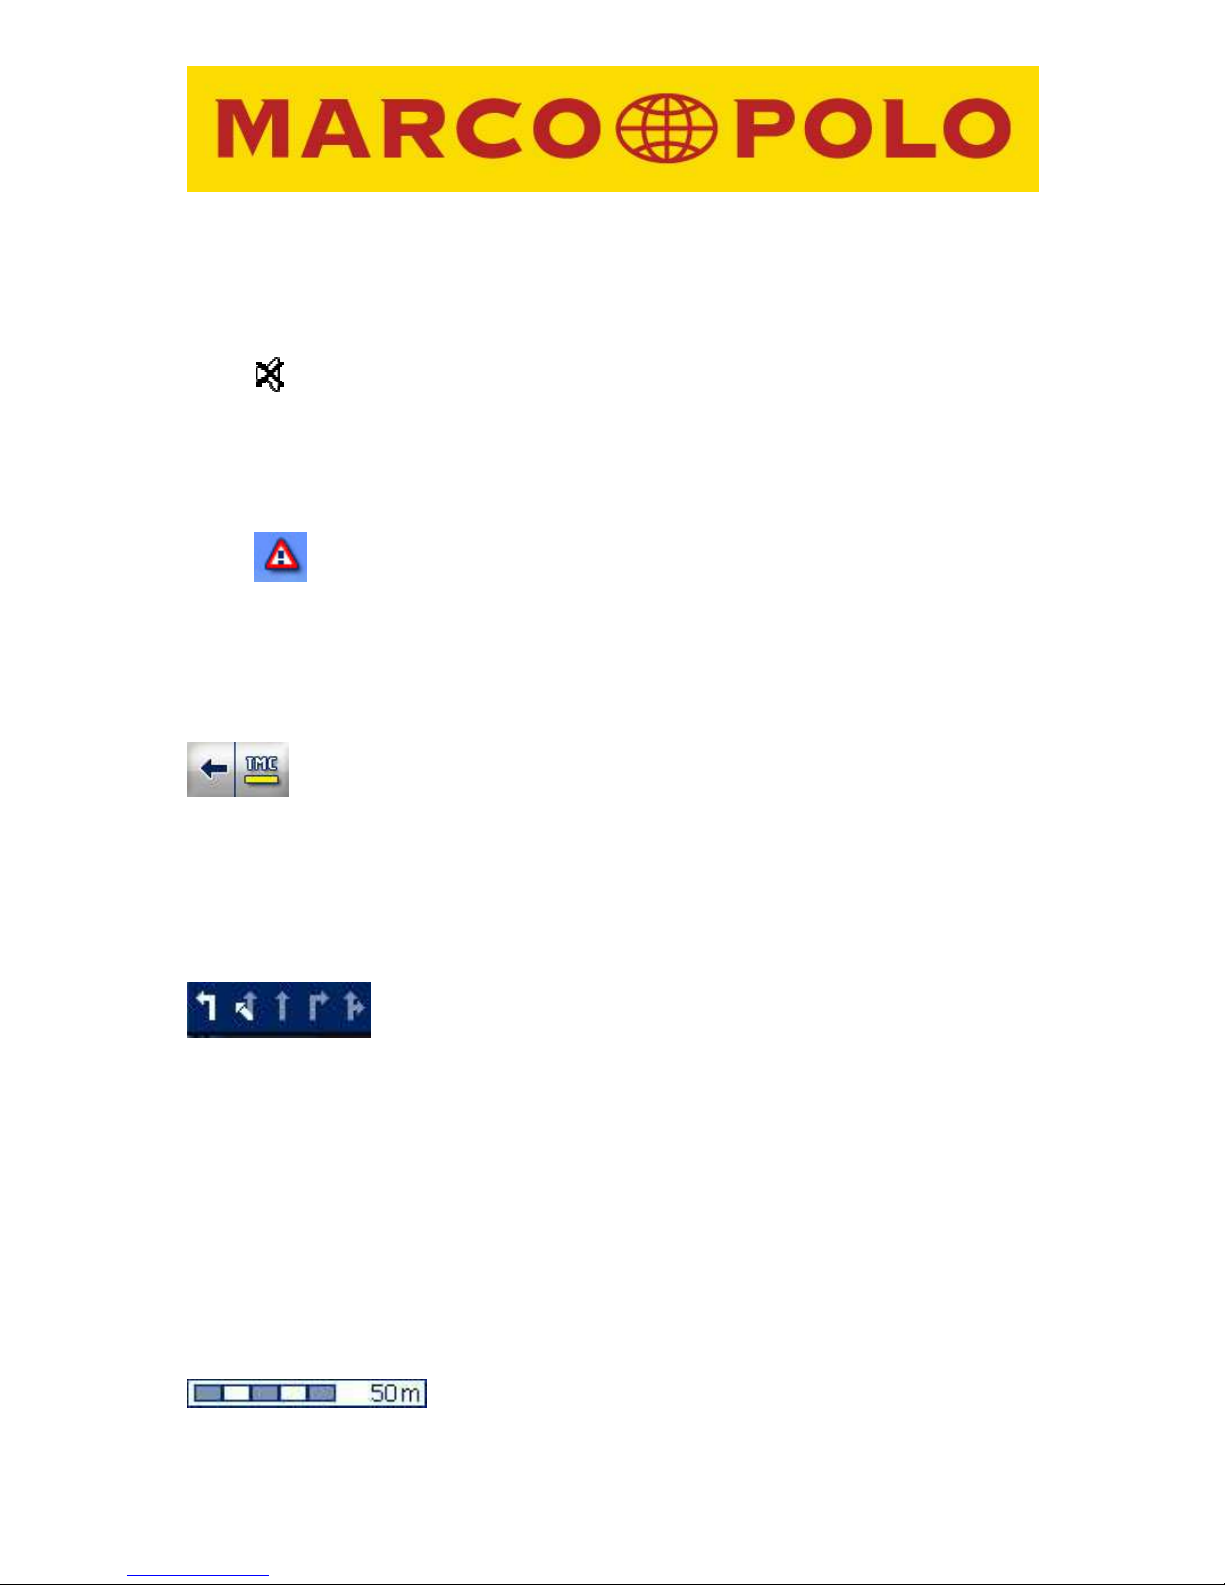
Mute: if you mute the system volume controls, this is indicated in the
navigation screen by a loud-speaker with a line through it.
Note: You can mute the system volume via the quick-access menu or the
settings menu. To do so, tap the speaker symbol in the volume control menu.
Speed camera detector (optional): the warning triangle tells you if you
have activated the speed camera detector or not.
You will find more information on activating the speed camera detector in
Chapter 6.5
E. Rapid access menu
A rapid access menu is hidden behind an arrow next to the TMC button.
The menu is opened by tapping on the arrow. You can also use the rapid access
menu to call up a number of functions while navigating. You will find more
information on the rapid access menu in Chapter 3.2. You also close the rapid
access menu by tapping the arrow.
F. Lane assistant / street name display
The lane assistant helps you navigate multi-lane roads or
highways and complicated intersections, e.g. on motorways, motorway junctions,
main roads, and major important roads (e.g. near airports).
The lane assistant indicates which lane the driver should take in order to turn onto
the correct road or intersection.
The lanes for your the route, and therefore the lanes you should take, are indicated
by white arrows. Blue arrows indicate other lanes which do not apply to your route.
The lane assistant is to be found directly under the position arrow. If you are not on
one of the roads listed above and are driving in a city, the name of the street in which
you are driving will be displayed instead of the lane assistant.
G. Scale
The integrated auto-zoom automatically alters the scale of
the map display depending on the speed of your vehicle. The display will tell you the
scale currently in use.

20
H. Manoeuvre field
The manoeuvre field indicates the direction of the next turn-off using an arrow; at
intersections, other streets are also shown as well as the distance to the next
manoeuvre. If you are on a roundabout, streets that come off the roundabout are
also shown in addition to the turnoff arrow.
Relevant cross-streets and intersections before the next turnoff are also displayed.
The numbers indicate how many cross streets/intersections you still have to pass
before you turn off.
I. Next manoeuvre but one
If you have to undertake several manoeuvres in quick succession, the next
manoeuvre but one is indicated in the form of a direction arrow to the right of the
manoeuvre field to help you find your way in good time.
J. Speed camera detector (optional)
If you have activated speed camera detector data in the settings menu, you will
receive a visual warning on the screen as well as an audible signal. When you
approach stationary speed cameras, the speed camera symbol is displayed on the
map. You receive an audible signal at least 50 m before the speed camera and again
at least 15 m before the speed camera, depending on the speed limit. If you are
exceeding the legal speed limit, you are warned earlier.
Note: Please only use the speed camera detector option after reading chapter 6.5.
K. Map detail
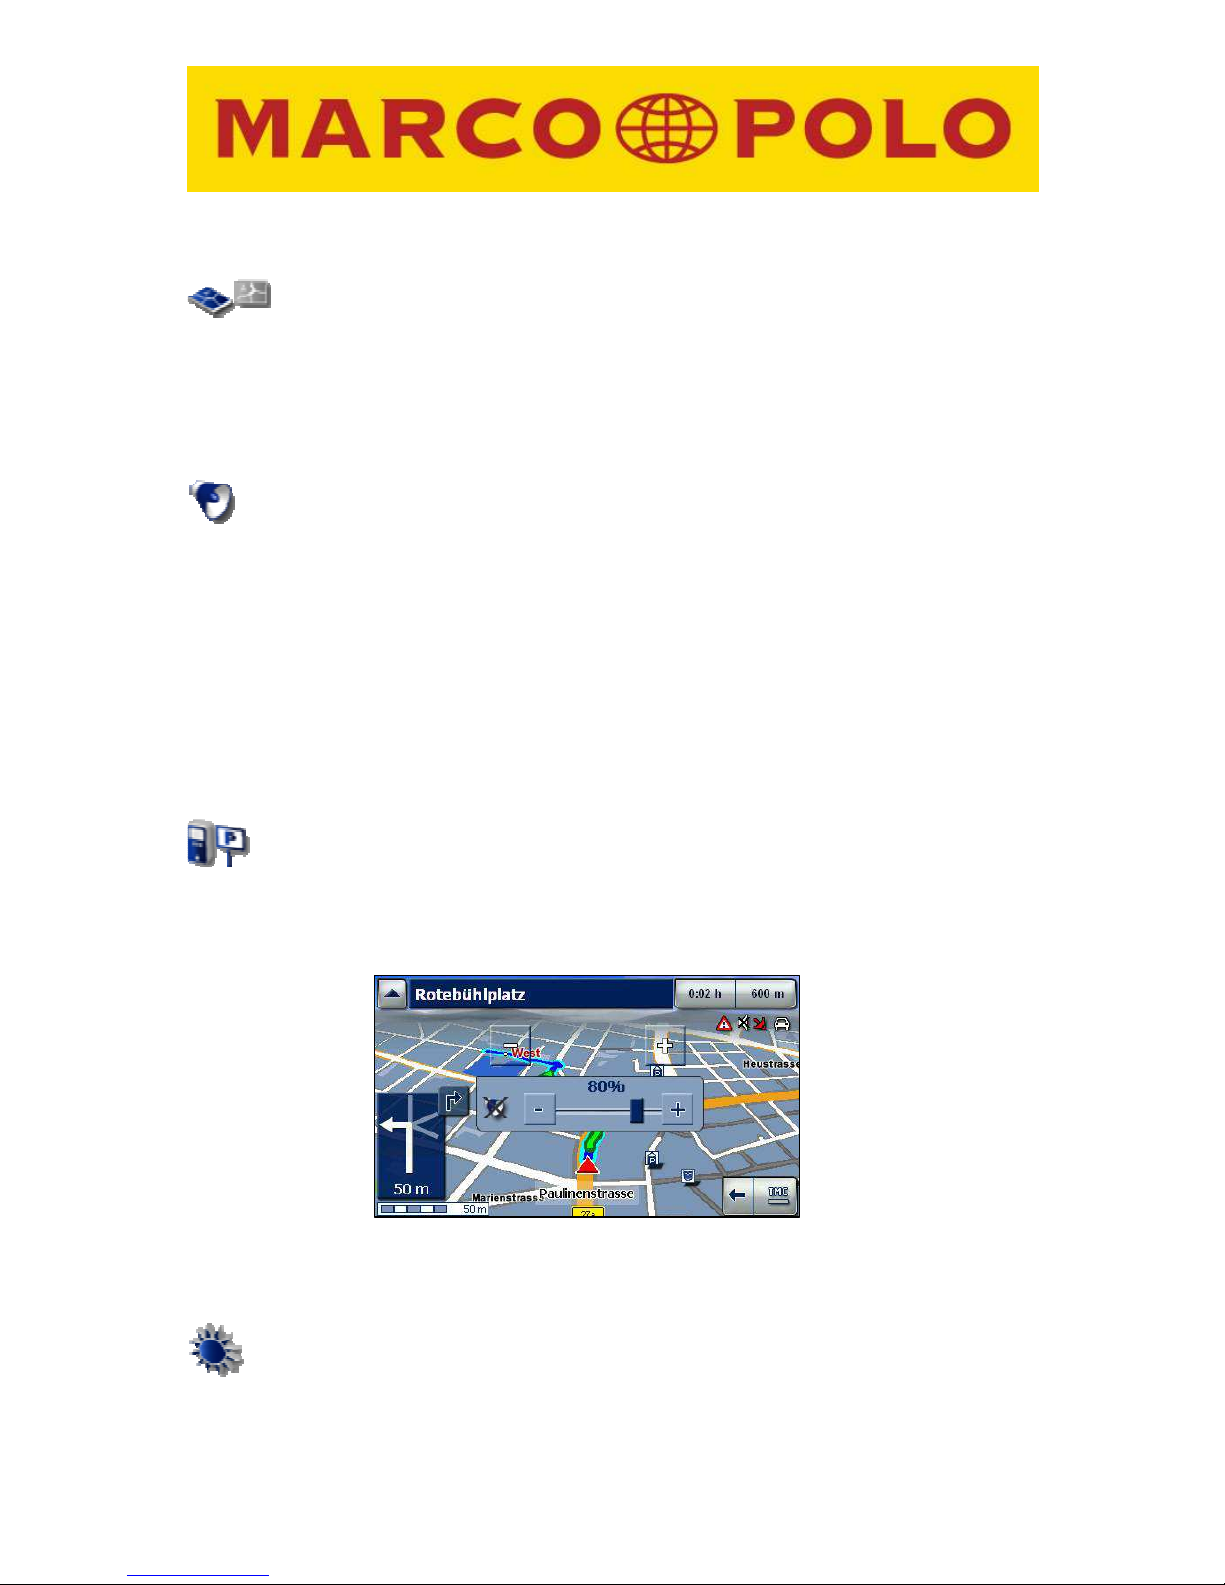
You can use the +/- buttons to increase or reduce the size of the map (zoom in and
out). When you touch one of the buttons, a slide control will also appear which can
be used to change the required map size more rapidly. Do this by moving the slide
control to the right or the left or by clicking on the corresponding position in the line.
The map will remain in the zoom-in or zoom-out status for at least 10 seconds.
21
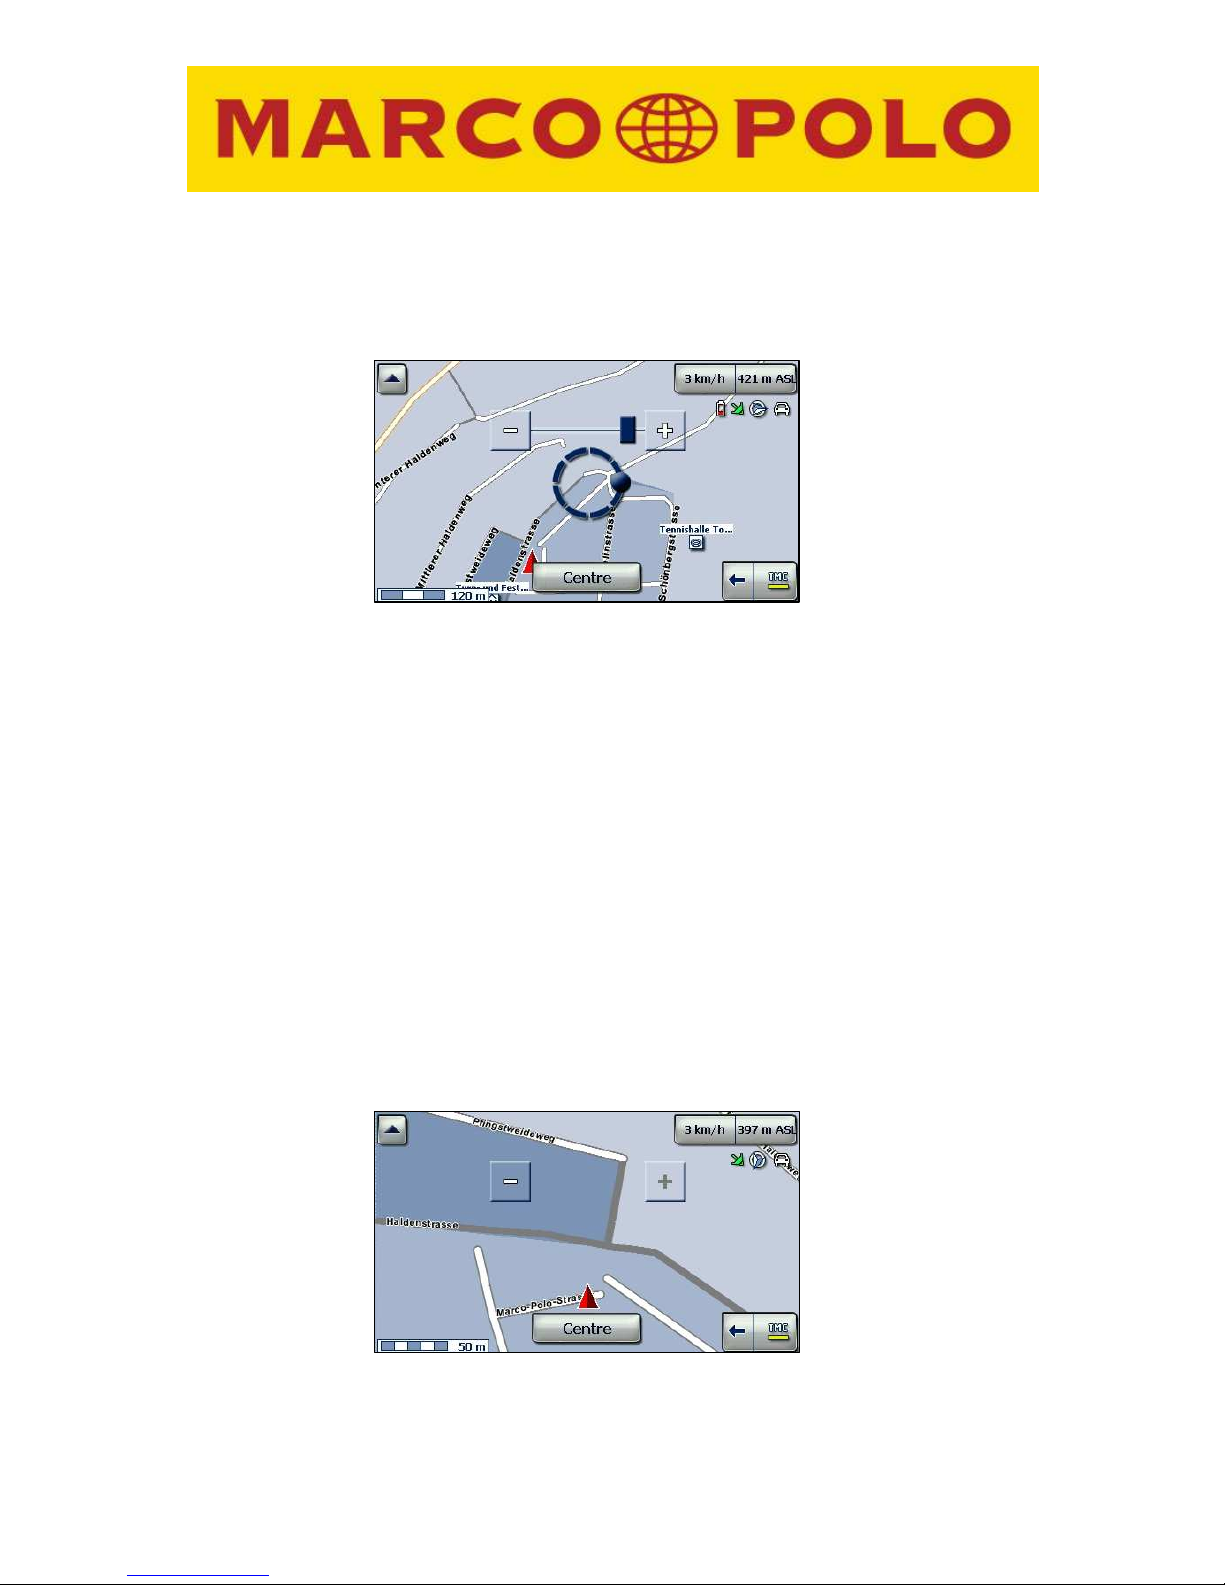
Rotating and orienting the map towards the north
When you tap on the +/- buttons, a control dial will open in the middle of the map as
well as a slide control.
Important: the map must be in the 2D view for you to be able to rotate, move or
orient the map towards the north. Chapter 6.1.1 will tell you how to set the 2D view.
Rotating the map: the positioning ball moves when you tap on a segment of the
control dial and the map is rotated correspondingly. The positioning ball can also be
moved to the required position by ”dragging and dropping“ (clicking on the
positioning ball and dragging it with a blunt object at the same time).
Orienting the map to the north: to do this, tap briefly on the positioning ball in the
control dial. The ball moves automatically to its new position when the map is
oriented to the north.
If you wish to orient the map once again to your vehicle position and the direction in
which you are travelling, tap on the button Centre which is displayed in the
navigation screen when you rotate and orient the map to the north.
The map is automatically centred when you alter your speed. However, you have to
enter a different speed range before this happens.

22
The slide control and the control dial will be automatically hidden if the map is not
rotated or moved within a 3 second time limit or if a function other than the rotation,
move or zoom function is called up.
Moving the map: the section of the map which is displayed can be moved when in
the 2D mode. To do this, tap the map and, at the same time, drag it in the direction
you want to see. This moves the part of the map which is displayed and you can see
a further part of the calculated route.
If you want to realign the vehicle position in the map in the direction of travel, tap on
the Centre button which is displayed on the navigation screen when moving the
map.
L. Speed warning
The speed warning will show you the relevant maximum speeds on motorways and
main roads in the form of traffic sign. If you exceed the speed limit by the margin that
you have defined for yourself a warning triangle is displayed on the left navigation
screen. Depending on the settings, you are also provided with an audible warning.
Note: The speed warning feature must first be activated in the settings menu. You
can also establish your personal speed limits there.
Speed limits that are linked to specific conditions such as the weather or time of day
are indicated by symbols such as a rain cloud or a clock.
3.2 Rapid access menu functions
A number of functions and settings are hidden behind the rapid access menu. These
can be activated or amended during navigation without interrupting the navigation.
The screen is divided (split screen) when the quick access menu is opened (by
tapping on the arrow in the lower right hand corner of the screen) and the display of
your current position is moved a little to the left. The vehicle position returns to the
centre when the menu is closed.
A list with buttons is now displayed. You use the buttons to determine which view is
to be shown in the split screen on the right hand side of the screen –. Details of the
choices are described below.
.
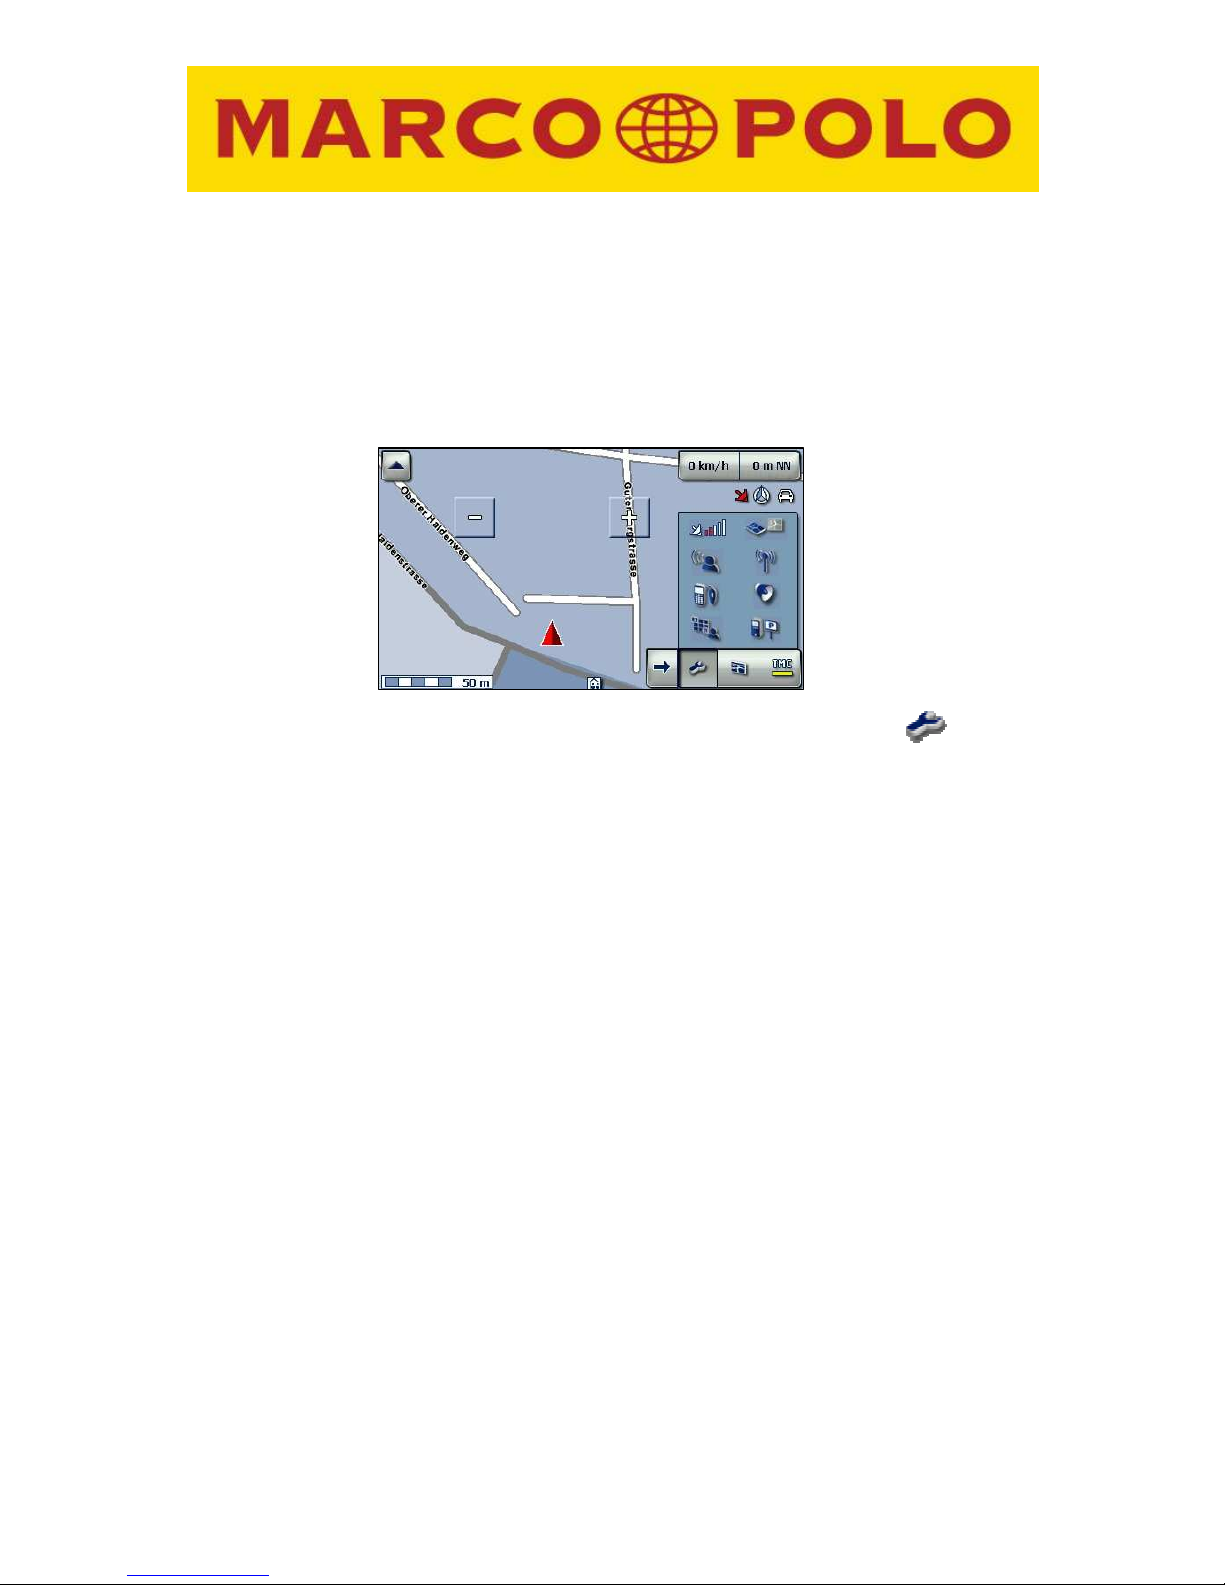
23
Options, a further Map and TMC messages can be displayed in the split screen.
When the menu is opened again, the split screen view is determined by the last
button to be selected.
3.2.1 Split Screen: options
An option display opens in the split screen when you click on the button . You
can call up information, amend settings or activate functions by selecting one of the
options displayed.
24
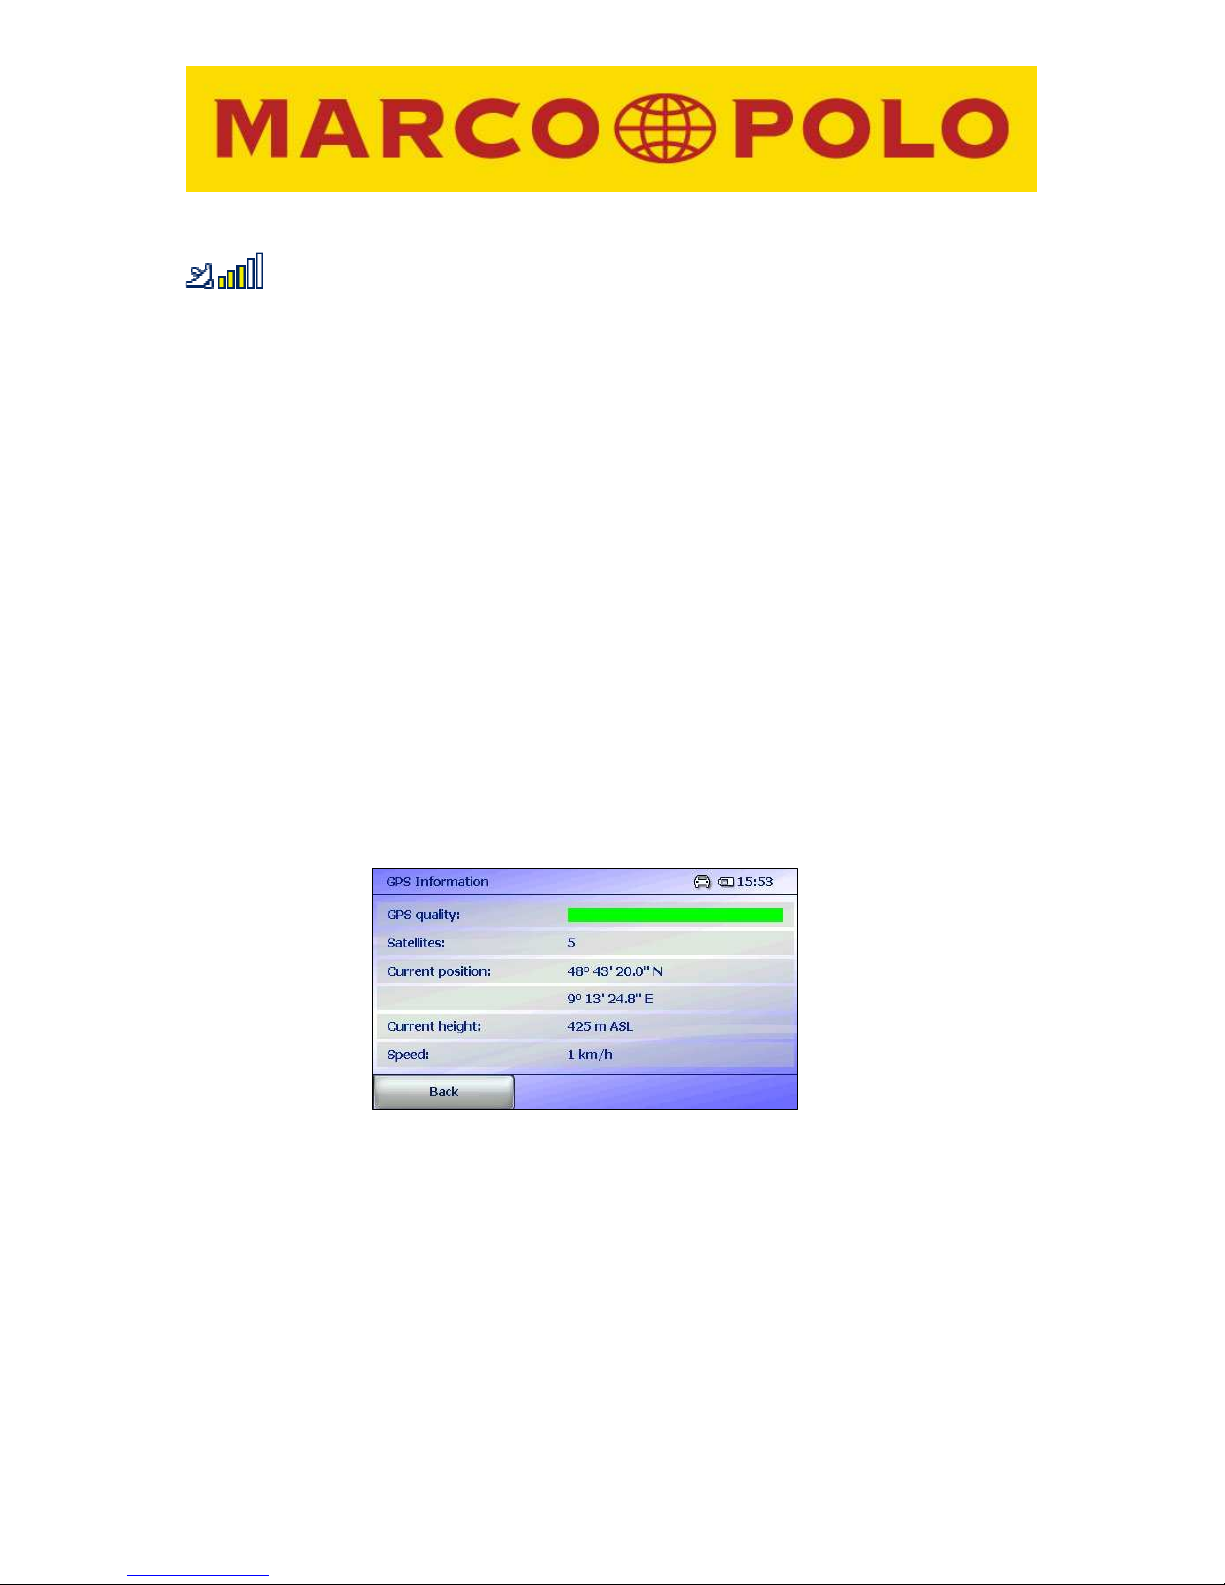
3.2.1.1 GPS
The bars alongside the satellite icon indicate the signal strength of the GPS receiver
at your current location. Adequate GPS reception is essential for any navigation
system. This button allows you to check the GPS status during your trip.
• Red: Insufficient GPS signal to determine your position. Signals are being
received from fewer than 3 satellites.
• Yellow: The GPS signal is sufficient to determine your position, but not sufficient
to determine elevation. Signals are being received from 3 satellites.
• Green: You are receiving a high-quality GPS signal that allows your elevation to
be determined. Signals are being received from at least 4 satellites.
• White (optional): A GPS signal is not available (e.g. in a tunnel).
Tap the GPS button to open an information screen that provides the following
additional GPS reception information:
• GPS signal quality
• Number of GPS satellites from which signals are being received
• Longitude and latitude for your current position
• Current elevation
• Speed
25
3.2.1.2 2D/3D view
The current map view can be changed simply by tapping on this icon. The view will
change to 2D or 3D depending on the setting. Tapping again will change the map
view.
3.2.1.3 Loudspeaker
When you call up the loudspeaker icon a slide control will appear in the middle part
of the navigation screen. You control the volume by moving the slide control, by
clicking on the +/- buttons or on a point in the line.
If you would like to turn off the audio application entirely, tap on the loudspeaker
symbol.
If no changes are made, the slide control will automatically disappear after 2
seconds.
3.2.1.4 Special destinations
By tapping this symbol you are able to select from a special destination category so
you can search for special destinations such as hotels, restaurants etc. in the vicinity
of selected locations.
For more information on special destinations, please consult Chapter 4.1.5.
3.2.1.5 Brightness
You can change the brightness of the navigation screen by tapping on this icon.
There are three possible brightness settings in the day and night views.

26
3.2.1.6 Detours
By tapping on the icon you can establish whether you wish to make a detour round a
specific section of your route.
An alternative route will be calculated after you have selected the length of the
section you wish to avoid.
3.2.1.7 Next destination
If you are currently navigating a tour with various interim destinations, you can skip
the current destination by tapping this icon and head for the next interim destination
instead.
The route to the next interim destination is calculated.
3.2.1.8 Save your position
Tapping on this icon records your current position and adds it to your Favourites.
This function is particularly helpful if you are in a city with which you are unfamiliar.
After you have saved the required position e.g. a parking place, you can explore the
city on foot and later call up the position you have saved under Favourites and ask
for instructions on how to return to your car.
3.2.2 Split Screen: map (128 MB device only)
When you click on the button , an additional 2D map view appears in the righthand half of the screen. This view makes it easier to orient yourself and provides a
better overview of intersections or complex traffic situations..

27
The size of the map view is automatically adjusted to the speed at which you are
currently driving. The steps at which zoom-in or zoom-out takes place and therefore
the size of the small map which appears on the screen depend on the road type you
have set (city, main road, motorway). You will see a - and a + sign in the small map
view which you can use to zoom further in or out to obtain an better view of the
section of road on which you are driving.
Note: whether or not a map can be shown in the split screen depends on the
product.
3.2.3 TMC list
Depending on the settings you made in the TMC settings menu, your Marco Polo
Navigator receives TMC traffic information during your trip and processes this
information during route calculation. A coloured bar continuously indicates the TMC
status.
Reception of TMC messages is activated by default.
• Grey: No reception of TMC traffic information. Possible causes include:
o TMC is deactivated in the settings menu
o No TMC receiver is connected
o The TMC antenna is positioned incorrectly
o An unknown TMC encryption format is being received
o No TMC transmitter is available in the region
• Green: A TMC transmitter is being received. However, there are no current
TMC messages regarding traffic problems.
• Yellow: There are current TMC messages. However, traffic on the calculated
route is not affected.
• Red: There are current TMC messages and at least one of them affects the
calculated route.
Note: When you are in Manual mode, the TMC bar never changes to red since you
are not navigating a calculated route.
Note: The display remains yellow if there are traffic jams on your route but they are
not located within the next 50 km. For example, when you are driving from Stuttgart
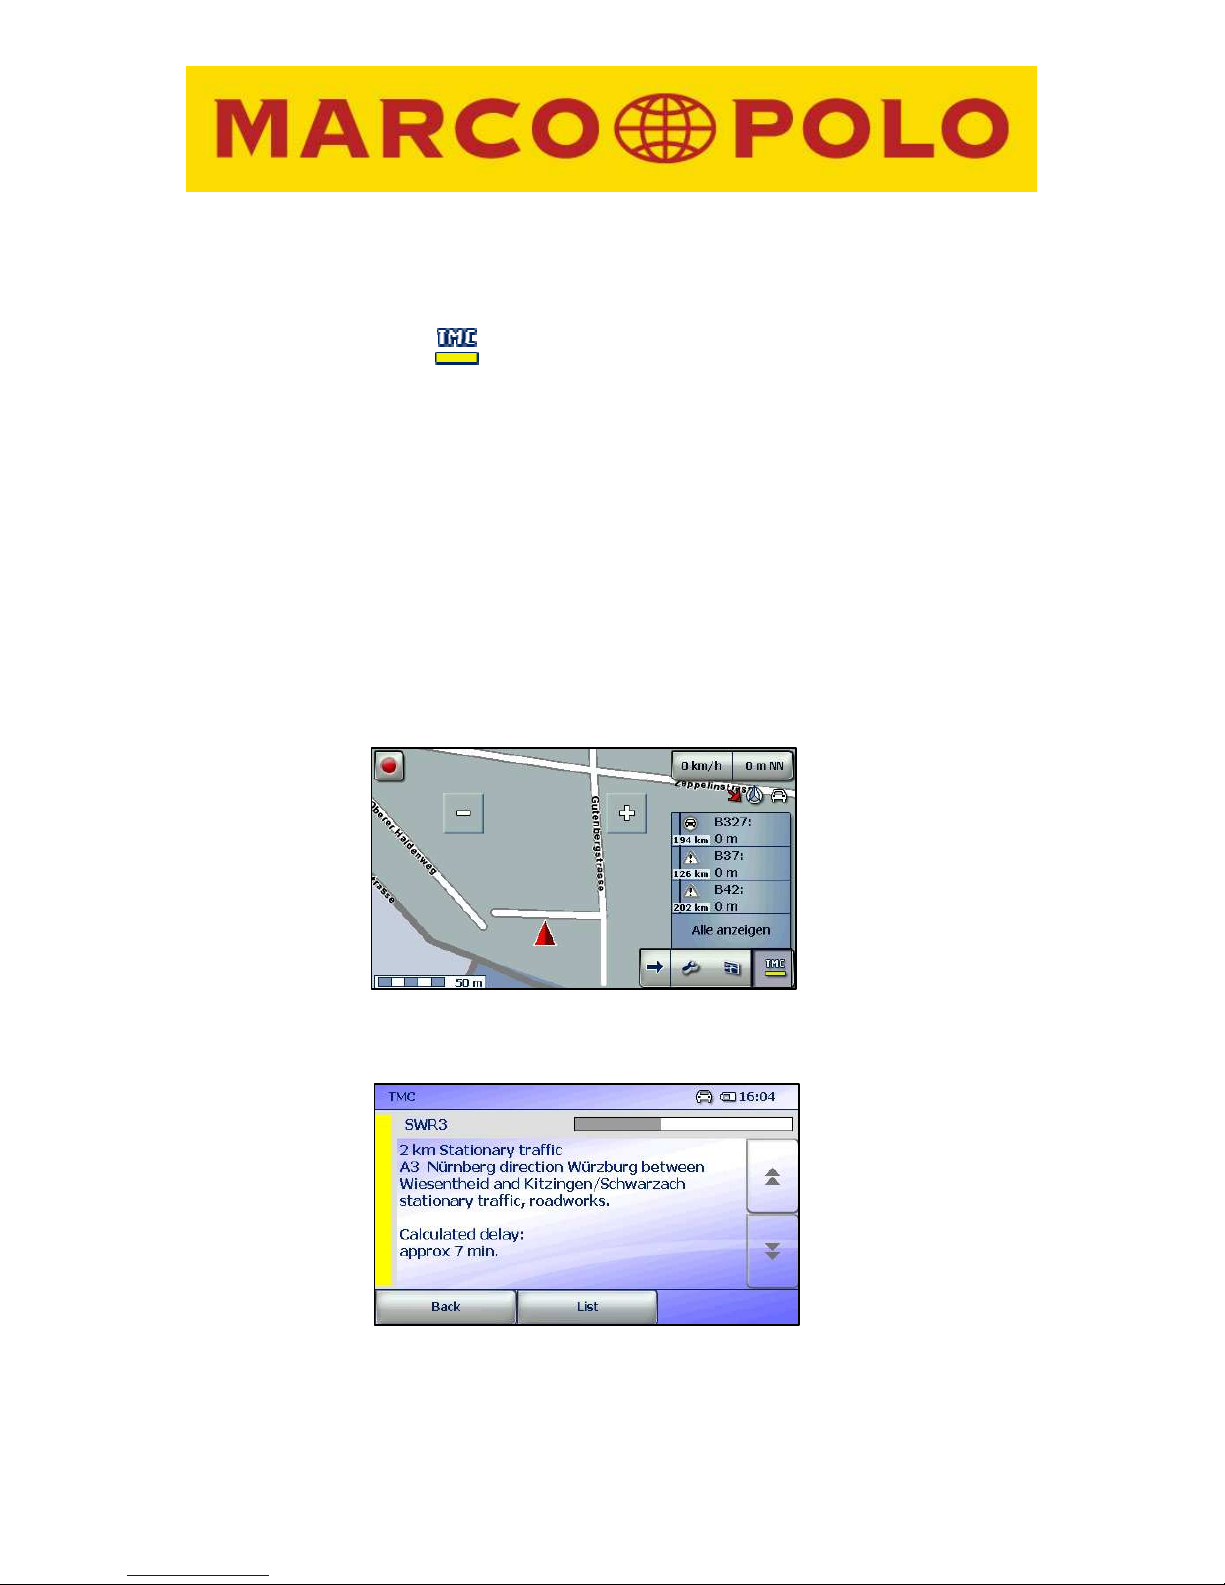
28
to Hamburg, you do not need to know whether there are traffic jams in the vicinity of
Hamburg at the start of your trip. When you reach your destination a few hours later,
the traffic jam may have already cleared.
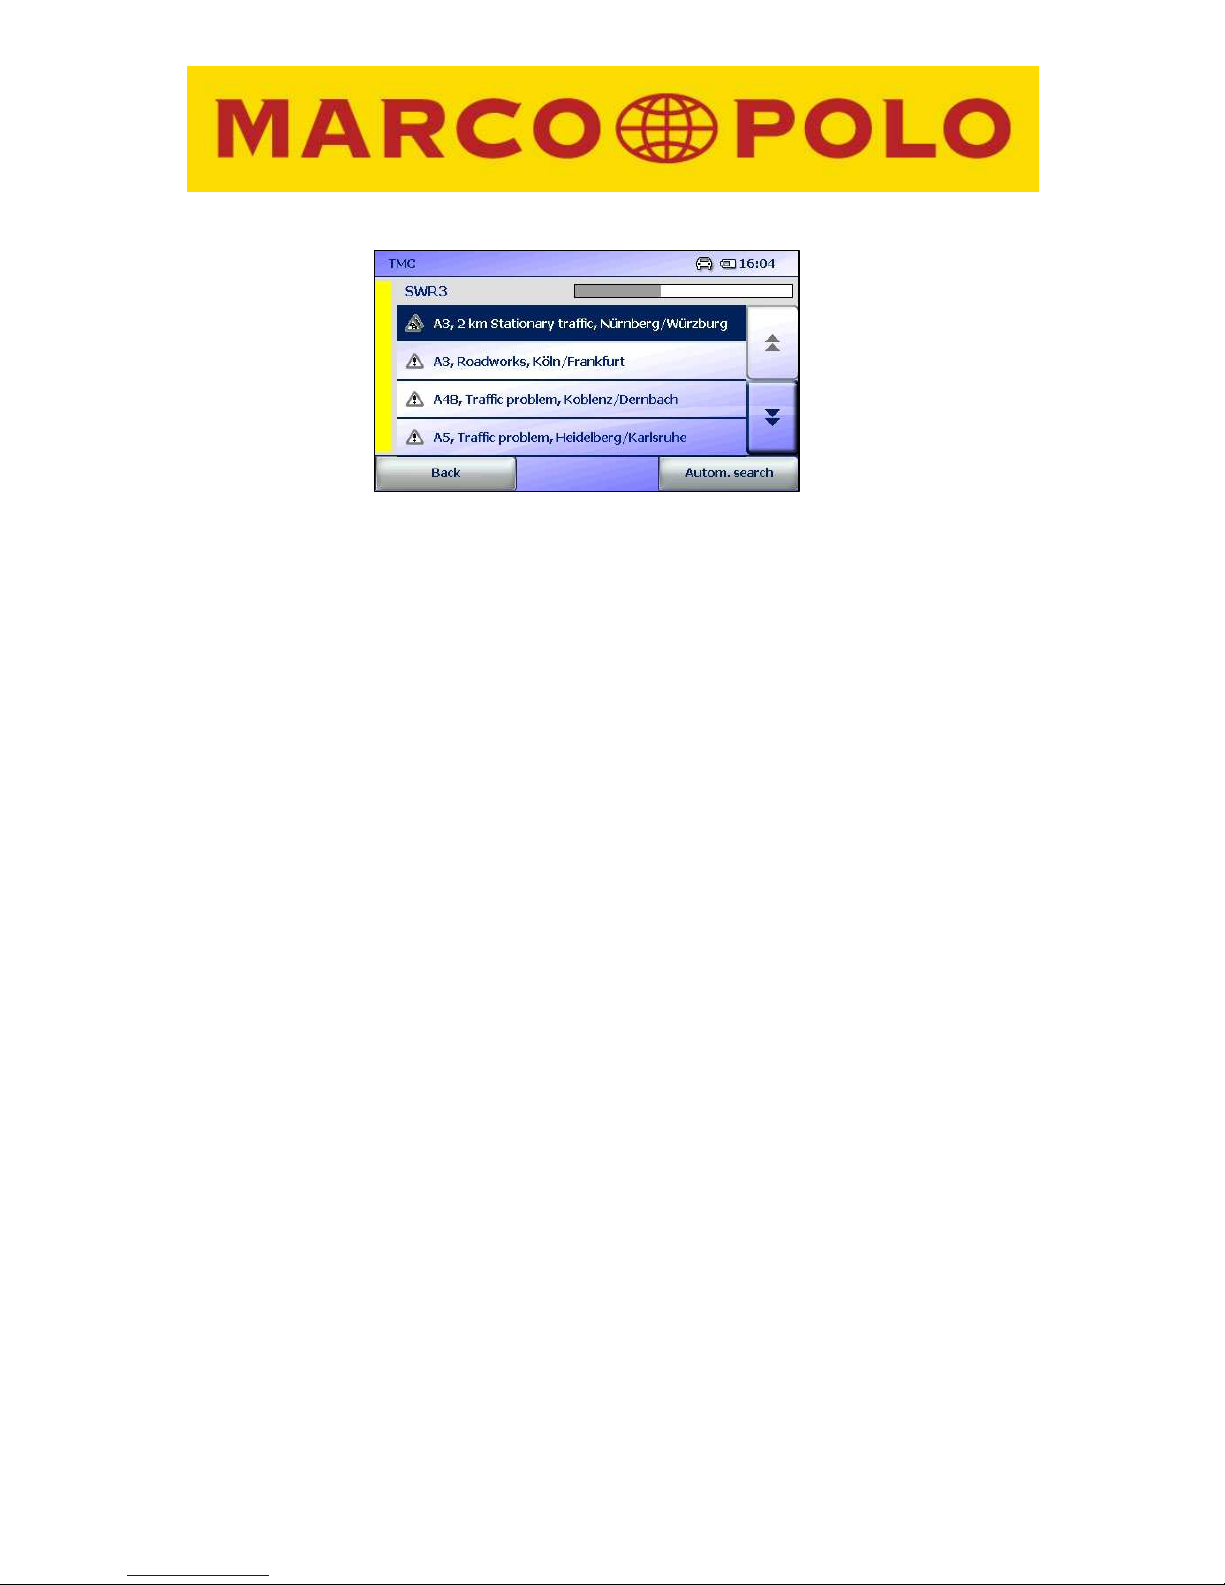
If you tap on the button you will receive brief additional traffic information on
the route you are taking. The split screen will show a list of information on traffic jams
along your route.
The list will include a symbol showing the reason for each jam; your distance from
the traffic jam is shown underneath along with the length of the tail-back (on the
right).
The list is arranged in descending order of distance from your present position so
that the nearest jam is at the head of the list. .
You can select one of the items on the list by tapping on it. A screen with detailed
information will then open. You will also receive a description of the traffic problem
and the approximate delay.
If you tap on Display all, a comprehensive list with information on the jams will be
displayed.
Tapping on the button Automatic search initiates a search for a transmitter
providing information on traffic congestion. The automatic search stops if a
transmitter with this information is found.
29
Note: if traffic has completely stopped, the display shows ”Expected delay
approximately > 1 hour.“
If there are one or more areas of congestion along your route, the navigation device
will ask you if you want to take these into consideration in the planning of your route.
If you answer Yes to this question your route will be revised if an alternative is
available which would reduce your overall journey time.
If No TMC is displayed on the screen, this is the equivalent of the grey bar with the
TMC symbol described above.
If No traffic information is displayed, this means that no traffic information is
available at the present time.
If you are driving in manual mode, the 3 jams closest to your current position are
displayed.
30
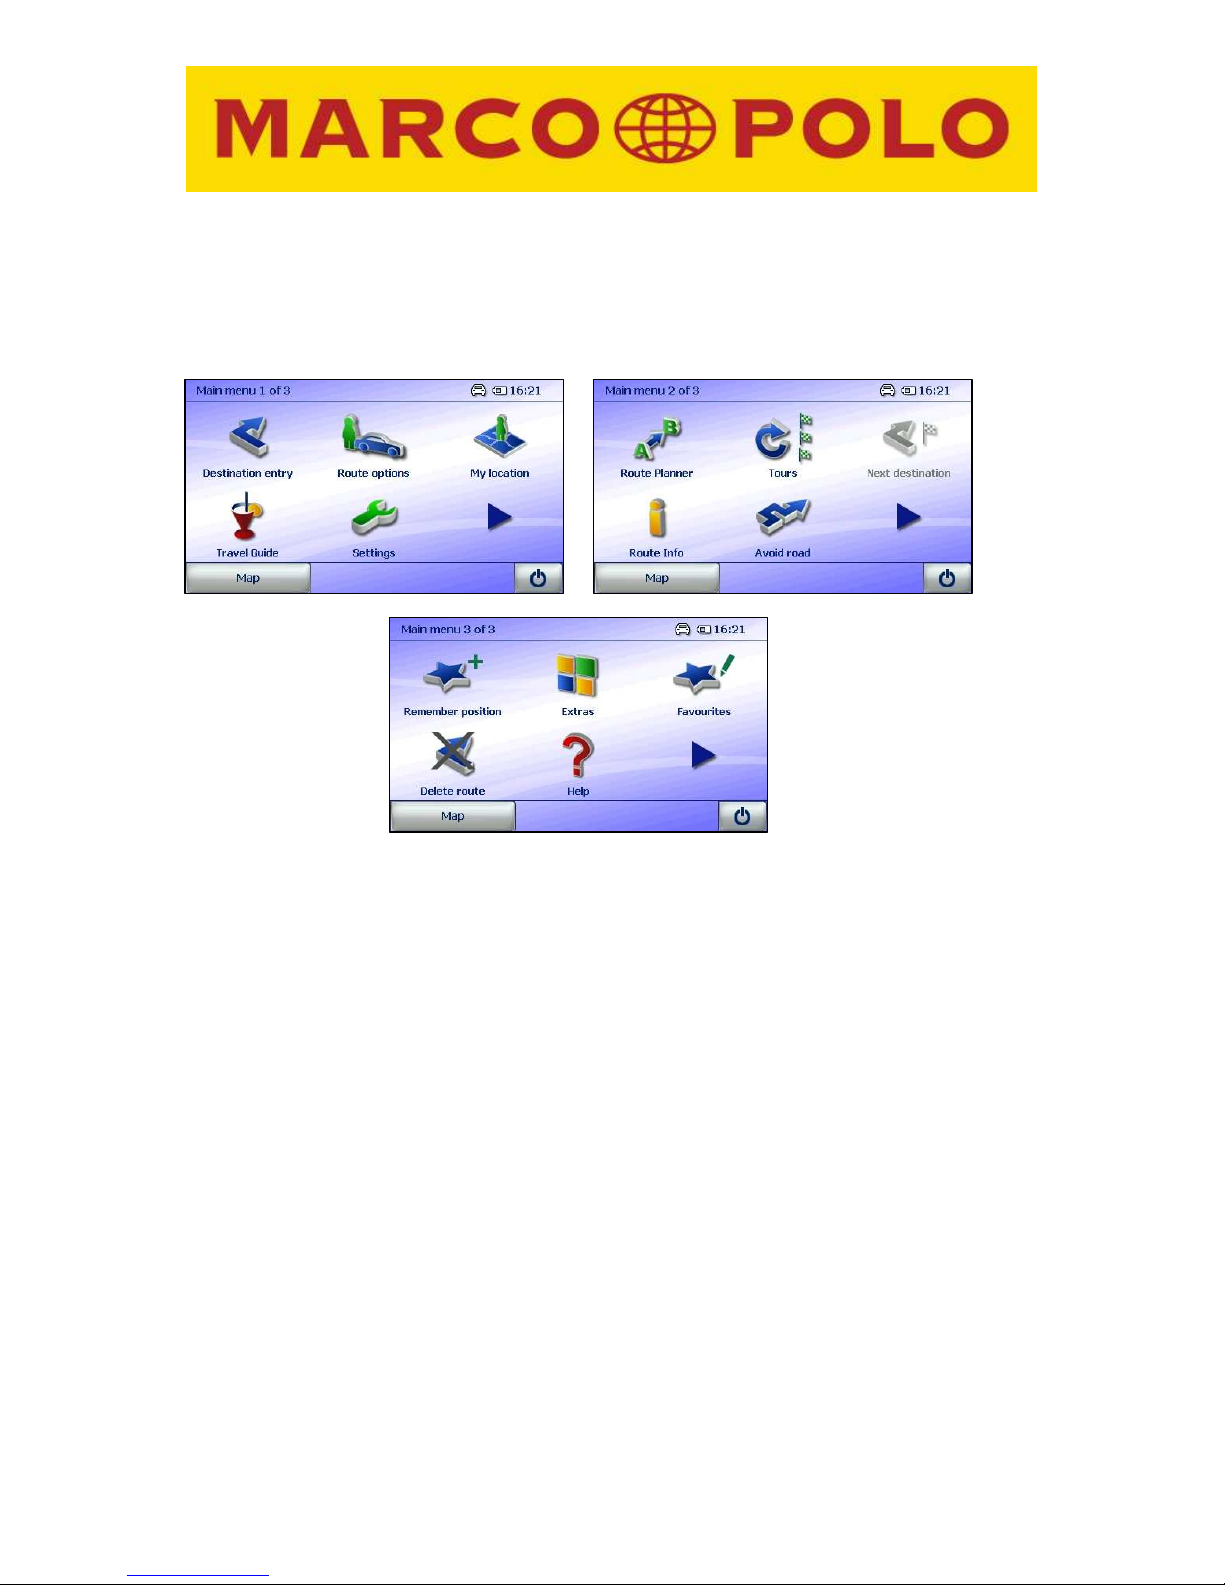
4 Marco Polo Navigator function overview
All Marco Polo Navigator functions are found in the main menu, which consists of 3
different screens. Tap the arrow to move between the screens.
The first page of the main menu is automatically displayed the first time the device is
turned on. From there, you can select various functions or, by clicking on the arrow
button, switch to additional pages in the main menu and therefore access additional
functions.
This chapter describes all main menu options and their application.
Note: The destination entry, route planning, tours, and manual mode options are
not available without the applicable map information. Make sure you install
corresponding maps before using one of these functions. Map information is preinstalled on your navigation device and / or an SD card (see Additional information
section, Chapter B) when the product is purchased.
4.1 Destination entry
Using the destination entry button, you can enter a destination of your choice and
have the navigation device guide you there conveniently. With the Marco Polo
Navigator, you can navigate to a specific house number (depending on the map
information available).
 Loading...