

Marco Polo ETP-LOC-01, ETP-TAG-01 Instructions Manual
Operating Instructions
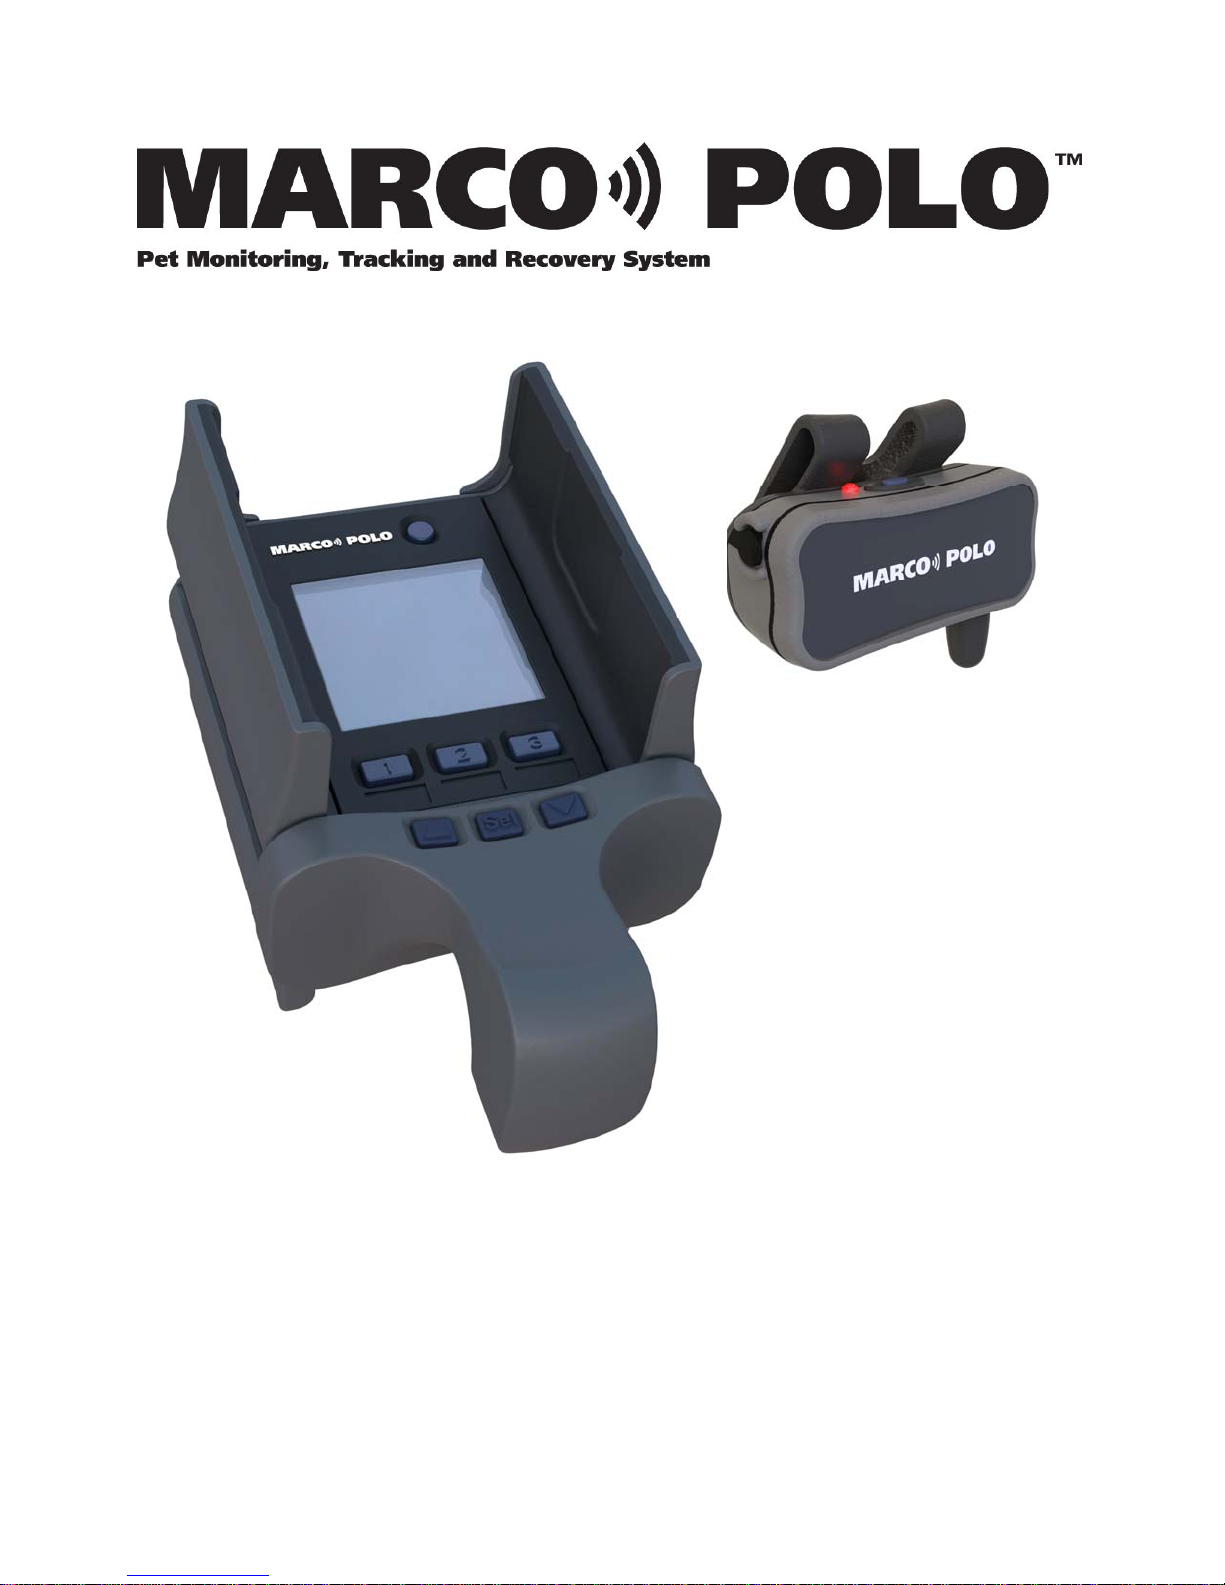
Locator Model ETP-LOC-01
Tag Model ETP-TAG-01

This device complies with Part 15 of the FCC Rules. Operation is subject to the
following two conditions: (1) this device may not cause harmful interference, and
(2) this device must accept any interference received, including interference that
may cause undesired operation. Changes or modifications not expressly approved
by the party responsible for compliance could void the user’s authority to operate
the equipment.
This equipment has been tested and found to comply with the limits for a Class B
digital device, pursuant to Part 15 of the FCC Rules. These limits are designed to
provide reasonable protection against harmful interference in a residential
installation. This equipment generates, uses and can radiate radio frequency energy
and, if not installed and used in accordance with the instructions, may cause harmful
interference to radio communications. However, there is no guarantee that
interference will not occur i n a particular installation.
If this equipment does cause harmful interference to radio or television reception,
which can be determined by turning the equipment off and on, the user is
encouraged to try to correct the interference by one or more of the following
measures:
-- Reorient or relocate the receiving antenna.
-- Increase the separation between the equipment and receiver.
-- Connect the equipment into an outlet on a circuit different from that to which the
receiver is connected.
-- Consult the dealer or an experienced radio/TV techni cian for help.
This device complies with Industry Canada license-exempt RSS standard(s).
Operation is subject to the following two conditions: (1) this device may not cause
interference, and (2) this device must accept any interference, including interference
that may cause undesired operation of the device.
Cet appareil s’accorde avec Industrie Canada licence-exempte RSS standard. (1)
cet apparei l ne peut pas causer l’intervention, et (2) cet appareil doit accepter de
l’intervention, y compris l’intervention qui peut causer l’opération non désirée de
This Class【B】 digital apparatus complies with Canadian ICES-003.
Cet appareil numérique de la classe B est conforme à la norme NMB-003 du
Canada..
Copyright © 2012 Eureka Technology Partners, LLC ALL RIGHTS RESERVED
Protected under the following US and Foreign Patents:
US 6,788,199 US 7,148,801 CA 2438172 AU 2002255750

Marco Polo Operating Instructions
Limitation of Liability
The Marco Polo system (the Product) is designed and manufactured with the
intended use as a pet tracking assistant. The Product is a supplement to the normal
precautions a reasonable pet owner would take to ensure the safety and confinement
of their pet. This Product is not a substitute for proper fencing in good repair, the use
of leashes, tie-outs or any other measures typically used to restrain pets and keep
them out of harm’s way. All owners of pets are enco uraged to seek the advice of a
trained professional regarding the proper enclosure and environment for their pet
and to comply with all applicable municipal laws regarding pet ownership.
EUREKA TECHNOLOGY P ARTNERS, LLC DISCLAIMS ALL WA RRANTIES
ARISING OUT OF THE SALE AND USE OF THE PRODUCT, WHETHER
EXPRESS OR IMPLIED, INCLUDING ANY IMPLIED WARRANTIES OF
MERCHANTABILITY OR FITNESS FOR A PARTICULAR PURPOSE. BY
USING THE PRODUCT, YOU HEREBY WAIVE ANY CLAIMS YOU MAY
HAVE REGARDING LOSS OF PROPERTY OR PE RSONAL INJURY, EVE N IF
THE LOSS WAS DUE TO A MALFUNCTION OF THE PRODU CT.
THIS PRODUCT IS NOT INTENDED FOR USE ON PEOPLE OR FOR ANY
PURPOSE WHERE INJURY OR LOSS OF LIFE MAY RESULT FROM THE
USE OR MISUSE OF THE PRODUCT.
Important Note: To avoid possible injury, the American
Kennel Club (AKC) recommends that ALL collars and
tags of any kind be removed from pets prior to crating.

Contents
Marco Polo Operating Instructions
Introduction........................................................................... 1
User Controls and Displays................................................... 2
System Setup......................................................................... 3
Battery Charging.............................................................. 3
Tag Attachment................................................................ 4
Powering On the Locator and Tag . .................................. 5
Pairing a Tag and Locator................................................ 6
Labeling the Pet Buttons.................................................. 7
Rescue Group Searching.................................................. 7
Backlight.......................................................................... 7
Sounds.............................................................................. 7
Tracking a Pet........................................................................ 8
Searching.......................................................................... 8
Tracking........................................................................... 9
Exiting Searching/Track Mode ...................................... 11
Tracking Tips................................................................. 12
Monitoring a Pet.................................................................. 14
Monitoring Setups.......................................................... 14
Monitoring a Single Pet ................................................. 17
Monitoring Multiple Pets............................................... 19
Switching Between Modes............................................. 20
Low Battery Alarm ........................................................ 20
Troubleshooting................................................................... 21
Specifications ...................................................................... 22
Contact................................................................................. 22
Warranty.............................................................................. 23

Introduction
The Marco Polo pet monitoring, tracking and recovery system is designed to help
you keep your pet safe, 24 x 7, anywhere you choose to take them, with the
maximum comfort for your pet and the least hassle and expense for you.
The Marco Polo system consists of a handheld device called a “locator” and one
or more small, lightweight devices called “tags” that attach to your pet’s collar.
As in the popular swimming pool game, the Marco Polo locator sends out signals
to the tag on your pet’s collar asking, “Where are you?” The tag on your pet
answers back, “Here I am!” This allows Marco Polo to keep track of your pet,
even when you are not around. If your pet wanders, Marco Polo’s tracking
feature allows you to quickly find their location and bring them safely back home.
The Marco Polo system ha s two basic modes of operation:
In the Monitoring mode the locator continually checks on your pet’s
whereabouts to ensure that they have not wandered outside a boundary area
that you have selected for them. If the pet is found to be out of its designated
safe zone then the locator will notify you with an alarm. Up to 3 pets may be
monitored at one time with individual safe zones and alarm conditions
configurable for each pet.
In the Tracking mode the Marco Polo locator searches the surrounding area
for a wandering pet and, once found, d isplays the approximate distance and
direction to their location.
The Marco Polo system is designed to give you years of trouble-free and
expense-free service. It can operate anywhere, from urban areas to the most
remote locations, making it perfect for active pet owners who wish to bring their
pets along.
Please take the time to review the enclosed instructions and practice with
your new system so that if the day comes when your furry friend is found
missing you can quickly return them to safety.
1
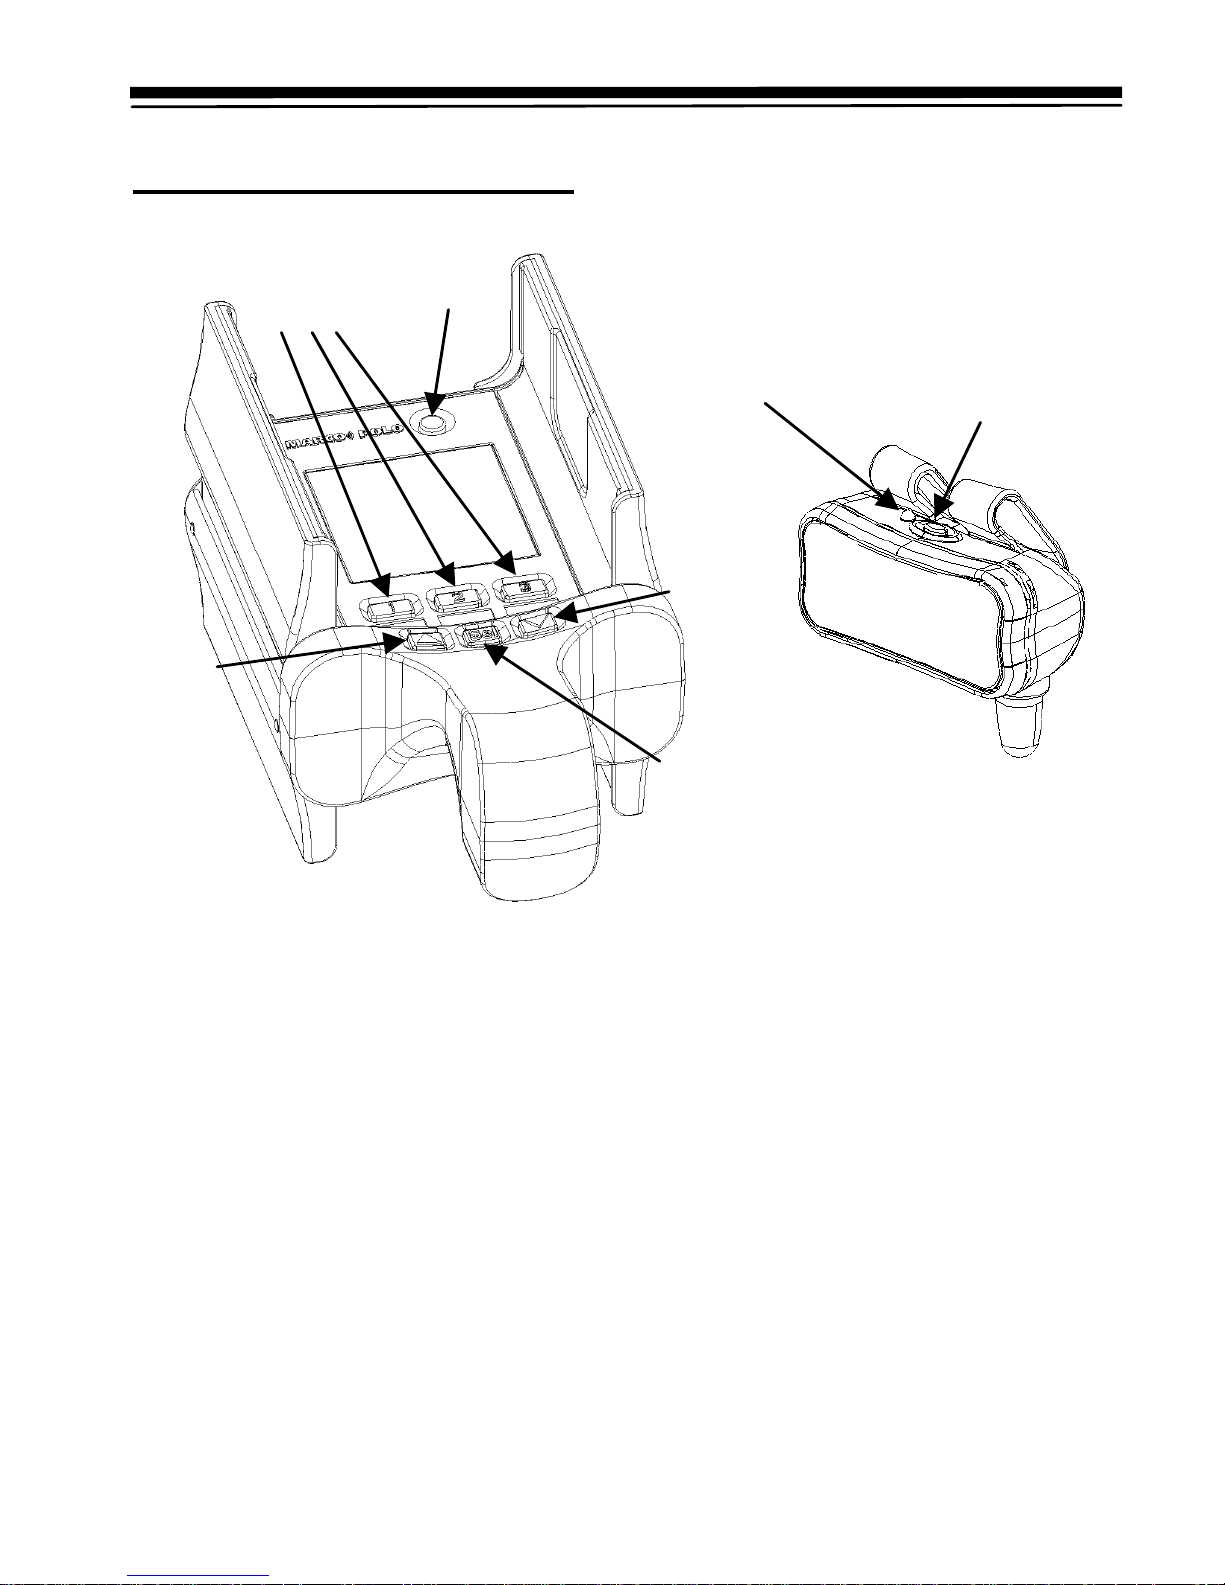
User Controls and Displays
Pet Buttons
1 2 3
Power
Button
Status
Light
Power
Button
Down
Up
Select
Locator:
Power Button – Turns the Locator on and off.
Pet Buttons – One button for eac h of up to 3
pets. Pressing button changes the mode for
that pet’s tag from Idle to Track to Monitor.
Up Button – Moves the selection cursor up
one position.
Select Button – Selects the item currently
flashing.
Down Button - Moves the selection cursor
down one position.
Tag:
Power Button – Hold down
to turn power On/Off.
Status Light – Indicates On
and Off status and battery
charging status.
2
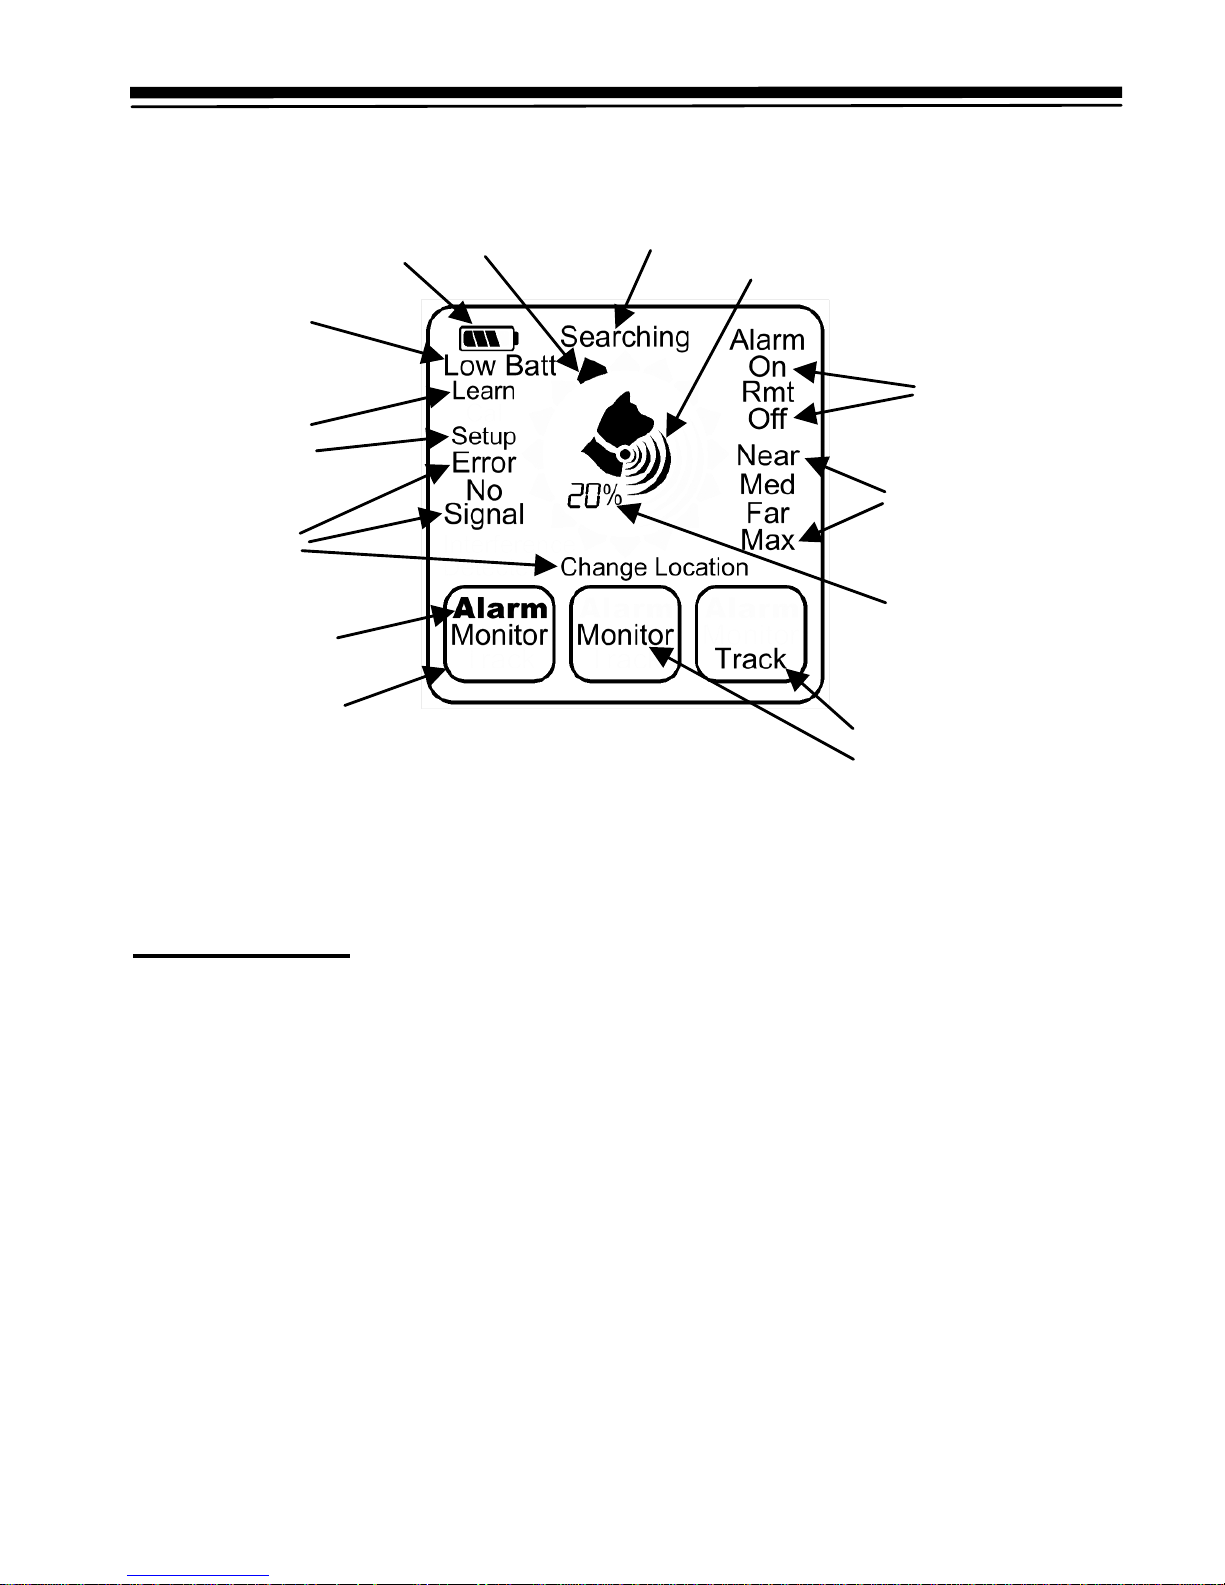
g
g
Selections
Tag Low
Battery
Indicator
Setup
Status
Locator
Battery
Status
Directional
Arrow
Search
Indicator
Signal
Strength Bars
Boundary
Alarm
Settin
Settings
s
Messages
Tag Alarm
Distance
Percenta
e
Mode Box
Tag Mode
Indicators
Figure 2
Locator Display Elements
System Setup
Battery Charging
The Marco Polo pet monitoring and tracking system consists of two parts: a
handheld “Locator” unit and up to three “Tag” units that can be attached to y our
pet’s collar. Prior to first use, the internal lithium-ion rechargeable batteries must
be charged with the included batter y charger adapter. Also, if the battery is ever
removed from the locator, the charger must b e connected at leas t momenta rily to
reset it. Figure 3 shows the location of the charging jacks.
3
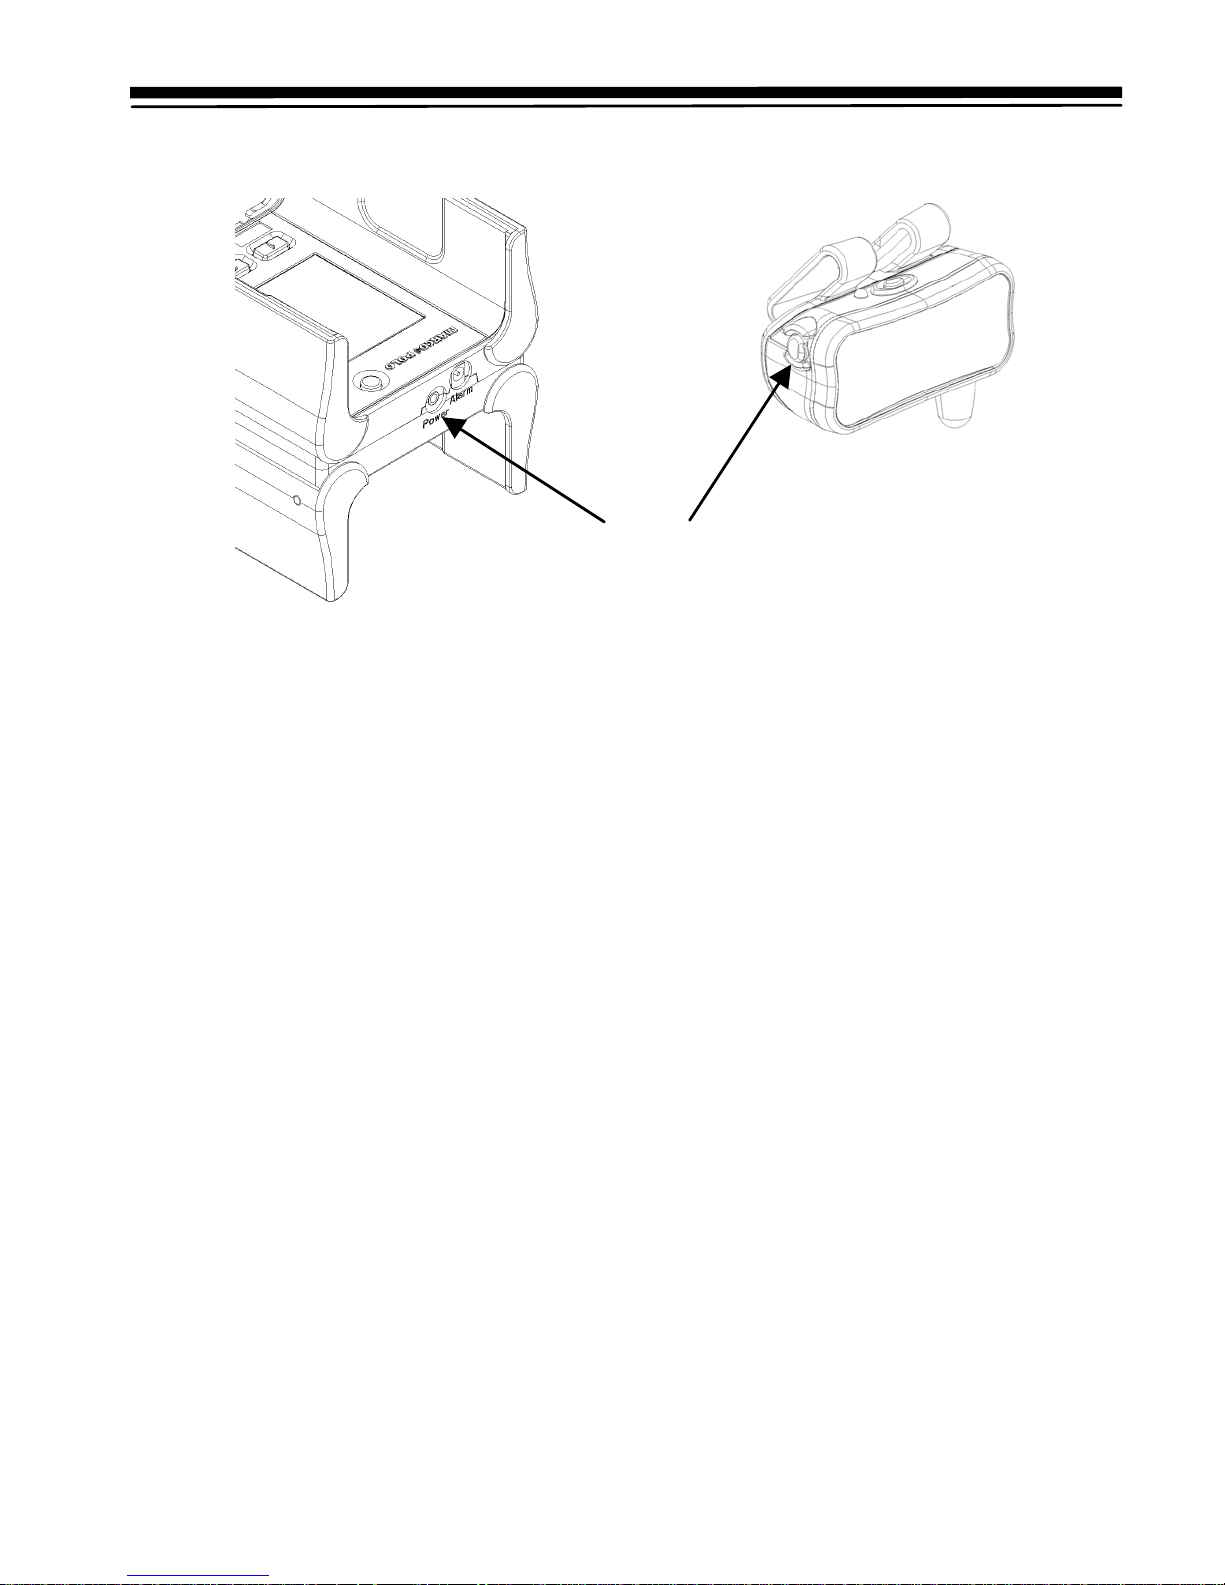
Location of Charging
Charging Jacks
Figure 3
Jacks
Charging the Tag - press and hold the power button on the tag until the red light
begins to flash. The tag’s status light will flash until the charge cycle is complete
and then the light will go off. The tag will not function while charging is in
progress. Make certain to securely replace the protective rubber cover after
charging, if necessary, twist the cover back and forth while pressing to seat the
cover all the way into the hole.
Charging the Locator - the locator’s battery status indicator will show the charge
level increasing during the charge cycle and then the indicator will show full
when the charging is complete. The locator can be used in any mode while
connected to the charger.
Tag Attachment
To attach the tag to your pet’s collar, place the hooked end of the collar clip
against the top edge of the collar and press down firmly until the collar is all the
way inside the clip as shown in Figure 4.
4
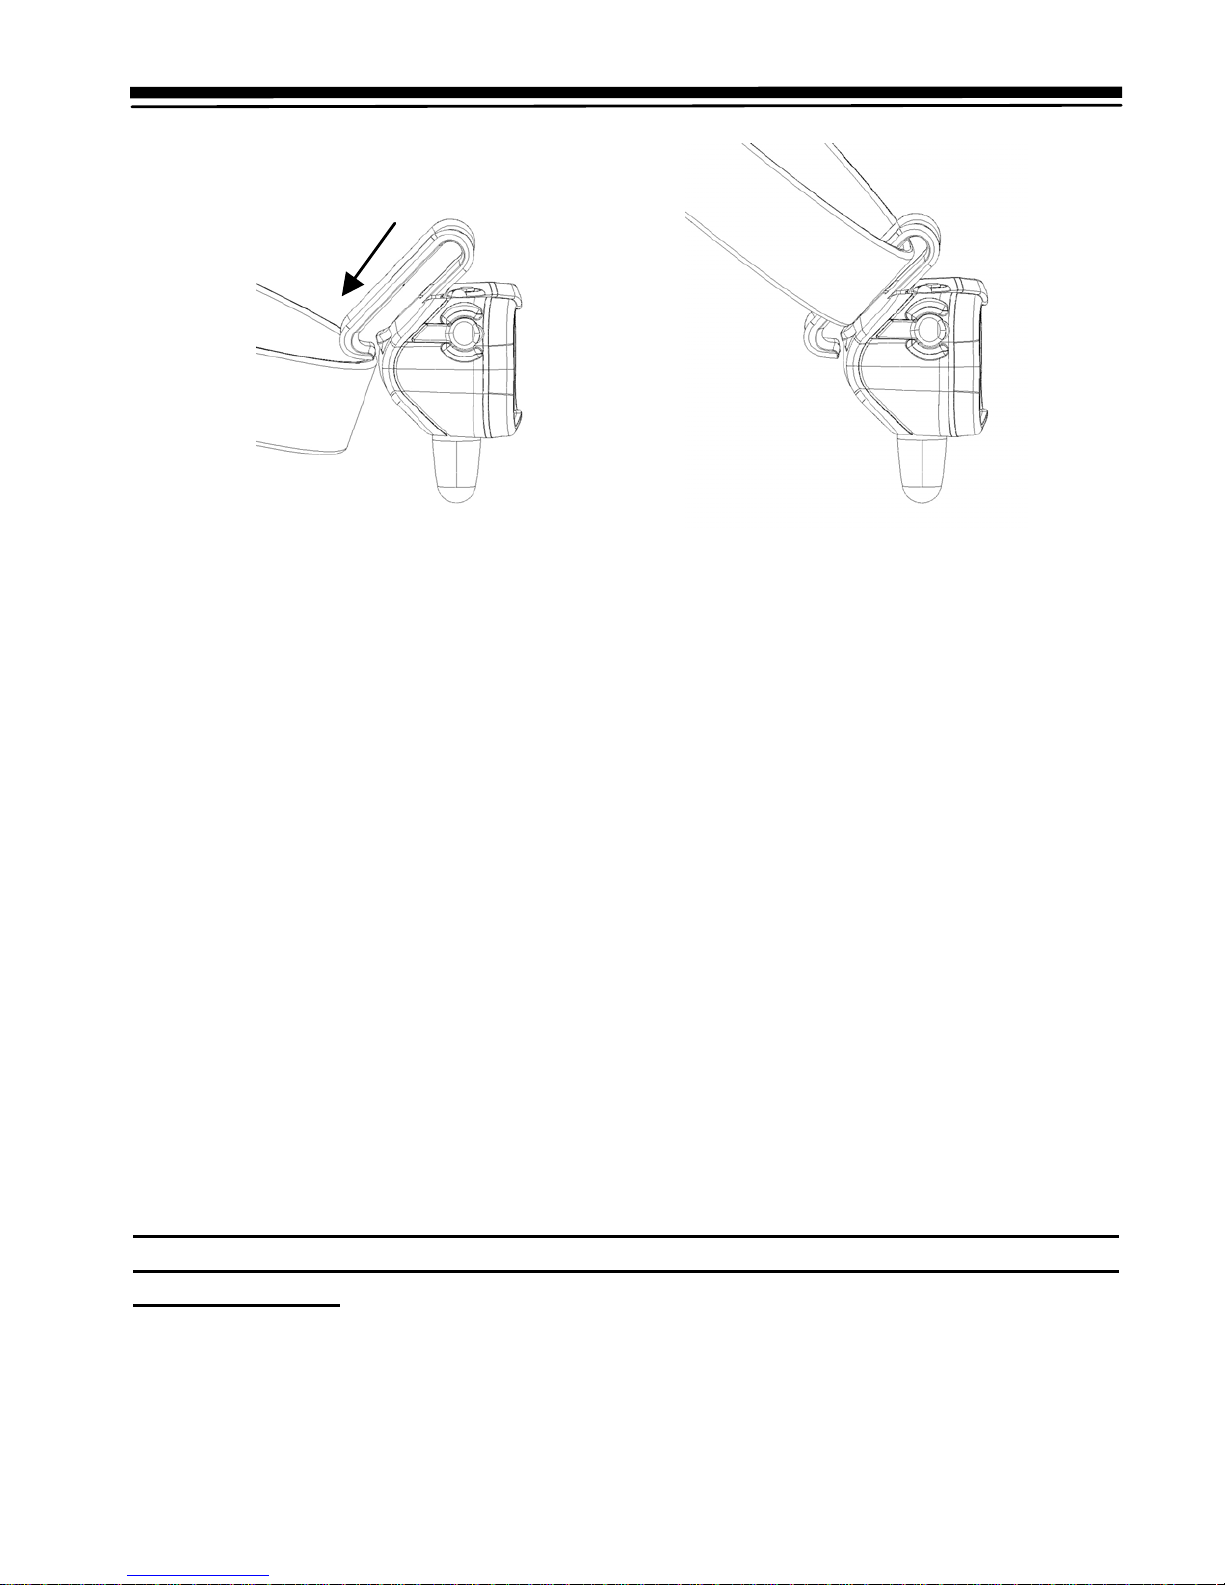
Attaching the Tag to a Collar
Figure 4
When attaching the tag to a collar, always select the side of the collar’s buckle
that is way from the D-ring for holding license and ID tags. The best
arrangement is to have the D-ring on the left, buckle in the center an d the Marco
Polo tag on the right (turn the collar over if necessary to get this arrangement.) If
the collar is an adjustable type then the side away from the D-ring may have two
thicknesses of mater ial, if this is the case then slip the tag’s collar clip over just
the outer thickness of the collar so that the clip rests between the two collar
straps.
The collar clip on the tag is designed to be used with collars ranging in size from
½” (12mm) wide and 3/32” (2mm) thick to 1” (25mm) wide and 3/16” (5mm)
thick. Collars in this size range are available to fit most pets. If you are choosing
a new collar for your pet then select the widest and thickest collar that will fit
them comfortably as this will provide the most secure attachment for the tag.
To remove the tag from the pet’s collar, pry the hooked end of the clip outwards
from the body of the tag with your finger and then slide the collar out of the clip.
Note: To avoid possible injury, the American Kennel Club (AKC)
recommends that ALL collars and tags of any kind be removed from pets
prior to crating.
Powering On the Locator and Tag
To power on the locator: Press and hold the Power button (see the User
Controls and Displays section for the location of the power button) until all of the
display segments flash and the locator beeps twice.
5
 Loading...