

Page 1
This user manual is subject to be revised without prior notice.
www.makagps.com
Page 2
2
LIST
Getting Started
- General information
- Specifications
- Product guidance
- Notice for safety
- Cautions while using
- Other cautions
---04
---05
---06
---08
---10
---12
Product Guide
- Default components
- Optional components
- External appearance
- Installing instruction
- Power cable hardwiring
---14
---15
---16
---20
---22
Recording Guide
- Recording guide
- Driving recording guide
- Event recording guide
- Parking recording guide
- Photo capture guide
---25
---26
---28
---30
---32
Screen Guide
- Booting / Main screen
- Main screen
- Video playback
---34
---34
---37
Setting
- Setting guide ---40
PC Viewer
- PC Viewer install
- Starting PC Viewer
- PC Viewer setting
- TAT browser / File transfer
---46
---48
---52
---53
Others
- Firmware update
- Caution for firmware update
- Q & A
---56
---57
---58
Page 3
3
Page 4
4
GENERAL INFORMATION
General Information
Before using the device, read this user manual carefully for proper use.
If firmware is updated to improve product performance, this user manual can be revised without prior notice.
Product Guidance
Our device is also called vehicle recorder recording your driving process.
- Because the device cannot always record all video and sounds depending on different circumstances,
please use it as a reference to check driving video.
- This device support TAT function.
- With TAT function, you do not need to format SD card periodically.
Serial Number
- Each product has own serial number.
- Serial number is printed on the sticker attached on the bottom of device supplying production date, etc.
Page 5
5
SPECIFICATIONS
- Video :
- Sensor :
- Camera :
- Screen :
- SD card :
- WiFi :
- GPS :
- Recording mode :
- Power input :
- Memory format :
- G-sensor :
- Motion sensor :
- Security LED :
- Video playback :
- Low power protection :
- Auto power off :
- Working temperature :
- Size / Weight :
Front Full HD (1080p) / 30fps + Rear HD (720p) / 30fps
AptinaAR0330
3M pixel (Front), 1M pixel (Rear)
3.5inch (480x320 pixels) full touch LCD
up to 64GB micro SD card. Format free
802.11 b/g/n, Android App, iOSApp
external smart GPS (Optional Accessories)
Driving/Event/Parking/Photo
12V~24V (12V@330mA/1Ch, 12V@400mA/2CH)
TAT included. Possible to format in settings.
3axis gravity sensor
Detect motion in parking mode
Front side
In main unit LCD, Bundled PC viewer
Detect car battery low power to prevent battery drainage
In abnormal high temperature, DVR power off automatically
(in parking mode).
-10˚~60˚
110 x 68 x 17 (mm, W/D/H) / 120g
Page 6
6
PRODUCT GUIDANCE
Voice Recording
High sensitive MIC is installed.
-Record video and voice simultaneously.
-No voice recording setting as a default setting.
-To active voice recording, check “voice recording” in main screen or settings menu.
-Video and voice recording use more memory space.
Operating Status
-When booting, voice guide you recording in process.
-Front blue LED shows recording in process.
-Rear blue LED let you know recording in process.
Security LED
-Can check if the device works from outside during driving.
-LED is flashed when the device detects a motion in parking mode and warn any theft.
Time Check
RTC is installed.
-RTS means “Real Time Clock”
-Default time is factory setting time.
-If GPS cable is connected, GPS set the real time
-If you want to change the time, you need to set your country local time zone first, and then date, time.
Page 7
7
PRODUCT GUIDANCE
Vocal Guidance
Speaker is installed.
-Event beep sounds are generated in various status.
-Voice guidance is generated.
-Voice is generated during playback in device.
Mounting
Mount holder is supplied.
-Fix mount holder into front window shield.
-Fix rear camera into rear window shield.
-Adjust camera height angle.
-Not support right and left angle.
Page 8
8
NOTICE FOR SAFETY
This user manual is made for easy using the device, further more it will be helpful for your safety driving.
Before operating the device, read the manual carefully and follow these safety warnings in order to prevent
the user’s property damage.
Notice
• If the device is relocated, then it may cause the camera angle changed simultaneously.
Before using the device, be sure to adjust the camera angle and double check it.
• Make sure that the device is installed in a proper place. If not, the video recording can not work well.
• Windows tinting may affect video quality, so avoid tinting windows deeply.
• Keep your vehicle windows always clean for the best video quality.
• The device is regarded as driving record equipment; driver or user may get the proper video images
only in the normal conditions.
When you drive through a tunnel or drive at night, the video cannot work properly.
Intense back light also affect the quality of the video.
• If the device is damaged by a huge car accident or power does not connected, it may affect to record the
accident situation normally.
• Keep camera lenses always clean. If the lenses have some substances or fingerprint on it, you may bad quality of
video recordings.
• The recommended operating temperature range will be at -10℃ to 60℃, make sure that the optimal temperature
is maintained.
Do not expose the device under extreme temperature (too high or too low), or else the device can be damaged
quickly.
Even if you are not using it, keep the device within acceptable operating temperatures.
• Do not use the device in a hot and humid circumstance.
• Make sure that it is far away from the water or other liquids, it may cause device damage and we will not take
responsibilities for such incidents.
• Do not press the button intensely, or else it might cause device damage.
• Only use soft and dry cotton cloth to clean up the device.
Page 9
9
NOTICE FOR SAFETY
• Do not use strong chemicals or detergents to clean the device, it might cause device damage.
• Do not arbitrarily disassemble or drop the device, it may cause serious damage or a mechanical breakdown.
• Do not operate the device while driving, or else it might cause a vehicle accident.
• Do not install the device in which driver’s view is blinded, it may cause car accidents.
• The device cannot interwork well with other company's equipment.
If you are trying to connect in a force, it may cause device damage and we will not take responsibilities for
such incidents.
• Keep the device and cables clean, or else it may cause damage or malfunction.
• When the device is damaged by an accident, stop using it and contact us immediately.
• Keep checking the camera angle; make sure that the device is fixed firmly, as it may become detached due to
severe vibration of vehicle in a long distance driving.
Page 10
10
CAUTIONS WHILE USING
Before using the device, read the instructions carefully for proper use.
•When you first start using our device, check the recorded files after 5minutes filming.
After checking the device and SD card before recording, do double check that the installation method have
no problem then you may take recordings normally.
• Do not save any other files on SD card, it may cause malfunction or it may affect the storage capacity of recording.
• Do not remove SD card before cutting off the power of the device completely.
After turning off your engine, if you take out SD card from the device when LED is still on, then the last recorded
file cannot be saved.
• Keep the memory capacity of SD card more than 300MB for normal recordings.
If the capacity is less than that, it may not record properly.
• For more safely using SD card, we highly recommend you keep to format SD card regularly; it can prevent
SD card error effectively.
• After long time recording usage with enclosed SD card, it may not work well due to its own limited write/read cycles.
Replace it with new one, or else we will not take any responsibilities for such case.
• Use the most reliable SD card for the device.
We will not take any responsibility for damages or problems caused by other branded SD card instead of using the
enclosed SD card.
It may cause bad quality of recordings by using less reliable SD card.
Page 11
11
CAUTIONS WHILE USING
• Whenever possible, move and park your vehicle in a shady area.
- If you park the vehicle outside for a long time, remember to cut off the power supply from the device.
Or else it may cause malfunction of the device due to the extreme high temperature.
- If the inside vehicle temperature raised to over 80℃, the device is automatically cut off the power due to the
auto power off circuit built-in it.
• If you connect the hardwire power cable for parking mode, vehicle battery begins to be discharged.
- The decrepit vehicle or long-term parking can be discharged easily.
- If you connect the device to permanent power in parking mode, vehicle battery can be totally discharged.
- The device has built in Low Voltage Cut Off circuit, so it may prevent the vehicle battery from drainage
in parking mode.
• Due to SD card is regarded as consumable items, keep to check and maintain it.
- The period of the repair warranty of SD card is 6 months from the date of purchase.
- If it has passed its warranty, we will not take any responsibilities.
- We highly recommend you format SD card every 1 month.
- Format method: Press the “Initialize SD card” button on settings menu with voice guidance, then it will be
formatted automatically
Page 12
12
OTHER CAUTIONS
• When you insert SD card into the device, check card directions carefully.
• Carefully remove SD card from the device, so that it may not stick out so far from you.
• Do not remove SD card suddenly while the device is still working.
It may cause recognition problems of SD card or SD card will be damaged.
• When upgrading the firmware, do not remove SD card and keep the power is connected well.
Or else it may cause the device damage.
• Keep the window is clean and mount holder fixed firmly, as it may become detached while driving.
Do not use the same adhesive tape several times for fixing mount holder, it may detach from windows
and cause an accidents.
• Before connecting the hardwire power cable, read the power cable hardwiring manual firstly.
If you connect it in a wrong way, it may cause the device damage.
Page 13
13
Page 14

14
DEFAULT COMPONENTS
Default Components
Components could be changed to improve product quality without prior notice.
Main unit
Mount holder
Quick start guide Cable holder
SD card w/Sd card Reader
Cigarette power cable
Hardwire power cable
Rear camera
Page 15

15
OPTIONAL COMPONENTS
Optional components
External GPS
Each components could be changed depending on their quality and supply status
Page 16
16
EXTERNAL APPEARANCE
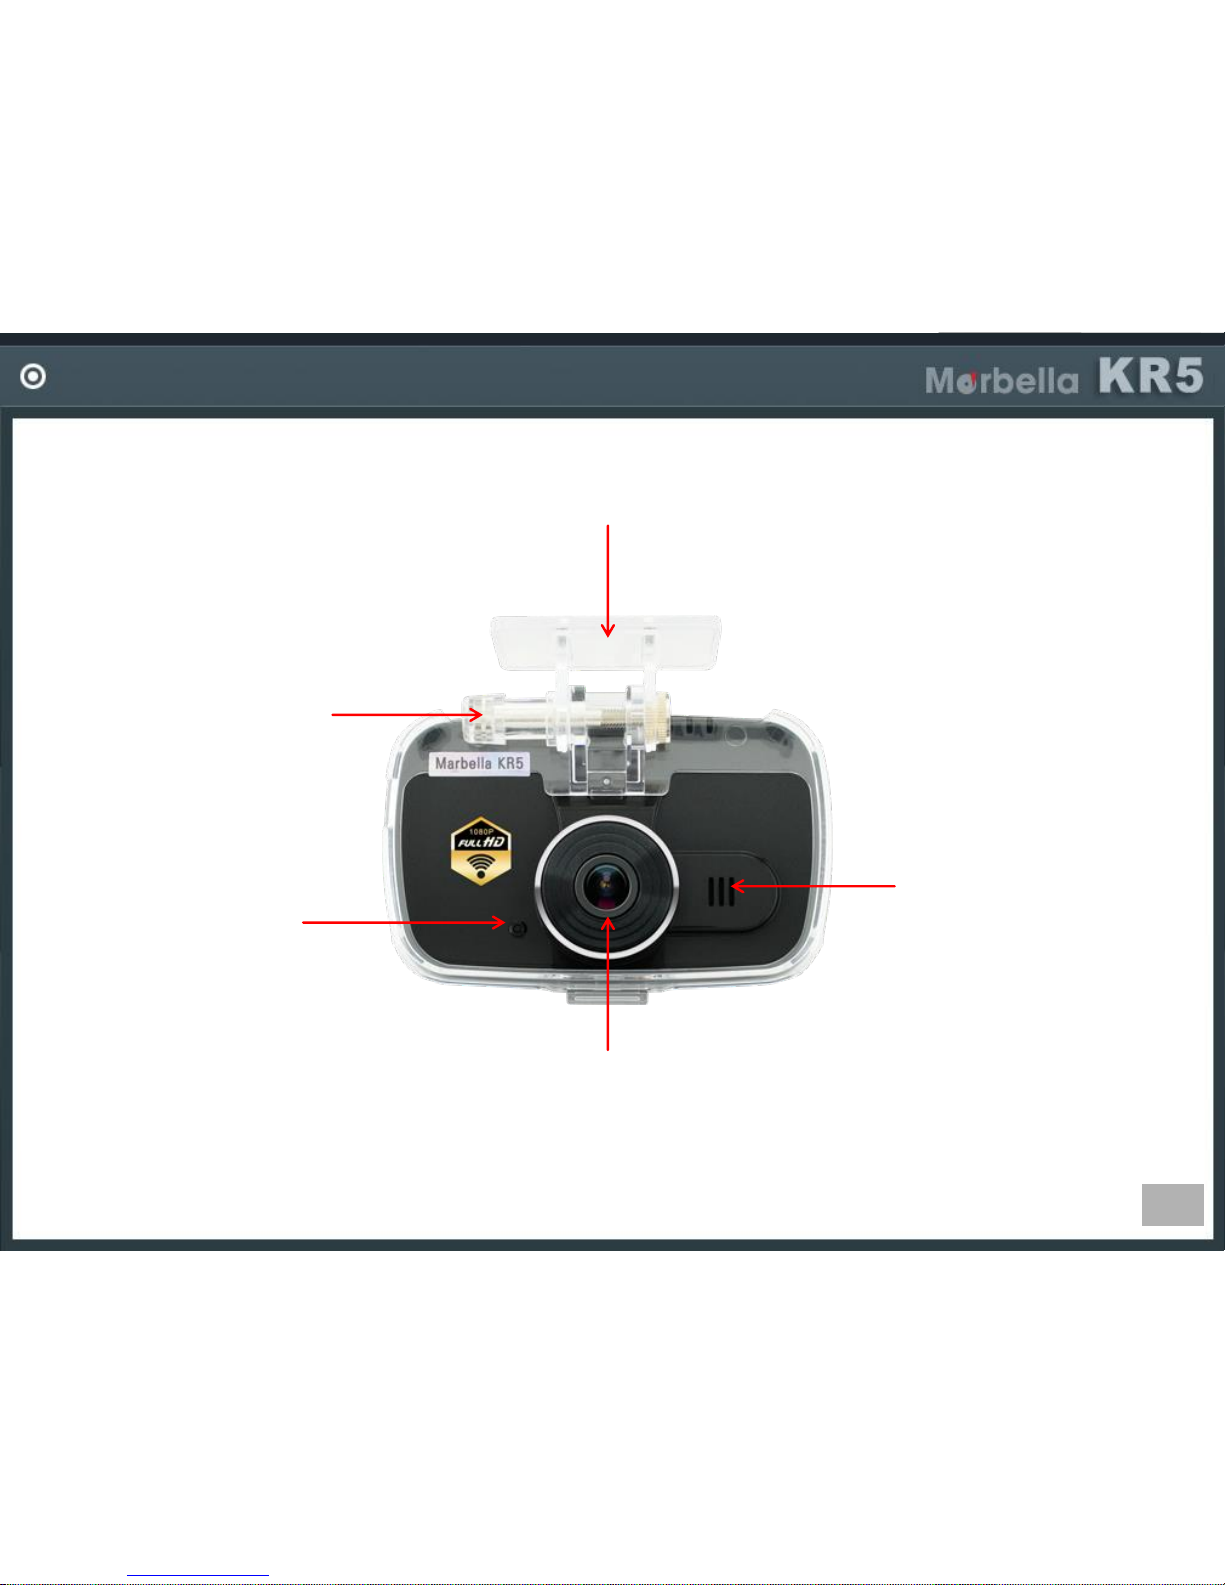
Mounting surface
. Attach it using double sided tape.
Holder angle adjustor
. Adjust camera angle
Security LED
. Shows when the device
works properly.
LED blinks.
Speaker
.Various voice guidance
and event beep sounds
are generated.
Camera lens
. Manage it from dust.
Page 17
17
EXTERNAL APPEARANCE
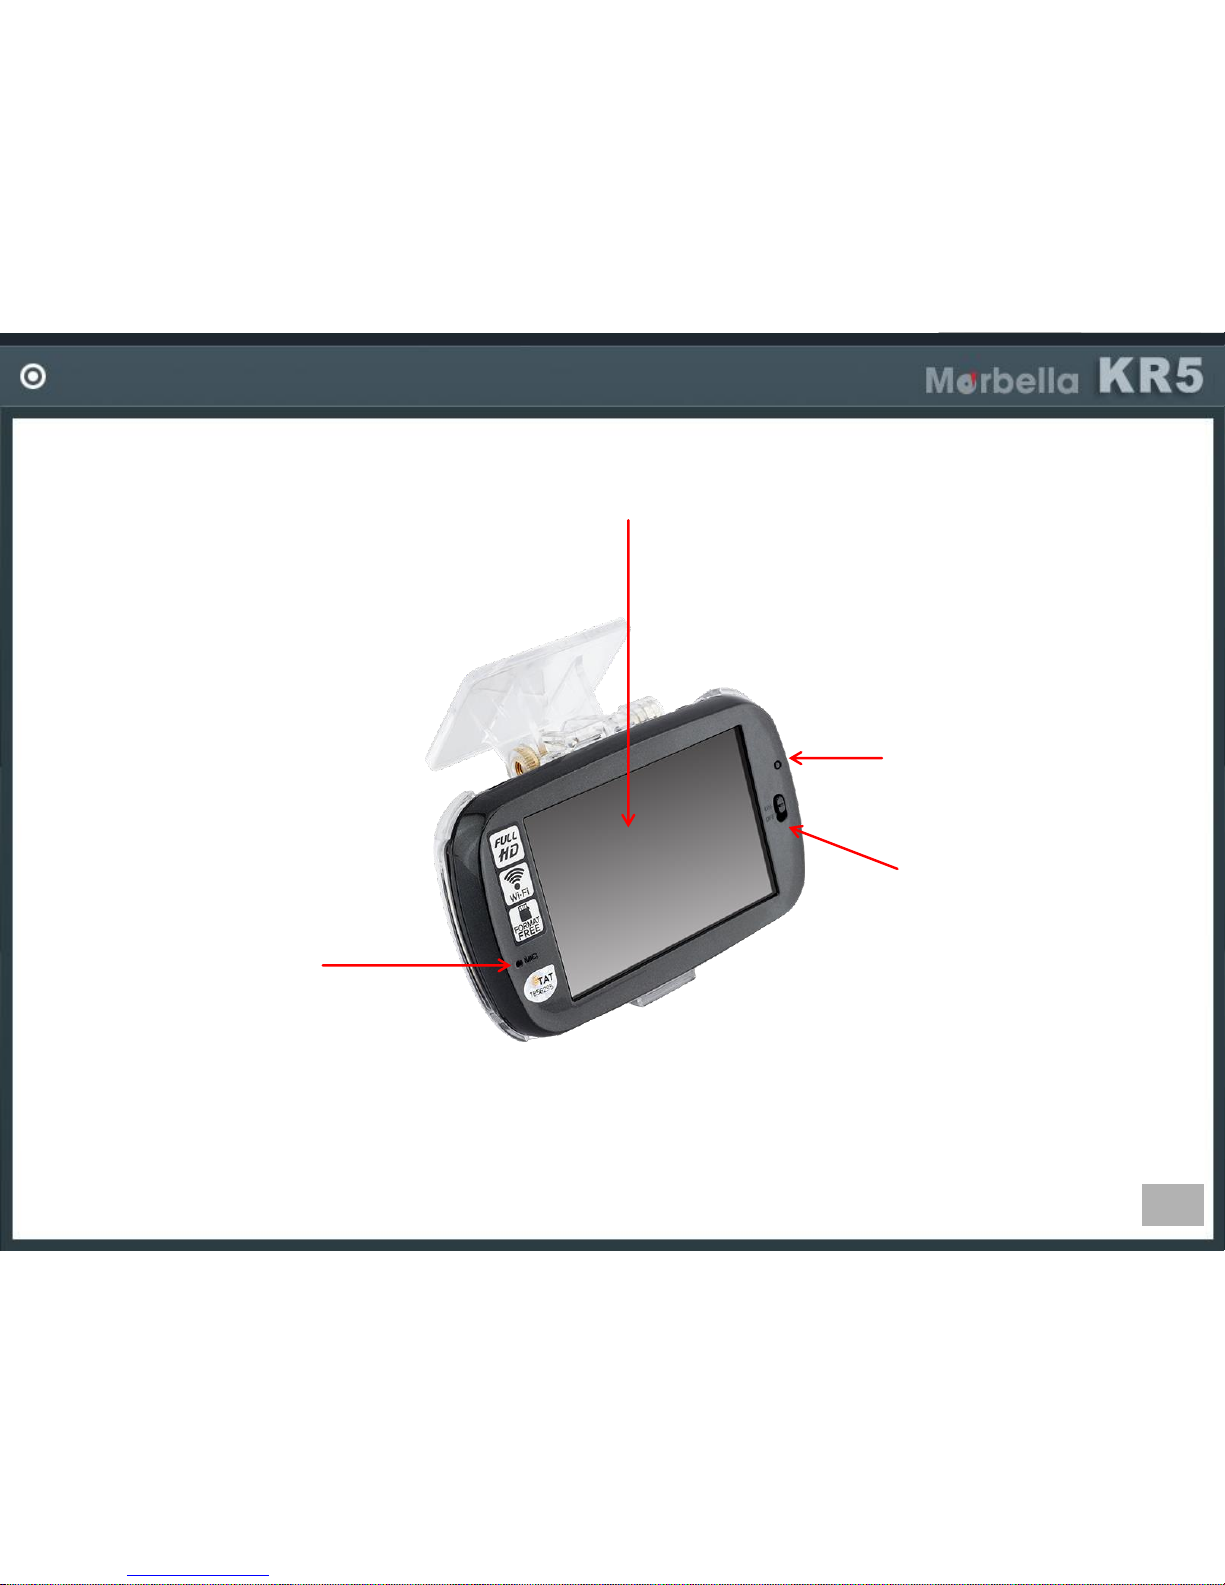
LCD Screen
. Can see and play recording files or operate using
various menus.
MIC
.Can record voice.
.Voice REC can be ON
in main screen or setting.
Power Switch
.To turn on / off the device.
REC LED
.Shows normal operation
of the device.
Page 18
18
EXTERNAL APPEARANCE
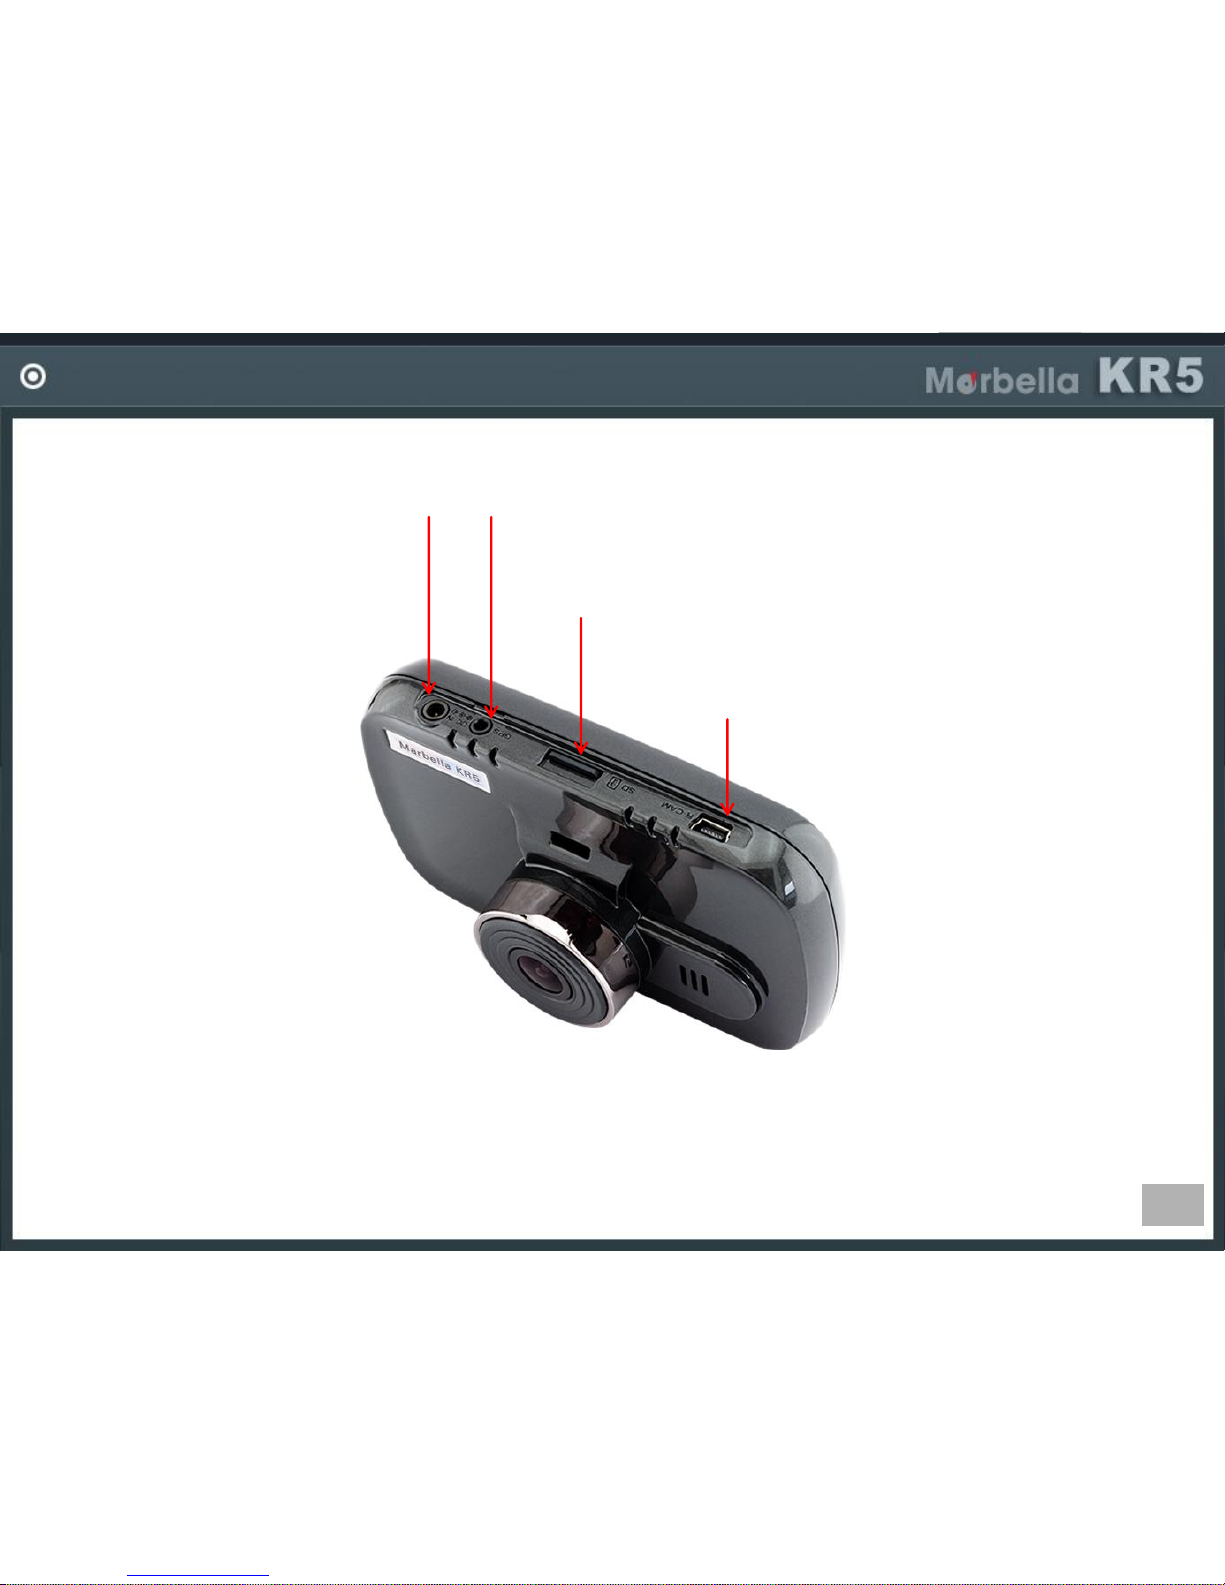
GPS Port
. Connect external GPS antenna
. GPS record location of the video.
Micro SD Card Slot
. Insert micro SD card.
Power In
. Connect power to the device.
(12V~24V )
. Use hardwire power cable
or cigar power cable.
Rear Cam Port
. Connect the rear camera.
Page 19
19
EXTERNAL APPEARANCE
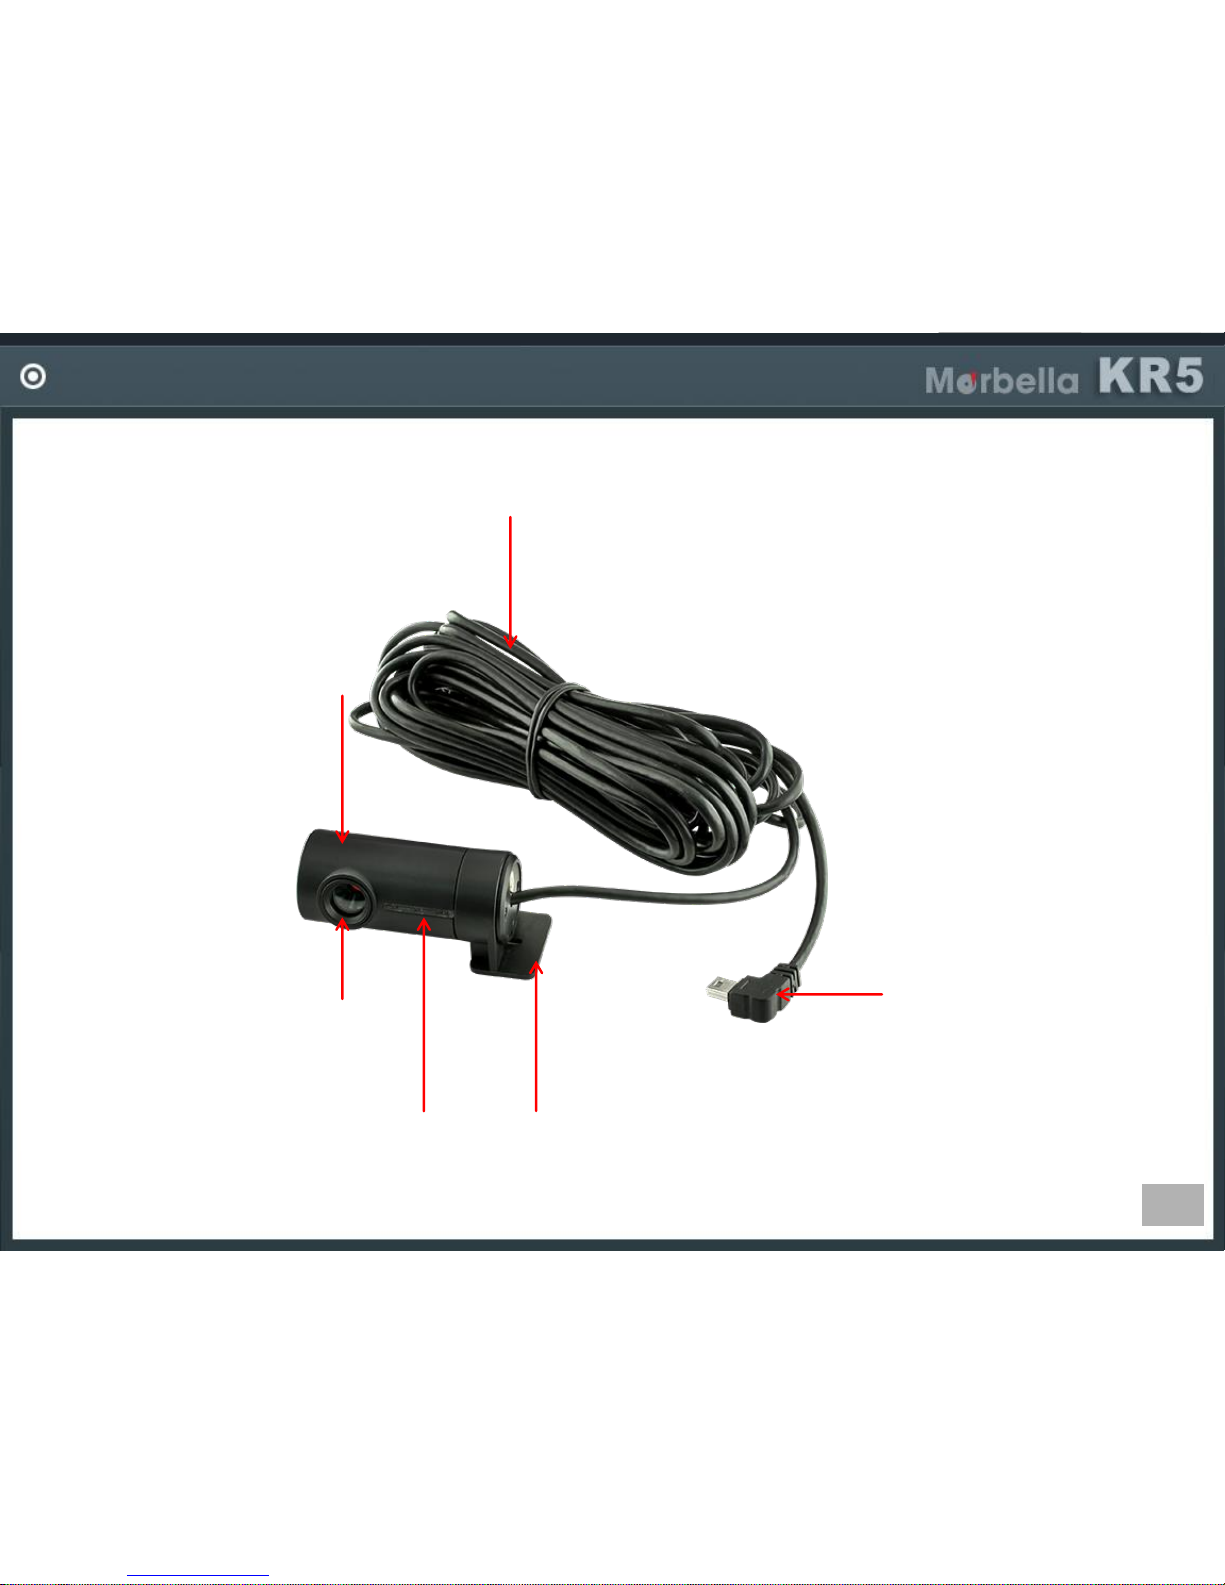
Rear Cam Cable
. Connect main unit and rear camera.
Connector to Main
. Connect to main unit.
Angle Adjustor
. Adjust rear camera
angle
Rear Cam Lens
. Rear side video.
Security LED
. Shows normal operation
of rear camera.
Mounting Surface
. Fix rear camera on the rear window shield.
Page 20
20
INSTALLING INSTRUCTION
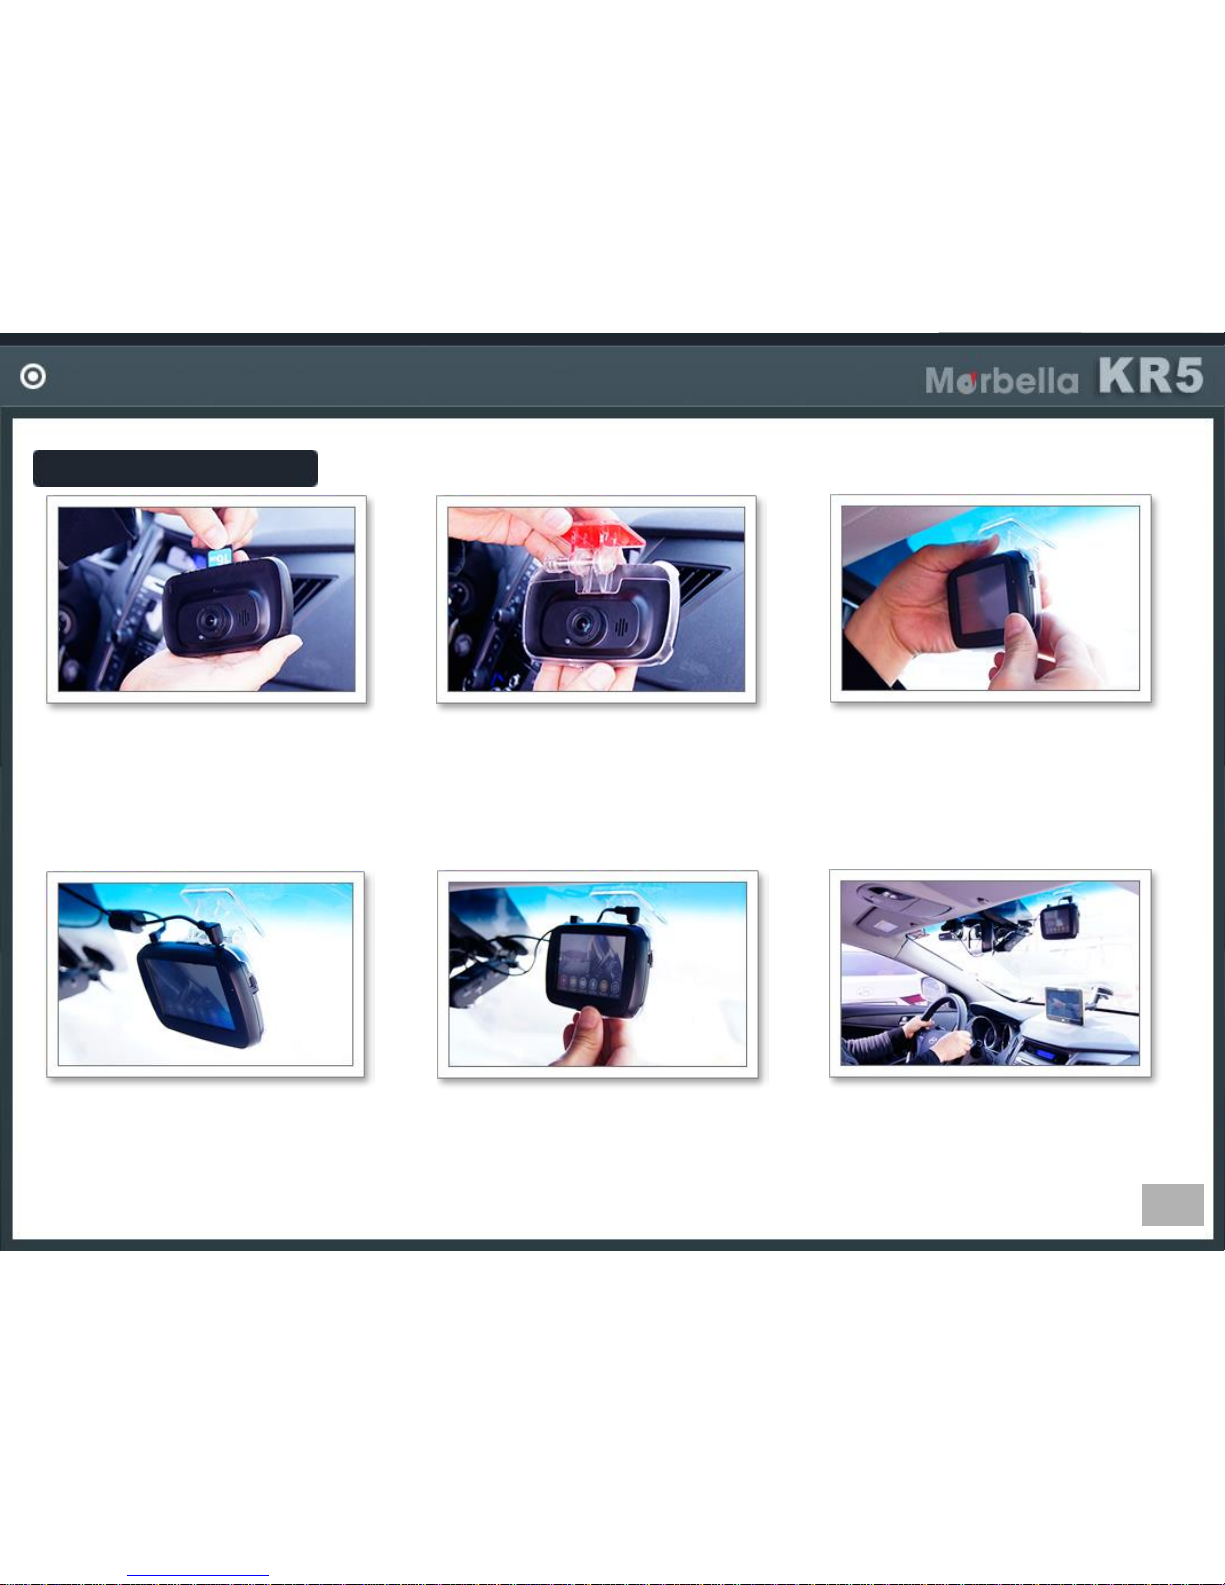
Insert a SD card before using the
device.
Front Camera
Each DVR model have different design. Below guide is just reference.
Keep mount holder securely locked in
the main unit. Fix the middle latch of
holder on the slit above lens of the
main camera first. Then fix lower part
of holder until hearing clicking sound.
In order to avoid affecting driver’s sight, it’s
better to choose a space in the back of room
mirror, than fix the mount holder into it
securely by enclosed double-sided tape.
Connect the rear camera into the
main camera. Fix the rear camera on
the rear window shield, and connect
the rear cam cable between rear
camera and RCAM port of main
camera.
Connect the power cable. There are
2kinds of power cable - hardwire
power cable and cigar power cable..
After booting, you can see front and
rear video on the LCD screen. Check
if it records well and adjust camera
angle if necessary.
Page 21
21
INSTALLING INSTRUCTION
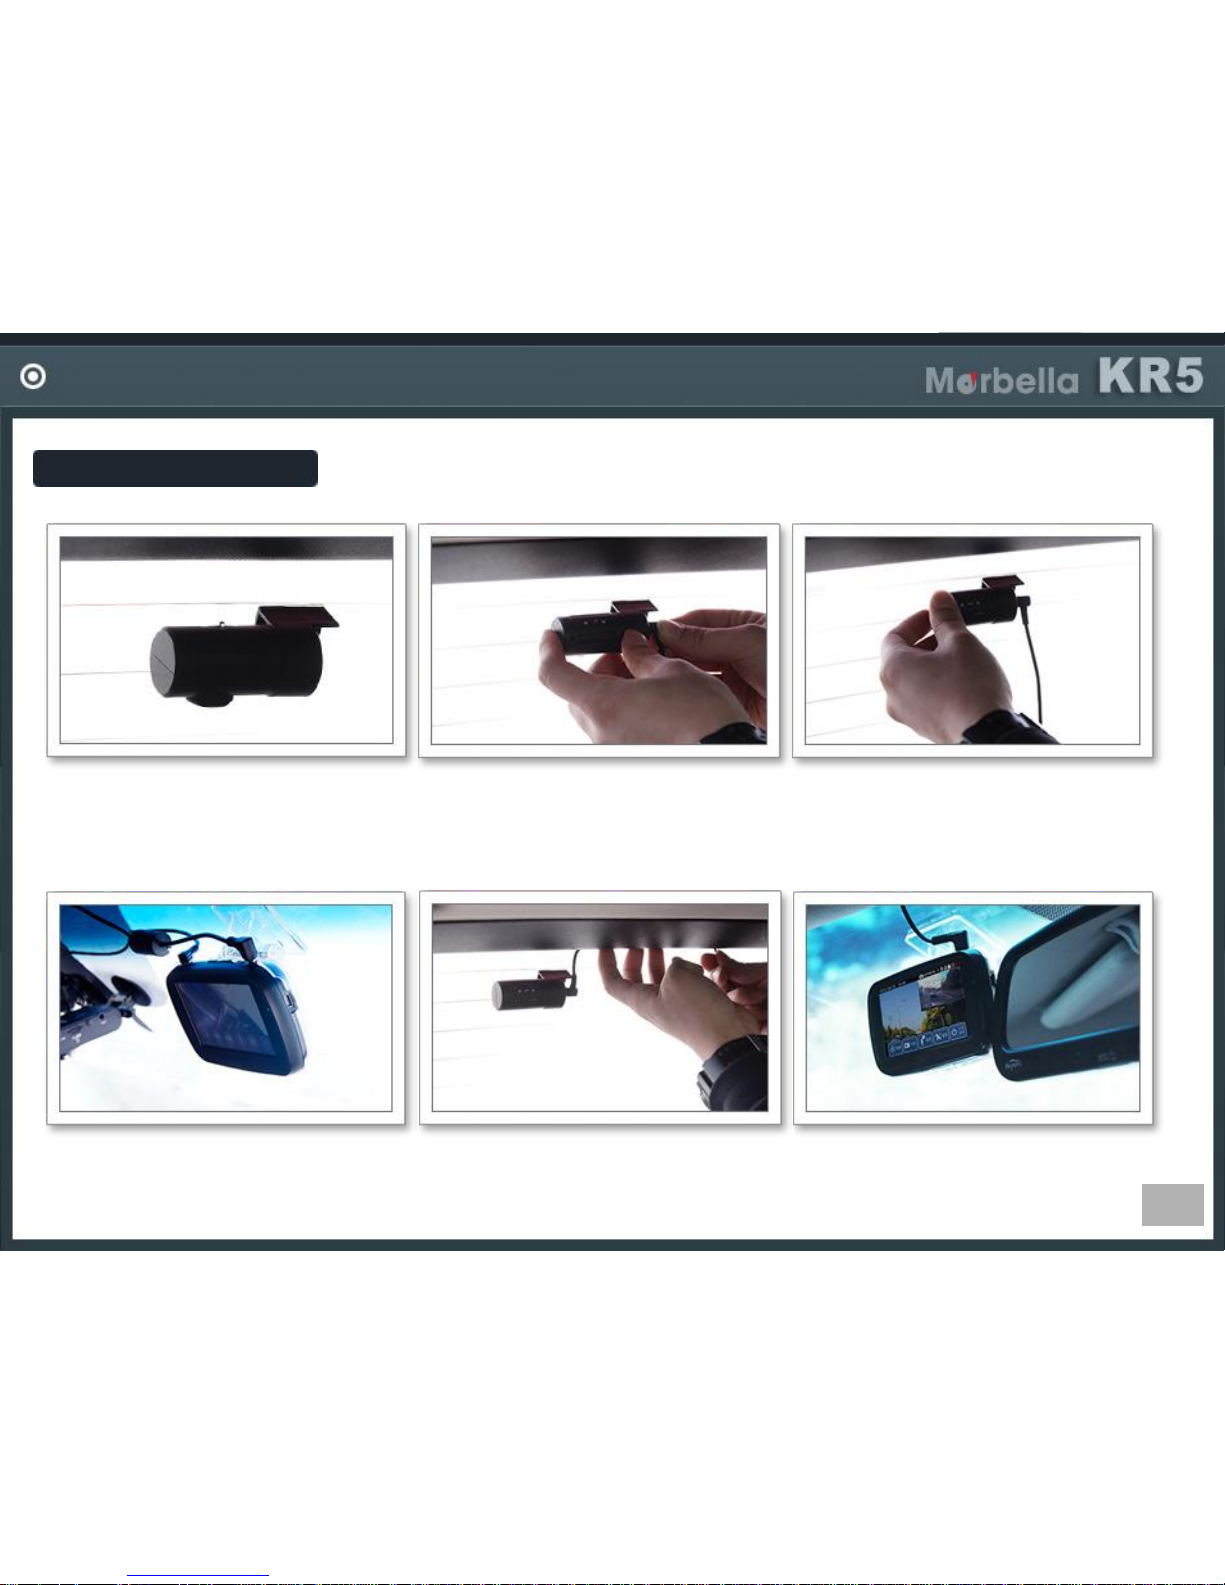
Fix the rear camera on the rear
window.
Rear Camera
Each DVR model have different design. Below guide is just reference.
Connect the rear camera cable into
the rear camera.
(some cameras have already cable
fixed)
Adjust camera angle with angle adjustor.
Connect the rear camera cable
into the main unit.
R-cam the cable into window
aperture to make it invisible.
Check the rear cam view after
starting engine.
Page 22
22
POWER CABLE HARDWIRING
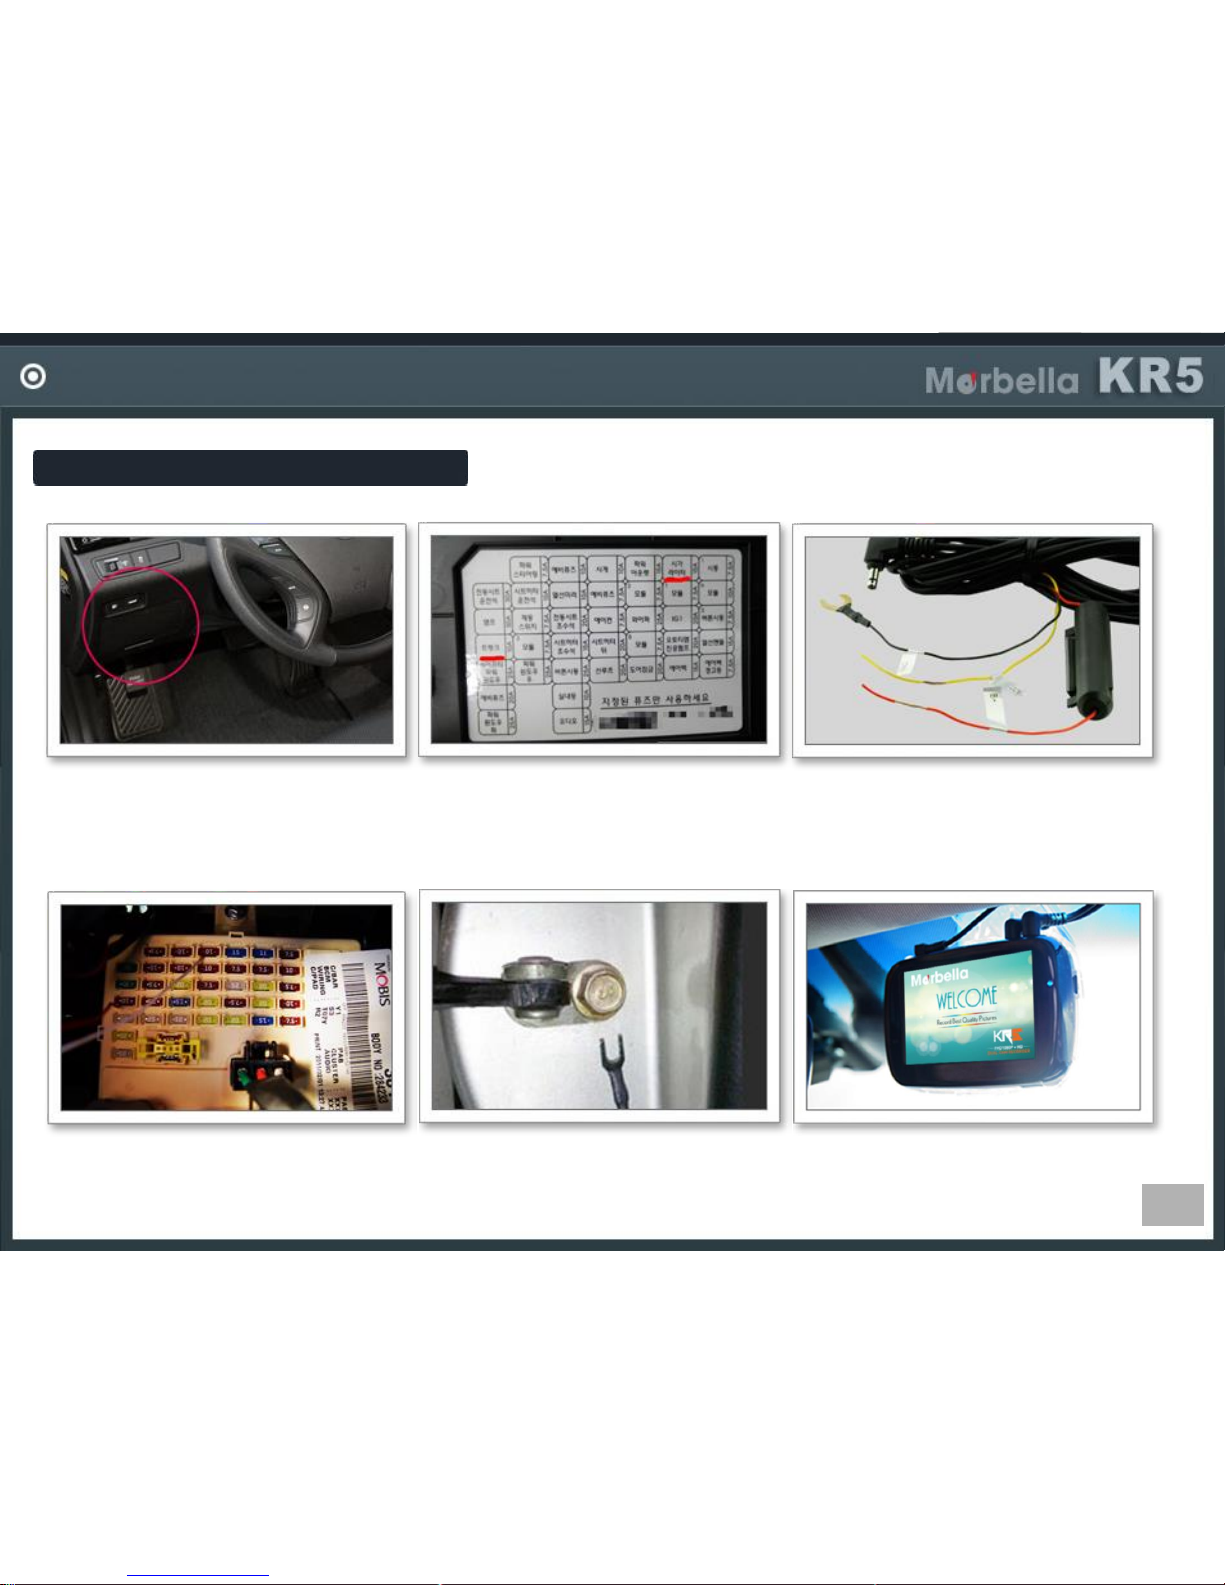
Fuse box is normally located left
under the driver’s seat.
You can open the fuse box.
Power cable hardwiring
Fuse box of each car brand is different.
Just refer this guide.
Fuse locations and names are
written on the fuse box cover.
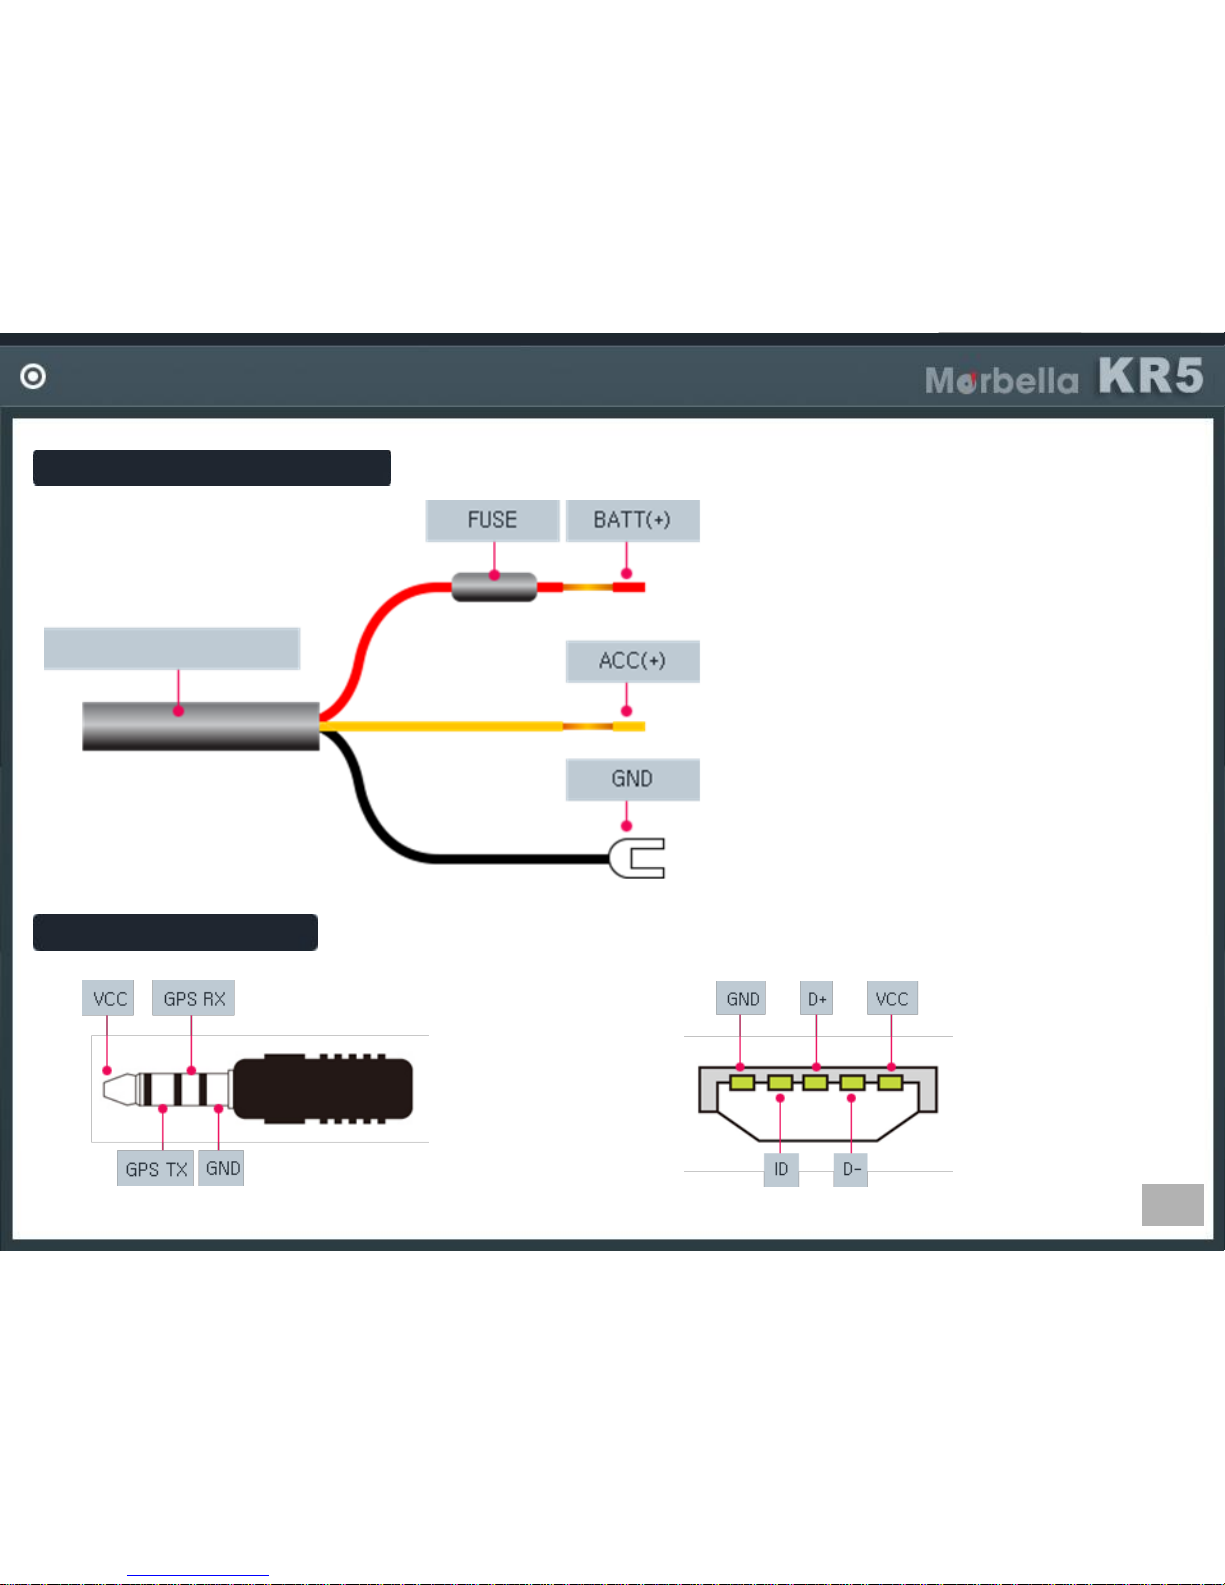
Check the hardwire power cable. It is
composed of GND, ACC(+), BATT(+)
Connect ACC and BATT into fuse.
Refer to the hardwire power cable
Guide to check the location.
Fix the GND on the nut connected
in metal in the car.
Check the operation after booting.
Page 23
23
POWER CABLE HARDWIRING
Power Cable Hardwiring
BATT(+)
Red wire having fuse.
Connect it to car permanent power source
(EX : emergency lamp, dome light, taillight etc..)
ACC(+)
Yellow wire.
Connect to the fuse that gets power through
the ignition.
(EX: cigarette lighter, audio)
GND
Black wire.
Connect to the vehicle chassis or vehicle bolts.
Plug and USB Info
GPS Plug
GPS IN Plug 2.5pai pin information
5 Pin USB
Mini USB 5pin
information
HARDWIRE POWER CABLE
Page 24
24
Page 25
25
RECORDING GUIDE
Recording Guide
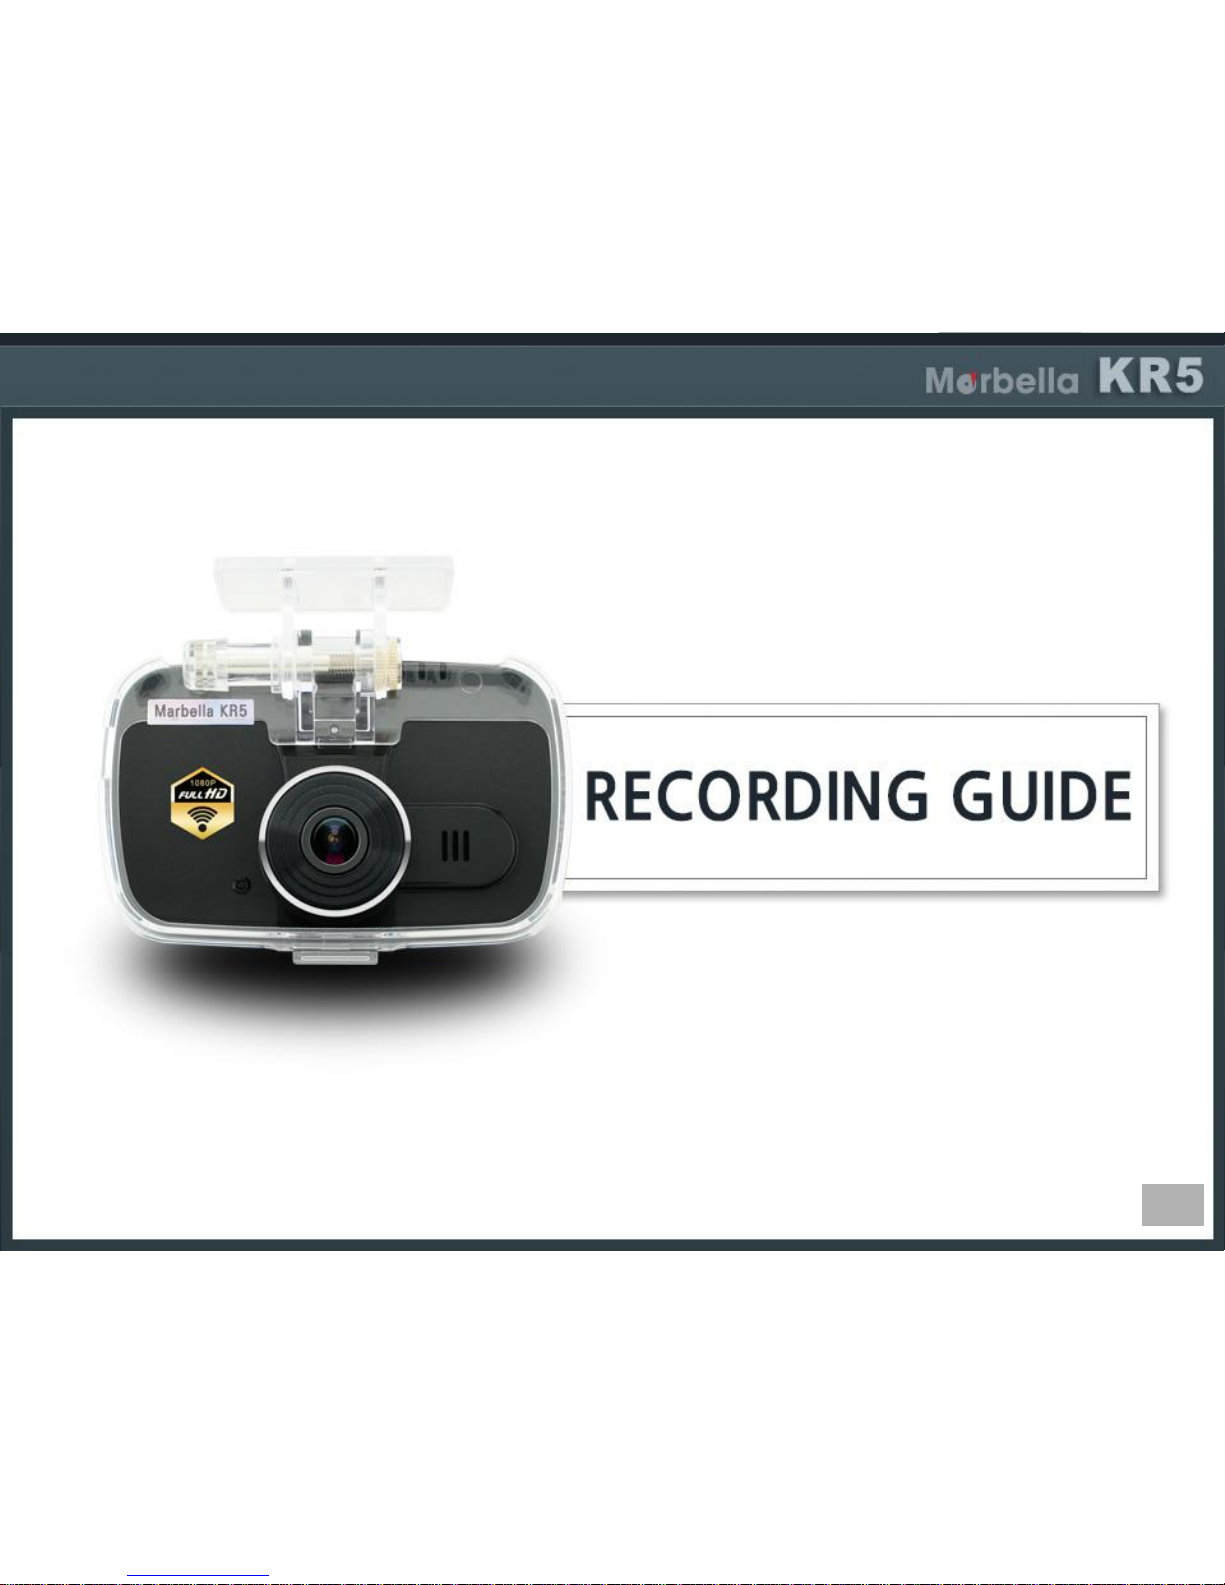
There are 4 types of recording including driving recording, event recording, parking recording, and photo capture.
Driving Recording
When the ignition is turned on, the device will begin recording automatically till the ignition is turned off.
Event Recording
In the case of an impact, event recording mode will be activated through G-sensor detector and separate files
will be produced.
Parking Recording
If a movement or impact is detected in parking mode, the recordings will be activated for a certain time.
If there are no more movements, it stops recording and goes into sleep mode.
Photo Capture
This device supports photo capture. In driving mode if you click the photo button in main screen,
the image is saved as in photo.
Page 26
26
DRIVING RECORDING GUIDE
Driving Recording Guide
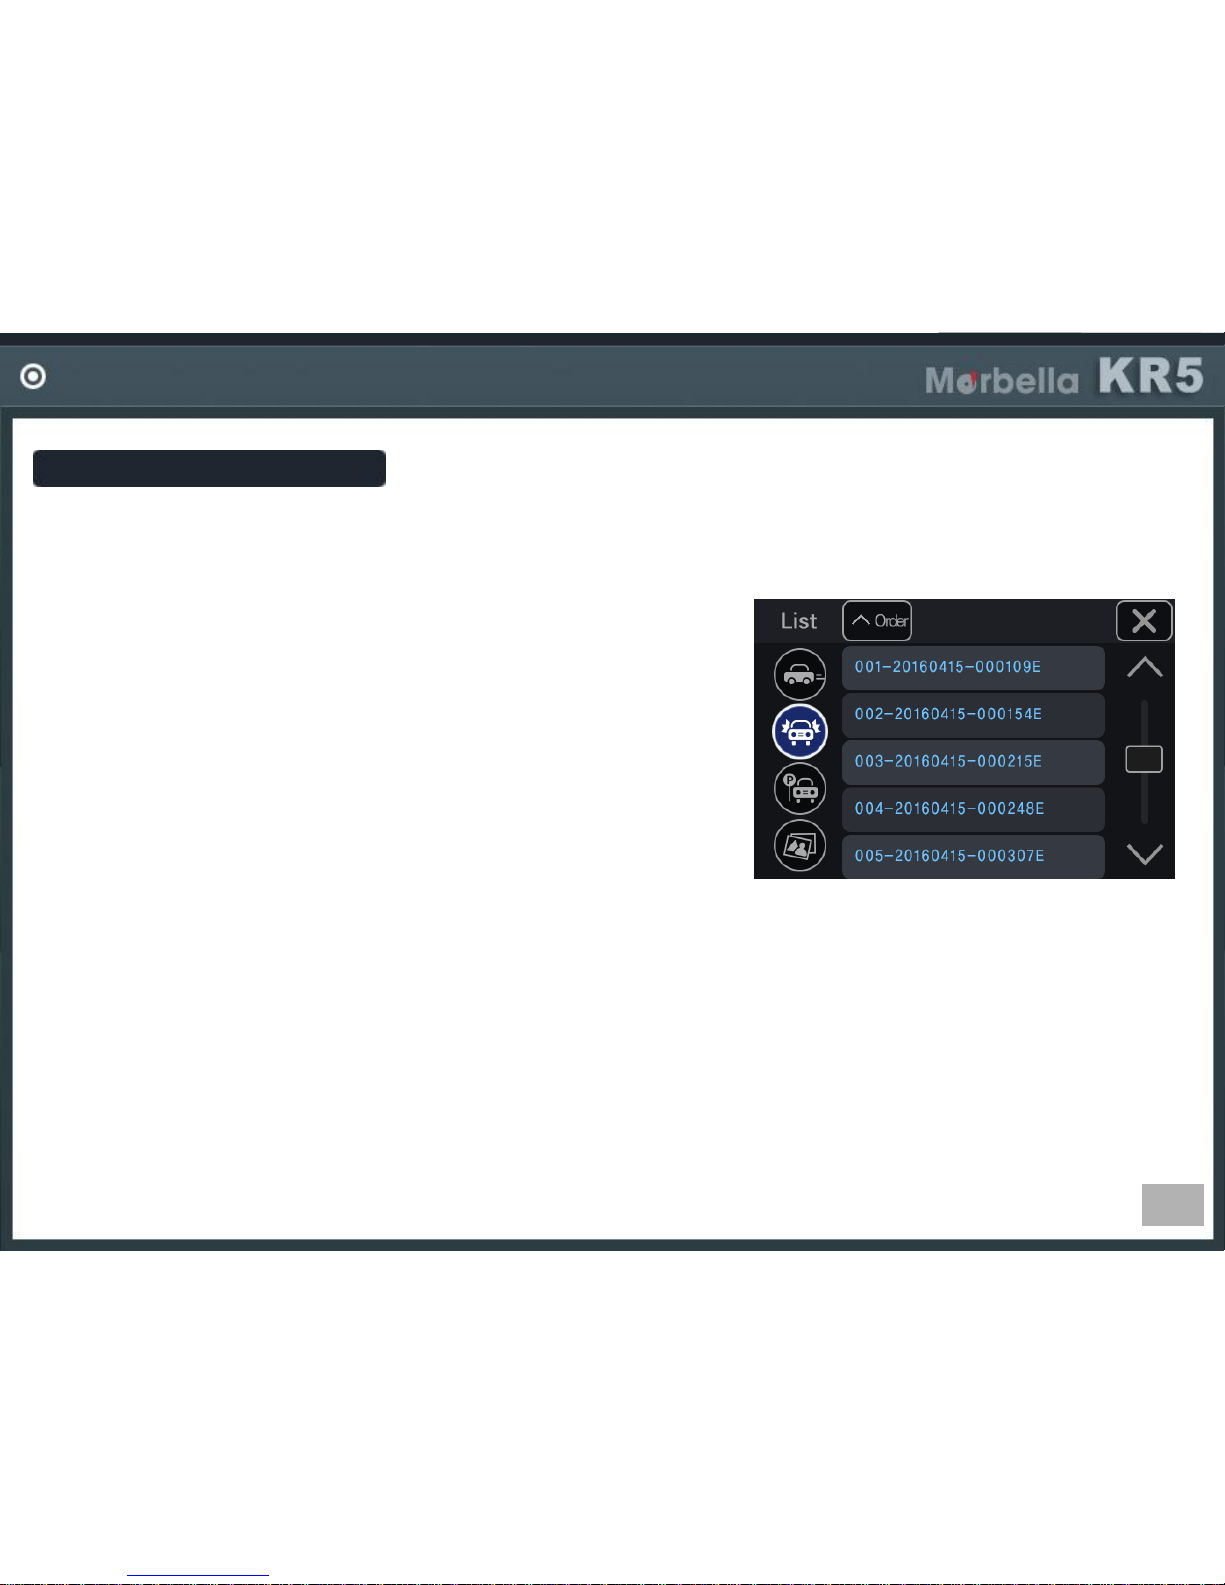
When the ignition is turned on, the device will begin recording automatically till the ignition is turned off.
Recording time
Recording file is made at 1min long.
Recording file
It is made in the format, Year/Mon/Day, hour/min/sec.
ex) 001-20161009_103316I (in case of driving recording file)
001 : file index
20161009 : date (year 2016, Oct, 9th)
103316 : time (10oclock 33min 16sec)
I : driving REC, E: event REC, P : parking REC
A,B : photo, A-front, B-rear
If the SD card memory is full
The program will delete the oldest file in order, then create the new file by current date and time.
In the case of an impact?
The sensors will trigger the event mode.
When an impact is registered, it begins to record 10 seconds prior to the impact and 10 seconds after the impact.
The maximum recording time of each file will be up to 20 seconds long.
If the power goes out while driving?
All current recordings will be saved immediately.
In power hardwiring connection, it goes to parking mode recording.
In ACC (cigar power) connection, recording will be stopped.
Page 27
27
DRIVING RECORDING GUIDE
If you remove the SD card during driving recording?
This device record at every 1sec. Last 1second image is not saved.
And because the SD card or main unit could be damaged, do not remove SD card during operation.
If you can not find a file in driving recording file list?
During driving recording, if an impact is detected, event recording starts.
Find event recording file in main unit display or PC viewer.
If driving record does not work?
First, there could be power supply problem.
Please check hardwire or cigar power cable, and also LED lamp on.
Second, SD card could have a problem.
Please check if SD card is inserted firmly, or SD card life time could be ended.
Carefully check and manage SD card periodically.
Third, main unit could have a problem.
In this case, do not disassemble it by yourself, but call to service center.
Page 28
28
EVENT RECORDING GUIDE
Event Recording Guide
When an impact is occurred based on your registered data(adjust the value in configuration), alarm will beep
once in shortly and REC LED lamp flashes.
Purpose of event recording is to save a important file such as accident video separately in order to prevent it’s missing.
Recording time
Event file is recorded for 10 seconds prior to the impact and 10
seconds after the impact, total max 20seconds.
Recording file
It is made in the format, Year/Mon/Day hour/min/sec.
ex) 001-20161009_103316E (in case of event recording file)
001 : file index
20161009 : date (year 2016, Oct, 9th)
103316 : time (10oclock 33min 16sec)
I : driving REC, E: event REC, P : parking REC
A,B : photo, A-front, B-rear
If the SD card memory is full
The program will delete the oldest file in order, then create the new
file by current date and time.
How to detect an impact
This device have G-sensor installed.
This sensor consider normal driving if a car moves in same speed. But in very short time if a car moves
forward/reward or right/left or high/low suddenly, this sensor consider it as an impact, and generate event
recording.
Page 29
29
EVENT RECORDING GUIDE
If car engine is off suddenly by such as a accident?
In case of hardwiring power connection, if there is no disconnection with car battery, it keeps recording.
But in case of cigar power connection, recording stops after saving last 1second image.
If there is not a file you look for in event recording file list?
The DVR can not record all accidents. Sometimes, by unknown reasons some recording files are not saved.
There could be SD card problem or power supply problem.
If you can not find a file you look for, please call to service center.
Page 30
30
PARKING RECORDING GUIDE
Parking Recording Guide
Parking recording mode will be only activated when the device is connected by hardwire power cable.
Recording starts when there is an impact or movement.
Recording time
Parking file size is maximum 1min.
In case an impact is detected, it records upto 10seconds from an
impact. In case an movement in front or rear is detected, it keep
recording at 1min long till movement is ended
-Recording file
It is made in the format, Year/Mon/Day hour/min/sec.
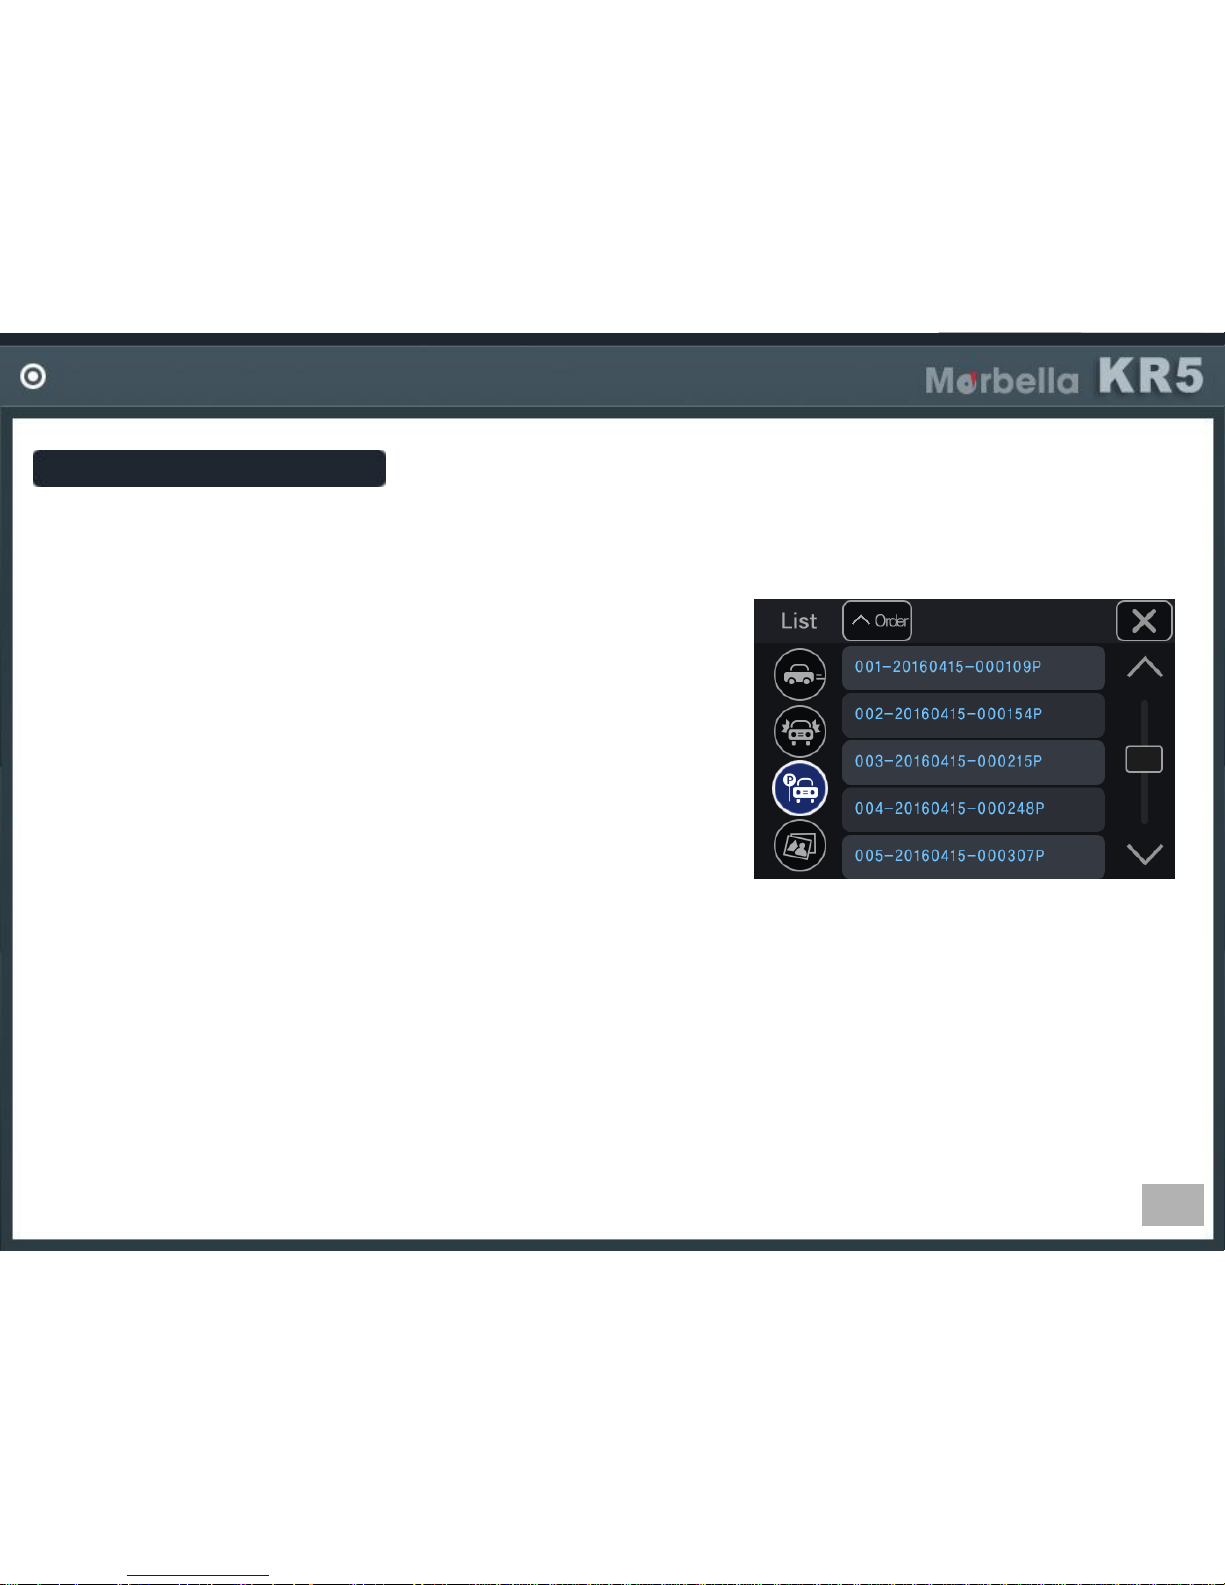
ex) 001-20161009_103316P (in case of parking recording file)
001 : file index
20161009 : date (year 2016, Oct, 9th)
103316 : time (10oclock 33min 16sec)
I : driving REC, E: event REC, P : parking REC
A,B : photo, A-front, B-rear
If the SD card memory is full
The program will delete the oldest file in order, then create the new file by current date and time.
How to do parking recording.
Parking recording mode will be only activated when the device is connected by hardwiring. (Impossible
in cigar power connection)
In parking mode, if a movement in front or rear side (man, car, animal, etc), it keep recording at 1min long. If a
movement is not detected it stops recording.
If an impact is detected by car or man, the device detects and starts recording up to 10seconds from an
impact
Page 31
31
If recording is not saved from a certain time when parking a car for long time?
In order to prevent car battery drainage, this device support auto off function of parking recording.
There are 2 ways to protect battery.
First, you can set up parking recording time.
Second, you can set up low battery power detection.
Car battery power voltage become down around the time battery is discharged..
Check your battery discharge power voltage and set it up in settings.
When a movement is detected what will happen?
LED lamp in the device blinks.
PARKING RECORDING GUIDE
Page 32
32
PHOTO CAPTURE GUIDE
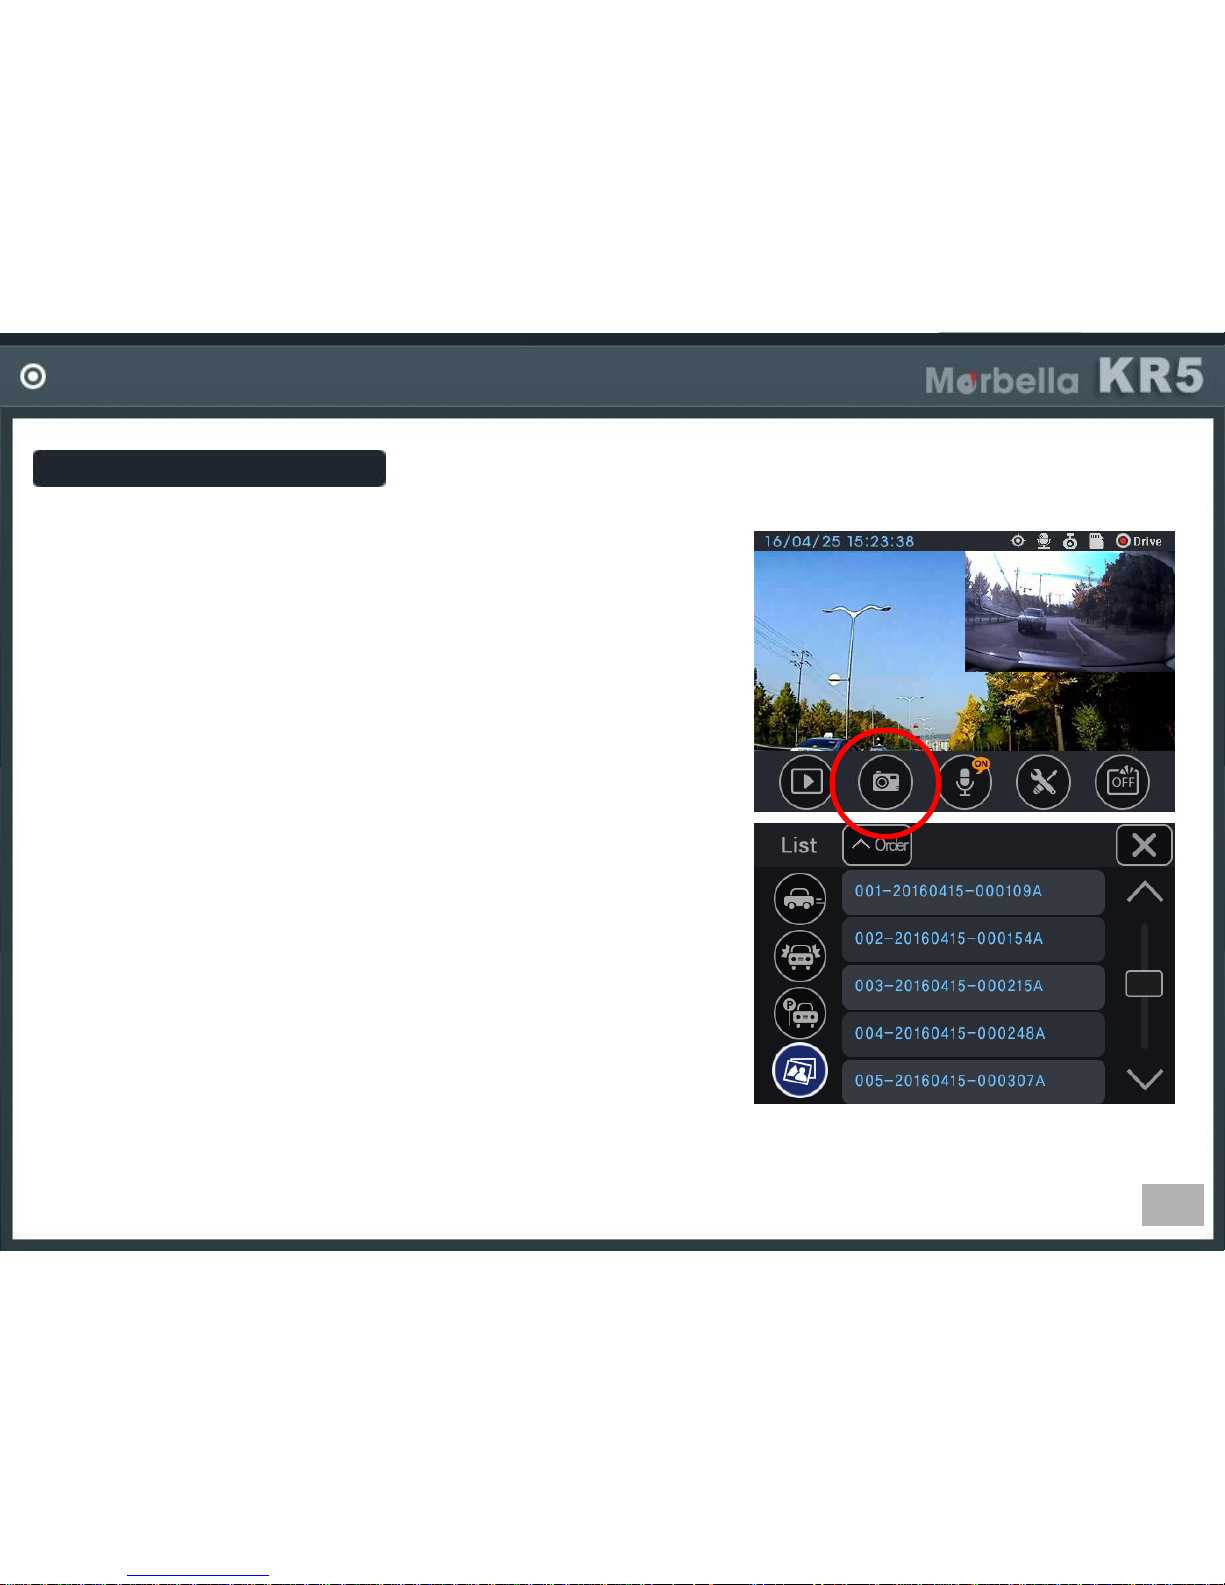
Photo Capture Guide
You can take a picture during driving.
If you click photo button in main screen an image is saved.
Recording file
It is made in the format, Year/Mon/Day hour/min/sec.
ex) 001-20161009_103316A (in case of parking recording file)
001 : file index
20161009 : date (year 2016, Oct, 9th)
103316 : time (10oclock 33min 16sec)
I : driving REC, E: event REC, P : parking REC
A,B : photo, A-front, B-rear
Which side image can be taken?
It can take front and rear both sides.
Front image file name have “A”, rear image have “B”
When you click the photo button, image is saved as JPG.
Page 33
33
Page 34
34
BOOTING / MAIN SCREEN
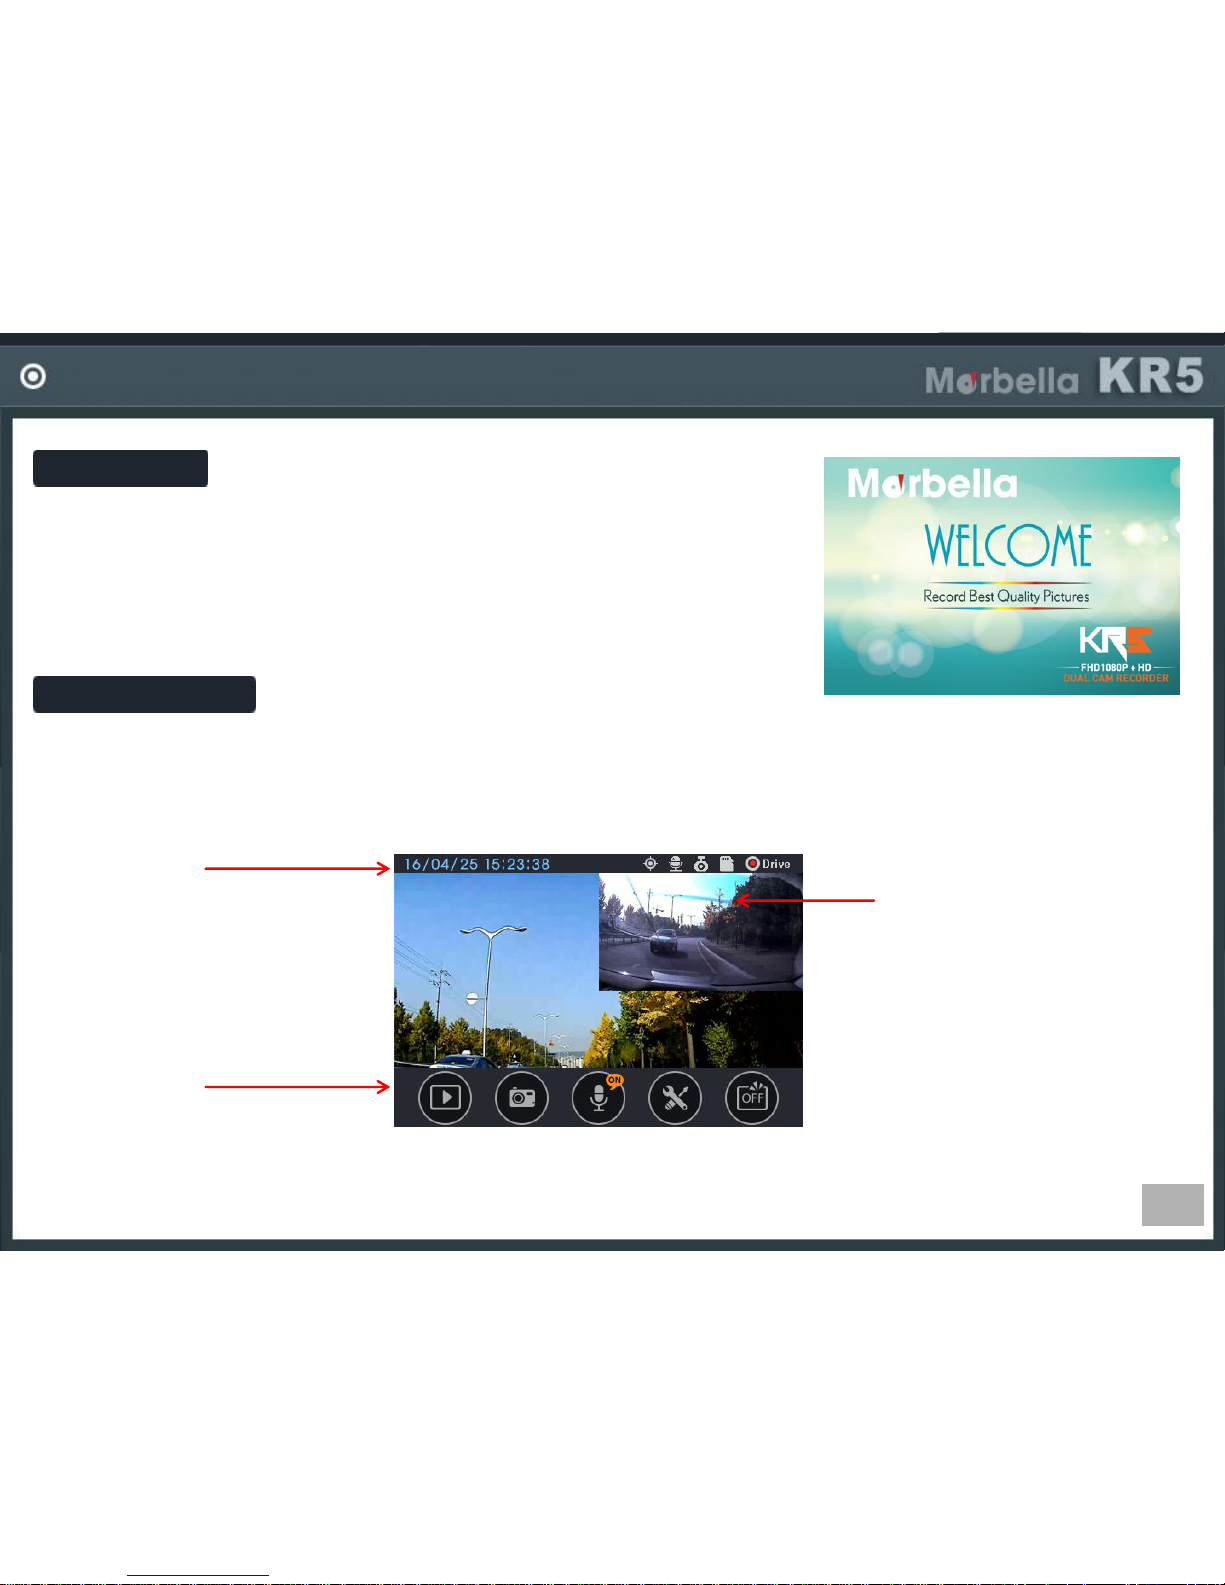
Booting
Power on the ignition or slide the power switch on your left hand side
of the device to turn on the device.
After power is connected, it will automatically enter into the driving mode
and start recording.
(In hardwiring power connection, parking mode is changed to driving mode).
Main Screen
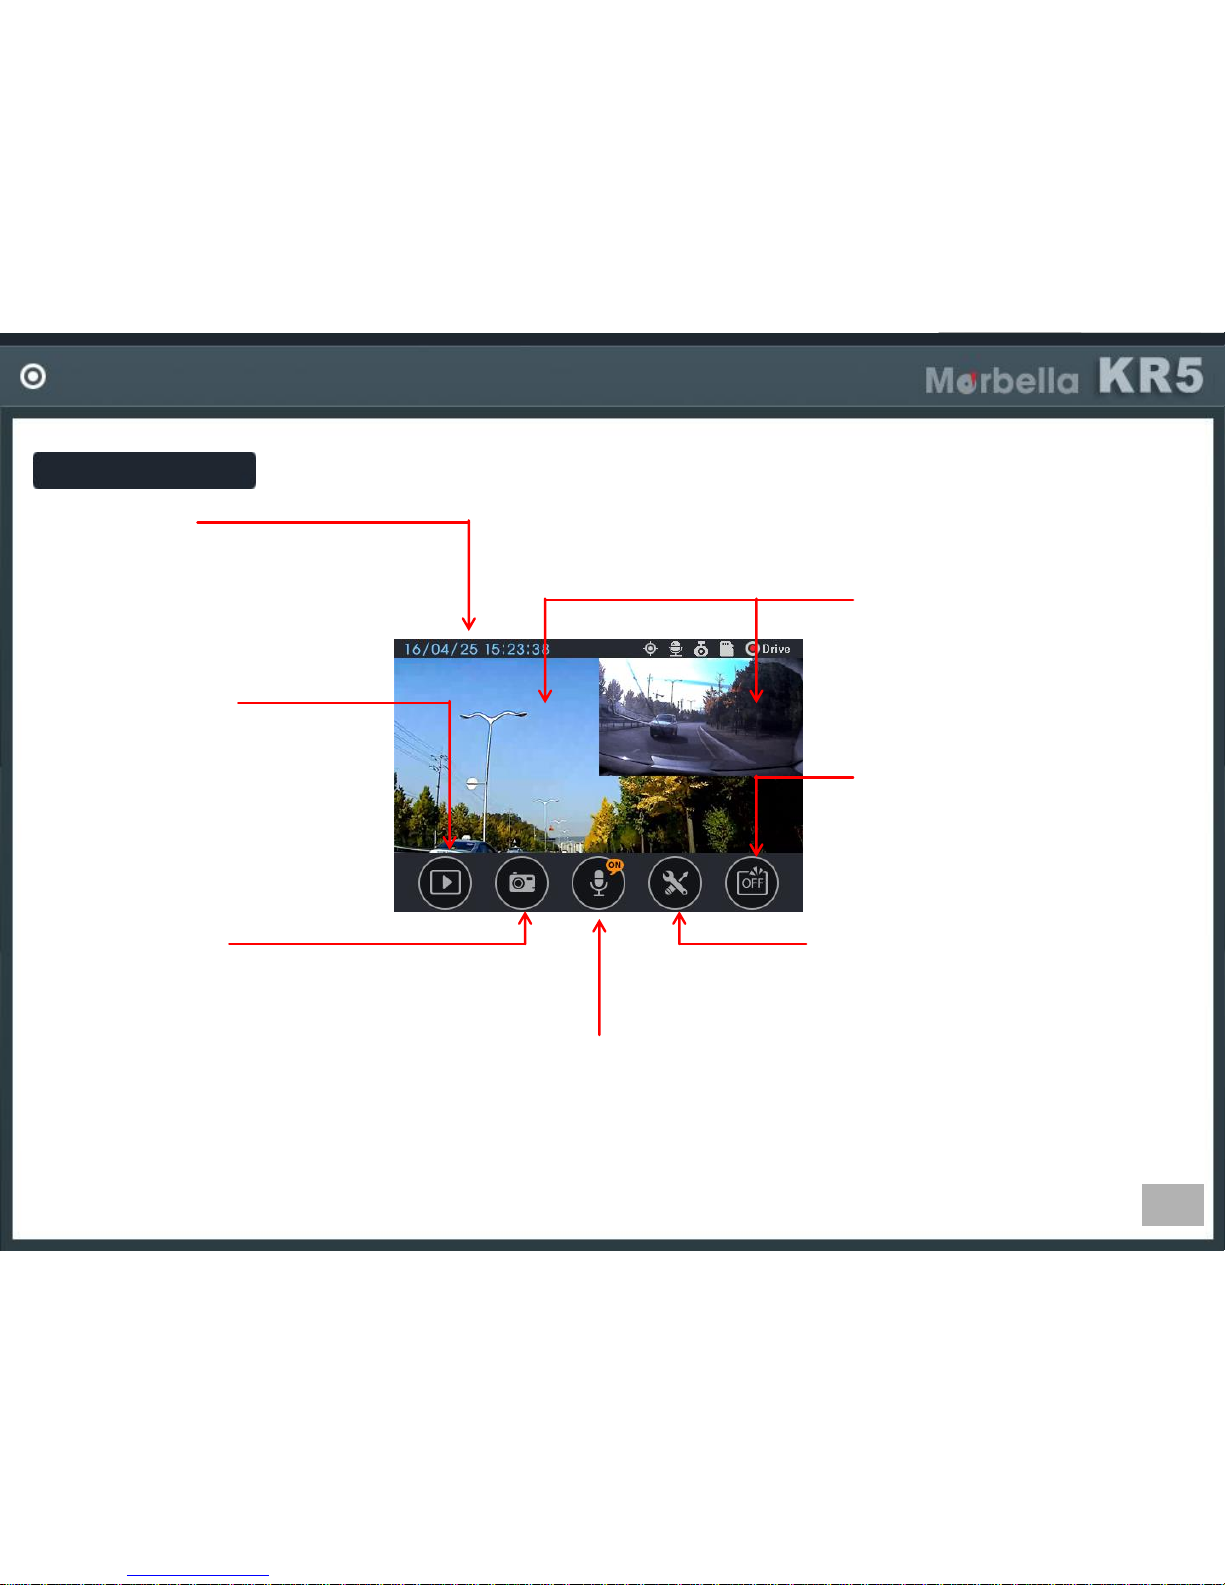
There is status bar in the top, real time video screen in the middle, menu bar in the bottom of screen.
Menu bar is disappeared after seconds as default setting.
Status Bar
-Shows current date/time and
various status information by
icons.
Button Area
-Operate functions using
each button.
View Area
-Shows real time video.
If you can not see the
menu bar, touch the
screen then menu bar will
be displayed.
Page 35
35
MAIN SCREEN
Main Screen
Status Bar
-Shows date, time and
various recording
conditions by icons.
Video Playback
-Play the recorded files.
If you click play button, file list
is displayed, and a selected file
will be played.
During playback, recording
stops.
LCD OFF
-Screen is turned off automatically
if turn off time is set. If you want
to turn off LCD earlier than auto
off time, touch this button.
Photo Capture
-Take a photo of front and rear view.
They are saved as Front Full HD, Rear
HD size in JPG file.
Voice Recording
-Voice is recorded together with video.
Settings
-Configurate various settings such as
volume, brightness, memory partition,
etc.
Front/Rear Video
-1 channel version shows one
full screen and 2channel version
shows front and rear screen in
several ways.
Page 36
36
MAIN SCREEN
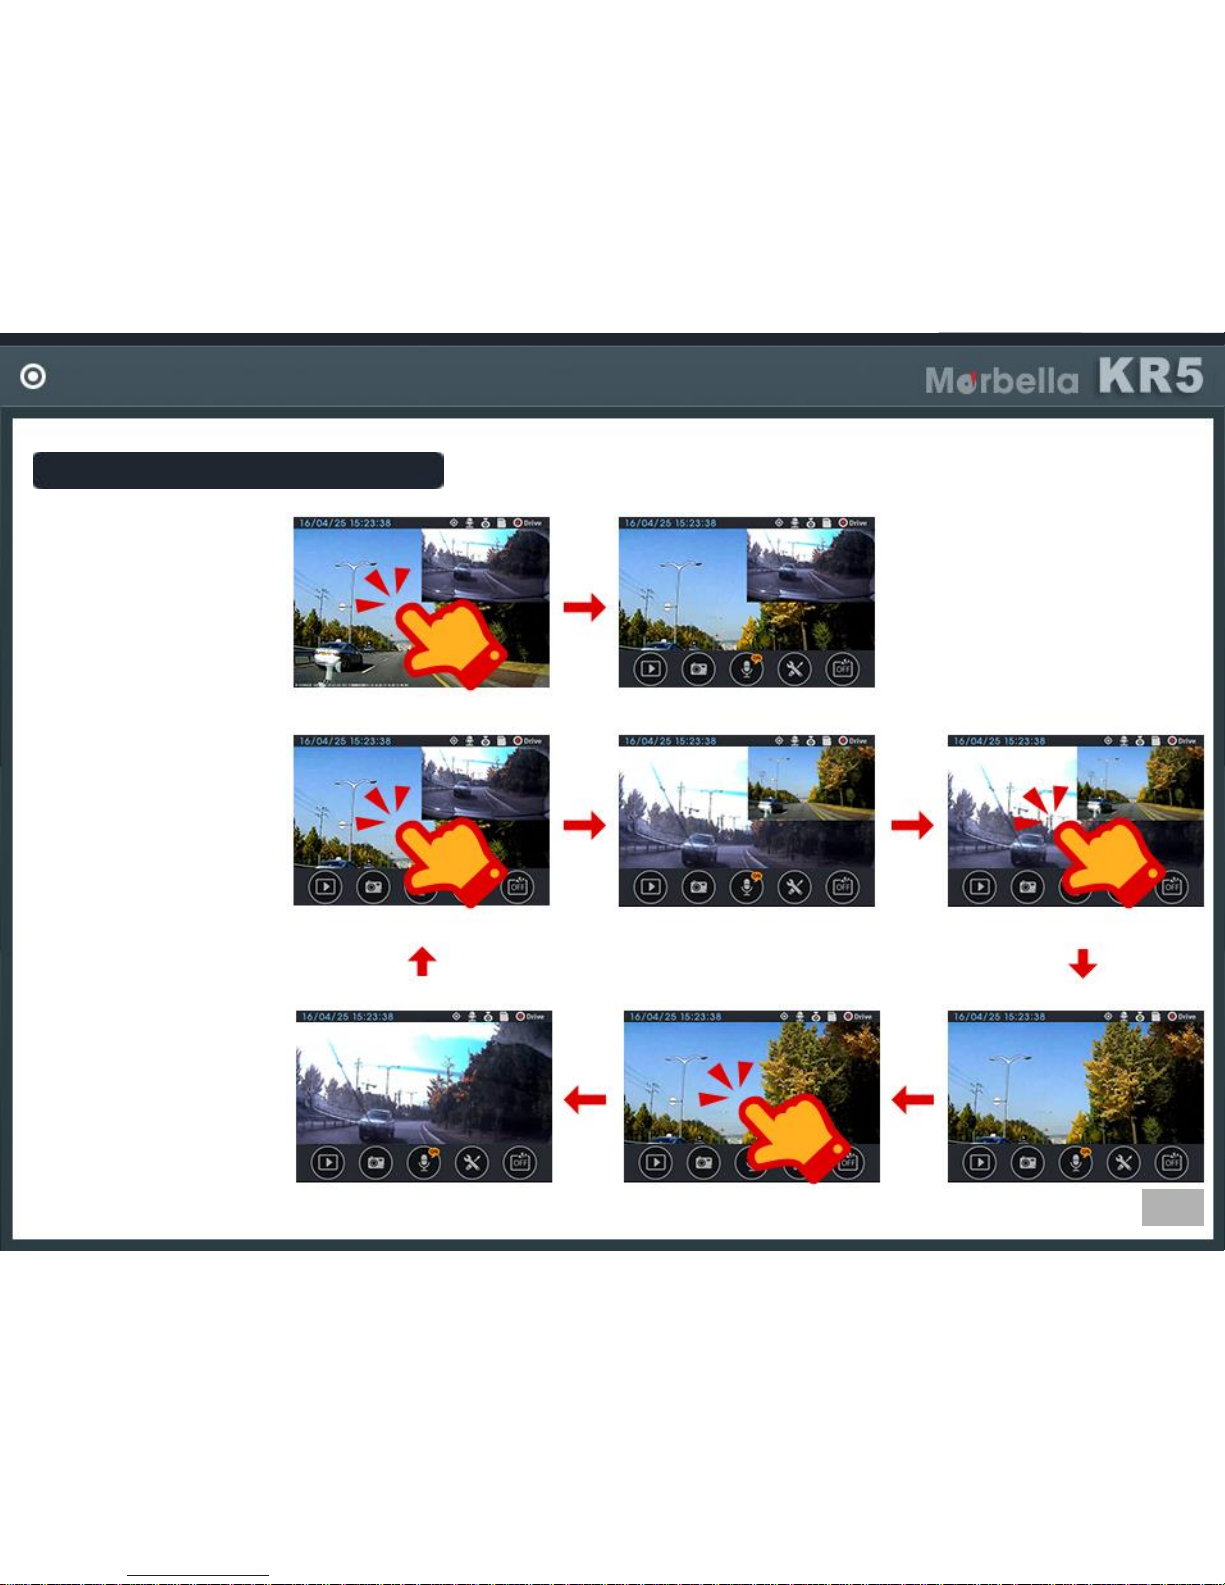
How To Change Main Screen
In Case Menu Bar
Disappeared
In Case Menu Bar
Displayed
Page 37
37
VIDEO PLAYBACK
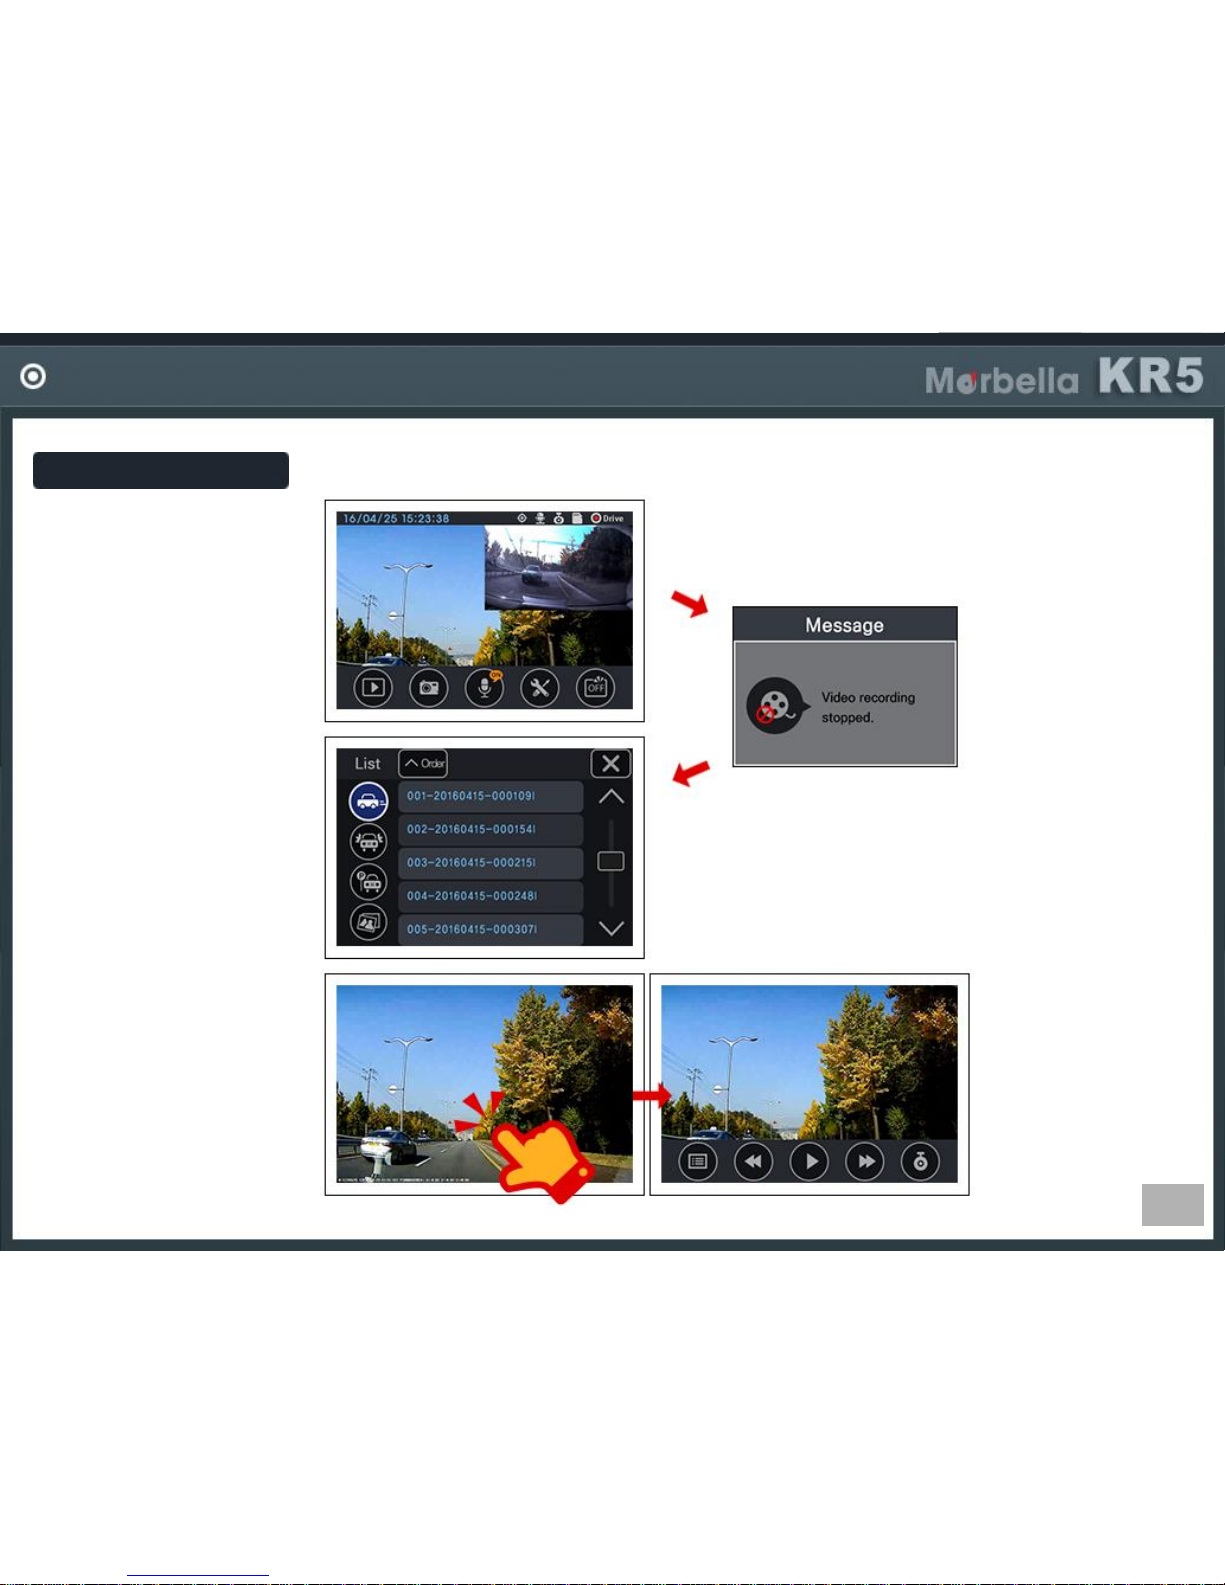
Video Playback
Video Playback
-Click playback button in
main screen.
Select a File
-Select Driving or Event or
Parking or Photo folder
and then a file, then it
will play.
Playback Screen
-Playing screen.
During playback, if you
touch the screen, menu
buttons will display.
Playback Pause
-During playback, recording stops.
Page 38
38
VIDEO PLAYBACK
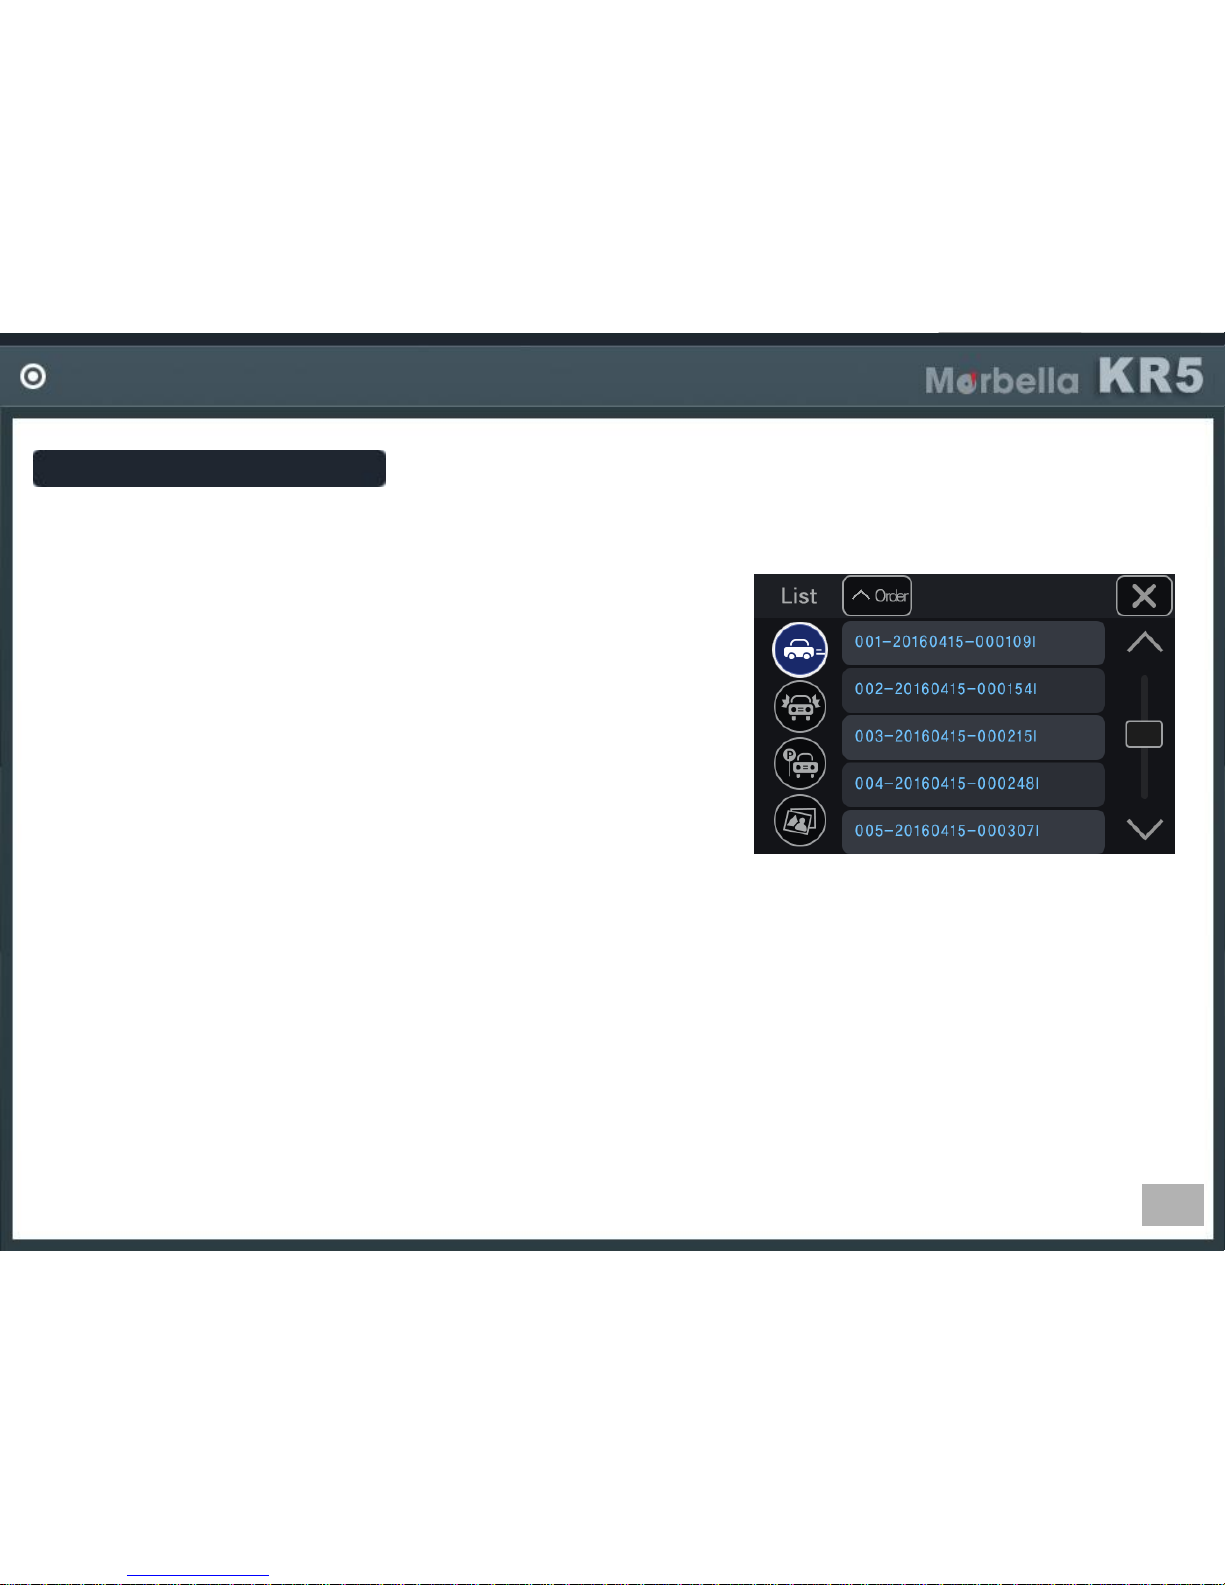
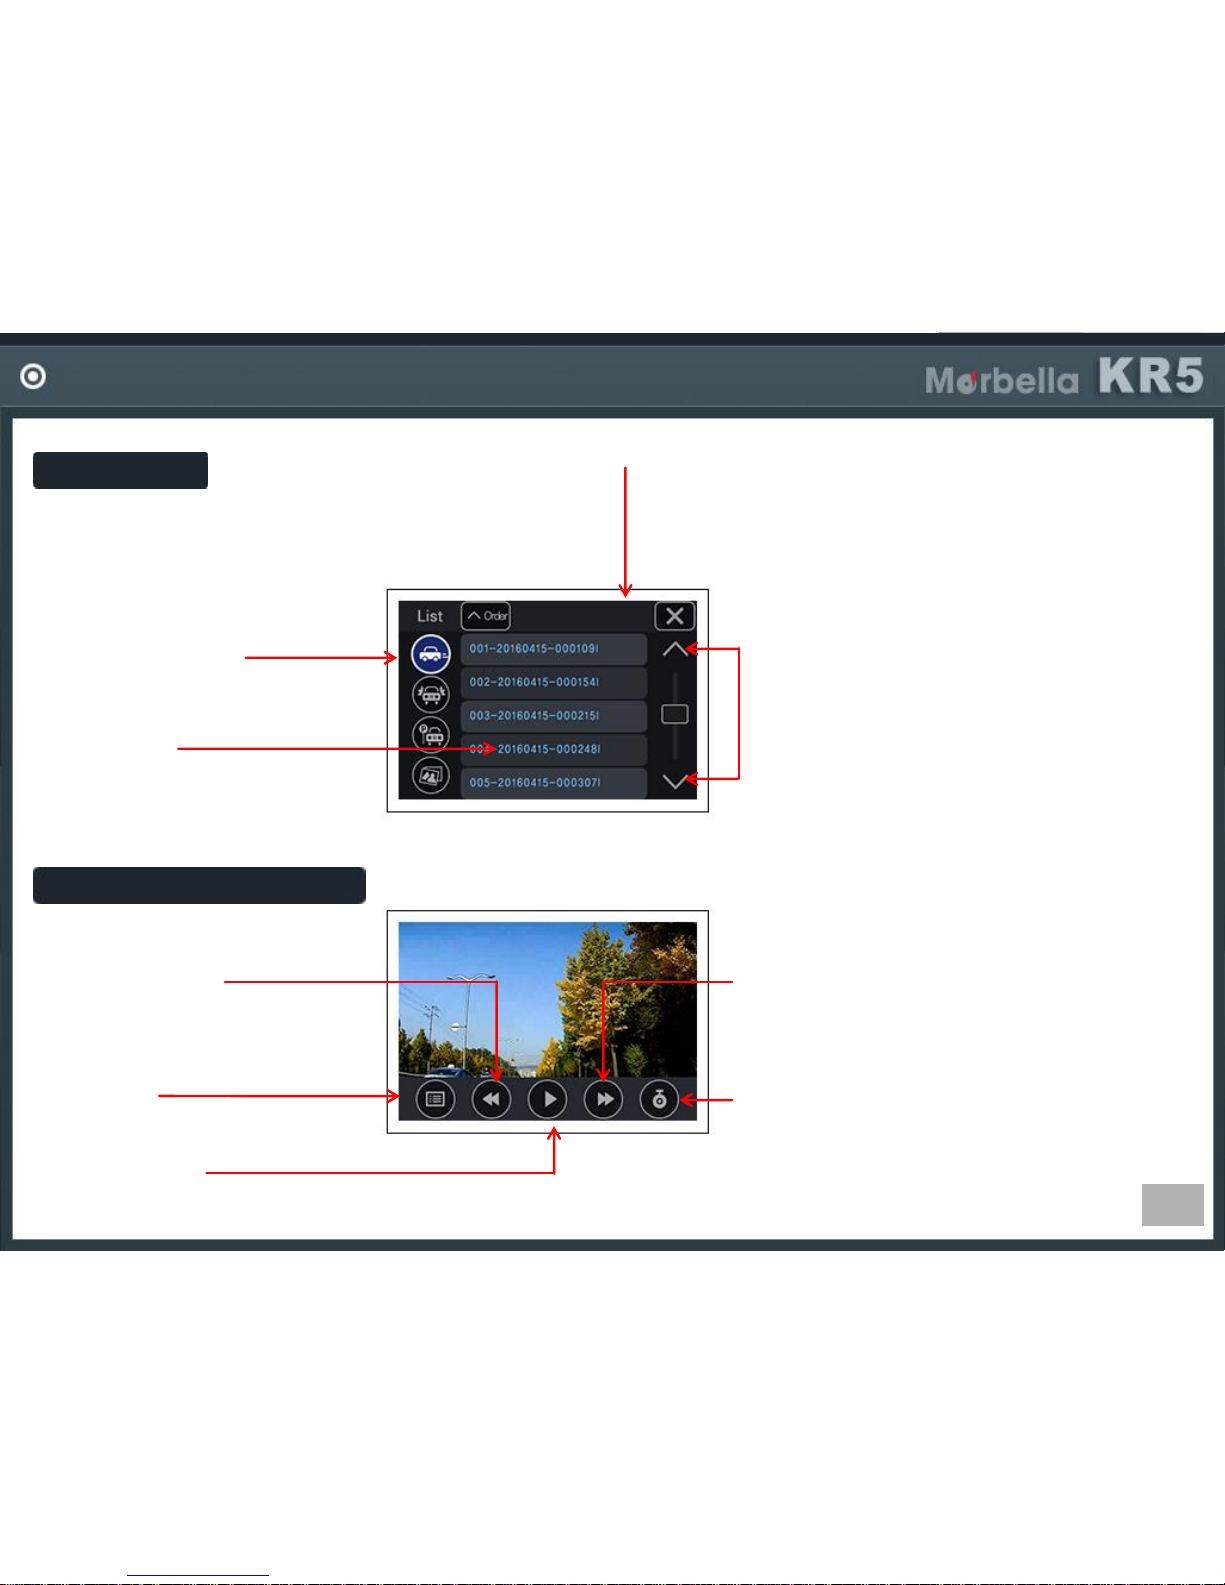
Play List
Select File Folder
-Select Driving/Event/Parking/
Photo folders
Video File
-If you click a file, playback
starts
Previous File
-Playback previous file.
Move Page
-Move to next or previous page.
Each page shows 5files.
File Order
-You can change the file order in
ascending or descending.
Video Playback Screen
File List
-Move to file list.
Play / Pause
-Play or pause the video.
Next Video
-Play next video file.
Front/Rear Change
-Select front or rear side video.
(FrontRear, RearFront)
Page 39
39
Page 40
40
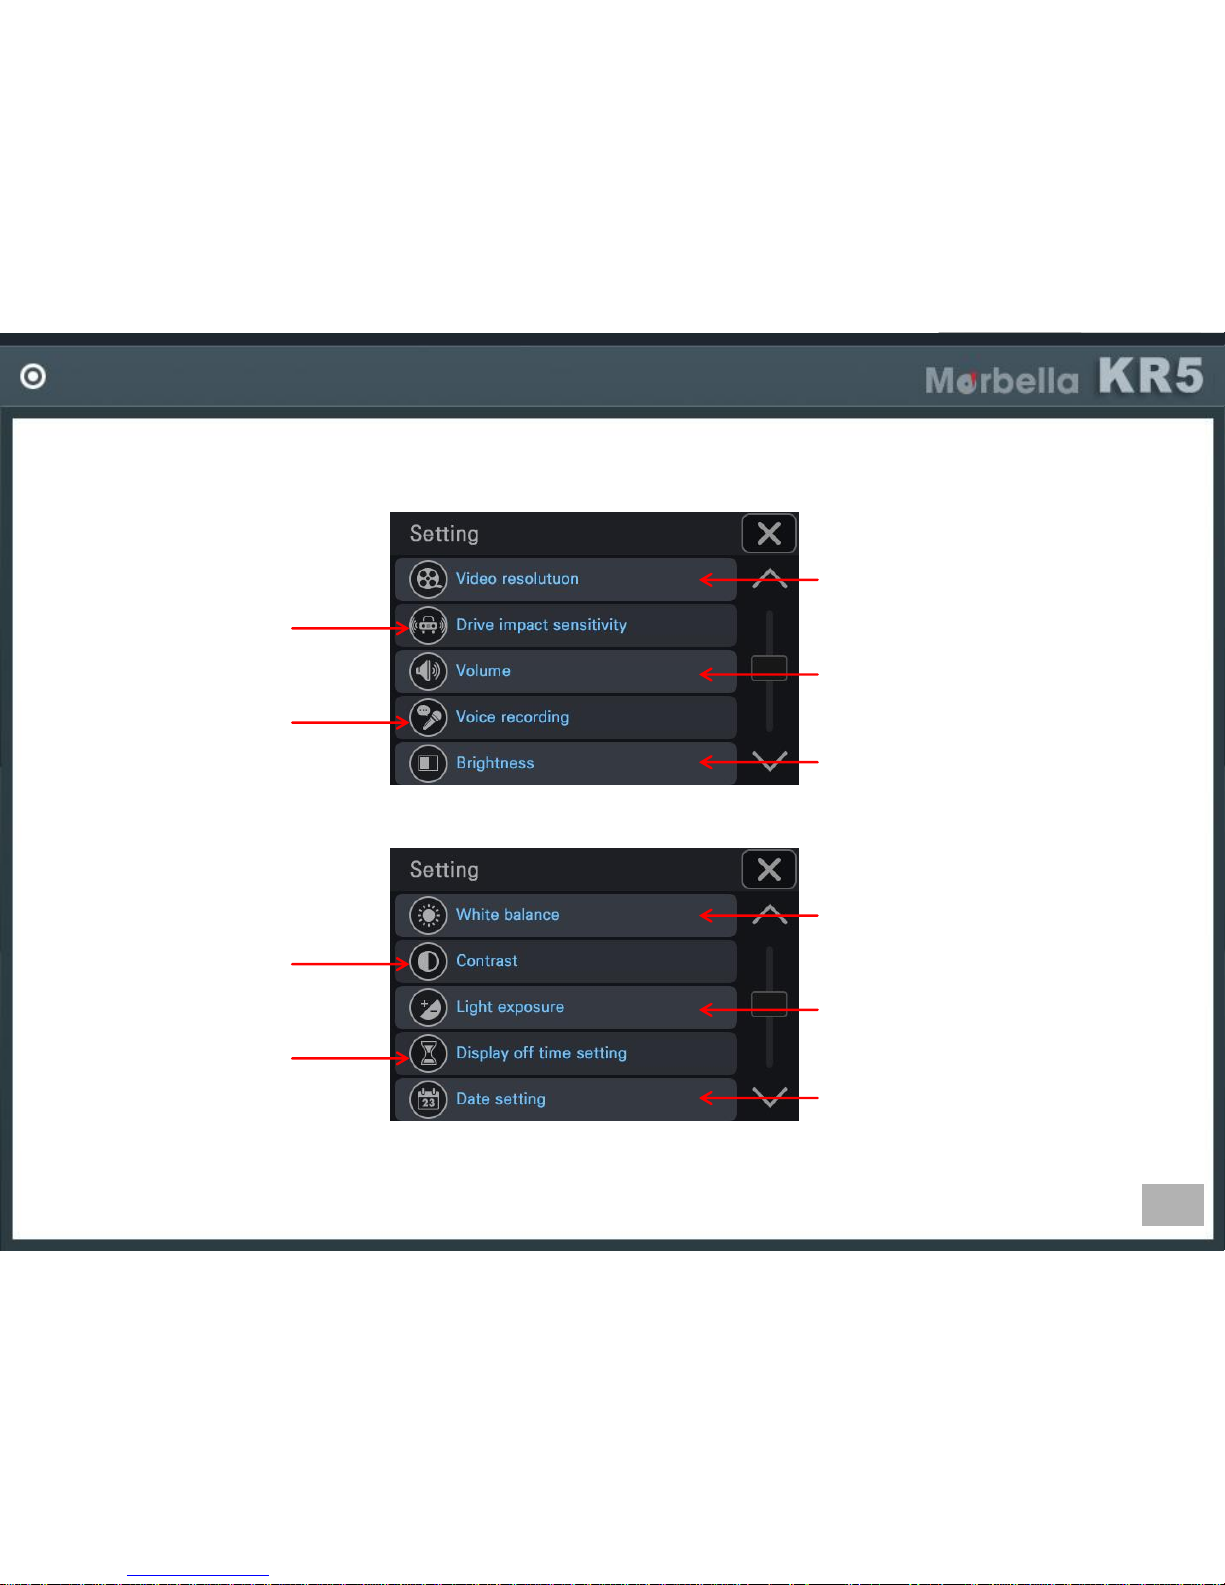
SETTING GUIDE
Select video quality.
Set up impact sensor
sensibility in driving.
Set up volume.
Set up screen brightness.
Turn on/off voice
recording.
Set up white balance.
Set up screen contrast.
Set up exposure value.
Set up current date.
Set up LCD off time.
Page 41
41
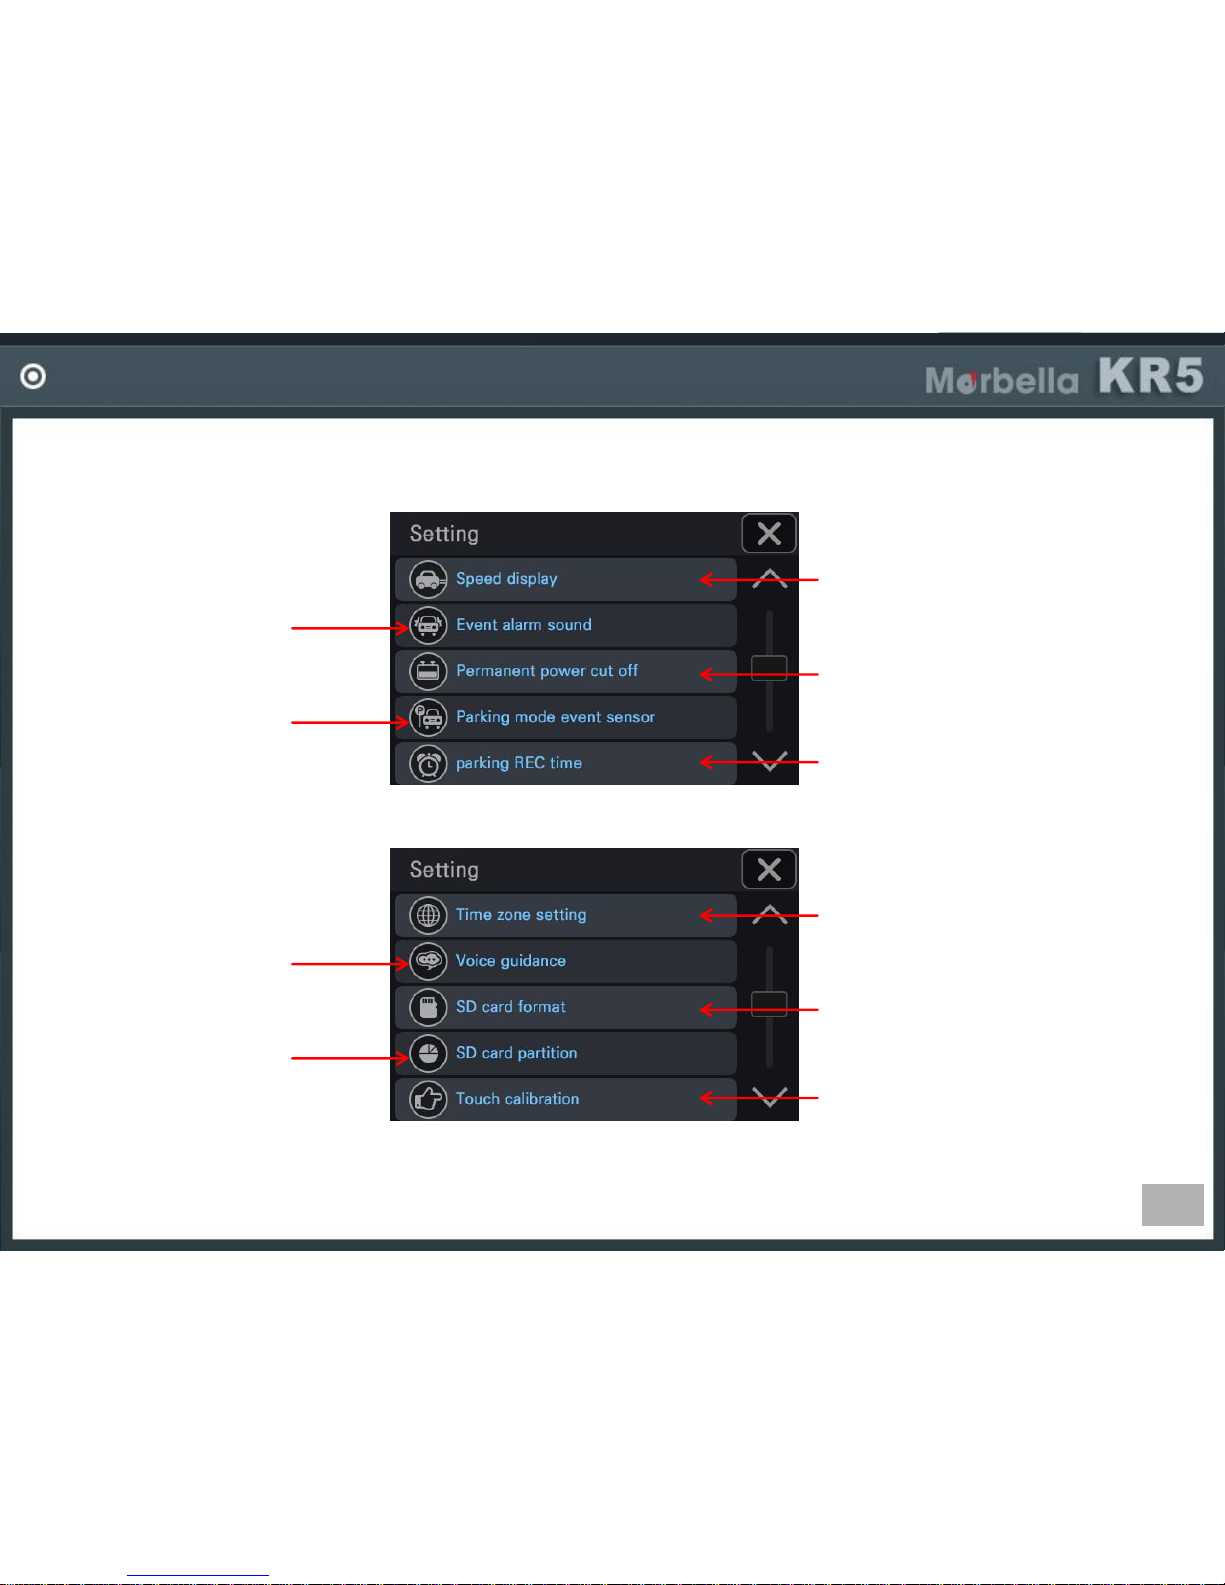
SETTING GUIDE
Set up speed display.
Set up event alarm.
Set up car battery low power
detection.
Set up parking REC time.
Set up impact sensor in
parking mode.
Set up global time zone.
Set up voice guidance.
Format SD card.
Calibrate screen touch.
Set up SD card partition.
Page 42
42
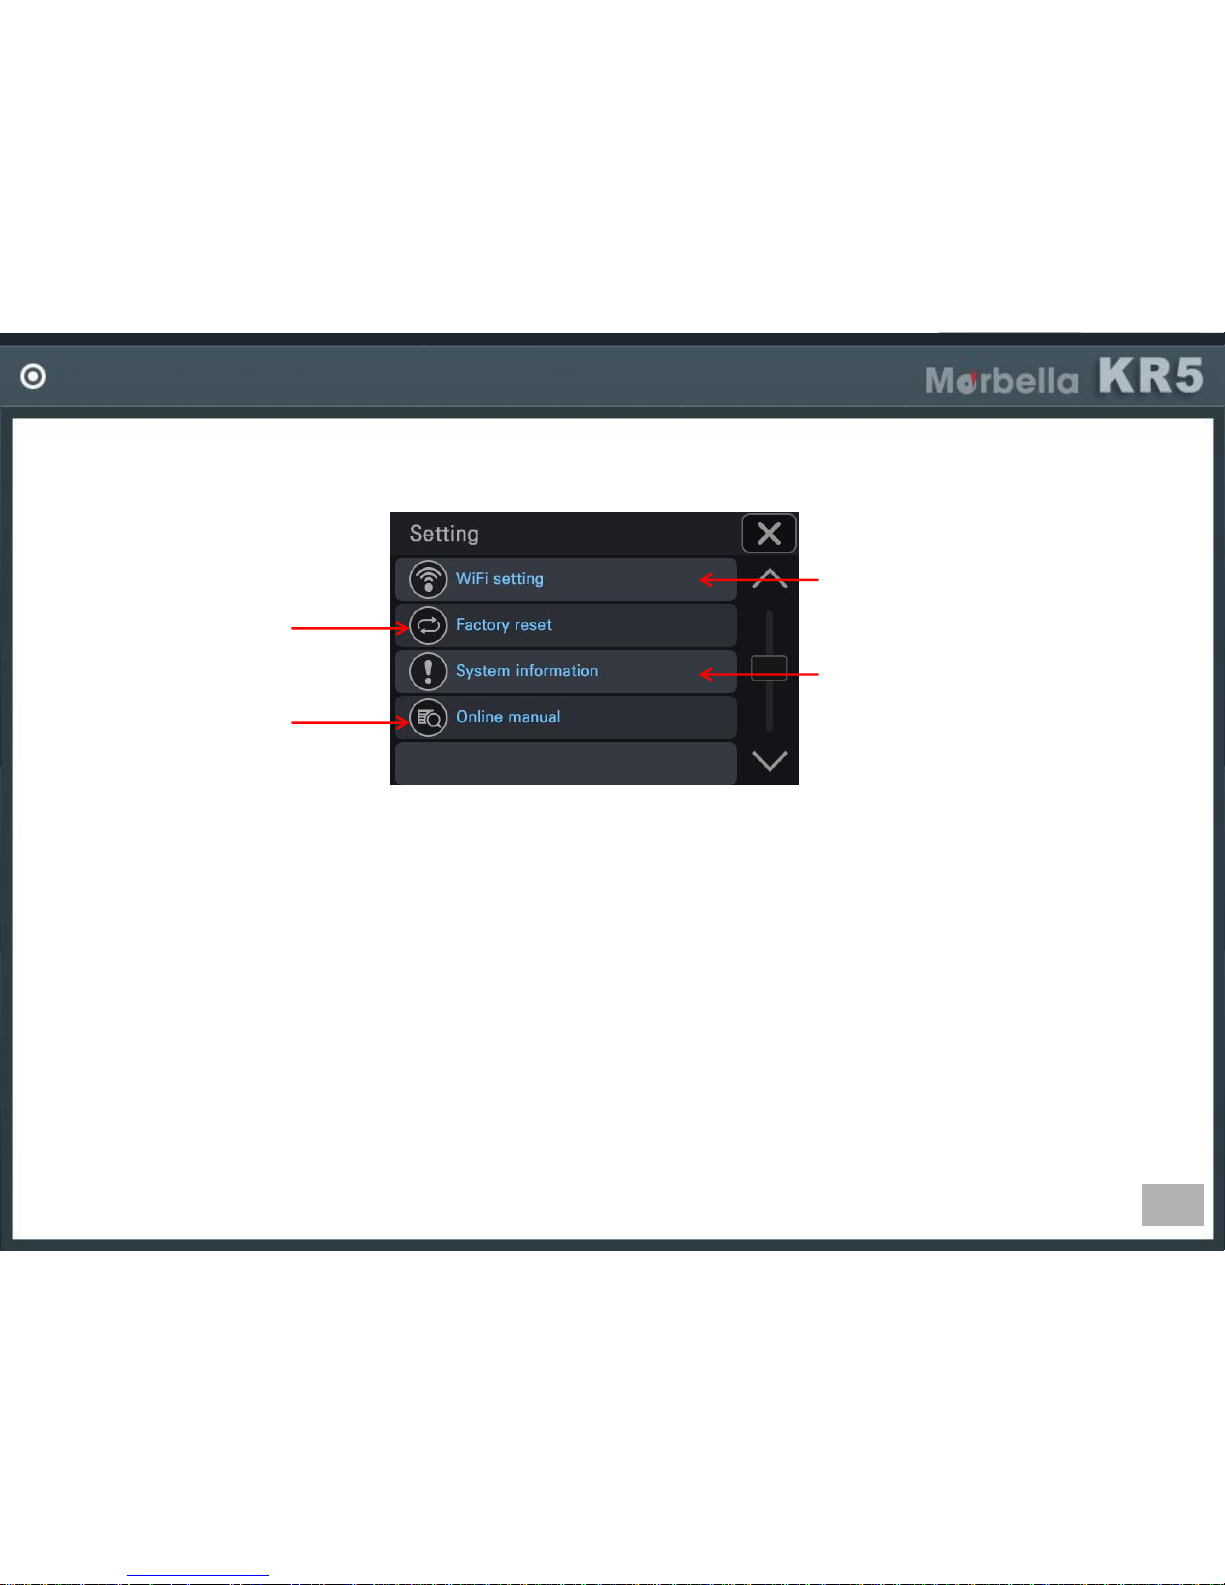
SETTING GUIDE
Turn on / off WiFi.
Return to factory reset.
Show firmware version.
Shows online full version
manual.
Page 43
43
SETTING GUIDE
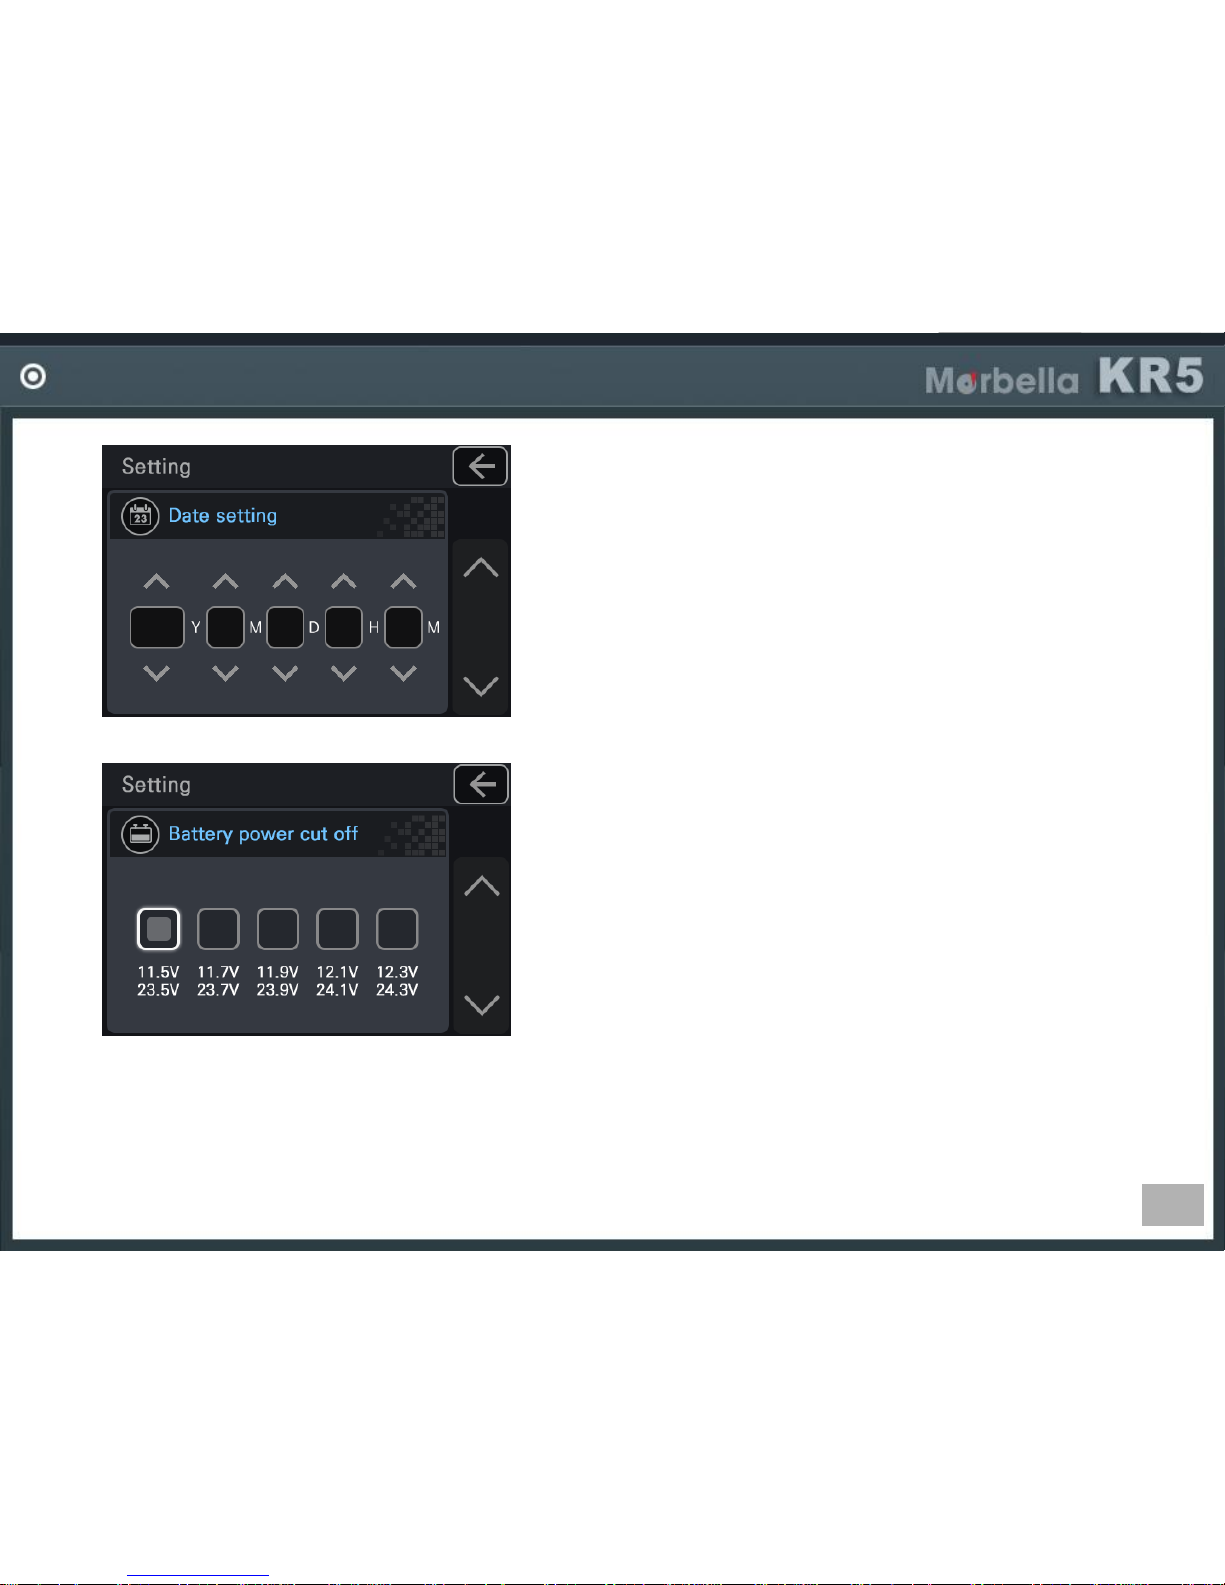
DATE/TIME SETTING
-Set up date and time of the device.
If GPS is connected, no need to set up date and time
because it is set up automatically by GPS data.
If there is no GPS, surely set up date and time here.
Otherwise video will not show right date and time.
POWER CUT OFF
-Power cut off is the function to prevent car battery drainage
by checking car battery power voltage in parking mode
recording.
It cuts off power when car power goes down under the
setting voltage.
Page 44
44
SETTING GUIDE
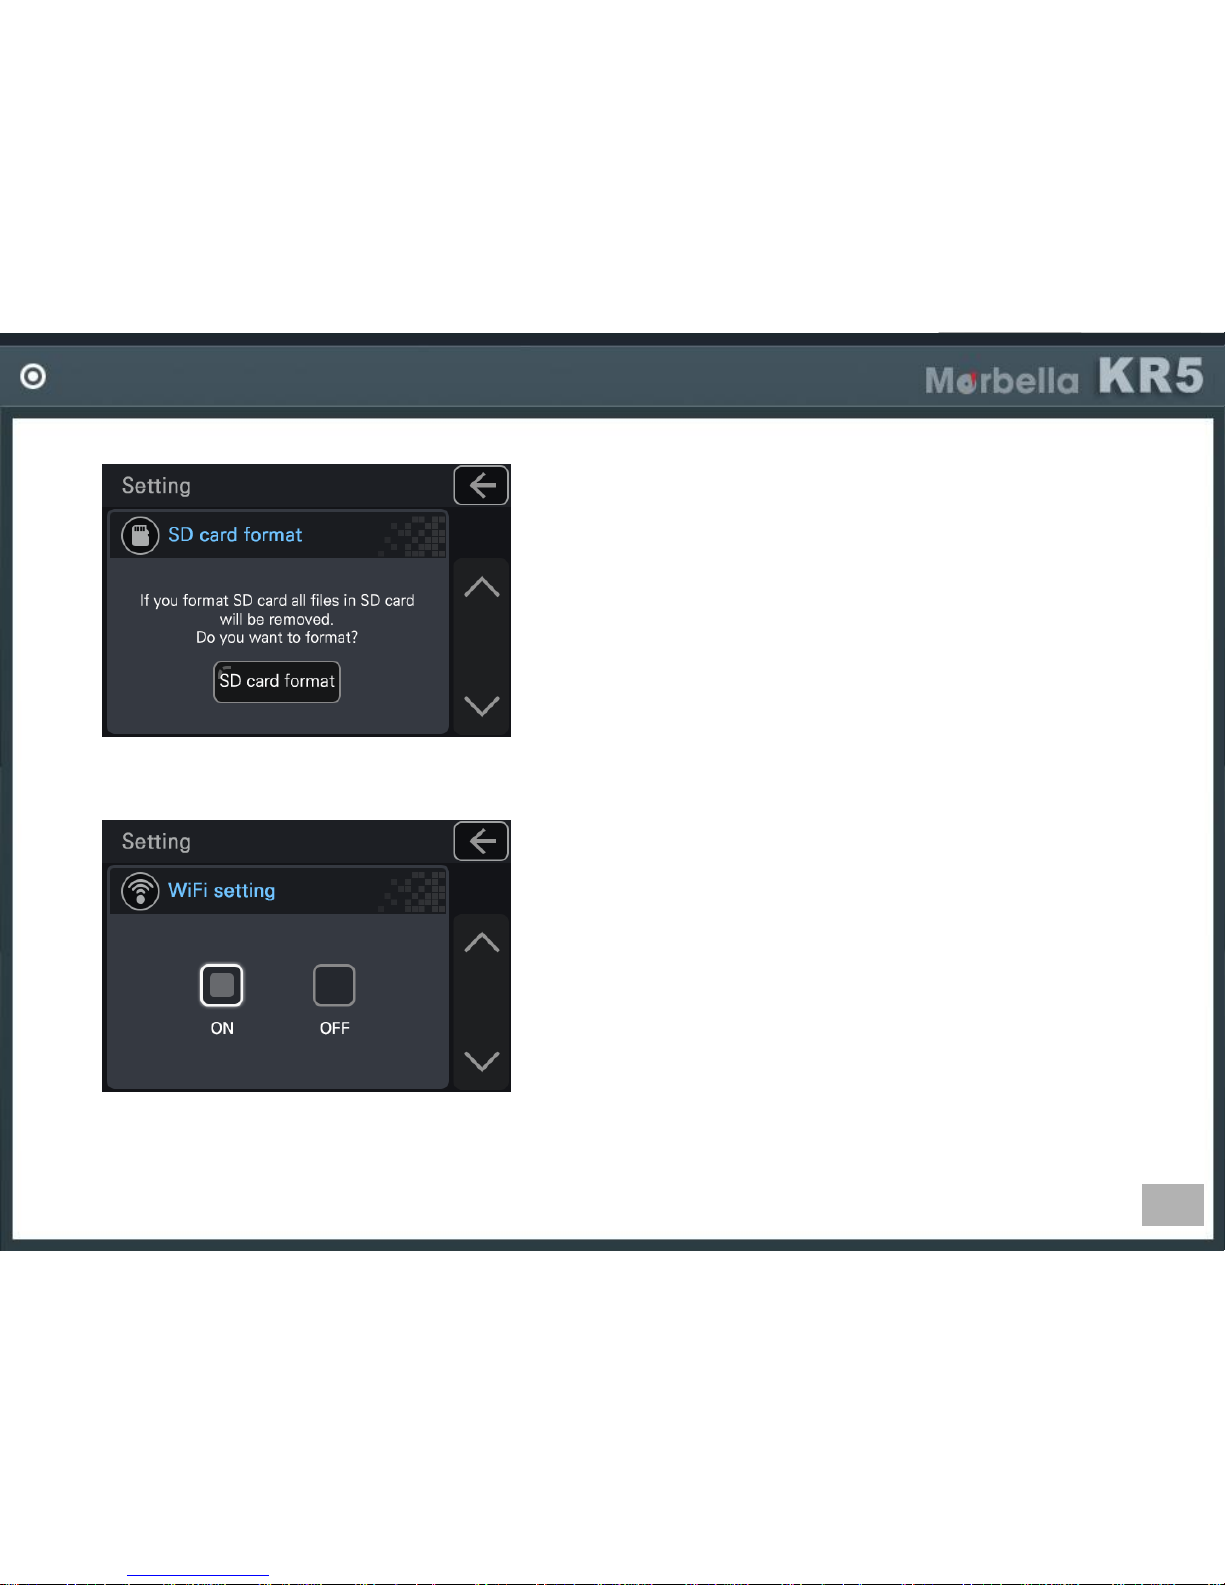
SD CARD FORMAT
-This device do not require periodical SD card format which
is called TAT function.
But if you need SD card format in some cases, use this
SD format function.
WiFi SETTING
-To able or disable WiFi.
Page 45
45
Page 46
46
PC VIEWER INSTALL
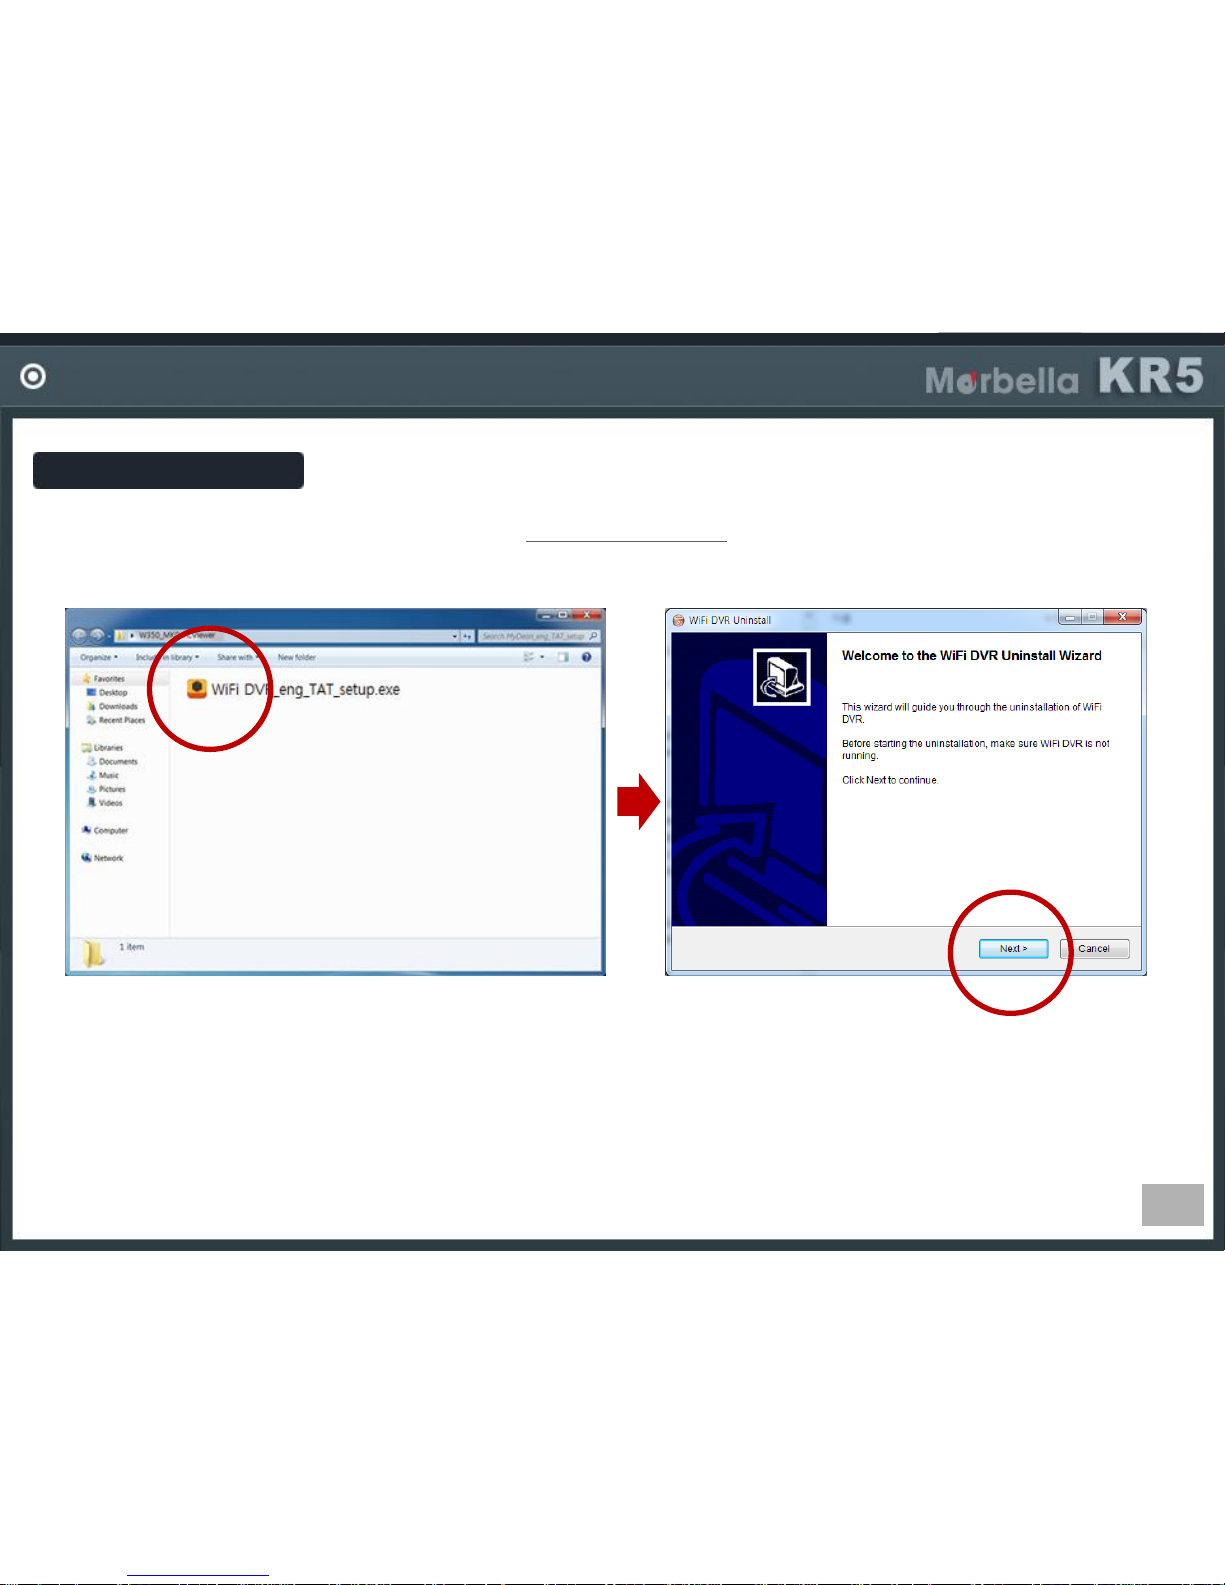
PC Viewer Install
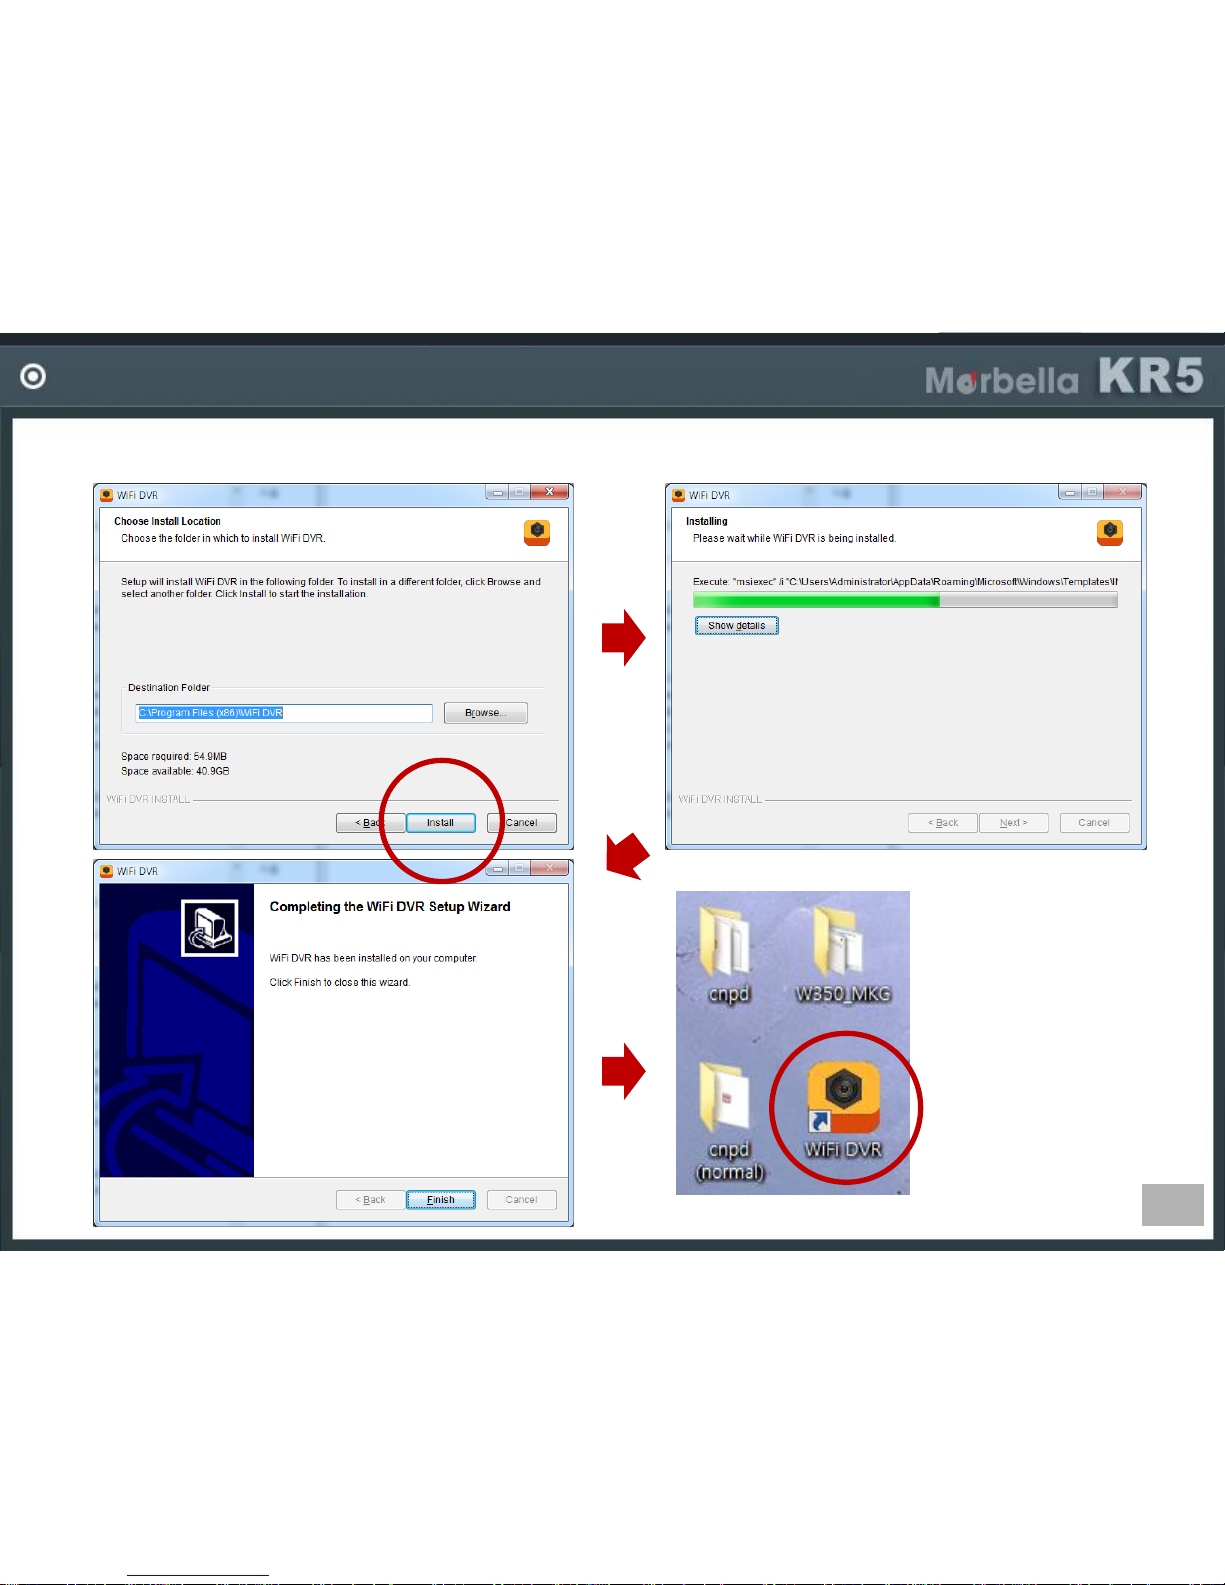
-Install PC viewer which can be downloaded from : www.makagps.com.sg > Support > Downloads > Marbella Roadcorder
Page 47
47
PC VIEWER INSTALL
Page 48
48
STARTING PC VIEWER
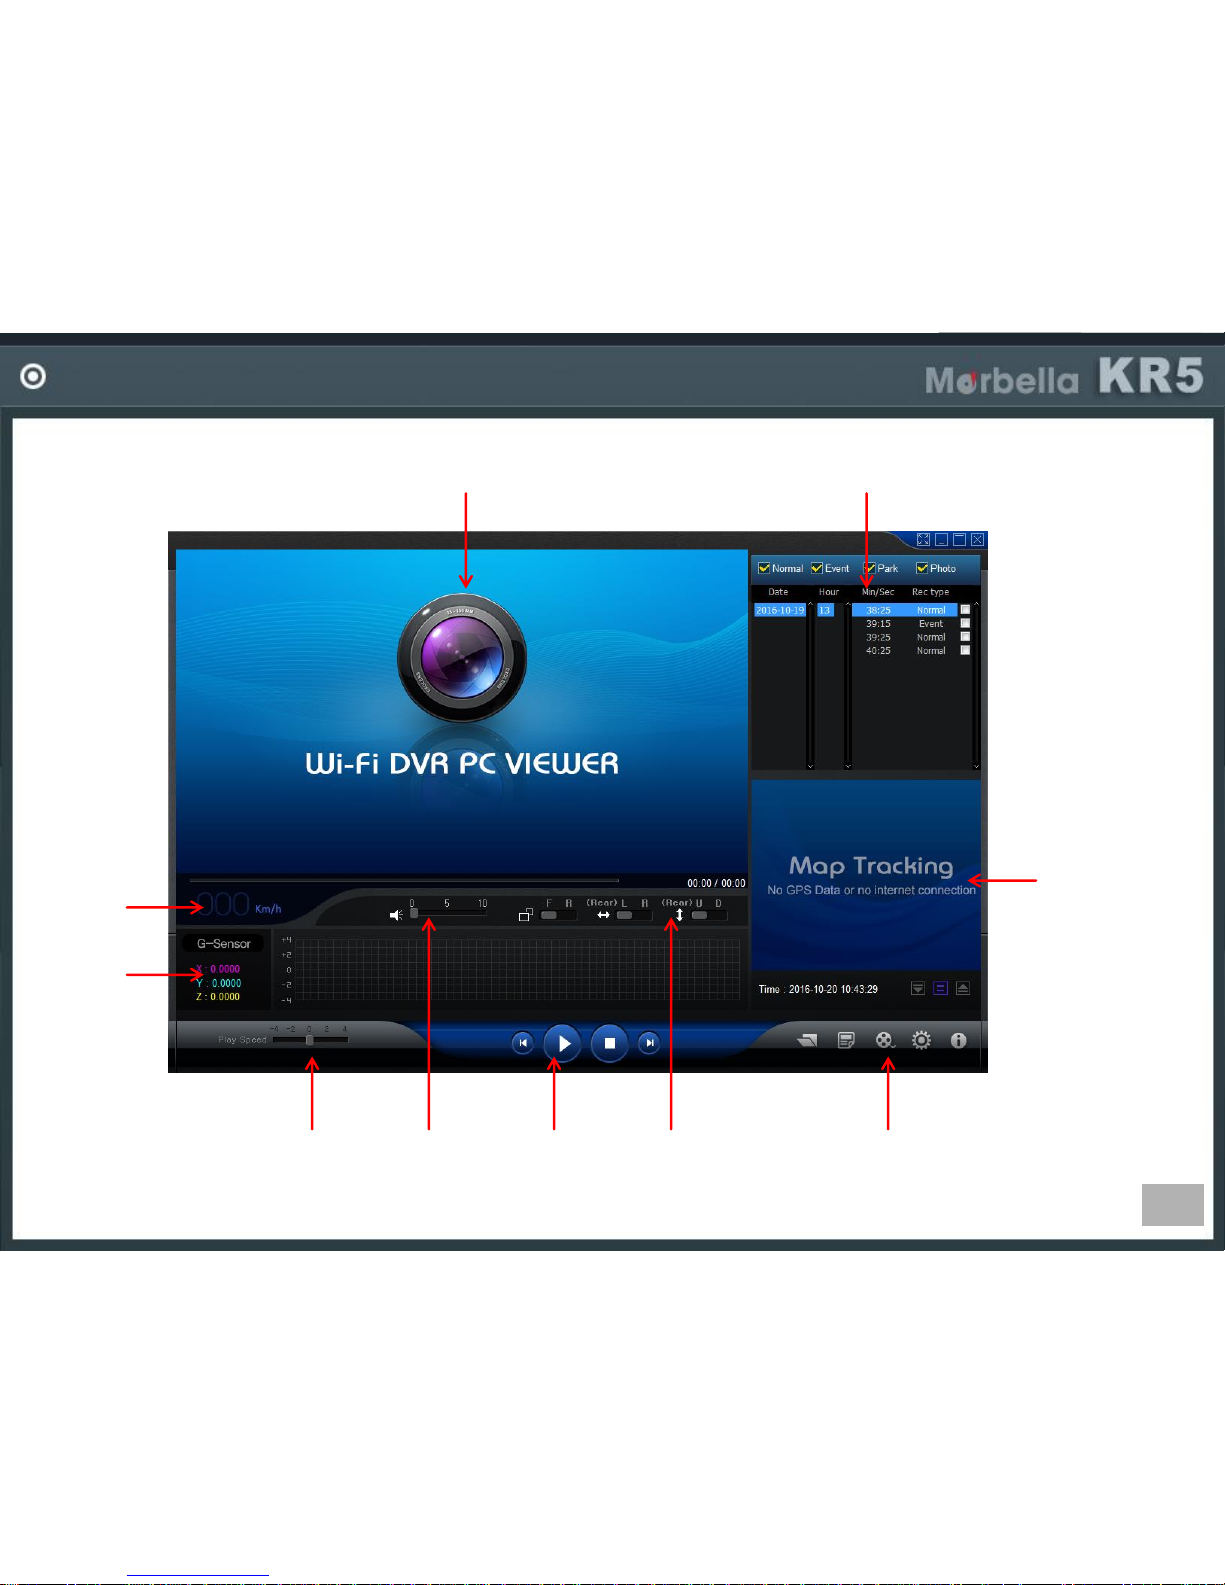
Screen
File list
Speed
G-sensor
Play
speed
Volume
Playback
control
View
reverse
Video setting and
file saving
Map
Page 49
49
STARTING PC VIEWER
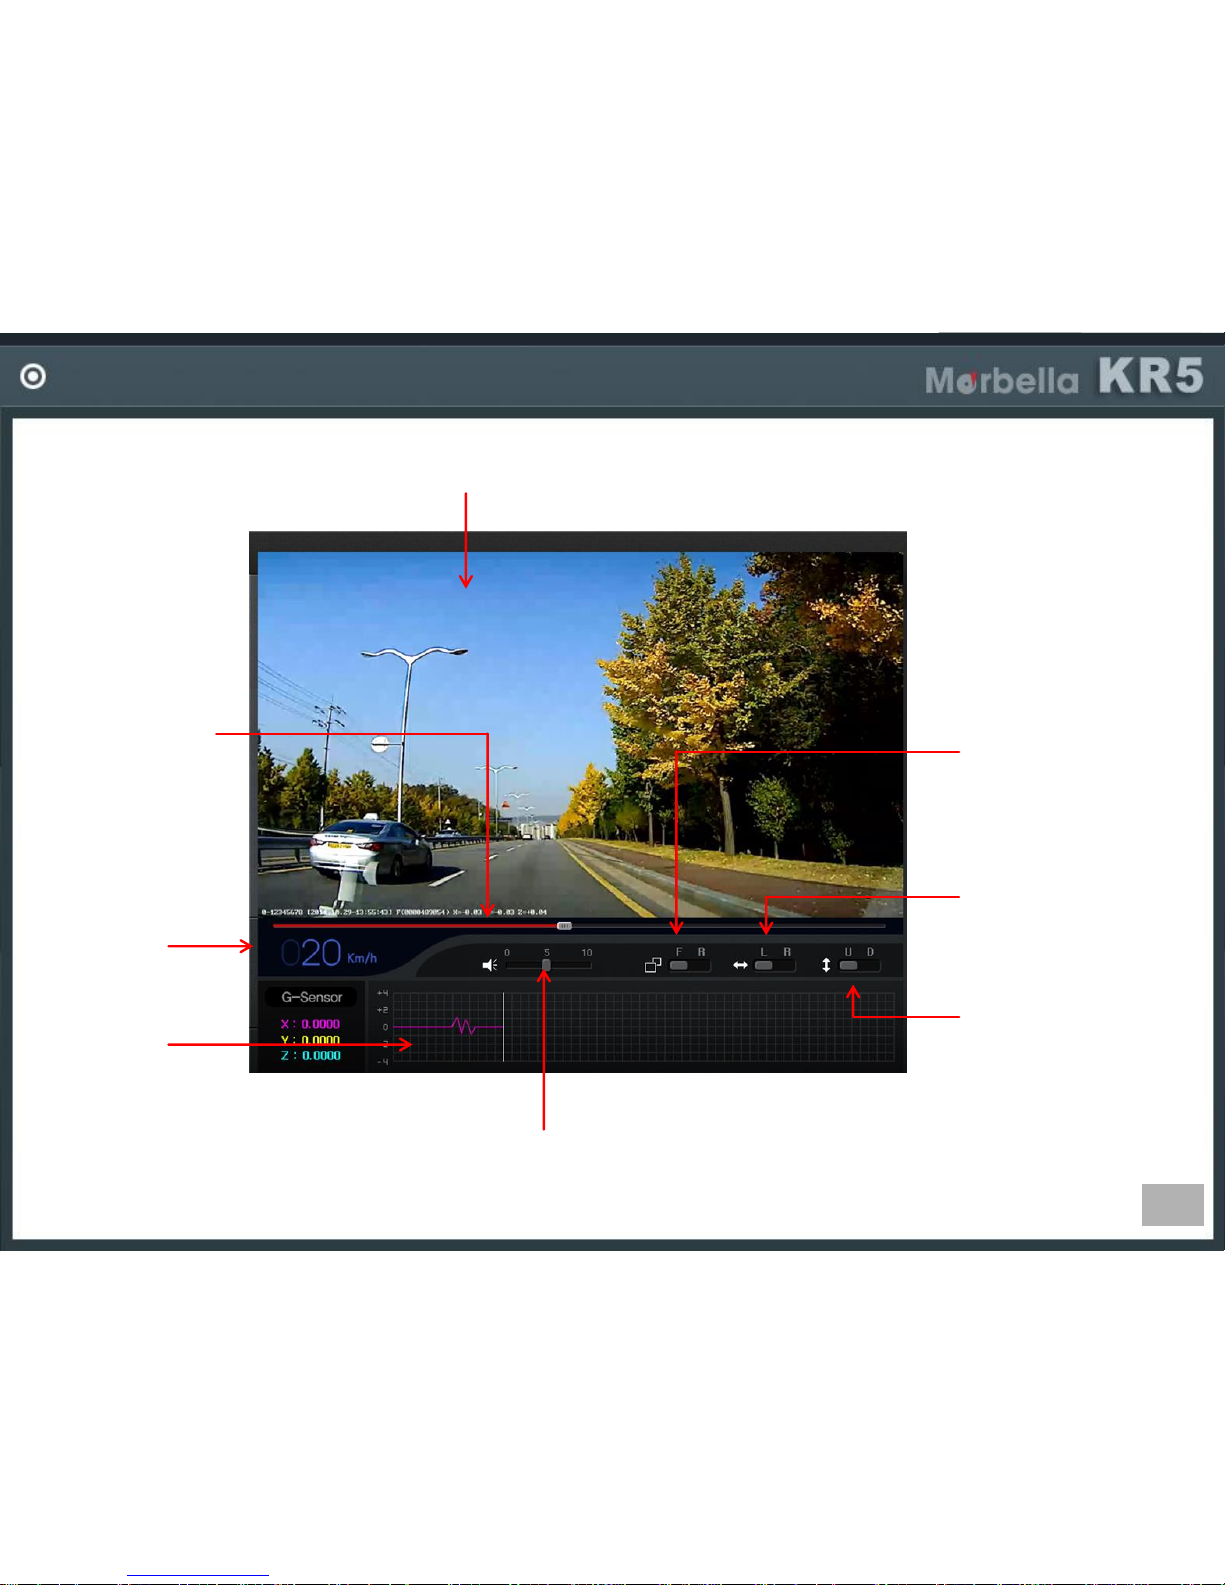
Screen
-Shows video.
Progressing Bar
-Shows playback
processing
Volume Control
-Can control volume.
Car Speed
-Shows driving
speed.
G-sensor
-Shows G-sensor
value in graphics.
F/R Convert
-Shows front and
rear video in
exchange.
L/R Reverse
-Reverse front view
right and left.
Upside Down
-Shows front video
upside down.
Page 50
50
STARTING PC VIEWER
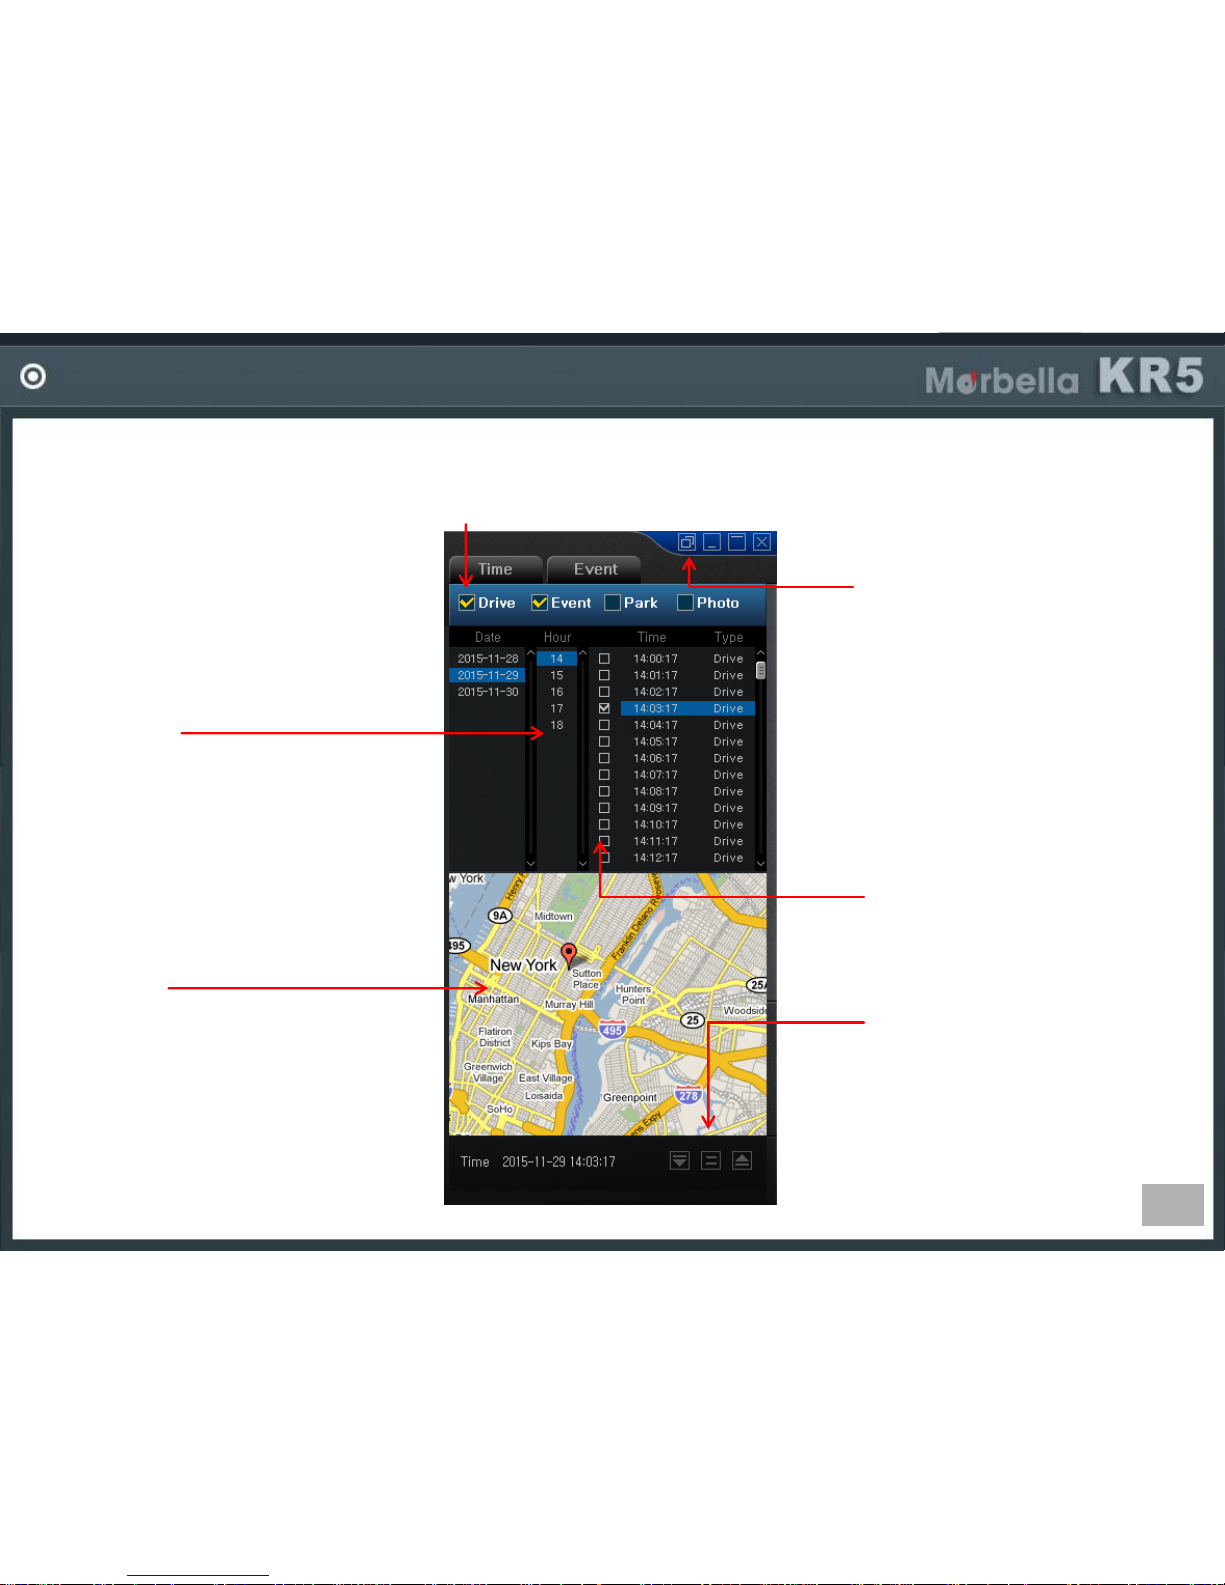
File Select
-Select a file in Driving/Event/
Parking/Photo folder
Time Select
-Shows files in each
recording time.
Map Screen
-Shows recording location.
(GPS should be connected to
show map.)
Full Screen.
-Shows the screen in
full size of PC.
File Select
-Can select a single or
multi files.
List Change
-Display files differently
as below.
Page 51
51
STARTING PC VIEWER
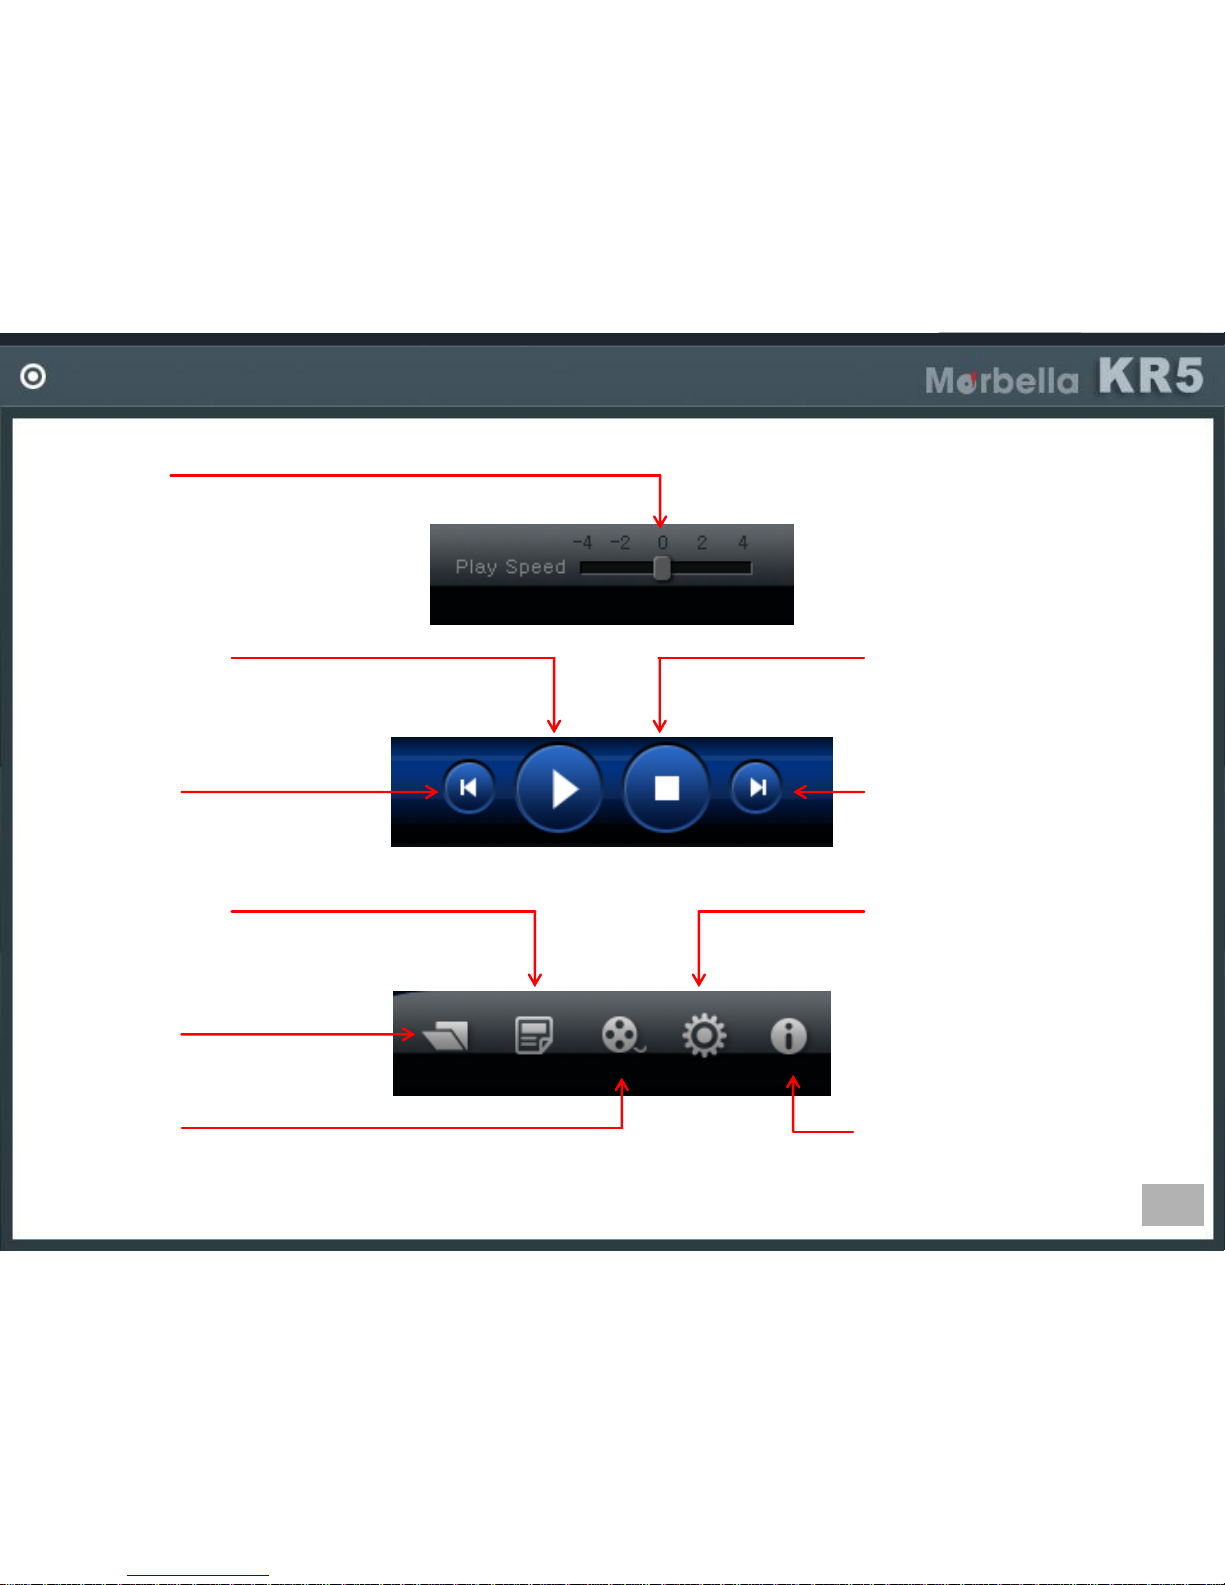
Previous File
-Play previous file of current
playing file.
Information
-Shows PC viewer version
information.
Play Speed
-Control video playback speed.
Video Playback
-Play or pause the video.
Stop
-Stop or pause playing video.
Next File
-Playback next file of
current playing file.
Screen Capture
-Capture current image of the playing video.
Call Files
-Call files stored in SD card.
Settings
-Configure various settings of
DVR device. New settings are
stored in SD card and
transferred to the device
when device booting.
File Save
-Can change current playing
file in to AVI file and
save it in PC.
Page 52
52
PC VIEWER SETTINGS
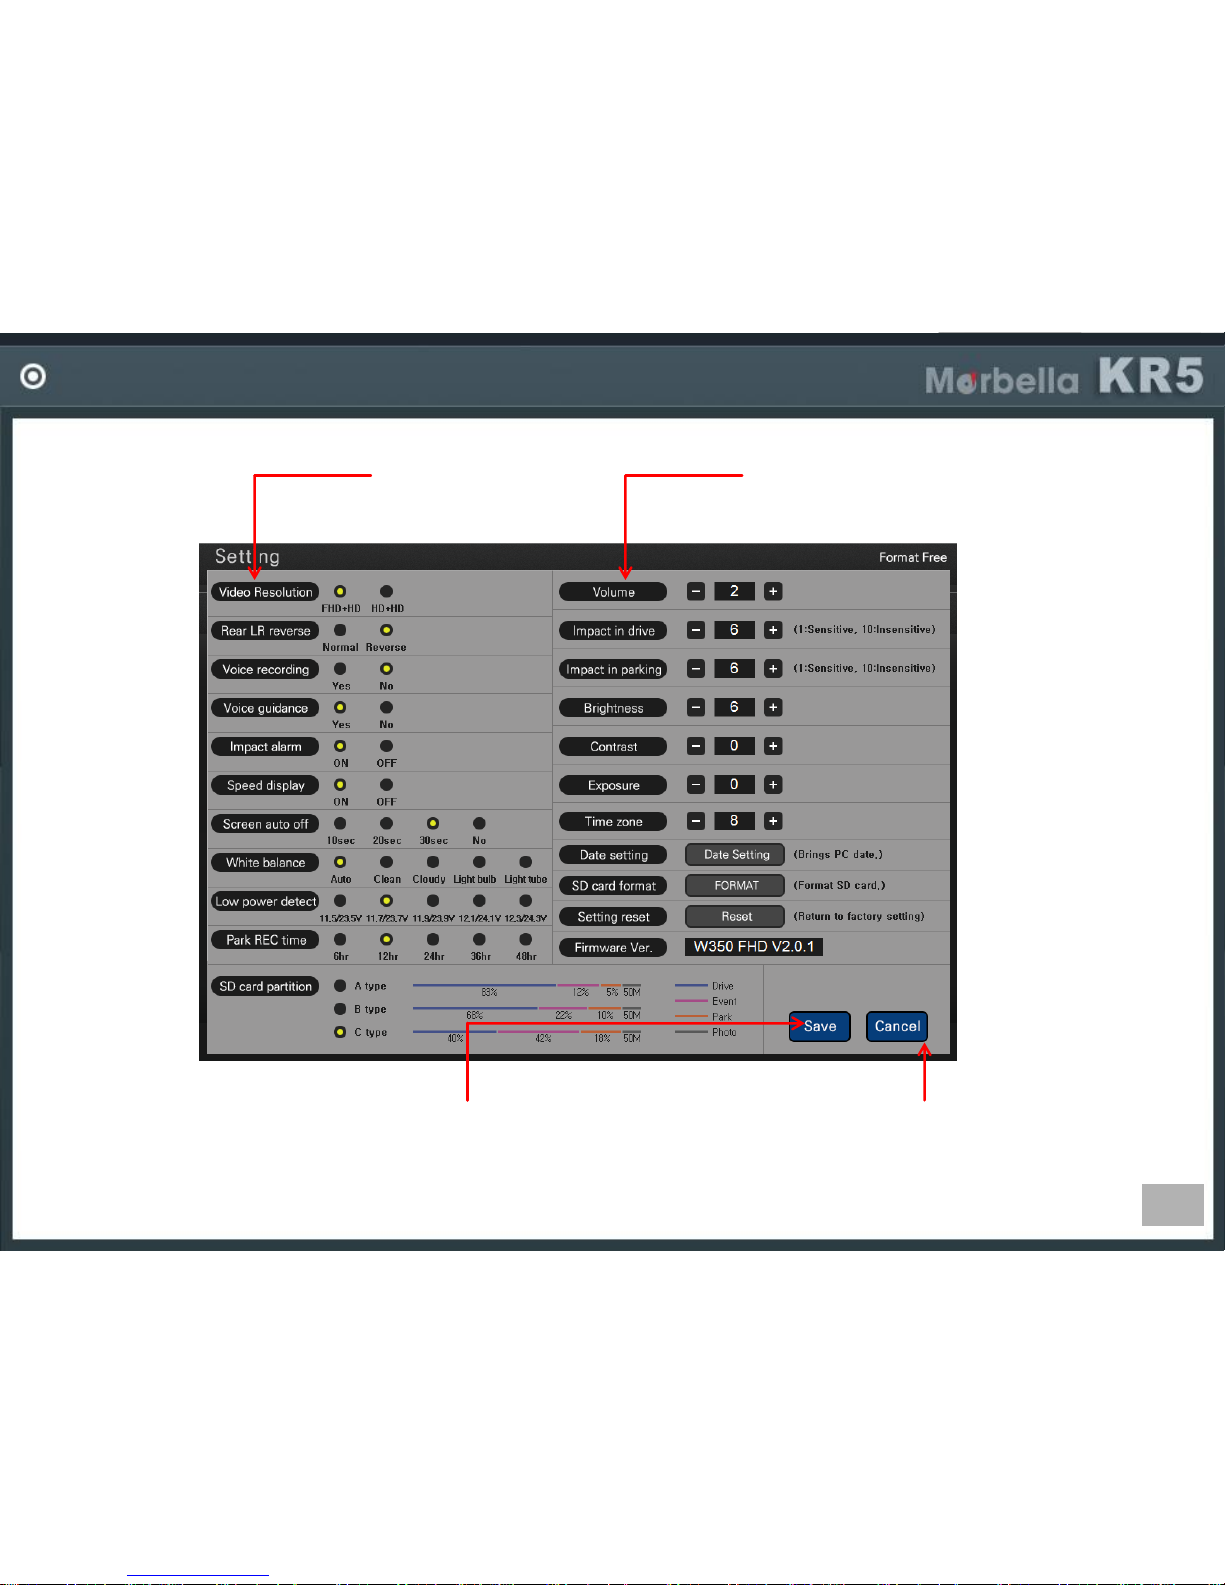
Cancel
-Do not save new setting
value and move out
from setting screen.
Category Area
-Select each setting
category.
Save
-New setting value is saved in SD card.
The new value is transferred to device
when booting.
Control Area
-Set up various setting value.
Page 53
53
TAT BROWSER / FILE CONVERTER
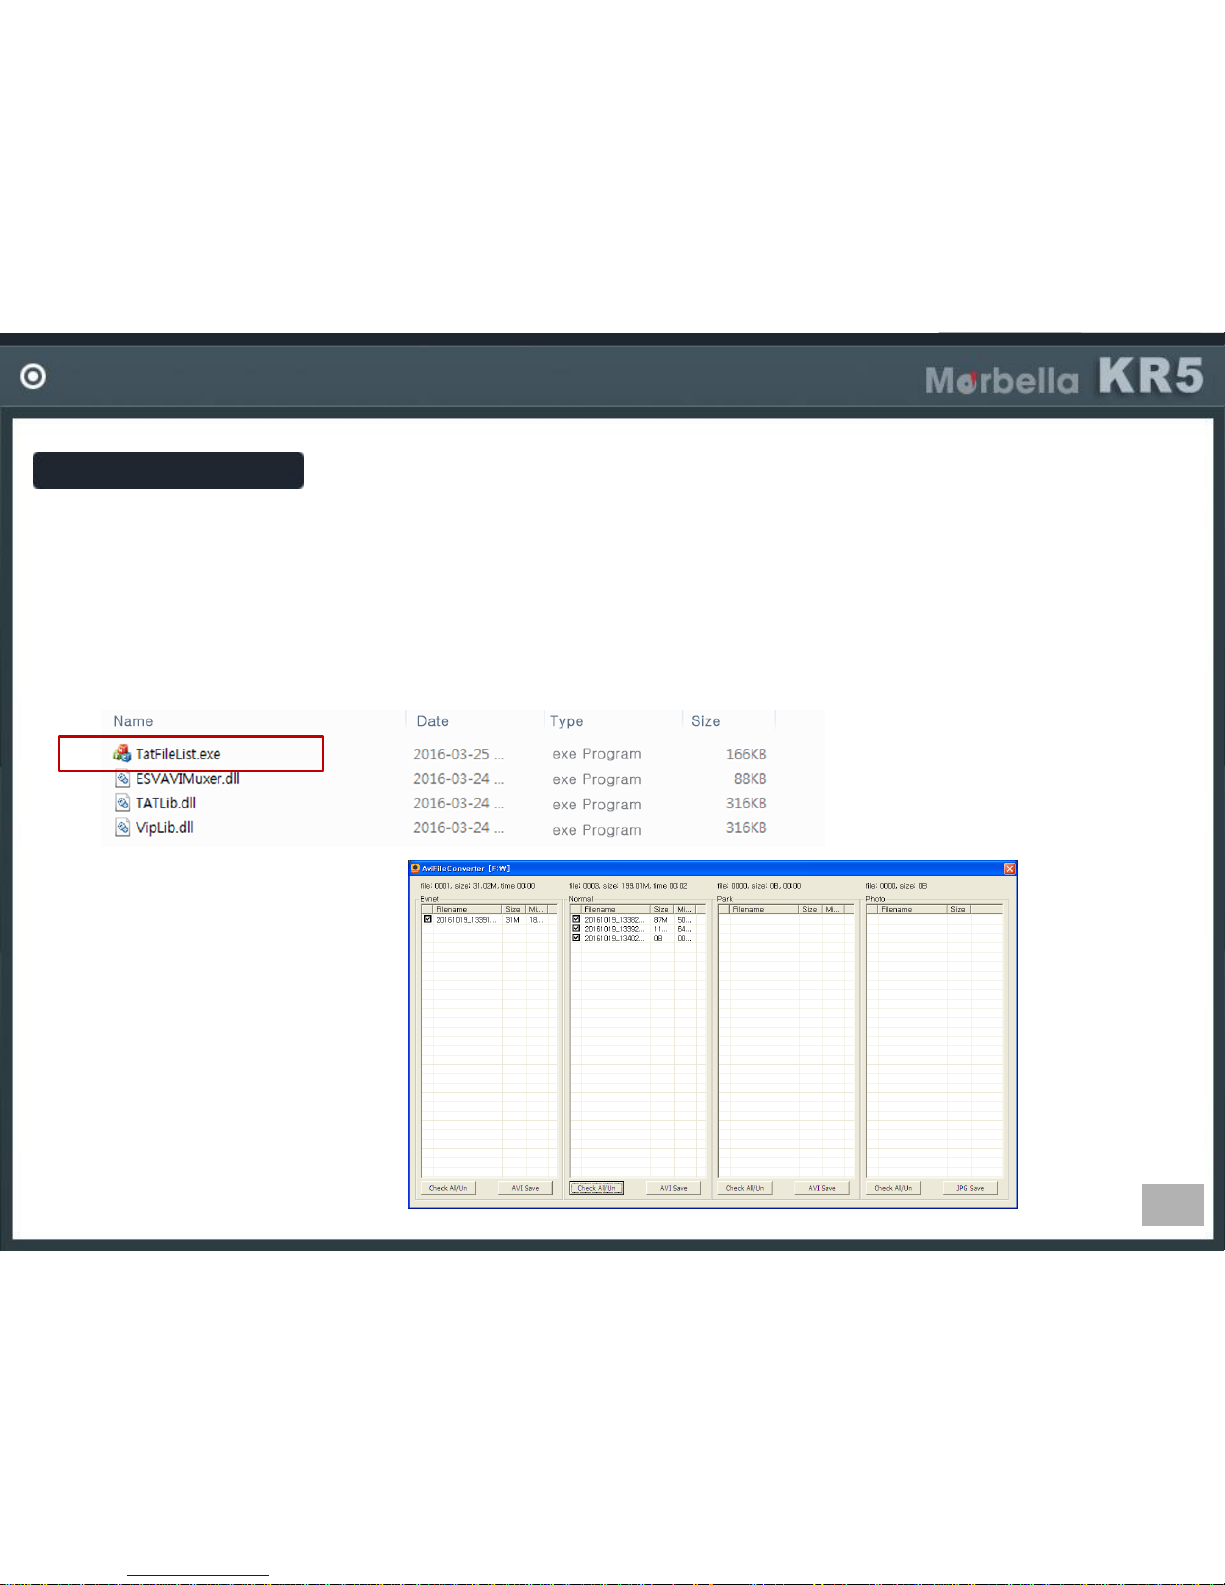
Open TAT File
-This product support TAT function which do not require SD format.
TAT video file is not seen and open in public PC viewer. File can be seen in bundled PC viewer or
TAT browser stored in CD.
TAT BROWSER
-Install TAT browser (TatFileList.exe) stored in CD in your PC
TAT BROWSER MAIN SCREEN
Page 54
54
TAT BROWSER / FILE CONVERTER
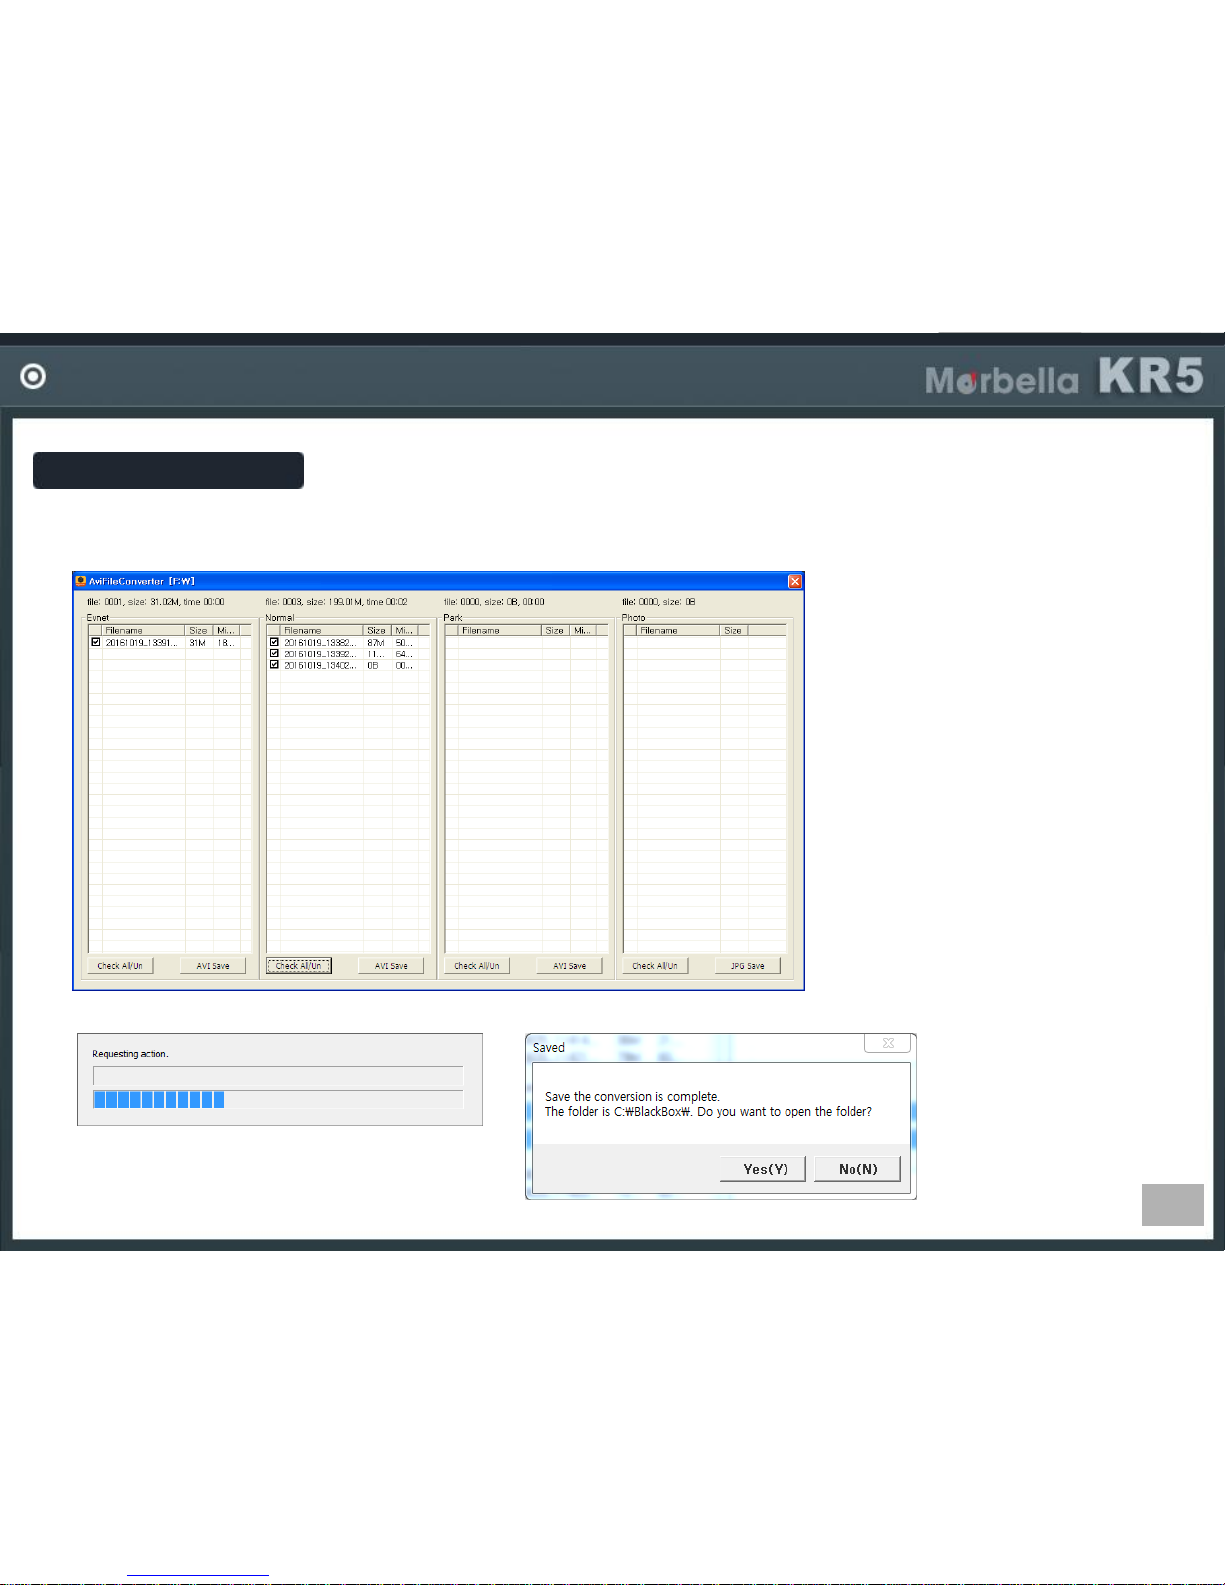
TAT File Convert
TAT file will be converted in AVI file in this browser. Then you can play the AVI file in public player in your PC.
Page 55
55
Page 56
56
FIRMWARE UPDATE
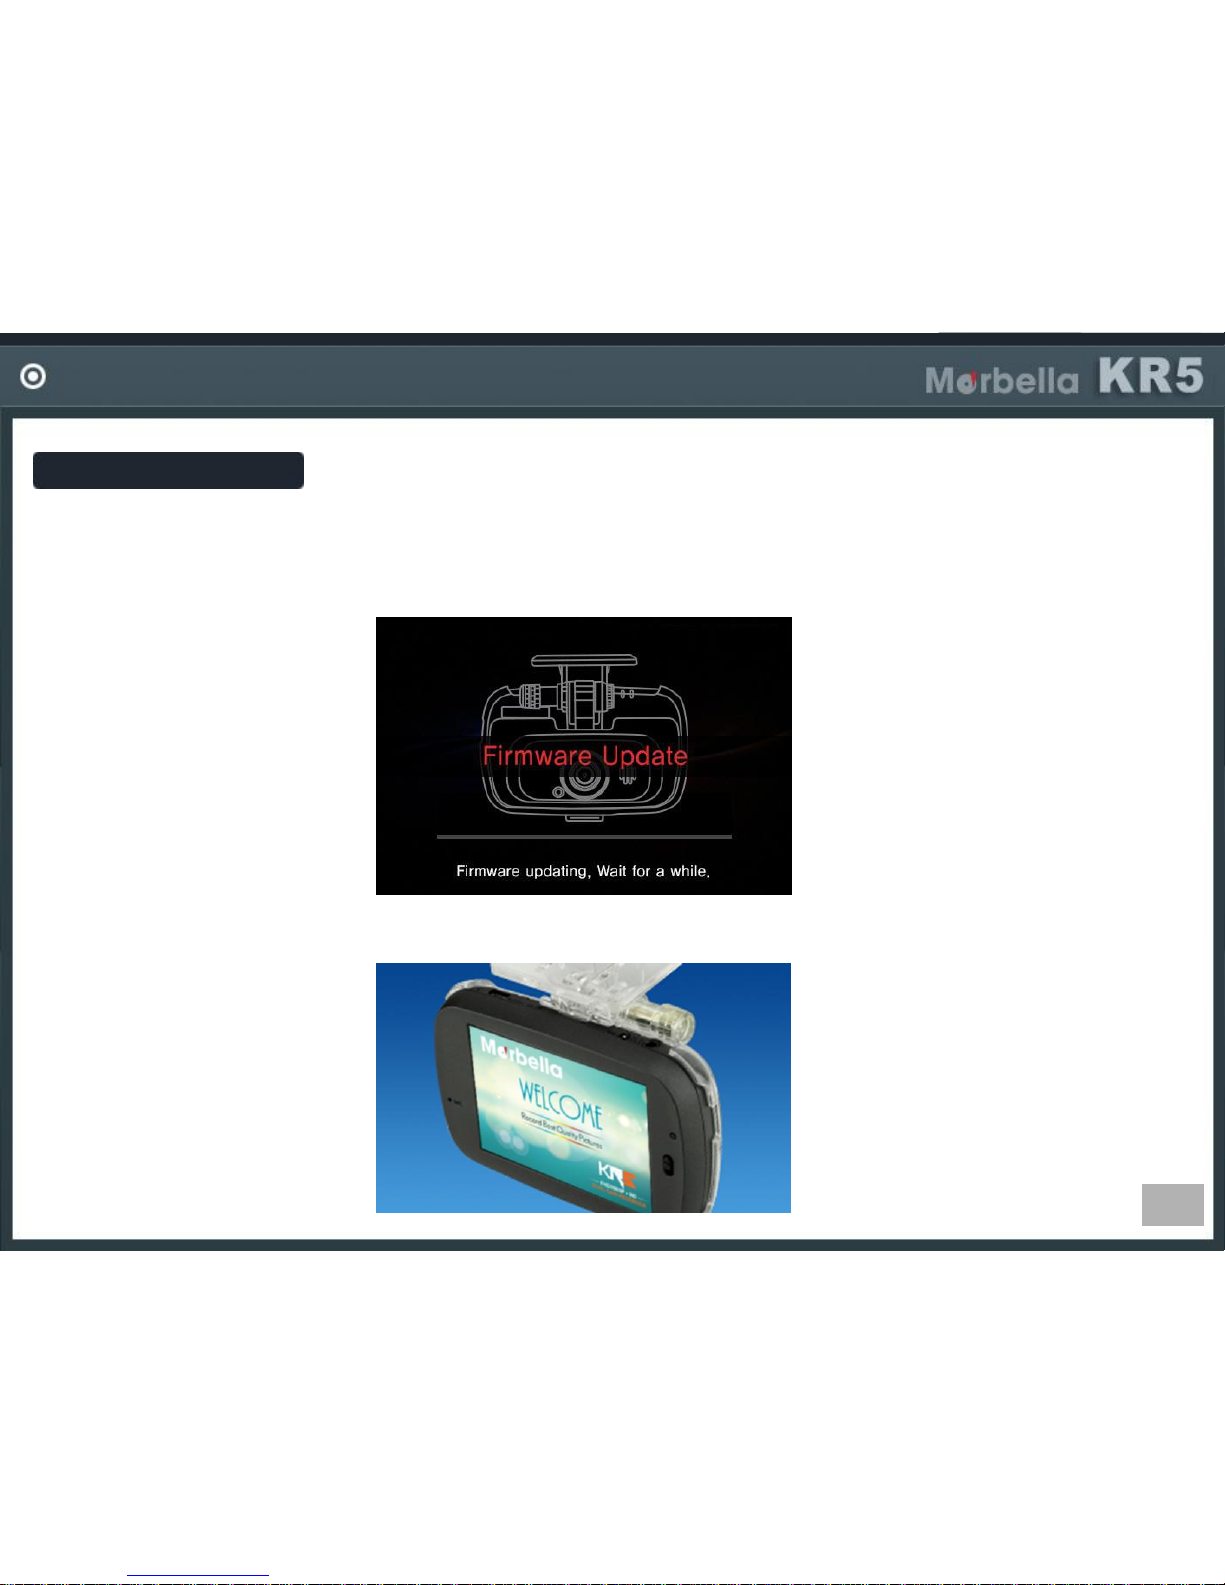
Firmware Update
-Get the latest firmware from your local service center or local distributor home page.
-Unzip and store the firmware files in SD card.
-If you power on the device, firmware will be upgraded automatically.
-After firmware update, the device will reboot.
(Firmware in SD card will be deleted automatically)
Page 57
57
CAUTION FOR FIRMWARE UPDATE
Caution
-Start car engine.
Power should not be disconnected during update.
-Firmware file should be stored in top level folder in SD card.
-No need to delete firmware files in SD card.
After update firmware files are deleted automatically.
-If there is not enough space in SD card, delete files in SD card first.
-After firmware update device will reboot automatically.
Page 58
58
Q & A
Video recording does not work.
Check whether SD card is inserted properly.
SD card has its own lifetime.
If it does not work well, replace it with a new one
or format SD card regularly.
Make sure that there is no connection between
navigation and device by USB cable.
Voice recording does not work.
Check whether voice REC function is activated.
Check that MIC hole is not blocked by anything.
There is no power on the device.
Reconnect the power supply by enclosed cigar
lighter.
It cannot copy the files on SD.
Before using SD card, format it once again.
LCD screen goes dim.
Tinted window glass can affect to the screen brightness.
Check the better position and fix again the device.
Or you can adjust the brightness through PC viewer
program.
GOOGLE map does not display on the screen.
GPS module has built in the GPS mount holder.
(This is an optional and sold separately)
Check GPS mount holder cables is connected well.
Check that there is nothing to block GPS signal reception.
Rear camera does not work.
Check whether the R-cam cable is connected well to the
product.
Check there is nothing around camera lens.
The quality of recording image is shaking during driving.
Check whether the mount holder is fixed well.
Or else, fix the device firmly into the vehicle by enclosed
adhesive tape.
The recorded image is too blurry.
Check camera lens is clean.
Check vehicle window glass is clean.
 Loading...