

Page 1
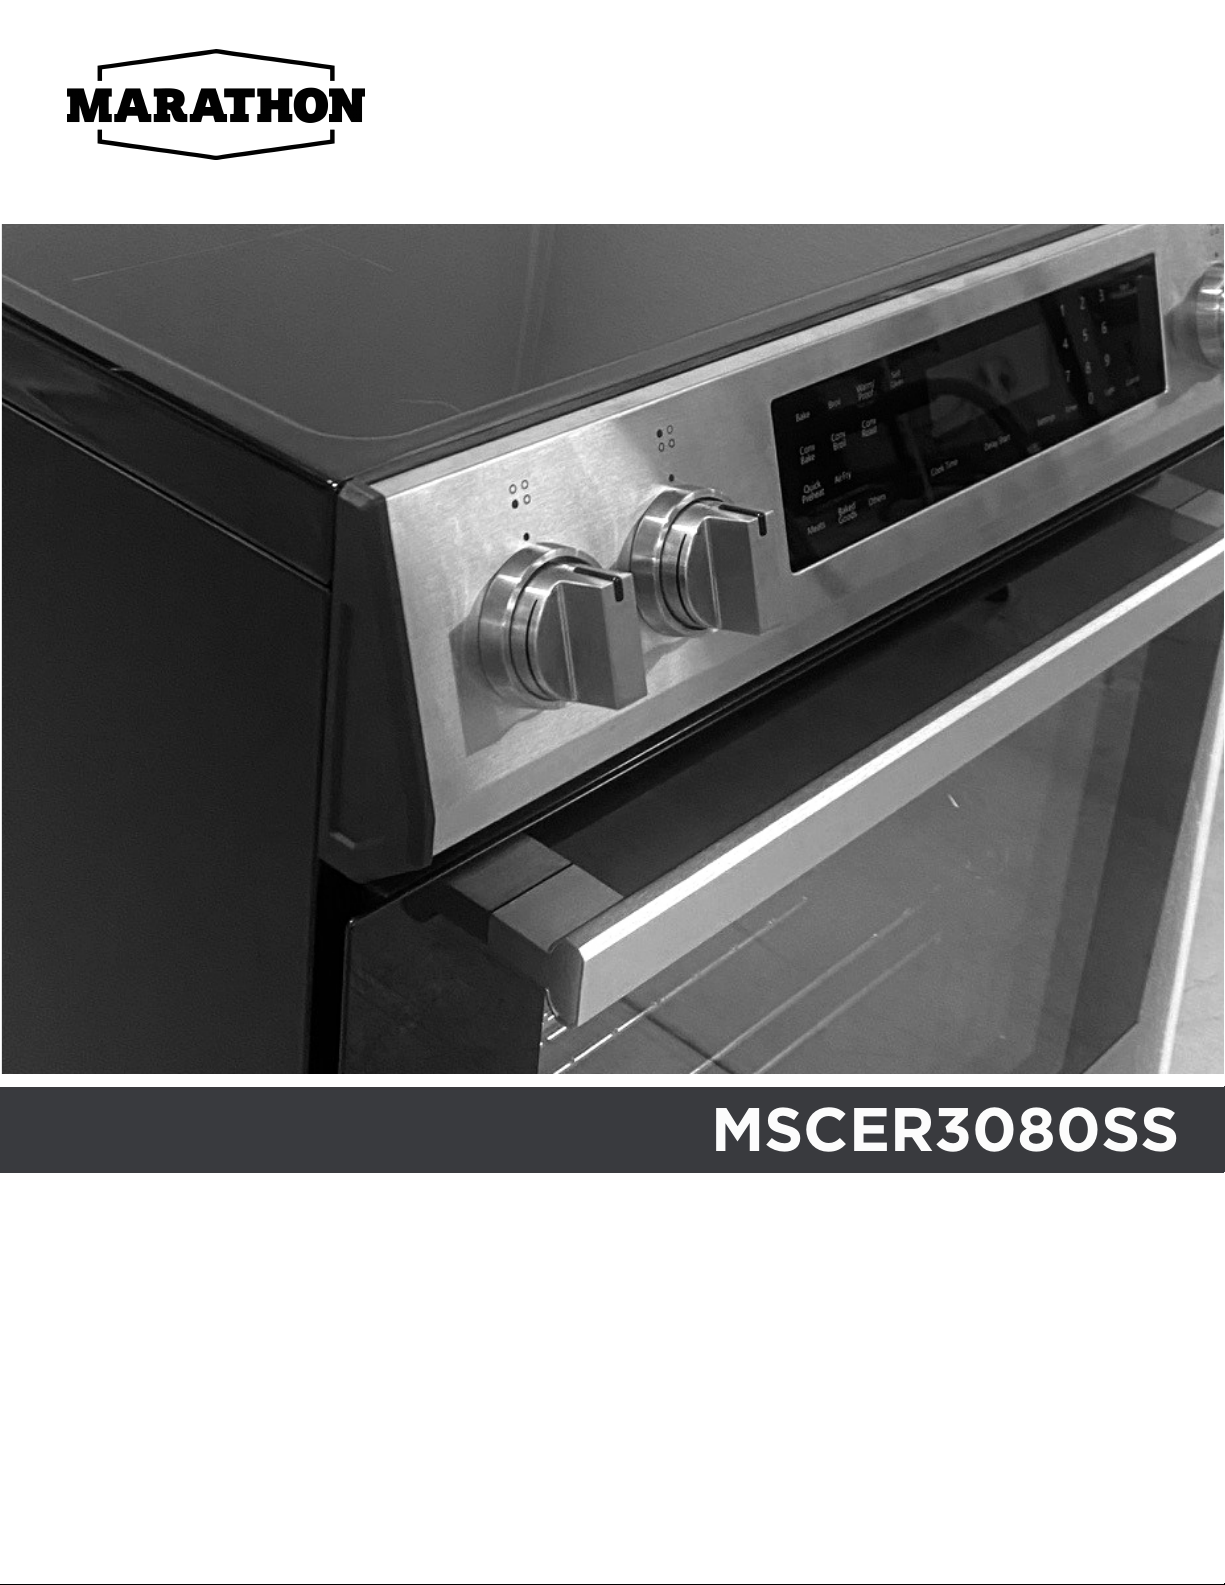
Deluxe 30" Smooth Top
Electric Range
MSCER3080SS
Congratulations on the purchase of your new Marathon Electric Range!
To activate your Warranty, please register your appliance at www.stirlingmarathon.com
or by completing and mailing the enclosed Warranty Registration Card. We are confident
you will have years of hassle free enjoyment and ask that you please retain the Use & Care
Guide for future reference and your safety.
Before installing please, read your Use & Care guide carefully and pay special attention
to the Safety & Warning information outlined in the following pages.
For immediate assistance: 1-844-309-9777
www.stirlingmarathon.com
Page 2
Important Safety Information
! WA R
SUFFOCATION HAZARD AND RISK OF CHILD ENTRAPMENT
To avoid the possibility of child entrapment, please take the following precautions before discarding your old electric range
Remove the oven door completely from the electric range.
Never allow children to operate, play with, or crawl inside the electric range.
BEFORE FIRST USE
It is very important that you review this Owner’s Manual very carefully before you plug in or use your new
appliance.
Your appliance must be correctly installed as detailed in this Manual in order to avoid the risk
of fire, electrical shock or injury.
DANGER!
• It is recommended that a separate circuit, serving only your appliance be provided.
• Never clean appliance parts with flammable fluids. These fumes can create a fire hazard or explosion.
Never use or store gasoline or other flammable vapors or liquids inside or in the proximity of this appliance,
failing to do so may result in a fire hazard or explosion.
• Before cleaning or servicing this appliance, unplug the appliance completely from the electrical outlet.
Failure to do so can result in electrical shock or death.
• Do not attempt to repair or replace any part of your appliance unless it is specifically recommended in
this Manual. All other servicing should be referred to a qualified Service Technician.
WARNING!
• For your safety, this appliance should never be used as a source of heat or space heating. The
stove top elements should not be operated without proper cookware.
• All openings in the wall behind the appliance and floor under the appliance shall be sealed.
• Keep appliance area clear and free from combustible materials, gasoline, and other flammable
vapors.
• Do not obstruct the flow of ventilation air around the appliance.
• Always disconnect the electrical supply to the appliance before servicing.
• When removing appliance for cleaning and/or service:
• Disconnect AC power supply.
• Carefully remove the range by pulling backwards
CAUTION!
• Do not abuse the oven door (e.g. standing, sitting, or leaning on them). This can result in potential
hazards and /or injury.
• It is important for the appliance to be level in order to work properly.
• Never allow children to operate, play with or crawl inside the appliance.
• Your range must be wired and fused to meet the requirements of the Canadian Electrical Code. Please consult
your local electrical authority for further details.
• Replacement Parts – Only authorized replacement parts may be used in performing service on the
range. For replacement parts contact us at [email protected].
Page 3
Product Overview
A
B
I
J
K
C
L
D
M
E
F
G
H
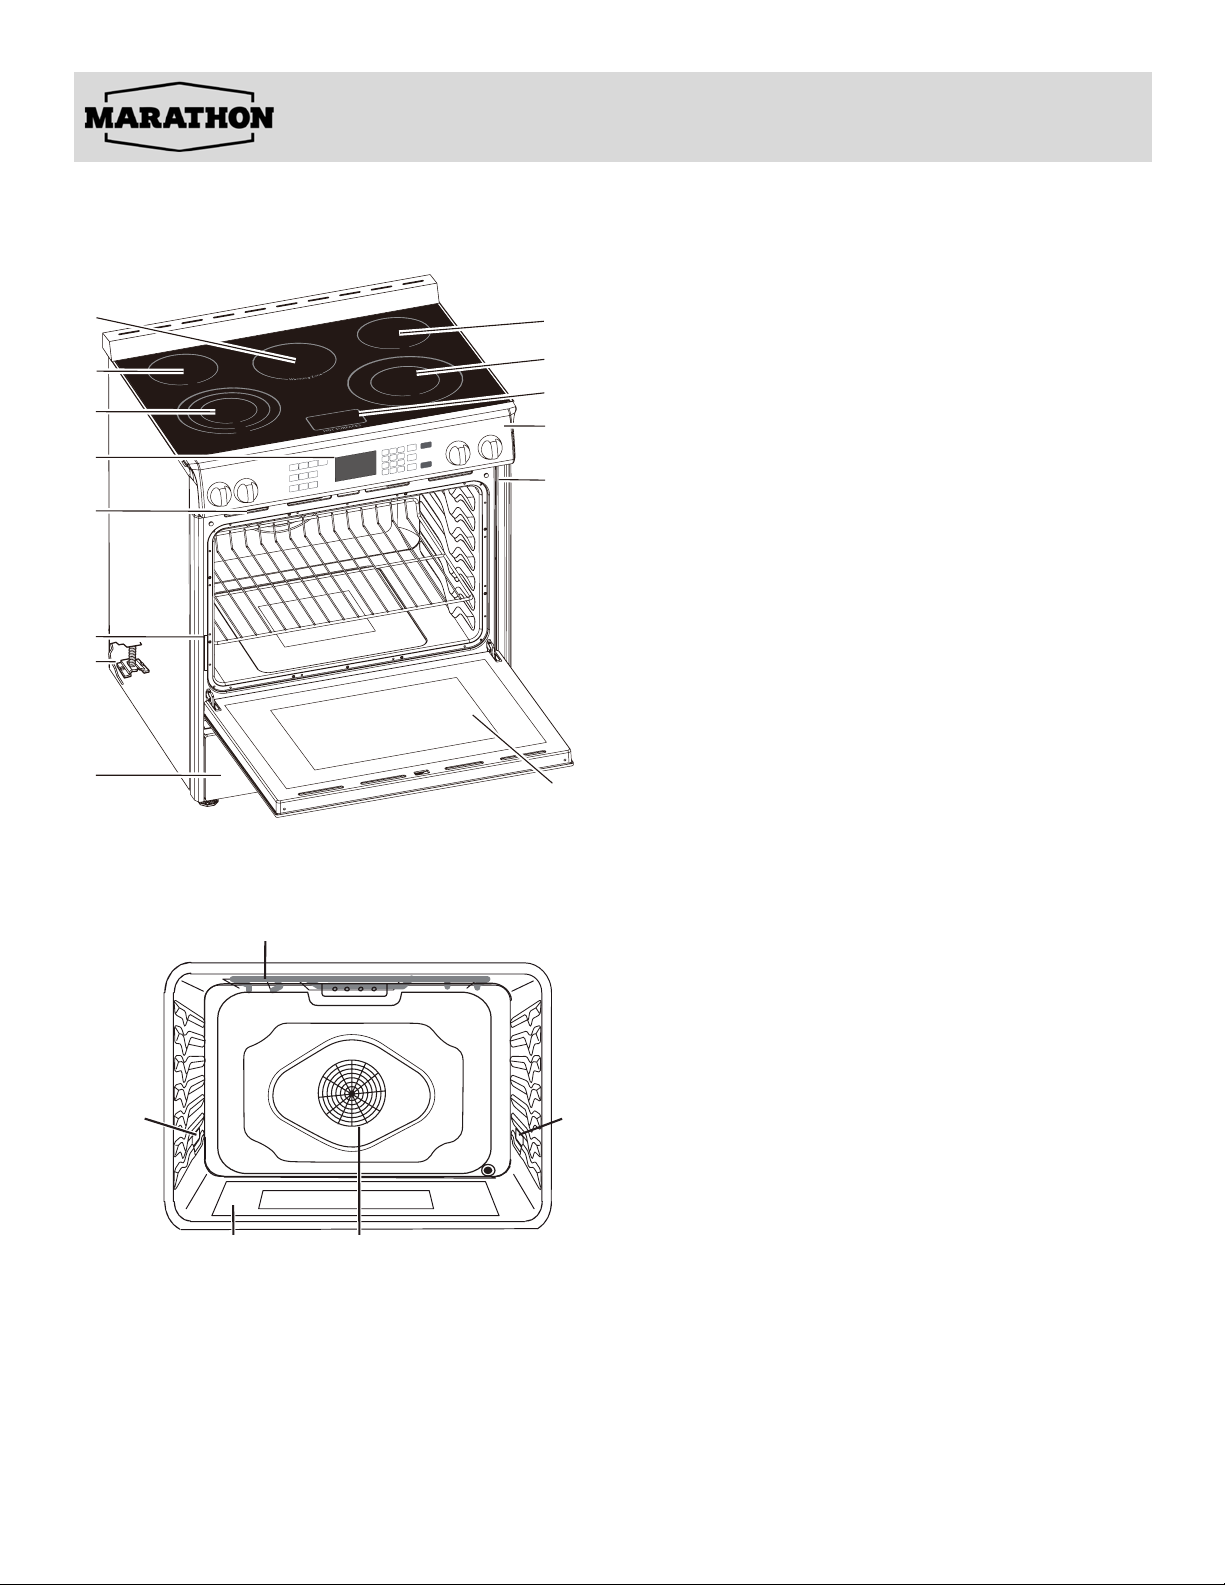
A.
Warming Zone Burner
Left Rear Surface Burner
B.
Left Front Surface Burner (Triple-element)
C.
Clock/Timer
D.
Oven Vent
E.
Model and Serial Number Plate
F.
Anti-tip Bracket
G.
Storage Drawer
H.
Right Rear Surface Burner
I.
Right Front Surface Burner (Dual-element)
J.
Hot Surface Indicator Lights
K.
Control Panel
L.
Door Gasket
M.
Broil Element
N.
Oven Light
O.
Convection Fan and Element
P.
Bottom Element (not visible)
Q.
Oven Door Window
R.
R
N
O O
Q P
Page 4

Important Precautions and
Recommendations
BEFORE USE
Carefully unpack and ensure there is no damage to the oven, cooktop or structure and that
the oven door opens and closes properly. Remove all packing materials (i.e. plastic bags,
polystyrene foam, packing straps, etc.) and keep out of reach of children to prevent
possible serious injury. The range has been thoroughly tested for safe and efficient
operation. However, as with any appliance, there are specific installation and safety
precautions that must be followed to ensure safe and satisfactory operation.
NOTICE: Before you use this range for the first time: from the manufacturing process, the Bake and
Broil elements have a protective coating, which must be burned off before use. To do this, open
the oven door and set the temperature control knob to 450°F. Turn the function selector to the Bake
element and the Broil element separately for approximately 15 minutes. The burners also have a
protective coating, which must be burned off before use. To do this, set the burner selector to the
maximum setting for 5 minutes. It is important to ensure adequate ventilation. Switch off the burners
and allow cooling completely.
IMPORTANT: This range is designed and manufactured solely for the cooking of domestic
(household) food and is not suitable for any non--domestic application and therefore should not be
used in a commercial environment. The range warranty will be voided if the range is used within a
non-domestic environment i.e. a semi commercial, commercial or communal environment.
• Do not carry out cleaning or maintenance operations on the appliance without having previously
disconnected it from the electric power supply.
• After use, ensure that the knobs are in “OFF” position.
• Keep children away from the range when it is in use.
• Fire Risk! Do not store flammable materials in the oven or in the bottom drawer.
• Make sure that electrical cables connecting other appliances in the proximity of the range cannot
come into c ontact with the elements on the cooktop or caught in the oven door.
• DO NOT line the oven walls or oven bottom or racks with aluminum foil
• Do not place shelves, pans, backing trays, broil tray or other cooking utensils on the bottom of the
oven chamber. Always place on an oven shelf.
• The manufacturer declines all liability for injury to persons or damage to property caused by
incorrect or improper use of the range.
• Burn Hazard! The oven and cooking accessories may become very hot during and after use. Make sure
children are kept out of reach and warn them accordingly. To avoid burns use cloths and gloves when
handling hot parts or utensils.
• Stand away from the range when opening the oven door. Hot air or steam which escapes can cause
burns to hands, face, and/or eyes.
• Never clean the oven with any high-pressure steam cleaning devices.
• Do Not Use Water on Grease Fires - Smother fire or flame or use dry chemical or foam type
extinguisher.
Page 5

Installation Instructions
• Never leave surface units unattended at high heat settings as boil overs can cause smoke and grease
spillovers may cause a fire resulting in damage or injury.
• Glazed Cooking Utensils - Only certain types of glass, glass/ceramic, ceramic, earthenware, or other
glazed utensils are suitable for range top service without breaking due to sudden change in
temperature.
• Do Not Cook on Broken Cook-top – If cook-top should break, cleaning solutions and spillovers may
penetrate the broken cook-top and create a risk of electric shock. Contact a qualified
technician immediately.
• Clean Cook-top With Caution – If a wet sponge or cloth is used to wipe spills on a hot cooking area,
be careful to avoid steam burn. Some cleaners can produce noxious fumes if applied to a hot surface
• Do Not Heat Unopened Food Containers – Build-up of pressure may cause container to burst and result in
injury.
• Keep Oven Vent Ducts Unobstructed.
• Placement of Oven Racks – Always place oven racks in desired location while oven is cool. If rack must be
moved while oven is hot, do not let potholder contact hot heating element in oven.
• Do Not Touch Surface Units, Heating Elements, Interior Surfaces of Oven - Surface units and heating
elements may be hot even though they are dark in color. Area near surface and interior surfaces of an
oven become hot enough to cause burns. During and after use, do not touch, or let clothing or other
flammable materials contact surface units, areas near units or interior surfaces of oven until they have had
sufficient time to cool. Other surfaces of the appliance may become hot enough to cause burns –among
these surfaces are oven vent openings and surfaces near these openings, oven doors, and window of oven
doors.
*** THIS APPLIANCE IS APPROVED FOR INDOOR USE ONLY ***
Page 6
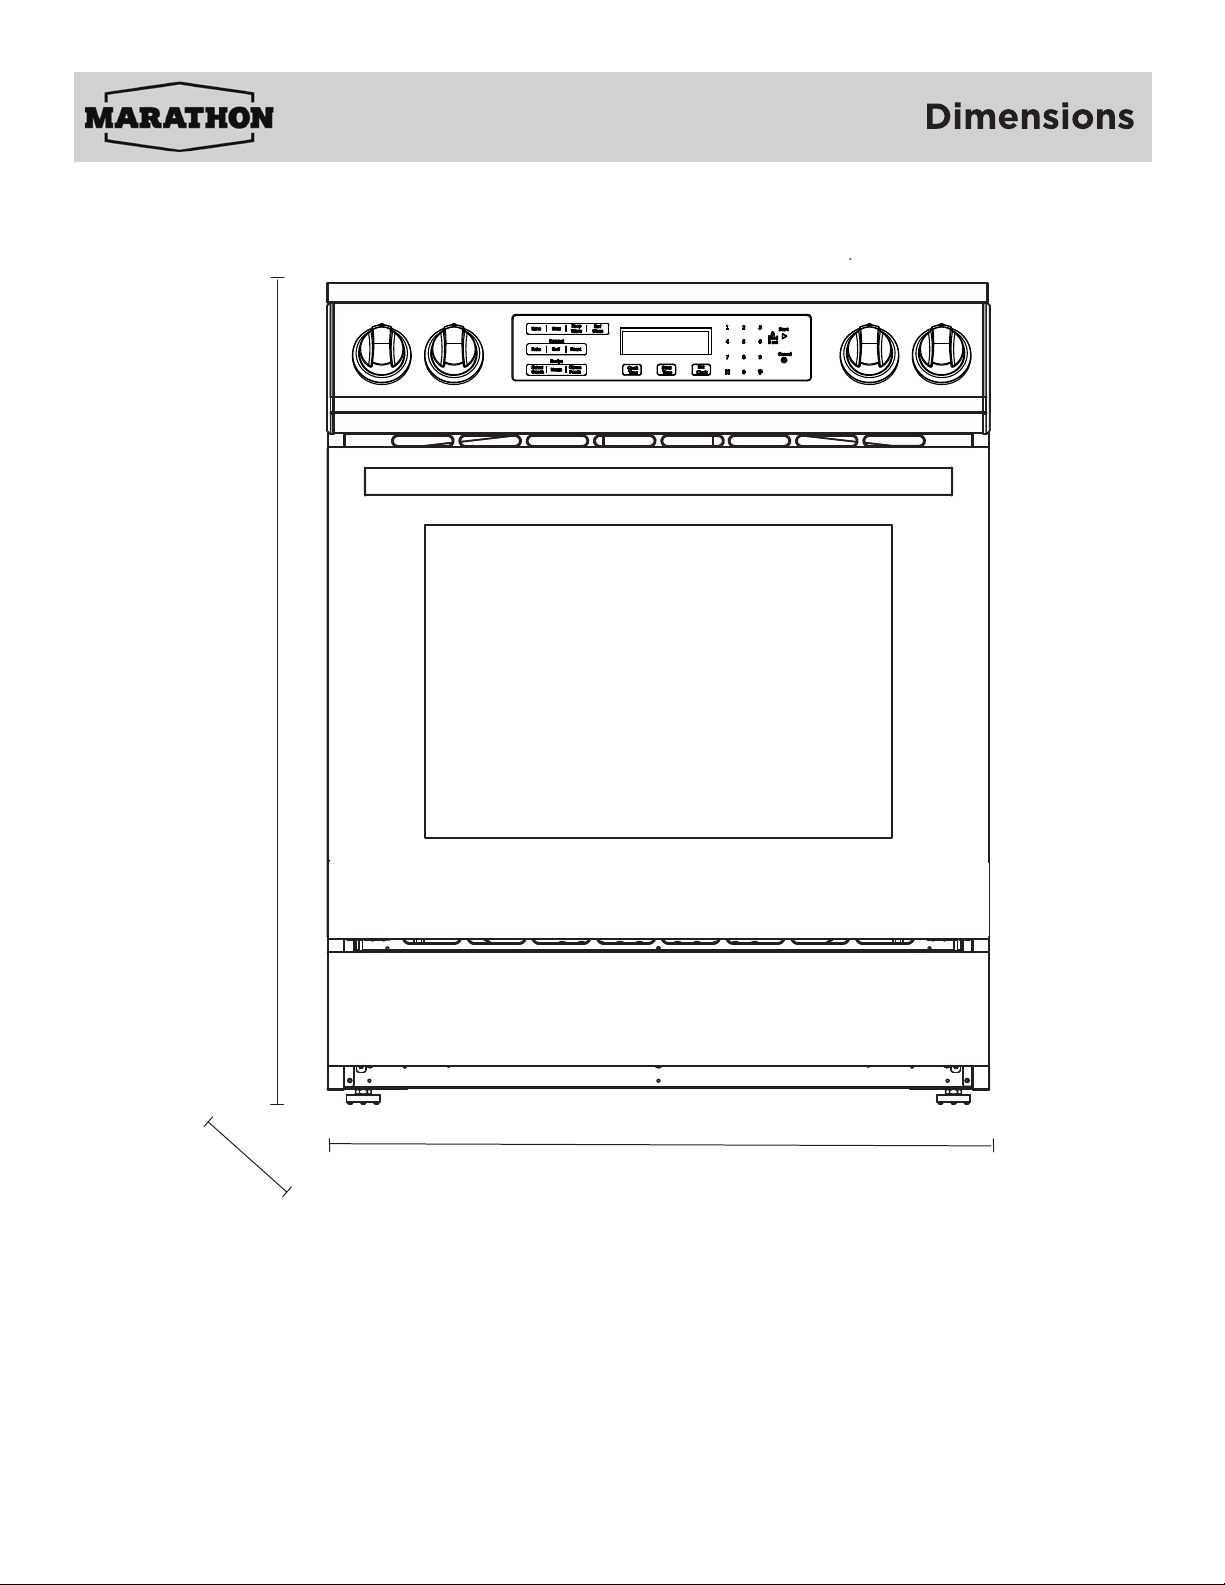
36’’ (914 mm)
25 13/16'' (656 mm)
29 15/16’’ (760 mm)
Page 7
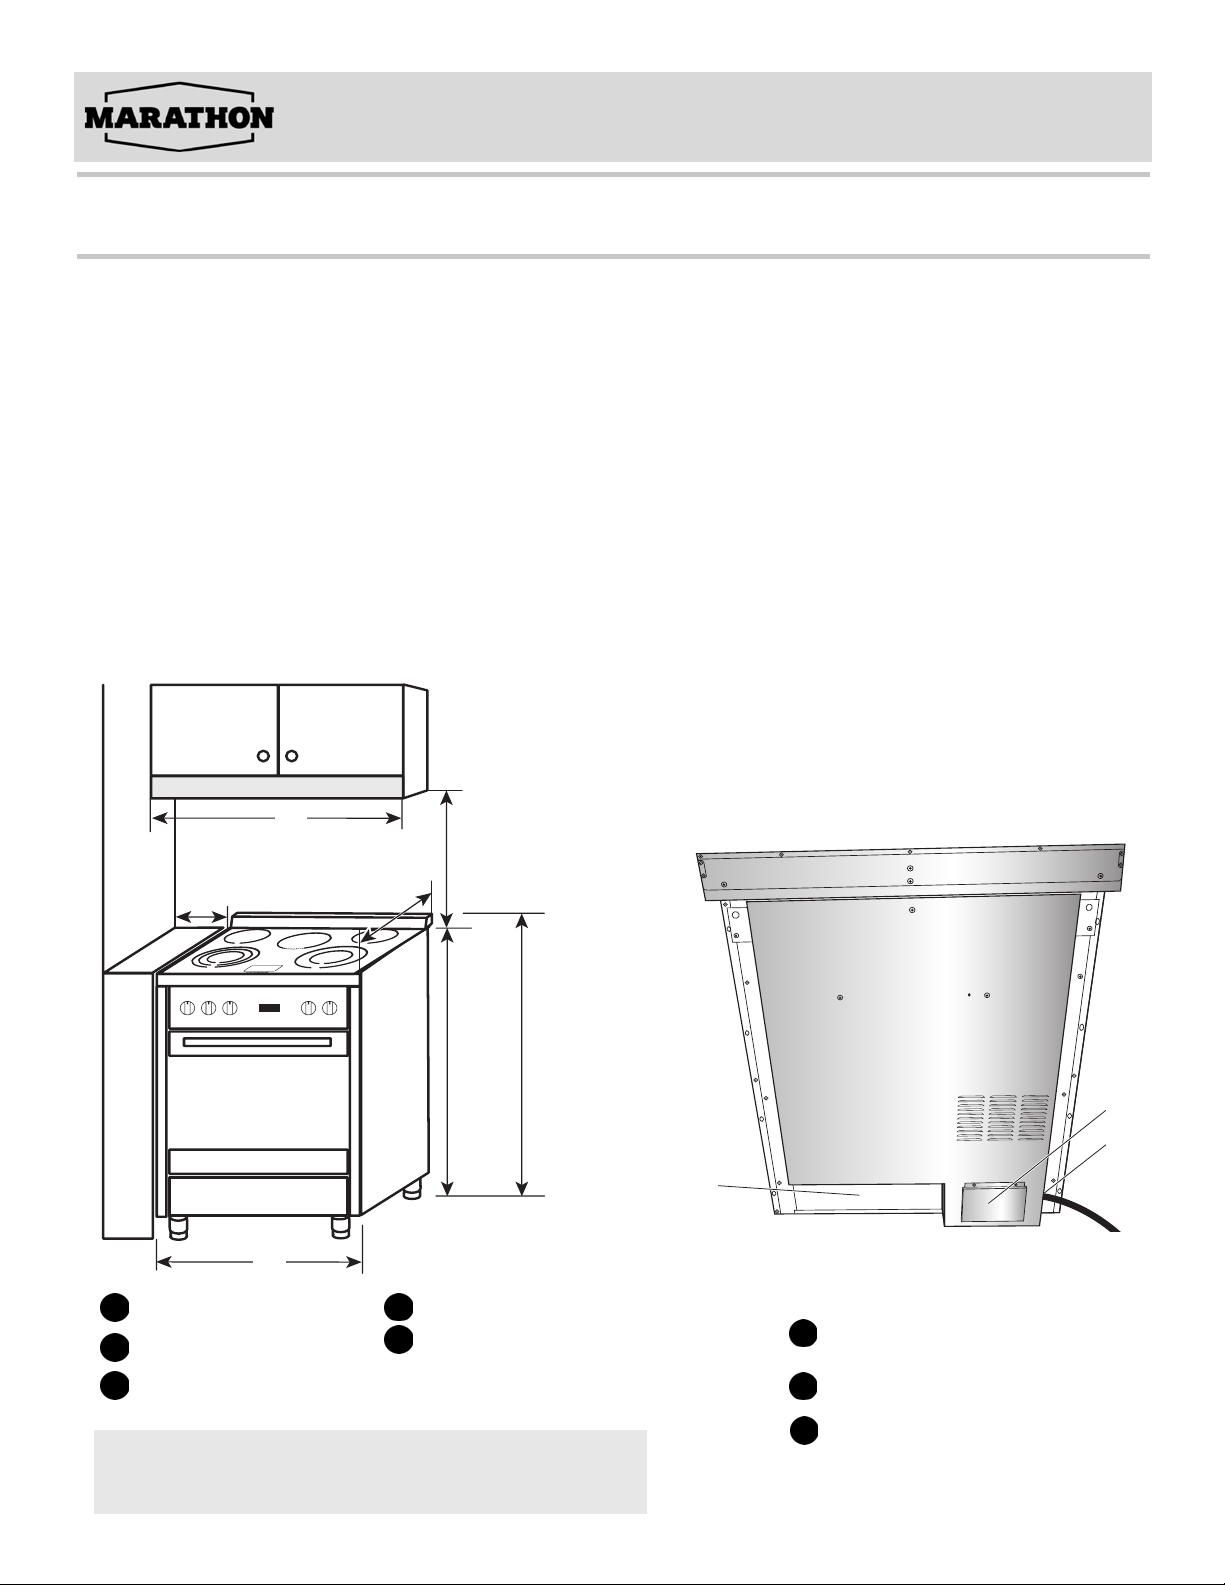
Installation location
Location Requirements
GENERAL
•
The range should be located for convenient use in the kitchen.
•
Recessed installations must provide complete enclosure of the sides and rear of the range.
•
To eliminate the risk of burns or fire by reaching over heated surface units, cabinet storage space located above the
surface units should be avoided. If cabinet storage is to be provided, the risk can be reduced by installing a range
hood or microwave hood combination that projects horizontally a minimum of 5" (12.7 cm) beyond the bottom of the
cabinets.
•
All openings in the wall or floor where range is to be installed must be sealed.
•
Do not seal the range to the side cabinets.
•
Grounded electrical supply is required. See “Electrical Requirements” section.
DIMENSIONS
PRODUCT/OPENING
a
5.9" (15 cm)
Min.
BACK OF RANGE
30" (77 cm)
Min.
c
ed
a
b
c
b
A
30" (76 cm)
B
29 7/8" (76 cm)
C
25" (63.5 cm)
NOTE: Range can be raised approximately 1" (2.5 cm) by
adjusting the leveling legs. Front of door and drawer may
extend farther forward depending on styling.
D
36" (91.4 cm)
E
37 3/4" (96 cm)
Access Panel to Electrical
A
Supply Connection
B
Power Cord Opening
Recessed Area
C
Page 8
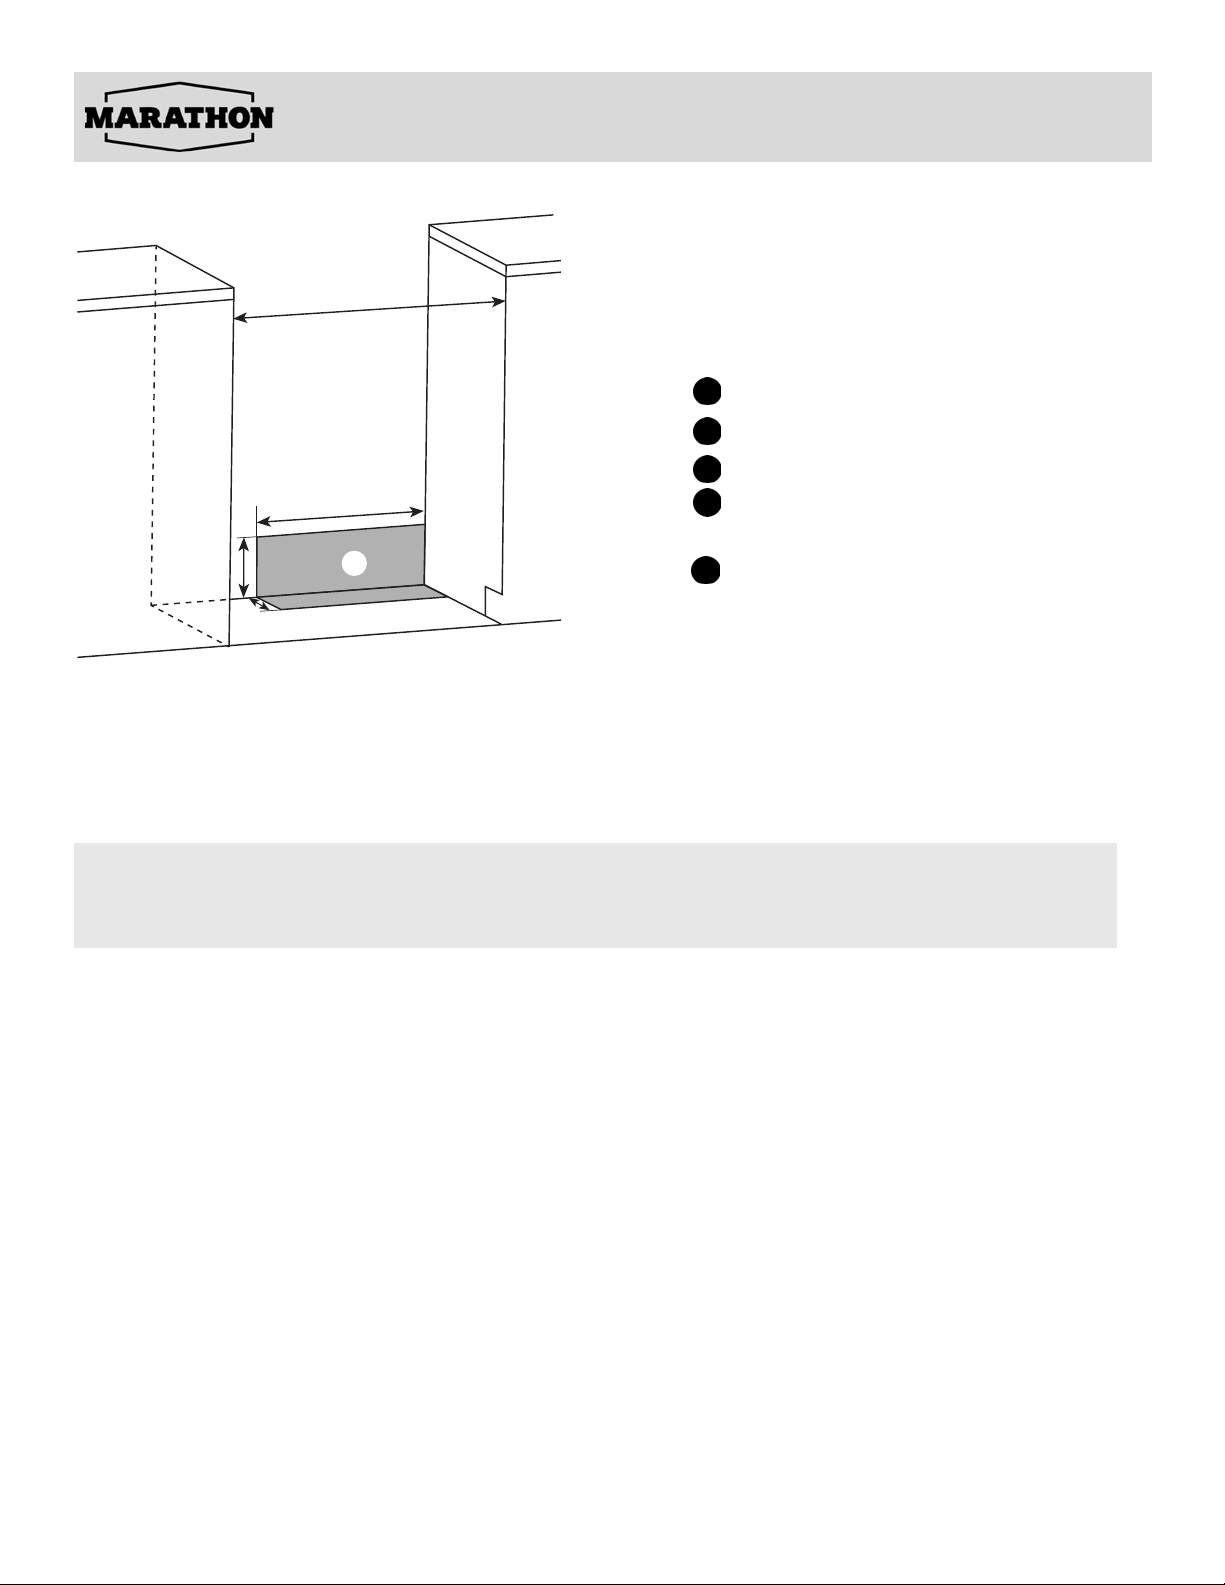
b
a
Installation Dimensions Guide
POWER SUPPLY
IMPORTANT: To connect to an outlet in the wall, the
electrical outlet must be recessed. If the electrical outlet is
in the floor, it can be either recessed or surface mounted.
30" (76 cm)
B
171/2" (44 cm)
CACCC
71/4" (18.4 cm)
D
3" (7.6 cm)
Recommended
c
e
E
Location for
Electrical Outlet
d
• Contact a qualified floor covering installer to check that the floor covering can withstand at
least 200°F (93°C).
• Use an insulated pad or 1/4" (0.64 cm) plywood under range if installing range over carpeting.
IMPORTANT: Some cabinet and building materials are not designed to withstand the heat
produced by the oven for baking and self-cleaning. Check with your builder or cabinet supplier to
make sure that the materials used will not discolor, delaminate or sustain other damage.
Page 9
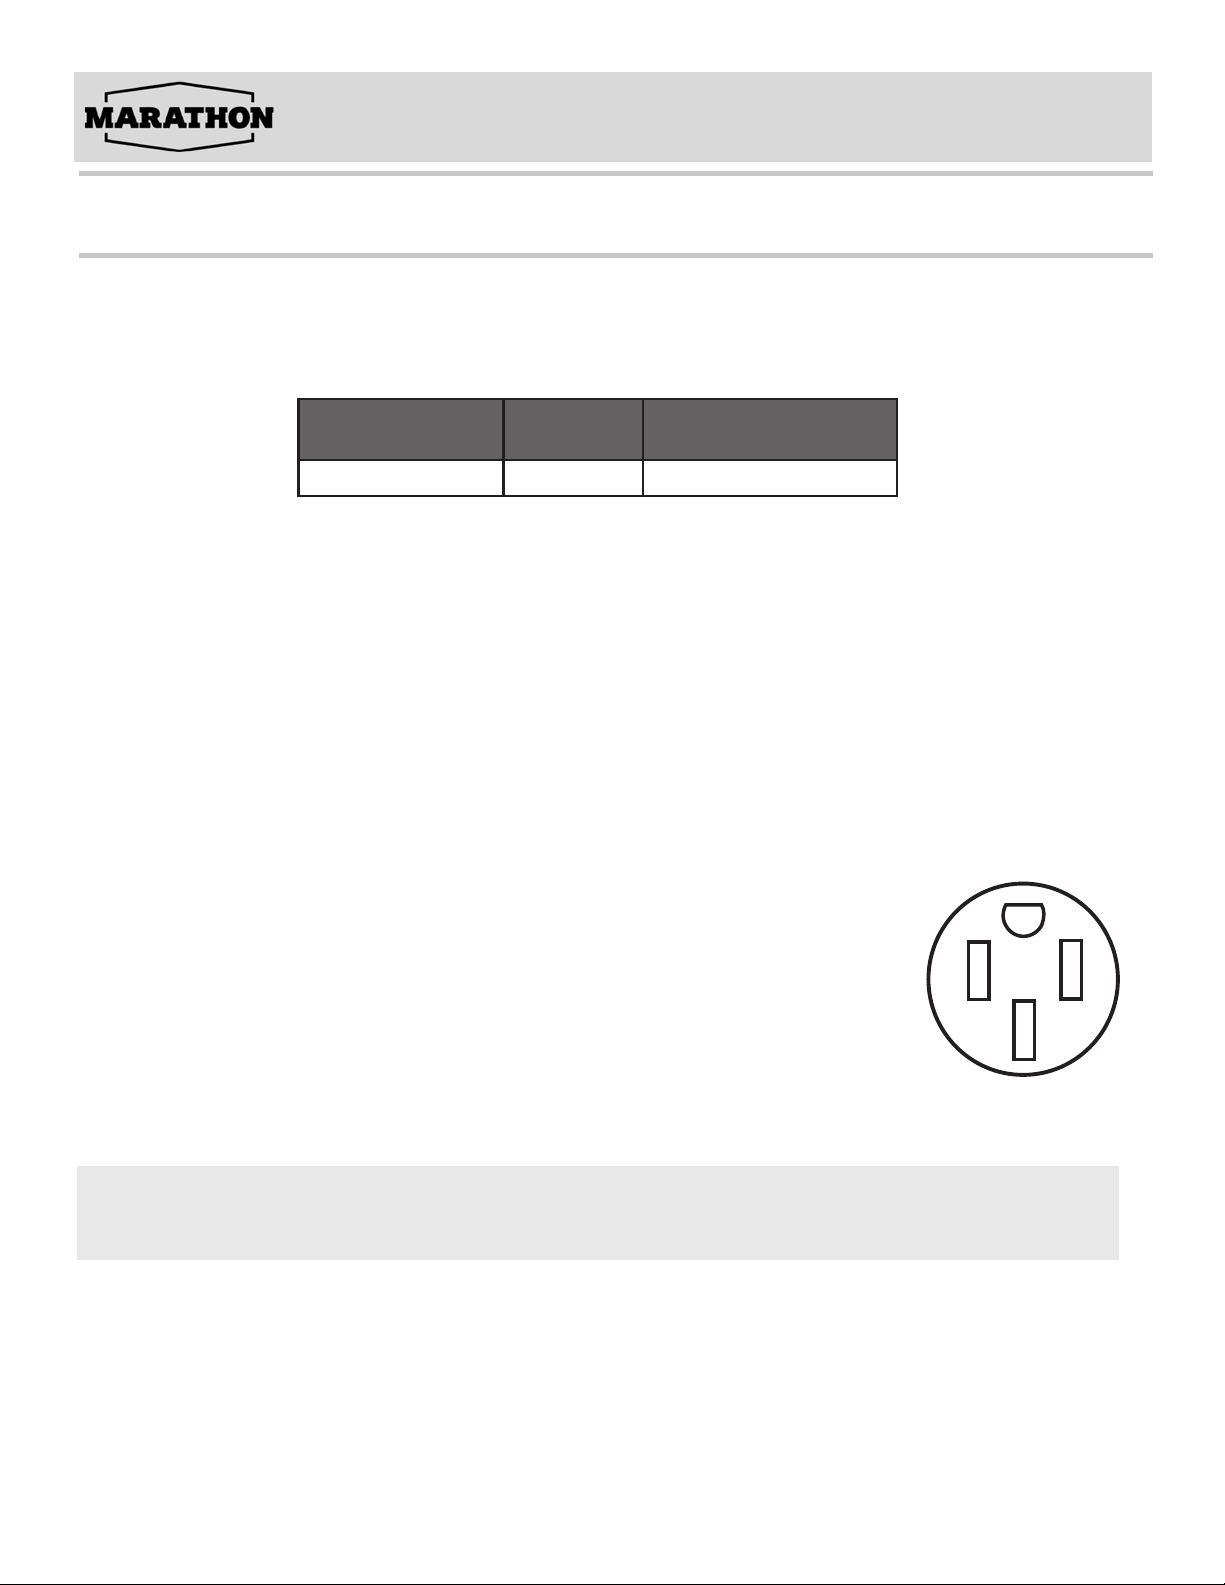
Installation requirements
Electrical Requirements
• Range must be connected to the proper electrical voltage and frequency as specified on the model/serial number
rating plate. All models are dual rated, and designed to be connected to either 120/240V AC, 60Hz, 4-wire, singlephase power supply.
Voltage and
Frequency
240V, 60 Hz 50 A
Amps Circuit Required
50 Amp Circuit
• When a 4-wire, single phase 120/240 volt, 60 Hz., AC only electrical supply is available, a 50-amp maximum circuit
protection is required
• If codes permit and a separate ground wire is used, it is recommended that a qualified electrical installer determine
that the ground path is adequate and wire gauge are in accordance with local codes.
• Be sure that the electrical connection and wire size are adequate and in conformance with CSA Standard C22.1,
Canadian Electrical Code, Part 1 - latest edition, and all local codes and ordinances.
A copy of the above code standards can be obtained from:
Canadian Standards
Association 178 Rexdale Blvd.
Toronto, ON M9W 1R3
CANADA
• Check with a qualified electrical installer if you are not sure the range is properly
grounded.
• This range is equipped with a CSA International Certified Power Cord intended
to be plugged into a standard 14-50R wall receptacle. Be sure the wall receptacle is
within reach of range’s final location.
• Do not use an extension cord.
IMPORTANT: This appliance shall be installed only by authorized persons and in accordance with the
manufacturer’s installation instructions, local gas fitting regulations, municipal building codes, electrical wiring
regulations, local water supply regulations.
Page 10
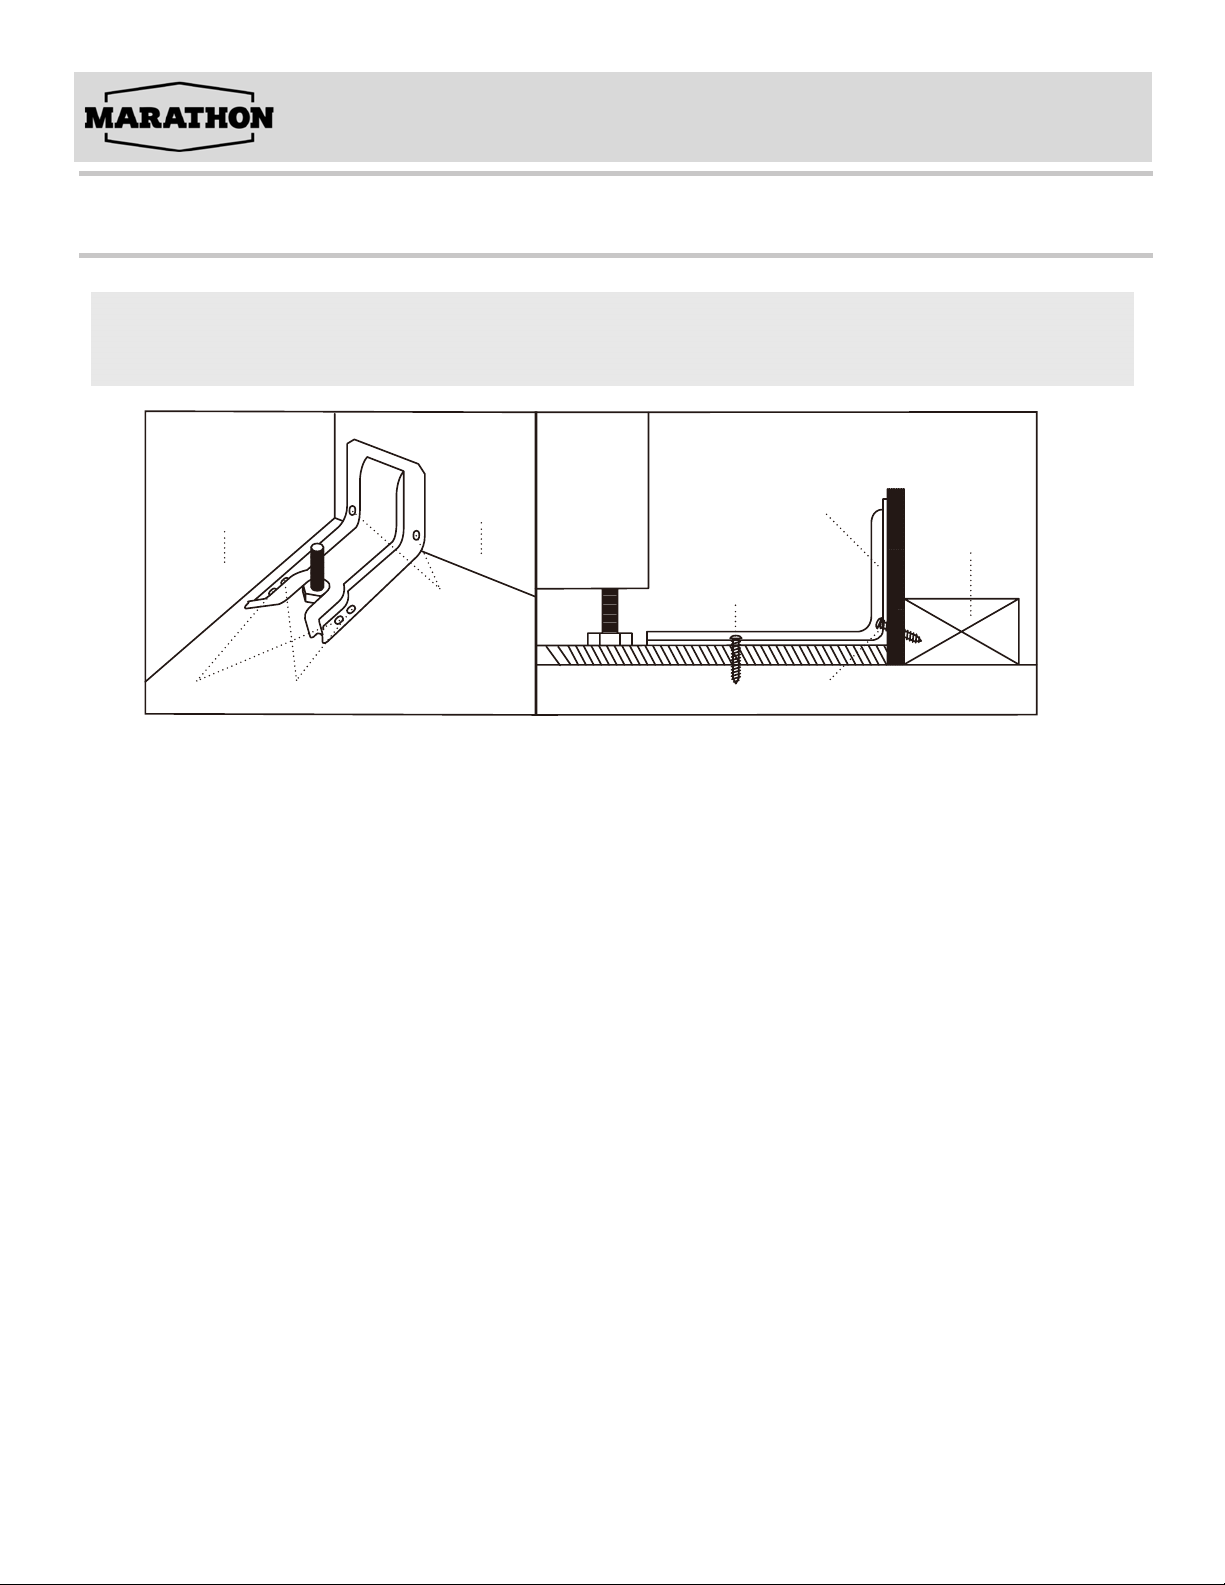
Installation requirements
Install Anti-Tip Bracket
NOTE: The anti-tip bracket must be PROPERLY INSTALLED and the rear leveling leg must be FULLY ENGAGED
into the bracket to the pre-vent the range from tipping. NEVER remove the leveling legs. This will prevent the range
from being secured to the ANTI-TIP bracket properly.
Adjacent cabinet
or final location
of range side panel
Loc A Loc B
Rear Wall
Loc C
Two screws must
enter floor or wall
at Loc A, B, or C.
Attachment to Floor or Rear Wall
Bracket
Wall Sill Plate
Screw must enter
wood or concrete
Screw must enter wood
Page 11
Operating the Range
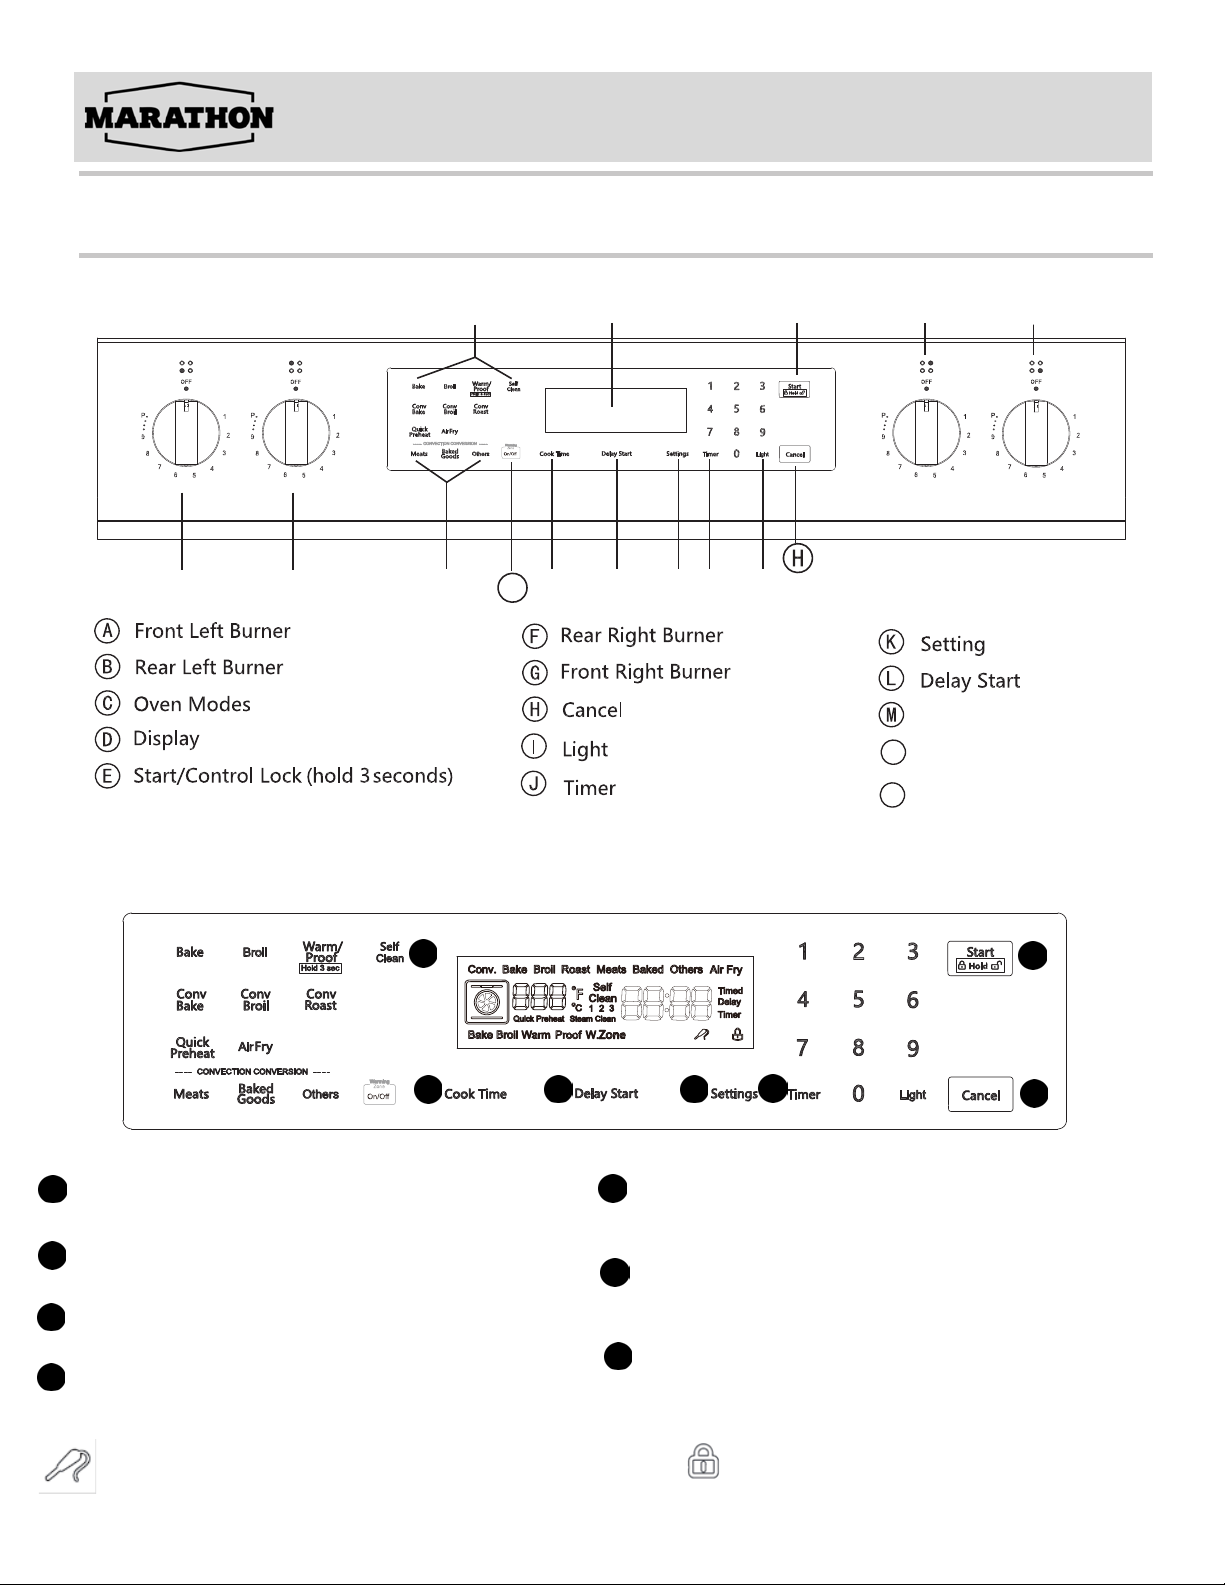
Control Panel
c d e f g
P
n
m l kj ia b
Key and icon definitions
G
C
AAA
Start:
Start button, start operation or start Settings to take effect.
Cancel:
B
Cancel button to cancel the current operation.
Cook time:
C
Bake time button, used to set the bake time.
Delay start:
D
The Appointment time button is used to set the start time.
Cook time
N
Convection conversion
P
Warming zone
AAA
D
E
E
FFF F
FFF F
G
E
Settings:
Select system Settings. Press repeatedly to display different
Settings.
Timer:
Timer symbol - This symbol is displayed on the LED after the
timer function is set.
Self clean:
Self-cleaning button to start the self-cleaning mode.
FFF F
BB
Pin symbol - this symbol appears on the display screen when the system detects a
pin(optional).
Child lock symbol - the same as locking all keys, the
child lock is set, the display will appear this symbol
Page 12
Operating the Range
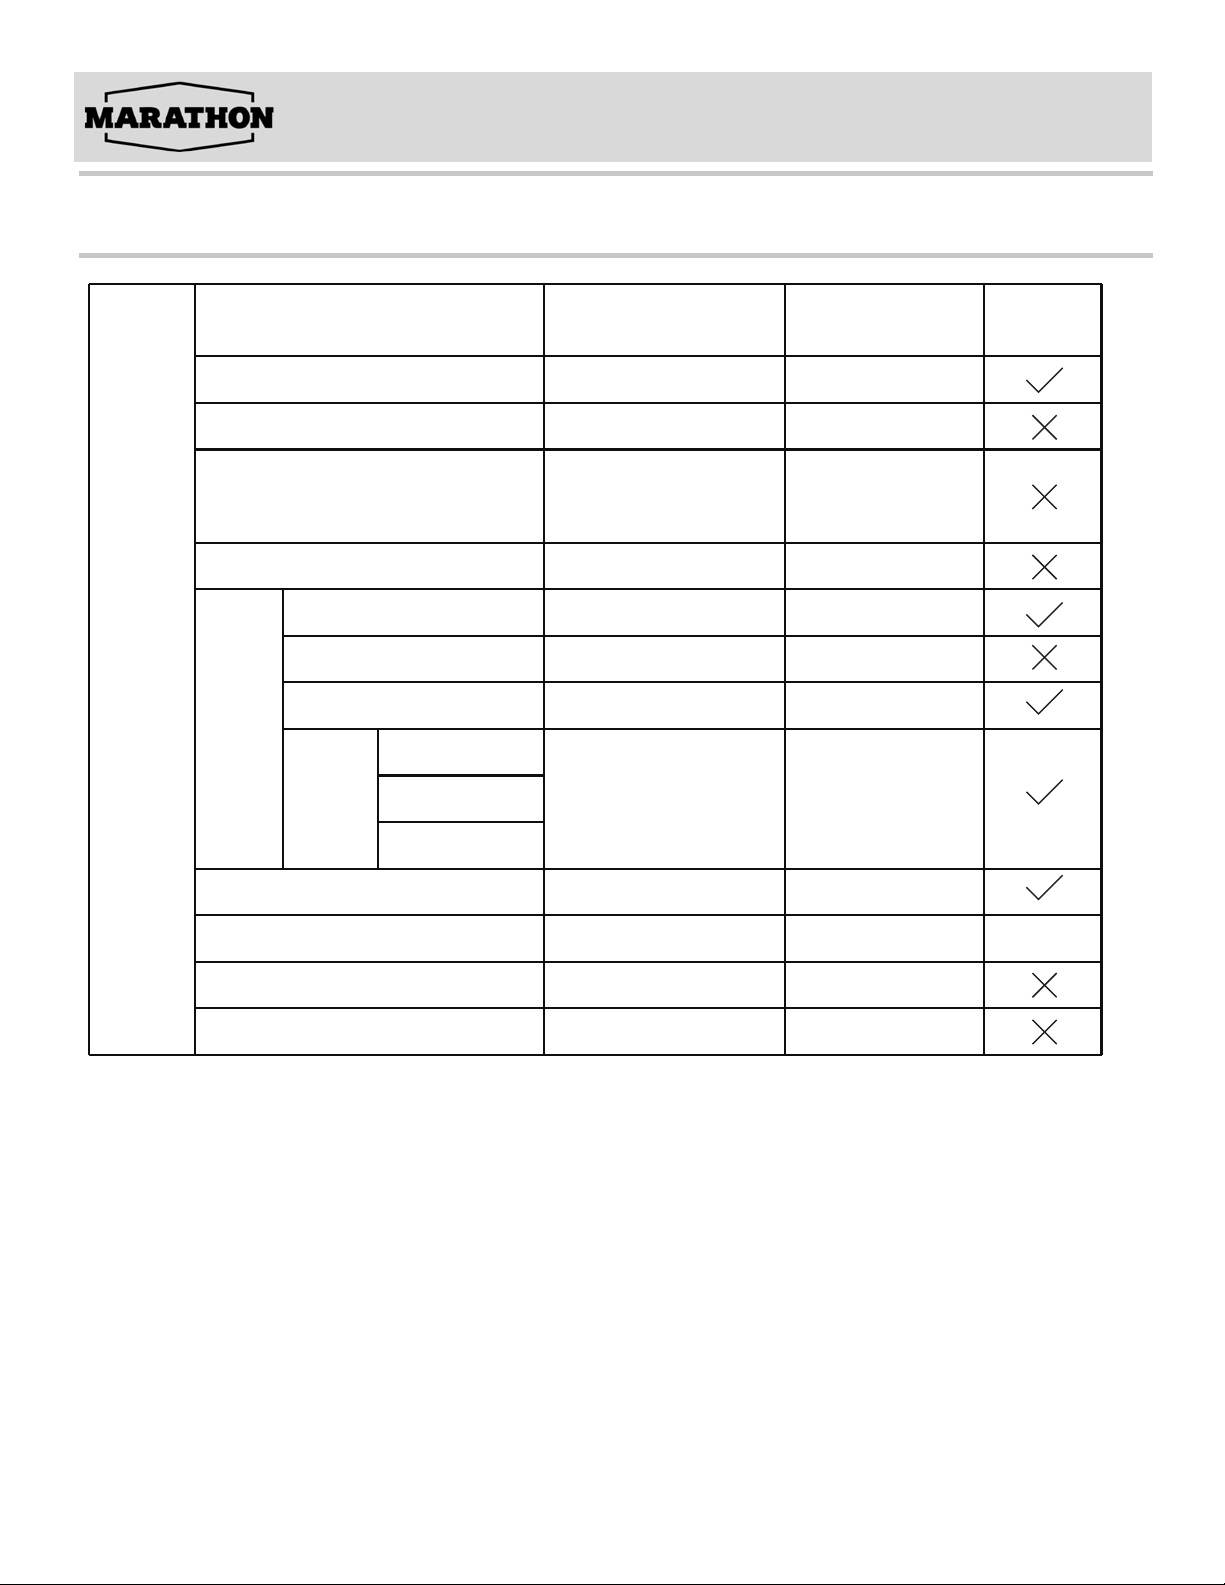
Functional Operation
Oven
Operating Mode
Bake 350
Proof (Press for 3 seconds
in Warm Mode temp)
Warm
Convect bake
Convect broil
Conv
Convect roast
1. Meats
Easy
convect
2. Baked goods
3. Others
Default temperature
(°F)
HiBroil
100
140
325
450
325
350
Adjustable
range
170-550
Hi Lo
80-120
140-210
170-500
170-550
170-550
170-500
Preheat
phase
Air Fry
Self clean
Steam clean
420
No
300-450
Core up to 806°F
(430°C)
//
Note:
• The preheating stage indicates whether real-time display of temperature is required.
• There is a preheating stage: When the actual oven core temperature is less than 170°F, the interface displays Lo.
• When the actual core temperature of the oven is greater than or equal to 170°F, the interface displays the
temperature in real time.
• When the actual oven core temperature reaches the set value, the interface always displays the set temperature
value.
• Non-preheating stage: the set temperature value is always displayed on the heating interface of the oven from the
beginning.
Page 13
Operating the Range
Cooking Settings
1) Select the required baking function, touch the button on the display screen, the interface will light up the
function options, and the default temperature and default time will appear on the display panel.
2) Click ''Start'' to Start the operation. When the actual temperature of the furnace core is lower than 170°F, the
the display screen will display "Lo". When the actual temperature of the furnace core is higher than 170°F, the
interface needs to display the current temperature in real time. When the core temperature has reached the
set value, the interface will always show that the set value no longer changes in real time.
3) To set the temperature, you can modify the temperature by touching the corresponding digital button. The
number changes from right to left in turn. If it exceeds the allowed setting range, an invalid sound "didi" will be
emitted when touching the Start button.
4) Set the working time, touch cook time, the time digital tube display --:--, and blink, touch the number key, the
displayed numbers change from right to left, run the setting range (0:00-11:59), if you do not set this parameter,
the oven default 2 hours; If the value exceeds the allowed setting range, the next operation is not allowed, and
the system makes two invalid beeps. After the Cook time is set, the system prompts you to enter Delay Start
or touch start to start the operation.
5) To set the appointment function, touch Delay start to set the appointment. The default time is the current
clock time. Delay start indicates when the oven starts to work. After setting, touch the Start button, and the
screen will start the countdown of reservation. If the countdown time exceeds 1 hour, the screen will display in
the form of hour/minute. If the countdown time is less than 1 hour, the display is displayed in the form of
minutes per second.
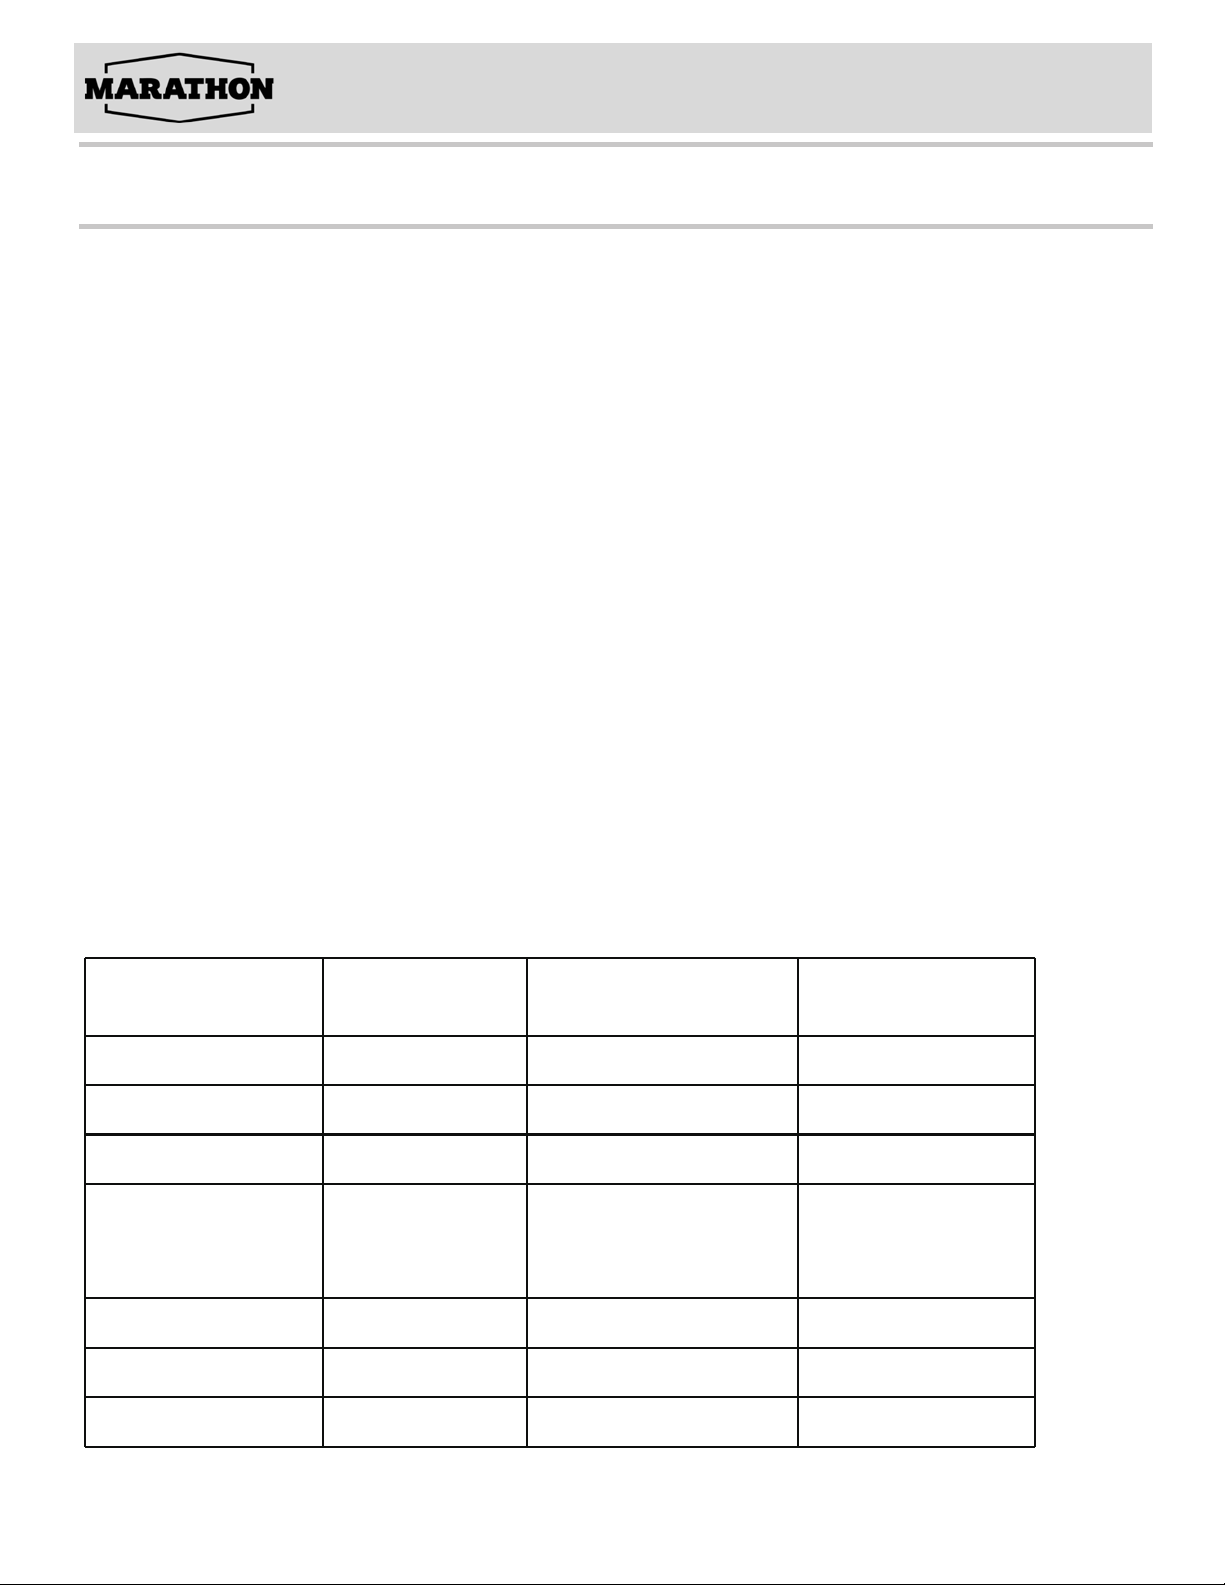
Settings Function
To access the settings function, press the Settings button on the switch panel. There are
seven Settings. You can press the Settings button repeatedly to select the Settings
Parameter that can
be set
Clock
Temp unit
Sound
Calibration
Touch Settings
repeatedly
Touch one
Touch twice
Touch three Press1:On/Off On
Touch four
Configurable content Default
Start = Set
Press 1:Degree F/C
Press1 to change mode
Then Press3 to increase
Press6 to decrease
12:00PM
F
00°F (-30°F - 30°F)
Demo mode Touch five
12/24 H Touch six
Sabbath
Touch seven
Press1:On/Off
Press1:12 H/24 H
Press1:On/Off
Off
12 H
Off
Page 14

Operating the Range
Other Settings
Setting the Time Clock:
Touch the Settings once to enter the clock setting. By default, the current time is 12:00
At this time, you can enter the required time, for example, 11:00, you can touch 1, 1, 0, 0, the original time
number first zero, --:--, and then the number changes from right to left, press the start key to save the current
data and exit, or directly cancel not saving the current data and exit.
Setting Temperature Unit
Press the Settings button twice. The interface displays the default unit to set the temperature unit. The
default unit is Fahrenheit.
Sound Settings
Sound is used to control whether or not the buttons sound, but the work tone is always present. Press the
Settings button three times. The current sound status is displayed in the middle of the screen. On indicates
that sound is enabled, and Off indicates that sound is disabled. You can switch by touching the number key
1. Touch the Start key to confirm exit
Demo mode:
This parameter is set to facilitate users to enter the demonstration mode and perform operations on the
interface in any mode. However, heating components such as the electric heat pipe are not enabled. The
default value is OFF. Press the Settings key 5 times to enter the demo, then press the number key 1 to
switch. Touch the Start key to confirm exit
Child Lock Function
1. When oven is in standby, Push and Hold Start button for 3 seconds to lock Control Panel. A lock symbol
will appear.This will only allow function of the start button.
2. When the oven is “ON” Push and hold the Start button for 3 seconds to lock the control panel. A lock
symbol will appear.
3. To unlock the control panel at any time, Push and hold the Start button for 3 seconds and the lock symbol
will disappear.
Page 15

Operating the Range
Timer Function
1) Touch the timer button on the numeric keypad to enter the timer settings as shown below:
• The longest time allowed to set a timer is for 12 hours.
• If the timer is set to less than 1 hour, then the display will show as (minutes: seconds)
• If the timer is set to more than 1 hour, then the display will show as (hours: minutes)
• For example, when setting the timer for 30 minutes, you can touch ‘3’ and ‘0’ on the numeric
keypad, after setting you can touch the ‘timer’ key to confirm and it will begin to count down
• In a standby state, the timer is on the digital tube of the display screen
• In a running state, the timer countdown is not displayed, only the timer icon is displayed
• At the end of the countdown, the buzzer will ring and the timer symbol blinks 00:00, at this time you
can touch any key to cancel the timer
• If there is no touch, the buzzer will stop after 1 minute and the timer icon & 00:00 will stop blinking
and disappear
2) To cancel the timer at any time, just touch the ‘'timer'’ key
Error alarm message
Anormal Temperature Sensor: ERR1
In any state, if the temperature sensor is open or short, the oven will give an alarm and display ERR1
Page 16

Operating the Range
Cooktop Use
The ceramic cooking area will glow red when a heating element is on. Some parts of the cooktop may not
glow red when an element is on. This is normal. The cooking area cycles off and on, even when set to HI,
to keep the cooktop glass from overheating. It is normal for the surface of ceramic glass to appear to
change color when surface cooking areas are hot. As the glass cools, it will return to its original color.
IMPORTANT: To avoid permanent damage from pitting or scratching, and to keep the cooktop surface in
good condition, clean the cooktop after each use. Ceramic glass cooktop cleaner and a cooktop scraper
are also recommended for stubborn soils. Do not use abrasive cleaners, cleaning pads or harsh chemicals
for cleaning. All of the items to clean and condition your ceramic glass cooktop are available at most
grocery stores. See the “Range Care” section for additional information.
• Make sure the bottoms of pots and pans are clean and dry before using them. Residue and water can
leave deposits when heated.
• Avoid storing jars or cans above the cooktop. Dropping a heavy or hard object onto the cooktop could
crack the cooktop.
• To avoid damage to the cooktop, do not leave a hot lid on the cooktop. As the cooktop cools, air can
become trapped between the lid and the cooktop, and the ceramic glass could break when the lid is
removed.
• For foods containing sugar in any form, clean up all spills as soon a possible. If sugary spills are
allowed to cool down, they can adhere to the cooktop and can cause pitting and permanent marks.
• Remove the spill using a scraper while the surface is still warm.
• To avoid scratches, do not slide cookware or bakeware across the cook-top. Aluminum or copper
bottoms and rough finishes on cookware or bakeware could leave scratches or marks on the cooktop.
• To avoid damage to the cooktop, do not allow objects that could melt, such as plastic or aluminum foil,
to touch any part of the entire cooktop.
• To avoid damage to the cooktop, do not use the cooktop as a cutting board.
• To avoid damage to the cooktop, do not cook foods directly on the cooktop.
Page 17

Operating the Range
Cooktop use
BEFORE USE
1) If present, remove all packing and literature from the cooktop surface.
2) Clean your glass top. A thorough cleaning with a glass top cleaner is recommended. It only takes
a minute and puts a clean, shiny coating on the glass top before its initial use.
3) Place a saucepan of water on each of the front burners and turn them on HI heat for at least 30
minutes. Turn off the front burners.
4) Place a saucepan of water on each of the rear burners and turn them on HI heat for at least 30
minutes. Turn off the rear burners.
NOTES:
• This procedure evaporates any protective oils and humidity collected during the manufacturing
process, and enables the electronic control circuits to cooperate properly.
• There may be a slight odor during the first several uses: this is normal and will disspipate.
• The cooking surface will hold the heat and remain hot over 20 minutes after the elements have
been turned off.
HEATING ELEMENTS
NOTES:
• For fastest boiling with pots 10" (25.4 cm) and larger, use the Even-Heat ™ (Triple-ring) element with
all elements set to “HI.”
• For best low heat performance with pans 10" (25.4 cm) and large , use the Dual-Size element set to
“Single Lo.”
• For best melting performance with small pans, use the Even-Heat element.
HOT SURF ACE INDICATOR LIGHT are located on the glass cooktop... The Hot Surface Indicator Lights
will glow as long as any cooking area is too hot to touch, even after the surface cooking area is turned
off.
DUAL-RING COOKING ELEMENT offer the flexibility to use larger cookware.
• Single-size elements can be used in the same way as a regular element
• The dual-size combines both the single and outer element and is recom-mended for larger size
cookware.
Page 18

Operating the Range
Cooktop use
CONTROL KNOBS
The control knobs turn in either direction and from any position to the desired temperature setting or to OFF.
NOTES:
Once the element is turned Off, the Hot Surface indicator light will remain illuminated until the surface
temperature of the element has cooled.The placement of each knob corresponds to the placement of the
heating element that it controls. To Turn On Any Heating Element: PUSH DOWN on the knob and TURN in
either direction to desired heat setting.
TRIPLE-RING ELEMENT
• The High heat option can be used to boil small amounts of liquid quickly. To reduce the power setting, turn
the knob clockwise.
• The Melt setting is designed for delicate foods that require low heat, such as when melting chocolate or
holding sauces. Use cookware appropriate in size for the triple-ring Element.
Page 19

Operating the Range
Cooktop use
WARMING ZONE ELEMENT
• Use the Warming Zone element to keep cooked foods warm. One hour is the recommended maximum time
recommended to maintain food quality.
• Do not use the Warming Zone element to heat cold foods.
• The Warming Zone element can be used alone or when any of the other surface cooking areas are being
used.
• The Warming Zone element area will not glow red when cycling on. However, the hot surface indicator will
glow while the Warming Zone element is in use.
• Use only cookware recommended for cooktop use
• Cover all foods with a lid or aluminum foil. When warming baked good allow a small opening in the cover for
moisture to escape.
• Do not use plastic wrap to cover food because the plastic wrap may melt
• Use pot holders to remove food
Page 20

Operating the oven
Oven Modes
This multi-function oven combines the functions of traditional oven modes with the functions of modern,
fan-assisted convection modes in a single oven. Use the Cooking Mode control, located on the control
panel, to select the oven mode.
IMPORTANT: During any cycle, the heating elements will turn off when the oven door is opened, and stay
off until the door is closed. To maintain oven temperature, limit door openings during cooking.
OVEN RACKS
The oven racks can be placed in any of the six height positions within the oven.
Oven racks have a stop to keep them from being unintentionally withdrawn fully.
BAKE
Baking is cooking with heated air. Both upper and lower elements in the oven are
used to heat the air, but the fan is used only during preheating.
Follow the recipe for baking temperature, time and rack position. Baking time will vary with the
temperature of ingredients and the size, shape and finish of the baking utensil.
The temperature can be set from 170°F (77°C) to 500°F (260°C).
1. Close the oven door.
NOTE: The oven controls cannot be set if the oven door is open.
2. Press BAKE. “BAKE” will appear in the display, and 350°F (177°C) will be displayed. “Set temp or
Press START” will appear in the text area.
3. Press START, if you wish to bake at 350°F (177°C).
OR
6
5
4
3
2
1
Enter the desired temperature by pressing the number keypad, and then press START. The
temperature can be set from 170°F (77°C) to 500°F (260°C).
NOTES:
• The temperature may be changed at any time during cooking. Press CANCEL to clear the settings.
Select oven mode, then enter the desired temperature by pressing the number keypad, and then
press START.
• After selecting an Oven Mode and Temperature, you have the option to set a Cook Time and Start
Time before pressing START. See “Cook Time” and
“Start Time.”
4. Once START has been pressed, the oven will begin to preheat. When the oven has reached the set
temperature, a tone will sound.
NOTE: If a Start Time was set, the oven will turn on at the set time.
5. Place the food in the oven and close the oven door when preheat is complete.
6. Press CANCEL when finished cooking, and remove food from the oven.
NOTE: If you used Cook Time or Start Time to set a cook time, the oven will turn off automatically.
Page 21

Operating the oven
Oven Modes
BROIL
Broiling uses direct radiant heat to cook food. The lower the temperature, the slower the cooking. Thicker
cuts and unevenly shaped pieces of meat, fish and poultry may cook better at lower broiling temperatures.
NOTES:
• Before broiling, position rack according to the Broiling Chart.
• For best results, use a two-piece broiler pan with a grid (not provided).
It is designed to drain juices which helps to avoid spatter and smoke.
• For proper draining, do not cover the grid with foil. The bottom of the pan may be lined with aluminum
foil for easier cleaning.
• Trim excess fat to reduce spattering. Slit the remaining fat on the edges to avoid curling.
• Select HI Broil 550°F (288°C) for most broiling. Select LO Broil 450°F (232°C for low-temperature
broiling for foods that take longer to cook, such as poultry, to avoid over browning.
• Pull out oven rack to stop position before turning or removing food. Use tongs to turn food to avoid the
loss of juices. Very thin cuts of fish, poultry or meat may not need to be turned.
• After broiling, remove the pan from the oven when removing the food. Drippings will bake on the pan if
left in the heated oven, making cleaning more difficult.
• Position food on grid in the broiler pan, then place it in the center of the oven rack. Close the oven door
and set the control.
TO BROIL
The temperature can be set from 450°F (232°C) to 550°F (288°C).
1. Place the food in the oven, preheating is not necessary.
2. Close the oven door.
3. Press BROIL. “BROIL” and “Set temp or START” and “550ºF” (288ºC) will bedisplayed.
4. Press START, if you wish to broil at 550°F (288°C).
OR
Enter the desired temperature by pressing the number keypad, and then press START. The
temperature can be set from 450°F (232°C) to 550°F (288°C).
NOTES:
• The temperature can be changed at any time during cooking. Press CANCEL to clear the
settings. Select oven mode, then enter the desired temperature by pressing the number keypad,
and then press START.
• After selecting an Oven Mode and Temperature, you have the option to set a Cook Time and
Start Time before pressing START. See “Cook Time” and “Start Time.”
5. BROIL will appear in the display after Start is pressed.
6. When cooking is finished, press CANCEL, and then remove food from the oven.
NOTE: If you used Cook Time or Delay Start to set a cook time, the oven will turn off
automatically
Page 22

Operating the oven
Oven Modes
WARM
The Warm mode keeps hot, cooked foods at serving temperature.
1. Press WARM/PROOF “WARM” and “Set Temp or Press START” and 170°F (78°C) will be displayed.
2. Press START, if you wish to Warm food at 170°F (78°C).
OR
Enter the desired temperature by pressing the number keypad, and then press START. The temperature can
be set from 140°F (60°C) to 210°F (99°C).
3. “WARM” will appear in the display, once Start is pressed.
NOTE:
After selecting an Oven Mode and Temperature, you have the option to set a Cook Time and Start Time
before pressing START. See “Cook Time” and “Start Time.”
4. Place food in the oven and close the door.
5. Press CANCEL when finished, and remove food from the oven.
Page 23

Operating the oven
Oven Modes
P
ROOF
The Proof mode prepares dough for baking by activating the yeast. Follow the recipe directions as a guide.
Before proofing, place the dough in a lightly greased bowl and cover loosely with wax paper, coated with shortening.
1. Place on second rack from the bottom and close the oven door.
2. Press WARM/PROOF, and hold for 3 seconds and then press PROOF on the menu screen. “PROOF”
and “Set Temp or Press START,” and 100°F (38°C) will be displayed.
3. Press START, if you wish to Proof dough at 100°F (38°C).
OR
Enter the desired temperature by pressing the number keypad, and then press START.The temperature
can be set from 80°F (27°C) to 120°F (49°C).
4. “PROOF” will appear in the display, once Start is pressed.
NOTE: After selecting an Oven Mode and Temperature, you have the option to set a Cook Time and
Time before pressing START. See “Cook Time” and “Start Time.”
Start
5. Let the dough rise until nearly doubled in size, checking after 20-25 minutes. Proofing time may vary
depending on dough type and quantity.
6. Press CANCEL when finished.
7. Before second proofing, shape the dough, place it in baking pan(s) and cover loosely with plastic wrap,
coated with cooking spray. Follow the same placement and control steps above. Before baking, remove
the plastic wrap.
Page 24
Operating the oven
CONVECTION
During convection cooking, the fan provides hot air circulation throughout the oven. The movement of
heated air around the food can help to speed up cooking by penetrating the cooler outer surfaces. Food
cooks more evenly, browning and crisping outer surfaces while sealing moisture inside.
When the oven is set to the Convection function, the ring element, bake and broil elements, and the fan will
operate to heat the oven cavity. The fan and the elements will turn off automatically when the door is open.
Once the door is closed, the element(s) will automatically turn on.
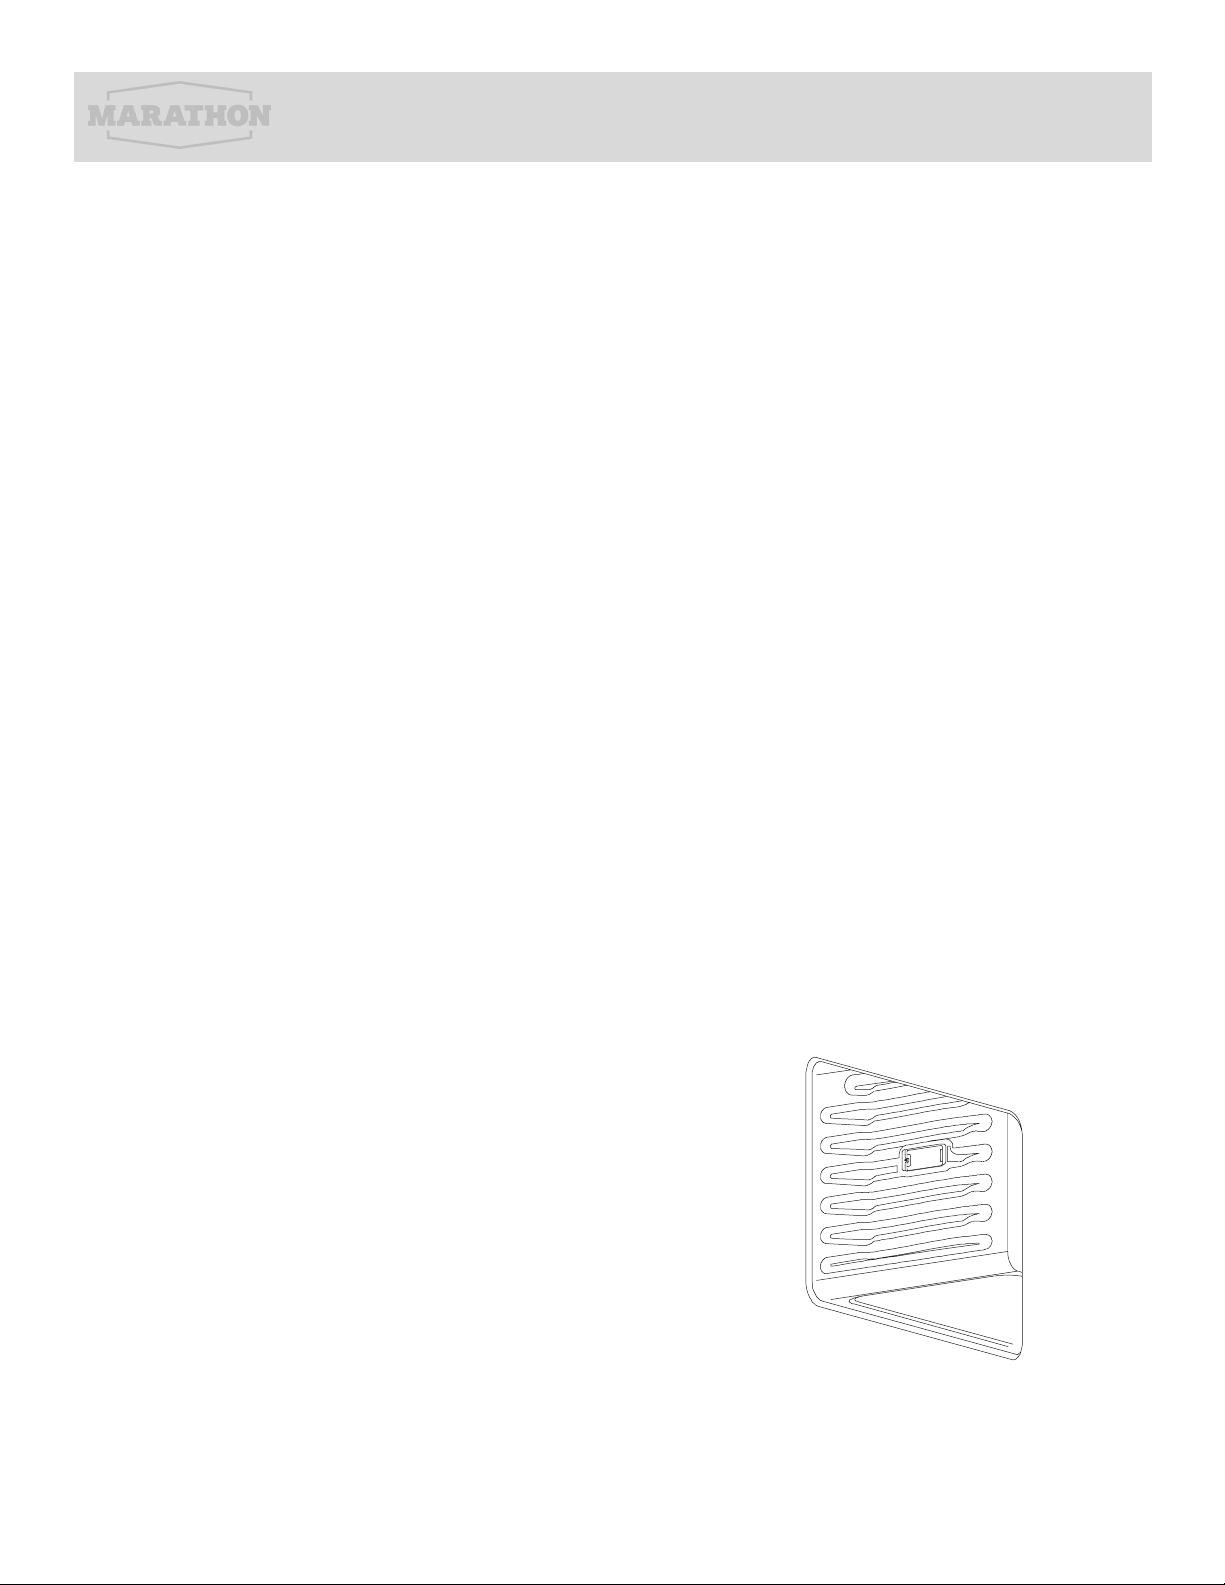
CONVECTION FAN
The convection fan operates during any convection mode. When the oven is operating in convection mode, the
fan will turn off automatically when the door is opened. The convection fan may run in non-convection modes
during the preheat time.
CONVECTION BAKE
• Use Convection Bake for single or multiple rack baking. Reduce standard recipe baking temperature by
25°F (15°C).
• For best results, foods should be cooked uncovered, in low-sided pans to take advantage of the forced
air circulation. Use shiny aluminum pans for best results unless otherwise specified.
• Heatproof glass or ceramic can be used. Reduce temperature by another 25°F (15°C) when using
heatproof glass dishes for a total reduction of 50°F (30°C).
• Dark metal pans may be used. Note that food may brown faster when using dark metal bake ware.
• The number of racks used is determined by the height of the food to be cooked.
• Baked items, for the most part, cook extremely well in convection. Don’t try to convert recipes such as
custards, quiches, pumpkin pie, or cheesecakes, which do not benefit from the convection-heating
process. Use the regular Bake mode for these foods.
• Multiple rack cooking for oven meals is done on rack positions 1, 2, 3 , 4 and 5. All five positions can be
used for cookies, biscuits and appetizers.
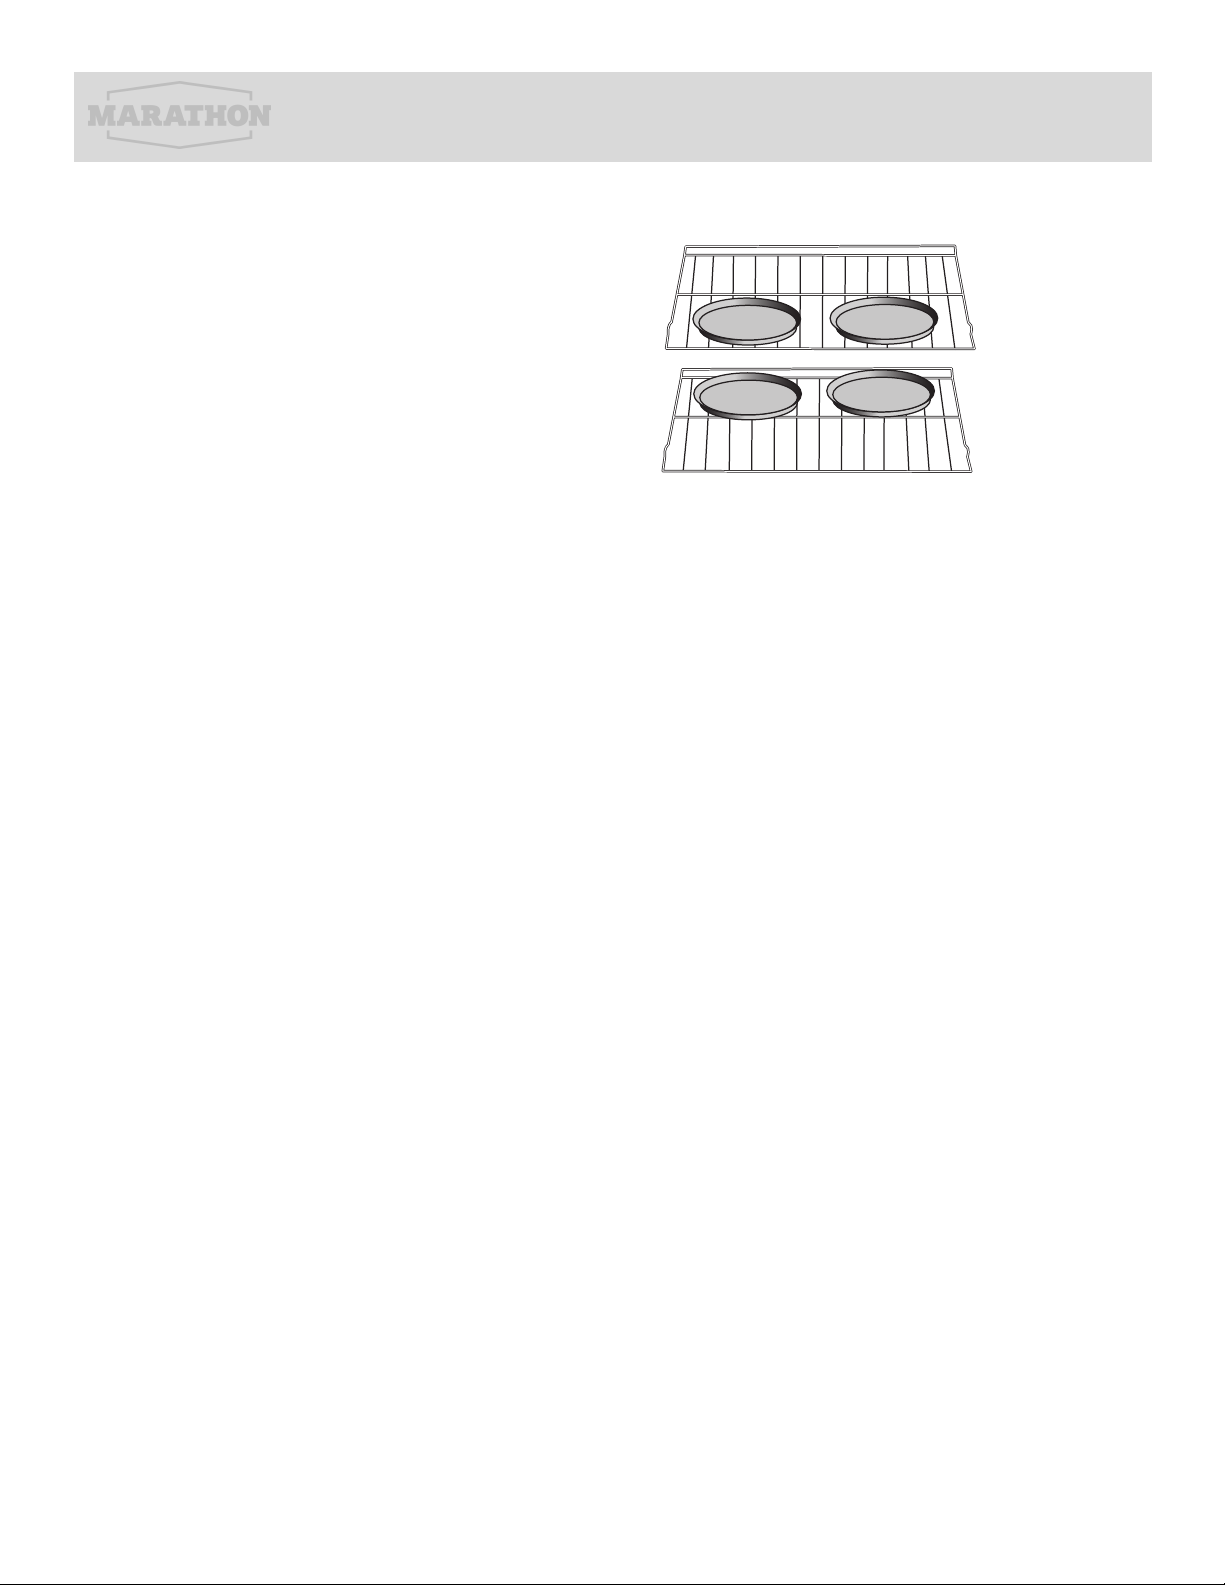
• 2 Rack baking: Use positions 1 and 3.
• 3 rack baking: Use positions 2, 3 and 4 or 1, 3 and 5.
6
5
4
3
2
1
Page 25
Operating the oven
• When baking four cake layers at the same time,
stagger pans so that one pan is not directly
above another. For best results, place cakes on
front of upper rack and back of lower rack. Allow
1" - 1½" (2.5 -4 cm) air space around pans.
To Set Convection Bake:
1. Press Convection BAKE once. “Set Temp or Press START” and 325°F (162°C) will be displayed.
2. Press START If you wish to convection bake at 325°F (162°C).
OR
Rack 3
Rack 1
Enter the desired temperature by pressing the number keypad, and then press START. The temperature can
be set from 170°F (77°C) to 500°F(260°C).
NOTES:
• To change the set temperature press CANCEL. Press the number keypad to enter the desired
temperature, and then press START.
• After selecting an Oven Mode and Temperature, you have the option to set a Cook Time and Start
Time before pressing START. See “Cook Time” and “Start Time.”
3. The oven will begin preheating once Start is pressed. A tone will sound when the oven is at the set
temperature.
NOTE: There are two preheat modes for Convection Bake. Use ‘Quick Preheating’ when using multiple
racks. It is possible to switch between ‘Quick Preheating’ and ‘Preheating’ by pressing the ‘Quick Preheating’
button during the preheating cycle. .
4. Place the food in the oven and close the oven door when preheat is completed.
5. Press CANCEL when finished, and then remove food from the oven.
NOTE:
If you used Cook Time or Start Time to set a cook time, the oven will turn off automatically.
Page 26

Operating the oven
CONVECTION BROIL
General Guidelines
•
Place rack in the required position needed before turning on the oven.
•
Use Convection Broil mode with the oven door closed.
•
When convection broiling, enter your normal broiling temperature.
•
Do not preheat oven.
•
Use the 2-piece broil pan.
•
Turn meats once halfway through the cooking time. See the Convection Broil chart.
•
Thicker cuts and unevenly shaped pieces of meat, fish and poultry may cook better at lower broiling
temperatures.
To Set Convection Broil:
1. Place the food in the oven and close the oven door.
2. Press Convection BROIL once. “Set Temp or Press Start” and 450°F (232°C) will be displayed.
3. Press START, if you wish to broil at 450°F (232°C).
OR
Enter the desired temperature by pressing the number keypad, and then press START. The
temperature can be set from 170°F (77°C) to 550°F (288°C).
NOTES:
• To change the set temperature press CANCEL. Press the number keypad to enter the desired
temperature, and then press START.
• After selecting an Oven Mode and Temperature, you have the option to set a Cook Time and Start
Time before pressing START. See “Cook Time” and “Start Time.”
4. “Convect Broil” will be displayed, once Start is pressed.
5. Press CANCEL when cooking is finished, and then remove food from the oven.
Page 27

Operating the oven
CONVECTION ROAST
When Convection roasting, enter your normal roasting temperature. The roasting time should be 15-30%
less than in conventional cooking. It is not necessary to preheat the oven for convection roast.
General Guidelines
• Do not preheat for Convection Roast.
• Roast in a low-sided, uncovered pan.
• When roasting whole chickens or turkey, tuck wings behind back and loosely tie legs with kitchen string.
• Use the 2-piece broil pan for roasting uncovered.
• Use a meat thermometer to determine the internal doneness.
• Double-check the internal temperature of meat or poultry by inserting meat thermometer into another
position.
• Large poultry may need to be covered with foil (and pan roasted) during a portion of the roasting time to
prevent over-browning.
• The minimum safe temperature for stuffing in poultry is 165ºF (75ºC). After removing the food from the
oven, cover loosely with foil for 10 to 15 minutes before carving if necessary to increase the final foodstuff
temperature by 5° to 10°F (3° to 6° C).
To Set Convection Roast:
1. Place the food in the oven and close the oven door.
2. Press CONVECTION ROAST once. “Set Temp or Press Start”, and 325°F (163°C) will be displayed.
3. Press START, if you wish to convection roast at 325°F (163°C).
OR
Enter the desired temperature by pressing the number keypad, and then press START. The temperature
can be set from 170°F (77°C) to 500°F (260°C).
NOTES:
• To change the set temperature during cooking, press CANCEL. Press the number keypad to enter
the desired temperature, and then press START.
• After selecting an Oven Mode and Temperature, you have the option to set a Cook Time and Start
Time before pressing START. See “Cook Time” and “Start Time.”
4. Press START. After pressing START, the oven will display ”CONVECT ROAST” while cooking.
5. Press CANCEL when finished, and then remove food from the oven.
NOTE: If you used Cook Time or Start Time to set a cook time, the oven will turn off automatically.
Page 28

Operating the oven
CONVECTION CONVERSION
When using a Convection Recipe, enter your normal cooking temperature and time. The
Convection Conversion mode will adjust the temperature and time for perfect cooking results.
IMPORTANT:
• The oven door must be closed before selecting a Convection Conversion oven mode.
• Setting Cook Time is required for a Convection Conversion oven mode. If Cook Time was not set, the
control will prompt you to Set Cook Time. See “Cook Time.”
NOTE: At the end of the set Cook Time, the oven will turn off automatically, the end of cycle tone will
sound and “Cooking Complete” will appear in the display.
BAKED GOODS
1. Press BAKED GOODS among the Convection Conversion controls.
2. Set the oven temperature.
NOTE: The temperature can be set from 170°F (77°C) to 500°F (260°C).
3. Press START. “Set cooking time” will appear in the display.
4. Press the number keypad to enter the desired cook time. “Press START” will appear in the
display.
NOTE: If a delayed start time is desired, Press START TIME, and then press the number keypad
to enter the desired start time. “Press START” will appear the display. Set Cook Time is
mandatory for the Convection Conversion oven mode. If Cook Time was not set, the control will
prompt you to “Set Cook Time.”
5.
Press START. The oven begins to preheat. Once the set temperature has been reached, a tone
will sound.
NOTE: If the recipe requires the food to be cooked in a preheated oven, add
15 minutes to Cook Time to allow time for the oven to preheat. Once the oven is heated to the set
temperature and the tone sounds, place food in the oven.
6.
At the end of the set Cook Time the oven will turn off automatically, the end of cycle tone will
sound and “Cooking Complete” will appear in the display.
Page 29

Operating the oven
MEATS
IMPORTANT: It is not necessary to preheat the oven for the convection conversion MEAT option.
1. Press MEATS among the Convection Conversion controls.
2. Set the oven temperature.
NOTE: The temperature can be set from 170°F (77°C) to 500°F (260°C).
3. Press START. “Set cooking time” will appear in the display.
4. Press the number keypad to enter the desired cook time. “Press START” will appear in the display.
NOTE: Set Cooking Time is mandatory for the Convection Conversion oven mode.
5. At the end of the set Cook Time the oven will turn off automatically, the end of cycle tone will sound
and “Cooking Complete” will appear in the display.
OTHER FOODS
1. Press OTHER FOODS among the Convection Conversion controls.
2. Set the oven temperature.
NOTE: The temperature can be set from 170°F (77°C) to 500°F (260°C).
3. Press START. “Set cooking time” will appear in the display.
4. Press the number keypad to enter the desired cook time. “Press START” will appear in the display.
NOTE: If a delayed start time is desired, Press DELAY START, and then press the number keypad
to enter the time-of-day you want the oven to turn on. “Press START” will appear the display. Set
Cook Time is mandatory for the Convection Conversion oven mode. If Cook Time was not set, the
control will prompt you to Set Cook Time.
5. Once START has been pressed, the oven begins to preheat. Once the set temperature has been
reached, a tone will sound.
NOTE: If the recipe requires the food to be cooked in a preheated oven, add
15 minutes to Cook Time to allow time for the oven to preheat. Once the oven is heated to the set
temperature and the tone sounds, place food in the oven.
6. At the end of the set Cook Time the oven will turn off automatically, the end of cycle tone will sound
and “Cooking Complete” will appear in the display.
Page 30

Care and Maintenance
Cleaning
Sparkling results in only three steps:
1
To thoroughly clean your glass-ceramic cooktop, first remove dirt and food with a suitable metal scraper.
2
Once the glass-ceramic cooktop has cooled, put a few drops of a suitable cleaner on it and rub it on
with a paper tow
3
Then wipe the glass-ceramic cooktop with a damp cloth and dry it with a clean cloth.
IMPORTANT: To avoid damaging the cooktop, do not use steel wool, abrasive powder cleansers,
chlorine bleach, rust remover or ammonia. Ceramic cooktop cleaning materials: cooktop cleaner,
cooktop scraper and cooktop cleaning pads are available at most grocery stores.
Page 31
Care and Maintenance
CLEANING
IMPORTANT: Before cleaning, make sure all controls are turned off, and the oven and cooktop are
cool. Always follow label instructions on cleaning products. It is recommended that you first use soap,
water and a soft cloth or sponge unless otherwise noted. Do not use abrasive cleaning products.
EXTERIOR STAINLESS STEEL
Cleaning Methods:
• Liquid detergent or all-purpose cleaner: Rinse well with clean water and dry with soft, lint-free cloth.
• Stainless Steel Cleaner and Polish
• Vinegar for hard water spots
NOTE: Do not use soap-filled scouring pads, abrasive cleaners, cooktop polishing cream, steel-wool pads,
gritty washcloths or some paper towels. Damage may occur, even with one-time or limited use. Rub in
direction of grain to avoid damaging.
OVEN DOOR EXTERIOR
Cleaning Method:
Glass cleaner and paper towels or nonabrasive plastic scrubbing pad: Apply glass cleaner to soft cloth or
sponge, not directly on panel.
OVEN CAVITY
Food spills should be cleaned when oven cools. At high temperatures, foods react with porcelain, so
staining, etching, pitting or faint white spots can result.
Cleaning Method:
Mild detergent and warm water.
DO NOT line the oven walls or oven bottom or racks with aluminum foil
Page 32

Care and Maintenance
OVEN SELF-CLEANING
The Self-Cleaning cycle uses very high temperatures, burning soil to a powdery ash.
IMPORTANT: The health of some birds is extremely sensitive to the fumes given off during the SelfCleaning cycle. Exposure to the fumes may result in death to certain birds. Always move birds to another
closed and well-ventilated room.
NOTES:
• Self-clean the oven before it becomes heavily soiled. Heavy soil results in longer cleaning and more
smoke.
• Keep the kitchen well-ventilated during the Self-Cleaning cycle to help get rid of heat, odors, and
smoke.
• Do not clean, rub, damage or move the oven gasket. The door gasket is essential for a good seal.
• Allow the oven to cool to room temperature before using the Self- Clean feature. If your oven cavity is
above 170°F (77°C), “Oven Cooling” will appear in the display and the Self-Clean cycle will not activate
until it cools down.
• The oven light will not work during the Self-Cleaning cycle. On some models, the surface elements will
not work during the Self-Cleaning cycle.
• When “LOCK” shows in the display, the oven door cannot be opened. To avoid damage to the door, do
not force the door open when “LOCK” is displayed.
Prepare Oven:
• Remove the broiler pan, cookware and bakeware and, on some models, the temperature probe from
the oven.
• Remove oven racks to keep them shiny and easy to slide. See “General Cleaning” section for more
information.
• Remove any foil from the oven because it may burn or melt, damaging the oven.
• Hand clean inside door edge and the 1½" (3.8 cm) area around the inside oven cavity frame, being
certain not to move or bend the gasket. This area does not get hot enough during self-cleaning to
remove soil. Do not let water, cleaner, etc., enter slots on door frame. Use a damp cloth to clean this
area.
• Wipe out any loose soil to reduce smoke and avoid damage. At high temperatures, foods react with
porcelain. Staining, etching, pitting or faint white spots can result. This will not affect cooking
performance.
Page 33

Care and Maintenance
To Self-Clean:
NOTE: Removing racks prior to self-cleaning mode
The oven is preset for a 2.5 hour Cleaning cycle; however, the Cleaning time can be adjusted.
Suggested cleaning times are:
2 Hours - Light soil
3.0 Hours - Average soil
3.5 Hours - Heavy soil.
1. Close the oven door.
NOTE: If an oven door is left open, “Door Open Clean Canceled” will appear in the display and a
tone will sound.
2. Press SELF CLEAN three times to cycle through the levels
“Select Level” and “Press 1. Level 1 (Quick) 2. Level 2, 3. Level 3, will scroll in the display text
area.
3. Enter the desired Clean level by pressing the number keypad, and then press START.
NOTE: The oven door will lock. “SELF CLEAN” will appear in the display panel until the clean
cycle is finished.
When the self-clean cycle ends:
“COMPLETE” appears in the display and the oven door unlocks.
4. Open the oven door. Once the oven has completely cooled, remove ash with a damp cloth.
NOTE: To avoid breaking the glass, do not apply a cool, damp cloth to the inner door glass
before it has cooled completely.
Page 34
Care and Maintenance
To Delay Start Self-Clean:
1. Press START TIME.
2. “--:--” will be displayed, and “Set time to delay. Then Press START” will scroll from right to left in
the selected oven text area. Enter the time-of-day that you want oven cleaning to begin, by
pressing the number keypad.
3. Press START. “Select cooking/cleaning mode” will scroll in the selected oven text area.
4. Press SELF CLEAN. “Remove Racks” will scroll in the selected oven text area for 5 seconds,
followed by “Select Option.”
5. “Select Level” and “Press 1. Level 1 (Quick) 2. Level 2, 3. Level 3, 4. Level 4 (reg),
5. Level 5, 6. Level 6 (Maxi)” will scroll in the display text area.
6. Enter the desired Clean level by pressing the corresponding number on the keypad.
7. Press START. The cleaning cycle will begin when the Start Time is reached.
When the self-clean cycle ends:
“COMPLETE” appears in the display and the oven door unlocks.
8. Open the oven door. Once the oven has completely cooled, remove ash with a damp cloth.
NOTE:
To avoid breaking the glass, do not apply a cool, damp cloth to the inner door glass before it
has completely cooled.
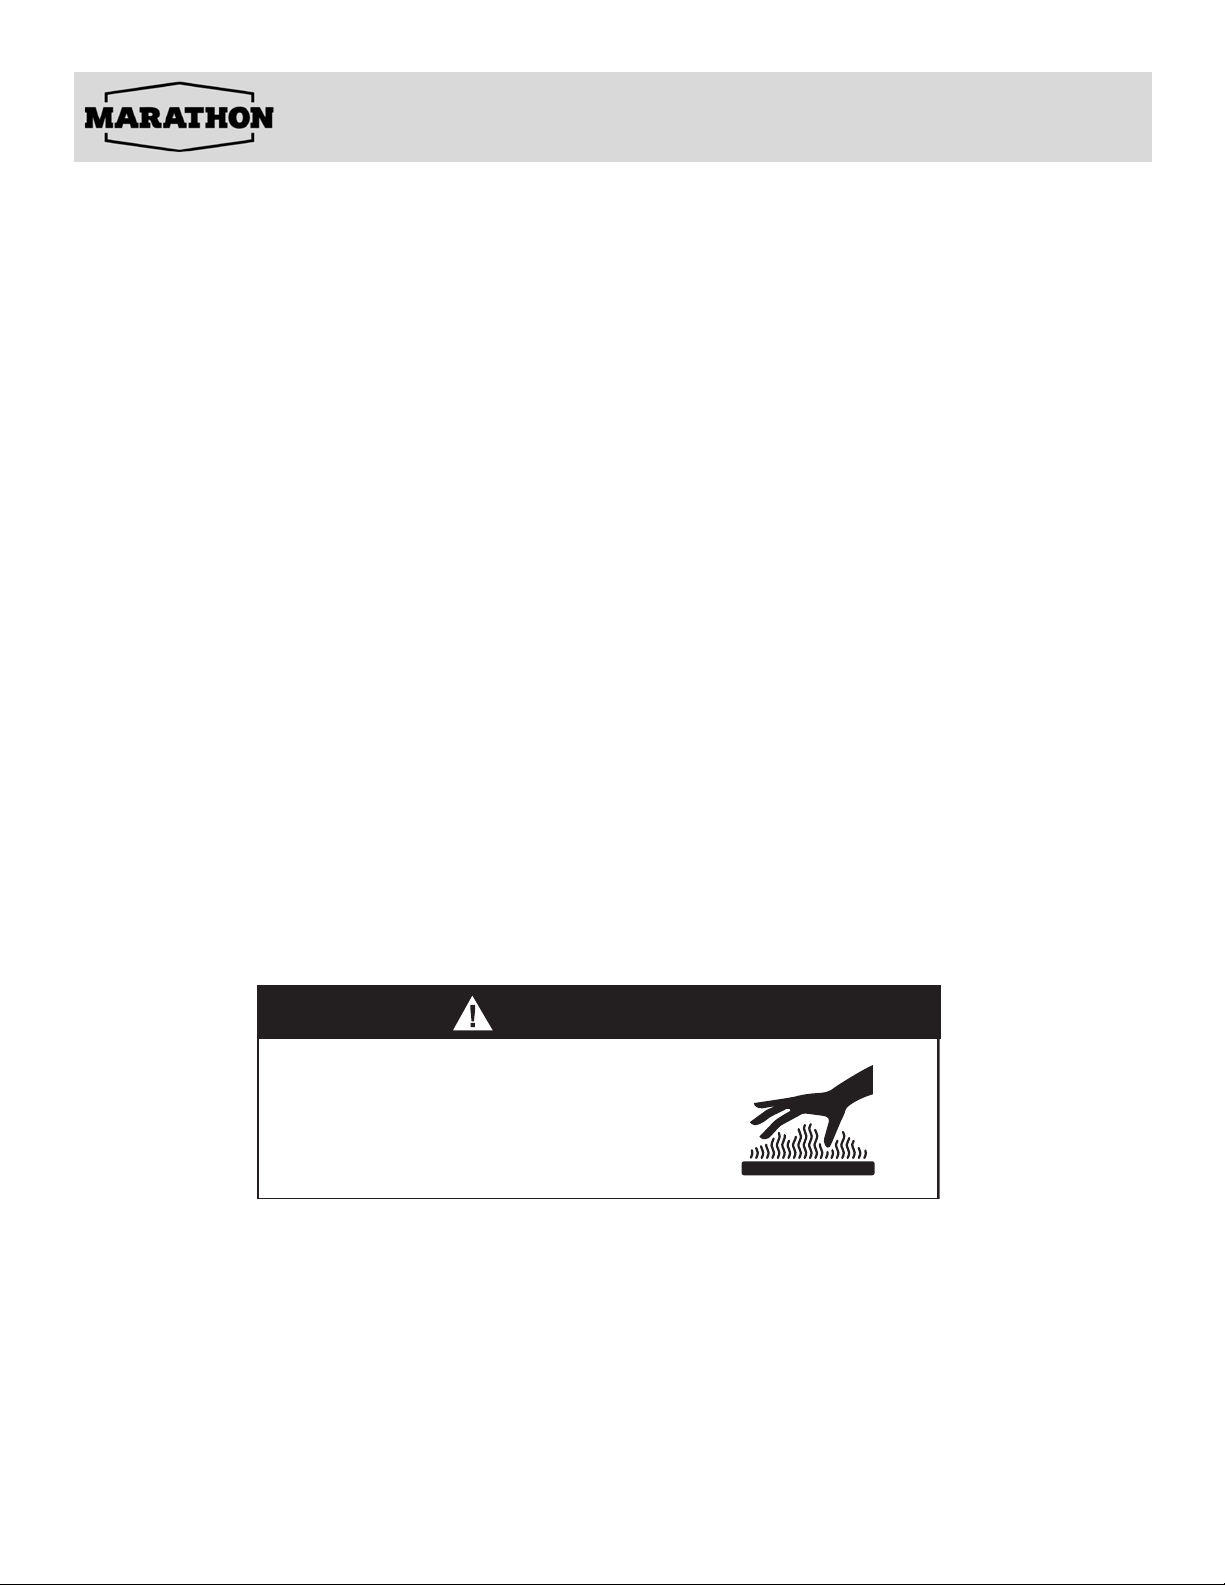
WARNING
Burn Hazard
Do not touch the oven during the Self-Cleaning cycle.
Keep children away from oven during Self-Cleaning cycle.
Failure to do so can result in burns.
Page 35
Care and Maintenance
Oven Door Removal
For normal oven use, there is no need to remove the oven door. However, should it become necessary to remove the
door, follow the instructions in this section.
IMPORTANT:
• Easier to complete with 2 people as door is heavy.
• Make sure oven is cool and power to the oven has been turned off before removing the door.
• The oven door is heavy and fragile. Use both hands, and grasp only the sides of the oven door to remove.
• Be sure that both levers are securely in place before removing the door.
• Do not force door open or closed.
• Recommend opening the warming drawer slightly
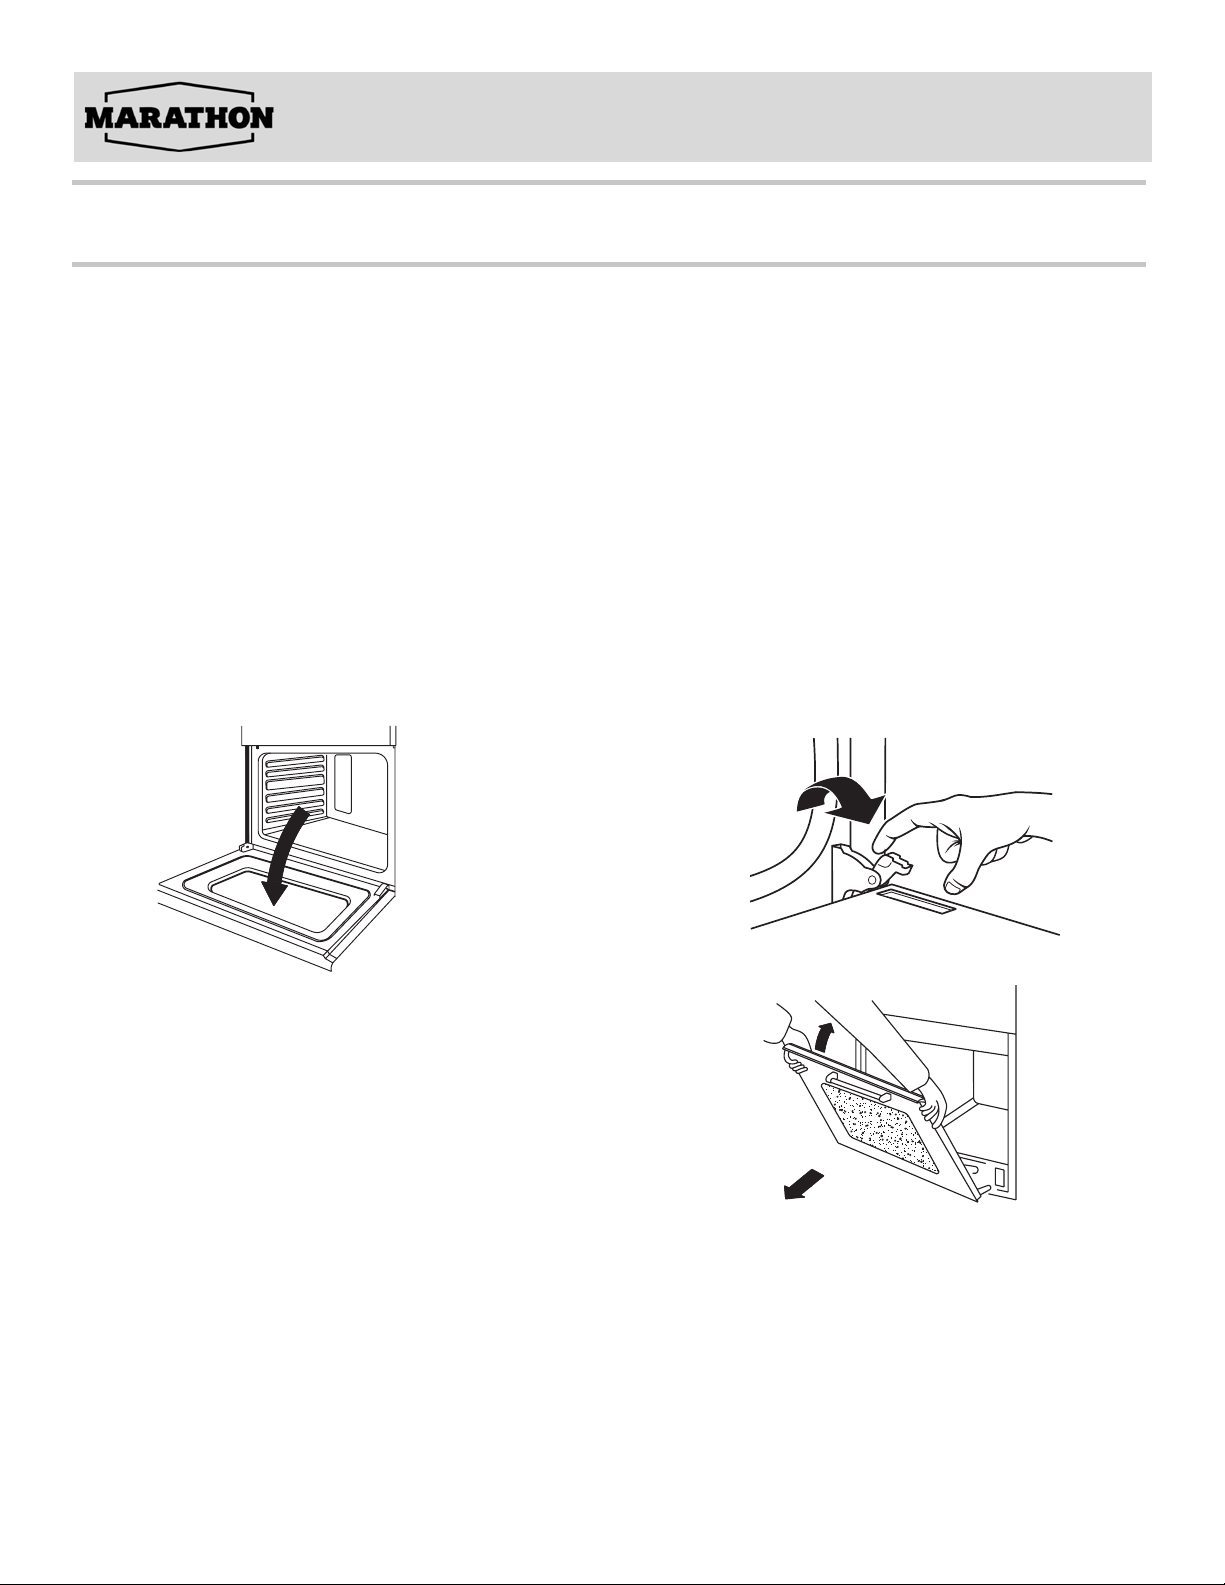
To remove the oven door:
1. Open the oven door completely.
2. Lift up the hinge latch on each side.
3.
4.
5.
Close the oven door as far as it will shut.
While grasping both outside edges of the oven door,
lift up on the door.
Continue to push the top of the door closed, while pulling
the bottom of the door out of the hinge receivers in the
door frame.
To replace the oven door:
Insert both hanger arms into the hinge receivers in the door frame.
1.
2.
Slowly open the oven door, and you will feel the door set into place.
3.
Move the hinge latches back into the locked position.
Check that the door opens and closes freely. If it does not, repeat the door
4.
removal and replacement procedures.
Page 36
Care and Maintenance
Replacing an Oven Light
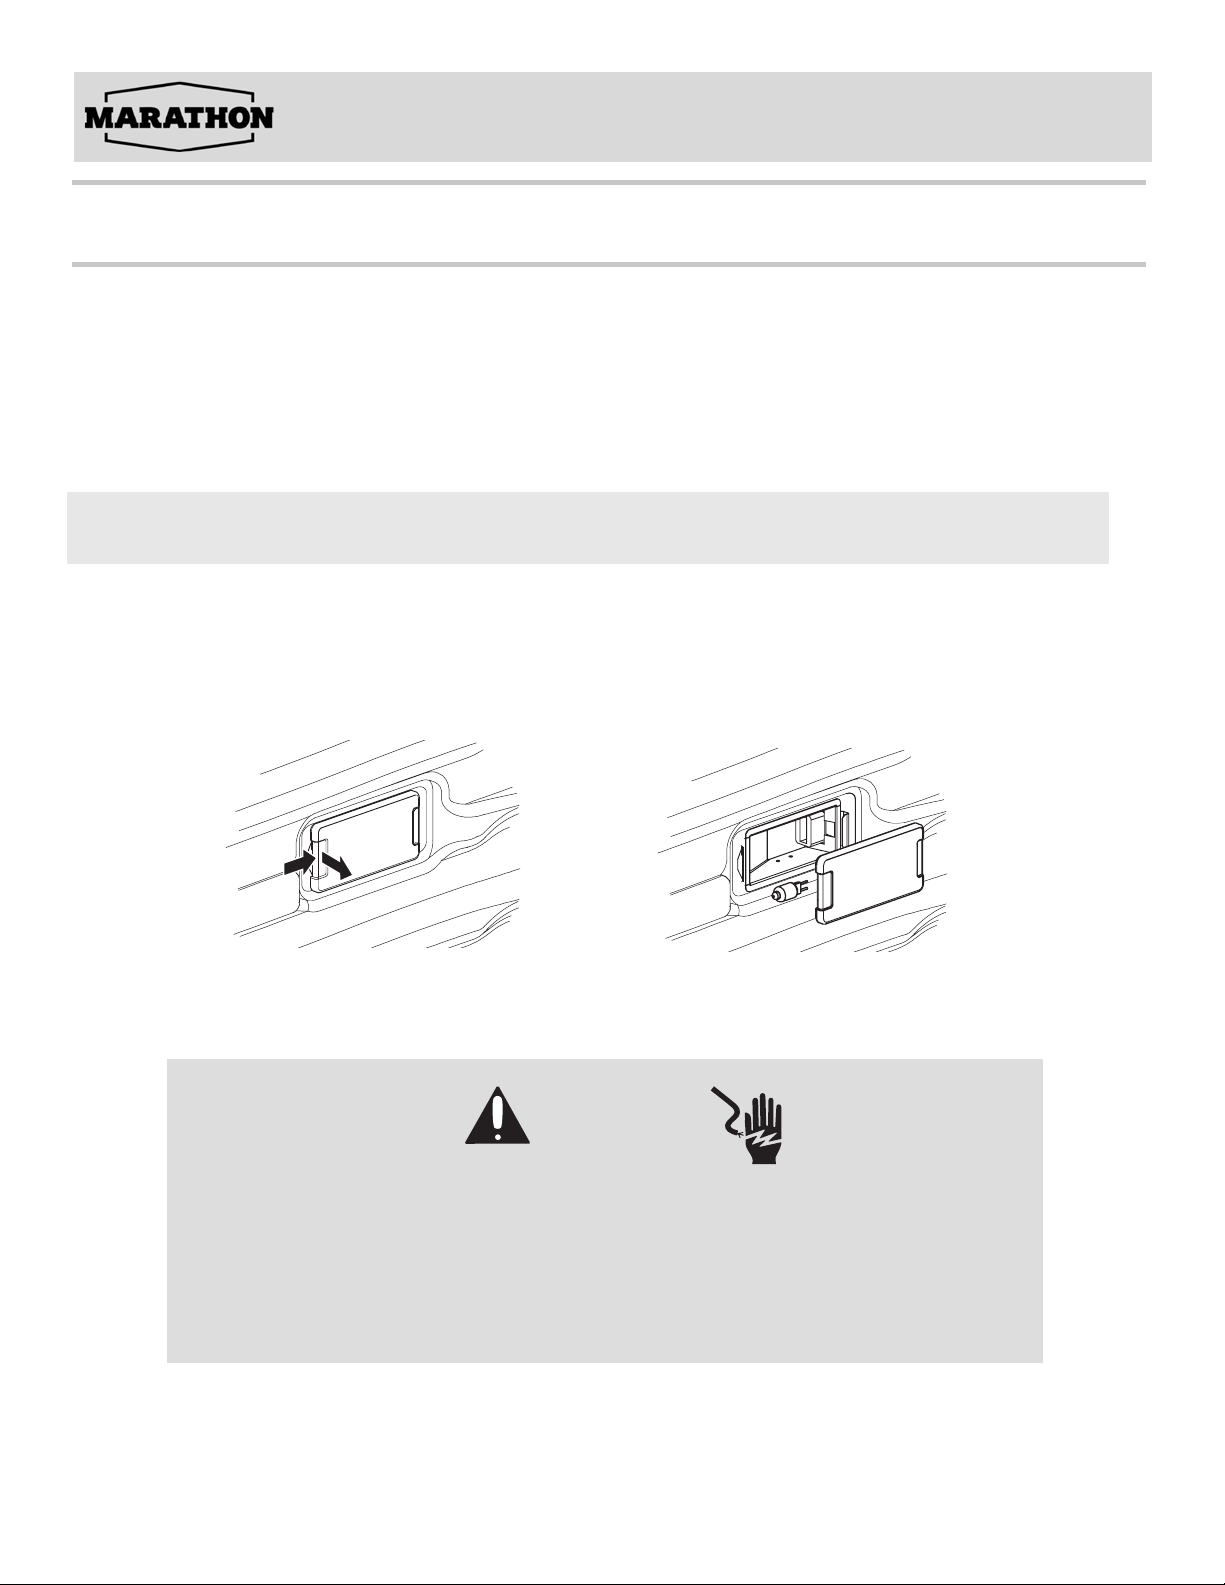
The oven light is a standard 25 watt (G9) appliance bulb.
1.
Disconnect power at the main power supply (fuse or breaker box).
2.
Remove the bulb cover by pulling it out of the opening.
3. Remove the burned out bulb from the socket.
NOTE: To avoid damage or decreasing the life of the new bulb, do not touch bulb with bare fingers.
.
Wear cotton gloves or use a tissue when replacing the light bulb
Replace the bulb, and then replace the bulb cover.
4.
5.
Reconnect power at the main power supply (fuse or breaker box).
WARNING
Electrical Shock Hazard
Make sure the oven and lights are cool and power to the oven has been turned off before
replacing the light bulb(s). The lenses must be in place when using the oven. The lenses
serve to protect the light bulb from breaking. The lenses are made of glass. Handle carefully
to avoid breakage. Failure to do so could result in death, electric shock, cuts or burns.
Page 37
TROUBLESHOOTING
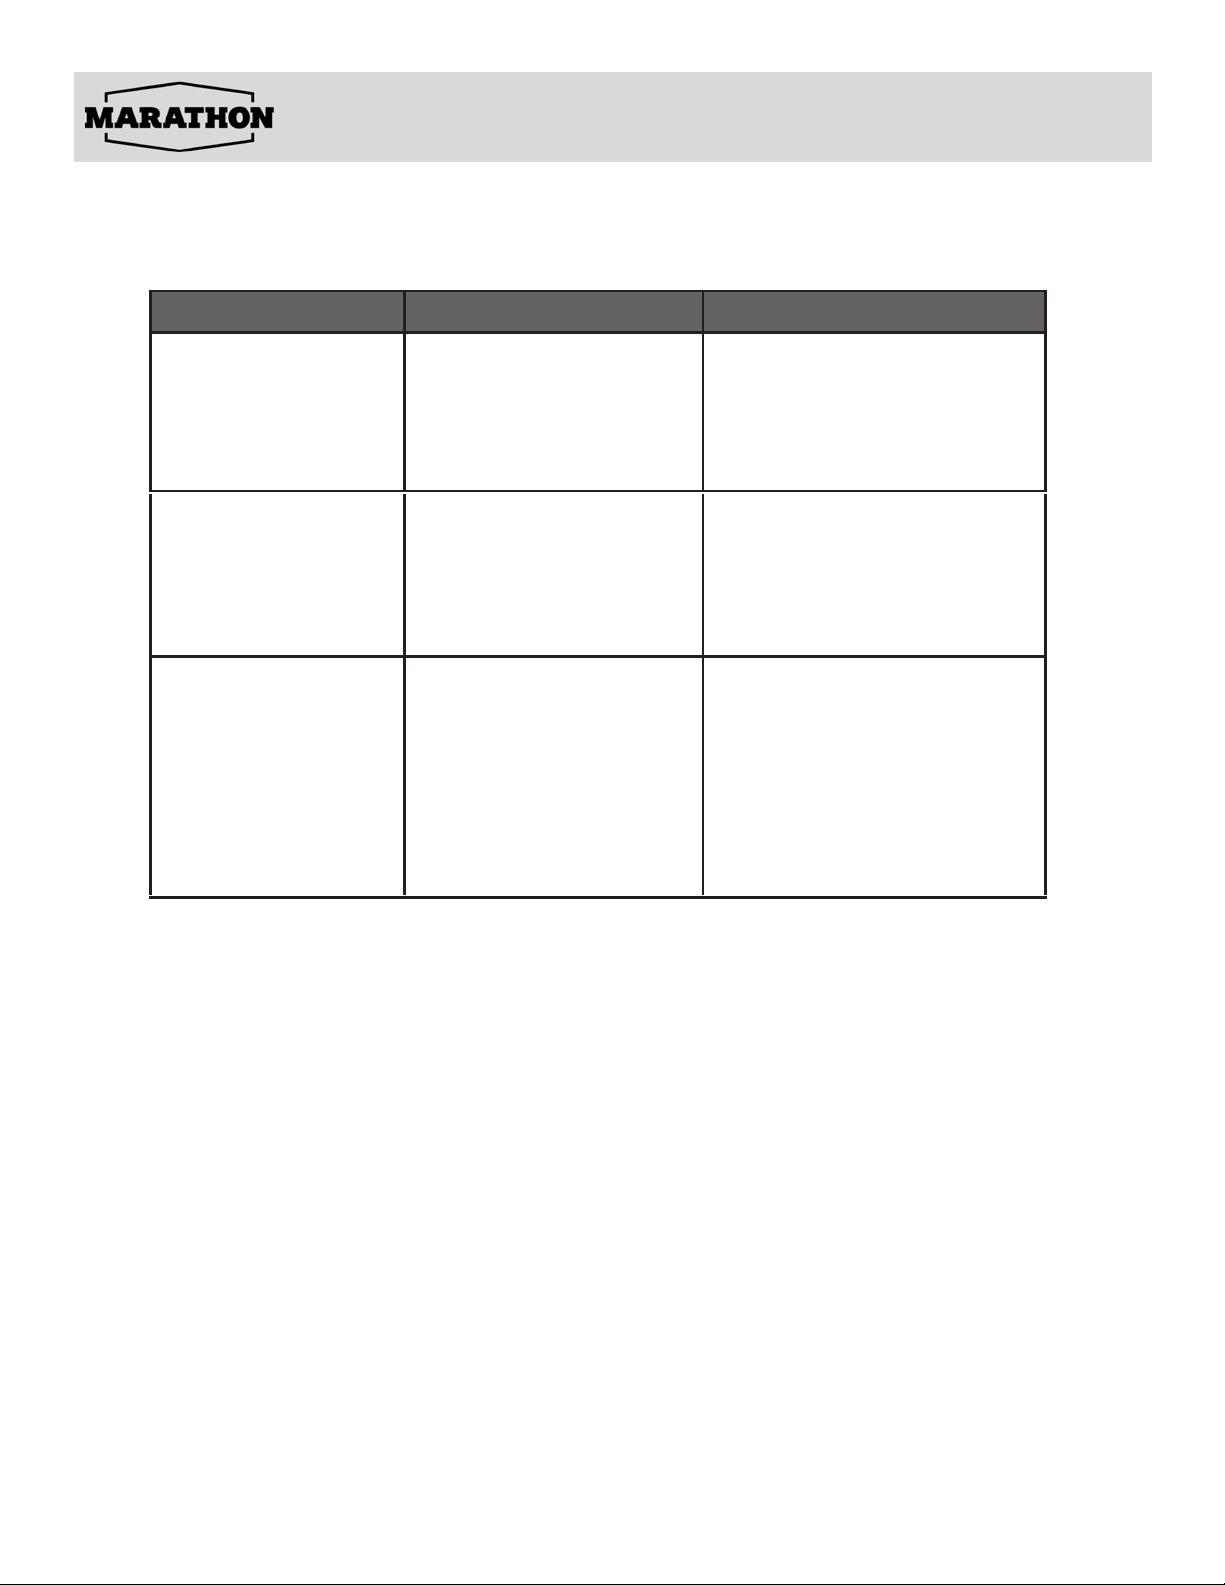
COOKTOP
PROBLEM POSSIBLE CAUSE SOLUTION
Heating elements
and controls do
not work.
Heating elements
cycle off even
when elements
are turned to their
highest settings.
Glass ceramic
surface is see
through or
appears to be red
in color.
Fuse is blown or circuit
breaker is tripped.
No electricity to
the cooktop.
Heating element
temperature limiters are
temporarily shutting off
the elements due to
exceeding the maximum
allowable temperature.
Under direct or bright
lighting, you will
sometimes be able to
see through the glass
and into the chassis due
to its transparent
quality. You may also
notice a red tint under
these conditions
Replace the fuse or reset
the circuit breaker. If the
problem continues, call an
electrician.
Have electrician check
your power supply.
This is a normal operating
condition, especially during
rapid heat-up operations.
The element will cycle back
on automatically after it has
cooled sufficiently.
These are normal properties
of black ceramic glass
panels.
Page 38
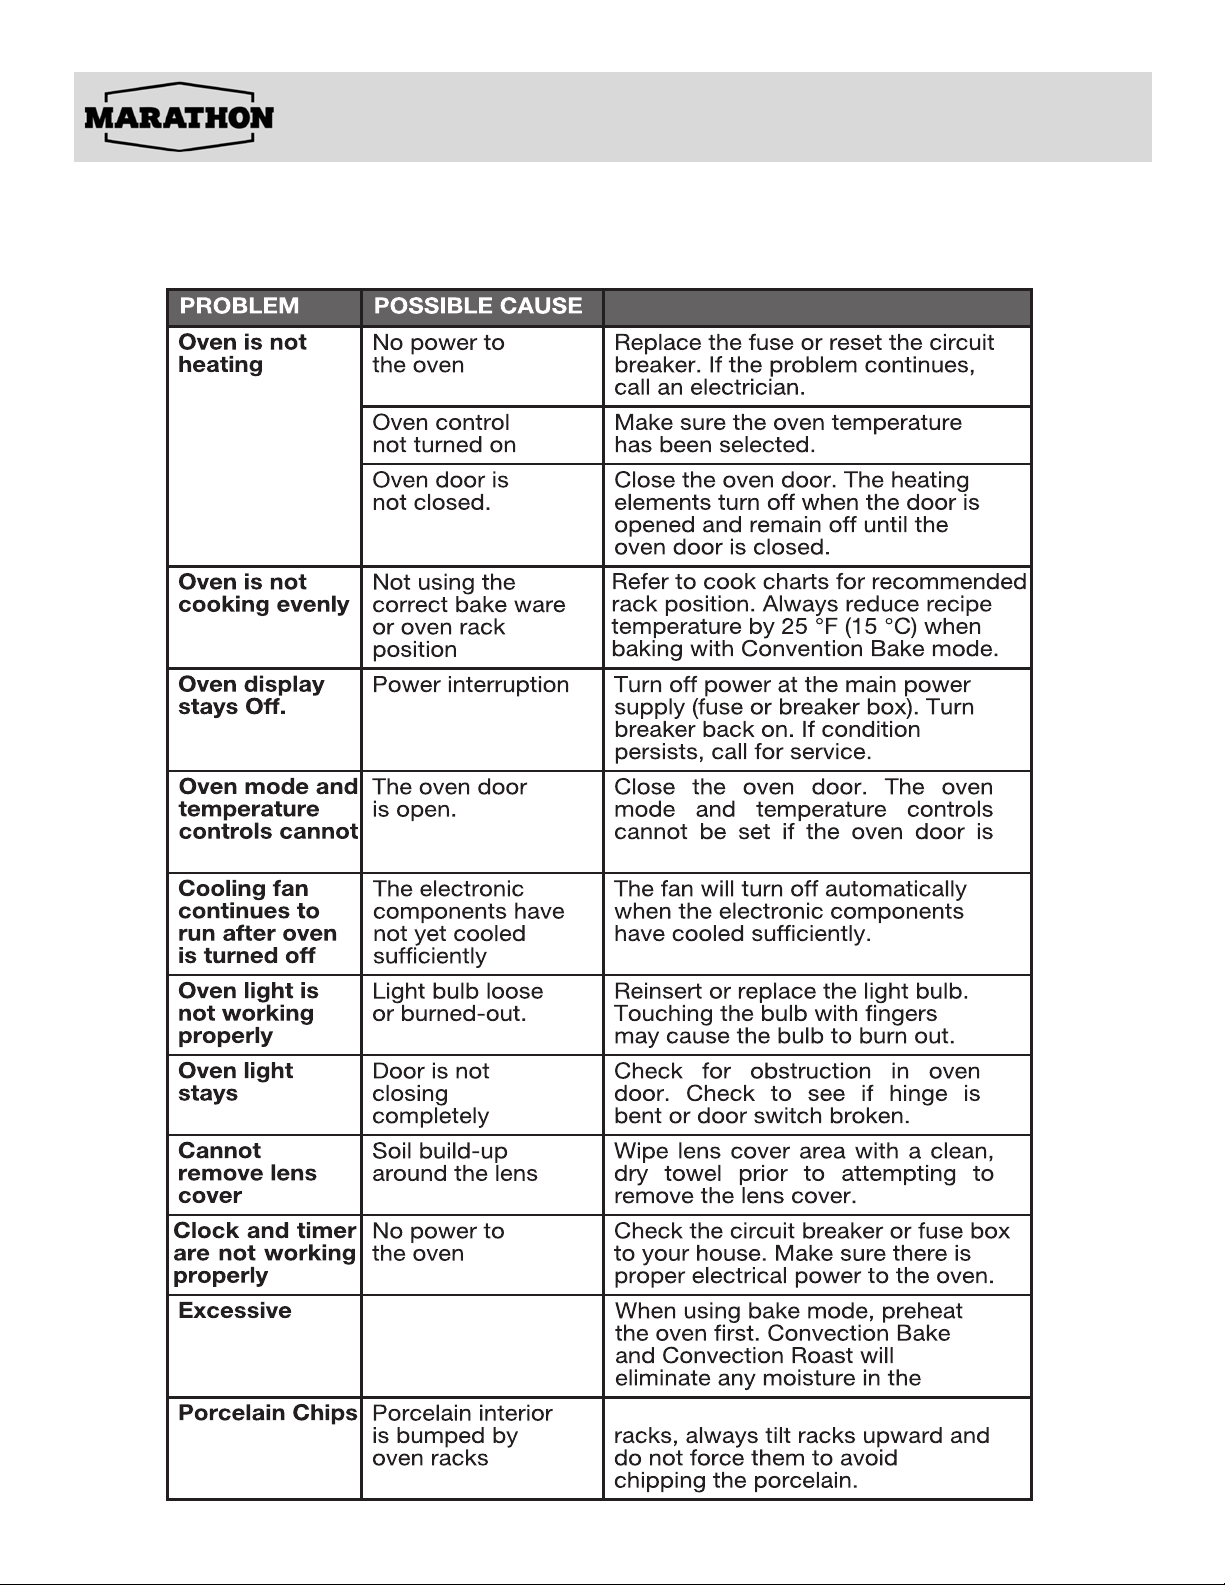
OVEN
SOLUTION
TROUBLESHOOTING
be set.
on
Moisture
open.
cover.
oven.
When removing and replacing oven
Page 39
2 Years Limited Warranty
When operated and maintained according to the instructions in the Use & Care Guide, MARATHON a registered trademark of
Stirling Marathon Limited agrees to repair this product for 2 years from the date of original purchase and/or agrees to pay for
parts and service/labour required to correct defects in materials or workmanship. Any Service must be approved and provided
by an Authorized Stirling Marathon Service provider. YOUR EXCLUSIVE REMEDY UNDER THIS LIMITED WARRANTY
SHALL BE PRODUCT REPAIR OR REPLACEMENT AT THE SOLE DISCRETION OF STIRLING MARA THON LIMITED AS
PROVIDED HEREIN. This limited warranty is valid only in Canada and the Continental United States with proof of original
purchase and confirmed warranty registration.
How to Obtain Service
Carry-In: The original purchaser must deliver or ship the defective product to an authorized Stirling Marathon Service present
a copy of the original bill of sale or Warranty Registration Confirmation.
In-Home: Contact Authorized Service Center and provide a copy of the Original bill of sale or Warranty Registration Card. If
you are in a remote area or the closest Authorized Service Center is further than 100 km (60 miles), you will be required to
deliver the appliance to the closest Service Center at your expense.
Stirling Marathon is not responsible or liable for any spoilage or damage to food or other contents of this appliance, whether
due to any defect of the appliance, or its use, whether proper or improper.
Items Excluded from Items Excluded from WWarrantyarranty
• Damages due to shipping or improper installation.
• Damages due to misuse or abuse.
• Content losses due to failure of the unit.
• Commercial or Rental Use Limited to 90 days Parts & Labour.
• Plastic parts such as door bins, panels, door shelves, racks, light bulbs, etc.
• Punctures to the evaporator system due to improper defrosting of the unit.
• Service or Repair by a unauthorized service technicians.
• Service calls that do not involve defects in material and workmanship such as instruction on the proper use of the product, door reversal or improper
installation.
• Replacement or resetting of house fuses or circuit breakers.
• Delivery costs incurred as the result of a unit that fails.
• Expenses for travel and transportation for product service if your appliance is located in a remote area where service by an unauthorized service
technician is not available.
• The removal and reinstallation of your appliance if it is not installed correctly or is in a inaccessible location, as per the published installation
instructions.
• Liability under this warranty is limited to repair, replacement or refund. If a replacement unit is not available or the unit cannot be repaired, liability is
limited to the actual.
• Purchase price paid by the consumer.
• This warranty applies only to the original purchaser and does not extend to any subsequent owner(s) and is non-transferable.
• No warranty or insurance herein contained or set out shall apply when damage or repair is caused by any of the following:
accident, alteration, abuse or misuse of the appliance such as inadequate air circulation in the room or abnormal operating conditions (extremely high
or low room temperature).
• Use for commercial or industrial purposes (i.e. If the appliance is not installed in a domestic residence). Fire, water damage, theft, war, riot, hostility,
acts of God such as hurricanes, floods etc.
• Service calls resulting in customer education.
• lmproper installation (ie. Building-in of a free-standing appliance or using an appliance outdoors that is not approved for outdoor application).
For Service or Assistance please contact us at:
info@stirlingmarathon.com or visit us at www.stirlingmarathon.com.
V.01/2024
 Loading...