

Page 1
12 cu.ft. Frost Free Refrigerator
Owner’s Use & Care Manual
MFF120W
Page 2
Congratulations
Congratulations on the purchase of you r new Marathon Appliance!
To activate your Warranty, please register your appliance at www.stirlingmarathon.com or by completing
and mailing the enclosed Warranty Registration Card. We are confident you will have years of hassle free
enjoyment and ask that you please retain the Use & Care Guide for future reference and your safety.
Important Safety Instructions
T
o reduce the risk of fire, elec tric a l shock, or injury follow these basic precautions when using your appli a nce .
Before installing please read your Use & Care guide carefully and pay special attention to the Safety and Warning
information outlined in the following pages.
To avoid the possibility of child entrapment please take the following precautions before throwing out the refrigerator
Remove all doors from the unit.
Leave the shelves in place so that children may not easily climb inside
Never allow children to operate, play with, or crawl inside the refrigerator.
Before first use
Before connecting the refrigerator to an electrical power supply, let it stand upright for approximately 4
hours to let the refrigerant settle in the compressor. This will reduce the possibility of malfunctions in the
cooling system due to transportation. Please wipe and clean the interior of the refrigerator thoroughly with a
damp, non-abrasive cloth.
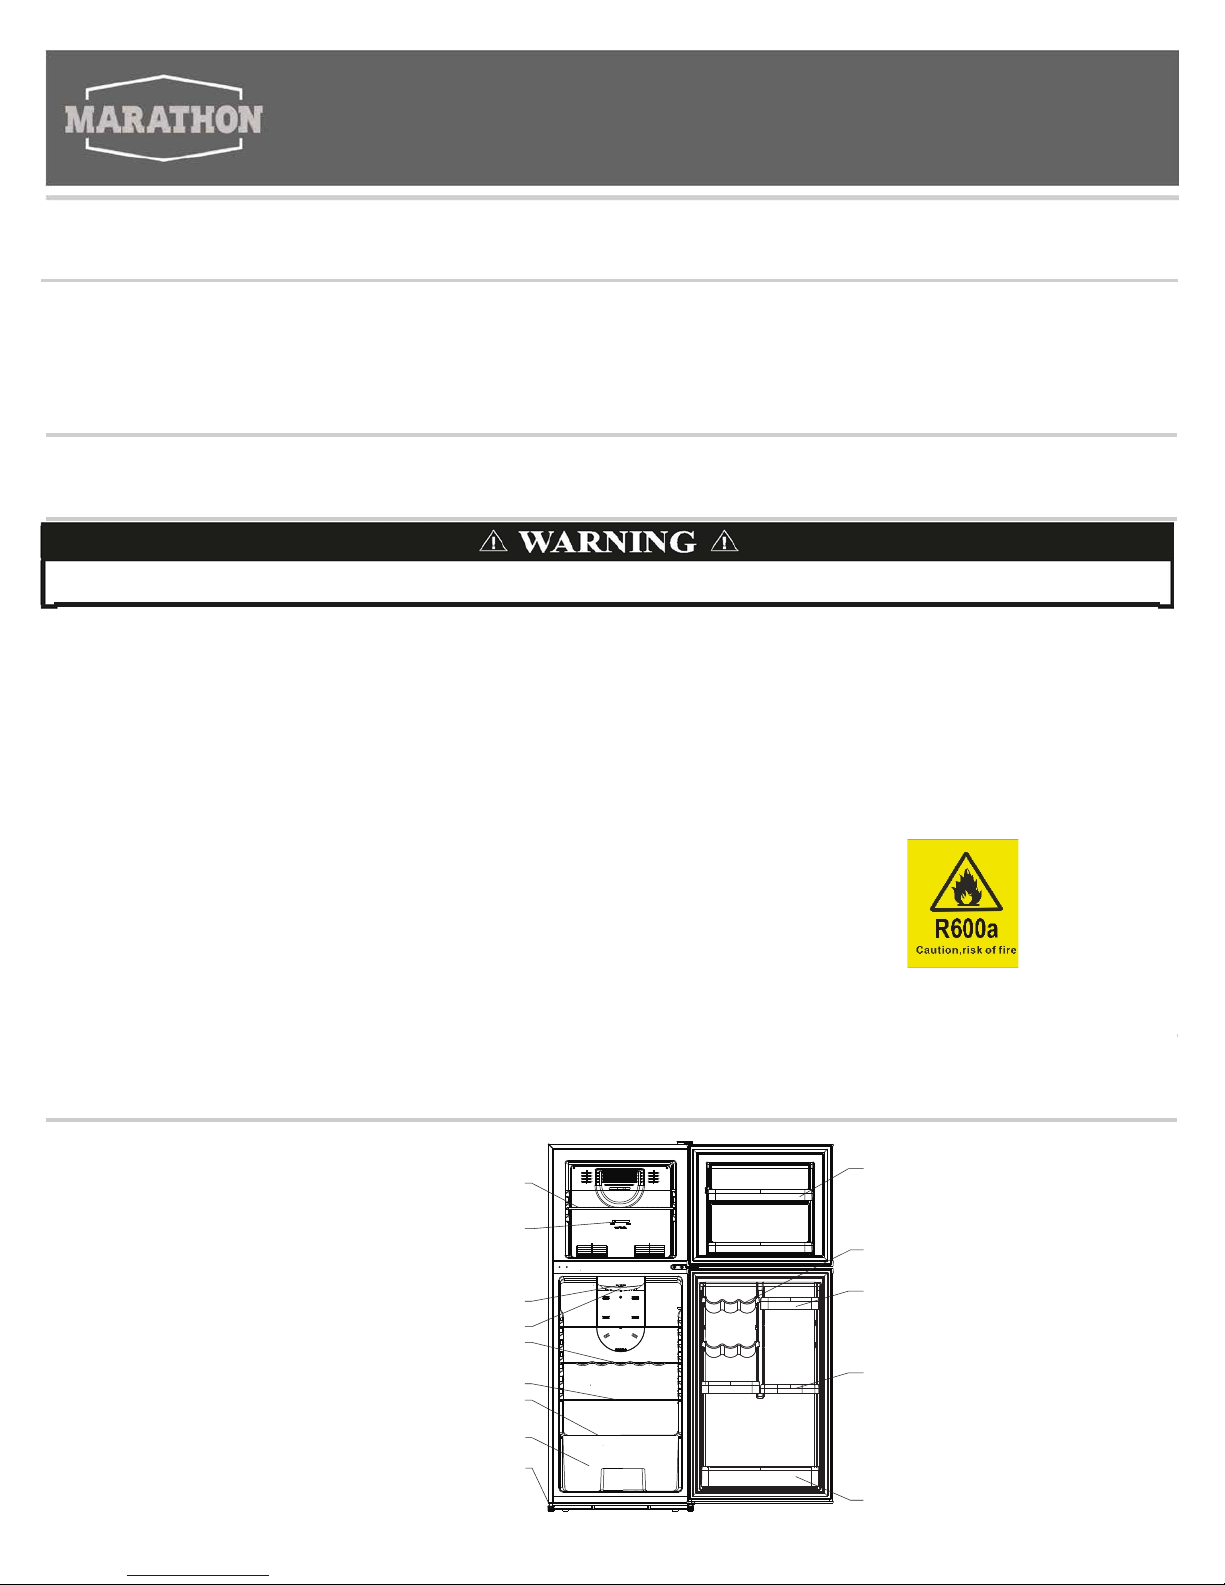
Parts Description
1
1) WARNING----Keep venti lation open ings, in the appliance enclosure or in the built-in structure , clear of obs truction.
2) WARNING----Do not use mechanical devices or other means to accelerate the defrosting process, other than those recommended by the manufacturer.
3) WARNING----Do not use electrical appliances inside the appliance
4) WARNING----DANGER: Ne ver all ow chil dren to pl ay
with, operate, or crawl inside the appliance. Risk of child entrapment. Before you discard or recycle your old
refrigerator or freezer:
• Completely remove the doors or lids
• Leave the shelves in place so that children may not easily climb inside.
5) Always unplug before any ma intenance or service on the appliance.
6) If the component part is damaged, it must be replaced by the manufacturer, its service agent or similar qualified persons in order to avoid a hazard.
7) Follow local r egulations regardi ng disposal of the a ppliance due to flammable refrigerant a nd blowing gas. All re fri gera tio n products conta i n r efr iger a nts, whi ch u n der
the guidelines of federal law must be removed before disposal. It is the consumer's responsibility to comply with federa l an d local r egu lati ons wh en di sposi ng of t his
product.
8) This ap
pliance is intended to be used in household and similar environment such as:
• staff kitchen, workshop, office and other working environments;
• farm houses and by clients in hotels, motels and other residential type environments;
• bed and breakfast type environments;
• catering and similar non-retail applications.
9) Do not store or use gasoline or any infla mmable liquors and liquids inside or in the vicinity of refri gerator.
10) Do not use an extension cord with t his a ppliance. I f the power cord is too short, have a qualified electrician install an outlet n ea r the ap pl iance. Use of an ext en sion ca n
negatively affect the appliance’s performance.
1. Freezer she l f
2. Freezer temperature control
3. Refrigerator temperature control
4. Light Bulb
6.
Tempered Glas s Shelf
7.
Crisper cover
8
.
Crisper
9.
Adjustable feet
10.
Freezer Door Rail
11.
Can Rack
12.
Gallon Door S torage
13.
Refrigerator Door Bin II
5. Wine Shelf
Refrigerator Door Bin I
14.
1
2
3
4
5
6
7
8
9
10
11
13
12
14
Page 3
Installation Instructions
2
Before connecting the appliance to the power supply, let it st and f or a bout 4 hour s, whic h wil l r educe a pos sibi lity of
malfunctions in th e cool ing syste m due to t ranspor t hand ling.
Clean the appli ance, and be th orou gh, especially in the interior (See “H OW TO CLEAN ” ) .
In case the interior a cces sories are n o t cor rectly plac ed, rearrange them as d escr ibed in “Parts Description”
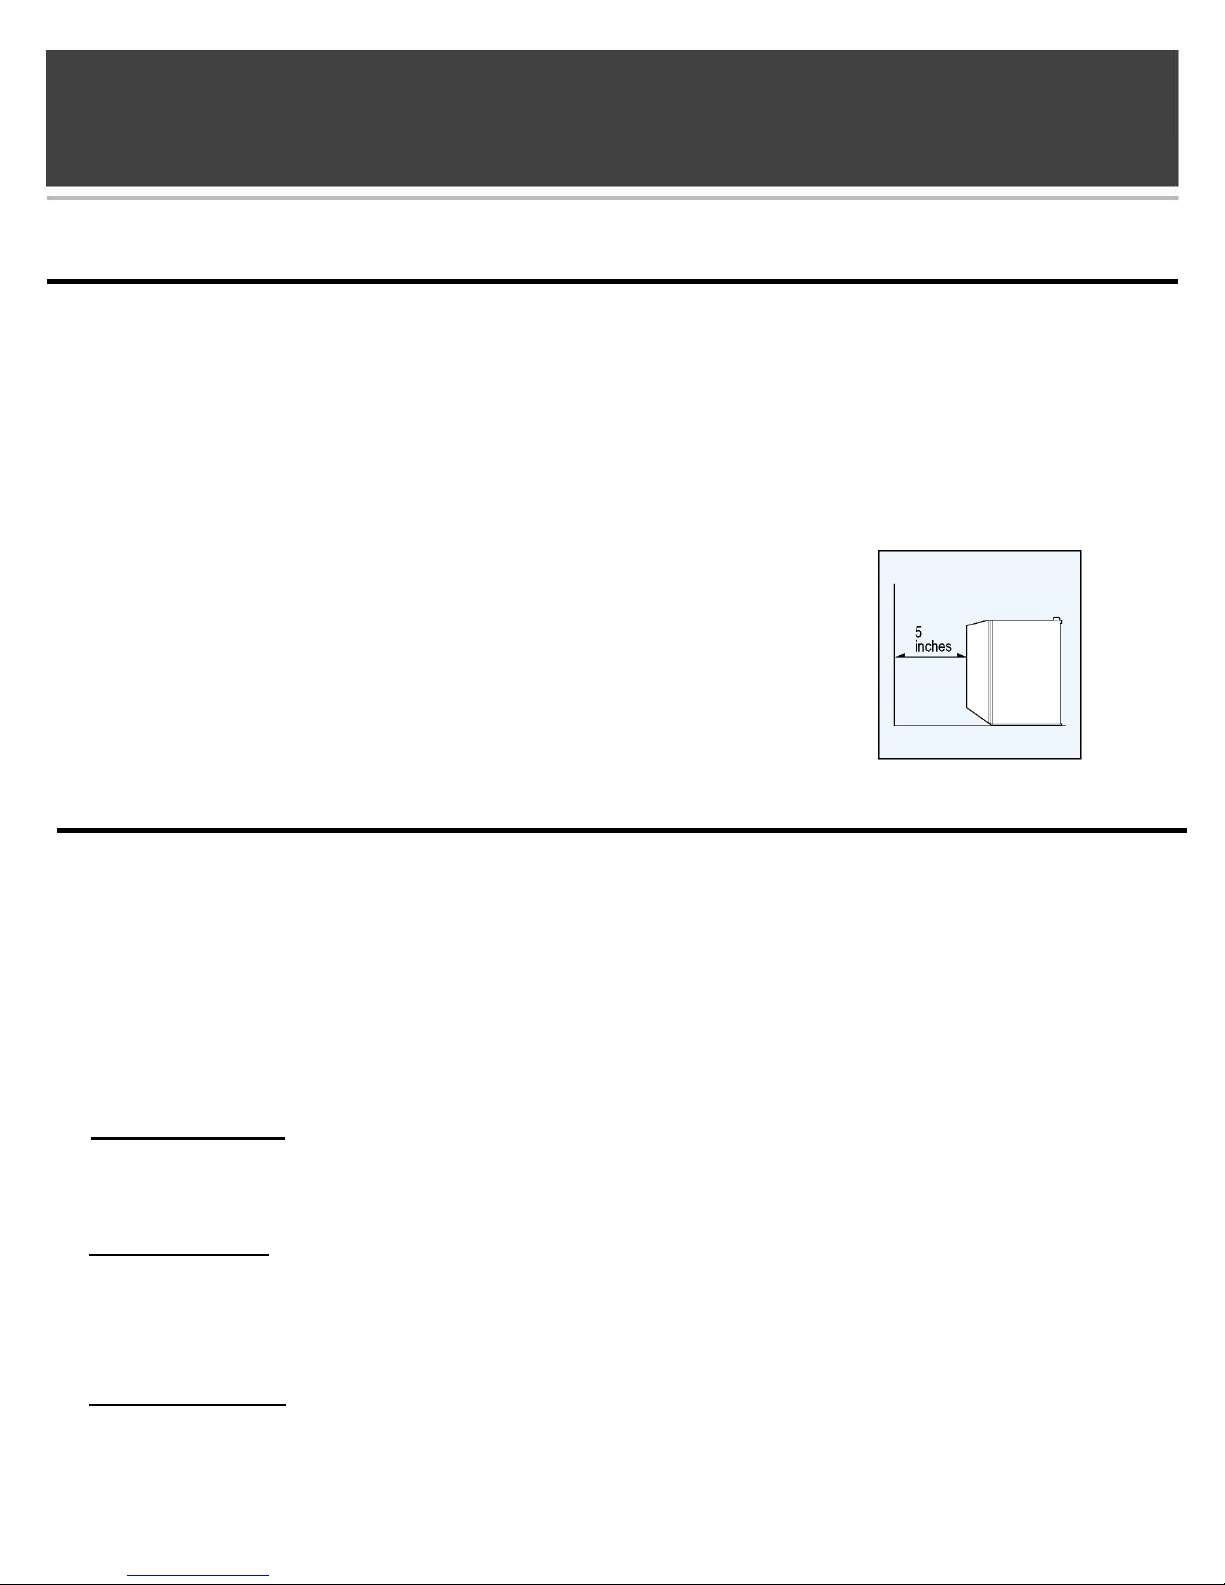
Install the appliance in a convenient location away from extreme heat and cold. Allow sufficient clearance between the
fridge and side wall so the door will open without obstruction. The freezer is not designed for built in installation.
Sel ec t a s pace with st rong level flo or.
Try to allow a minimum of 5 inches of space between the appliance’s side and the wall.
Important
DANGER: R isk of child entr apment. Be fore you throw a way your old appliance:
Remove th e door s and/ or lid.
Leave the shelves in place so that children may not easily climb inside.
The appliance must be correctly connected to the power supply, DO NOT use an extension cord.
Do n ot tou ch CO LD or FRO STY s urf aces w hile t he a pplia nc e oper at es, esp ec ially wit h wet ha nds a s t he ski n ma y
stick to t he col d sur f ace.
Disconnect the appliance from the power supply before repair or maintenance
Do not defrost the appliance with other electric devices (hair dryer etc.) and never scrape the ice or frost layer with
sharp tools.
The rating plate is on the back of the appliance.
Tips for Energy Savings
Try not t o open the door too of ten, especially when t he weather is wet and hot. Once you open the door, mind to close i t as soon as possible.
Every now and then check if the appliance is sufficiently ventilated (adequate air circulation around the appliance).
Ice and frost layer increase energy consumption, so please defrost the appliance as soon as the accumulated ice/frost layer is 1/8” thick.
Replacing the Light Bulb
1. Switch off t he refrigerator and pull ou t power cor d from wall socket. Wait several minutes until the bulb is cool to the t ouch..
2. R emove t he bulb cover by removing a s cr ew that holds t he cover.
3. U nscrew the old bulb and replace a n ew bulb (Max. 10W)
4. Reinstall the bulb cove r and fix it by the scr ew previously removed.
5. Plug the refrigerator back in to the electrical outlet.
Cleaning Your Refrigerator
Cleaners: Never use harsh, abrasive cleaners, heavy-duty cleaners, or solvents on any surface.
Exterior: Wipe with damp, suds y cl oth, rinse a nd dry. For stu bborn st ains and for pe riodic waxing, use s ilicon wax.
Interior: Was h shelves and other r emovable parts in warm sudsy water, r inse and dry. Wa sh int e rior wi th baking soda solut ion (3 t ablespoons to I liter of
water) or warm sudsy water, rinse and dry.
MFF120W
Page 4
Use and Care
1. Clea n th e fr eez er th orou gh ly. Wip e th e out s ide wit h a s oft dr y cl oth, t he interior
with a clean moist cloth.
2.
Insert the power supply cord into the electrical outlet.
3.
Tur n t h e th er mos t a t dia l t o “ 7 ”. C los e t h e do or a nd l et t he freez er op er a t e f or 1 5
-
20 minutes.
Note:
Wait 3 -5 minutes before restarting if you unplug the freezer.
The unit may fail to operate properly if restarted too quickly.
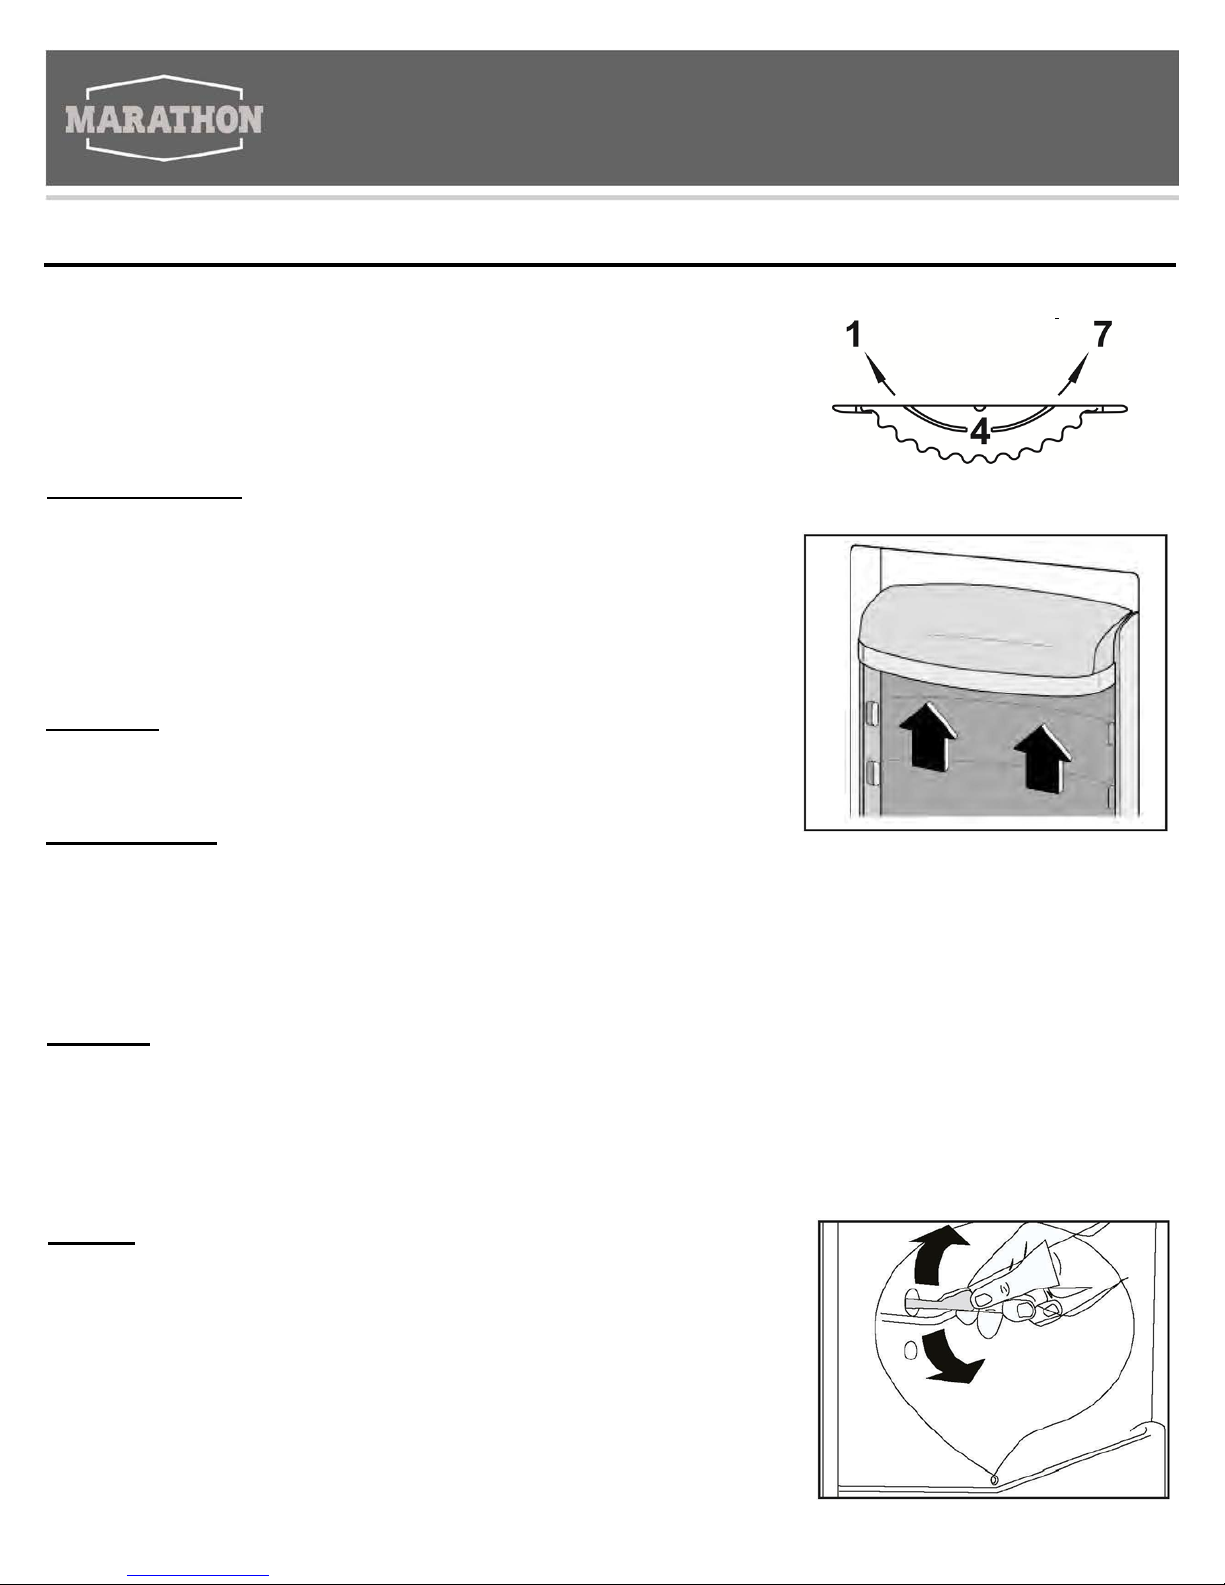
Temperature Control
The temperature control is located inside the refrigerator compartment on the top. The
refr igerator com p artment temperature contr ol ranges fr om “1” , col d setting, to “7”,
coldest
setting. The first time the unit is turned on, adjust the temperature control knob to a higher
(colder) setting and run for at least 24 hours before readjusting the temperature and placing
food inside. This will ensure the cabinet is thoroughly c
hilled before food is placed into the
refrigerator.
If you cho ose to chan g e th e thermosta t s etting, ad ju s t the ther m ostat by one
increment at a time. After each movement of the control knob, allow several hours for the
unit to adjust
completely. Large amounts of food may lower the cooling efficiency of th e
appliance.
Accessories
To permit storage of food packages of various sizes, the adjustable door bins
can be placed at different heights. To adjust, pull the door b i n upwar ds until it
comes free, then position as required.
Refrigerated Food
•
•
•
•
•
Do not store warm food or evaporating liquids in the refrigerator
Cover or wrap the food that has a strong odor
Cooked foods, cold dishes, etc...: these should be covered and may be placed on any shelf.
Fruit and vegetables: these should be thoroughly cleaned and placed in the vegetable crisper pr ovi d ed. D a ir y
products should be placed in special airtight containers or wrapped as airtight as possible.
Milk: Cartons or bottles should be sealed and placed in the refrigerator door storage area
Defrosting
It is time to defrost your Freezer when the frost accumulated on the evaporator shelves reaches about 1/8” thick. To
Defrost, set the thermostat dial to “OFF” or “0” and remove all contents from the fr
eez er compar tmen t. Leave the
fre e zer do or op e n to allow ac c umul at e d ice/fros t to melt. R e move large piec es of ice as ne ed. Do not u se hot w ater or
other electr ic h eat i n g devices to melt the accumulated ic e. Aft er defr osting, r emov e accumulated ice/water an
d wipe
the freezer compartment with a soft cloth. Restart the unit per starting instructions.
Never use a knife or other sharp instr u me nt to s crape ice/ frost from the inside of t he unit.
Cleaning
Cleaners:
Ne ver use h ar sh, abrasive clean ers, heavy -duty cleaner s, or solve nts on
any surf ace.
Exterior:
Wip e w i th damp, sudsy c loth, rinse and dry. For stubborn s tains and for
periodic waxing, use silicon wax.
Interior:
Wash shel ves and other removab le parts in warm sudsy water, rinse and
dry. W ash interior w ith bakin g soda solution (3 ta blesp oons to I liter of
water) or warm suds y water, rins e and dr y.
Gasket/Door Seal
: Wash with warm sudsy water.
Replace all parts and retur n thermostat dial to d e sired settin g.
3
Page 5
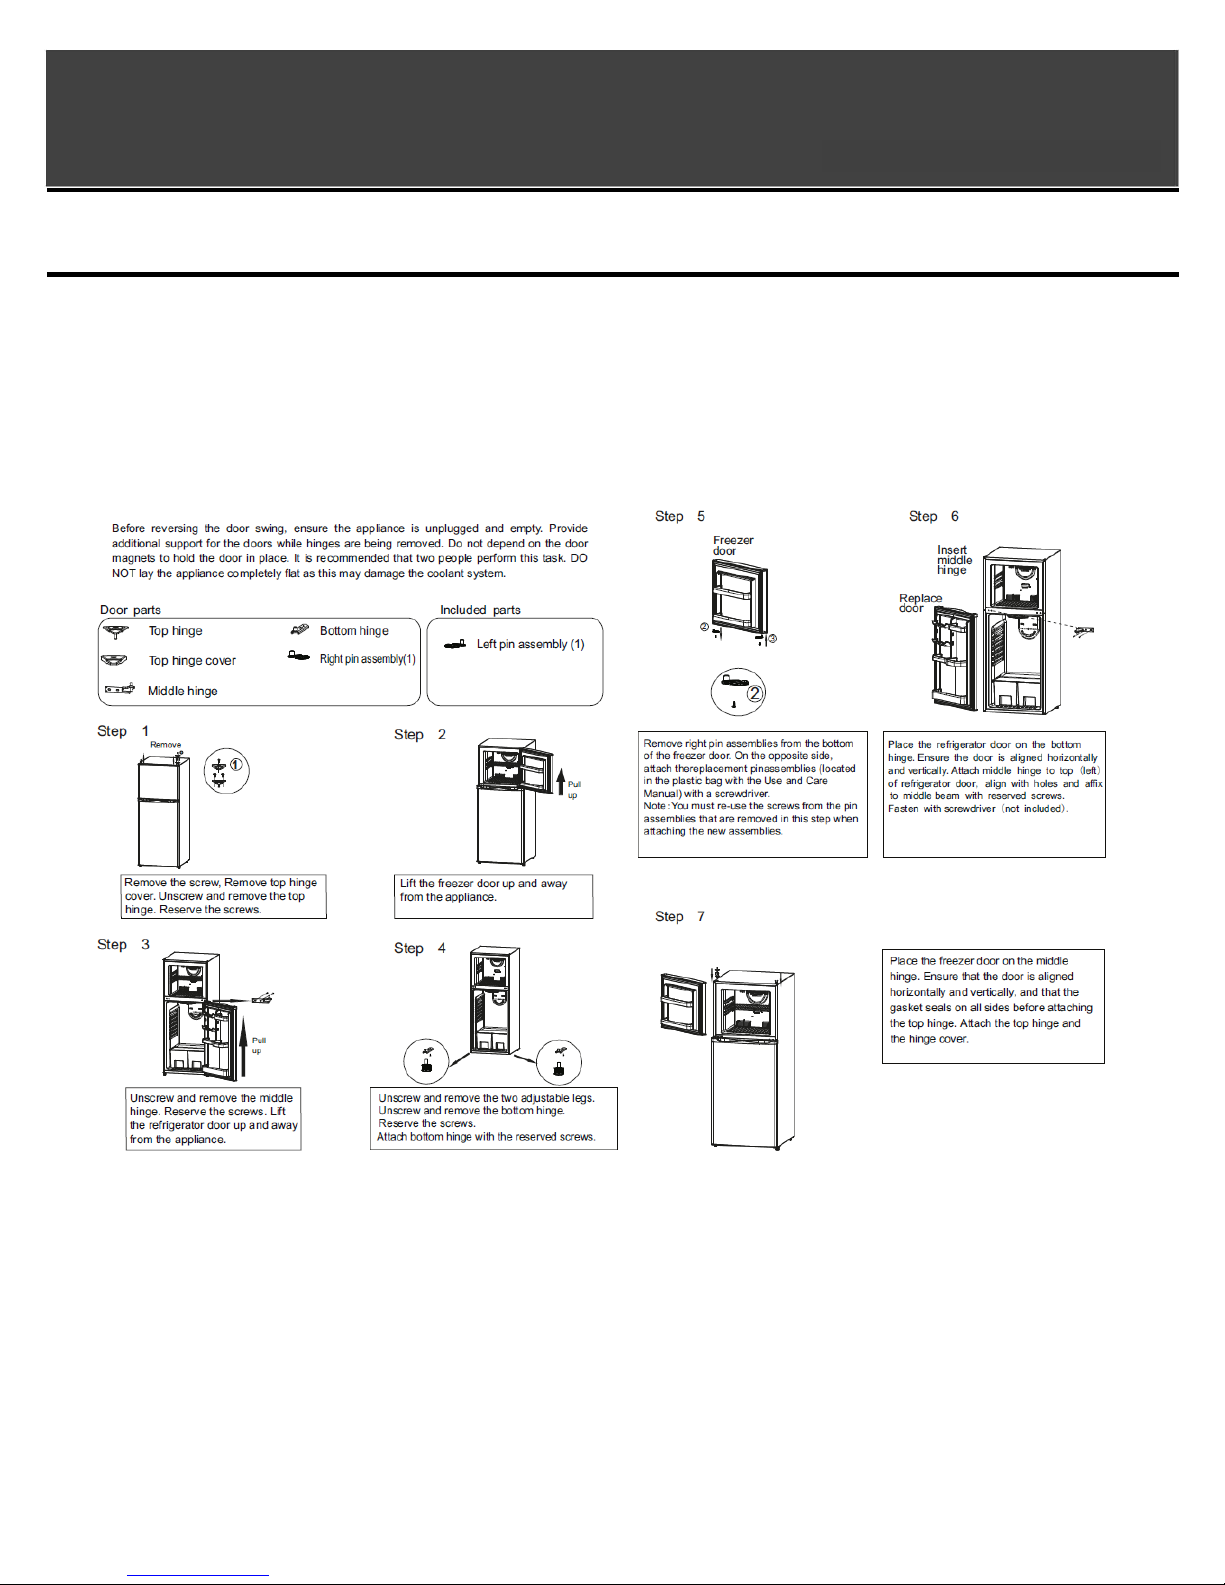
Changing the Reversible Door
4
MFF120W
Page 6

Important Warning
Keep ventilation openings, in the appliance enclosure or in the built-in structure, clear of
obstruction. Do not use mechanical devices or other means to accelerate the defrosting process,
other than those recommended by the manufacturer.
Do not change or damage the refrigerant circuit.
Do not store explosive substances such as aerosol cans with a flammable propellant in this
appliance. During transportation and installation of the appliance, be certain that none of the
components of the refrigerant circuit become damaged.
It is dangerous to alter the specifications or modify this product in any way. Any damage to the
cord may cause a short circuit, fire and/or electric shock.
This appliance is intended to be used in residential household, office or light commercial
applications such as Hotels and College Dorms.
All electrical components (plug, power cord, compressor and etc.) must be replaced by a certified
service agent or qualified service personnel.
The refrigerant contained within the compressor of the appliance is isobutene (R600a) which is
environmentally friendly but flammable.
Make sure that the power plug is not crushed or damaged at the back of the appliance. A crushed
or damaged power plug may overheat and cause a fire.
Power cord must not be lengthened.
Make sure that you can come to the mains plug of the
appliance. Do not pull the mains cable.
If
the power plug socket is loose, do not insert the power plug. There is a risk of electric shock or
fire. You must not operate the appliance without the lamp.
This appliance is heavy. Care should be taken when moving it.
Do not remove nor touch items from the freezer compartment if your hands are damp/wet, as this
could
cause skin abrasions or frost/freezer bums.
Avoid prolonged exposure of the appliance to direct sunlight.
5
Page 7

Troubleshooting
You can solve many common refrigerator problems easily, saving you the cost of a possible service call. Try the
suggestions below to see if you can solve the problem before calling for service.
temporarily.
component
Pour toute question ou préoccupation, veuillez nous contacter à customerservice@stirlingmarathon.com
ou en ligne sur www.stirlingmarathon.com
6
Solution
Set the knob at other number to switch
on the appliance.
Re-insert power cord
Check fuse, replace if necessary.
Check if power is controlled by switch or
contact an electrician.
Please loo k in the in it ial Te mp erature
Setting section.
Open the door only as long as
necessary.
Turn the thermostat to a colder setting
Please loo k in the in stallation loca t ion
section.
Turn the thermostat to a warmer setting
temporarily.
Re-adjust the feet.
Move the applia nce slightly.
If necessary, carefully bend the
Power failure.
It's normal.
Possible caus e
Temperature regulation knob is set at
number "O".
Power cord is not pl ugged in or is
loose
Fuse has blown or is defective
Electrical outlet is defective or
controlled by a light switch.
Temperature is not properly adjusted.
Door was open for an extended period.
A large quantity of warm food was
placed in the appliance within the last
24 hours.
The appliance is near a heat source.
Temperature is set too cold.
Appliance is not level.
The appliance is to uching the wall or
other objects.
A component, e. g. a pi pe, on the rear
of the appliance is touching another
part of the applianc e or the w all.
Freezer has defrosted and is not
operating or has sh ut off
Condenser is inside the panel.
Problem
Freezer does
not work
The food is too
warm.
Appliance cool s
too much
Unusual noise s
Water on the floor
Side panel is hot
MFF120W
Problem
Possible Causes
Ref riger at or does not o perate
• Refrigerator is unplugged.
• The circuit breaker is tripped/ fuse blown.
Compressor turns on and off
• The room temperature is warmer than normal
• Door is l eft open or is fr e quent ly opened.
• Th e refri gerat o r do es n o t have t he c orrect
clearances.
• The refrigerator has recent ly be e n disconn e c ted for
a period of time.
Refrigerator compartments are too
warm
• Temperature control is not set correctly.
• Door is left ope n or is f requentl y ope ned.
• The door gasket does not seal properly.
• A large amount of wa rm or h ot foo d was stor ed
rec e ntly. Wa it for the refrigerator t o reach its
selected t emperature.
• Th e refrigerator has recent ly be e n disconn e c ted for
a period of time.
Vibrating or rattling (slight vibration
is normal)
• Leveling legs need adjusting
• Refrigera tor is pla c ed on an uneven or weak
surface.
• The refrigerator is touching the wall. Re-level the
refrigerator and move it away from the wall.
Tempera ture of ext ern al refrigerato r
surface is warm
• Th e exter ior refri gerat o r walls can be as mu ch as
30°F warmer than room temperature.
• This is normal whil e the compressor works to
transfer heat from inside the refriger ator cabinet.
Moisture c ollects inside the refrigerator
• Door is left ope n or is f requentl y ope ned.
Moisture forms on outside of
refrigerator
• Is normal in hot and humid w eath er. Air car ries
moisture into the refrigerator when doors are
opened.
Bubbling or gurgling sounds (like
boiling water)
• This i s the nor ma l sound of re f rigerant ( use d to co ol
refrigerator) circulating throughout the system.
Popping or cr acking sounds w hen
compressor comes on
• This is nor ma l. Metal parts undergo expansion and
contraction, like hot water pipes. The sound will
level off or disappear as refrigerator runs.
The door will n ot close properly
• The refrigerator is not on a level surface.
• Th e gasket is dirty.
• The storage basket is out of position.
Page 8

2 Year Limited Warranty
When operated and maintained according to the instructions in the Use & Care Guide, Marathon, a registered trademark of Stirling Marathon Limited, agrees to repair or replace this product for 2 years from the
date of original purchase and/or agrees to pay for parts and service/labor required to correct defects in materials or workmanship. Any and all Service must be approved and provided by an Authorized Stirling
Marathon Service provider. YOUR EXCLUSIVE REMEDY UNDER THIS LIMITED WARRANTY
SHALL BE PRODUCT REPAIR OR REPLACEMENT AT THE SOLE DISCRETION OF STIRLING MARATHON LIMITED AS PROVIDED HEREIN. This limited warranty is valid only in Canada and
the Continental United States with proof of original purchase and confirmed warranty registration.
TERMS OF WARRANTY BY PRQDUC T
Capacity/Type
Warranty Type
How to Obtain Service
Carry-In: The original purchaser must deliver or ship the defective product to an authorized Stirling Marathon Service present a copy of the original bill of sale or Warranty
Registration
Confirmation
In-Horne:
Contact
Authorized Service Center and provide a copy of the Original bill of sale or Warranty Registration Card.
If
you are in a remote area or the closest Authorized
Service
Center
is further than 100 km (60 miles), you will be required
to
deliver the appliance to the closest Service Center at your expense.
Stirling Marathon is not be responsible or liable for any spoilage or damage to food or other contents of this appliance, whether due to any defect of the appliance, or its use,
whether proper or improper.
Items Excluded from Warranty
•
•
•
•
•
•
•
•
•
•
•
•
•
Damages due to shipping damage or improper installation.
Damages due to misuse or abuse.
Content
losses due
to
failure of the unit
Commercial or Rental Use Limited to 90 days Parts & Labor
Plastic parts such as door bins, panels, door shelves, racks, light bulbs, etc.
Punctures to the evaporator system
due to improper defrosting of the unit
Service or Repair by unauthorized service technicians
Service calls that do not involve defects in material and workmanship such as instruction on proper use of the product, door reversal or improper installation.
Replacement or resetting of house fuses or circuit breakers.
Delivery costs incurred as the result of a unit that fails
Expenses for travel and 1ransportalion for product service if your appliance is located in a remote area where service by an unauthorized service technician is not
available.
The removal and reinstallation of your appliance
if
it is installed in an inaccessible location or is not installed in accordance with published installation
instructions.
Liability under this warranty is limited to repair, replacement or refund.
If
a replacement unit is not available or the unit cannot be repaired, liability is limited to the actual
purchase price paid by the consumer.
This warranty applies only to the original purchaser and does not extend to any subsequent owner(s) and is non-1ransferable.
No warranty or insurance herein contained or set out shall apply when damage or repair is caused by any of the following
Accident, alteration, abuse or misuse of the appliance such as inadequate air circulation in the room or abnormal operating conditions (extremely high or low room temperature).
Use for commercial or indus1rial purposes (i.e. If the appliance is not installed in a domestic residence).
Fire, water damage,
theft,
war,
riot, hostility, acts of God such as hurricanes, floods etc.
Service calls resulting in customer education.
lmproper Installation (ie. Building-in of a free standing appliance or using an appliance outdoors that is not approved for outdoor application).
•
•
•
•
•
•
•
For Service or Assistance please contact us at: warranty@stirlingmarathon.com or visit us at www.stirlingmarathon.com
7
Refri g er at io n & Fr e e zer s
Less
than
6 cu ft.
Carry-In
Refrigeration & Freezers
Greater than 6 cu ft.
In-Horne
Electric & Gas
Ranges
All
Sizes
In-Home
Page 9

2 Ans de Garantie Limitée
Lorsqu'il est utilisé et entretenu conformé me nt au x I nstructions d'Uti lisation et d'E nt retien, M arath on, une ma rque dé posé e de Stirlin g M aratho n Limi te d, accepte de ré parer ou de
remplacer ce produit pe ndant 2 ans à co mpte r de la date d'achat ori ginale et / ou accept e d
e payer pour les pièces et le service / travail nécessaires pour corriger les vices de matériaux
ou de fabrication. Tout se rvice doit être approuvé et fourni par un fournisse ur de s ervi ce autori sé par Stirlin g Ma ratho n. V OTRE RECOURS EXCLUSIF SOUS CETTE GARANTIE
LIMITÉE EST LA RÉPARATION DU PRODUIT OU SON REMPLACEMENT À LA SEULE DI SCRÉTION DE STIRLING MARATHON LIMITÉE, PRÉVUE AUX
PRÉSENTES. Cette garantie limitée est valable uniquement au Canada et aux États-Unis Continentaux avec preu ve d'ach at origin al et enregistrement de la garantie confirmée.
CONDITIONS DE GARANTIE P AR PRODIUT
Capacité I Type
Moins de 6 pi³
Type de Garantie
Réfrigérateurs & Congélateurs
Retour
À Domicile
À Domicile
Réfrigérateurs & Cong
é
lateurs
Gammes Électriques et au Gaz
Plus de 6 pi³
Toutes les Tailles
Comment Obtenir le Service
Retour : L 'acheteu r origina l d oi t l i vr e r ou ex pé dier le produit dé f e ct u eux à u n s ervice d e Ma r a thon St irli ng autor isé et p résenter une copi e d e la factu re ori ginal e de
vente ou la Confirmation d'Enregistrement de la Garantie.
In-Home: Contactez le Cent re de Se rvi ce Autoris é et fournissez une copie de la facture ori ginale de ve nte ou la Carte d'Enregistrement de la Garant ie. Si vous ête s dans une
région éloignée ou le Cent re de Se rvi ce Autoris é est à plus de 100 km ( 60 mil e s), vous se rez tenu de remet tre l'apparei l au cent re de se rvi ce le plus proche à v os frais.
Stirling Marathon ne pe ut être tenu re sponsable pour tout e dété riorati on ou do mm a ge à la nou rriture ou autre s conte nus de cet app areil, que ce soit en raison d' un défa ut de
l'appareil, ou de son utilisation, correcte ou incorrecte .
Éléments Exclus de la Garantie
• Les dommages dus à des dommages d'expédition ou à une mauvaise installation.
• Les dommages dus à une mauvaise utilisation ou de l'abus.
• Les pertes de contenu en raison de l'échec de l'unité
• Un usage Commercial ou Locatif limité à 90 jours Pièces & Main d'Œuvre
• Les pièces en plastique, tels que les bacs de portes, panneaux, étagères de porte, porte, ampoules, etc.
• Perforations du système d'évaporation dues à un mauvais dégivrage de l'appareil.
• Service ou réparations par des techniciens non autorisés
• Les appels de s e r v ice qui ne concernent pas les d éfauts de m at ériaux et de fab r ication te ls q u e d es in struct io ns sur l’ut i lisation correcte du produit, l'inversion de la porte ou une mauvaise installation.
• Le remplace m ent ou la remise à zéro des fusib les ou des d is jo ncteu rs.
• Les frais de livraison encourus à la suite d'une unité qui ne fonctionne plus
• Les frais de déplacement et de transport pour le service du produit si votre appareil est situé dans une région éloignée où le s ervice par un technicien de service au torisé n'est pas disponible.
• La dépos e et la r é ins ta lla t ion d e vo t re app a r e il si e lle est insta llée dan s un endroit ina c ce s s ib le o u n 'est p as ins ta llé conformément aux instructions d'installation.
• La resp on sabilité sous cet t e garant ie est lim it ée à la rép ar at io n , le r em plac ement ou le rembo ursem en t. Si une unité de rem placement n'est pas disponible ou si l'appareil ne peut pas être réparé, la responsabilité est
limitée au prix d'ach a t r éel payé p ar le consomm ateur.
• Cette garantie est applicable uniquement à l'acheteur original et ne couvre pas le(s) propriétaire(s) ultérieur(s) et est non-transférable.
• Aucune garantie ou assurance y figurant ou autrement stipulée n'est applicable lorsque le dommage ou la réparation est causée par un des éléments suivants
• Accident, modification, abus ou mauvaise utilisation de l'appareil tel que la circulation d'air insuffisante dans la chambre ou dans des conditions de fonctionnement anormales (température extrêmement élevée ou pièce
à basse température).
• Utilisation à des fins commerciales ou industrielles (c'est à dire, si l’appareil n’est pas installé dans une résidence d'habita tion domestique).
• Incendie, dégâts des eaux, vol, guerre, émeute, hostilité, les actes de Dieu tels que les ouragans, les inondations, etc.
• Les appels de s e r v ice co n d uisant à la format ion éducative des client s .
• Installation incorrecte (c'est à dire une addition de toute construction ou appareil additionnel(le) ou l'utilisation d’un appareil à l’extérieur qui n'est pas approuvé pour l'extérieur).
Pour le Service ou une Assi st ance, ve uillez nous conta cte r
à: warranty@stirlingmarathon.com ou nous rendre visite sur www.stirlingmarathon.com
7
Page 10

Dépannage
Vous pouvez résoudre de nombreux problèmes communs facilement, et éc on o m is er l e coût d’une intervention.
Essayez les suggestio ns ci-d essous pour voir si vous pouvez résoudre le problème avant d'app eler le service.
un réglage plus bas temporairement.
composant afin et le replacer.
Pour toute question ou préoccupation, veuillez nous contacter à
customerservice@stirlingmarathon.com
ou en ligne sur
www.stirlingmarathon.com
6
Solution
Réglez le bouton sur un autre numéro
pour allumer l'appareil.
Rebranchez le cordon d’alimentation
Vérifier le fusible, le remplacer si
nécessaire
Vérifiez si l'alimentation est contrôlée
par interrupteur ou contactez
un
électricien.
Veuillez consulter la première Section
de réglage de la température
N'ouvrez la porte que pendant une
durée de temps nécessaire
Mettez le régulateur de température sur
Veuillez vous référer à la sec
tion
concernant l'emplacement
de l'in stalla tion.
Mettez le régulateur de température sur
un réglage plus élevé temporairement
Réajustez les pieds
Déplacer légèrement l'appareil.
Si nécessaire, tordre soigneusement le
Panne de courant.
C'est normal.
Cause possible
Bouton de réglage de la température
fixe sur
"O".
Cordon d’alimentation débranché
ou desserré
Le fusible a sauté ou est défectueux
Prise électrique défectueuse ou
contrôlée par interrupteur
La température n'est pas correctement
ajustée
Porte ouverte pendant une longue
période
Une grande quantité de nourriture
chaude a été placée dans l'appareil au
cours des derniers 24 heures.
L’appareil est à proximité d’une source de
chaleur
Température trop basse.
L'appareil n'est pa s à niveau
L'appareil est en contact avec le mur
ou d'autres objets.
Un composant, par exemple un tuyau,
à l'arrière de l'appareil, est en contact
avec une autre partie de l'appareil ou
le mur.
Le congélateur a décon gelé et ne
fonctionne pas o u s’est éteint
Le condenseur se trouve dans
le panneau
Probl
è
me
Le congélateur ne
fonctionne pas
La nourriture est
trop chaude
L'appareil
refroidit trop
Bruits inhabituels
Il y a de l'eau sur
le plancher
Le panneau latéral
est chaud
MFF120W
Problème
Causes possibles
Réfrigérateur ne fonctionne pas
• Le réfrigéra teur est débranché.
• Le disjoncteur s’est déclenché / fusible grillé.
Compresseur s’allume et s’éteint
• La t empéra ture a mbia n te est plus élevée qu e la normal e
• La p o rte est l aiss ée ouverte ou est f réquemment o uv erte.
• Le réfri gérat eur n 'a pas assez de plac e.
• Le réfrigéra teur a réc emment été d ébran ché pour
une période de temps.
Compartiments du réfrigérateur trop
chaud
• Con tr ôle de la température incorrecte
• La p o rte est l aiss ée ouverte ou est f réquemment o uv erte.
• Le joint de la por te ne se referme pas c o rrecteme nt.
• Une gr an de quantité de nourriture chaude a été stocké
récemment. Attendez que le réfrigér ateur puisse atteindre la
température sélectionn ée.
• Le réfri gérat eur a récem m ent ét é déb ranch é pour
une période de temps.
Vibration ou cliqu etis ( une légère
vibration est normale)
• Ajustement nécessaire des pieds réglables
• Le réfrigérateur est pla cé sur une surface non plane
• Le réfri gérat eur touch e le mur. Remettez à niveau et l'éloigner
du mur.
La températur e externe a la surface
du réfrigérateur est élevée
• Les parois extérieures du réfrigérateur peuvent atteindre 30 ° C de plus
que la température ambiante
• Cec i est normal car le compr esseur fonctionne pour
transférer la chaleur de l'intér ieur du réfri gérat eur.
Humidité élevée à l'intérieur d u réfrigéra teur
• La porte est l aissée ouverte ou est f réq uemment ouv ert e.
Humidité fréquente sur la surface extérieure
du réfrigérateur
• C’est normal par temps chaud et humide. L’air transpor te
l'h umidi té dans le réfrigérat eur l o rs q ue les por tes so n t ouvertes.
Gargou illis (comme de l'eau bouillante)
• Cec i est le son normal du réfrigérant (utilisé pour refroidir le
réfrigérateur) circulant dans le système.
Bruits de craquement lorsque le compresseur
se met en marche
• Cec i est normal. Les part i es métalliqu es s e dil at ent et se
contractent, comme des tuyaux d'eau chaude. Le son sera
disparaitra au fur et à mesure que réfrigérateur co ntinue de fonctionner.
La porte ne ferm e pas corr ecte m ent
• Le réfrigér at eur n’est pas sur une surface plane.
• Le joint est sale.
• Le p anier de stockage n’est pas à la bonne plac e.
Page 11

Avertissement Important
5
Page 12

Changement de la Porte Réversible
4
MFF120W
Pièces
Pieces incluses
Tirer
Placez la porte du réfrigérateur sur la
charnière inférieure. Assurez-vous que la
porte soit alignée horizontalement et
verticalement. Attachez la charnière centrale
sur la partie supérieure (à gauche) de la porte
du réfrigérateur, alignez les trous et fixer à la
poutre centrale avec les vis gardées. Fixer
avec un t ournevis (non inclus).
Retirez la broche de droit e du fond de la
porte du congélateur. Du côté opposé,
fixez la broche de remplacement (situé
dans le sac en plastique avec le Manuel)
avec un t ournevis. Remarque: Vous devez
réutiliser les vis de la br oche enlevée dans
cette étape.
Porte congélateur
Étape 5
Replacer porte
Insérer charnière
centrale
Étape 6
Charnière sup.
Couvre charnière sup.
Charnière centrale
Charnière inf.
Broche droit e
Broche gauche
Étape 2
Étape 1
Retirer
Étape 3
Étape 4
Étape 7
Dévissez et retirez la charnière inférieure.
Dévissez et retirez les deux pieds réglables.
Gardez les vis. F ixer la charnière inférieure
avec les vis.
Dévissez et retirez la charnière centrale.
Gardez les vis. Retirez la porte du
réfrigérateur.
Placez la porte du congélateur sur la
charnière centrale. Faire en sorte que la porte
soit alignée horizontalement et
verticalement, et que les joints puissent être
étanches sur toutes les faces avant de fixer la
charnière supérieure. Fixez la charnière
supérieure et le couvercle de la charnière.
Retirez la porte du réfrigérateur.
Retirez la vis, retirez le couvercle de la de la
charnière supérieure. Dévissez et enlevez la
charnière. Gardez les vis.
Avant d’inverser l a porte, ass urez-vous que l'appareil soit débranché et vide. Prévoir un
support ad di tionnel des p ortes pendant que vous enlevez les charnières. Ne comptez pas sur
les aimants pour maintenir la porte en place. Il est recommandé que deux personnes
effectuent cette tâche. NE PAS poser l'appareil complètement à plat ca r ce la pourrai t
endommager le système de refroidissement.
Tirer
Page 13

Utilisation et Entretien
1. Net toyez soigneusement l e congél ateur. Essuyez l'extérieur ave c u n chiffon doux et sec,
et l'intérieur avec un chiffon propre et humide.
2. Insérez le cordon d'ali mentation d ans la pri s e électrique.
3. Tournez la molette du thermostat sur "7". Fermez la porte et laissez le con gélateur
fonctionner pendant 15
-20 minutes.
Rem
arque: Attendez 3-5 min utes ava n t de red émarrer si vo us débr anchez le congélateur.
L'appareil peut ne pas fonctionner correctement si redémarré trop rapidement.
Contrôle
de la temp ér ature
Pour contrôl er la température
, réglez le thermostat. " 1" est le réglage le plus chaud. "7"
est le plus froid. Le cadran
n'a pas à être mis exactem ent s ur un certain nom br e. Pour
faire des cubes de glace dan s le comparti men t con gélat eur, régl ez le thermost at sur le
ré
glage le plus froid et lais sez pendant 24 heures avant de régler la température et y
placer
de la nourri t ure. Si vous choisissez d’en modifier les réglages, réglez le thermostat
d'un incrément à la fois. Après chaque mouvement du bouton de
commande, attendez
quelques heures
. De grand es quantit és d'alim ents peu vent réd uire l'efficacit é de
l'appareil.
.
3
Nettoyage
Nettoyants: Ne jamais uti liser de n ettoyant s abrasif s, lou rds ou des solvants
sur une surface quelconque.
Extérieur: Essuyer avec un chiffon humide et sa vonneux, rincer et sécher.
Pour l es taches tenaces et un cirage périodique, u tilis ez de la cire de silicone.
Intérieur: Lavez les étagères et au t res parties amov i bl es dans de l'eau chaude
savonneuse, rincez et séchez. Lavez l'intérieur avec une solution de bicarbonate
de s o ud e (3 cuillères à soupe pour un litre d'eau) ou de l'eau chaude
savonneuse, rincez et séchez.
Joint de porte: Laver à l'eau chaude savonneuse.
Remplacer toutes les pièces et retourner le cadran du thermostat à la position
désirée.
Dégivrage
Dégivrez vot re c ongélat eur l o rs que le givre ac cumul é su r les étagères de l'évaporateur atteint environ 1/8" d'épaisseur. Pour
décongeler, réglez le bouton du thermostat sur "OFF" ou "0" et enlever tous le contenu du compartiment congélateur. Laissez la
porte du congélateur ouverte pour permettre à la glace accumulée de fondre. Retir ez les gros mor ceaux d e glace au besoin. Ne
pas utiliser d'eau chaude ou d'autres appareils de chauffage électrique pour faire fondre la glace. Après décongélation, enlever la
glace/l’eau accumulée et essuyez le compartiment avec un chiffon doux. Redémarrez l'unité par les instructions de démarrage.
Ne jamais utiliser un couteau o u un a ut re instrument tra nchant pour g ratter la glace/le gel à l'intérieur de l'unité.
Page 14

2
Instructions d’Installation
Avant de connecter l'appareil à l'alimentation, laissez-l e reposer pe ndant environ 4 heures, ce qui réduira la poss ibilité de
dysfonction neme nts dans l e s ystè m e de refroidissement en raison d e la manip ula tio n lors du transport.
Nettoyez l'appareil en profondeur, en particulier à l'intérieur (voir « Comment Nettoyer »).
Dans le cas où les acc essoires intérieurs ne s era ient pas correc te ment placés, les réarranger comme décrit dans «
Description des pièces »
Installez l'appareil dans un emplacement idéal loin de chal eurs et de froids extrêmes. Laisser un espace suff i sant entre le
réf ri gér ateur et la paroi la térale de sorte que la porte puisse s’ou vrir sans obstruction. Le c o ngé l ateur n’est pas conçu pour
une installation intégrée.
Sélectionnez un espace avec plancher résistant et à niveau.
Important
DANGER: Risque de piégeage des enfants. Avant de jeter votre ancien appareil :
Retir er les port es et / ou le couvercle.
Laissez les étag ères en pla ce afin que les enfants ne puissent pas grimp er fa cilement à l’intérieur.
L'appar eil doit êtr e cor rectemen t r accordé à l'alimentation él ectr ique, NE PAS utiliser une rallonge.
Ne touchez p a s l es surfaces FROIDES ou GIVREE tandis que l'appareil fon ctionne, surtout avec les mains mouillées car la
peau p eu t col ler à la sur face froide.
Débr anchez l'appar eil de l'alimentati on électr iq u e avant répara tion ou entretien
Ne pas dégivrer l'a ppareil avec d'autres a ppareils él ectriqu es ( sèche-cheveu x , etc.) et ne jamais gr atter la cou che de gl ace ou
de givre avec des outi ls tranch an ts.
La plaque signalétique se trouve au dos de l'appareil.
Conseils pour Économies en Énergie
E s sayez de ne pas ouvrir la porte trop s ouvent, s urtout quand il fait chaud e t humi de. Un e fois que vous ouvr ez la porte ,
essayez de la refermer dès que possible.
Vérifiez de temps en temps que l'appareil soit bien ventilé (circulation d'air suffisante autour d e l'appareil).
La couche de glace a u gmente la c onsom m ation d'én ergi e , veuillez d on c d ég ivrer l'a p pareil dès q ue la couche de g lace / de
gel accu mulée est de 1/8" d'épaisseur.
Remplacement de l'ampoule
1. Étei gnez le réfri g érateur et retirez le cordon d'al imentation de la prise murale. A ttendez q u elques minutes jusqu 'à ce que
l'ampoule soit froide au toucher..
2. Retir ez le couvercle de l'am p ou le en retir an t une vis qui maintient le couver cle.
3. Dévissez l'an ci enne ampoule et rempla cez-la par une ampoule neuve (max. 10W)
4. Réinstallez la couverture de l'ampou le et la fixer avec la vis reti rée précédemment .
5. Branchez le réfrigérateur à la prise électrique.
Nettoyage de votre Réfrigérateur
Nettoyants : Ne jamais utiliser, de nettoyants abrasifs, de nettoyants lourds ou des solvants sur une surface quelconque.
Extérieur : E s su yer avec un ch iffon humi d e et savonn eu x, rincer et sécher. Pour les taches t ena ces et un cira g e p ériodique, utiliser de
la cire d e s ilicone.
Intérieur : Laver les étagères et autres parties amovibles dans d e l’eau cha u d e sa vonneuse, rincez et s échez. Lavez l’intérieur avec
une solution de bicarbonate de soude (3 cuillères à soupe à un litre d'eau) ou de l’eau chaude sa vonneuse, rincez et s échez.
Joints de porte magnéti ques : Laver à l'eau ch a ude savonneuse.
La touche finale : Remplacer toutes les pièces et r etourner le ca d ran du ther mostat à la position d és irée.
MFF120W
Page 15

1
Pour r éduire les risques d'incendie, de choc électriq ue ou de blessure, suivre ces précautions de base lors de l’ utilisation de votre appareil.
1)
ATTENTION ---- Gardez le s ou ve rtures de ve nt i l ation, dans l'enceinte de l’appareil ou dans la structure intégrée, sans obstacles.
2) ATTENTION ---- Ne pas utiliser de dispositifs mécaniques ou autres moyens pour accélérer le processus de dégivrage, autres que ceux recommandés par le fabricant.
3) ATTENTION ---- Ne pas utiliser d’appareils électriques à l’intérieur de l'appareil
4) ATTENTION ---- DANGER: Ne jamais laisser d’enfants jouer avec, exploiter, ou ramper à l’intérieur de l’appareil. Risque d'enfermement des enfants. Avant de jet er ou de rec ycler votre
vieux réfrigérateur ou congélateur :
• Retirez complètement les portes ou les couvercles
• Laissez les étagères en place afin que les enfants ne puissent pas grimper facilement à l’intérieur.
5) Toujours débrancher l’appareil avant toute opération de maint enance ou de service sur l'appareil.
6) Si le composant est endommagé, il doit être remplacé par le fabricant, un agent de service ou un personne similaire qualifiée afin d’éviter tout danger.
7) Suivre la règlementation locale p ou r vous déb ar r as se r de l’ a pp a re il , dû à l’infl a mm a bil it é du réfri gé r a nt et du gaz. Tous les produ i t s de réfrigé r ati o n c onti ennent de s réfri gé r ant s, qu i , se l o n les
directives de la loi fédérale, doivent être enlevés au préalable. Il est de la responsabilité du consommateur de se conformer aux réglementations fédérales et locales lorsque vous vous débarrassez
de ce produit.
8) Cet appareil est destiné à être utilisé dans un environnement domestique ou de petit commerce tel que dans:
• les cuisines de personnels, les ateliers, les bureaux et autres environnements de travail ;
• les maisons de ferme et par les clients dans les hôtels, motels et autres environnements de type résidentiel ;
• les environnements de type maisons d’hôtes ;
• la restauration et autres applications similaires non liées à la grande distribution.
9) Ne pas entreposer ou utiliser de l’essence ou tout autre liquide inflammable et à l’intérieur ou dans à proximité du réfrigérateur.
10) Ne pas utiliser une rallonge avec cet appareil. Si le cordon d'alimentation est trop court, demandez à un électricien qualifié d'installer une prise près de l'appareil. L’utilisation d'une rallonge
peut négativement impacter la performance de l'appareil.
ATTENTION
1. Étagère congélateur
2. Contrôle de la température du congélateur
3. Contrôle de la température du réfrigérateur
5. Étagère à bouteilles
6. Étagère en verre trempé
7. Couverture Bac à légumes
8. Bac à légumes
9. Pieds réglables
10. Rail de la porte congélateur
11. Po rt e canettes
12. Réfrigérateur Porte Bin I
13. Gallon rangement
4..Ampoule
14. Réfrigérateur Porte Bin II
1
2
3
4
5
6
7
8
9
10
11
13
12
14
Page 16

Réfrigérateur Sans Givre 12 pi³
Guide d'utilisation et d’entretien du propriétaire
MFF120W
 Loading...