

Page 1
U.S. Patent Pending
Chameleon
User Manual
Page 2

Chameleon User Manual Doc# 100-03-080
1
Table of Contents
1 Introduction ............................................................................................................................. 2
2 Installation and Setup .............................................................................................................. 2
2.1 Uninstalling ..................................................................................................................... 5
3 Chameleon Encrypted Drives: Protecting Your Data ............................................................ 5
4 Encrypting Individual Files and Folders ................................................................................. 8
4.1 Encrypting Individual Files and Folders ......................................................................... 8
4.2 Decrypting Files ............................................................................................................ 11
4.3 View Encrypted File Details ......................................................................................... 14
5 Duplicating a Chameleon Device ......................................................................................... 15
6 Disabling Lost Chameleon Devices ...................................................................................... 16
6.1 Migrating Encrypted (.cge) Files .................................................................................. 18
7 Password Protection .............................................................................................................. 19
7.1 Password Modification ................................................................................................. 20
8 Adding, Deleting, and Resizing Encrypted Drives ............................................................... 21
9 Additional Functions and Limitations .................................................................................. 23
9.1 Using a Chameleon Device with Multiple Computers ................................................. 23
9.2 Using Multiple Devices with the Same Computer ....................................................... 23
9.3 Windows Paging File .................................................................................................... 24
9.4 Safe Removal ................................................................................................................ 25
9.5 Backing up your Data ................................................................................................... 26
10 Limited Warranty and Legal Notices ................................................................................ 26
Copyright © LucidPort Technology, Inc.
485 E. Evelyn Ave., Sunnyvale, CA 94086
Tel: (408)720-8800 Fax: (408)720-8900
www.lucidport.com
Page 3

Chameleon User Manual Doc# 100-03-080
2
1. Before installing the Chameleon software, make sure any previous versions of the
Chameleon software are uninstalled. Uninstalling does not delete existing encrypted drives.
2. Insert the installation CD and run the Setup program.1 (You can also download the setup
program from http://www.marathon6.com/chameleon.)
1 Introduction
Chameleon protects the files on your PC with AES-256 encryption. Chameleon differs from
other USB encryption devices by protecting the files on your hard disk rather than transferring
them to a USB device. Chameleon creates an encrypted drive using the free space in your hard
disk. Files and applications stored in this encrypted drive are protected and can only be accessed
when the Chameleon device is plugged in. Like the key for your car, the Chameleon device acts
like a physical key for your hard disk.
Chameleon works with Windows XP, Vista, and Win7 based PCs.
2 Installation and Setup
1
On some Windows7 computers, you may get a User Account Control warning that a program is trying to make
changes to the computer. Select “Yes” or “Install” if this occurs.
Copyright © LucidPort Technology, Inc.
485 E. Evelyn Ave., Sunnyvale, CA 94086
Tel: (408)720-8800 Fax: (408)720-8900
www.lucidport.com
Page 4
Chameleon User Manual Doc# 100-03-080
3
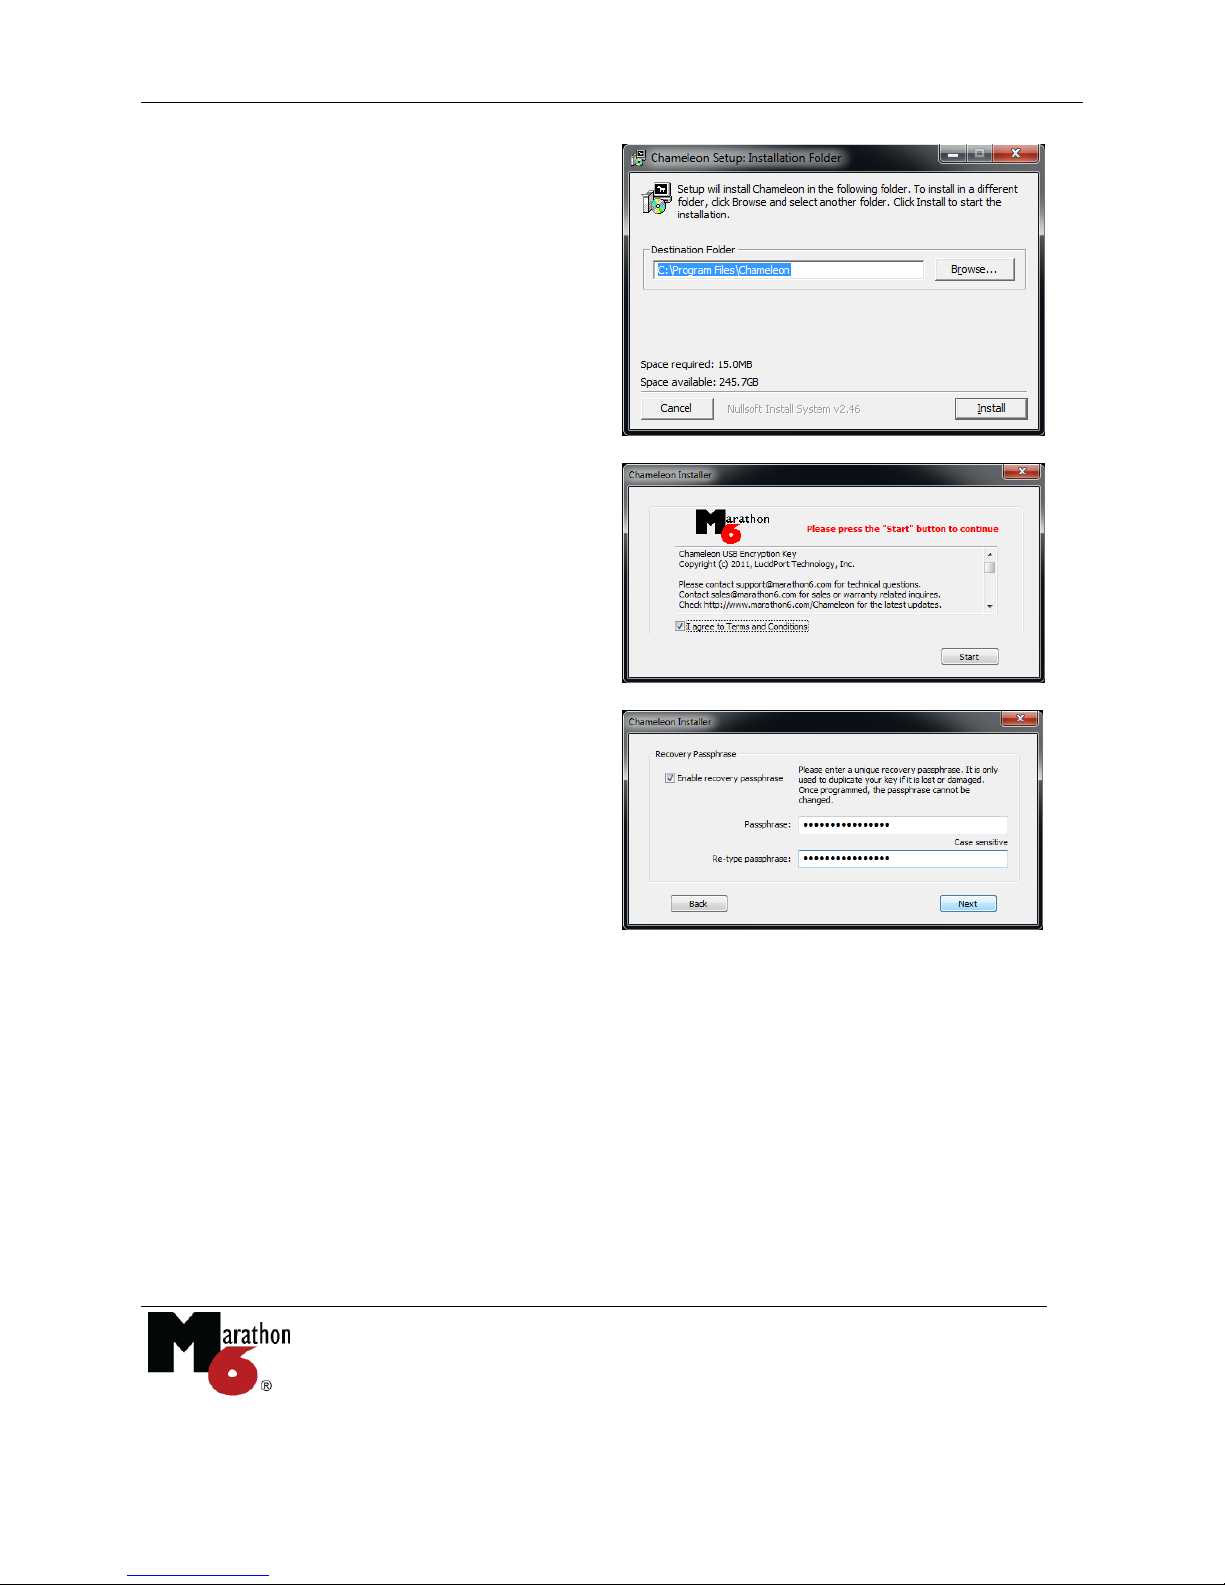
3. Click on the "Install" button to load the
software.
4. Insert the Chameleon device then press
"Start" to launch the installation wizard.
5. Choose between A), B), or C)
A) Choose a Recovery Passphrase. This passphrase is only used for making duplicate copies
of your Chameleon device (in case you lose it) and not used in normal operation. You can think
of the Recovery Passphrase as a password stored on the device itself.
Select a unique passphrase. Another Chameleon device with the same passphrase may be able to
access your data. Once programmed, the Recovery Passphrase can never be changed.
A good passphrase is at least 16 characters long and includes random letters (upper and lower
case), numbers, and special symbols. Protect your passphrase as you would protect a password.
An attacker who learns your passphrase can use it to make a duplicate device. There is no way
to duplicate a Chameleon device without your Recovery Passphrase.
Copyright © LucidPort Technology, Inc.
485 E. Evelyn Ave., Sunnyvale, CA 94086
Tel: (408)720-8800 Fax: (408)720-8900
www.lucidport.com
Page 5
Chameleon User Manual Doc# 100-03-080
4
B) For the best balance of security and redundancy, use a random sequence of at least 64
numbers and letters as the passphrase. After completing the installation, make several duplicate
devices with this sequence as backups (See “5 Duplicating a Chameleon Device”). In order
to create additional duplicates in the future, save the random sequence in a secure location.
Delete the sequence, otherwise.
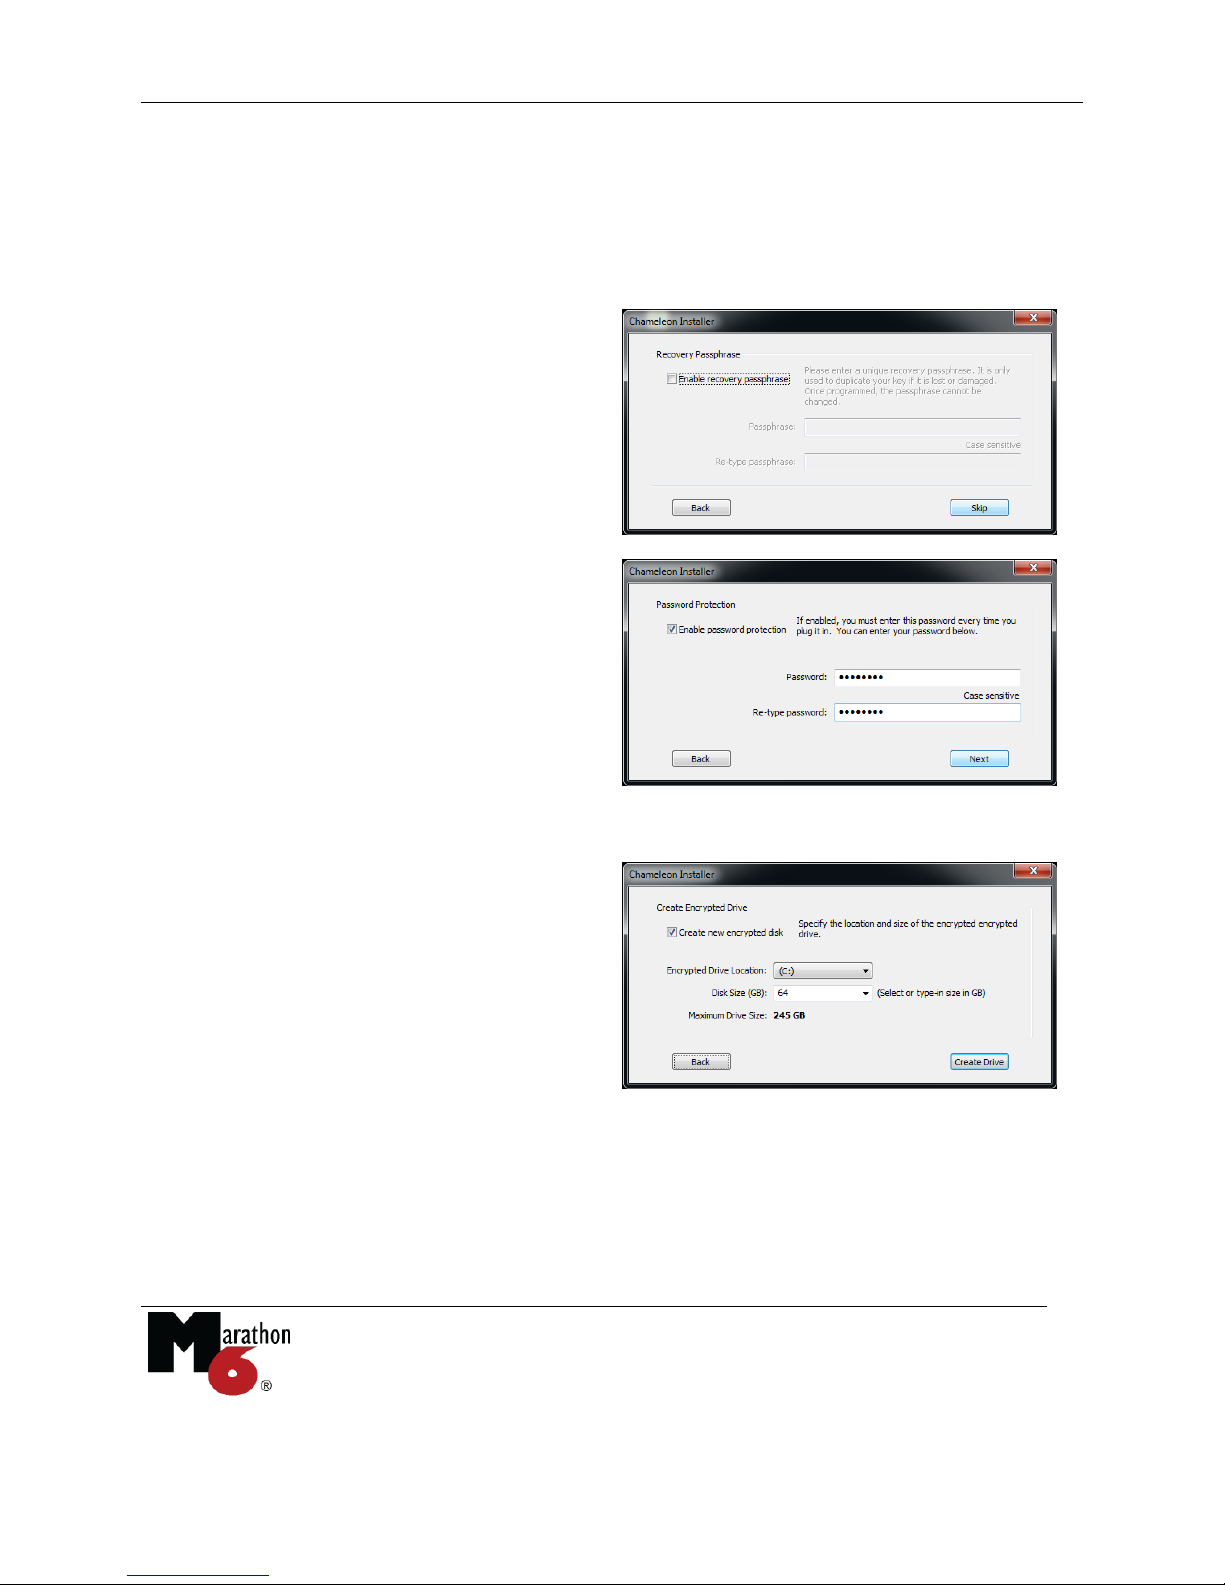
C) Disable the Recovery Passphrase. For the
strongest security, disable the Recovery
Passphrase. This instructs the Chameleon
device to generate its own random encryption
key. However, this means that you will not be
able to duplicate the device if it is lost or
broken.
6. Enable/Disable Password. When enabled
the password must be entered every time
the device is plugged in. A password is not
required and may be added or changed at
any time.
If enabled, the password should be
different from the Recovery Passphrase. A
password protects the Chameleon device
from unauthorized use.
7. Create an encrypted drive. Specify the
size and location of the drive. The installer
creates the encrypted drive using the free
space at that location. It can reside on your
local hard disk or on external USB drives.
The encrypted drive can be resized later.
All content copied to the encrypted drive is automatically protected. It is accessible when the
device is inserted, and disappears when the device is removed.
Copyright © LucidPort Technology, Inc.
485 E. Evelyn Ave., Sunnyvale, CA 94086
Tel: (408)720-8800 Fax: (408)720-8900
www.lucidport.com
Page 6

Chameleon User Manual Doc# 100-03-080
5
2.1 Uninstalling
You can uninstall the Chameleon software by locating “Chameleon” from the Windows start
menu and selecting “Uninstall” (Start > All Programs > Chameleon > Uninstall). Uninstalling
does not remove your encrypted drives. To remove the encrypted drives, delete the directory
ChameleonDrives from your hard disk’s top level directory (ex. C:\ ChameleonDrives\). The
ChameleonDrives directory can only be deleted when the Chameleon device is disconnected.
3 Chameleon Encrypted Drives: Protecting Your Data
Plug in your Chameleon device to access the encrypted drive. The encrypted drive appears like
any other hard disk in your system. You can store files in it, open files from it, install and run
programs from it, move files from one directory to another, and direct applications to use the
encrypted drive. Once the Chameleon device is removed, the encrypted drive disappears from
Windows. A forensic examination of your hard disk will reveal only encrypted, apparently
random, data.
Only files that are stored on the Chameleon drive are encrypted. Any files copied or read from
the encrypted drive are automatically decrypted. For instance, if a user were to attach a file from
an encrypted drive to an email, that file would be attached decrypted. For securing email
attachments and cloud storage, see section “4 Encrypting Individual Files and Folders”.
You can copy files to the encrypted drive simply by dragging and dropping them there.
However, this retains the original unencrypted file at its original location. A more secure method
is to right-click drag and drop. Hold down the right mouse button, then drag the selected file to
the encrypted drive. A dialog appears showing “Copy”, “Move”, and “Secure move”. The
secure move option moves the file into the encrypted drive, then scrubs away any traces of that
file from its original location.2 If a significant amount of data is involved, this may take some
time.
2
The standard Windows move command copies the file, then marks the original file as deleted. The deleted file
may be recoverable with specialized tools. The secure move option prevents recovery by overwriting the deleted
file.
Copyright © LucidPort Technology, Inc.
485 E. Evelyn Ave., Sunnyvale, CA 94086
Tel: (408)720-8800 Fax: (408)720-8900
www.lucidport.com
Page 7

Chameleon User Manual Doc# 100-03-080
6
You can also securely move a file to the encrypted drive by using the secure paste option. Right
click on the file or folder you want to move, then select “Cut”. Next, right click on a encrypted
drive or sub-directory, then select “Secure Paste”. Like the secure move option, the secure paste
command cleans away all traces of the unencrypted files from the hard disk.
Secure commands are only available when the Chameleon device is plugged in.
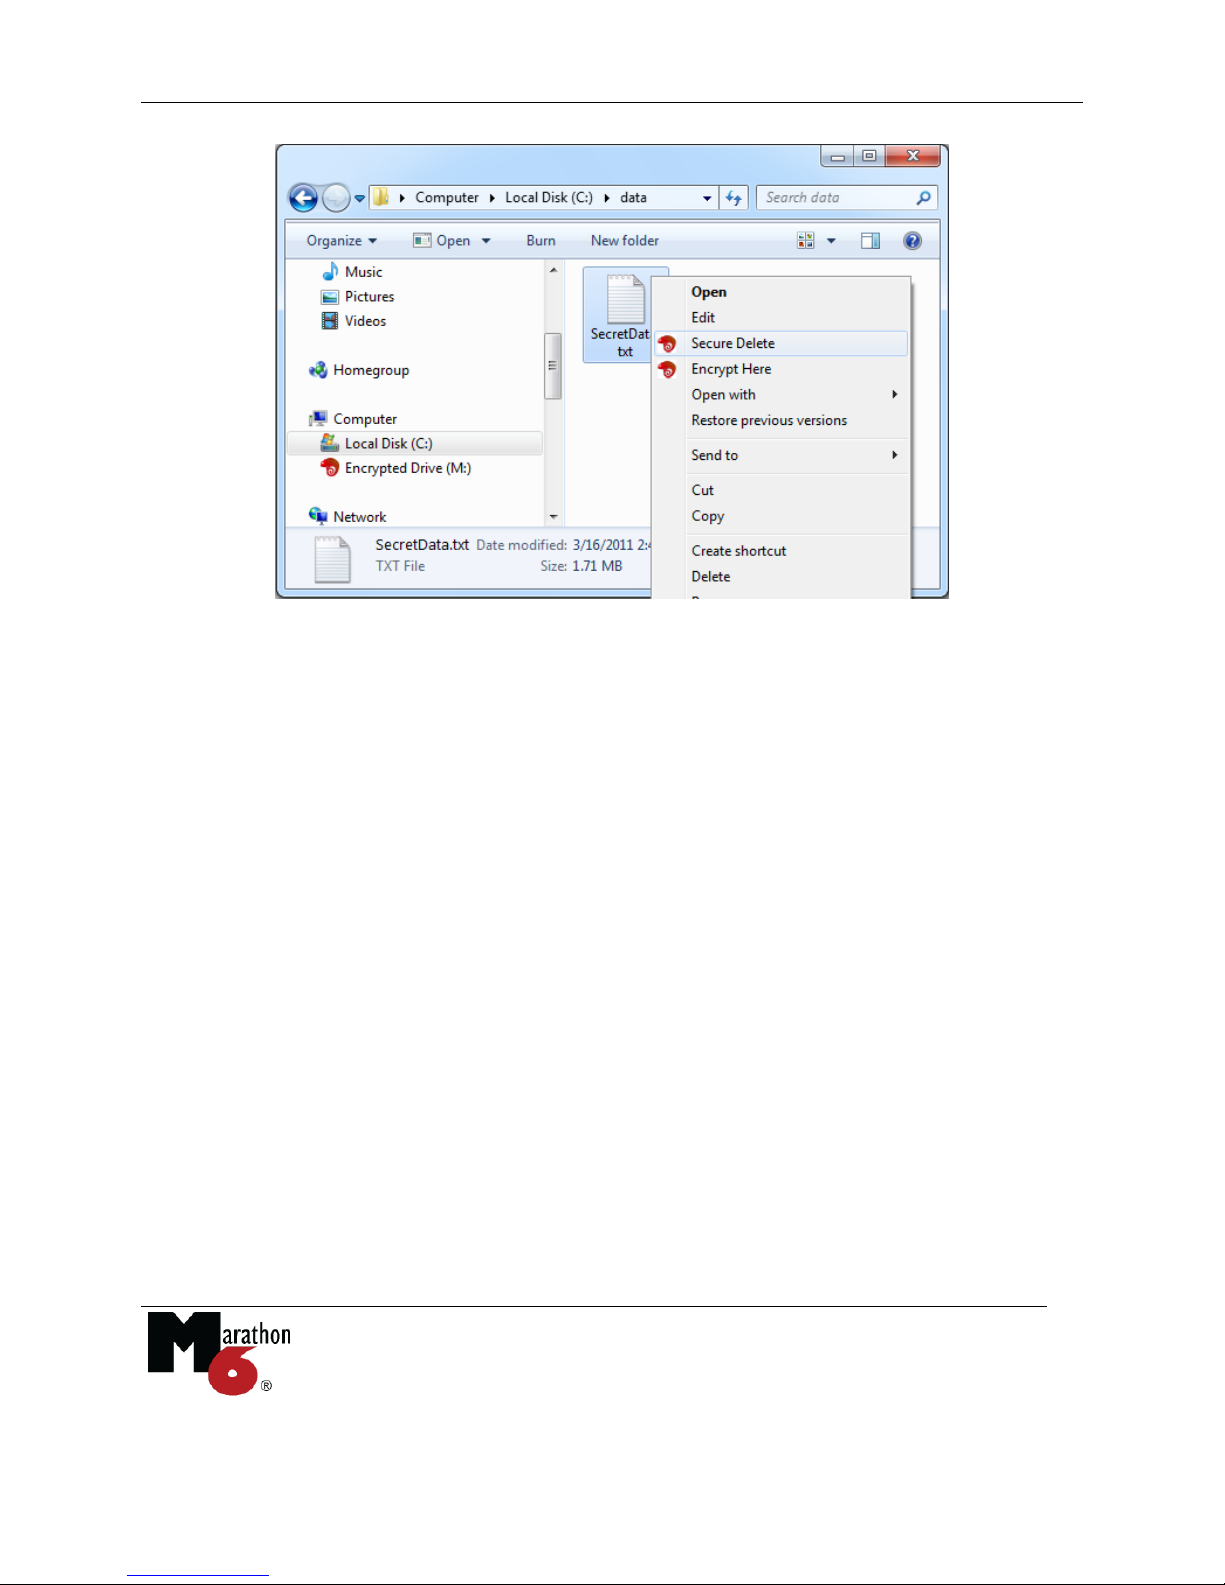
The Chameleon software also adds a secure delete command. Right click on any file or folder
then select “Secure Delete”. This is more secure than deleting the file then deleting it again from
the Windows’ Recycle Bin. Since secure delete overwrites every bit of the file from the hard
disk, this may take some time if a significant amount of data is involved. The normal Windows
cut, paste, and delete commands are still available.
Copyright © LucidPort Technology, Inc.
485 E. Evelyn Ave., Sunnyvale, CA 94086
Tel: (408)720-8800 Fax: (408)720-8900
www.lucidport.com
Page 8
Chameleon User Manual Doc# 100-03-080
7
Deleting a file stored in an encrypted drive places it in the Windows’ Recycle Bin. You can
recover the file from the Recycle Bin as long as the Chameleon device is still inserted. Deleted
files disappear from the Recycle Bin when the device is removed. They reappear in the Recycle
Bin when the device is reinserted. There is no need to secure delete any files located in the
encrypted drive.
Any files you create directly on the encrypted drive are automatically protected. However, some
applications store temporary information to your unencrypted drive. This information may be
recoverable with specialized tools. You should direct your applications to store their temporary
files in the encrypted drive. This can usually be accomplished by installing your applications
directly in the encrypted drive.
You can plug or unplug the Chameleon device at any time. Your computer is still fully
functional without the Chameleon device. Only the encrypted drive (and any programs and data
in it) will be unavailable. Be aware that unplugging the device while writing data to the
encrypted drive may result in data corruption. This is similar to removing an external hard disk
in the middle of a write to it. To be absolutely sure that no writes are occurring, use the
Windows Safe Remove function before unplugging the device.
Copyright © LucidPort Technology, Inc.
485 E. Evelyn Ave., Sunnyvale, CA 94086
Tel: (408)720-8800 Fax: (408)720-8900
www.lucidport.com
Page 9
Chameleon User Manual Doc# 100-03-080
8
1. Plug in the device
2. Enter your password
(if enabled)
If an application is open with an encrypted file, that application and file may still be accessible
even after you unplug the Chameleon device. For example, let’s say you are editing a protected
file in Microsoft Word. If you unplug the device, a copy of this file is still open in Word. You
cannot save this file to the encrypted drive until you re-insert the device. However, you are still
able to view and edit the parts of the file cached in working memory.
4 Encrypting Individual Files and Folders
The Chameleon device automatically encrypts all data placed in the encrypted drive and
automatically decrypts all data taken out of the encrypted drive. While convenient and secure,
this does not protect information you email or store online. For these situations, the Chameleon
device can encrypt and decrypt individual files and folders.
4.1 Encrypting Individual Files and Folders
You can encrypt a single file, a group of files, or whole directories (but not shortcuts or special
icons like the Windows Recycle Bin). Files encrypted by a Chameleon device can only be
decrypted using the same device (or by its Master).
Copyright © LucidPort Technology, Inc.
485 E. Evelyn Ave., Sunnyvale, CA 94086
Tel: (408)720-8800 Fax: (408)720-8900
www.lucidport.com
Page 10

Chameleon User Manual Doc# 100-03-080
9
3. Right click on the file
or folder you want to
protect.
4. Select “Encrypt
here” to create an
encrypted version of
the selected file
1. Plug in the device
2. Enter your password
(if enabled)
3. Click and hold down the right mouse button on the file or folder you want to protect.
The encrypted file appears as a file in the same folder with the same file name but with the
extension “.cge”. If desired, you can change the file name, but not the extension. This file is
encrypted using device’s AES-256 hardware. Unlike the encrypted drive, the encrypted file is
still visible when the device is removed. It can be attached to an email, copied to a thumb drive,
stored on the network, or synced to a cloud service.
You can also encrypt individual files and folders with right click drag and drop.
Copyright © LucidPort Technology, Inc.
485 E. Evelyn Ave., Sunnyvale, CA 94086
Tel: (408)720-8800 Fax: (408)720-8900
www.lucidport.com
Page 11

Chameleon User Manual Doc# 100-03-080
10
4. Drag the mouse
pointer to the target
folder and release the
right mouse button.
The encrypted file will
be created in this
folder.
5. Select “Encrypt move here” or “Encrypt copy here”.
“Encrypt move here” places the encrypted file at the destination while securely deleting
the source file.
“Encrypt copy here” does the same without deleting the source file.
1. Plug in the device
2. Enter your
password (if
enabled)
3. Right click on the file or folder you want to encrypt, then select “Cut” or “Copy”. You
can also use the Cut (CTRL+x) or Copy (CTRL+c) keyboard shortcuts.
You can also encrypt a file or folder by using the encrypted paste option:
Copyright © LucidPort Technology, Inc.
485 E. Evelyn Ave., Sunnyvale, CA 94086
Tel: (408)720-8800 Fax: (408)720-8900
www.lucidport.com
Page 12

Chameleon User Manual Doc# 100-03-080
11
4. Right click on
the destination
drive or
directory.
5. Select “Encrypt Paste”
This places the encrypted file at the destination. If you selected “Cut”, the source file will be
securely deleted after the encryption completes.
1. Plug in the device
2. Enter your password
(if enabled)
3. Double click the .cge file.
The decryption process will begin immediately.
4.2 Decrypting Files
To decrypt a .cge file:
Note: if you open the .cge file from an application (e.g. a web browser) using (for example)
“Open With”, then the file will be downloaded and decrypted in a temporary folder of the
application’s choosing. This will place the decrypted contents of the .cge file in an unintended
folder. Instead of opening the .cge directly from the application, save the .cge file to a folder of
your choice (using “Save As”), and then decrypt the file.
Copyright © LucidPort Technology, Inc.
485 E. Evelyn Ave., Sunnyvale, CA 94086
Tel: (408)720-8800 Fax: (408)720-8900
www.lucidport.com
Page 13

Chameleon User Manual Doc# 100-03-080
12
1. Plug in the device
2. Enter your password
(if enabled)
3. Right click on the
.cge file to be
decrypted.
4. Select “Decrypt
here” to create a copy
of the decrypted file(s)
or folder(s) contained
within the .cge file
1. Plug in the device
2. Enter your password
(if enabled)
The other methods for decrypting .cge files are essentially identical to encrypting:
Likewise, you can decrypt .cge files using the right-click/drag and drop method. Use this
method when the .cge file is located in unsecure storage. It is more secure because it avoids
having your unencrypted data reside (temporarily) in the unsecured storage. For instance, you
may have a .cge file stored on a network drive. Instead of double-clicking the file to decrypt it
on the network folder, you could use the following method to decrypt the file onto your local
hard drive.
Copyright © LucidPort Technology, Inc.
485 E. Evelyn Ave., Sunnyvale, CA 94086
Tel: (408)720-8800 Fax: (408)720-8900
www.lucidport.com
Page 14

Chameleon User Manual Doc# 100-03-080
13
3. Click and hold down the right mouse button on the .cge file.
4. Drag the mouse
pointer to the target
folder and release the
right mouse button.
The decrypted
contents will be
created in this folder.
5. Select “Decrypt move here” or “Decrypt copy here”.
“Decrypt move here” places the decrypted contents at the destination while securely
deleting the .cge file. You may want to use this method to avoid having your
unencrypted data reside (temporarily) in remote or unsecured storage.
“Decrypt copy here” does the same without deleting the source file.
1. Plug in the device
2. Enter your password
(if enabled)
3. Right click on the .cge file to be decrypted, then select “Cut” or “Copy”. You can also
use the Cut (CTRL+x) or Copy (CTRL+c) keyboard shortcuts.
The Decrypt Paste option is also available:
Copyright © LucidPort Technology, Inc.
485 E. Evelyn Ave., Sunnyvale, CA 94086
Tel: (408)720-8800 Fax: (408)720-8900
www.lucidport.com
Page 15

Chameleon User Manual Doc# 100-03-080
14
4. Right click on the
destination drive or
directory.
5. Select “Decrypt Paste”
This places the decrypted contents at the destination. If you selected “Cut”, the source file
will be securely deleted after the decryption completes.
1. Plug in the device
2. Enter your
password (if
enabled)
4.3 View Encrypted File Details
To view the details of an encrypted file:
Copyright © LucidPort Technology, Inc.
485 E. Evelyn Ave., Sunnyvale, CA 94086
Tel: (408)720-8800 Fax: (408)720-8900
www.lucidport.com
Page 16

Chameleon User Manual Doc# 100-03-080
15
3. Right click on the
.cge file
4. Select “Encrypted
File Details”
5. The file details are
displayed in a new
window
1. Plug in a new Chameleon device.
2. Start the
Chameleon
Manager
Click on Windows “Start” >
All Programs >
Chameleon >
Chameleon Manager
5 Duplicating a Chameleon Device
If you lose or break your Chameleon device, the data in the encrypted drive can be recovered
using a new Chameleon device and the Recovery Passphrase you specified during installation.
This process can also be used to create duplicate Chameleon devices. Devices without a
Recovery Passphrase cannot be duplicated.
Copyright © LucidPort Technology, Inc.
485 E. Evelyn Ave., Sunnyvale, CA 94086
Tel: (408)720-8800 Fax: (408)720-8900
www.lucidport.com
Page 17

Chameleon User Manual Doc# 100-03-080
16
3. In the “Duplicate
Key” tab, enter
your original
Recovery
Passphrase.
4. Click the “Create”
button.
This new duplicate device will not have a password associated with it. Click on the “Password
Management” tab to add one.
You do not need the original Chameleon device to make a duplicate. But as a precaution, an
encrypted drive must be present for successful duplication.
6 Disabling Lost Chameleon Devices
You can lock out a lost device by changing a device’s Recovery Passphrase and migrating all
encrypted drives3 to the new device. Each device can only be changed once. To repeat this
procedure, you will need a new Chameleon device. As a precaution, an encrypted drive must be
present for successful migration.
You will need a Chameleon device programmed with the original Recovery Passphrase that you
specified during installation. If your original device has been lost, you will need to prepare a
replacement (see “5 Duplicating a Chameleon Device”). Your hard disk (C:\) must have
enough free space to contain all the data on the encrypted drives. Depending on the volume of
3
Including backups
Copyright © LucidPort Technology, Inc.
485 E. Evelyn Ave., Sunnyvale, CA 94086
Tel: (408)720-8800 Fax: (408)720-8900
www.lucidport.com
Page 18

Chameleon User Manual Doc# 100-03-080
17
1. Plug in a duplicate of the original Chameleon device.
2. Enter your password (if
enabled).
3. Start the Chameleon
Manager
Click on Windows “Start” >
All Programs >
Chameleon >
Chameleon Manager
4. Select the “Change
Encryption” tab.
5. Enter the new Recovery
Passphrase. (Refer to “2
Installation and Setup” on
choosing a Recovery
Passphrase).
6. Press “Change”.
encrypted data, this process may take some time. Any unconnected encrypted drives (and
backups) will still be accessible by the original/lost device. You will be prompted to migrate
them when they are later connected.
To change the device and migrate the encrypted drives:
Copyright © LucidPort Technology, Inc.
485 E. Evelyn Ave., Sunnyvale, CA 94086
Tel: (408)720-8800 Fax: (408)720-8900
www.lucidport.com
Page 19

Chameleon User Manual Doc# 100-03-080
18
1. Plug in the device
2. Enter your
password (if
enabled)
3. Start the
“Encrypted File
Migrator”
Click on Windows “Start” >
All Programs >
Chameleon >
Encrypted File Migrator
This procedure creates replacement encrypted drives using the new Recovery Passphrase with all
your encrypted files in it. The updated Chameleon device will not have a password associated
with it. Click on the “Password Management” tab to add one.
Unmigrated encrypted drives are still accessible with the new Chameleon device.
6.1 Migrating Encrypted (.cge) Files
In addition to encrypted drives, you must also re-encrypt .cge files that were secured by the
original encryption key.
Copyright © LucidPort Technology, Inc.
485 E. Evelyn Ave., Sunnyvale, CA 94086
Tel: (408)720-8800 Fax: (408)720-8900
www.lucidport.com
Page 20

Chameleon User Manual Doc# 100-03-080
19
4. Select the .cge files
to be migrated.
Drag them directly
into the file list
window.
or
Click on “Add Files”,
navigate to and select
the files.
5. Close all open files residing in the encrypted drives.
Before the migration process begins the encrypted drives will be detached. If a file is
open, the Migrator will prompt the user to close it.
6. Click on the “Migrate” button
Once the migration process is complete, the lost device will not be able to access the encrypted
file. The hard disk containing the .cge files must have enough free space to contain a copy of the
largest file in the list. Depending on the volume of encrypted data, this process may take some
time.
Your encrypted drives will be reattached when the migration process is complete.
7 Password Protection
By default, no passwords are required for Chameleon devices. However, adding password
protection secures your data in the event that you lose your device along with your PC. When
enabled, the Chameleon software requests the password whenever it is plugged in or when the
computer is restarted or wakes from sleep.
Copyright © LucidPort Technology, Inc.
485 E. Evelyn Ave., Sunnyvale, CA 94086
Tel: (408)720-8800 Fax: (408)720-8900
www.lucidport.com
Page 21

Chameleon User Manual Doc# 100-03-080
20
1. Plug in the device
2. Enter your
password (if already
enabled)
3. Start the
Chameleon
Manager
Click on Windows “Start” >
All Programs >
Chameleon >
Chameleon Manager
The password is different from the Recovery Passphrase. The Recovery Passphrase is only
entered during initialization or duplication. When enabled, the password must be entered every
time the device is plugged in. It is used to prevent unauthorized access to your device, not to
protect your data. Chameleon devices with the same Recovery Passphrase, but different
passwords can access the same encrypted drives.
If you forget your password, remove password protection by entering your Recovery Passphrase
at the password prompt.
7.1 Password Modification
You can add, change, or remove password protection as many times as you want. It is possible
to have duplicate devices with different passwords (or no passwords at all). Be aware that a
Chameleon device without password protection can access the data protected by a different
device with password protection as long as they have the same Recovery Passphrase.
To modify password options:
Copyright © LucidPort Technology, Inc.
485 E. Evelyn Ave., Sunnyvale, CA 94086
Tel: (408)720-8800 Fax: (408)720-8900
www.lucidport.com
Page 22

Chameleon User Manual Doc# 100-03-080
21
4. Select the
“Password
Management” tab.
To add a password, select “Set New Password” then enter the new password and
click the “Proceed” button.
To change your password: Select “Change Password”. Enter your existing
password. Enter the new password and verify it. Click the “Proceed” button.
To remove the password, select “Remove Password” then enter your existing
password and click the “Proceed” button.
You can change the password as many times as you want.
8 Adding, Deleting, and Resizing Encrypted Drives
You can add, delete, or resize encrypted drives at any time. As long as there is sufficient disk
space, there is no limit to the number of encrypted drives you can have associated with a single
device. Encrypted drives can be created on your internal hard disk as well as external USB
drives.
Copyright © LucidPort Technology, Inc.
485 E. Evelyn Ave., Sunnyvale, CA 94086
Tel: (408)720-8800 Fax: (408)720-8900
www.lucidport.com
Page 23

Chameleon User Manual Doc# 100-03-080
22
1. Plug in your device.
2. Enter your
password (if already
enabled)
3. Start the
“Chameleon
Manager”
Click on the Windows “Start” >
All Programs >
Chameleon >
Chameleon Manager
4. Select the “Drive
Management” tab.
To add a drive, specify the size and location of the encrypted drive, then click the “Create
Drive” button.
Copyright © LucidPort Technology, Inc.
485 E. Evelyn Ave., Sunnyvale, CA 94086
Tel: (408)720-8800 Fax: (408)720-8900
www.lucidport.com
Page 24

Chameleon User Manual Doc# 100-03-080
23
To delete a drive, select the existing drive from the drop down menu, then select “Delete
Drive”. Click on the “Delete Drive” button. You will be prompted to type in a
confirmation.
To resize a drive, select your drive from the drop down menu, then select “Resize Drive”.
Enter the desired size, then click the “Resize Drive” button. When reducing drive size,
your hard disk (C:\) must have enough free space to temporarily hold all the contents of
the encrypted drive.
9 Additional Functions and Limitations
9.1 Using a Chameleon Device with Multiple Computers
A single Chameleon device can be used on multiple computers.
If the Chameleon software has not been installed, follow section 2 “Installation and Setup”
to install it on another computer. After Step #4, the installer will jump straight to Step #7 to
create an encrypted drive if the device has already been initialized.
If the Chameleon software has already been installed, refer to section 2 “Installation and
Setup” Step #7 to create an encrypted drive.
9.2 Using Multiple Devices with the Same Computer
You can have multiple encrypted drives associated with different Chameleon devices on the
same computer and hard disk.
Additional software installation is unnecessary. Plug in the second device and use the Chamleon
Manager to make encrypted drives associated with this device. Unless they are duplicates, the
second device can only access its own drives – and not the drives associated with the first device.
Should you no longer want to use a particular device on a particular PC, delete its encrypted
drives using the Chameleon Manager instead of uninstalling the Chameleon software.
Uninstalling the Chameleon software does not delete the encrypted drives.
The Chameleon software does not support more than one Chameleon device being inserted at a
time.
Copyright © LucidPort Technology, Inc.
485 E. Evelyn Ave., Sunnyvale, CA 94086
Tel: (408)720-8800 Fax: (408)720-8900
www.lucidport.com
Page 25

Chameleon User Manual Doc# 100-03-080
24
1. Plug in the device.
2. Enter your
password (if already
enabled)
3. Start the
“Chameleon
Manager”
Click on the Windows “Start” >
All Programs >
Chameleon >
Chameleon Manager
9.3 Windows Paging File
Windows may store temporary data in its paging file (virtual memory). This file is usually
unencrypted and is updated continuously. Enable pagefile encryption to direct Windows to
encrypt its paging file.
To enable page file encryption:
Copyright © LucidPort Technology, Inc.
485 E. Evelyn Ave., Sunnyvale, CA 94086
Tel: (408)720-8800 Fax: (408)720-8900
www.lucidport.com
Page 26

Chameleon User Manual Doc# 100-03-080
25
4. Select the
“Advanced” tab.
5. Select “Enable
pagefile encryption”
then click on
“Apply”
Encrypting the paging file eliminates a potential security hole, but slows the computer down
slightly. Only Windows 7 supports page file encryption (ignored for other operating systems).
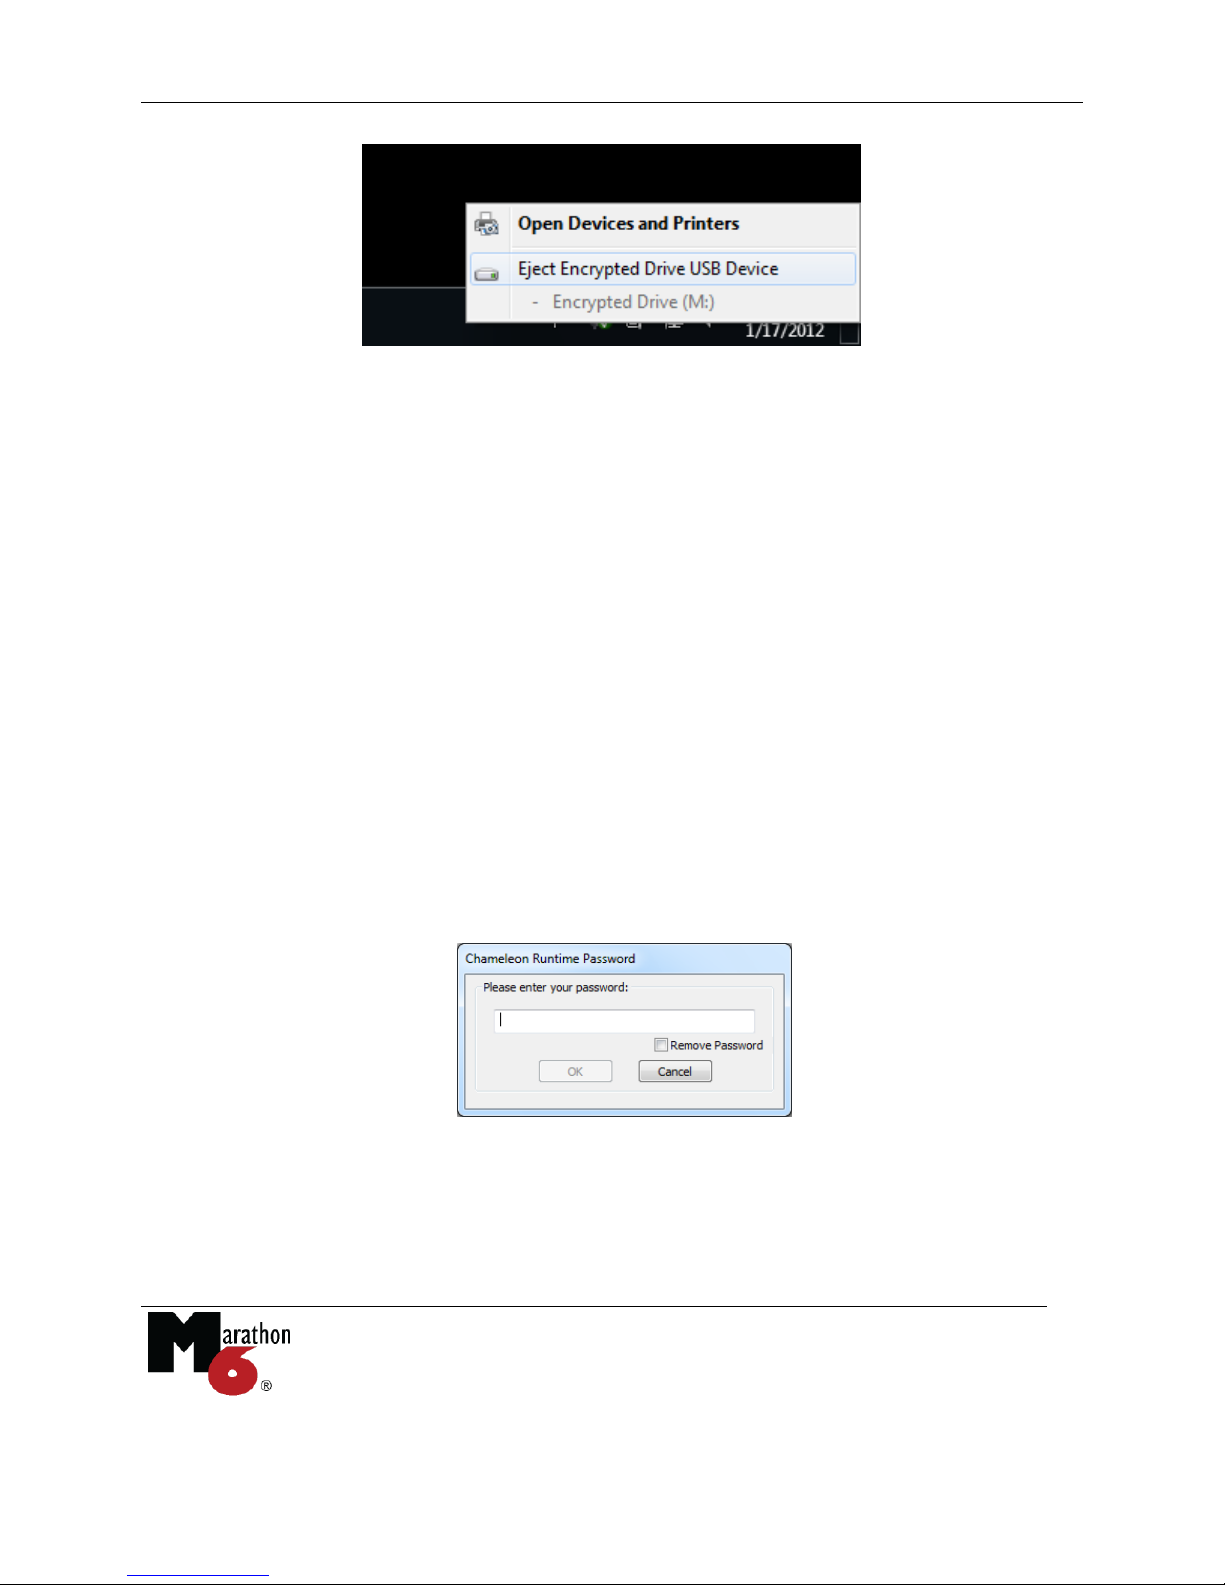
9.4 Safe Removal
Unplugging the Chameleon device while writing data to the encrypted drive may result in data
corruption. This is similar to removing an external hard disk in the middle of a write to it. To be
absolutely sure that no writes are occurring, use the Windows Safe Remove function before
unplugging the device.
Copyright © LucidPort Technology, Inc.
485 E. Evelyn Ave., Sunnyvale, CA 94086
Tel: (408)720-8800 Fax: (408)720-8900
www.lucidport.com
Page 27

Chameleon User Manual Doc# 100-03-080
26
9.5 Backing up your Data
Backup encrypted drives by copying the ChameleonDrives directory to another location. This
directory is located at the top level of your hard disk (ex. C:\ChameleonDrives\). Since
encrypted drives are always encrypted, backups are protected as well. You must unplug the
Chameleon device to back up your data.
You can add the ChameleonDrives directory to your list of scheduled backups.
WARNING: Do not copy the backup ChameleonDrives directory to the top level (root) of a
drive (e.g. D:\ChameleonDrives). The Chameleon software cannot distinguish between the
original and the copy. If identical drives are detected in the top level, the Chameleon software
will not activate either drive. Any subdirectory or network location will work (e.g.
D:\backup\ChameleonDrives).
10 Limited Warranty and Legal Notices
Chameleon
Copyright (c) 2011, LucidPort Technology, Inc.
485 E. Evelyn Ave
Sunnyvale, CA 94086
Tel: (408) 720-8800
Fax: (408) 720-8900
Please contact support@marathon6.com for technical questions.
Contact sales@marathon6.com for sales or warranty related inquires.
Check http://www.marathon6.com/chameleon for the latest updates.
Copyright © LucidPort Technology, Inc.
485 E. Evelyn Ave., Sunnyvale, CA 94086
Tel: (408)720-8800 Fax: (408)720-8900
www.lucidport.com
Page 28

Chameleon User Manual Doc# 100-03-080
27
LucidPort Technology, Inc. warrants to you that the Chameleon will be free from defects in
materials and workmanship under normal use for the 90 day warranty period starting on your
date of purchase. Your dated sales or delivery receipt is your proof of purchase date. You may
be required to provide proof of purchase as a condition of receiving warranty service.
If LucidPort Technology, Inc. receives, during the warranty period, notice of a defect in the
Chameleon, LucidPort Technology, Inc. will repair or replace the product, at LucidPort
Technology, Inc.’s option. LucidPort Technology, Inc. shall have no obligation to repair,
replace, or refund until you return the defective product to LucidPort Technology, Inc.. If your
Chameleon has recurring failures, at LucidPort Technology, Inc.’s option, LucidPort
Technology, Inc. may provide you a replacement of LucidPort Technology, Inc.’s choosing that
is the same or equivalent in performance or a refund of your purchase price instead of a
replacement.
To the extent permitted by local law, LucidPort Technology, Inc., and any replacement products
or parts, may contain new and used materials equivalent to new in performance and reliability.
Any replacement product or part will also have functionality at least equal to that of the product
or part being replaced. Replacement products and parts are warranted to be free from defect in
material or workmanship for 90 days.
LucidPort Technology, Inc., at its sole discretion, may subcontract to or engage a third party to
provide the warranty services.
DATA LOSS IS A FREQUENT CONSEQUENCE OF REPAIR. DATA STORED WITH THE
CHAMELEON IS NEVER COVERED BY WARRANTY.
This Limited Warranty does not apply to expendable or consumable parts or to any product in
which the chassis has been opened or if damaged or defective (a) due to accident, misuse, abuse,
contamination, virus infection, improper or inadequate maintenance or calibration or other
external causes; (b) by software, interfacing, parts or supplies not supplied by LucidPort
Technology, Inc.; (c) improper site preparation or maintenance; (d) loss or damage in transit; or
(f) modification or service by other than LucidPort Technology, Inc. or an LucidPort
Technology, Inc. authorized service provider.
TO THE EXTENT ALLOWED BY LOCAL LAW, IN NO EVENT SHALL LUCIDPORT
TECHNOLOGY, INC. BE LIABLE FOR ANY DAMAGES CAUSED BY THE PRODUCT
OR THE FAILURE OF THE PRODUCT TO PERFORM, INCLUDING ANY DIRECT,
INDIRECT, SPECIAL, INCIDENTAL, CONSEQUENTIAL OR PUNITIVE DAMAGES OF
ANY KIND, WHETHER BASED ON CONTRACT, TORT (INCLUDING NEGLIGENCE),
OR ANY OTHER LEGAL THEORY AND WHETHER ADVISED OF THE POSSIBILITIES
OF SUCH DAMAGES. LUCIDPORT TECHNOLOGY, INC. IS NOT LIABLE FOR ANY
CLAIM MADE BY A THIRD PARTY OR MADE BY YOU FOR A THIRD PARTY.
Copyright © LucidPort Technology, Inc.
485 E. Evelyn Ave., Sunnyvale, CA 94086
Tel: (408)720-8800 Fax: (408)720-8900
www.lucidport.com
Page 29

Chameleon User Manual Doc# 100-03-080
28
The AES encryption technology in the Chameleon is classified by the United States government
as an ECCN 5A002 item and can be exported under License Exception ENC, Sec. 740.17 (b)(3)
of the Export Administration Regulations ("EAR"). The Chameleon may not be used or
otherwise exported or re-exported into (or to a national or resident of) Cuba, Iran, North Korea,
Sudan, or Syria. No further approvals or authorizations from the US government are required.
Copyright © LucidPort Technology, Inc.
485 E. Evelyn Ave., Sunnyvale, CA 94086
Tel: (408)720-8800 Fax: (408)720-8900
www.lucidport.com
 Loading...