

Page 1

A
User Guide
Guía del usuario
Guide d’utilisation
Guida per l’uso
Benutzerhandbuch
ppendix
English ( 3 – 15 )
Español ( 16 – 29 )
Français ( 30 – 44 )
Italiano ( 45 – 58 )
Deutsch ( 59 – 72 )
English ( 73 – 74 )
Page 2

2
Page 3

A
A
User Guide (English)
Introduction
Box Contents
PMD-526C
Power Cable
Remote Control
RCA Cable
(2) Rack Ears
(6) Rackmount Screws
User Guide
Safety & Warranty Manual
Support
For the latest information about this product
(documentation, technical specifications, system
requirements, compatibility information, etc.) and
product registration, visit marantzpro.com.
Safety Instructions
Please also see the included Safety & Warranty Manual for more information.
Before turning the power
on:
Proper ventilation:
Make sure all connections are secure and correct and that there are no
problems with the connection cables.
Power is supplied to some of the circuitry even when the unit is powered off.
When the unit will not be used for long periods of time, disconnect the power
cable from the power outlet.
If the unit is left in a room which is not properly ventilated or is full of smoke
from cigarettes, dust, etc. for long periods of time, the surface of the optical
pickup may get dirty, causing incorrect operation.
bout condensation:
Cautions on using mobile
phones:
Moving the unit:
bout care:
Rackmount warnings:
(required rack specifications
for mounting the unit in a
rack)
Rack installation:
If there is a major difference in temperature between the inside of the unit and
the surroundings, condensation may form inside the unit, causing the unit not
to operate properly. If this happens, let the unit sit for an hour or two while
powered off, and wait until there is little difference in temperature before using
the unit.
Using a mobile phone near this unit may cause noise. If this occurs, move the
mobile phone away from this unit when it is in use.
Before moving the unit, turn off its power and disconnect the power cable from
the power outlet. Next, disconnect its connection cables from other devices
before moving it.
Wipe the cabinet and control panel clean with a soft cloth.
Follow the instructions when using a chemical cleaner.
Do not use benzene, paint thinner, insecticide, or other organic solvents to
clean the unit. These materials can cause material changes and discoloration.
EIA standard 19-inch (48.3cm) rack
1U-size installation compatible rack
Rack that has a guide rail or shelf board that can support this device
This product will work normally when the player unit
is mounted within 10° off the vertical plane at the
front panel. If the unit is tilted excessively, the disc
may not load or unload properly. (See image.)
Maximum
10°
Unit
3
Page 4

Features
Front Panel
12
4
7
9
11
16
2
3
1
1. Power Button: Press this button to turn the unit on or off. Make sure the AC In is properly connected to a power outlet. Do not turn the unit
off during media playback—doing so could damage your media.
2. Aux In: Connect an optional device to this input using a 1/8” (3.5mm) TRS cable. See Operation > Playing Audio from an External Device
for more information.
3. USB Port: Connect a mass-storage-class USB device to this port.
4. CD Slot: Insert a CD into this slot. See Operation > Playing Audio CDs for more information.
5. CD/AUX/USB/BT/SD Button: Press this to enter Media Selection screen. See Operation > Selecting Media Playback Mode for more
information.
6. Repeat Button: In CD, USB, or SD mode, press this button to switch between Repeat Playback modes: Repeat One
Repeat Off. See Operation > Playing Audio CDs for more information.
Power-On Play Button: Press and hold this button to turn Power-On Play on or off. See Operation > Additional Functions > Power-On
Play for more information.
Device Select: When in Bluetooth mode, press the Device Sel. button. The screen will show “BT Device List”. Use |<</<< and >>/>>| to
navigate through the list of Bluetooth devices. When you find one you want to pair to, select it by pressing the Jog Dial.
7. Random Button: In CD, USB, or SD mode, press this button to cycle through Random Play Mode
Pairing: When Bluetooth mode is selected, the device will automatically enter pairing mode. To disconnect from a paired Bluetooth device,
press and hold the Pairing button for 1.5 seconds. If you have set a custom Bluetooth pairing password, it is required to input this password
before pairing. If a custom password was not set, (factory default: 0000) it is not required to input the password.
8. Time Button: In CD, USB, or SD mode, press this button to switch the Time Mode in the display. See Operation > Playing Audio CDs for
more information.
Folder: When in USB or SD mode, hold this button to switch to Folder View.
Clear: In Bluetooth mode, press and hold the Clear button to remove all paired devices from the unit’s memory (and also unpair from a
currently paired device). After the devices have been cleared from the unit’s memory, to connect again to the same device, go to your
Bluetooth device and select “Unpair” or “Forget the Device”, depending on the type of device that you have. You can then select PMD-526C
from your list of Bluetooth devices and connect.
9. Text Button: In CD, USB Mode, or SD, press this button to switch the display between the track name and artist name.
Lock Button
information.
10. Eject Button: Press this to eject the CD in the CD slot. To force-eject a CD, power off the unit, then press and hold the eject button while
powering the unit back on. To exit force-eject mode, turn the unit off.
11. Display: This screen indicates the unit’s current operation. See Display for more information.
12. Tempo Control/Pitch: Press and release this knob to access the Tempo Control (t
playback in a range from -15% to +15%, in 1.5 increments. Press this knob again to access the Pitch controls. Turn this knob to raise or
lower the pitch of the audio playback in a range from -15% to +15%, in 1.5 increments. If the pitch is adjusted first and then the tempo is
adjusted, the pitch will remain at the previously set value. If the tempo is adjusted first and then the pitch is changed, the tempo will be reset
to the value of 0.
13. Track Select/Search Buttons: In CD, USB, BT, or SD Mode, press and release the |<</<< button to go to the previous track. Press and
release the >>/>>| button to go to the next track. In CD, USB, or SD Mode Press and hold the |<</<< button to rewind through a track at 5
times the normal playback speed. Press and hold the >>/>>| button to fast-forward through a track at 5 times the normal playback speed.
14. Stop Button: Press this button to stop playback. To view current firmware version, hold the stop button while powering on the unit.
15. Play/Pause Button: Press this button to start, resume, or pause playback.
16. Number Buttons (0–9): In CD Mode, Press one of these buttons to directly select a track to play. If the track number is two digits, press the
buttons in succession (e.g., 1 then 2 for Track 12).
17. SD Card Slot: Insert your SD card here to play music files.
4
5
6
: Press and hold this button to turn Panel Lock on and off. See Operation > Additional Functions > Panel Lock for more
8
10
) and turn the knob to to adjust the tempo of the audio
C
17
and Single Play Mode ().
13
15
14
, Repeat All , and
Page 5
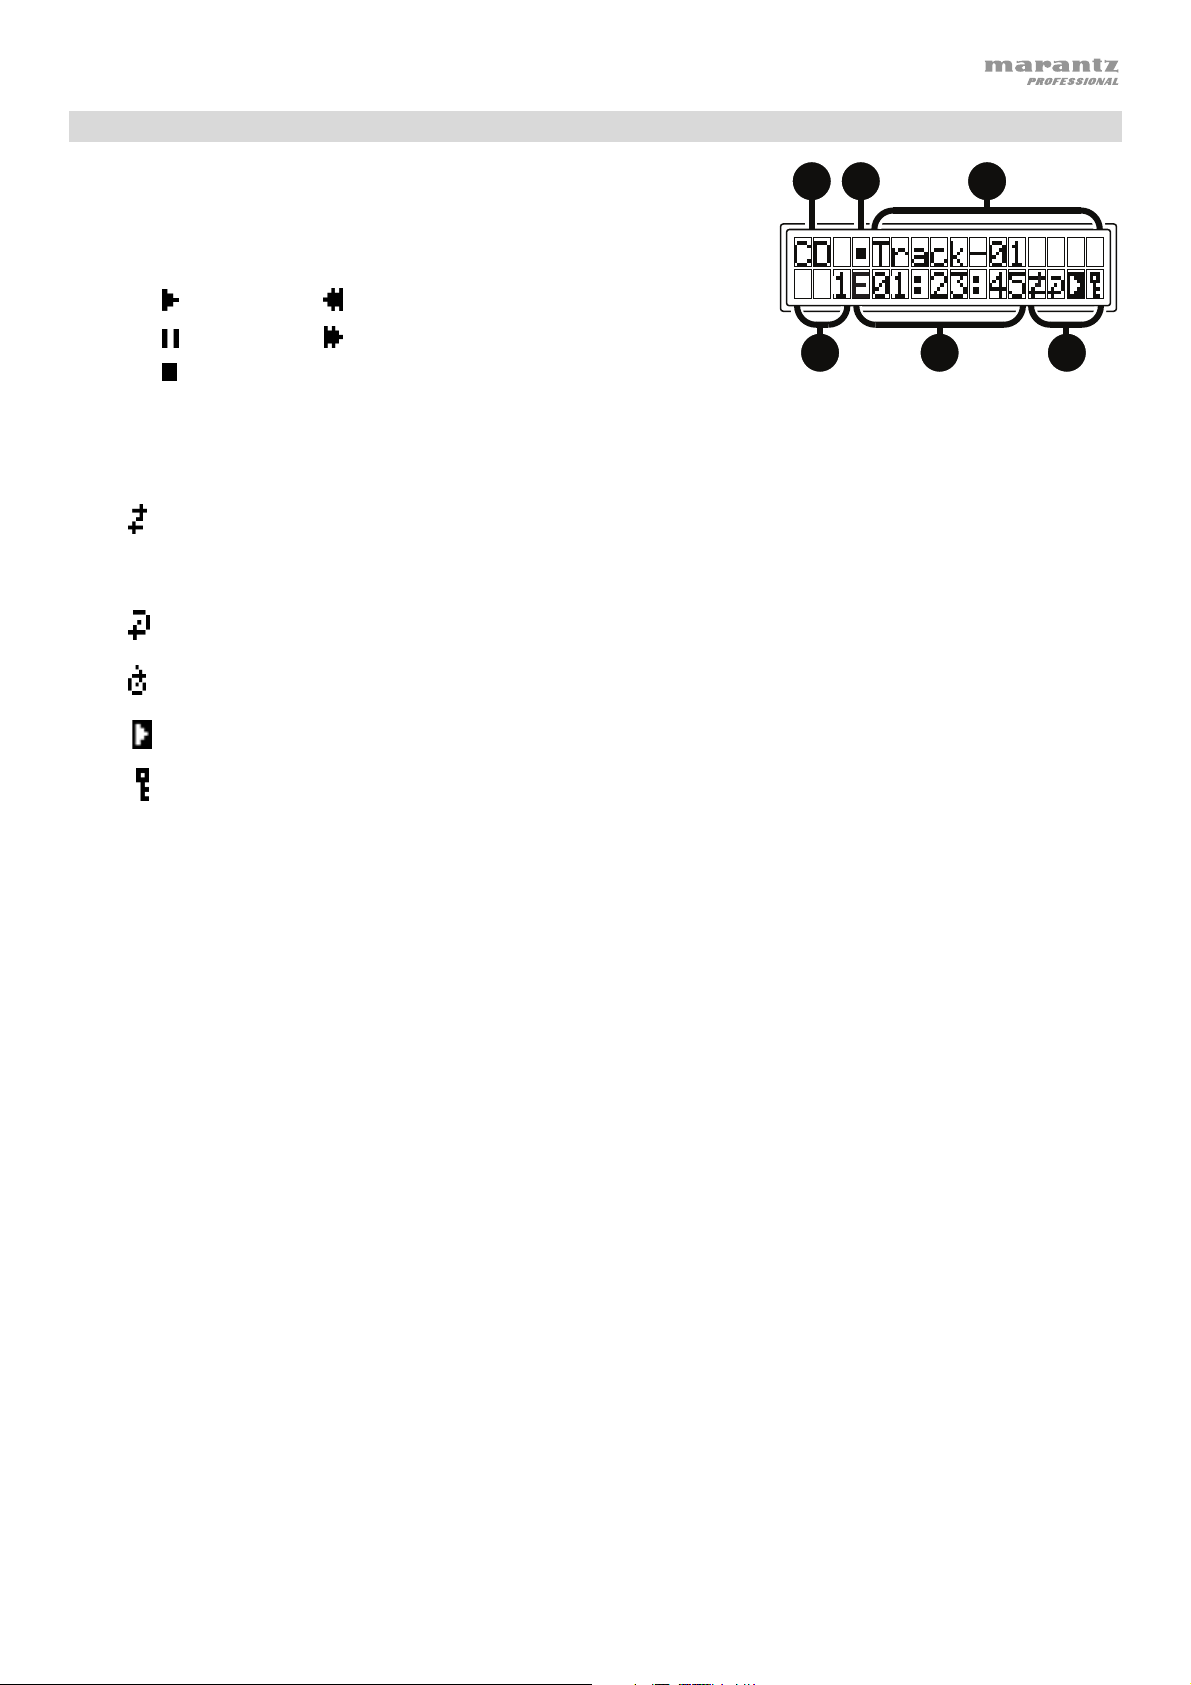
Display
1. Media Type: This is the currently selected media: CD, AUX, USB, SD or
Bluetooth. See Operation > Selecting Media Playback Mode for more
information.
2. Playback Operation Icon: This shows various symbols to indicate the current
playback status:
Playing Rewinding
23
1
Paused Fast-Forwarding
Stopped
4
56
3. Information: This shows extra information about the media being played.
4. Track/File Number: This is the number of the track or file.
5. Function Icons: This shows various symbols to indicate these current functions:
Random Playback (see Operation > Playing Audio CDs for more information)
Single Play Mode (see Operation > Playing Audio CDs for more information)
Repeat One (see Operation > Playing Audio CDs for more information)
Repeat All (see Operation > Playing Audio CDs for more information)
Power-On Play (see Operation > Additional Functions > Power-On Play for more information)
Panel Lock (see Operation > Additional Functions > Panel Lock for more information)
(see Features > Front Panel > Tempo Control/Pitch for more information)
t
C
6. Time: In CD, SD and USB Mode, this displays how much time has elapsed, the remaining time, total elapsed time, or the total
remaining time (for CD mode only) shown as hh:mm:ss (hours, minutes, and seconds).
See Operation > Playing Audio CDs for more information.
5
Page 6

Rear Panel
4
1
2
5
3
6
1. Outputs (unbalanced RCA): These outputs send the audio signals from a CD, SD, BT, or USB device (mass
storage class), and device connected to the Aux In. Use RCA cables to connect these outputs to external
speakers, sound system, etc. See Setup for more information.
2. Outputs (balanced XLR): These outputs send the audio signals from a CD, SD, BT, or USB device (mass
storage class), and device connected to the Aux In. Use XLR cables to connect these outputs to external
speakers, sound system, etc. See Setup for more information.
3. AC In: Use the included power cable to connect this input to a power outlet. See Setup for more information.
4. Bluetooth Receiver: This is the built-in antenna used to receive a signal from a Bluetooth device.
5. Remote Input: This input lets you connect a host device (usually a computer) to PMD-526C. You can use the
host device to control PMD-526C via commands sent from it (using RS-232C serial communication).
Note: Go to marantzpro.com to access the serial protocol guide for more information.
6. Operation Switch: For standard playback, leave this switch at the “Normal” position. If updating the unit, set this
switch to the “Update” position.
Setup
Important: Connect all cables securely and properly (with stereo cables: left with left, right with right), and do not
bundle them with the power cable.
1. Use XLR cables or a stereo RCA cable to connect the Outputs (balanced or unbalanced) to the analog inputs of
your external receiver, amp, powered monitors, etc.
2. After completing all the connections, use the included power cable to connect the AC In to a power outlet.
Example:
SOURCE SELECT
ZONE 2
ZONE 3 ZONE 3
ZONE 2
SOURCE
ON/OFF
ON/OFF
AUX 1
HDMI 7 5V/1A
INFO
SOURCE STATUS DIMMER
PHONES BACK
QUICK SELECT
OPTION
1 CBL/SAT 3 GAME4 NETWORK
2 Blu-ray
ENTER
VIDEO
L - AUDIO - R
SETUP
AUX 1
6
Receiver, amp, etc.
MASTER VOLUME
SETUP MIC
AV RECEIVER
Powered Monitors
Power
Page 7

Operation
Remote Control
1. Mute: Disables the sound from the audio outputs.
2. BT: Switch to Bluetooth mode.
3. Tempo/Pitch Menu: Cycle through tempo and pitch
controls.
Note: Tempo/Pitch controls will only function in CD, SD
and USB modes.
4. USB/SD: Switch between USB or SD mode.
5. AUX: Switch to Aux Mode.
6. CD: Switch to CD Mode.
7. Play: Plays audio from a CD, USB flash drive, SD card,
or Bluetooth device.
8. Pause: Pause audio from a CD, USB flash drive, SD or
Bluetooth device.
9. Stop: Stops audio from a CD, USB flash drive, or SD.
10. Eject: Ejects or inserts a CD.
11. Previous Track: Goes to the previous CD, USB, or SD
track.
12. Next Track: Advances to the next CD, USB, or SD track.
13. Search Backward: Hold to rewind through a CD, USB,
or SD track.
14. Search Forward: Hold to fast forward through a CD,
USB, or SD track.
15. Random: Press to cycle through Random Play Mode
or Single Play Mode () in CD, USB, or SD mode.
16. Display: Press and release the button to adjust the
display brightness. Press and hold the button to open
the options menu. Hold the button again to close the
option menu.
17. Tempo/Pitch Up: Adjust the tempo or pitch up.
18. Tempo/Pitch Down: Adjust the tempo or pitch down.
19. Repeat: In CD, USB, or SD mode, switch between Repeat Playback modes: Repeat One
All
, and Repeat Off.
20. Time: In CD, USB, or SD Mode, press this button to switch the time in the display from Time
Elapsed, Time Remaining, Total Elapsed Time, or Total Time Remaining (for CD Mode only).
21. Text/Lock: In CD, USB, or SD Mode, press to switch the display between the track name and artist
name. Press and hold to turn Panel Lock on and off.
4
7
8
11
13
16
20
1
USB/SD
PLAY
DISPLAY
TIME
17
2
BTMUTE
AUX CD
PAUSE
TEMPO / PITCH
18
PMD-526C
3
TEMPO/
PITCH
STOP
EJECT
RANDOM
REPEAT
TEXT
LOCK
21
5
6
9
10
12
15
14
19
, Repeat
7
Page 8

+
1
2 3
Battery Usage
Important: Before using the remote control
for the first time, pull the insulation sheet out
from the battery compartment.
To replace the battery:
1. On the back of the remote control, put a
paperclip into the door release hole and
DOOR RELEASE
DOOR RELEASE
then slide the door release open.
2. Pull out the old lithium battery from the
battery case and insert a new one. Place
OPEN
the battery so that the positive (+) side
faces upward.
3. Place the battery case carefully into the
compartment so the edges are in the
grooves and then slide the battery case
to its original position.
Important: Misuse of the lithium battery can result in heat build-up, ignition, or rupture. Bear in mind the
following points when using or replacing batteries:
• The supplied battery is for testing the functionality of the remote controller.
• Use a 3V CR2032 lithium battery.
• Never recharge the battery. Do not handle the battery roughly or disassemble the battery.
• When replacing the battery, place it with its polarities (+ and -) facing the correct directions.
• Do not leave the battery in a place subject to high temperature or direct sunlight.
• Keep the battery in a place beyond the reach of infants or children. If a battery is swallowed, consult a
physician immediately.
• If electrolyte has leaked, discard the battery immediately. Be careful when handling it as the electrolyte
can burn your skin or clothes. If the electrolyte touches your skin or clothes, immediately wash with
tap water and consult a physician.
• Before discarding a battery, insulate it with tape, etc. and dispose of it in a place without fire, by
following the directions or regulations laid down by the local authorities in the area of its disposal.
Operating Range
Point the remote control at the IR sensor when operating it.
Note: If the remote control sensor is exposed to direct sunlight, strong artificial light (like from an
interverter-type fluorescent lamp), or infrared light, the unit or remote control may not function properly.
DOOR RELEASE
OPEN
8
Page 9

Selecting the Media Playback Mode
To select what kind of media you want to play:
To cycle through the available options, press the Source button.
• CD: audio CD, CD-DA, CD-ROM, MP3, or CD with audio files (CDR) (see Playing Audio CDs)
• Aux: device connected to Aux In (see Playing Audio from an External Device)
• USB: USB device (mass storage class) (see Playing Audio Files On a USB Flash Drive)
• Bluetooth: Bluetooth device (see Playing Audio from a Bluetooth Device)
• SD: SD card, (see Playing Audio Files on a SD Card)
Playing Audio CDs
To play audio CDs:
1. If the unit is off, press the Power button to power it on.
Important: Do not insert a CD when the power is off. Doing so may damage the unit.
2. Insert a CD into the CD slot. (Hold the edges of the CD without touching the recorded surface. Be careful not to
trap your fingers when the disc is drawn into the unit.)
3. Select CD as the media type (described in Selecting the Media Playback Mode).
The CD will start playing automatically when Power-On Play mode is active.
In CD Mode, you can perform any of the following operations:
• To start, resume, or pause playback, press the Play/Pause button.
• To stop playback, press the Stop button.
• To rewind or fast-forward through the track, press and hold one of the Search buttons. The track will
rewind/fast-forward at 5 times the normal playback speed. To resume playback, release the button.
• To skip directly to a track:
1. If in Pause, Stop, or Play mode, press one of the Number buttons (0–9) to enter the desired track number. If
the track number is two digits, press the buttons in succession (e.g., 1 then 2 for Track 12). Alternatively, use
the |<</<< and >>/>>| buttons to select a track.
2. If the track was playing, was paused, or was stopped, playback will automatically begin once a new track is
selected.
• To select a Repeat Playback mode, press the Repeat button. It will cycle Repeat One (the same track will
repeat indefinitely), Repeat All
repeat).
(the list of all tracks will repeat indefinitely), and Repeat Off (no tracks will
• To select the Play Mode, press the Random button. It will cycle through Random (the tracks will play in a
random order [for up to 256 tracks]), and Single Play () (the current track will play until its end and then stop.
• To change the Time Mode in the display, press the Time button. It will cycle through Elapsed (how much time
has elapsed of the current track), Remaining (how much time remains of the current track), Total Elapsed Time
(how much time has elapsed of all remaining tracks), and Total Remaining (how much time remains of all
remaining tracks. This applies only to CDs.)
• To eject a CD, press the Eject button when the unit is stopped or paused. Ejecting will appear in the display
while ejecting the CD. No Disc will appear when there is no disc in the CD slot.
Important: Please see Other Information > CDs to learn more about the types of CDs the PMD-526C supports and
for more information about CD handling and care. When powering on the unit, hold the Eject button to engage Force
Eject Mode.
9
Page 10

Playing MP3 Files on a CD
To play MP3 files on a CD:
1. If the unit is off, press the Power button to power it on.
Important: Do not insert a CD when the power is off. Doing so may damage the unit. When powering on the unit,
hold the Eject button to engage Force Eject Mode.
2. Insert a CD into the CD slot. (Hold the edges of the CD without touching the recorded surface. Be careful not to
trap your fingers when the disc is drawn into the unit.)
3. Select CD as your desired media type: (described in Selecting the Media Playback Mode).
4. Select an audio file:
• To move through audio files, press the |<</<< and >>/>>| buttons.
• Press one of the Number buttons (0–9) to enter the desired track number. If the track number is two digits,
press the buttons in succession (e.g., 1 then 2 for Track 12).
In CD Mode, you can perform any of the following operations:
• To start, resume, or pause playback, press the Play/Pause button.
• To stop playback, press the Stop button.
• To rewind or fast-forward through the track, press and hold one of the Search buttons. The track will
rewind/fast-forward at 5 times the normal playback speed. To resume playback, release the button.
• To select a Repeat Playback mode, press the Repeat button. It will cycle through Repeat One (the same
track will repeat indefinitely), Repeat All
will repeat).
(the list of all tracks will repeat indefinitely), and Repeat Off (no tracks
• To select the Play Mode, press the Random button. It will cycle through Random (the tracks will play in a
random order [for up to 256 tracks]), and Single Play () (the current track will play until its end and then stop).
• To change the Time Mode in the display, press the Time button. It will cycle through Elapsed (how much time
has elapsed of the current track), Remaining (how much time remains of the current track), Total Elapsed Time
(how much time has elapsed of all remaining tracks), and Total Remaining (how much time remains of all
remaining tracks. This applies only to CDs.)
• To eject a CD, press the Eject button. Ejecting will appear in the display while ejecting the CD. No Disc will
appear when there is no disc in the CD slot.
Playing Audio from an External Device
To play audio on an external device (e.g., smartphone, computer, portable music player, etc.)
connected to the Aux In:
1. If the unit is off, press the Power button to power it on.
2. Connect the 1/8” (3.5 mm) stereo/headphone output of your external device to the Aux In.
3. Select Aux as the media type (described in Selecting the Media Playback Mode). If your external
device is connected, AUX Connected will appear in the display. If your external device is not
connected, AUX Disconnect will appear in the display.
4. To start playback, press the Play button on your external device.
Important: All buttons except for Power, CD/AUX/USB/BT/SD, and Eject will be locked/disabled.
10
Page 11
Playing Audio Files on a USB Flash Drive
To play audio files on a USB flash drive:
1. If the unit is off, press the Power button to power it on.
2. Connect your USB device (mass storage class) to the USB Port.
3. Select USB as your desired media type (described in Selecting the Media Playback Mode).
4. Select an audio file:
• When a USB flash drive is first connected, files on the root directory will be shown. Press and hold the Folder button to
open to the first folder. All files within that folder will appear first. All other playable content on the flash drive will appear
after. To access another folder, press and hold the Folder button again.
• To move through audio files, press the |<</<< and >>/>>| buttons.
• Press one of the Number buttons (0–9) to enter the desired track number. If the track number is two digits, press the
buttons in succession (e.g., 1 then 2 for Track 12).
In USB Mode, you can perform any of the following operations:
• To start, resume, or pause playback, press the Play/Pause button.
• To stop playback, press the Stop button.
• To rewind or fast-forward through the track, press and hold one of the Search buttons. The track will rewind/fast-forward at
5 times the normal playback speed. To resume playback, release the button.
• To change the view mode, press the Folder/Time button.
• To select another folder or audio file, follow the steps described in Step 4 above.
• To show different track information in the display, press the Text button. It will cycle through the file name and other text
information.
• To select a Repeat Playback mode, press the Repeat button. It will cycle through Repeat One (the same track will
repeat indefinitely), Repeat All
(the list of all tracks will repeat indefinitely), and Repeat Off (no tracks will repeat).
• To select the Play Mode, press the Random button. It will cycle through Random (the tracks will play in a random order
[for up to 256 tracks]), and Single Play () (the current track will play until its end and then stop).
• To change the Time Mode in the display, press the Time button. It will cycle through Elapsed (how much time has elapsed
of the current track) and Remaining (how much time remains of the current track).
• To remove a USB device, gently remove it from the USB Port when it is not playing. (Removing a USB device while it is
playing can damage it.)
Playing Audio from a Bluetooth Device
To play Bluetooth Tracks:
1. If the unit is off, press the Power button to power it on.
2. Select Bluetooth (BT) as the media type (described in Selecting the Media Playback Mode).
3. Navigate to your Bluetooth device’s setup screen, find “PMD-526C” and connect.
Note: If your Bluetooth device prompts for a pairing code, enter 0000.
In Bluetooth Mode, you can perform any of the following operations:
• To start, resume, or pause playback, press the Play/Pause button.
• To pause playback, press the Stop button.
• To see a list of Bluetooth devices, press the Device Sel. button. The screen will show “BT Device List”. Use the |<</<< and
>>/>>| buttons to navigate through the list of Bluetooth devices. When you find one you want to pair to, select it by pressing
the Jog Dial.
• To disconnect from a paired Bluetooth device, press and hold the Pairing button for 1.5 seconds. If you have set a custom
Bluetooth pairing password, it is required to input this password before pairing. If a custom password was not set, (factory
default: 0000) it is not required to input the password.
• To remove the list of paired devices and disconnect from any currently paired device, press and hold the Clear button
to remove all paired devices from the unit’s memory (and also unpair from a currently paired device). After the devices have
been cleared from the unit’s memory, to connect again to the same device, go to your Bluetooth device and select “Unpair”
or “Forget the Device”, depending on the type of device that you have. You can then select PMD-526C from your list of
Bluetooth devices and connect.
11
Page 12
Playing Audio from a SD Card
To play audio files on a SD Card:
1. If the unit is off, press the Power button to power it on.
2. Insert the SD card into the SD card slot.
3. Select SD as your desired media type (described in Selecting the Media Playback Mode).
4. Select an audio file:
• When a SD card is first connected, files on the root directory will be shown. Press and hold the Folder button
to open to the first folder. All files within that folder will appear first. All other playable content on the SD card
will appear after. To access another folder, press and hold the Folder button again.
• To move through audio files, press the |<</<< and >>/>>| buttons on the unit.
• Press one of the Number buttons (0–9) to enter the desired track number. If the track number is two digits,
press the buttons in succession (e.g., 1 then 2 for Track 12).
In SD Mode, you can perform any of the following operations:
• To start, resume, or pause playback, press the Play/Pause button.
• To stop playback, press the Stop button.
• To rewind or fast-forward through the track, press and hold one of the Search buttons. The track will
rewind/fast-forward at 5 times the normal playback speed. To resume playback, release the button.
• To change the view mode, press the Folder/Time button.
• To select another folder or audio file, follow the steps described in Step 4 above.
• To show different track information in the display, press the Text button. It will cycle through the file name
and other text information.
• To select a Repeat Playback mode, press the Repeat button. It will cycle through Repeat One (the same
track will repeat indefinitely), Repeat All
will repeat).
(the list of all tracks will repeat indefinitely), and Repeat Off (no tracks
• To select the Play Mode, press the Random button. It will cycle through Random (the tracks will play in a
random order [for up to 256 tracks]), and Single Play () (the current track will play until its end and then stop).
• To change the Time Mode in the display, press the Time button. It will cycle through Elapsed (how much time
has elapsed of the current track) and Remaining (how much time remains of the current track).
• To remove a SD card, gently push the card when it is not playing. (Removing a SD card while it is playing can
damage it.)
Additional Functions
Panel Lock
Use the Panel Lock feature to prevent accidental changes to the unit. When Panel Lock is activated, all
buttons except for the Power button and Text/Lock button are locked/disabled on the unit. (The remote
control will still function normally.)
To activate or deactivate Panel Lock, press and hold the Text/Lock button.
• When activated, P-Lock ON and
• When deactivated, P-Lock OFF will appear in the display, and
will appear in the display.
will disappear.
Power-On Play
Use the Power-On Play feature to set the unit to automatically start playback of the CD in the drive.
To activate or deactivate Power-On Play, press and hold the Pwr On Play button.
• When activated, P-OnPlay On will appear on the display.
• When deactivated, P-OnPlay Off will disappear on the display.
12
Page 13

Menu Settings
To access the Menu settings, press and hold the Jog dial (or press and hold the Display button on the
remote). Turn the Jog dial or use the < and > buttons on the remote to navigate through the menu. Press
the Jog dial to select an option or press the Play button on the remote. Press the Pause button on the
remote to return to the previous Menu option, exit out of the menu, or wait a few seconds and the unit will
automatically exit out of the Menu settings. The Menu settings seen are:
• Baud Rate (options are 9600, 38,400 and 115,200 b/s)
• Flash Update (starts the process to update the unit. See marantzpro.com to check if there are
any available updates)
• System Version (displays the current firmware version)
• System Reset (resets the unit to factory default settings)
Other Information
USB Devices
When playing audio files on a USB device, note the following:
• PMD-526C does not charge any connected USB device and does not support USB hubs or USB extension cables.
• PMD-526C supports USB devices that are mass storage class or compatible with MTP.
• PMD-526C supports FAT16 or FAT32 file systems only.
• You can have up to 999 folders and up to 8 folder levels, including the root directory.
• You can have up to 999 audio files. If the USB device contains more than 1000 files, some audio files may not play or
appear correctly.
• File names, folder names, and text characters can use up to 255 characters. Only uppercase letters, lowercase letters,
numbers, and symbols can be displayed. Japanese file names will not be shown. File names that begin with a “.” will
not be shown.
• Copyright-protected files might not play properly and/or may appear as Unknown File.
When playing audio files on a USB device, PMD-526C supports the following tag data:
• ID3 tags: Version 1.x and 2.x
• for MP3 files:
o Sample rate: 44.1 kHz
o Bit rate: 32 kbps to 320 kbps
o Format: MPEG1 Audio Layer 3
o File extension: .mp3
Audio File Playback Order
When playing audio files stored within multiple folders, the playback order of each folder is automatically set when
the unit reads the media. The files in each folder will play in the same order in which they were added to the media.
(This order may appear differently on your computer and/or in your software than it does on the unit.)
13
Page 14
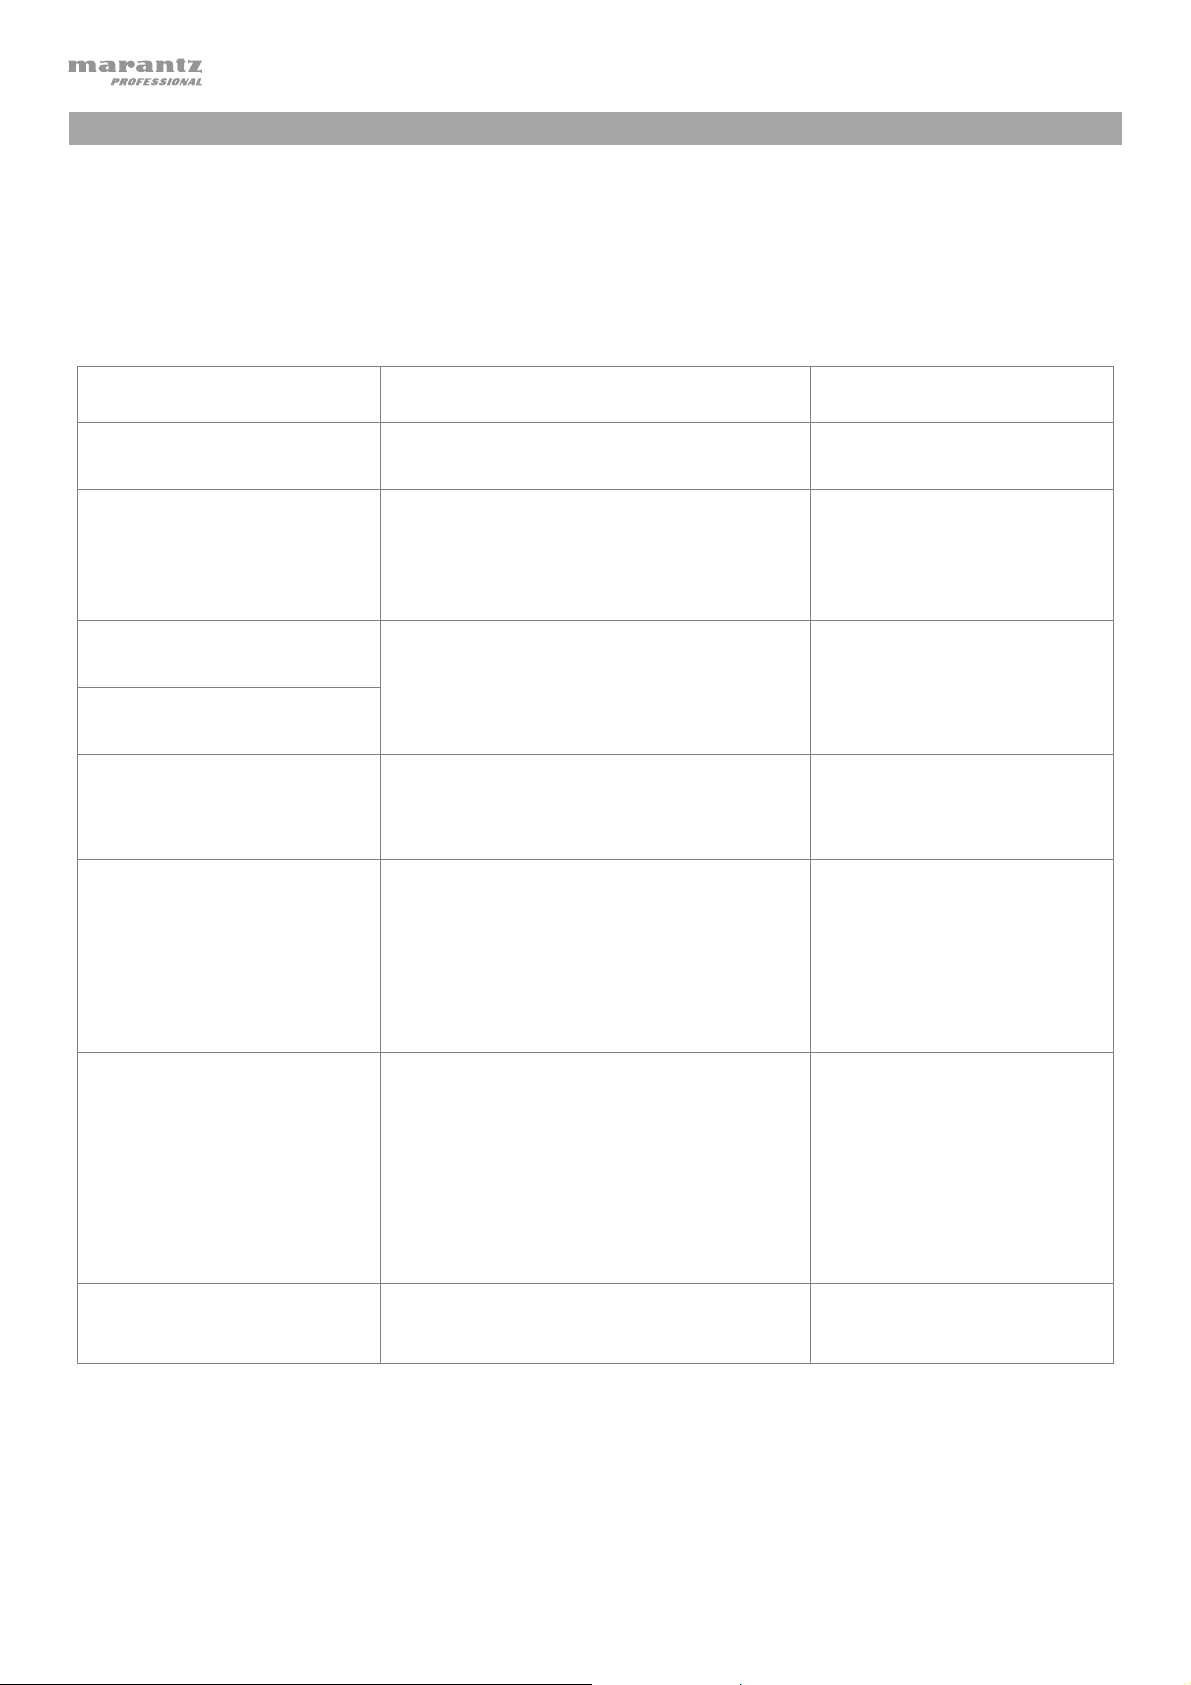
Troubleshooting
If you encounter a problem, do the following:
• Make sure all cables, devices, antennae, and/or media are properly and securely connected.
• Make sure you are using the unit as described in this User Guide.
• Make sure your other devices or media are working properly.
• If you believe the unit is not working properly, check the following table for your problem and solution.
Problem Solution Please see:
Power does not turn on. Make sure the unit is connected to a
power outlet.
CD cannot be inserted into
CD slot.
Make sure the unit is connected to a
power outlet and that it is powered on.
Press the Eject button to make sure a CD
is not already in the CD slot.
No Disc appears even when
a CD is inserted.
Press the Eject button to eject the CD
and insert it again.
A specific section of the CD
does not play properly.
Playback does not start even
after pressing the Play
button.
The unit does not produce
any sound, or the sound is
distorted.
Clean the CD with a dry cloth or
commercial CD cleaner.
Insert a different CD.
Make sure all cable, device, or media
connections are secure and correct.
Make sure none of the cables are
damaged.
Make sure the settings on your amplifier,
mixer, etc. are correct.
Setup
Setup
Other Information > CDs
Setup
The unit cannot play a CD-R. Make sure the CD-R has been finalized
properly.
Make sure the CD-R is of good quality.
Clean the CD with a dry cloth or
commercial CD cleaner.
Make sure the CD-R contains MP3 files.
The unit cannot play other files on CD-R.
The CD will not eject.
Press and hold the Eject button while
turning on the unit.
14
Other Information > CDs
Page 15
Problem Solution Please see:
No Device appears even
when a USB device is
inserted.
Files on a USB device do not
appear.
Disconnect and reconnect the USB device
to make sure it is securely inserted.
Make sure the USB device is of a mass
storage class or compatible with MTP.
Make sure the USB device is formatted
using a FAT16 or FAT32 file system.
Do not use a USB hub or USB extention
cable.
The unit does not supply power to USB
devices. If your USB device requires a
power source, connect it to one.
Not all USB devices are guaranteed to
work; some may not be recognized.
Make sure the files are of a supported file
format. Files that are not supported by this
unit will not appear.
Make sure the USB device uses a folder
structure that the unit supports: up to 999
folders (up to 8 folder levels, including the
root) and up to 999 files.
Other Information > USB
Devices
Files on a USB device
cannot play.
File names do not appear
properly.
If your USB device is partitioned, make sure
the files are in the first partition. The unit will
not show other partitions.
Make sure the files are of a supported file
format. Files that are not supported by this
unit will not appear.
Make sure the files are not copyrightprotected. The unit cannot play copyrightprotected files.
Make sure the files are using only
supported characters. Characters that are
not supported will be replaced with a “.”
15
Page 16
Appendix (English)
Technical Specifications
Digital Audio System
System
Compatible Media
Media player
CD, AUX, USB device (mass storage class), SD card,
Bluetooth audio
Supported Device Formats,
File Systems
CD: CD-DA, CD-ROM (ISO9660)
USB: FAT16, FAT32
SD: FAT16, FAT32
Supported File Formats MP3: Sample rate: 44.1 kHz
(in CD, USB, or SD Mode) Bit rate: 32 kbps to 320 kbps and VBR
Format: MPEG1 Audio Layer 3
File extension: .mp3
Number of Channels
Audio Frequency Range
Signal-to-Noise Ratio
Total Harmonic Distortion
1 (stereo), 2 (mono)
20 Hz – 20 kHz (+1.0 dB)
> 95 dB (A-weighted)
< 0.01%
Dynamic Range
Channel Separation
> 85 dB
> 80 dB
Bluetooth Bluetooth Version: 4.0
Output Class: Class 2
Supported Bluetooth Profiles: A2DP, AVRCP, HFP, SPP,
BAS, BLE, DIS, FMP, HRP, HRS, HTP, HTS, IAS, LLS
Bluetooth Range
49 ft.
15 m
73
Page 17
Outputs
Analog Out L/R
(unbalanced)
Type: RCA terminal
Load impedance: > 10 kΩ
Output level: 2 Vrms / at 10 kΩ load
Analog Out L/R (balanced) Type: XLR
Load impedance: > 10 kΩ
Output level: +4 dBu
Inputs
Aux In Type: 1/8” (3.5mm) TRS terminal
Input impedance: > 10 kΩ
Maximum input level: 1 Vrms
Other / General
File/Folder Limits Storage capacity: up to 2 TB
File size: up to 2 GB
File name length: up to 255 characters
Number of files: up to 999 (for 1 folder)
Number of folders: up to 999 folders (including the root directory)
Number of folder levels: up to 8 (including the root directory)
Folder name length: up to 255 characters
Power
100-240 V AC, 50/60 Hz
Power consumption: 15 W
Environmental
Conditions
Dimensions
(width x depth x height)
Weight
Operating temperature: 41 – 95 °F (5 – 35 °C)
Operating humidity: 25 – 85%, no condensation
19” x 9.4” x 1.7” / 483 x 239 x 43 mm (with rack ears)
16.9” x 9.4” x 1.7” / 429 x 239 x 43 mm (without rack ears)
6.3 lbs. / 2.9 kg
Trademarks & Licenses
Marantz is a trademark of D&M Holdings Inc., registered in the U.S. and other countries. All other product or
company names are trademarks or registered trademarks of their respective owners.
The Bluetooth word mark and logos are registered trademarks owned by Bluetooth SIG, Inc. and any use of such
marks by Marantz Professional is under license.
SD and SDHC are registered trademarks of SD-3C, LLC.
All other product names, company names, trademarks, or trade names are those of their respective owners.
74
Page 18

75
Page 19

marantzpro.com
Manual Version 1.2
 Loading...