

Page 1

PMD-100CD
User Guide
Guía del usuario
Guide d’utilisation
English (2–15)
Español (16–28)
Français (29–41)
Guida per l’uso
Benutzerhandbuch
Appendix
Italiano (42–55)
Deutsch (56–69)
English (70–71)
Page 2

User Guide (English)
Introduction
Thank you for purchasing the PMD-100CD. At Marantz Professional, performance and reliability mean as much
to us as they do to you. That’s why we design our equipment with only one thing in mind—to make your
performance the best it can be.
Box Contents
PMD-100CD
Power Cable
Remote Control
RCA Cable
User Guide
Safety & Warranty Manual
Support
For the latest information about this product (documentation, technical specifications, system requirements,
compatibility information, etc.) and product registration, visit marantzpro.com.
For additional product support, visit marantzpro.com/support.
2
Page 3
A
A
Safety Instructions
Please also see the included Safety & Warranty Manual for more information.
Before turning the power
on:
Make sure all connections are secure and correct and that there are no
problems with the connection cables.
Power is supplied to some of the circuitry even when the unit is powered
off. When the unit will not be used for long periods of time, disconnect the
power cable from the power outlet.
Proper ventilation:
bout condensation:
Cautions on using mobile
phones:
Moving the unit:
bout care:
Rackmount warnings:
If the unit is left in a room which is not properly ventilated or is full of smoke
from cigarettes, dust, etc. for long periods of time, the surface of the optical
pickup may get dirty, causing incorrect operation.
If there is a major difference in temperature between the inside of the unit
and the surroundings, condensation may form inside the unit, causing the
unit not to operate properly. If this happens, let the unit sit for an hour or
two while powered off, and wait until there is little difference in temperature
before using the unit.
Using a mobile phone near this unit may cause noise. If this occurs, move
the mobile phone away from this unit when it is in use.
Before moving the unit, turn off its power and disconnect the power cable
from the power outlet. Next, disconnect its connection cables from other
devices before moving it.
Wipe the cabinet and control panel clean with a soft cloth.
Follow the instructions when using a chemical cleaner.
Do not use benzene, paint thinner, insecticide, or other organic solvents to
clean the unit. These materials can cause material changes and
discoloration.
EIA standard 19-inch (48.3cm) rack
(required rack specifications
for mounting the unit in a
rack)
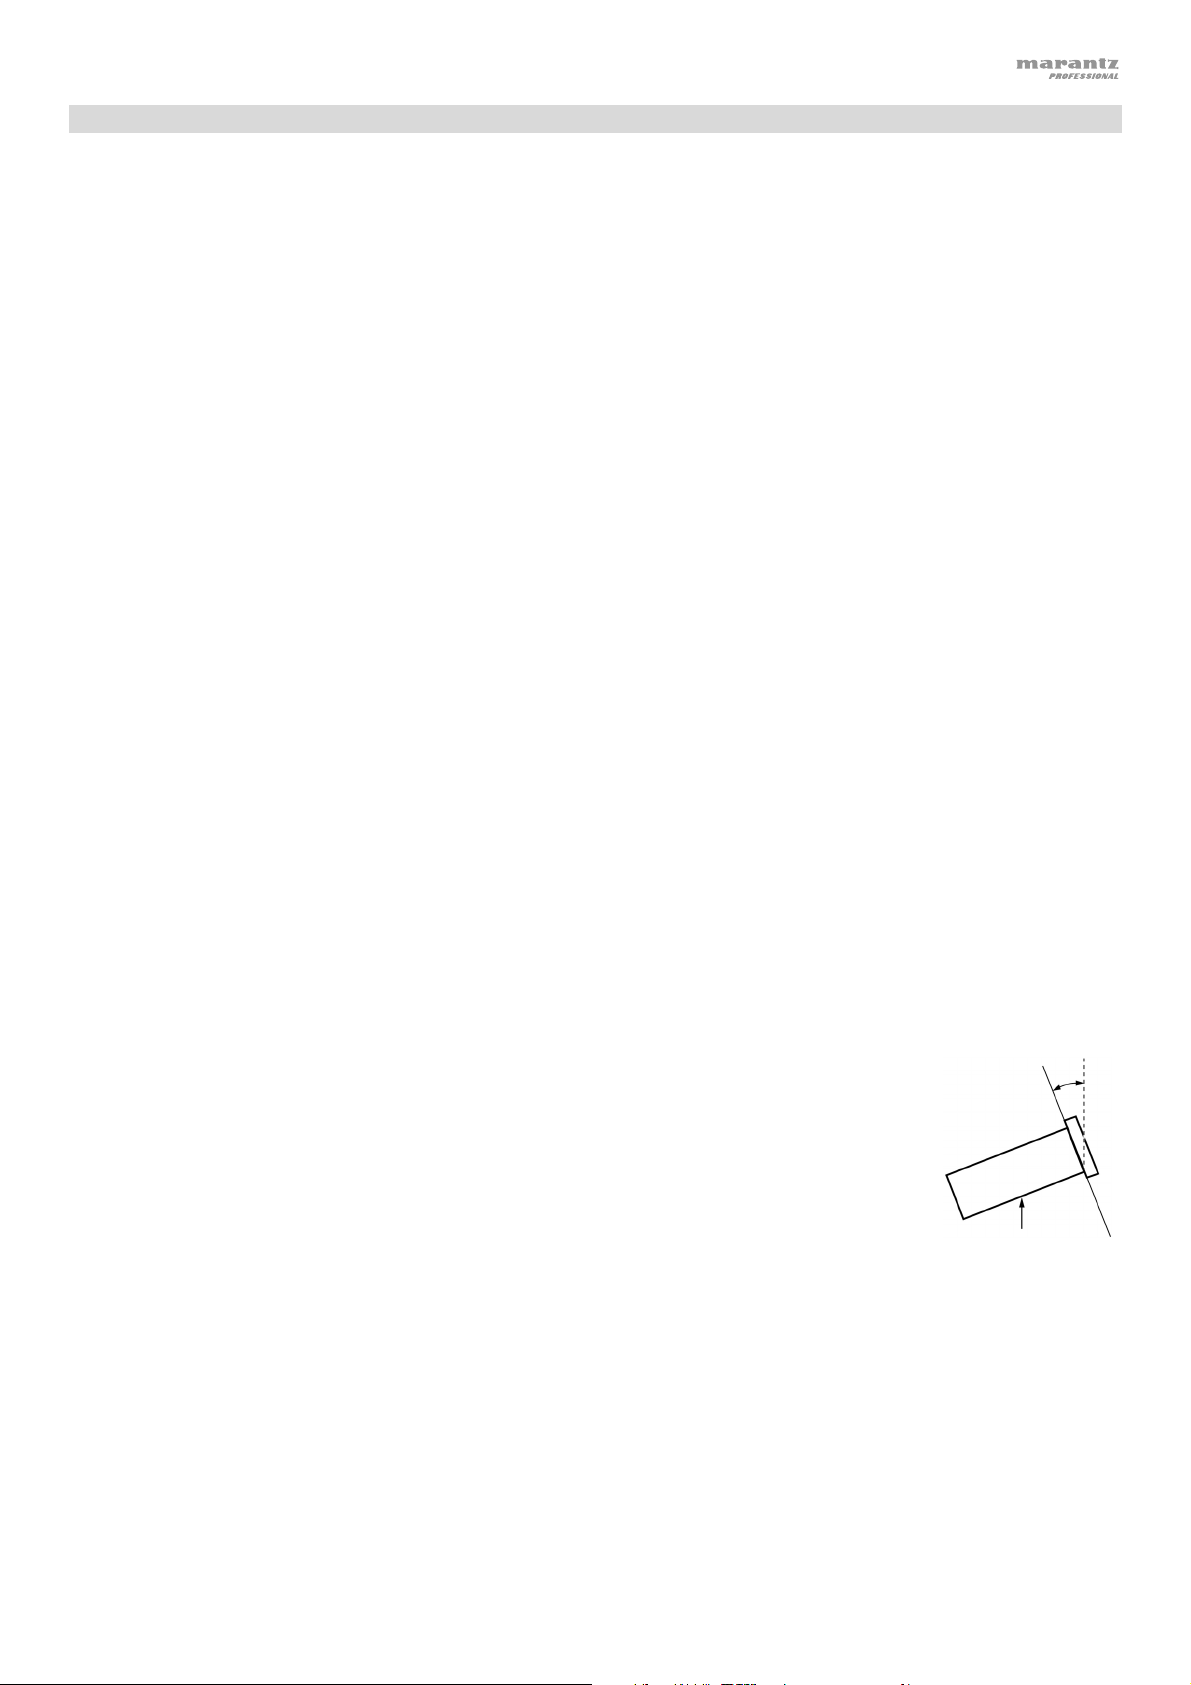
Rack installation:
1U-size installation compatible rack
Rack that has a guide rail or shelf board that can support this device
This product will work normally when the player
unit is mounted within 10° off the vertical plane at
Maximum
10°
the front panel. If the unit is tilted excessively, the
disc may not load or unload properly. (See image.)
Unit
3
Page 4
Features
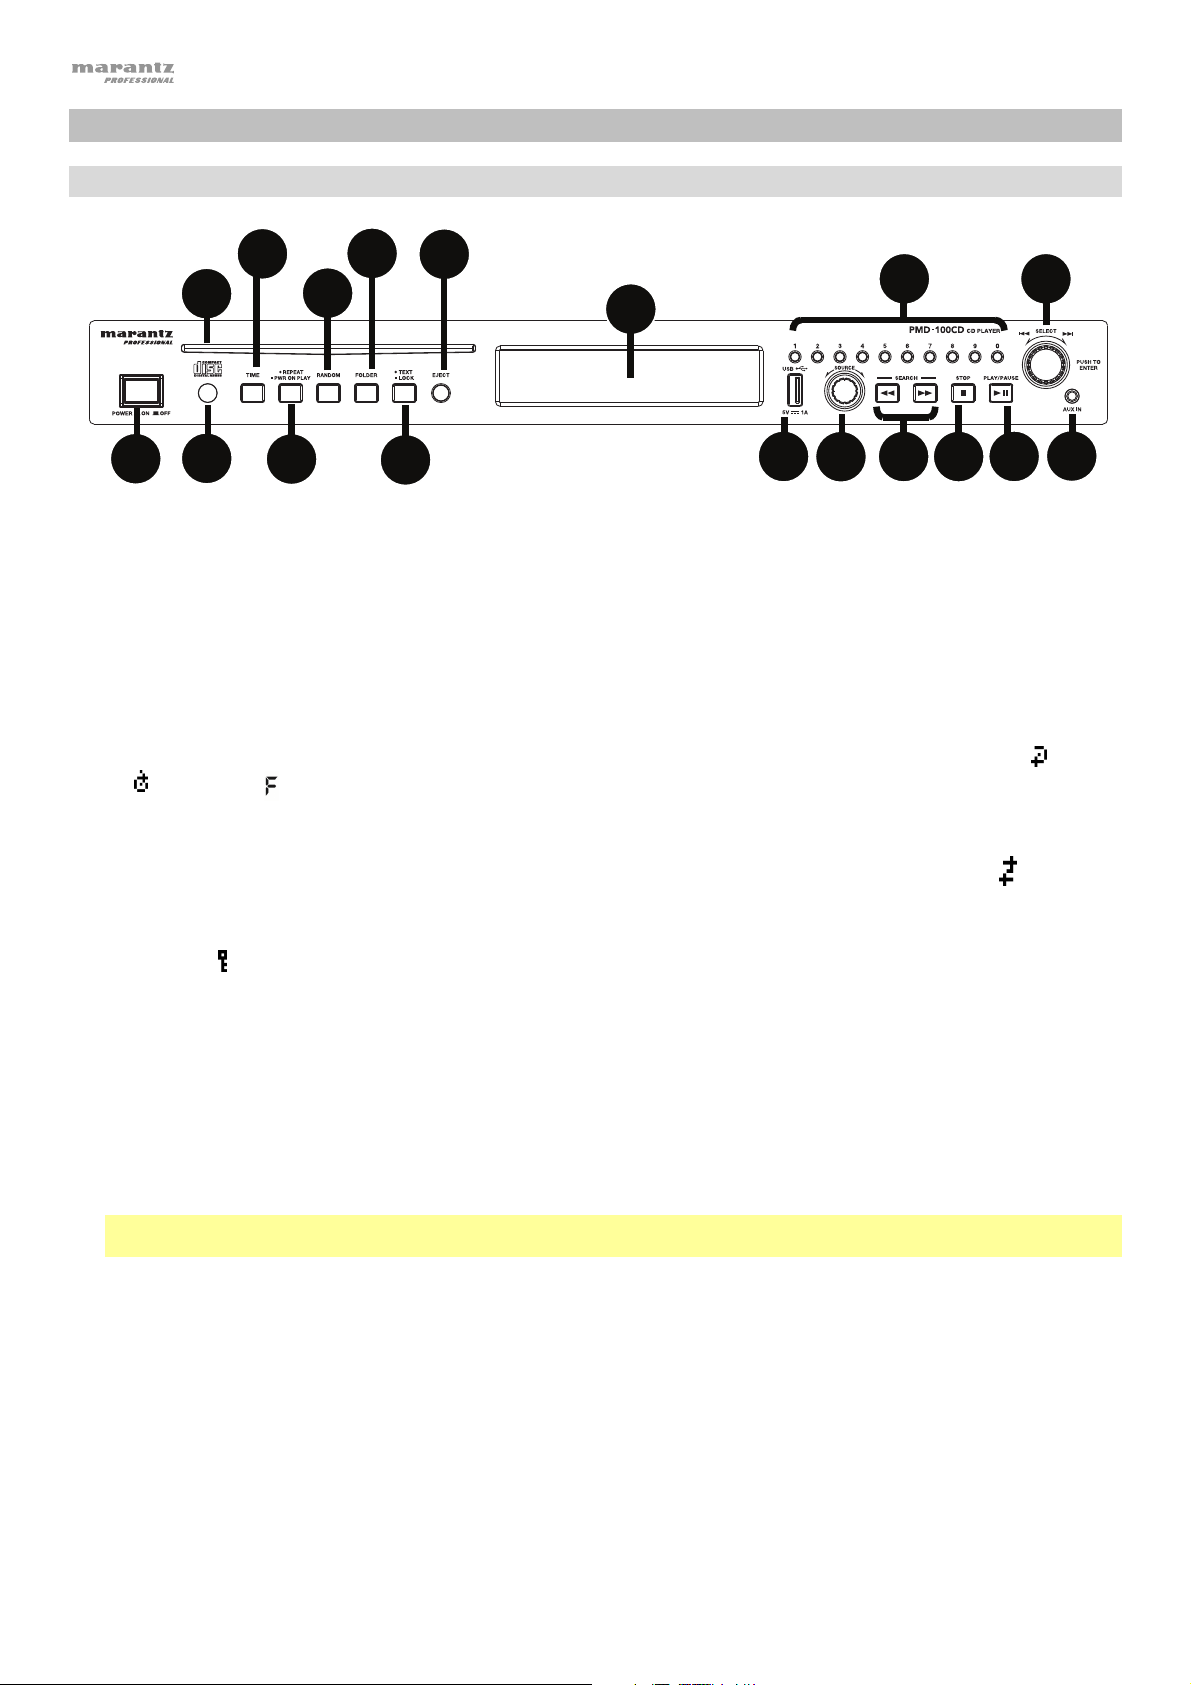
Front Panel
9
4
1
1. Power Button: Press this button to turn the unit on or off. Make sure the AC In is properly connected to a power outlet. Do
not turn the unit off during media playback—doing so could damage your media.
2. Aux In: Connect an optional device to this input using a 1/8” (3.5mm) TRS cable. See Operation > Playing Audio from an
External Device for more information.
3. USB Port: Connect a mass-storage-class USB device to this port.
4. CD Slot: Insert a CD into this slot. See Operation > Playing Audio CDs for more information.
5. Source: Rotate the knob to select the media playback mode: CD, USB, or Aux. See Operation > Selecting Media Playback
Mode
6. Repeat Button: In CD or USB Mode, press this button to switch between Repeat Playback modes: Repeat One , Repeat
All
Power-On Play Button: Press and hold this button to turn Power-On Play on or off. See Operation > Additional Functions
> Power-On Play for more information.
13
for more information.
, Repeat FLD (folder), and Repeat Off. See Operation > Playing Audio CDs for more information.
6
10
7
8
11
12
3
5
17
14
15
16
18
2
7. Random Button: In CD or USB Mode, press this button to cycle through Random FLD/Random Play Mode
Mode S, and Normal Play Mode.
8. Text Button: In CD or USB Mode, press this button to switch the display between the file name and other text information.
Lock Button : Press and hold this button to turn Panel Lock on and off. See Operation > Additional Functions > Panel
Lock for more information.
9. Time Button: In CD or USB Mode, press this button to switch the Time Mode in the display. See Operation > Playing Audio
CDs for more information.
10. Folder Button: Press and hold this button to select a folder.
11. Eject Button: Press this to eject the CD in the CD slot. To force-eject a CD, power off the unit, then press and hold the eject
button while powering the unit back on. To exit force-eject mode, turn the unit off.
12. Display: This screen indicates the unit’s current operation. See Display for more information.
13. Remote Sensor: Point the remote control at this sensor when operating it.
Note: If the remote sensor is exposed to direct sunlight, strong artificial light (like from an interverter-type fluorescent lamp),
or infrared light, the unit or remote control may not function properly.
14. Search Buttons: In CD or USB Mode, press and hold one of these buttons to rewind/fast-forward. The track will rewind/fastforward at 5 times the normal playback speed.
15. Stop Button: Press this button to stop playback. To view current firmware version, hold the stop button while powering on
the unit.
16. Play/Pause Button: Press this button to start, resume, or pause playback.
17. Number Buttons (0–9): In CD Mode, Press one of these buttons to directly select a track to play. If the track number is two
digits, press the buttons in succession (e.g., 1 then 2 for Track 12). See Operation > Playing Audio CDs for more
information.
18. Jog Dial: Turn this dial to browse the options shown in the display. Press this dial to confirm a selection. In CD and USB
mode this is used to browse and select tracks.
, Single Play
4
Page 5
Display
1. Media Type: This is the currently selected media: CD,
USB, or Aux. See Operation > Selecting Media
Playback Mode for more information.
2. Playback Operation Icon: This shows various
symbols to indicate the current playback status:
Playing Rewinding
Paused Fast-Forwarding
Stopped
3. Information: This shows extra information about the
media being played.
TRK Elapsed: Time Elapsed
TRK Remain: Time Remaining
DISC Elapsed: Total Time Elapsed (for CD Mode only)
DISC Remain: Total Time Remaining (for CD Mode only)
4. Track/File Number: This is the number of the track or file.
1
4
23
7
56
5. Function Icons: This shows various symbols to indicate these current functions:
Random Playback (see Operation > Playing Audio CDs for more information)
Repeat One (see Operation > Playing Audio CDs for more information)
Repeat All (see Operation > Playing Audio CDs for more information)
Power-On Play (see Operation > Additional Functions > Power-On Play for
more information)
6. Time: In CD and USB Mode, this is how much time has elapsed or is remaining, shown as hh:mm:ss
(hours, minutes, and seconds).
See Operation > Playing Audio CDs for more information.
7. Folder View
Panel Lock (see
Operation > Additional Functions > Panel Lock for more information)
5
Page 6
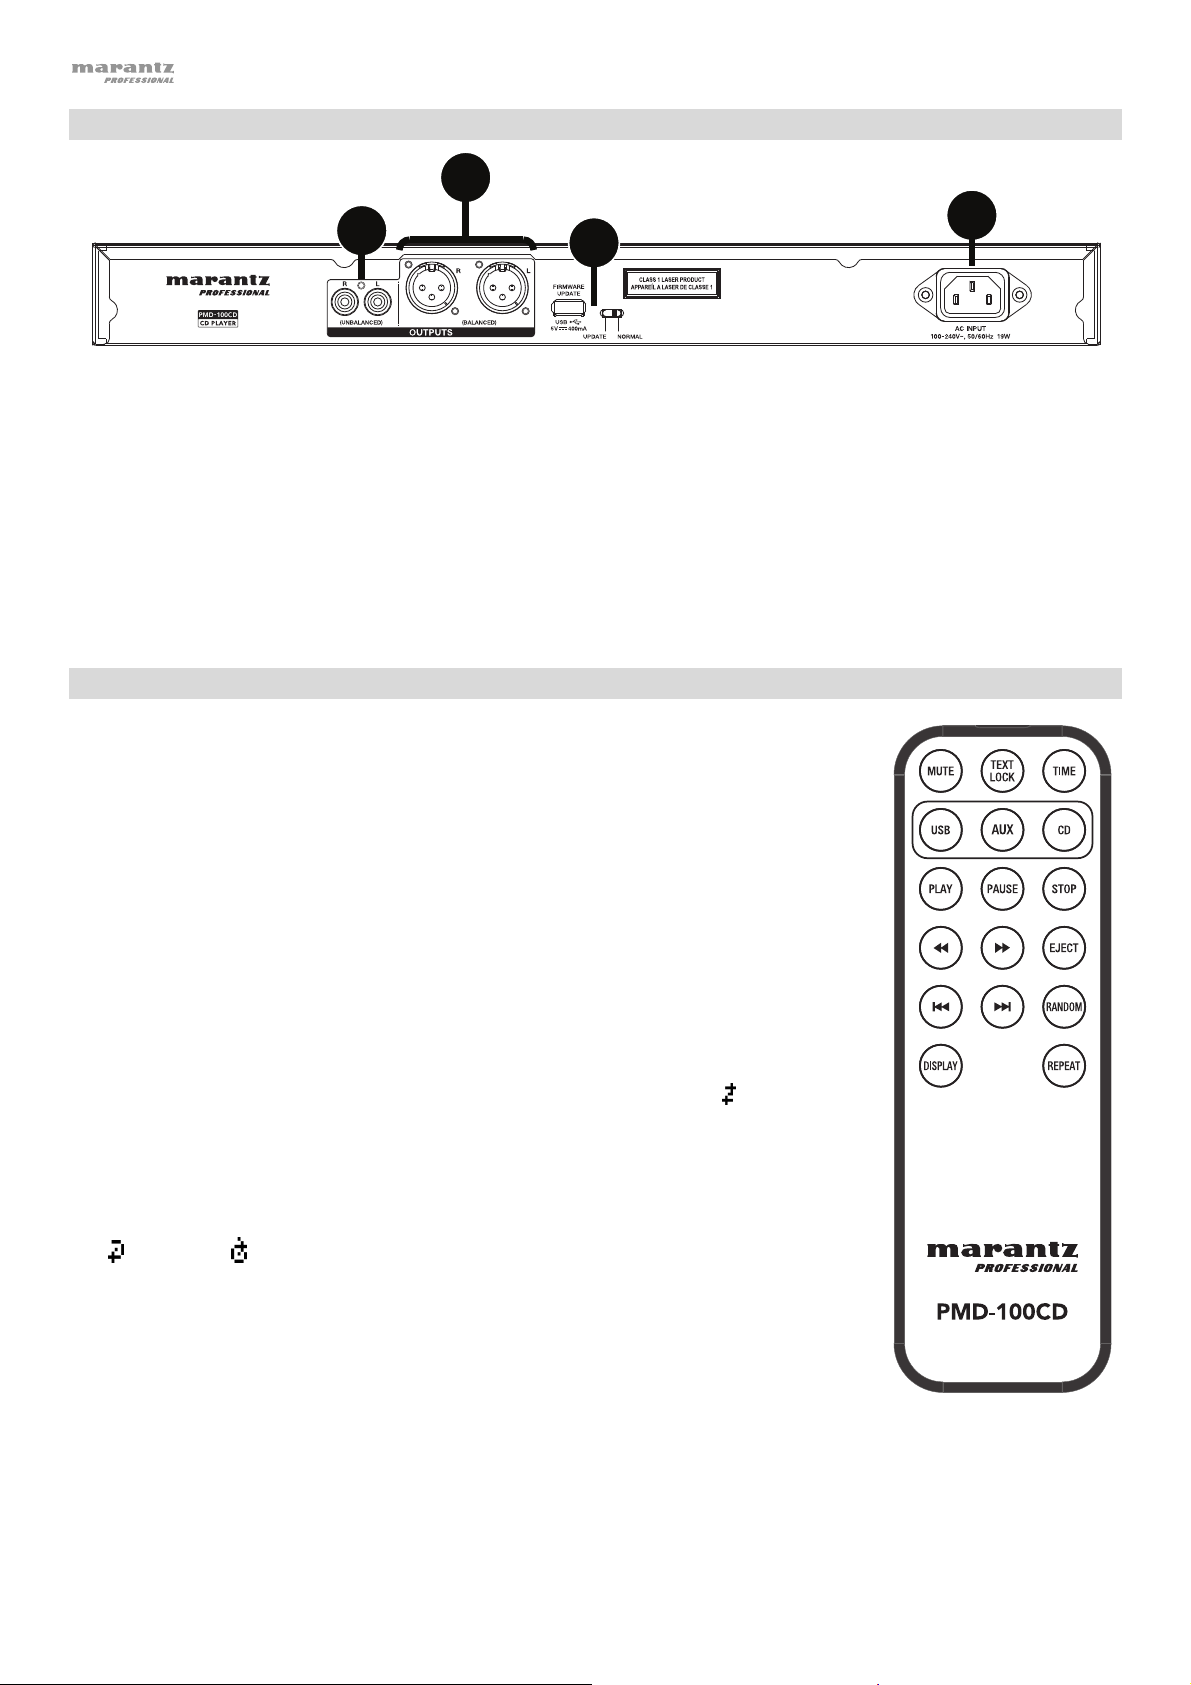
Rear Panel
2
1
1. Outputs (unbalanced RCA): These outputs send the audio signals from a CD, USB device (mass storage class),
and device connected to the Aux In. Use RCA cables to connect these outputs to external speakers, sound
system, etc. See Setup for more information.
2. Outputs (balanced XLR): These outputs send the audio signals from a CD, USB device (mass storage class),
and device connected to the Aux In. Use XLR cables to connect these outputs to external speakers, sound
system, etc. See Setup for more information.
3. AC In: Use the included power cable to connect this input to a power outlet. See Setup for more information.
4. USB Port: This USB port is used to upgrade the unit’s firmware. The “Update/Normal” switch is used to set the
mode for the USB connection for the firmware upgrade. If updating the unit, set this switch to the “Update”
position. For normal operation, this switch should be left in the “Normal” position.
4
3
Remote Control
1. Mute: Disables the sound from the audio outputs.
2. USB: Switch to USB Mode.
3. AUX: Switch to Aux Mode.
4. CD: Switch to CD Mode.
5. Play: Plays audio from a CD or USB flash drive.
6. Pause: Pause audio from a CD or USB flash drive.
7. Stop: Stops audio from a CD or USB flash drive.
8. Eject: Ejects or inserts a CD.
9. Search Backward: Hold to rewind through a CD or USB track.
10. Search Forward: Hold to fast forward through a CD or USB track.
11. Skip Back: Press to skip to the previous track or chapter.
12. Skip Forward: Press to skip to the next track or chapter.
13. Random: Press to cycle through Random FLD/Random Play Mode
Mode () in CD or USB mode.
14. Display: Press and release the button to adjust the display brightness. Press and
hold the button to open the options menu. Hold the button again to close the option
menu.
15. Repeat: In CD or USB mode, switch between Repeat Playback modes: Repeat One
, Repeat All , and Repeat Off.
16. Time: In CD or USB Mode, press this button to switch the time in the display from
Time Elapsed, Time Remaining, Total Elapsed Time, or Total Time Remaining (for CD
Mode only).
17. Text/Lock: In CD or USB Mode, press to switch the display between the track name
and artist name. Press and hold to turn Panel Lock on and off.
or Single Play
6
Page 7
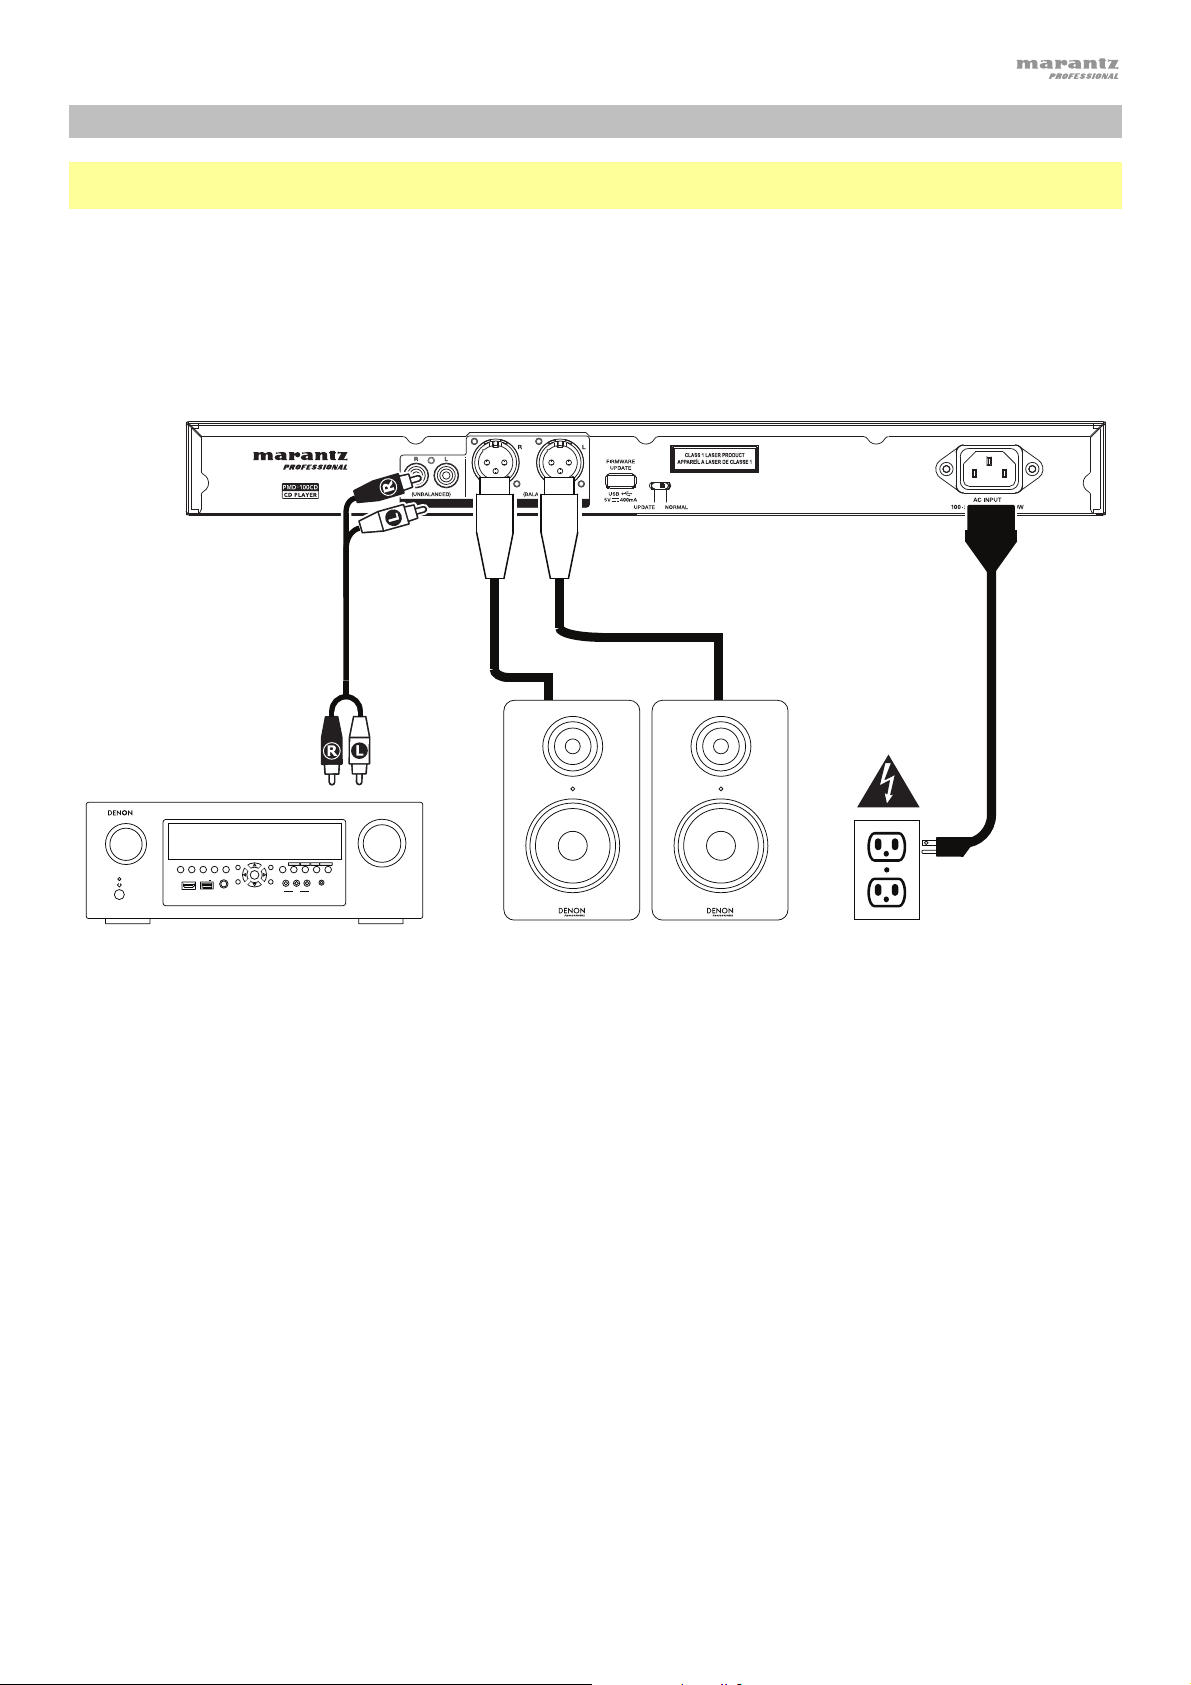
Setup
Important: Connect all cables securely and properly (with stereo cables: left with left, right with right), and do not
bundle them with the power cable.
1. Use XLR cables or a stereo RCA cable to connect the Outputs (balanced or unbalanced) to the analog inputs of
your external receiver, amp, powered monitors, etc.
2. After completing all the connections, use the included power cable to connect the AC In to a power outlet.
Example:
SOURCE SELECT
ZONE 2
ZONE 3 ZONE 3
ZONE 2
SOURCE
ON/OFF
ON/OFF
AUX 1
HDMI 7 5V/1A
INFO
SOURCE STATUS DIMMER
PHONES BACK
QUICK SELECT
OPTION
1 CBL/SAT 3 GAME 4 NETWORK
2 Blu-ray
ENTER
L - AUDIO - R
VIDEO
SETUP
AUX 1
Receiver, amp, etc.
MASTER VOLUME
SETUP MIC
IN-Command
SSEERI
INTEGRATED NETWORK AV RECEIVER
AVR-X4000
Powered Monitors
Power
7
Page 8

Operation
Selecting the Media Playback Mode
To select what kind of media you want to play:
To cycle through the available options, rotate the Source knob.
CD: audio CD, CD-DA, CD-ROM, or MP3 CD with audio files (CDR) (see Playing Audio CDs)
•
USB: USB device (mass storage class). (see Playing Audio Files on a USB Drive)
•
• Aux: device connected to Aux In. (see Playing Audio from an External Device)
Playing Audio CDs
To play audio CDs:
1. If the unit is off, press the Power button to power it on.
2. Insert a CD into the CD slot. (Hold the edges of the CD without touching the recorded surface. Be careful not to
3. Select CD as the media type (described in Selecting the Media Playback Mode).
In CD Mode, you can perform any of the following operations:
• To start, resume, or pause playback, press the Play/Pause button.
• To stop playback, press the Stop button.
Important: Do not insert a CD when the power is off. Doing so may damage the unit.
trap your fingers when the disc is drawn into the unit.)
The CD will start playing automatically when Power-On Play mode is active.
• To rewind or fast-forward through the track, press and hold one of the Search buttons. The track will
rewind/fast-forward at 5 times the normal playback speed. To resume playback, release the button.
• To skip directly to a track:
1. Press one of the Number buttons (0–9) to enter the desired track number. If the track number is two digits,
press the buttons in succession (e.g., 1 then 2 for Track 12). Alternatively, turn the Jog Dial to select a track
and press the Jog Dial to load the track.
• To select a Repeat Playback mode, press the Repeat button. It will cycle through Repeat One (the same track
will repeat indefinitely), Repeat All (the list of all tracks will repeat indefinitely), Repeat FLD (tracks in the
selected folder will repeat indefinitely), and Repeat Off (no tracks will repeat).
• To select the Play Mode, press the Random button. It will cycle through Random FLD (all tracks in the
selected folder will play back in random order), Random All (all tracks on the CD will play back in a random
order), Single Play (the current track will play until its end and then stop), and Normal (the CD will play from the
current track to the end and then stop).
• To change the Time Mode in the display, press the Time button. It will cycle through the TRK Elapsed (E):
how much time has elapsed of the current track. TRK
Remaining (R): how much time remains of the current
track. Disc Elapsed: how much time elapses of all remaining tracks. This applies only to CDs. Disc Remain:
how much time remains of all remaining tracks. This applies only to CDs.
• To eject a CD, press the Eject button when the unit is stopped or paused. Ejecting will appear in the display
while ejecting the CD. No Disc will appear when there is no disc in the CD slot.
Important: Please see Other Information > CDs to learn more about the types of CDs the PMD-100CD supports
and for more information about CD handling and care. When powering on the unit, hold the Eject button to engage
Force Eject Mode.
8
Page 9

Playing MP3 Files on a CD
To play MP3 files on a CD:
1. If the unit is off, press the Power button to power it on.
Important: Do not insert a CD when the power is off. Doing so may damage the unit.
2. Do one of the following:
• Insert a CD into the CD slot. (Hold the edges of the CD without touching the recorded surface. Be careful not
to trap your fingers when the disc is drawn into the unit.)
3. Select CD as your desired media type: (described in Selecting the Media Playback Mode).
4. Select an audio file:
• To move through audio files, turn the Jog Dial on the unit.
• To enter a folder, press and hold the Folder button for 3 seconds and turn the Jog Dial to select a folder.
Press the Jog Dial to enter the folder and scroll with the dial to find a track. Press the dial again to select a
track and press the Play/Pause button to play the track.
Note: If a track is not selected after a few seconds of entering a folder, the unit will exit the folder and return
In CD Mode, you can perform any of the following operations:
• To start, resume, or pause playback, press the Play/Pause button.
• To stop playback, press the Stop button.
• To rewind or fast-forward through the track, press and hold one of the Search buttons. The track will
• To select a Repeat Playback mode, press the Repeat button. It will cycle through Repeat One (the same track
• To select the Play Mode, press the Random button. It will cycle through Random FLD (all tracks in the
• To change the Time Mode in the display, press the Time button. It will cycle through Elapsed (E) (how much
• To eject a CD, press the Eject button. Ejecting will appear in the display while ejecting the CD. No Disc will
back to the previously selected track/folder.
rewind/fast-forward at 5 times the normal playback speed. To resume playback, release the button.
will repeat indefinitely), Repeat All (the list of all tracks will repeat indefinitely), Repeat FLD (tracks in the
selected folder will repeat indefinitely), and Repeat Off (no tracks will repeat).
selected folder will play back in random order), Random All (all tracks on the CD will play back in a random
order), Single Play (the current track will play until its end and then stop), and Normal (the CD will play from the
current track to the end and then stop).
time has elapsed of the current track) Remaining (R) (how much time remains of the current track), and Total
Remaining (how much time remains for the total audio CD).
appear when there is no disc in the CD slot.
9
Page 10

Playing Audio Files on a USB Flash Drive
To play audio files on a USB flash drive:
1. If the unit is off, press the Power button to power it on.
2. Connect your USB device (mass storage class) to the USB Port.
3. Select USB as your desired media type (described in Selecting the Media Playback Mode).
4. Select an audio file:
• To move through audio files, turn the Jog Dial on the unit.
• To enter a folder, press and hold the Folder button for 3 seconds and turn the Jog Dial to select a folder.
Press the Jog Dial to enter the folder and scroll with the dial to find a track. Press the dial again to select a
track and press the Play/Pause button to play the track.
Note: If a track is not selected after a few seconds of entering a folder, the unit will exit the folder and return
back to the previously selected track/folder.
In USB Mode, you can perform any of the following operations:
• To start, resume, or pause playback, press the Play/Pause button.
• To stop playback, press the Stop button.
• To rewind or fast-forward through the track, press and hold one of the Search buttons. The track will
rewind/fast-forward at 5 times the normal playback speed. To resume playback, release the button.
• To change the view mode, press the Folder button.
• To select another folder or audio file, follow the steps described in Step 4 above.
• To show different track information in the display, press the Text button. It will cycle through the file name and
other text information.
• To select a Repeat Playback mode, press the Repeat button. It will cycle through Repeat One (the same track
will repeat indefinitely), Repeat All (the list of all tracks will repeat indefinitely), Repeat FLD (tracks in the selected
folder will repeat indefinitely), and Repeat Off (no tracks will repeat).
• To change the Time Mode in the display, press the Time button. It will cycle through Elapsed (E) (how much
time has elapsed of the current track) and Remaining (R) (how much time remains of the current track).
• To remove a USB device, gently remove it from the USB Port when it is not playing. (Removing a USB device
while it is playing can damage it.)
Playing Audio from an External Device
To play audio on an external device (e.g., smartphone, computer, portable music player, etc.) connected to
the Aux In:
1. If the unit is off, press the Power button to power it on.
2. Connect the 1/8” (3.5 mm) stereo/headphone output of your external device to the Aux In.
3. Select Aux as the media type (described in Selecting the Media Playback Mode). If your external device is
connected, AUX Connected will appear in the display. If your external device is not connected, AUX
Disconnect will appear in the display.
4. To start playback, press the Play button on your external device.
Important: All buttons except for Power and Eject will be locked/disabled when you are in AUX Mode.
10
Page 11

Additional Functions
Panel Lock
Use the Panel Lock feature to prevent accidental changes to the unit. When Panel Lock is activated, all buttons
except for the Power button and Text/Lock button are locked/disabled on the unit. (The remote control will still
function normally.)
To activate or deactivate Panel Lock, press and hold the Text/Lock button.
• When activated, P-Lock ON and
• When deactivated, P-Lock OFF will appear in the display, and
will appear in the display.
will disappear.
Power-On Play
Use the Power-On Play feature to set the unit to automatically start playback of the CD in the drive.
To activate or deactivate Power-On Play, press and hold the Pwr On Play button.
• When activated, P-OnPlay On will appear on the display.
• When deactivated, P-OnPlay Off will disappear on the display.
11
Page 12
Other Information
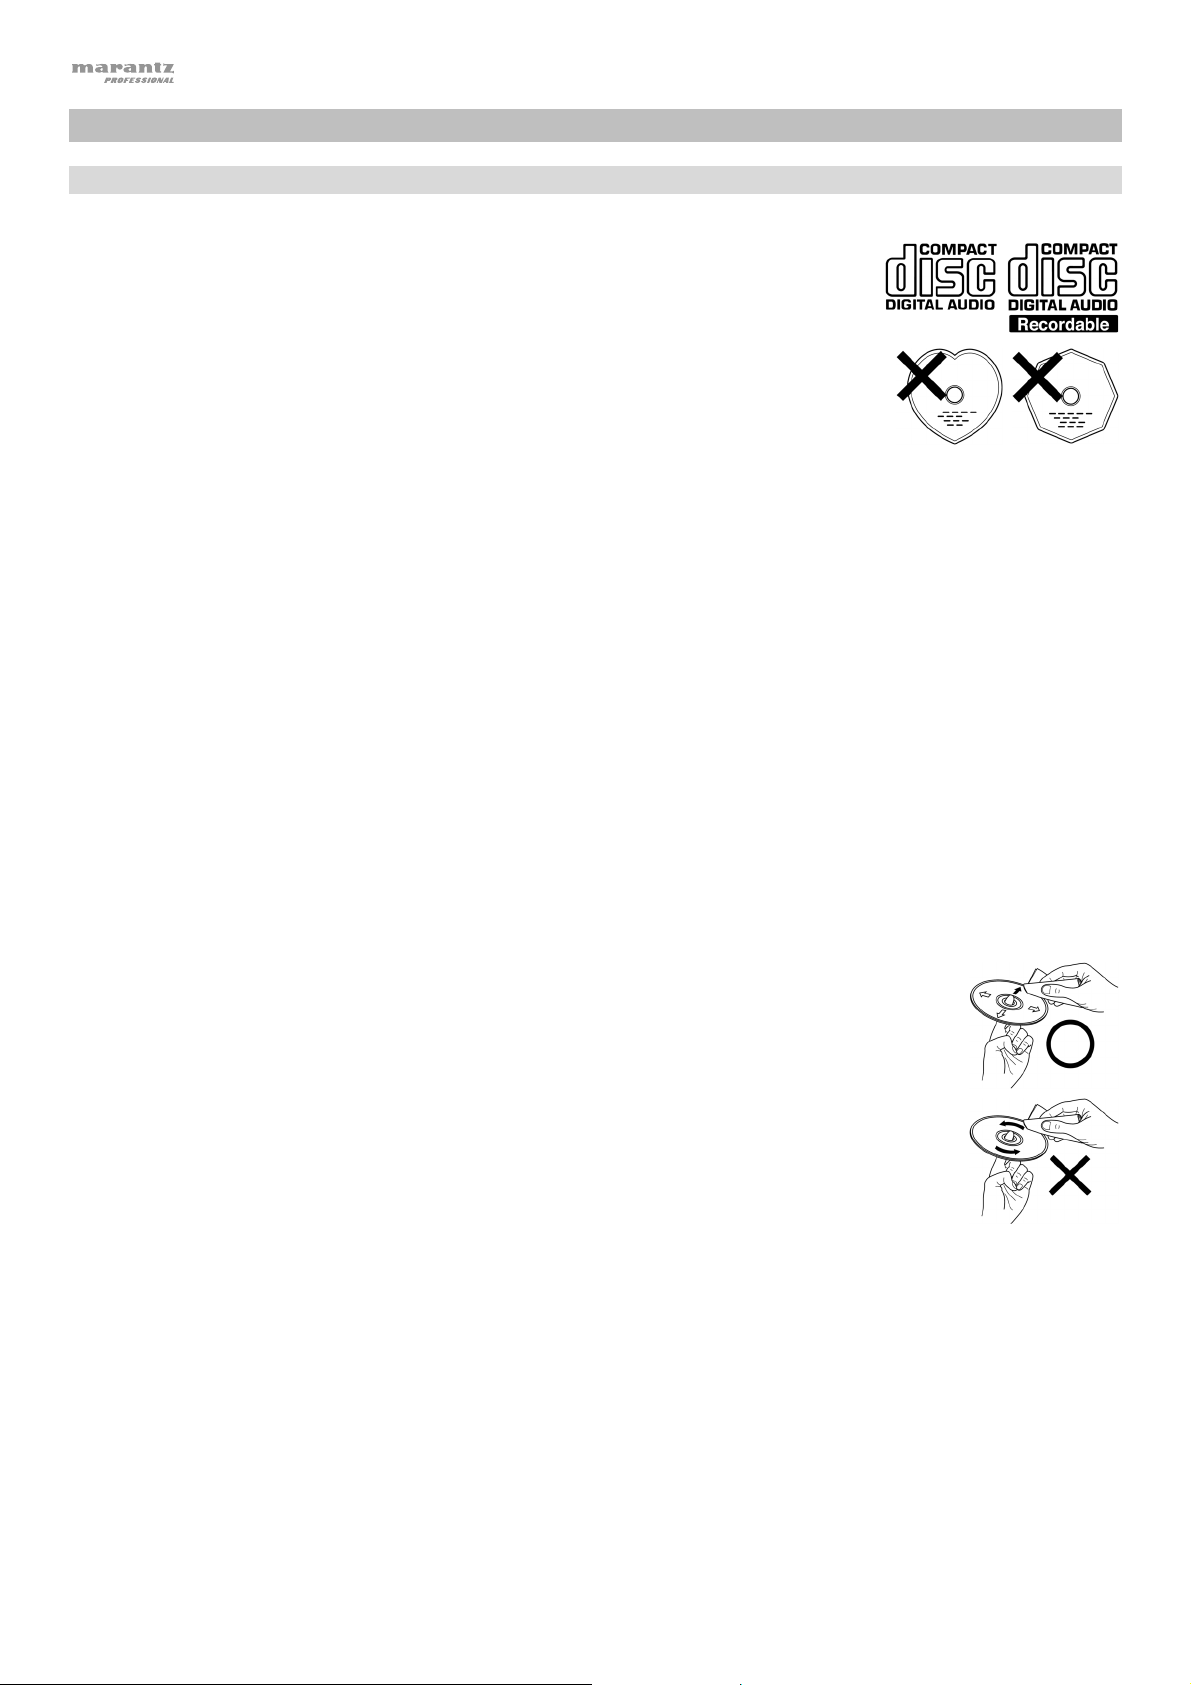
CDs
When playing audio CDs, note the following:
• PMD-100CD can play Music CDs and CD-R discs. Both are usually marked with
the Compact Disc Digital Audio logo (see image).
• Do not play discs in non-circular shapes (heart-shaped discs, octagonal discs, etc.;
see image) or discs that have been repaired with adhesive or tape. These can
damage the unit.
• PMD-100CD can play finalized discs only. (Finalization is the process that makes
recorded CD-R discs playable on compatible players.)
• Depending on the software used to burn a CD (or other conditions), some CDs may
not play correctly.
When playing CDs with audio files, note the following:
• The writing software format must be ISO9660 Level 1.
• You can have up to 300 folders and up to 8 folder levels, including the root directory.
• You can have up to 300 audio files. If the CD contains more than 300 files, some audio files may not play or
appear correctly.
• File names, folder names, and text characters can use up to 255 characters. Only uppercase letters, lowercase
letters, numbers, and symbols can be displayed. Japanese file names will not be shown. File names that begin
with a “.” will not be shown.
• Copyright-protected files might not play properly and/or may appear as Unknown File.
• Depending on the software used to burn a CD (or other conditions), some files may not play or appear correctly.
• When playing audio files on a CD, PMD-100CD supports the following tag data:
o ID3 tags: Version 1.x and 2.x
o META-tags: compatible with title, artist, and album names
o Sample rate: 44.1 kHz
o Bit rate: 32 kbps to 320 kbps
o Format: MPEG1 Audio Layer 3
o File extension: .mp3
Be careful not to scratch discs when removing them from their cases. Do not bend or heat discs,
and do not enlarge the hole in the center of the disc. Do not write on the labeled surface of the
disc or attach new labels to discs.
If fingerprints, dirt, or condensation are on a disc, clean it with a commercially available disc
cleaning set or a soft, dry cloth. Gently wipe it from the inside towards the outside, not in a circular
motion. Do not use record spray, antistatic agents, benzene, thinner, or other solvents.
After using discs, remove them from the unit and store them in their cases to protect them from
dust, scratches, warping, etc. Do not store discs in places exposed to long periods of direct
sunlight or places exposed to heat, dust, humidity, etc.
12
Page 13

USB Devices
When playing audio files on a USB device, note the following:
• PMD-100CD does not charge any connected USB device and does not support USB hubs or USB extension
cables.
• PMD-100CD supports USB devices that are mass storage class or compatible with MTP.
• PMD-100CD supports FAT16 or FAT32 file systems only.
• You can have up to 999 folders and up to 8 folder levels, including the root directory.
• You can have up to 999 audio files. If the USB device contains more than 999 files, some audio files may not play
or appear correctly.
• File names, folder names, and text characters can use up to 255 characters. Only uppercase letters, lowercase
letters, numbers, and symbols can be displayed. Japanese file names will not be shown. File names that begin
with a “.” will not be shown.
• Copyright-protected files might not play properly and/or may appear as Unknown File.
When playing audio files on a USB device, PMD-100CD supports the following tag data:
• ID3 tags: Version 1.x and 2.x
• for MP3 files:
o Sample rate: 44.1 kHz
o Bit rate: 32 kbps to 320 kbps
o Format: MPEG1 Audio Layer 3
o File extension: .mp3
Audio File Playback Order
When playing audio files stored within multiple folders, the playback order of each folder is automatically set when
the unit reads the media. The files in each folder will play in the same order in which they were added to the media.
(This order may appear differently on your computer and/or in your software than it does on the unit.)
The folder structure also determines the playback order:
o For audio files on a CD-R, files in all folders on the first level will play, then files in all folders on the second level,
then on the third level, and so on.
o For audio files on a USB device, files in the first folder on the first level will play, then files on the second level in
that same folder, then files on the third level in that same folder, and so on. After playing all files on all levels of
that first folder, the same process will continue for files in the second folder on the first level.
13
Page 14

Troubleshooting
If you encounter a problem, do the following:
• Make sure all cables, devices, antennae, and/or media are properly and securely connected.
• Make sure you are using the unit as described in this User Guide.
• Make sure your other devices or media are working properly.
• If you believe the unit is not working properly, check the following table for your problem and solution.
Problem Solution Please see:
Power does not turn on. Make sure the unit is connected to a
power outlet.
CD cannot be inserted into
CD slot.
Make sure the unit is connected to a
power outlet and that it is powered on.
Press the Eject button to make sure a CD
is not already in the CD slot.
No Disc appears even when
a CD is inserted.
Press the Eject button to eject the CD
and insert it again.
A specific section of the CD
does not play properly.
Playback does not start even
after pressing the Play
button.
The unit does not produce
any sound, or the sound is
distorted.
Clean the CD with a dry cloth or
commercial CD cleaner.
Insert a different CD.
Make sure all cable, device, or media
connections are secure and correct.
Make sure none of the cables are
damaged.
Make sure the settings on your amplifier,
mixer, etc. are correct.
Setup
Setup
Other Information > CDs
Setup
The unit cannot play a CD-R. Make sure the CD-R has been finalized
properly.
Make sure the CD-R is of good quality.
Clean the CD with a dry cloth or
commercial CD cleaner.
Make sure the CD uses a folder structure
that the unit supports: up to 300 folders
(up to 8 folder levels, including the root)
and up to 300 files.
Make sure the CD-R contains MP3 files.
The unit cannot play other files on CD-R.
The CD will not eject.
Press and hold the Eject button while
turning on the unit.
14
Other Information > CDs
Page 15

Problem Solution Please see:
No Device appears even
when a USB device is
inserted.
Files on a USB device do not
appear.
Disconnect and reconnect the USB
device to make sure it is securely
inserted.
Make sure the USB device is of a mass
storage class or compatible with MTP.
Make sure the USB device is formatted
using a FAT16 or FAT32 file system.
Do not use a USB hub or USB extention
cable.
The unit does not supply power to USB
devices. If your USB device requires a
power source, connect it to one.
Not all USB devices are guaranteed to
work; some may not be recognized.
Make sure the files are of a supported file
format. Files that are not supported by
this unit will not appear.
Make sure the USB device uses a folder
structure that the unit supports: up to 999
folders (up to 8 folder levels, including the
root) and up to 999 files.
Other Information > USB
Devices
Other Information > USB
Devices
Files on a USB device
cannot play.
File names do not appear
properly.
If your USB device is partitioned, make
sure the files are in the first partition. The
unit will not show other partitions.
Make sure the files are of a supported file
format. Files that are not supported by
this unit will not appear.
Make sure the files are not copyrightprotected. The unit cannot play copyrightprotected files.
Make sure the files are using only
supported characters. Characters that are
not supported will be replaced with a “.”
Other Information > USB
Devices
Other Information > USB
Devices
15
Page 16

Guía del usuario (Español)
Introducción
Gracias por comprar el PMD-100CD. En Marantz Professional, el rendimiento y la confiabilidad significan tanto
para nosotros como para usted. Por eso es que diseñamos nuestros equipos con una sola cosa en mente—
hacer que pueda tocar su mejor interpretación.
Contenido de la caja
PMD-100CD
Cable de corriente
Control remoto
Cable RCA
Guía del usuario
Manual sobre la seguridad y garantía
Soporte
Para obtener la información más reciente acerca de este producto (documentación, especificaciones técnicas,
requisitos de sistema, información de compatibilidad, etc.) y registrarlo, visite marantzpro.com.
Para obtener soporte adicional del producto, visite marantzpro.com/support.
16
Page 17

A
A
A
V
A
A
A
Instrucciones de seguridad
Para más información, consulte también el Manual de seguridad y garantía incluido.
ntes de encender la
unidad:
segúrese de que todas las conexiones estén aseguradas y correctas y que no
haya problemas con los cables de conexión.
lgunos circuitos permanecen alimentados aun cuando la unidad está
apagada. Cuando la unidad no se utilizará durante largos períodos de tiempo,
desconecte el cable de corriente de la toma de corriente.
entilación apropiada:
cerca de la condensación:
Precauciones sobre el uso
de teléfonos móviles:
Cómo mover la unidad:
Cómo cuidar la unidad:
dvertencias para el
montaje en rack:
(especificaciones para rack
requeridas para montar la
unidad en un rack)
Si la unidad se deja en una sala que no está ventilada apropiadamente o está
llena de humo de cigarrillos, polvo, etc., durante largos períodos de tiempo, la
superficie óptica puede ensuciarse, causando un funcionamiento incorrecto.
Si existe una gran diferencia de temperatura entre el interior de la unidad y los
alrededores, puede acumularse condensación en el interior, haciendo que la
unidad no funcione correctamente. Si esto ocurriera, deje la unidad apagada
durante una o dos horas y espere hasta que haya una menor diferencia de
temperatura antes de utilizar la unidad.
Utilizar un teléfono móvil cerca de esta unidad puede ocasionar ruido. Si esto
ocurriera, aleje el teléfono móvil de la unidad cuando lo esté utilizando.
ntes de mover la unidad, apáguela y desconecte el cable de corriente de la
toma de corriente. A continuación, desconecte sus cables de conexión con
otros dispositivos antes de moverlo.
Limpie el gabinete y el panel de control con un paño suave.
Siga las instrucciones cuando utilice un limpiador químico.
No utilice benceno, diluyente de pintura, insecticidas u otros solventes
orgánicos para limpiar la unidad. Estas sustancias pueden causar cambios y
decoloración en los materiales.
Rack EIA estándar de 19 pulg. (48,3 cm)
Rack compatible con instalación de tamaño 1U
Rack que posee un riel guía o estante capaz de acomodar este dispositivo
Instalación del rack:
Este producto funcionará normalmente cuando la
unidad de reproducción se monte a menos de 10°
respecto del plano vertical del panel frontal. Si la
unidad se inclina demasiado, puede que el disco no
se inserte o expulse correctamente. (Consulte la
imagen).
Máximo de 10°
Unidad
17
Page 18

Características
Panel frontal
9
4
1
1. Botón de encendido: Pulse este botón para encender o apagar la unidad. Asegúrese de que la entrada AC In esté conectada
firmemente a la toma de corriente. No apague la unidad mientras esté reproduciendo medios—esto podría dañarlos.
2. Entrada auxiliar: Conecte un dispositivo opcional a esta entrada utilizando un cable TRS de 3,5 mm (1/8 pulg.).
3. Puerto USB: Conecte un dispositivo USB de almacenamiento masivo a este puerto. Consulte Funcionamiento > Reproducción de
archivos de audio para mayor información.
4. Ranura para CD: Inserte un CD en esta ranura. Consulte Funcionamiento > Reproducción de CD de audio para mayor
información.
5. Fuente: gire la perilla para seleccionar el modo de reproducción de medios: CD, USB o Aux. Consulte Funcionamiento >
Selección del modo de reproducción de medios para mayor información.
6. Botón de repetición: En modo CD o USB, pulse este botón para alternar entre los modos de repetición de reproducción: repetir
uno
audio para mayor información.
Botón de reproducción al encender: Mantenga pulsado este botón para encender o apagar la reproducción al encender. Consulte
Funcionamiento > Funciones adicional > Reproducción al encender para mayor información.
7. Botón Play Mode (Modo de reproducción): Estando en modo CD o USB, pulse este botón para alternar entre el Aleatorio
FLD/modo de reproducción aleatoria
8. Botón de texto: En modo CD o USB, pulse este botón para alternar entre el nombre del archivo y la otra información en formato de
texto a mostrar en la pantalla.
Botón de bloqueo : Mantenga pulsado este botón para activar o desactivar el bloqueo del panel. Consulte Funcionamiento >
Funciones adicional > Bloqueo del panel para mayor información.
9. Botón de tiempo: En modo CD o USB, pulse este botón para alternar el modo de tiempo en la pantalla. Consulte Funcionamiento
> Reproducción de CD de audio para mayor información.
10. Botón Folder (Carpeta): Mantenga pulsado este botón para seleccionar una carpeta.
11. Botón de expulsión: Púlselo para expulsar el CD de la ranura de CD. Para expulsar un CD a la fuerza, apague la unidad y luego
mantenga pulsado el botón de expulsión mientras vuelve a encender la unidad. Para salir del modo de expulsión forzada, apague la
unidad.
12. Pantalla: Esta pantalla indica el funcionamiento actual de la unidad. Para más información, consulte Pantalla.
13. Sensor remoto: Apunte el control remoto hacia este sensor al utilizarlo.
Nota: Si el sensor del control remoto se expone a luz solar directa, luz artificial intensa (como una lámpara fluorescente de tipo invertido)
o luz infrarroja, puede que la unidad o el control remoto no funcionen correctamente.
14. Botones de búsqueda: En modo CD o USB, mantenga pulsado este botón para rebobinar/avanzar rápidamente. La pista se
rebobinará/avanzará rápidamente a 5 veces la velocidad de reproducción normal.
15. Botón Parar: Pulse este botón para detener la reproducción. Para ver la versión actual del firmware, mantenga pulsado el botón
Stop (Parar) mientras enciende la unidad.
16. Botón Reproducir/Pausa: Pulse este botón para iniciar, reanudar o poner en pausa la reproducción.
17. Botones numéricos (0–9): En modo CD, pulse alguno de estos botones directamente para seleccionar una pista a reproducir Si el
número de la pista es de dos dígitos, pulse los botones en sucesión (por ej., 1 y después 2 para la pista 12). Consulte
Funcionamiento > Reproducción de CD de audio para mayor información.
18. Tecla giratoria: Gire esta tecla para navegar por las opciones que se muestran en la pantalla. Pulse esta tecla giratoria para
confirmar una selección. En los modos CD y USB, éste se utiliza para explorar y seleccionar pistas.
18
13
, repetir todos , repetir carpeta, o repetición desactivada . Consulte Funcionamiento > Reproducción de CD de
6
10
7
11
17
12
8
, el modo de reproducción individual S y el modo de reproducción normal.
3
5
14
15
16
18
2
Page 19

l
Pantalla
1. Tipo de medio: Es el medio actualmente seleccionado: CD, USB, o Aux. Consulte
Funcionamiento > Selección del modo de reproducción de medios para mayor
información.
2. Ícono de operación de reproducción: Muestra diversos símbolos para indicar el
estado de reproducción actual:
Reproduciendo Rebobinando
En pausa Avanzando rápidamente
Detenido
3. Información: Muestra información adicional sobre el medio que se está reproduciendo.
TRK Elapsed: Tiempo transcurrido
TRK Remain: Tiempo restante
DISC Elapsed: Tiempo total restante (sólo para modo de CD)
DISC Remain: Tiempo total restante (sólo para modo de CD)
4. Número de pista/carpeta: El número de la pista o archivo.
5. Íconos de función: Muestran diversos símbolos que indican las funciones actuales:
Reproducción aleatoria (consulte Funcionamiento > Reproducción de CD de audio para mayor información)
23
1
4
7
56
Repetir uno (consulte Funcionamiento > Reproducción de CD de audio para mayor información)
Repetir todos (consulte Funcionamiento > Reproducción de CD de audio para mayor información)
Reproducción al encender (consulte Funcionamiento > Funciones adiciona
mayor información)
6. Time (Tiempo): En modo CD y USB, este botón muestra en la pantalla el tiempo transcurrido o restante, expresado en el
formato hh:mm:ss (horas, minutos y segundos).
Consulte Funcionamiento > Reproducción de CD de audio para mayor información.
7. Ver carpetas
Bloqueo del panel (consulte Funcionamiento > Funciones adicional > Bloqueo del panel para mayor información)
>Reproducción al encender para
Panel trasero
2
1
1. Salidas (RCA desbalanceadas): Estas salidas envían las señales de audio desde un CD, dispositivo USB (de almacenamiento
masivo) y dispositivo conectado a la entrada auxiliar Aux In. Utilice cables RCA para conectar a estas salidas altavoces externos,
un sistema de sonido, etc. Consulte Instalación para mayor información.
2. Salidas (XLR balanceadas): Estas salidas envían las señales de audio desde un CD, dispositivo USB (de almacenamiento
masivo) y dispositivo conectado a la entrada auxiliar Aux In. Utilice cables XLR para conectar a estas salidas altavoces externos,
un sistema de sonido, etc. Consulte Instalación para mayor información.
3. Entrada AC In (Corriente alterna): Utilice el cable de corriente incluido para conectar esta entrada a una toma de corriente.
Consulte Instalación para mayor información.
4. Puerto USB: Este puerto USB se utiliza para actualizar el firmware de la unidad. El interruptor "Actualizar/Normal" se utiliza
para ajustar el modo de la conexión USB para la actualización de firmware. Si está actualizando la unidad, coloque este
interruptor en la posición “Update”. Para que la unidad funcione de modo normal, este interruptor debe dejarse en la
posición Normal.
4
3
19
Page 20

Control remoto
1. Silenciar: Desactiva el sonido que sale por las salidas de audio.
2. USB: Pasa a modo USB.
3. AUX: Pasa a modo AUX.
4. CD: Pasa a modo CD.
5. Play (Reproducir): Reproduce audio desde un CD o unidad de memoria USB.
6. Pause (Pausa): Pone en pausa el audio de un CD o unidad de memoria USB.
7. Stop (Detener): Detiene el audio de un CD o dispositivo de memoria USB.
8. Eject (Expulsar): Expulsa o inserta un CD.
9. Search Backward (Búsqueda hacia atrás): Manténgalo pulsado para rebobinar la
pista de un CD o USB.
10. Search Forward (Búsqueda hacia adelante): Manténgalo pulsado para avanzar
rápidamente por la pista de un CD o USB.
11. Buscar hacia atrás: Pulse para saltar a la pista o capítulo anterior.
12. Saltar hacia adelante: Pulse uno de estos botones para saltar a la pista o capítulo
siguiente.
13. Random (Aleatorio): Pulse este botón para alternar entre el Aleatorio FLD/modo de
reproducción aleatoria o el modo de reproducción individual () en modo CD o
USB.
14. Pantalla: Pulse y suelte el botón para ajustar el brillo de la pantalla. Mantenga
pulsado este botón para abrir el menú de opciones. Mantenga pulsado el botón
nuevamente para cerrar el menú de opciones.
15. Repeat (Repetición): En modo CD o USB, alterna entre los modos de repetición de
reproducción: Repetir uno, repetir todos, o repetición desactivada.
16. Time (Tiempo): En modo CD o USB, pulse este botón para alternar el tiempo que
se muestra en la pantalla entre el tiempo transcurrido, el tiempo restante, total
transcurrido tiempo, o el
17. Text/Lock (Texto/Bloqueo): En modo CD o USB, pulse este botón para alternar
entre el nombre del archivo y el nombre de la pista en la pantalla. Mantenga pulsado
este botón para activar o desactivar el bloqueo del panel.
tiempo restante total (sólo para modo CD).
20
Page 21

Instalación
Importante: Conecte todos los cables firme y correctamente (los cables estéreo: izquierdo con izquierdo, derecho con
derecho) y no los agrupe junto con el cable de corriente.
1. Utilice cables XLR o un cable RCA estéreo para conectar las salidas (balanceadas o desbalanceadas) a las entradas
analógicas de su receptor externo, amplificador, monitores alimentados, etc.
2. Una vez completadas todas las conexiones, utilice el cable de corriente incluido para conectar la entrada AC In a una
toma de corriente.
Ejemplo:
SOURCE SELECT
ZONE 2
ZONE 2
ZONE 3 ZONE 3
ON/OFF
ON/OFF
SOURCE
AUX 1
HDMI 7 5V/1A
INFO
SOURCE STATUS DIMMER
ENTER
PHONES BACK
Receptor, amplificador, etc.
OPTION
SETUP
1 CBL/SAT 3 GAME 4 NETWORK
2 Blu-ray
L - AUDIO - R
VIDEO
AUX 1
QUICK SELECT
MASTER VOLUME
SETUP MIC
IN-Command
SSEERI
INTEGRATED NETWORK AV RECEIVER
AVR-X4000
Monitores alimentados
Corriente
Functionamiento
Selección del modo de reproducción de medios
Cómo seleccionar el tipo de medio que desea reproducir:
Para alternar entre las opciones disponibles, gire el mando Fuente.
• CD: CD de audio, CD-DA, CD-ROM, MP3 CD, o CD con archivos de audio (CDR) (consulte Reproducción de CD
de audio)
• USB: Dispositivo USB, (de almacenamiento masivo) (consulte Reproducción de archivos de audio en una unidad
de memoria USB)
• Aux: dispositivo conectado a la entrada Aux In (consulte Reproducción de audio desde un dispositivo externo)
21
Page 22

Reproducción de CD de audio
Como reproducir un CD de audio:
1. Si la unidad está apagada, pulse el botón Power (Encendido) para encenderla.
Importante: No inserte un CD cuando la unidad esté apagada. Esto podría dañar la unidad.
2. Inserte un CD en la ranura de CD. (Sostenga el CD por los bordes sin tocar la superficie grabada. Tenga cuidado de que sus
dedos no queden atrapados cuando el disco se inserta en la unidad).
3. Seleccione CD como el tipo de medio (descrito en Selección del modo de reproducción de medios).
El CD comenzará a reproducirse automáticamente cuando el modo de reproducción al encender esté activado.
En modo CD, puede efectuar cualquiera de las siguientes operaciones:
• Para comenzar, reanudar o poner en pausa la reproducción, pulse el botón Play/Pause (Reproducir/poner en pausa).
• Para detener la reproducción, pulse el botón Stop (Detener).
• Para rebobinar o avanzar rápidamente por la pista, mantenga pulsado alguno de los botones Search (Buscar). La pista
se rebobinará/avanzará rápidamente a 5 veces la velocidad de reproducción normal. Para reanudar la reproducción, suelte el
botón.
• Para saltar directamente a una pista:
Pulse uno de los botones numéricos (0–9) para introducir el número de la pista deseada. Si el número de la pista es de dos
dígitos, pulse los botones en sucesión (por ej., 1 y después 2 para la pista 12). Como alternativa, gire la tecla giratoria para
seleccionar una pista y luego pulse dicha tecla para cargarla.
• Para seleccionar un modo de repetición de reproducción, pulse el botón Repeat. Alternará entre repetir uno
misma pista se repetirá indefinidamente), repetir todos
(la lista de todas las pistas se repetirá indefinidamente), repetir
(la
FLD (l as pistas en la carpeta seleccionada se repetirán de forma indefinida), y repetición desactivada (no se repetirá
ninguna pista).
• Para seleccionar el modo de reproducción, pulse el botón Random. Realizará un ciclo por Random FLD (todas las pistas
de la carpeta seleccionada se reproducirán en orden aleatorio), Random All (todas las pistas del CD se reproducirán en
orden aleatorio), Single Play (se reproducirá la pista actual hasta el final y luego se detendrá), y Normal (se reproducirá el CD
desde la pista actual hasta el final y luego se detendrá).
• Para cambiar el modo de tiempo en la pantalla, pulse el botón Time (Tiempo). Alternará entre transcurrido TRK: cuánto
tiempo ha transcurrido de la pista actual. restante TRK: cuánto tiempo queda de la pista actual). DISC Elapsed: tiempo total
restante (sólo para modo de CD). DISC Remain: tiempo total restante sólo para modo de CD.
• Para expulsar un CD, pulse el botón Eject (Expulsar) cuando la unidad esté detenida o en pausa. Aparecerá “Ejecting”
(Expulsando) en la pantalla mientras se expulsa el CD. Aparecerá “No Disc” (Sin disco) cuando no haya discos en la ranura
de CD.
Importante: Consulte Otra información > CD para aprender más sobre los tipos de CD que soporta el PMD-100CD y para más
información sobre la manipulación y cuidado de los CD. Al encender la unidad, mantenga pulsado el botón Eject (Expulsión) para
activar el modo de expulsión forzada.
22
Page 23

Reproducción de archivos mp3 en un CD
Cómo reproducir archivos mp3 en un CD:
1. Si la unidad está apagada, pulse el botón Power (Encendido) para encenderla.
Importante: No inserte un CD cuando la unidad esté apagada. Esto podría dañar la unidad.
2. Seleccione una de los siguientes procedimientos:
• Inserte un CD en la ranura de CD. (Sostenga el CD por los bordes sin tocar la superficie grabada. Tenga cuidado de que
sus dedos no queden atrapados cuando el disco se inserta en la unidad).
3. Seleccione CD como el tipo de medio deseado: (descrito en Selección del modo de reproducción de medios).
4. Seleccione un archivo de audio:
• Para desplazarse por los archivos de audio, gire la tecla giratoria de la unidad.
• Para entrar a una carpeta, mantenga pulsado el botón Folder (Carpeta) durante 3 segundos y gire la tecla giratoria
para seleccionar una carpeta. Pulse la tecla giratoria para entrar en la carpeta y desplácese con dicha tecla hasta
encontrar la pista. Pulse la tecla giratoria nuevamente para seleccionar una pista y pulse el botón Play/Pause para
reproducirla.
Nota: Si no se selecciona ninguna pista a los pocos segundos después de entrar a una carpeta, la unidad saldrá de esa
carpeta y regresará a la pista/carpeta seleccionada anteriormente.
En modo CD o USB, puede efectuar cualquiera de las siguientes operaciones:
• Para comenzar, reanudar o poner en pausa la reproducción, pulse el botón Play/Pause (Reproducir/poner en
pausa).
• Para detener la reproducción, pulse el botón Stop (Detener).
• Para rebobinar o avanzar rápidamente por la pista, mantenga pulsado alguno de los botones Search (Buscar). La
pista se rebobinará/avanzará rápidamente a 5 veces la velocidad de reproducción normal. Para reanudar la
reproducción, suelte el botón.
• Para seleccionar el modo de reproducción, pulse el botón Random. Realizará un ciclo por Random FLD (todas las
pistas de la carpeta seleccionada se reproducirán en orden aleatorio), Random All (todas las pistas del CD se
reproducirán en orden aleatorio), Single Play (se reproducirá la pista actual hasta el final y luego se detendrá), y Normal
(se reproducirá el CD desde la pista actual hasta el final y luego se detendrá).
• Para cambiar el modo de tiempo en la pantalla, pulse el botón Time. Alternará entre Elapsed (E, (cuánto tiempo ha
transcurrido de la pista actual) Remaining (R, cuánto tiempo queda de la pista actual), and Total Remaining (cuánto
tiempo queda del CD de audio entero).
• Para expulsar un CD, pulse el botón Eject (Expulsar). Aparecerá “Ejecting” (Expulsando) en la pantalla mientras se
expulsa el CD. Aparecerá “No Disc” (Sin disco) cuando no haya discos en la ranura de CD.
Reproducción de archivos de audio en una unidad de memoria flash USB
Cómo reproducir archivos de audio en una unidad de memoria flash USB:
1. Si la unidad está apagada, pulse el botón Power para encenderla.
2. Conecte su dispositivo USB (de almacenamiento masivo) en el puerto USB.
3. Seleccione USB como el tipo de medio (descrito en Selección del modo de reproducción del medio).
4. Seleccione un archivo de audio:
• Para desplazarse por los archivos de audio, gire la tecla giratoria de la unidad.
• Para entrar a una carpeta, mantenga pulsado el botón Folder (Carpeta) durante 3 segundos y gire la tecla giratoria
para seleccionar una carpeta. Pulse la tecla giratoria para entrar en la carpeta y desplácese con dicha tecla hasta
encontrar la pista. Pulse la tecla giratoria nuevamente para seleccionar una pista y pulse el botón Play/Pause para
reproducirla.
Nota: Si no se selecciona ninguna pista a los pocos segundos después de entrar a una carpeta, la unidad saldrá de esa
carpeta y regresará a la pista/carpeta seleccionada anteriormente.
23
Page 24

En modo USB, puede efectuar cualquiera de las siguientes operaciones:
• Para comenzar, reanudar o realizar una pausa en la reproducción, pulse el botón Play (Reproducir).
• Para detener la reproducción, pulse el botón Stop.
• Para rebobinar o avanzar rápidamente por la pista, mantenga pulsado alguno de los botones Search (Buscar). La pista
se rebobinará/avanzará rápidamente a 5 veces la velocidad de reproducción normal. Para reanudar la reproducción,
suelte el botón.
• Para cambiar el modo de vista, pulse el botón Folder.
• Para seleccionar otra carpeta o archivo de audio, siga los pasos descritos en el Paso 4 anterior.
• Para mostrar diferente información sobre la pista en la pantalla, pulse el botón Text (Texto). Alternará entre el
nombre del archivo y un texto con información.
• Para seleccionar un modo de repetición de reproducción, pulse el botón Repeat (Repetir). Alternará entre Repeat
One (la misma pista se repetirá indefinidamente), Repeat All (la lista de todas las pistas se repetirá indefinidamente),
Repeat FLD (las pistas en la carpeta seleccionada se repetirán indefinidamente), y Repeat Off (no se repetirá ninguna
pista).
• Para cambiar el modo de tiempo en la pantalla, pulse el botón Time. Alternará entre Elapsed (E, cuánto tiempo ha
transcurrido de la pista actual) y Remaining (R, cuánto tiempo queda de la pista actual).
• Para extraer un dispositivo USB, extráigalo suavemente del puerto USB cuando no se esté reproduciendo. (Extraer
un dispositivo USB mientras se está reproduciendo podría dañarlo).
Importante: Todos los botones a excepción de Power, CD/USB/Aux y Eject se encontrarán bloqueados/desactivados cuando
esté en modo auxiliar.
Reproducción de audio desde un dispositivo externo
Cómo reproducir audio desde un dispositivo externo (por ej., teléfono inteligente, ordenador, reproductor de música
portátil, etc.) conectado a la entrada Aux In:
1. Si la unidad está apagada, pulse el botón Power (Encendido) para encenderla.
2. Conecte a la entrada Aux In la salida para auriculares/estéreo de 3,5 mm (1/8 pulg.) de su dispositivo externo.
3. Seleccione Aux como el tipo de medio (descrito en Selección del modo de reproducción de medios). Si su dispositivo
externo está conectado, aparecerá AUX Connected (Auxiliar conectado) en la pantalla. Si su dispositivo externo no está
conectado, aparecerá AUX Disconnect (Auxiliar desconectado) en la pantalla.
4. Para comenzar la reproducción, pulse el botón Play en su dispositivo externo.
Importante: Todos los botones excepto Power y el botón de expulsión estarán bloqueados / deshabilitados.
Funciones adicional
Bloqueo del panel
Utilice la característica de bloqueo del panel para evitar cambios accidentales a la unidad. Cuando se activa el bloqueo del panel,
todos los botones excepto el botón Power y Text/Lock están bloqueados/deshabilitados en la unidad. (El control remoto seguirá
funcionando normalmente).
Para activar o desactivar el bloqueo del panel, mantenga pulsado el botón Text/Lock.
• Una vez activado, aparecerá P-Lock ON (Bloqueo de panel activado) y
en la pantalla.
• Una vez desactivado, aparecerá P-Lock OFF (Bloqueo de panel desactivado) en la pantalla y
desaparecerá.
Reproducción al encender
Utilice la característica de reproducción al encender a fin de configurar la unidad para comenzar la reproducción
automáticamente del CD en la unidad de CD.
Para activar o desactivar la reproducción al encender, mantenga pulsado el botón Pwr On Play.
• Una vez activada, P-OnPlay On (Reproducción al encender activada) aparecerá en la pantalla.
• Una vez desactivada, P-OnPlay Off (Reproducción al encender desactivada) aparecerá en la pantalla.
24
Page 25

V
Otra información
CD
Al reproducir CD de audio, observe lo siguiente:
• El PMD-100CD puede reproducir CD de Música y discos CD-R. Ambos suelen tener
el logo de Compact Disc Digital Audio (consulte la imagen).
• No reproduzca discos que no sean circulares (discos con forma de corazón,
octogonales, etc.; consulte la imagen) o discos que hayan sido reparados con cinta.
Estos discos podrían dañar la unidad.
• El PMD-100CD solo puede reproducir discos finalizados. (La finalización es el
proceso que hace que los discos CD-R grabados puedan reproducirse en
reproductores compatibles).
• Dependiendo del software utilizado para grabar un CD (u otras condiciones), puede
que algunos CD no se reproduzcan correctamente.
Al reproducir CD con archivos de audio, observe lo siguiente:
• El formato del software de grabación debe ser ISO9660 Nivel 1.
• Puede tener hasta 300 carpetas y hasta 8 niveles de carpetas, incluyendo el directorio raíz.
• Puede tener hasta 300 archivos de audio. Si el CD contiene más de 300 archivos, puede que algunos archivos
de audio no se reproduzcan ni aparezcan correctamente.
• Los nombres de los archivos, las carpetas y caracteres de texto pueden utilizar hasta 255 caracteres. Solo
pueden mostrarse las letras mayúsculas, minúsculas, los números y los símbolos. No se muestran los nombres
de archivos japoneses. Los nombre del archivo que comiencen con “.” no se mostrarán.
• Puede que los archivos protegidos por Copyright no se reproduzcan correctamente y aparezcan como
Unknown File (Archivo desconocido).
• Dependiendo del software utilizado para grabar un CD (u otras condiciones), puede que algunos archivos no se
reproduzcan correctamente.
• Al reproducir archivos de audio en un CD, el PMD-100CD soporta la siguiente información de etiquetas:
o Etiquetas ID3: Versión 1.x y 2.x
o META-etiquetas: compatibles con el título, artista y
nombre del álbum.
o Frecuencia de muestreo: 44,1 kHz
Tenga cuidado de no rayar los discos al sacarlos de sus cajas. No doble o caliente los discos y
no agrande el orificio en el centro del disco. No escriba sobre la superficie impresa del disco ni le
agregue nuevas etiquetas al disco.
Si el disco presenta huellas digitales, suciedad o condensación, límpielo con un kit de limpieza
disponible en cualquier tienda o un trapo húmedo y suave. Pase el trapo gentilmente desde el
centro hasta el borde, no en sentido circular. No utilice aerosol para discos de vinilo, agentes
antiestática, benceno, diluyente u otros solventes.
Después de utilizar los discos, extráigalos de la unidad y almacénelos en sus cajas para
protegerlos del polvo, rayones, pandeo, etc. No almacene los discos en lugares expuestos a
períodos prolongados de luz solar directa o lugares expuestos a altas temperaturas, polvo,
humedad, etc.
elocidad en bits: 32 kbps a 320 kbps
o
o Formato: MPEG1 Audio Layer 3
o Extensión del archivo: .mp3
25
Page 26

Dispositivos USB
Al reproducir archivos de audio desde un dispositivo USB, observe lo siguiente:
• El PMD-100CD no carga la batería de ningún dispositivo USB conectado y no soporta hubs (concentradores)
USB ni alargadores USB.
• El PMD-100CD soporta dispositivos USB de almacenamiento masivo o compatibles con MTP.
• El PMD-100CD solamente soporta sistemas de archivos FAT16 o FAT32.
• Puede tener hasta 999 carpetas y hasta 8 niveles de carpetas, incluyendo el directorio raíz.
• Puede tener hasta 999 archivos de audio. Si el dispositivo USB contiene más de 999 archivos, puede que
algunos archivos de audio no se reproduzcan ni aparezcan correctamente.
• Los nombres de los archivos, las carpetas y caracteres de texto pueden utilizar hasta 255 caracteres. Solo
pueden mostrarse las letras mayúsculas, minúsculas, los números y los símbolos. No se muestran los nombres
de archivos japoneses. Los nombre del archivo que comiencen con “.” no se mostrarán.
• Puede que los archivos protegidos por Copyright no se reproduzcan correctamente y aparezcan como
Unknown File (Archivo desconocido).
Al reproducir archivos de audio desde un dispositivo USB, el PMD-100CD soporta la siguiente información de
etiquetas:
• Etiquetas ID3: Versión 1.x y 2.x
• para archivos MP3:
o Frecuencia de muestreo: 44,1 kHz
o Velocidad en bits: 32 kbps a 320 kbps
o Formato: MPEG1 Audio Layer 3
o Extensión del archivo: .mp3
Orden de reproducción de archivos de audio
Cuando se reproducen archivos de audio almacenados en múltiples carpetas, el orden de reproducción para cada
carpeta se ajusta automáticamente cuando la unidad lee el medio. Los archivos en cada carpeta se reproducirán en
el mismo orden en el que se agregaron al medio. (Puede que este orden luzca diferente en su ordenador y/o en su
software respecto del orden de la unidad). La estructura de carpetas también determina el orden de reproducción:
o Para archivos de audio en un CD-R, primero se reproducirán los archivos de todas las carpetas en el primer nivel,
a continuación, los archivos de todas las carpetas en el segundo nivel, y a continuación en el tercero y así
sucesivamente.
o Para archivos de audio en un dispositivo USB, primero se reproducirán los archivos de la primera carpeta en
el primer nivel, a continuación los archivos en el segundo nivel de esa misma carpeta y a continuación los
archivos en el tercer nivel de esa misma carpeta, y así sucesivamente. Una vez reproducidos todos los archivos
en todos los niveles en esa primera carpeta, se repetirá el mismo proceso para los archivos en la segunda
carpeta del primer nivel.
26
Page 27

Solución de problemas
Si experimenta problemas, realice lo siguiente:
• Asegúrese de que todos los cables, dispositivos, antenas, y/o medios estén conectados firme y
correctamente.
• Asegúrese de estar utilizando la unidad como describe esta Guía del usuario.
• Asegúrese de que todos sus otros dispositivos o medios funcionen correctamente.
• Si cree que la unidad no está funcionando correctamente, busque su problema y solución en la
siguiente tabla.
Problema Solución Consulte:
La unidad no se enciende. Asegúrese de que la unidad esté conectada a
una toma de corriente.
El CD no se puede insertar
en la ranura de CD.
Asegúrese de que la unidad esté conectada a
una toma de corriente y que esté encendida.
Pulse el botón Eject (Expulsar) para
asegurarse de que no haya otro CD en la
ranura de CD.
Aparece No Disc aun
cuando hay un CD insertado.
Pulse el botón Eject para expulsar el CD e
insértelo nuevamente.
Una sección específica del
CD no se reproduce
correctamente.
La reproducción no
comienza después de pulsar
el botón Play.
La unidad no emite ningún
sonido o el sonido está
distorsionado.
Limpie el CD con un paño seco o un
limpiador de CD comercial.
Inserte un CD diferente.
Asegúrese de que todas las conexiones de
cables, dispositivos o medios estén firmes y
correctas.
Asegúrese de que ninguno de los cables esté
dañado.
Asegúrese de que los ajustes en su
amplificador, mezclador, etc. sean correctos.
Instalación
Instalación
Otra información > CD
Instalación
La unidad no puede
reproducir un CD-R.
Asegúrese de que el CD-R haya sido
finalizado correctamente.
Asegúrese de que el CD-R sea de buena
calidad.
Limpie el CD con un paño seco o un
limpiador de CD comercial.
Asegúrese de que el CD posea una
estructura de carpetas soportada por la
unidad: hasta 300 carpetas (hasta 8 niveles
de carpetas, incluyendo la raíz) y hasta 300
archivos.
Asegúrese de que el CD-R contenga archivos
MP3. La unidad no puede reproducir otro tipo
de archivos desde un CD-R.
Otra información > CD
27
Page 28

Problema Solución Consulte:
El CD no se puede
expulsar.
No aparecen los archivos
en un dispositivo USB.
No se reproducen los
archivos en un dispositivo
USB.
Mantenga pulsado el botón Eject a la vez
que enciende la unidad.
Asegúrese de que los archivos sean de
un formato soportado. Los archivos que
no sean soportados por esta unidad no
aparecerán.
Asegúrese de que el dispositivo USB
posea una estructura de carpetas
soportada por la unidad: hasta 999
carpetas (hasta 8 niveles de carpetas,
incluyendo la raíz) y hasta 999 archivos.
Si su dispositivo USB está particionada,
asegúrese de que los archivos se
encuentren en la primera partición. La
unidad no mostrará las otras particiones.
Asegúrese de que los archivos sean de
un formato soportado. Los archivos que
no sean soportados por esta unidad no
aparecerán.
Asegúrese de que los archivos no estén
protegidos por copyright. La unidad no
puede reproducir archivos protegidos por
copyright.
Otra información >
Dispositivos USB
Otra información >
Dispositivos USB
Los nombres de los
archivos no aparecen
correctamente.
Asegúrese de que los archivos solo
utilicen caracteres soportados. Los
caracteres que no sean soportados se
reemplazarán por un “
.”.
Otra información >
Dispositivos USB
28
Page 29

Guide d’utilisation (Français)
Introduction
Merci d’avoir fait l’acquisition du PMD-100CD. Chez Marantz Professional, la performance et la fiabilité sont
aussi importantes pour nous qu’ils le sont pour vous. C’est pourquoi nous concevons nos produits avec une
seule chose en tête — faire de votre performance la meilleure qui soit.
Contenu de la boîte
PMD-100CD
Câble d’alimentation
Télécommande
Câble RCA
Guide d’utilisation
Consignes de sécurité et informations concernant la garantie
Assistance
Pour les toutes dernières informations concernant la documentation, les spécifications techniques, la
configuration requise, la compatibilité et l’enregistrement du produit, veuillez visiter marantzpro.com.
Pour de l’assistance supplémentaire, veuillez visiter le site marantzpro.com/support.
29
Page 30

A
V
V
À
A
k
Consignes de sécurité
Pour de plus amples informations, veuillez consulter les Consignes de sécurité et informations concernant la garantie.
vant de mettre l’appareil sous
tension :
euillez vous assurer que tous les branchements sont bien faits et que les
câbles de connexion ne présentent aucun problème.
Certains circuits restent sous tension même lorsque l’appareil est éteint. Si
l’appareil ne doit pas être utilisé pendant un certain temps, débrancher le câble
d’alimentation de la prise secteur.
entilation :
propos de la condensation :
Précautions relatives à
l’utilisation des téléphones
mobiles :
Déplacement de l’appareil :
Entretien :
Précautions relatives au
montage en rack :
(spécifications de rack requises
pour le montage en rack)
Installation du rac
:
Si l’appareil est laissé dans une pièce qui n’est pas correctement ventilée ou
est plein de fumée de cigarette, de poussière, etc., pour de longues périodes
de temps, la surface de la tête de lecture optique risque de se salir, provoquant
un mauvais fonctionnement.
Si la différence de température entre l’intérieur de l’appareil et la pièce est
importante, de la condensation risque de se former sur les pièces internes,
empêchant l’appareil de fonctionner correctement. Dans ce cas, laissez
l’appareil hors tension au repos pendant une heure ou deux, jusqu’à ce que la
différence de température diminue.
L’utilisation d’un téléphone mobile à proximité de cet appareil peut entrainer
des phénomènes de bruit. Si tel est le cas, éloignez le téléphone mobile de
l’appareil lorsque vous l’utilisez.
vant de déplacer l’appareil, veuillez le mettre hors tension et débranchez le
câble d’alimentation de la prise secteur. Débranchez ensuite les câbles
connectés aux autres composants du système avant de déplacer l’appareil.
Essuyez l’enceinte et le panneau de commande avec un chiffon doux.
Suivez les instructions lorsque vous utilisez un produit nettoyant chimique.
N’utilisez pas de benzène, de diluant à peinture, d’insecticide, ou d’autres
solvants organiques pour nettoyer l’appareil. Ces matériaux peut causer des
changements importants et une décoloration.
Rack standard EIA 48,3 cm (19 po)
Rack compatible pour l’installation taille 1U
Rack avec un rail-guide ou une étagère pour soutenir l’appareil
Ce produit fonctionnera normalement lorsque le
lecteur est monté jusqu’à 10 degrés par rapport au
Maximum
de 10°
plan vertical du panneau avant. Si l’appareil est
incliné de manière excessive, le disque peut ne pas
être charge ou décharge correctement. (Voir image.)
L’appareil
30
Page 31

Caractéristiques
Panneau avant
9
4
1
1. Interrupteur d’alimentation : Cette touche permet de mettre l’appareil sous/hors tension. Veuillez vous assurer que le câble d’alimentation est
branché correctement à l’entrée d’alimentation c.a. (AC In) et à la prise secteur. N’éteignez pas l’appareil pendant la lecture d’un périphérique,
car cela pourrait endommager les données se trouvant sur ce dernier.
2. Entrée auxiliaire : Cette entrée auxiliaire permet de relier un périphérique facultatif en utilisant un câble TRS 3,5 mm (1/8 po). Veuillez consulter la
section Fonctionnement > Lecture audio à partir d’un périphérique externe pour plus d’information.
3. Port USB : Ce port permet de relier un périphérique de stockage USB.
4. Fente pour disque : Insérez un CD dans cette fente. Veuillez consulter la section Fonctionnement > Lecture de CD audio pour plus
d’information.
5. Source: Tournez le bouton rotatif pour sélectionner le mode de lecture multimédia: CD, USB ou Aux. Veuillez consulter la section
Fonctionnement > Sélection du type de média pour plus d’information.
6. Touche de lecture répétée : En mode CD ou USB, cette touche permet de basculer entre les modes de lecture répétée : Repeat One
(lecture répétée d’une piste), Repeat All
désactivée). Veuillez consulter la section Fonctionnement > Lecture de CD audio pour plus d’information.
Touche d’activation automatique de la lecture lors de la mise sous tension : Maintenez cette touche enfoncée afin d’activer/désactiver la
fonction d’activation automatique de la lecture lors de la mise sous tension. Veuillez consulter la section Fonctionnement > Fonctions
supplémentaires > Activation automatique de la lecture lors de la mise sous tension pour plus d’information.
7. Touche Play Mode : En mode CD ou USB, cette touche permet de basculer entre les Random (aléatoire) FLD/modes de lecture Random
(aléatoire)
8. Touche d’affichage textuel : En mode CD ou USB, cette touche permet de basculer entre l’affichage du nom de fichier et d’autres
informations textuelles.
Touche de verrouillage : Cette touche permet d’activer/désactiver la fonction de verrouillage des touches. Veuillez consulter la section
Fonctionnement > Fonctions supplémentaires > Verrouillage du panneau pour plus d’information.
9. Touche de la durée : En mode CD ou USB, cette touche permet de basculer entre les modes d’affichage de la durée. Veuillez consulter la
section Fonctionnement > Lecture de CD audio pour plus d’information.
10. Touche des dossiers : Maintenir cette touche enfoncée permet de sélectionner un dossier.
11. Touche d’éjection : Cette touche permet d’éjecter le disque compact de la fente. Pour forcer le lecteur à éjecter le CD, maintenez la touche
Eject enfoncée tout en mettant l’appareil sous tension. Remettez l’appareil hors tension afin de quitter le mode d’éjection forcée.
12. Écran : Cet écran indique le fonctionnement actuel de l’appareil. Veuillez consulter la section Écran d’affichage pour plus d’information.
13. Récepteur de signal de la télécommande : Lorsque vous utilisez la télécommande, pointez-la vers ce capteur.
Remarque : L’appareil ou la télécommande risque de fonctionner incorrectement si le récepteur de signal de la télécommande est exposé
à la lumière directe du soleil, à une lumière artificielle puissante émise par une lampe fluorescente de type inverseur ou à une lumière
infrarouge.
14. Touches de recherche : En mode CD ou USB, ces touches permettent d’effectuer un retour/avance rapide. La piste recule/avance à 5 fois
la vitesse de lecture normale.
15. Touche d’arrêt de lecture : Cette touche permet d’arrêter la lecture. Pour afficher la version actuelle du progiciel, maintenez la touche
d’arrêt de lecture tout en mettant l’appareil sous tension.
16. Touche pour lancer/interrompre la lecture : Cette touche permet de lancer/interrompre et reprendre la lecture.
17. Touches numériques (0 – 9) : En Mode CD, ces touches permettent de sélectionner directement une piste à lire. Si le numéro de piste est
constitué de deux chiffres, appuyez sur les touches successivement (p. ex., 1 suivi de 2 pour la piste numéro 12). Veuillez consulter la section
Fonctionnement > Lecture de CD audio pour plus d’information.
18. Molette : Cette molette permet de parcourir les options affichées à l’écran. Appuyer sur la molette permet de confirmer la sélection. En mode
CD et USB, cette touche est utilisée pour parcourir et sélectionner les pistes.
13
, Single (S, simple) et Normal (normal).
6
10
7
11
17
18
12
8
(lecture répétée de toutes les pistes), Repeat Dossier , et Repeat Off (lecture répétée
3
5
14
15
16
2
31
Page 32

A
Écran d’affichage
1. Type de médias : Affiche le support sélectionné : CD, USB, ou Aux. Veuillez
consulter la section Fonctionnement > Sélection du type de média pour plus
d’information.
2. Icône du mode de lecture : Ceci affiche divers symboles indiquant le mode
de lecture en cours :
Lecture Retour rapide
Interrompu Avance rapide
Arrêt
3. Muestra información adicional sobre el medio que se está reproduciendo.
TRK Elapsed : Temps écoulé
TRK Remain : Temps restant
DISC Elapsed : Temps total écoulé (mode CD uniquement)
DISC Remain : Temps total restant (mode CD uniquement)
4. Numéro de piste/dossier : Ceci affiche le numéro de la piste ou du fichier.
5. Touches des fonctions : Ceci affiche divers symboles indiquant les fonctions en cours :
Lecture aléatoire (veuillez consulter la section Fonctionnement > Lecture de CD audio pour plus
d’information).
1
4
23
7
56
Lecture répétée d’une piste (veuillez consulter la section Fonctionnement > Lecture de CD audio pour
plus d’information).
Lecture répétée de toutes les pistes (veuillez consulter la section Fonctionnement > Lecture de CD audio
pour plus d’information).
Activation automatique de la lecture lors de la mise sous tension (veuillez consulter la section
Fonctionnement > Fonctions supplémentaires >
sous tension pour plus d’information.
6. Durée : En mode CD et USB, ceci indique le temps écoulé ou restant affiché en hh:mm:ss (heures, minutes et
secondes).
Veuillez consulter la section Fonctionnement > Lecture de CD audio pour plus d’information.
7. Affichage d’un dossier
Verrouillage du panneau (veuillez consulter la section Fonctionnement > Fonctions supplémentaires >
Verrouillage du panneau pour plus d’information).
ctivation automatique de la lecture lors de la mise
32
Page 33

Panneau arrière
2
1
1. Sorties (RCA asymétriques) : Ces sorties transmettent les signaux audio d’un CD, périphérique USB (classe de stockage de
masse) et périphérique connecté à l’entrée auxiliaire. Utilisez des câbles RCA pour relier ces sorties aux enceintes externes,
système de sonorisation, etc. Veuillez consulter la section Installation pour plus d’information.
2. Sorties (XLR symétriques) : Ces sorties transmettent les signaux audio d’un CD, périphérique USB (classe de stockage de
masse) et périphérique connecté à l’entrée auxiliaire. Utilisez des câbles XLR pour relier ces sorties aux enceintes externes,
système de sonorisation, etc. Veuillez consulter la section Installation pour plus d’information.
3. Entrée d’alimentation c.a. : Utilisez le câble d’alimentation inclus pour brancher cette entrée à une prise secteur. Veuillez
consulter la section Installation pour plus d’information.
4. Port USB: Ce port USB permet de faire la mise à niveau du progiciel de l’appareil. Le commutateur « mise à jour/normal » est
utilisé pour définir le mode de connexion USB pour la mise à jour du progiciel. Lors de la mise à jour de l’appareil, réglez ce
sélecteur sur la position « Update ». En mode de fonctionnement normal, le commutateur devrait être en position « normal ».
4
3
Télécommande
1. Mute : Cette touche permet de désactiver le son des sorties audio.
2. USB : Cette touche permet de basculer l’appareil en mode USB.
3. AUX : Cette touche permet de basculer l’appareil en mode Aux.
4. CD : Cette touche permet de basculer l’appareil en mode CD.
5. Lecture : Cette touche permet de lancer la lecture audio provenant d’un CD ou d’une clé
USB.
6. Interrompre la lecture : Cette touche permet d’interrompre la lecture audio provenant d’un
CD ou d’une clé USB.
7. Arrêt de lecture : Cette touche permet d’arrêter la lecture audio provenant d’un CD ou d’une
clé USB.
8. Touche d'éjection : Cette touche permet d’éjecter ou d’insérer un CD.
9. Recherche arrière : Mantenir cette touche enfoncée permet d’effectuer une lecture
arrière rapide à travers une piste CD ou USB.
10. Recherche avant : Mantenir cette touche enfoncée permet d’effectuer une lecture
avant rapide à travers une piste CD ou USB.
11. Recherche arrière: Appuyez sur ces touches pour revenir/passer au chapitre, à la piste, ou
au fichier précédent.
12. Saut avant: Appuyez sur ces touches pour revenir/passer au chapitre, à la piste, ou au fichier
suivant.
13. Random : En mode CD ou USB, cette touche permet de basculer entre les aléatoire
FLD/modes de lecture Random (aléatoire) et Single ( - simple].
14. Écran d’affichage : Appuyer et relâcher cette touche afin de régler la luminosité de l’écran.
Maintenir cette touche enfoncée permet d’accéder au menu des options. Maintenir cette
touche enfoncée à nouveau permet de quitter le menu des options.
15. Repeat : En mode CD ou USB, appuyer sur cette touche permet de basculer entre les modes
de lecture répétée : Repeat One [lecture répétée d’une piste], Repeat All [lecture répétée de
toutes les pistes] et Repeat Off [lecture répétée désactivée].
16. Time : En mode CD ou USB, cette touche permet de modifier le mode d'affichage de la durée
entre le temps de lecture écoulé [Elapsed], le temps restant [Remain] de la piste et le temps
restant [Total], total écoulé time, [Total Remaining] sur le disque [mode CD seulement].
17. Text/Lock : En mode CD ou USB, cette touche permet de basculer entre l’affichage du nom
de la piste et le nom de l’artiste. Maintenir cette touche enfoncée permet d’activer/désactiver
la fonction de verrouillage du panneau.
33
Page 34

Installation
Important : Raccordez tous les câbles correctement (câbles stéréo : le canal gauche sur le connecteur gauche et le canal droit
sur le connecteur droit), et ne les groupez pas avec le câble d’alimentation.
1. Utilisez des câbles XLR ou un câble RCA stéréo pour relier les sorties (symétriques ou asymétriques) aux entrées
analogiques de votre récepteur, amplificateur, enceintes amplifiées, etc.
2. Après avoir fait toutes les connexions, utilisez le câble d’alimentation fourni afin de relier l’entrée d’alimentation à une prise
secteur.
Exemple :
SOURCE SELECT
ZONE 2
ZONE 2
ZONE 3 ZONE 3
ON/OFF
SOURCE
ON/OFF
AUX 1
HDMI 7 5V/1A
INFO
OPTION
SOURCE STATUS DIMMER
ENTER
PHONES BACK
SETUP
1 CBL/SAT 3 GAME 4 NETWORK
2 Blu-ray
L - AUDIO - R
VIDEO
AUX 1
QUICK SELECT
Récepteur, amplificateur, etc.
MASTER VOLUME
SETUP MIC
IN-Command
SSEERI
INTEGRATED NETWORK AV RECEIVER
AVR-X4000
Enceintes amplifiées
Alimentation
Fonctionnment
Sélection du type de média
Pour sélectionner le type de média que vous souhaitez lire :
Pour faire défiler les options disponibles, tourner le bouton source.
• CD : CD audio, CD-DA, CD-ROM, MP3 CD, ou CD avec les dossiers audio (CDR) (voir Lecture de CD audio)
• USB : Périphérique USB (stockage de masse) (voir Lecture de fichiers audio sur une clé USB)
• Aux : Périphérique branché à l’entrée auxiliaire (voir Lecture audio à partir d'un périphérique externe)
Lecture de CD audio
Pour faire la lecture de CD audio :
1. Si l’appareil est hors tension, appuyez sur l’interrupteur d’alimentation (Power) afin de le mettre sous tension.
Important : N’insérez pas un CD lorsque l’appareil est hors tension. Cela pourrait endommager l’appareil.
2. Insérez un CD dans la fente pour disque. (Tenez les rebords du CD sans toucher à la surface enregistrée. Veillez à ne pas
vous coincer les doigts lorsque le disque est entraîné dans l’appareil.)
3. Sélectionnez CD comme type de média (comme indiqué dans la section Sélection du type de média). Le disque
commencera à jouer automatiquement.
Le CD commence à jouer automatiquement lorsque le mode Power-On Play est activé.
34
Page 35

En mode CD, vous pouvez effectuer les opérations suivantes :
• Pour lancer, interrompre ou arrêter la lecture, appuyez sur la touche de lecture.
• Pour arrêter la lecture, appuyez sur la touche d’arrêt de lecture.
• Pour reculer ou avancer rapidement dans la piste, maintenez l’une des touches de recherche. La piste recule/avance
à 5 fois la vitesse de lecture normale. Pour reprendre la lecture, relâchez la touche.
• Pour passer directement à une piste :
Vous pouvez appuyer sur une des touches numériques (0-9) pour entrer le numéro d'une autre piste. Si le numéro de
piste contient deux chiffres, appuyez sur les touches successivement (p. ex., 1 suivi de 2 pour la piste numéro 12). Vous
pouvez également tourner la molette afin de sélectionner la piste, puis appuyer sur la molette pour la charger.
• Pour sélectionner un mode de lecture répétée, appuyez sur la touche Repeat. Les options suivantes défileront Repeat
One
(la même piste se répète indéfiniment), Repeat All (la liste de toutes les pistes se répète indéfiniment),
Repeat FLD (les pistes du dossier sélectionné se répètent indéfiniment) et Repeat Off (lecture répétée désactivée).
• Pour sélectionner un mode de lecture, appuyez sur la touche Random. Il parcourra les modes Random FLD (toutes les
pistes dans le dossier sélectionné joueront de manière aléatoire), Random All (toutes les pistes sur le CD joueront de manière
aléatoire), Single Play (la piste en cours joue jusqu'au bout, puis la lecture s'arrête) et Normal (la lecture du CD se fait à partir
de la piste en cours jusqu’à la fin du CD, puis s'arrête).
• Pour changer le mode d’affichage de la durée, appuyez sur la touche Time. Les options suivantes défileront écoulé TRK :
affiche le temps écoulé de la piste en cours. restant TRK : affiche le temps restant de la piste en cours. DISC Elapsed :
temps total écoulé (mode CD uniquement). DISC Remain : Temps total restant (mode CD uniquement).
• Pour éjecter un CD, appuyez sur la touche Eject lorsque la lecture est arrêtée ou interrompue. Ejecting s’affiche lors de
l’éjection du CD. No Disc s’affiche lorsqu’il n’y a pas de disque dans la fente pour disque.
Important : Veuillez consulter la section Informations supplémentaires > CD pour en savoir plus sur les types de CD pris en
charge par le PMD-100CD et pour plus d’informations sur la manipulation et l’entretien des CD. Lors de la mise sous tension,
maintenez la touche Eject enfoncée pour forcer le lecteur à éjecter le CD (mode Force Eject).
Lecture de fichiers MP3 sur un CD
Pour faire la lecture de fichiers MP3 sur un CD :
1. Si l’appareil est hors tension, appuyez sur l’interrupteur d’alimentation afin de le mettre sous tension.
Important : N’insérez pas un CD lorsque l’appareil est hors tension. Cela pourrait endommager l’appareil.
2. Sélectionnez une des options suivantes :
Remarque : Vous pouvez lire des fichiers MP3 sur un CD-R ou CD-ROM, ou lire des fichiers MP3 sur un périphérique USB.
3. Sélectionnez CD comme type de média : (comme indiqué dans la section Sélection du type de média).
4. Sélectionnez un fichier audio :
Pour parcourir les fichiers audio, tournez la molette.
• Pour accéder à un dossier, maintenez la touche Folder enfoncée pendant 3 secondes, puis tournez la molette afin de
sélectionner un dossier. Appuyez sur la molette pour accéder au dossier, puis tournez la molette pour faire défiler et
trouver une piste. Appuyez de nouveau sur la molette afin de sélectionner la piste, puis appuyez sur la touche
lancer/interrompre la lecture pour faire jouer la piste.
Remarque : Si une piste n'est pas sélectionnée quelques secondes après avoir accédé à un dossier, l'appareil quitte le
dossier et retourne à la piste/dossier sélectionné précédemment.
35
Page 36

En mode CD ou USB vous pouvez effectuer les opérations suivantes :
• Pour lancer, interrompre ou arrêter la lecture, appuyez sur la touche de lecture.
• Pour arrêter la lecture, appuyez sur la touche d’arrêt de lecture.
• Pour reculer ou avancer rapidement dans la piste, maintenez l’une des touches de recherche (Search). La
piste recule/avance à 5 fois la vitesse de lecture normale. Pour reprendre la lecture, relâchez la touche.
• Pour sélectionner un mode de lecture, appuyez sur la touche Random. Il parcourra les modes Random FLD
(toutes les pistes dans le dossier sélectionné joueront de manière aléatoire), Random All (toutes les pistes sur le
CD joueront de manière aléatoire), Single Play (la piste en cours joue jusqu'au bout, puis la lecture s'arrête) et
Normal (la lecture du CD se fait à partir de la piste en cours jusqu’à la fin du CD, puis s'arrête).
• Pour changer le mode d'affichage de la durée, appuyez sur la touche Time. Les options suivantes défileront :
Temps écoulé (E, affiche le temps écoulé de la piste en cours), Temps restant (R, affiche le temps restant de la
piste en cours) et Temps restant sur le disque (T, affiche le temps restant de toutes les pistes restantes à lire sur
le CD).
• Pour éjecter un CD, appuyez sur la touche Eject. Ejecting s’affiche lors de l’éjection du CD. No Disc s’affiche
lorsqu’il n’y a pas de disque dans la fente pour disque.
Lecture de fichiers audio sur une clé USB
Pour faire la lecture de fichiers audio sur une clé USB :
1. Si l’appareil est hors tension, appuyez sur la touche d'alimentation afin de le mettre sous tension.
2. Insérez le périphérique USB (stockage de masse) dans le port USB.
3. Sélectionnez USB comme type de média (comme indiqué dans la section Sélection du type de média).
4. Sélectionnez un fichier audio :
• Pour parcourir les fichiers audio, tournez la molette.
• Pour accéder à un dossier, maintenez la touche Folder enfoncée pendant 3 secondes, puis tournez la molette
afin de sélectionner un dossier. Appuyez sur la molette pour accéder au dossier, puis tournez la molette pour faire
défiler et trouver une piste. Appuyez de nouveau sur la molette afin de sélectionner la piste, puis appuyez sur la
touche lancer/interrompre la lecture pour faire jouer la piste.
Remarque : Si une piste n'est pas sélectionnée quelques secondes après avoir accédé à un dossier, l'appareil
quitte le dossier et retourne à la piste/dossier sélectionné précédemment.
En mode USB, vous pouvez effectuer les opérations suivantes :
• Pour lancer la lecture ou faire un arrêt de lecture momentané, appuyez sur la touche lancer/interrompre la
lecture.
• Pour faire un arrêt de lecture, appuyez sur la touche d’arrêt de lecture.
• Pour reculer ou avancer rapidement dans la piste, maintenez l'une des touches de recherche. La piste
recule/avance à 5 fois la vitesse de lecture normale. Pour reprendre la lecture, relâchez la touche.
• Pour changer le mode d’affichage, appuyez sur la touche Folder.
• Pour sélectionner un autre dossier ou fichier audio, suivez les étapes décrites dans l'étape 4 ci-dessus.
• Pour afficher différentes informations de piste, appuyez sur la touche Text. Elle permet de faire défiler le nom
de fichier et les autres informations textuelles.
• Pour sélectionner un mode de lecture répétée, appuyez sur la touche Repeat. Les options suivantes défileront
Repeat One (la même piste se répète indéfiniment), Repeat All (la liste de toutes les pistes se répète
indéfiniment), Repeat FLD (les pistes du dossier sélectionné se répètent indéfiniment) et Repeat Off (lecture
répétée désactivée).
• Pour changer le mode d'affichage de la durée, appuyez sur la touche Time. Les options suivantes défileront :
Temps écoulé (E, affiche le temps écoulé de la piste en cours) et Temps restant (R, affiche le temps restant de la
piste en cours).
• Pour retirer un périphérique USB, retirez-le doucement du port USB alors qu’il n’est pas en cours de lecture.
(Le retrait d'un périphérique USB en cours de lecture peut l'endommager.)
Important : Toutes les touches autres que la touche d’alimentation et Eject seront verrouillées/désactivées en mode
auxiliaire.
36
Page 37

Lecture audio à partir d’un périphérique externe
Pour lire des fichiers audio sur un périphérique externe (p. ex., smartphone, ordinateur, lecteur de musique
portable, etc.) branché à l’entrée auxiliaire :
1. Si l’appareil est hors tension, appuyez sur l’interrupteur d’alimentation afin de le mettre sous tension.
2. Branchez la sortie stéréo/casque 3,5 mm (1/8 po) d’un périphérique externe à l’entrée auxiliaire.
3. Sélectionnez Aux comme type de média (comme indiqué dans la section Sélection du type de média). Lorsque
le périphérique externe est branché, AUX Connected s’affiche. Lorsque le périphérique externe n’est pas
branché, AUX Disconnect s’affiche.
4. Pour lancer la lecture, appuyez sur la touche de lecture du périphérique externe.
Important : Toutes les touches autres que l’interrupteur d’alimentation, CD/USB/Aux et la touche
d’éjection seront verrouillées/désactivées.
Fonctions supplémentaires
Verrouillage du panneau
Utiliser la fonction de verrouillage du panneau pour empêcher la modification accidentelle des réglages de l’appareil.
Lorsque la fonction de verrouillage du panneau est activée, toutes les touches sauf l’interrupteur d’alimentation et la
touche Text/Lock sont verrouillées sur l’appareil. (La télécommande fonctionne normalement.)
Pour activer ou désactiver le verrouillage du panneau, maintenez la touche Text/Lock enfoncée.
• Lorsqu’activée, P-Lock ON et
• Lorsque désactivée, P-Lock OFF s’affiche et
s’affiche.
disparait.
Activation automatique de la lecture lors de la mise sous tension
Utilisez la fonction d’activation automatique de la lecture (Power-On Play) afin que l’appareil lance automatiquement
la lecture du CD lors de la mise sous tension.
Pour activer ou désactiver l’activation automatique de la lecture lors de la mise sous tension, maintenez la
touche Pwr On Play enfoncée.
• Lorsqu'activée, P-OnPlay On s'affiche.
• Lorsque désactivée, P-OnPlay Off s'affiche.
37
Page 38

Informations supplémentaires
CD
Lors de la lecture de CD audio, veuillez prendre note des points suivants :
• Le PMD-100CD peut lire les disques compacts audio (CD) et les disques compacts
enregistrables (CD-R). Tous deux sont habituellement marqués avec le logo Compact Disc
Digital Audio (voir image).
• N’essayez pas de lire les disques de formes non circulaires (disques en forme de coeur,
disques octogonaux, etc. ; voir image) ou des disques qui ont été réparés avec de l’adhésif ou
du ruban adhésif. Ceux-ci peuvent endommager l’appareil.
• Le PMD-100CD ne peut lire que les disques finalisés. (La finalisation est le processus qui rend
les disques compacts enregistrables (CD-R) lisibles sur des lecteurs compatibles.)
• En raison du logiciel de gravure utilisé, certains disques peuvent ne pas être lus correctement.
Lors de la lecture de CD contenant des fichiers audio, veuillez prendre note des points suivants :
• Le format d’enregistrement du logiciel de gravure doit être ISO9660 Level 1.
• Vous pouvez avoir jusqu’à 300 dossiers et jusqu’à 8 niveaux de dossiers, y compris le répertoire racine.
• Vous pouvez avoir jusqu’à 300 fichiers audio. Si le CD contient plus de 300 fichiers, certains fichiers audio peuvent ne
pas être lus ou s’afficher correctement.
• Les noms de fichier, les noms de dossier et les informations textuelles peuvent contenir jusqu’à 255 caractères.
Uniquement les lettres majuscules, les lettres minuscules, les chiffres et les symboles peuvent s’afficher. Les noms de
fichier en japonais ne peuvent s’afficher. Les noms de fichier qui commencent par « . » ne s’afficheront pas.
• Les fichiers protégés par droit d’auteur peuvent ne pas être lus correctement et/ou peuvent apparaître sous forme de
fichier inconnu (Unknown File).
• En raison du logiciel de gravure utilisé, certains fichiers peuvent ne pas être lus ou affichés correctement.
• Lors de la lecture des fichiers audio sur un CD, le PMD-100CD prend en charge les données de balise suivantes :
o Balises ID3 : Version 1.x et 2.x
o Balises META : compatible avec le titre de la piste, le nom de
l’artiste et le nom de l’album
o Fréquence d’échantillonnage : 44,1 kHz
o Débit binaire : 32 kb/s à 320 kb/s
o Formatage : MPEG1 Audio Layer 3
o Extension de fichier : .mp3
Lorsque vous sortez un disque de son étui, manipulez-le avec précaution pour éviter de le rayer. Ne pliez
déformez pas ou n’exposez pas les disques à la chaleur et n’essayez pas d’agrandir le trou au centre du
disque. N’écrivez pas sur la face étiquetée (imprimé) et ne collez aucune étiquette sur vos disques.
Si des empreintes digitales, de la saleté ou de la condensation se forme sur la surface d’un disque,
nettoyez-le avec un produit de nettoyage spécialisé disponible dans le commerce ou un chiffon doux.
Essuyez délicatement le disque par des mouvements rectilignes allant du centre au rebord, et non pas par
des mouvements circulaires. N’utilisez aucun produit antistatique ou aérosol pour disque, ni aucun
solvant volatil tel que le benzène ou autre dissolvant.
Assurez-vous de retirer les disques après leur utilisation et de les ranger dans leur boîtier pour les
protéger de la poussière, des rayures, des déformations, etc. Ne rangez pas les disques dans des
endroits ou ils peuvent être exposés à la lumière directe du soleil, à la chaleur, à la poussière, à l’humidité,
etc.
38
Page 39

Périphériques USB
Lors de la lecture de fichiers audio sur périphérique USB, veuillez prendre note des points suivants :
• Le PMD-100CD ne recharge pas les périphériques USB branchés, ne prend pas en charge les concentrateurs USB ou
les câbles d’extension USB.
• Le PMD-100CD prend en charge les périphériques USB de stockage de masse ou compatibles avec MTP.
• Le PMD-100CD soutient les systèmes de fichiers FAT16 ou FAT32 seulement.
• Vous pouvez avoir jusqu’à 999 dossiers et jusqu’à 8 niveaux de dossiers, y compris le répertoire racine.
• Vous pouvez avoir jusqu’à 999 fichiers audio. Si le périphérique USB contient plus de 999 fichiers, certains fichiers
audio peuvent ne pas être lus ou s’afficher correctement.
• Les noms de fichier, les noms de dossier et les informations textuelles peuvent contenir jusqu’à 255 caractères.
Uniquement les lettres majuscules, les lettres minuscules, les chiffres et les symboles peuvent s’afficher. Les noms de
fichier en japonais ne peuvent s’afficher.
• Les fichiers protégés par droit d’auteur peuvent ne pas être lus correctement et/ou peuvent apparaître sous forme de
fichier inconnu (Unknown File).
Les noms de fichier qui commencent par « . » ne s’afficheront pas.
Lors de la lecture de fichiers audio sur périphérique USB, le PMD-100CD prend en charge les données de balise
suivantes :
• Balises ID3 : Version 1.x et 2.x
• Fichiers MP3 :
o Fréquence d’échantillonnage : 44,1 kHz
o Débit binaire : 32 kb/s à 320 kb/s
o Formatage : MPEG1 Audio Layer 3
o Extension de fichier : .mp3
Ordre de lecture des fichiers audio
Lors de la lecture des fichiers audio stockés dans des dossiers multiples, l’ordre de lecture de chaque dossier est définie
automatiquement lorsque l’appareil lit le média. Les fichiers de chaque dossier sont lus dans le même ordre dans lequel ils
ont été ajoutés aux médias. (Il se peut que l’ordre des fichiers sur l’appareil diffère de celle sur votre ordinateur ou dans
votre logiciel.) La structure des dossiers détermine aussi l’ordre de lecture :
o Pour les fichiers audio sur un CD-R, les fichiers de premier niveau de tous les dossiers seront lus en premier, puis
les fichiers de deuxième niveau de tous les dossiers seront lus en deuxième, puis les fichiers de troisième niveau de
tous les dossiers seront lus, et ainsi de suite.
o Pour les fichiers audio sur un périphérique USB, les fichiers de premier niveau du premier dossiers seront lus, puis
les fichiers du deuxième niveau du même dossier seront lus, puis les fichiers du troisième niveau du même dossier
seront lus, et ainsi de suite. Après avoir lus tous les fichiers de tous les niveaux de ce premier dossier, le même
processus se poursuivra pour les fichiers du premier niveau du deuxième dossier.
39
Page 40

Guide de dépannage
En cas de problème, procédez comme suit :
• Assurez-vous que tous les câbles, périphériques, antennes et/ou médias sont correctement raccordés.
• Assurez-vous que vous utilisez l’appareil comme indiqué dans ce guide d’utilisation.
• Assurez-vous que vos autres appareils ou médias fonctionnent correctement.
• Si vous croyez que l’appareil ne fonctionne pas correctement, vérifiez le tableau suivant afin de trouver le
problème et la solution.
Problème Solution Veuillez consulter :
L’appareil ne s’allume pas. Assurez-vous que le câble d’alimentation
est branché correctement à la prise secteur.
Le CD ne peut pas être
inséré dans la fente pour
disque.
Assurez-vous que le câble d’alimentation
est branché correctement à la prise secteur
et que l’appareil est sous tension.
Appuyez sur la touche Eject pour s’assurer
qu’un CD n’est pas déjà dans la fente pour
disque.
No Disc s’affiche même
lorsqu’un CD est inséré.
Appuyez sur la touche Eject afin d’éjecter
le CD, puis réinsérez-le.
Une section spécifique du
CD n’est pas lue
correctement.
La lecture ne démarre pas
même après avoir appuyé
sur la touche de lecture.
Nettoyez le CD avec un chiffon doux ou un
produit de nettoyage spécialisé disponible
dans le commerce.
Insérez un CD différent.
L’appareil ne produit aucun
son, ou le son est déformé.
Assurez-vous que tous les câbles,
périphériques, ou médias sont
correctement raccordés.
Assurez-vous que les câbles de ne soient
endommagés.
Assurez-vous que les paramètres sur votre
amplificateur, console de mixage, etc. sont
corrects.
Installation
Installation
Informations supplémentaires
> CD
Installation
L’appareil ne peut pas lire un
CD-R.
40
Assurez-vous que le CD-R a été finalisé
correctement.
Assurez-vous que le CD-R est de bonne
qualité.
Nettoyez le CD avec un chiffon doux ou un
produit de nettoyage spécialisé disponible
dans le commerce.
Assurez-vous que le CD utilise une
structure de dossiers qui prend en charge :
jusqu’à 300 dossiers et jusqu’à 8 niveaux
de dossiers, y compris le répertoire racine
et jusqu’à 300 fichiers.
Assurez-vous que le CD-R contient des
fichiers MP3. L’appareil ne peut pas lire
d’autres types de fichiers sur les CD-R.
Informations supplémentaires
> CD
Page 41

Problème Solution Veuillez consulter :
Le CD ne s’éjecte pas.
No Device s’affiche même
lorsqu’un périphérique USB est
insérée.
Maintenez la touche Eject enfoncée tout
en mettant l’appareil sous tension.
Retirez, puis réinsérez le périphérique
USB afin de vérifier qu’il ou elle est bien
inséré.
Assurez-vous que le périphérique USB
est bien de classe de stockage de masse
ou compatibles avec MTP.
Assurez-vous que le périphérique USB
est formatée à l’aide d’un système de
fichiers FAT16 ou FAT32.
N’utilisez pas de concentrateur USB ou
de câble d’extension USB.
L’appareil ne peut fournir d’alimentation
aux périphériques USB. Si votre
périphérique USB nécessite une source
d’alimentation, branchez-le à une prise
secteur.
Certains périphériques USB peuvent ne
pas fonctionnés ; certains peuvent ne
pas être reconnus.
Informations supplémentaires
> Périphériques USB
Les fichiers sur un périphérique
USB n’apparaissent pas.
Les fichiers sur un périphérique
USB ne sont pas lus.
Assurez-vous que les fichiers sont d’un
format de fichier pris en charge. Les
fichiers qui ne sont pas pris en charge
par cet appareil ne seront pas affichés.
Assurez-vous que le périphérique utilise
une structure de dossiers qui prend en
charge : jusqu’à 999 dossiers et jusqu’à
8 niveaux de dossiers, y compris le
répertoire racine et jusqu’à 999 fichiers.
Si votre périphérique USB est
partitionnée, assurez-vous que les
fichiers se trouvent sur la première
partition. L’appareil n’affiche pas les
autres partitions.
Assurez-vous que les fichiers sont d’un
format de fichier pris en charge. Les
fichiers qui ne sont pas pris en charge
par cet appareil ne seront pas affichés.
Assurez-vous que les fichiers ne sont pas
protégés par droit d’auteur. L’appareil ne
peut pas lire les fichiers protégés par
droit d’auteur.
Informations supplémentaires
> Périphériques USB
Informations supplémentaires
> Périphériques USB
Les noms de fichiers
n’affichent pas correctement.
Vérifiez que les fichiers utilisent
seulement les caractères pris en charge.
Les caractères qui ne sont pas pris en
charge seront remplacés par un « . »
Informations supplémentaires
> Périphériques USB
41
Page 42

Guida per l’uso (Italiano)
Introduzione
Grazie per aver acquistato il PMD-100CD. Per noi di Marantz Professional, prestazioni e affidabilità contano
moltissimo, proprio come per te. Ecco perché progettiamo i nostri dispositivi con un unico obiettivo in mente:
rendere le tue prestazioni le migliori possibili.
Contenuti della confezione
PMD-100CD
Cavo di alimentazione
Telecomando
Cavo RCA
Guida per l’uso
Manuale di sicurezza e garanzia
Assistenza
Per le ultime informazioni in merito a questo prodotto (documentazione, specifiche tecniche, requisiti di
sistema, informazioni sulla compatibilità, ecc.) e per effettuarne la registrazione, recarsi alla pagina
marantzpro.com.
Per ulteriore assistenza sul prodotto, recarsi alla pagina marantzpro.com/support.
42
Page 43

A
A
A
A
Istruzioni di sicurezza
Per maggiori informazioni, si veda anche il Manuale di sicurezza e garanzia in dotazione.
Prima di accendere
l’alimentazione:
deguata ventilazione:
Informazioni sulla
condensa:
Precauzioni circa l’uso di
telefoni cellulari:
Spostare l’apparecchio:
Informazioni sulla
manutenzione:
ssicurarsi che tutti i collegamenti siano sicuri e corretti e che non vi siano
problemi a livello dei cavi di alimentazione.
d alcuni elementi della circuiteria viene fornita alimentazione anche quando
l’apparecchio è spento. In caso di mancato utilizzo dell’apparecchio per lunghi
periodi di tempo, scollegare il cavo di alimentazione dalla presa elettrica.
Se l’apparecchio viene lasciato in una stanza non adeguatamente ventilata o
piena di fumo di sigaretta, polvere, ecc. per lunghi periodi di tempo, la
superficie del pickup ottico si può sporcare, causando un malfunzionamento.
Se vi è una notevole differenza di temperatura tra l’interno dell’apparecchio e la
zona circostante, all’interno dell’apparecchio si può formare condensa, che
può causare un malfunzionamento dell’apparecchio. Se ciò accade, lasciare
che l’apparecchio rimanga spento per un’ora o due e attendere fino a quando
la differenza di temperatura non sarà minima, prima di utilizzare l’apparecchio.
L’utilizzo di un telefono cellulare vicino all’apparecchio, può causare rumore. Se
ciò accade, allontanare il telefono cellulare dall’apparecchio quando è in uso.
Prima di spostare l’apparecchio, spegnere l’alimentazione e scollegare il cavo
di alimentazione dalla presa elettrica. Quindi, scollegare i cavi di alimentazione
dagli altri dispositivi prima di spostarlo.
Pulire l’alloggiamento e il pannello di controllo con un panno morbido.
Quando si utilizza un detergente chimico, seguire le istruzioni.
vvertenze relative
all’installazione su rack:
(specifiche del rack richieste per
il montaggio dell’unità su rack)
Installazione su rack:
Non utilizzare benzene, diluente, insetticida o altri solventi organici per pulire
l’unità. Tali materiali possono causare modifiche ai materiali e decolorazione.
Rack EIA standard da 19” (48,3 cm)
Rack da 1U compatibile all’installazione.
Rack dotato di una guida o scaffale in grado di supportare il dispositivo.
Massimo
di 10°
Questo prodotto funzionerà normalmente quando il
lettore è montato entro 10° dal piano verticale sul
pannello anteriore. Se l’apparecchio è inclinato
eccessivamente, il disco potrebbe non caricarsi o
caricarsi in maniera errata. (Si veda immagine.)
L’appaarecchio
43
Page 44

Caratteristiche
Pannello anteriore
9
4
13
1
1. Tasto di alimentazione: premere questo tasto per accendere o spegnere l’apparecchio. Assicurarsi che l’ingresso AC In sia
adeguatamente collegato a una presa elettrica. Non spegnere l’apparecchio durante la riproduzione dei media: questo potrebbe
danneggiare i media.
2. Ingresso Aux: collegare un dispositivo opzionale a questo ingresso servendosi di un cavo TRS da 1/8” (3,5mm). Si veda Operazione
> Riproduzione di audio da un dispositivo esterno per maggiori informazioni.
3. Porta USB: collegare un dispositivo di memoria di massa USB a questa porta.
4. Slot CD: inserire un CD in questo slot. Si veda Operazione > Riproduzione di CD audio per maggiori informazioni.
5. Sorgente: ruotare la manopola per selezionare la modalità di riproduzione multimediale: CD, USB o Aux. Si veda Operazione >
Scelta della modalità di riproduzione dei media per maggiori informazioni.
6. Tasto Repeat (ripeti): in modalità CD o USB, premere questo tasto per passare tra le modalità di ripetizione riproduzione: Repeat
, Repeat All , Repeat Cartella , e Repeat Off (ripeti uno, ripeti tutti, ripeti spento). Si veda Operazione > Riproduzione
One
di CD audio per maggiori informazioni.
Tasto Power-On Play: Tenere premuto questo tasto per accendere o spegnere Power-On Play. Si veda Operazione > Funzioni
aggiuntive > Power-On Play (riproduzione all’accensione) per maggiori informazioni.
7. Tasto Modalità di riproduzione (Play): In modalità CD o USB, premere questo tasto per scorrere lungo le casuale FLD/modalità
Random Play (riproduzione casuale)
8. Tasto text (testo): in modalità CD o USB, premere questo tasto per passare tra le modalità di visualizzazione nome file e altre
informazioni di testo.
Tasto Lock : tenere premuto questo tasto per accendere o spegnere Panel Lock. Si veda Operazione > Funzioni aggiuntive >
Blocco pannello per maggiori informazioni.
9. Tasto Time: in modalità CD o USB, premere questo tasto per passare alla modalità Time a display. Si veda Operazione >
Riproduzione di CD audio per maggiori informazioni.
10. Tasto cartella: temere premuto questo tasto per selezionare una cartella.
11. Tasto di espulsione (Eject): premere questo tasto per espellere il CD presente nella slot CD. Per effettuare l'espulsione forzata di un
CD, spegnere l'apparecchio, quindi premere il tasto di espulsione riaccendendo l'apparecchio. Per uscire dalla modalità di
espulsione forzata, spegnere l'apparecchio.
12. Display: questa schermata indica l’operazione corrente dell’apparecchio. Si veda Display per maggiori informazioni.
13. Sensore del telecomando: puntare il telecomando verso questo sensore al momento di utilizzarlo.
Nota bene: Se il sensore del telecomando è esposto alla luce diretta del sole, a una forte luce artificiale (come da una lampada
fluorescente a inverter) o a luci infrarosse, l’apparecchio o il telecomando potrebbero non funzionare correttamente.
14. Tasti di ricerca search: in modalità CD o USB, tenere premuto uno di questi tasti per il riavvolgimento/avanzamento rapido. La traccia si
riavvolgerà/avanzerà veloci a 5 volte la normale velocità di riproduzione.
15. Tasto Stop: premere questo tasto per interrompere la riproduzione. Per visualizzare la versione corrente del firmware, tenere
premuto il tasto stop mentre si accende l'apparecchio.
16. Tasto Play/Pause: premere questo tasto per avviare, riprendere e interrompere la riproduzione.
17. Tasti numerici (0–9): in modalità CD, premere uno di questi tasti per selezionare direttamente una traccia da riprodurre. Se il numero
di traccia è di due cifre, premere i tasti in successione (ad es., 1 e 2 per la traccia 12). Si veda Operazione > Riproduzione di CD
audio per maggiori informazioni.
18. Manopola Jog: girare questa manopola per navigare tra le opzioni illustrate. Premere questa manopola per confermare una scelta.
In modalità CD e USB questo viene utilizzato per scorrere lungo le tracce e selezionarle.
6
10
7
11
17
12
8
, Single Play S (riproduzione singola) e Normal Play (riproduzione normale).
3
5
14
15
16
18
2
44
Page 45

a
r
Display
1. Tipo di media: questo è il media selezionato attualmente: CD, USB
o Aux. Si veda Operazione > Scelta della modalità di
riproduzione dei media per maggiori informazioni.
2. Icona di riproduzione: mostra vari simboli per indicare lo stato
corrente di riproduzione:
Riproduzione Riavvolgimento
Pausa Avanzamento veloce
Interruzione
3. Informazioni: mostra informazioni extra sui media riprodotti.
TRK Elapsed: tempo trascorso
TRK Remain: tempo rimanente
DISC Elapsed: tempo totale trascorso (per la sola modalità CD)
DISC Remain: tempo totale rimanente (per la sola modalità CD)
4. Numero di traccia/file: indica il numero della traccia o del file.
5. Icone funzione: mostra vari simboli per indicare queste funzioni correnti:
Riproduzione casuale (si veda Uso > Riproduzione di CD audio per maggiori informazioni)
1
23
4
7
56
Ripeti una (si veda Uso > Riproduzione di CD
Ripeti tutte (si veda Uso > Riproduzione di CD audio per maggiori informazioni)
Power-On Play (si veda Uso > Funzioni aggiuntive > Powe
per maggiori informazioni)
6. Time (tempo): in modalità CD e USB, si tratta del tempo trascorso o rimanente, mostrato a display nel formato
hh:mm:ss (ore, minuti e secondi).
Si veda Operazione > Riproduzione di CD audio per maggiori informazioni.
7. Visualizza cartella
Blocco pannello (si veda Operazione > Funzioni aggiuntive > Blocco pannello per maggiori informazioni.)
udio per maggiori informazioni)
-On Play (riproduzione all’accensione)
45
Page 46

Pannello posteriore
2
1
1. Uscite (RCA non bilanciate): queste uscite inviano i segnali audio da un dispositivo CD, USB (memoria di massa) e da
un dispositivo collegato all’ingresso Aux. Servirsi di cavi RCA per collegare queste uscite ad altoparlanti esterni,
impianto audio, ecc. Si veda Installazione per maggiori informazioni.
2. Uscite (XLR bilanciate): queste uscite inviano i segnali audio da un dispositivo CD, USB (memoria di massa) e da un
dispositivo collegato all’ingresso Aux. Servirsi di cavi XLR per collegare queste uscite ad altoparlanti esterni, impianto
audio, ecc. Si veda Installazione per maggiori informazioni.
3. Ingresso CA: servirsi del cavo di alimentazione in dotazione per collegare questo ingresso ad una presa di
alimentazione. Si veda Installazione per maggiori informazioni.
4. Porta USB: questa porta USB serve ad aggiornare il firmware dell’apparecchio. L’interruttore “Update/Normal” serve a
impostare la modalità del collegamento USB per l’aggiornamento del firmware. Se si aggiorna l'apparecchio,
impostare l'interruttore su “Update”. Per un uso normale, questo interruttore deve essere lasciato su Normal.
4
3
Telecomando
1. Muto: disattiva il suono proveniente dalle uscite audio.
2. USB: fa passare in modalità USB.
3. AUX: fa passare in modalità Aux.
4. CD: fa passare in modalità CD.
5. Play (riproduci): riproduce l'audio da un CD o una chiavetta USB flash.
6. Pause (pausa): interrompe momentaneamente l'audio proveniente da un CD o una
chiavetta USB flash.
7. Stop: arresta l'audio proveniente da un CD o da una chiavetta USB flash.
8. Eject (espelli): espelle o inserisce un CD.
9. Search Backward (cerca indietro): tenere premuto per riavvolgere lungo una traccia
CD o USB.
10. Search Forward (cerca avanti): tenere premuto per avanzare rapidamente lungo una
traccia CD o USB.
11. Random (Riproduzione casuale): premere questo comando per commutare tra le
Casuale FLD/modalità di riproduzione casuale o di riproduzione singola () in modalità
CD o USB.
12. Skip Back (cerca indietro): premere per passare alla traccia o al capitolo precedente.
13. Skip Forward (salta avanti): premere per passare alla traccia o al capitolo successivo.
14. Display: premere e rilasciare il tasto per regolare la luminosità del display. Tenere
premuto questo tasto per aprire il menu opzioni. Tenere nuovamente premuto il tasto
per chiudere il menu opzioni.
15. Repeat (Ripeti): in modalità CD o USB, fa passare tra le modalità di ripetizione
riproduzione: Repeat One, Repeat All e Repeat Off (ripeti uno, ripeti tutti, ripeti spento).
16. Time (tempo): in modalità CD o USB, premere questo tasto per far commutare il tempo
a display tra tempo trascorso, tempo rimanente, totale trascorso time, o tempo totale
rimanente (per la sola modalità CD).
17. Text/Lock: in modalità CD o USB, premere questo tasto per commutare tra le modalità
di visualizzazione nome della traccia e nome dell'artista. Tenerlo premuto per accendere
o spegnere Panel Lock.
46
Page 47

Installazione
Importante: collegare tutti i cavi in maniera sicura e adeguata (con cavi stereo: sinistro con sinistro, destro con
destro) e non unirli in un fascio unico con il cavo di alimentazione.
1. Servirsi di cavi XLR o di un cavo stereo RCA per collegare le uscite (bilanciate o non bilanciate) agli ingressi
analogici del ricevitore esterno, amp, casse, ecc.
2. Dopo aver effettuato tutti i collegamenti, servirsi del cavo di alimentazione in dotazione per collegare l’ingresso
AC in una presa di corrente.
Esempio:
SOURCE SELECT
ZONE 2
ZONE 2
ZONE 3 ZONE 3
ON/OFF
SOURCE
ON/OFF
AUX 1
HDMI 7 5V/1A
INFO
OPTION
SOURCE STATUS DIMMER
ENTER
PHONES BACK
SETUP
QUICK SELECT
1 CBL/SAT 3 GAME 4 NETWORK
2 Blu-ray
L - AUDIO - R
VIDEO
AUX 1
MASTER VOLUME
SETUP MIC
IN-Command
SSEERI
INTEGRATED NETWORK AV RECEIVER
AVR-X4000
Ricevitore, amp, ecc. Alimentazione
Monitor
Operazione
Scelta della modalità di riproduzione dei media
Per selezionare il tipo di media che si desidera riprodurre:
Per commutare tra le opzioni disponibili, ruotare la manopola Source.
• CD: CD audio, CD-DA, CD-ROM, MP3 CD, o CD con file audio (CDR) (si veda Riproduzione di CD audio)
• USB: dispositivo USB (memoria di massa) (si veda Riproduzione di file audio su un drive USB)
• Aux: dispositivo collegato all’ingresso Aux (si veda Riproduzione di audio da un dispositivo esterno)
47
Page 48

Riproduzione di CD audio
Per riprodurre CD audio:
1. Se l’apparecchio è spento, premere il tasto Power per accenderlo.
Importante: non inserire CD quando l’alimentazione è spenta. Così facendo è possibile danneggiare il dispositivo.
2. Inserire un CD nell’apposito slot CD. (Reggere i bordi del CD senza toccare la superficie registrata. Prestare attenzione a non
pinzarsi le dita quando il disco viene trascinato all’interno dell’apparecchio.)
3. Selezionare CD come tipo di media (descritto in Scelta della modalità di riproduzione dei media).
Il CD inizierà a essere riprodotto automaticamente. Quando la modalità di riproduzione Power-On Play è attiva inizierà la
riproduzione automatica del CD.
In modalità CD, è possibile eseguire una delle seguenti operazioni:
• Per avviare, riprendere o interrompere la riproduzione, premere il tasto Play/Pause.
• Per interrompere la riproduzione, premere il tasto Stop.
• Per riavvolgere o avanzare rapidamente lungo la traccia, tenere premuto uno dei tasti di ricerca Search. La traccia
si riavvolgerà/avanzerà veloci a 5 volte la normale velocità di riproduzione. Per riprendere la riproduzione, lasciare la
pressione del tasto.
• Per saltare direttamente a una traccia:
Premere uno dei tasti numerici (0–9) per inserire il numero di traccia desiderato. Se il numero di traccia è di due cifre,
premere i tasti in successione (ad es., 1 e 2 per la traccia 12). Alternativamente, girare la manopola per selezionare una
traccia e premerla per caricarla.
• Per selezionare una modalità di riproduzione ripetuta, premere il tasto Repeat. Commuterà tra Repeat One
stessa traccia verrà ripetuta in maniera indefinita), Repeat All
indefinita), Repeat FLD (Le tracce presenti nella cartella selezionata verranno ripetute in maniera indefinita) e Repeat
Off (nessuna traccia verrà ripetuta).
• Per selezionare la modalità di riproduzione, premere il tasto Random. Commuterà tra Random FLD: tutte le tracce
presenti nella cartella selezionata saranno riprodotte in ordine casuale. Random All: tutte le tracce presenti sul CD
saranno riprodotte in ordine casuale. Single Play: la traccia corrente sarà riprodotta fino alla fine e poi la riproduzione si
arresterà. Normal: il CD verrà riprodotto dalla traccia corrente alla fine del CD e poi la riproduzione si arresterà.
• Per modificare la modalità Time visualizzata a display, premere il tasto Time. Commuterà tra trascorso TRK:
quantità di tempo trascorso della traccia corrente. rimanente TRK: quantità di tempo rimanente sulla traccia corrente.
DISC Elapsed: tempo totale trascorso (per la sola modalità CD). DISC Remain: tempo totale rimanente (per la sola
modalità CD).
• Per espellere un CD, premere il tasto Eject con l’unità spenta o in pausa. Durante l’espulsione di un CD, a display
comparirà la scritta Ejecting. Quando nello slot CD non è presente alcun disco, comparirà la scritta No Disc.
Per informazioni in merito alla riproduzione di CD con file audio, si veda Riproduzione di file audio.
Importante: Si veda Altre informazioni > CD per saperne di più sui tipi di CD supportati dal PMD-100CD e per maggiori
informazioni in merito alla gestione e alla cura dei CD. Al momento di accendere l'apparecchio, tenere premuto il tasto Eject per
attivare la modalità di espulsione forzata.
(l’elenco di tutte le tracce verrà ripetuto in maniera
(la
48
Page 49

Riproduzione di file MP3 presenti su un CD
Per riprodurre i file MP3 presenti su un CD:
1. Se l’apparecchio è spento, premere il tasto Power per accenderlo.
Importante: non inserire CD quando l’alimentazione è spenta. Così facendo è possibile danneggiare il dispositivo.
2. Procedere in uno dei seguenti modi:
Nota bene: si possono riprodurre file MP3 su un CD-R o CD-ROM, o si possono riprodurre file MP3 files
presenti su un dispositivo USB.
3. Selezionare CD come tipo di media desiderato: (come descritto nel paragrafo Selezionare la modalità di
riproduzione dei media).
4. Selezionare un file audio:
• Per passare da un file audio all'altro, girare la manopola Jog sull'apparecchio.
• Per entrare in una cartella, tenere premuto il tasto Folder per 3 secondi e girare la manopola Jog per
selezionare una cartella. Premere la manopola Jog per entrare nella cartella e scorrere servendosi della
manopola stessa per trovare una traccia. Premere nuovamente la manopola per selezionare la traccia e
premere il tasto Play/Pause per avviarne la riproduzione.
Nota bene: se non viene selezionata alcuna traccia entro pochi secondi dalla selezione della cartella,
l'apparecchio uscirà dalla cartella stessa e tornerà alla traccia/cartella selezionata in precedenza.
In modalità CD o USB è possibile eseguire una delle seguenti operazioni:
• Per avviare, riprendere o interrompere la riproduzione, premere il tasto Play/Pause.
• Per interrompere la riproduzione, premere il tasto Stop.
• Per riavvolgere o avanzare rapidamente lungo la traccia, tenere premuto uno dei tasti di ricerca Search.
La traccia si riavvolgerà/avanzerà veloci a 5 volte la normale velocità di riproduzione. Per riprendere la
riproduzione, lasciare la pressione del tasto.
• Per selezionare la modalità di riproduzione, premere il tasto Random. Commuterà tra Random FLD (tutte
le tracce presenti nella cartella selezionata saranno riprodotte in ordine casuale), Random All (tutte le tracce
presenti sul CD saranno riprodotte in ordine casuale), Single Play (la traccia corrente sarà riprodotta fino alla
fine e poi la riproduzione si arresterà) e Normal (il CD verrà riprodotto dalla traccia corrente alla fine del CD e
poi la riproduzione si arresterà).
• Per cambiare la modalità di tempo a display, premere il tasto Time. Si passa da Elapsed (E, il tempo
trascorso della traccia corrente) a Remaining (R, il tempo rimanente della traccia corrente), a Total
Remaining (il tempo totale rimanente del CD audio).
• Per espellere un CD, premere il tasto Eject. Durante l’espulsione di un CD, a display comparirà la scritta
Ejecting. Quando nello slot CD non è presente alcun disco, comparirà la scritta No Disc.
49
Page 50

Riproduzione di file audio su un drive USB flash
Per riprodurre file audio su un drive USB flash
1. Se l'apparecchio è spento, premere il tasto Power per accenderlo.
2. Collegare il dispositivo USB (di memoria di massa) alla porta USB.
3. Selezionare USB come tipo di media desiderato (come descritto nel paragrafo Scelta della modalità di riproduzione
dei Media).
4. Selezionare un file audio:
• Per passare da un file audio all'altro, girare la manopola Jog sull'apparecchio.
• Per entrare in una cartella, tenere premuto il tasto Folder per 3 secondi e girare la manopola Jog per
selezionare una cartella. Premere la manopola Jog per entrare nella cartella e scorrere servendosi della manopola
stessa per trovare una traccia. Premere nuovamente la manopola per selezionare la traccia e premere il tasto
Play/Pause per avviarne la riproduzione.
Nota bene: se non viene selezionata alcuna traccia entro pochi secondi dalla selezione della cartella,
l'apparecchio uscirà dalla cartella stessa e tornerà alla traccia/cartella selezionata in precedenza.
In modalità USB si possono svolgere tutte le seguenti operazioni:
• Per avviare, riprendere o interrompere la riproduzione, premere il tasto Play/Pause.
• Per interrompere la riproduzione, premere il tasto Stop.
• Per tornare indietro o avanzare rapidamente lungo la traccia, tenere premuto uno dei tasti Search. La traccia
tornerà indietro/avanzerà rapidamente a una velocità pari a 5 volte la velocità di riproduzione normale. Per
riprendere la riproduzione, lasciare il tasto.
• Per cambiare la modalità di visualizzazione, premere il tasto Folder.
• Per selezionare un'altra cartella o un altro file audio, seguire i passaggi illustrati nella Fase 4 di cui sopra.
• Per mostrare diverse informazioni sulla traccia a display, premere il tasto Text. Scorrerà tra il nome del file e
altre informazioni di testo.
• Per selezionare una modalità di riproduzione ripetuta, premere il tasto Repeat. Scorrerà da Repeat One (la
stessa traccia verrà ripetuta indefinitamente), Repeat All (l'intero elenco delle tracce verrà ripetuto
indefinitamente), Repeat FLD (le tracce presenti nella cartella selezionata verranno ripetute indefinitamente) e
Repeat Off (non verrà ripetuta alcuna traccia).
• Per cambiare la modalità di tempo a display, premere il tasto Time. Si passa da Elapsed (E, il tempo trascorso
della traccia corrente) a Remaining (R, il tempo rimanente della traccia corrente).
• Per rimuovere un dispositivo USB, estrarlo delicatamente dalla porta USB quando non è in uso. (La rimozione
di un dispositivo USB durante la sua riproduzione può danneggiarlo.)
Importante: tutti i tasti ad eccezione di Power, CD/USB/Aux ed Eject saranno bloccati/disattivati quando ci si trova in
modalità Aux.
Riproduzione di audio da un dispositivo esterno
Per riprodurre audio su un dispositivo esterno (ad es. smartphone, computer, lettore musicale portatile, ecc.)
collegato all’ingresso aux:
1. Se l’apparecchio è spento, premere il tasto Power per accenderlo.
2. Collegare l’uscita stereo/cuffie da 1/8” (3,5 mm) del dispositivo esterno all’ingresso Aux.
3. Selezionare Aux come tipo di media (descritto in Scelta della modalità di riproduzione dei media). Se il dispositivo
esterno è collegato, il messaggio AUX Connected (aux collegato) comparirà a display. Se il dispositivo esterno non è
collegato, il messaggio AUX Disconnect (aux scollegato) comparirà a display.
4. Per avviare la riproduzione, premere il tasto Play sul dispositivo esterno.
Importante: Tutti i tasti ad eccezione di Power e il tasto di espulsione (Eject) saranno bloccati/disabilitati.
50
Page 51

Funzioni aggiuntive
Blocco pannello
Servirsi della funzione blocco pannello per evitare modifiche accidentali. Quando il blocco pannello è attivato, tutti i
tasti ad eccezione del tasto Power e del tasto Text/Lock sono bloccati/disabilitati sull’apparecchio. (Il telecomando
continuerà a funzionare normalmente.)
Per attivare o disattivare il blocco pannello, tenere premuto il tasto Text/Lock.
• Una volta attivato, la scritta P-Lock ON e
• Quando disattivato, comparirà la scritta, P-Lock OFF a display, e
compariranno a display.
scomparirà.
Power-On Play (riproduzione all’accensione)
Servirsi della funzione Power-On Play per configurare l'apparecchio in modo che avvii automaticamente la
riproduzione del CD nel drive.
Per attivare o disattivare Power-On Play, tenere premuto il tasto Pwr On.
• Una volta attivato, P-OnPlay On comparirà a display.
• Una volta disattivato, P-OnPlay Off comparirà a display.
51
Page 52

Altre informazioni
CD
Quando si riproducono CD audio, va notato quanto segue:
• Il PMD-100CD può riprodurre CD musicali e dischi CD-R. Entrambi sono solitamente
contrassegnati con il logo Compact Disc Digital Audio (si veda immagine).
• Non riprodurre dischi di forma non circolare (dischi a forma di cuore, dischi ottagonali,
ecc. si veda immagine) oppure dischi che sono stati riparati con adesivo o nastro. Questi
possono danneggiare l’apparecchio.
• In PMD-100CD può riprodurre solo dischi finalizzati. (La finalizzazione è il processo che
rende i dischi CD-R registrati riproducibili su lettori compatibili.)
• A seconda del software utilizzato per masterizzare un CD (o di altre condizioni), alcuni CD
potrebbero non essere riprodotti correttamente.
Quando si riproducono CD contenenti file audio, va notato quanto segue:
• Il formato di scrittura del software deve essere ISO9660 Livello 1.
• Possono essere presenti fino a un massimo di 300 cartelle e fino a un massimo di 8 livelli di cartelle, inclusa la
directory principale.
• È possibile avere fino a un massimo di 300 file audio. Se il CD contiene più di 300 file, alcuni file audio
potrebbero non essere riprodotti o comparire correttamente.
• I nomi dei file, delle cartelle e i testi possono presentare fino a un massimo di 255 caratteri. A display possono
essere visualizzati unicamente lettere maiuscole, lettere minuscole, numeri e simboli. I nomi di file in giapponese
non compariranno a display. I nomi di file che iniziano per “.” non saranno illustrati.
• I file protetti da copyright potrebbero non essere riprodotti adeguatamente e/o comparire come “Unknown File”
(file sconosciuto).
• A seconda del software utilizzato per masterizzare un CD (o di altre condizioni), alcuni file potrebbero non essere
riprodotti o non apparire correttamente.
• Nel riprodurre i file audio presenti su un CD, il PMD-100CD supporta i seguenti dati tag:
o Tag ID3: versione 1.x e 2.x
o META-tag: compatibili con titolo, artista e nome dell’album
o Frequenza di campionamento: 44,1 kHz
o Bit rate: da 32 kbps ta 320 kbps
o Formatta: MPEG1 Audio Layer 3
o Estensione del file: .mp3
Prestare attenzione a non graffiare i dischi nell’estrarli dalle loro custodie. Non piegare né riscaldare
i dischi e non allargare il foro al centro del disco. Non scrivere sulla superficie etichettata del disco
e non attaccare nuove etichette sul disco stesso.
Se su un disco sono presenti impronte, sporcizia o condensa, pulirlo con un set detergente
disponibile in commercio o con un panno morbido e asciutto. Passarlo delicatamente dall’interno
verso l’esterno, non con un movimento circolare. Non utilizzare spray per dischi, agenti antistatici,
benzene, diluenti o altri solventi.
Dopo aver utilizzato i dischi, rimuoverli dall’apparecchio e riporli nelle rispettive custodie per
proteggerli dalla polvere, graffi, deformazione, ecc. Non riporre i dischi in luoghi esposti alla luce
diretta del sole per lunghi periori di tempo o luoghi esposti a calore, polvere, umidità, ecc.
52
Page 53

Dispositivi USB
Al momento di riprodurre file audio presenti su un dispositivo USB, va notato quanto segue:
• Il PMD-100CD non carica alcun dispositivo USB collegato e non supporta hub USB né cavi di prolunga USB.
• Il PMD-100CD supporta dispositivi USB che sono dispositivi di memoria di massa o compatibili con MTP.
• Il PMD-100CD supporta unicamente file system FAT16 o FAT32.
• Possono essere presenti fino a un massimo di 999 cartelle e fino a un massimo di 8 livelli di cartelle, inclusa la
directory principale.
• È possibile avere fino a un massimo di 999 file audio. Se il dispositivo USB contengono più di 999 file, alcuni file
audio potrebbero non essere riprodotti o comparire correttamente.
• I nomi dei file, delle cartelle e i testi possono presentare fino a un massimo di 255 caratteri. A display possono
essere visualizzati unicamente lettere maiuscole, lettere minuscole, numeri e simboli. I nomi di file in giapponese
non compariranno a display. I nomi di file che iniziano per “.” non saranno illustrati.
• I file protetti da copyright potrebbero non essere riprodotti adeguatamente e/o comparire come “Unknown File”
(file sconosciuto).
Al momento di riprodurre file audio presenti su un dispositivo USB, il PMD-100CD supporta i seguenti dati tag:
• Tag ID3: versione 1.x e 2.x
• per file MP3:
o Frequenza di campionamento: 44,1 kHz
o Bit rate: da 32 kbps ta 320 kbps
o Formato: MPEG1 Audio Layer 3
o Estensione del file: .mp3
Ordine di riproduzione dei file audio
Al momento di riprodurre file audio memorizzati in cartelle multiple, l’ordine di riproduzione di ciascuna cartella è
impostato automaticamente quando l’apparecchio legge il media. I file presenti in ciascuna cartella verranno
riprodotti nello stesso ordine in cui sono stati aggiunti al media. (Tale ordine può apparire in maniera diversa sul
computer e/o nel software rispetto a quanto compare nell’apparecchio.) La struttura delle cartelle determina a sua
volta l’ordine di riproduzione.
o Nel caso di file audio su un CD-R, i file di tutte le cartelle sul primo livello verranno riprodotti, quindi verranno
riprodotti i file in tutte le cartelle sul secondo livello, quindi quelle sul terzo livello e così via.
o Nel caso di file audio su un dispositivo USB, i file contenuti nella prima cartella sul primo livello verranno
riprodotti, quindi verranno riprodotti i file al secondo livello in quella stessa cartella, quindi i file al terzo livello in
quella stessa cartella e così via. Dopo aver riprodotto tutti i file su tutti i livelli di quella prima cartella, lo stesso
procedimento avrà luogo per i file contenuti nella seconda cartella del primo livello.
53
Page 54

Risoluzione di problemi
In caso di problemi, procedere come segue:
• Assicurarsi che tutti i cavi, i dispositivi, le antenne e/o i media siano collegati in maniera corretta e ben
salda.
• Assicurarsi di utilizzare l’apparecchio come descritto nel presente Guida per l’uso.
• Assicurarsi che gli altri dispositivi o media funzionino correttamente.
• Se si ritiene che l’apparecchio non funzioni come si deve, verificare nella seguente tabella il problema
riscontrato e la relativa soluzione.
Problema Soluzione Si veda:
L’apparecchio non si
accende.
Impossibile inserire il CD
nello slot CD.
La scritta No Disc compare
anche quando è stato
inserito un CD.
Una sezione specifica del CD
non viene riprodotta
correttamente.
La riproduzione non viene
avviata nemmeno dopo aver
premuto il tasto Play.
L’apparecchio non produce
alcun suono o il suono è
distorto.
Assicurarsi che l’apparecchio sia collegato a
una presa elettrica.
Assicurarsi che l’apparecchio sia collegato a
una presa elettrica e che sia acceso.
Premere il tasto Eject per assicurarsi che
nello slot CD non sia già presente un CD.
Premere il tasto Eject per espellere il CD e
inserirlo nuovamente.
Pulire il CD con un panno morbido o con un
detergente per CD in commercio.
Inserire un CD diverso.
Assicurarsi che tutti i cavi, i dispositivi o i
collegamenti dei media siano saldi e corretti.
Assicurarsi che non vi siano cavi danneggiati.
Assicurarsi che le impostazioni
dell’amplificatore, del mixer, ecc. siano
corrette.
Installazione
Installazione
Altre informazioni > CD
Installazione
L’apparecchio non è in grado
di riprodurre un CD-R.
54
Assicurarsi che il CD-R sia stato finalizzato
correttamente.
Assicurarsi che il CD-R sia di buona qualità.
Pulire il CD con un panno morbido o con un
detergente per CD in commercio.
Assicurarsi che il CD impieghi una struttura a
cartelle supportata dall’apparecchio: fino a un
massimo di 300 cartelle (fino a un massimo di
8 livelli, inclusa la radice) e fino a un massimo
di 300 file.
Assicurarsi che il CD-R contenga file MP3.
L’apparecchio non è in grado di riprodurre
altri file su un CD-R.
Altre informazioni > CD
Page 55

Problema Soluzione Si veda:
Il CD non viene espulso.
La scritta No Device
compare anche quando è
stato inserito un dispositivo
USB.
I file presenti su un
dispositivo USB non
compaiono.
Tenere premuto il tasto Eject mentre si
accende l’apparecchio.
Scollegare e ricollegare il dispositivo USB per
assicurarsi che sia inserita in maniera sicura.
Assicurarsi che il dispositivo USB sia un
dispositivo di memoria di massa o compatibile
con MTP.
Assicurarsi che il dispositivo USB siano
formattati con il file system FAT16 o FAT32.
Non utilizzare un hub USB né un cavo di
prolunga USB.
L’apparecchio non fornisce alimentazione ai
dispositivi USB. Se il dispositivo USB richiede
una fonte di alimentazione, collegarlo a una.
Non tutti i dispositivi USB funzioneranno
necessariamente: alcuni potrebbero non
essere riconosciuti.
Assicurarsi che i file siano in un formato
supportato. I file non supportati da questo
apparecchio non compaiono.
Altre informazioni >
Dispositivi USB
Altre informazioni >
Dispositivi USB
I file presenti su un
dispositivo USB non
suonano.
I nomi dei file non
compaiono adeguatamente.
Assicurarsi che il dispositivo USB impieghino
una struttura a cartelle supportata
dall’apparecchio: fino a un massimo di 999
cartelle (fino a un massimo di 8 livelli, inclusa
la radice) e fino a un massimo di 999 file.
Se il dispositivo USB sono suddivisi in
partizioni, assicurarsi che i file si trovino nella
prima partizione. L’apparecchio non mostrerà
altre partizioni.
Assicurarsi che i file siano in un formato
supportato. I file non supportati da questo
apparecchio non compaiono.
Assicurarsi che i file non siano protetti da
copyright. L’apparecchio non può riprodurre
file protetti da copyright.
Assicurarsi che i file impieghino unicamente i
caratteri supportati. I caratteri non supportati
saranno sostituiti da “.”
Altre informazioni >
Dispositivi USB
Altre informazioni >
Dispositivi USB
55
Page 56

Benutzerhandbuch (Deutsch)
Einführung
Vielen Dank für den Kauf des PMD-100CD. Bei Marantz Professional schätzen wir Leistung und Zuverlässigkeit
- genau wie Sie. Darum entwerfen wir unsere Geräte stets nur mit einem einzigen Ziel vor Augen: Ihre
Anwendung so gut wie möglich zu unterstützen.
Lieferumfang
PMD-100CD
Stromkabel
Fernbedienung
RCA-Kabel
Benutzerhandbuch
Sicherheits- und Garantieinformationen
Kundendienst
Für die neuesten Informationen zu diesem Produkt (Dokumentation, technische Daten, Systemanforderungen,
Informationen zur Kompatibilität etc.) und zur Produktregistrierung besuchen Sie marantzpro.com.
Für zusätzlichen Produkt-Support besuchen Sie marantzpro.com/support.
56
Page 57

A
V
V
Sicherheitshinweise
Bitte beachten Sie auch das mitgelieferte Handbuch für Sicherheitshinweise und Garantieinformationen.
Bevor Sie das Gerät
einschalten:
Richtige Belüftung:
Über Kondensation:
orsichtsmaßnahmen
bei der Verwendung von
Mobiltelefonen:
Sorgen Sie dafür, dass alle Anschlüsse sicher und korrekt sind und dass
keine Probleme mit den Verbindungskabeln bestehen.
uch wenn das Gerät ausgeschaltet ist, werden einige Schaltkreise mit
Strom versorgt. Wenn das Gerät längere Zeit nicht benutzt wird, ziehen Sie
das Netzkabel aus der Steckdose.
Wird das Gerät über längere Zeit in einem Raum aufbewahrt, der nicht gut
belüftet oder voller Zigarettenrauch, Staub usw. ist, kann die Oberfläche des
optischen Lesekopfes schmutzig werden, wodurch es zu Fehlfunktionen
kommen kann.
Wenn zwischen dem Geräteinneren und der Umgebung große
Temperaturunterschiede bestehen, kann sich Kondenswasser im Inneren des
Gerätes bilden, wodurch das Gerät nicht ordnungsgemäß funktioniert. In
solchen Fällen lassen Sie das Gerät ausgeschaltet ein bis zwei Stunden
ruhen und warten bis sich die Temperaturunterschiede angeglichen haben
bevor Sie das Gerät wieder verwenden.
Die Verwendung eines Mobiltelefons in der Nähe dieses Geräts kann
Störgeräusche verursachen. Wenn dies geschieht, bewegen Sie das
Mobiltelefon weiter weg vom Gerät, wenn Sie es verwenden.
Transport des Gerätes:
Zur Pflege:
Warnungen zur Rackmontage:
(Erforderliche Rack-Spezifikationen
für die Montage des Geräts in
einem Rack)
Rack-Montage:
Bevor Sie das Gerät bewegen, schalten Sie es aus und ziehen das Netzkabel
aus der Steckdose. Als nächstes ziehen Sie die Verbindungskabel von den
anderen Geräten ab.
Wischen Sie das Gehäuse und das Panel mit einem weichen Tuch ab.
Folgen Sie den Anweisungen, wenn Sie einen chemischen Reiniger
verwenden.
erwenden Sie weder Benzol, Verdünner, Insektengift oder andere
organische Lösungsmittel zur Reinigung des Geräts. Diese Materialien
können Materialveränderungen und Entfärbungen verursachen.
EIA-Standard 19”-Rack (48.3cm)
Kompatibel mit 1U-Rack-Größe
Rack mit Führungsschiene oder Regalbrett, das das Gerät tragen kann
Dieses Produkt funktioniert auch dann noch
ordnungsgemäß, wenn der Player in einem 10°
10° Maximum
Winkel von der vertikalen Ebene montiert wird.
Wenn das Gerät zu stark gekippt wird, kann die
Disc jedoch nicht richtig entnommen oder
eingelegt werden. (Siehe Bild.)
Gerät
57
Page 58

Funktionen
Vorderseite
9
4
1
1. Ein-/Ausschalter: Drücken Sie diese Taste, um das Gerät ein-/auszuschalten. Sorgen Sie dafür, dass AC In ordnungsgemäß mit
einer Steckdose verbunden ist. Schalten Sie das Gerät während der Medienwiedergabe nicht aus - dies könnte Ihr Medium
beschädigen.
2. Aux-Eingang: Schließen Sie mit einem 1/8” (3,5 mm) TRS-Kabel ein optionales Gerät an diesen Eingang an. Siehe Betrieb >
Audiowiedergabe über ein externes Gerät für weitere Informationen.
3. USB-Port: Schließen Sie ein Massenspeichergerät der USB-Klasse an diesen Port an.
4. CD-Slot: Legen Sie eine CD in diesen Slot ein. Siehe Betrieb > Wiedergabe von Audio-CDs für weitere Informationen.
5. Source: Drehen Sie den Knopf, um den Medienwiedergabemodus auszuwählen: CD, USB oder Aux. Siehe Betrieb > Auswahl des
Medien-Wiedergabemodus für weitere Informationen.
6. Taste Wiederholen: Im CD- oder USB-Modus drücken Sie diese Taste, um zwischen den Wiederholungs-Modi zu wechseln:
Repeat One
Informationen.
Taste Wiedergabebeginn beim Einschalten: Halten Sie diese Taste, um diese Funktion ein- oder auszuschalten. Siehe Betrieb >
Weitere Funktionen > Wiedergabebeginn beim Einschalten für weitere Informationen.
13
6
, Repeat All , Repeat Ordner , und Repeat Off. Siehe Betrieb > Wiedergabe von Audio-CDs für weitere
10
7
8
11
12
3
5
17
14
15
16
18
2
7. Taste Wiedergabemodus: Drücken Sie diese Taste im CD-Modus, um durch die Zufalls FLD/Wiedergabemodi Normal
und Zufallswiedergabe zu blättern.
Text-Taste : Drücken Sie diese Taste im CD- oder USB-Modus, um in der Anzeige zwischen Dateinamen und anderen
Textinformationen zu wechseln.
8. Sperrtaste: Halten Sie diese Taste gedrückt, um Panel Sperren ein- und auszuschalten. Siehe Betrieb > Weitere Funktionen >
Panel Sperren für weitere Informationen.
9. Zeit-Taste: Im CD- oder USB-Modus können Sie diese Taste drücken, um den Zeitmodus am Display umzuschalten. Siehe Betrieb
> Wiedergabe von Audio-CDs oder Wiedergabe von Audiodateien für weitere Informationen.
10. Ordner-Taste: Halten Sie diese Taste gedrückt, um einen Ordner auszuwählen.
11. Auswurftaste: Drücken Sie diese Taste, um die CD aus dem Slot auszuwerfen. Um ein Auswerfen der CD zu erzwingen, schalten Sie
das Gerät aus und halten dann die Auswurftaste gedrückt während Sie das Gerät einschalten. Um den erzwungenen Auswurfmodus
zu verlassen, schalten Sie das Gerät aus.
12. Display: Dieses Display zeigt die aktuelle Funktion des Gerätes. Siehe Display für weitere Informationen.
13. Fernbedienungssensor: Um die Fernbedienung zu verwenden, richten Sie sie auf diesen Sensor.
Hinweis: Wenn der Fernbedienungssensor direktem Sonnenlicht, starkem künstlichen Licht (wie etwa von wechselgerichteten
Neonlichtlampen) oder Infrarotlicht ausgesetzt ist, kann es sein, dass das Gerät oder die Fernbedienung nicht richtig funktionieren.
14. Suchtasten: Halten Sie eine dieser Tasten im CD- oder USB-Modus gedrückt, um zurückzuspulen/vorzuspulen. Wird der Track in 5-
facher Wiedergabegeschwindigkeit zurückgespult/vorgespult.
15. Stopp-Taste: Drücken Sie diese Taste, um die Wiedergabe zu stoppen. Um die aktuelle Firmware-Version zu sehen, halten Sie die
Stopp-Taste beim Einschalten gedrückt.
16. Taste Wiedergabe/Pause: Drücken Sie diese Taste, um die Wiedergabe zu starten/wieder aufzunehmen oder zu pausieren.
17. Zifferntasten (0-9): Drücken Sie im CD-Modus auf eine dieser Tasten, um den wiederzugebenden Track direkt auszuwählen. Wenn
die Tracknummer zweistellig ist, drücken Sie die Tasten nacheinander (z.B. 1 und dann 2 für Track 12). Siehe Betrieb > Wiedergabe
von Audio-CDs für weitere Informationen.
18. Jog-Rad: Drehen Sie diesen Drehregler, um durch die im Display angezeigten Optionen zu blättern. Drücken Sie auf diesen
Drehregler, um die Auswahl zu bestätigen. Im CD- und USB-Modus wird dies verwendet, um Tracks zu suchen und auszuwählen.
58
, Einzel S
Page 59

Display
1. Medientyp: Dies sind die aktuell ausgewählten Medien: CD, USB oder Aux.
Siehe Betrieb > Auswahl des Medien-Wiedergabemodus für weitere
Informationen.
2. Wiedergabesymbol: Dies zeigt verschiedene Symbole, um den aktuellen
Wiedergabestatus anzuzeigen:
Wiedergabe Zurückspulen
Pause Schnellvorlauf
Gestoppt
3. Information: Dies zeigt zusätzliche Informationen über die abgespielten Medien.
TRK Elapsed: Verstrichene Zeit
TRK Remain: Verbleibende Zeit
DISC Elapsed: Verstrichene Gesamtzeit (nur für den CD-Modus)
DISC Remain: Verbleibende Gesamtzeit (nur für CD-Modus)
4. Track-/Dateinummer: Dies ist die Nummer des Tracks oder der Datei.
5. Funktionssymbole: Dies zeigt verschiedene Symbole, um diese aktuellen Funktionen anzugeben:
Zufallswiedergabe (siehe Betrieb > Wiedergabe von Audio-CDs für weitere Informationen.)
23
1
4
7
56
Repeat One (siehe Betrieb > Wiedergabe von Audio-CDs für weitere Informationen.)
Repeat All (siehe Betrieb > Wiedergabe von Audio-CDs für weitere Informationen)
Wiedergabebeginn beim Einschalten (Siehe Betrieb > Weitere Funktionen > Wiedergabebeginn
beim Einschalten für weitere Informationen)
6. Zeit: Zeigt an, wieviel Zeit im CD- und USB-Modus verstrichen ist oder verbleibt und wird im Format hh:mm:ss
(Stunden, Minuten und Sekunden).
Siehe Betrieb > Wiedergabe von Audio-CDs für weitere Informationen.
7. Ordneransicht
Panel Sperren (siehe Betrieb > Weitere Funktionen > Panel Sperren für weitere Informationen)
59
Page 60

Rückseite
2
1
1. Ausgänge (unsymmetrisch RCA): Diese Ausgänge senden die Audiosignale von einer CD, einem USB-Gerät
(Massenspeicher-Klasse) und einem Gerät, das mit dem Aux In verbunden ist. Verwenden Sie Cinch-Kabel, um externe
Lautsprecher, Soundsysteme etc. mit diesen Ausgängen zu verbinden. Siehe Setup für weitere Informationen.
2. Ausgänge (symmetrisch XLR): Diese Ausgänge senden die Audiosignale von einer CD, einem USB-Gerät
(Massenspeicher-Klasse) und einem Gerät, das mit dem Aux In verbunden ist. Verwenden Sie XLR-Kabel, um externe
Lautsprecher, Soundsysteme etc. mit diesen Ausgängen zu verbinden. Siehe Setup für weitere Informationen.
3. AC In: Verwenden Sie das mitgelieferte Netzkabel, um diesen Eingang mit einer Steckdose zu verbinden. Siehe Setup
für weitere Informationen.
4. USB-Port: Dieser USB-Port dient der Aktualisierung der Geräte-Firmware. Der Schalter „Aktualisieren/Normal“ wird
verwendet, um den Modus für den USB-Anschluss der Firmware zu aktualisieren. Wenn Sie das Gerät aktualisieren,
setzen Sie diesen Schalter auf die Position "Aktualisieren". Bei normalem Betrieb sollte dieser Schalter in der Position
Normal belassen werden.
4
3
Fernbedienung
1. Stummschalten: Schaltet den Ton der Audioausgängen stumm.
2. USB: Wechselt in den USB-Modus.
3. AUX: Wechselt in den Aux-Modus.
4. CD: Wechselt in den CD-Modus.
5. Wiedergabe: Wiedergabe von Audio von einer CD oder einem Bluetooth-Gerät.
6. Pause: Pausiert die Wiedergabe von Audio von einer CD oder USB-Stick.
7. Stopp: Stoppt die Wiedergabe von CD oder USB-Stick.
8. Auswerfen: Zum Auswerfen oder Einführen einer CD.
9. Suche Rückwärts: Halten Sie diese Taste, um rückwärts durch eine CD oder USB-
Tracks zu suchen.
10. Suche Vorwärts: Halten Sie diese Taste, um vorwärts durch eine CD oder USB-
Tracks zu suchen.
11. Zufallswiedergabe: Drücken Sie diese Taste, um zwischen zufalls
FLD/Zufallswiedergabemodus und Single Play-Modus () im CD- oder USB-Modus zu
wechseln.
12. Skip Back: Drücken um zum vorherigen Track oder Kapitel zu springen.
13. Skip Forward: Drücken um zum nächsten Track oder Kapitel zu springen.
14. Display: Drücken Sie die Taste, um die Helligkeit des Displays einzustellen. Halten Sie
die Taste gedrückt, um das Optionsmenü zu öffnen. Halten Sie die Taste erneut
gedrückt, um das Optionsmenü zu schließen.
15. Wiederholen: Im CD- oder USB-Modus können Sie zwischen Wiederholungsmodi
umschalten: Repeat One, Repeat All und Repeat Off.
16. Zeit: Im CD- oder USB-Modus drücken Sie diese Taste, um bei der Zeitanzeige
zwischen verstrichener Zeit, verbleibender Zeit, total verstrichene Zeit, oder
Gesamtrestzeit (nur im CD-Modus) zu wechseln.
17. Text/Sperre: Drücken Sie diese Taste im CD- oder USB-Modus, um die Anzeige
zwischen Tracknamen und Künstlernamen zu wechseln. Halten Sie diese Taste
gedrückt, um Panel Sperren ein- und auszuschalten.
60
Page 61

Setup
Wichtig: Schließen Sie alle Kabel sicher und ordnungsgemäß an (Stereo-Kabel: links mit links, rechts mit rechts) und
bündeln Sie sie nicht mit dem Netzkabel.
1. Verwenden Sie XLR-Kabel oder ein Stereo-Cinch-Kabel, um die Ausgänge (symmetrisch oder unsymmetrisch) mit
den analogen Eingängen Ihres externen Empfängers, Verstärkers usw. zu verbinden.
2. Nachdem alle Verbindungen hergestellt wurden, verbinden Sie die AC In-Buchse über das mitgelieferte
Netzkabel mit einer Steckdose.
Beispiel
SOURCE SELECT
ZONE 2
ZONE 2
ZONE 3 ZONE 3
ON/OFF
SOURCE
ON/OFF
AUX 1
HDMI 7 5V/1A
INFO
SOURCE STATUS DIMMER
PHONES BACK
QUICK SELECT
OPTION
1 CBL/SAT 3 GAME 4 NETWORK
2 Blu-ray
ENTER
L - AUDIO - R
VIDEO
SETUP
AUX 1
Empfänger, Verstärker usw.
MASTER VOLUME
SETUP MIC
IN-Command
SSEERI
INTEGRATED NETWORK AV RECEIVER
AVR-X4000
Aktivmonitore
Strom
Betrieb
Auswahl des Medien-Wiedergabemodus
So wählen Sie aus, drehen Sie den Source-Knopf:
Um durch die verfügbaren Optionen zu blättern, drücken Sie die Quellen-Taste und drehen Sie den Knopf, um die
Quelle auszuwählen.
• CD: Audio-CD, CD-DA, CD-ROM, MP3 CD, oder CD mit Audio-Dateien (CDR) (siehe Wiedergabe von
Audio-CDs)
• USB: USB-Gerät (Massenspeicher-Klasse) (siehe Wiedergabe von Audiodateien auf einem USB-
Laufwerk)
• Aux: Gerät mit Aux In verbunden (siehe Audiowiedergabe über ein externes Gerät)
Wiedergabe von Audio-CDs
So geben Sie Audio-CDs wieder:
1. Wenn das Gerät ausgeschaltet ist, drücken Sie den Ein-/Ausschalter, um das Gerät einzuschalten.
Wichtig: Legen Sie keine CD ein, wenn das Gerät ausgeschaltet ist. Dies könnte das Gerät beschädigen.
2. Legen Sie eine CD in den CD-Slot. (Halten Sie die CD an den Rändern ohne die bespielte Oberfläche zu
berühren. Achten Sie darauf, dass Ihre Finger beim Einziehen der CD nicht eingeklemmt werden.)
3. Wählen Sie CD als Medientyp (beschrieben im Abschnitt Auswahl des Medien-Wiedergabemodus).
61
Page 62

Die CD wird automatisch abgespielt. Die CD beginnt automatisch mit der Wiedergabe, wenn der Modus "Wiedergabebeginn beim
Einschalten" aktiv ist. (Tracks im ausgewählten Ordner werden unbegrenzt wiederholt)
Im CD-Modus können Sie eine der folgenden Funktionen durchführen:
• Um die Wiedergabe zu starten, fortzusetzen oder zu pausieren, drücken Sie die Taste Wiedergabe/Pause.
• Um die Wiedergabe zu stoppen, drücken Sie die Stopp-Taste.
• Um vor- oder rückwärts durch den Track zu navigieren, halten Sie eine der Suchtasten gedrückt. Wird der Track in
5-facher Wiedergabegeschwindigkeit zurückgespult/vorgespult. Um die Wiedergabe fortzusetzen, lassen Sie die Taste
los.
• Um direkt zu einem Track zu springen:
Drücken Sie eine der Zifferntasten (0–9), um die gewünschte Tracknummer einzugeben. Wenn die Tracknummer
zweistellig ist, drücken Sie die Tasten nacheinander (z.B. 1 und dann 2 für Track 12). Wahlweise drehen Sie das Jog-
Rad, um einen Track auszuwählen und drücken dann das Jog-Rad, um den Track zu laden.
• Um einen Wiederholungs-Modus auszuwählen, drücken Sie die Taste Wiederholen. Dies blättert durch Repeat One
(der gleiche Track wird auf unbestimmte Zeit wiederholt), Repeat All (die Liste aller Tracks wird auf unbestimmte Zeit
wiederholt), Repeat FLD (Tracks im ausgewählten Ordner werden unbegrenzt wiederholt), und Repeat Off (keine
Tracks werden wiederholt).
• Um den Wiedergabemodus zu wählen, drücken Sie die Taste Zuflal (Random). Das Gerät blättert durch Random FLD
(alle Tracks im ausgewählten Ordner werden in zufälliger Reihenfolge wiedergegeben), Random All (alle Tracks auf der
CD werden in zufälliger Reihenfolge wiedergegeben), Single Play (der aktuelle Track wird bis zum Ende gespielt und
dann gestoppt) und Normal (die CD wird ab dem aktuellen Track bis zum Ende wiedergegeben und dann gestoppt).
• Um den Zeitanzeigemodus im Display zu ändern, drücken Sie die Zeit-Taste. Sie blättern so durch TRK Elapsed
verstrichene Zeit des aktuellen Tracks. TRK Remaining: verbleibende Zeit des aktuellen Tracks. DISC Elapsed:
verstrichene Gesamtzeit (nur für den CD-Modus. DISC Remain: Verbleibende Gesamtzeit (nur für CD-Modus).
• Um eine CD auszuwerfen, drücken Sie die Auswurftaste wenn die Wiedergabe gestoppt oder pausiert wird. Beim
Auswerfen der CD zeigt das Display Ejecting. Befindet sich keine Disc im CD Slot, wird No Disc angezeigt.
Wichtig: Bitte lesen Sie den Abschnitt Weitere Informationen > CDs, um mehr über die CD-Typen, die von PMD-100CD
unterstützt werden und mehr über Handhabung und Pflege von CDs zu erfahren. Wenn Sie das Gerät einschalten, halten Sie die
Auswurftaste gedrückt, um den Auswurfmodus zu aktivieren.
62
Page 63

Abspielen von MP3-Dateien auf einer CD
Um MP3-Dateien auf einer CD wiederzugeben:
1. Wenn das Gerät ausgeschaltet ist, drücken Sie den Ein-/Ausschalter, um das Gerät einzuschalten.
Wichtig: Legen Sie keine CD ein, wenn das Gerät ausgeschaltet ist. Dies könnte das Gerät beschädigen.
2. Führen Sie einen der folgenden Schritte aus:
• Legen Sie eine CD in den CD-Slot. (Halten Sie die CD an den Rändern ohne die bespielte Oberfläche zu
berühren. Achten Sie darauf, dass Ihre Finger beim Einziehen der CD nicht eingezwickt werden.)
3. Wählen Sie CD als gewünschten Medientyp: (beschrieben im Abschnitt Auswahl des Medien-
Wiedergabemodus).
4. Wählen Sie eine Audiodatei:
• Um durch die Audiodateien zu blättern, drehen Sie das Jog-Rad am Gerät.
• Um einen Ordner zu öffnen, halten Sie die Taste Ordner 3 Sekunden lang gedrückt und drehen das Jog-
Rad, um einen Ordner auszuwählen. Drücken Sie das Jog-Rad, um in den Ordner zu gelangen und blättern
Sie mit dem Rad, um einen Track auszuwählen. Drücken Sie erneut auf das Rad, um einen Track
auszuwählen und drücken die Taste Wiedergabe/Pause, um den Track zu spielen.
Hinweis: Wenn nach einigen Sekunden nach Öffnen des Ordners kein Track ausgewählt wird, verlässt das
Gerät den Ordner und springt wieder zurück zum zuvor gewählten Track/Ordner.
Im CD- oder USB-Modus können Sie eine der folgenden Funktionen ausführen:
• Um die Wiedergabe zu starten, fortzusetzen oder zu pausieren, drücken Sie die Taste
Wiedergabe/Pause.
• Um die Wiedergabe zu stoppen, drücken Sie die Stopp-Taste.
• Um vor- oder rückwärts durch den Track zu navigieren, halten Sie eine der Suchtasten gedrückt. Wird
der Track in 5-facher Wiedergabegeschwindigkeit zurückgespult/vorgespult. Um die Wiedergabe
fortzusetzen, lassen Sie die Taste los.
• Um die Zufallswiedergabe ein- oder auszuschalten, drücken Sie die Taste Zufall (Random). Das Gerät
blättert durch Random FLD (alle Tracks im ausgewählten Ordner werden in zufälliger Reihenfolge
wiedergegeben), Random All (alle Tracks auf der CD werden in zufälliger Reihenfolge wiedergegeben),
Single Play (der aktuelle Track wird bis zum Ende gespielt und dann gestoppt) und Normal (die CD wird ab
dem aktuellen Track bis zum Ende wiedergegeben und dann gestoppt).
• Um den Uhrzeitanzeigemodus im Display zu ändern, drücken Sie die Zeit-Taste. Sie blättern so durch
Verstrichene Zeit (E verstrichene Zeit des aktuellen Tracks), Verbleibende Zeit (R (verbleibende Zeit des
aktuellen Tracks) und Verbleibende Gesamtzeit (verbleibende Zeit aller Tracks auf der CD).
• Um eine CD auszuwerfen, drücken Sie die Auswurftaste. Beim Auswerfen der CD zeigt das Display
Ejecting. Befindet sich keine Disc im CD Slot, wird No Disc angezeigt.
63
Page 64

Wiedergabe von Audiodateien auf einem USB-Laufwerk
Um Audiodateien von einem USB-Laufwerk zu spielen:
1. Wenn das Gerät ausgeschaltet ist, drücken Sie den Ein-/Ausschalter, um das Gerät einzuschalten.
2. Schließen Sie Ihr USB-Gerät (Massenspeicher-Klasse) an den USB-Anschluss an.
3. Wählen Sie USB als gewünschten Medientyp (beschrieben in Auswahl des Medien-Wiedergabemodus).
4. Wählen Sie eine Audiodatei:
• Um durch die Audiodateien zu blättern, drehen Sie das Jog-Rad am Gerät.
• Um einen Ordner zu öffnen, halten Sie die Taste Ordner 3 Sekunden lang gedrückt und drehen das Jog-
Rad, um einen Ordner auszuwählen. Drücken Sie das Jog-Rad, um in den Ordner zu gelangen und blättern
Sie mit dem Rad, um einen Track auszuwählen. Drücken Sie erneut auf das Rad, um einen Track
auszuwählen und drücken Sie die Taste Wiedergabe/Pause, um den Track zu spielen.
Hinweis: Wenn nach einigen Sekunden nach Öffnen des Ordners kein Track ausgewählt wird, verlässt das
Gerät den Ordner und springt wieder zurück zum zuvor gewählten Track/Ordner.
Im USB-Modus können Sie eine der folgenden Funktionen wählen:
• Um die Wiedergabe zu starten, zu pausieren oder wieder aufzunehmen, drücken Sie die Taste
Wiedergabe/Pause.
• Zum Stoppen der Wiedergabe drücken Sie die Taste Stopp.
• Um vor- oder rückwärts durch den Track zu navigieren, halten Sie eine der Suchtasten gedrückt.
Zunächst wird der Track in 5-facher Wiedergabegeschwindigkeit zurückgespult/vorgespult. Um die
Wiedergabe wieder aufzunehmen, lassen Sie die Taste los.
• Drücken Sie die Taste Ordner, um den Ansichtsmodus zu ändern.
• Um einen anderen Ordner oder Audiodatei auszuwählen, befolgen Sie die in Schritt 4 beschriebenen
Schritte.
• Um verschiedene Titelinformationen im Display anzuzeigen, drücken Sie die Text-Taste. Dies blättert
durch den Dateinamen und andere Textinformationen.
• Um einen Wiederholungs-Modus auszuwählen, drücken Sie die Taste Wiederholen. Dies blättert durch
Repeat One (der gleiche Track wird auf unbestimmte Zeit wiederholt), Repeat All (die Liste aller Tracks wird
auf unbestimmte Zeit wiederholt), Repeat FLD (Tracks im ausgewählten Ordner werden unbegrenzt
wiederholt) und Repeat Off (keine Tracks werden wiederholt).
• Um den Uhrzeitanzeigemodus im Display zu ändern, drücken Sie die Zeit-Taste. Sie blättern so durch
Verstrichen (E verstrichene Zeit des aktuellen Tracks) und Verbleibend (R verbleibende Zeit des aktuellen
Tracks).
• Um ein USB-Gerät zu entfernen, ziehen Sie es vorsichtig aus dem USB-Port, wenn das Gerät nicht spielt.
(Wenn ein USB-Gerät während der Wiedergabe entfernt wird, kann es zu Geräteschäden kommen.)
Wichtig: Alle Tasten außer Ein-/Ausschalter und Auswerfen werden gesperrt/deaktiviert, wenn Sie sich im AuxModus befinden.
64
Page 65

Audiowiedergabe über ein externes Gerät
Um Audio auf einem externen Gerät abzuspielen (z.B. Smartphone, Computer, tragbarer Musik-Player etc.),
das über Aux In angeschlossen ist:
1. Wenn das Gerät ausgeschaltet ist, drücken Sie den Ein-/Ausschalter, um das Gerät einzuschalten.
2. Verbinden Sie den 1/8” (3,5 mm) Stereo/Kopfhörerausgang Ihres externen Geräts mit dem Aux In.
3. Wählen Sie Aux als Medientyp aus (beschrieben im Abschnitt Auswahl des Medien-Wiedergabemodus). Wenn
Ihr externes Gerät angeschlossen ist, erscheint am Display AUX Connected. Falls Ihr externes Gerät
angeschlossen ist, wird AUX Disconnect am Display angezeigt.
4. Um die Wiedergabe zu starten, drücken Sie die Wiedergabe-Taste auf Ihrem externen Gerät.
Wichtig: Alle Tasten außer Ein-/Ausschalter, CD/USB/Aux und Auswurftaste werden gesperrt/deaktiviert.
Zusätzliche Funktionen
Panel Sperren
Verwenden Sie die Panel Lock-Funktion, um versehentliche Änderungen zu vermeiden. Wenn Panel Lock aktiviert ist,
sind alle Tasten mit Ausnahme des Ein-/Ausschalters und der Taste Text/Sperren gesperrt/deaktiviert. (Die
Fernbedienung funktioniert weiterhin normal.)
Um Panel Sperren zu aktivieren oder zu deaktivieren, halten Sie die Taste Text/Sperren gedrückt.
• Bei Aktivierung wird P-Lock ON und
• Bei Deaktivierung erscheint P-Lock OFF am Display und
am Display erscheinen.
wird verschwinden.
Wiedergabebeginn beim Einschalten
Verwenden Sie die Funktion Wiedergabebeginn beim Einschalten, damit das Gerät die Wiedergabe der CD im
Laufwerk automatisch beginnt.
Um den Wiedergabebeginn beim Einschalten zu aktivieren oder zu deaktivieren, halten Sie die Taste Pwr On
Play gedrückt.
• Bei Aktivierung erscheint P-OnPlay On am Display.
• Bei Deaktivierung erscheint P-OnPlay Off am Display.
65
Page 66

Weitere Informationen
CDs
Bei der Wiedergabe von Audio-CDs ist Folgendes zu beachten:
• Das PMD-100CD kann Musik-CDs und CD-R Discs wiedergeben. Beide sind in der Regel mit
dem Compact Disc Digital Audio-Logo gekennzeichnet (siehe Bild).
• Spielen Sie keine Discs in unrunden Formen (herzförmige Discs, achteckige Discs etc.; siehe
Bild) oder Discs, die mit Klebstoff oder Klebeband repariert wurden. Diese können das Gerät
beschädigen.
• Das PMD-100CD kann finalisierte Discs abspielen. (Das Finalisieren ist ein Prozess, der
aufgenommene CD-R Discs auf kompatiblen Playern abspielbar macht.)
• Je nach Software (oder anderen Bedingungen), die zum Brennen der CD verwendet wurde,
kann es sein, dass manche CDs nicht richtig abgespielt werden können.
Bei der Wiedergabe von CDs mit Audiodateien ist Folgendes zu beachten:
• Das Schreibsoftware-Format muss ISO9660 Level 1 sein.
• Sie können bis zu 300 Ordner und bis zu 8 Ordnerebenen (einschließlich Root-Verzeichnis) anlegen.
• Sie können bis zu 300 Audiodateien haben. Wenn die CD mehr als 300 Dateien enthält, kann es sein, dass einige
Audiodateien nicht richtig abgespielt oder richtig angezeigt werden.
• Dateinamen, Ordnernamen und Textzeichen können bis zu 255 Zeichen verwenden. Es können nur Großbuchstaben,
Kleinbuchstaben, Zahlen und Symbole angezeigt werden. Japanischen Dateinamen werden nicht angezeigt.
Dateinamen, die mit einem “.” beginnen, werden nicht angezeigt.
• Urheberrechtlich geschützte Dateien können möglicherweise nicht richtig wiedergegeben und/oder können als
Unbekannte Datei angezeigt werden.
• Je nach Software (oder aufgrund von anderen Faktoren), die für das Brennen der CD verwendet wurde, können einige
Dateien nicht abgespielt oder richtig angezeigt werden.
• Bei der Wiedergabe von Audio-Dateien auf einer CD unterstützt das PMD-100CD folgende Tag-Daten:
o ID3-Tags: Version 1.x und 2.x
o META-Tags: kompatibel mit Track, Interpret und Albumnamen
o Abtastrate: 44,1 kHz
o Bitrate: 32 kbps bis 320 kbps
o Format: MPEG1 Audio Layer 3
o Dateierweiterung: .mp3
Achten Sie darauf, die Disc nicht zu zerkratzen, wenn Sie sie aus der Hülle nehmen. Biegen oder erhitzen
Sie die Disc nicht und vergrößern Sie das Loch in der Mitte der Disc nicht. Beschriften Sie die bedruckte
Seite der Disc nicht und kleben Sie keine neuen Etiketten auf die Disc.
Wenn sich Fingerabdrücke, Schmutz oder Kondensation auf einer Disc sammeln, reinigen Sie sie mit
einem handelsüblichen CD-Reinigungs-Set oder einem weichen, trockenen Tuch. Wischen Sie die CD von
innen nach außen ab und vermeiden Sie kreisende Bewegungen. Verwenden Sie kein Schallplatten-Spray,
Antistatikmittel, Benzol, Verdünner oder andere Lösungsmittel.
Nach der Verwendung der Discs entfernen Sie sie aus dem Gerät und bewahren Sie sie in ihren Hüllen
auf, um sie vor Staub, Kratzern, Verformungen usw. zu schützen. Bewahren Sie die CDs nie an Orten mit
längerer direkter Sonneneinstrahlung auf bzw. an Orten, in denen Sie großer Hitze, Staub, Feuchtigkeit
usw. ausgesetzt sind.
66
Page 67

USB-Geräte
Bei der Wiedergabe von Audiodateien auf einem USB-Gerät ist Folgendes zu beachten:
• Das PMD-100CD lädt angeschlossene USB-Geräte nicht auf und unterstützt keine USB-Hubs oder USB-
Verlängerungskabel.
• Das PMD-100CD unterstützt USB-Geräte, die der Massenspeicher-Klasse angehören oder mit dem MTP
kompatibel sind.
• Das PMD-100CD unterstützt nur FAT16- oder FAT32-Dateisysteme.
• Sie können bis zu 999 Ordner und bis zu 8 Ordnerebenen (einschließlich Root-Verzeichnis) anlegen.
• Sie können bis zu 999 Audiodateien haben. Wenn das USB-Gerät mehr als 999 Dateien enthält, kann es sein,
dass manche Audiodateien nicht richtig abgespielt oder angezeigt werden.
• Dateinamen, Ordnernamen und Textzeichen können bis zu 255 Zeichen verwenden. Es können nur
Großbuchstaben, Kleinbuchstaben, Zahlen und Symbole angezeigt werden. Japanischen Dateinamen werden
nicht angezeigt. Dateinamen, die mit einem “.” beginnen, werden nicht angezeigt.
• Urheberrechtlich geschützte Dateien können möglicherweise nicht richtig wiedergegeben und/oder können als
Unbekannte Datei angezeigt werden.
Bei der Wiedergabe von Audiodateien auf einem USB-Gerät unterstützt das PMD-100CD folgende Tag-Daten:
• ID3-Tags: Version 1.x und 2.x
• Für MP3-Dateien:
o Abtastrate: 44,1 kHz
o Bitrate: 32 kbps bis 320 kbps
o Format: MPEG1 Audio Layer 3
o Dateierweiterung: .mp3
Wiedergabereihenfolge von Audiodateien
Wenn Audiodateien wiedergegeben werden, die in verschiedenen Ordnern gespeichert sind, wird die
Wiedergabereihenfolge der einzelnen Ordner automatisch eingestellt, wenn das Gerät die Medien liest. Die Dateien in
jedem Ordner werden in jener Reihenfolge abgespielt, in der sie dem Medium hinzugefügt wurden. (Diese
Reihenfolge kann auf Ihrem Computer und/oder in der Software anders als auf dem Gerät dargestellt werden.)
Die Ordnerstruktur bestimmt auch die Wiedergabereihenfolge:
o Bei Audiodateien auf einer CD-R werden Dateien in allen Ordnern auf der ersten Ebene abgespielt,
anschließend werden Dateien in allen Ordnern auf der zweiten Ebene abgespielt, dann auf der dritten Ebene usw.
o Bei Audiodateien auf einem USB-Gerät werden Dateien im ersten Ordner auf der ersten Ebene abgespielt,
anschließend Dateien auf der zweiten Ebene im selben Ordner, dann Dateien auf der dritten Ebene im selben
Ordner usw. Nachdem alle Dateien auf allen Ebenen dieses ersten Ordners abgespielt wurden, wird der gleiche
Vorgang für die Dateien im zweiten Ordner auf der ersten Ebene fortgesetzt.
67
Page 68

A
A
Fehlerbehebung
Wenn Sie ein Problem haben, gehen Sie wie folgt vor:
• Sorgen Sie dafür, dass alle Kabel, Geräte, Antennen und/oder Medien richtig und fest angeschlossen sind.
• Achten Sie darauf, dass das Gerät laut vorliegendem Benutzerhandbuch verwendet wird.
• Achten Sie darauf, dass Ihre anderen Geräte oder Medien ordnungsgemäß funktionieren.
• Wenn Sie glauben, dass das Gerät nicht ordnungsgemäß funktioniert, überprüfen Sie die folgende Tabelle
auf Lösungen für das Problem.
Problem Lösung Siehe:
Das Gerät lässt sich nicht
einschalten.
CD kann nicht in den CD-Slot
gelegt werden.
Trotz eingelegter CD erscheint
No Disc.
Ein bestimmter Abschnitt der
CD wird nicht korrekt
wiedergegeben.
Es erfolgt keine Wiedergabe
nachdem die Wiedergabe-
Taste gedrückt wurde.
Das Gerät gibt keinen Ton aus
bzw. der Ton ist verzerrt.
Achten Sie darauf, dass das Gerät an eine
Steckdose angeschlossen ist.
Stellen Sie sicher, dass die Einheit mit einer
Steckdose verbunden ist und dass sie
eingeschaltet ist.
Drücken Sie die Auswurftaste, um
sicherzustellen, dass sich nicht bereits eine CD
im CD-Slot befindet.
Drücken Sie die
uswurftaste, um die CD
auszuwerfen und erneut einzulegen.
Reinigen Sie die CD mit einem trockenen Tuch
oder einem handelsüblichen CD-Reiniger.
Legen Sie eine andere CD ein.
Stellen Sie sicher, dass Kabel, Gerät oder
Medienanschlüsse sicher und korrekt sind.
Achten Sie darauf, dass keine Kabel
beschädigt sind.
Überprüfen Sie, ob die Einstellungen auf Ihrem
Verstärker, Mixer usw. korrekt sind.
Setup
Setup
Weitere Informationen >
CDs
Setup
Das Gerät kann keine CD-R
abspielen.
Stellen Sie sicher, dass die CD-R
ordnungsgemäß finalisiert wurde.
Weitere Informationen >
CDs
Achten Sie darauf, dass die CD-R von guter
Qualität ist.
Reinigen Sie die CD mit einem trockenen Tuch
oder einem handelsüblichen CD-Reiniger.
Sorgen Sie dafür, dass die CD eine
Ordnerstruktur verwendet, die vom Gerät
unterstützt wird: bis zu 300 Ordner (bis zu 8
Ordnerebenen einschließlich Root-Verzeichnis)
und bis zu 300 Dateien.
Stellen Sie sicher, dass die CD-R MP3-Dateien
enthält. Das Gerät kann keine anderen Dateien
auf CD-R abspielen.
Die CD wird nicht ausgeworfen.
Halten Sie die
uswurftaste beim Einschalten
des Gerätes gedrückt.
68
Page 69

Problem Lösung Siehe:
Obwohl ein USB-Gerät
angeschlossen eingelegt ist,
erscheint No Device.
Dateien auf einem USBGerät werden nicht
angezeigt.
Trennen und verbinden Sie das USB-Gerät
erneut und stecken Sie sie erneut ein, um
sicherzustellen, dass sie richtig eingesteckt
ist.
Achten Sie darauf, dass das USB-Gerät der
Massenspeicher-Klasse angehört oder mit
dem MTP kompatibel ist.
Sorgen Sie dafür, dass das USB-Gerät mit
einem FAT16 oder FAT32-Dateisystem
formatiert wurde.
Verwenden Sie keinen USB-Hub oder USBVerlängerungskabel.
Das Gerät versorgt USB-Geräte nicht mit
Strom. Wenn Ihr USB-Gerät eine Stromquelle
benötigt, schließen Sie es an eine an.
Nicht alle USB-Geräte werden funktionieren;
manche werden nicht erkannt.
Stellen Sie sicher, dass es sich bei den
Dateien um ein unterstütztes Dateiformat
handelt. Dateien, die von diesem Gerät nicht
unterstützt werden, werden nicht angezeigt.
Weitere Informationen
> USB-Geräte
Weitere Informationen
> USB-Geräte
Dateien auf einem USBGerät können nicht
wiedergegeben werden.
Die Dateinamen werden
nicht richtig angezeigt.
Allgemeinhinweis zur Konformitätserklärung: Hiermit erklären wir, daß sich das Gerät PMD-100CD in Übereinstimmung mit den
grundlegenden Anforderungen der europäischen Richtlinie 1999/5/EG befindet. Die vollständige EG Konformitätserklärung kann unter
folgender Adresse angefordert werden:
inMusic GmbH
Harkortstrasse 12-32
40880 Ratingen
GERMANY
Stellen Sie sicher, dass das USB-Gerät eine
Ordnerstruktur verwendet, die vom Gerät
unterstützt wird: bis zu 999 Ordner (bis zu 8
Ordnerebenen einschließlich RootVerzeichnis) und bis zu 999 Dateien.
Wenn Ihr USB-Gerät partitioniert ist, stellen
Sie sicher, dass sich die Dateien in der ersten
Partition befinden. Das Gerät wird keine
anderen Partitionen anzeigen.
Stellen Sie sicher, dass es sich bei den
Dateien um ein unterstütztes Dateiformat
handelt. Dateien, die von diesem Gerät nicht
unterstützt werden, werden nicht angezeigt.
Stellen Sie sicher, dass die Dateien nicht
urheberrechtlich geschützt sind. Das Gerät
kann urheberrechtlich geschützte Dateien
nicht abspielen.
Stellen Sie sicher, dass die Dateien nur
unterstützte Zeichen verwenden. Zeichen, die
nicht unterstützt werden, werden mit einem
„.“ ersetzt.
Weitere Informationen
> USB-Geräte
Weitere Informationen
> USB-Geräte
69
Page 70

Appendix (English)
Technical Specifications
Digital Audio System
System
Compatible Media
Supported Device Formats,
File Systems
Media player
CD, USB device (mass storage class)
CD: CD-DA, CD-ROM (ISO9660)
USB: FAT16, FAT32
Supported File Formats MP3:
(in CD or USB Mode)
Number of Channels
Audio Frequency Range
Signal-to-Noise Ratio
Total Harmonic Distortion
Dynamic Range
1 (stereo), 2 (mono)
20 Hz – 20 kHz (+1.0 dB)
> 95 dB (A-weighted)
< 0.01%
> 85 dB
Sample rate: 44.1 kHz
Bit rate: 32 kbps to 320 kbps and VBR
Format: MPEG1 Audio Layer 3
File extension: .mp3
Channel Separation
> 80 dB
70
Page 71

Outputs
Analog Out L/R
(unbalanced)
Type: RCA terminal
Load impedance: > 10 kΩ
Output level: 2 Vrms / at 10 kΩ load
Analog Out L/R (balanced) Type: XLR
Load impedance: > 10 kΩ
Output level: +4 dBu
Inputs
Aux In Type: 1/8” (3.5mm) TRS terminal
Input impedance: > 10 kΩ
Maximum input level: 1 Vrms
Other / General
File/Folder Limits Storage capacity: up to 2 TB
File size: up to 2 GB
File name length: up to 255 characters
Number of files: up to 999 (for 1 folder)
Number of folders: up to 999 folders (including the root directory)
Number of folder levels: up to 8 (including the root directory)
Folder name length: up to 255 characters
Power USA and Canada: 120 V AC, 60 Hz
Europe and Asia Pacific Region: 230 V AC, 50/60 Hz
Japan: 100 V AC, 50/60 Hz
Power consumption: 19 W
Environmental
Conditions
Dimensions
(width x depth x height)
Weight
Operating temperature: 41 – 95 °F (5 – 35 °C)
Operating humidity: 25 – 85%, no condensation
19.00” x 13.66” x 1.73” / 483 x 347 x 44 mm (with rack ears)
17.09” x 13.66” x 1.73” / 434 x 347 x 44 mm (without rack ears)
7.94 lbs. / 3.6 kg
Trademarks & Licenses
Marantz is a trademark of D&M Holdings Inc., registered in the U.S. and other countries. Marantz Professional products are
produced by inMusic Brands, Inc., Cumberland, RI 02864, USA. All other product names, company names, trademarks, or trade
names are those of their respective owners.
71
Page 72

72
Page 73

marantzpro.com
Manual Version 1.0
 Loading...