

Page 1

Model ZS5300 User Guide
Multi Zone Selector
R
Page 2

CAUTION
RISK OF ELECTRIC SHOCK
DO NOT OPEN
CAUTION: TO REDUCE THE RISK OF ELECTRIC SHOCK,
DO NOT REMOVE COVER (OR BACK)
NO USER-SERVICEABLE PARTS INSIDE
REFER SERVICING TO QUALIFIED SERVICE PERSONNEL
The lightning flash with arrowhead symbol within an equilateral
triangle is intended to alert the user to the presence of
uninsulated “dangerous voltage” within the product’s enclosure
that may be of sufficient magnitude to constitute a risk of
electric shock to persons.
The exclamation point within an equilateral triangle is intended
to alert the user to the presence of important operating and
maintenance (servicing) instructions in the literature
accompanying the product.
WARNING
TO REDUCE THE RISK OF FIRE OR ELECTRIC SHOCK, DO NOT EXPOSE THIS
PRODUCT TO RAIN OR MOISTURE.
CAUTION: TO PREVENT ELECTRIC SHOCK, MATCH WIDE BLADE OF PLUG TO
WIDE SLOT, FULLY INSERT.
ATTENTION: POUR ÉVITER LES CHOC ÉLECTRIQUES, INTRODUIRE LA LAME LA
PLUS LARGE DE LA FICHE DANS LA BORNE CORRESPONDANTE
DE LA PRISE ET POUSSER JUSQU’AU FOND.
NOTE TO CATV SYSTEM INSTALLER:
This reminder is provided to call the CATV (Cable-TV) system installer’s attention to Section 820-40 of the NEC which
provides guidelines for proper grounding and, in particular, specifies that the cable ground shall be connected to the
grounding system of the building, as close to the point of cable entry as practical.
Page 3

This product was designed and manufactured to meet strict
quality and safety standards. There are, however, some
installation and operation precautions which you should be
particularly aware of.
1. Read Instructions – All the safety and operating instructions
should be read before the product is operated.
2. Retain Instructions – The safety and operating instructions
should be retained for future reference.
3. Heed Warnings – All warnings on the product and in the
operating instructions should be adhered to.
4. Follow Instructions – All operating and use instructions
should be followed.
5. Cleaning – Unplug this product from the wall outlet before
cleaning. Do not use liquid cleaners or aerosol cleaners.
Use a damp cloth for cleaning.
6. Attachments – Do not use attachments not recommended
by the product manufacturer as they may cause hazards.
7. Water and Moisture – Do not use this product near waterfor example, near a bath tub, wash bowl, kitchen sink, or
laundry tub, in a wet basement, or near a swimming pool,
and the like.
8. Accessories – Do not place this product on an unstable
cart, stand, tripod, bracket, or table. The product may fall,
causing serious injury to a child or adult, and serious
damage to the product. Use only with a cart, stand, tripod,
bracket, or table recommended by the manufacturer, or
sold with the product. Any mounting of the product should
follow the manufacturer’s instructions, and should use a
mounting accessory recommended by the manufacturer.
9. A product and cart combination should be
moved with care. Quick stops, excessive
force, and uneven surfaces may cause the
product and cart combination to overturn.
10.Ventilation – Slots and openings in the cabinet are provided
for ventilation and to ensure reliable operation of the product
and to protect it from overheating, and these openings must
not be blocked or covered. The openings should never be
blocked by placing the product on a bed, sofa, rug, or other
similar surface. This product should not be placed in a built-in
installation such as a bookcase or rack unless proper
ventilation is provided or the manufacturer’s instructions
have been adhered to.
11.Power Sources – This product should be operated only
from the type of power source indicated on the marking label.
If you are not sure of the type of power supply to your home,
consult your product dealer or local power company. For
products intended to operate from battery power, or other
sources, refer to the operating instructions.
12.Grounding or Polarization – This product may be
equipped with a polarized alternating-current line plug (a
plug having one blade wider than the other). This plug will fit
into the power outlet only one way. This is a safety feature.
If you are unable to insert the plug fully into the outlet, try
reversing the plug. If the plug should still fail to fit, contact
your electrician to replace your obsolete outlet. Do not
defeat the safety purpose of the polarized plug.
13.Power-Cord Protection – Power-supply cords should be
routed so that they are not likely to be walked on or pinched
by items placed upon or against them, paying particular
attention to cords at plugs, convenience receptacles, and
the point where they exit from the product.
14.Protective Attachment Plug – The product is equipped
with an attachment plug having overload protection. This is
a safety feature. See Instruction Manual for replacement or
resetting of protective device. If replacement of the plug is
required, be sure the service technician has used a
replacement plug specified by the manufacturer that has
the same overload protection as the original plug.
15.Outdoor Antenna Grounding – If an outside antenna or
cable system is connected to the product, be sure the
antenna or cable system is grounded so as to provide
some protection against voltage surges and built-up static
charges. Article 810 of the National Electrical Code,
ANSI/NFPA 70, provides information with regard to proper
grounding of the mast and supporting structure, grounding
of the lead-in wire to an antenna discharge unit, size of
grounding conductors, location of antenna-discharge unit,
connection to grounding electrodes, and requirements for
the grounding electrode. See Figure 1.
Figure 1
EXAMPLE OF ANTENNA GROUNDING AS PER
NATIONAL ELECTRICAL CODE, ANSI/NFPA 70
IMPORTANT SAFETY
INSTRUCTIONS
READ BEFORE OPERATING EQUIPMENT
ANTENNA
LEAD IN WIRE
ANTENNA
DISCHARGE
UNIT(NEC
SECTION 810-20)
GROUNDING
CONDUCTORS
(NEC SECTION
810-21)
POWER SERVICE GROUNDING
ELECTRODE SYSTEM (NEC
ART 250, PART H)
GROUND
CLAMP
ELECTRIC SERVICE
EQUIPMENT
GROUND CLAMPS
NEC - NATIONAL ELECTRICAL CODE
This Class B digital apparatus complies with
Canadian ICES-003.
Cet appareil numérique de la Classe B est
conforme à la norme NMB-003 du Canada.
Page 4

16.Lightning – For added protection for this product during a
lightning storm, or when it is left unattended and unused for
long periods of time, unplug it from the wall outlet and
disconnect the antenna or cable system. This will prevent
damage to the product due to lightning and power-line
surges.
17.Power Lines – An outside antenna system should not be
located in the vicinity of overhead power lines or other
electric light or power circuits, or where it can fall into such
power lines or circuits. When installing an outside antenna
system, extreme care should be taken to keep from
touching such power lines or circuits as contact with them
might be fatal.
18.Overloading – Do not overload wall outlets, extension
cords, or integral convenience receptacles as this can
result in a risk of fire or electric shock.
19.Object and Liquid Entry – Never push objects of any kind
into this product through openings as they may touch
dangerous voltage points or short-out parts that could result
in a fire or electric shock. Never spill liquid of any kind on the
product.
20.Servicing – Do not attempt to service this product yourself
as opening or removing covers may expose you to
dangerous voltage or other hazards. Refer all servicing to
qualified service personnel.
21.Damage Requiring Service – Unplug this product from
the wall outlet and refer servicing to qualified service
personnel under the following conditions:
a. When the power-supply cord or plug is damaged.
b. If liquid has been spilled, or objects have fallen into the
product.
c. If the product has been exposed to rain or water.
d. If the product does not operate normally by following the
operating instructions. Adjust only those controls that are
covered by the operating instructions as an improper
adjustment of other controls may result in damage and will
often require extensive work by a qualified technician to
restore the product to its normal operation.
e. If the product has been dropped or damaged in any way, and
f. When the product exhibits a distinct change in performance
– this indicates a need for service.
22.Replacement Parts – When replacement parts are
required, be sure the service technician has used
replacement parts specified by the manufacturer or have the
same characteristics as the original part. Unauthorized
substitutions may result in fire, electric shock, or other
hazards.
23.Safety Check – Upon completion of any service or repairs
to this product, ask the service technician to perform safety
checks to determine that the product is in proper operating
condition.
24.Wall or Ceiling Mounting – The product should be mounted
to a wall or ceiling only as recommended by the manufacturer.
25.Heat – The product should be situated away from heat
sources such as radiators, heat registers, stoves, or other
products (including amplifiers) that produce heat.
26.Apparatus shall not be exposed to dripping and splashing
and no objects filled with liquids, such as vases, shall be
placed on the apparatus.
Page 5

1
ENGLISH
Introduction......................................................2
Features ...........................................................2
About the keypad ...........................................................3
Accessories .....................................................3
Functional Overview .......................................4
Front panel .....................................................................4
Rear panel......................................................................5
Remote control unit (RC5300ZS)...................................6
ID Code Setup..................................................8
Preparation and Connection ..........................9
Connecting speakers .....................................................9
Connection example ....................................................10
Operation Examples......................................15
Remote Code List .........................................16
Troubleshooting ............................................17
Care and Maintenance ..................................17
Specification ..................................................18
Table of Contents
Page 6

Thank you for purchasing the Marantz ZS5300 Multi
Zone Selector Amplifier.
This remarkable component has been engineered to
provide you with many years of whole house audio
enjoyment.
Please take a few minutes to read this manual
thoroughly before you connect and operate the
ZS5300.
As there are a number of connection and
configurations options, you are encouraged to
discuss your own particular multi zone setup with
your Marantz A/V specialist dealer.
ZS5300 is a 2ch x 3 zones amplifier with Multi-Zone/
Source selector.
• All channels identically designed, complete
discrete construction class-D power amplifier.
To maximize sound performance, a large R-core
power transformer is used.
The power amplifier is designed using discrete,
class-D amplifier construction for all 6 channels.
This assures that the channels are the same
quality and power.
• 3 zone control function
Combining this unit and a keypad, you can
construct a multi-zone system which can control
up to 3 zones.
• ID selector switch which allows for zone
expansion
This unit can be connected in cascade by changing
the ID switch on the rear panel. Up to 3 units can
be connected so the zone system can be
expanded up to 9 zones.
• Power save function by independent power
control
This unit can control the power on/off for each
zone. The power for the un-used zone can be
turned off for power saving capability.
• Party mode
You can direct the same source to all the zones
simultaneously. This is terrific for events like
entertaining. In addition you can control volume
and muting capability.
• Banana plug compatible speaker terminal
The speaker terminals can be connected with
banana plugs directly as well as traditional
speaker cable.
FeaturesIntroduction
2
ENGLISH
Page 7
You can connect the majority of keypads, IR receivers
as well as some control related products available in
the market.
These are examples of systems that have been tested
by Marantz America:
❖ NILES
Keypad : IntelliPad
IR Main System unit : IRP6+
IR Sensor : MS 2
IR Flasher : IRC-2
The Niles logo and IntelliPad are registered trademark
of Niles Audio Corporation.
❖ XANTECH
Keypad : SMARTPAD3
Connecting block : 789-44
IR Sensor : 480-30 Series
IR Emitter : 282M
The Xantech logo and SMARTPAD3 are registered
trademark of Xantech Corporation.
Note:
If you wish to use products that are not listed above,
please contact your authorized Marantz dealer for
possible compatibility issues.
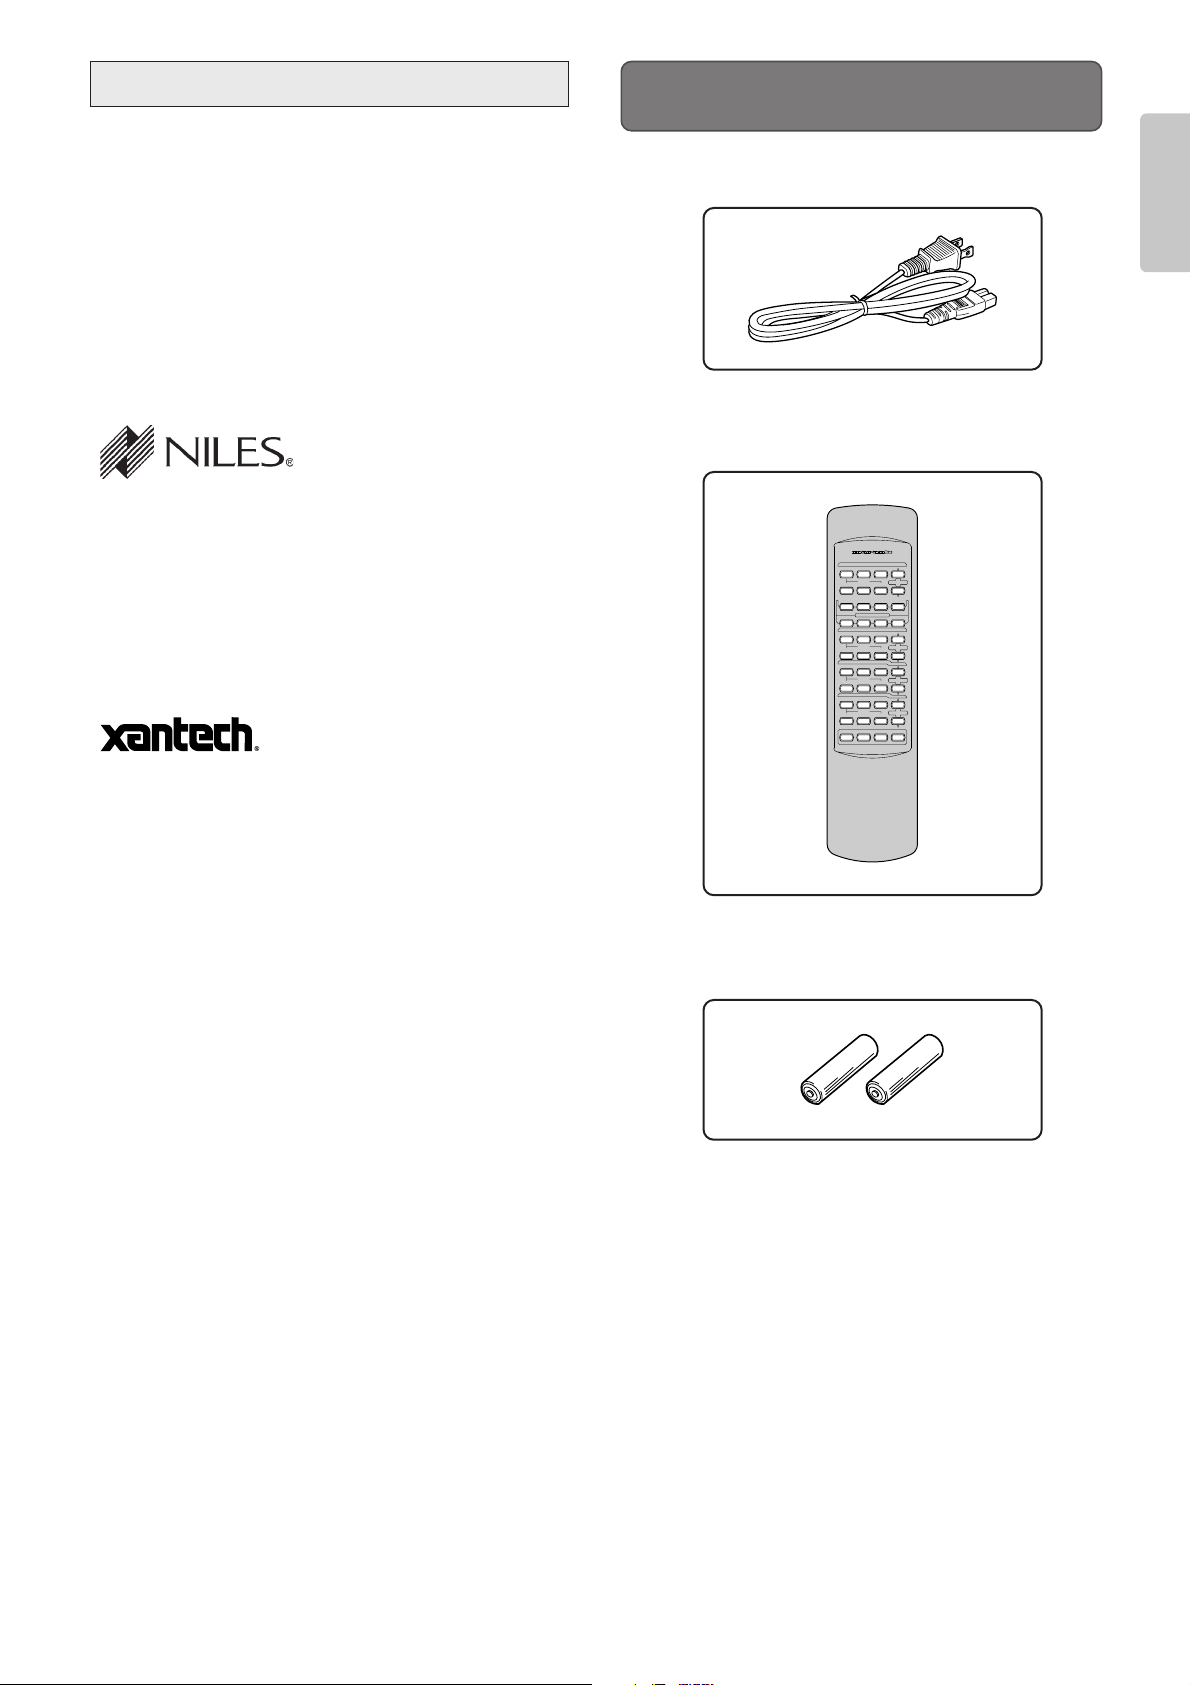
•
AC power cord x 1
• Remote control unit x 1
• AA-size batteries x 2
VOLUME
VOLUME
VOLUME
VOLUME
INPUT
2
ZONE 1
DIRECT
3
1
ON/OFF
INPUT
2
ZONE 2
MUTE
DIRECT
3
1
ON/OFF
ON/OFF
GLOBAL CONTROL
ON
1
DIRECT
ID-2
SET
ID-3
ID-1
INPUT
ZONE 3
ZONE 2 ZONE 3
ZONE 1
GLOBAL
OFF
ON
OFF
MUTE
DIRECT
32
1
REMOTE CONTROLLER RC5300ZS
MUTE
DIRECT POWER
ON/OFF
32
INPUT
MUTE
Accessories
About the keypad
3
ENGLISH
Page 8
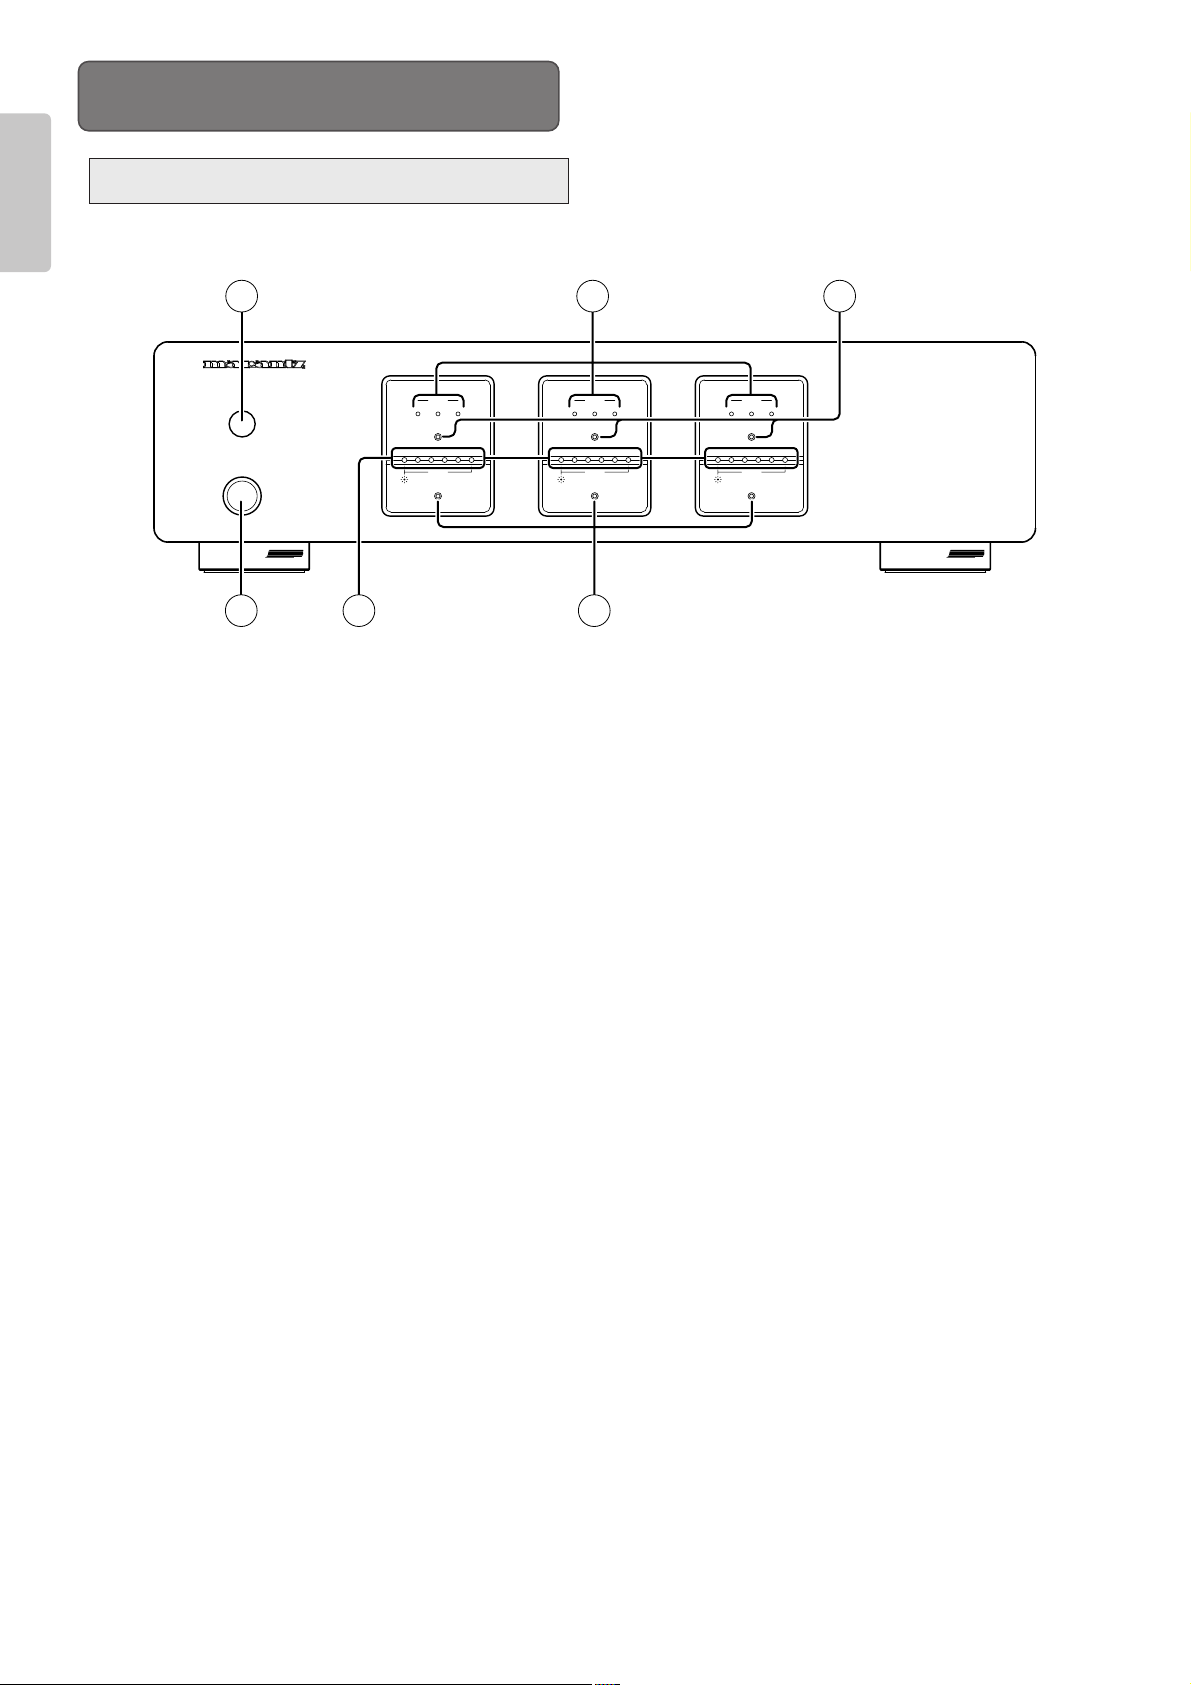
qq
Main power switch (POWER ON / STANDBY)
Press this button to turn the main power on. Press again
to turn it off. When the main power is turned on, Zone1,
Zone2 and Zone3 turn into standby mode and power for
each zone can be switched with the remote control unit
RC5300ZS (provided) or a Keypad (option). For regular
use, please leave the unit powered on.
ww
Volume level indicator (LEVEL)
These indicators show the level of the volume. When all
the indicators light up, the volume is at the maximum level.
When all the indicators lights are off, the volume is at the
minimum level. Volume can be adjusted individually from
each of Zone1, Zone2 and Zone3. Volume adjustment can
be adjusted, with the remote control unit or a Keypad.
Mute indicator (MUTE)
These indicators flash when the sound is muted. When
volume is at the maximum, all the indicators flash. When
the volume is at the minimum, only the first indicator
flashes. Mute can be controlled individually from each of
Zone1, Zone2 and Zone3. Muting can be done with the
remote control unit or a Keypad. If the volume is adjusted
when muted, mute is released.
Caution
When these indicators are flashing, no sound is outputted.
When releasing mute, please check the volume position. If
volume is set too loud, the speakers may be damaged.
ee
Standby indicator (STANDBY)
This indicator lights up when any of the zones are in
standby. Zone1, Zone2 and Zone3 can be in standby
mode independently. Power for each zone can be
controlled with the remote control unit or a Keypad.
rr
Direct indicator (DIRECT)
When the “Zone Direct” input is chosen for the source, this
indicator lights up. The source connected to the “Zone
Direct” terminal for Zone1 can be selected only for Zone1.
The same applies for Zone2 and Zone3. Source selection
can be selected with the remote control unit or a Keypad.
tt
Input indicator (INPUT)
Depending on which input is selected in each zone, the
appropriate INPUT indicator will be illuminated. The Inputs
can be selected by a remote control unit or a Keypad.
yy
IR (Remote control) sensor
This window receives infrared signals from the remote
control unit.
4
ENGLISH
Front panel
Functional Overview
MUTE
LEVEL LEVELLEVEL
MUTE MUTE
DIRECTDIRECT
65432
11
23456
STANDBY
1
ZONE 3
INPUT
32
STANDBY
6543
23
INPUT
ZONE 1
1
2
1
DIRECT
ZONE 2
STANDBY
INPUT
32
1
MULTI ZONE SELECTOR ZS5300
POWER
ON/STANDBY
3
1
5
6
4
2
Page 9
5
ENGLISH
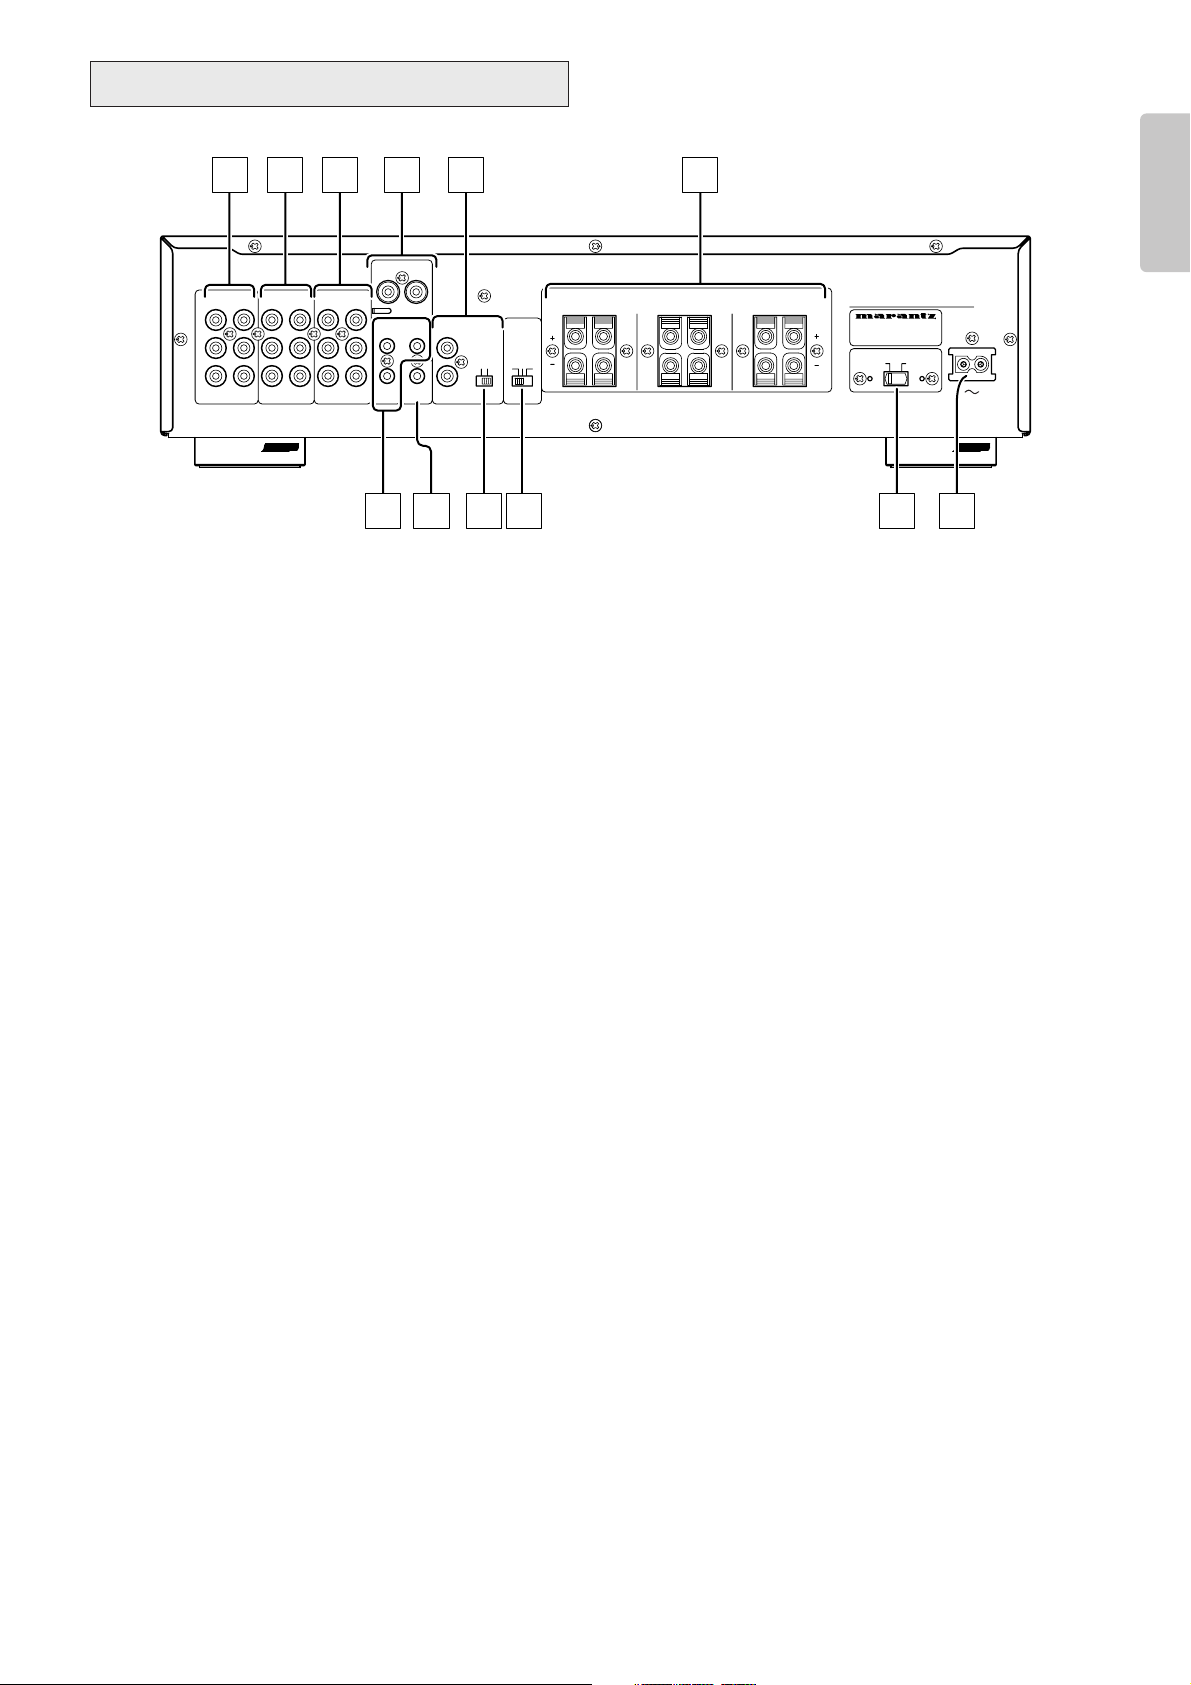
zz
Audio input terminal (AUDIO IN)
Connect the analog audio output from your audio device
(CD player, TV, DVD player, etc.). Up to 3 audio devices
can be connected.
xx
Audio output terminal (AUDIO OUT)
These terminals are designed as an Audio pass through.
They can be used to when cascading one or two other
ZS5300s. Another example might be to share source
components with a dedicated home theater system etc.
cc
Zone direct input terminal (ZONE DIRECT IN)
These terminals are only for their corresponding zone.
Connect the analog audio output terminals from your audio
device (CD player, TV, DVD player, etc.). Although up to 3
devices can be connected each to a different zone, the
device connected to “ZONE DIRECT 1” can be played
only in ZONE 1. The same applies to ZONE DIRECT 2
and ZONE DIRECT 3.
• You can construct a powerful & unique multi-zone
system by connecting the Marantz music server
(DH9300). (
☞
P. 13)
vv
Zone 3 pre output terminal (ZONE 3 PRE OUT)
These terminals are preamplifier output terminals for
Zone 3. These terminals can be connected with other
audio devices such as an external amplifier.
bb
Remote control input / output terminal
(REMOTE CONTROL)
By connecting this unit to another Marantz audio component
using a System control cable, you can remotely operate the
components as a single system.
nn
Speaker output terminal (SPEAKERS)
Connect speakers for each zone.
• Rating of speaker impedance: 6 ohm
mm
Status output terminal (STATUS OUT)
These terminals are DC trigger output terminals to
determine whether power of a zone is on or off.
Connect these terminals to Keypads, etc.
• Rating of status output: 12V 100mA.
,,
Flasher input terminal (FLASHER IN)
This terminal is to control the unit from each zone. Connect
the control signal from a Keypad, etc.
..
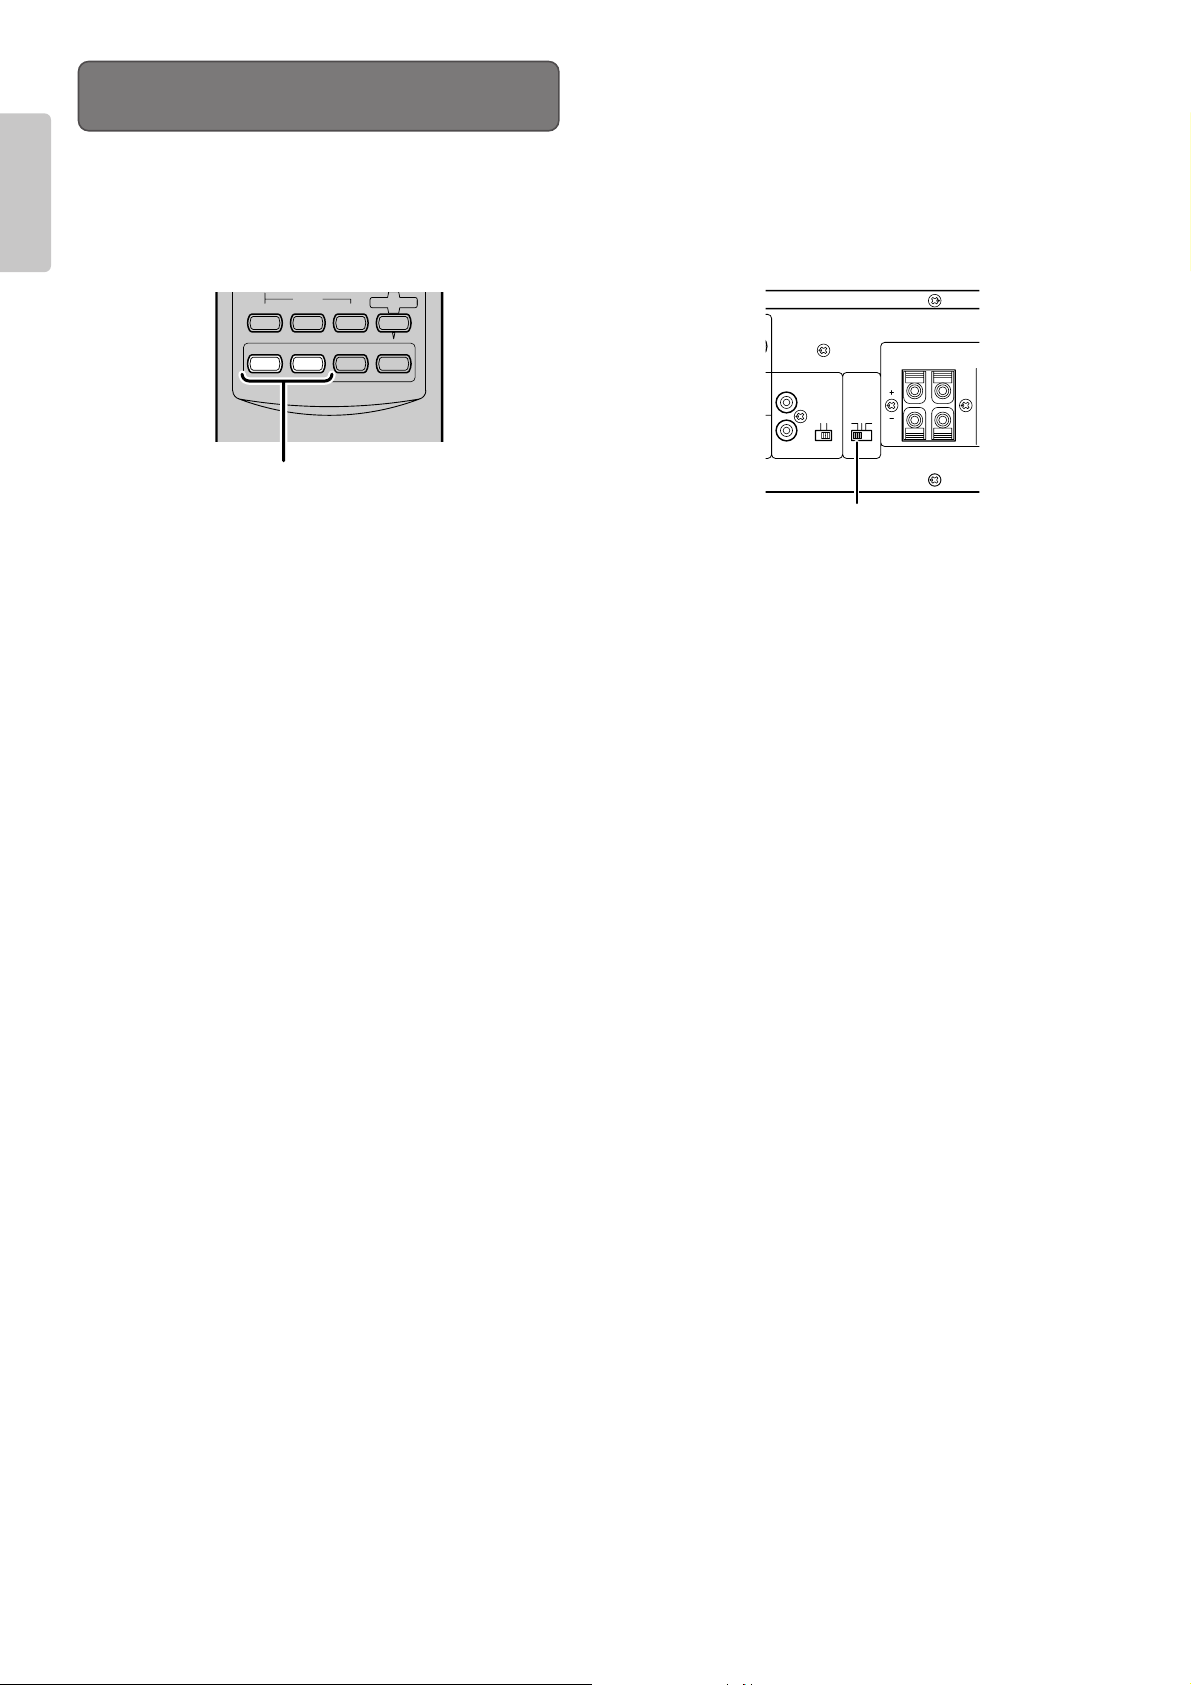
Remote control internal / external switch
(INT. / EXT.)
This switch is to select if the remote sensor on the front
panel work or not. If you use two or more ZS5300s in
cascade connection, set this switch at INT. for the ZS5300
that functions as the maser. Set the switch at EXT. for the
slave ZS5300s.
INT. : Enable the remote sensor.
EXT. : Disable the remote sensor.
⁄⁄00
ID select switch (ID SELECTOR)
When two or three ZS5300s are used, set independent ID
numbers for each. Up to 3 ZS5300s can be connected.
Different ID numbers must be set for each unit.
⁄⁄11
Voltage selector (VOLTAGE SELECTOR)
Select the power voltage of your location. You can select
115V or 230V.
• Be sure to disconnect the power cord when changing
this switch.
⁄⁄22
Power inlet (AC IN)
Plug the power cord into this socket.
CAUTION:
Be sure to use the power cord rating more than 2.5A, 250V
and 18AWG when operating 230V AC voltage.
ZONE
1
R
ZONE
3
3
ZONE
2
FLASHER
REMOTE CONTROL
OUT
IN
2
STATUS OUT
ZONE
1
L
SPEAKERS
(
MINIMUM 6 OHMS
)
R
ZONE
3
L
R
SELECTOR
L
VOLTAGE SELECTOR
3
INT.
EXT.
AUDIO OUT
115V
R
L
IN
AUDIO IN
ID
ZONE
2
230V
SERIAL NO.
ZONE DIRECT IN
R
1
L
ZONE 3 PRE OUT
AC IN
Rear panel
1 2 3 4 5 6
AUDIO IN
1
2
3
ZONE 3 PRE OUT
RRL
AUDIO OUT
ZONE DIRECT IN
LLR
LLR
RRL
STATUS OUT
ZONE
ZONE
2
1
ZONE
FLASHER
3
IN
REMOTE CONTROL
IN
EXT.
OUT
ID
SELECTOR
22113
INT.
ZONE
1
R
SPEAKERS
L
R
(
MINIMUM 6 OHMS
ZONE
2
)
ZONE
3
R
L
L
MODEL NO. ZS5300
VOLTAGE SELECTOR
115V
SERIAL NO.
230V
AC IN
7 8 9 10 11 12
Page 10

q GLOBAL CONTROL buttons
With these buttons you can control volume, source
selection, etc. for all the zones at the same time. If two or
three units are connected in cascade, all the zones can
be controlled at the same time as well.
• GLOBAL DIRECT button
This enables you to select the Zone Direct input
(dedicated to that zone) to be played in all
zones 1, 2, & 3 of all connected ZS5300s.
• GLOBAL INPUT 1, 2, 3 button
This enables you to select the Input 1,2,or 3 to
be played globally with all connected ZS5300s.
• GLOBAL ON / OFF button
This enables you to turn the power on/off for the
all zones of all connected ZS5300s. Press once
to turn on, press again to turn off.
• GLOBAL MUTE button
This enables you to turn the mute on/off for all
connected ZS5300s. Press once to turn mute
on, press again to turn mute off.
• GLOBAL VOLUME button
This enables you to control the volume up/down
for all the connected ZS5300s.
• GLOBAL ON button
This enables you to turn the power on for the all
zones of all connected ZS5300s.
• GLOBAL OFF button
This enables you to turn the power off for the all
zones of all connected ZS5300s.
Remote control unit (RC5300ZS)
w DIRECT POWER button
You can control power for each zone independently with
these buttons.
• ZONE 1 DIRECT ON button
Turn the power on for Zone 1 independently.
• ZONE 1 DIRECT OFF button
Turn the power off for Zone 1 independently.
• ZONE 2 DIRECT ON button
Turn the power on for Zone 2 independently.
• ZONE 2 DIRECT OFF button
Turn the power off for Zone 2 independently.
• ZONE 3 DIRECT ON button
Turn the power on for Zone 3 independently.
• ZONE 3 DIRECT OFF button
Turn the power off for Zone 3 independently
e Buttons for ZONE 1, 2, 3
The descriptions below are common. The button’s
functions are the same for Zone 2 and 3; so only the
buttons for Zone 1 described.
• ZONE 1 DIRECT button
Select the “Zone Direct” input for Zone 1.
• ZONE 1 INPUT 1, 2, 3 buttons
Select the “Input 1” or “Input 2” or “Input 3” for
Zone 1.
• ZONE 1 ON / OFF button
Turn the power on/off for Zone 1.
Press once to turn on, press again to turn off.
• ZONE 1 MUTE button
Turn the mute on/off for Zone 1.
Press once to turn on, press again to turn off.
If volume is adjusted when muted, mute is
turned off.
• ZONE 1 VOLUME button
Control the volume up/down for Zone 1.
r ID setting button
When two or three ZS5300s are connected remote cable
together or used in same area, this allows the setting of
different ID numbers.
See "ID Code Setup" for setting ID code for the remote
control unit. (
☞
P. 8)
Default setting the unit is ID-1.
6
ENGLISH
GLOBAL CONTROL
DIRECT
1
2
DIRECT
DIRECT
3
DIRECT
4
MUTE
ON/OFF
INPUT
1
32
ZONE 2 ZONE 3
ZONE 1
ON
DIRECT POWER
OFF
ZONE 1
ON/OFF
MUTE
INPUT
2
3
1
ZONE 2
MUTE
ON/OFF
INPUT
2
3
1
ZONE 3
MUTE
ON/OFF
INPUT
32
1
ID-2
SET
ID-1
REMOTE CONTROLLER RC5300ZS
VOLUME
GLOBAL
VOLUME
VOLUME
VOLUME
ID-3
ON
OFF
Page 11

7
ENGLISH
❖ Using the remote control unit
1. Remote control
Operate the remote control unit (RC5300ZS) within a
distance of approximately 16 feet (5m) from the IR
(remote control) window on the front of the unit.
If the transmitter is pointed to a direction other than
the IR SENSOR or if there is an obstacle between
them, remote control may not be possible.
• Remote control operating range
2. Loading batteries
Batteries in this remote control unit have a life of
approximately 1 year under normal operating
conditions. When the remote control unit is not to
being used for an extended period of time, remove
the batteries. Also, when you notice that the batteries
are starting to run down, replace them as soon as
possible.
1. Remove the battery cover
Note :
• Do not use the rechargeable batteries(Ni-Cd type).
2. Insert the AA size batteries with correct (+) and
(–) polarity.
3. Close the battery cover until it clicks.
60
Approximately
16 feet (5m)
Remote control unit
ZS5300
Page 12
8
ENGLISH
❖ Setting ID code
Ex.) Set to ID-1
Remote control unit
Press and hold SET, then
Press
ID-1 and release both.
Rear panel of the unit
Set to “1”.
R
33
3
REMOTE CONTROL
OUT
ZONE
1
L
ESPEAKERS (MINIMUM 6 OHMS
)
R
ZONE 3
LR
SELECTOR
L
VOLTAGE SELECTOR
INT.
EXT.
115V
IN
ID
ZONE 2
230V
SERIAL NO.
AC IN
MODEL NO. ZS5300
ID Code Setup
The ZS5300 system can be expanded up to 3 units.
When using 1 unit alone, set the ID switch on the rear panel to “1”.
To set the remote control unit to the ID number of the unit, follow the procedure below.
1. Press the SET button and hold it, then press the ID-1 button , then release both buttons.
2. This remote control unit has been set as ID-1. To set the ID to 2 and 3, follow the same procedure.
3. When the batteries are replaced, the unit defaults to the factory setting of ID-1.
Note:
This is important, because if you have changed ID numbers, you will have to reset the ID number when the
batteries are replaced.
*Default setting for both the remote control unit and the unit is ID-1
INPUT
1
SET
REMOTE CONTROLLER RC5300ZS
VOLUME
32
ID-2
ID-1
ID-3
T
REMOTE CONTROL
R
SELECTOR
IN
INT.
EXT.
OUT
R
ID
22113
L
SP
ZONE
1
Page 13

❖ Before making connections
Be sure to turn the power off for the ZS5300 and other products to be connected to ZS5300 before making
connections.
Please refer the instruction manuals for other products to make sure of the proper connections and terminals.
❖ Keypad
The keypads that can be connected to the unit are keypads and connecting boxes made by NILES and XANTECH
shown below. If you want to use products that are not in the list below or made by other manufacturers, please
contact your authorized Marantz dealer.
• NILES
Keypad : IntelliPad
IR Main System unit : IRP6+
IR Sensor : MS 2
IR Flasher : IRC-2
• XANTECH
Keypad : SMARTPAD3
Connecting block : 789-44
IR Sensor : 480-30 Series
IR Emitter : 282M
Note:
When connecting a Keypad, refer to the instruction manual for the Keypad as well as for this unit.
Preparation and Connection
9
ENGLISH
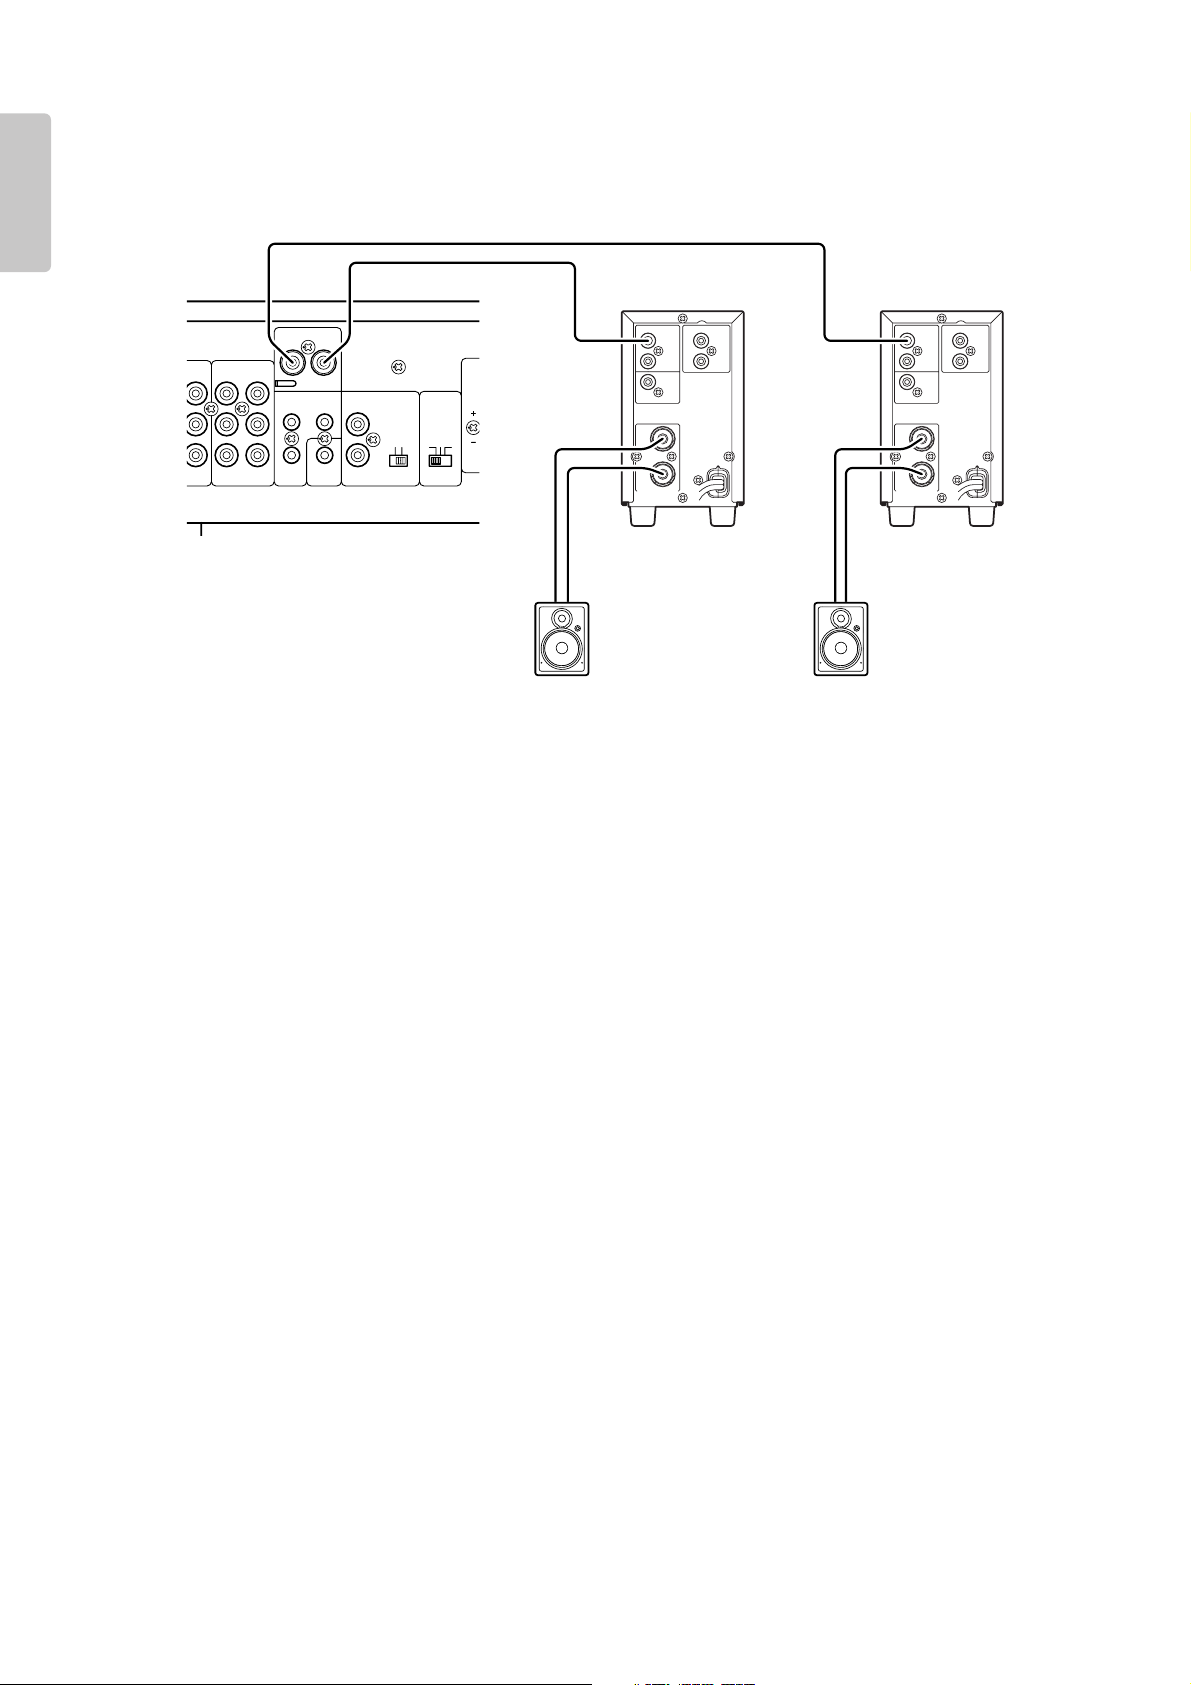
There are 2 ways to connect speakers. See the
pictures below.
❖ Connecting speaker wire
1. Strip away approx. 6/8 inch (20 mm) of wire
insulation.
2. Twist the bared wire ends tight to prevent short
circuits.
3. Insert the bare part of the wire into the hole in the
each terminal as follow.
❖ Connecting banana plug
Banana plug connections are also possible.
Connecting speakers
Approx. 6/8 inch
(20 mm)
Page 14

10
ENGLISH
❖ NILES system
Connection example
ZONE
1
R
ZONE
3
3
ZONE
2
FLASHER
REMOTE CONTROL
OUT
IN
2
STATUS OUT
ZONE
1
L
SPEAKERS
(
MINIMUM 6 OHMS
)
R
ZONE
3
L
R
SELECTOR
L
VOLTAGE SELECTOR
3
INT.
EXT.
AUDIO OUT
115V
R
L
IN
AUDIO IN
ID
ZONE
2
230V
SERIAL NO.
ZONE DIRECT IN
R
1
L
ZONE 3 PRE OUT
AC IN
Remote
Status
Analog
Speaker
IR Data
Flasher
To cascade connection
DC power supply
plugged into an
unswitched AC outlet.
Speaker
Speaker
Speaker
MS-2 IR Sensor in
a remote location
MS-2 IR Sensor in
a remote location
MS-2 IR Sensor in
a remote location
IR Flasher
IRC-2
CD Player
DVD Player
Tuner
HDD Player
Analog
out
Analog
out
Analog
out
Remote
Remote
Remote
Analog
out
ZS5300
AUDIO IN
1
2
3
LLR
+
12
V
POWER
G
N
D
MODEL
AUDIO OUT
D
A
T
A
LLR
+
G
12
N
V
D
IRP6
STATU S
ZONE DIRECT IN
RRL
+
D
12
A
V
T
A
+
ZONE 3 PRE OUT
STATUS OUT
ZONE
ZONE
+
G
D
12
N
A
V
D
T
A
SENSOR INPUTS
FLASHER LEVEL
+-+
RRL
1
2
G
D
N
A
D
T
A
FLASHERS
-
ZONE
FLASHER
IN
+
12
V
+-+
REMOTE CONTROL
3
G
D
N
A
D
T
A
(
SPEAKERS
ZONE
1
R
ID
SELECTOR
IN
22113
INT.
EXT.
OUT
MINIMUM 6 OHMS
ZONE
L
R
)
2
L
ZONE
3
R
L
MODEL NO. ZS5300
VOLTAGE SELECTOR
115V
SERIAL NO.
230V
AC IN
LR
MP00124
+
G
D
12
N
A
V
D
T
A
IR
DATA
OUT
D
G
A
N
T
-
D
A
AMPLIFIER
INPUT
L+ L-R+R
SPEAKER
OUTPUT
L+ L
-
-
R+R
-
Zone-1
In
Out
In
Out
+
12V DC
MARANTZ
MARANTZ
MARANTZ
AMPLIFIER
INPUT
L+ L-R+R-L+ L
AMPLIFIER
INPUT
-
R+R-L+ L-R+R
L+ L
SPEAKER
OUTPUT
-
SPEAKER
OUTPUT
LR
MP00124
R+R
-
Zone-2
LR
MP00124
-
2134
Zone-3
MARANTZ
Page 15

11
ENGLISH
❖ XANTECH system
ZONE
1
R
ZONE
3
3
ZONE
2
FLASHER
REMOTE CONTROL
OUT
IN
2
STATUS OUT
ZONE
1
L
SPEAKERS
(
MINIMUM 6 OHMS
)
R
ZONE
3
L
R
SELECTOR
L
VOLTAGE SELECTOR
3
INT.
EXT.
AUDIO OUT
115V
R
L
IN
AUDIO IN
ID
ZONE
2
230V
SERIAL NO.
ZONE DIRECT IN
R
1
L
ZONE 3 PRE OUT
AC IN
Remote
Status
Analog
Speaker
IR Data
Flasher
To cascade connection
DC power supply
plugged into an
unswitched AC outlet.
Speaker
Speaker
Speaker
480-30 series
IR Receivers
IR Emitter
282M
White stripe
7-foot ribbon cable with
mini plug removed
480-30 series
IR Receivers
White stripe
7-foot ribbon cable with
mini plug removed
480-30 series
IR Receivers
White stripe
7-foot ribbon cable with
mini plug removed
CD Player
DVD Player
Tuner
HDD Player
Analog
out
Analog
out
Analog
out
Remote
Remote
Remote
Analog
out
ZS5300
AUDIO OUT
AUDIO IN
LLR
1
2
3
CONNECTING BLOCK
12VDC
ZONE DIRECT IN
LLR
EMITTERS
789-44
GND
+12VDC
RRL
STATUS
IR IN
ZONE 3 PRE OUT
RRL
STATUS OUT
ZONE
1
ZONE
2
IR
RCVR
ZONE
FLASHER
IN
3
REMOTE CONTROL
IN
OUT
(
SPEAKERS
ZONE
1
R
ID
SELECTOR
22113
INT.
EXT.
MINIMUM 6 OHMS
ZONE
L
R
)
2
L
ZONE
3
R
L
MODEL NO. ZS5300
VOLTAGE SELECTOR
115V
SERIAL NO.
230V
AC IN
LR
PM110
SMART PAD
PROGRAMMABLE MODULE
TM
3
L+ L-R+R-L+ L-R+R
AMPLIFIER
INPUT
SPEAKER
OUTPUT
+12V
IR OUT
STATUS
GND
OUT
+12V
GND
Zone-1
1
In
Out
In
Out
3
24
MARANTZ
MARANTZ
MARANTZ
MARANTZ
PM110
SMART PAD
PROGRAMMABLE MODULE
PM110
SMART PAD
PROGRAMMABLE MODULE
TM
3
L+ L-R+R-L+ L-R+R
AMPLIFIER
L+ L-R+R-L+ L-R+R
AMPLIFIER
INPUT
INPUT
SPEAKER
OUTPUT
TM
3
SPEAKER
OUTPUT
-
-
LR
GND
+12V
IR OUT
STATUS
OUT
+12V
GND
Zone-2
LR
GND
+12V
IR OUT
STATUS
OUT
+12V
GND
Zone-3
Page 16
12
ENGLISH
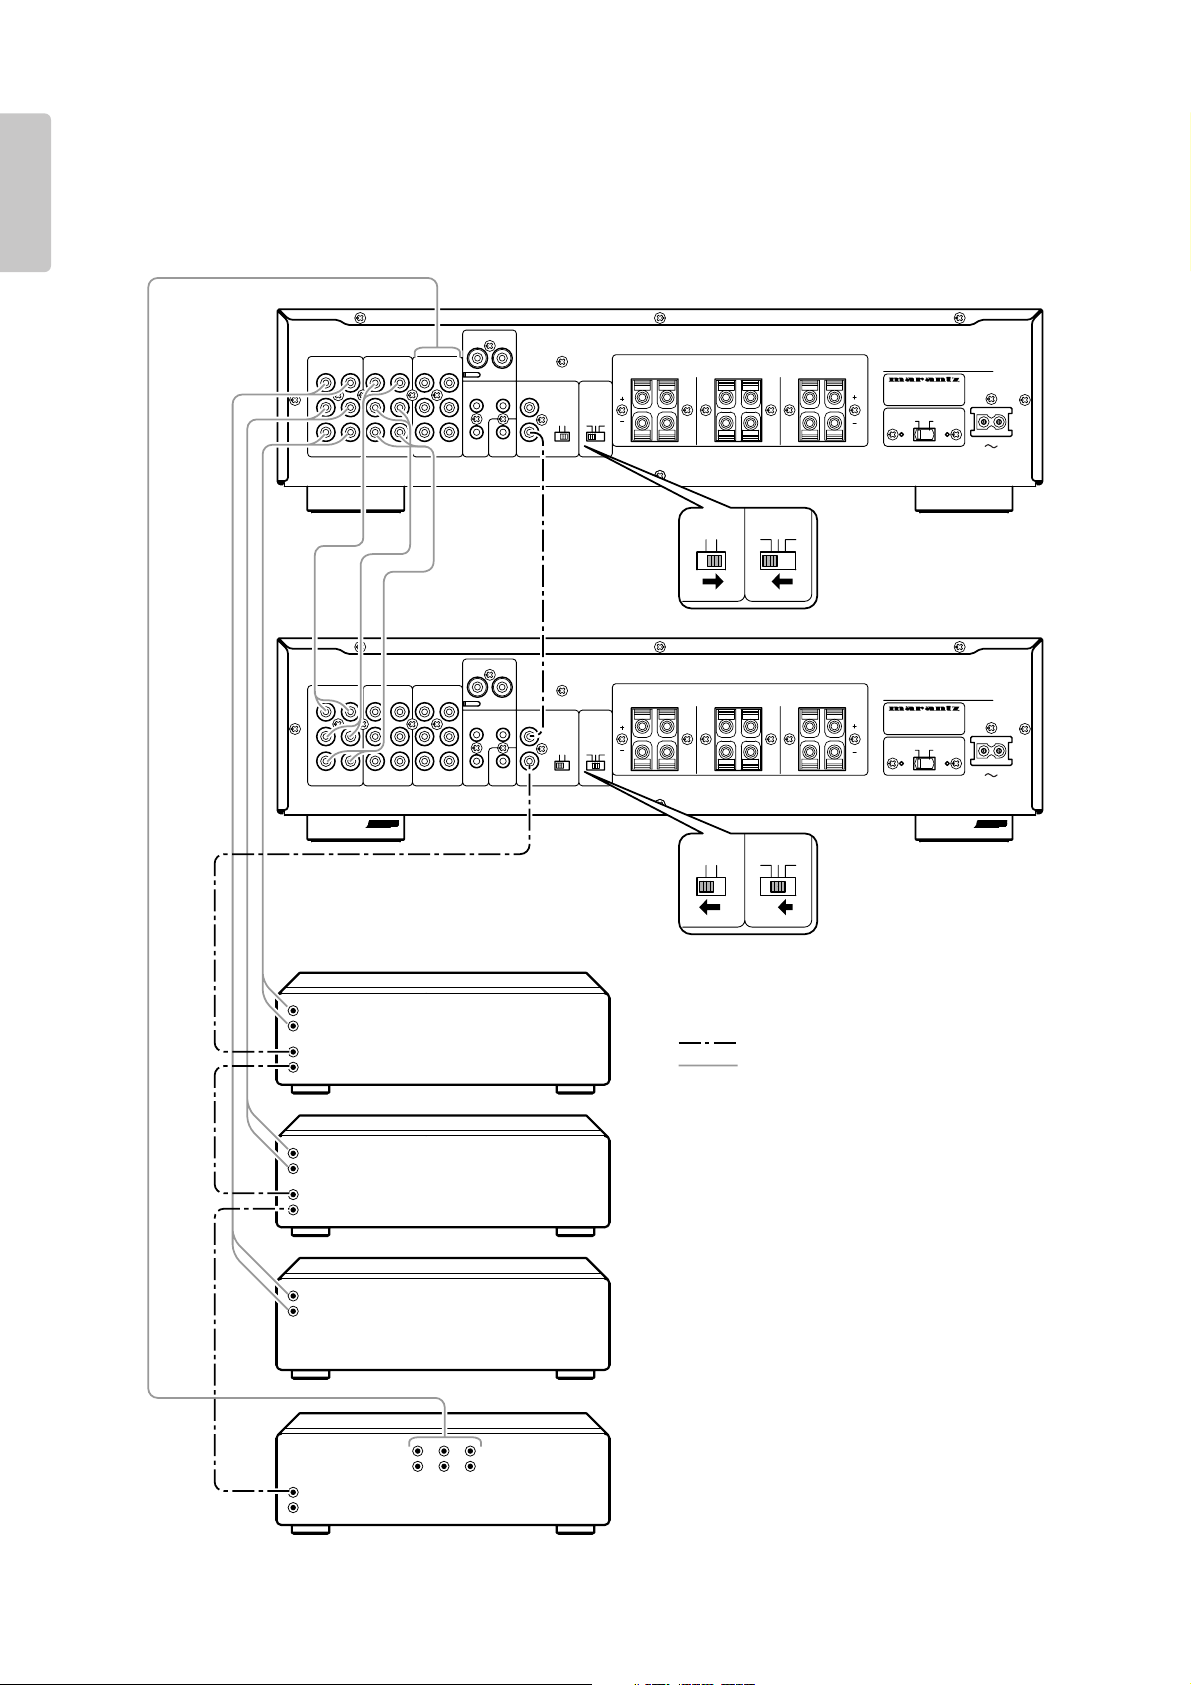
❖ Cascade connection
ZONE
1
R
ZONE
3
3
ZONE
2
FLASHER
REMOTE CONTROL
OUT
IN
2
STATUS OUT
ZONE
1
L
SPEAKERS
(
MINIMUM 6 OHMS
)
R
ZONE
3
L
R
SELECTOR
L
VOLTAGE SELECTOR
3
INT.
EXT.
AUDIO OUT
115V
R
L
IN
AUDIO IN
ID
ZONE
2
230V
SERIAL NO.
ZONE DIRECT IN
R
1
L
ZONE 3 PRE OUT
AC IN
ZONE
1
R
ZONE
3
3
ZONE
2
FLASHER
REMOTE CONTROL
OUT
IN
2
STATUS OUT
ZONE
1
L
SPEAKERS
(
MINIMUM 6 OHMS
)
R
ZONE
3
L
R
SELECTOR
L
VOLTAGE SELECTOR
3
INT.
EXT.
AUDIO OUT
115V
R
L
IN
AUDIO IN
ID
ZONE
2
230V
SERIAL NO.
ZONE DIRECT IN
R
1
L
ZONE 3 PRE OUT
AC IN
3
INT.
EXT.
3
INT.
EXT.
Remote
Analog
Set to INT
Set to 1
Set to EXT
Set to 2
Note:
To change the positions of the EXT./INT. switch and the ID switch, turn off the main power switch of the ZS5300.
When the main power switch is on, changing the positions do not affect.
ZS5300 (Master)
ZS5300 (Slave)
CD Player
DVD Player
Tuner
HDD Player
Analog
out
Analog
out
Analog
out
Remote
Remote
Remote
Analog
out
ZONE 3 PRE OUT
RRL
RRL
STATUS OUT
ZONE
ZONE
ZONE
1
REMOTE CONTROL
1
ZONE
3
IN
INT.
EXT.
OUT
2
FLASHER
IN
R
ID
SELECTOR
22113
AUDIO OUT
AUDIO IN
LLR
1
2
3
ZONE DIRECT IN
LLR
(
SPEAKERS
ZONE
L
R
INT.
EXT.
MINIMUM 6 OHMS
2
)
ZONE
3
R
L
L
MODEL NO. ZS5300
VOLTAGE SELECTOR
115V
SERIAL NO.
230V
AC IN
22113
ZONE 3 PRE OUT
RRL
RRL
STATUS OUT
ZONE
ZONE
ZONE
1
REMOTE CONTROL
1
ZONE
3
IN
INT.
EXT.
OUT
2
FLASHER
IN
R
ID
SELECTOR
22113
AUDIO OUT
AUDIO IN
LLR
1
2
3
ZONE DIRECT IN
LLR
In
Out
MARANTZ
(
SPEAKERS
ZONE
L
R
INT.
EXT.
MINIMUM 6 OHMS
2
)
ZONE
3
R
L
L
MODEL NO. ZS5300
VOLTAGE SELECTOR
115V
SERIAL NO.
230V
AC IN
22113
1
In
Out
24
3
MARANTZ
MARANTZ
MARANTZ
Page 17
13
ENGLISH
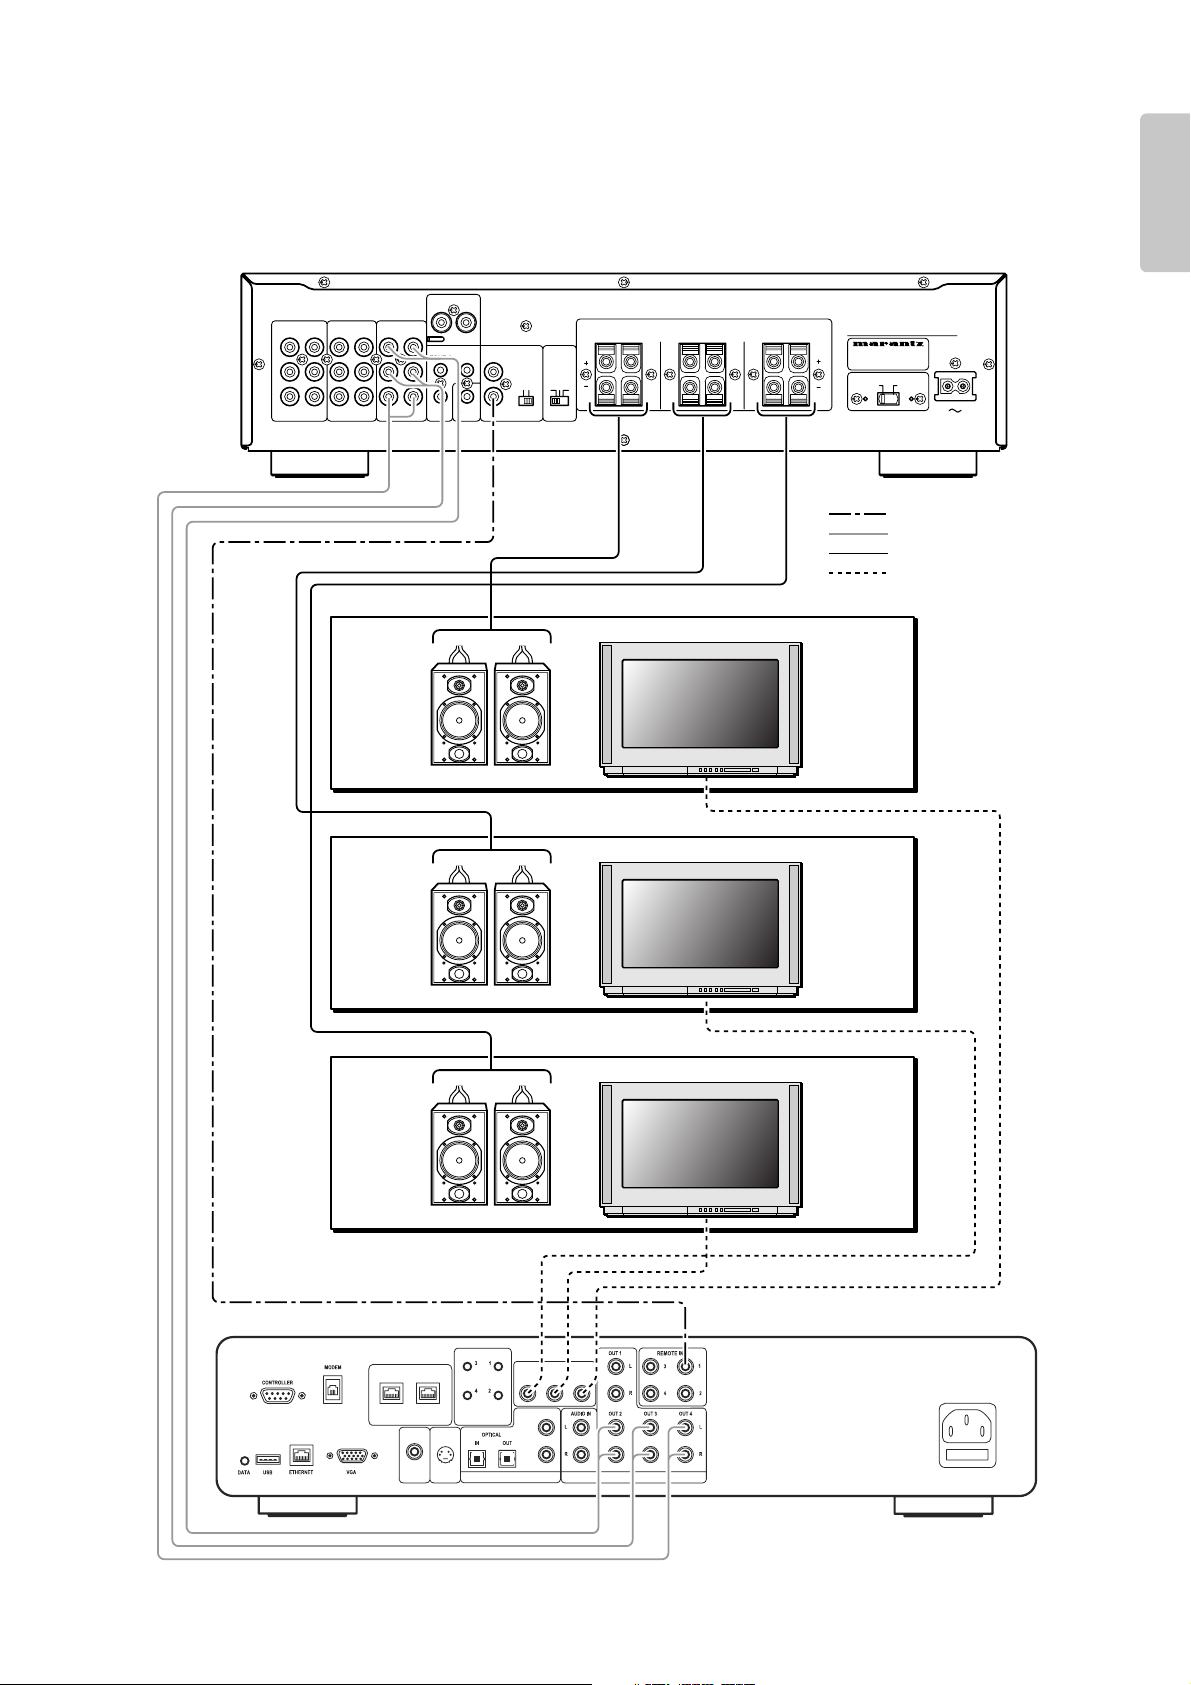
❖ Connection with the DH9300
ZONE
1
R
ZONE
3
3
ZONE
2
FLASHER
REMOTE CONTROL
OUT
IN
2
STATUS OUT
ZONE
1
L
SPEAKERS
(
MINIMUM 6 OHMS
)
R
ZONE
3
L
R
SELECTOR
L
VOLTAGE SELECTOR
3
INT.
EXT.
AUDIO OUT
115V
R
L
IN
AUDIO IN
ID
ZONE
2
230V
SERIAL NO.
ZONE DIRECT IN
R
1
L
ZONE 3 PRE OUT
AC IN
Remote
Analog
Speaker
Video
Speaker
Speaker
Speaker
ZS5300
AUDIO OUT
AUDIO IN
LLR
1
2
3
ZONE DIRECT IN
LLR
RRL
ZONE 3 PRE OUT
RRL
STATUS OUT
ZONE
1
ZONE
2
ZONE
FLASHER
IN
3
REMOTE CONTROL
IN
OUT
(
SPEAKERS
ZONE
1
R
ID
SELECTOR
22113
INT.
EXT.
MINIMUM 6 OHMS
ZONE
L
R
)
2
L
ZONE
3
R
L
MODEL NO. ZS5300
VOLTAGE SELECTOR
115V
SERIAL NO.
230V
AC IN
LR
LR
LR
TV
Zone-1
TV
Zone-2
TV
DH9300
OPUS CONNECTION
VIDEO 1
OUT
MODULATED
S-VIDEO
OUT
REMOTE IN
VIDEO 4
OUT
VIDEO 3
Zone-3
VIDEO 2
OUT
OUT
ANALOGUE AUDIODIGITAL AUDIO
Page 18
14
ENGLISH
❖ Connecting external power amplifier
When using speakers which might need high power to drive (ex. some outdoor speakers), you might need more
power than the ZS5300 can provide. If you need more power, you can connect the “ZONE 3 PRE OUT” to an
external power amplifier.
Sound level can be adjusted with Volume Up/Down on ZS5300.
❖ Connecting power cord
When all the connections are made, plug the power
cord into the power outlet.
❖ Setup
This is an example to construct 3-zone system with a
NILES keypad.
See the picture Connection Example "NILES system"
(☞P. 10).
When all the connections are made, teach the
keypad the remote commands.
To teach the commands to the keypad or more
information, please refer to the instruction manual of
your keypads.
ZONE
1
RR
ZONE
3
3
ZONE
2
FLASHER
REMOTE CONTROL
OUT
IN
STATUS OUT
ZONE 1
L
SPEAKERS (MINIMUM 6 OHMS
)
R
ZONE 3
LR
SELECTOR
L
VOLTAGE SELECTOR
INT.
EXT.
O
115V
L
IN
ID
ZONE 2
230V
SERIAL NO.
ZONE DIRECT IN
L
ZONE 3 PRE OUT
AC IN
MODEL NO. ZS5300
Outdoor speaker
Outdoor speaker
Power amplifier
Power amplifier
ZONE 3 PRE OUT
RRL
UT
ZONE DIRECT IN
LLRRRL
STATUS OUT
ZONE
ZONE
REMOTE CONTROL
1
ZONE
3
IN
2
FLASHER
OUT
IN
ID
SELECTOR
22113
INT.
EXT.
ZS5300
REMOTE CONT.
IN
INPUT
INVERT
OUT
OUTPUT
VIDEO/
5-13VDC
EXT.CONT.IN
+
-
SPEAKER SYSTEM
8 OHMS
MA6100
REMOTE CONT.
IN
INPUT
INVERT
OUT
OUTPUT
VIDEO/
5-13VDC
EXT.CONT.IN
+
-
SPEAKER SYSTEM
8 OHMS
MA6100
Page 19

15
ENGLISH
❖ Refer to connection example "NILES system" (
☞
P.10)
Operation Examples
1. Press the CD button on the keypad.
The power of ZS5300’s Zone 1 is turned on and
the input source is switched to Input 3.
Pressing the POWER button on the keypad also
turns on the power.
2. Press the PLAY button on the keypad.
CD player begins to play.
3. Press the VOLUME 3 button on the keypad.
The volume level of ZS5300’s Zone 1 is
increased.
Also pressing the VOLUME 4 button decreases
the volume level.
4. Press the MUTE button on the keypad to mute the
sound.
The volume level indicators of ZS5300’s Zone 1
flashes.
To release the mute, press the
MUTE button
again or press the
VOLUME 3 or 4.
5. Press the STOP button on the keypad.
The CD player stops.
6. Press the POWER button on the keypad.
The power of ZS5300’s Zone 1 is turned off and
the STANDBY indicator lights up.
Main room
ZONE 1
light up
light up
light up
flash
1.
MULTI ZONE SELECTOR ZS5300
ZONE 1
INPUT
23
1
DIRECT
6543
2
3.
4.
1
MUTE
LEVEL
STANDBY
6.
POWER
1.
ON/STANDBY
CD
DVD
TUNER
VCR
LASER
SAT
1.
2.
4.1. 6.
5.
3.
Page 20

16
ENGLISH
❖ Remote code list (RC-5 extension)
Remote Code List
FUNCTION ID-1 ID-2 ID-3 Note
Global Power ON/OFF 161210 161210 161210 Global control code
Global Power ON 161211 161211 161211 Global control code
Global Power OFF 161212 161212 161212 Global control code
Global Volume up 161600 161600 161600 Global control code
Global Volume down 161700 161700 161700 Global control code
Global Mute 161319 161319 161319 Global control code
Global INPUT 1 160039 160039 160039 Global control code
Global INPUT 2 160049 160049 160049 Global control code
Global INPUT 3 160059 160059 160059 Global control code
Global Direct in 160060 160060 160060 Global control code
Zone 1 Power ON/OFF 161220 161223 161226
Zone 1 Power ON 161221 161224 161227
Zone 1 Power OFF 161222 161225 161228
Zone 1 INPUT 1 160030 160033 160036
Zone 1 INPUT 2 160031 160034 160037
Zone 1 INPUT 3 160032 160035 160038
Zone 1 Direct in 160017 160018 160019
Zone 1 Mute ON/OFF 161310 161313 161316
Zone 1 Volume up 161610 161613 161616
Zone 1 Volume down 161710 161713 161716
Zone 2 Power ON/OFF 161230 161233 161236
Zone 2 Power ON 161231 161234 161237
Zone 2 Power OFF 161232 161235 161238
Zone 2 INPUT 1 160040 160043 160046
Zone 2 INPUT 2 160041 160044 160047
Zone 2 INPUT 3 160042 160045 160048
Zone 2 Direct in 160024 160025 160026
Zone 2 Mute ON/OFF 161311 161314 161317
Zone 2 Volume up 161611 161614 161617
Zone 2 Volume down 161711 161714 161717
Zone 3 Power ON/OFF 161240 161243 161246
Zone 3 Power ON 161241 161244 161247
Zone 3 Power OFF 161242 161245 161248
Zone 3 INPUT 1 160050 160053 160056
Zone 3 INPUT 2 160051 160054 160057
Zone 3 INPUT 3 160052 160055 160058
Zone 3 Direct in 160027 160028 160029
Zone 3 Mute ON/OFF 161312 161315 161318
Zone 3 Volume up 161612 161615 161618
Zone 3 Volume down 161712 161715 161718
Setup Set ------- ------- ------Setup ID-1 ------- ------- ------Setup ID-2 ------- ------- ------Setup ID-3 ------- ------- -------
ID initial : ID-1
ID setting : Push and hold SET first and ID-* buttons next simultaneously. (*=1 or 2 or 3)
Page 21
17
ENGLISH
In case of trouble with the unit, first check the following before calling for service.
1. Are all the connections made properly?
2. Are you operating the unit properly by following user’s guide?
3. Are the other products working properly?
If the unit still does not work properly, check the items shown in the following table.
If your trouble cannot be solved with the remedy actions listed in the following table, malfunction of the internal
circuitry is suspected; immediately unplug the AC power cord and contact a Marantz authorized dealer or service
center.
Troubleshooting
Remedy
• Check if the power cord is plugged properly into an
AC power outlet.
• Check the settings of the INPUT SELECTOR,
VOLUME control.
• Check if the MUTE function is de-activated.
(The MUTE indicator is OFF.)
• Turn the power off and change the connections of
the left and right speaker systems. If sound still
does not come out from the same speaker system,
check the connection cords or the speaker system
itself.
• Check the settings of the INPUT SELECTOR.
• Check that the speaker cords are connected
properly.
• Check that the connection cords with RCA pin
plugs are connected properly.
• Check the ID switch of the rear panel is set
properly.
• Check the ID setting of the remote controller is set
properly.
Problem
The amplifier does not work and the indicator
does not light up.
The indicator lights up but the amplifier will
not function.
Sound is produced only from one of the
speaker systems.
Sound is not produced at all.
Doesn't work properly when it is connected to
Cascade.
This section describes the care and maintenance
tasks that must be performed to optimize the
operation of your Marantz equipment.
❖ Cleaning of the external surfaves of the
unit
The exterior finish of your unit will last indefinitely
with proper care and cleaning.
Never use scouring pads, steel wool, scouring
powders or harsh chemical agents, alcohol, thinners,
benzene, insecticide or other volatile substances as
these will mar the finish of the equipment.
Likewise, never use cloths containing chemical
substances. If the unit gets dirty, wipe the external
surfaces with a soft, lint-free cloth.
Care and Maintenance
Page 22

Rated power output
Zone1 L/R (40Hz -20KHz) ..................................................................................................... 60W 6-ohm / Channel
Zone2 L/R (40Hz -20KHz) ..................................................................................................... 60W 6-ohm / Channel
Zone3 L/R (40Hz -20KHz) ..................................................................................................... 60W 6-ohm / Channel
THD (40Hz - 20KHz) ........................................................................................................................... 0.05% 6-ohm
Input sensitivity ........................................................................................................................ 300mV / 60W Output
Input impedance ....................................................................................................................................... 20K ohms
Frequency response (-1dB) .............................................................................................................. 10Hz to 30KHz
Signal to noise ratio .......................................................................................................................................... 85dB
Power requirement ........................................................................................................... 115V / 230V AC 50/60Hz
Power consumption ......................................................................................................................................... 100W
Dimensions (Maximum)
Width .................................................................................................................................... 17.32 inches (440 mm)
Height ..................................................................................................................................... 4.53 inches (115 mm)
Depth .................................................................................................................................... 13.31 inches (338 mm)
Weight .......................................................................................................................................... 18.74 lbs (8.5 Kg)
Accessories
AC power cord ........................................................................................................................................................ 1
Remote control unit (RC5300ZS)............................................................................................................................. 1
AA-size batteries ..................................................................................................................................................... 2
Design and specifications are subject to change without notice.
Specification
18
ENGLISH
Page 23

1
FRANÇAIS
Introduction......................................................2
Caractéristiques ..............................................2
Le clavier........................................................................3
Accessoires .....................................................3
Vue d’ensemble des fonctions.......................4
Panneau avant ...............................................................4
Panneau arrière .............................................................5
Télécommande (RC5300ZS) .........................................6
Réglage du code d'identification ...................8
Préparation et connexion ...............................9
Connexion des enceintes...............................................9
Exemple de connexion.................................................10
Exemples de fonctionnement ......................15
Liste des codes de la télécommande ..........16
En cas de difficult..........................................17
Soins et entretien ..........................................17
Spécifications ...............................................18
Table des matières
Page 24

2
FRANÇAIS
Merci d'avoir porté votre choix sur l'amplificateur
avec sélecteur multi-zone ZS5300 de Marantz.
Cet appareil remarquable a été conçu pour répandre
le son dans toute la maison et pour vous fournir de
nombreuses années de service.
Veillez prendre quelques minutes pour lire
attentivement ce mode d’emploi avant de brancher et
d'utiliser le ZS5300.
Comme il existe plusieurs options de connexion et de
configuration, nous vous conseillons de consulter
votre revendeur Marantz A/V en ce qui concerne
votre réglage multi-zone spécifique.
Le ZS5300 est un amplificateur 2 canaux x 3 zones
avec un sélecteur multi-zone/de source.
• Tous les canaux sont conçus de façon identique,
amplificateur de puissance de catégorie D avec
construction discrète.
Afin de maximaliser les performances sonores, un
gros transformateur R-core est utilisé.
L'amplificateur de puissance a été fabriqué en
utilisant un amplificateur de catégorie D discret
pour les 6 canaux. Cela permet de garantir que
les canaux sont de qualité et de puissance
identique.
•
Fonction de commande 3 zones
En associant cet appareil et un clavier, vous
pouvez créer un système multi-zone capable de
contrôler 3 zones maximum.
• Commutateur de sélecteur d'identification
permettant une extension de zone
Cet appareil peut être connecté en chaîne en
changeant le commutateur d'identification sur le
panneau arrière. 3 appareils maximum peuvent
être connectés, ainsi le système de zone peut être
étendu jusqu'à 9 zones.
• Fonction d'économie d'électricité par une
commande indépendante
Cet appareil peut commander la mise sous
tension/hors tension pour chaque zone. Ainsi, une
zone non-utilisée peut être inactivée afin
d'économiser de l'électricité.
• Mode Party
Il est possible de diriger simultanément la même
source vers toutes les zones. Cette fonction
convient parfaitement lors de soirées. De plus, il
est possible, de commander le volume et la
fonction de mise en sourdine.
•
Borne d'enceinte compatible avec une fiche
banane
Les bornes d'enceintes peuvent être connectées
directement avec des fiches bananes ainsi
qu'avec un câble d'enceinte traditionnel.
CaractéristiquesIntroduction
Page 25

3
FRANÇAIS
La majorité des claviers, récepteurs IR ainsi que
certains appareils de commande disponibles sur le
marché peuvent être connectés.
Ce sont des exemples de systèmes testés par
Marantz Amérique :
❖ NILES
Clavier : IntelliPad
Système IR principal : IRP6+
Capteur IR : MS 2
Clignotant IR : IRC-2
Les logos Niles et IntelliPad sont des marques
déposées de Niles Audio Corporation.
❖ XANTECH
Clavier : SMARTPAD3
Bloc de connexion : 789-44
Capteur IR : Série 480-30
Emetteur IR : 282M
Les logos Xantech et SMARTPAD3 sont des
marques déposées de Xantech Corporation.
Remarques :
Si vous souhaitez utiliser des appareils non
répertoriés ci-dessus, contactez votre revendeur
agréé Marantz pour les questions de compatibilité.
•
Cordon d'alimentation CA x 1
• Télécommande x 1
• Piles de type AA x 2
VOLUME
VOLUME
VOLUME
VOLUME
INPUT
2
ZONE 1
DIRECT
3
1
ON/OFF
INPUT
2
ZONE 2
MUTE
DIRECT
3
1
ON/OFF
ON/OFF
GLOBAL CONTROL
ON
1
DIRECT
ID-2
SET
ID-3
ID-1
INPUT
ZONE 3
ZONE 2 ZONE 3
ZONE 1
GLOBAL
OFF
ON
OFF
MUTE
DIRECT
32
1
REMOTE CONTROLLER RC5300ZS
MUTE
DIRECT POWER
ON/OFF
32
INPUT
MUTE
Accessoires
Le clavier
Page 26

4
FRANÇAIS
qq
Touche d'alimentation principale
(POWER ON/STANDBY)
Appuyer sur cette touche pour mettre l'appareil sous
tension. Appuyer de nouveau sur cette touche pour le
mettre hors tension. Lorsque l'alimentation principale est
activée, Zone1, Zone2 et Zone3 passent en mode veille
et l'alimentation de chaque zone peut être commutée
avec la télécommande RC5300ZS (fournie) ou avec un
clavier (option). Pour une utilisation régulière, laisser
l'appareil sous tension.
ww
Témoin du niveau de volume (LEVEL)
Ces témoins indiquent le niveau du volume. Lorsque tous
les témoins sont allumés, le niveau de volume est au
maximum. Lorsque tous les témoins sont éteints, le niveau
de volume est au minimum. Le volume peut être réglé
individuellement pour les Zone1, Zone2 et Zone3. Le
volume peut être réglé avec la télécommande ou avec un
clavier.
Témoin de sourdine (MUTE)
Ces témoins clignotent lorsque le son est mis en sourdine.
Lorsque le volume est au maximum, tous les témoins
clignotent. Lorsque le volume est au minimum, seulement
le premier témoin clignote. La mise en sourdine peut être
utilisée individuellement pour les Zone1, Zone2 et Zone3.
La mise en sourdine peut être effectuée avec la
télécommande ou un clavier. Si le volume est réglé
pendant la mise en sourdine, cette fonction sera annulée.
Attention
Lorsque ces indicateurs clignotent, aucun son n'est émis.
Lors de l'annulation de la mise en sourdine, vérifier la
position du volume. Si le volume est trop fort, cela pourrait
endommager les enceintes.
ee
Témoin de veille (STANDBY)
Ce témoin s'allume lorsque l'une des zones est en veille.
Les Zone1, Zone2 et Zone3 peuvent être mises en mode
veille indépendamment. L'alimentation de chaque zone
peut être commandée avec la télécommande ou un
clavier.
rr
Témoin direct DIRECT
Lorsque l'entrée "ZONE DIRECT" a été sélectionnée pour
la source, ce témoin s'allume. La source connectée à la
borne "ZONE DIRECT" pour la Zone1 peut être
sélectionnée uniquement pour la Zone1. Cela est
également valable pour la Zone2 et la Zone3. La source
peut être sélectionnée avec la télécommande ou avec un
clavier.
tt
Témoin d'entrée (INPUT)
En fonction de l'entrée sélectionnée pour chaque zone, le
témoin INPUT correspondant sera allumé. Les entrées
peuvent être sélectionnées en utilisant une télécommande
ou un clavier.
yy
Capteur IR (Télécommande)
Cette fenêtre reçoit les signaux infrarouges de la
télécommande.
Panneau avant
Vue d’ensemble des fonctions
MUTE
LEVEL LEVELLEVEL
MUTE MUTE
DIRECTDIRECT
65432
11
23456
STANDBY
1
ZONE 3
INPUT
32
STANDBY
6543
23
INPUT
ZONE 1
1
2
1
DIRECT
ZONE 2
STANDBY
INPUT
32
1
MULTI ZONE SELECTOR ZS5300
POWER
ON/STANDBY
3
1
5
6
4
2
Page 27

5
FRANÇAIS
zz
Bornes d'entrée audio (AUDIO IN)
Connecter la sortie audio analogique de l'appareil audio
(lecteur de CD, TV, lecteur de DVD, etc.). Jusqu'à 3
appareils audio peuvent être connectés.
xx
Bornes de sortie audio (AUDIO OUT)
Ces bornes sont conçues comme une liaison audio. Elles
peuvent être utilisés lors d'une connexion en chaîne avec
un ou deux autres ZS5300. Elles peuvent également
servir à partager des composants de sources avec un
système cinéma à domicile, etc.
cc
Bornes d'entrée directe de zone
(ZONE DIRECT IN)
Ces bornes sont uniquement pour leur zone
correspondante. Connecter les bornes de sortie audio
analogiques de l'appareil audio (lecteur de CD, TV,
lecteur de DVD, etc.). Bien que 3 appareils puissent être
connectés à une zone différente, l'appareil connecté sur
"ZONE DIRECT 1" peut être utilisé uniquement dans la
ZONE 1. La même chose est valable pour ZONE DIRECT
2 et ZONE DIRECT 3.
• Vous pouvez créer un système multi-zone unique et
puissant en connectant le serveur musical Marantz
(DH9300). (
☞
p. 13)
vv
Bornes de pré-sortie Zone 3
(ZONE 3 PRE OUT)
Ces bornes sont les bornes de sortie du pré-amplificateur
pour la Zone 3. Ces bornes peuvent être connectées
avec d'autres appareils audio comme un amplificateur
externe.
bb
Bornes d'entrée / sortie de la
télécommande (REMOTE CONTROL)
En connectant cet appareil avec un autre composant
audio Marantz en utilisant un câble de contrôle de
système, il est possible d'utiliser les composants à
distance comme pour un système unique.
nn
Bornes de sortie des enceintes
(SPEAKERS)
Connecter les enceintes pour chaque zone.
• Impédance de l'enceinte: 6 Ω
mm
Bornes de sortie de l'état (STATUS OUT)
Ces bornes sont des bornes de sorties activées par le
CC pour déterminer si l'alimentation d'une zone est
activée ou non.
Brancher ces bornes aux claviers, etc.
• Puissance de la sortie d'état: 12 V, 100 mA.
,,
Bornes d'entrée du clignotant
(FLASHER IN)
Cette borne sert à commander l'appareil dans chaque
zone. Connecter le signal de commande d'un clavier, etc.
..
Commutateur interne / externe de la
télécommande (INT./EXT.)
Ce commutateur sert à sélectionner si le capteur à
distance de la face avant fonctionne ou non. Si vous
utilisez deux ZS5300 ou plus connectés en chaîne, régler
le commutateur sur INT. Le ZS5300 fonctionnera comme
le maître. Régler le commutateur sur EXT. pour que le
ZS5300 soit asservi.
INT. : Active le capteur à distance.
EXT. : Inactive le capteur à distance.
⁄⁄00
Commutateur de sélection d'identification
(ID SELECTOR)
Lorsque deux ou trois ZS5300 sont utilisés, sélectionner
une identification indépendante pour chacun d'entre eux.
Jusqu'à 3 ZS5300 peuvent être connectés. Différentes
identifications doivent être sélectionnées pour chaque
appareil.
⁄⁄11
Sélecteur de tension
(VOLTAGE SELECTOR)
Sélectionner la tension correspondant à la région. Il est
possible de sélectionner 115 V ou 230 V.
• S'assurer de débrancher le cordon d'alimentation lors
du changement du commutateur.
⁄⁄22
Alimentation (AC IN)
Brancher le cordon d'alimentation dans cette prise.
ATTENTION:
S'assurer de bien utiliser le cordon d'alimentation de
puissance 2,5A, 250V et 18RSP (réseau sélectif planaire)
lors de l'utilisation de la tension 230V CA.
ZONE
1
R
ZONE
3
3
ZONE
2
FLASHER
REMOTE CONTROL
OUT
IN
2
STATUS OUT
ZONE
1
L
SPEAKERS
(
MINIMUM 6 OHMS
)
R
ZONE
3
L
R
SELECTOR
L
VOLTAGE SELECTOR
3
INT.
EXT.
AUDIO OUT
115V
R
L
IN
AUDIO IN
ID
ZONE
2
230V
SERIAL NO.
ZONE DIRECT IN
R
1
L
ZONE 3 PRE OUT
AC IN
Panneau arrière
1 2 3 4 5 6
AUDIO OUT
AUDIO IN
1
2
3
LLR
LLR
ZONE 3 PRE OUT
ZONE DIRECT IN
RRL
RRL
STATUS OUT
ZONE
ZONE
ZONE
1
REMOTE CONTROL
1
ZONE
3
IN
INT.
EXT.
FLASHER
OUT
IN
2
ID
SELECTOR
R
22113
SPEAKERS
L
R
(
MINIMUM 6 OHMS
ZONE
2
)
ZONE
3
R
L
L
7 8 9 10 11 12
MODEL NO. ZS5300
VOLTAGE SELECTOR
115V
SERIAL NO.
230V
AC IN
Page 28

6
FRANÇAIS
q Touches de contrôle global
(GLOBAL CONTROL)
Ces touches permettent de commander simultanément le
volume, la sélection de source, etc. pour toutes les zones.
Si deux ou trois appareils sont connectés en chaîne,
toutes les zones peuvent également être commandées
simultanément.
• Touche de sélection globale (GLOBAL DIRECT)
Cette touche permet de sélectionner l'entrée
Zone Direct (dédiée à cette zone) qui sera lue
dans toutes les zones 1, 2, & 3 de tous les
ZS5300 connectés.
• Touche d’entrée globale (GLOBAL INPUT 1, 2, 3)
Cette touche permet de sélectionner l'entrée 1,
2,ou 3 qui sera lue globalement pour tous les
ZS5300 connectés.
• Touche de mise sous tension/hors tension globale
(GLOBAL ON / OFF)
Cette touche permet d'activer/inactiver
l'alimentation pour toutes les zones de tous les
ZS5300 connectés. Appuyer une fois sur la
touche pour l'activer et appuyer à nouveau pour
l'éteindre.
• Touche de sourdine globale (GLOBAL MUTE)
Cette touche permet d'activer/inactiver la mise
en sourdine de tous les ZS5300 connectés.
Appuyer une fois sur la touche pour activer la
mise en sourdine et appuyer à nouveau pour
inactiver la fonction.
• Touche de volume globale (GLOBAL VOLUME)
Cette touche permet de commander
l'augmentation/la réduction de volume pour tous
les ZS5300 connectés.
• Touche GLOBAL ON
Cette touche permet d'activer toutes les zones
de tous les ZS5300 connectés.
Télécommande (RC5300ZS)
• Touche GLOBAL OFF
Cette touche permet d'inactiver toutes les zones
de tous les ZS5300 connectés.
w Touche d’alimentation directe
(DIRECT POWER)
Ces touches permettent de commander indépendamment
l'alimentation de chaque zone.
• Touche de mise sous tension directe de la zone 1
(ZONE 1 DIRECT ON)
Active l’alimentation indépendamment pour la
zone 1.
• Touche de mise hors tension directe de la zone 1
(ZONE 1 DIRECT OFF)
Inactive l’alimentation indépendamment pour la
zone 1.
• Touche de mise sous tension directe de la zone 2
(ZONE 2 DIRECT ON)
Active l’alimentation indépendamment pour la
zone 2.
• Touche de mise hors tension directe de la zone 2
(ZONE 2 DIRECT OFF)
Inactive l’alimentation indépendamment pour la
zone 2.
• Touche de mise sous tension directe de la zone 3
(ZONE 3 DIRECT ON)
Active l’alimentation indépendamment pour la
zone 3.
• Touche de mise hors tension directe de la zone 3
(ZONE 3 DIRECT OFF)
Inactive l’alimentation indépendamment pour la
zone 3.
e Touches pour ZONE 1, 2, 3
Les descriptions ci-dessous sont communes. Les fonctions
des touches sont identiques pour Zone 2 et 3; par
conséquent, uniquement les touches pour la Zone 1 sont
décrites.
• Touche directe pour la zone 1 (ZONE 1 DIRECT)
Sélectionne l'entrée "Zone Direct" pour la Zone 1.
• Touches d’entrée 1, 2, 3 de la zone 1
(ZONE 1 INPUT 1, 2, 3)
Sélectionne l'entrée "Input 1" ou "Input 2" ou
"Input 3" pour la Zone 1.
• Touche de mise sous tension-hors tension de la
zone 1 (ZONE 1 ON / OFF)
Active / inactive la Zone 1.
Appuyer une fois pour activer la zone et appuyer
à nouveau pour l'inactiver.
• Touche de sourdine de la zone 1 (ZONE 1 MUTE)
Active / inactive la mise en sourdine pour la
Zone 1.
Appuyer une fois pour activer la fonction et
appuyer à nouveau pour l'inactiver.
Si le volume est réglé lors de la mise en
sourdine, cette fonction est annulée.
• Touche de volume de la zone 1 (ZONE 1 VOLUME)
Commande l'augmentation / la réduction de
volume pour la Zone 1.
r Touche de réglage de l'identification
Lorsque deux ou trois ZS5300 sont connectés ensemble
à l'aide d'un câble à distance ou sont utilisés dans la
même zone, cette touche permet de sélectionner les
différentes identifications.
Voir les "Réglage du code d'identification" pour régler le
code d'identification de la télécommande. (
☞
p. 8)
Le réglage par défaut de l'appareil est ID-1.
GLOBAL CONTROL
DIRECT
1
2
DIRECT
DIRECT
3
DIRECT
4
MUTE
ON/OFF
INPUT
ZONE 2 ZONE 3
DIRECT POWER
ZONE 1
ON/OFF
MUTE
INPUT
2
ZONE 2
MUTE
ON/OFF
INPUT
2
ZONE 3
MUTE
ON/OFF
INPUT
ID-2
ID-1
VOLUME
32
VOLUME
3
VOLUME
3
VOLUME
32
1
ZONE 1
ON
OFF
1
1
1
SET
REMOTE CONTROLLER RC5300ZS
GLOBAL
OFF
ID-3
ON
Page 29

7
FRANÇAIS
❖ Utilisation de la télécommande
1. Télécommande
Utiliser la télécommande (RC5300ZS) dans une
distance d'environ 16 pieds (5 m) de la fenêtre IR
(télécommande) située sur la face avant de l'appareil.
Si l'émetteur est pointé dans une direction autre que
le capteur IR ou s'il y a un obstacle entre eux, la
télécommande peut ne pas fonctionner.
• Plage de fonctionnement de la télécommande
2. Chargement des piles
Les piles de cette télécommande durent environ un
an dans des conditions d’utilisation normale. Lorsque
la télécommande n'est pas utilisée pendant une
période prolongée, retirer les piles. De même,
lorsque les piles commencent à décliner, les changer
dès que possible.
1. Retirer le couvercle des piles.
Remarque :
• N’utilisez pas les piles rechargeables (Type Ni-Cd).
2. Insérer les piles de type AA en respectant la polarité
(+) et (–) .
3. Refermer le couvercle des piles jusqu'à ce qu'il
s'enclenche.
60
Environ
16 pieds (5m)
Télécommande
ZS5300
Page 30

8
FRANÇAIS
❖ Régler le code d'identification
Ex.) Régler sur ID-1
Télécommande
Maintenir enfoncée la touche
SET, puis appuyer sur ID-1 et
relâcher les deux touches.
Panneau arrière de l'appareil
Régler sur "1".
R
33
3
REMOTE CONTROL
OUT
ZONE
1
L
ESPEAKERS (MINIMUM 6 OHMS
)
R
ZONE 3
LR
SELECTOR
L
VOLTAGE SELECTOR
INT.
EXT.
115V
IN
ID
ZONE 2
230V
SERIAL NO.
AC IN
MODEL NO. ZS5300
Le système ZS5300 peut contenir un maximum de 3 appareils.
Lors de l'utilisation d'un seul appareil, régler le commutateur d'identification situé sur le panneau arrière sur "1".
Pour régler la télécommande sur le numéro d'identification de l'appareil, suivre la procédure ci-dessous.
1. Maintenir enfoncée la touche SET puis appuyer ID-1 et relâcher les deux touches.
2. Cette télécommande a été réglée sur ID-1. Pour régler l'identification sur 2 et 3, suivre la même procédure.
3. Lors du changement des piles, le réglage d'origine par défaut ID-1 est restitué.
Remarque :
Cela est important car si les identifications ont été changées, il faudra les régler de nouveau lors du changement
des piles.
*Le réglage par défaut pour la télécommande et pour l'appareil est ID-1
Réglage du code d'identification
INPUT
1
SET
ID-1
REMOTE CONTROLLER RC5300ZS
VOLUME
32
ID-2
ID-3
T
ZONE
REMOTE CONTROL
R
IN
INT.
EXT.
OUT
ID
SELECTOR
R
22113
SP
1
L
Page 31

9
FRANÇAIS
❖ Avant d'effectuer les connexions
S'assurer que le ZS5300 et les autres appareils à connecter au ZS5300 sont bien inactivés avant d'effectuer les
connexions.
Consulter les modes d’emploi des autres appareils pour s'assurer d'effectuer les bonnes connexions avec les
bornes appropriées.
❖ Clavier
Les claviers pouvant être connectés à l'appareil sont des claviers et des boîtes de connexion fabriqués par NILES
et XANTECH comme indiqué ci-dessous. Si vous souhaitez utiliser des appareils non-répertoriés ci-dessous ou
d'une autre marque, contactez votre revendeur agréé Marantz.
• NILES
Clavier : IntelliPad
Système IR principal : IRP6+
Capteur IR : MS 2
Clignotant IR : IRC-2
• XANTECH
Clavier : SMARTPAD3
Bloc de connexion : 789-44
Capteur IR : Série 480-30
Emetteur IR : 282M
Remarque :
Lors de la connexion d'un clavier, consulter le mode d’emploi du clavier et celui de l'appareil.
Préparation et connexion
Il existe deux manières de connecter les enceintes.
Voir les illustrations ci-dessous.
❖ Connexion du câble d'enceinte
1.Dénudez environ 6/8 inch (20 mm) de l'isolement
du fil.
2. Torsadez l'extrémité du fil dénudé de manière
bien serrée afin d'éviter un court circuit.
3. Insérer la partie dénudée du câble dans l'orifice
de chaque borne comme ce qui suit.
❖ Connexion de la fiche banane
Des connexions par fiche banane sont également
possibles.
Connexion des enceintes
Environ 6/8 inch
(20 mm)
Page 32

10
FRANÇAIS
❖ Système NILES
Exemple de connexion
ZONE
1
R
ZONE
3
3
ZONE
2
FLASHER
REMOTE CONTROL
OUT
IN
2
STATUS OUT
ZONE
1
L
SPEAKERS
(
MINIMUM 6 OHMS
)
R
ZONE
3
L
R
SELECTOR
L
VOLTAGE SELECTOR
3
INT.
EXT.
AUDIO OUT
115V
R
L
IN
AUDIO IN
ID
ZONE
2
230V
SERIAL NO.
ZONE DIRECT IN
R
1
L
ZONE 3 PRE OUT
AC IN
Télécommande
Etat
Analogique
Enceinte
Données IR
Clignotant
Pour une connexion en chaîne
Alimentation CC
Branchée dans une
prise CA non commutée.
Enceinte
Enceinte
Enceinte
Capteur IR MS-2
dans un endroit
éloigné.
Capteur IR MS-2
dans un endroit
éloigné.
Capteur IR MS-2
dans un endroit
éloigné.
Clignotant IR
IRC-2
Lecteur CD
Lecteur DVD
Tuner
Lecteur HDD
Sortie
analogique
Sortie
analogique
Sortie
analogique
Télécommande
Télécommande
Télécommande
Sortie
analogique
ZS5300
AUDIO OUT
AUDIO IN
LLR
1
2
3
+
12
V
POWER
G
N
D
MODEL
D
A
T
A
LLR
+
G
12
N
V
D
IRP6
STATU S
ZONE DIRECT IN
RRL
+
D
12
A
V
T
A
+
G
N
D
SENSOR INPUTS
ZONE 3 PRE OUT
+
D
12
A
V
T
A
FLASHER LEVEL
+-+
RRL
STATUS OUT
ZONE
ZONE
G
N
D
FLASHERS
-
1
2
D
A
T
A
ZONE
FLASHER
IN
+
12
V
+-+
REMOTE CONTROL
3
G
D
N
A
D
T
A
(
SPEAKERS
ZONE
1
R
ID
SELECTOR
IN
22113
INT.
EXT.
OUT
MINIMUM 6 OHMS
ZONE
L
R
)
2
L
ZONE
3
R
L
MODEL NO. ZS5300
VOLTAGE SELECTOR
115V
SERIAL NO.
230V
AC IN
LR
MP00124
+
G
D
12
N
A
V
D
T
A
IR
DATA
OUT
D
G
A
N
T
-
D
A
AMPLIFIER
INPUT
L+ L-R+R
SPEAKER
OUTPUT
L+ L
-
-
R+R
-
Zone-1
+
12V DC
In
Out
In
Out
MARANTZ
MARANTZ
MARANTZ
AMPLIFIER
INPUT
L+ L-R+R-L+ L
AMPLIFIER
INPUT
-
R+R-L+ L-R+R
L+ L
SPEAKER
OUTPUT
-
SPEAKER
OUTPUT
LR
MP00124
R+R
-
Zone-2
LR
MP00124
-
2134
Zone-3
MARANTZ
Page 33

11
FRANÇAIS
❖ Système XANTECH
ZONE
1
R
ZONE
3
3
ZONE
2
FLASHER
REMOTE CONTROL
OUT
IN
2
STATUS OUT
ZONE
1
L
SPEAKERS
(
MINIMUM 6 OHMS
)
R
ZONE
3
L
R
SELECTOR
L
VOLTAGE SELECTOR
3
INT.
EXT.
AUDIO OUT
115V
R
L
IN
AUDIO IN
ID
ZONE
2
230V
SERIAL NO.
ZONE DIRECT IN
R
1
L
ZONE 3 PRE OUT
AC IN
Télécommande
Etat
Analogique
Enceinte
Données IR
Clignotant
Pour une connexion en chaîne
Alimentation CC
Branchée dans une prise
CA non commutée.
Enceinte
Enceinte
Enceinte
Récepteur IR
série 480-30
Emetteur IR
282M
Bande BLANCHE
7- Câble plat avec mini
prise retirée
Récepteur IR
série 480-30
Bande BLANCHE
7- Câble plat avec mini
prise retirée
Récepteur IR
série 480-30
Bande BLANCHE
7- Câble plat avec mini
prise retirée
Lecteur CD
Lecteur DVD
Tuner
Lecteur HDD
Sortie
analogique
Sortie
analogique
Sortie
analogique
Télécommande
Télécommande
Télécommande
Sortie
analogique
ZS5300
AUDIO OUT
AUDIO IN
LLR
1
2
3
12VDC
ZONE DIRECT IN
LLR
RRL
EMITTERS
789-44
CONNECTING BLOCK
GND
+12VDC
STATUS
IR IN
ZONE 3 PRE OUT
RRL
STATUS OUT
ZONE
1
ZONE
2
IR
RCVR
ZONE
FLASHER
IN
3
REMOTE CONTROL
IN
OUT
(
SPEAKERS
ZONE
1
R
ID
SELECTOR
22113
INT.
EXT.
MINIMUM 6 OHMS
ZONE
L
R
)
2
L
ZONE
3
R
L
MODEL NO. ZS5300
VOLTAGE SELECTOR
115V
SERIAL NO.
230V
AC IN
LR
PM110
SMART PAD
PROGRAMMABLE MODULE
TM
3
L+ L-R+R-L+ L-R+R
AMPLIFIER
INPUT
SPEAKER
OUTPUT
+12V
IR OUT
STATUS
GND
OUT
+12V
GND
Zone-1
In
Out
In
Out
1
MARANTZ
MARANTZ
MARANTZ
3
24
MARANTZ
PM110
SMART PAD
PROGRAMMABLE MODULE
PM110
SMART PAD
PROGRAMMABLE MODULE
TM
3
L+ L-R+R-L+ L-R+R
AMPLIFIER
L+ L-R+R-L+ L-R+R
AMPLIFIER
INPUT
INPUT
SPEAKER
OUTPUT
TM
3
SPEAKER
OUTPUT
-
-
LR
GND
+12V
IR OUT
STATUS
OUT
+12V
GND
Zone-2
LR
GND
+12V
IR OUT
STATUS
OUT
+12V
GND
Zone-3
Page 34

12
FRANÇAIS
❖ Connexion en chaîne
ZONE
1
R
ZONE
3
3
ZONE
2
FLASHER
REMOTE CONTROL
OUT
IN
2
STATUS OUT
ZONE
1
L
SPEAKERS
(
MINIMUM 6 OHMS
)
R
ZONE
3
L
R
SELECTOR
L
VOLTAGE SELECTOR
3
INT.
EXT.
AUDIO OUT
115V
R
L
IN
AUDIO IN
ID
ZONE
2
230V
SERIAL NO.
ZONE DIRECT IN
R
1
L
ZONE 3 PRE OUT
AC IN
ZONE
1
R
ZONE
3
3
ZONE
2
FLASHER
REMOTE CONTROL
OUT
IN
2
STATUS OUT
ZONE
1
L
SPEAKERS
(
MINIMUM 6 OHMS
)
R
ZONE
3
L
R
SELECTOR
L
VOLTAGE SELECTOR
3
INT.
EXT.
AUDIO OUT
115V
R
L
IN
AUDIO IN
ID
ZONE
2
230V
SERIAL NO.
ZONE DIRECT IN
R
1
L
ZONE 3 PRE OUT
AC IN
3
INT.
EXT.
3
INT.
EXT.
Télécommande
Analogique
Réglé sur INT.
Réglé sur 1
Réglé sur EXT.
Réglé sur 2
Remarque :
Pour changer les positions du commutateur EXT./INT. et du commutateur d'identification, inactiver le commutateur d'alimentation
principale du ZS5300.
Lorsque le commutateur d'alimentation principale est activé, le changement de position n'est pas effectif.
ZS5300 (maître)
ZS5300 (asservi)
Lecteur CD
Lecteur DVD
Tuner
Lecteur HDD
Sortie
analogique
Sortie
analogique
Sortie
analogique
Télécommande
Télécommande
Télécommande
Sortie
analogique
ZONE 3 PRE OUT
ZONE DIRECT IN
RRL
RRL
STATUS OUT
ZONE
ZONE
ZONE
1
REMOTE CONTROL
1
ZONE
3
IN
INT.
EXT.
OUT
2
FLASHER
IN
R
ID
SELECTOR
22113
AUDIO OUT
AUDIO IN
1
2
3
LLR
LLR
(
SPEAKERS
MINIMUM 6 OHMS
ZONE
L
R
INT.
EXT.
)
2
L
ZONE
3
R
L
MODEL NO. ZS5300
VOLTAGE SELECTOR
115V
SERIAL NO.
230V
AC IN
22113
ZONE 3 PRE OUT
ZONE DIRECT IN
RRL
RRL
STATUS OUT
ZONE
ZONE
ZONE
1
REMOTE CONTROL
1
ZONE
3
IN
INT.
EXT.
OUT
2
FLASHER
IN
R
ID
SELECTOR
22113
AUDIO OUT
AUDIO IN
1
2
3
LLR
LLR
In
Out
MARANTZ
(
SPEAKERS
MINIMUM 6 OHMS
ZONE
L
R
INT.
EXT.
)
2
L
ZONE
3
R
L
MODEL NO. ZS5300
VOLTAGE SELECTOR
115V
SERIAL NO.
230V
AC IN
22113
In
Out
1
24
3
MARANTZ
MARANTZ
MARANTZ
Page 35

13
FRANÇAIS
❖ Connexion avec le DH9300
ZONE
1
R
ZONE
3
3
ZONE
2
FLASHER
REMOTE CONTROL
OUT
IN
2
STATUS OUT
ZONE
1
L
SPEAKERS
(
MINIMUM 6 OHMS
)
R
ZONE
3
L
R
SELECTOR
L
VOLTAGE SELECTOR
3
INT.
EXT.
AUDIO OUT
115V
R
L
IN
AUDIO IN
ID
ZONE
2
230V
SERIAL NO.
ZONE DIRECT IN
R
1
L
ZONE 3 PRE OUT
AC IN
Télécommande
Analogique
Enceinte
Vidéo
Enceinte
Enceinte
Enceinte
ZS5300
AUDIO OUT
AUDIO IN
LLR
1
2
3
ZONE DIRECT IN
LLR
RRL
ZONE 3 PRE OUT
RRL
STATUS OUT
ZONE
1
ZONE
2
ZONE
FLASHER
IN
3
REMOTE CONTROL
IN
OUT
(
SPEAKERS
ZONE
1
R
ID
SELECTOR
22113
INT.
EXT.
MINIMUM 6 OHMS
ZONE
L
R
)
2
L
ZONE
3
R
L
MODEL NO. ZS5300
VOLTAGE SELECTOR
115V
SERIAL NO.
230V
AC IN
LR
LR
LR
TV
Zone-1
TV
Zone-2
TV
DH9300
OPUS CONNECTION
VIDEO 1
OUT
MODULATED
S-VIDEO
OUT
REMOTE IN
VIDEO 4
OUT
VIDEO 3
Zone-3
VIDEO 2
OUT
OUT
ANALOGUE AUDIODIGITAL AUDIO
Page 36

14
FRANÇAIS
❖ Connexion d'un amplificateur de puissance externe
Lors de l'utilisation d'enceintes ayant besoin d'une forte puissance (ex. certaines enceintes d'extérieur), il est
possible que le ZS5300 ne fournisse pas une puissance suffisante. En cas de besoin de puissance supplémentaire,
il est possible de connecter la sortie "ZONE 3 PRE OUT" à un amplificateur de puissance externe.
Le niveau sonore peut être réglé avec les touches d'augmentation/diminution du volume du ZS5300.
❖ Connexion du cordon d'alimentation
Lorsque toutes les connexions sont effectuées,
brancher le cordon d'alimentation dans la prise.
❖ Réglage
C'est un exemple pour créer un système à 3 zones
avec un clavier NILES.
Voir l'illustration Exemple de connexion "Système
NILES"
(☞p. 10).
Lorsque toutes les connexions sont effectuées,
enseigner les commandes à distance au clavier.
Pour enseigner les commandes au clavier ou pour
plus d'informations, consulter le mode d’emploi du
clavier.
ZONE
1
RR
ZONE
3
3
ZONE
2
FLASHER
REMOTE CONTROL
OUT
IN
STATUS OUT
ZONE 1
L
SPEAKERS (MINIMUM 6 OHMS
)
R
ZONE 3
LR
SELECTOR
L
VOLTAGE SELECTOR
INT.
EXT.
O
115V
L
IN
ID
ZONE 2
230V
SERIAL NO.
ZONE DIRECT IN
L
ZONE 3 PRE OUT
AC IN
MODEL NO. ZS5300
Enceinte extérieure
Enceinte extérieure
Amplificateur de puissance
Amplificateur de puissance
ZONE 3 PRE OUT
RRL
UT
ZONE DIRECT IN
LLRRRL
STATUS OUT
ZONE
ZONE
REMOTE CONTROL
1
ZONE
3
IN
2
FLASHER
OUT
IN
ID
SELECTOR
22113
INT.
EXT.
ZS5300
REMOTE CONT.
IN
INPUT
INVERT
OUT
OUTPUT
VIDEO/
5-13VDC
EXT.CONT.IN
+
-
SPEAKER SYSTEM
8 OHMS
MA6100
REMOTE CONT.
IN
INPUT
INVERT
OUT
OUTPUT
VIDEO/
5-13VDC
EXT.CONT.IN
+
-
SPEAKER SYSTEM
8 OHMS
MA6100
Page 37

15
FRANÇAIS
❖ Se reporter à l'exemple de connexion "Système NILES" (
☞
p. 10)
Exemples de fonctionnement
1. Appuyer sur la touche CD du clavier.
La Zone 1 du ZS5300 est activée et la source
d'entrée bascule sur l'entrée 3.
Le fait d'appuyer sur la touche POWER du clavier
active également l'appareil.
2. Appuyer sur la touche PLAY du clavier.
Le lecteur de CD débute la lecture.
3. Appuyer sur la touche VOLUME 3 du clavier.
Le niveau de volume de la Zone 1 du ZS5300
augmente.
Le fait d'appuyer sur la touche VOLUME 4
diminue le niveau de volume.
4. Appuyer sur la touche MUTE du clavier pour une
mise en sourdine.
Le témoin du niveau de volume de la Zone 1 du
ZS5300 clignote.
Pour annuler la mise en sourdine, appuyer à
nouveau sur la touche MUTE ou sur la touche
VOLUME 3 ou 4.
5. Appuyer sur la touche STOP du clavier.
Le lecteur de CD s'arrête.
6. Appuyer sur la touche POWER du clavier.
L'alimentation de la Zone 1 du ZS5300 est
inactivée et le témoin STANDBY s'allume.
Pièce principale
ZONE 1
s'allume
s'allume
s'allume
Clignote
1.
MULTI ZONE SELECTOR ZS5300
ZONE 1
INPUT
23
1
DIRECT
6543
2
3.
4.
1
LEVEL
MUTE
STANDBY
6.
POWER
1.
ON/STANDBY
1.
CD
DVD
TUNER
VCR
LASER
SAT
2.
5.
3.
4.1. 6.
Page 38

16
FRANÇAIS
❖ Liste des codes de la télécommande (extension RC-5)
Liste des codes de la télécommande
FONCTION ID-1 ID-2 ID-3 Remarque
Global Marche/arrêt 161210 161210 161210
Code de commande global
Global Marche 161211 161211 161211
Code de commande global
Global Arrêt 161212 161212 161212
Code de commande global
Global
Augmentation du volume
161600 161600 161600
Code de commande global
Global Diminution du volume 161700 161700 161700
Code de commande global
Global Mise en sourdine 161319 161319 161319
Code de commande global
Global ENTREE 1 160039 160039 160039
Code de commande global
Global ENTREE 2 160049 160049 160049
Code de commande global
Global ENTREE 3 160059 160059 160059
Code de commande global
Global Entrée directe 160060 160060 160060
Code de commande global
Zone 1 Marche/arrêt 161220 161223 161226
Zone 1 Marche 161221 161224 161227
Zone 1 Arrêt 161222 161225 161228
Zone 1 ENTREE 1 160030 160033 160036
Zone 1 ENTREE 2 160031 160034 160037
Zone 1 ENTREE 3 160032 160035 160038
Zone 1 Entrée directe 160017 160018 160019
Zone 1
Mise en sourdine marche/arrêt
161310 161313 161316
Zone 1
Augmentation du volume
161610 161613 161616
Zone 1 Diminution du volume 161710 161713 161716
Zone 2 Marche/arrêt 161230 161233 161236
Zone 2 Marche 161231 161234 161237
Zone 2 Arrêt 161232 161235 161238
Zone 2 ENTREE 1 160040 160043 160046
Zone 2 ENTREE 2 160041 160044 160047
Zone 2 ENTREE 3 160042 160045 160048
Zone 2 Entrée directe 160024 160025 160026
Zone 2
Mise en sourdine marche/arrêt
161311 161314 161317
Zone 2
Augmentation du volume
161611 161614 161617
Zone 2 Diminution du volume 161711 161714 161717
Zone 3 Marche/arrêt 161240 161243 161246
Zone 3 Marche 161241 161244 161247
Zone 3 Arrêt 161242 161245 161248
Zone 3 ENTREE 1 160050 160053 160056
Zone 3 ENTREE 2 160051 160054 160057
Zone 3 ENTREE 3 160052 160055 160058
Zone 3 Entrée directe 160027 160028 160029
Zone 3
Mise en sourdine marche/arrêt
161312 161315 161318
Zone 3
Augmentation du volume
161612 161615 161618
Zone 3 Diminution du volume 161712 161715 161718
Réglage
Réglage ------- ------- -------
Réglage
ID-1 ------- ------- -------
Réglage
ID-2 ------- ------- -------
Réglage
ID-3 ------- ------- -------
Identification initiale : ID-1
Réglage de l’identification : Appuyer sur la touche SET, et, tout en la maintenant enfoncée,
appuyer sur la touche ID-*. (*=1 ou 2 ou 3)
Page 39

17
FRANÇAIS
En cas de problème avec l’appareil, vérifier d'abord les points suivants avant de faire appel au service après-vente.
1. Les connexions sont-elles effectuées correctement ?
2. L'appareil est-il utilisé correctement en suivant le mode d’emploi ?
3. Les autres appareils fonctionnent-ils correctement ?
Si l'appareil ne fonctionne toujours pas correctement, vérifier les points indiqués dans le tableau suivant.
Si les problèmes ne sont pas résolus en suivant les actions indiquées dans le tableau suivant, un
dysfonctionnement du circuit interne est probable; débrancher immédiatement le cordon d'alimentation CA et
contacter un service après-vente ou un revendeur agréé Marantz.
En cas de difficult
Solution
• Vérifier si le cordon d'alimentation est branché
correctement dans une prise CA.
• Vérifier les réglages des commandes INPUT
SELECTOR et VOLUME.
• Vérifier si la fonction MUTE est désactivée.
(Le témoin MUTE est éteint.)
• Mettre l'appareil hors tension et modifier les
connexions des systèmes d'enceintes gauche et
droit. Si aucun son n'est émis du même système
d'enceinte, vérifier les cordons de connexion ou le
système d'enceinte.
• Vérifier les réglages de la commande INPUT
SELECTOR.
• Vérifier que les cordons des enceintes sont
connectés correctement.
• Vérifier que les cordons de connexion avec les
fiches RCA sont connectés correctement.
• Vérifier que le commutateur d'identification sur le
panneau arrière est réglé correctement.
• Vérifier que le réglage d'identification de la
commande est correct.
Problème
L'amplificateur ne fonctionne pas et le témoin
ne s'allume pas.
Le témoin s'allume mais l'amplificateur ne
fonctionne pas.
Le son ne provient que d'un système
d'enceinte.
Aucun son n'est produit.
Ne fonctionne pas correctement lors d'une
connexion en chaîne.
Cette section décrit les procédures de soins et de
maintenance à effectuer pour optimaliser le
fonctionnement de l'appareil Marantz.
❖ Nettoyage des surfaces extérieures
L'extérieur de l'appareil a une durée de vie illimitée
s'il est correctement entretenu et nettoyé.
Ne jamais utiliser de tampon à récurer, de paille de
fer, de poudre à récurer ni de produits chimiques
décapants, d'alcool, de dissolvant, d'essence,
d'insecticide ni d'autres substances volatiles car ces
produits ternissent l'appareil.
Ne pas non plus utiliser de chiffons imbibés de
produits chimiques. Si l'appareil est sale, essuyer
l'extérieur avec un chiffon doux et sans peluche.
Soins et entretien
Page 40

18
FRANÇAIS
Puissance de sortie
Zone1 G/D (40 Hz –20 kHz) ..................................................................................................... 60 W 6 ohms / canal
Zone2 G/D (40 Hz –20 kHz) ..................................................................................................... 60 W 6 ohms / canal
Zone3 G/D (40 Hz –20 kHz) ..................................................................................................... 60 W 6 ohms / canal
DHT (40 Hz – 20 kHz) ........................................................................................................................ 0,05% 6 ohms
Sensibilité d'entrée .................................................................................................................. 300 mV / 60 W sortie
Impédance d'entrée ................................................................................................................................... 20 kohms
Réponse en fréquence (-1dB) .......................................................................................................... 10 Hz à 30 kHz
Rapport signal/bruit ......................................................................................................................................... 85 dB
Alimentation requise ..................................................................................................... 115 V / 230 V CA, 50/60 Hz
Consommation électrique ................................................................................................................................ 100W
Dimensions (Maximum)
Largeur ................................................................................................................................... 17,32 pieds (440 mm)
Hauteur .................................................................................................................................... 4,53 pieds (115 mm)
Profondeur ............................................................................................................................. 13,31 pieds (338 mm)
Poids ......................................................................................................................................... 18,74 livres (8,5 Kg)
Accessoires
Cordon d'alimentation CA ....................................................................................................................................... 1
Télécommande (RC5300ZS) .................................................................................................................................. 1
Piles de type AA ...................................................................................................................................................... 2
Les caractéristiques et équipements peuvent être modifiés sans préavis.
Spécifications
Page 41

1
ESPAÑOL
Introducción.....................................................2
Características.................................................2
Acerca del teclado..........................................................3
Accesorios.......................................................3
Descripción funcional.....................................4
Panel delantero ..............................................................4
Panel trasero..................................................................5
Mando a distancia (RC5300ZS).....................................6
Configuración del código ID ..........................8
Preparativos y conexiones.............................9
Conexión de altavoces...................................................9
Ejemplo de conexión ...................................................10
Ejemplos de uso............................................15
Lista de códigos de mando a distancia ......16
Localización de Averías................................17
Cuidado y mantenimiento ............................17
Especificaciones ...........................................18
Índice
Page 42

2
ESPAÑOL
Gracias por adquirir el amplificador con selector
multizona ZS5300 de Marantz.
Este sobresaliente componente ha sido diseñado
para proporcionar muchos años de reproducción de
audio en el hogar.
Antes de conectar y usar el ZS5300, tómese unos
minutos para leer atentamente este manual.
Como existen diversas opciones de conexión y
configuración, le recomendamos consultar a su
distribuidor Marantz A/V especializado para que le
asesore acerca de su configuración multizona
particular.
El ZS5300 es un amplificador de 2 canales x 3 zonas
con selector multizona/selector de fuente.
• Todos los canales han sido diseñados
idénticamente, con una completa construcción
discreta de amplificador de potencia clase D.
Para maximizar el rendimiento sónico se ha
empleado un gran transformador de potencia con
núcleo R.
El diseño del amplificador de potencia utiliza una
construcción discreta de amplificador clase D
para los 6 canales. Esto garantiza que todos los
canales ofrecen la misma calidad y potencia.
•
Función de control de 3 zonas
Utilizando este equipo conjuntamente con un
teclado, se puede construir un sistema multizona
que puede controlar hasta 3 zonas.
• Interruptor selector de ID que permite expandir
las zonas
El equipo puede conectarse en cascada si se
cambia la posición de ajuste del interruptor selector
de ID en el panel trasero. Se puede conectar hasta
3 equipos, lo que permite expandir el sistema de
zonas hasta 9 zonas.
• Función de ahorro de energía con control de
alimentación independiente
El equipo puede controlar la
conexión/desconexión de la alimentación en cada
zona. El suministro de energía a las zonas no
utilizadas puede desconectarse para ahorrar
energía.
• Modo de fiesta
Se puede dirigir la misma fuente a todas las zonas
simultáneamente. Esto es ideal para reuniones,
fiestas, etc. También se puede controlar el
volumen y la función de silenciamiento.
•
Terminales de altavoces compatibles con clavijas
banana
Los terminales de altavoces pueden conectarse
directamente a clavijas banana, así como a
cables de altavoces tradicionales.
CaracterísticasIntroducción
Page 43

3
ESPAÑOL
Se puede conectar la mayoría de los teclados y
receptores IR, así como algunos productos de control
disponibles en el mercado.
Los siguientes son ejemplos de sistemas que han sido
probados por Marantz America:
❖ NILES
Teclado : IntelliPad
Unidad de sistema principal IR : IRP6+
Sensor IR : MS 2
Emisor de destellos IR : IRC-2
El logotipo de Niles e IntelliPad son marcas
comerciales registradas de Niles Audio Corporation.
❖ XANTECH
Teclado : SMARTPAD3
Bloque de terminales : 789-44
Sensor IR : Serie 480-30
Emisor IR : 282M
El logotipo de Xantech y SMARTPAD3 son marcas
comerciales registradas de Xantech Corporation.
Nota:
Si desea usar productos no incluidos en la lista
anterior, póngase en contacto con su distribuidor
Marantz autorizado para que le asesore acerca de
posibles problemas de compatibilidad.
•
Cable de alimentación de CA x 1
• Mando a distancia x 1
• Pilas tamaño AA x 2
VOLUME
VOLUME
VOLUME
VOLUME
INPUT
2
ZONE 1
DIRECT
3
1
ON/OFF
INPUT
2
ZONE 2
MUTE
DIRECT
3
1
ON/OFF
ON/OFF
GLOBAL CONTROL
ON
1
DIRECT
ID-2
SET
ID-3
ID-1
INPUT
ZONE 3
ZONE 2 ZONE 3
ZONE 1
GLOBAL
OFF
ON
OFF
MUTE
DIRECT
32
1
REMOTE CONTROLLER RC5300ZS
MUTE
DIRECT POWER
ON/OFF
32
INPUT
MUTE
Accesorios
Acerca del teclado
Page 44

4
ESPAÑOL
qq
Interruptor de alimentación principal
(POWER ON/STANDBY)
Pulse este botón para conectar la alimentación principal.
Púlselo de nuevo para desconectar la alimentación.
Cuando se conecta la alimentación principal, la zona 1,
zona 2 y zona 3 quedan en modo de espera; en esta
condición, el suministro de energía a cada zona puede
controlarse mediante el mando a distancia RC5300ZS
(suministrado) o a través de un teclado (opcional). Para
uso regular, mantenga conectado el suministro de
energía al equipo.
ww
Indicadores de nivel de volumen (LEVEL)
Estos indicadores muestran el nivel de volumen. Cuando
todos los indicadores se iluminan, significa que el volumen
está al nivel máximo. Cuando todos los indicadores están
apagados, significa que el volumen está al nivel mínimo.
El volumen puede ajustarse individualmente desde la
zona 1, zona 2 y zona 3. El volumen puede ajustarse
mediante el mando a distancia o utilizando un teclado.
Indicadores de silenciamiento (MUTE)
Estos indicadores parpadean cuando se silencia la salida
de sonido. Cuando el volumen se encuentra al nivel
máximo, todos los indicadores parpadean. Cuando el
volumen se encuentra al nivel mínimo, sólo parpadea el
primer indicador. La función de silenciamiento puede
controlarse individualmente desde la zona 1, zona 2 y
zona 3. La función de silenciamiento puede
activarse/desactivarse mediante el mando a distancia o
utilizando un teclado. Si se ajusta el volumen cuando la
función de silenciamiento está activada, ésta se desactiva.
Precaución
Cuando estos indicadores parpadean, no hay salida de
sonido. Al cancelar la función de silenciamiento,
compruebe el nivel de volumen. Los altavoces pueden
dañarse si el volumen está ajustado a un nivel
excesivamente alto.
ee
Indicador de espera (STANDBY)
Este indicador se ilumina cuando cualquiera de las
zonas se encuentra en modo de espera. La zona 1, zona
2 y zona 3 pueden encontrarse en modo de espera de
forma independiente. El suministro de energía a cada
zona puede controlarse mediante el mando a distancia o
utilizando un teclado.
rr
Indicador directo (DIRECT)
Cuando se selecciona la entrada "directo a zona" para la
fuente, este indicador se ilumina. La fuente conectada al
terminal "ZONE DIRECT" de la zona 1 sólo puede
seleccionarse para la zona 1. Lo mismo es valido para la
zona 2 y la zona 3. La fuente puede seleccionarse
mediante el mando a distancia o utilizando un teclado.
tt
Indicador de entrada (INPUT)
Dependiendo de la entrada que se selecciona en cada
zona, el indicador INPUT correspondiente se ilumina. Las
entradas pueden seleccionarse utilizando el mando a
distancia o un teclado.
yy
Sensor IR (mando a distancia)
Esta ventanilla recibe las señales infrarrojas desde el
mando a distancia.
Panel delantero
Descripción funcional
MUTE
LEVEL LEVELLEVEL
MUTE MUTE
DIRECTDIRECT
65432
11
23456
STANDBY
1
ZONE 3
INPUT
32
STANDBY
6543
23
INPUT
ZONE 1
1
2
1
DIRECT
ZONE 2
STANDBY
INPUT
32
1
MULTI ZONE SELECTOR ZS5300
POWER
ON/STANDBY
3
1
5
6
4
2
Page 45

5
ESPAÑOL
zz
Terminales de entrada de audio (AUDIO IN)
Conecte aquí la salida de audio analógica de un
dispositivo de audio (reproductor de CD, televisor,
reproductor de DVD, etc.). Se pueden conectar hasta 3
dispositivos de audio.
xx
Terminales de salida de audio (AUDIO OUT)
Estos terminales han sido diseñados como un paso
directo de audio. Pueden utilizarse al conectar en cascada
uno o dos ZS5300 adicionales. Otro ejemplo de aplicación
puede ser compartir componentes de fuente con un
sistema home theater dedicado, etc.
cc
Terminales de entrada directa a zona
(ZONE DIRECT IN)
Estos terminales son para sus zonas correspondientes.
Conecte aquí los terminales salida de audio analógica de
un dispositivo de audio (reproductor de CD, televisor,
reproductor de DVD, etc.). Aun cuando se puede conectar
hasta 3 dispositivos a cada zona, el dispositivo conectado
a "ZONE DIRECT 1" sólo puede reproducirse en ZONE 1.
Lo mismo se aplica a ZONE DIRECT 2 y ZONE DIRECT 3.
• Se puede construir un sistema multizona poderoso y
exclusivo conectando el servidor de música Marantz
(DH9300). (
☞
P. 13)
vv
Terminales de salida de preamplificador para
la zona 3 (ZONE 3 PRE OUT)
Estos terminales son terminales de salida de
preamplificador para la zona 3. Pueden conectarse a otros
dispositivos de audio como, por ejemplo, un amplificador
externo.
bb
Terminales de entrada / salida de mando a
distancia (REMOTE CONTROL)
Si conecta este equipo a otro componente de audio
Marantz utilizando un cable de control de sistema, podrá
controlar a distancia todos los componentes como un
solo sistema integrado.
nn
Terminales de salida de altavoces
(SPEAKERS)
Conecte aquí los altavoces para cada zona.
• Impedancia de los altavoces: 6 Ω
mm
Terminales de salida de estado
(STATUS OUT)
Estos terminales son terminales de salida de activación
de CC que determinan si la alimentación eléctrica de una
zona está conectada o desconectada.
Conecte estos terminales a teclados, etc.
• Régimen de la salida de estado: 12 V, 100 mA.
,,
Terminal de entrada emisor de destellos
(FLASHER IN)
Este terminal sirve para controlar el equipo desde cada
zona. Conecte aquí la señal de control de un teclado, etc.
..
Interruptor de mando a distancia interno /
externo (INT./EXT.)
Este interruptor se utiliza para activar o desactivar el
sensor de mando a distancia del panel delantero. Si
utiliza dos o más ZS5300 conectados en cascada, ajuste
este interruptor a la posición INT. en el ZS5300 que
funciona como equipo principal. Ajuste el interruptor a la
posición EXT. en los ZS5300 secundarios (esclavos).
INT. : Habilita el sensor de mando a distancia.
EXT. : Inhabilita el sensor de mando a distancia.
⁄⁄00
Interruptor selector de ID (ID SELECTOR)
Cuando utilice dos o tres ZS5300, establezca números ID
independientes para cada uno. Se pueden conectar hasta
3 ZS5300. Se debe establecer números ID distintos para
cada equipo.
⁄⁄11
Selector de tensión (VOLTAGE SELECTOR)
Seleccione la tensión de alimentación utilizada en su
lugar de residencia. Puede seleccionar 115 V o 230 V.
• Asegúrese de desconectar el cable de alimentación antes
de cambiar la posición de ajuste de este interruptor.
⁄⁄22
Entrada de corriente (AC IN)
Conecte el cable de alimentación a este conector.
PRECAUCIÓN:
Al utilizar el equipo con una tensión de 230 V CA,
asegúrese de usar un cable de alimentación con una
capacidad superior a 2,5 A, 250 V y 18 AWG.
ZONE
1
R
ZONE
3
3
ZONE
2
FLASHER
REMOTE CONTROL
OUT
IN
2
STATUS OUT
ZONE
1
L
SPEAKERS
(
MINIMUM 6 OHMS
)
R
ZONE
3
L
R
SELECTOR
L
VOLTAGE SELECTOR
3
INT.
EXT.
AUDIO OUT
115V
R
L
IN
AUDIO IN
ID
ZONE
2
230V
SERIAL NO.
ZONE DIRECT IN
R
1
L
ZONE 3 PRE OUT
AC IN
Panel trasero
1 2 3 4 5 6
AUDIO OUT
AUDIO IN
LLR
1
2
3
LLR
ZONE 3 PRE OUT
ZONE DIRECT IN
RRL
RRL
STATUS OUT
ZONE
ZONE
ZONE
1
REMOTE CONTROL
1
ZONE
3
IN
INT.
EXT.
FLASHER
OUT
IN
2
ID
SELECTOR
R
22113
SPEAKERS
L
R
(
MINIMUM 6 OHMS
ZONE
2
)
ZONE
3
R
L
L
7 8 9 10 11 12
MODEL NO. ZS5300
VOLTAGE SELECTOR
115V
SERIAL NO.
230V
AC IN
Page 46

6
ESPAÑOL
q Botones de control global
(GLOBAL CONTROL)
Con estos botones se puede controlar el volumen,
seleccionar la fuente, etc. para todas las zonas al mismo
tiempo. Si hay dos o tres equipos conectados en
cascada, todas las zonas también pueden controlarse al
mismo tiempo.
• Botón directo global (GLOBAL DIRECT)
Este botón le permite seleccionar la entrada
"directo a zona" (dedicada a dicha zona) a
reproducir en las zonas 1, 2 y 3 de todos los
ZS5300 conectados.
• Botón de entrada global 1, 2, 3
(GLOBAL INPUT 1, 2, 3)
Este botón le permite seleccionar la entrada 1, 2
o 3 a reproducir globalmente en todos los
ZS5300 conectados.
• Botón de encendido / apagado global
(GLOBAL ON / OFF)
Este botón le permite conectar/desconectar la
alimentación de todas las zonas de todos los
ZS5300 conectados. Pulse el botón una vez para
conectar la alimentación; púlselo nuevamente
para desconectarla.
• Botón de silenciamiento global (GLOBAL MUTE)
Este botón le permite activar/desactivar la
función de silenciamiento en todos los ZS5300
conectados. Pulse el botón una vez para activar
la función de silenciamiento; púlselo nuevamente
para desactivarla.
• Botón de volumen global (GLOBAL VOLUME)
Este botón le permite aumentar/disminuir el
volumen en todos los ZS5300 conectados.
• Botón GLOBAL ON
Este botón le permite conectar la alimentación
eléctrica de todas las zonas de todos los
ZS5300 conectados.
Mando a distancia (RC5300ZS)
• Botón GLOBAL OFF
Este botón le permite desconectar la
alimentación eléctrica de todas las zonas de
todos los ZS5300 conectados.
w Botón de alimentación directa
(DIRECT POWER)
Estos botones le permiten controlar la alimentación de
cada zona de forma independiente.
• Botón de conexión de la alimentación de la zona 1
(ZONE 1 DIRECT ON)
Para conectar la alimentación de la zona 1
independientemente.
• Botón de desconexión de la alimentación de la
zona 1 (ZONE 1 DIRECT OFF)
Para desconectar la alimentación de la zona 1
independientemente.
• Botón de conexión de la alimentación de la zona 2
(ZONE 2 DIRECT ON)
Para conectar la alimentación de la zona 2
independientemente.
• Botón de desconexión de la alimentación de la
zona 2 (ZONE 2 DIRECT OFF)
Para desconectar la alimentación de la zona 2
independientemente.
• Botón de conexión de la alimentación de la zona 3
(ZONE 3 DIRECT ON)
Para conectar la alimentación de la zona 3
independientemente.
• Botón de desconexión de la alimentación de la
zona 3 (ZONE 3 DIRECT OFF)
Para desconectar la alimentación de la zona 3
independientemente.
e Botones para las zonas 1, 2, 3 (ZONE 1, 2, 3)
Las siguientes descripciones son comunes para todos
los botones. Las funciones de los botones son las
mismas para las zonas 2 y 3; sólo se describen los
botones para la zona 1.
• Botón directo de la zona 1 (ZONE 1 DIRECT)
Para seleccionar la entrada "ZONE DIRECT"
para la zona 1.
• Botones de entrada 1, 2, 3 para la zona 1
(ZONE 1 INPUT 1, 2, 3)
Para seleccionar la "entrada 1", "entrada 2" o
"entrada 3" para la zona 1.
• Botón de conexión / desconexión de la
alimentación de la zona 1 (ZONE 1 ON / OFF)
Para conectar/desconectar la alimentación de la
zona 1. Pulse el botón una vez para conectar la
alimentación; púlselo nuevamente para
desconectarla.
• Botón de silenciamiento de la zona 1
(ZONE 1 MUTE)
Para activar/desactivar la función de
silenciamiento para la zona 1. Pulse el botón una
vez para activar la función de silenciamiento;
púlselo nuevamente para desactivarla. Si se
ajusta el volumen cuando la función de
silenciamiento está activada, ésta se desactiva.
• Botón de volumen de la zona 1 (ZONE 1 VOLUME)
Para aumentar/disminuir el nivel de volumen en
la zona 1.
r Botón de ajuste de número ID
Cuando se conectan dos o tres ZS5300 mediante un cable
remoto o si se utilizan los equipos en el mismo lugar, este
interruptor permite establecer distintos números ID.
Para obtener información sobre cómo establecer un
código ID para el mando a distancia, consulte la sección
"Configuración del código ID". (
☞
P. 8)
El ajuste por defecto para el equipo es ID-1.
GLOBAL CONTROL
DIRECT
1
2
DIRECT
DIRECT
3
DIRECT
4
MUTE
ON/OFF
INPUT
ZONE 2 ZONE 3
DIRECT POWER
ZONE 1
ON/OFF
MUTE
INPUT
2
ZONE 2
MUTE
ON/OFF
INPUT
2
ZONE 3
MUTE
ON/OFF
INPUT
ID-2
ID-1
VOLUME
32
VOLUME
3
VOLUME
3
VOLUME
32
1
ZONE 1
ON
OFF
1
1
1
SET
REMOTE CONTROLLER RC5300ZS
GLOBAL
OFF
ID-3
ON
Page 47

7
ESPAÑOL
❖ Uso del mando a distancia
1. Mando a distancia
El mando a distancia (RC5300ZS) puede utilizarse a
una distancia de aproximadamente 16 pies (5 m) de
la ventanilla IR (mando a distancia) situada en el
panel delantero del equipo.
Si apunta el transmisor en una dirección distinta del
sensor de infrarrojos o si hay algún obstáculo entre
ellos, tal vez no pueda realizar el control remoto.
• Alcance del mando a distancia
2. Instalación de las pilas
Las pila del mando a distancia tienen una vida útil de
aproximadamente 1 año bajo condiciones de uso
normales. Cuando no vaya a usar el mando a distancia
durante un período prolongado de tiempo, extraiga las
pilas. Asimismo, cuando note que las pilas comienzan
a perder su carga, sustitúyalas lo antes posible.
1. Quite la tapa del compartimiento de las pilas.
Nota:
• No use las pilas recargables (tipo Ni-Cd).
2. Instale las pilas tamaño AA, observando la
polaridad correcta (+ y –).
3. Cierre la tapa del compartimiento de las pilas
hasta escuchar un "clic".
60
Aproximadament
e 16 pies (5m)
Mando a distancia
ZS5300
Page 48

8
ESPAÑOL
❖ Ajuste del código ID
Ej.:) Para ajustarlo a ID-1
Mando a distancia
Mientras mantiene pulsado
SET, pulse ID-1; luego, libere
ambos botones.
Panel trasero del equipo
Ajustar a "1".
R
33
3
REMOTE CONTROL
OUT
ZONE
1
L
ESPEAKERS (MINIMUM 6 OHMS
)
R
ZONE 3
LR
SELECTOR
L
VOLTAGE SELECTOR
INT.
EXT.
115V
IN
ID
ZONE 2
230V
SERIAL NO.
AC IN
MODEL NO. ZS5300
El sistema ZS5300 puede expandirse hasta un máximo de 3 equipos.
Cuando use un equipo solo, ajuste el interruptor selector de ID, situado en el panel trasero, a "1".
Para ajustar el mando a distancia al número ID del equipo, siga el procedimiento que se describe a continuación.
1. Mientras mantiene pulsado el botón SET, pulse el botón ID-1; luego, libere ambos botones.
2. El mando a distancia queda ajustado a ID-1. Para ajustar el ID a 2 o 3, siga el mismo procedimiento.
3. Cuando se sustituyen las pilas, el equipo establece de forma predeterminada el ajuste de fábrica ID-1.
Nota:
Esto es importante, pues si ha cambiado los números ID, tendrá que volver a ajustar el número ID al sustituir las pilas.
*El ajuste por defecto tanto para el mando a distancia como para el equipo es ID-1
Configuración del código ID
1
SET
REMOTE CONTROLLER RC5300ZS
INPUT
ID-1
VOLUME
32
ID-2
ID-3
T
REMOTE CONTROL
R
ID
SELECTOR
IN
OUT
22113
INT.
EXT.
R
L
SP
ZONE
1
Page 49

9
ESPAÑOL
❖ Antes de hacer las conexiones
Asegúrese de desconectar la alimentación del ZS5300 y de los otros productos conectados a éste antes de hacer
las conexiones.
Consulte los manuales de instrucciones de los otros productos para comprobar los terminales y la forma correcta
de conectarlos.
❖ Teclado
Los teclados que se pueden conectar al equipo con los teclados y cajas de conexión fabricados por NILES y
XANTECH que se indican a continuación. Si desea usar productos no incluidos en la siguiente lista o productos de
otras marcas, póngase en contacto con su distribuidor Marantz autorizado.
• NILES
Teclado : IntelliPad
Unidad de sistema principal IR : IRP6+
Sensor IR : MS 2
Emisor de destellos IR : IRC-2
• XANTECH
Teclado : SMARTPAD3
Bloque de terminales : 789-44
Sensor IR : Serie 480-30
Emisor IR : 282M
Nota:
Al conectar un teclado, consulte tanto el manual de instrucciones del teclado como el de este equipo.
Preparativos y conexiones
Existen dos formas de conectar altavoces. Vea los
diagramas más abajo.
❖ Conexión del alambre del altavoz
1. Pele aproximadamente 6/8 inch (20 mm) del
aislamiento del cable.
2. Retuerza los extremos de cable desnudo para
impedir cortocircuitos.
3. Introduzca la parte descubierta del alambre en el
agujero en cada terminal de la siguiente forma.
❖ Conexión de la clavija con punta cónica
También se pueden hacer conexiones con clavija de
punta cónica.
Conexión de altavoces
aproximadamente
6/8 inch (20 mm)
Page 50

10
ESPAÑOL
❖ Sistema NILES
Ejemplo de conexión
ZONE
1
R
ZONE
3
3
ZONE
2
FLASHER
REMOTE CONTROL
OUT
IN
2
STATUS OUT
ZONE
1
L
SPEAKERS
(
MINIMUM 6 OHMS
)
R
ZONE
3
L
R
SELECTOR
L
VOLTAGE SELECTOR
3
INT.
EXT.
AUDIO OUT
115V
R
L
IN
AUDIO IN
ID
ZONE
2
230V
SERIAL NO.
ZONE DIRECT IN
R
1
L
ZONE 3 PRE OUT
AC IN
Mando a distancia
Estado
Analógico
Altavoz
Datos IR
Emisor de destellos
A conexión en cascada
Fuente de alimentación
de CC conectada a una
salida de CA sin
interruptor
Altavoz
Altavoz
Altavoz
Sensor MS-2 IR
en una ubicación
remota.
Emisor de
destellos IR
IRC-2
Reproductor de CD
Reproductor de DVD
Sintonizador
Reproductor
de HDD
Salida
analógica
Salida
analógica
Salida
analógica
Mando a
distancia
Salida
analógica
Sensor MS-2 IR
en una ubicación
remota.
Sensor MS-2 IR
en una ubicación
remota.
Mando a
distancia
Mando a
distancia
ZS5300
AUDIO IN
1
2
3
+
12
V
LLR
N
POWER
G
D
MODEL
AUDIO OUT
D
A
T
A
LLR
+
G
12
N
V
D
IRP6
STATU S
ZONE DIRECT IN
RRL
+
D
12
A
V
T
A
+
ZONE 3 PRE OUT
STATUS OUT
ZONE
ZONE
+
G
D
12
N
A
V
D
T
A
SENSOR INPUTS
FLASHER LEVEL
+-+
RRL
1
2
G
D
N
A
D
T
A
FLASHERS
-
ZONE
FLASHER
IN
+
12
V
+-+
REMOTE CONTROL
3
G
D
N
A
D
T
A
(
SPEAKERS
ZONE
1
R
ID
SELECTOR
IN
22113
INT.
EXT.
OUT
MINIMUM 6 OHMS
ZONE
L
R
)
2
L
ZONE
3
R
L
MODEL NO. ZS5300
VOLTAGE SELECTOR
115V
SERIAL NO.
230V
AC IN
LR
MP00124
+
G
D
12
N
A
V
D
T
A
IR
DATA
OUT
D
G
A
N
T
-
D
A
AMPLIFIER
INPUT
L+ L-R+R
SPEAKER
OUTPUT
L+ L
-
-
R+R
-
Zone-1
+
In
Out
In
Out
12V DC
MARANTZ
MARANTZ
MARANTZ
AMPLIFIER
INPUT
L+ L-R+R-L+ L
AMPLIFIER
INPUT
-
R+R-L+ L-R+R
L+ L
SPEAKER
OUTPUT
-
SPEAKER
OUTPUT
LR
MP00124
R+R
-
Zone-2
LR
MP00124
-
2134
MARANTZ
Zone-3
Page 51

11
ESPAÑOL
❖ Sistema XANTECH
ZONE
1
R
ZONE
3
3
ZONE
2
FLASHER
REMOTE CONTROL
OUT
IN
2
STATUS OUT
ZONE
1
L
SPEAKERS
(
MINIMUM 6 OHMS
)
R
ZONE
3
L
R
SELECTOR
L
VOLTAGE SELECTOR
3
INT.
EXT.
AUDIO OUT
115V
R
L
IN
AUDIO IN
ID
ZONE
2
230V
SERIAL NO.
ZONE DIRECT IN
R
1
L
ZONE 3 PRE OUT
AC IN
Mando a distancia
Estado
Analógico
Altavoz
Datos IR
Emisor de destellos
A conexión en cascada
Altavoz
Altavoz
Altavoz
Receptores IR de la
serie 480-30
Emisor IR
282M
Franja BLANCA
Cable de cinta de 7 pies
de largo, con miniclavija
retirada
Fuente de alimentación
de CC conectada a una
salida de CA sin
interruptor
Reproductor de CD
Reproductor de DVD
Sintonizador
Reproductor
de HDD
Salida
analógica
Salida
analógica
Salida
analógica
Salida
analógica
Receptores IR de la
serie 480-30
Franja BLANCA
Cable de cinta de 7 pies
de largo, con miniclavija
retirada
Receptores IR de la
serie 480-30
Franja BLANCA
Cable de cinta de 7 pies
de largo, con miniclavija
retirada
Mando a
distancia
Mando a
distancia
Mando a
distancia
ZS5300
AUDIO OUT
AUDIO IN
LLR
1
2
3
CONNECTING BLOCK
12VDC
ZONE DIRECT IN
LLR
EMITTERS
789-44
GND
+12VDC
RRL
STATUS
IR IN
ZONE 3 PRE OUT
RRL
STATUS OUT
ZONE
1
ZONE
2
IR
RCVR
ZONE
FLASHER
IN
3
REMOTE CONTROL
IN
OUT
(
SPEAKERS
ZONE
1
R
ID
SELECTOR
22113
INT.
EXT.
MINIMUM 6 OHMS
ZONE
L
R
)
2
R
L
PM110
SMART PAD
PROGRAMMABLE MODULE
L+ L-R+R-L+ L-R+R
ZONE
3
AMPLIFIER
INPUT
L
MODEL NO. ZS5300
VOLTAGE SELECTOR
115V
SERIAL NO.
230V
AC IN
LR
TM
3
SPEAKER
OUTPUT
+12V
IR OUT
STATUS
GND
OUT
+12V
GND
Zone-1
In
Out
In
Out
1
MARANTZ
MARANTZ
MARANTZ
3
24
MARANTZ
PM110
SMART PAD
PROGRAMMABLE MODULE
PM110
SMART PAD
PROGRAMMABLE MODULE
TM
3
L+ L-R+R-L+ L-R+R
AMPLIFIER
L+ L-R+R-L+ L-R+R
AMPLIFIER
INPUT
INPUT
SPEAKER
OUTPUT
TM
3
SPEAKER
OUTPUT
-
-
LR
GND
+12V
IR OUT
STATUS
OUT
+12V
GND
Zone-2
LR
GND
+12V
IR OUT
STATUS
OUT
+12V
GND
Zone-3
Page 52

12
ESPAÑOL
❖ Conexión en cascada
ZONE
1
R
ZONE
3
3
ZONE
2
FLASHER
REMOTE CONTROL
OUT
IN
2
STATUS OUT
ZONE
1
L
SPEAKERS
(
MINIMUM 6 OHMS
)
R
ZONE
3
L
R
SELECTOR
L
VOLTAGE SELECTOR
3
INT.
EXT.
AUDIO OUT
115V
R
L
IN
AUDIO IN
ID
ZONE
2
230V
SERIAL NO.
ZONE DIRECT IN
R
1
L
ZONE 3 PRE OUT
AC IN
ZONE
1
R
ZONE
3
3
ZONE
2
FLASHER
REMOTE CONTROL
OUT
IN
2
STATUS OUT
ZONE
1
L
SPEAKERS
(
MINIMUM 6 OHMS
)
R
ZONE
3
L
R
SELECTOR
L
VOLTAGE SELECTOR
3
INT.
EXT.
AUDIO OUT
115V
R
L
IN
AUDIO IN
ID
ZONE
2
230V
SERIAL NO.
ZONE DIRECT IN
R
1
L
ZONE 3 PRE OUT
AC IN
3
INT.
EXT.
3
INT.
EXT.
Mando a distancia
Analógico
Ajustar a INT.
Ajustar a 1
Ajustar a EXT.
Ajustar a 2
Nota:
Para cambiar la posición de ajuste del interruptor EXT./INT. y del interruptor selector de ID, desactive el interruptor de
alimentación principal del ZS5300.
Cuando el interruptor de alimentación principal está activado, el cambio de posición de ajuste no tiene ningún efecto.
ZS5300 (principal)
ZS5300 (secundario)
Reproductor de CD
Reproductor de DVD
Sintonizador
Reproductor
de HDD
Salida
analógica
Salida
analógica
Salida
analógica
Salida
analógica
Mando a
distancia
Mando a
distancia
Mando a
distancia
ZONE 3 PRE OUT
ZONE DIRECT IN
RRL
RRL
STATUS OUT
ZONE
ZONE
ZONE
1
REMOTE CONTROL
1
ZONE
3
IN
INT.
EXT.
OUT
2
FLASHER
IN
R
ID
SELECTOR
22113
AUDIO OUT
AUDIO IN
1
2
3
LLR
LLR
(
SPEAKERS
MINIMUM 6 OHMS
ZONE
L
R
INT.
EXT.
)
2
L
ZONE
3
R
L
MODEL NO. ZS5300
VOLTAGE SELECTOR
115V
SERIAL NO.
230V
22113
AC IN
ZONE 3 PRE OUT
ZONE DIRECT IN
RRL
RRL
STATUS OUT
ZONE
ZONE
ZONE
1
REMOTE CONTROL
1
ZONE
3
IN
INT.
EXT.
OUT
2
FLASHER
IN
R
ID
SELECTOR
22113
AUDIO OUT
AUDIO IN
1
2
3
LLR
LLR
In
Out
MARANTZ
(
SPEAKERS
MINIMUM 6 OHMS
ZONE
L
R
INT.
EXT.
)
2
L
ZONE
3
R
L
MODEL NO. ZS5300
VOLTAGE SELECTOR
115V
SERIAL NO.
230V
AC IN
22113
In
Out
1
MARANTZ
MARANTZ
24
3
MARANTZ
Page 53

13
ESPAÑOL
❖ Conexión al DH9300
ZONE
1
R
ZONE
3
3
ZONE
2
FLASHER
REMOTE CONTROL
OUT
IN
2
STATUS OUT
ZONE
1
L
SPEAKERS
(
MINIMUM 6 OHMS
)
R
ZONE
3
L
R
SELECTOR
L
VOLTAGE SELECTOR
3
INT.
EXT.
AUDIO OUT
115V
R
L
IN
AUDIO IN
ID
ZONE
2
230V
SERIAL NO.
ZONE DIRECT IN
R
1
L
ZONE 3 PRE OUT
AC IN
Mando a distancia
Analógico
Altavoz
Vídeo
Altavoz
Altavoz
Altavoz
ZS5300
AUDIO IN
LLR
1
2
3
AUDIO OUT
ZONE DIRECT IN
LLR
RRL
ZONE 3 PRE OUT
RRL
STATUS OUT
ZONE
ZONE
(
SPEAKERS
ZONE
1
SELECTOR
R
ID
22113
REMOTE CONTROL
1
ZONE
3
IN
INT.
EXT.
OUT
2
FLASHER
IN
MINIMUM 6 OHMS
ZONE
L
R
)
2
L
ZONE
3
R
L
MODEL NO. ZS5300
VOLTAGE SELECTOR
115V
SERIAL NO.
230V
AC IN
LR
LR
LR
TV
Zone-1
TV
Zone-2
TV
DH9300
OPUS CONNECTION
VIDEO 1
OUT
S-VIDEO
OUT
MODULATED
REMOTE IN
VIDEO 4
OUT
VIDEO 3
Zone-3
VIDEO 2
OUT
OUT
ANALOGUE AUDIODIGITAL AUDIO
Page 54

14
ESPAÑOL
❖ Conexión de un amplificador de potencia externo
Al usar altavoces que necesitan alta potencia para ser excitados (p. ej., algunos altavoces exteriores), puede
necesitarse más potencia de la que el ZS5300 puede proporcionar. Si necesita más potencia, podrá conectar el
terminal "ZONE 3 PRE OUT" a un amplificador de potencia externo.
El nivel de sonido puede ajustarse con el botón de aumento/disminución de volumen del ZS5300.
❖ Conexión del cable de alimentación
Una vez que haya hecho todas las conexiones,
enchufe el cable de alimentación en la toma de
corriente.
❖ Configuración
Este ejemplo muestra la forma de construir un
sistema de 3 zonas con un teclado NILES.
Vea el diagrama Ejemplo de conexión "Sistema
NILES" (
☞
P. 10).
Una vez que haya hecho todas las conexiones,
programe en el teclado los comandos del mando a
distancia.
Para programar los comandos en el teclado u
obtener más información, consulte el manual de
instrucciones del teclado.
ZONE
1
RR
ZONE
3
3
ZONE
2
FLASHER
REMOTE CONTROL
OUT
IN
STATUS OUT
ZONE 1
L
SPEAKERS (MINIMUM 6 OHMS
)
R
ZONE 3
LR
SELECTOR
L
VOLTAGE SELECTOR
INT.
EXT.
O
115V
L
IN
ID
ZONE 2
230V
SERIAL NO.
ZONE DIRECT IN
L
ZONE 3 PRE OUT
AC IN
MODEL NO. ZS5300
Altavoz exterior
Altavoz exterior
Amplificador de potencia
Amplificador de potencia
ZONE 3 PRE OUT
RRL
UT
ZONE DIRECT IN
LLRRRL
STATUS OUT
ZONE
ZONE
REMOTE CONTROL
1
ZONE
3
IN
2
FLASHER
OUT
IN
ID
SELECTOR
22113
INT.
EXT.
ZS5300
REMOTE CONT.
IN
INPUT
INVERT
OUT
OUTPUT
VIDEO/
5-13VDC
EXT.CONT.IN
+
-
SPEAKER SYSTEM
8 OHMS
MA6100
REMOTE CONT.
IN
INPUT
INVERT
OUT
OUTPUT
VIDEO/
5-13VDC
EXT.CONT.IN
+
-
SPEAKER SYSTEM
8 OHMS
MA6100
Page 55

15
ESPAÑOL
❖ Vea el ejemplo de conexión "Sistema NILES" (
☞
P.10)
Ejemplos de uso
1. Pulse el botón CD en el teclado.
Se conecta la alimentación de la zona 1 del ZS5300
y la fuente de entrada cambia a la entrada 3.
También puede pulsar el botón POWER del teclado
para conectar la alimentación.
2. Pulse el botón PLAY en el teclado.
Comienza la reproducción en el reproductor de CD.
3. Pulse el botón VOLUME 3 en el teclado.
Aumenta el nivel de volumen en la zona 1 del
ZS5300.
También al pulsar el botón VOLUME 4 disminuye
el nivel del volumen.
4. Pulse el botón MUTE en el teclado para silenciar
la salida de sonido.
Los indicadores del nivel del volumen de la zona
1 del ZS5300 parpadean.
Para desactivar la función de silenciamiento,
vuelva a pulsar el botón MUTE o pulse el botón
VOLUME 3 o 4.
5. Pulse el botón STOP en el teclado.
El reproductor de CD se detiene.
6. Pulse el botón
POWER en el teclado.
Se desconecta la alimentación de la zona 1 del
ZS5300 y el indicador STANDBY se ilumina.
Habitación principal
Zona 1
iluminar
iluminar
iluminar
Parpadear
1.
MULTI ZONE SELECTOR ZS5300
ZONE 1
INPUT
23
1
DIRECT
6543
2
POWER
1.
ON/STANDBY
1
MUTE
3.
4.
LEVEL
STANDBY
6.
CD
DVD
TUNER
VCR
LASER
SAT
1.
2.
5.
3.
4.1. 6.
Page 56

FUNCIONAL ID-1 ID-2 ID-3 Nota
Global
Conexión/desconexión de la alimentación
161210 161210 161210 Código de control global
Global Conexión de la alimentación 161211 161211 161211 Código de control global
Global Desconexión de la alimentación 161212 161212 161212 Código de control global
Global Aumento de volumen 161600 161600 161600 Código de control global
Global Disminución de volumen 161700 161700 161700 Código de control global
Global Silenciamiento 161319 161319 161319 Código de control global
Global ENTRADA 1 160039 160039 160039 Código de control global
Global ENTRADA 2 160049 160049 160049 Código de control global
Global ENTRADA 3 160059 160059 160059 Código de control global
Global Entrada directa 160060 160060 160060 Código de control global
Zona 1
Conexión/desconexión de la alimentación
161220 161223 161226
Zona 1
Conexión de la alimentación
161221 161224 161227
Zona 1
Desconexión de la alimentación
161222 161225 161228
Zona 1 ENTRADA 1 160030 160033 160036
Zona 1 ENTRADA 2 160031 160034 160037
Zona 1 ENTRADA 3 160032 160035 160038
Zona 1 Entrada directa 160017 160018 160019
Zona 1
Activación/desactivación de silenciamiento
161310 161313 161316
Zona 1 Aumento de volumen 161610 161613 161616
Zona 1 Disminución de volumen 161710 161713 161716
Zona 2
Conexión/desconexión de la alimentación
161230 161233 161236
Zona 2 Conexión de la alimentación 161231 161234 161237
Zona 2 Desconexión de la alimentación 161232 161235 161238
Zona 2 ENTRADA 1 160040 160043 160046
Zona 2 ENTRADA 2 160041 160044 160047
Zona 2 ENTRADA 3 160042 160045 160048
Zona 2 Entrada directa 160024 160025 160026
Zona 2
Activación/desactivación de silenciamiento
161311 161314 161317
Zona 2 Aumento de volumen 161611 161614 161617
Zona 2 Disminución de volumen 161711 161714 161717
Zona 3
Conexión/desconexión de la alimentación
161240 161243 161246
Zona 3 Conexión de la alimentación 161241 161244 161247
Zona 3 Desconexión de la alimentación 161242 161245 161248
Zona 3 ENTRADA 1 160050 160053 160056
Zona 3 ENTRADA 2 160051 160054 160057
Zona 3 ENTRADA 3 160052 160055 160058
Zona 3 Entrada directa 160027 160028 160029
Zona 3
Activación/desactivación de silenciamiento
161312 161315 161318
Zona 3 Aumento de volumen 161612 161615 161618
Zona 3 Disminución de volumen 161712 161715 161718
Configuración
Ajuste ------- ------- -------
Configuración
ID-1 ------- ------- -------
Configuración
ID-2 ------- ------- -------
Configuración
ID-3 ------- ------- -------
16
ESPAÑOL
❖ Lista de códigos de mando a distancia (extensión RC-5)
Lista de códigos de mando a distancia
ID inicial : ID-1
Ajuste ID : Mantengo pulsado prionero el botón SET y luego ID-* en forma simultánea los botones.
(*=1 o 2 o 3)
Page 57

17
ESPAÑOL
Si tiene problemas con el equipo, compruebe los siguientes puntos antes de solicitar reparaciones.
1. ¿Ha realizado todas las conexiones correctamente?
2. ¿Está utilizando el equipo correctamente, siguiendo las instrucciones del manual del usuario?
3. ¿Funcionan correctamente los otros productos?
Si el equipo sigue presentando problemas, compruebe los puntos de la siguiente tabla.
Si no logra solucionar el problema llevando a cabo las acciones indicadas en la tabla, significará que la circuitería
interna probablemente tiene algún desperfecto; desenchufe inmediatamente el cable de alimentación de CA y
póngase en contacto con un distribuidor o centro de servicio Marantz autorizado.
Localización de Averías
REMEDIO
• Compruebe si el cable de alimentación está
conectado de forma correcta a la toma de corriente
de CA.
• Compruebe los ajustes del selector INPUT
SELECTOR y del control VOLUME.
• Compruebe si la función de silenciamiento (MUTE)
está desactivada. (El indicador MUTE está apagado.)
• Desconecte la alimentación y cambie las
conexiones de los sistemas de altavoces izquierdo
y derecho. Si el mismo sistema de altavoces sigue
sin emitir sonido, compruebe los cables de conexión
o el sistema de altavoces.
• Compruebe el ajuste del selector INPUT SELECTOR.
• Asegúrese de que los cables de los altavoces estén
conectados correctamente.
• Asegúrese de que los cables de conexión con clavijas
de espiga RCA estén conectados correctamente.
• Compruebe si el interruptor selector de ID del panel
trasero está ajustado correctamente.
• Asegúrese de que el ajuste de número ID del
mando a distancia sea correcto.
Problema
El amplificador no funciona y el indicador no
se ilumina.
El indicador se ilumina, pero el amplificador
no funciona.
Sólo uno de los sistemas de altavoces
produce sonido.
Ausencia total de sonido.
El equipo no funciona correctamente al ser
conectado en cascada.
Esta sección describe los procedimientos de cuidado
y mantenimiento que deben llevarse a cabo para
optimizar el funcionamiento de este equipo Marantz.
❖ Limpieza de las superficies exteriores
del equipo
El acabado exterior del equipo durará
indefinidamente con el cuidado y limpieza
adecuados.
Nunca use esponjas de fregar, lana de acero, polvos
de fregar y productos químicos fuertes, alcohol,
diluyente, benceno, insecticida u otras sustancias
volátiles, ya que dañarán el acabado del equipo.
Asimismo, nunca use paños que contengan
sustancias químicas. Si el equipo se ensucia, limpie
las superficies exteriores con un paño suave, sin
hilas.
Cuidado y mantenimiento
Page 58

18
ESPAÑOL
Potencia de salida nominal
Zona 1 I/D (40 Hz - 20 kHz) .................................................................................................. 60 W 6 ohmios / canal
Zona 2 I/D (40 Hz - 20 kHz) .................................................................................................. 60 W 6 ohmios / canal
Zona 3 I/D (40 Hz - 20 kHz) .................................................................................................. 60 W 6 ohmios / canal
D.A.T. (40 Hz - 20 kHz) ................................................................................................................. 0,05 %, 6 ohmios
Sensibilidad de entrada ..................................................................................................... 300 mV / 60 W de salida
Impedancia de entrada ........................................................................................................................... 20 kohmios
Respuesta de frecuencia (-1 dB) ...................................................................................................... 10 Hz a 30 kHz
Relación señal a ruido ...................................................................................................................................... 85dB
Alimentación ................................................................................................................. 115 V / 230 V CA, 50/60 Hz
Consumo ........................................................................................................................................................ 100 W
Dimensiones (máximas)
Ancho ............................................................................................................................... 17,32 pulgadas (440 mm)
Alto ..................................................................................................................................... 4,53 pulgadas (115 mm)
Profundidad ...................................................................................................................... 13,31 pulgadas (338 mm)
Peso ............................................................................................................................................ 18,74 lbs. (8,5 Kg)
Accesorios
Cable de alimentación de CA ................................................................................................................................. 1
Mando a distancia (RC5300ZS)............................................................................................................................... 1
Pilas tamaño AA ..................................................................................................................................................... 2
El diseño y las especificaciones están sujetos a cambios sin previo aviso.
Especificaciones
Page 59

1
PORTUGUÊS
Introdução........................................................2
Características.................................................2
Sobre o teclado ..............................................................3
Acessórios.......................................................3
Vista geral das funções ..................................4
Painel da frente ..............................................................4
Painel de trás .................................................................5
Controlo remoto (RC5300ZS) ........................................6
Definição do código ID ...................................8
Preparação e ligação.......................................9
Ligação de altifalantes ...................................................9
Exemplo de ligação......................................................10
Exemplos de operação .................................15
Lista de códigos remotos ............................16
Solução de Problemas..................................17
Cuidado e manutenção.................................17
Especificações ..............................................18
Índice
Page 60

2
PORTUGUÊS
Os nossos agradecimentos por ter adquirido o
Amplificador Selector de Zona Múltipla Marantz
ZS5300.
Este notável componente foi concebido para lhe
proporcionar muitos anos de total satisfação de
audição doméstica.
Queira dispender alguns minutos a ler
cuidadosamente este manual antes de ligar e operar
o ZS5300.
Dado que existe um grande número de opções de
ligações e configurações, recomendamos que
discuta a sua configuração específica com o
especialista do seu revendedor Marantz A/V.
O ZS5300 é um amplificador 2 ch x 3 zonas com
selector Zona Múltipla/Fonte.
• Todos os canais com idêntica designação,
completam a discreta construção do amplificador
de potência de classe D.
Para maximizar o desempenho sonoro, foi utilizado
um amplo transformador de potência de núcleo R.
O amplificador de potência foi concebido utilizando
construção discreta do amplificador de classe D
para todos os 6 canais. Desta forma assegura-se
que todos os canais têm a mesma qualidade e
potência.
•
Função de controlo de 3 zonas
Combinando esta unidade com um teclado,
poderá construir um sistema de zonas múltiplas,
capaz de controlar até 3 zonas.
• Interruptor selector ID permitindo expansão de
zonas
Esta unidade pode ser ligada em cascata alterando
o interruptor ID do painel posterior. Podem ser
ligadas até 3 unidades de forma a que o sistema
de zonas pode ser expandido até a 9 zonas.
• Função de economia de corrente por controlo de
corrente independente
Esta unidade pode controlar a ligação/desligação
da corrente para cada zona. A corrente para a
zona não utilizada pode ser desligada permitindo
economia de corrente.
• Modo festa
Poderá dirigir a mesma fonte simultaneamente
para todas as zonas. Isto é óptimo para ocasiões
festivas. Poderá para além disso controlar o
volume e a função de silenciamento.
• Terminal do altifalante compatível com ficha de
banana
Os terminais do altifalante podem ser ligados com
fichas de banana directamente bem como com
cabos de altifalantes tradicionais.
CaracterísticasIntrodução
Page 61

3
PORTUGUÊS
Poderá ligar a maior parte dos teclados e receptores
de infravermelhos assim como alguns produtos
relacionados com o controlo, disponíveis no mercado.
Estes são exemplos de sistemas que foram testados
pela Marantz America:
❖ NILES
Teclado : IntelliPad
Unidade de Sistema
Principal de Infravermelhos : IRP6+
Sensor de infravermelhos : MS 2
Flash de infravermelhos : IRC-2
As siglas Niles e IntelliPad são marcas registadas da
Niles Audio Corporation.
❖ XANTECH
Teclado : SMARTPAD3
Bloco de ligação : 789-44
Sensor de infravermelhos : Série 480-30
Emissor de infravermelhos : 282M
As siglas Xantech e SMARTPAD3 são marcas
registadas da Xantech Corporation.
Nota :
Caso deseje usar produtos que não estejam listados
acima, queira contactar o seu revendedor autorizado
Marantz para questões de possível compatibilidade.
•
Cabo de alimentação CA x 1
• Unidade de controlo remoto x 1
• Pilhas de tamanho AA x 2
VOLUME
VOLUME
VOLUME
VOLUME
INPUT
2
ZONE 1
DIRECT
3
1
ON/OFF
INPUT
2
ZONE 2
MUTE
DIRECT
3
1
ON/OFF
ON/OFF
GLOBAL CONTROL
ON
1
DIRECT
ID-2
SET
ID-3
ID-1
INPUT
ZONE 3
ZONE 2 ZONE 3
ZONE 1
GLOBAL
OFF
ON
OFF
MUTE
DIRECT
32
1
REMOTE CONTROLLER RC5300ZS
MUTE
DIRECT POWER
ON/OFF
32
INPUT
MUTE
Acessórios
Sobre o teclado
Page 62

4
PORTUGUÊS
qq
Interruptor de Alimentação Principal
(POWER ON/STANDBY)
Prima este botão para ligar a alimentação principal.
Prima novamente para desligar. Quando a alimentação
principal está ligada, Zona1, Zona2 e Zona3 passam a
modo espera e a alimentação para cada zona pode ser
comutada com o controlo remoto RC5300ZS (fornecido)
ou um teclado (opção). Para uma utilização normal,
deixe o unidade ligada.
ww
Indicador de nível de volume (LEVEL)
Estes indicadores mostram o nível do volume. Quando
todos os indicadores acenderem, o volume esta ao nível
máximo. Quando todos os indicadores estiverem
apagados, o volume está no nível mínimo. O volume
pode ser ajustado individualmente para cada Zona1,
Zona2 e Zona3. O ajuste do volume pode ser efectuado
com o controlo remoto ou um teclado.
Indicador de silenciador (MUTE)
Estes indicadores piscam quando o som é silenciado.
Quando o volume está no máximo, todos os indicadores
piscam. Quando o volume está no mínimo, pisca apenas
o primeiro indicador. O silenciamento pode ser controlado
individualmente para cada Zona1, Zona2 e Zona3. O
silenciamento pode ser efectuado com o controlo remoto
ou um teclado. Se o volume for ajustado enquanto
silenciado, o silenciador e cancelado.
Atenção
Quando estes indicadores piscam, não é debitado qualquer
som. Ao cancelar o silenciador, queira verificar a posição do
volume. Se o volume estiver regulado muito alto, os
altifalantes podem ser danificados.
ee
Indicador de espera (STANDBY)
Este indicador acende quando qualquer das zonas
estiver em espera. Zona1, Zona2 e Zona3 podem estar
em modo espera independentemente. A alimentação
para cada zona pode ser controlada com o controlo
remoto ou um teclado.
rr
Indicador directo (DIRECT)
Quando é escolhida para fonte a entrada " ZONA DIRECT
", este indicador acende. A fonte ligada ao terminal "ZONA
DIRECT" para Zona1 pode ser seleccionada apenas para
a Zona1. O mesmo se aplica para Zona2 e Zona3. A
selecção de fonte pode ser efectuada com o controlo
remoto ou um teclado.
tt
Indicador de entrada (INPUT)
Dependendo de qual entrada está seleccionada em cada
zona, será iluminado o indicador INPUT respectivo. As
Entradas podem ser seleccionadas por um controlo
remoto ou um teclado.
yy
Sensor de infravermelhos
(Controlo remoto)
Esta janela recebe sinais de infravermelhos do controlo
remoto.
Painel da frente
Vista geral das funções
MUTE
LEVEL LEVELLEVEL
MUTE MUTE
DIRECTDIRECT
65432
11
23456
STANDBY
1
ZONE 3
INPUT
32
STANDBY
6543
23
INPUT
ZONE 1
1
2
1
DIRECT
ZONE 2
STANDBY
INPUT
32
1
MULTI ZONE SELECTOR ZS5300
POWER
ON/STANDBY
3
1
5
6
4
2
Page 63

5
PORTUGUÊS
zz
Terminal de entrada áudio (AUDIO IN)
Ligue a saída áudio analógica do dispositivo áudio (leitor
CD, TV, leitor DVD, etc.). Podem ser ligados até 3
dispositivos áudio.
xx
Terminal de saída áudio (AUDIO OUT)
Estes terminais são concebidos como uma passagem
áudio. Podem ser usados quando ligar em cascata um
ou dois outros ZS5300s. Outro exemplo poderá ser
partilhar componentes de fonte com um sistema de
cinema doméstico dedicado, etc.
cc
Terminal de entrada directo de zona
(ZONE DIRECT IN)
Estes terminais são apenas para as zonas
correspondentes. Ligue os terminais de saída áudio
analógicos do seu dispositivo áudio (leitor CD, TV, leitor
DVD, etc.). Ainda que os 3 dispositivos possam ser ligados
cada um a uma zona diferente, o dispositivo liado a "ZONE
DIRECT 1" pode ser reproduzido apenas na ZONE 1. O
mesmo se aplica a ZONE DIRECT 2 e ZONE DIRECT 3.
• Poderá construir um sistema de zonas múltiplas potente
e único ligando o servidor de música Marantz (DH9300).
(
☞
pág.13)
vv
Terminal de pré saída da Zona 3
(ZONE3 PRE OUT)
Estes terminais são terminais de saída pré amplificada
para a Zona 3. Podem ser ligados com outros dispositivos
áudio tais como um amplificador externo.
bb
Terminal de entrada / saída do controlo
remoto (REMOTE CONTROL)
Se ligar esta unidade a outro componente áudio Marantz
utilizando um cabo de controlo de sistema, poderá operar
remotamente os componentes como um sistema único.
nn
Terminal de saída do altifalante
(SPEAKERS)
Ligue altifalantes para cada zona.
• Valor da impedância do altifalante: 6 Ω
mm
Terminal de saída de estado (STATUS OUT)
Estes terminais são terminais de saída activados por CC
para determinar se a alimentação de uma zona está
ligada ou desligada.
Ligue estes terminais a teclados, etc.
• Valor da saída de estado: 12 V, 100 mA.
,,
Terminal de entrada do flash (FLASHER IN)
Este terminal é para controlar a unidade de cada zona.
Ligue o sinal de controlo a um teclado, etc.
..
Interruptor interno / externo do controlo
remoto (INT. / EXT.)
Este interruptor é para seleccionar se o sensor remoto do
painel frontal funciona ou não. Se usar dois ou mais
ZS5300s em ligação em cascata, regule este interruptor
em INT. para o ZS5300 que funciona como principal.
Regule o interruptor em EXT. para o ZS5300s secundário.
INT. : Activa o sensor remoto.
EXT. : Desactiva o sensor remoto.
⁄⁄00
Interruptor de selecção ID (ID SELECTOR)
Quando são usados dois ou três ZS5300s, defina números
ID independentes para cada um. Podem ser ligados até 3
ZS5300s. Deverão ser definidos números ID diferentes
para cada unidade.
⁄⁄11
Selector de voltagem (VOLTAGE SELECTOR)
Seleccione a voltagem da sua área. Poderá seleccionar
115 V ou 230 V.
• Assegure-se que desliga o cabo de alimentação
quando alterar este interruptor.
⁄⁄22
Entrada de alimentação (AC IN)
Ligue o cabo de alimentação a esta tomada.
ATENÇÃO:
Assegure-se de que usa um cabo de alimentação
especificado para mais de 2,5 A, 250 V e 18 AWG quando
operar com tensão de CA 230 V.
ZONE
1
R
ZONE
3
3
ZONE
2
FLASHER
REMOTE CONTROL
OUT
IN
2
STATUS OUT
ZONE
1
L
SPEAKERS
(
MINIMUM 6 OHMS
)
R
ZONE
3
L
R
SELECTOR
L
VOLTAGE SELECTOR
3
INT.
EXT.
AUDIO OUT
115V
R
L
IN
AUDIO IN
ID
ZONE
2
230V
SERIAL NO.
ZONE DIRECT IN
R
1
L
ZONE 3 PRE OUT
AC IN
Painel de trás
1 2 3 4 5 6
AUDIO OUT
AUDIO IN
LLR
1
2
3
LLR
ZONE 3 PRE OUT
ZONE DIRECT IN
RRL
RRL
STATUS OUT
ZONE
ZONE
ZONE
1
REMOTE CONTROL
1
ZONE
3
IN
INT.
EXT.
FLASHER
OUT
IN
2
ID
SELECTOR
R
22113
SPEAKERS
L
R
(
MINIMUM 6 OHMS
ZONE
2
)
ZONE
3
R
L
L
7 8 9 10 11 12
MODEL NO. ZS5300
VOLTAGE SELECTOR
115V
SERIAL NO.
230V
AC IN
Page 64

6
PORTUGUÊS
q Botões controlo global
(GLOBAL CONTROL)
Com estes botões poderá controlar o volume,
seleccionar a fonte, etc. para todas as zonas ao mesmo
tempo. Se duas ou três unidades estiverem ligadas em
cascata, todas as zonas podem ser controladas também
ao mesmo tempo.
• Botão directo global (GLOBAL DIRECT)
Este permite-lhe seleccionar a entrada Zona
Directa (dedicada a essa zona) a ser reproduzida
em todas as zonas 1, 2, & 3 de todos ZS5300s
ligados.
• Botão entrada global 1, 2, 3
(GLOBAL INPUT 1, 2, 3)
Este permite-lhe seleccionar a Entrada 1, 2 ou
3 a ser reproduzida globalmente com todos
ZS5300s ligados.
• Botão global ligado/desligado
(GLOBAL ON / OFF)
Este permite-lhe ligar/desligar a alimentação de
todas as zonas de todos os ZS5300s ligados.
Prima uma vez para ligar, prima novamente
para desligar.
• Botão silencioso global (GLOBAL MUTE)
Este permite-lhe ligar/desligar o silenciador de
todos os ZS5300s ligados. Prima uma vez para
ligar o silenciador, prima novamente para
desligar o silenciador.
• Botão volume global (GLOBAL VOLUME)
Este permite-lhe levantar/baixar o volume para
todos os ZS5300s ligados.
• Botão global ligado (GLOBAL ON)
Este permite-lhe ligar a alimentação de todas as
zonas de todos ZS5300s ligados.
Controlo remoto (RC5300ZS)
• Botão global desligado (GLOBAL OFF)
Este permite-lhe desligar a alimentação de
todas as zonas de todos ZS5300s ligados.
w Botão zona 1 directa ligada
(DIRECT POWER)
Com estes botões poderá controlar a alimentação para
cada zona independentemente.
• Botão zona 1 directa ligada (ZONE 1 DIRECT ON)
Ligue a alimentação para a Zona 1
independentemente.
• Botão zona 1 directa desligada
(ZONE 1 DIRECT OFF)
Desliga a alimentação para a Zona 1
independentemente.
• Botão zona 2 directa ligada (ZONE 2 DIRECT ON)
Liga a alimentação para a Zona 2
independentemente.
• Botão zona 2 directa desligada
(ZONE 2 DIRECT OFF)
Desliga a alimentação para a Zona 2
independentemente.
• Botão zona 3 directa ligada (ZONE 3 DIRECT ON)
Liga a alimentação para a Zona 3
independentemente.
• Botão zona 3 directa desligada
(ZONE 3 DIRECT OFF)
Desliga a alimentação para a Zona 3
independentemente.
e Botões para zona 1, 2, 3 (ZONE 1, 2, 3)
As descrições seguintes são comuns. As funções dos
botões são as mesmas para a Zona 2 e 3; portanto são
descritos apenas os botões para a Zona 1.
• Botão zona 1 directa (ZONE 1 DIRECT)
Selecciona a entrada "Zona Directa" para a
Zona 1.
• Botões zona 1 entrada 1, 2, 3
(ZONE 1 INPUT 1, 2, 3)
Selecciona "Entrada 1" ou "Entrada 2" ou
"Entrada 3" para Zona 1.
• Botão zona 1 ligada/desligada
(ZONE 1 ON / OFF)
Liga/desliga a alimentação para a Zona 1.
Prima uma vez para ligar, prima novamente
para desligar.
• Botão zona 1 silenciada (ZONE 1 MUTE)
Liga/desliga o silenciador para a Zona 1.
Prima uma vez para ligar, prima novamente
para desligar.
Se o volume for ajustado quando silenciado, o
silenciador é desligado.
• Botão zona 1 volume (ZONE 1 VOLUME)
Levanta/baixa o volume para a Zona 1.
r Botão de definição ID
Quando dois ou três ZS5300s estiverem ligados ao
mesmo cabo remoto ou forem usados na mesma área,
será possível definir números ID diferentes.
Consulte a "Definição do código ID" para definir o código
ID para o controlo remoto. (
☞
pág.8)
A definição da unidade por defeito é ID-1.
GLOBAL CONTROL
DIRECT
1
2
DIRECT
DIRECT
3
DIRECT
4
MUTE
ON/OFF
INPUT
ZONE 2 ZONE 3
DIRECT POWER
ZONE 1
ON/OFF
MUTE
INPUT
2
ZONE 2
MUTE
ON/OFF
INPUT
2
ZONE 3
MUTE
ON/OFF
INPUT
ID-2
ID-1
VOLUME
32
VOLUME
3
VOLUME
3
VOLUME
32
1
ZONE 1
ON
OFF
1
1
1
SET
REMOTE CONTROLLER RC5300ZS
GLOBAL
OFF
ID-3
ON
Page 65

7
PORTUGUÊS
❖ Operação da unidade de controlo remoto
1. Controlo remoto
Opere a unidade de controlo remoto (RC5300ZS)
dentro de uma distância de aproximadamente 5 m da
janela de infravermelhos (controlo remoto) na parte
da frente da unidade.
Se o transmissor estiver apontado numa direcção
diferente do sensor de infravermelhos ou se existir
um obstáculo entre eles, pode não ser possível fazer
o controlo remoto.
• Raio de acção do controlo remoto
2. Instalar pilhas
As pilhas deste controlo remoto tem uma vida de
aproximadamente 1 ano em condições normais de
operação. Quando a unidade de controlo remoto não
for utilizada durante um longo período de tempo,
remova as pilhas. Além disso, quando notar que as
pilhas estiverem a ficar fracas, substitua-as logo que
possível.
1. Remova a tampa das pilhas.
Nota :
• Não use pilhas recarregáveis (tipo Ni-Cd).
2. Introduza as pilhas de tamanho AA com a
polaridade (+) e (–) correcta.
3. Feche a tampa das pilhas até fazer um clique.
60
aproximadamente
5m
Controlo remoto
ZS5300
Page 66

8
PORTUGUÊS
❖ Definição do código ID
Ex.) Definição como ID-1
Controlo remoto
Prima e mantenha premido
SET, e depois prima ID-1 e
solte os dois.
Painel de trás da unidade
Definir como "1".
R
33
3
REMOTE CONTROL
OUT
ZONE
1
L
ESPEAKERS (MINIMUM 6 OHMS
)
R
ZONE 3
LR
SELECTOR
L
VOLTAGE SELECTOR
INT.
EXT.
115V
IN
ID
ZONE 2
230V
SERIAL NO.
AC IN
MODEL NO. ZS5300
Definição do código ID
O sistema ZS5300 pode ser expandido a até 3 unidades.
Quando usar 1 unidade isolada, regule o interruptor ID na parte de trás do painel em "1".
Para definir o controlo remoto no número ID da unidade, use o seguinte procedimento.
1. Prima o botão SET e mantenha-o premido e depois prima o botão ID-1, depois liberte ambos os botões.
2. Este controlo remoto foi definido como ID-1. Para definir o ID em 2 e 3, siga o mesmo procedimento.
3. Quando as pilhas são substituídas, a unidade volta às definições de fábrica de ID-1.
Nota:
Isto é importante, pois se tiver alterado os números ID, terá de redefinir o número ID quando as pilhas forem
substituídas.
*A definição por defeito tanto para o controlo remoto como para a unidade é ID-1
1
SET
REMOTE CONTROLLER RC5300ZS
INPUT
ID-1
VOLUME
32
ID-2
ID-3
T
REMOTE CONTROL
R
ID
SELECTOR
IN
OUT
22113
INT.
EXT.
R
L
SP
ZONE
1
Page 67

9
PORTUGUÊS
❖ Antes de efectuar ligações
Assegure-se de que desliga a alimentação para o ZS5300 e outros aparelhos a serem ligados ao ZS5300 antes
de fazer ligações.
Consulte o manual de instruções dos outros aparelhos para se certificar das ligações e terminais correctos.
❖ Teclado
Os teclados que podem ser ligados à unidade são os teclados e caixas de ligação fabricados por NILES e
XANTECH apresentados abaixo. Se quiser usar produtos que não estejam na lista abaixo ou de outros
fabricantes, queira contactar o seu revendedor autorizado Marantz.
• NILES
Teclado : IntelliPad
Unidade de Sistema
Principal de Infravermelhos : IRP6+
Sensor de infravermelhos : MS 2
Flash de infravermelhos : IRC-2
• XANTECH
Teclado : SMARTPAD3
Bloco de ligação : 789-44
Sensor de infravermelhos : Série 480-30
Emissor de infravermelhos : 282M
Nota:
Quando ligar um teclado, consulte o manual de instruções do teclado bem como o desta unidade.
Preparação e ligação
Existem duas formas de ligar os altifalantes. Veja as
figuras seguintes.
❖ Ligação com fio de altifalante
1. Retire aproximadamente 6/8 inch (20 mm) da
insulação do fio.
2. Enrole muito bem as pontas desencapadas do fio
para evitar curto circuitos.
3. Introduza a parte descarnada do fio no orifício de
cada terminal como se segue.
❖ Ligação de ficha de banana
É possível também fazer ligações com ficha banana.
Ligação de altifalantes
aproximadamente
6/8 inch (20 mm)
Page 68

10
PORTUGUÊS
❖ Sistema NILES
Exemplo de ligação
ZONE
1
R
ZONE
3
3
ZONE
2
FLASHER
REMOTE CONTROL
OUT
IN
2
STATUS OUT
ZONE
1
L
SPEAKERS
(
MINIMUM 6 OHMS
)
R
ZONE
3
L
R
SELECTOR
L
VOLTAGE SELECTOR
3
INT.
EXT.
AUDIO OUT
115V
R
L
IN
AUDIO IN
ID
ZONE
2
230V
SERIAL NO.
ZONE DIRECT IN
R
1
L
ZONE 3 PRE OUT
AC IN
Controlo remoto
Estado
Analógico
Altifalante
Dados de infravermelho
Flash
Para ligação em cascata
Fonte de alimentação CC
Ligada a uma tomada CA
não comutada.
Altifalante
Altifalante
Altifalante
Sensor de
infravermelhos
MS-2 num local
distante.
Sensor de
infravermelhos
MS-2 num local
distante.
Sensor de
infravermelhos
MS-2 num local
distante.
Flash de
infravermelhos
IRC-2
Leitor CD
Leitor DVD
Sintonizador
Leitor HDD
Saída
analógico
Saída
analógico
Saída
analógico
Controlo remoto
Controlo remoto
Controlo remoto
Saída
analógico
ZS5300
AUDIO IN
LLR
1
2
3
+
G
12
N
V
D
MODEL
POWER
AUDIO OUT
D
A
T
A
LLR
+
G
12
N
V
D
IRP6
STATU S
ZONE DIRECT IN
RRL
+
D
12
A
V
T
A
+
ZONE 3 PRE OUT
STATUS OUT
ZONE
ZONE
+
G
D
12
N
A
V
D
T
A
SENSOR INPUTS
FLASHER LEVEL
+-+
RRL
1
2
G
D
N
A
D
T
A
FLASHERS
-
ZONE
FLASHER
IN
+
12
V
+-+
REMOTE CONTROL
3
G
D
N
A
D
T
A
(
SPEAKERS
ZONE
1
R
ID
SELECTOR
IN
22113
INT.
EXT.
OUT
MINIMUM 6 OHMS
ZONE
L
R
)
2
L
ZONE
3
R
L
MODEL NO. ZS5300
VOLTAGE SELECTOR
115V
SERIAL NO.
230V
AC IN
LR
MP00124
+
G
D
12
N
A
V
D
T
A
IR
DATA
OUT
D
G
A
N
T
-
D
A
AMPLIFIER
INPUT
L+ L-R+R
SPEAKER
OUTPUT
L+ L
-
-
R+R
-
Zone-1
+
12V DC
In
Out
In
Out
MARANTZ
MARANTZ
MARANTZ
AMPLIFIER
INPUT
L+ L-R+R-L+ L
AMPLIFIER
INPUT
-
R+R-L+ L-R+R
L+ L
SPEAKER
OUTPUT
-
SPEAKER
OUTPUT
LR
MP00124
R+R
-
Zone-2
LR
MP00124
-
2134
Zone-3
MARANTZ
Page 69

11
PORTUGUÊS
❖ Sistema XANTECH
ZONE
1
R
ZONE
3
3
ZONE
2
FLASHER
REMOTE CONTROL
OUT
IN
2
STATUS OUT
ZONE
1
L
SPEAKERS
(
MINIMUM 6 OHMS
)
R
ZONE
3
L
R
SELECTOR
L
VOLTAGE SELECTOR
3
INT.
EXT.
AUDIO OUT
115V
R
L
IN
AUDIO IN
ID
ZONE
2
230V
SERIAL NO.
ZONE DIRECT IN
R
1
L
ZONE 3 PRE OUT
AC IN
Controlo remoto
Estado
Analógico
Altifalante
Dados de infravermelho
Flash
Para ligação em cascata
Altifalante
Altifalante
Altifalante
Receptores de
infravermelhos Série 480-30
Emissor de
infravermelhos
282M
Fita BRANCA
Cabo de fita de 7 pés com
a mini ficha removida
Fonte de alimentação CC
Ligada a uma tomada CA
não comutada.
Leitor CD
Leitor DVD
Sintonizador
Leitor HDD
Saída
analógico
Saída
analógico
Saída
analógico
Controlo remoto
Controlo remoto
Controlo remoto
Saída
analógico
Receptores de
infravermelhos Série 480-30
Fita BRANCA
Cabo de fita de 7 pés com
a mini ficha removida
Receptores de
infravermelhos Série 480-30
Fita BRANCA
Cabo de fita de 7 pés com
a mini ficha removida
ZS5300
AUDIO OUT
AUDIO IN
1
2
3
LLR
LLR
EMITTERS
789-44
CONNECTING BLOCK
+12VDC
12VDC
ZONE DIRECT IN
RRL
GND
STATUS
IR IN
ZONE 3 PRE OUT
RRL
STATUS OUT
ZONE
1
ZONE
2
IR
RCVR
ZONE
FLASHER
IN
3
REMOTE CONTROL
IN
OUT
(
SPEAKERS
ZONE
1
R
ID
SELECTOR
22113
INT.
EXT.
MINIMUM 6 OHMS
ZONE
L
R
)
2
L
ZONE
3
R
L
MODEL NO. ZS5300
VOLTAGE SELECTOR
115V
SERIAL NO.
230V
AC IN
LR
PM110
SMART PAD
PROGRAMMABLE MODULE
TM
3
L+ L-R+R-L+ L-R+R
AMPLIFIER
INPUT
SPEAKER
OUTPUT
+12V
IR OUT
STATUS
GND
OUT
+12V
GND
Zone-1
In
Out
In
Out
1
MARANTZ
MARANTZ
MARANTZ
3
24
MARANTZ
PM110
SMART PAD
PROGRAMMABLE MODULE
PM110
SMART PAD
PROGRAMMABLE MODULE
TM
3
L+ L-R+R-L+ L-R+R
AMPLIFIER
L+ L-R+R-L+ L-R+R
AMPLIFIER
INPUT
INPUT
SPEAKER
OUTPUT
TM
3
SPEAKER
OUTPUT
-
-
LR
GND
+12V
IR OUT
STATUS
OUT
+12V
GND
Zone-2
LR
GND
+12V
IR OUT
STATUS
OUT
+12V
GND
Zone-3
Page 70

12
PORTUGUÊS
❖ Ligação em cascata
ZONE
1
R
ZONE
3
3
ZONE
2
FLASHER
REMOTE CONTROL
OUT
IN
2
STATUS OUT
ZONE
1
L
SPEAKERS
(
MINIMUM 6 OHMS
)
R
ZONE
3
L
R
SELECTOR
L
VOLTAGE SELECTOR
3
INT.
EXT.
AUDIO OUT
115V
R
L
IN
AUDIO IN
ID
ZONE
2
230V
SERIAL NO.
ZONE DIRECT IN
R
1
L
ZONE 3 PRE OUT
AC IN
ZONE
1
R
ZONE
3
3
ZONE
2
FLASHER
REMOTE CONTROL
OUT
IN
2
STATUS OUT
ZONE
1
L
SPEAKERS
(
MINIMUM 6 OHMS
)
R
ZONE
3
L
R
SELECTOR
L
VOLTAGE SELECTOR
3
INT.
EXT.
AUDIO OUT
115V
R
L
IN
AUDIO IN
ID
ZONE
2
230V
SERIAL NO.
ZONE DIRECT IN
R
1
L
ZONE 3 PRE OUT
AC IN
3
INT.
EXT.
3
INT.
EXT.
Controlo remoto
Analógico
Defina em
INT.
Defina em 1
Defina em EXT.
Defina em 2
Nota:
Para alterar as posições do interruptor EXT./INT. e do interruptor ID, desligue o interruptor principal do ZS5300.
Quando o interruptor de alimentação principal estiver ligado, a mudança de posição daqueles interruptores não tem qualquer
efeito.
ZS5300 (Principal)
ZS5300 (Secundário)
Leitor CD
Leitor DVD
Sintonizador
Leitor HDD
Saída
analógico
Saída
analógico
Saída
analógico
Controlo remoto
Controlo remoto
Controlo remoto
Saída
analógico
ZONE 3 PRE OUT
ZONE DIRECT IN
RRL
RRL
STATUS OUT
ZONE
ZONE
ZONE
1
REMOTE CONTROL
1
ZONE
3
IN
INT.
EXT.
OUT
2
FLASHER
IN
R
ID
SELECTOR
22113
AUDIO OUT
AUDIO IN
1
2
3
LLR
LLR
(
SPEAKERS
MINIMUM 6 OHMS
ZONE
L
R
INT.
EXT.
)
2
L
ZONE
3
R
L
MODEL NO. ZS5300
VOLTAGE SELECTOR
115V
SERIAL NO.
230V
AC IN
22113
ZONE 3 PRE OUT
ZONE DIRECT IN
RRL
RRL
STATUS OUT
ZONE
ZONE
ZONE
1
REMOTE CONTROL
1
ZONE
3
IN
INT.
EXT.
OUT
2
FLASHER
IN
R
ID
SELECTOR
22113
AUDIO OUT
AUDIO IN
1
2
3
LLR
LLR
(
SPEAKERS
MINIMUM 6 OHMS
ZONE
L
EXT.
2
R
L
INT.
22113
)
R
ZONE
3
L
MODEL NO. ZS5300
VOLTAGE SELECTOR
115V
230V
SERIAL NO.
AC IN
In
Out
MARANTZ
In
Out
1
24
3
MARANTZ
MARANTZ
MARANTZ
Page 71

13
PORTUGUÊS
❖ Ligação com o DH9300
ZONE
1
R
ZONE
3
3
ZONE
2
FLASHER
REMOTE CONTROL
OUT
IN
2
STATUS OUT
ZONE
1
L
SPEAKERS
(
MINIMUM 6 OHMS
)
R
ZONE
3
L
R
SELECTOR
L
VOLTAGE SELECTOR
3
INT.
EXT.
AUDIO OUT
115V
R
L
IN
AUDIO IN
ID
ZONE
2
230V
SERIAL NO.
ZONE DIRECT IN
R
1
L
ZONE 3 PRE OUT
AC IN
Controlo remoto
Analógico
Altifalante
Vídeo
Altifalante
Altifalante
Altifalante
ZS5300
AUDIO OUT
AUDIO IN
LLR
1
2
3
LLR
ZONE DIRECT IN
RRL
ZONE 3 PRE OUT
RRL
STATUS OUT
ZONE
ZONE
(
SPEAKERS
ZONE
1
SELECTOR
R
ID
22113
REMOTE CONTROL
1
ZONE
3
IN
INT.
EXT.
OUT
2
FLASHER
IN
MINIMUM 6 OHMS
ZONE
L
R
)
2
L
ZONE
3
R
L
MODEL NO. ZS5300
VOLTAGE SELECTOR
115V
SERIAL NO.
230V
AC IN
LR
LR
LR
TV
Zone-1
TV
Zone-2
TV
DH9300
OPUS CONNECTION
VIDEO 1
OUT
MODULATED
REMOTE IN
S-VIDEO
OUT
VIDEO 4
OUT
VIDEO 3
Zone-3
VIDEO 2
OUT
OUT
ANALOGUE AUDIODIGITAL AUDIO
Page 72

14
PORTUGUÊS
❖ Ligação do amplificador de potência externo
Quando usar altifalantes que possam necessitar de alta potência (p.ex. alguns altifalantes para exteriores), poderá
necessitar de mais potência que a debitada pelo ZS5300. Se necesitar de mais potência, poderá ligar "ZONE 3
PRE OUT" a um amplificador de potência externo.
O nível sonoro pode ser ajustado com Levantar/Baixar Volume no ZS5300.
❖ Ligação do cabo de alimentação
Quando estiverem efetuadas todas as ligações, ligue
o cabo de alimentação à tomada de corrente.
❖ Regulação
Este é um exemplo para construir um sistema de 3
zonas com um teclado NILES.
Veja a figura Exemplo de ligação "Sistema NILES"
(☞pág.10).
Quando estiverem feitas todas as ligações, ensine
ao teclado os comandos remotos.
Para ensinar os comandos ao teclado ou mais
informação, queira consultar o manual de instruções
dos seus teclados.
ZONE
1
RR
ZONE
3
3
ZONE
2
FLASHER
REMOTE CONTROL
OUT
IN
STATUS OUT
ZONE 1
L
SPEAKERS (MINIMUM 6 OHMS
)
R
ZONE 3
LR
SELECTOR
L
VOLTAGE SELECTOR
INT.
EXT.
O
115V
L
IN
ID
ZONE 2
230V
SERIAL NO.
ZONE DIRECT IN
L
ZONE 3 PRE OUT
AC IN
MODEL NO. ZS5300
Altifalante de exterior
Altifalante de exterior
Amplificador de Potência
Amplificador de Potência
REMOTE CONT.
IN
INPUT
INVERT
OUT
OUTPUT
VIDEO/
5-13VDC
EXT.CONT.IN
+
-
SPEAKER SYSTEM
8 OHMS
MA6100
UT
ZONE DIRECT IN
LLRRRL
ZONE 3 PRE OUT
RRL
STATUS OUT
ZONE
ZONE
REMOTE CONTROL
1
ZONE
3
2
FLASHER
IN
ZS5300
REMOTE CONT.
IN
INPUT
INVERT
OUT
OUTPUT
VIDEO/
ID
SELECTOR
IN
OUT
22113
INT.
EXT.
5-13VDC
EXT.CONT.IN
+
-
SPEAKER SYSTEM
8 OHMS
MA6100
Page 73

15
PORTUGUÊS
❖ Consulte o exemplo de ligação "Sistema NILES " (
☞
Pág.10)
Exemplos de operação
1. Prima o botão CD no teclado.
A alimentação da Zona 1 do ZS5300 é ligada e a
fonte de entrada é comutada para Entrada 3.
Se premir o botão POWER no teclado também
liga a alimentação.
2. Prima o botão PLAY no teclado.
O leitor de CD inicia a reprodução.
3. Prima VOLUME 3 no teclado.
O nível do volume da Zona 1 do ZS5300 é
aumentado.
Também premindo o botão VOLUME 4 diminui o
nível de volume.
4. Prima o botão MUTE do teclado para silenciar o
som.
Os indicadores nível de volume da Zona 1 do
ZS5300 piscam.
Para cancelar o silenciamento, prima novamente
o botão MUTE ou prima VOLUME 3 or 4.
5. Prima o botão STOP no teclado.
O leitor de CD pára.
6. Prima o botão POWER no teclado.
A alimentação da Zona 1 do ZS5300 é desligada
e o indicador STANDBY acende.
Sala principal
Zona 1
aceso
aceso
aceso
piscar
1.
MULTI ZONE SELECTOR ZS5300
ZONE 1
INPUT
23
1
DIRECT
6543
2
3.
4.
1
MUTE
LEVEL
STANDBY
6.
POWER
1.
ON/STANDBY
CD
DVD
TUNER
VCR
LASER
SAT
1.
2.
5.
3.
4.1. 6.
Page 74

FUNÇÃO ID-1 ID-2 ID-3 Observação
Global Alimentação ligada/desligada 161210 161210 161210 Código de controlo global
Global Alimentação ligada 161211 161211 161211 Código de controlo global
Global Alimentação desligada 161212 161212 161212 Código de controlo global
Global Volume para cima 161600 161600 161600 Código de controlo global
Global Volume para baixo 161700 161700 161700 Código de controlo global
Global Silenciador 161319 161319 161319 Código de controlo global
Global ENTRADA 1 160039 160039 160039 Código de controlo global
Global ENTRADA 2 160049 160049 160049 Código de controlo global
Global ENTRADA 3 160059 160059 160059 Código de controlo global
Global Entrada directa 160060 160060 160060 Código de controlo global
Zona 1 Alimentação ligada/desligada 161220 161223 161226
Zona 1 Alimentação ligada 161221 161224 161227
Zona 1 Alimentação desligada 161222 161225 161228
Zona 1 ENTRADA 1 160030 160033 160036
Zona 1 ENTRADA 2 160031 160034 160037
Zona 1 ENTRADA 3 160032 160035 160038
Zona 1 Entrada directa 160017 160018 160019
Zona 1 Silenciador ligado/desligado 161310 161313 161316
Zona 1 Volume para cima 161610 161613 161616
Zona 1 Volume para baixo 161710 161713 161716
Zona 2 Alimentação ligada/desligada 161230 161233 161236
Zona 2 Alimentação ligada 161231 161234 161237
Zona 2 Alimentação desligada 161232 161235 161238
Zona 2 ENTRADA 1 160040 160043 160046
Zona 2 ENTRADA 2 160041 160044 160047
Zona 2 ENTRADA 3 160042 160045 160048
Zona 2 Entrada directa 160024 160025 160026
Zona 2 Silenciador ligado/desligado 161311 161314 161317
Zona 2 Volume para cima 161611 161614 161617
Zona 2 Volume para baixo 161711 161714 161717
Zona 3 Alimentação ligada/desligada 161240 161243 161246
Zona 3 Alimentação ligada 161241 161244 161247
Zona 3 Alimentação desligada 161242 161245 161248
Zona 3 ENTRADA 1 160050 160053 160056
Zona 3 ENTRADA 2 160051 160054 160057
Zona 3 ENTRADA 3 160052 160055 160058
Zona 3 Entrada directa 160027 160028 160029
Zona 3 Silenciador ligado/desligado 161312 161315 161318
Zona 3 Volume para cima 161612 161615 161618
Zona 3 Volume para baixo 161712 161715 161718
Regulação Definir ------- ------- ------Regulação ID-1 ------- ------- ------Regulação ID-2 ------- ------- ------Regulação ID-3 ------- ------- -------
16
PORTUGUÊS
❖ Lista de códigos remotos (Extensão RC-5)
Lista de códigos remotos
ID inicial: ID-1
Definição de ID: Prima e mantenha premidos os botões SET primeiro e ID-* a seguir,
simultaneamente. (*=1 ou 2 ou 3)
Page 75

17
PORTUGUÊS
Em caso de problemas com a unidade, antes de pedir assistência verifique primeiro o seguinte .
1. Estão todas as ligações correctamente efetuadas?
2. Estará a operar a unidade correctamente de acordo com o guia do utilizador?
3. Estarão os outros produtos a funcionar correctamente?
Se a unidade ainda não funciona correctamente, verifique os pontos indicados na tabela seguinte.
Se o seu problema não puder ser resolvido com as acções curativas listadas na tabela seguinte, supeita-se de
mau funcionamento do circuito interno; desligue imediatamente o cabo de alimentação CA e contacte um
revendedor autorizado ou centro de assistência Marantz.
Solução de Problemas
Solução
• Verifique se o cabo de alimentação está
correctamente ligado a uma tomada de corrente CA.
• Verifique as regulações do INPUT SELECTOR,
controlo de VOLUME.
• Verifique se a função MUTE está desactivada.
(O indicador MUTE está desligado.)
• Desligue a alimentação e mude as ligações dos
sistemas de altifalantes esquerdo e direito. Se o
som ainda não sair do mesmo sistema de
altifalantes, verifique os cabos de ligação do
próprio sistema de altifalantes.
• Verifique as regulações do INPUT SELECTOR.
• Verifique se os cabos do altifalante estão
correctamente ligados.
• Verifique se os cabos de ligação com fichas RCA
estão correctamente ligados.
• Verifique se o interruptor ID do painel traseiro está
correctamente regulado.
• Verifique se a regulação ID do controlo remoto
está correcta.
Problema
O amplificador não trabalha e o indicador não
acende.
O indicador acende mas o amplificador não
funciona.
O som é produzido apenas a partir de um dos
sistemas de altifalantes.
O som não é produzido de todo.
Não funciona correctamente quando está
ligado a Cascata.
Esta secção descreve as operações de cuidado e
manutenção que devem ser executadas para
optimizar a operação do seu equipamento Marantz.
❖ Limpeza das superfícies externas da
unidade
O acabamento exterior da sua unidade durará
indefinidamente com o cuidado e limpeza convenientes.
Nunca use esponjas abrasivas, lã de aço, pós
abrasivos ou agentes químicos agressivos , alcóol,
diluentes, benzina, inseticida ou outras substâncias
voláteis, pois estas danificarão o acabamento do
equipamento.
Da mesma forma, nunca use panos contendo
substâncias químicas. Se a unidade se sujar, limpe
as superfícies exteriores com um pano macio e sem
fiapos.
Cuidado e manutenção
Page 76

18
PORTUGUÊS
Potência de saída nominal
Zona1 E/D (40 Hz –20 kHz) ..................................................................................................... 60 W 6 ohms / canal
Zona2 E/D (40 Hz –20 kHz) ..................................................................................................... 60 W 6 ohms / canal
Zona3 E/D (40 Hz –20 kHz) ..................................................................................................... 60 W 6 ohms / canal
DHT (40 Hz – 20 kHz) ........................................................................................................................ 0,05% 6 ohms
Sensibilidade de entrada ......................................................................................................... 300 mV / 60 W saída
Impedância de entrada .............................................................................................................................. 20 kohms
Resposta de frequência (-1 dB) ....................................................................................................... 10 Hz a 30 kHz
Relação sinal / ruído ........................................................................................................................................ 85 dB
Requisitos de potência ................................................................................................. 115 V / 230 V CA, 50/60 Hz
Consumo de corrente ...................................................................................................................................... 100W
Dimensões (Máximo)
Largura ........................................................................................................................... 17,32 polegadas (440 mm)
Altura ................................................................................................................................ 4,53 polegadas (115 mm)
Profundidade .................................................................................................................. 13,31 polegadas (338 mm)
Peso ............................................................................................................................................. 18,74 lbs (8,5 Kg)
Acessórios
Cabo de alimentação CA ........................................................................................................................................ 1
Unidade de controlo remoto (RC5300ZS) ............................................................................................................... 1
Pilhas de tamanho AA ............................................................................................................................................ 2
Design e especificações sujeitos a alteração sem aviso prévio.
Especificações
Page 77

Printed in Japan 10/2002 MITf 02AJ851250
is a registered trademark.
R
COUNTRY COMPANY ADDRESS
ALGERIE Azur 2000 8, Lotissement Ben Hatadi, Alger, Algerie
ARMENIA NGYIG Ltd. 47 A/75 St. Lalaiants, 375000 Yerevan, Armenia
AUSTRALIA QualiFi Pty. Ltd., P.O. Box 350, Mt. Waverley, VIC 3149, Australia
AUSTRIA Huber & Prohaska GmbH Taborstraße 95 / Ladestraße 1, Gebäude Hangartner, A-1200 Wien, Austria
BAHREIN Ambassador Stores P.O. Box 237,141, Government Avenue, Manama,Bahrein
BANGLADESH Target 1078, Ramjoy Mohanja Lane Asadgonj, Chittagong 4000, Bangladesh
BELGIUM Van der Heyden Audio N.V. Brusselbaan 278, 9320 Erembodegem, Belgium
BULGARIA Ariescommerce GmbH Makedonia Blvd. 16, 1606 Sofia, Bulgaria
CANADA Lenbrook Industries Limited 633 Granite Court, Pickering, Ontario
CHINA
Guang Chang Audio International Co., Ltd.
No.38 Yushan Road, ShiQiao, Pan Yu, Guang Dong, China
CYPRUS Empire Hifi systems Ltd. P.O. Box 5604, Nicosia, Cyprus
CZECH REPUBLIC Audio International Sokolska 41, 67902 Rajecko, OKR,Blansko, Czech Republic
DENMARK Audio Nord Dali Allé 1, 9610 Noerager, Denmark
DUBAI V.V.& SONS P.O. Box 105, Dubai, U.A.E.
EGYPT Solimco 9, El Attibaa St. Doki, Cairo, Egypt
ESTONIA HiFi Club Estonia Ehte 4, 90503 Haapsalu, Estonia
F.Y.R.O.M. T.P. KODI ul.Cedomir Kantargiev 21a, Skopje, Former Yugoslavian Republic of Macedonija
FINLAND Audio Nord Uudenmaankatu 4-6, Helsinki SF-00120, Finland
FRANCE Marantz France A division of Marantz Europe B.V., P.O. Box 301, 92 156 Suresnes Cedex, France
GERMANY Marantz Deutschland Hakenbusch 3, 49078 Osnabrück, Germany
GREECE Adamco S.A. 188, Hippocratous Street, 11471 Athens, Greece
HEADQUARTERS EUROPE: Marantz Europe B.V. P.O. Box 8744, 5605 LS Eindhoven, The Netherlands
HONG KONG Marantz Hong Kong Ltd. Unit 1706, Metroplaza II, 223 Hing Fong Road, Kwai Fong, N.T., Kowloon, Hong Kong
HUNGARY Infovox Ltd. Terez Krt.31, 1067 Budapest, Hungary
ICELAND ID Electronics Ltd. Armula 38, 108 Reykjavik, Iceland
INDIA NOVA Audio Private 8,Punam Co-op.Society 29/30 Road#5, Union Park MUMBAI 400052, India
IRAN Home Co. 5th floor no 878 Philips Building Enghelab ave, P.O. 11365/7844 Tehran, Iran
IRELAND Marantz Ireland Clonskeagh, Dublin 14, Ireland
ISRAEL Elmor Ltd. 52 Heh Beiyar Street, Kikar Hamedina, Tel Aviv, Israel
ITALY Marantz Italy Via Casati 23, 20052 Monza (Milano), Italy, Servizio Consumatori 1678-20026, Numero Verde
IVORY COAST Hifivoir B.P. 2428, Abidjan 01, Ivory Coast
JAPAN Marantz Japan Inc. 35-1 Sagami Ohno 7-Chome, Sagamihara-shi, Kanagawa 228-8505, Japan
KOREA MK Enterprises Ltd. Rm604, Electro-officetel, 16-58. Hangang-ro 3Ga, Yongsan-Ku, Seoul, Korea
KUWAIT alAlamiah Electronics Intl. P.O. Box 8196, Salmiah 22052, Kuwait
LATVIA Ace Ltd. 61, LacPlesa Str., Riga LV 1011, Latvia
LEBANON AZ Electronics S.A., 1, P.O. Box 11 2833, Beirut, Lebanon
LITHUANIA Accapella Ltd. Ausros, Vartu G/5, Pasazo SKG., 2001 Vilnius, Lithuania
MALAYSIA Wo Kee Hong Electronics Sdn. Bhd. 2nd Floor Bangnan Infinite Centre, Lot1, Jalan 13/6, 46200 Petaling Jaya, Selangor Datul Ehsan, Malaysia
MALTA Doneo Co Ltd. 78 The Strand, Sliema SLM07, Malta
MAURITIUS SKR Electronics Ltd. P.O. Box 685, Bell Village, Port Louis, Mauritius
MILITARY MARKET EUROPE PASCO GmbH PO BOX 1280, Sandhausen 69200, Germany
NEW ZEALAND Wildash Audio Systems 14 Malvern Road, Mt. Albert, Auckland, New Zealand
NORWAY Audio Nord Sandkerveien 64, Oslo 0483, Norway
OMAN Mustafa & Jawad Trading CO. P.O. Box 1918, Ruwi, Oman
POLAND Philips Polska Sp. z.o.o. Al.Jerozolimskie 195b, 02 222 Warszawa, Poland
PORTUGAL Corel2 Comércio de Electrónica Lda., Av. Luís Bívar, No 85 A, 1050 Lisboa, Portugal
PROFESSIONAL EUROPE Marantz Professional Products Kingsbridge House, Padbury Oaks, 575-583 Bath Road, Longford, Middlesex UB7 0EH, U.K.
PROFESSIONAL U.S.A. Marantz Professional Products Distributed by: Superscope Technologies Inc., 1000 Corporate Blvd. Ste.D, Aurora, Illino
QATAR Almana & Partners W.W.L. P.O. Box 49, Doha, Qatar
REUNION Vision + 180 Rue du Marechal Leclerc, 97400 Saint Denis, Ile de la Reunion
ROMANIA Nova Music Entertainment 5, Zagazului Str. Bl.1G,apt.18, sector 1,Bucharest, Romania
RUSSIA Absolute Audio 7/2, Montazhnaya Street, 107497 Moscow, Russia
SAUDI ARABIA Adawlia Univ. Electr. Apl P.O. Box 2154, Alkhobar 31952, Saudi Arabia
SINGAPORE Wo Kee Hong Distribution PTE Ltd. 130 Joo Seng Road, #03-02 Olivine Building, Singapore 368357
SLOVAKIA Bis Audio s.r.o. Nam. SNP 10, 96001 Zvolem, Slovakia
SLOVENIA Bofex Smartinska 152, HALA V/3, 61000 Ljubljana, Slovenia
SOUTH AFRICA Coherent Imports (PTY) Ltd. P.O. Box 1614, Alberton, 1450, South Africa
SPAIN Marantz Spain Martinez Villergas 2, Apartado 2065, Madrid 28027, Spain
SRI LANKA The listening Room Mezzanine Floor, The Landmark 385, Galle Road, Colombo - 3, Sri Lanka
SWEDEN Audio Nord Almedalsvagen 4, Gotenborg 402-23, Sweden
SWITZERLAND Sound Company AG Postfach, 8010 Zürich, Switzerland
SYRIA Hamzeh & Partners Hafez Ibrahim Str. No 117, Damascus Shalan, Syria
TAHITI Covecolor Av. Prince Hinoi, Cours de l'union sacré, P.O. Box 2334, Papeete, Tahiti
TAIWAN Pai-Yuing Co. Ltd. 6th No 148 Sung Kiang Road, Taipei 10429, Taiwan R.O.C.
THAILAND MRZ Standard Co. Ltd. 746-750 Mahachai Road, Wangburapa, Bangkok 10200, Thailand
TUNESIA Societe EDEVIG 40, Avenue du Golfe Arabe, El Menzah, 1004, Tunesia
TURKEY Türk Philips Ticaret A.S. Yukari Dudullu Organize sanayi Bolgesi, 2.Cadde no.28, 81260 Umraniye-Istanbul, Turkey
U.K. Marantz Hifi UK Ltd. Kingsbridge House, Padbury Oaks, 575-583 Bath Road, Longford, Middlesex UB7 0EH, U.K.
U.S.A. Marantz America Inc. 1100 Maplewood Drive Itasca, IL 60143, U.S.A.
YUGOSLAVIA ITM Company Omladinskih Brigada 86, 11070 Belgrade, Yugoslavia
WWW.MARANTZ.COM
 Loading...