

Page 1

Model WB6000
61" Plasma Wall Mount
User Guide
Page 2

INTRODUCTION
INTRODUCTION
Thank you for purchasing the MARANTZ WB6000 Plasma Display Mounting System.
This system has been specially designed using high quality steel for stability
and ease of installation.
For your safety, and for the protection of your plasma screen, we recommend that
you have your equipment and the Marantz Mounting System professionally installed.
However, if you decide to install the system yourself, we recommend you read this
guide thoroughly beforehand, making sure that you are familiar with the proper use,
installation and safety precautions contained herein before proceeding with the installation.
Please retain this guide for future reference.
Marantz will not be responsible for any damage or injury
resulting from improper installation of this product.
TECHNICAL FEATURES
TECH. FEATURES
>
Heavy-duty 12 gauge steel construction
>
Special powder-coated finish for durability
>
Unique single-piece mounting bracket for easy installation
>
1" (2.54 cm) depth for "close-to-wall" mounting
>
Up to 15 degree Tilt-Mount Option available
>
Long mounting slots to allow for centering when
mounting on 16" (40.64 cm) studs
>
Allows for up to 7 inches of lateral shift for centering
Hardware
1 pc - Wall Mount
6 pcs - M8 x 20mm Screws
6 pcs - 8mm Flat Washers
6 pcs - 8mm Spacers
4 pcs - 5/16" Lag Bolts
4 pcs - 5/16" Washers
>
Dimensions: 35.5" W x 22.5" H x 1"D
90.17W x 57.15H x 2.54D (cm)
2
Page 3

PRECAUTIONS
PRECAUTIONS
>
Always unplug the Plasma Display before attaching it to the Marantz
Plasma Wall Mount.
The Marantz Plasma Wall Mount is intended for mounting on flat surfaces such
>
as walls with wood studs, reinforced metal studs or solid-flat concrete. Always
use the appropriate hardware in sufficient quantities for each mounting surface.
Marantz will not assume any responsibility for damage resulting from the use of
improper mounting hardware.
The intended flat surface should be capable of supporting a weight of 4 times
>
the weight of the Plasma Display plus the weight of the mount (25 lbs.) and the
associated equipment. Reinforcement may be necessary to ensure this capability.
If you are in doubt, consult your with your Marantz Authorized Dealer or a
professional home theatre installation specialist.
Have the help of two people or more when you attempt to mount the Plasma
>
to the already-mounted Marantz Plasma Mount Hardware. Plasma Displays
are heavy and difficult to handle for one person.
>
DO NOT subject the unit or supporting structure to shock, vibration, movement
or danger of impact which could result in damage to your Plasma Display or
personal injury.
DO NOT mount in direct sunlight, or near a heater, fireplace or air conditioner
>
which could result in damage to your Plasma Display or increase the risk of fire.
>
Ventilation is Required. To allow heat to
50mm (2")
Wall
50mm (2")
disperse, leave space between surrounding
objects as shown on the diagram at right
when installing.
(2")
mm
Wall
50mm (2")
(2") 50
mm
CAUTION! Failure to adhere to the precautions listed above may
result in damage to your Plasma Display or injury to your person.
3
Page 4

MOUNTING HARDWARE
INSTALLATION
Mounting Hardware
Machine Screw
M8 x 30mm
PREPARING FOR INSTALLATION
The Marantz Plasma Wall Mount is designed for mounting on a flat surface.
The mounting 'slots' will give you 7 inches (17.78 cm) of lateral shift movement
so that the mount can be more easily centered on the wall.
The Marantz Plasma Wall Mount provides a Screw Kit for your Plasma Display.
Lay your Plasma Display face down on a soft flat surface, such as carpeting, and
screw the 'Screw Assembly' (provided) into the mounting holes in the back of the
Plasma Display.
Flat Washer
Spacer
8mm
Screw Assembly
Spacer
Flat Washer
Machine Screw
MOUNTING THE PLASMA MOUNT SYSTEM
Locate the wall studs nearest your mounting location and drill pilot holes (at least four)
for 5/16" (0.794 cm) Lag Bolts with washers for studded walls, or appropriate anchors
for your mounting surface. Marantz assumes no responsibility for improper use of
mounting hardware. Use the Marantz Plasma Wall Mount for a template for vertical
spacing if you prefer.
Mount the Marantz Plasma Wall Mount to the wall surface, using mounting slots
provided, ensuring that the mount is level.
Adjust the lateral shift of the mount for centering on the wall. Sliding the mount
horizontally along the mounting slots provides up to 7 inches of lateral shift.
Once the Marantz Plasma Wall Mount is centered, tighten down the mounting bolts.
Now you are ready to install the Plasma Display onto the Wall Mount. Have one
or more persons on each side of the Plasma Display and lift it into a vertical position
so that you can see the mounting screws in the back of the display and see the
mounting key holes on the Plasma Wall Mount. Gently lower the screws into
(degree) key holes and down to the left 1/2".
the 450
4
Page 5
INSTALLATION
INSTALLATION
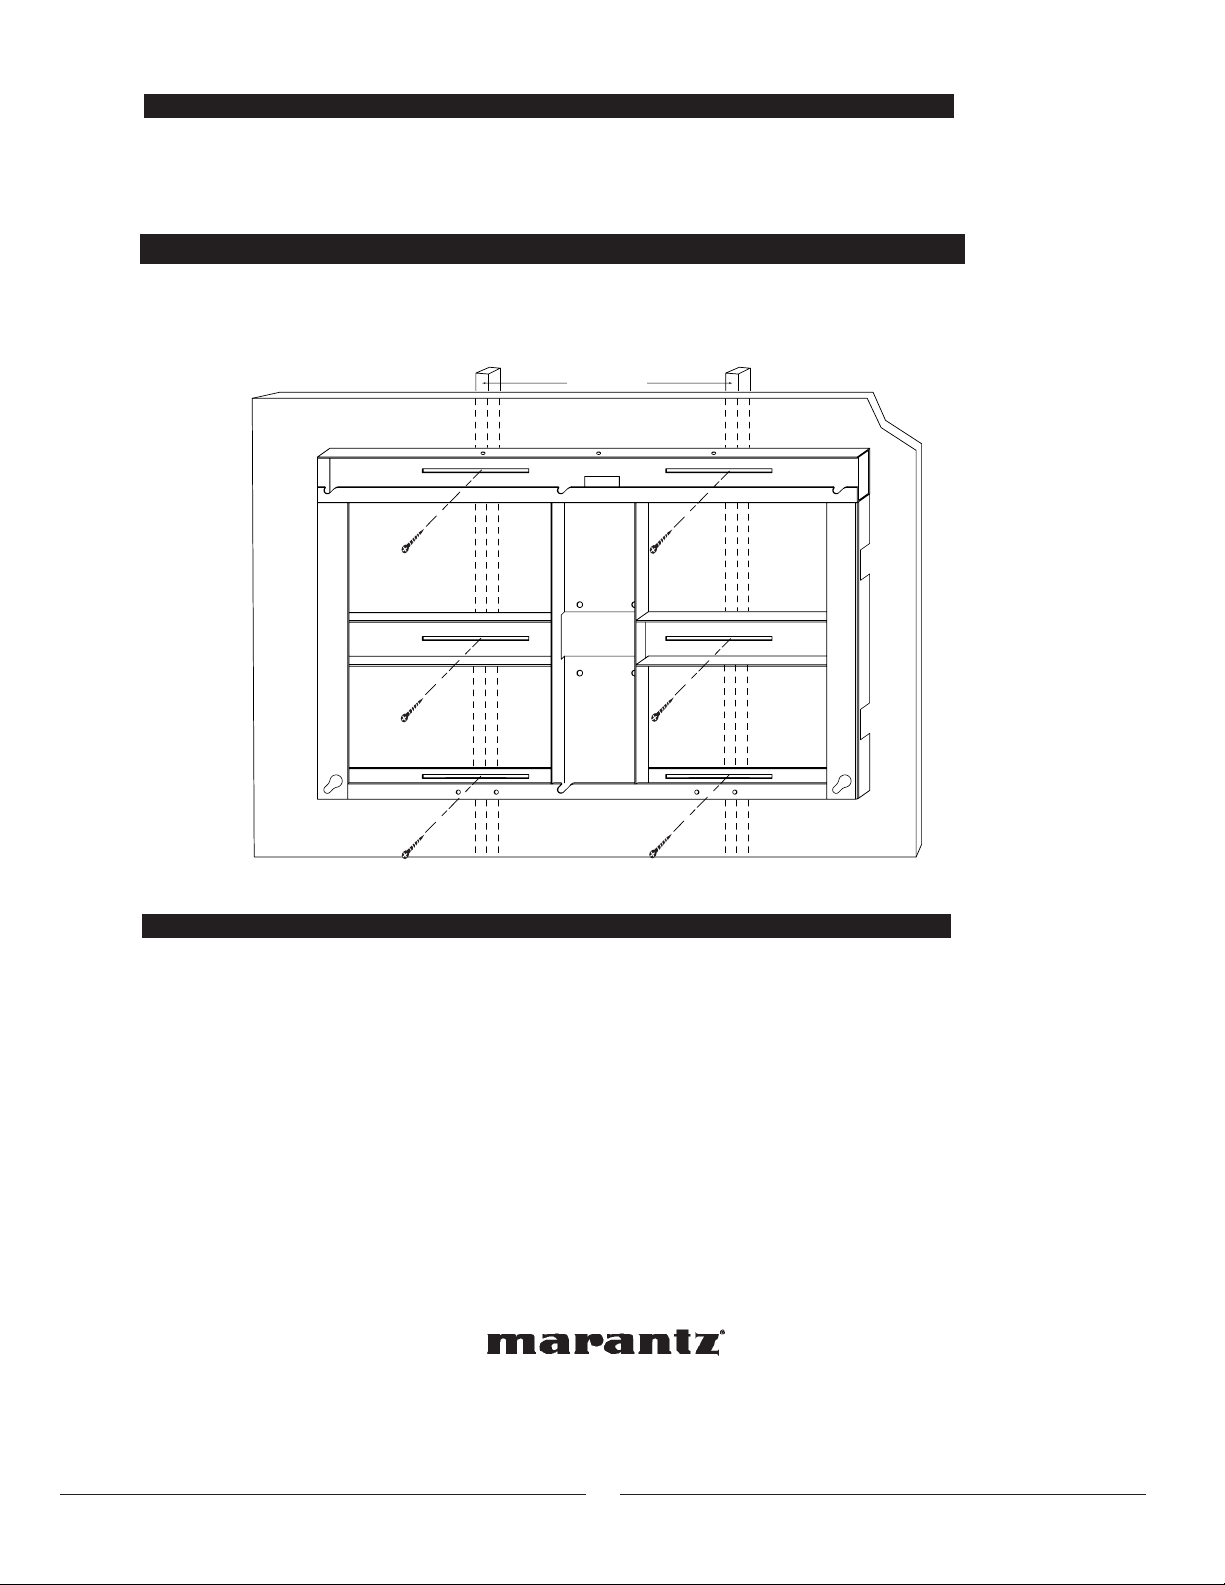
MOUNTING THE PLASMA WALL MOUNT
MOUNTING FOR HORIZONTAL PLASMA POSITION
Figure: 1
OPTIONS
16" wall studs
wall
OPTIONS
>
Tilt-Mount Option: Please refer the TK6540 User Guide
>
Table-Top Stand Option: Please refer the PL6540 User Guide
110 Maplewood Drive
Itasca, IL 60143
Phone: 630 741-0300 Fax: 630 741-0301
You can find your nearest authorized distributor or dealer
on our website at: www.marantz.com
5
 Loading...