

Marantec America D211315 Users Manual

Instructionsfor Models: ML-143(1,2,4), ML-243(1,2,4), ML-343(1)
ML-140(1,2,4), ML-240(1,2,4), ML-139(1,2,4), ML-239(1,2,4)
Transmitters
FEATURES
A family of state-of-the-art transmitters is tailored for discerning
homeowner’s. Each transmitter is custom encoded and ergonomically designed to be an integral part of your garage door opener
system. Offering 3 styles to suit your personal preference: the
Midi (1-, 2- or 4-channel), the Mini (1-, 2- or 4-channel), and the
Micro (1-channel), the smallest transmitter of its kind.
1. Installing the Battery
Midi (Figure 1.A) and Mini (Figure 1.B)
■ Remove battery compartment cover (back of transmitter) by
using small screwdriver.
■ Insert the provided 12V battery (type 23A) as shown.
■ Replace battery compartment cover.
Micro (Figure 1.C)
Micro transmitters come with batteries already installed. When
replacing batteries follow the steps below:
■ Remove battery compartment cover (front of transmitter).
■ Insert two 3V batteries (type CR1025) as shown.
■ Replace battery compartment cover.
Note: Replace batteries with same type only.
2. Using the Transmitter
■ To open or close garage door, press and hold button (Midi and
Mini transmitters have indicator lights that will start blinking).
When garage door begins to move, release button.
■ To stop garage door during travel, press and hold button until
door stops, then release button.
■ To continue garage door travel after stopping it, press and hold
button. Once pressed, the door will travel in the opposite
direction.
3. Transmitter Mounting
The transmitters can be conveniently mounted inside your car
using the mounting plate, or the mounting plate and visor clip
(Midi and Mini Transmitters only).
Mounting Plate (Figure 2.)
The mounting plate enables you to mount the transmitter easily
to the dashboard or other convenient area.
■ Secure the mounting plate to area of preference using velcro
(not provided) or other means.
■ Snap the transmitter into the mounting plate, which will hold it
firmly in place.
Visor Clip (Midi and Mini Transmitters: Figure 2.)
The visor clip permits easy mounting of the transmitter to a visor.
■ Attach visor clip to mounting plate.
■ Snap transmitter into mounting plate.
■ Affix complete assembly to visor.
Programming
Cable
3-hole Terminal
Programming
Cable
3-hole Terminal
B. Micro Transmitter
A. Midi or Mini Transmitter
Figure 2. Mounting Plates & Visor Clips
C. Micro
Transmitter
B. Mini
Transmitter
A. Midi
Transmitter
Figure 1. Battery Compartment
Battery
Compartment
Cover
3V (type CR1025)
Battery
Programming
Cable
3-hole
Terminal
Micro Transmitter
Micro Mounting Plate
Transmitter—Midi
Mounting Plate
Visor Clip
Mini
Transmitter
Battery
Compartment
Cover
12V (type 23A)
Battery
Battery
Compartment
Cover
12V (type 23A)
Battery
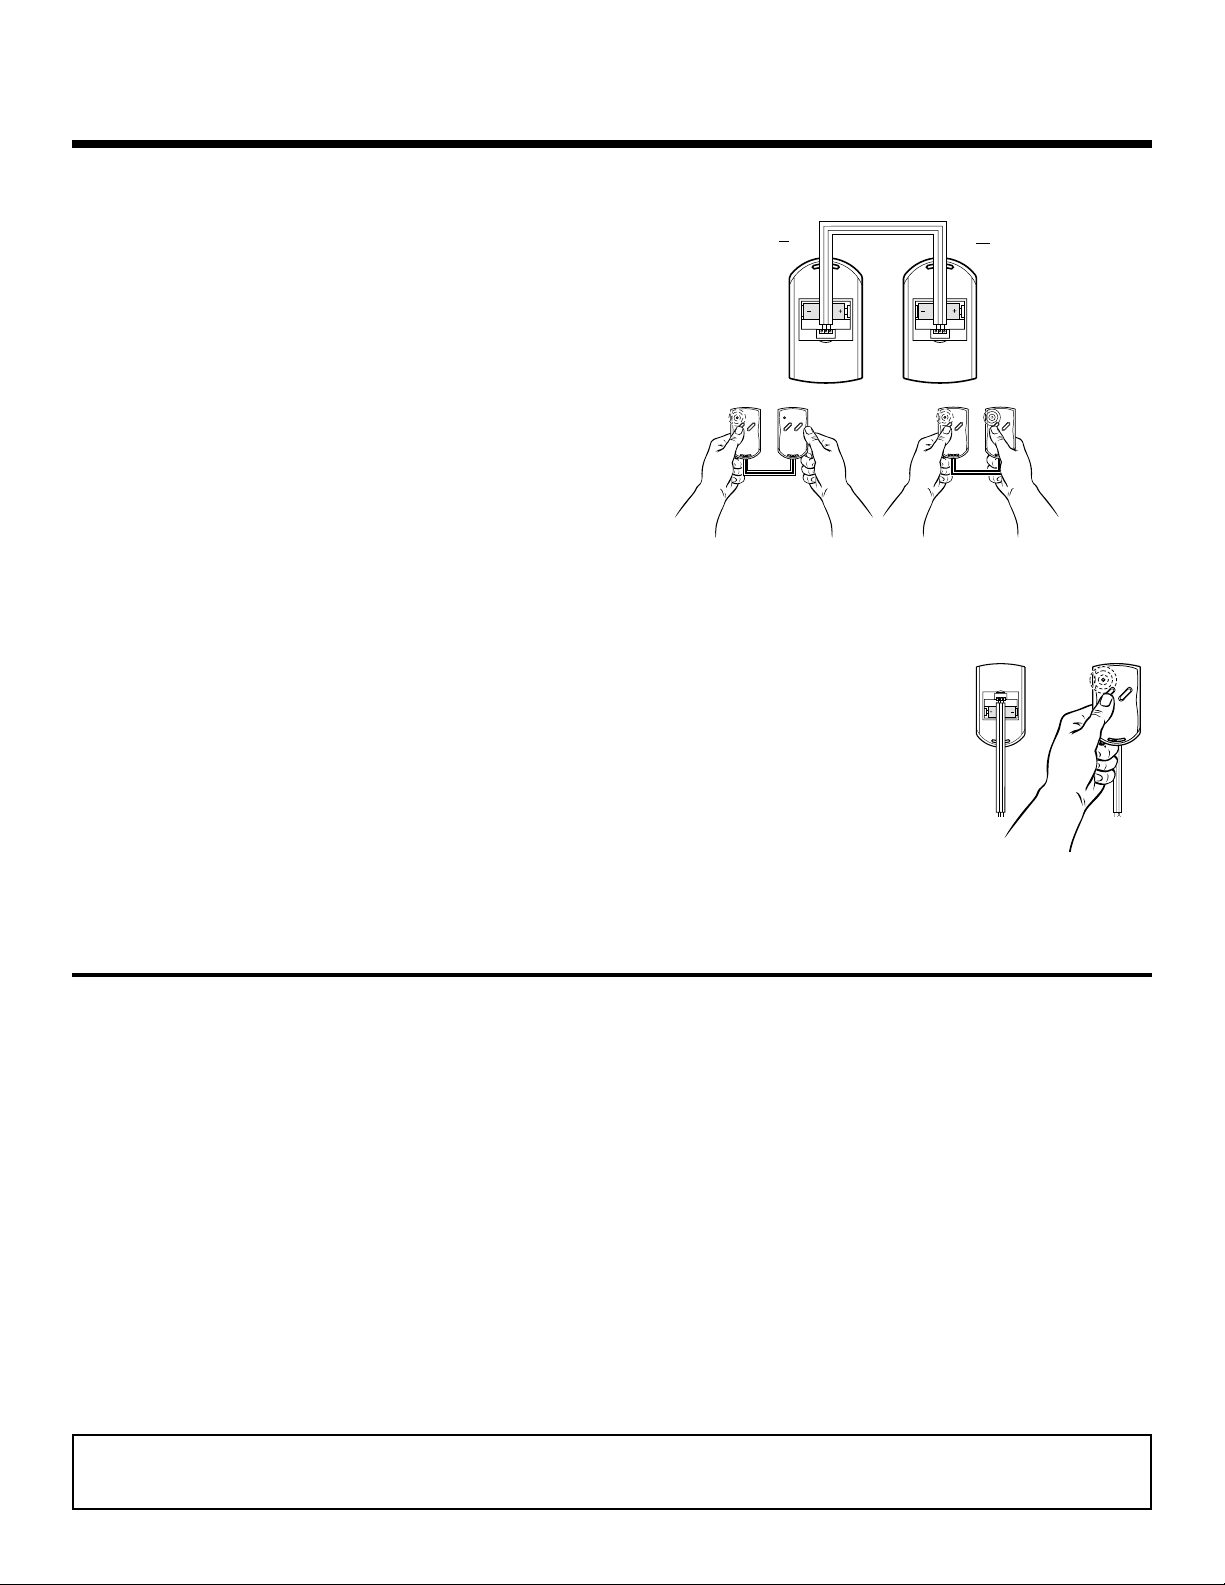
4. Multiple Transmitters
Each transmitter comes factory programmed with random codes.
1-channel transmitters have one random code, 2-channel transmitters have 2 different random codes, one per button, and 4channel transmitters have 4 different random codes, one per button. Transmitters that accompany a power head have at least
one code that already matches that power head. Transmitters
that are purchased separately as accessories have random codes
that must be changed in order to match the code of the “active”
transmitter you are already using. Below are instructions for
transferring an active code from a button on one transmitter to
a button of your choice on another transmitter.
■ Remove battery compartment covers (as shown previously in
Figure 1) of both transmitters, the one with the active code
and the new transmitter that needs to receive the active code.
■ Connect programming cable to both transmitters. Line up
either end of the stripped cable so 3 wires align with 3-hole
terminal, then firmly insert cable. See Figure 3.
■ Press and hold button on transmitter with the active code ((L)
in Figure 3). Midi and Mini transmitters have indicator lights
that will blink to show that code transfer is ready.
■ While keeping the transmitter (L) button pressed, press and
hold the button on the new transmitter (R) that you want to
transfer the active code to.
■ Code transfer will occur in approximately 2 seconds. If the
new transmitter (R) is a Midi or a Mini, the indicator light will
illuminate continuously to show that transfer is complete.
■ All buttons can be released. Code transfer is completed.
■ Cable can be removed and the covers replaced.
■ Both transmitters can now be used to operate the same door.
Note: For multi-button transmitters, be sure to carry out this
procedure for all the buttons you desire to use.
For micro transmitters, follow the same steps only there will
be no LED light indication.
5. Changing the Code on Transmitters
The transmitter factory preset code can be changes as follows:
FCC Certified: This device complies with Part 15 of the FCC rules. Operation is subject to the following two conditions: (1) this device may not cause
harmful interference, and (2) this device must accept any interference received, including interference that may cause undesired operation.
Changes or modifications not expressly approved by the party responsible for compliance could void the user’s authority to operate the equipment.
8030012 © 2001 All rights reserved. 01/01 Marantec America Corporation, 675 Heathrow Dr., Lincolnshire, IL 60069 1-888-622-2489
Transmitter
with Active
Code
New
Transmitter
Figure 3. Multiple Transmitters—Code
Transfer
L
R
L
R
L
R
Light
Blinks
Light
Blinks
Light
Off
Light
Illunimates
Continuously
Press First
and hold
Press Second
and hold
Keep Pressed
Release when
Light Illunimates
Continuously
Transmitters
Instructions (continued)
■ Remove battery cover from compartment.
■ Connect the programming 3-prong
cable to programming terminal in
transmitter. Fig. 3A.
■ Cross any two wires of the programming cable, one of them must be the
center wire.
■ Press and hold the button on the
transmitter.
■ Code will change in approximately 2
seconds.
■ Release the button after the light illuminates continuously then remove the
cable and replace the cover.
Note: For multi-button transmitters, be sure to carry out this
procedure for all the buttons you desire to use.
For micro transmitters, follow the same steps only there will
be no LED light indication.
LIMITED WARRANTY:
Transmitters (model #’s ML-143(1,2,4), ML-243(1,2,4), ML-343(1), ML140(1,2,4), ML-240(1,2,4), ML-139(1,2,4), ML-239(1,2,4) - (1) Year Warranty
(Labor not included)
COVERAGE: Any defect in material and or workmanship from personal,
normal household use in accordance with the Owner‘s Manual.
WARRANTY OWNERSHIP: The warranty is limited to the consumer who
originally purchased and/or registered the product.
MARANTECAMERICA CORPORATION COMMITMENT: If the Marantec
®
product is found to be defective, we will repair or, at our option, replace
it at no charge to the customer. We may elect to use new or reconditioned replacement parts or product of the same or similar design at
that given time.
LIMITATIONS: Marantec
®
will not be liable for loss or damage to property or any incidental or consequential loss or expense from property
damage due directly or indirectly from the use of this product other
than in the States that do not allow such exclusion of limitation.
Marantec
®
will not cover batteries, unauthorized repair parts, installa-
tions, commercial use, damage while in transit, defects resulting from
accidents, or resulting from alterations, lack of proper maintenance,
unauthorized repair or modification of product, misuse or abuse of
product, fire, flood, or acts of God, or other failures due to not properly
following the Marantec
®
Owner‘s Manual. No labor costs are covered.
This warranty applies only to Marantec
®
’sAccessories purchased and
used in the United States, Canada, or Mexico. Marantec
®
under no circumstances will be liable for consequential, incidental or special damages arising in connection with the use, or inability to use, this product.
In no event shall Marantec
®
’s liability for breach of warranty, breach of
contract, negligence or strict liability exceed the cost of the product
covered hereby. No person is authorized to assume for Marantec
America Corporation any other liability in connection with the sale of
this product.
WARRANTY SERVICE: Service from Authorized Dealers: Contact the
source that sold you and/or installed your Garage Door Opener unit.
Self-Service: Call Marantec
®
’s Toll Free Helpline at: 1-888-622-2489 where
a trained Marantec
®
representative will assist you in diagnosing and
providing you with directions and parts to repair it yourself if possible.
Figure 3A. Code Changing
 Loading...