

Page 1
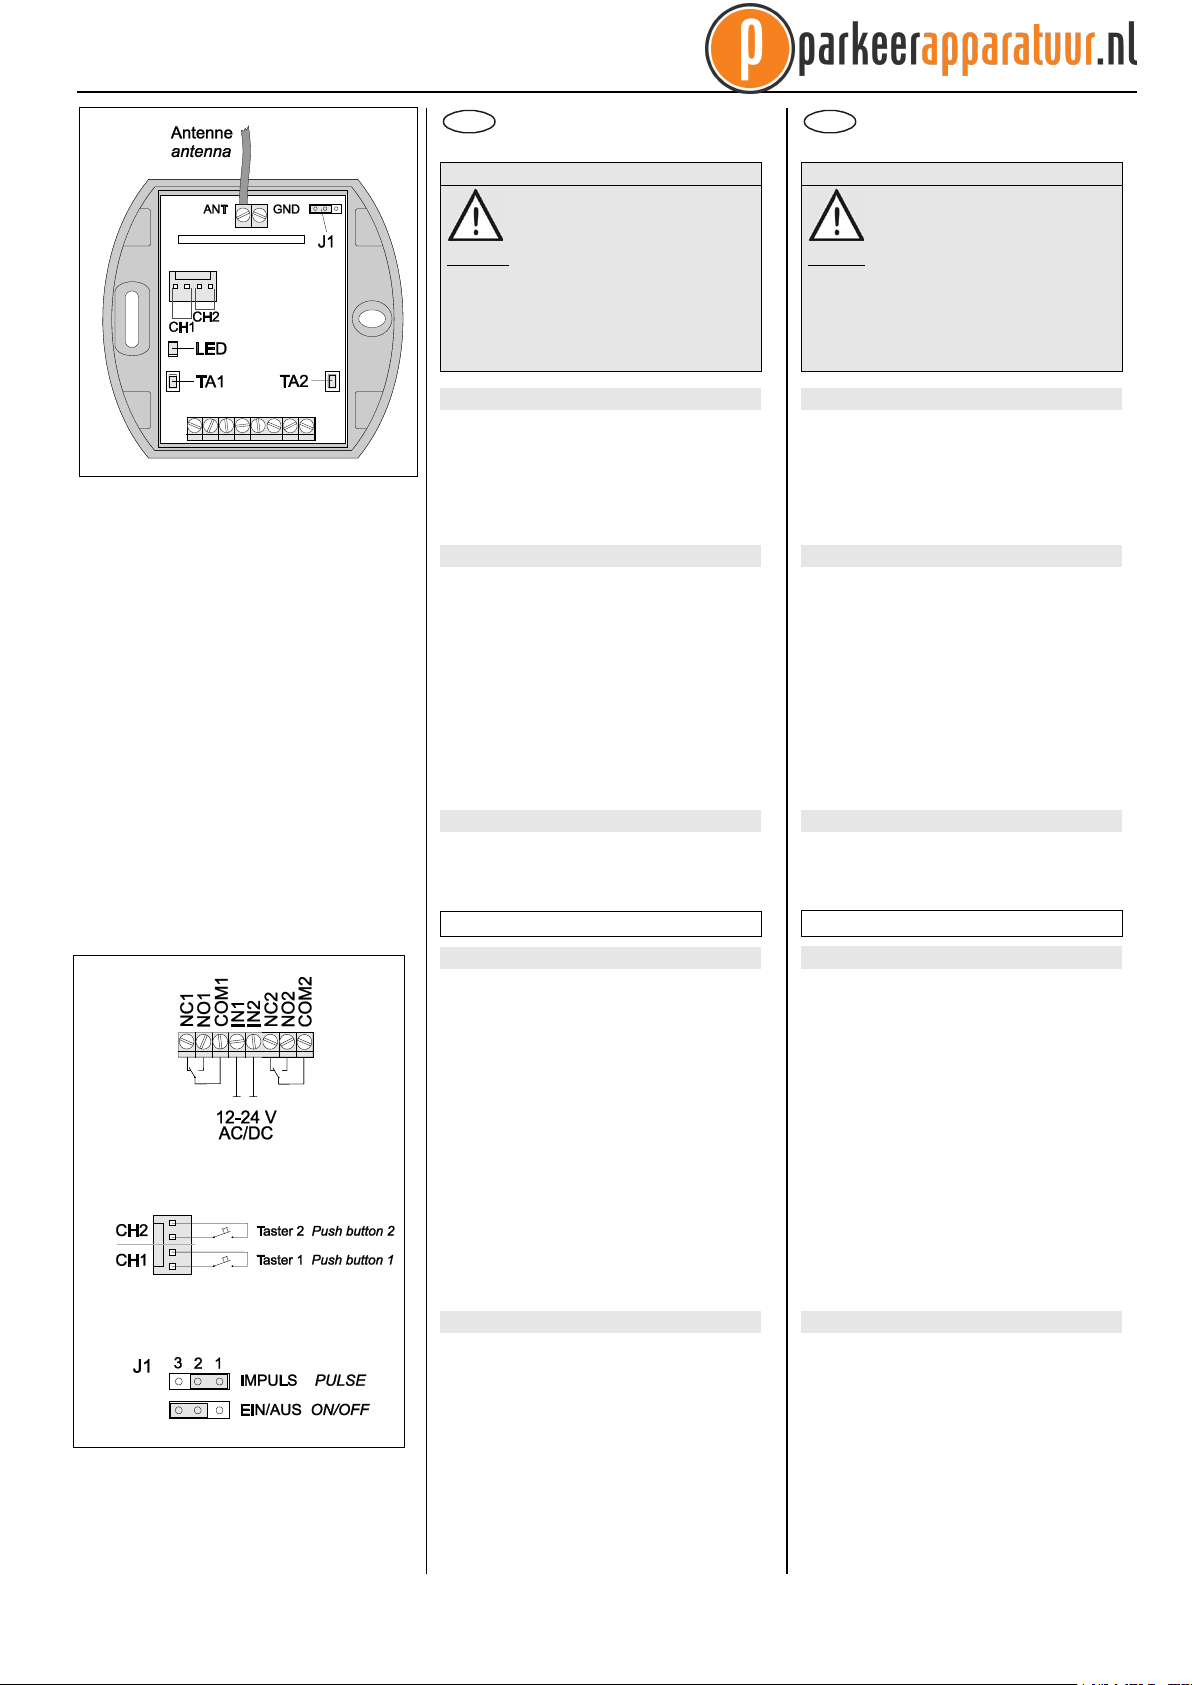
Digital 992 Universalempfänger Universal receiver
Digital 992 - IP20
Digital 992 - IP65 (o. Abbildung / not illustrated)
D
Bedienungsanleitung
Sicherheitshinweise
Bevor Sie den Universalempfänger
anschließen und benutzen, lesen Sie
bitte diese Anleitung sorgfältig durch!
Achtung! Beachten Sie die zulässige Versorgungsspannung und die maximale Kontaktbelastung!
Lassen Sie nicht funktionierende Universalempfänger vom Hersteller überprüfen!
Nehmen Sie keine eigenmächtigen Veränderungen an dem Universalempfänger vor!
Bestimmungsgemäßer Gebrauch
Das Gerät darf ausschließlich mit Schutzkleinspannung (SELV) betrieben werden und ausschließlich
als Funksteuerung zum Schalten von Geräten mit
Schutzkleinspannung (SELV) verwendet werden.
Der Hersteller haftet nicht für Schäden, die durch
unsachgemäßen oder bestimmungsfremden Gebrauch entstehen!
Funktionsweise
Der Universalempfänger Digital 992 kann im Spannungsbereich von 12-24 V AC/DC betrieben werden.
Es können zwei potenzialfreie Relaisausgänge
geschaltet werden.
Es stehen die Betriebsarten IMPULS (1 Sekunde)
und EIN/AUS (1-Tast-Bedienung) zur Verfügung.
Werksseitig ist die Betriebsart IMPULS voreingestellt.
Je Kanal können bis zu 100 verschiedene Sendercodes von Funksendern gespeichert werden.
Zusätzlich besteht die Möglichkeit, je Kanal einen
externen Impuls-Taster anzuschließen und mit
diesem das jeweilige Relais entsprechend der
gewählten Betriebsart zu schalten.
Lieferumfang
Universalempfänger, Klebepad,
Bedienungsanleitung
GB
Operating Instructions
Safety Advice
Carefully read through these instructions before connecting and operating
the universal receiver!
Caution! Observe the permissible supply
voltage and the max. contact rating!
Have faulty universal receivers checked by the
manufacturer!
Do not make any unauthorized alterations or
modications to the universal receiver!
Intended Use
The unit may only be operated with safety extra low
voltage (SELV) and may only be used as a radio
control for switching devices with safety extra low
voltage (SELV).
The manufacturer shall not be liable for any damage
caused by improper or non-intended use.
Function
The universal receiver Digital 992 can be operated in
a voltage range of 12-24 V AC/DC.
Two potential-free relay outputs may be switched.
Two operating modes are available: PULSE
(1 second) and ON/OFF (one-button-mode). Factory
setting is the PULSE mode.
For each channel 100 different radio transmitter
codes can be memorized.
It is also possible to connect one external pulse
button for each channel which can be used to switch
the corresponding relay according to the selected
operating mode.
Scope of Delivery
Universal receiver, Adhesive pad,
Operating instructions
Den Universalempfänger benutzen
Montieren und anschließen
− Entfernen Sie den Gehäusedeckel.
1
2
3
Bild1-3 / Fig: 1-3
− Befestigen Sie den Universalempfänger mit dem
Klebepad an einem geeigneten Ort.
Schließen Sie die Versorgungsspannung (12-24V
−
AC/DC) und die zu schaltenden Schutzkleinspannungsverbraucher wie folgt an (Bild 1):
Versorgungsspannung: IN1, IN2
Verbraucher 1 (an Relais 1 / Kanal 1):
Verbraucher 2 (an Relais 2 / Kanal 2):
− Schließen Sie bei Bedarf die externen Taster wie
folgt an (Bild 2):
Taster 1 (für Relais 1/Verbraucher 1): CH1
Taster 2 (für Relais 2/Verbraucher 2): CH2
− Setzen Sie den Gehäusedeckel wieder auf.
NO1 - COM1: Schließer
NC1 - COM1: Öffner
NO2 - COM2: Schließer
NC2 - COM2: Öffner
Sender einlernen
Für jeden Kanal können 100 unterschiedliche Sendercodes gespeichert werden.
1. Wählen Sie mit dem Jumper J1 die gewünschte
Betriebsart (Bild 3):
J1 in Position 1-2: IMPULS (1 Sekunde)
J1 in Position 2-3: EIN/AUS
2. Drücken Sie die Taste TA1 (für den Kanal 1)
bzw. TA2 (für den Kanal 2) und halten Sie diese
gedrückt. Nach ca. 3 s beginnt die LED für ca.
10 s zu blinken. Lassen Sie die Taste los.
Using the universal receiver
Mounting and Connecting
− Remove the housing cover.
− Mount the universal receiver in a suitable
location.
− Connect the supply voltage (12-24 V AC/DC)
and the safety extra low voltage devices to be
switched as follows (Fig.: 1):
Supply voltage: IN1, IN2
Device 1 (relay 1 / channel 1):
NO1 - COM1: NO contact
NC1 - COM1: NC contact
Device 2 (relay 2 / channel 2):
NO2 - COM2: NO contact
NC2 - COM2: NC contact
− If necessary, connect the external push button
as follows (Fig.: 2):
Push button 1 (for relay 1/device 1): CH1
Push button 2 (for relay 2/device 2): CH2
− Remount the housing cover.
Memorizing the Transmitter
100 different transmission codes can be memorized
for each channel.
1. Select the desired operating mode via jumper J1
(Fig.: 3):
J1 in position 1-2: Pulse (1 second)
J1 in position 2-3: ON/OFF
2. Press and hold button TA1 (for channel 1) or
TA2 (for channel 2). After about 3 s the LED will
begin to ash for about 10 s. Release the button.
UM116794 1014 D/GB
Page 2
Montagehinweise:
Die Empfangsleistung kann von mehreren Faktoren
beeinflusst werden: z. B. Standort, verwendeter
Sender, nicht entstörte Geräte und Anlagen, andere
Sender im Frequenzbereich, Wetterlage u. a.
Bringen Sie den Universalempfänger nicht in Bodennähe und nicht in Metallnähe an!
Alle Anschlussleitungen dürfen maximal 3 m lang
sein!
Wenden Sie sich bei Störungen an den Fachbetrieb
oder an den Hersteller.
Mounting advice:
The reception quality can be affected by a number of
factors: location, equipment and systems without
interference suppression, other transmitters within
the frequency range, atmospheric conditions and
other factors.
Do not mount the universal receiver near the oor or
near large metal objects!
The maximum length of any connecting cables may
not exceed 3 m.
In the case of malfunctions, contact your retailer or
the manufacturer.
3. Drücken Sie innerhalb der 10 s die Lerntaste
des Senders und die Sendertaste, deren Code
gespeichert werden soll. W urde der Code
gespeichert, leuchtet die LED des
Universalempfängers für 4 Sekunden.
4. Wiederholen Sie die drei Schritte mit weiteren
Sendern.
Wenn alle Speicherplätze belegt sind, blinkt die LED
für ca. 4 s schnell.
Zum Ändern der Betriebsart eines bereits eingelernten Senders, muss durch „Reset“ der Speicher des
gewünschten Kanals gelöscht werden, dann kann der
Sender mit neuer Betriebsart wieder eingelernt
werden.
Reset (Speicher komplett löschen)
Sie können den Speicherinhalt für jeden Kanal
separat löschen oder beide gleichzeitig.
− Drücken Sie die Taste TA1 (für den Kanal 1)
bzw. TA2 (für den Kanal 2) und halten Sie diese
für 10 s gedrückt. Nach ca. 3 s beginnt die LED
zu blinken.
Wenn alle gespeicherten Sendercodes für den
gewählten Kanal gelöscht sind, leuchtet die LED.
Lassen Sie die Taste los.
oder
− Halten Sie die Tasten TA1 und TA2 gleichzeitig
für 10 Sekunden gedrückt. Nach ca. 3 s beginnt
die LED zu blinken.
Wenn alle gespeicherten Sendercodes für beide
Kanäle gelöscht sind, leuchtet die LED. Lassen
Sie die Tasten los.
3. Within 10 s, press the learning transmitter button
and the transmitter button of which the code is to
be memorized. As soon as the code is
memorized, the LED of the universal receiver
remains lit for as long as the transmitter button is
held.
4. Repeat the three steps with other transmitters.
If all memory locations are occupied, the LED ashes
rapidly for approx. 4 s.
To change the mode of an already memorized
transmitter the memory of the desired channel must
be deleted rst (see "Reset"), then the transmitter
can be memorized with a new operating mode again.
Reset (Deleting Memory completely)
The memory for each channel can be deleted separately.
− Press and hold button TA1 (for channel 1) or
TA2 (for channel 2) for 10 s. After about 3 s the
LED will begin to ash.
As soon as all memorized transmission codes
for the chosen channel have been deleted, the
LED will light up. Release the button.
or
− Press and hold the buttons TA1 and TA2
simultaneously for 10 seconds. After about 3 s
the LED will begin to flash.
As soon as all memorized transmission codes
for both channels have been deleted, the LED
will light up. Release the buttons.
Allgemeine Informationen
Entsorgungshinweise
Entsorgen Sie das Altgerät über eine Sammelstelle
für Elektronikschrott oder über Ihren Fachhändler.
Entsorgen Sie das Verpackungsmaterial in die
Sammelbehälter für Pappe, Papier und Kunststoffe.
Altgeräte dürfen nicht mit dem Hausmüll entsorgt
werden!
Konformität
Dieses Produkt erfüllt die wesentlichen Anforderungen der
R&TTE-Richtlinie 1999/5/EG.
Die Konformitätserklärung ist auf folgender Internetseite abrufbar: www.marantec.de.
Technische Daten
Frequenz: 433,92 MHz/868,30 MHz
Modulation: FSK
Funktelegramm: bi·linked
Verschlüsselung: AES 128 Bit
Spannungsversorgung: 12-24 V AC/DC
Kontaktbelastung
externe Taster: ca. 5 mA
Ruhestrom: 10 mA (12V DC)
15 mA (12V AC)
Stromaufnahme:
Relais ON 55 mA (12V DC)
70 mA (12V AC)
Leistungsaufnahme: 0,7 W (DC)
1,0 VA (AC)
Ausgang: 2 potenzialfreie
Relaiskontakte
Max. Kontakt- AC: 24 V / 1 A / 24 VA
belastung: DC: 30 V / 1 A / 30 W
Schutzart: IP20 / IP65
Betriebstemperatur: -20°C bis +60°C
Abmessungen: IP20: 63 x 35 x 70 mm
IP65: 72 x 114 x 36 mm
Gewicht: IP20: ca. 50 g
IP65: ca. 100 g
General Information
Disposal
Dispose of the waste product via a collection point
for electronic scrap or via your specialist dealer.
Put the packaging material into recycling bins for
cardboard, paper and plastics.
Waste electrical products may not be disposed
of with household waste!
Conformity
This product conforms to the
basic requirements of the
R&TTE Directive 1999/5/EC.
The Declaration of Conformity can be found on the
Internet at: www.marantec.de.
Technical Details
Frequency: 433.92 MHz/868.30 MHz
Modulation: FSK
Radio telegram: bi·linked
Encoding: AES 128 Bit
Supply voltage: 12-24 V AC/DC
Max. contact rating
external push-buttons: approx. 5 mA
Standby: 10 mA (12V DC)
15 mA (12V AC)
Current consumption:
Reley ON 55 mA (12V DC)
70 mA (12V AC)
Input power: 0.7 W (DC)
1.0 VA (AC)
Output: 2 potential-free relay
contacts
Max. contact rating: AC: 24 V / 1 A / 24 VA
DC: 30 V / 1 A / 30 W
Degree of protection: IP20 / IP65
Operating temperature: -20°C to +60°C
Dimensions: IP20 : 63 x 35 x 70 mm
IP65: 72 x 114 x 36 mm
Weight: IP20: approx. 50 g
IP65: approx. 100 g
UM116794 1014 D/GB
 Loading...