

Mapmyindia ICENAV 501 Instructions Manual
DVD/VCD/CD/MP3/MPEG4/SD/USB PLAYER WITH FM/AM TUNER
GPS & BLUETOOTH
ICENAV 501
Operating Instructions
1 2
Safety Precautions
Never expose this unit, amplifier,
and speakers to moisture or water to
prevent electric sparks or re.
Please don't change the fuse on
the power cord without professional
guidance, using improper fuse may
cause damage to this unit or even cause
re.
Please contact your nearest dealer
if one of the following symptoms is
experienced:
(a). Water or other objects enters the
unit.
(b). There is smoke.
(c). Peculiar smell.
Only connect the unit to a 12-volt power
supply with negative grounding.
Never install this unit where the
operation & condition for safe driving is
impaired.
Never use the video display function
in the front when driving to prevent the
violation of laws & regulations and also
to reduce the risk of traffic accident
except for using rear view video
camera.
MUTE
OK
Thank you for purchasing this product.
Please read through these operating
instructions so you will know how to
operate your model properly. After
you’ve nished reading the instructions,
keep this manual in a safe place for
future reference.
To ensure safe driving, please adjust
the volume to a safe and comfortable
level in case of emergency situations.
1. Never disassemble or adjust the unit without any professional guidance.
For details, please consult any professional car shop / dealer for inquiry.
2. If the front panel or TFT monitor is dirty, please use a clean silicone cloth and neutral detergent
to wipe off the spot. Using a rough cloth and non-neutral detergent such as alcohol for cleaning
may result in scratching or decoloration to the monitor.
3. If any abnormal behavior of the unit is found, please refer to trouble shooting guide of this
manual. If no relevant information is found, please press the [RESET] button on the front panel
to resume factory default.
4. If you have parked the car in hot or cold weather for a long time, please wait until the
temperature in the car becomes normal before operating the unit.
5. Using the car heater in low temperature environment may result in moisture inside the unit, DO
NOT use the unit in this situation. Eject the disc and wipe off the moisture on the disc. If the unit
still doesn't work after a few hours, please contact the service center.
6. Do not impact the LCD monitor which could cause damage.
7. To prevent damage to the screen, avoid touching it with sharp objects.
8. To provide a clear demonstration and an alternative for easy understanding to the operation of
this unit, graphic illustrations are used.
However, some illustrations are different from the actual images displayed on the screen.
9. Operate the unit correctly according to this manual to prevent unnecessary problem. The
guarantee won't be valid if the problem is caused by inappropriate operation.
Safety Precautions
MAP
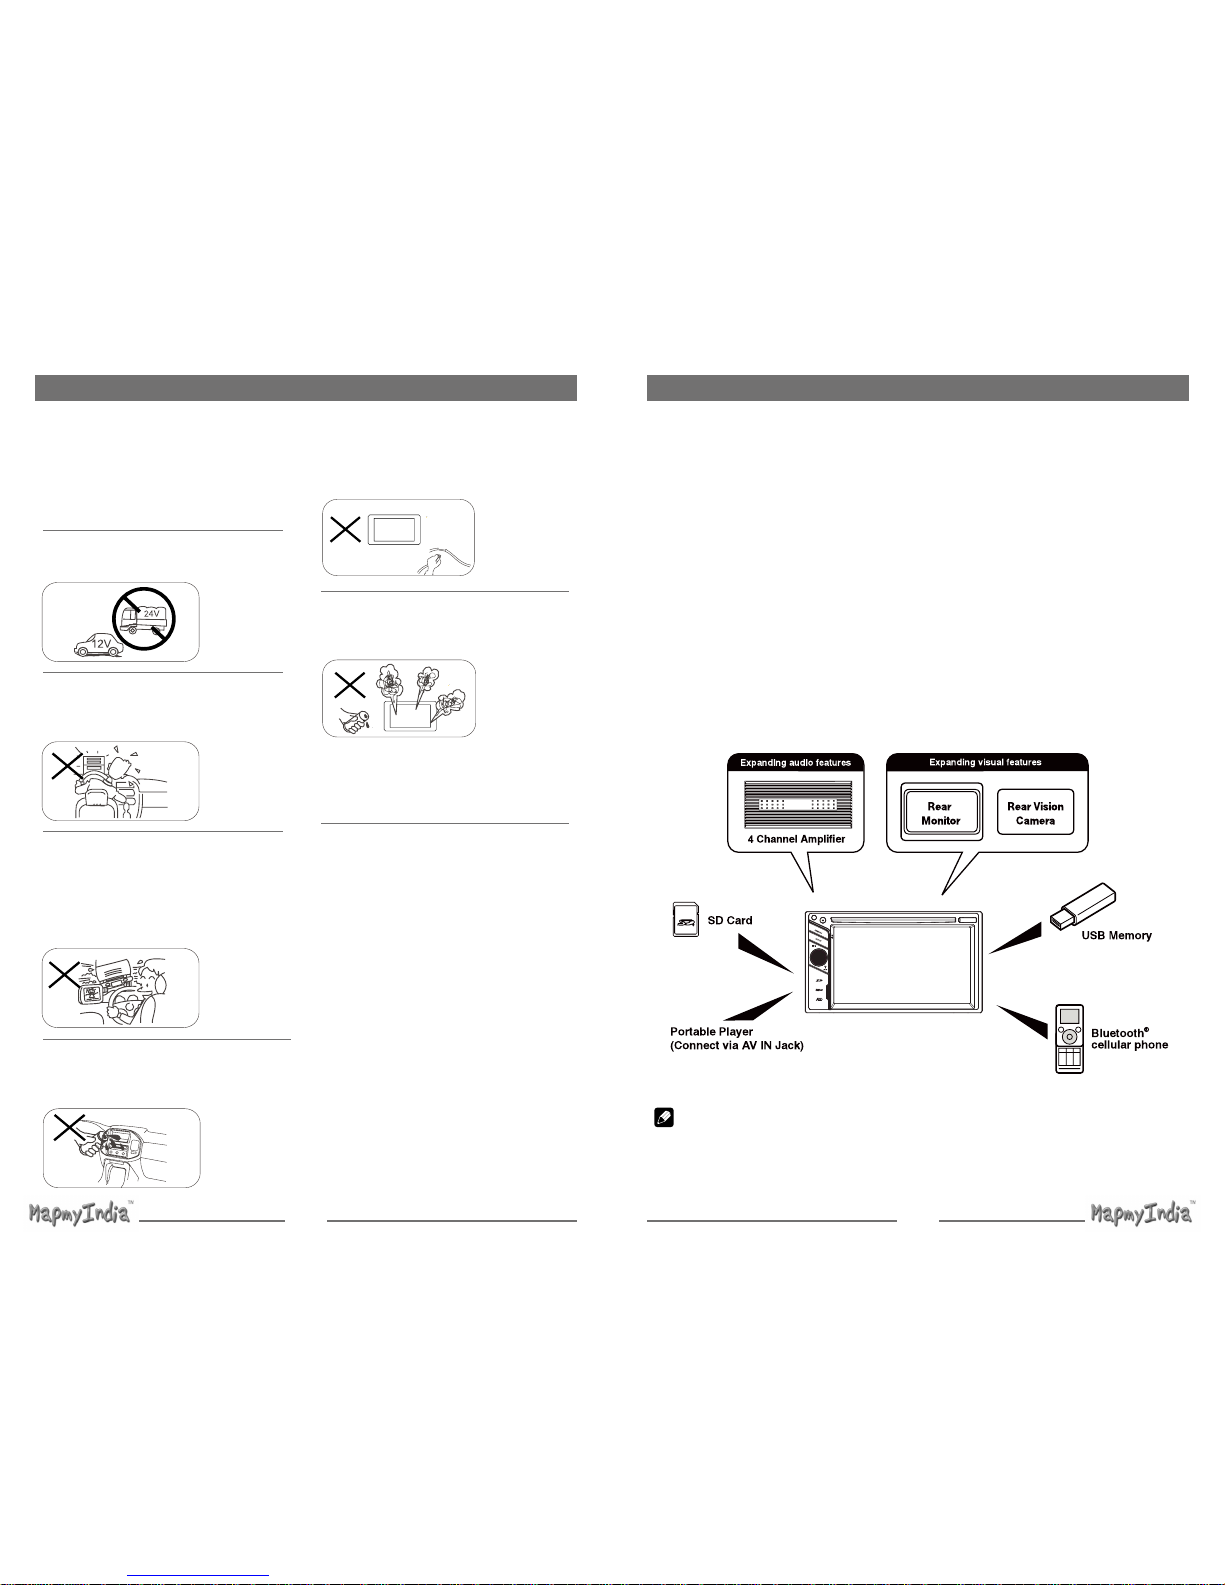
Note:
The items listed outside of the frame are the commercial products generally sold.
Expanding Systems
3 4
Contents
Safety Precautions ...................................1
Before Using .............................................4
Front Panel .............................................4
Remote Control.......................................5
Notes on Remote Control Usage ............6
Uninstall Battery......................................6
Install Battery ..........................................6
Basic Operations ......................................7
Parking Brake Inhibit...............................7
Mute ........................................................7
Power On / Off ........................................ 7
Audible Beep Conrmation ..................... 7
Playing Source Selection ........................7
Volume Adjustment.................................7
EQ Menu.................................................7
Select Preset Equalizer ..........................8
Adjust EQ Parameters ............................ 8
Adjust Fader/Balance .............................8
Set Date /Time ........................................9
Radio Mode .............................................10
Tuner TFT Display ................................10
Select Radio as Playing Source ...........10
Select One Radio Band ........................10
Tune......................................................10
Playback Mode........................................11
Load a Disc ...........................................11
Eject a Disc ...........................................11
Touch Screen Controls ......................... 11
Preset Station .......................................11
Local Seeking .......................................11
EQ Selection .........................................11
Controlling Playback .............................12
Connect a USB Device ......................... 12
Remove a USB Device .........................12
Insert/Remove a SD Card.....................12
Play/Pause............................................12
Previous/Next .......................................12
Search for a Folder ...............................12
Repeat ..................................................13
Repeat A-B ...........................................13
Shufe (Random) Play..........................13
Select Audio Mode................................13
Select Subtitle Language ......................13
Change View Angle ..............................13
Video Setup ..........................................14
Playback Information ............................14
Direct Track Entry .................................14
Rotate Pictures .....................................14
Zoom.....................................................14
Bluetooth Mode ......................................15
Pair the Bluetooth-enabled Devices .....15
Disconnect Bluetooth Device ................15
Make a Call ...........................................15
Answer an Incoming Call ......................15
Adjust Bluetooth Settings......................16
Settings ...................................................17
Display System .....................................17
Adjust General Settings ........................ 17
Calibration.............................................17
Adjust Time Settings .............................17
Adjust Sound Settings ..........................18
Adjust Video Settings............................18
Adjust Disc Rating ................................18
Adjust Volume Settings.........................19
Adjust Reset Settings ...........................19
Other Modes ............................................20
Listen to Other Devices ........................20
Reset ....................................................20
GPS ......................................................20
Specications .........................................21
Troubleshooting .....................................23
Installation ...............................................24
Wire Connections ...................................25
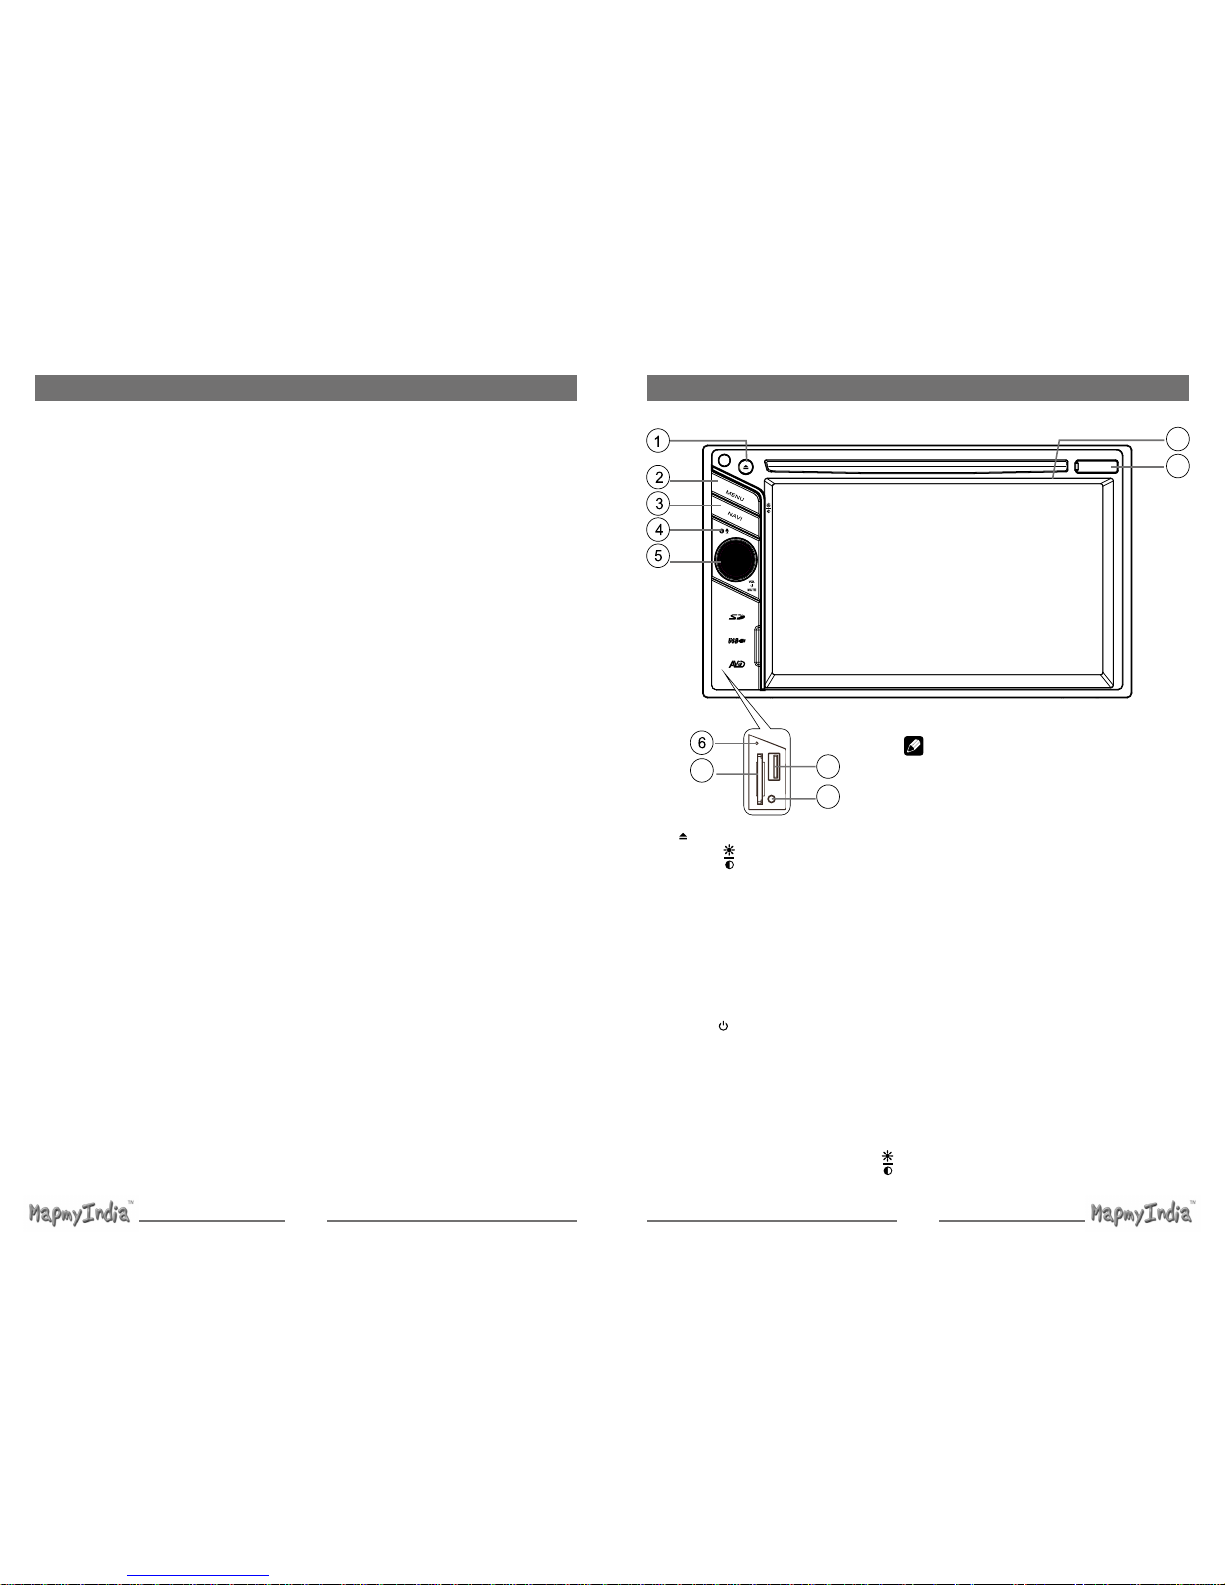
Front Panel
Before Using
MAP
7
8
9
10
11
Note:
The graphic in this manual is for reference only, and
may be different from that in real unit. Reference to
real unit is suggested.
1. [ ] Button: Eject disc
2. [MENU/
] Button:
Press to switch between the main
menu and current source.
Press and hold to enter brightness
adjustment mode, then rotate the
knob to adjust.
3. [NAVI] Button:
Press to switch to navigation mode.
4. Internal Microphone
Internal microphone for Bluetooth calls.
5. [ VOL /
/ MUTE] knob:
Press to turn the unit on. Press and
hold again to turn the unit off.
Press to silence the audio volume.
Turn clockwise to increase the
volume, and turn counter-clockwise
to decrease the volume.
Rotate the knob adjust the screen
brightness (press the [MENU/
]
button)
6. Reset Button
Press to reset system settings to factory
default (except password and parental
lock settings).
7. SD/SDHC card slot
Insert an SD card for playback of music/
video/picture les.
8. USB Connector
Connect a USB device for playback of
music/video/picture les.
9. A/V Input
Accepts a 3.5mm jack through which
signals from various audio/video devices
can be applied to
the unit.
10. Map Slot
The Mini SD card is used for the
Navigation Map only, not for music
or other files. This may be used for
rmware updates if required.
11. Disc slot

5 6
Before Using
Remote Control
1.
Change Current Source.
2. Eject the disc.
3. Enter the DVD menu.
4. Enter the
DVD Title.
5. Zoom in /out on an image.
6. Select radio band.
7. EQ setting
8. Dimmer adjustment
9.
[
]-
Fast Reverse
[ ]-
Fast Forward
10. Dial/Receive call
11.
Conrm
12.
[ ]-Play Photo:UP-DOWN Mirror;
Play Disc:Select Files.
[ ]-Play Photo:Left-Right Mirror;
Play Disc:Select Files.
[ ]-Return To Play List
[ ]-Play Photo:Clockwise Rotation ;
Play Disc:Select Files.
13. Stop/Return
14. Digit area
15.
Return to Main Menu
16. Power on/off
17.
Playback disc in different angle for a scene
18.
DVD Subtitle
19. Setup to repeat playback from time frame A
to time frame B.
20. Repeat playback of current chapter.
21. Slow playback
22. Play all chapter in random order.
23. - Radio tune
[ ]-
Previous
[ ]-
Next
24. Hang up
25. Increase/Decrease volume.
26. Pause playback/Start playback.
27. Toggle on/off audio output.
28.
Audio Channel Select.
EJECT
Notes on Remote Control Usage
1. Aim the remote control at the remote sensor on the unit.
2. Replace the battery from the remote control or insert a battery insulator if the battery has not
been used for a month or longer.
3. DO NOT store the remote control in direct sunlight or in high temperature environment, or it
may not function properly.
4. The battery can work for 6 months under normal condition. If the remote control won’t work,
please change the battery.
5. Use“button shaped” lithium battery“CR2025”(3V) only.
6. DO NOT recharge, disassemble, heat or expose the battery in fire.
7. Insert the battery in proper direction according to the ( + ) and ( - ) poles.
8. Store the battery in a place where children cannot reach to avoid the risk of accident.
Uninstall Battery
Slide out the battery compartment tray
at the bottom on the back of the remote
control.
Install Battery
Use button-shaped lithium battery
CR2025 (3V)” only. Insert the battery
to the battery tray with proper direction
according to the (+) and (-) poles.
Before Using
PULL OUT PUSH IN
7 8
Parking Brake Inhibit
• When the “BRAKE” cable is connected to
the brake switch, the display on the TFT
monitor will display video only when the
vehicle is applied.
• Parking brake function is overridden when
the video source is set to REVERSE.
• When the parking brake inhibit is active,
the front monitor displays “WARNING Do
not watch wideo while driving!”, preventing
the driver from watching content while
driving. Rear video screens are not
affected.
Mute
Press [
VOL / / MUTE
] knob or the [
MUTE ] button on remote control to mute
the volume from the unit. Press again to
restore the volume. [
] is displayed on
the LCD. Adjusting the volume or using any
of the audio setup features cancels the mute
function.
Power On / Off
Press the
[
VOL / / MUTE
]
knob on the
unit (or the [ POWER ] button on the remote
control) to turn the unit on. The current mode
status appears in the LCD.
Press and hold the
[
VOL / / MUTE
]
knob to power off the unit.
Audible Beep Conrmation
An audible beep tone conrms each function
selection. The Beep tone can be disabled
through the Setup menu.
Basic Operations
Playing Source Selection
Press the [ MENU] button on the front panel
or the [ SRC ] button on the remote to
change between available playing sources.
The playing mode is displayed on the screen.
4
3
2 1
3 5
3
1. Date and Time display. Double click to
switch to Clock mode.
2. Function icons
3. 1/2 or 2/2: Touch this page button to view
the first or second page of on-screen
buttons. You also can drag left or right on
the blank area to switch the pages.
4. Touch repeatedly to change wall papers.
5. Touch for quick access to Equalizer level
settings.
Volume Adjustment
To increase or decrease the volume level,
turn the
[
VOL / / MUTE
]
knob on the
front panel or press the [ VOL+ ] / [ VOL ]
button on the remote control. The volume
ranges from “0”to “39”. The LCD or TFT
screen displays the volume level for 3
seconds.
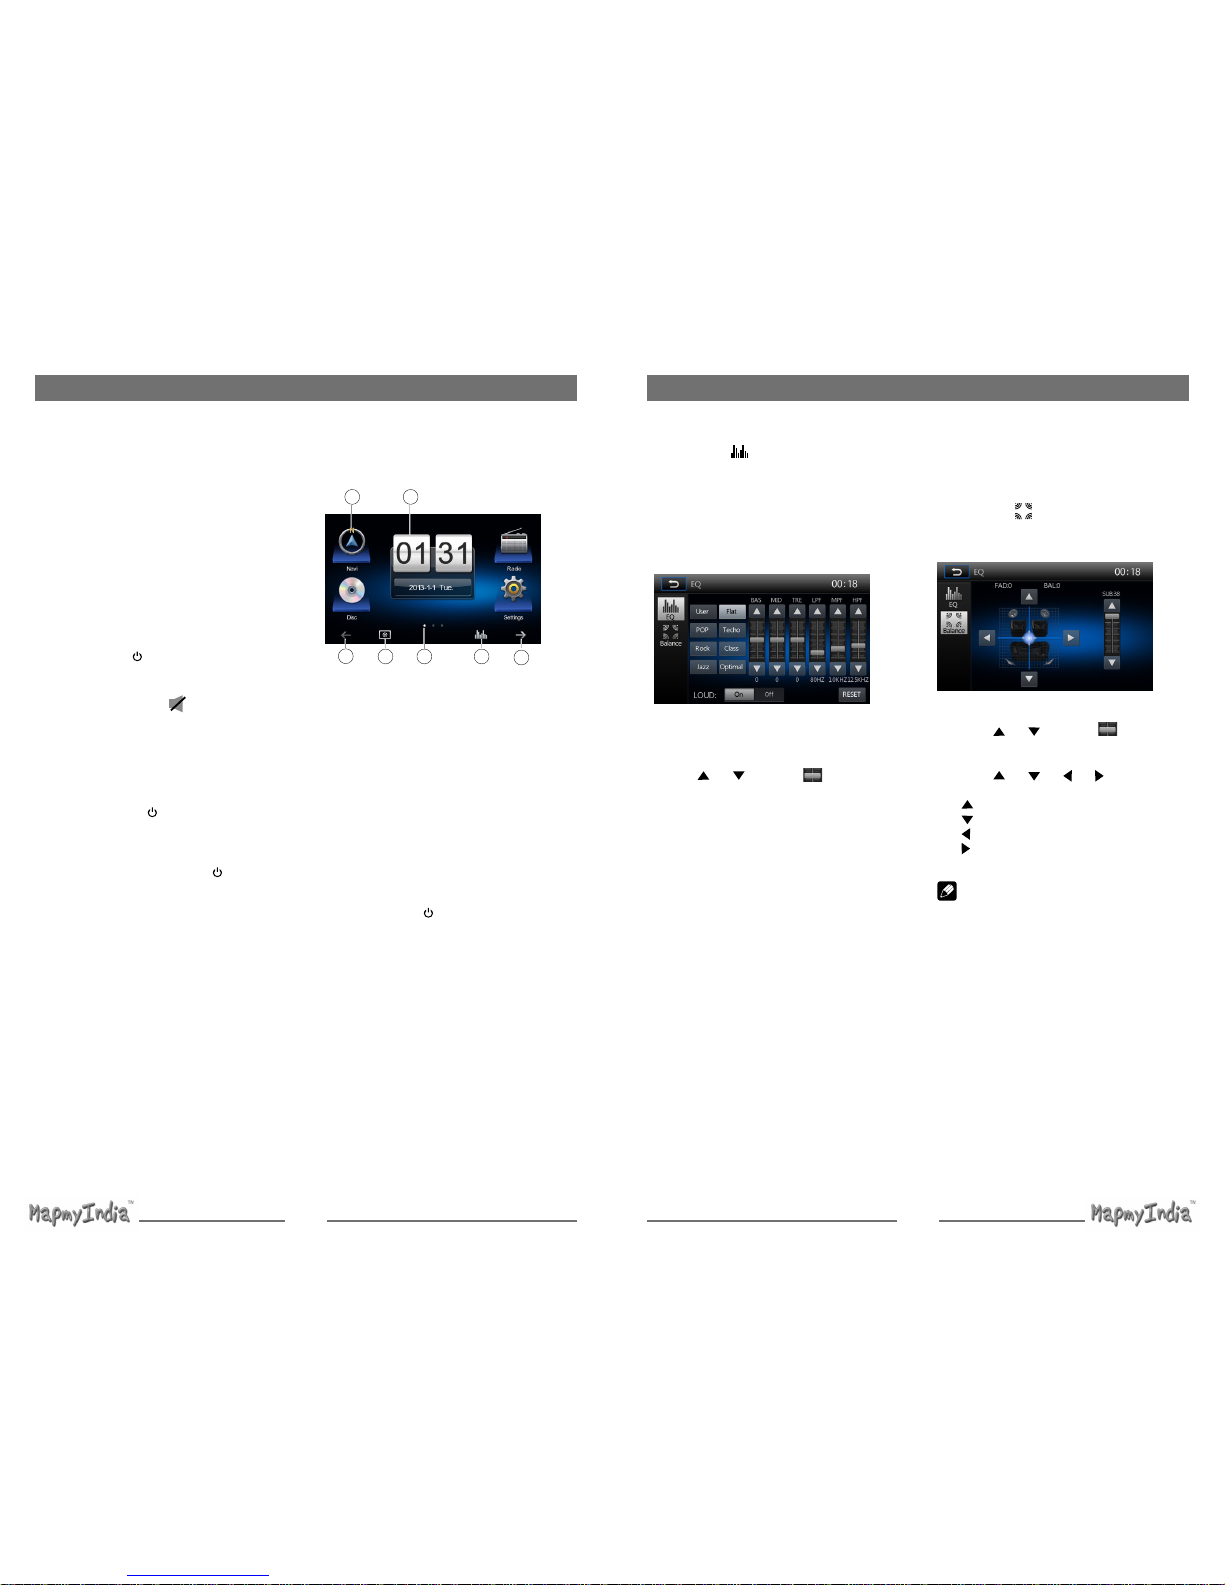
EQ Menu
The Audio Control feature allows you to
easily adjust your audio system to meet the
acoustical characteristics of your vehicle,
which vary depending on the type of vehicle
and its measurements. Proper setting of the
Fader and Balance boosts the effects of the
cabin equalizer.
Basic Operations
Select Preset Equalizer
1. Enter the EQ setup mode
Touch the [
] icon in the user interface
and the EQ setup interface will display on
the screen.
2. Select EQ mode
∙ [User] ∙ [Rock]
∙ [Flat] ∙ [Class]
∙ [Pop] ∙ [Jazz]
∙ [Techno] ∙ [Optimal]
Adjust EQ Parameters
To adjust EQ parameters, touch and drag the
parameters adjustment bar.
Touch [ ] / [ ] or drag [ ] to adjust the
parameters.
[ User ]: Set the desired audio effect.
∙ [BAS] bass range: -7 to +7
∙ [MID] middle range: -7 to +7
∙ [TRE] treble range: -7 to +7
∙ [LPH] low pass filter range: 60, 80, 100,
200
∙ [MPF] middle pass filter range: 0.5K, 1K,
1.5K, 2.5K
∙ [HPF] high pass filter rang: 10K, 12.5K,
15K, 17.5K
[ LOUD: On/Off ]: When listening to music
at low volumes, this featurewill selectively
boost certain bass and treble frequencies.
[ RESET ]: Cancel the equalizer function
settings.
Adjust Fader/Balance
You can adjust front/back/left/right balance
of the speaker and the subwoofer volume to
get balanced listening effect according to the
surroundings and your interest.
1. Enter the EQ setup mode
Touch the [
] icon in the user interface
and the EQ setup interface will display on
the screen.
2. Adjust subwoofer volume
Touch [
] / [ ] or drag [ ] to adjust
subwoofer volume from 0 to38.
3. Adjust fader / balance value
Touch [ ] / [ ] / [ ] / [ ] to adjust
fader / balance value
∙ [ ]: Front speaker, fader range: 0 to 7.
∙ [ ]: Rear speaker, fader range: 0 to 7.
∙ [ ]: Left speaker, balance range: 0 to 7.
∙ [ ]: Right speaker, balance range: 0
to 7.
Note:
1. The parameters of the EQ modes has
been preset and you can not change them
besides ‘User’.
2. The EQ mode will change to ‘User’
automatically when you adjust the
frequency value under the modes besides
‘User’.
3. The value of Sub is independent of EQ
mode and can be adjusted separately.
 Loading...