

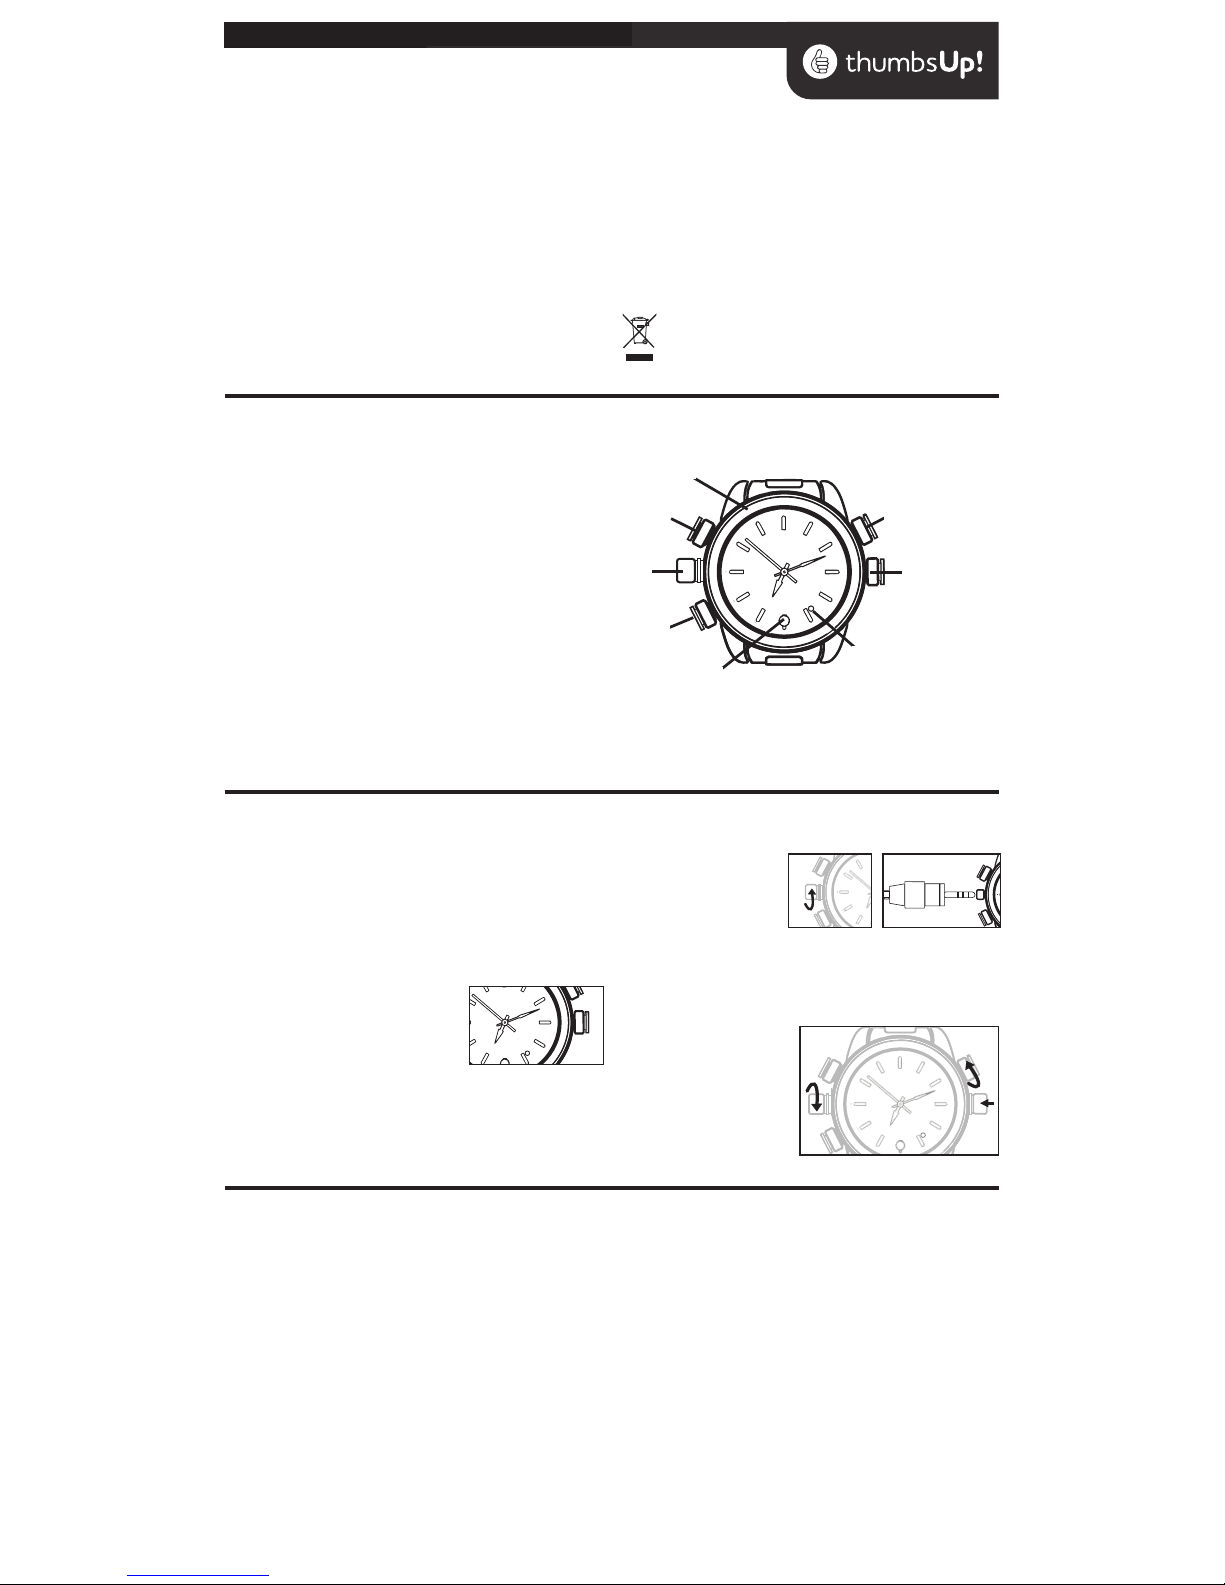
FEATURES AND CONTROLS
1. Camera lens
2. POWER button
Long Press to switch the device ON/OFF, Press to record/stop a normal video
3. USB connector
4. MODE Button
Short Press to take a still image, Long Press to enter/leave sound recording mode
5. Watch Dial Ring
6. Microphone
7. Time Set Bezel
8. Status Indicator Light
Note:
All the features of the Spy Watch are detailed as above. All other embellishments are
purely cosmetic.
The Watch Dial Ring can be rotated anti clockwise but performs no other function.
IMPORTANT SAFETY INFORMATION
• Please follow all the precautions listed below for safety and to reduce the risk of re,
injury or electrical shock.
• Read all the instructions and retain them.
• Do not expose the device to extreme temperatures and bright sun.
• Do not aim the camera at the sun or strong light as the lens may be damaged.
• Protect the watch glass and avoid scratching it.
• Clean the watch with a cloth designed to clean spectacles or camera lenses.
WARNING:
This appliance uses a Lithium Polymer Battery and a button cell alkaline battery. There is
a risk of leakage, explosion, re or burns if the device is opened, or immersed in water or if the battery
terminals are short-circuited with a metal object. If either battery is punctured or mishandled the
battery contents may leak. If battery contents come into contact with skin or eyes, rinse the aected
area continuously for 15 minutes in clean cold water and seek medical help immediately.
The button cell should be replaced only with the correct battery by a trained person.
Used cells should be disposed only at sites with facilities for accepting used alkaline cells.
FEATURES AND SPECIFICATIONS
• Shoots video, takes photographs, records audio, can be used as a webcam
• Video format : AVI, 1280*960 VGA 30fps, 4:3 image ratio
• Photo format: 3264*2448 pxls JPG
• Splash proof
• 4GB memory
• Requires lithium polymer battery and alkaline button cell (included)
WARRANTY. Your appliance is warranted for 12 months from the date of purchase. If a fault
develops during this period, please return the unit to your nearest Maplin store with the
original receipt as proof of purchase, or contact www.maplin.co.uk. This warranty does not
aect your consumer rights.
Disposal: Waste electrical products should not be disposed of with household waste.
In the EU this means that the camera or any button cell can only be disposed of at a site
with special facilities for receiving used batteries. For your nearest facilities visit your local
authority website.
Spy Watch Instructions
INTRODUCTION
This super stylish, covert spy Watch records video, takes photographs, records audio, and of
course tells the time.
The Spy Watch may be used stand-alone or as a webcam when connected to a suitable PC
UNPACKING
The carton contains:
• The Spy Watch, USB cable
• Remove the Watch carefully from the packing.
• Unwrap and uncoil the USB cable.
SETTING THE TIME
• Place a ngernail behind the time set bezel and
pull it forward gently.
• Rotate the bezel to set the time of day.
• Press the bezel shut.
The Watch function is totally separate from the watch . The camera will work even if the watch is
not operational.
CHARGING THE INTERNAL BATTERY
Fully charge the built-in battery before using the Spy Watch.
Unscrew the bezel covering the USB
port. Plug the jack on the USB cable into
the watch and then connect the other
end to a USB port on your PC. You may
also use a Mains- USB adaptor.
While charging, a blue light will glow and a red light will ash. Once charged,the blue light will
remain lit indicating the camera is ready for use. Unplug the USB cable and replace the bezel.
Note: when the battery power is low the Spy Watch camera will enter protection mode and will
not operate until recharged.
BEFORE USING THE SPY WATCH
The watch is splash proof and will tolerate
brief immersion in water. It is not suitable
for use when the wearer is engaged in wa
-
ter sports, swimming or diving.
Ensure that the timing bezel and the re
movable caps covering the USB port and
the Microphone are rmly shut before use.
RECORDING A VIDEO
STANDARD RECORDING
• To switch the camera on: Press the POWER button. The red indicator light ash and then the
blue light will illuminate and stay on to indicate standby mode.
• To start video recording: Press the POWER button (short press).
the blue light will ash and then extinguish to indicate recording is in progress,
• During recording:
For best results, ensure the object of focus remains at least 50cm from the camera in sucient lighting
The recording will automatically save every 50 minutes unless switched o before this time elapses.
• To conrm that the watch is in video recording mode: Press either the POWER or MODE
button briey. The blue light will ash three times.
• To stop recording: Press and hold the POWER button.
The le will be automatically saved. The red light will ash three times to indicate ‘le saved’ .
The watch will now power o.
• Repeat the above procedure to start a new video recording
SOUND RECORDING
• Press the POWER button to turn the Spy watch on and wait for it to enter standby. (BLUE LIGHT)
• Press and hold the MODE button (4).
The red light will ash THREE times and then turn o.
The camera will now automatically start a voice recording.
• To stop recording: Press the MODE button once briey.
The blue light will now illuminate to indicate the watch is in Standby mode.
RECORDING A STILL IMAGE
• Press the POWER button to turn the Spy Watch on and wait for it to enter standby. (BLUE LIGHT)
• Press the MODE button briey to change to take a still image.
The red light will illuminate briey, the images will save automatically. and then the blue light returns to solid
illumination to indicate standby.
• Press again to take another picture.
MANUAL AND AUTO POWER OFF
• To manually turn the power o: Press and hold the POWER button for 3 seconds and release.
The blue light will turn o.
Auto-power o function
1. When battery power runs low while lming, the le will be saved automatically before the camera
turns o.
2. When there is not enough space left on the watch memory while recording, the le will be saved
automatically before the camera powers o.
3. In standby mode, if no actions are made for 3 minutes, the camera will auto-power o.
4
3
5
6
7
8
1
2
PLAYING A VIDEO RECORDING
• Connect the watch to the computer.
A Removable disk icon representing the Spy Watch will
appear in the Autoplay menu.
If the Spy Watch cannot be identied, re-connect it.
• Click “Open Folder” to open the folder
The watch automatically sorts the les by type.
Open the relevant folder and click a recording to play
the le via your default media player.
Note: It is better to copy or cut a video le onto your PC
hard drive before playing it. Large video les may not play
without interruption directly from the watch memory.
SETTING THE TIME STAMP
• After recording your rst video, connect the watch to the computer.
• Open the TAG,TXT le. Change the time
shown to the correct time and date in
the format YYYY-MM-DD HH:MM:SS and
save the le.
• The next video you take will display the
new time and date in the lower right
hand corner of the screen.
• Note: the tag le will continue to show
the original time and date but the videos will show the updated information.
• If you need to change the time or date again, repeat the above process.
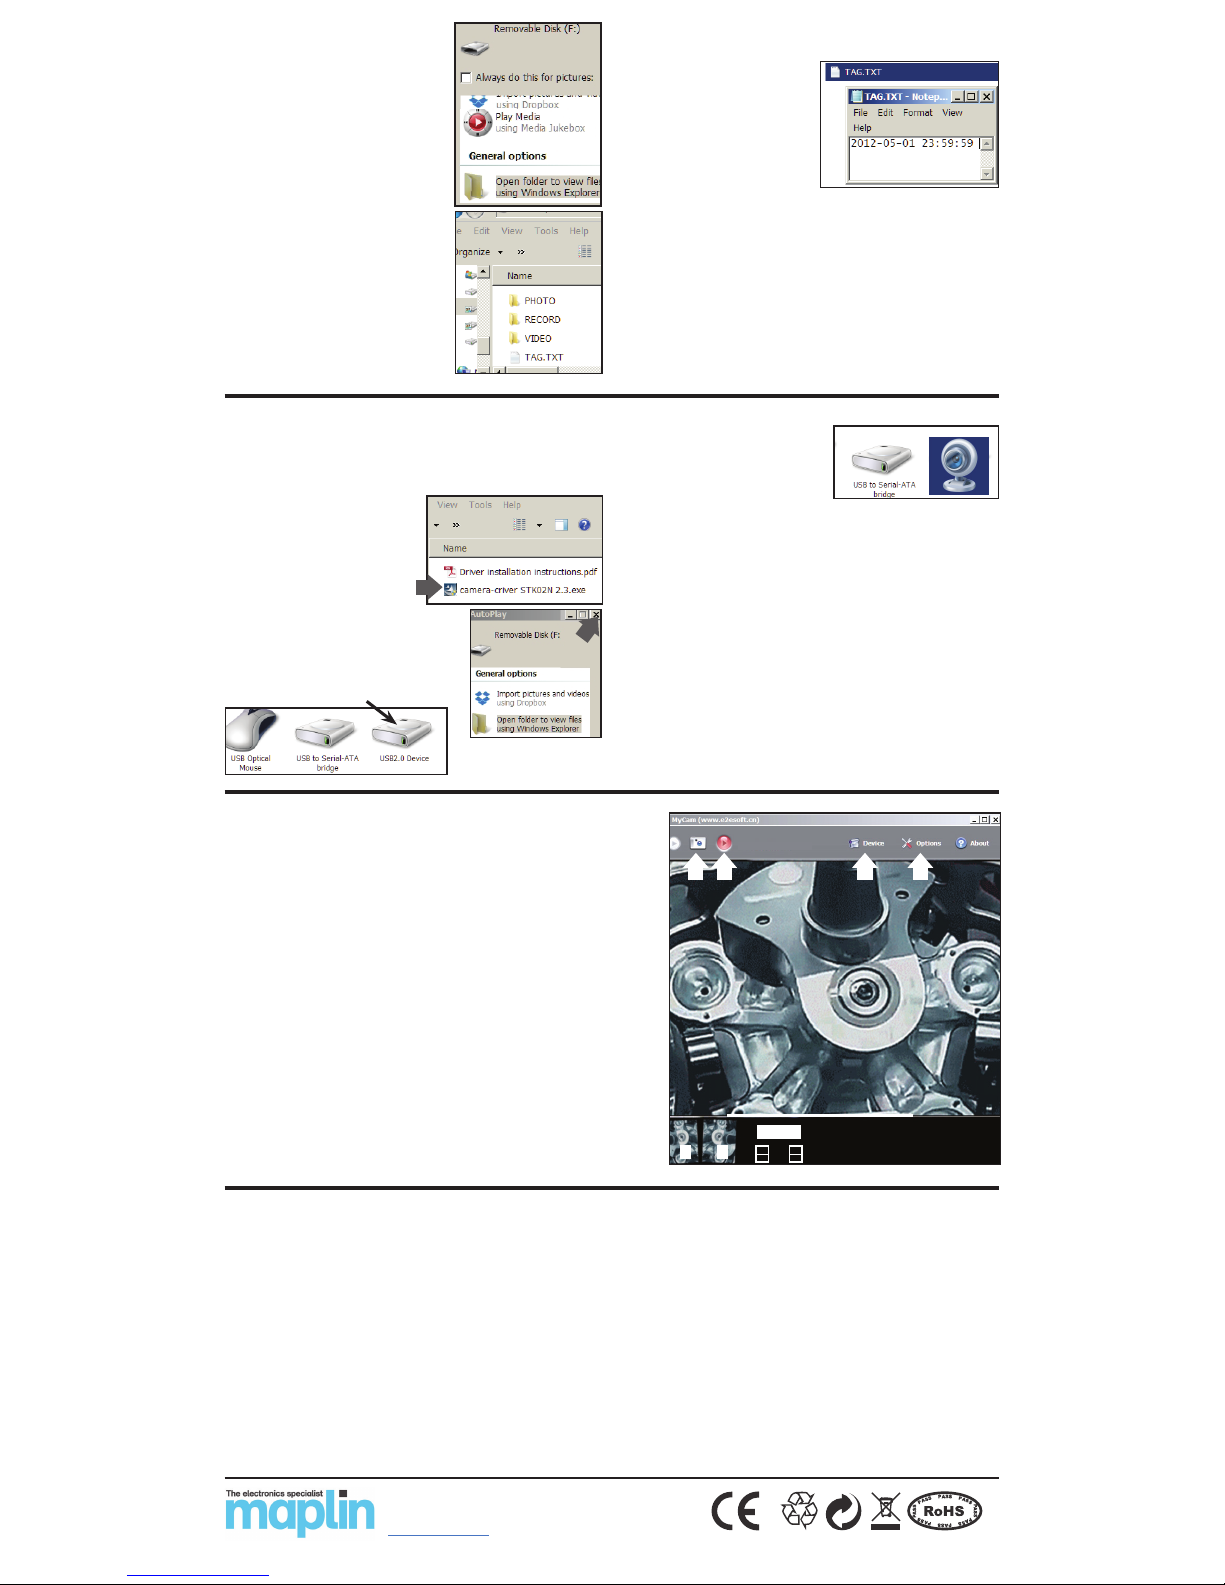
ABOUT MyCam
1. Still Image Capture: Captures a still image.
The image capture is displayed on the bar at the bottom of the screen (See A below).
2. Record/Stop: Press to start and stop recording.
When a recording is stopped the recording is saved and the capture appears at the bottom of the
screen (See B below) . The screen reverts to display the live video stream.
3. Device: Allows you to select the Watch (Standard Camera) or other imaging device.
4. Options: Allows you to specify a default folder (which can be dierent for images and
videos) and various quality parameters.
To display an image or play a stored video:
• Navigate to the folder and click the image/video or
• If the image/video icon appears in the bottom bar, simply click on the icon. Move the
scroll bar to the left/right to browse to the wanted image or video.
The image/video location is displayed and the le will play with your default program.
Note: Do not operate the device controls when using the spy Watch as a webcam. Use only the
controls on the program.
2 3 41
A
A
B
STANDARD CAMERA
AFTER USE
Close any software program, and unplug the USB cable from the Spy Watch and the PC
STORAGE
Store the unit in a safe place at room temperature, away from sources of heat or damp and out
of reach of children.
CLEANING
Clean the spy Watch with a soft cloth as used for polishing camera lenses or spectacles.
CONDITIONS OF USE
Please adhere to local laws when using this camera. Publishing recordings obtained surrepti
-
tiously and without the subject’s consent could constitute an oence.
If the device has not been used for a long time, ensure it is fully charged before reuse.
File security: This product does not guarantee the integrity and security of saved les. Al-
ways back up important documents.
Video quality: This product is not a professional video recording device.
Operating temperature: 0-40ºC
Operating humidity: 20% - 80%. This product is splash proof but not fully waterproof.
This product is not shock proofed.
Do not expose the camera to strong direct light.
Do not use the device in a dusty environment.
Do not use or store near strong magnetic or electric elds
SpyWtch2
Maplin Electronics Ltd. Unit 1, Brookelds Way,
Manvers, Rotherham, South Yorkshire, S63 5DL
www.maplin.co.uk
USING THE SPY WATCH AS A WEBCAM
1. Install the supplied software. Load the driver CD. If your PC does not have a suit
able CD drive you can click on this link to download the software from the ThumbsUp
website: http://www.thumbsupuk.com/Products/Spy_Watch_-_4GB
Unzip the Driver le. Click on the executable le.
Follow all the prompts and allow the software
to fully install.
Remove the CD from the CD drive
2. Connect the Spy Watch to the PC.
The Autoplay menu will deploy
3. Close the Autoplay Window. Do not open the folder
4. Navigate to “Control Panel/Devices and Printers”
Conrm that a “USB2.0 Device” is present
5. Press the POWER button once
The Disk Drive will be replaced with a Camera icon.
The device is now ready for use as a webcam.
Sometimes the camera may not be detected. If this occurs remove and re-insert the USB cable. If
this does not work, remove the USB cable and re-boot the PC. The drive should then be detected.
VIDEO CAPTURE SOFTWARE
You may need to install a suitable video capture program from the web. There are several free
programs that provide excellent results. One such program is MyCam. This is a free download
from CNET:
http://download.cnet.com/MyCam/3000-13633_4-75186067.html
Download the le and unzip the le to a folder. The program is deployed from the folder by
clicking on “MyCam.exe”
1. Connect the Spy Watch to the PC.
2. Deploy the program and wait a few seconds for the program to recognise the Spy Watch.
3. Use the software to record videos and still images
The next page will give you a brief summary of the MyCam software.
 Loading...