

Page 1
Octal Duo Stereo Headphone Amplifier
Users' Manual
Rev Oct. 12/14
Mapletree Audio Design
Al Freundorfer
R. R. 1, Seeley's Bay, Ontario, Canada, K0H 2N0
(613) 387-3830
www.mapletreeaudio.com
info@mapletreeaudio.com
© Copyright Al Freundorfer 2014
0
Page 2
Introduction
The Mapletree Audio Design Octal Duo (OD) 300 Stereo Headphone Amplifier represents a high
performance development of an octal-based headphone amplifier. The use of a high capacity power
supply provides increased power output and a lower driving impedance employing a widely available
6AS7G/6080 output tube and 6SL7/5691 driver. The separate power supply chassis allows flexibility in
positioning each unit and reduces the heat seen by components in the main amplifier chassis. Premium
components include Tantalum film resistors in the driver stage.
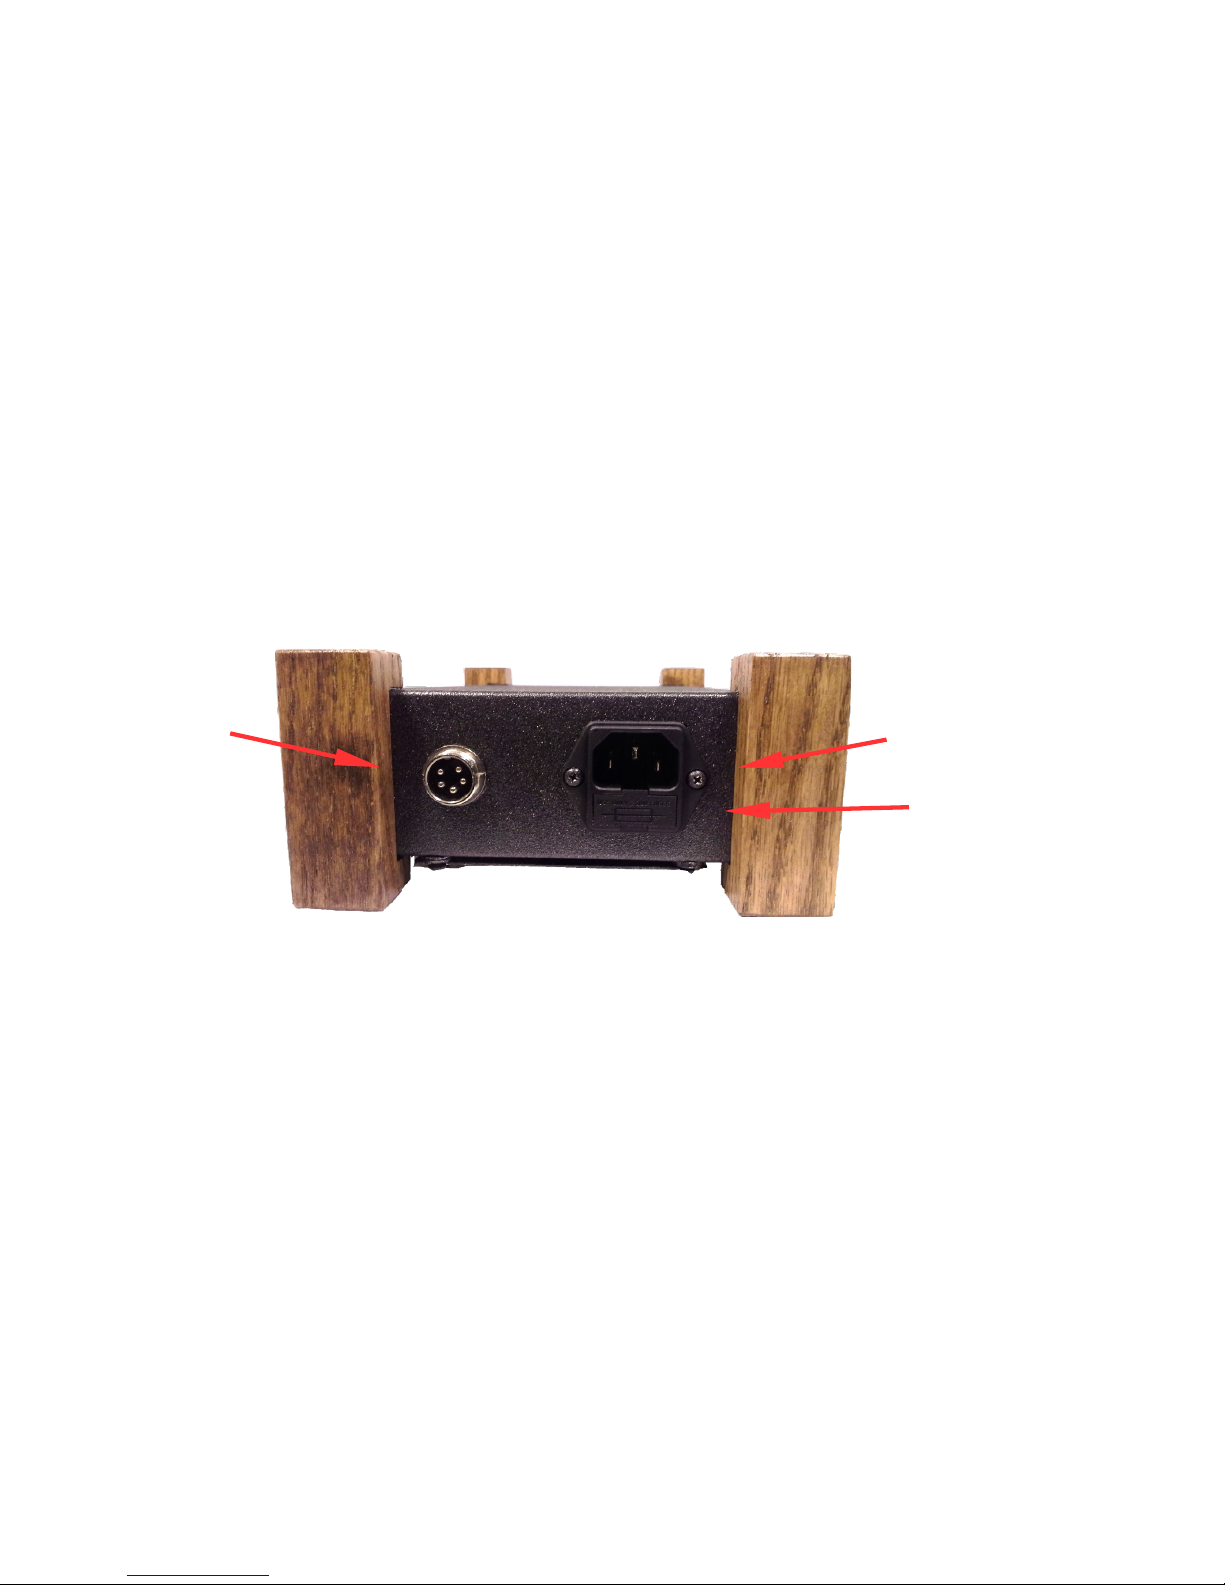
Input/Output Connections
The standard IEC line cord is attached to the receptacle on the rear panel of the OD300 power supply.
It is compatible with a 120 VAC line with a frequency of 50–60 Hz. A 1A/250 V fuse provides primary
protection for the power supply. It is located under the chassis and can be accessed by removing the
bottom cover of the power supply with the unit unplugged and waiting 3 minutes after powering off.
Under normal conditions, it should not be necessary to replace the fuse. If power fails to come on, you
can check the fuse and replace with a spare if necessary. If the fuse blows a second time,
you should not try to operate the unit. Contact Mapletree Audio Design for information regarding
service.
DC Power
Output
The power supply is connected to the amplifier chassis with the supplied power interconnect cord.
Never power on the power supply without making this connection. The two chassis may be stacked or
separated as permitted by the power interconnect cord.
The power switches are located on the front panel of the power supply. The heater switch needs to be
turned on first. Allow the heater to warm up for about one minute before turning on the high voltage
switch. This will increase the life of your vacuum tubes. The LED pilot light indicates the power on
condition for the heater and high voltages. Both lights have to be on for the OD300 to be functional.
Switch the high voltage off first and wait for about 10 seconds to allow the high voltage capacitors to
discharge. Lastly, switch off the heater supply. The heater supply is not a standby switch. If one leaves
the heater switch on, it will eventually burn out.
AC Power
Input
Fuse Tray
The RCA jacks allow connection to a line-level stereo source (e.g. CD player) while maintaining the
connection to the regular amplification system. The input impedance is 50 k which is compatible withΩ
all source output circuits.
1
Page 3
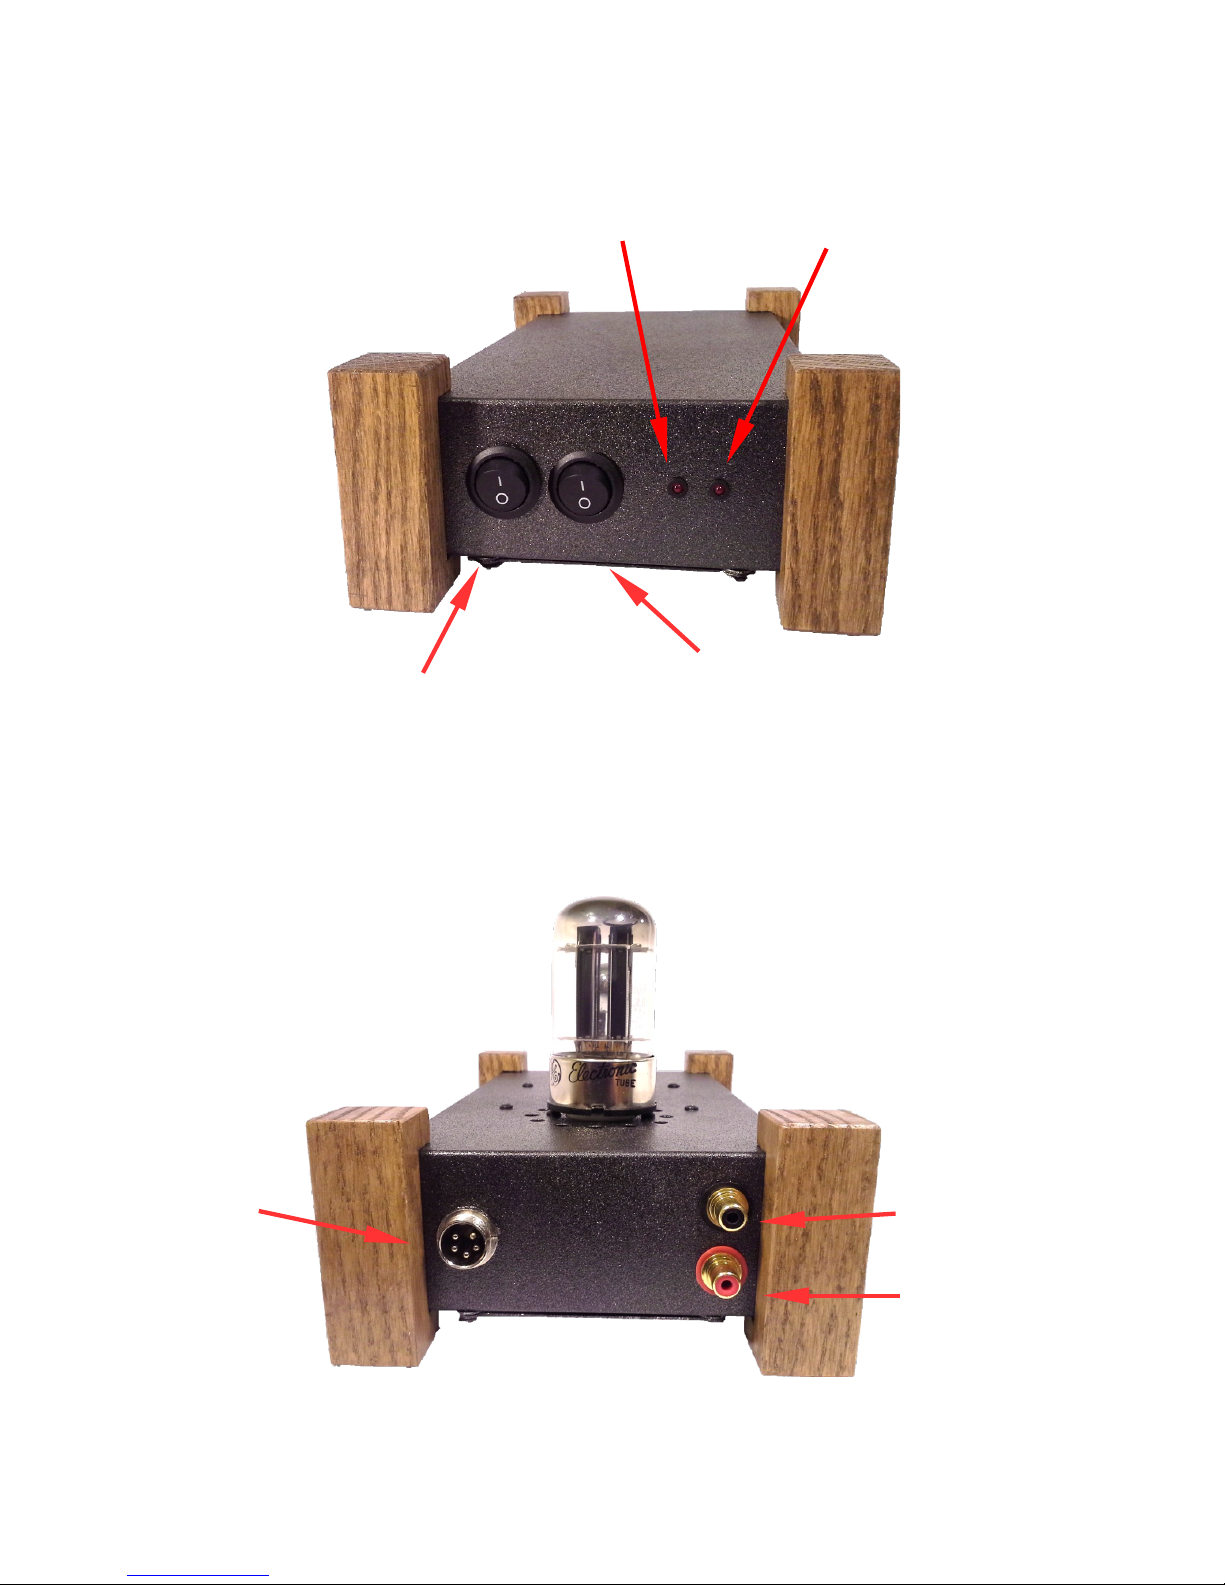
LED High Voltage
Power Indicator
LED Heater
Power Indicator
Heater-On Switch
(Switch on first. Allow 50 seconds to
warm up the heater before switching on
heater.
Switch off last.)
DC Power
Input
High Voltage-On Switch
(Switch on second. After both heater switch and high
voltage switch are on, the OD300 is operational.
Switch off first. Wait 10 seconds before turning off
heater)
Left Channel
Input
Right Channel
Input
2
Page 4

The headphone output jacks are two standard ¼" stereo phone jacks. The high impedance output (HiZ)
gives the most power output before clipping occurs but has a higher output impedance. The low
impedance output (LoZ) gives less power output before clipping occurs but has a lower output
impedance. If your headphones are terminated in a 1/8" plug, an adapter is required (usually supplied
with your headphones). Headphone impedance from 16 to 300 are suitable for use in both the HiZ Ω
and LoZ outputs.
1/4” Headphone
Volume Control
Min. Volume:
Full Counter-Clockwise
Max. Volume:
Full Clockwise
Jack HiZ
1/4” Headphone
Jack LoZ
Controls
The signal level in both channels is controlled simultaneously by the volume control on the front panel
of the OD300 amplifier.
Tubes
A tube burn-in period of several hours may be needed to achieve the best sonic performance. Tube life
should be thousands of hours. Aging tubes may result in a reduced gain in one or both channels or an
increase in noise levels. Infrequently, a heater may burn out which is indicated by total loss of sound.
The OD300 is supplied with 1 – 6SL7 (driver) and 1 – 6080 (output) tube. Replacement tubes can be
obtained from several suppliers in the U. S. and Canada. Both types are currently manufactured and are
also available as new old stock (NOS). Some listeners enjoy trying different brands and variants of
tubes. The greatest sonic variation will occur with different driver tubes. The 6SL7 should have
matched sections so as to have a balanced right and left channels.
3
Page 5

Warranty
Factory assembled MAD components are warranted for 2 years to the original purchaser for failure of
all parts (excluding tubes). Tubes are warranted for 90 days exclusive of shipping cost. Service,
including parts and labor (but excluding shipping), is free within
the warranty period.
6AS7G or 6080
6SL7 or 5691
Back
Front
Additional Notes
This manual is an aid to the user for the operation of the OD300. Details of the amplifier and power
supply circuits are subject to change without notice so as to achieve the best possible performance. The
schematic is only representative of the actual amplifier and component manufactures, model and values
may vary.
4
Page 6

MAD OD300 Custom Measured
10 100 1000 10000 100000
0
1
2
3
4
5
6
7
8
9
10
Right
Left
Frequency [Hz]
Gain [dB]
Frequency response at 0.2 Vrms HiZ output into 32 Ohms headphone load:
Maximum undistorted HiZ output at 1 kHz:
Po(max) Rload
1.4 W 16 Ω
1.0 W 21 Ω
0.7 W 32 Ω
0.1 W 300 Ω
5
Page 7

Overload characteristic (1 kHz, 21 Ohm load HiZ)
V
=4.5 Vrms
out
V
=5.0 Vrms
out
Measured output impedance at 1 kHz: LoZ 1.1 and HiZ 2.1 Ω Ω
Input impedance: 50 kΩ
Hum and noise at output: less than 3 V rms (120 dB below max. output)
Recommended load impedance: 16–600 Ω
Phase: non-inverting
Power consumption: 90 W, 120 VAC ( 240 VAC Europe) 50-60 Hz
6
Page 8

MAD OD300 Headphone Amplifier
Version:5c
© Copyright Al P Freundorfer 2014
Rev. October 2014
7
 Loading...