

Page 1
QUICK START GUIDE
3
Camera Overview
Table of Contents
6
Change Camera Mode
10
Quick Settings
Inserting / Removing the Battery
Inserting / Removing Memory Cards
Charging the Battery
Status LEDs
11
Photos
Taking a Photo
Photo Settings
18
19
Playback
System Settings
Viewing Videos and Photos on Your Camera
Viewing Videos and Photos on HDTV
6
Powering Camera On and O
8
Touch Display Overview
Touch Display Gestures
14
Video
Video Settings
01
Survey3
Page 2
22
22
26
26
27
Table of Contents
Using the GPS Module
Wireless
Package Included
Optional Accessories
Customer Support
Wi-Fi Remote Control
Bluetooth Remote Control
02 03
Camera Overview
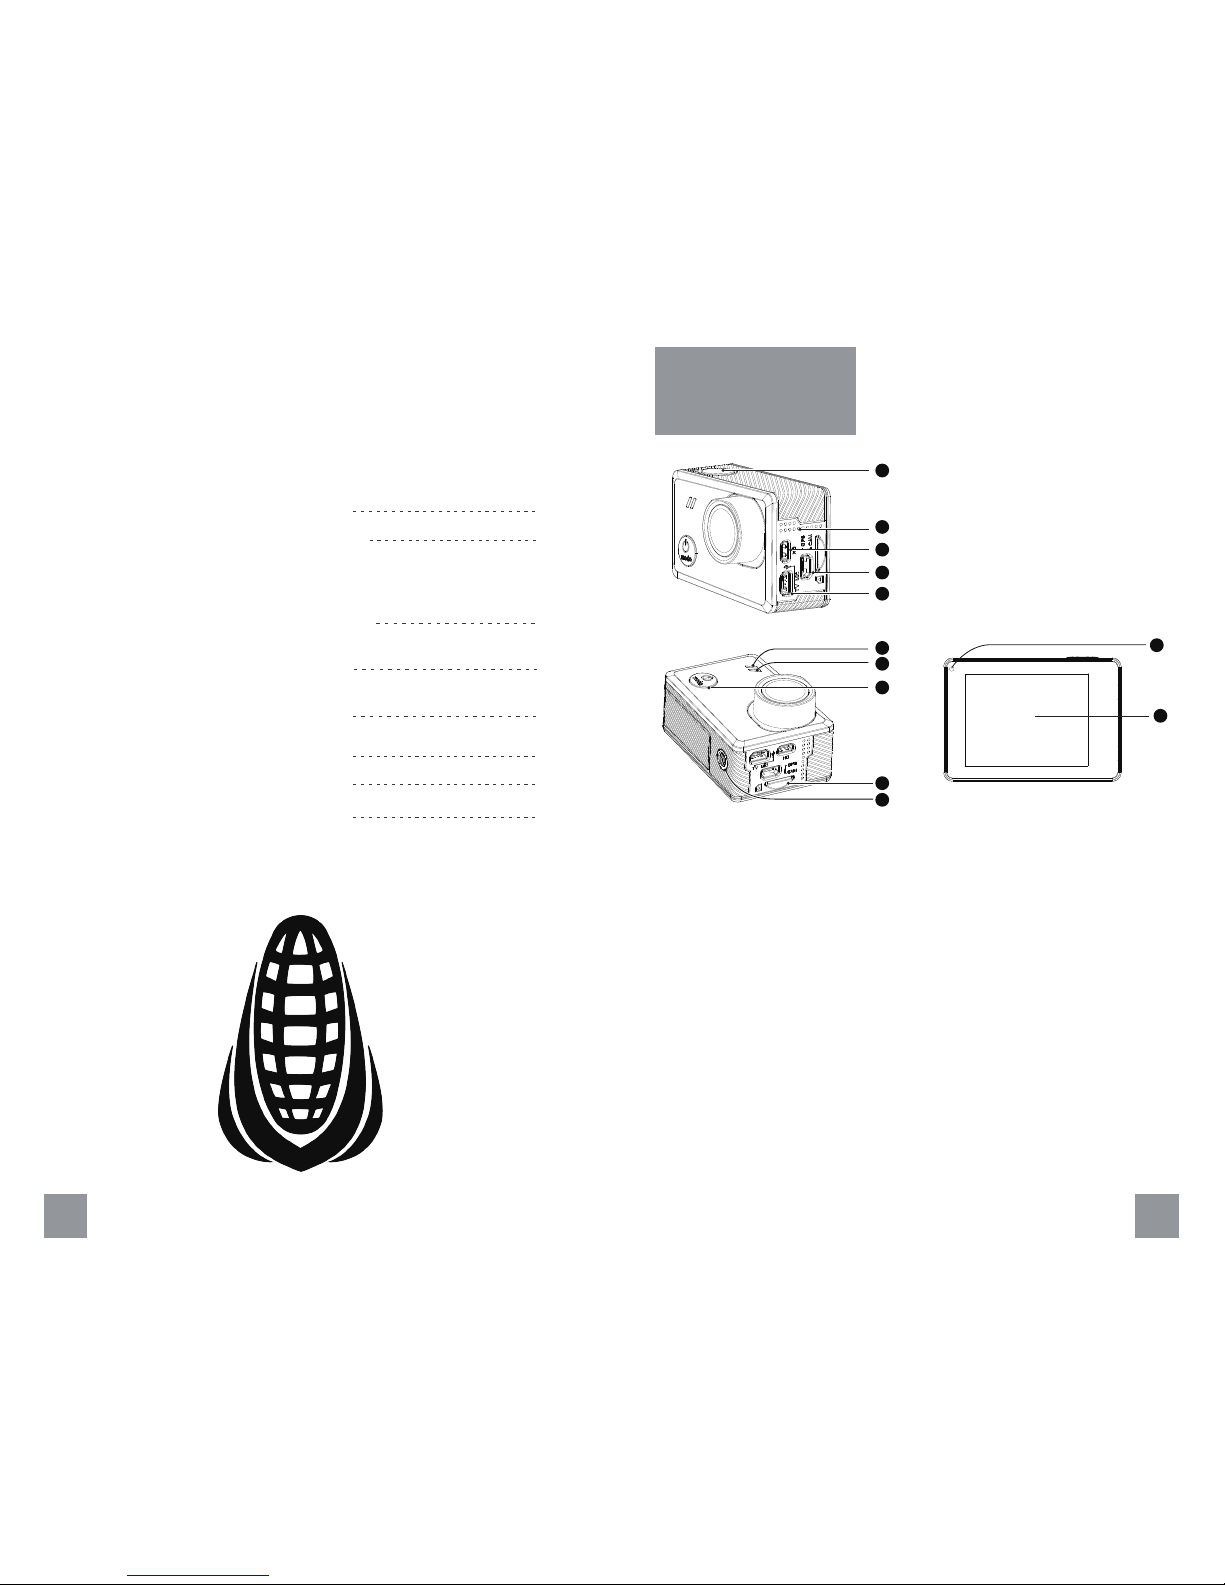
1. Shutter Button
2. Cooling Hole
3. HDMI Port (supports PWM trigger cable,
not included)
4. Mini-USB Port (supports included external
GPS module)
5. Mini-USB Port (supports composite A / V
cable, 3.5mm mic adapter, not included)
6. Front LED 1
7. Front LED 2
8. Power / Mode Button
9. MicroSD Card Slot
10. Tripod Mount
11. Back LED
12. Touch Display
11
12
1
2
3
5
4
6
7
8
10
9
25
USB Media Management
24
PWM Triggering
23
Connecting External Microphone
Page 3
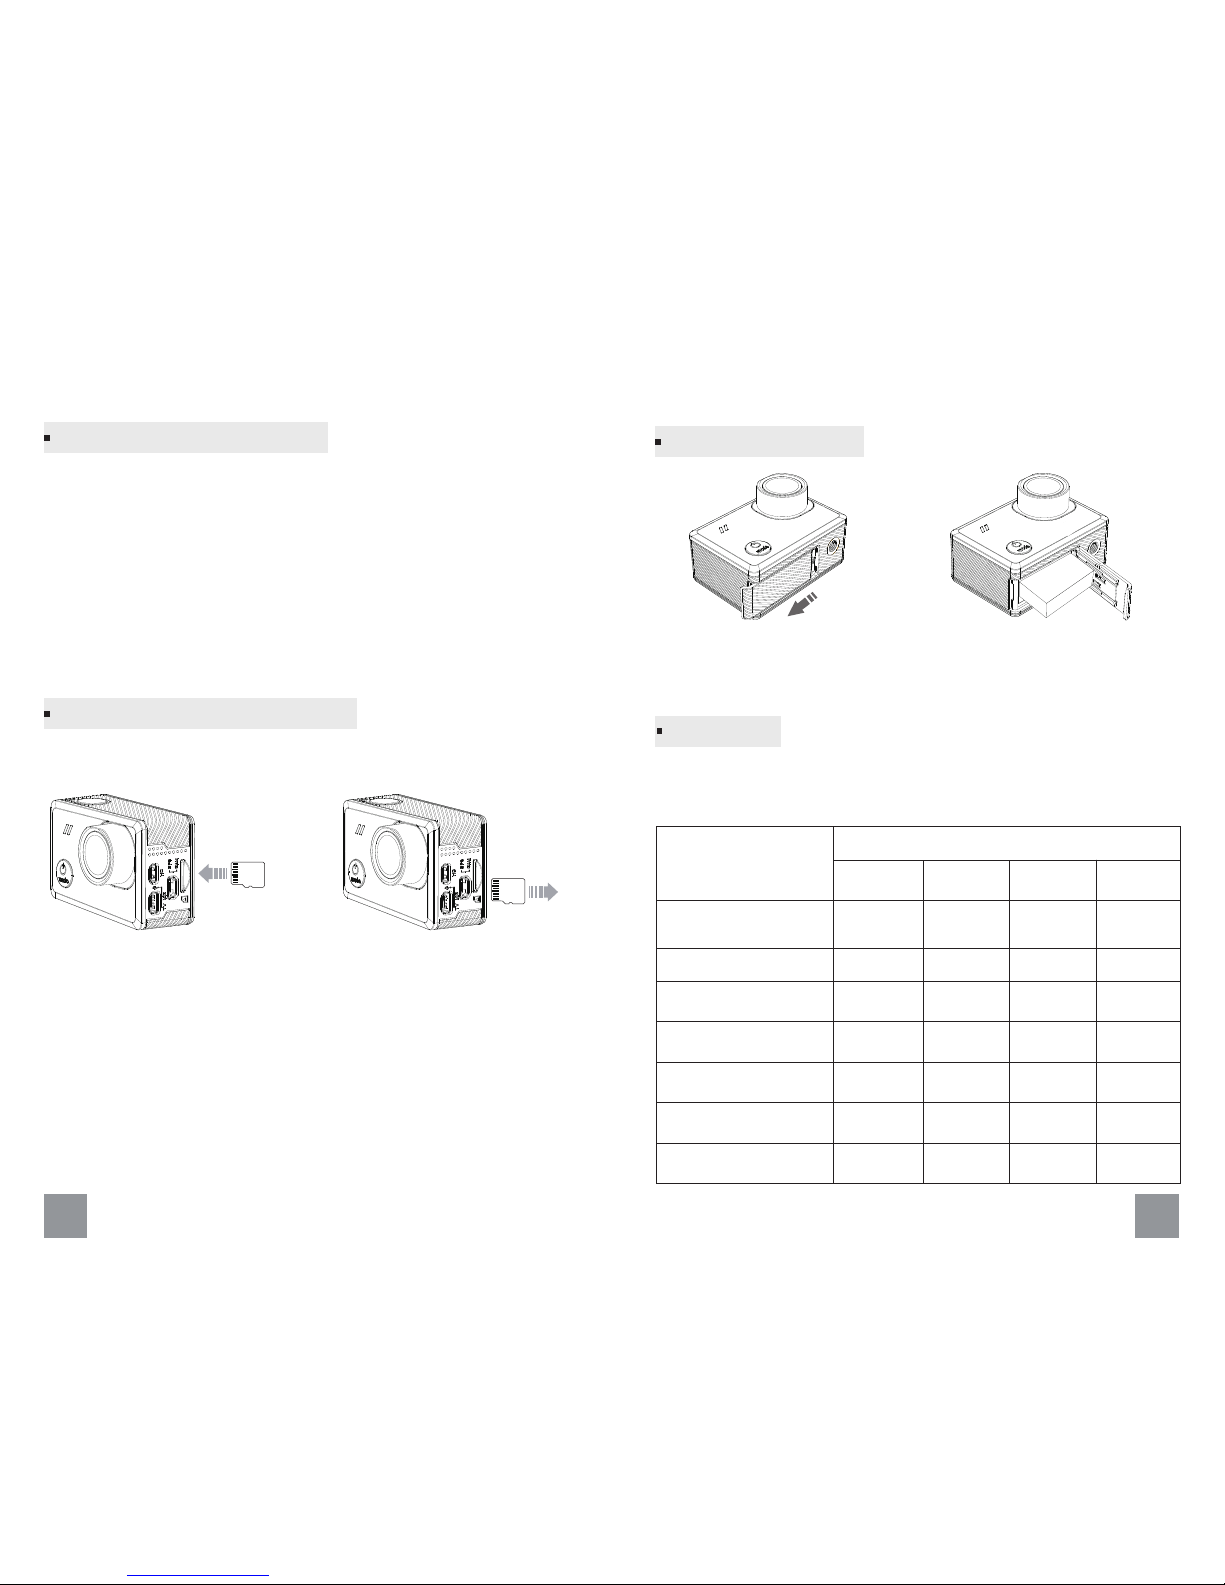
1. Open the battery cover and insert the battery (normally a battery is
already installed).
3. Charging the battery by connecting the camera to a computer or
other USB charging adapter using the included USB cable. The camera
status light turns on during charging.
Note: Using wall chargers marked: output 5V 1A. If you don’t know the
voltage and current of your charger, use the included USB cable to
charge the camera from your computer or a power bank.
Note: The microSD card is sold separately. The microSD card must have
a Class-10 or UHS-I rating and the capacity up to 128GB.
Inserting / Removing Memory Cards
To Insert the microSD Card: To Remove the microSD Card:
Slide the memory card into the
card slot with the label facing
the back of the camera.
When fully inserted, the card
clicks into place.
Place your fingernail against the
edge of the memory card and
lightly press it further into the
camera.
The card springs out far enough
to be removed.
SD
SD
04 05
There are 4 LEDs on the camera, the default status is showed as below,
and also user can turn on or off LED in the menu.
Status LEDs
Status
The camera is powered on
and in standby mode
The camera is recording
In photo mode
A photo taken
Battery charging
Battery charging
completed
Firmware upgrading
LED Activity
/
/
/
/
/
/
/
/
/
Front LED 1 Front LED 2
Solid Green
Flashing Green
Once
Solid Red
Solid Red
Solid Red
Top LED
Solid Red
Solid Red
Flashing Green
Flashing Red
Flashing Red
Flashing Red
Flashing Red
Flashing Red
Flashing Red
Solid Red
Flashing Red
Solid Red
Solid Green
Solid Red
Back LED
Getting Started
Press to unlock the battery
cover, then push it out.
Rechargeable battery
Charging the Battery
Inserting / Removing the Battery
Page 4
To Power on: Hold the Power button for 3 seconds.
To Power off: Hold the Power button for 4 seconds.
Note:
1. To prevent loss of data, always turn off the camera before removing
the battery or memory card.
2. The camera will automatically turn off after removing the memory
card or battery.
Powering Camera
On and O
06 07
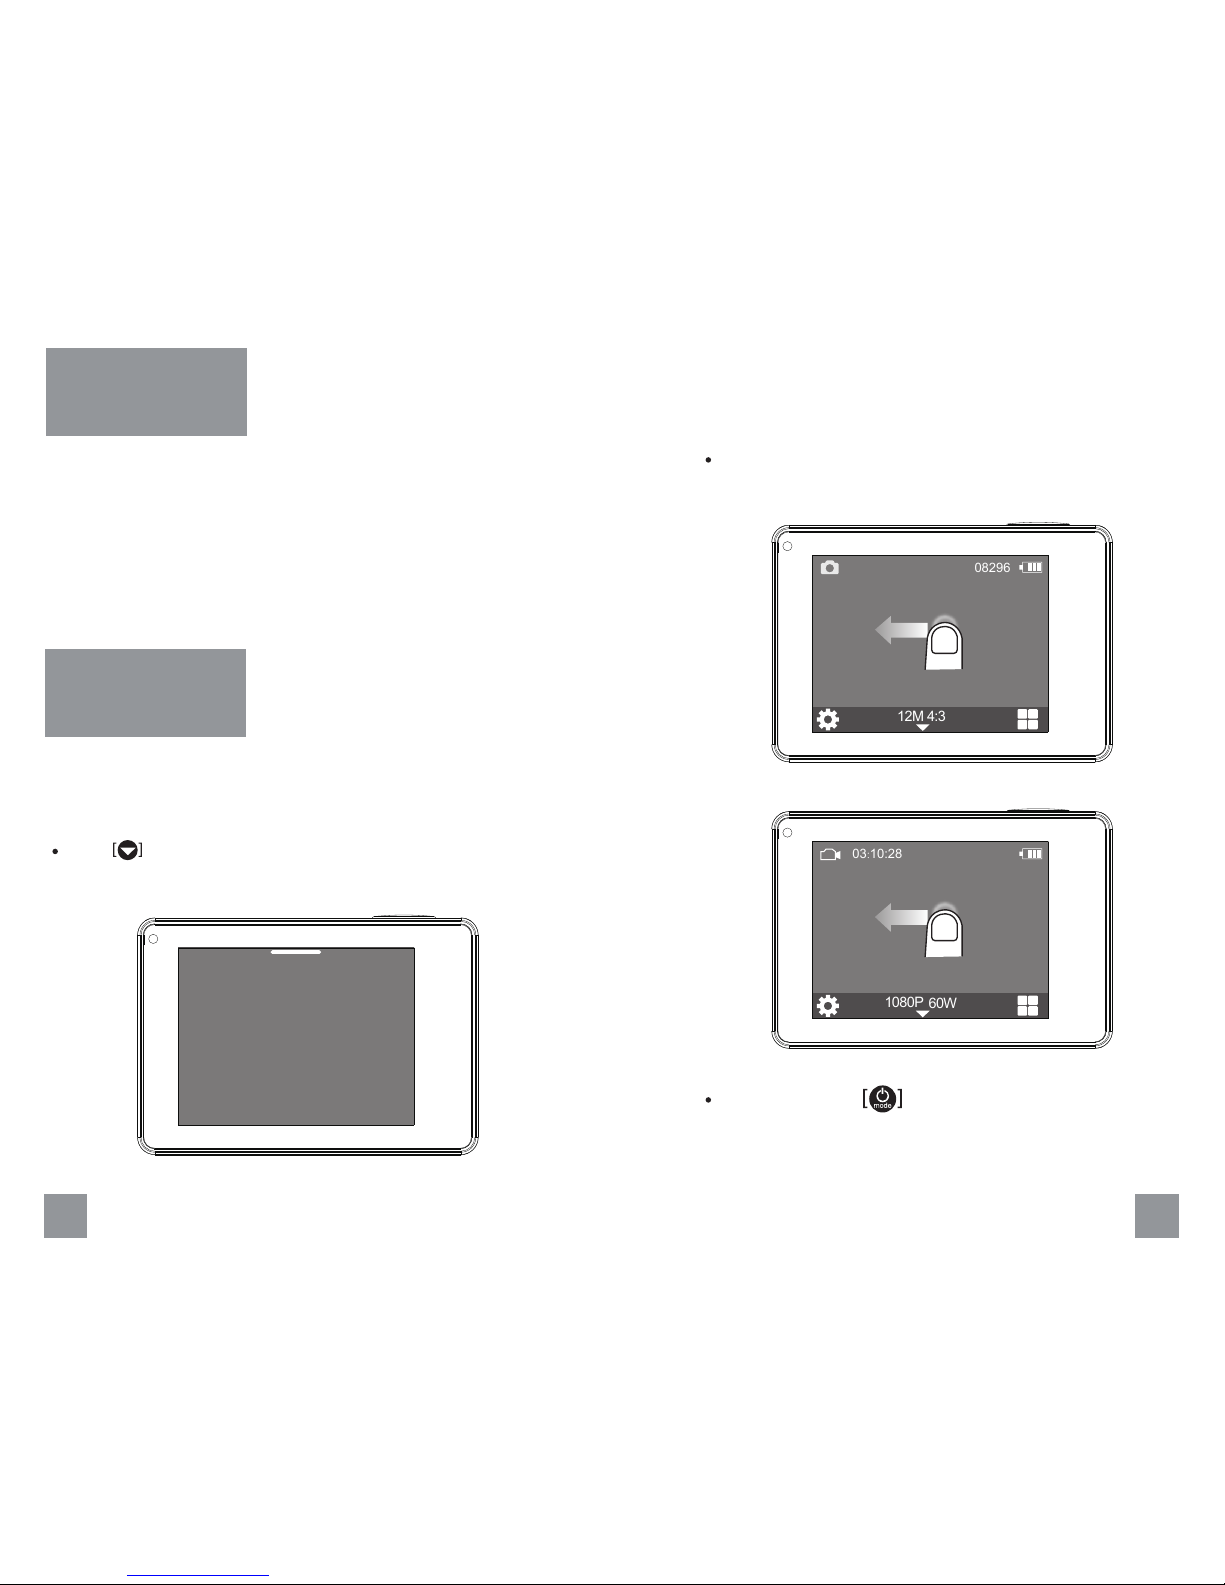
There are three camera modes, Video, Photo and Playback. You can
choose the camera mode in the main menu, press mode button or
swipe left to change the capture mode.
Touch to enter main menu and choose the camera mode.
Change Camera
Mode
Main Menu
Video PlaybackPhoto
08296
Press mode button to change the capture mode.
Swipe left on the main screen to change the capture mode.
4:3
12M
03:10:28
60W
1080P
No GPS
Page 5
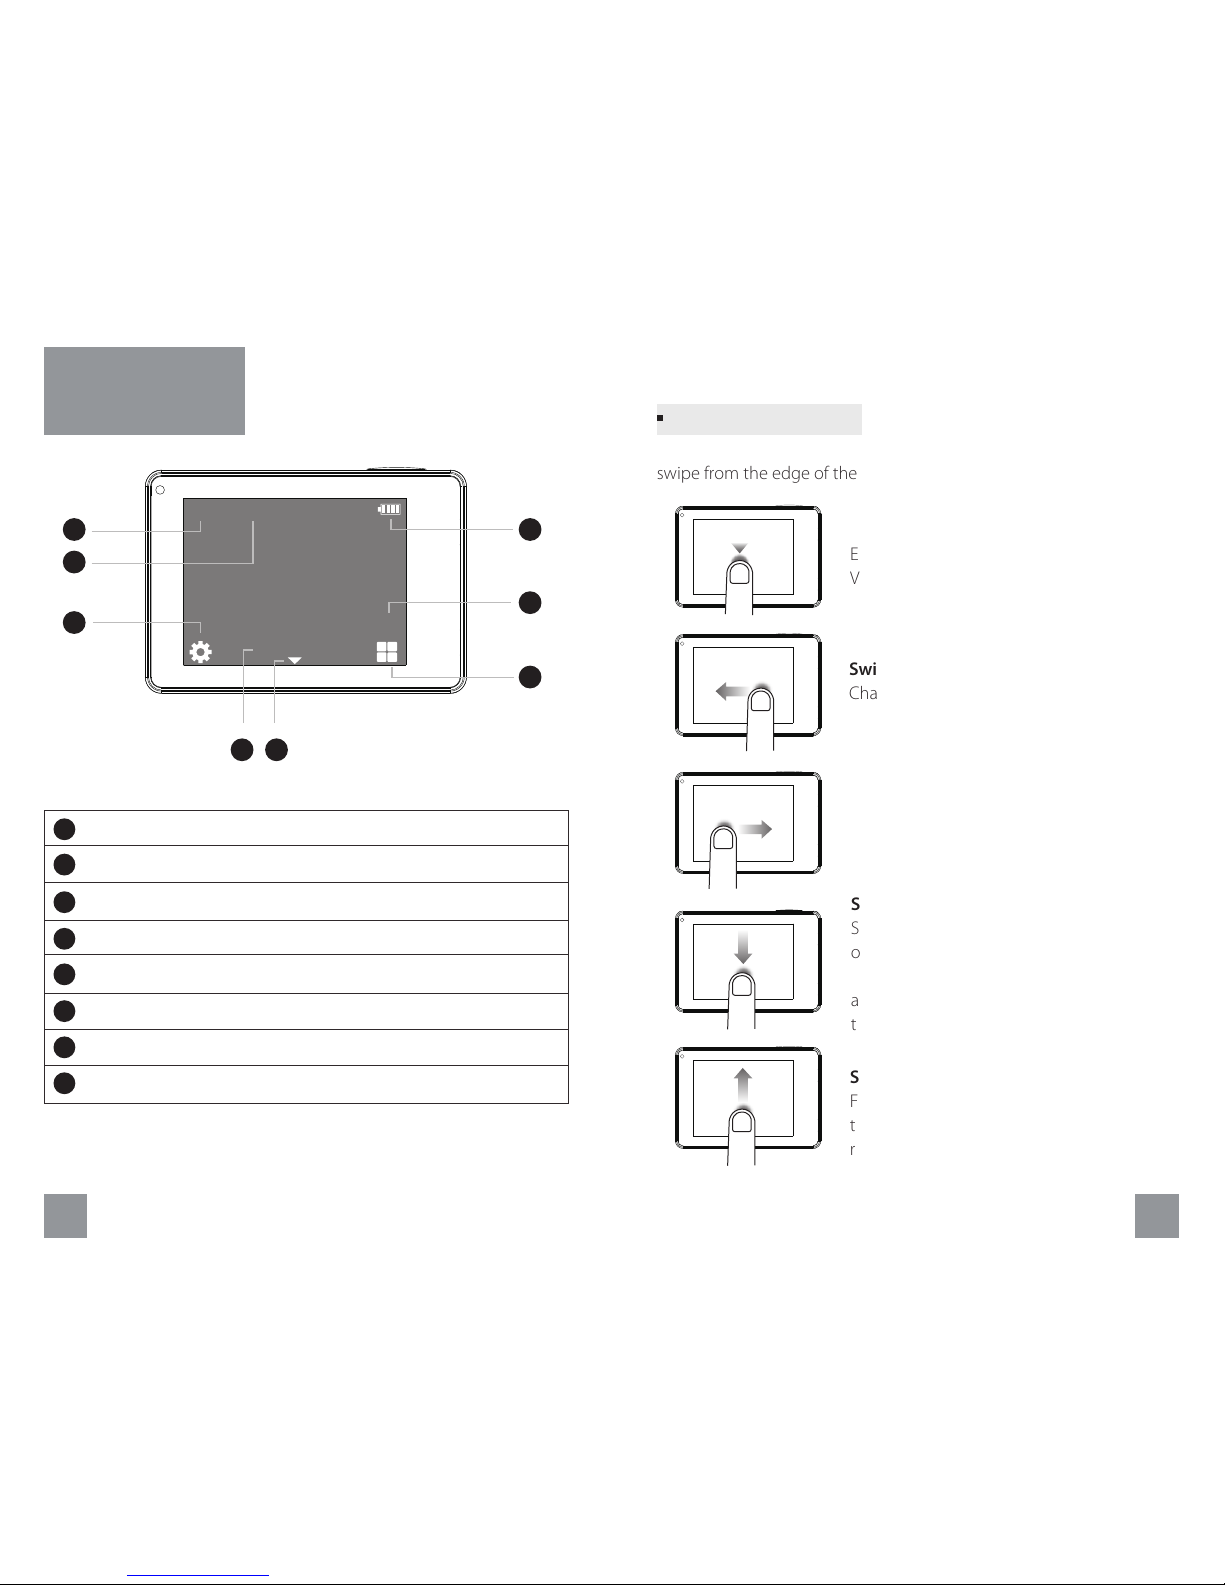
Use these gestures to navigate the touch display. When swiping,
swipe from the edge of the screen.
Tap
Enter the main menu, system settings and
Video/Photo settings.
Swipe Right
Change the view for main and slave camera.
Swipe Down
Swipe down to open the quick settings, enable
or disable Wi-Fi, bluetooth, etc. From setting
menu, select an item, swipe down to choose
an option. Otherwise, swipe down to return to
the main screen.
Swipe Up
From setting menu, select an item, swipe up
to choose an option. Otherwise, swipe up to
return to the main screen.
Swipe Left
Change capture mode.
Touch Display Gestures
08 09
The touch display provides information for current modes and settings.
1 Display the camera mode
2 Left recording time / Elapsed time
3 Battery indicator
4 GPS status
5 Go to video / photo settings
6 Select to open the main menu
7 Display the resolution
8 Go to the system settings
Touch Display
Overview
00:03:20
No GPS
1
2
7
3
4
5
6
8
Main Screen
4:3
W
1080P
Page 6
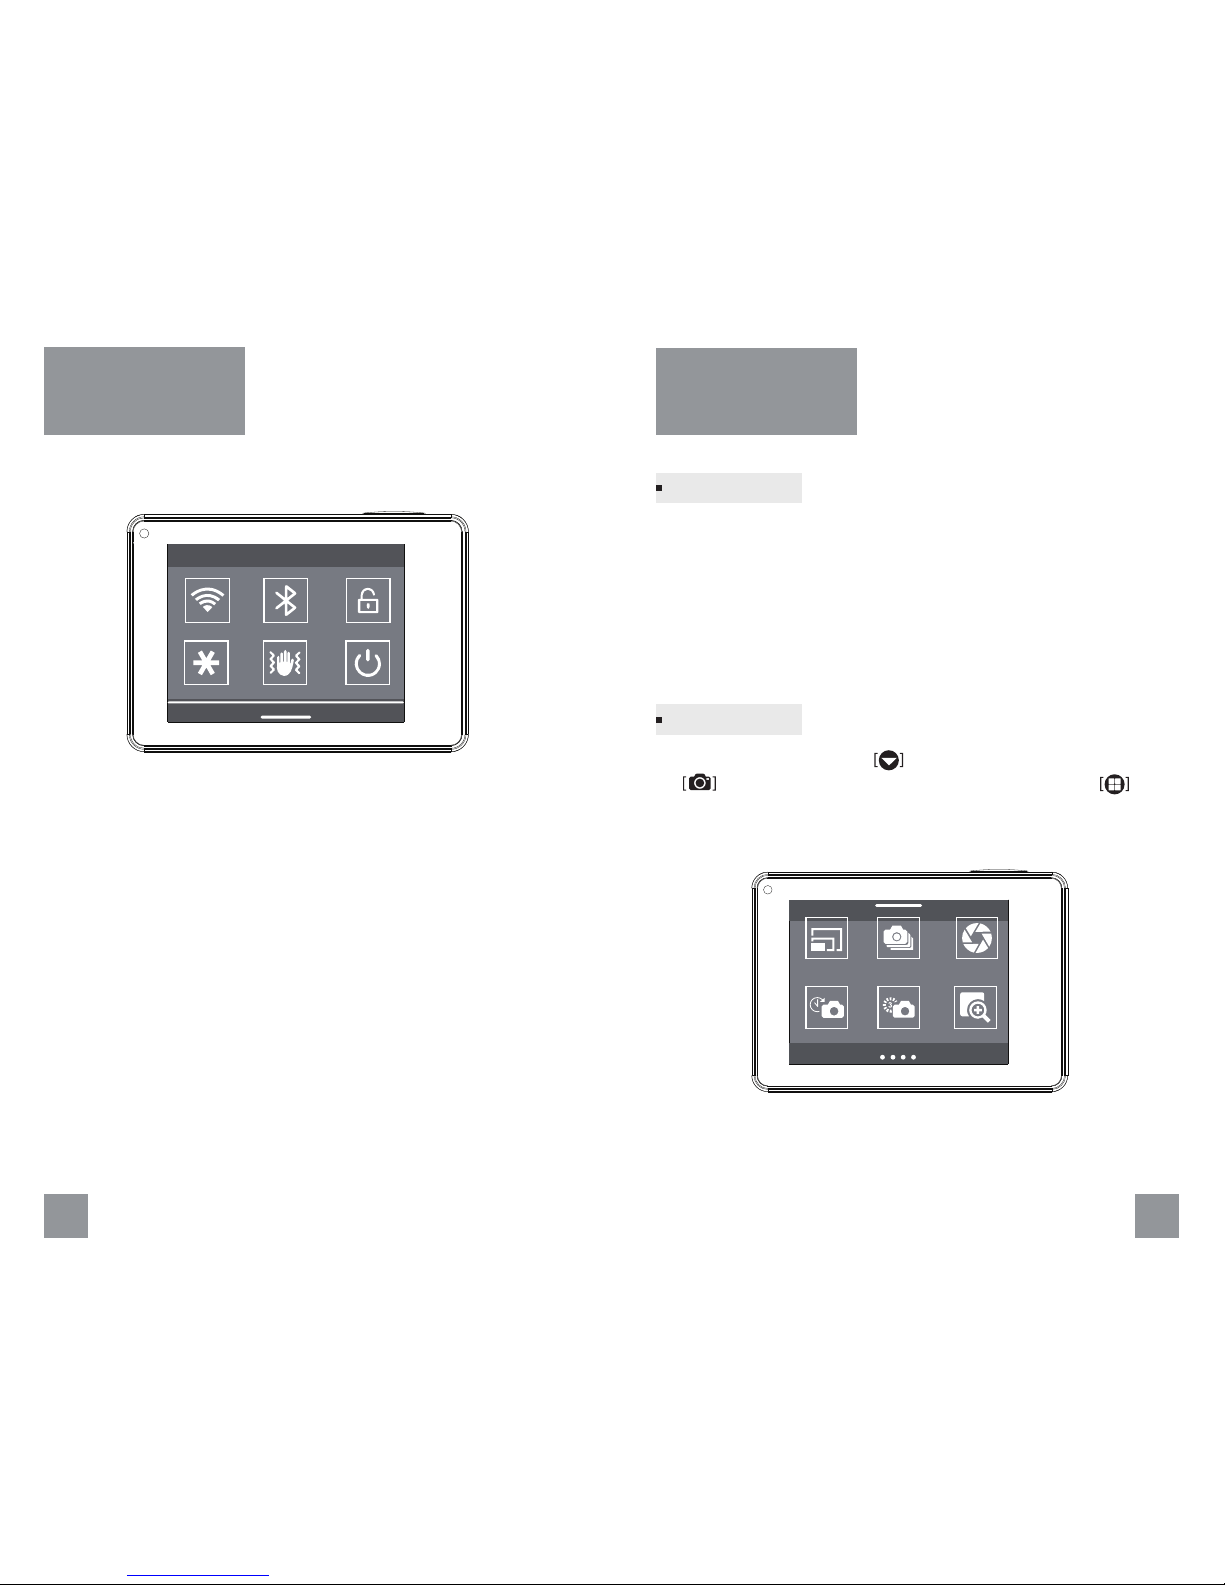
In Quick settings, you can find the frequently used settings.
From the main screen, swipe down to enter the quick settings.
Wi-Fi: Turn On / Off Wi-Fi.
Bluetooth: Turn On / Off Bluetooth.
Lock: Turn off the touch display instantly to save battery life.
EV Lock: Lock the Exposure Value.
Gyro: Turn On / Off Gyro stablization. It helps the footage stay clear
and stable in situations where the camera is subject to knocks and
bumps. The options for this setting are On and Off (Default).
Auto O: Powers off your camera instantly.
Quick Settings
10 11
Image Size Mode Shutter
Self-Timer ZoomInterval
Photos
Photo captures either Single, Sequence or Continuous photo.
In quick capture mode, while the camera is powered off, hold down
the shutter button to power on the camera and release until the
camera start to take photos in Time Lapse mode.
All photos are captured at 12MP or 8MP.
Taking a photo
From the main screen, touch to enter the main menu and select
the or swipe left to change to photo mode, then select to go
to photo settings.
Photo Settings
Page 7

Metering: The metering mode refers to the way in which the camera
determines the exposure. Various metering modes are provided to
allow the user to select the most appropriate one for use in a variety of
lighting conditions.
ISO: You can set the camera’s sensitivity in low-light environments,
and creates a balance between brightness and resulting image noise.
The camera automatically uses the best ISO level for the lighting
conditions, higher ISO values have brighter photo in low light and
more visible noise, lower ISO values have darker photo in low light and
reduced image noise.
Color: Color allows you to adjust the color profile of your photos.
Contrast: Contrast is the scale of difference between black and white
in your photo. The settings from "Low to High". High contrast photos
will have bright highlights and dark shadows, bold colours. Low
contrast photos will have a narrow range of tones.
Stamp: Add a date stamp to your photo.
GPS Stamp: Add GPS stamp to your video. The options are All Info,
Speed, Coordinates. The GPS information include speed, speed
tracking, coordinates, route, distance, elevation gain and time.
RAW: When this setting is turned on, it will take .jpg image for
immediate viewing and a RAW photo. RAW format is only available for
the single photo capture mode.
12 13
Sharpness: Sharpness controls the sharpness of your photos. You can
use High option for an ultra-sharp look, the Medium option for
moderate sharpness, or the Low option for a softer look.
WB (White Balance): White balance adjusts the overall color tone of
photos. The camera can automatically adjust the white balance or you
can manually adjust the white balance.
WB Custom: Custom White Balance is for even more accuracy in color
balancing. It is a quick, easy, and accurate way to help correcting for
scene's color temperature and neutralize the whites, grays, and blacks.
Exposure: Exposure value (EV) affects the level of brightness of your
photo. Adjusting this setting can improve image quality when
shooting in environments with contrasting lighting conditions.
Image Size: Set the capture image size, 12MP (default), 8MP.
Mode: Sets the photo mode: single, continuous or sequence.
Single: Enables you to take a single photo using automatic exposure.
Adjusting the Interval value will allow for interval photo capture. To
stop, press shutter when OSD text is visible.
Continuous: Captures a series of photos continuously while the
shutter button is pressed.
Burst: Captures a sequence of 3 or 10 photos in one second.
Shutter: Shutter speed adjusts the amount of time that the shutter is
open. The higher the X value in 1/X the faster and less light captured.
Interval: Interval determines the amount of time that passes between
each single photo. Our website mentions the fastest capture times
(based on V90 SD cards), which includes both the interval time and the
time it takes to save the image to the memory. Leaving the interval set
to the 0.5 seconds will provide the fastest interval capture times.
Self -Timer: Set the timer to delay taking a photo.
Zoom: This option zooms in on the center of the shot, cropping the
image/sensor.
Page 8
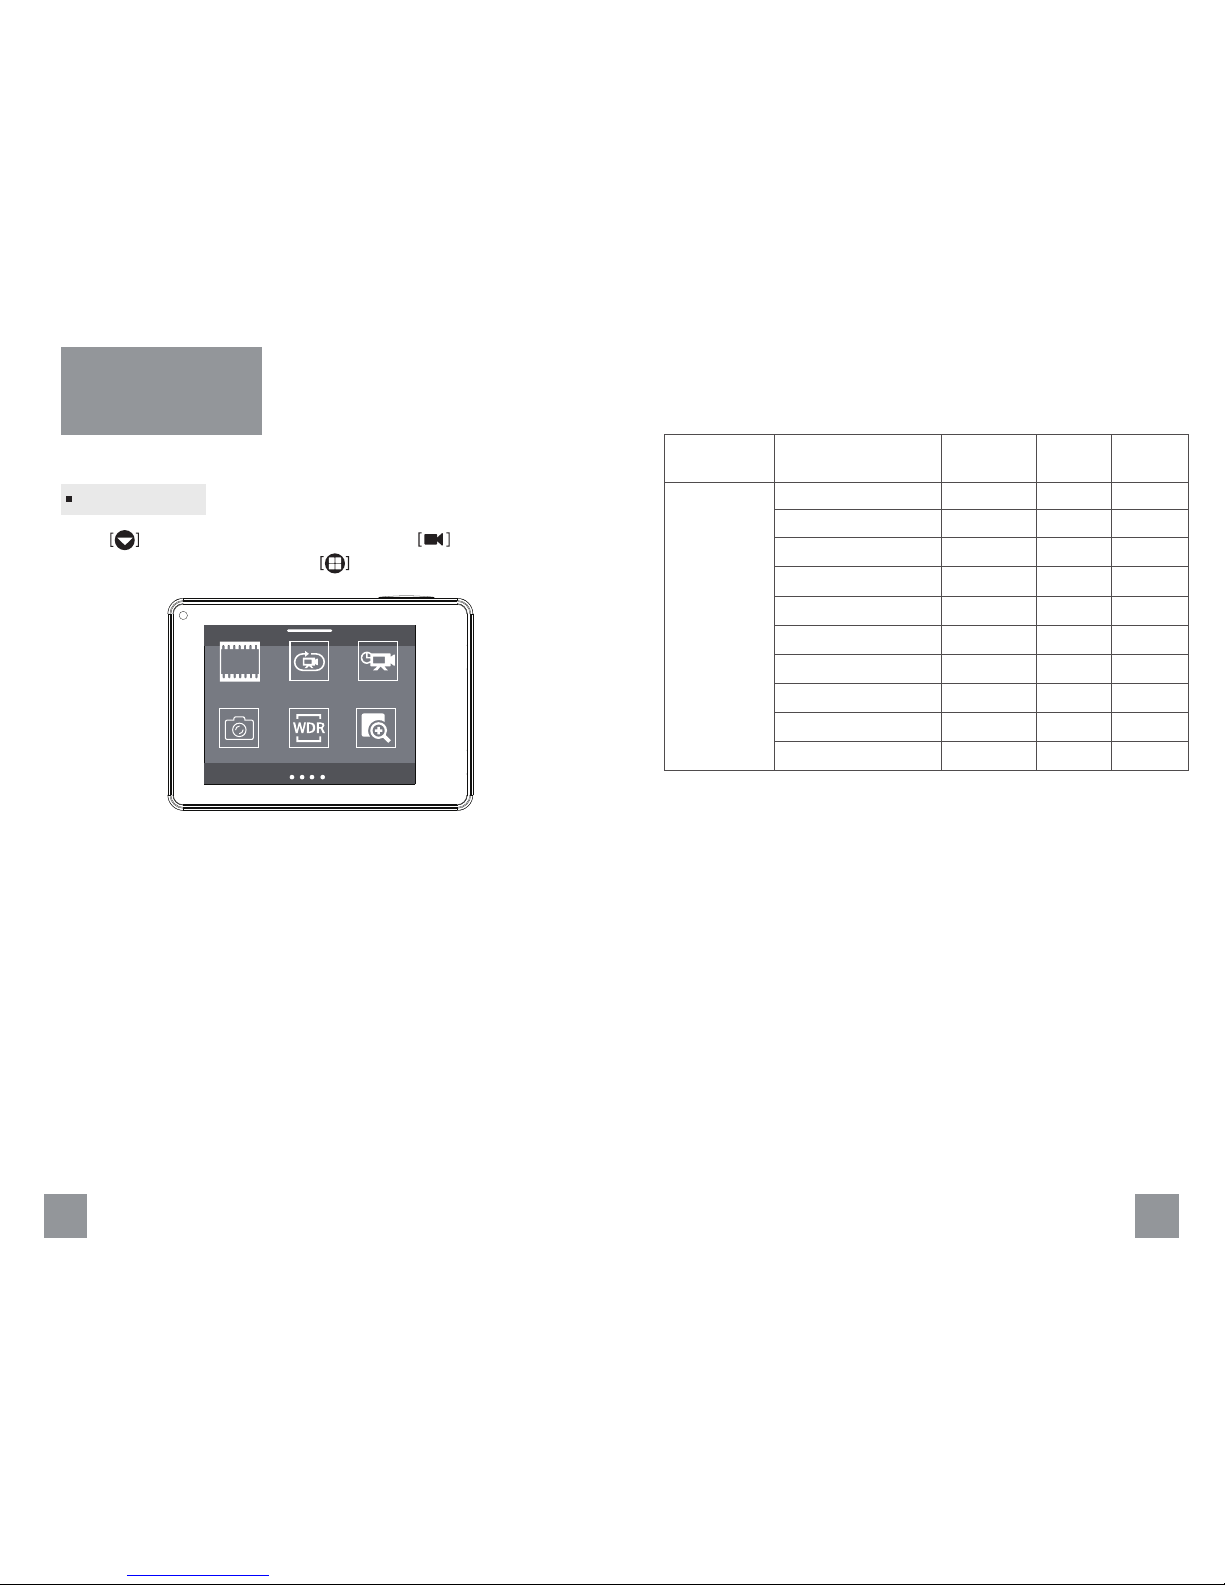
Recording
video for main
camera only.
16:9720P (1280 x 720)
16:9
4:3
2160P (2880 x 2160)
2160P (2880 x 2160)
1440P (2560 x 1440)
1440P (1920 x 1440)
1296P (2304 x1296)
1080P (1920 x 1080)
1080P (1440 x 1080)
16:9
4:3
16:9
4:3
16:9
16:9
4:3
Wide, Zoom
Wide, Zoom
Wide, Zoom
Wide, Zoom
Wide, Zoom
Wide, Zoom
60, 30
30
30
120, 60, 30
24
24
30
30
30
240
Wide, Zoom
Wide, Zoom
Wide, Zoom
Wide, Zoom
WVGA (848x 480)
VGA (640x 480)
Mode
Video Resolution (pixels)
Aspect Ratio
FPS FOV
Loop: Enable loop recording and set the camera to record in various
intervals (2, 3, 5, 10 minutes, etc).
Time-lapse: Set the time interval for Time Lapse mode. Time Lapse
Video record video from frames captured at specific intervals, creating
a Time Lapse movie without the need to stitch all of the photos
together. This enables you to capture long-term action that is ready for
playback or sharing immediately.
Interval: Take video snapshot at set time intervals while recording.
14 15
Video
Resolution Loop Time-Lapse
WDR ZoomInterval
HD
Touch to enter the main menu and select the or swipe left to
change to video mode, then select to go to video settings.
Resolution: Set the resolution of the video, resolution refers to the
number of horizontal lines in the video.
Use this table to help you determine the best resolution for your activity.
The video resolution is the width and height of the video in pixels. The
aspect ratio is the ratio of the video width to the video height. Frames per
second (FPS) refers to the number of video frames that are captured in
each second.
Video Settings
Page 9

WDR (Wide Dynamic Range): Dynamic range is the ratio of the
brightest portion of the image to the darkest portion of the image.
WDR enables the camera to deliver video with near perfect exposure in
varying lighting situations.
ZOOM: It zooms in on the center of the shot, good for capturing
content at a distance, change the zoom value according to the
distance between the camera and object.
Gyro: Turn on video stabilization to reduce shake video. It will produce
smoother footage especially for cycling, driving, and walking. The
options for this setting are On and Off (Default).
Sharpness: Sharpness controls the sharpness of your video footage .
You can use High option for an ultra-sharp look, the Medium option for
moderate sharpness, or the Low option for a softer look.
WB (White Balance): White balance adjusts the overall color tone of
videos. The camera can automatically adjust the white balance or you
can manually adjust the white balance.
WB Custom: Custom White Balance is for even more accuracy in color
balancing. It is a quick, easy, and accurate way to help correcting for
scene's color temperature and neutralize the whites, grays, and blacks.
Exposure: Exposure value (EV) affects the level of brightness of your
video. Adjusting this setting can improve image quality when shooting
in environments with contrasting lighting conditions.
Metering: The metering mode refers to the way in which the camera
determines the exposure. Various metering modes are provided to
allow the user to select the most appropriate one for use in a variety of
lighting conditions.
Color: Color allows you to adjust the color profile of your video
footage or photos.
16 17
Conrast: Contrast is the scale of difference between black and white in
your video. The settings from "Low to High". High contrast video will
have bright highlights and dark shadows, bold colours. Low contrast
video will have a narrow range of tones.
Bitrate: You can set the bitrate for video. High bitrate may improve the
quality and smoothness of the video, especially when recording fast
motion or high contrast scenes. Using high bitrate mode may decrease
the amount of recording time available on your memory card. Using
low bitrate will save space and record for longer time.
Microphone: Set the sensitivity of microphone. The settings from "Low
to High" determine the sound level.
Motion Det: Enable motion detection mode. When this feature is
activated, recording will begin if there is movement in front of the
camera. Once the camera does not detect movement for 60 seconds,
recording will stop and the device will switch to detect mode. The
device will record again if it will detect a new movement in front of the
camera.
G-sensor: The G-sensor measures shock forces. The settings from “Low
to High” determine the amount for force needed to lock the file from
being overwritten. If the file is locked while recording, there will be
on the screen.
Stamp: Add a date stamp to your video.
GPS Stamp: Add GPS stamp to your video. The GPS information
include speed, speed tracking, coordinates, route, distance, elevation
gain and time. The options for this setting are All Info, Speed,
Coordinates.
Page 10
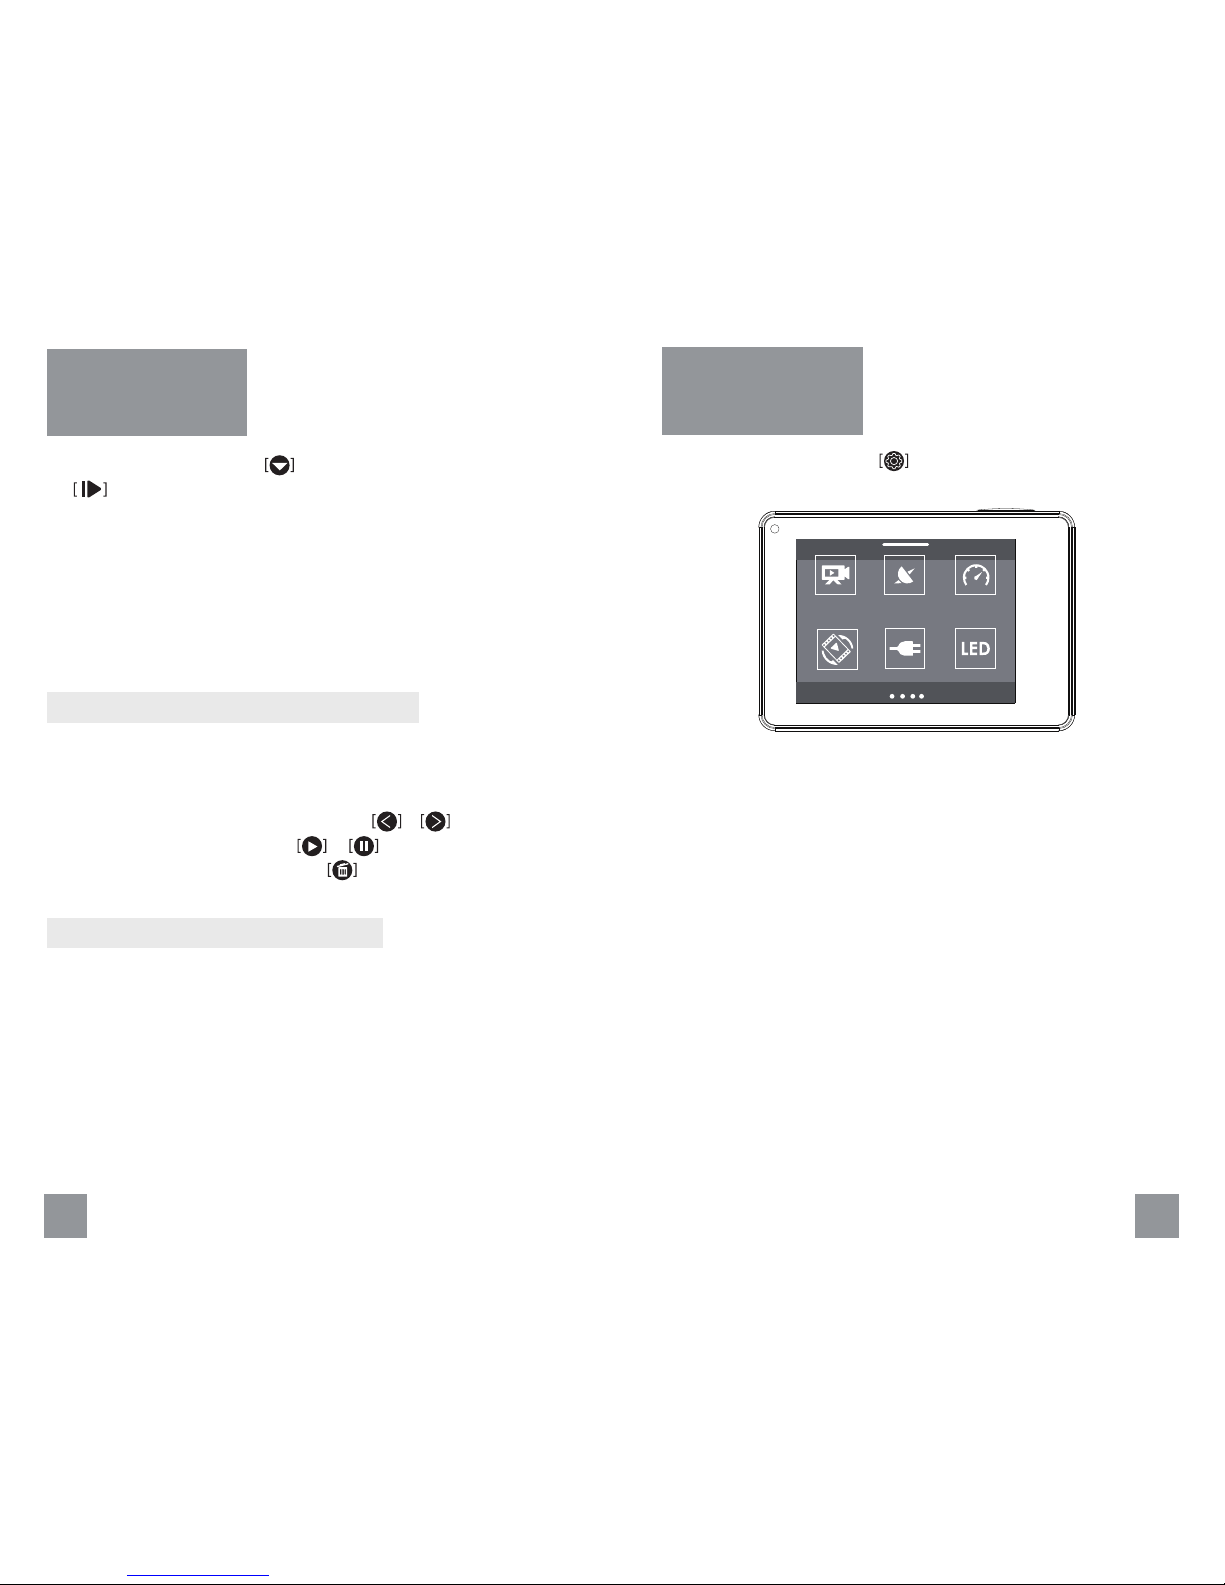
Quick Rec Speed Unit
Rotation
GPS
LEDExt Power
System Settings
From the main screen, select to get into system settings.
Quick Rec: With Quick Rec, you can quickly turn your camera on and
begin capturing video or Time Lapse photos. The options for this
setting are On (Default) and Off.
GPS: Enable the camera to receive GPS satellite signals, the camera
records GPS position data at all times when GPS is on, the data is
collected by external GPS module. The options for this setting are On
(Default) and Off.
Speed Unit: You can set the unit of speed. The options for this setting
are MPH and KM/H.
Rotation: If you mount your camera upside down, you might have to
rotate the files during editing. This setting eliminates the need to flip
your video or photos after recording. The options for this setting are
Both Off (Default), Both On, Front On, Rear On.
18 19
Playback
You can play back your content on the camera’s touch display, your
computer, TV, or smartphone/tablet.
You can also play back content by inserting the microSD card directly
into a device, such as a computer or compatible TV. With this method,
playback resolution depends on the resolution of the device and its
ability to play back that resolution.
From the main screen, touch to enter the main menu and select
the , then you will get into the playback screen.
1. From the main menu, select Playback.
2. Select a video or photo to play.
3. Select an option:
a) To view the previous or next items, select or .
b) To play or pause a video, select or .
c) To delete the photo or video, select .
Playing back videos and photos on your HDTV let you directly view the
content in your camera on a large screen.
You can output HDMI Video or composite video on your HDTV. For
outputting HDMI video, you must have a micro HDMI cable, for
outputting composite video, you must also have a RCA composite
video cable.
The camera support outputting video while recording.
Viewing Videos and Photos on Your Camera
Viewing Videos and Photos on a HDTV
Page 11

Set Time: Set the date and time for your camera. The date and time
are automatically updated when you connect your camera with GPS
module and GPS feature enabled.
Zone: Set the time zone. The time zone affects the date format and
time stamp.
Date Format: Set the camera to show dates in a YY/MM/DD, or
DD/MM/YY, or MM/DD/YY format.
Format: To keep your microSD card in good condition, format it on a
regular basis.
Note: Formatting erases all of your content, so be sure to offload your
photos and videos first.
Reset: This option resets all of your camera settings to the defaults.
Version: Displays the firmware information.
Ext Power (External Power): Set the camera to go to the Charge, Power
On or Recording mode while the external charger connected.
LED: Set which status lights blink. The options are All LED On (default),
All LED Off, Front LED On, Front LED Off and Back LED On.
OSD: The OSD (on-screen display) info setting determines whether the
recording icons and file information on video and on the viewing
screen appear during playback. The options for this setting are On
(default), Record Dot (only show the recording indicator icon) and Off.
Beep: Set the camera to beep or not while pressing a button.
Lock: Turns off the touch display after a period of inactivity to save
battery life. The options are 15 Seconds, 1 Minute (default), 3 Minutes, 5
Minutes, and Off. To turn on the touch display again, press any of the
button on the camera.
Auto O: Powers off your camera after a period of inactivity to save
battery life. The options are 1 Minute, 3 Minutes (default), 5 Minutes, 10
Minutes, 15 Minutes, 30 Minutes, 60 Minutes, and Off.
TV Mode: TV Mode setting is mainly for watching the video on
TV/HDTV to control the video frame rate of the recording.
NTSC: Watch the video on the area of North America.
PAL: Watch the video on the PAL/HDTV (apply to the most of TV
except the area of North America).
Frequency: This setting allows you to set the light frequency to avoid
flickering issue of videos.
Note: 60Hz in US and Canada and 50Hz in other countries.
Language: Set the on-screen text language.
20 21
Page 12
22 23
1. Enable the Wi-Fi:
a) From the main screen, swipe down to enable the Wi-Fi features.
When Wi-Fi is on, a Wi-Fi status icon appears on the camera main
screen. Note: When Wi-Fi is on, only the swipe down gesture is
available and you can only set your camera with your phone.
2. To connect your camera with GitUp app:
a) Download and install the GitUp app to your smartphone/tablet.
b) Power on the camera and enable the Wi-Fi.
c) Connect to the Wi-Fi connection names MAPIR-xxxxxxxx.
d) Open the app, click the Connect, the app will automatically search
the camera, it will show live preview once connected.
Note: The default Wi-Fi password is 12345678.
With the Bluetooth remote control, you can remotely control the
Survey3 camera to start / stop recording, take photos.
From the main screen, swipe down to enable the bluetooth features.
When bluetooth is on, the camera will search the bluetooth remote
control automatically, normally it will take about 3 to 5 seconds for
pairing with remote control.
Bluetooth Remote Control
Using the GPS
Module
Wireless
With the GPS module connected, it will enable you to capture the
location where your videos and photos were taken. The ultra-fast 10X
GPS processor allows you to update GPS data quickly, recording your
latitude and longitude data precisely.
Note: You can download the Dashcam Viewer (https://dashcamview-
er.com/) to playback the GPS data.
Connecting External
Microphone
An external microphone can provide enhanced audio for your captured
video. (sold separately).
Note: The S3 does not support external stereo microphone.
When you enable and connect an external microphone, the camera
records audio from both the external microphone and the built-in
microphone.
The GitUp app allows you to control your camera remotely using a
smartphone or tablet. Features include full camera control, live
preview, playback and video / photo download.
Wi-Fi Remote Control
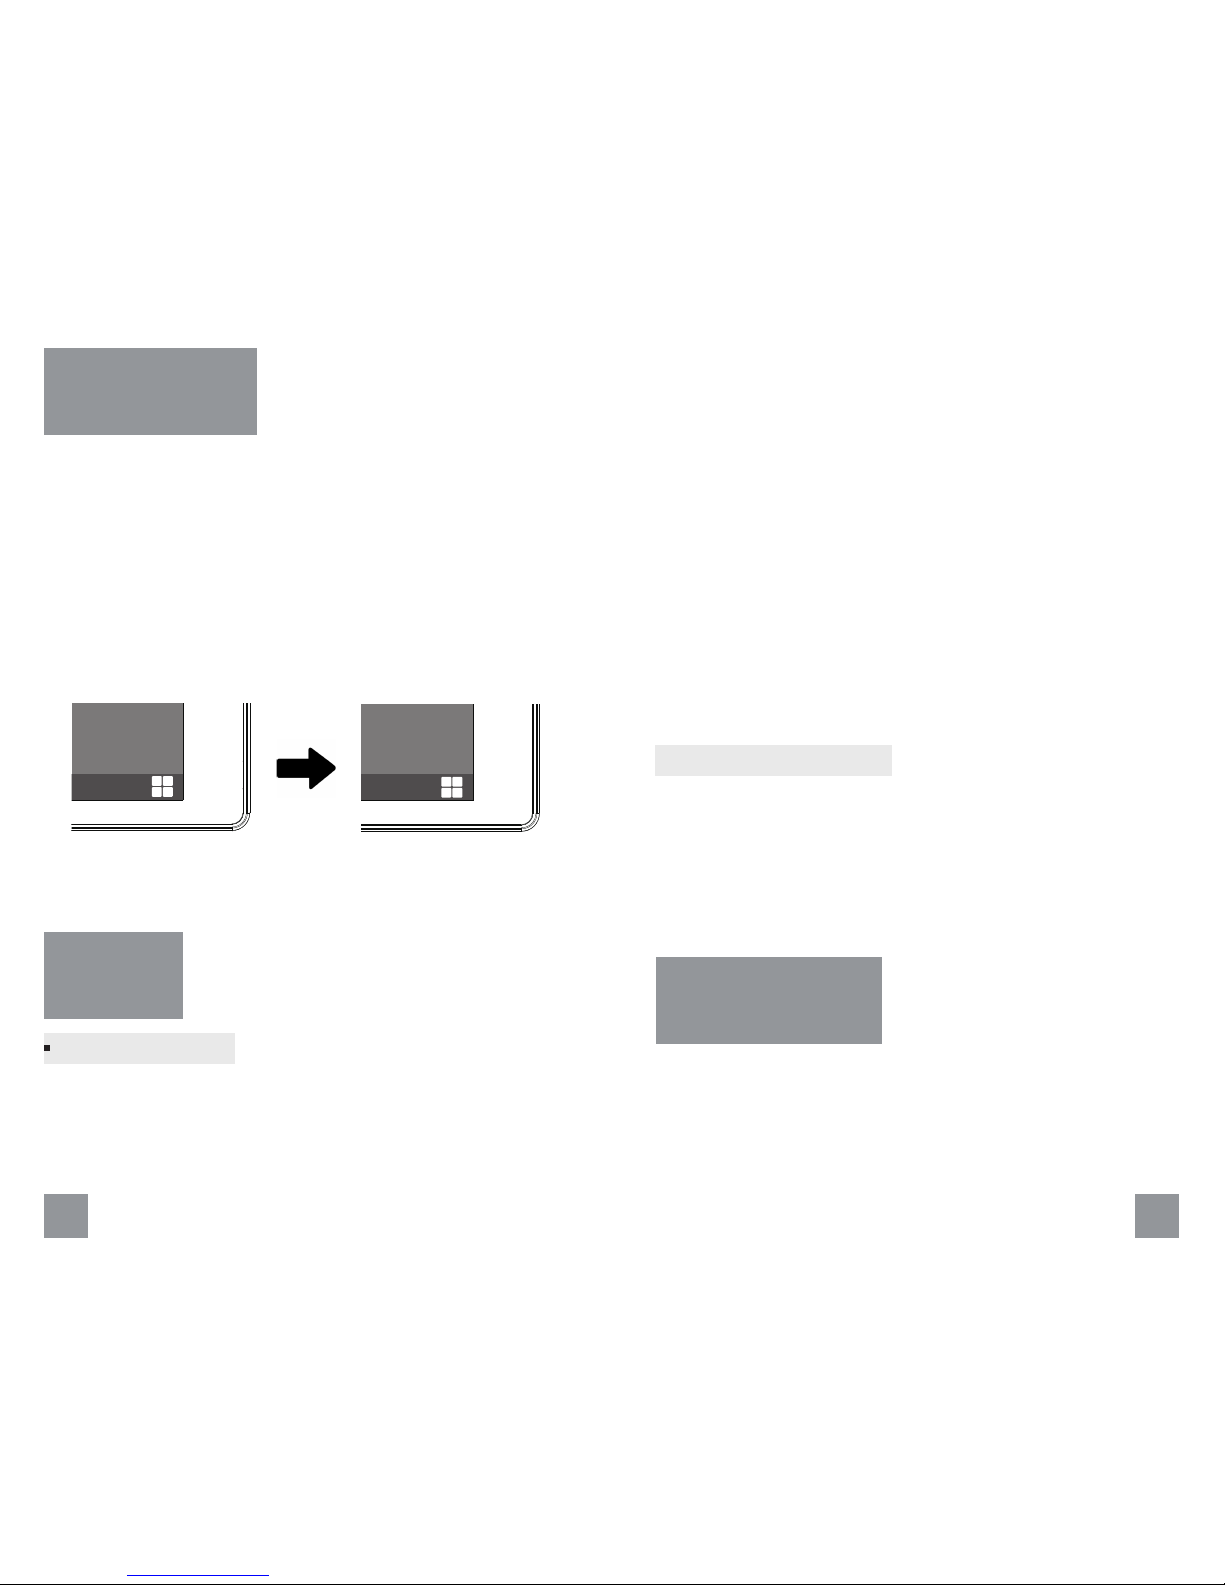
When you first plug the GPS unit in, and you are on the default Photo
Mode screen, you will see red colored text saying “GPS OK” in the
bottom right of the screen:
During this time the GPS is acquiring a better lock status. Once the GPS
has good lock there will be an audible tone sequence (6 beeps) and
the text will turn green and read “GPS Good”.
08296
GPS OK
08296
GPS Good
Page 13
2524
USB Media
Management
PWM
Triggering
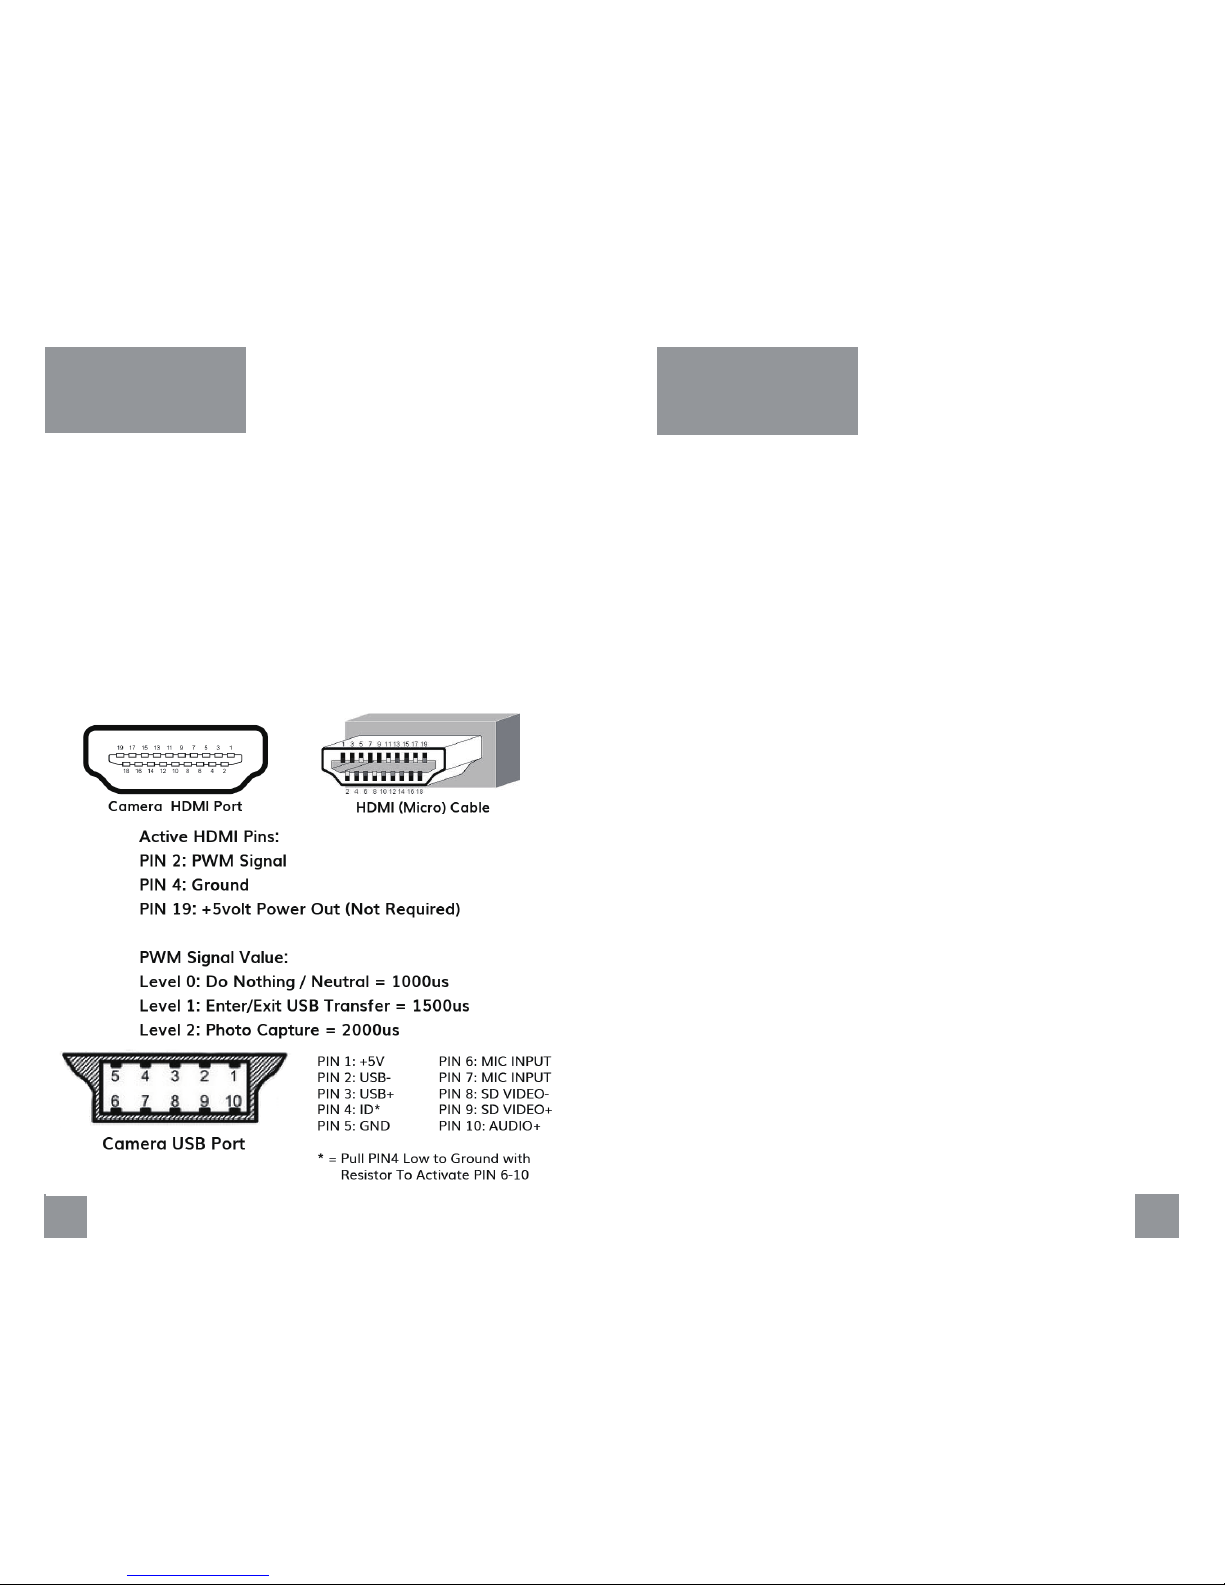
The Survey3 camera can receive and act on a couple PWM values
when sending a PWM pulse using the optional HDMI PWM trigger
cable. Please see the below PWM levels for more details.
The 1000us neutral value is the default value the camera is always
expecting and will not do anything at that pulse width.
To capture a photo, send the camera a momentary 2000us pulse.
To enter media transfer mode, send the camera a momentary 1500us
pulse. To exit send a 1500us pulse again.
Survey3 allows you to power on and charge the camera by
connecting one end of the USB cable to the USB/FPV port and the
other end to your computer.
The microSD card in the camera stores the captured media and
typically must be removed and inserted into a computer in order to
browse the saved media content. With Survey3 though you have the
option to also send the camera a 1500us PWM signal to put the
camera into media transfer mode, making media browsing easier.
Media transfer mode allows the computer that is connected to the
camera to then mount the camera’s microSD card and the captured
media will show up as a removable disk on the computer. This allows
you to browse the contents as well as perform some remote
automation.
One common application for media transfer mode is to connect the
camera to a companion computer such as a Raspberry Pi on your
robot (UAS/drone) and then move the camera’s media to the
computers own storage media. This allows the content to more easily
be removed from your robot if the Survey3 cameras are too difficult
to access. You could also perform some processing on the media.
Enabling Media Transfer Mode: Send the camera a 1500us PWM
pulse using the optional HDMI PWM trigger cable.
Disabling Media Transfer Mode: Send the camera a 1500us PWM
pulse when it is already in media transfer mode.
Page 14
26
2726
Customer
Support
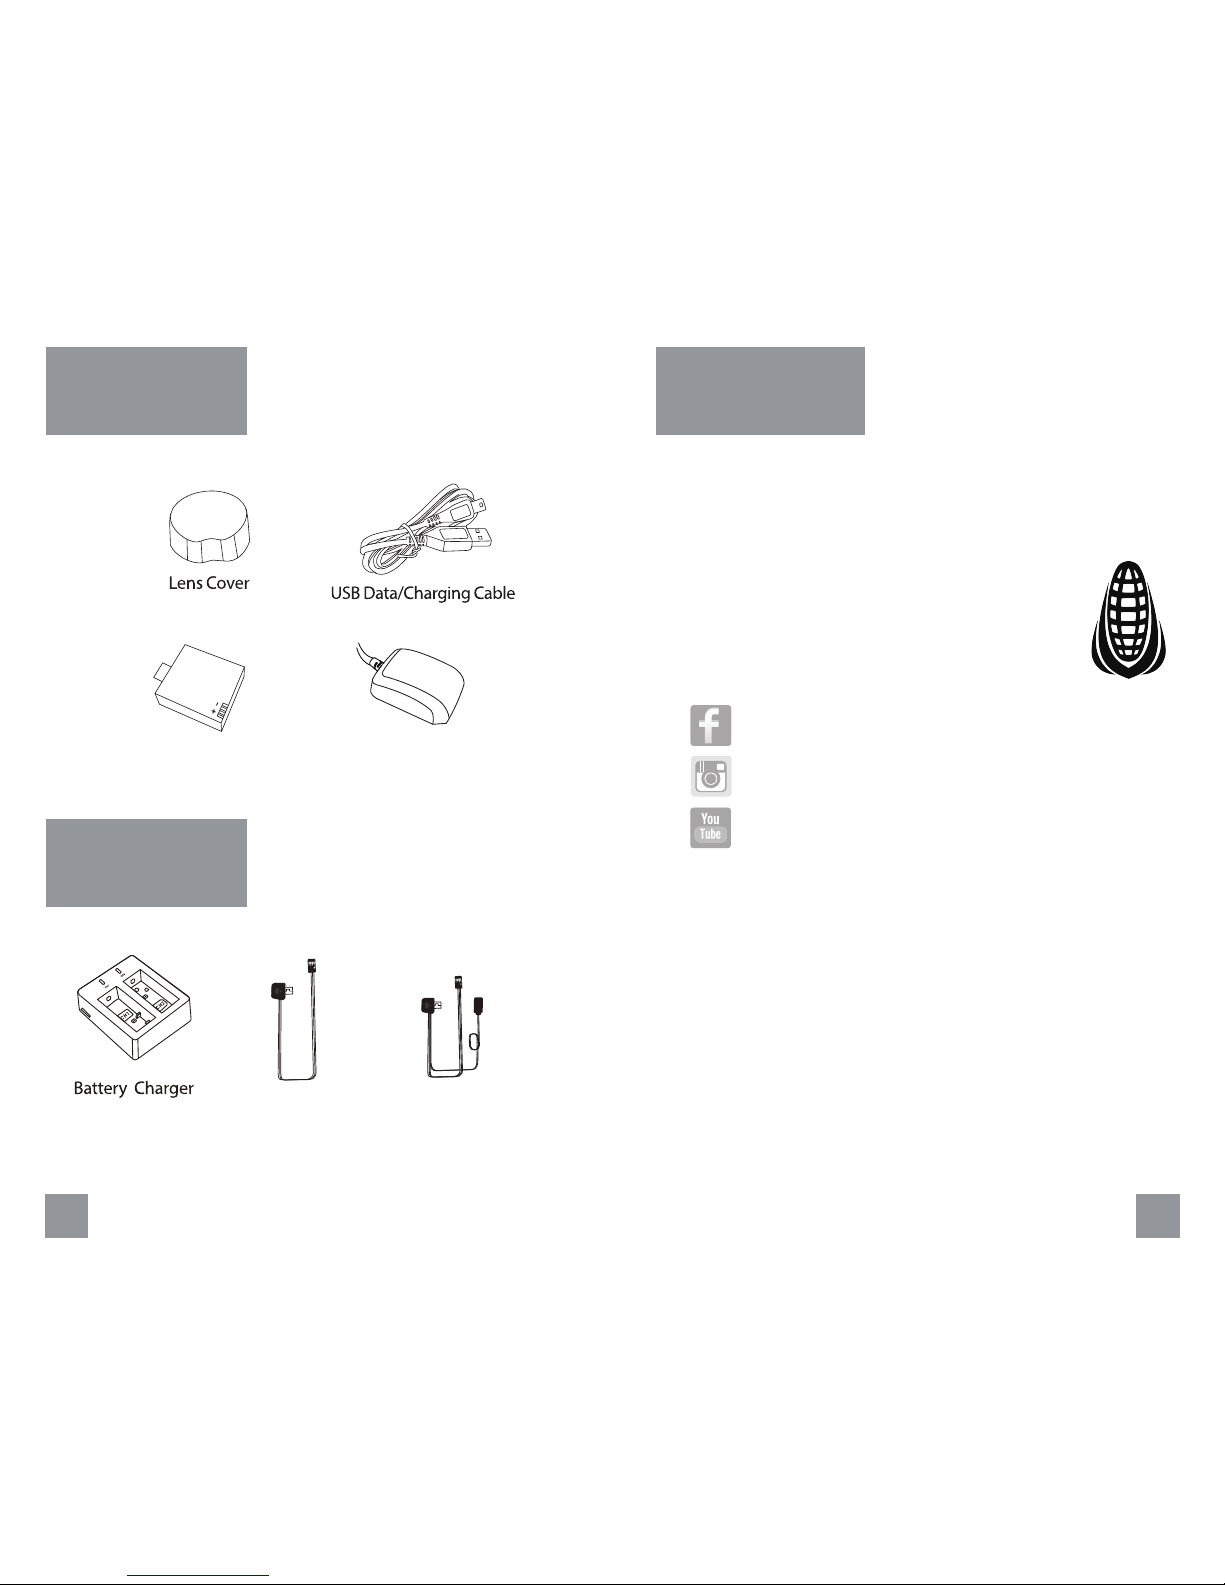
Package
Included
Optional
Accessories
FPV Cable
Battery
GPS
Module
GPS
Trigger Cable
Please go to www.mapir.camera for more information
about our products.
MAPIR
®
is a brand/dba of Peau Productions, Inc.
Peau Productions, Inc.
7592 Metropolitan Drive - Suite 401
San Diego, CA 92108 USA
+1 (877) 949 - 1684
[email protected]
Live Chat is Available On Our Website
Peau Productions, Inc. (dba MAPIR) warrants to the original retail purchaser of all hardware products listed for
sale at www.mapir.camera (the “Product”) that at the time of purchase, this product is free from material
defect in materials and workmanship. Should this Product fail during normal usage and conditions due to
defective material or workmanship within one year from the date of purchase, or such longer period as is
required by applicable law (“Warranty Period”), such defect(s) will be repaired or replaced at Peau
Productions' option, without charge for parts or labor directly related to the defect(s).
This Warranty extends only to customers who purchase the product from a Peau Productions authorized
reseller and is not transferable or assignable. This Warranty does not apply to: (1) Product subjected to
abnormal use or conditions; accident (including, without limitation, collision, crash or fire); alteration, or
improper repair; (2) damage from exposure to moisture or extreme environmental conditions; (3) damage
from use with any accessory, software, or other product not expressly authorized by Peau Productions; (4)
damage from external causes such as dirt, sand, battery leakage, blown fuse, or improper usage of any
electrical source; or (5) use in violation of law or ordinances in effect in the jurisdiction in which the Product is
used.
Peau Productions assumes no liability for any accident, injury, death, loss, or other claim related to or resulting
from the use of this product. Peau Productions makes no other warranties for the Product, and makes no
warranties whatsoever for service, software, maintenance or support for non-Peau Productions branded
products. Such products, service, software, maintenance or support is provided by Peau Productions “As Is”
and any third-party warranties, products, software, services, maintenance or support are provided by the
original manufacturer or supplier, not by Peau Productions.
THE EXTENT OF PEAU PRODUCTIONS' LIABILITY UNDER THIS WARRANTY IS LIMITED TO THE REPAIR OR
REPLACEMENT PROVIDED ABOVE, AND IN NO EVENT, SHALL ITS LIABILITY EXCEED THE PURCHASE PRICE
PAID BY PURCHASER FOR THE PRODUCT.
(Manual Updated: October 2017)
www.facebook.com/mapircamera/
https://www.instagram.com/mapircameras/
https://www.youtube.com/c/MAPIRCamera
 Loading...