


Information in this procedures guide is subject to change without notice.
All brand or product names are trade names, service marks, trademarks, or
registered trademarks of their respective companies or organizations.
Systems Environment
Application Development: Microsoft Visual C++ and C# 2008 (9.0), .NET 3.51 SP1,
.NET 4.6.1 or later (ASE-Q only)
Desktop Database (ASE-Q only): SQL Anywhere 11
Oracle Database 19c Enterprise Edition Release 19.9.0.0.0
Oracle Client 12.2.0.1
Optional System Environments
MAPI Compliant E-mail client to support e-mail transfer of survey information
Note: This document can be viewed online or printed in a duplex (two-sided)
format. Blank pages have been automatically inserted as needed for correct
pagination in the printed copy.

Contents
Introduction ................................................................................. 9
About this User’s Guide ..................................................................... 9
View and Navigate this Document Online.......................................... 10
View a Printed Copy of this Document.............................................. 11
Conventions ................................................................................. 11
LTCSP CBTs ..................................................................................... 11
Accessibility Features...................................................................... 12
In this Guide ................................................................................ 12
In the Application.......................................................................... 12
LTCSP Procedures...................................................... ................. 13
Import User Account File................................................................. 13
LTCSP Surveys................................................................................. 14
Create LTCSP Survey Shell in ACO................................................... 14
Transfer LTCSP Surveys to ASE-Q .................................................... 14
Open a Survey in LTCSP................................................................. 17
LTCSP Screen Navigation and Features ........................................... 19
Title toolbar ................................................................................. 19
Quick Access menu ....................................................................... 19
Function toolbar............................................................................ 20
Change Column Order ................................................................... 20
Drop-down Lists ........................................................................... 20
Hover.......................................................................................... 21
Expand/Collapse Sections .............................................................. 22
Resize Sections with Expander Bars................................................. 23
Update PDF Documents ................................................................... 24
LTCSP Notes.................................................................................... 25
Surveyor Notes............................................................................. 26
Surveyor Notes in Resident Manager........................................... 27
Interview, Observations, and Record Review Notes ............................ 28
Facility Task Notes......................................................................... 28
View Resident Initial Pool Notes ................................................. 28
View Surveyor Facility Task Notes............................................... 29
Medication Administration ......................................................... 30
Investigation Notes ....................................................................... 30
View Body Map and Drawings for any Surveyor ............................ 31
Notes History ............................................................................... 32
User’s Guide 1/29/21 3

Contents
Reports and Attachments ................................................................ 34
Generate Reports.......................................................................... 34
Use the “Immediate Jeopardy Template” ..................................... 36
Add Attachments .......................................................................... 37
Data Sharing ................................................................................... 40
Open the Data Sharing screen ........................................................ 40
Share Data by USB/File ................................................................. 42
Share Data Via Email..................................................................... 43
Share Data Across a Network ......................................................... 44
Data Sharing for RO/CO Users ........................................................ 45
RO/CO Data Share Using USB/File.............................................. 45
RO/CO Data Share Across a Network .......................................... 47
Team Meeting.................................................................................. 48
Offsite Preparation...................................................... .................... 49
Enter Offsite Prep Information ........................................................ 50
Active Complaint and FRI data ........................................................ 51
Complaints and FRIs Information during the Survey ..................... 53
Anonymous Complaints and FRIs ............................................... 56
Entrance Conference ....................................................................... 56
Resident Manager............................................................................ 58
Open the Resident Manager............................................................ 59
Resident Manager views................................................................. 59
Resident Manager Filter and Sort..................................................... 60
Filter by group......................................................................... 61
Sort residents.......................................................................... 61
Search Residents .......................................................................... 62
Initial Pool ...................................................................................... 63
Offsite Selected Residents .............................................................. 64
Include Resident in Initial Pool ........................................................ 65
Add/Update Residents .................................................................... 69
Add a New Admission .................................................................... 69
Update Resident Information .......................................................... 71
Assign Subgroup to Resident .......................................................... 72
Surveyor Assignments ..................................................................... 73
Assign Surveyor to Resident ........................................................... 74
Change Surveyor Assignments........................................................ 75
Unassign Surveyor ........................................................................ 76
Manage Your Workload .................................................................. 77
Initial Pool Resident Interviews, Observations, & Record Reviews.. 78
Open Interview and Observations.................................................... 78
Care Areas ................................................................................... 80
Navigate Care Areas................................................................. 81
Adding Care Areas on the Record Review screen .......................... 82
Probe Text ................................................................................... 83
Assign Interview Status and Subgroup to Resident ............................ 84
Conduct Resident Interview (RI) ..................................................... 85
4 1/29/21 LTCSP 11.9.5

Contents
Conduct Resident Representative Interview (RRI) .............................. 85
Add an RRI after sample finalization ........................................... 86
Conduct Resident Observation (RO) ................................................. 87
Conduct a Limited Record Review (RR)............................................. 88
Determine Weight Loss/Gain........................................................... 89
Mark an MDS Discrepancy.............................................................. 90
Mark a Significant Concern............................................................. 91
Transfer Resident Data................................................................... 91
Completed Screens ....................................................................... 95
Finalize Sample ............................................................................... 96
Open the Finalize Sample screen..................................................... 96
Finalize Sample by Resident view ............................................... 99
Finalize Sample by Care Area view ............................................ 100
Finalize Sample Filter and Sort.................................................. 101
Adjust Facility Census ................................................................... 102
Start Sample Finalization .............................................................. 102
Reset Sample Finalization......................................................... 104
Modify Resident Care Areas ........................................................... 105
Add Residents to Sample .............................................................. 105
Remove Residents from Sample ..................................................... 106
Complete Sample Finalization ........................................................ 107
Balance the Survey Team’s Workload............................................ 108
Closed Record Review Sample....................................................... 110
Open the Closed Record Sample screen........................................... 110
Adjust the Closed Record Review Sample ........................................ 111
Finalize the Closed Record Review Sample....................................... 112
Facility Tasks......................................... ........................................ 112
Mandatory Facility Tasks ............................................................... 114
Triggered Facility Tasks ................................................................. 115
Open the Facility Tasks screen ....................................................... 116
Assign Facility Tasks ..................................................................... 117
Initiate a Facility Task ................................................................... 118
Remove Facility Tasks ................................................................... 119
Open a Facility Task...................................................................... 119
Add/Remove Residents to/from Facility Tasks................................... 123
Complete a Facility Task ................................................................ 124
Environment ............................................................................... 126
Infection Control.......................................................................... 128
Medication Administration ............................................................. 128
Determine Error Rate .............................................................. 129
Enter Med Admin Notes ........................................................... 131
Medication Storage and Labeling .................................................... 133
Resident Council .......................................................................... 134
Resident Investigations............................................... .................. 136
Open the Investigations screen...................................................... 136
Investigations Filter and Sort......................................................... 138
Assign Investigations.................................................................... 139
Add Investigations ....................................................................... 140
Remove Investigations.................................................................. 140
User’s Guide 1/29/21 5

Contents
Open an Investigation .................................................................. 141
Investigation screen layout............................................................ 142
Complete an Investigation............................................................. 146
Transfer Investigation Answers to Another Resident .......................... 149
Complete a Closed Record Review .................................................. 149
Initiate a Tag............................................................................... 150
Edit Potential Citation Documentation................. .......................... 152
Open Edit Potential Citation Doc ..................................................... 152
Potential Citations... ...................................................................... 154
Open Potential Citations................................................................ 154
Filter the Tag Tree ................................................................... 156
View Potential Citation Information............................................ 156
Declare Citations.......................................................................... 157
Cite a Tag .............................................................................. 158
Citing an SQC Tag ................................................................... 159
Don't Cite a Tag ...................................................................... 159
Modify the Sample List for the Facility.......... ................................. 161
Add Residents to List.................................................................... 161
Load Cites ........ ............................................................................. 162
Load Cites into Citation Manager .................................................... 162
Validation Issues.......................................................................... 163
Extended Survey for SQC Citation .................................................. 164
Generate Survey Documentation Reports in ACO....................... .... 165
LTCSP Comparative
Survey Procedures for ROs................................................. ...... 167
LTCSP Comparative Surveys......................... ................................. 167
Create the LTCSP Comparative Survey Shell in ARO .......................... 167
Transfer LTCSP Comparative Surveys to ASE-Q ................................ 171
Export the LTCSP Comparative and State Surveys ....................... 171
Import the LTCSP Comparative and State Surveys....................... 172
Open an LTCSP Comparative Survey in LTCSP .................................. 174
LTCSP for LTCSP Comparative Surveys.......................................... 174
Data Transferred from the State Survey .......................................... 174
Data not transferred from the SA survey ......................................... 175
Offsite Preparation........................................................................ 176
Resident Manager.......................................................................... 179
Interview, Observations, and Record Review ................................ 181
Team Meeting................................................................................ 182
Team Meeting Day 1..................................................................... 183
Day 1 Questions and Response Explanations............................... 183
Team Meeting Day 2 or Later......................................................... 185
Day 2 or Later Questions and Response Explanations ................... 185
6 1/29/21 LTCSP 11.9.5

Contents
Finalize Sample ............................................................................. 186
Facility Tasks......................................... ........................................ 190
Closed Record Sample ............................................................... .... 191
Investigations ............................................................................... 192
Potential Citations... ...................................................................... 193
Finishing the LTCSP Comparative .................................................. 19 3
Compare RO to SA Tags ................................................................ 194
Federal Monitoring Survey Documentation Report ............................. 196
Federal Monitoring Survey Documentation Report ........................ 197
Supporting Materials ................................................................ 203
Tips, Troubleshooting, Quick Reference ........................................ 203
Resident Manager Tips.................................................................. 203
Interview Status .......................................................................... 205
Interview and Observations Tips .................................................... 206
Sample Finalization Tips................................................................ 207
Facility Tasks Tips ........................................................................ 208
Non-mandatory Facility Task Triggers .............................................. 209
Resident Investigations Tips .......................................................... 210
Potential Citations Tips ................................................................. 211
Citation Determination Tips ........................................................... 212
MDS Indicators ............................................................................ 212
Care Area to RI/RO/RR Mapping..................................................... 214
Record Review Rules .................................................................... 222
Care Area to Investigative Area Mapping......................................... 223
Data Sharing Checklists................................................................. 226
Checklist for Using USB Drive ........................................................ 226
Checklist for Using Wired Network.................................................. 227
Checklist for Using Wireless Network .............................................. 228
Keyboard Shortcuts....................................................................... 229
Ease of Access Keyboard Shortcuts................................................. 229
Additional Ease of Access/Navigation Keyboard Shortcuts .................. 229
Quick Access Menu Shortcuts ........................................................ 230
Notes Menu Bar ........................................................................... 230
Surveyor Notes and Note Fields Shortcuts ....................................... 232
General keyboard shortcuts........................................................... 234
Dialog Box Keyboard Shortcuts ...................................................... 236
User’s Guide 1/29/21 7

Contents
8 1/29/21 LTCSP 11.9.5

The Long-Term Care Survey Process (LTCSP) application supports the survey
process for long-term care facilities. The application lets you enter information
electronically as you work through the survey process. For those acting as team
coordinator (TC) for a given survey, the application provides extra functionality.
The software also includes the ability for RO teams to conduct LTCSP
Comparative surveys. By linking the state survey to the LTCSP Comparative
survey in ARO, the system will display information from the SA survey in the
LTCSP Comparative survey for the RO team members to use during their
survey. See
“LTCSP Comparative Survey Procedures for ROs” for details.
About this User’s Guide
The LTCSP User’s Guide gives you the information you need to:
Introduction
• Create and access a survey
• Use the LTCSP application to conduct the survey
• Manage citations
• Create and conduct an LTCSP Comparative survey
Note: This guide assumes that you are familiar with basic Windows operations
and that you have attended training offered by your agency.
This guide consists of this introduction and the following two chapters:
1 Procedures
Provides task-based procedures for using the LTCSP application.
2 Supporting Materials
Contains supplemental information and reference items.
Note: For detailed information about the LTCSP process, refer to the Long Term
Care Survey Process (LTCSP) Procedure Guide (Navigation menu |
Resources | Procedures Guide).
User’s Guide 1/29/21 9
Introduction
View and Navigate this Document Online
You must have Adobe Reader installed to view this document online. You can
download the latest version from
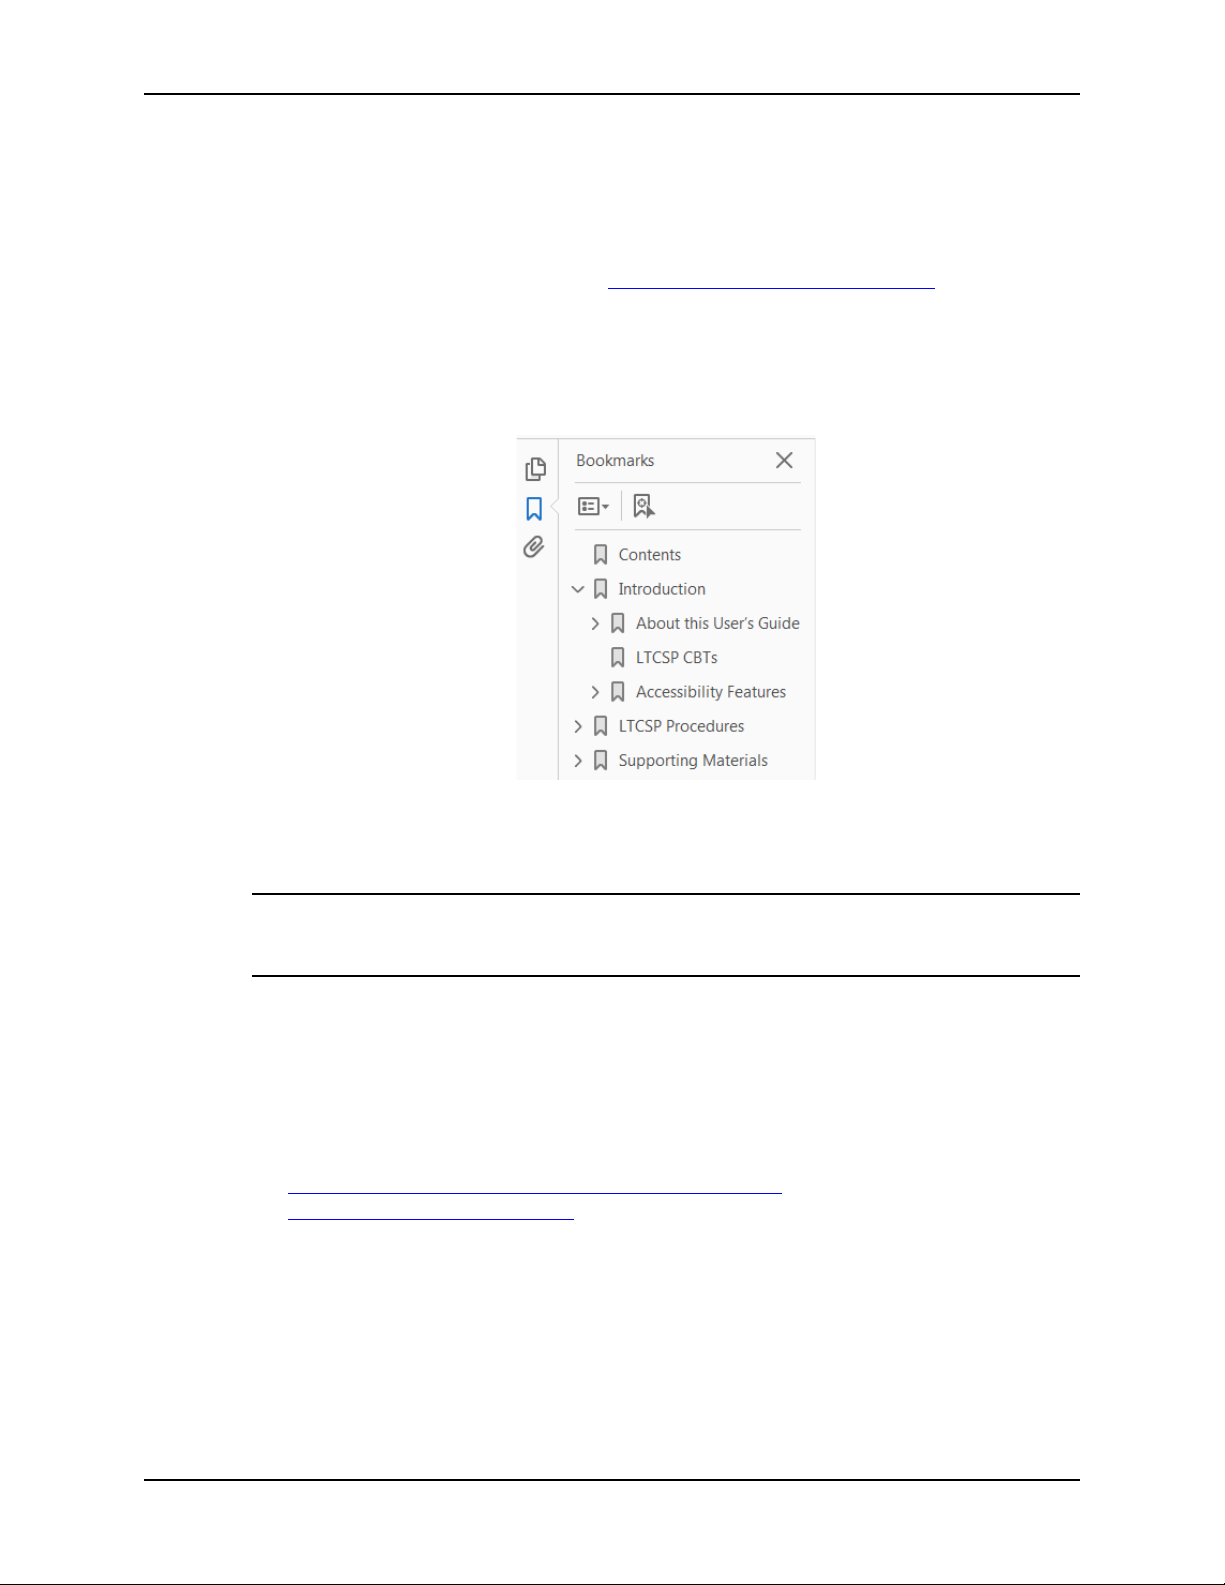
On any page, you can click the Increase (+) or Decrease (-) button in the
toolbar
to adjust the page magnification to your comfort level. Use the
bookmarks in the left pane of Adobe Reader to locate and go (click the
bookmark) to relevant information in this User’s Guide.
https://get.adobe.com/reader/.
Figure 1: Bookmarks
You can also click the Contents bookmark and then click links in the table of
contents to go to relevant topics.
TIP: For best viewing quality in Adobe Reader, go to Edit | Preferences | Page
Display (path may vary somewhat depending on version). Select the
applicable Smooth Text option.
If you need more information, links to relevant additional material in this
document are included. Click a link to directly access the related information.
In the Procedures chapter, there are three types of links (cross-references) to
onal material. They are grouped at the end of a procedure or descriptive
additi
section in the format shown below.
More ...
“View and Navigate this Document Online” on page 10
“Resident Manager” on page 58
➥ Click the first link to go to the indicated procedure.
➥ Click the second link to go to descriptive information about the indicated
topic.
10 1/29/21 LTCSP 11.9.5

View a Printed Copy of this Document
While it is designed to be used easily online, you can print this document if you
prefer. If you print this document, use the table of contents to locate the
information you need. Links (cross-references) to additional material in this
document include page numbers; simply go to the indicated page.
Conventions
This guide uses the following conventions:
Bold In procedures: names of screens, screen sections, buttons, menu
options, keys you press.
ASE-Q Generic reference to ASPEN Survey Explorer-Quality.
web Generic reference to the World Wide Web.
More …
Introduces a list of “see also” cross-references.
LTC S P C BTs
Note: Notes give you important information that may affect how you use a
function.
TIP: Tips give you useful hints, suggestions, or alternative approaches.
LTCSP CBTs
Interactive Computer-based Training (CBT) modules covering a number of
LTCSP application features and procedures are available on the Quality, Safety,
Education Portal, (QSEP). Follow your SA’s practice for accessing the site.
User’s Guide 1/29/21 11
Introduction
Accessibility Features
This LTCSP User’s Guide and the application user interface include
508-compliant accessibility features, which are detailed below.
In this Guide
This User’s Guide incorporates the following 508-compliant accessibility
features:
• Alternate text (alt text), which screen
graphics.
• All graphics have captions.
• Information is not conveyed by means of color alone.
• Tables are not used for formatting, so all text is accessible to screen
readers.
• The last chapter lists keyboard
• Reading order is optimized, so content is read correctly by screen readers.
In the Application
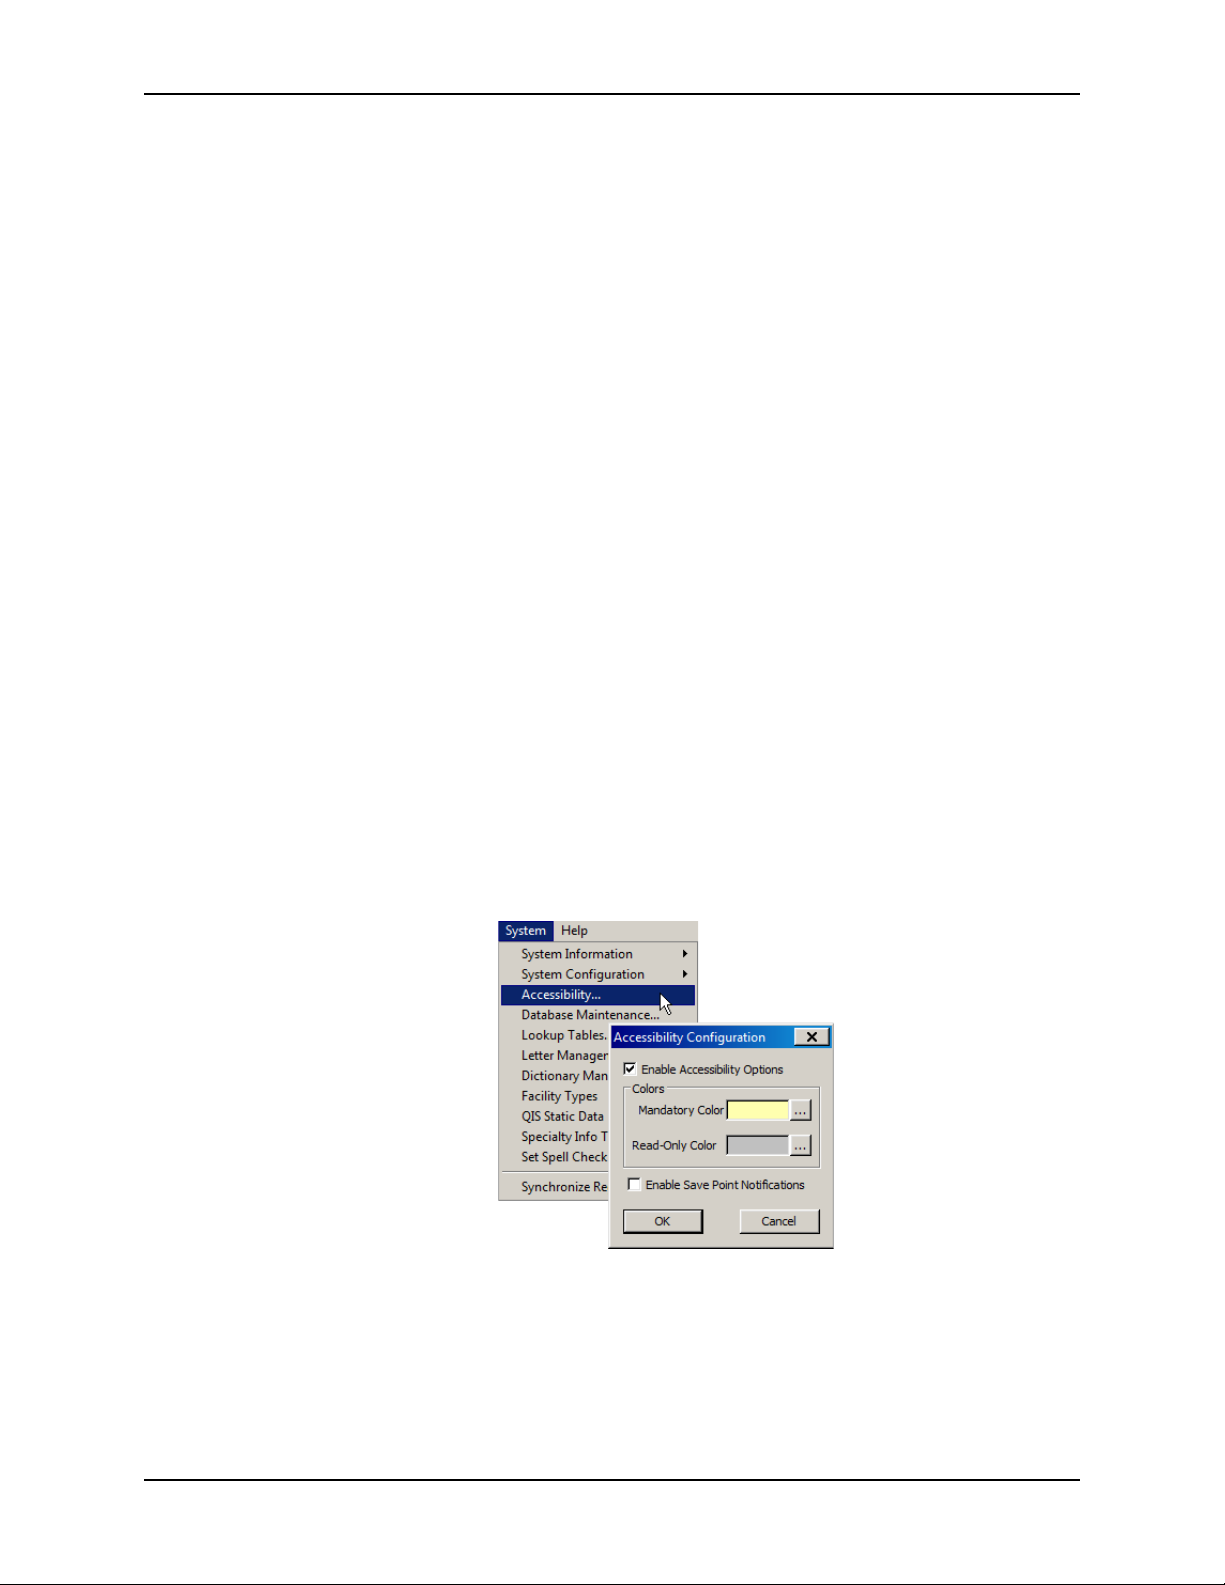
• The LTCSP application adopts the tablet or laptop accessibility settings you
set in ASE-Q. The Accessibility menu option on the System menu in ASE-Q
lets you specify field color preferences and enable/disable save point
notification, i.e., audible confirmation upon saving.
readers can read, is defined for all
shortcuts for easy reference.
Figure 2: Accessibility option and Accessibility Configuration window
12 1/29/21 LTCSP 11.9.5
LTCSP Procedures
Import User Account File
To use the Long-Term Care Survey Process (LTCSP) application, you need an ID
with Assessment access. You will need to import your user account file the first
time you open ASE-Q.
To import your user account:
1 Locate the ASE-Q shortcut on your desktop and double-click.
2 Click OK on the alert that you are accessing a U.S. Government Information
System.
3 I
f you receive an ASPEN Explorer notice that the date format needs to be
updated, click Yes to proceed.
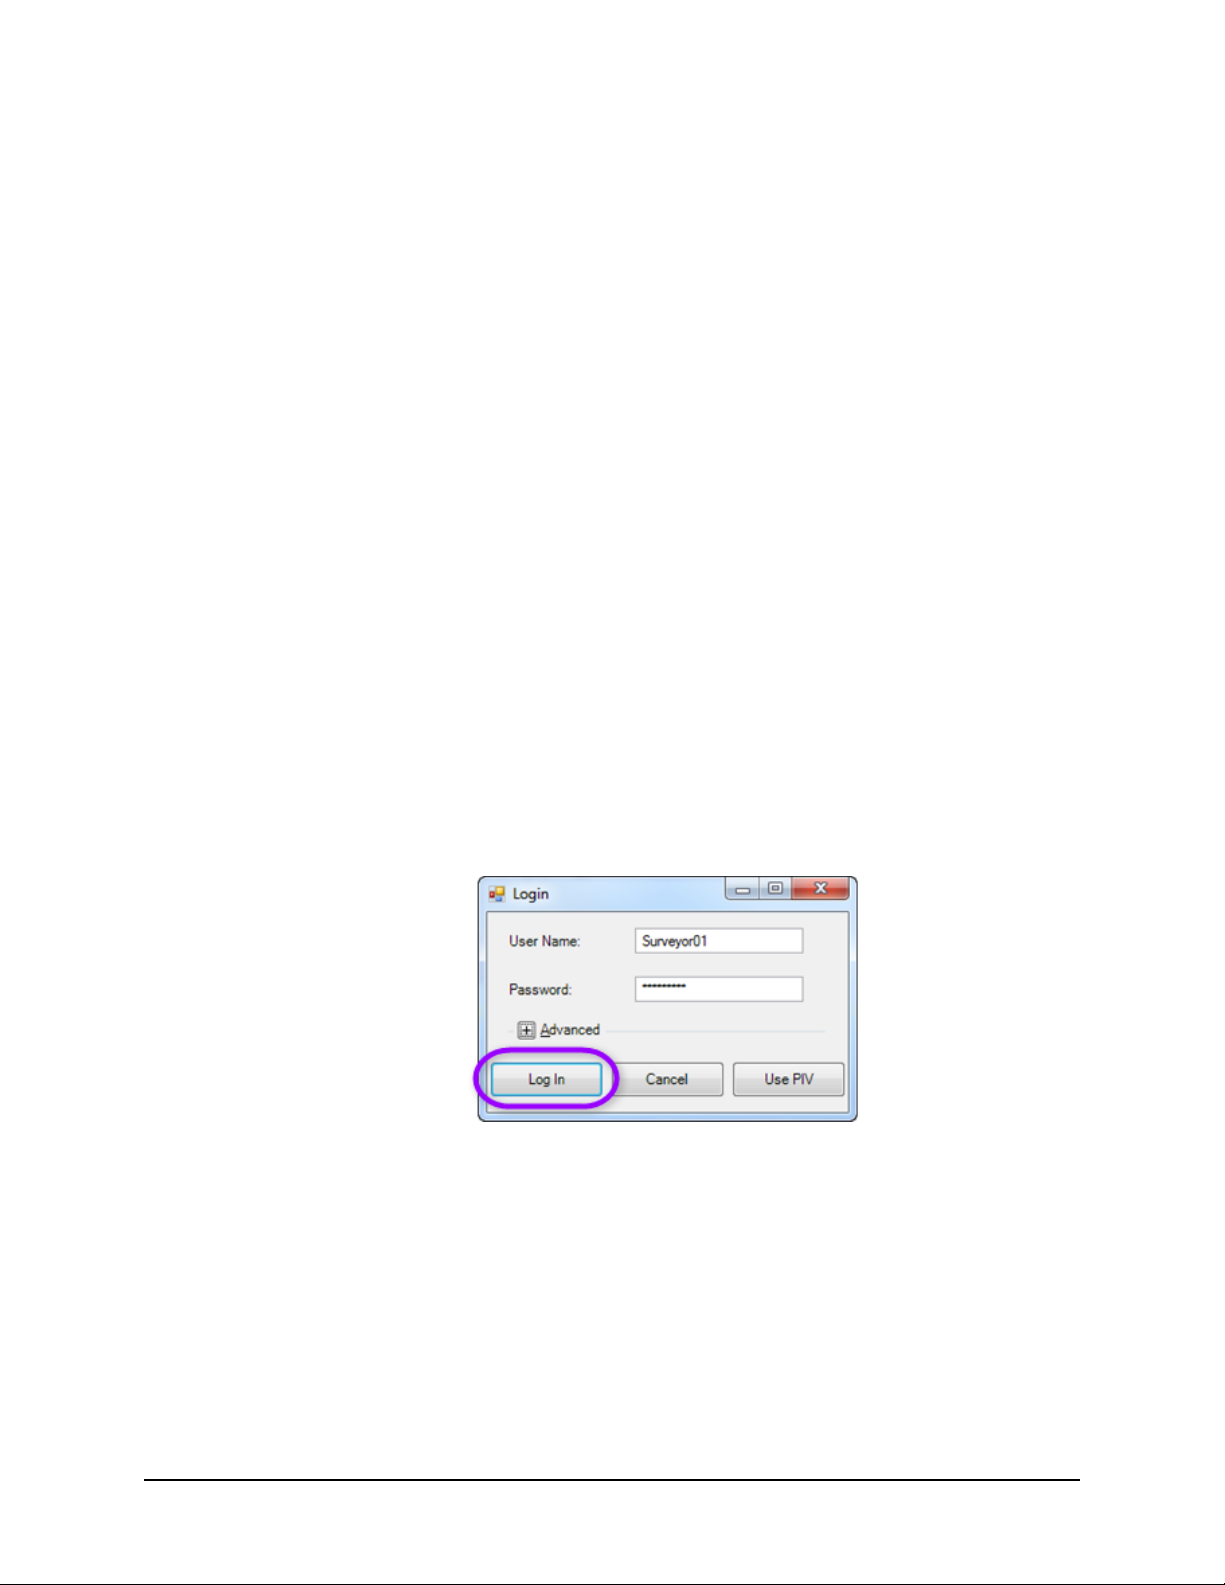
the ASE-Q Login window, enter your User Name and Password.
4 In
5 Click Log In.
Figure 3: ASE-Q Login window
If this is your first time opening ASE-Q, your user account information is not
recognized by the Sybase database and a message indicates that ASPEN
cannot validate the login.
To validate the login:
1 Select Load a User Account File.
2 Navigate to and select the file ASEUserTx.zip.
3 Click Op
en to import the user information.
4 Click Apply to complete the transfer and open ASE-Q.
User’s Guide 1/29/21 13

LTCSP Procedures
LTCSP Surveys
The scheduling supervisor or team coordinator (TC) first sets up an LTCSP
survey shell in ACO, then exports it to team members. This ensures that all
team members are working with the same survey when they begin. Later,
survey data from all team members is combined.
Note: The term Team Leader appears in the application. This represents the
same roles/responsibilities as Team Coordinator.
Create LTCSP Survey Shell in ACO
A new survey can be set up in ACO at any time, even before the survey visit.
It is associated with the applicable certification kit for the facility.
To create a survey shell:
1 In ACO, open or create a certification kit for the facility.
2 In the Survey List section of the Certification & Surveys tab, click New
to open the Create Survey window.
3 Enter basic survey information.
4 Assign team members and designate the team leader.
More ...
For detailed information on creating certification kits and surveys including combined
surveys (certification and complaint), refer to the ACO Procedures Guide, which is posted on
the QTSO website at
https://qtso.cms.gov/software/aspen/reference-manuals.
Transfer LTCSP Surveys to ASE-Q
From ACO, the scheduling supervisor or team coordinator can export one or
more LTCSP surveys with the associated provider and intake information in an
encrypted format to a transfer location. This can be a shared wired or wireless
network location, or USB flash drive. Surveyors then import the contents of the
export transfer file into ASE-Q.
Note: The survey shell should be exported from ACO as close to the survey
start data as possible and no more than 5 business days before the survey start
date.
To export an LTCSP survey shell from ACO:
1 In ACO, locate and select the survey in the Tree or List view.
2 Drag it to the Export button in the toolbar.
14 1/29/21 LTCSP 11.9.5

LTC S P Surveys
3 In the Export window, indicate your Export To location according to your
SA practices.
• Aspen Transfer Location–Select the applicable location.
• Other Zip File Location–Enter the path to the transfer file or navigate to
it using the binoculars.
4 Click OK in the Export window.
5 In the Survey Export window, select the survey(s) you want to send to the
transfer destination.
6 Click Continue with Export.
If there are differences between source and destination content, one or
more Merge windows may appear.
7 Resolve any source/destination differences and continue the transfer.
8 Address sample calculation issues.
• Survey already exported
If this is the initial export of the survey, the LTCSP sample is
automatically calculated. If the survey has already been exported,
however, a message appears with the date and time of the previous
export, as well as the user who exported the survey.
➥ Indicate whether you want to recalculate the LTCSP sample.
•Select Yes to recalculate the sample and continue with the
export.
•Select No to continue the export without recalculating the
sample.
•Select Cancel to abort the export.
Note: Only recalculate the sample if the prior export was more than 5
days before the survey start date. If survey team members all export
the survey from ACO, only the team coordinator should recalculate the
sample to avoid data conflicts.
• Survey being exported by another user
If another user is exporting the survey, a message notifies you that the
LTCSP sample calculations are currently being performed by other users,
and asks if you would like to wait and retry the transfer.
➥ Indicate whether you want to retry the transfer.
•Select Yes to retry the LTCSP transfer after the other user’s
transfer is complete.
•Select No to skip the LTCSP transfer.
•Select Cancel to abort the transfer.
User’s Guide 1/29/21 15

LTCSP Procedures
9 In the LTC Survey Process Transfer window, click OK.
10 In the Finalize Transfer window, select Apply to complete the export
process, or Cancel to reverse the transfer.
When the export is complete, surveyors can import the survey(s) with the
associated provider and intake information into ASE-Q.
To import an LTCSP survey into ASE-Q:
1 On the ASE-Q toolbar, click Import.
2 In the Import Type section, select Surveys.
3 Select the appropriate Import From option to indicate the location of the
transfer file:
• ASPEN Transfer Location–Select the applicable location.
• Other Zip File Location–Enter the path to the transfer file or navigate to
• Locate ASE Database–Use option for wired or wireless ASE-Q to ASE-Q
it.
network transfers. Enter database name or IP address.
4 In the Select Survey(s) to Import window, select the surveys you want
to import and click Continue with Import.
A log of changes made during the import is displayed.
5 Click OK in the LTCSP Survey Process Information window.
6 In the LTC Survey Process Transfer window, click OK.
7 Click Apply to finalize the transfer.
16 1/29/21 LTCSP 11.9.5
LTC S P Surveys
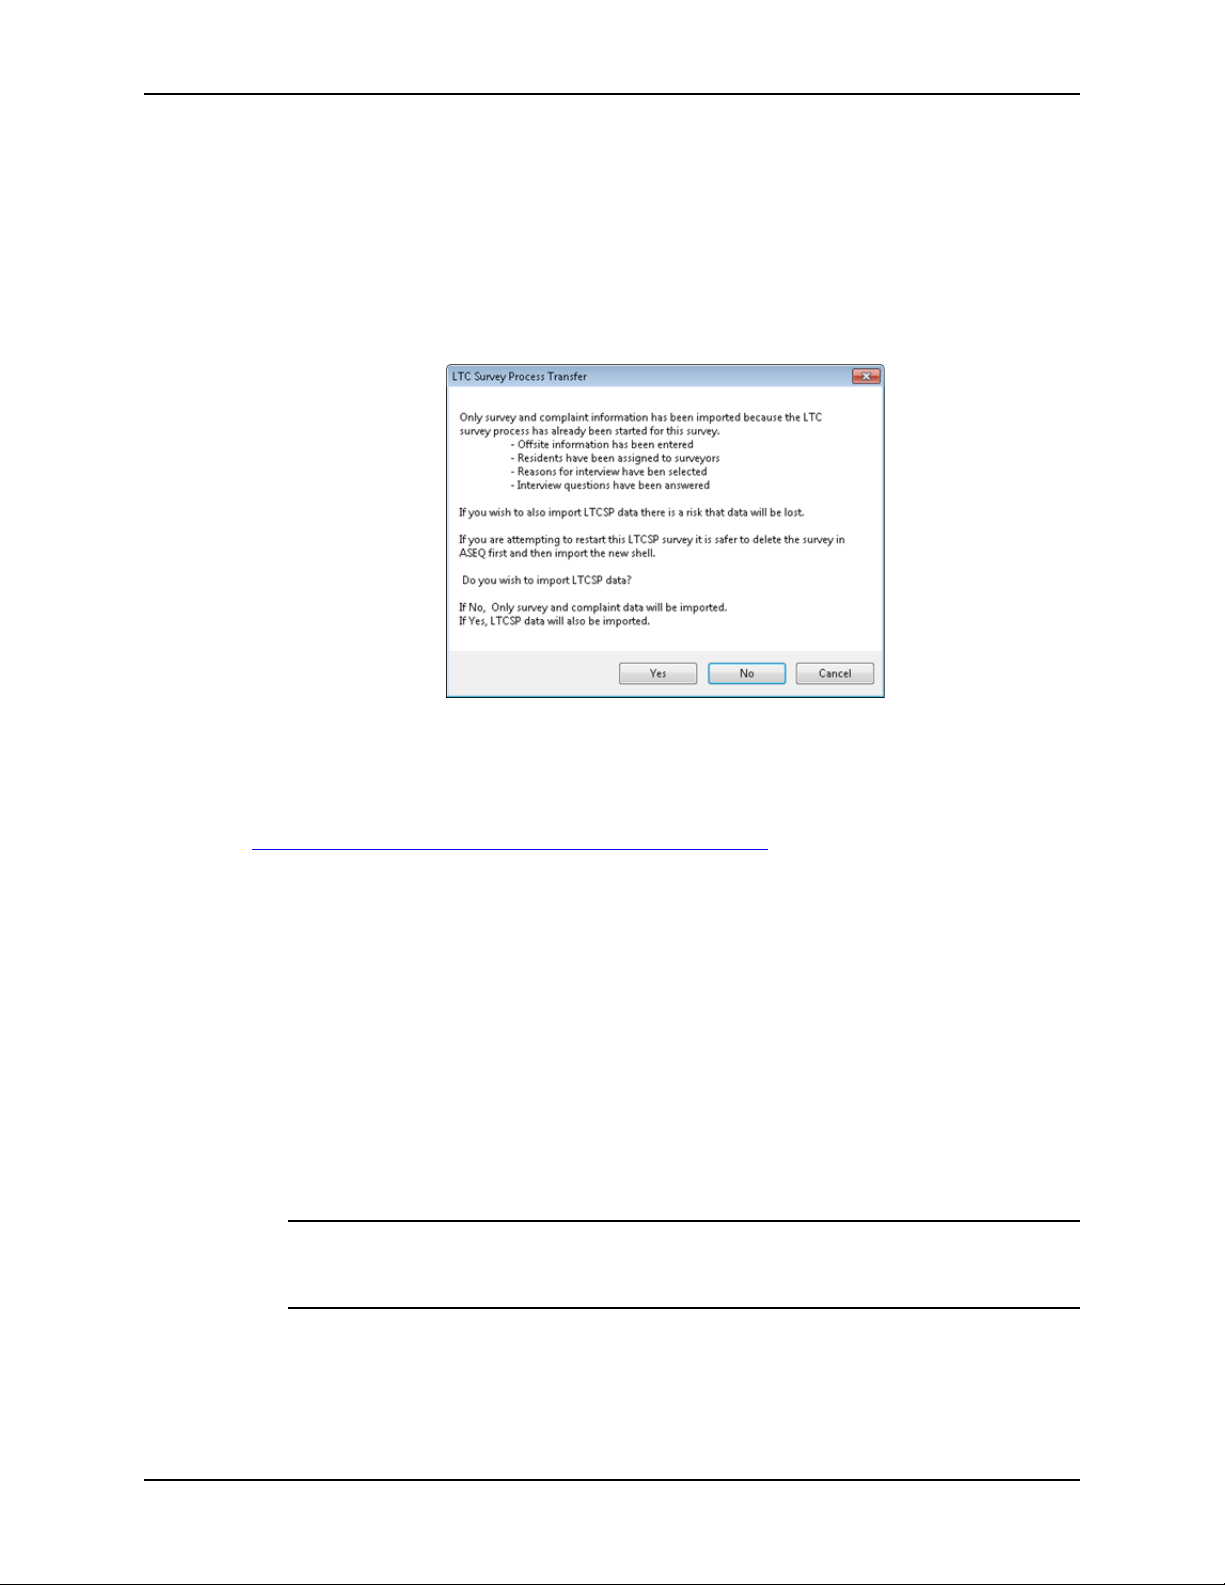
Import an existing survey
If you import an existing survey into ASE-Q, you have two options: to
mport only survey and complaint data or to import all data. Importing all
i
data runs the risk of overwriting all your survey data. You will receive the
following message during the survey transfer.
Figure 4: LTC Survey Process Transfer window
More ...
For detailed information on transferring surveys from ACO to ASE-Q, refer to the ACO
Procedures Guide and ASE-Q Procedures Guide, which are posted at
https://qtso.cms.gov/software/aspen/reference-manuals.
Open a Survey in LTCSP
You open a survey in LTCSP through ASE-Q either directly in Tree view or
through the Citation Manager. You must be on the survey team and have
Assessment access.
To open LTCSP from Tree view:
1 Open ASE-Q.
2 In Tree view, locate the LTCSP survey.
3 Right-click the survey and select LTCSP.
The LTCSP application is opened for the
Note: The LTCSP option is enabled only for LTCSP surveys. Currently that
is the initial health survey for a certification or recertification, or a Federal
Monitoring Survey (FMS) for a federal nursing home.
selected survey.
User’s Guide 1/29/21 17

LTCSP Procedures
To open LTCSP from Citation Manager:
1 Open ASE-Q.
2 In Tree view, locate the LTCSP survey.
3 Right
-click the survey and select Citation Manager.
4 Click the LTC Survey button to open the survey.
Figure 5: LTC button in Citation Manager
The LTCSP application opens for the survey.
Note: The LTC Survey button only appears if the survey is defined as an
LTCSP survey. Currently that is the initial survey for a certification or
recertification for a federal nursing home.
18 1/29/21 LTCSP 11.9.5
LTCSP Screen Navigation and Features
LTCSP Screen Navigation and Features
All screens have the same basic layout making it easy to move from one task
to the next.
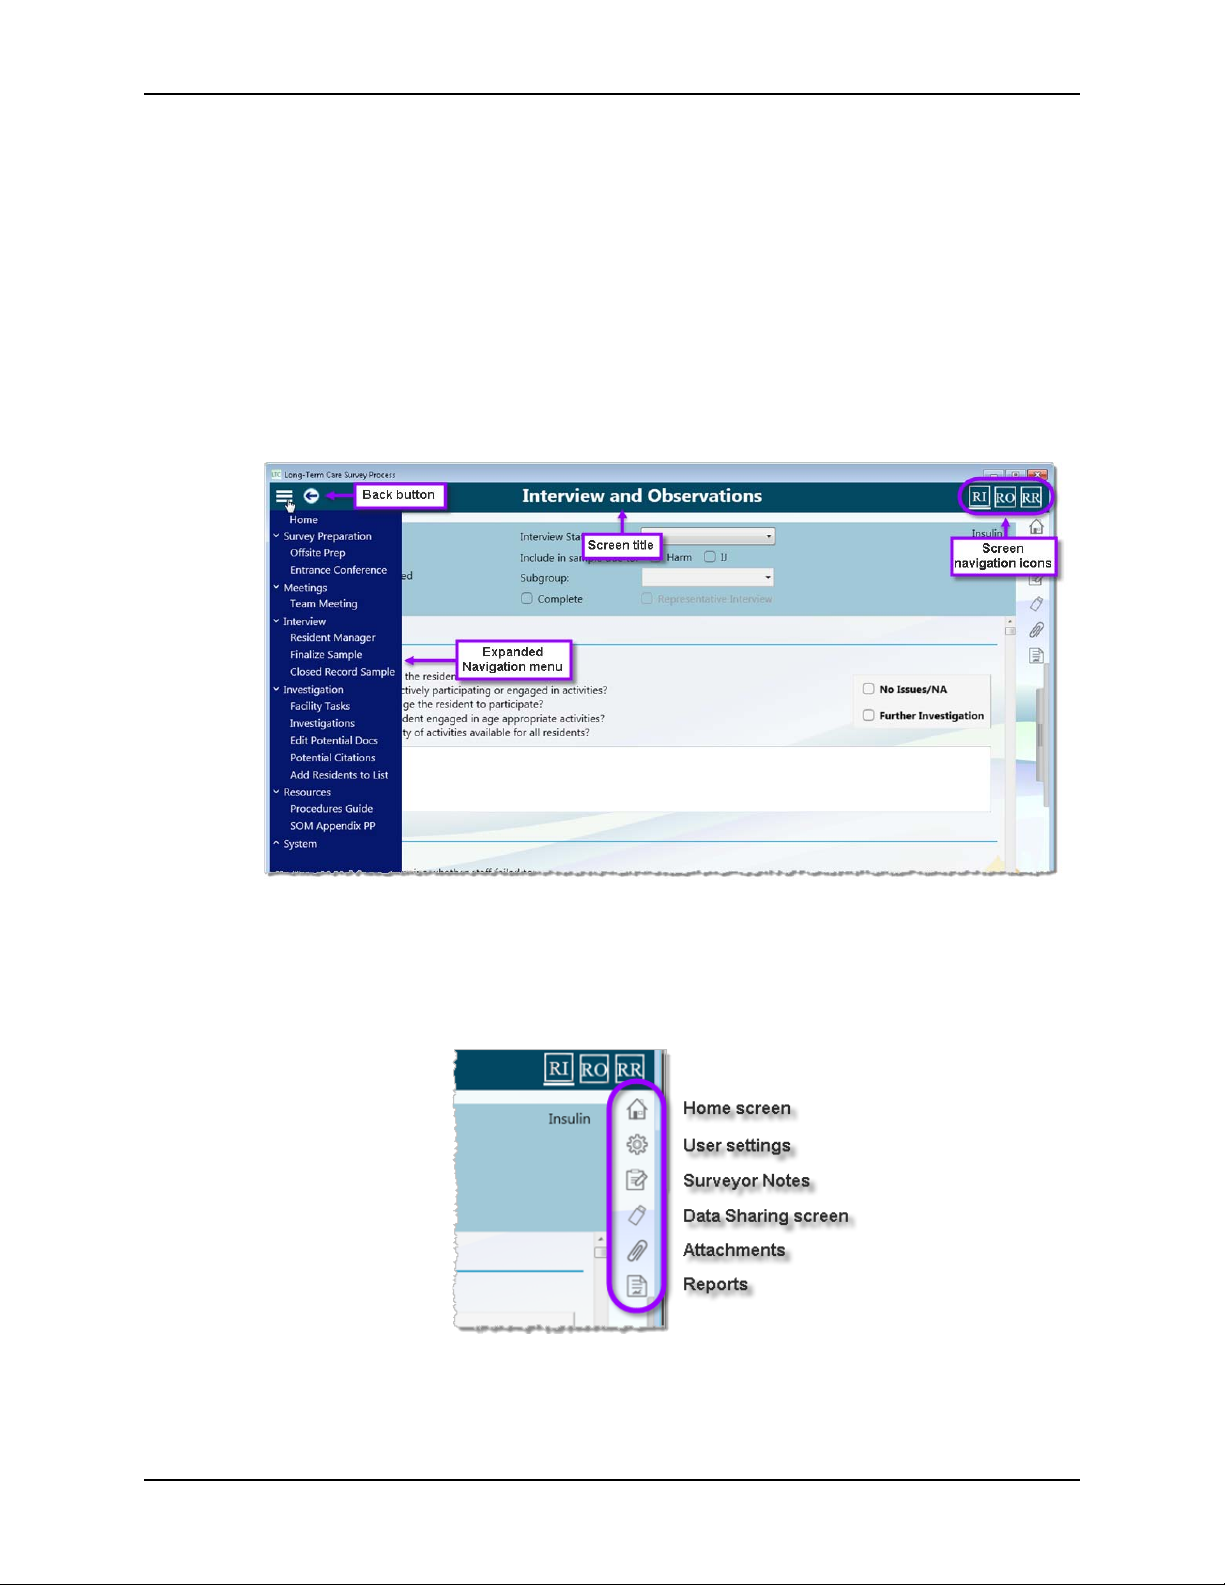
Title toolbar
The Title bar always includes the screen title and Navigation menu. Some
screens include a Back button and navigation icons.
Figure 6: Title toolbar
Quick Access menu
This set of general function icons is located on the right side of every screen.
Figure 7: Quick Access menu
User’s Guide 1/29/21 19
LTCSP Procedures
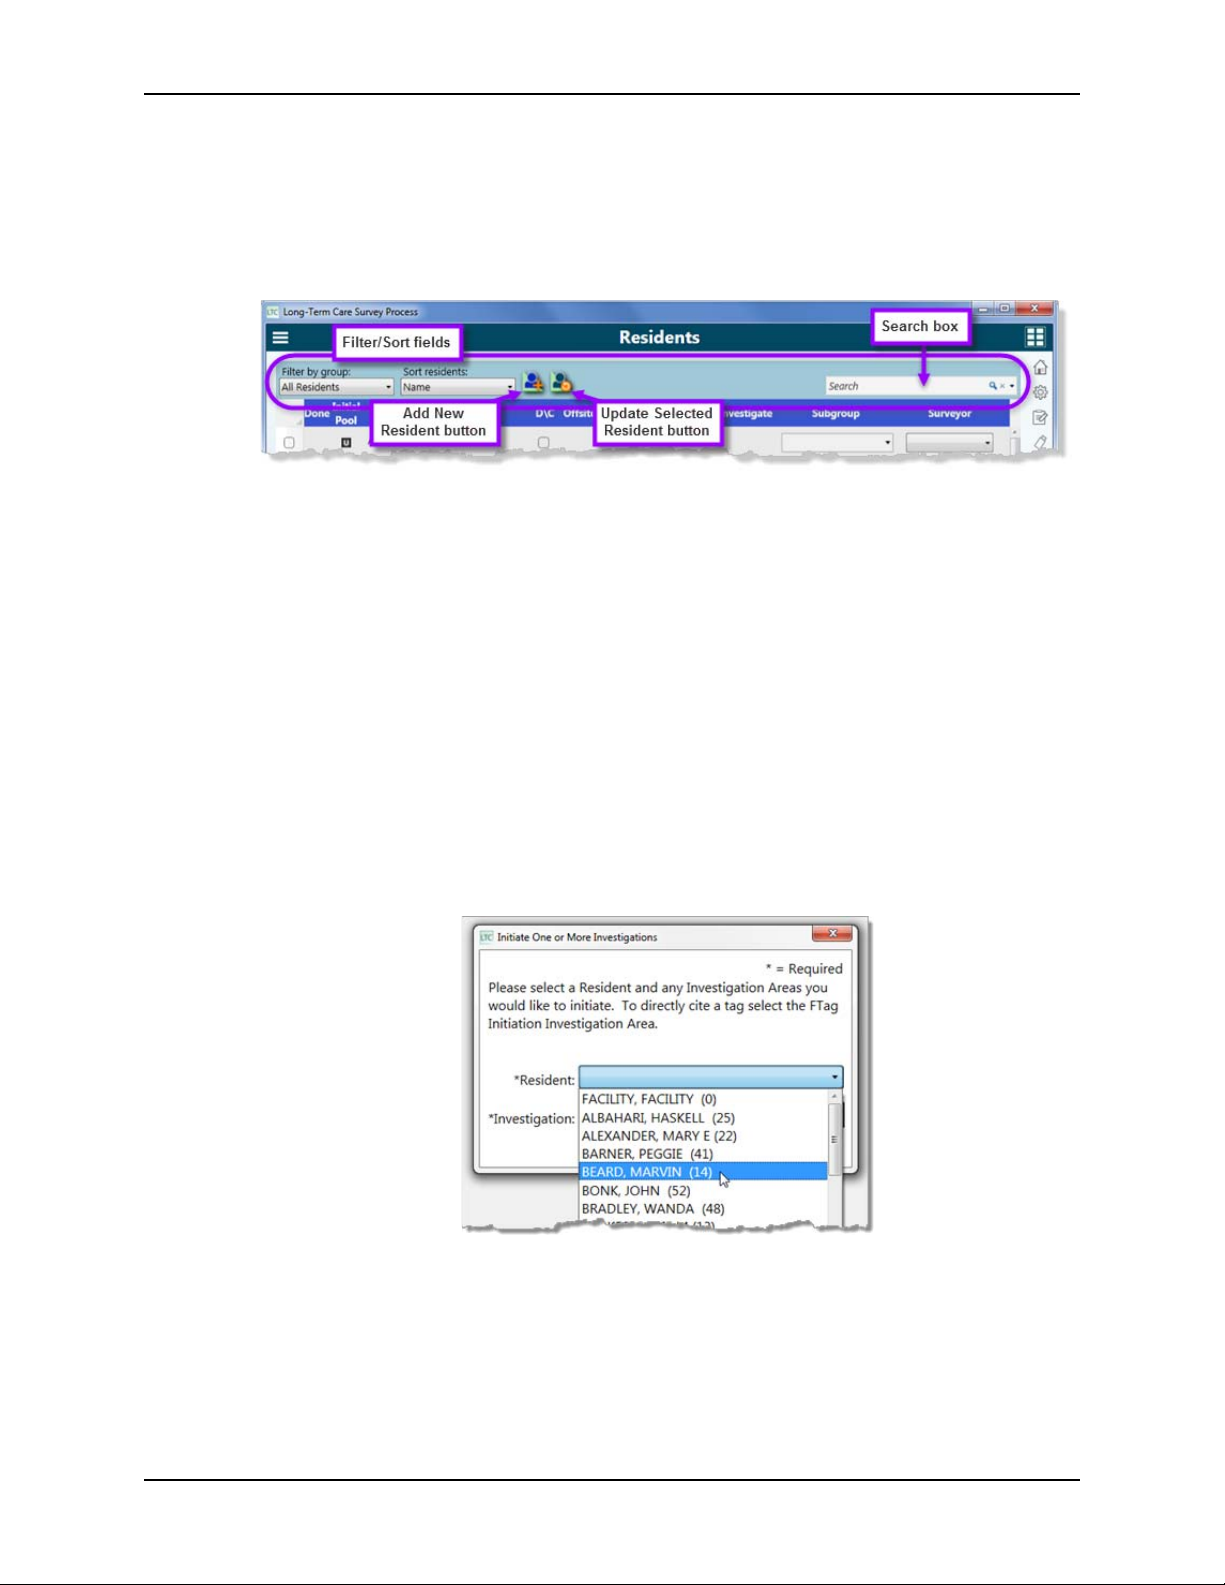
Function toolbar
This toolbar includes function icons specific to the screen/task.
Figure 8: Residents screen–Function toolbar example
Change Column Order
You can rearrange column headings to any order you want in the Residents list;
Offsite Prep, Finalize Sample, Investigations, and Workload screens; and any
area of a screen that has a list with headings.
To move a column:
➥ Click the title of the column and drag it to the desired location in the header.
Drop-down Lists
Drop-down lists appear throughout the application where you need to select
one or more items from a list. For example, the following screen within
Investigations has two drop-down lists.
Figure 9: Resident drop-down list
20 1/29/21 LTCSP 11.9.5
Figure 10: Investigations drop-down list
LTCSP Screen Navigation and Features
To close a drop-down list:
➥ Click outside the list or press Escape.
Hover
When you hover the cursor (i.e., move it over object on screen), the application
will determine the cursor type/shape to display (hand, i-beam, etc.) based on
the context. If you hover the cursor over a button or icon, a description of the
command it represents displays.
Figure 11: Example of Hover help
User’s Guide 1/29/21 21
LTCSP Procedures
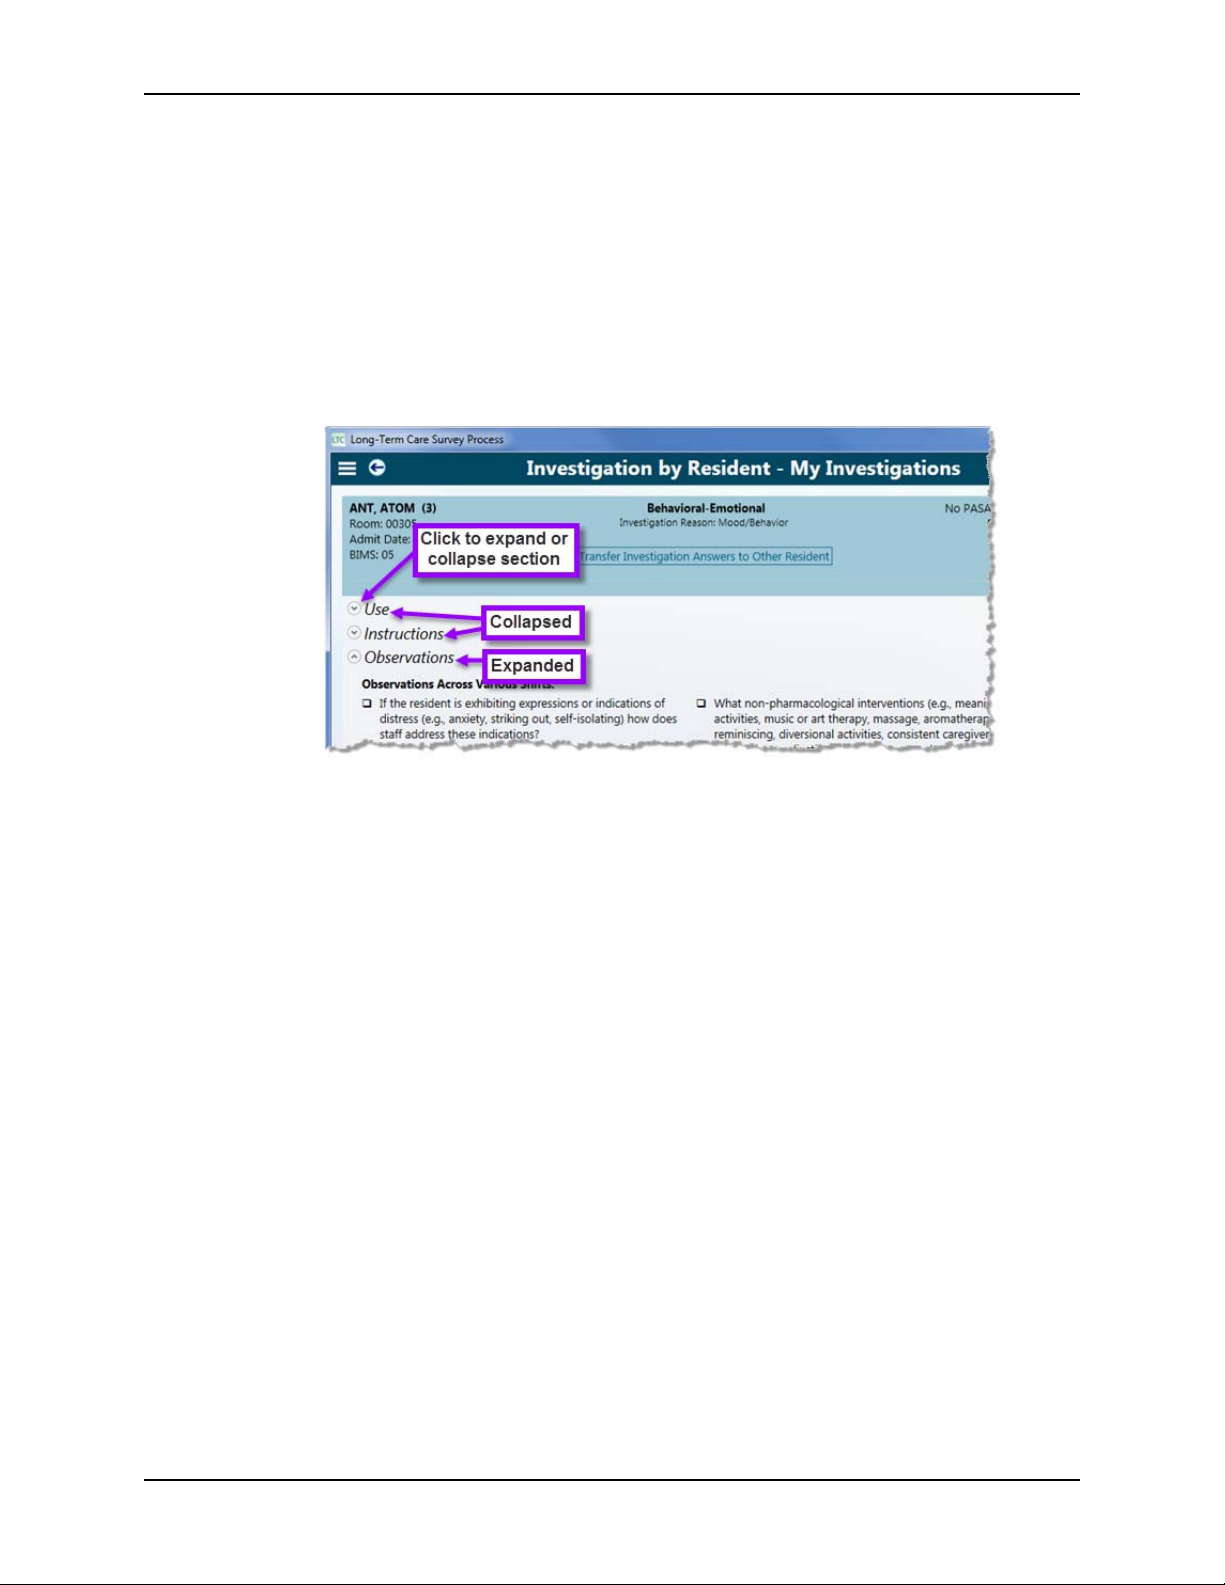
Expand/Collapse Sections
On facility task and investigation screens, you can expand and collapse Use,
Instructions, Probes/Critical Elements, MDS indicators, etc. as needed to more
easily accomplish your work.
To expand/collapse a section:
➥ Click the arrow in front of the section label. Click again to collapse/expand.
Figure 12: Use and Instructions sections collapsed, Observations section expanded
22 1/29/21 LTCSP 11.9.5
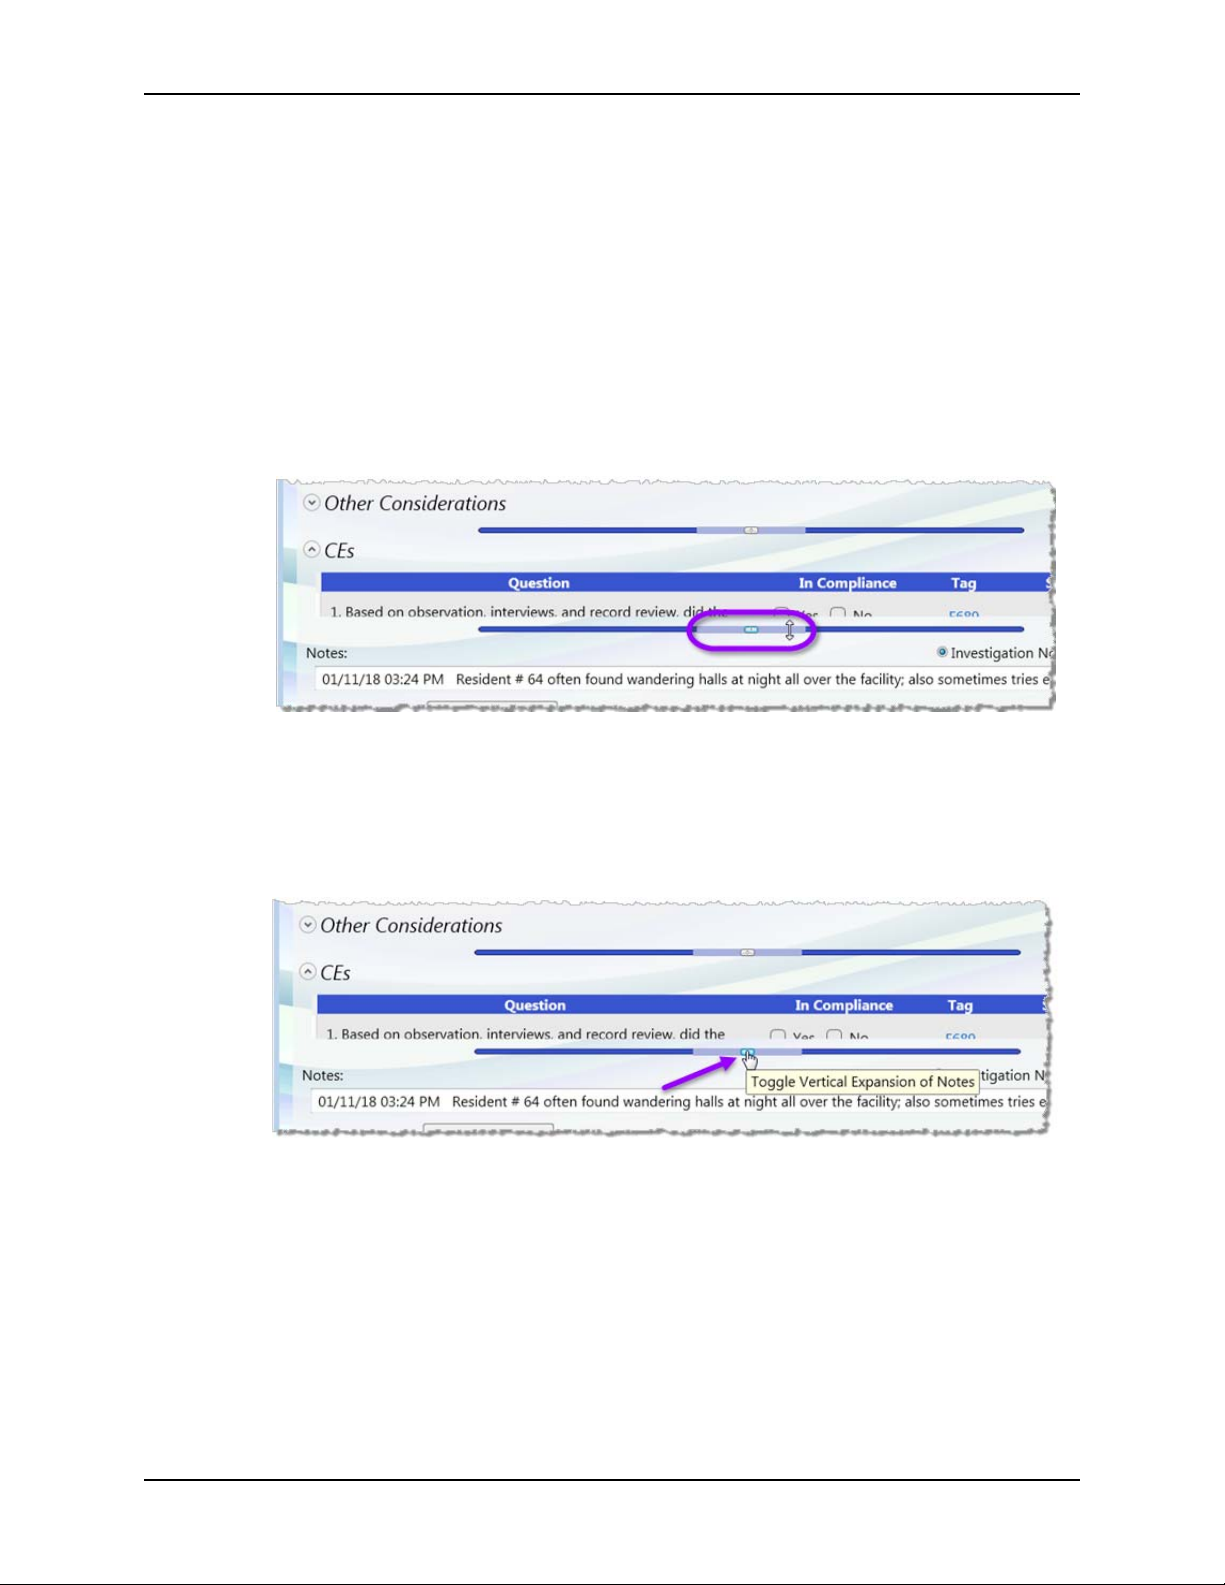
Resize Sections with Expander Bars
In the Entrance Conference, facility task, and investigation screens, use
Expander bars to control screen space by adjusting section size.
To resize a section:
➥ Hover over the Expander bar until you see a double-headed arrow, then
click and drag the bar up or down to resize the area. For example, it may
be helpful to expand the Notes section so you can see more of the text you
entered.
LTCSP Screen Navigation and Features
Figure 13: Expander bar activated
-or-
Hover over the Expand icon in the center of the bar until you see a hand
cursor, then click to expand the area beneath the bar to full screen. Click
the icon again to return the area to its previous size.
Figure 14: Expander bar–Expand icon
User’s Guide 1/29/21 23
LTCSP Procedures
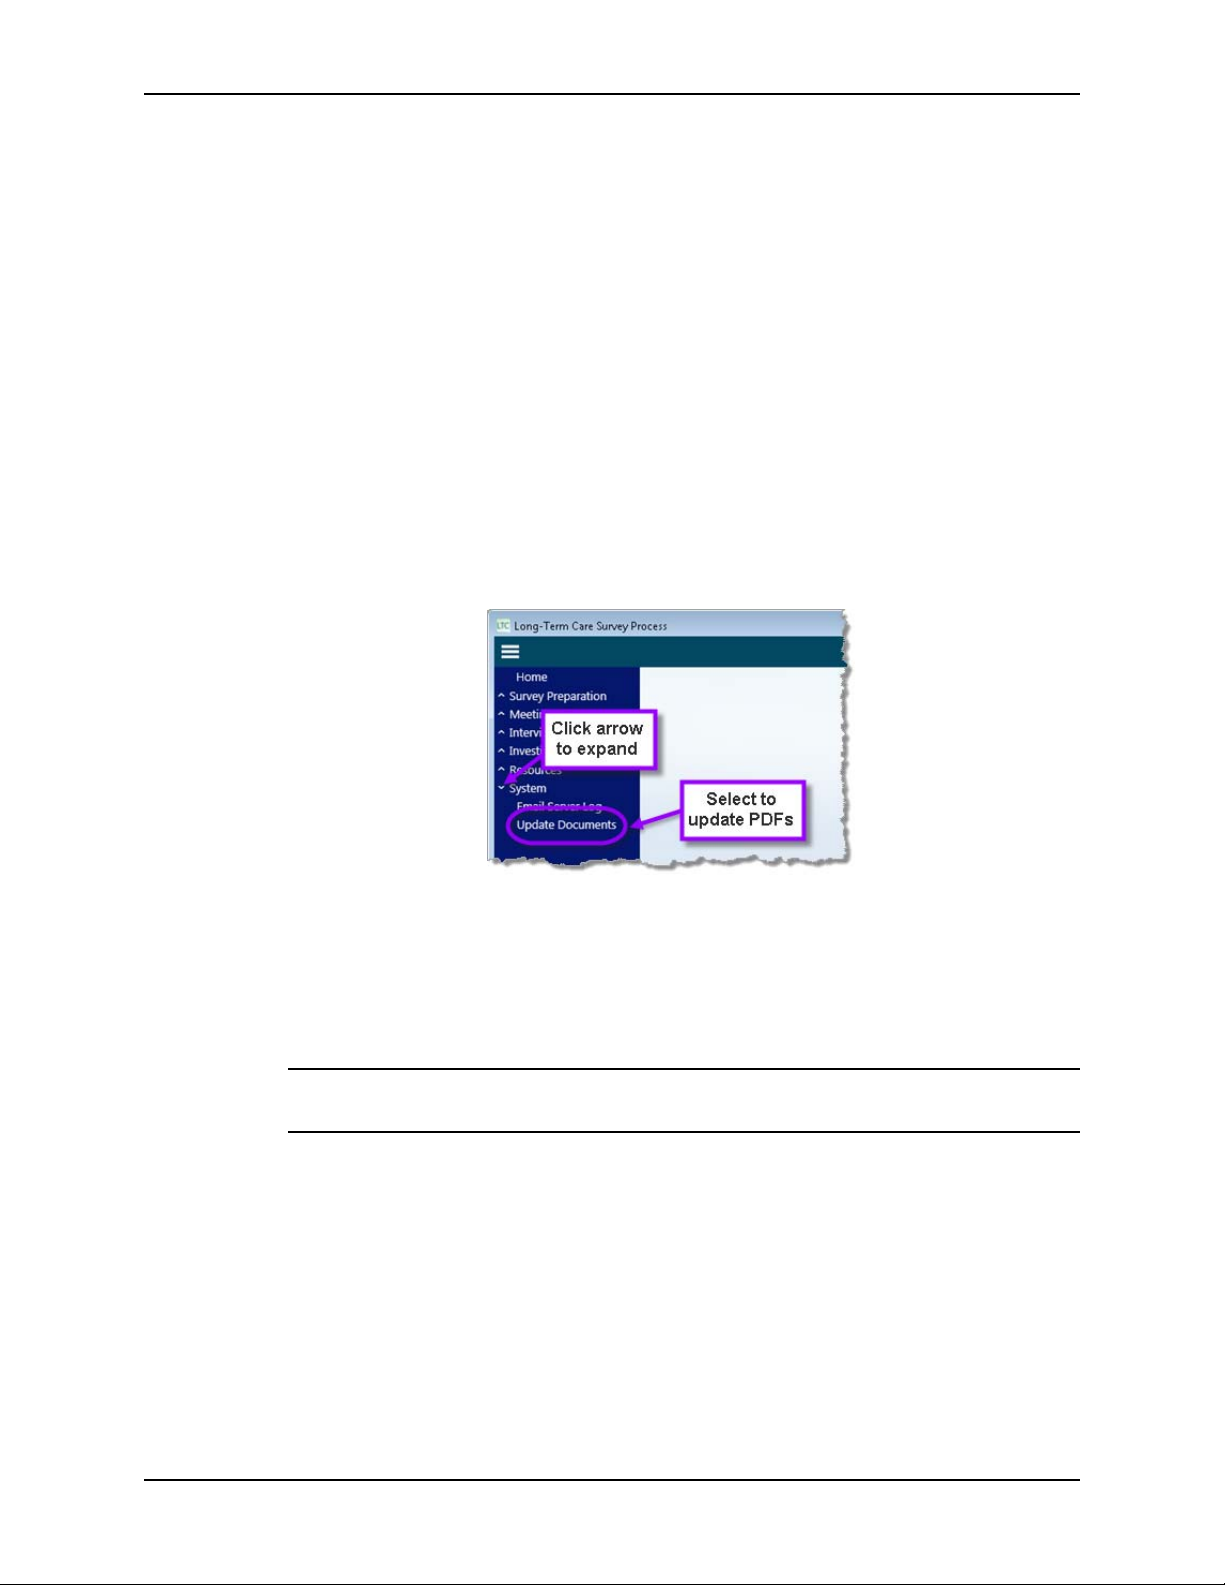
Update PDF Documents
LTCSP includes PDFs for facility task and investigation pathways along with
procedure guides and report templates. On occasion these PDFs need to be
updated, and you can update them from LTCSP. Your state agency will be
notified when updates have been made to these documents. You need to be
connected to the internet to update documents.
To update PDF documents:
1 Verify you are connected to the internet.
2 Open a survey in LTCSP (it doesn’t matter which survey, once updated all
PDFs will be available for any survey).
3 Th
Figure 15: System menu expanded to show Update Documents option
4 Click OK when
e Navigation menu should be open, if not, click the menu icon to open.
Expand the System section, and select Update Documents.
A popup reminds you to close all open PDF documents—if open, a document
cannot be updated.
Click OK.
the updates are complete.
TIP: If you get a message saying that a PDF was open and the update
stops, close the PDF and rerun Update Documents.
24 1/29/21 LTCSP 11.9.5
LTCSP Notes
The LTCSP application provides multiple places to add notes. The main notepad,
Surveyor Notes, is available from the Quick Access menu and can be used to
record general notes. Specific notes fields are available in some screens and are
associated with the screen’s functionality. For example, when conducting a
facility task, you can take notes for the task you are working on.
If you copy and paste from another application (e.g., a web page) the
formatti
in LTCSP. Copying and pasting text from an LTCSP notes field to another LTCSP
notes field will keep any formatting.
TIP: If you want to keep the formatting from another document, attach the
Features common to a number of notes fields include:
• Al
ng will be removed and only the text will copy. You can format the text
document using the Attachments feature (see
page 37).
t + R or Insert Resident ID button to insert resident number.
LTC S P Notes
“Add Attachments” on
Figure 16: Insert Resident ID button
In a screen used to gather information for a specific resident, the resident
ID is inserted. In notes fields where no specific resident is referenced, you
select a specific resident from the full resident list to insert their ID.
Note: Inserting a resident ID using the keystroke or icon automatically adds
the resident to the “Sample List Provided to the Facility” report.
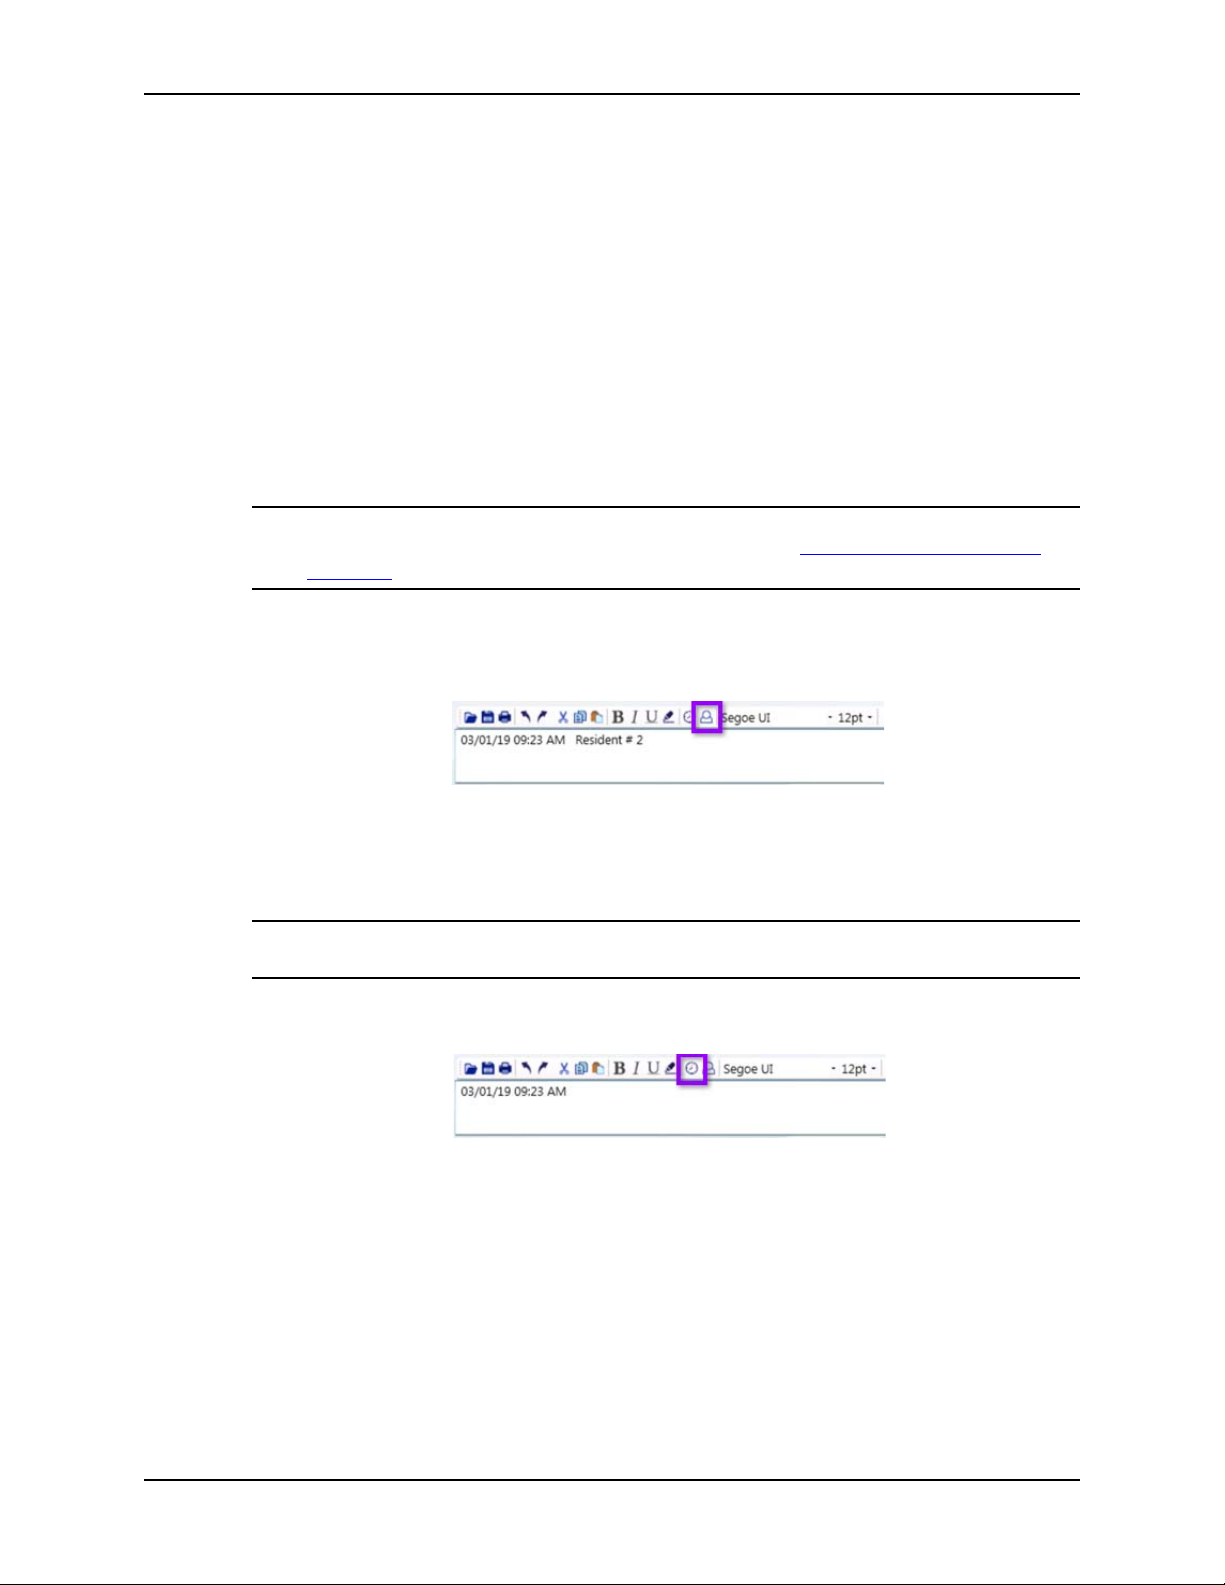
• Alt + T or Insert Timestamp button to insert current date/time.
Figure 17: Insert Timestamp button
The system automatically inserts a date/time stamp into some notes fields
when you click in the field the first time. For subsequent notes, use the
shortcut (Alt + T) or button to insert the date/time stamp.
User’s Guide 1/29/21 25
LTCSP Procedures
• Standard word processing features.
Basic editing functions are available in all notes fields.
Note: Highlighted text does not show in combined notes fields such as
Resident IP Notes in facility tasks or when showing answers for all surveyors
in either facility tasks or investigations. Highlighting also does not show on
reports.
• Record notes using stylus or keyboard entry.
•Click Back button to exit notes field when finished.
• All information in notes fields and throughout the application is
automatically saved every two minutes.
More ...
“Notes Menu Bar” on page 230
“Surveyor Notes and Note Fields Shortcuts” on page 232
Surveyor Notes
Allows each surveyor to enter notes throughout the survey. You cannot view
other surveyor’s notes in LTCSP, but you can view all surveyor notes (after data
share) in the “Surveyor Notes” report. You can also review your notes History.
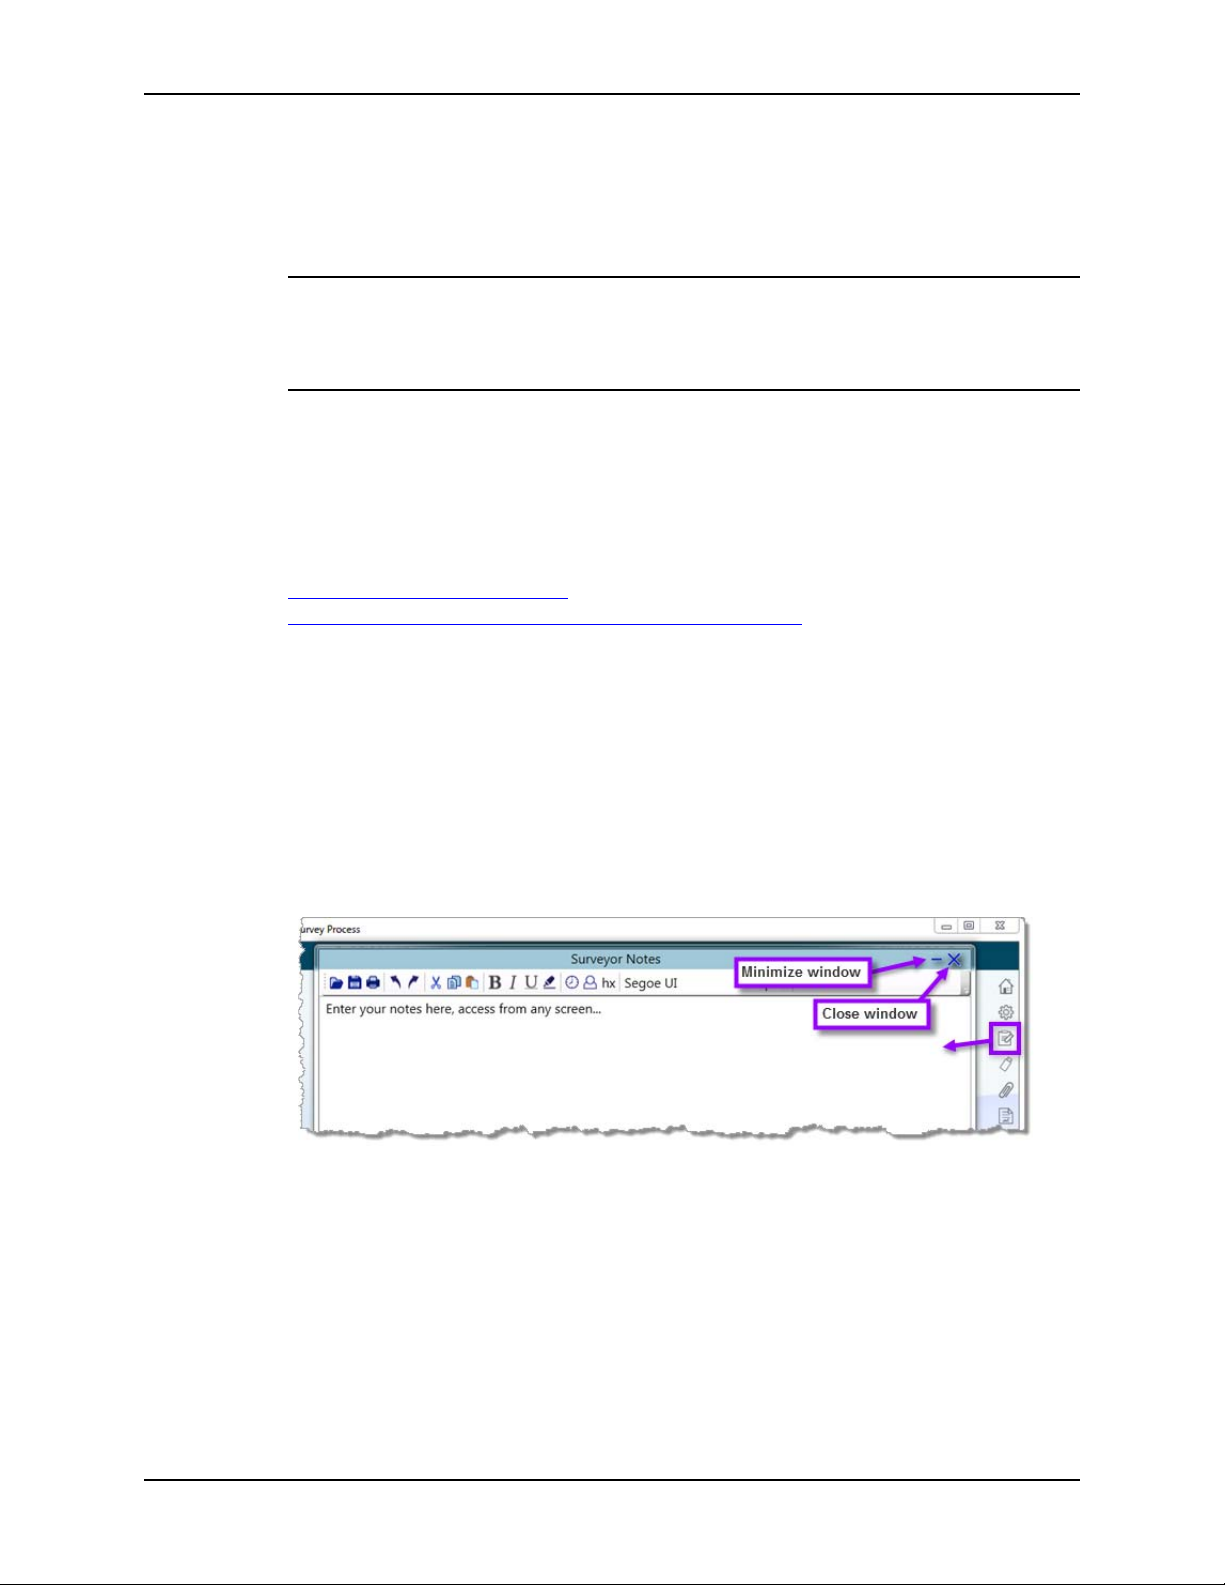
To open Surveyor Notes:
1 In the Quick Access menu on any screen, click the Surveyor Notes icon,
or press Alt + N.
Figure 18: Surveyor Notepad
2 Click the Minimize button to keep notepad available from the taskbar.
-or-
Click the X in the upper right to close.
26 1/29/21 LTCSP 11.9.5
LTC S P Notes
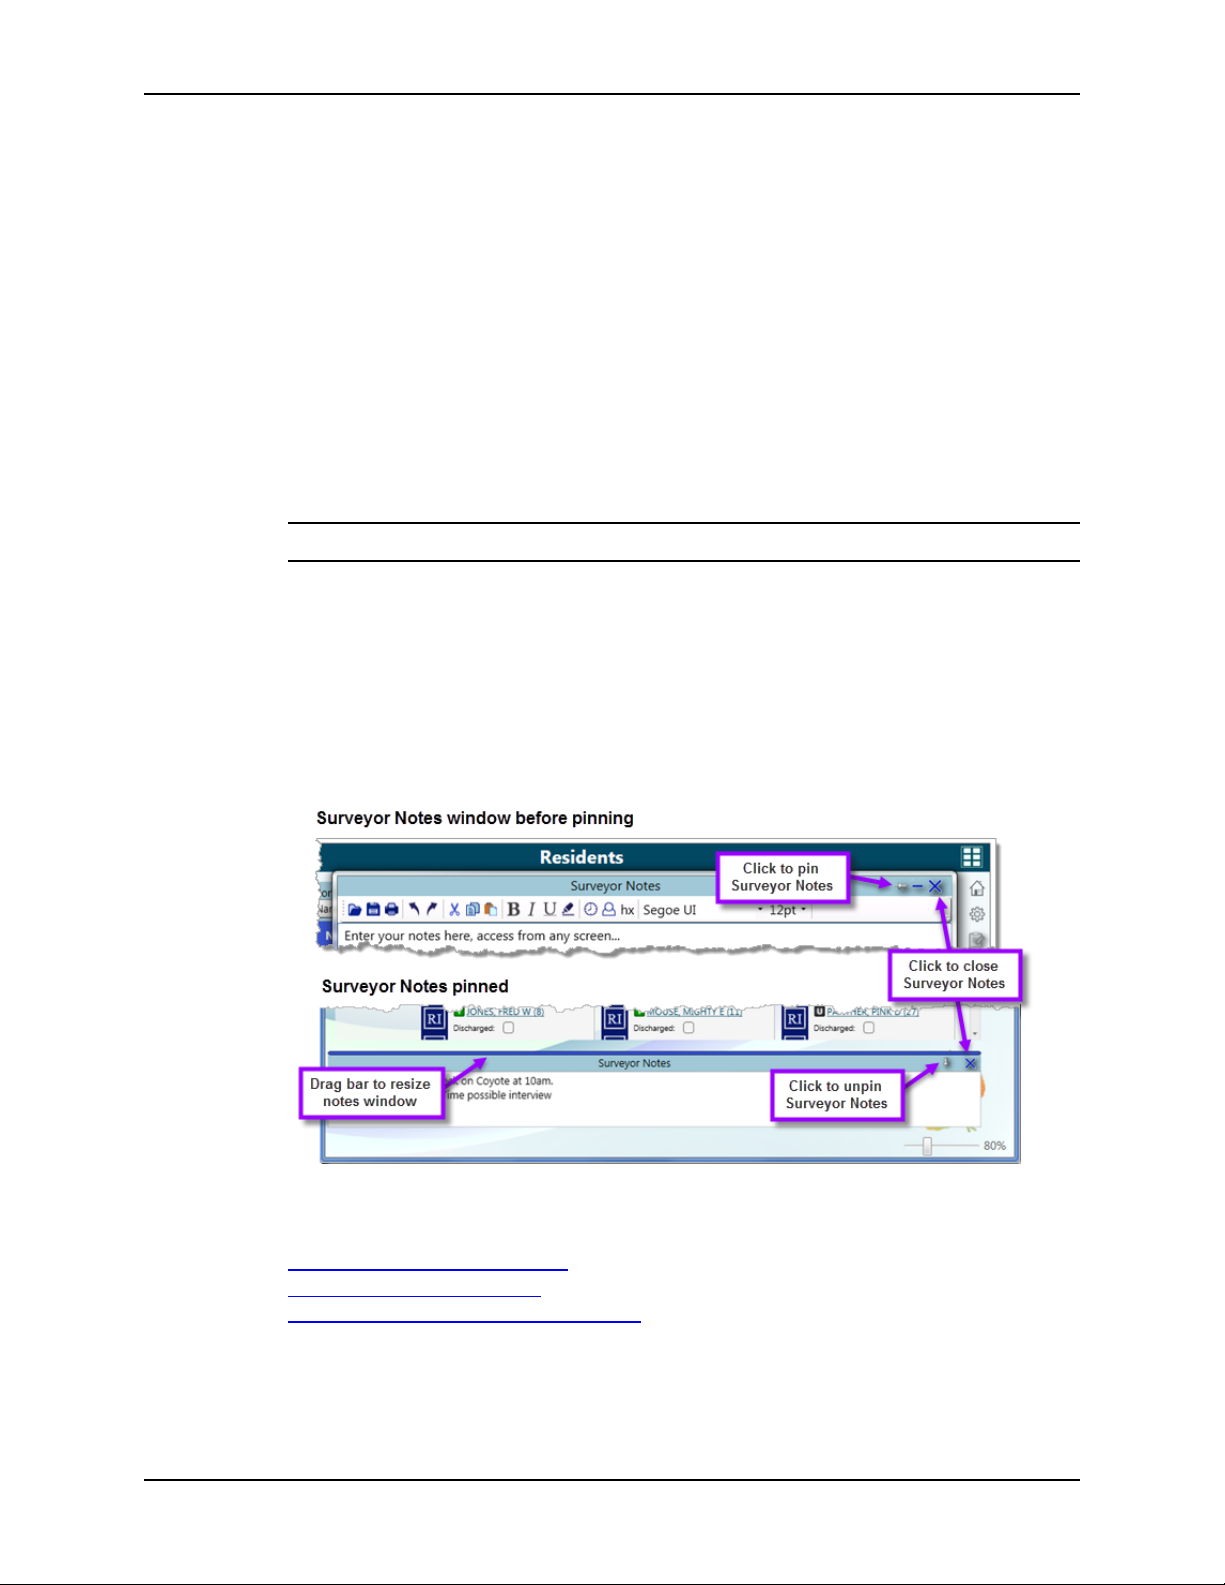
Surveyor Notes in Resident Manager
When in the Resident Manager List or Card view screens, you can pin Surveyor
Notes to the bottom of the screen. These are the only screens where this option
is available. Once you have pinned the notes, LTCSP remembers this setting for
both the List and Card View screens until you unpin or close Surveyor Notes.
To pin Surveyor Notes:
➥ From the Quick Access menu, click the Surveyor Notes icon, or press
Alt + N to open the Surveyor Notes window.
➥ Click the Pin icon in the Surveyor Notes title bar. The Surveyor Notes
appear at the bottom of the screen.
TIP: Use the Expander bar to resize the notes box.
To unpin Surveyor Notes:
➥ Click the Unpin icon in the Surveyor Notes title bar. The Surveyor Notes
window opens and no longer appears on the bottom of the screen.
To close Surveyor Notes:
➥ In either the Surveyor Notes window or the pinned notes box, click the
blue X to close Surveyor Notes.
Figure 19: Surveyor Notes pinned and unpinned in Resident Manager
More ...
“Notes Menu Bar” on page 230
“Facility Tasks” on page 112
“Reports and Attachments” on page 34
User’s Guide 1/29/21 27
LTCSP Procedures
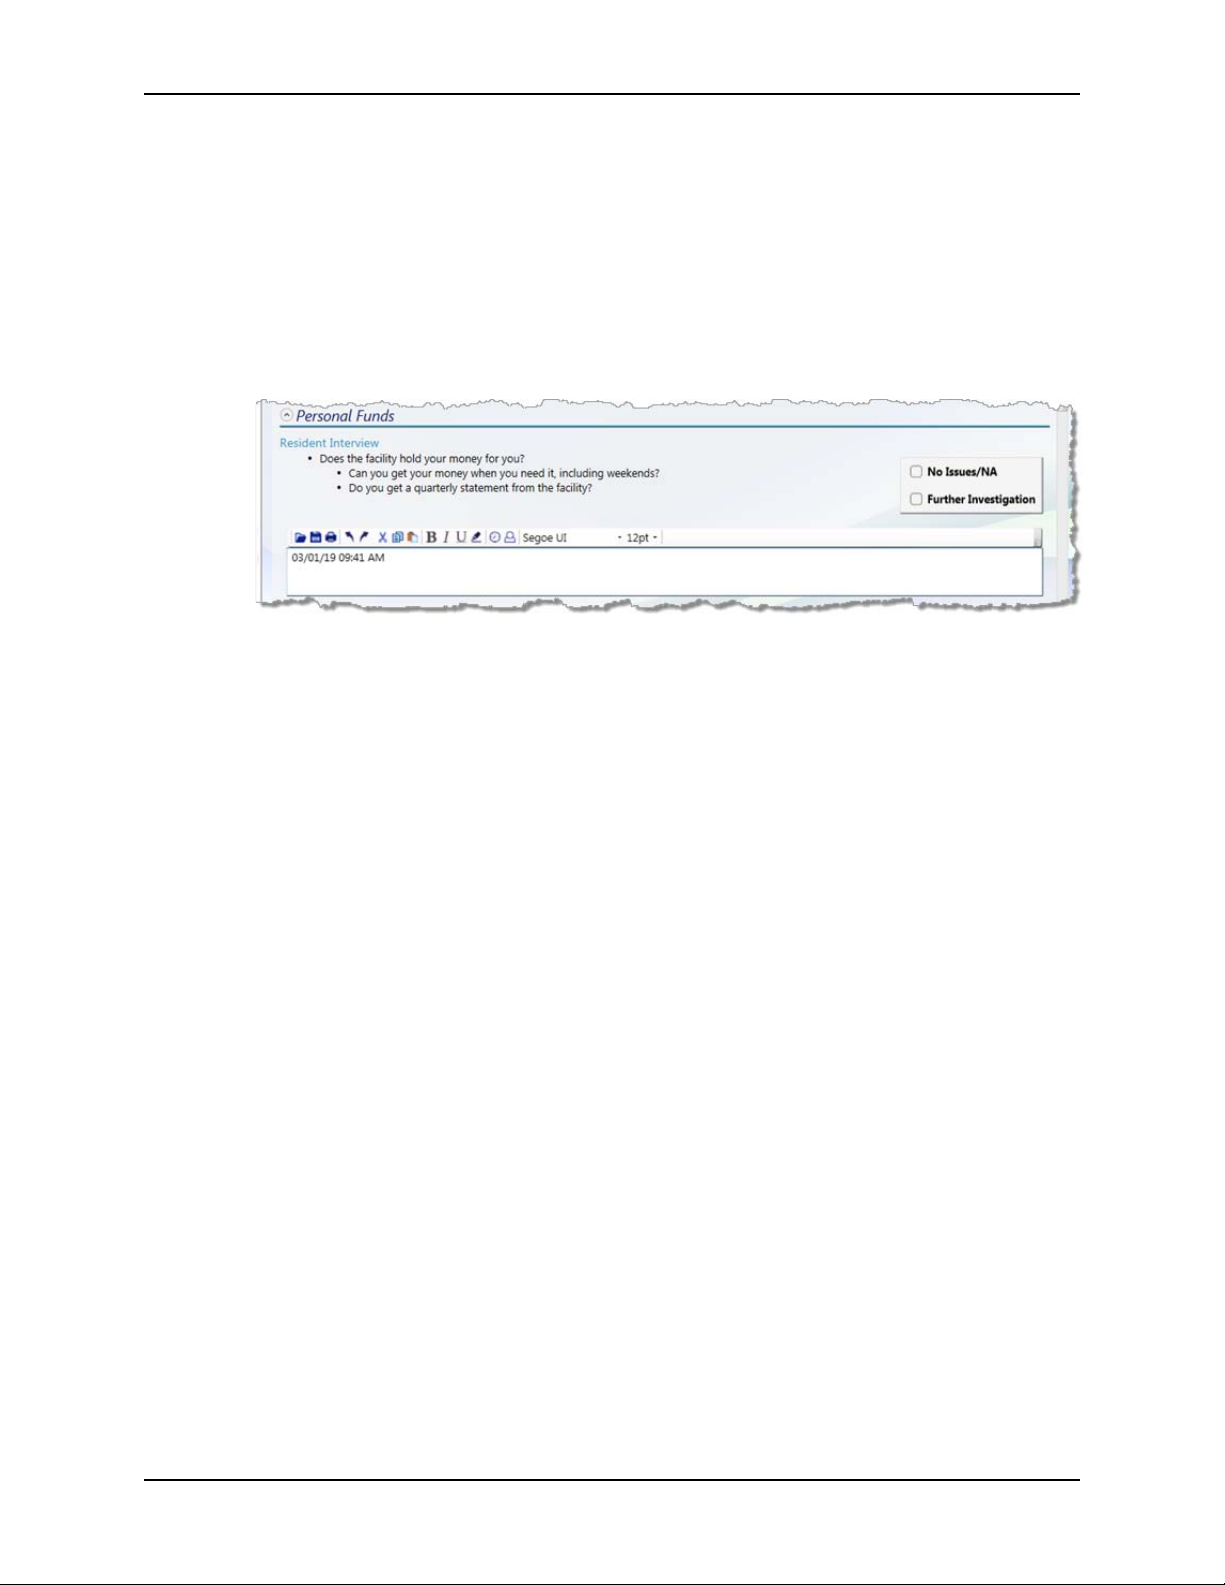
Interview, Observations, and Record Review Notes
Notes entered for care areas in the initial pool Interview and Observations,
Observations, and Record Review screens carry forward with the resident and
care area. The date/time stamp is automatically inserted when you click in the
field the first time. For subsequent notes, press Alt + T or use the Insert
Timestamp button to insert the date/time stamp.
Figure 20: Care area notes field
Facility Task Notes
Notes fields are available for every task and include standard notes features.
These notes carry forward with the facility task. Care area notes taken during
the interview, observation, or record review for a resident listed in a facility task
can be viewed in the Resident Initial Pool Notes field or by clicking the resident
name in the facility task resident list.
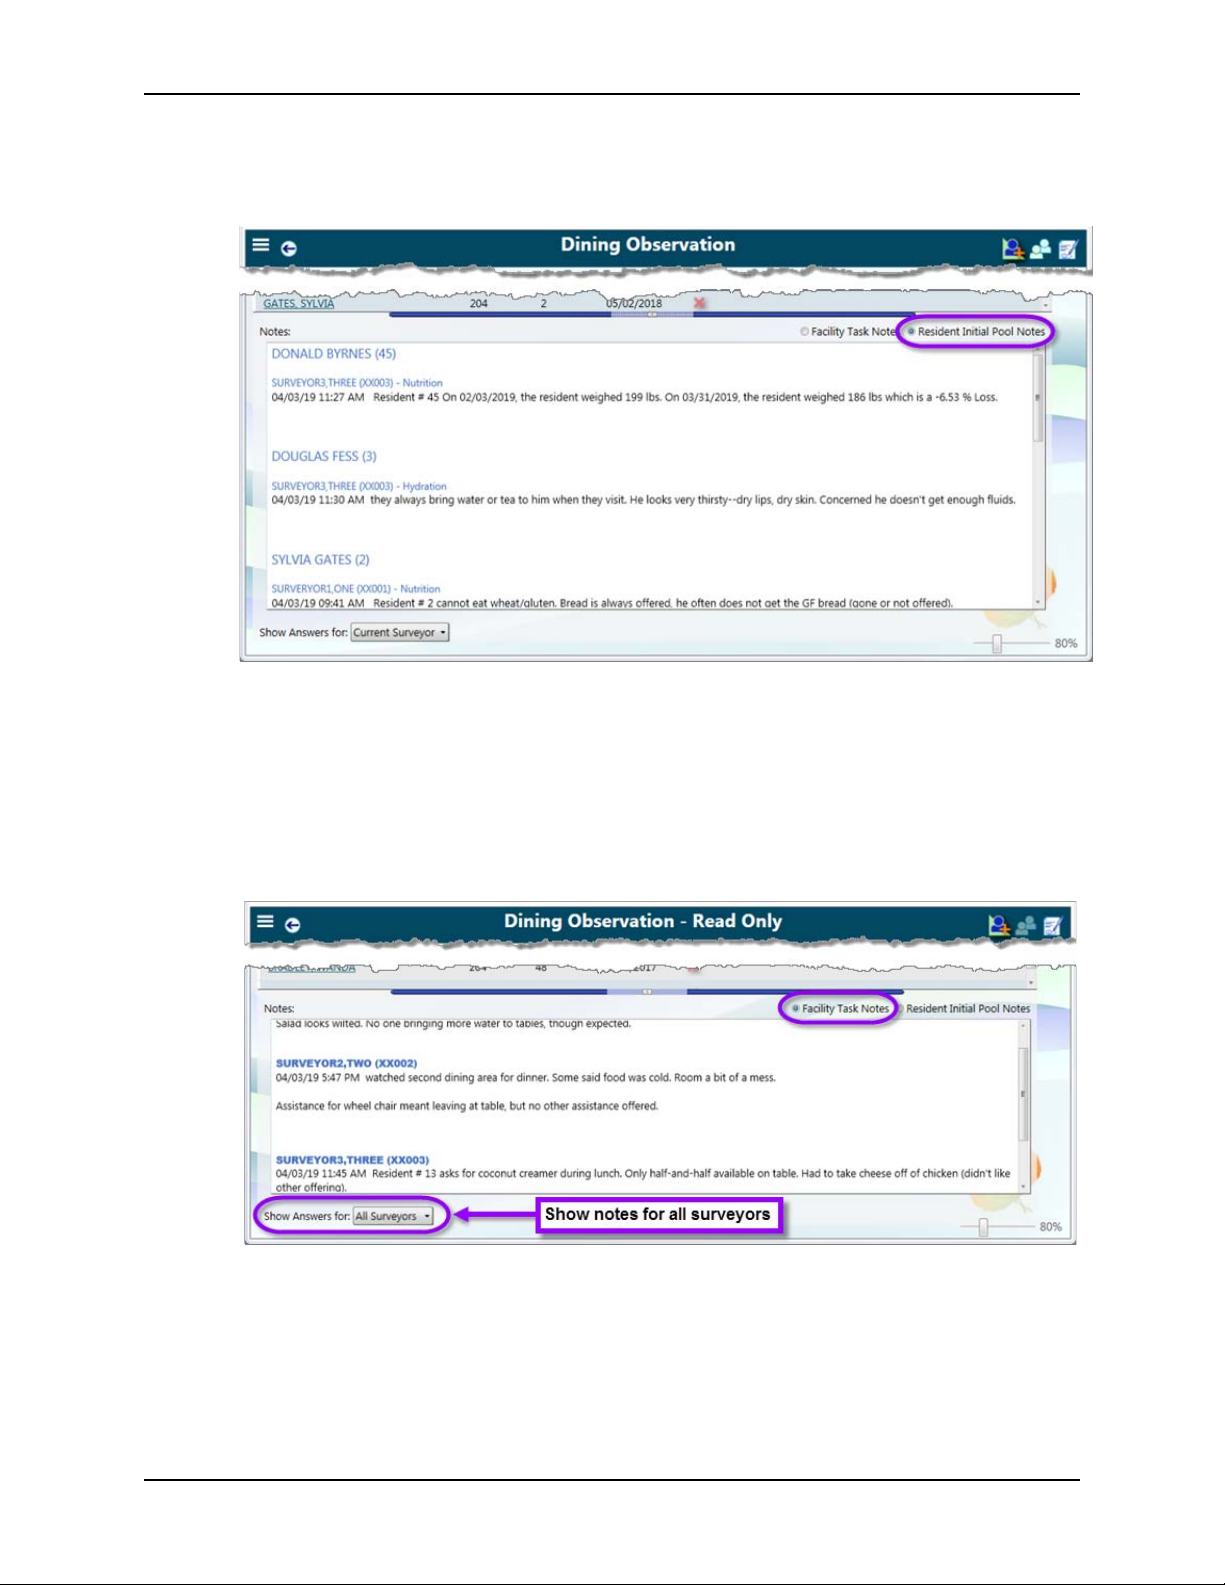
View Resident Initial Pool Notes
For any surveyor who took notes for a resident added to a facility task, those
notes are viewable in the notes area for the facility task.
To view initial pool notes for residents in a facility task:
➥ On the specific facility task screen, select Resident Initial Pool Notes for
the notes field.
You can copy any notes from here and paste into any other notes field. If
you want to include the initial pool notes in the CMS-2567, ensure you copy
and paste the applicable information into the Facility Task Notes since that
is the only information that pulls forward to the Potential Citation screen.
28 1/29/21 LTCSP 11.9.5
LTC S P Notes
Figure 21: Resident Initial Pool Notes in a facility task
View Surveyor Facility Task Notes
Show Answers for Select All Surveyors to see notes entered for that task
by any surveyor (read-only) after data is shared, or select Current Surveyor
(default) to show only notes entered by you. You must set the filter to Current
Surveyor to enter documentation or answer any CEs.
Figure 22: Facility task Notes field
User’s Guide 1/29/21 29
LTCSP Procedures
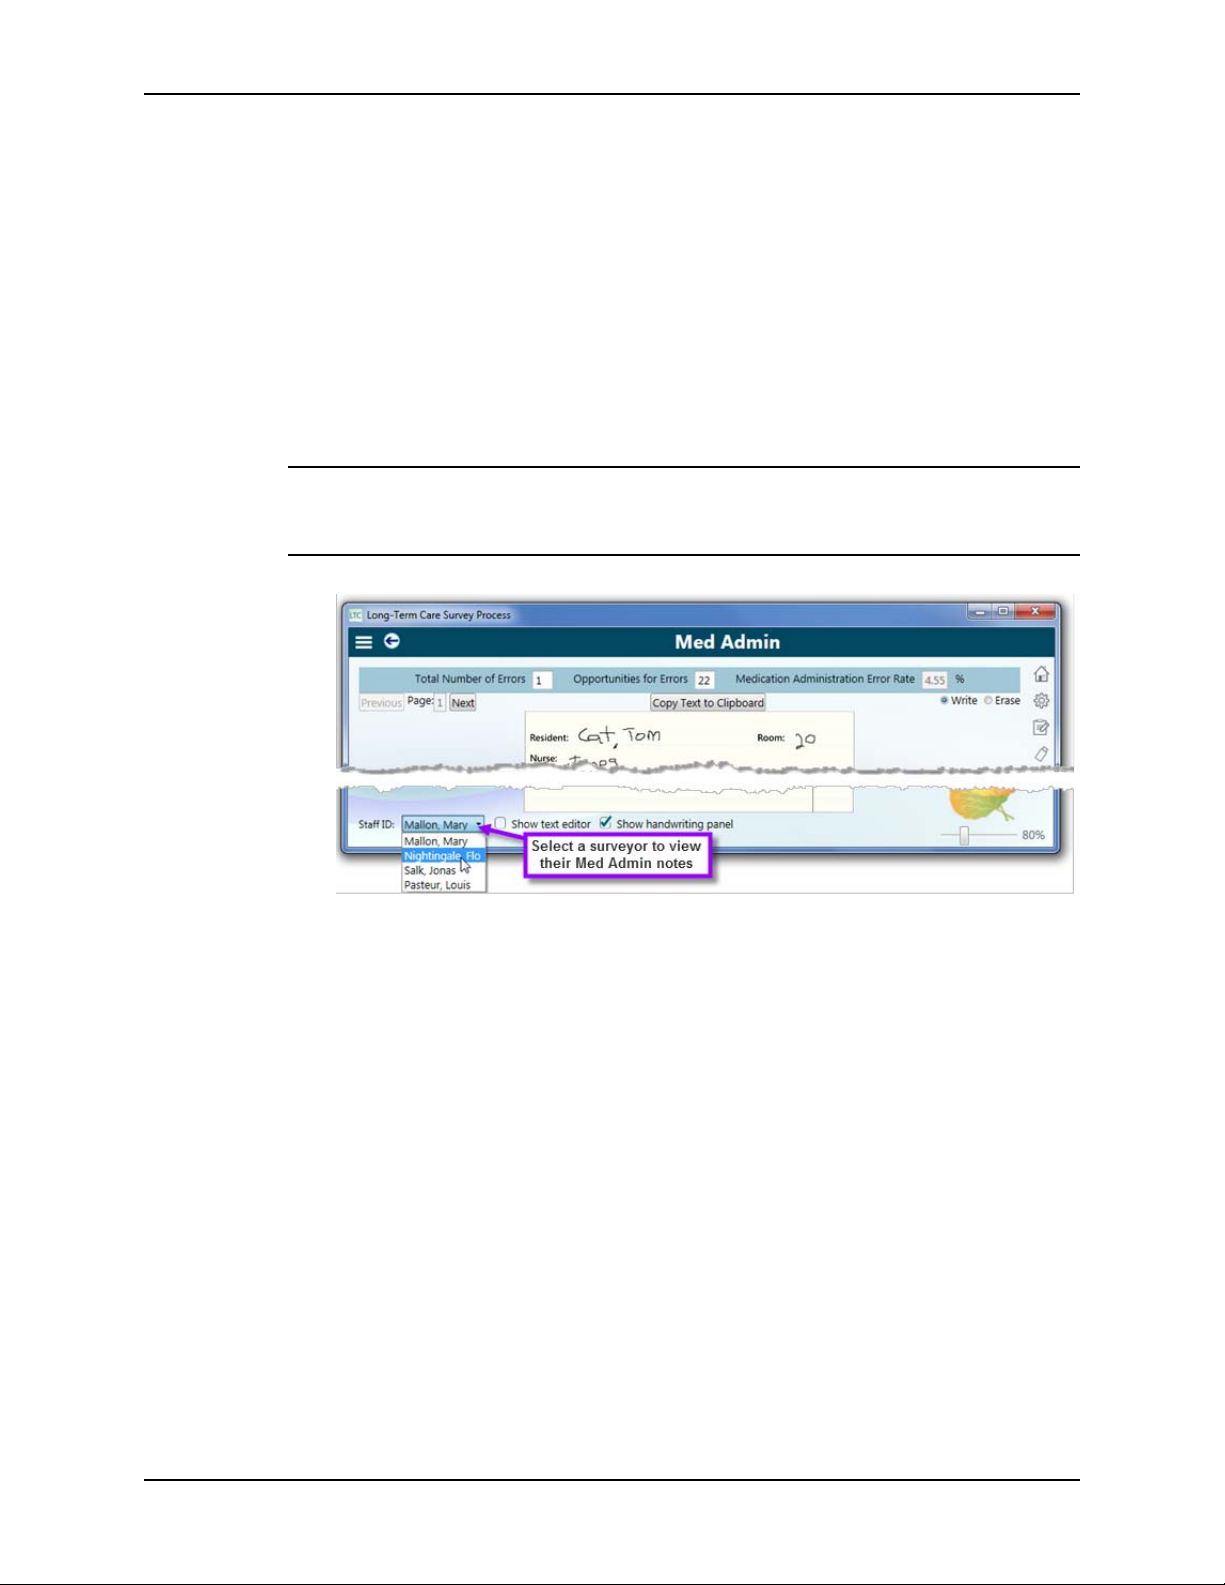
Medication Administration
You can view other surveyors’ notes (after data share) in the Med Admin notes
screen—both handwritten and in the text editor.
To review other surveyor Med Admin notes:
1 From the Medication Administration facility task, open the Med Admin
screen (click the icon in the upper right).
2 Fr
only.
Note: You will see the selected surveyor notes in whatever view you have
open. For example, if you only have the handwritten panel open, you will
not see any notes in the text editor.
om the Staff ID drop-down select a surveyor. Their notes appear as read
Figure 23: View other surveyors’ Med Admin notes
Investigation Notes
Two Notes fields are provided on investigation screens:
• Investigation Notes
Notes specific to the investigative area for the current resident.
Investigation Notes apply only to the current investigative area. Initial pool
notes for the investigative area appear under the Investigation Notes.
• Resident Notes
General information about the resident available to any investigation the
resident is associated with. Resident Notes carry over to all investigative
areas for the resident.
30 1/29/21 LTCSP 11.9.5

LTC S P Notes
Use the radio buttons to toggle between Investigation Notes and Resident
Notes.
Select Show Answers for All Surveyors to
show notes entered by any surveyor
(read-only) after data is shared, or select Show Answers for Current Surveyor
to show only notes entered by you. You must set the filter to Current Surveyor
to enter documentation or answer any CEs.
Figure 24: Investigation Notes field
View Body Map and Drawings for any Surveyor
You can view other surveyors’ drawings (after data share) in the investigation
notes screens—body maps for pressure ulcers and abuse; drawn/handwritten
notes in other investigations, and the dining and kitchen facility tasks.
To review another surveyor’s drawings:
1 From the investigation, open the Draw or Body Map screen (click the icon in
the upper right).
om the Staff ID drop-down, select a surveyor. Their drawings appear as
2 Fr
read only.
Figure 25: View other surveyors’ investigation drawings
User’s Guide 1/29/21 31

LTCSP Procedures
Notes History
The History feature in Surveyor Notes, Facility Task Notes, and Investigation
Notes allows you to view the notes you have previously taken in your current
survey. If you deleted, lost, or edited any text that you may want to include,
you can find the information by selecting the time stamp before the text was
changed or removed. The system saves your notes every two minutes or when
you close the Surveyor Notepad or leave the facility task or investigation screen
ensuring that you will never lose more than two minutes of work. If no change
is made to the notes within two minutes, that time stamp will not appear in the
list.
The history is saved locally and does not get transferred when you data share.
system automatically deletes the notes history after 90 days.
The
To view Document History:
1 From the Surveyor Notes window or the notes field in a facility task or
investigation, click the History button on the notes toolbar to open the
Document History window.
Figure 26: Example of a Notes History button in the toolbar
2 Select a note by the time stamp in the left-hand pane. The notes for that
time appear on the right. Use the scroll bar to review the entire note, if
necessary.
You can copy and paste all or any portion of the notes into your notes, any
other note
s field, or any text editor.
32 1/29/21 LTCSP 11.9.5

LTC S P Notes
3 Click the X in the upper right hand corner to close the Docum ent History
window.
Figure 27: Surveyor Notes Document History window
Note: The Show History option is not available when the Surveyor Notepad is
pinned to the list or card view screens. Unpin the notes to access the history
function.
User’s Guide 1/29/21 33

LTCSP Procedures
Reports and Attachments
A number of LTCSP reports and forms are available to view and print as needed
during the survey process. You can add supporting and supplemental material
as attachments.
Generate Reports
The Reports option provides access to a variety of reports. Click the Reports
icon (or press Alt + P) from any screen to generate, view, and print reports.
Figure 28: Reports icon
34 1/29/21 LTCSP 11.9.5

Reports and Attachments
The Reports window is context sensitive. Depending on the screen you are on
when you click the Reports icon, different reports appear in the top section
(Reports associated with the current view). The bottom section lists all other
LTCSP reports.
Figure 29: Reports window opened from Finalize Sample
To generate a report:
1 On the Quick Access menu. click the Reports icon.
-or-
Press Alt + P.
2 In the Reports window, select one or more reports.
Report(s) related to the screen you are on,
appear in the top of the window.
3 Click the Run Reports button at the bottom of the window.
A PDF of each report is generated.
4 Click the X
in the upper right of the PDF window to close it.
5 Click Done to close the Reports window.
User’s Guide 1/29/21 35

LTCSP Procedures
Use the “Immediate Jeopardy Template”
If you need to conduct an IJ investigation, the “Immediate Jeopardy Template”
is available from Reports. You can fill in the writable PDF form on your tablet.
To use the “Immediate Jeopardy Template”:
1 From the Quick Access menu. click the Reports icon.
Press Alt + P.
2 Scroll to the Immediate Jeopardy Template listing and click the icon to
open.
-or-
Figure 30: Immediate Jeopardy Template listed in Reports
3 Enter information into the template. Once you have entered some text,
from the File menu, select Save As (or Shift + Ctrl + S) to save the PDF
and automatically attach it to your LTCSP survey.
➥ The Save in recent folder dialog opens. Select the default directory (if
you change the directory, the system will not be able to attach this
document).
➥ Click Save in the Save As dialog and Yes to overwrite the file. The
system automatically names the form with the event ID and the
surveyor ID (eventID-surveyorID-IJ_Template.pdf).
➥ Close the document and click Attach in the File Open in Another
Program dialog. The system automatically attaches the document and
lists it on the Attachments screen. Enter a description for the IJ
Template on the Attachments list.
TIP: If you close the “Immediate Jeopardy Template” and want to make
changes, use the Edit button on the Attachments screen (see
below). When you use File | Save As again, the system attaches the
updated version of the document to the survey with a new date/time
stamp.
36 1/29/21 LTCSP 11.9.5

Reports and Attachments
4 If you want to add a new “Immediate Jeopardy Template” once you have
already created and saved one (e.g., if you have more than one FTag cited
at IJ and you only list one FTag on each template), open a new template
from Reports. Answer Yes to create a new document or No if you want to
edit an already existing template.
If you click Yes
As (or Shift + Ctrl + S) as before to save and attach a new copy of the
template. The system automatically assigns the Immediate Jeopardy
category. To help keep multiple copies of the “Immediate Jeopardy
Template” straight, enter a description on the Attachments screen for each
(see below).
Add Attachments
During a survey, you may want to attach forms and other documentation that
support the investigation. Files attached in LTCSP are included in the data
sharing process, and also appear in ASE-Q Tree view and Citation
Manager | Attachments.
to create a new template, from the File menu, select Save
Figure 31: Attachments screen
The Attachments icon on the Quick Access menu opens the Attachments
screen where you to attach files to the survey; it is available from all screens.
Attachments uploaded from LTCSP are limited to 4 MB in size. Anything larger
must be
uploaded from ASE-Q.
The same file types can be attached in LTCSP as in ASE-Q:
• Microsoft Word documents
Microsoft Excel spreadsheets
•
User’s Guide 1/29/21 37

LTCSP Procedures
•PDF documents
• Images: jpg, png etc.
You can either copy and paste or drag and drop an attachment.
To copy and paste a screenshot:
1 In the Quick Access menu, click the Attachments icon (paper clip).
Press Alt + A.
•Press Ctrl + Alt + Print Screen or use the Windows Snip tool to grab
2 On the Attachments screen, click the Paste from Clipboard button at the
bottom of the screen to add.
You will get an error message if the file is larger than 4 MB.
3 Click in the text box to the right of the file name and enter a brief
description.
-or-
a screenshot.
4 Click View to see the screenshot.
To copy and paste a file:
1 Open the Attachments screen.
2 Copy the file from Windows Explorer.
3 Repeat steps 3-5 above.
To drag and drop an attachment:
1 Open the Attachments screen.
2 Drag a file from your desktop to the Attachments screen.
3 Repeat steps 4 and 5 above.
To confirm an attachment is in ASE-Q:
1 Open ASE-Q.
From the Tree view:
•In Tree view, locate the applicable LTC survey.
•Expand the Attachments node and verify that the attachment is listed.
-or-
From Citation Manager:
• Right-click the survey and select Citation Manager.
•Click the Attach button.
38 1/29/21 LTCSP 11.9.5

Reports and Attachments
To edit an attachment:
1 On the Attachments screen, click the Edit button for the attachment. The
attachment opens in the default program for the file type (excluding
scanned or read-only documents).
2 Update the document. From the File menu, select Save As. You must use
the Save As option and not just Save to have the updated version of your
document attached to the survey.
➥ The Save in recent folder dialog opens. Select the default directory (if
you change the directory, the system will not be able to attach this
document).
➥ Click Save in the Save As dialog and Yes to overwrite the file.
3 Close the document and click Attach in the File Open in Another
Program dialog. The system automatically attaches the document and lists
it on the Attachments screen.
The document changes are saved in LTCSP and the date/time stamp
updates to the time you made the changes.
TIP: You must use Save As to have your updates automatically saved to
your document already attached to your LTCSP survey. If you just save
a document, the system won’t update the attached document and you
will have to attach the updated version to LTCSP.
To view an attachment:
1 On the Attachments screen, click the View button for the attachment. The
attachment opens in the default program for the file type.
2 Review the information. If you make any changes that you wish to include,
you cannot automatically attach the file since it is in Read-only mode. Follow
the above directions to attach the updated document to your LTCSP survey.
To filter attachments:
1 On the Attachments screen, click the Filter by Category drop-down
menu and select the Immediate Jeopardy category (this is currently the
only available category).
The screen lists only those attachments assigned the Immediate
Jeopardy category.
2 To to show all the attached documents again, click the Filter by Category
drop-down menu and select the blank line.
User’s Guide 1/29/21 39

LTCSP Procedures
To delete an attachment:
1 On the Attachments screen, click the Delete button for the document.
The filename and description appear with a strike through, but you can still
view the document.
2 To restore the attachment while it is still visible in the list, click the
Undelete button for the document.
3 To permanently delete attached file(s) marked with a strike through, click
Delete Marked Attachments at the bottom of the screen.
The attachment(s) disappear from the list.
Data Sharing
The LTCSP application includes functionality to facilitate data sharing between
Team Coordinators (TCs) and team members as they prepare for and conduct
a survey. LTCSP has one data sharing screen that provides all methods of data
transfer—no difference for RO users. You can share encrypted data using a:
• File stored on a USB drive or anywhere on a shared system
• Secured wireless network
• Secured wired network
Each team member’s data is first shared with the team coordinator, then the
TC shares the data with all team members to ensure that updates are correctly
recorded and the TC and all team members are working with the same survey
information. Data sharing is always performed between team members and the
team coordinator. Team members cannot share data with other team members
directly.
Open the Data Sharing screen
The Survey Team Data Sharing screen looks the same for team members and
the team coordinator, but the options and instructions are different depending
on your role.
40 1/29/21 LTCSP 11.9.5

Data Sharing
To open the Survey Team Data Sharing screen:
➥ Click the Data Transfer icon in the Quick Access menu, or press Alt + D.
Figure 32: Survey Team Data Sharing screen
The blue diamond next to the name in the team roster section at the top
indicates the team coordinator. If you need to reassign the TC role to a different
survey team member, you can select the desired team member and then select
the Assign Leader button. The blue diamond indicator then appears next to
the newly assigned TC.
ast Update Date column displays the last date and time data was
The L
shared. When sharing data using a file (USB), this is the date and time of the
most recent data send/receive action for the associated surveyor. When sharing
data using a network (wired/wireless), the date and time indicate the most
recent transfer for both the team member and team coordinator.
The Se
rver column lists IDs of servers using an LTCSP database that are
connected to your secured network. You can select the Reload Server List
button to refresh the list to see any connected team members.
The Machine ID (IP) column
allows you to enter another team member's
computer IP address if necessary, when data sharing using a wireless network.
The computer assigns each machine a unique IP address when it is connected
to a wired/wireless network, so every survey team member should verify their
IP address before data sharing.
User’s Guide 1/29/21 41

LTCSP Procedures
The System ID column lists the resident ID number assigned to each of the
surveyors. This number is used to identify the resident ID range assigned to
each team member. This assures that if surveyors add residents, they’ll have
unique resident IDs.
Reorder the columns by clicking the column title and dragging to desired place.
Share Data by USB/File
To share LTCSP data by file, the file is first sent to a transfer file on a flash drive
(USB), or a drive on a shared system. Then the data is received by pulling it
from the transfer file to the destination computer where data is updated
accordingly. Regional and Central Office (RO/CO) users must adhere to
additional security requirements when sharing data using a USB/File.
To send data to a flash drive for sharing:
1 Open the Survey Team Data Sharing screen.
2 Insert the flash drive into your computer.
3 On the Survey Team Data Sharing screen, select the team member(s) for
data sharing if you are the team coordinator (The TC may select multiple
team members to share data with). If you are a team member, you must
select the team coordinator.
Team coordinators can share data with all team members, but team
members can only share data with the TC.
4 In the Share Data Using A File section, select Send Data.
5 In the Select the Drive/Folder you want to transfer to window, select
the USB as your transfer location.
The default transfer filename is <EventID>-<Surveyor ID>, e.g.,
2EN911-50250.
6 Select Open to initiate the data send.
A Transfer Progress window appears (often very briefly). When the data
send is complete, a notification lets you know if it was successful or not. If
the transfer failed, this window lets you know what didn't transfer, and why.
7 If the data send was successful, select OK.
To receive shared data from a flash drive:
1 If necessary, open the Survey Team Data Sharing screen on your (the
receiving TC’s/member’s) computer.
2 Insert the flash drive with the sent data into your computer.
3 In the Share Data Using a File section, select Receive Data to pull the
data into your machine.
Since you're receiving from a flash drive, it is not necessary to select names
in the team roster section.
42 1/29/21 LTCSP 11.9.5

Data Sharing
4 In the Select the Drive/Folder you want to transfer from window,
select the location and file to receive (<EventID>-<Surveyor ID>, e.g.,
2EN911-50250).
5 Select Open to initiate the data transfer to your computer.
A Transfer Progress window appears (often very briefly). When the transfer
is complete, a notification lets you know if the data receive was successful
or not. If the data share failed, this window lets you know what didn't
transfer, and why.
6 If the data share was successful, select OK.
7 Select Open to initiate the data transfer to your machine.
The Transfer Progress window appears. For the team coordinator, conflicts
(if any) are listed during the transfer process for resolution.
8 When the transfer concludes successfully, select OK in the confirmation
message.
The survey on your machine now contains the updated information that the
TC sent.
More ...
“Open the Data Sharing screen” on page 40
“RO/CO Data Share Using USB/File” on page 45
“Data Sharing Checklists” on page 226
Share Data Via Email
From LTCSP, you can email a survey with associated LTCSP data to one or more
recipients, by creating a data share file containing the survey as an attachment
to the email.
To share data via email:
1 Save the survey file to data share to a file location on your computer.
2 Open your email, and attach that file to an email message to the desired
team coordinator/team member (TC/TM).
3 The receiving TC/TM saves the attached data share file on their computer.
4 On the Survey Team Data Sharing screen, select Receive Data.
If you are the TC, you must select the TM you are receiving the data share
file from, and then select Receive Data.
5 In the Select the Drive/Folder you want to transfer from window,
select the location and file to receive (<EventID>-<Surveyor ID>, e.g.,
2EN911-50250).
User’s Guide 1/29/21 43

LTCSP Procedures
6 Select Open to initiate the data transfer to your computer.
The Transfer Progress window appears. For the team coordinator, conflicts
(if any) are listed during the transfer process for resolution.
7 When the transfer concludes successfully, select OK in the confirmation
message.
The survey on your machine now contains the updated information that the
TC/TM sent.
Share Data Across a Network
Survey team members can share encrypted LTCSP data across a network with
a secured wired or wireless connection. A wired connection exists when
multiple computers are physically connected to each other, or to a secured
router with a cable. A wireless connection exists when multiple computers
access the same secured wireless router.
Only the team coordinator can initiate data sharing across a network, whether
wired or wireless. The procedure is the same for both. Data is copied across the
network from specified team member(s) to the TC’s computer, then the
updated data is copied from the TC’s computer back across the network to the
team member(s).
Note: A TC can initiate data sharing using a network at any time during the
survey.
To share data across a network:
1 If necessary, connect any computers from/to which you want to transfer
data.
That could mean connecting to the team's secure server with a cable or
wirelessly, or in the case of a direct connection, plugging a cable into the
team member computer(s) and team coordinator's computer.
2 Open the Survey Team Data Sharing screen.
3 Select the checkbox to the left of the surveyor(s) you want to share data
with.
4 For each selected team member, select the applicable Server (computer).
TIP: You may need to select Reload Server List to make sure the list of
server IDs is current. The search and update may take several
minutes. If the Reload Server List function does not find a team
member's server ID when data sharing over a wireless network, you
can enter the team member’s computer IP in the IP column to
complete the transfer.
44 1/29/21 LTCSP 11.9.5

Data Sharing
5 Select Share Data Now to initiate the data transfer.
When the data share begins, the Transfer Progress window appears.
Message(s) appear if there is an issue with starting the transfer, e.g., you
selected a server ID but not the checkbox for a surveyor.
Notification(s) appear when data conflicts prevent synchronization, e.g., a
resident is assigned to two surveyors. The LTCSP application uses
pre-defined rules to resolve most data conflicts, but if a notification appears,
you (the TC) must resolve the conflict.
6 When the transfer and synchronization concludes successfully, select OK in
the confirmation message.
This confirmation indicates that the survey data was first copied from the
selected team member(s), then to the team member(s). That is, the survey
data was copied from the team member(s) to your computer and then the
updated survey data was sent back to the team member(s).
More ...
“Open the Data Sharing screen” on page 40
“Data Sharing Checklists” on page 226
Data Sharing for RO/CO Users
Regional Office, Central Office, and CMS contract (RO/CO) users must adhere
to additional security requirements when sharing data, both when using a
USB/file, or wired/wireless methods. When a survey team consists of state and
RO/CO users, special measures must be taken.
• The survey team must use the state configuration.
• Some states may provide an RO user with a pre-configured state computer
for the survey. In these instances, the state configuration is used, and there
are no special considerations.
The following instructions are for RO/CO users if the state survey team is data
sharing using a USB drive/file or a wired/wireless connection.
RO/CO Data Share Using USB/File
Although LTCSP automatically encrypts the data when it is shared, RO/CO users
are required to encrypt any USB/flash drive in order to send and receive files
on it. For survey teams with both state and RO/CO users, data sharing using a
USB drive may not work due to incompatible encryption methods, and testing
whether it works may end up encrypting a flash drive and making it unusable.
In that case, it may be necessary to share files via email.
To send data to a flash drive for sharing:
1 Open the Survey Team Data Sharing screen.
2 Insert the flash drive (USB) into your computer.
User’s Guide 1/29/21 45

LTCSP Procedures
3 When you insert a USB stick into an RO/CO user’s machine, the CMS Check
Point Encryption application automatically asks to encrypt the USB stick if it
is not already CMS encrypted.
Note: If the USB has embedded default encryption, it must be formatted in
FAT32 format (Standard format for removable devices). CMS Check Point
encryption automatically creates dual partition storage on the stick: Drive
E: Business related (Encrypted by CMS), and drive D: Non Business (no
encryption).
4 Enter and confirm a password for the USB stick encryption, then select
Continue.
Both sender and recipient must use the same password.
5 On the Survey Team Data Sharing screen, select team member(s) for
data sharing if you are the team coordinator. If you are a team member, you
must select the team coordinator.
Team coordinators can share data with all team members, but team
members can only share data with the TC.
6 In the Send Data Using A File section, select Send Data.
7 In the Select the Drive/Folder you want to transfer to window, select
the USB as your transfer location. i.e., Business Data - Encrypted (E).
The default transfer filename is <EventID>-<Surveyor ID>, e.g.,
2EN911-50250.
Note: For Non Business storage, any files coming out from the CMS laptop
cannot be saved to a D: non-Business storage location (with no encryption).
8 Select Open to initiate the data transfer.
A Transfer Progress window appears (often very briefly). When the transfer
is complete, a notification lets you know if the data share was successful or
not. If the data share failed, this window lets you know what didn't transfer,
and why.
9 If the data share was successful, select OK.
To receive shared data from a flash drive:
1 If necessary, open the Survey Team Data Sharing screen on your (the
receiving TC’s/member’s) computer.
2 Insert the flash drive with the sent data into your computer and enter the
encryption password if asked.
Both sender and recipient must use the same password.
46 1/29/21 LTCSP 11.9.5

Data Sharing
3 In the Share Data Using A File section, select Receive Data to pull the data
into your machine.
Since you're receiving data from a flash drive, you don't have to select
names in the team roster section.
4 In the Select the Drive/Folder you want to transfer from window,
select the file to receive from the E drive or Business Data - Encrypted (E)
location, and select Open.
A Transfer Progress window appears (often very briefly). When the data
share is complete, a notification lets you know if the data share was
successful or not. If the data share failed, this window lets you know what
didn't transfer, and why.
5 If the data share was successful, select OK.
RO/CO Data Share Across a Network
RO/CO computers are already configured to share data across a secured wired
or wireless network. However, you are required to disconnect from the CMS
Cisco Connect VPN before you can begin sharing your LTCSP data.
After you have disconnected from the CMS Cisco Connect VPN, the process for
sharing data using a network is the same as the state method.
To disconnect from CMS VPN:
1 Launch the Cisco AnyConnect Secure Mobility Client application from
the desktop or system tray, or you can search for it in the Start menu.
2 On the Cisco AnyConnect Secure Mobility Client window, select
Disconnect.
Note: Internet access and CMS email will be disconnected.
To reconnect CMS VPN:
1 Connect to a secured network location or internet access point.
2 Launch the Cisco AnyConnect Secure Mobility Client application from
the desktop or system tray, or you can search for it in the Start menu.
3 On the Cisco AnyConnect Secure Mobility Client window, select
Connect.
4 Enter your PIV card PIN.
After connecting successfully, you can minimize or close the Cisco
AnyConnect Secured Mobility Client window.
More ...
“Share Data Across a Network” on page 44
User’s Guide 1/29/21 47

LTCSP Procedures
Team Meeting
The Team Meeting screen is available only to the team coordinator. The survey
team meets as needed throughout the survey. The Team Meeting screen
provides information to facilitate team discussion. Some information is entered
by the TC, and some information is automatically updated each time the TC
opens the screen. After data sharing with the team, all team members’ data is
included on this screen.
Day 1 questions deal mainly with the initial pool
each surveyor included in the initial pool. Day 1 also lists remaining work that
each surveyor needs to complete for their initial pool. Day 2 questions focus
more on concerns and survey workload such as how much work each surveyor
has left. These questions help the team gauge the status of the survey and
make decisions for the next steps.
such as how many residents
To enter and review Team Meeting information:
1 From the Navigation menu, select Team Meeting.
The Team Meeting screen opens to Day 1.
Figure 33: Team Meeting screen—Day 1
2 Review and enter Day 1 team meeting information and notes about any
issues.
The system indicates if no information is available for system-generated
entries
48 1/29/21 LTCSP 11.9.5
.

Offsite Preparation
3 To enter and view Day 2 or later team meeting information, select Day 2 or
Later.
Figure 34: Team Meeting screen—Day 2 or Later
4 To print Team Meeting information as a report, click the Reports icon in the
Quick Access menu, select Team Meeting Notes, and click the Run
Reports button at the bottom of the dialog box.
Offsite Preparation
Before going out on a survey, the TC must do some preparation. The Offsite
Preparation screen in LTSCP provides a place where the system automatically
enters some information and the TC enters other information. This information
helps guide the survey team while on the survey.
For example, to help ensure that a survey team
TC assigns areas of the facility to each survey team member. For this purpose,
the TC uses the facility f l o or plan on file (for a recert, not an initial certification)
and divides the facility among the team to ensure every area is covered. The
surveyors screen all the residents in their assigned area.
If the survey is a combined complaint survey, complaint data is pulled from
S and appears in the LTCSP Offsite Preparation screen. The TC should
ACT
review the complaints and make assignments as applicable once the survey has
been imported.
Note: For specific instructions on attaching complaints to an LTCSP survey,
refer to the LTCSP Complaints Guide posted at
https://qtso.cms.gov/software/ltcsp/reference-manuals, then expand the
LTCSP Reference Materials section.
covers the entire facility, the
User’s Guide 1/29/21 49

LTCSP Procedures
Enter Offsite Prep Information
Only the team coordinator can make changes to information on the Offsite
Preparation screen in LTCSP; however, all team members can view the
information.
To enter offsite prep info:
1 From the Navigation menu, select Offsite Prep.
Some information has already been provided.
Figure 35: Offsite Preparation screen
2 In the Review Prior to Visit section, enter patterns of repeat deficiencies,
results from the last Standard survey, complaint/FRI history, and active
complaint/FRI information (e.g., specific allegations).
3 If a combined complaint surv
ey, review and make assignments in the Active
Complaints and FRIs section.
4 Answ
50 1/29/21 LTCSP 11.9.5
er the abuse question below the Active Complaints section.

5 As applicable, add federal waivers/variances, active enforcement cases, and
Ombudsman information.
6 Scroll to the bottom of the screen to the Team unit assignments section
and enter team assignments.
7 Open the Facility Tasks screen to assign mandatory facility tasks.
8 From Reports (see “Generate Reports” on page 34), print the Facility Matrix
with instructions, the Entrance Conference Instructions, and the Beneficiary
Notice worksheet.
9 Share offsite prep data with the team.
Active Complaint and FRI data
When you have a combined complaint survey, the active complaint and FRI
information is pulled from ACTS when you export the survey from ACO and
appears on the Offsite Preparation screen. The TC can use this information to
add complaints/FRIs to the survey
Offsite Preparation
For each complaint or FRI the TC can:
• Review intake information
• Select complaints/FRIs to be included with the survey based on each
facility’s census information; you can add more to the survey later by
initiating an investigation)
• Match complaint/FRI residents to MDS residents or add a resident not in
the MDS resident list
• Match anonymous complaints/FRIs to the Facility
User’s Guide 1/29/21 51

LTCSP Procedures
• Add applicable initial pool care areas, investigations, or facility tasks
• Assign selected complaints/FRIs to surveyors
Figure 36: Active Complaint and FRI section of the Offsite Preparation screen
After reviewing the complaints and FRIs, the TC determines which should be
added to the initial pool. Those complaints and FRIs added need to be assigned
appropriate LTCSP areas and then assigned to a surveyor. All this can be done
from the Offsite Prep screen.
To add a complaint/FRI resident to the initial pool:
1 On the Offsite Preparation screen, click the Expand/Collapse arrow to
view the Complaint/FRI information.
ick the Intake number or the Allegation name to view the notes (usually
2 Cl
one of the two has been filled out). Click Close to close the notes box.
3 Identi
fy the complaint resident and select from the LTCSP Resident
Roster.
•In the LTCSP Resident Roster, scroll to match the reported Complaint
esident to the MDS name and select.
R
• If the resident is not in the list, click the Add New Resident icon to add
the resident to the survey and then use the roster to add the new
resident to the complaint or FRI.
• If no resident has been identified, select Facility, Facility from the list.
The system then adds this to all anonymous complaints and FRIs.
52 1/29/21 LTCSP 11.9.5

Offsite Preparation
4 Based on the allegations, select the appropriate LTCSP area(s) for the
complaint or FRI resident. These links become active when you assign the
LTC SP Res i d ent.
• Add Initial Pool Care Area: Associates the complaint resident with a
care area on the Interview/Observation/Record Review screens. A
Complaint link appears next to the assigned care area.
• Directly Add New Investigation: Use the Initiate One or More
Investigations dialog to select investigative area and assign a surveyor.
• Link or Add Facility Task: Select one or more tasks to add to the
survey for the complaint.
• Add a Closed Record Review: Select the Reason and provide a
description.
LTCSP areas added are listed on the screen.
5 When you decide to add a complaint resident (or Facility) to the initial pool:
Note: You can add an investigation to any complaint/FRI resident without
adding them to the initial pool.
• Select the checkbox in the In Pool column—this also activates the
surveyor drop-down list and updates the Initial Pool status to Yes in
Resident Manager.
•In the Initial Pool Surveyor column, select a surveyor—this
assignment also appears in Resident Manager.
Note: the maximum number of complaint and FRI residents is based on the
facility census information. For detailed instructions on complaints, refer to the
Long Term Care Survey Process (LTCSP) Procedure Guide (In LTCSP:
Navigation menu | Resources | Procedures Guide).
Complaints and FRIs Information during the Survey
The Complaint or Facility Reported Incident subgroups are added to the
selected residents. A Complaint link appears on any relevant screens—click to
bring up a list of Complaints/FRIs with intakes relevant to that area. Use the
expand/collapse arrows to view the same information that is on the Offsite Prep
screen.
User’s Guide 1/29/21 53

LTCSP Procedures
Initial Pool Care Areas: A Complaint link appears on the Interview,
Observations, and Record Review screens beneath the MDS indicators and
next to any Care Areas linked to a complaint/FRI for that resident.
Anonymous complaints/FRIs links appear for every resident.
Figure 37: Interview and Observations screen with Complaint information
Facility Tasks: COMP appears on main screen and a Complaint link
appears next to the Pathway link in the Function toolbar. For any resident
added to a facility task, a Complaint link appears next to their name in the
resident list.
Figure 38: Complaint notation and links in facility task screens
54 1/29/21 LTCSP 11.9.5

Offsite Preparation
Investigations: C o m p is noted in the Inv. Reason column a n d a Complaint
link appears next to the investigation title.
Figure 39: Complaint notation and links in investigations screens
Sample Screens: Sample by Resident and Sample by Care Area indicate
Complaint Care Areas. Closed Record Review indicates complaint residents.
Figure 40: Complaint notation and links on sample and Closed Record Review screens
User’s Guide 1/29/21 55

LTCSP Procedures
Potential Citations: When a tag that came from a complaint is cited, the
A-Complaint Investigation citation category is automatically selected.
Note: For specific instructions on adding complaints to an LTCSP survey already
in progress, refer to the LTCSP Complaints Guide posted at
https://qtso.cms.gov/software/ltcsp/reference-manuals, then expand the
LTCSP Reference Materials section.
Anonymous Complaints and FRIs
Since no one resident can be linked to an anonymous complaint or FRI, a
Complaint link appears on relevant screens. If a complaint or FRI has been
linked to an Initial Pool Care Area, Complaint links appear for every resident on
the Interview, Observations, and Record Review screens.
More ...
“Assign Facility Tasks” on page 117
“Generate Reports” on page 34
“Data Sharing” on page 40
Entrance Conference
Upon entering the facility, the team gives a copy of the Entrance Conference
form to the facility for them to complete. The Entrance Conference screen
provides a place to enter notes and to check off items on the form as they are
completed.
Multiple documents of various formats can be attached and are transferred as
part of the data sharing process. The information helps guide the survey team
while on the survey.
Note: Only the team coordinator can enter notes for the entrance conference;
however, all surveyors can view the information after data share.
56 1/29/21 LTCSP 11.9.5

Entrance Conference
To enter data on the Entrance Conference screen:
1 From the Navigation menu, select Entrance Conference.
Figure 41: Entrance Conference screen
2 Review the screen:
• Entrance Conference Date and Time—automatically rec
ords when the
entrance conference screen is opened for the first time (at the top of the
screen), but if this is not the actual start time you can reset the time and
date. Click Set to update the current Date and Time.
• Entrance Conference form checklist—the TC can check off items as the
facility provides information.
•Notes—area for TC to enter entrance conference notes.
• Expander bar—adjusts the size of the form and notes areas.
3 Enter notes about
User’s Guide 1/29/21 57
the entrance conference at the bottom of the screen.

LTCSP Procedures
To print the Entrance Conference Instructions for the facility:
1 Click the Reports icon in the Quick Access menu, or press Alt + P.
2 On the Reports screen, select the box for Entrance Conference
Instructions, which is listed in the first section of the Reports window when
you are on the Entrance Conference screen.
3 Click the Run Reports button to generate a PDF of the report.
4 Print the PDF.
5 Click X to close the PDF window and Done to close the Reports screen.
More ...
“LTCSP Notes” on page 25
Procedure: “Adjust Facility Census” on page 102
Resident Manager
The residents listed in the Resident Manager screens are generated by the
system based on Minimum Data Set (MDS) data. When the survey shell is
exported from ACO/ARO into ASE-Q, the MDS data is used to:
• Identify all residents still in the facility with an assessment within the last
180 days.
• Calculate MDS indicators for each resident, and then determine facility rates
for each indicator.
• Flag residents as offsite selected based on:
- Number of assessments/residents included with the exported survey
shell
- Residents with the highest number of indicators that reflect the facility
rates.
A resident qualifies for the offsite selected group only if they've had an
assessment in the last 120 days.
The Resident Manager screens in LTCSP are used by the survey team to:
• Add newly admitted residents who did not have MDS data from the last 120
days and therefore are not listed in Resident Manager.
• Identify residents for the initial pool process.
• Identify the appropriate subgroup(s).
• Update a resident's information such as room number.
• Provide access to Interviews, Observations, and Record Review screens for
any resident included in the initial pool.
• Provide status of resident interview process to help manage work.
• Search for a resident by name or room number.
58 1/29/21 LTCSP 11.9.5

Open the Resident Manager
The Resident Manager is opened from the Navigation menu. There are two
different views, List and Card. Surveyors can choose the view they prefer and
can switch between the views.
To open the Resident Manager:
1 From the Navigation menu, select Resident Manager.
This opens the Residents screen in List view.
o switch between views, click the Card View or List View icon at the
2 T
upper right of the screen.
Resident Manager views
There are two different views that can be used to manage residents:
•List view
Resident Manager
The default Residents list view displays residents alphabetically by last
name. Use the Sort function to change the sort as desired and Filter to see
specific residents.
Figure 42: Navigation features in Residents screen–List view
User’s Guide 1/29/21 59

LTCSP Procedures
• Card view
Individual cards display resident information. The screen title displays
Incomplete Residents and changes to Residents when all are completed.
Figure 43: Residents–Card view
Most functionality is available in both views; however, some functions are easier
to perform in one view versus the other. Surveyors can use their preferred view
or switch between views depending on the task they are performing.
Resident Manager Filter and Sort
The Filter and Sort functions let you display only the residents you need to see.
You can filter residents in both List and Card views by group, and sort residents
in List view by category.
Figure 44: Filter and Sort options
60 1/29/21 LTCSP 11.9.5

Resident Manager
Filter by group
The Filter by group drop-down menu, located on the left side of the function
bar, allows you to view the following groups of residents:
• All Residents: All residents from MDS data plus any added by surveyors
• My Residents: All residents assigned to you
• All Current Sample Residents: All system-selected residents included as
sample candidates:
- Offsite selected residents with at least one area marked for Further
Investigation (FI)
- Any initial pool resident with FI marked for abuse
- Any initial pool resident the surveyor marked Harm or IJ
• Offsite Selected: All residents preselected by system from MDS data
• New Admissions: All residents noted by surveyors as being admitted
within the last 30 days
• FRI: Residents associated with an official facility reported incident that the
survey team is investigating with the survey
• Vulnerable: Residents marked as vulnerable by surveyors
• Complaint: Residents associated with an official complaint made to the
state that the survey team is investigating with the survey
• Identified Concern: Residents who are not in any of the above subgroups.
but are noted by surveyors as having a specific concern
To filter residents by group:
1 In either List view or Card view, click the arrow in the Filter by group box
to see the list of filter choices.
2 Select the desired group.
The screen refreshes to display only those residents belonging to that
group.
More ...
“Resident Manager Tips” on page 203
Sort residents
The Sort residents drop-down menu, located to the right of the Filter by group
menu in List view, allows you to sort the residents according to the following
categories:
• Name: Lists residents alphabetically by last name.
• Room: Lists residents by room number in ascending order. Residents
without a room number are listed alphabetically by last name at the top of
the list.
User’s Guide 1/29/21 61

LTCSP Procedures
• Surveyor: Lists residents assigned to surveyors by surveyor number.
Residents not assigned to a surveyor are listed alphabetically by last name
at the bottom of the list.
• Offsite Selected: Lists residents preselected by the system at the top of
the list.
• New Admissions: Lists residents with the subgroup New Admissions at the
top of the list.
• FRI: Lists residents with the subgroup FRI at the top of the list.
• Vulnerable: Lists residents with the subgroup Vulnerable at the top of the
list.
• Complaint: Lists residents with the subgroup Complaint at the top of the
list.
• Identified Concern: Lists residents marked with the subgroup Identified
Concern at the top of the list.
Although the Sort residents menu is not available in Card view, the sort option
selected in List view is applied to Card view.
TIP: You can apply a sort to any group you filter by, not only the full resident
list.
To sort residents by category:
1 In List view, click the arrow in the Sort residents box to see the list of
categories.
2 Select the desired category.
The screen refreshes to display residents in the specified order.
More ...
“Resident Manager Tips” on page 203
Search Residents
The Search field lets you locate residents by name or room number in List and
Card views. A history of searches is kept so you can conveniently repeat
searches.
Note: Partial name or number searches do not work.
62 1/29/21 LTCSP 11.9.5

Initial Pool
Figure 45: Search field in Card view
To search for a resident:
1 In the Search box, type full first name, last name, or room number and
press Enter or click the magnifying glass.
o repeat a search, click the down arrowhead and select the desired search
2 T
text.
3 Click the x in
Note: Until you select X, the screen will only show the search results.
More ...
“Resident Manager Tips” on page 203
Initial Pool
There are many ways to organize the initial pool. One option is the team
coordinator assigns area(s) of the facility to each surveyor. Surveyors visit
room to room to screen all residents in their assigned area(s) in order to
identify residents for their initial pool. The goal of each surveyor is to conduct
an interview, observation, and limited record review with the residents in their
initial pool. It is from the initial pool (for all surveyors) that the survey team
pulls residents into the sample.
Surveyors set the Initial Pool (IP) Status to Y
pool. Only residents with an Initial Pool status of Yes appear on the Finalize
Sample screen. Offsite residents automatically have an IP status of Yes and
must be included unless they have been discharged.
Up to five complaint and FRI residents, when
coordinator on the offsite prep screen, are automatically included in the initial
pool and sample for the team and will have an IP status of Yes.
the Search box to clear the search results.
es to add a resident to the initial
designated by the team
Surveyors can include any other resident in their initial pool by setting the IP
status to
Yes on the Resident Manager screens, the Interview, Observations,
and Record Review screens and in the Add/Update resident dialogs.
User’s Guide 1/29/21 63

LTCSP Procedures
During the screening process, surveyors can use all the IP statuses to help
organize their residents. LTCSP assigns the IP status Unknown to all non-offsite
residents. You can change this to Maybe during screening to identify possible
residents for your initial pool. Select No to remove a resident from the initial
pool (offsite residents require a discharge reason).
Only an IP indicator of Yes activates the interview, observation and record
review screens. The RI, RO, and RR screens remain read-only for any other IP
indicator status (U, N, or M).
More ...
For detailed instructions on performing the initial pool process, refer to the Long Term
Care Survey Process (LTCSP) Procedure Guide (In LTCSP: Navigation menu | Resources
| Procedures Guide).
Offsite Selected Residents
When you export the survey shell from ACO/ARO, the system identifies the
residents in the facility and performs MDS indicator calculations. This
information is included with the survey shell imported into ASE-Q. From these
calculations, some residents are pre-selected to be included in the initial pool
during the survey and automatically have an IP status of Yes. They are referred
to as offsite selected residents and must be included in the initial pool unless
they no longer reside at the facility.
The number of offsite selected residents depends on the number of residents
included with the survey shell and the required sample size needed for
investigation. The offsite selected residents comprise 70% of the sample and
your team will fill in the remaining 30%. For example, if the facility MDS data
shows 100 residents currently at the facility, the Target Sample Size will be 20.
Of those 20, 14 will be pre-selected by the system and added to the sample if
concerns are identified.
Once onsite, surveyors do not need to consider maintaining a 70/30 split
between offsite and onsite selected residents. The focus is on identifying
residents for the initial pool and sample based on concerns.
Note: Since each surveyor needs to cover a certain area of the facility, some
surveyors may have a higher number of offsite selected residents in their initial
pool than others.
64 1/29/21 LTCSP 11.9.5

Include Resident in Initial Pool
Surveyors can manage their residents using the Initial Pool (IP) status available
in the Resident Manager, Interview, Observations, and Record Review screens.
Only those with an IP status of Yes will be included in the initial pool and only
these residents appear in the Finalize Sample list.
Cli ck a n I P st at u s i con to o pe n th e I P st atu s d i al og w hi c h p rov id e s b a si c re si d en t
nformation and their MDS indicators.
i
Offsite selected residents have IP status values of:
Initial Pool
• Yes—default;
• No—removes from initial pool; requires a reason
For the remaining residents you can set an IP status of:
• Unkno
• Maybe—mark residents during initial screening as possibilities for IP or that
the resident is unavailable, for example, the resident isn't in the room
• Yes—re
• No—removes from initial pool; removes surveyor assignment
The system will change the IP status of complaint residents added to the initial
pool in Offsite Prep to Yes.
Surveyors can set the IP status on the following:
• Resident Manager List and Card view screens
• Interview & Observations screen
• Observations screen
• Record Review screen
• Add/Update Resident dialog
wn—default
quired to proceed with interview/observation and sampling
required to proceed with interview/observation and sampling
➥ Click the icon on a screen to open the IP selection dialog for that resident.
From the Resident Manager List View:
Figure 46: IP Status icon on Resident Manager List View
User’s Guide 1/29/21 65

LTCSP Procedures
From the Resident Manager Card View:
From Interview, Observations, or Record Review screens:
Figure 47: IP Status icon on Resident Manager Card View
Figure 48: IP Status icon in Interview, Observations, or Record Review screens
66 1/29/21 LTCSP 11.9.5

From the Add/Update Resident dialog:
Initial Pool
Figure 49: IP Status selection in the Add/Update Resident dialog
Note: Only residents with an IP of Yes appear on the Finalize Sample screen
regardless if any Further Investigations were marked during the interview
process.
User’s Guide 1/29/21 67

LTCSP Procedures
To include a resident in your initial pool:
1 Open the Resident Manager List View or Card View screens, or open the
Interview, Observations, or Record Review screen for the resident.
2 Click the Initial Pool icon to open the selection box:
➥ For an Offsite resident, Yes is default; select No and provide a reason.
Figure 50: IP Status selection dialog for an offsite resident
➥ For a non-offsite resident Unknown is default; select Maybe, Yes, or
No.
Figure 51: IP Status selection dialog for an offsite resident
TIP: The button with an * and bolded text indicates the current IP status.
For example, if the status is Yes it appears on the button as *Yes.
3 Select applicable subgroups.
More ...
“Open the Resident Manager” on page 59
“Add a New Admission” on page 69
“Assign Surveyor to Resident” on page 74
“Assign Subgroup to Resident” on page 72
68 1/29/21 LTCSP 11.9.5

Add/Update Residents
You can add a newly admitted resident or update information for a current
resident. If you duplicate a resident, you can delete the added resident as long
as no data has been added to that resident.
Add a New Admission
When surveyors begin the initial pool process, the facility should provide them
with a list of new admissions in their area. A new admission should be added
to the resident list only if the surveyor includes the newly admitted resident in
the initial pool (based on the screening) and the resident isn't already included
in the resident list. The system automatically assigns a unique ID to each new
admission added to the resident list. The process is the same in both List and
Card views.
To add a new admission:
1 Open the Resident Manager.
Add/Update Residents
2 Click the Add N
dialog.
ew Resident icon to open the Add/Update Resident
Figure 52: Add/Update Resident window
3 Enter resident information including Name, Room #, Admission Date.
When you add a new admission, the system automatically assigns you as
the surveyor.
User’s Guide 1/29/21 69

LTCSP Procedures
4 The system automatically assigns the subgroup New Admissions to the
resident to ensure high risk medications, diagnoses, and hospice are listed
in the Record Review. Select any other subgroup(s), if applicable, in the
Subgroup drop-down list.
When you add a new admission, the system assigns a unique ID for that
resident (in parentheses after the name). To avoid any conflict, each
surveyor is assigned a block of 50 numbers to use for the unique IDs.
5 Click Save.
To delete an added resident:
1 Open the Add/Update Resident dialog for the duplicate resident (you can
only delete residents added by the team not those on the MDS resident list).
From the List view, select the resident’s name and click the Update
Selected Resident icon.
From the Card view, select the resident’s name.
-or-
2 Click the Delete Resident button at the bottom of the dialog box.
If the resident has data associated to their ID or is found associated with a
task you will receive a warning and the resident will not be deleted. Remove
or transfer the data to the correct resident to delete.
70 1/29/21 LTCSP 11.9.5

Add/Update Residents
Add/Update Resident dialog—Delete Resident
More ...
“Open the Resident Manager” on page 59
“Assign Subgroup to Resident” on page 72
Update Resident Information
Basic resident information such as room number or name can be changed by
surveyors. These changes do not affect the MDS data and are only used to help
surveyors in the field.
To update resident information:
1 Open the Resident Manager.
List view, select the checkbox for the resident, then click the Update
2 In
Resident icon.
-or-
In Card view, click the resident name on the card.
the Add/Update Resident window, update resident information (e.g.,
3 In
First Name, Room #, IP status) as needed.
4 Click Save.
More ...
“Open the Resident Manager” on page 59
User’s Guide 1/29/21 71

LTCSP Procedures
Assign Subgroup to Resident
If you decide to include a resident in the initial pool who is not offsite selected,
or want to assign an additional subgroup to an offsite selected resident, you
can assign one or more of the following subgroups to indicate why you chose
to include the resident.
All applicable subgroups should be identifi
ed for each initial pool resident.
•All
•New Admissions
• Facility Reported Incidents
• Vulnerable Residents
• Complaint Residents (official complaints from ACTS)
If none of these reasons apply, but you feel the re
sident should be included in
the initial pool, select Identified Concern and enter a description of the concern.
Once Identified Concern is selected, all other subgroup options are grayed out.
If any other subgroup(s) are selected, Identified Concern is grayed out; you
must deselect any other subgroups in order to activate Identified Concern.
Subgroup(s) can also be assigned on
the Resident Interview/Observation
screen. For example, if you determine from observation that a resident is very
dependent on the facility staff, you may want to mark that resident as
vulnerable.
To add a subgroup to a resident:
1 Open the Resident Manager.
2 In List view, click the down arrow in the Subgroup field for the resident.
Figure 53: Subgroup options
72 1/29/21 LTCSP 11.9.5

3 Select the applicable option.
If you select Identified Concern, all other options gray out and you are
required to enter a rationale for the concern.
TIP: Subgroup can also be assigned in the Add/Update Resident window, and
Interview and Observations (RI) or Observations (RO) screens, all of
which can be opened from List or Card view.
More ...
“Open the Resident Manager” on page 59
“Resident Manager Tips” on page 203
Surveyor Assignments
Team coordinators can assign survey team members to residents at any time,
even before arriving at the facility (e.g., active complaints or offsite selected
residents). Later, team member assignments may need to be changed and
team members can make their own assignments.
Surveyor Assignments
More ...
“Balance the Survey Team’s Workload” on page 108
User’s Guide 1/29/21 73
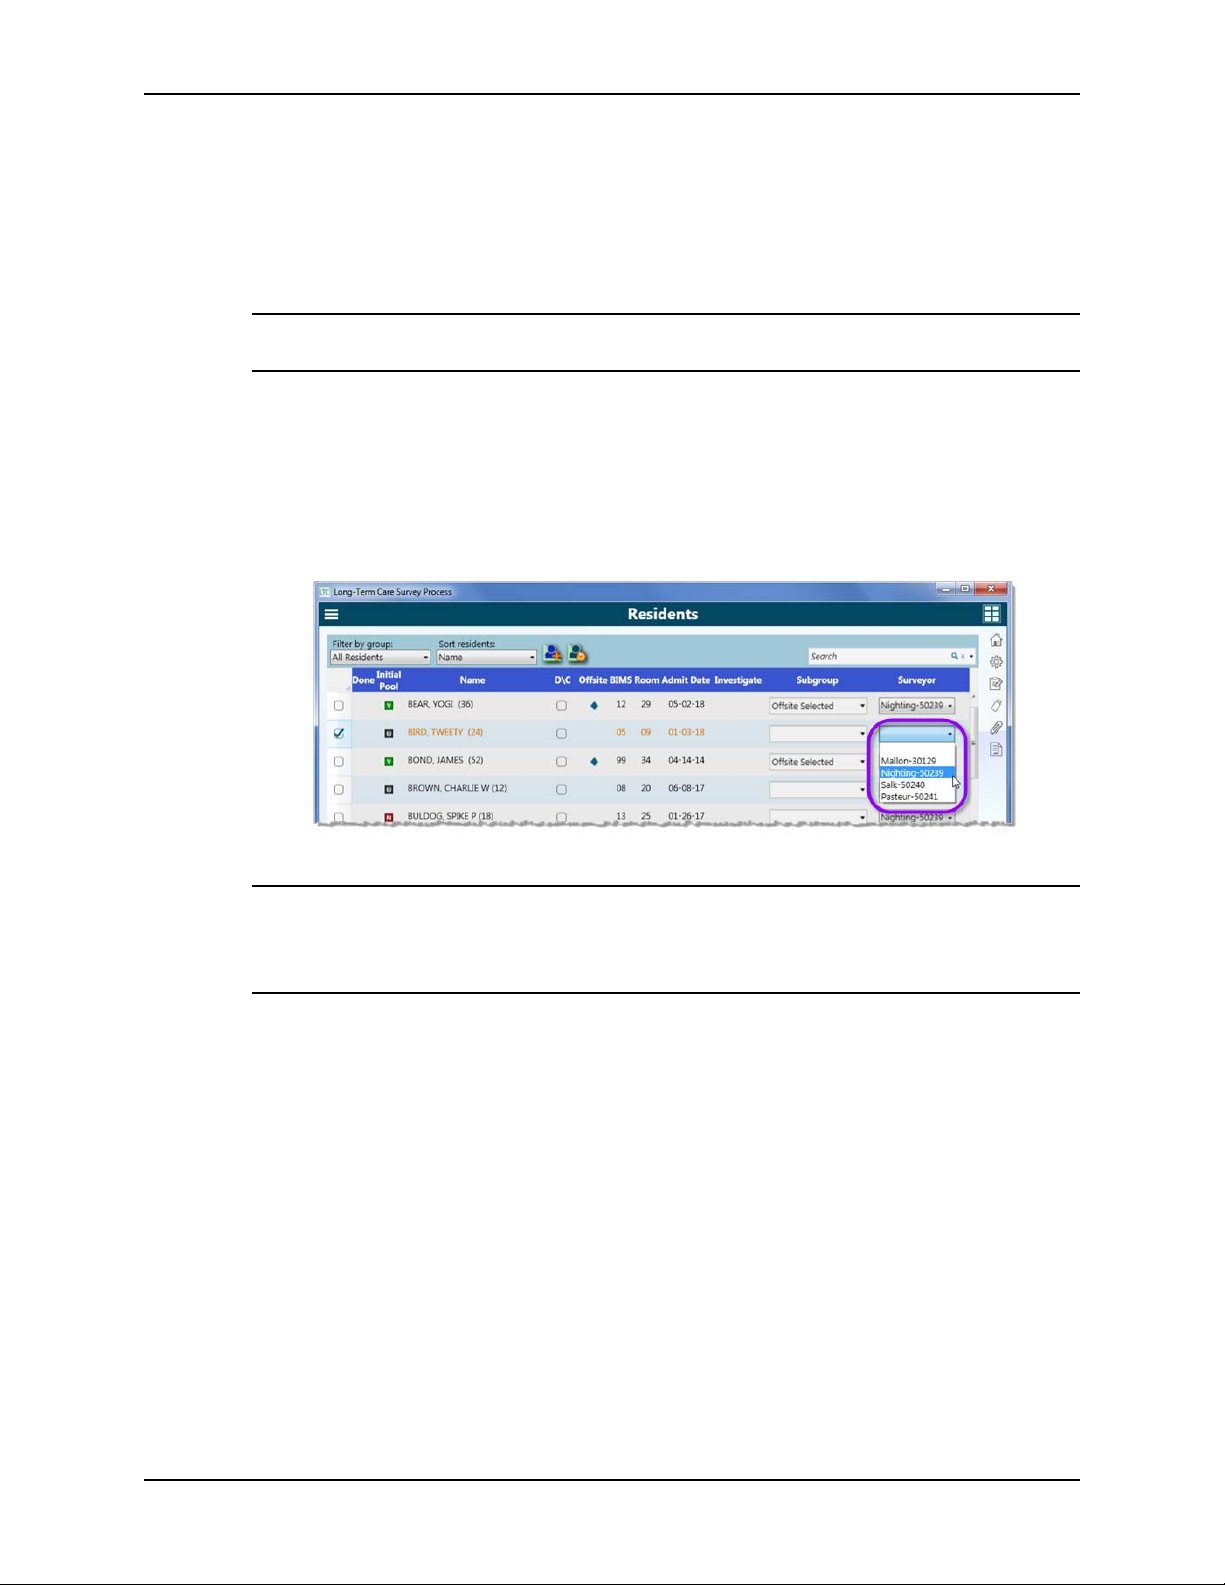
LTCSP Procedures
Assign Surveyor to Resident
Surveyor assignments can be made in the Surveyor field in the Residents list
or in the Add/Update Resident dialog for a selected resident.
Note: Team coordinators can assign any survey team member; team members
can assign only themselves.
To assign a surveyor to a resident in List view:
1 Open the Resident Manager.
List view, select the checkbox to the left of the resident.
2 In
3 From the Surveyor drop-down list, select the surveyor you want to assign
to the resident.
Figure 54: Surveyor drop-down list
TIP: In List view only, to assign a surveyor to multiple residents at once, select
the checkbox for all applicable residents, then select the surveyor name
for one of the selected residents and the surveyor name will be applied to
all selected residents.
To assign a surveyor to a resident via Add/Update Resident:
1 In List view, select the checkbox for the resident, then click the Update
Selected Resident icon.
-or-
In Card view, select the resident name on the card.
74 1/29/21 LTCSP 11.9.5

Surveyor Assignments
2 In the Add/Update Resident dialog, select the surveyor you want to
assign from the Surveyor drop-down list.
Figure 55: Assign surveyor to resident via Add/Update Resident
3 Click Save.
More ...
“Open the Resident Manager” on page 59
Change Surveyor Assignments
Use this function to change surveyor assignments for the initial pool. In
Resident Manager anyone can change surveyor assignments—only one
surveyor can be assigned to a resident during the initial pool interviews,
observations, and record review. Once the sample is finalized, adjust surveyor
assignments on the Investigations screen.
To change an existing surveyor assignment:
1 Open the Resident Manager.
2 In List view or the Add/Update Resident window, select the new
surveyor you want to assign to the resident from the Surveyor drop-down
list.
User’s Guide 1/29/21 75

LTCSP Procedures
3 Click Yes in the reassignment confirmation message.
Note: Once the survey has been started, each surveyor will have to assign a
different resident to themselves—data share will not assign a resident to
another surveyor, so each surveyor maintains their own resident list after
starting the surveyor.
More ...
“Open the Resident Manager” on page 59
“Assign Investigations” on page 139
Unassign Surveyor
All team members can unassign or reassign any survey team member; it is a
good idea to communicate these changes to help with data conflicts during data
sharing.
To unassign a surveyor:
1 Open the Resident Manager.
2 In List or Card view, open the Add/Update Resident window and select
the blank option in the Surveyor drop-down.
-or-
In Card view, drag and drop the resident’s card to the Unassign icon.
-or-
In List view, in the row for the resident open the Surveyor drop-down and
select the blank line.
-or-
Change the IP status to No or Unknown (non-offsite only) for the resident.
When you unassign a surveyor from an offsite selected resident, the LTCSP
application requires a reason be specified: Expired, Hospitalized,
Discharged to community, or Assign to another surveyor. Any offsite
selected resident marked as Discharged is automatically added as a Closed
Record Review candidate.
Note: When you unassign a non-offsite resident, the system automatically
changes the IP status to No.
More ...
“Open the Resident Manager” on page 59
“Closed Record Review Sample” on page 110
76 1/29/21 LTCSP 11.9.5

Manage Your Workload
You can manage your workload by either:
• Assigning yourself the offsite selected residents in your assigned area of the
facility, then adding other residents who should be in the initial pool as
determined through screening.
Surveyor Assignments
Figure 56: Manage workload by only assigning offsite residents
-or-
• Assigning yourself all residents in your assigned area of the facility, then
unassigning residents who should not be in the initial pool as determined
through screening.
Figure 57: Manage workload by only assigning all residents
More ...
“Assign Surveyor to Resident” on page 74
“Unassign Surveyor” on page 76
User’s Guide 1/29/21 77

LTCSP Procedures
Initial Pool Resident Interviews, Observations, & Record Reviews
After identifying residents for the initial pool, you are ready to interview,
observe, and perform a limited record review for those residents. You may find
issues related to care areas that will be investigated later in the LTCSP process.
For the residents in your initial pool, the Interview and Observations screen is
used to:
• Conduct resident interviews (RI)
• Conduct resident representative interviews for non-interviewable residents
(RRI)
• Make observations of residents (RO)
• Perform a limited record review of residents (RR)
During the initial pool process you will:
• Conduct the Interview, Observations, and Record Reviews for all care areas
(CAs) and indicate the areas where you determine a need for further
investigation (FI) (it is best practice to respond to all areas to know they
have been addressed)
• Indicate if there are any MDS discrepancies
• Indicate if any issues found are at the Harm or IJ level
More ...
“Interview and Observations Tips” on page 206
Open Interview and Observations
Access the Interview and Observations (RI) screen from the Resident Manager
in either List or Card view.
To open the Interview and Observations screen:
1 In List or Card view, locate the resident.
2 In List view, double-click the resident’s name.
-or-
In Card view, click the RI icon on the resident’s card.
78 1/29/21 LTCSP 11.9.5

Initial Pool Resident Interviews, Observations, & Record Reviews
The Interview and Observations screen opens. The layout is the same,
whether opened from List or Card view.
Figure 58: Interview and Observations screen
The interview CAs are organized first by quality of life and resident rights,
followed by quality of care. Resident information displays on the upper left,
process information in the middle, and MDS indicators on the right. A weight
calculator is available to determine weight gain/loss.
Note: Interview and Observations appear together on this screen since
surveyors often conduct an observation while interviewing a resident. The
Observations (RO) screen shows only observation CAs.
More ...
“Interview and Observations Tips” on page 206
User’s Guide 1/29/21 79

LTCSP Procedures
Care Areas
The screen lists all care areas (aka initial pool or interview areas) specific to the
screen (Interview and Observations, Observations, or Record Review).
TIP: To jum p to a s p ecif ic ca r e are a (CA ) , click the tab on the right of the screen
When conducting a resident interview, you must cover every care area (initial
pool/interview area), whether or not the area is an MDS indicator for a resident.
You will ask questions guided by the probes provided in the application, or your
own questions, as long as you adequately address the area with the resident.
You will then select the appropriate response option:
•No Issues/NA
Select if you have determined that there are either no issues (NI) for the CA
or the CA does not apply to the resident (e.g., catheter questions only apply
to residents needing a catheter).
to open the Care Area pullout menu and select the desired CA.
Dialysis, smoking, hospice, ventilator, and transmission-based precautions
CAs have a separate NA option.
• Further Investigation
Select if something heard or observed requires further investigation (FI).
You should document the concern in the Notes field for the CA.
When you select a response, the CA is marked with a green checkmark (no
concern) or an orange exclamation point (further investigation required) to
indicate completion, both on the screen and pullout menu.
It is best practice to respond to all areas to know they have been addressed.
You may only mark those CAs that require further investigation with two
exceptions (see below).
Function toolbar for the system to recognize that you have completed the
resident Interview, Observations, and Record Review (you must mark all three
screens).
You do not have to mark No Issues/NA with two exceptions:
1 For the required areas of hospice, dialysis, ventilator, smoking,
transmission-based precaution, you must mark No Issues if the
area applies to the resident and there are no concerns to ensure
at least one resident is sampled for the area, and
2 For the medication-related record review areas of insulin,
antipsychotic, anticoagulant, high risk medications, diagnoses,
and hospice, you must document whether the resident is
currently receiving the medication or has one of the conditions
listed to ensure the Unnecessary Medication selection is based on
accurate and current information.
However, you must check the Complete option in the
80 1/29/21 LTCSP 11.9.5

Initial Pool Resident Interviews, Observations, & Record Reviews
Note: On the combined Interview and Observation screen, the completion
indicator (checkmark or orange exclamation) shows only when NI or FI is
marked for the Resident Interview portion of the care area. If you only mark NI
or FI for the Resident Observation portion, no completion indicator shows for
the Interview and Observation care area or on the pullout menu. The
completion indicator does show on the Observation screen and pullout menu
for that care area. If the RO portion is marked FI, and the RI portion is marked
NI, the orange exclamation shows on both screens.
However, if the care area is a Resident Observation only (no interview portion),
the completion indicator shows for the care area on both the Interview and
Observation and the Observation screens.
When all CAs for the interview, observation, and record review are complete
(i.e., marked either NI or FI), a green checkmark appears over the
corresponding icon.
• In Card view, a green checkmark appears on the RI/RO/RR icon to indicate
completion, and an orange exclamation point appears next to the resident’s
name if at least one CA was marked FI.
• In List view, a green checkmark appears next to the resident’s name when
all three screens (RI, RO, RR) are complete, and a blue circle in the
Investigate column indicates at least one CA is marked for Further
Investigation.
TIP: To free up screen space as you go along, select Collapse Completed
Care Areas at the bottom of the screen (RI, RO, RR).
Navigate Care Areas
You should conduct the interview in the order that the care areas appear on the
screen—starting with quality of life questions and moving on to quality of care
questions. If, however, you do need to go to a specific care area use the Care
Area pullout menu. You can also alphabetize the list of care areas on the menu
to make it easier to find a specific care area.
To use the Care Area pullout menu:
➥ Click the tab to open the Care Area pullout menu. Initially the view is the
same order as the care areas appear on the screen (quality of life to quality
of care).
• Click a care area name to jump to that care area on the screen.
TIP: The menu uses abbreviations for the care area names, hover over a
menu name to see the full care area name.
User’s Guide 1/29/21 81

LTCSP Procedures
➥ Click the Alphabetize Care Area button to sort the care areas listed on the
menu alphabetically.
•Click the Alphabetize Care Area button again to return the sort order
Note: Whichever sort order you set the Care Area menu to remains the sort
order in LTCSP until you change the order again.
Figure 59: Care Area pullout menu Alphabetize Care Area menu button
to the default.
Adding Care Areas on the Record Review screen
If you find issues during limited record reviews that are not covered by the
system-selected care areas, you can add any other care area to the Record
Review screen. Rather than selecting the Other Concerns care area, you can
select a more specific care area that will then trigger the appropriate
investigation.
To add a care area to the Record Review screen:
1 On the Record Review screen, click to open the Additional Care Areas
list.
2 Sele
ct one or more care areas you would like to add; click out of the
drop-down list or press Escape to close.
82 1/29/21 LTCSP 11.9.5

Initial Pool Resident Interviews, Observations, & Record Reviews
The added care areas appear on the screen and in the pullout menu.
Figure 60: Select an additional care area
TIP: You can remove a care area that you added as long as you remove your
answers (NI or FI) from the care area. Remove the selection from the
Additional Care Areas list and the CA will be removed.
More ...
“Interview and Observations Tips” on page 206
“LTCSP Notes” on page 25
Probe Text
LTCSP provides a list of questions specifically tailored for each care area. These
questions are called probe text. They serve as suggestions or guidance that
surveyors can reference for assistance when conducting interviews,
observations, and record review.
TIP: Select/deselect Show probe text at the bottom of the screen (RI) to
show/hide suggested questions.
More ...
“Interview and Observations Tips” on page 206
User’s Guide 1/29/21 83

LTCSP Procedures
Assign Interview Status and Subgroup to Resident
After selecting residents to include in the initial pool, you determine and set the
interview status and subgroup for each resident on the Interview and
Observations screen.
Resident Interview (RI) or Observation (RO) ma
y or may not be applicable and
required depending on the assigned interview status. If RI or RO is not
required, a green checkmark is placed on the corresponding icon (indicating
completion) as soon as a triggering interview status is selected. For example,
neither interview or observation is possible or required if a resident is out of the
facility, so both RI and RO are marked as complete.
Record Review (RR) is required for all initial pool residents regardless of interview
status. Different CAs will be listed on the RR screen depending on interview status
and subgroup. For example, additional areas are listed for new admissions.
To set resident interview status and subgroup:
1 Open the Interview and Observations screen. Verify th a t the IP status is
Yes. If not, set to Yes to continue.
2 In the
resident information section at the top of the screen, select the
appropriate Interview Status and Subgroup for the resident.
Figure 61: Interview Status options
Figure 62: Subgroup options
More ...
“Open Interview and Observations” on page 78
“Interview Status” on page 205
84 1/29/21 LTCSP 11.9.5

Initial Pool Resident Interviews, Observations, & Record Reviews
Conduct Resident Interview (RI)
The resident interview screen (Interview and Observations) includes the
Resident Observation section since it is often possible to conduct an observation
while interviewing a resident. Care areas for both the resident interview and
observation are listed.
Offsite selected residents should always be interviewed unless they are Out of
Facility, refused, unavailable for interview, or non-interviewable. If they cannot
be interviewed, a limited record review must be completed. If the offsite
resident is discharged from the facility, they are listed in the closed record
sample as a closed record candidate.
To record results of a resident interview/observation:
1 Open the Interview and Observations screen. Verify th a t the IP status is
Yes. If not, set to Yes to continue.
2 For Interview Status, select Interviewable.
3 Based on the interview/observation, select No Issues/NA or Further
Investigation for all CAs and enter notes as appropriate.
When you select an option, the CA is marked with a green checkmark (no
concern) or an orange exclamation point (further investigation required),
both on the screen and pullout menu.
Some CAs are observation-only. When you complete an observation-only
CA on the Interview and Observations screen, the green checkmark appears
even if you mark Further Investigation for the observation. The orange
exclamation appears only on the Observations screen.
When all Resident Interview CAs are complete for a resident, a green
checkmark appears over the RI icon to indicate the interview process is
complete.
More ...
“Open Interview and Observations” on page 78
“Interview and Observations Tips” on page 206
“LTCSP Notes” on page 25
Conduct Resident Representative Interview (RRI)
Not every resident is capable of being interviewed. The survey team should try
to conduct three resident representative interviews for non-interviewable
residents per survey. If a representative is not available, the surveyor still
conducts the observations and limited record review for the resident.
To record results of a resident representative interview:
1 Open the Interview and Observations screen. Verify th a t the IP status is
Yes. If not, click the IP status icon and set to Yes to continue.
2 For Interview Status, select Non-Interviewable.
User’s Guide 1/29/21 85

LTCSP Procedures
3 Select the Representative Interview checkbox. An RRI Contact
Information field appears. Enter representative contact information for easy
reference.
The RRI option is enabled only when Interview Status i
s Non-Interviewable.
When selected, the probes change and some additional probes specific to
the representative interview are available.
4 Based on the
interview, select No Issues/NA or Further Investigation
and enter any notes for all care areas.
When you select an option, the CA is mark
ed with a green checkmark (no
concern) or an orange exclamation point (further investigation required),
both on the screen and pullout menu.
Some CAs are observation-on
ly. When you complete an observation-only
CA on the Interview and Observations screen, the green checkmark appears
even if you mark Further Investigation for the observation. The orange
exclamation appears only on the Observations screen.
When all Resident Representative Intervi
ew CAs are complete for a resident,
a green checkmark appears over the RI icon to indicate the interview
process is complete.
Add an RRI after sample finalization
Before sample finalization you may not have an opportunity to conduct a
resident representative interview. If an RRI/family interview is completed
during the investigative process, complete the RRI interview on the Resident
Manager screen.
If the resident was already included in the ini
tial pool, go to the RI screen to
complete the RRI interview. If the resident was not part of the IP, you can add
them to the initial pool and conduct interview.
To conduct a resident representative interview after sample
finalization:
1 Open the Interview and Observations screen for the resident.
2 Click the Add to Initial Pool for Representative Interview button.
Figure 63: Add to Initial Pool for Representative Interview button
86 1/29/21 LTCSP 11.9.5

Initial Pool Resident Interviews, Observations, & Record Reviews
3 Click Yes in the Confirm Status Change dialog to add the resident to the
initial pool. The system automatically:
• Changes the IP status to Yes
• Changes the Interview Status to Non-Interviewable
•Selects Representative Interview and activates RRI Contact field
• Activates questions for the representative interview
• Adds resident to the Finalize Sample screen, even though the sample
has been finalized
• Adds resident to all Initial Pool reports
Figure 64: Screen updated after adding a representative interview
4 Conduct the interview.
If you determine that a CA needs further investigation, you will need to
initiate the investigation on the Investigations screen or add the resident to
the appropriate facility task.
More ...
“Open Interview and Observations” on page 78
“LTCSP Notes” on page 25
Conduct Resident Observation (RO)
The resident interview screen (Interview and Observations) includes the
Resident Observation section since it is often possible to conduct an observation
while interviewing a resident. If you complete observation-only care areas on
the Interview and Observations screen, the Complete and Further Investigation
indicators appear only on the Observations screen. You can, of course,
complete observation-only CAs directly on the Observations screen, the likely
option for residents you observe but do not interview.
To record resident observation results:
1 Open the Interview and Observations screen. Verify th a t the IP status is
Yes. If not, set to Yes to continue.
2 Sel
User’s Guide 1/29/21 87
ect the RO icon to open the Observations screen.

LTCSP Procedures
3 Based on your observations, select No Issues/NA or Further
Investigation and enter any notes for all CAs.
When you select a result, the CA is marked with a green checkmark or an
orange exclamation point to indicate completion, both on the screen and
pullout menu.
When all Resident Observation CAs are complete, a green checkmark
appears over the RO icon.
More ...
“Open Interview and Observations” on page 78
“Interview and Observations Tips” on page 206
“LTCSP Notes” on page 25
Conduct a Limited Record Review (RR)
The system selects certain care areas for the limited record review based on
assigned MDS indicators for each resident.
A limited record review must be conducted for all initial pool residents including
those who refuse, are non-interviewable, or are out of the facility. Different CAs
appear for each resident based on MDS data, interview status, and subgroup.
Since no MDS data exists for new admissions, the limited record review lists all
available CAs. The record review is used to identify MDS indicators, for
example:
•Hospice
• High risk medications
•Diagnoses
You can add additional care areas to the Record Review, if necessary (see
“Adding Care Areas on the Record Review screen”).
Complete a limited record review:
1 Open the Interview and Observations screen. Verify th a t the IP status is
Yes. If not, set to Yes to continue.
2 Click the RR icon to open the Record Review screen.
88 1/29/21 LTCSP 11.9.5

Initial Pool Resident Interviews, Observations, & Record Reviews
3 Based on the record review, select No Issues/NA or Further
Investigation and enter any notes for all CAs.
When you select a result, the CA is marked with a green checkmark or an
orange exclamation point to indicate completion, both on the screen and
Care Area pullout menu.
When all Record Review CAs are complete, a green checkmark appears over
the RR icon.
More ...
“Open Interview and Observations” on page 78
“Adding Care Areas on the Record Review screen” on page 82
“Interview and Observations Tips” on page 206
“LTCSP Notes” on page 25
Determine Weight Loss/Gain
The weight calculator, available in the RI, RO, RR as well as the Nutrition
investigation screens, provides a way to calculate weight loss/gain for a
resident. Once calculated, you can paste a statement into a notes field with the
weights, the date each weight was taken and the percent difference in weight
measurements. Once you enter both dates, the system will determine the gain
or loss based on the earliest date entered whether it is first or second.
The system keeps the data in the weight calculator only for that resident—once
you switch to a different screen (e.g., the Resident Manager card or list view)
the data no longer appears in the weight calculator.
To calculate weight loss/gain for a resident:
1 Click the Weight Calculator button.
2 Enter the first weight and associated date.
3 Enter the second weight and associated date.
User’s Guide 1/29/21 89

LTCSP Procedures
To paste the weight loss/gain statement into a notes field:
1 Click the X to close the calculator.
2 Click in the notes field where you want the statement.
3 Click the Paste Weight Calcul
Figure 65: Weight calculator (top) and example of message inserted
Mark an MDS Discrepancy
If you discover an MDS discrepancy during interview/observation/record
review, mark it for the care area. For example, if Cath (Catheter) is included in
a resident’s MDS indicator list, but you discover during the interview that the
resident never had a catheter, you need to mark this as an MDS discrepancy.
The Resident Assessment facility task is triggered when an MDS discrepancy is
identified.
ation icon, or press Alt + W.
To mark an MDS discrepancy:
1 On the applicable screen (RI, RO, or RR), click the tab on the right to open
the Care Area pullout menu, if desired.
elect the applicable care area.
2 S
3 Click the MDS Discrepancy checkbox.
This checkbox is available only for CAs that are mapped to an MDS indicator.
More ...
“Interview and Observations Tips” on page 206
90 1/29/21 LTCSP 11.9.5

Initial Pool Resident Interviews, Observations, & Record Reviews
Mark a Significant Concern
If issues are found indicating a potential Harm or IJ (Immediate Jeopardy)
situation, you can indicate this. The resident is automatically flagged for further
investigation and included in the current sample.
To mark a significant concern:
➥ On an RI, RO, or RR screen, select a reason for Include in s ample due to:
Harm or IJ.
In Card view, an orange exclamation point appears next to the resident’s
name. In List view, there is a blue circle in the Investigate column for the
resident.
Note: The Include in Sample due to reason also appears in the Sample
Reason column on the Finalize Sample screen.
Transfer Resident Data
Surveyors on occasion may accidentally record interview/observations/record
review data under the wrong resident name.
All care area answers and notes transfer from the original (wrong) resident to
the receiving (correct) resident. If a subgroup was assigned to the resident, you
will have to manually update that for the correct resident. You can transfer
answers for all screens or any combination of the resident interview, resident
observation, or record review screens, including resident representative
interview.
The notes transfer for care areas and appear on all screens—for example, if you
transfer only the Resident Interview screen, the care area notes for those care
areas that appear on the Observations or Record Review screens appear for all
screens as they normally do when you enter notes for a care area that appears
on more than one screen.
LTCSP provides an interview transfer option to move all the data to the correct
resident if that resident
• has an IP indicator set to Yes
• is not assigned to a different surveyor
• has no data entered on any screen
If you are transferring only one (or two) screens, you can transfer data to the
correct resident’s screen, if that resident
• has an IP indicator set to Yes
• is not assigned to a different surveyor
• has no responses entered on the screen being transferred
User’s Guide 1/29/21 91
LTCSP Procedures
• has no MDS Discrepancies selected on any screen
• has no care area notes in shared care area notes fields (see table below)
For the screens that you are not transferring you can have care area notes for
care areas specific to that screen and not a shared care area—you still must not
have any care area notes in the other care areas on any screen for the transfer
to work. The following table lists the care areas where you can have data if not
transferring to that screen.
OK to have a note in care area…
If NOT
transferring data
to this screen
Notification of Change
Language/Communication
Mood/Behavior
Restraints
Accident Hazards
Call Light in Reach, Call system Functioning
Edema
Psych Med Side Effects
Psych/Opioid Med Side Effects
AC Med Side Effects
Oxygen
Positioning
Ventilator/Tracheostomy
Change of Condition
RRI
RO
RO
RO
RO
RO
RO
RO
RO
RO
RO
RO
RO
RR
Antipsychotic with Alzheimer's or Dementia
PASSAR
High Risk Meds
Advance Directives
Diagnoses
Insulin
AC
92 1/29/21 LTCSP 11.9.5
RR
RR
RR
RR
RR
RR
RR

Initial Pool Resident Interviews, Observations, & Record Reviews
To transfer interview data to another resident:
1 Open the Resident Manager.
2 Verify that the receiving resident has no information entered and the IP
status is set to Yes.
3 In Card or List view, locate the resident with the data you want to transfer.
4 In Card view, click the resident’s name.
-or-
In List view, select the box next to the resident’s name and click the
Update Resident icon.
5 In the Add/Update Resident dialog, click the Transfer RI/RRI, RO, or
RR Info to Another Resident button at the bottom.
6 In the To list, select the receiving resident.
7 In the Types list, select All or RI, RO, RR, or any combination of these to
transfer.
User’s Guide 1/29/21 93

LTCSP Procedures
Note: If you only transfer resident interview/resident representative
interview answers and not the resident observation answers, the completed
indicators appear on the RI/RRI screen for the correct resident only, even if
the care area included the answer for the observation section.
Figure 66: Select resident and info to transfer
8 Click the Transfer button.
TIP: When you set the IP Status to Yes, the system automatically assigns
you as surveyor, but you can change the surveyor assignment in the
Add/Update Resident dialog.
9 Click OK, then Save.
10 Verify that the information transferred correctly. Select an Interview Status
to complete any remaining care areas on any screen.
94 1/29/21 LTCSP 11.9.5

Completion checkmarks or Further Investigation exclamations and all notes
transfer along with the answers. Notes for RI/RRI and RO combined care areas
appear for both residents if you only transfer one of the screens (e.g., transfer
answers for RI, not RO, that include notes for the Nutrition CA, notes stay in
the original resident’s notes field as well as appear in the receiving resident’s
notes).
TIP: If you used the resident unique ID in any of your notes, this number does
not change, so you will need to update your notes to the ID of the resident
you transferred the answers to.
More ...
“Open the Resident Manager” on page 59
Completed Screens
As you choose NI or FI for a care area, the system marks these CAs complete.
When all CAs for a screen (Interview and Observations, Observations, or
Record Review) are completed, the system automatically marks the screen as
complete with a green checkmark over the RI, RO, or RR icon in the upper right
part of the screen or on the Resident card.
Initial Pool Resident Interviews, Observations, & Record Reviews
When you have completed all three screens for a resident, the system marks
the resident as complete. In List view a green checkmark displays beside the
resident name. In Card view, the resident’s card is automatically moved to the
Complete folder.
You always want to complete a full interview with a resident, but if for some
reason you cannot complete an interview/observation/record review for a
resident, you can manually mark any or all of them as complete. You might use
this option, for example, to manually mark RI as complete for a resident you
cannot complete an interview with.
To manually mark a screen as complete:
1 Go to the applicable screen: RI, RO, or RR.
2 Select the Complete checkbox (at the top in the Function toolbar).
A green checkmark is placed on the applicable icon.
To view residents marked as complete:
➥ In the List view, look for the green checkmark to the left of a resident’s
name.
➥ In the Card view, click the Complete folder.
User’s Guide 1/29/21 95

LTCSP Procedures
Finalize Sample
The sample selection process occurs after the initial pool process is completed
and data is shared with all team members. During the sample selection
process, the TC will:
• Update the facility census number if necessary.
• Determine the number of residents required to complete the sample.
• Decide if any offsite selected residents should be replaced in the sample.
• Record the selected sample residents in the LTCSP application, and verify
any areas of concern.
All the data gathered from the initial pool process (interviews, observations,
and record review) is available and provides the survey team with information
to help choose residents to include in the sample for investigation.
TIP: If you start sample finalization on the Finalize Sample screen too soon,
press Alt + U to reactivate the Start Sample Finalization button. This only
works for Start Sample Finalization; once the sample is finalized, it cannot
be reset.
Residents are selected for investigation, either by the system or the survey
team, through:
•Sample finalization
• Closed record review
There is a separate process for selecting residents with closed records for
the sample.
More ...
“Closed Record Review Sample” on page 110
“Reset Sample Finalization” on page 104
Open the Finalize Sample screen
There are two different views of the Finalize Sample screen, by Resident and
by Care Area. Surveyors can choose the view they prefer and switch between
views.
Note: Do not start sample finalization until data has been shared with all team
members.
Only the team coordinator can actually select the sample. All surveyors have
read-only access to the information to help with the team discussion and
decision making. Both views are read-only until the finalize sample process is
initialized.
96 1/29/21 LTCSP 11.9.5

To open the Finalize Sample screen:
1 From the Navigation menu, select Finalize Sample.
Figure 67: Finalize Sample option
Finalize Sample
Resident view appears by default.
Figure 68: Finalize Sample screen–default Resident view
2 To switch between views, click the by Resident or by Care Area icon in
the upper right corner of the screen.
User’s Guide 1/29/21 97

LTCSP Procedures
3 To display care areas and MDS information in either Resident or Care Area
view, click the arrow to the left of the resident’s name to expand/collapse
the resident record.
Care areas and MDS information can be viewed at any time, but CAs cannot
be modified until
you initiate sample finalization.
4 In eithe
r view, click a CA for a resident to display any notes that were
recorded during the interview and observation of initial pool residents.
Figure 69: Finalize Sample–Care Area notes
More ...
“Sample Finalization Tips” on page 207
98 1/29/21 LTCSP 11.9.5

Finalize Sample
Finalize Sample by Resident view
By default, current sample residents are listed according to the value in the
Sort residents field. The Finalize Sample by Resident view displays basic
resident information, the number of care areas marked as Further Investigate
for each resident, and also provides the ability to select which residents to
include in the sample.
Figure 70: Finalize Sample with resident expanded to show care areas and MDS indicators
More ...
“Sample Finalization Tips” on page 207
User’s Guide 1/29/21 99

LTCSP Procedures
Finalize Sample by Care Area view
Care areas are listed by default in descending order according to the number
of residents marked for Further Investigation for each area. In Sample shows
how many of these residents are included in the sample. Care Area view may
help in ensuring care area representation in the sample.
Figure 71: Finalize Sample by Care Area with resident expanded
More ...
“Sample Finalization Tips” on page 207
100 1/29/21 LTCSP 11.9.5
 Loading...