

Page 1
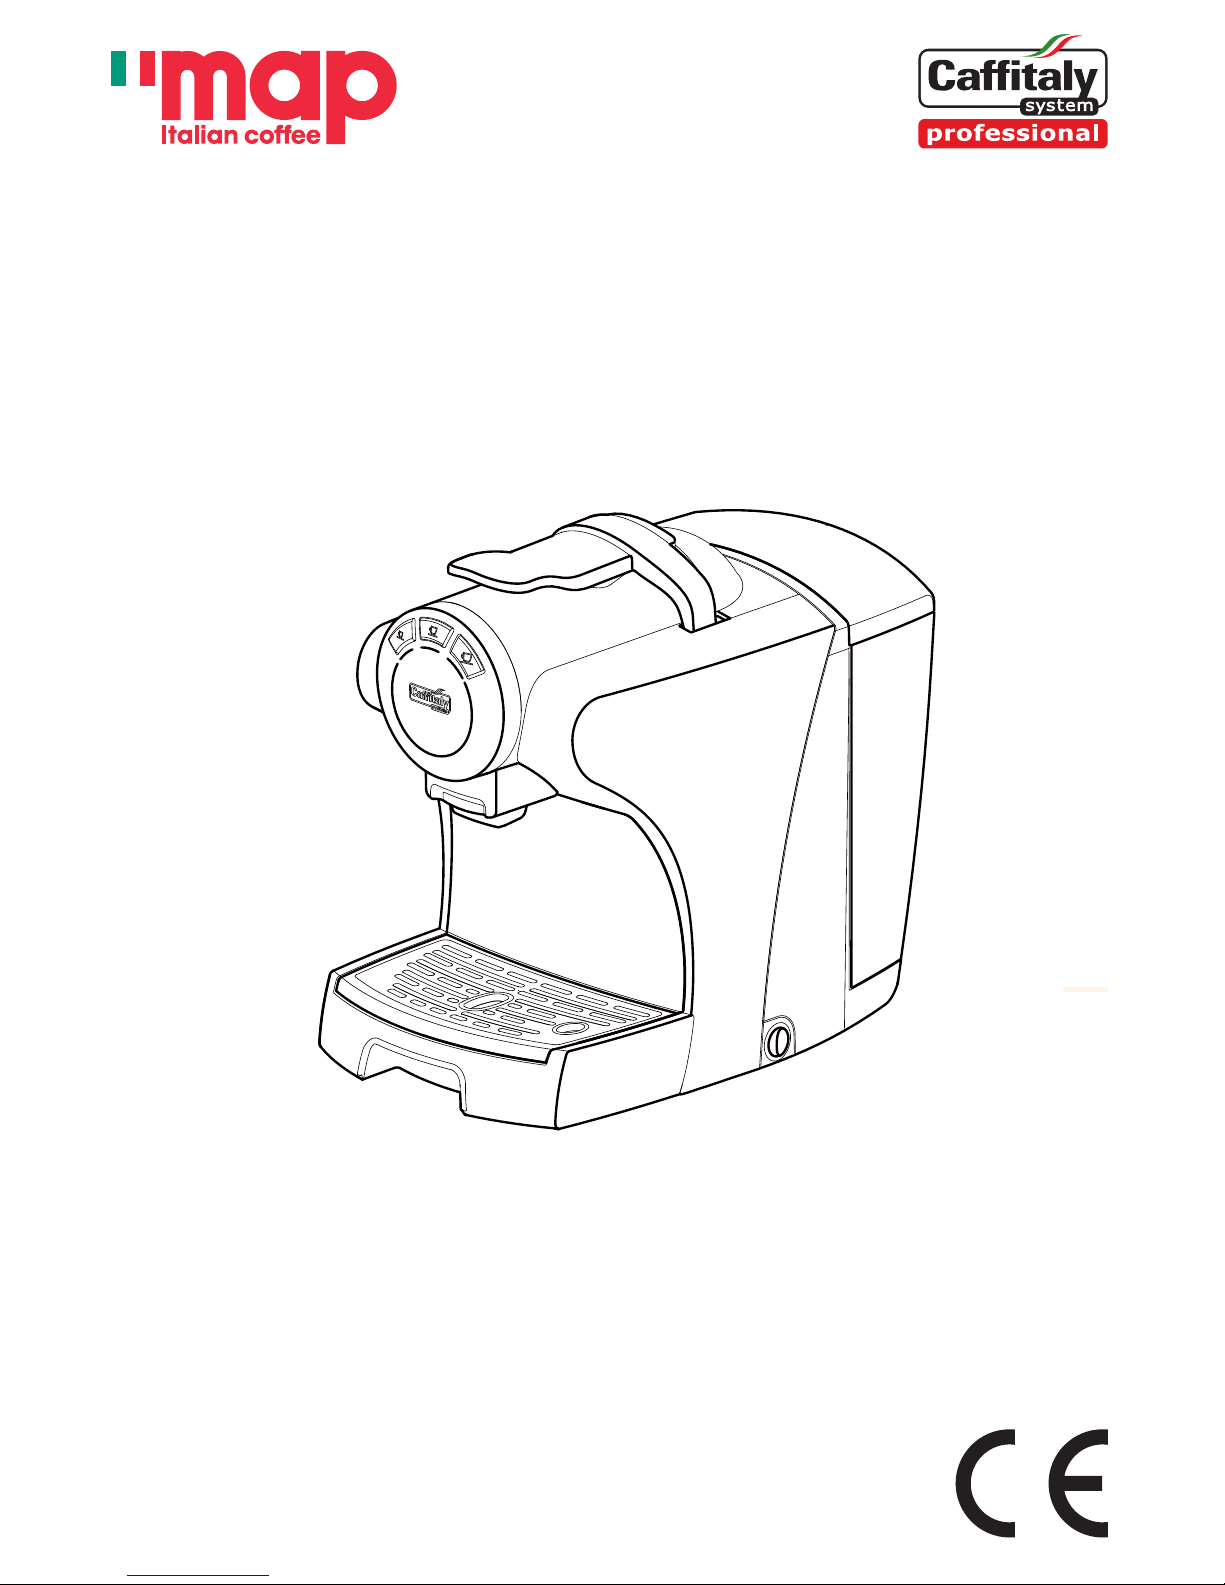
Instruction Manual
Model S05 / CAPO
Page 2
2
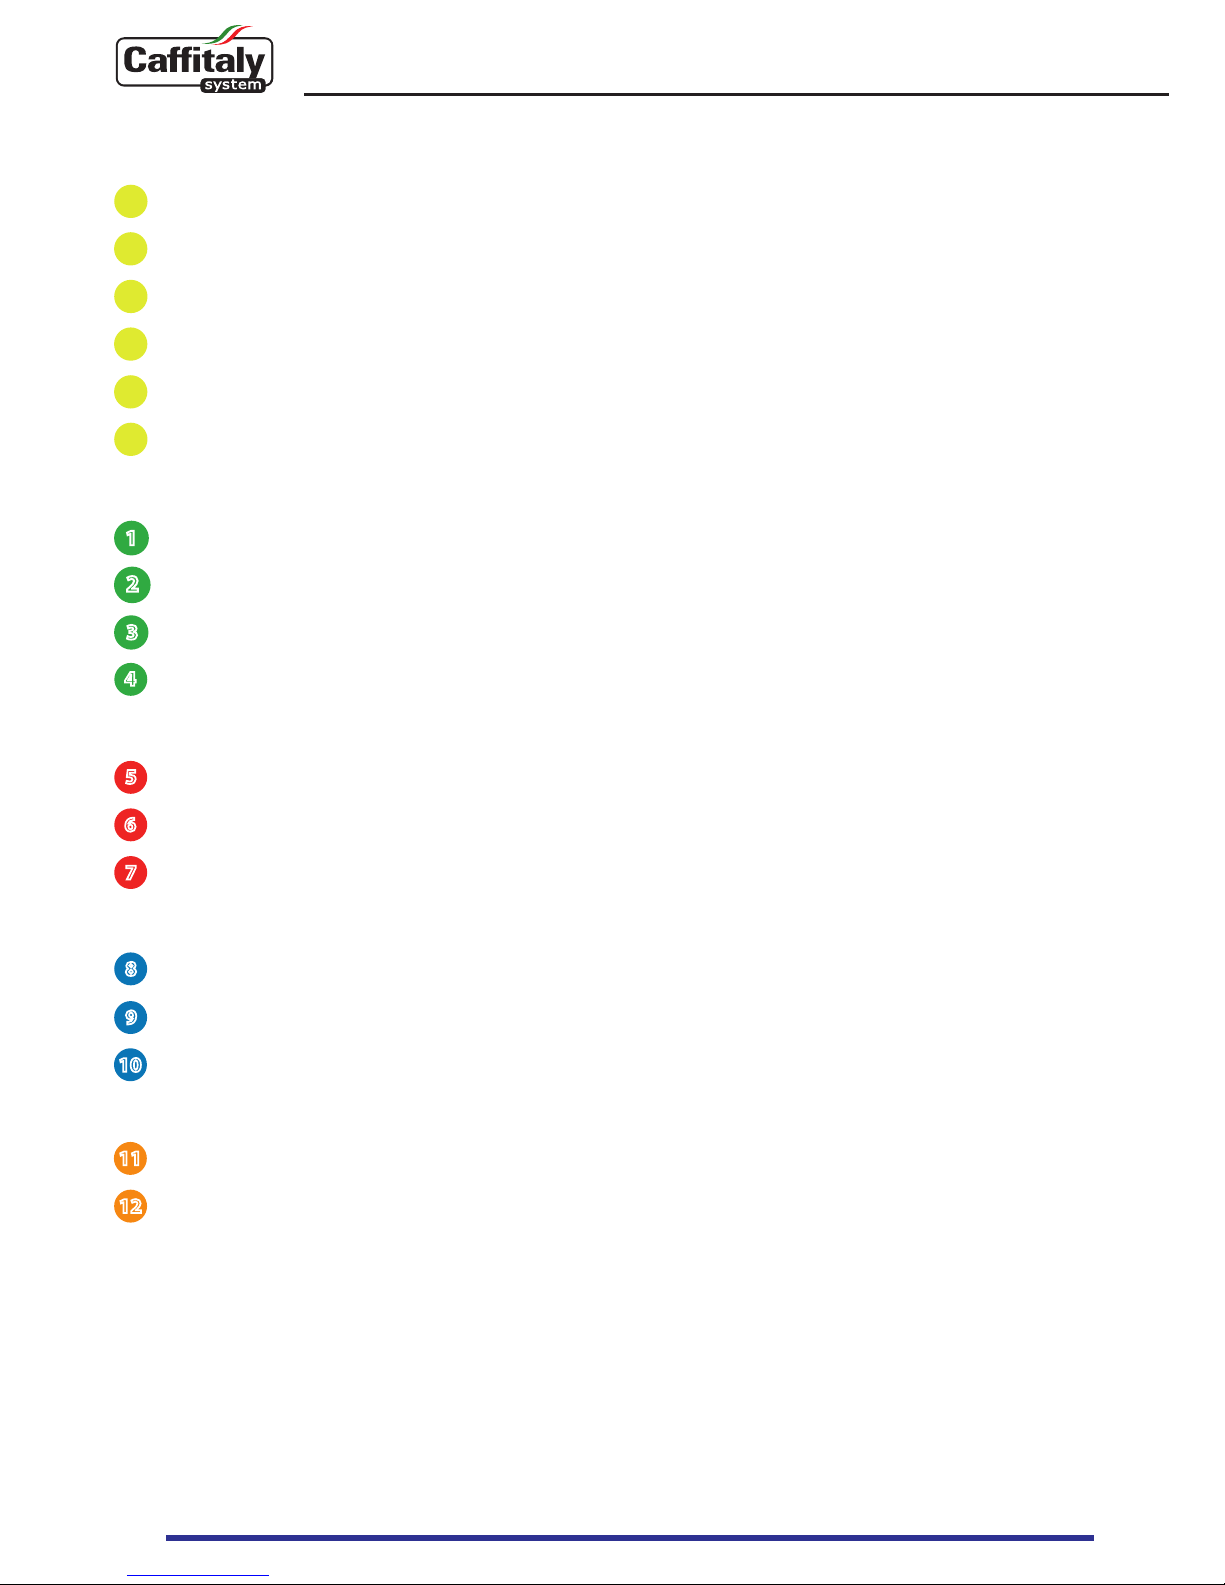
2
1
3
4
5
6
7
8
9
10
11
12
Table of contents
Introduction
Intended use ......................................................................................... 25
Follow the instructions - Symbols ..................................................... 25
Your Map Coee contact ..................................................................... 25
Safety warnings .................................................................................... 26
Instructions for use and disposal ...................................................... 27
Description of machine components ............................................... 28
Installation / Setup
First use or after a long period of nonuse ........................................ 29
Turning on the appliance .................................................................... 30
General operating indicators ............................................................. 31
Adjusting the cup/mug height .......................................................... 33
Dispensing the product
Dispensing coee ................................................................................. 34
Correct use of the buttons .................................................................. 35
Programming the quantity of coee in a cup ................................. 36
Cleaning and Maintenance
Saving energy ....................................................................................... 37
Daily maintenance ............................................................................... 38
Descaling ............................................................................................... 39
Miscellaneous
Troubleshooting ................................................................................... 43
Technical data ....................................................................................... 44
Page 3
3
Dear Customer,
Congratulations on the purchase of your new coee machine.
Thank you for having chosen our product and for your condence in our
company.
Intended use
This appliance is intended to be used in domestic and similar applications such as, for example:
- sta cooking areas in shops, oces and other work environments;
- holiday farms;
- by guests staying at hotels, motels and other residential facilities;
- facilities like bed and breakfasts.
Use only Map Coee capsules. Use of the appliance in any manner other than as directed herein
could cause harm to persons and void your warranty.
The manufacturer will not be responsible for injury or damage resulting from improper use of the
appliance.
Follow the instructions (Symbols)
CAUTION
This is the safety warning symbol. It is used to call your attention to possible risks of
personal injury. Abide by the safety messages provided in order to avoid possible injury
or death.
NOTE
This is the symbol used to highlight some actions that will optimise use of the
appliance.
Not dishwasher safe Maintenance tips
This symbol is used to highlight a blinking WHITE light indication.
This symbol is used to highlight a YELLOW or RED light indication.
Introduction
Your Map Coee Customer Care email: info@mapcoee.com.au
phone: 1800 239 438
Page 4
4
Introduction
Safety warnings
Carefully read the following instructions! In this way you will avoid the risk of personal injury and
damage to the appliance.
After removing the packaging, check that the appliance is not damaged. If damage is found, or
upon the rst sign of a defect (unusual noise or odours), or if any problem is detected inside the
appliance, do not use it and contact an Authorised Service Centre instead.
The packaging elements (plastic bags, etc.) must not be left within reach of children as they are
potential sources of danger.
Only use the appliance if the power cord is intact. If the cord is damaged, it should be replaced:
contact an Authorised Service Centre. Danger of electric shocks may occur otherwise.
Only use and store the appliance indoors. Make sure the electrical elements, plug and cord are
dry. Never submerge the appliance in water. Protect the appliance from sprays and drips. Water
and electricity together constitute a risk of electrocution.
Only connect the appliance to power outlets complying with the requirements of the law. Make
sure that the power supply voltage matches the rating shown on the data plate on the bottom
of the appliance.
The surface on which the appliance is installed must be solid, stable and heat-resistant, with an
incline no greater than 2°.
Do not allow the appliance to be used by children or persons with impaired mental, physical
or sensory faculties or insucient experience and/or skills, unless they are under the careful
supervision and guidance of a person responsible for their safety.
Children must be kept under supervision to prevent them from playing with the appliance.
Do not leave the power cord near hot surfaces, sharp edges or other sharp objects.
Never place your hands inside the capsule compartment. Danger of injury.
Always close the lever. Never open the lever while the appliance is operating.
Never remove parts of the appliance. Do not insert objects into the openings. This could cause
electric shocks! Any operation that is not described in this instruction manual should only be
performed by an Authorised Service Centre!
Do not pull on the power cord to disconnect it. Remove the plug to avoid damage to the outlet.
Page 5
The appliance has been manufactured using high quality materials that can be reused
or recycled. Dispose of the appliance in a suitable waste collection centre.
To rule out any abuse and dangers involved, ensure that the machine cannot be
plugged into the mains before delivering it to the scrapping service.
To achieve this, unplug the appliance from the outlet and cut the power cord as close
as possible to the machine.
At the end of its useful life, the product should not be disposed of with unsorted
household waste. It should be taken to a suitable selective waste collection centre set
up by the local authorities or returned to a retailer who provides this service. Separate
collection of an electric household appliance avoids a possible negative impact on the
environment and health arising from improper disposal and enables the materials
it is made of to be recovered so as to achieve signicant savings of energy and
resources. The crossed-out wheelie bin symbol applied on the product highlights the
need to dispose of electric appliances separately. Improper disposal of the product
by the user shall be subject to specic administrative sanctions as provided for under
current regulations. The packaging is made from recyclable materials. Contact the
competent authorities for information regarding local legislation.
5
Instructions for use and disposal
Introduction
Descale the appliance regularly, following the instructions provided. Failure to do so will result
in appliance working ineciently.
Clean the appliance carefully and regularly. If it is not cleaned, the build-up that forms may be
hazardous to your health. Unplug the appliance and allow it to cool before cleaning.
If you do not expect to use the appliance for a long period of time (leaving on vacation, etc.),
unplug it.
Page 6
6
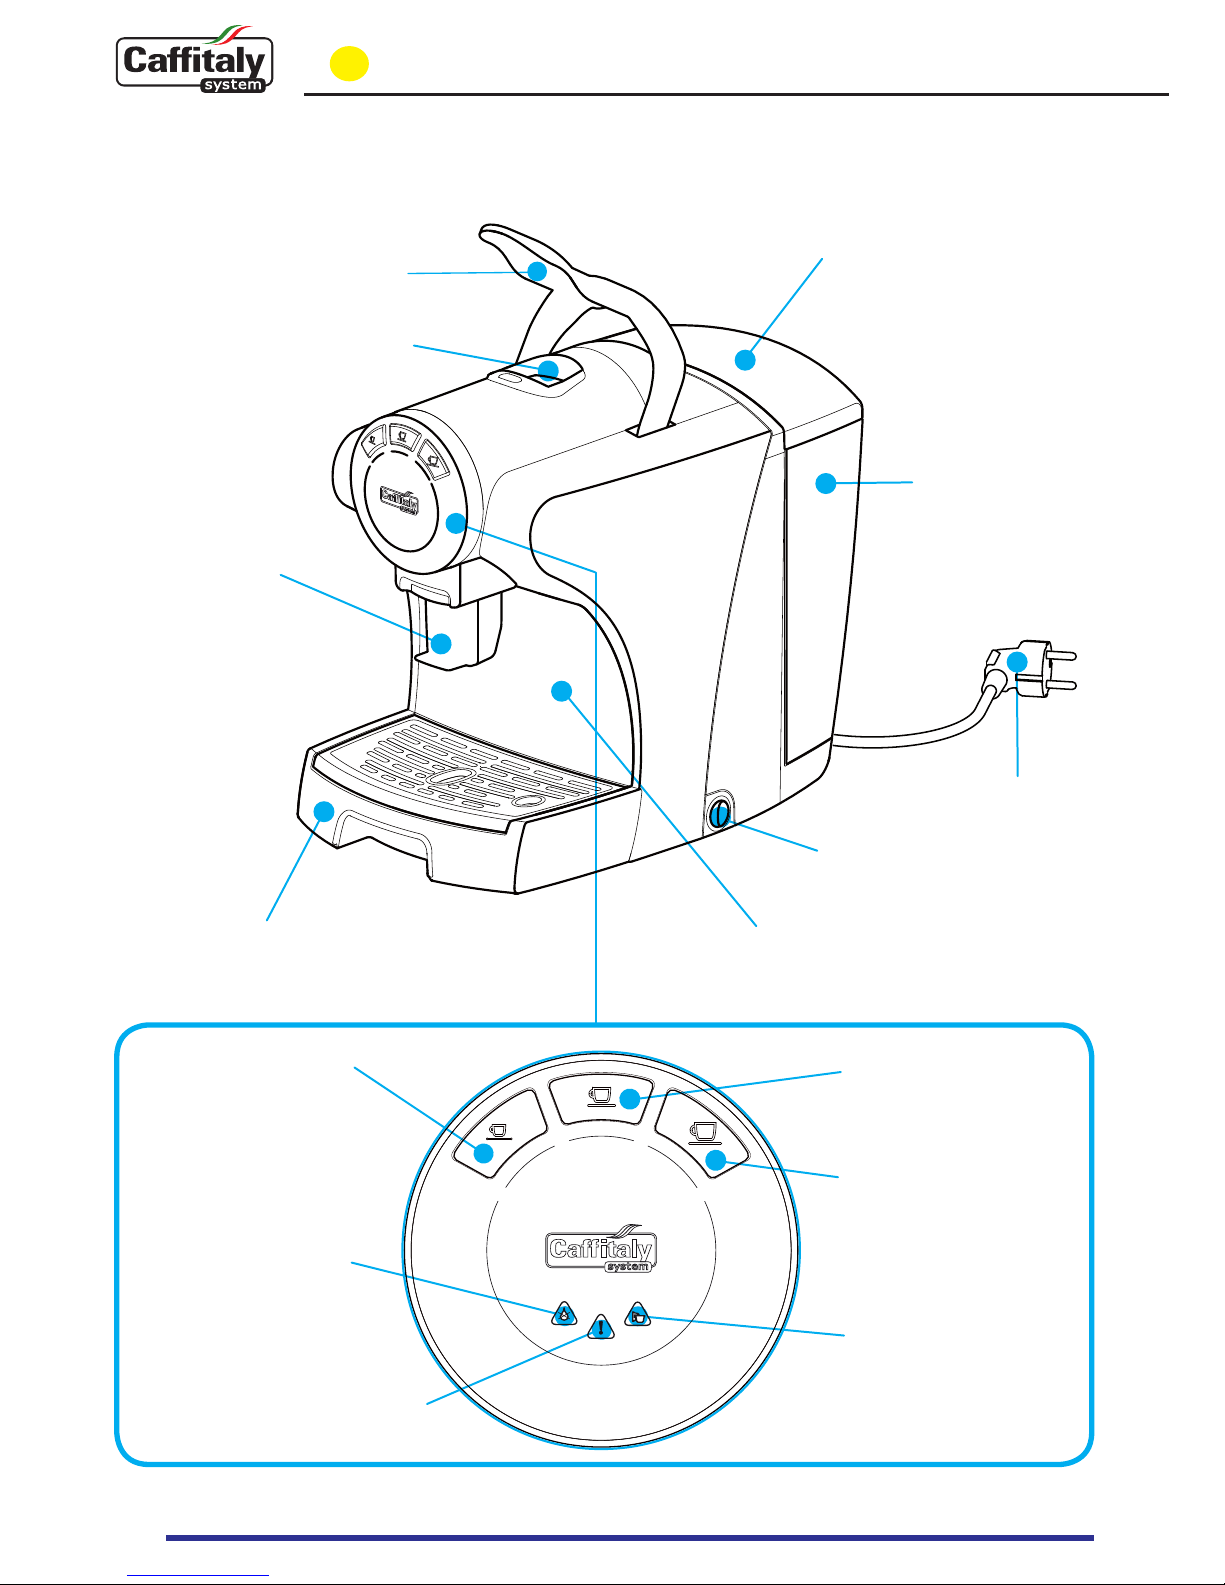
Power cord
Power on/o switch
"Long coee" button
"Espresso" button
"No Water"
indicator light
"Capsule drawer full"
indicator light
"Descaling"
indicator light
Drip tray
Dispensing
spout
(adjustable)
Lever for opening capsule
compartment
Capsule compartment
Used capsule drawer
Water tank
Water tank cover
Description of machine components
Introduction
"Filter coee" button
Page 7

7
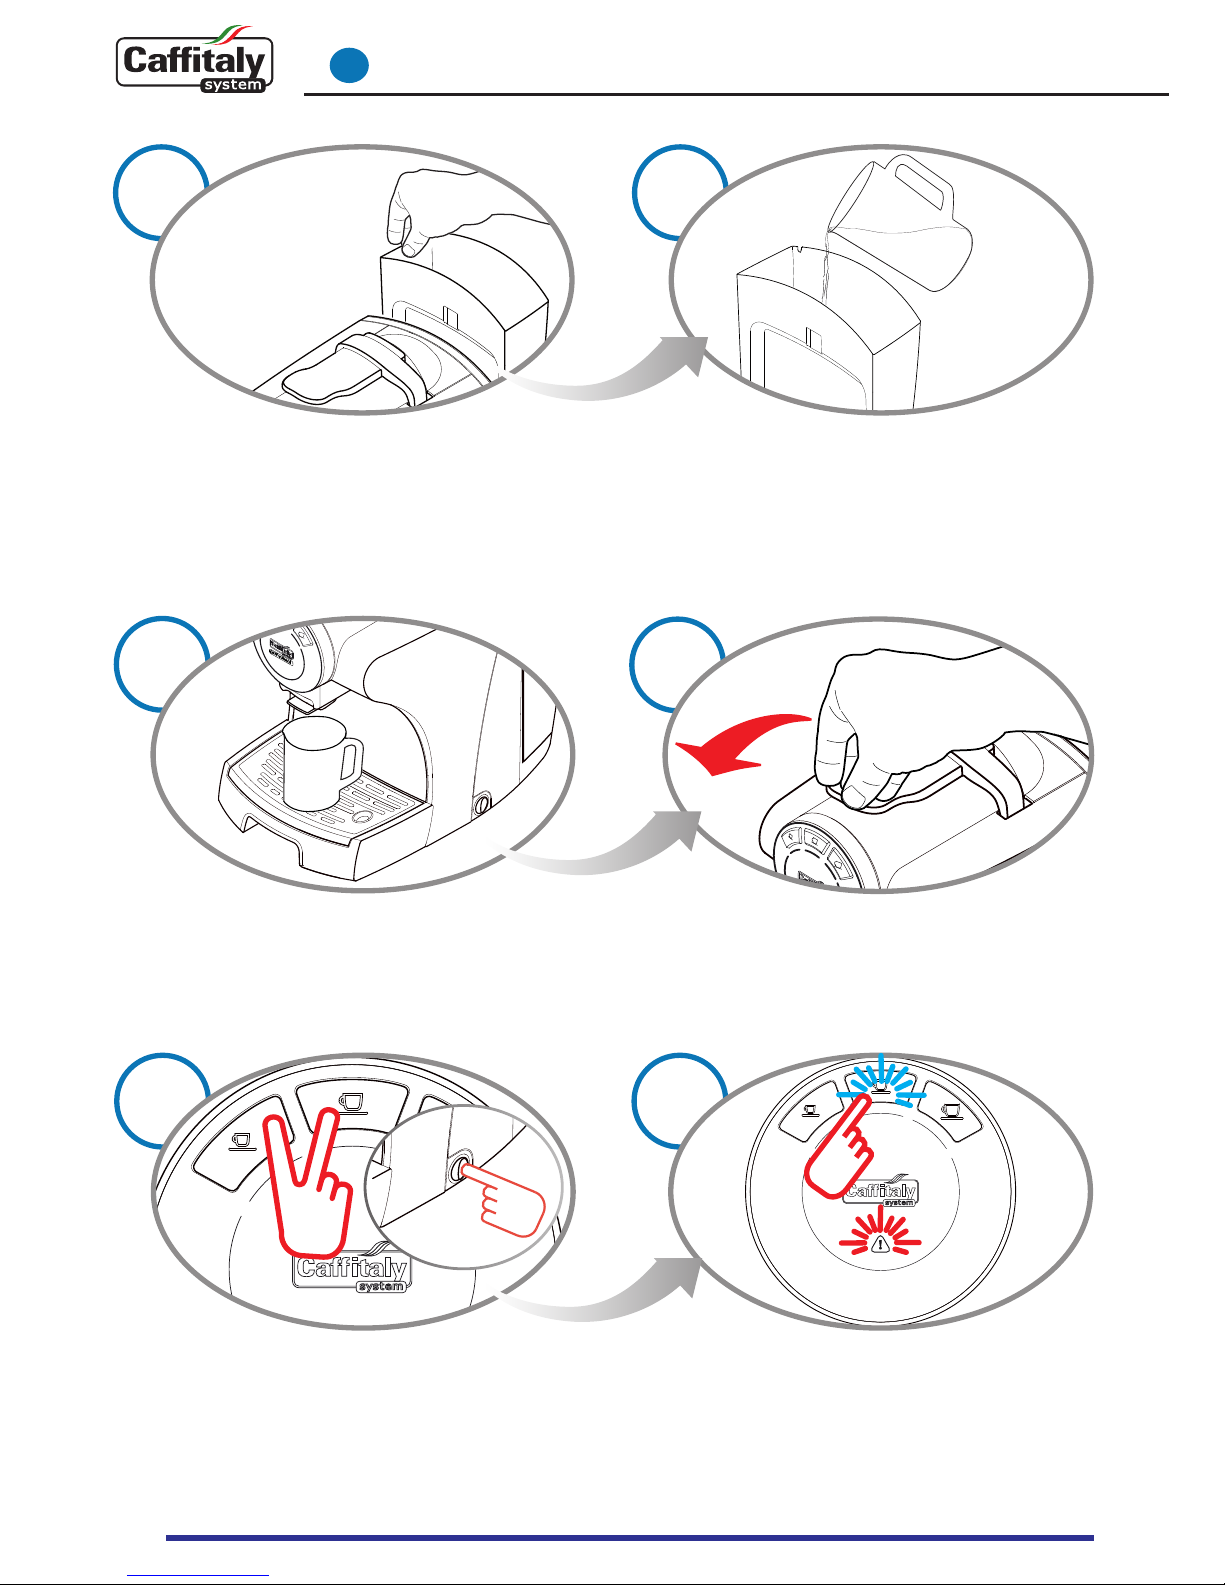
First use or after a long period of disuse
1
5
21
43
Fill the tank with fresh, still water. Plug in the appliance and turn it on.
Make sure the lever is closed. Together with the indicator light for the
dispensing buttons (espresso, long coee,
lter coee) the RED no water indicator light
also blinks alternately.
Place a large container (at least 250 ml) under
the coee dispensing spout.
Press one of the buttons (espresso, long coee,
lter coee). Wait for the machine to complete
the priming cycle and ll with water. The no
water indicatorl ight switches o.
6
NOTE:
If the buttons and the no water indicator light continue to blink after the lling
procedure has ended, repeat the steps in point 6.
Page 8
8
Turning on the appliance
2
Turning on the appliance
2
1
2
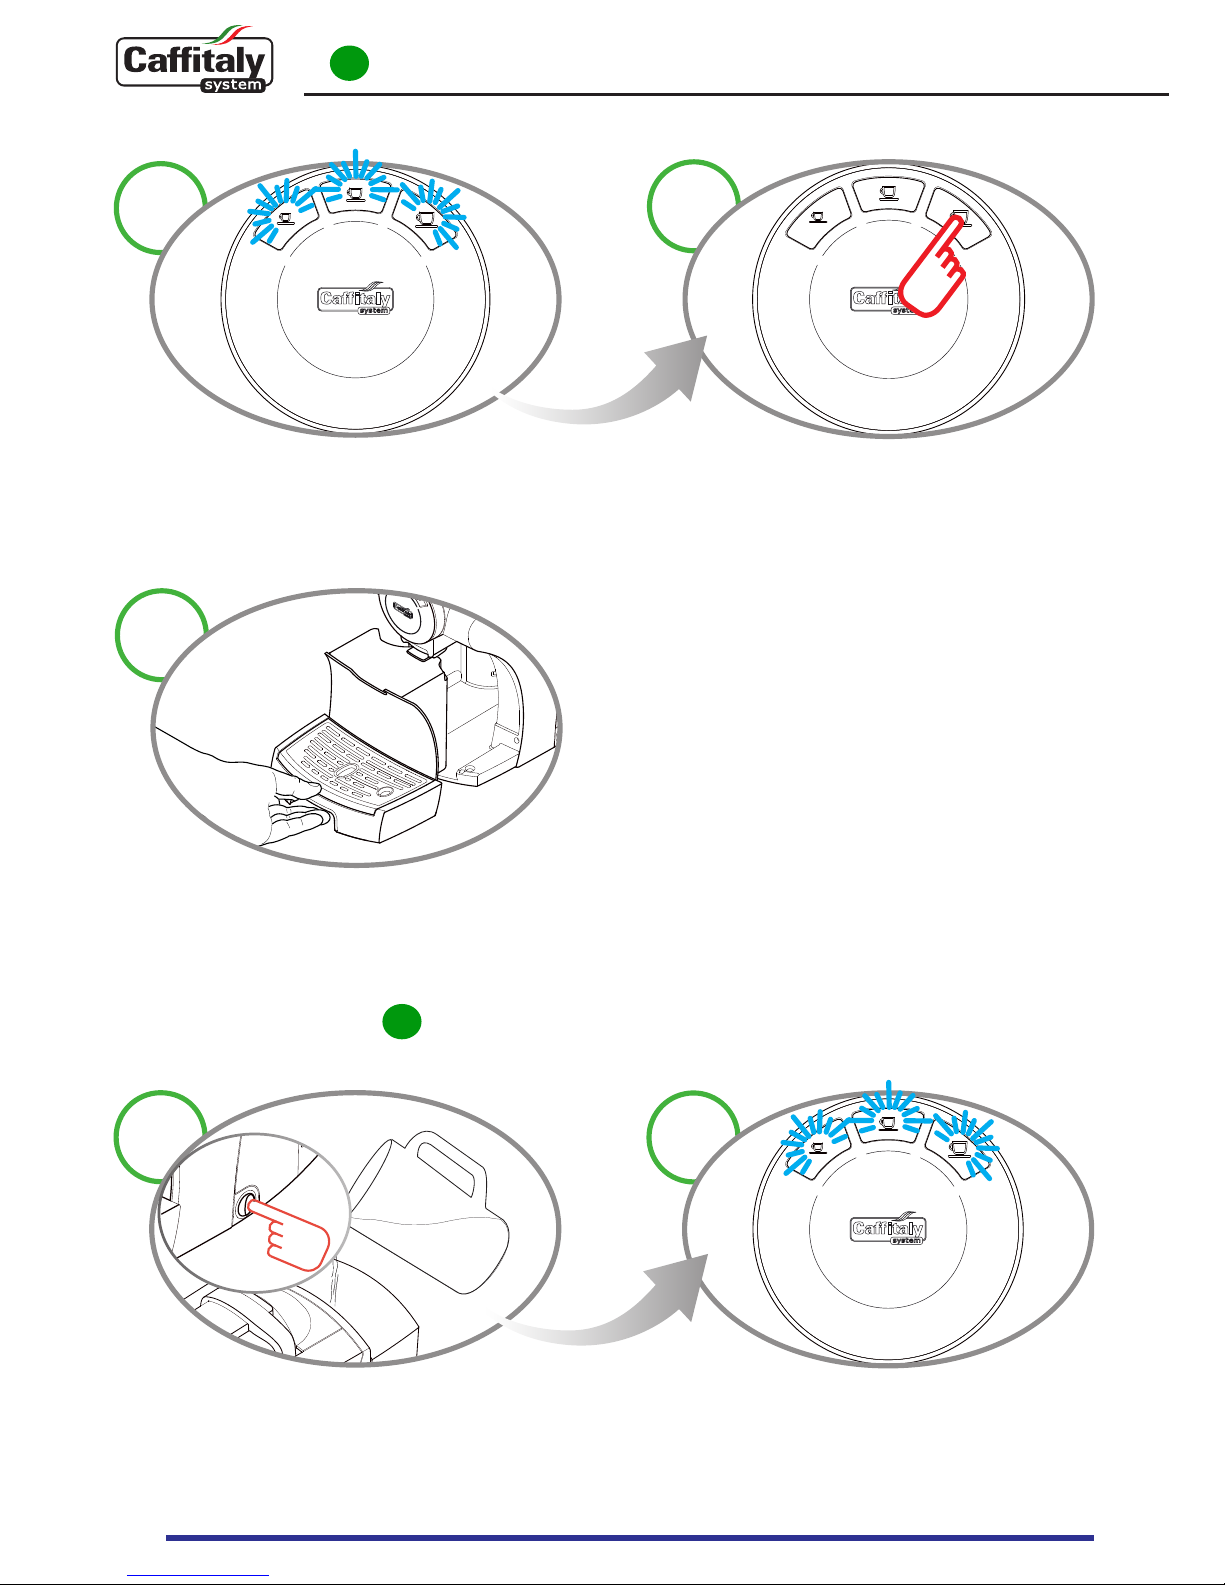
Fill the tank with fresh, still water. Turn
on the appliance.
The buttons blink at the same time; the
machine is warming up. When the buttons
turn on and remain steadily lit, the appliance is
ready for use.
7
8
9
The buttons (espresso, long coee, lter
coee) blink at the same time; the machine is
warming up.
When the buttons turn on and remain steadily
lit, rinse by pressing the lter coee button.
Press the button again to rinse a second time.
Wait for the machine to complete the rinse cycle.
At the end of this operation, empty out the
water from the used capsule drawer.
Page 9
9
General operating indications
3
21
3 4
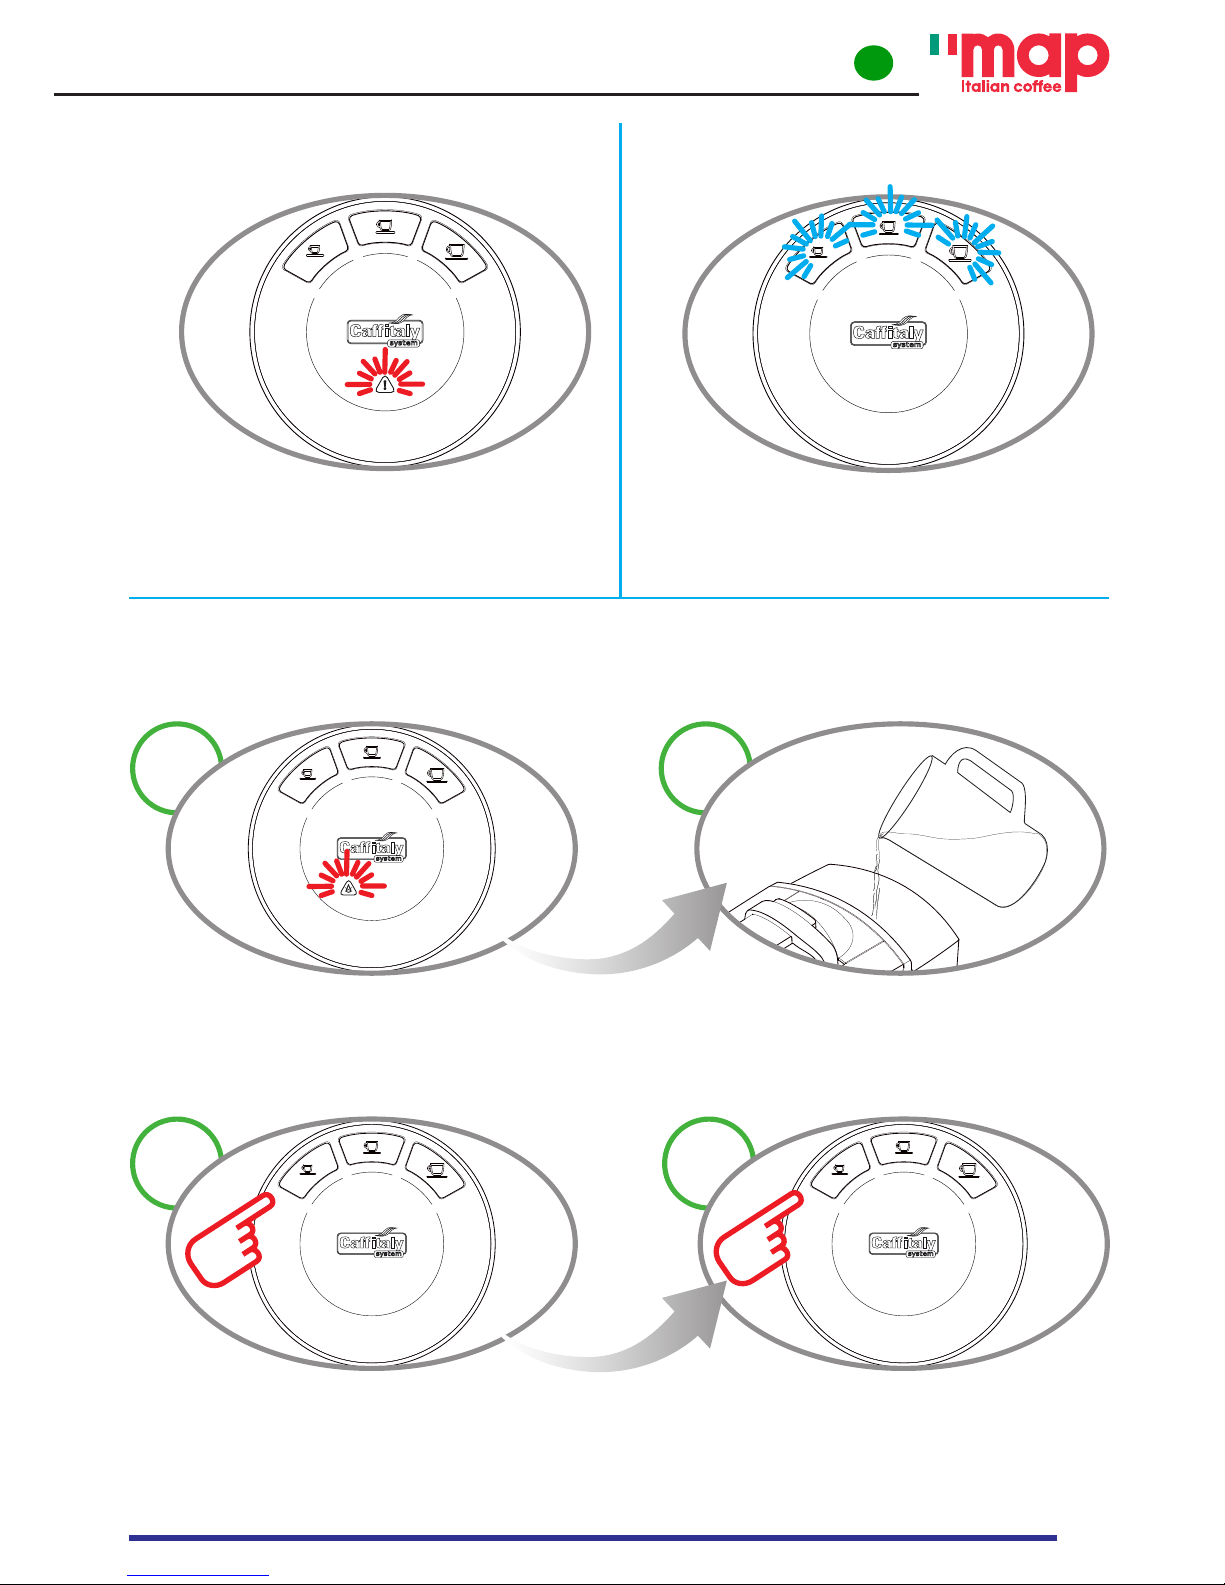
WHEN THE WATER RUNS OUT
DURING OPERATION
The water tank is empty when the no water
indicator light blinks RED and the appliance
emits 3 beeps.
Fill the tank with fresh, still water.
When the buttons turn on and remain steadily
lit, the appliance is ready for use.
Press one of the buttons (espresso, long
coee, lter coee). Wait for the machine
to complete the priming cycle and ll with
water.
DESCALING SIGNAL
When the descaling blinks YELLOW and
the machine emits 3 beeps, it is advisable to
perform the descaling cycle. (See Ch. 10)
HEATING
The buttons blink at the same time.
Page 10
10
1
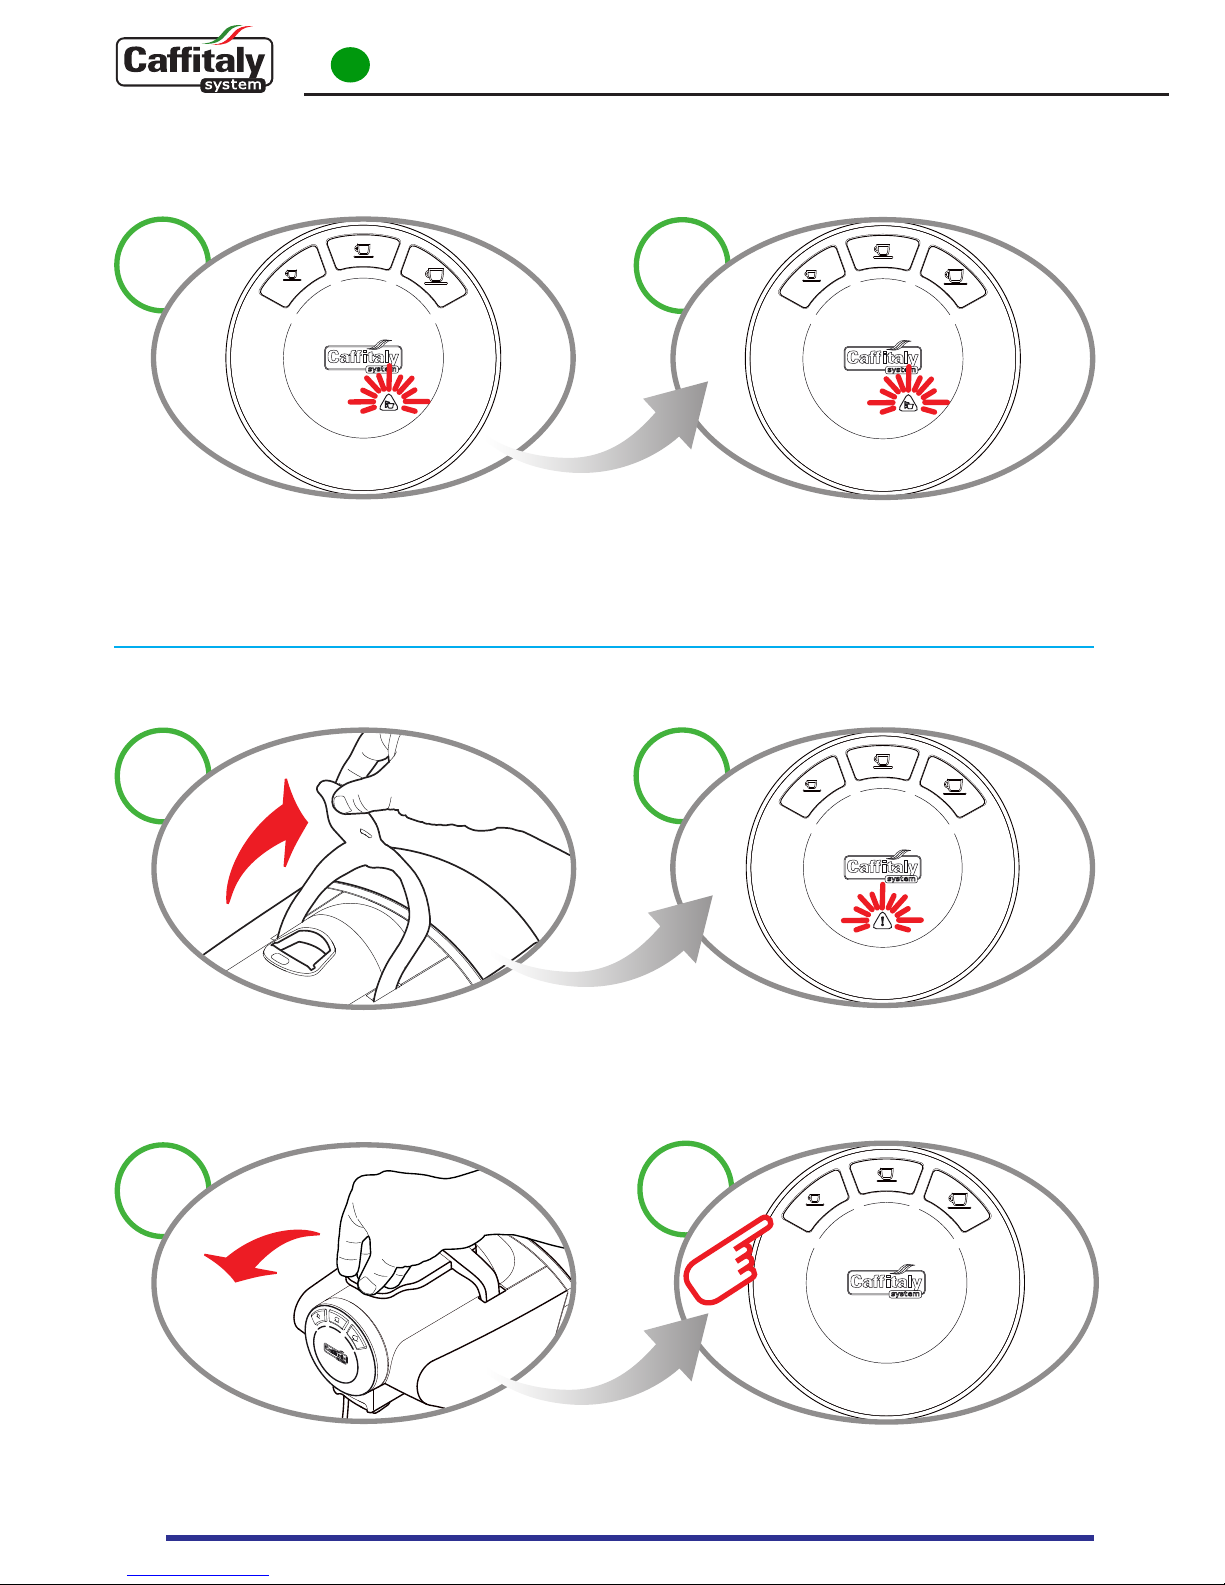
IF THE LEVER IS RAISED
If the lever is raised while a product is being
dispensed.
The descaling blinks RED and a beep is emitted.
The appliance will immediately stop dispensing.
General operating indications
3
2
4
3
Close the lever.
Press a button to reset the alarm.
The appliance is ready for use.
1ST GROUNDS DRAWER SIGNAL 2ND GROUNDS DRAWER SIGNAL -
DISABLING
When the capsule drawer full blinks RED, it is
advisable to empty the used capsule drawer.
1
2
When the capsule drawer full turns RED and
remains steady, the machine stops running and
you MUST empty the used capsule drawer. This
process should take place while the machine is on.
Page 11
11
Adjusting the cup/mug height
4
1
3
4
2
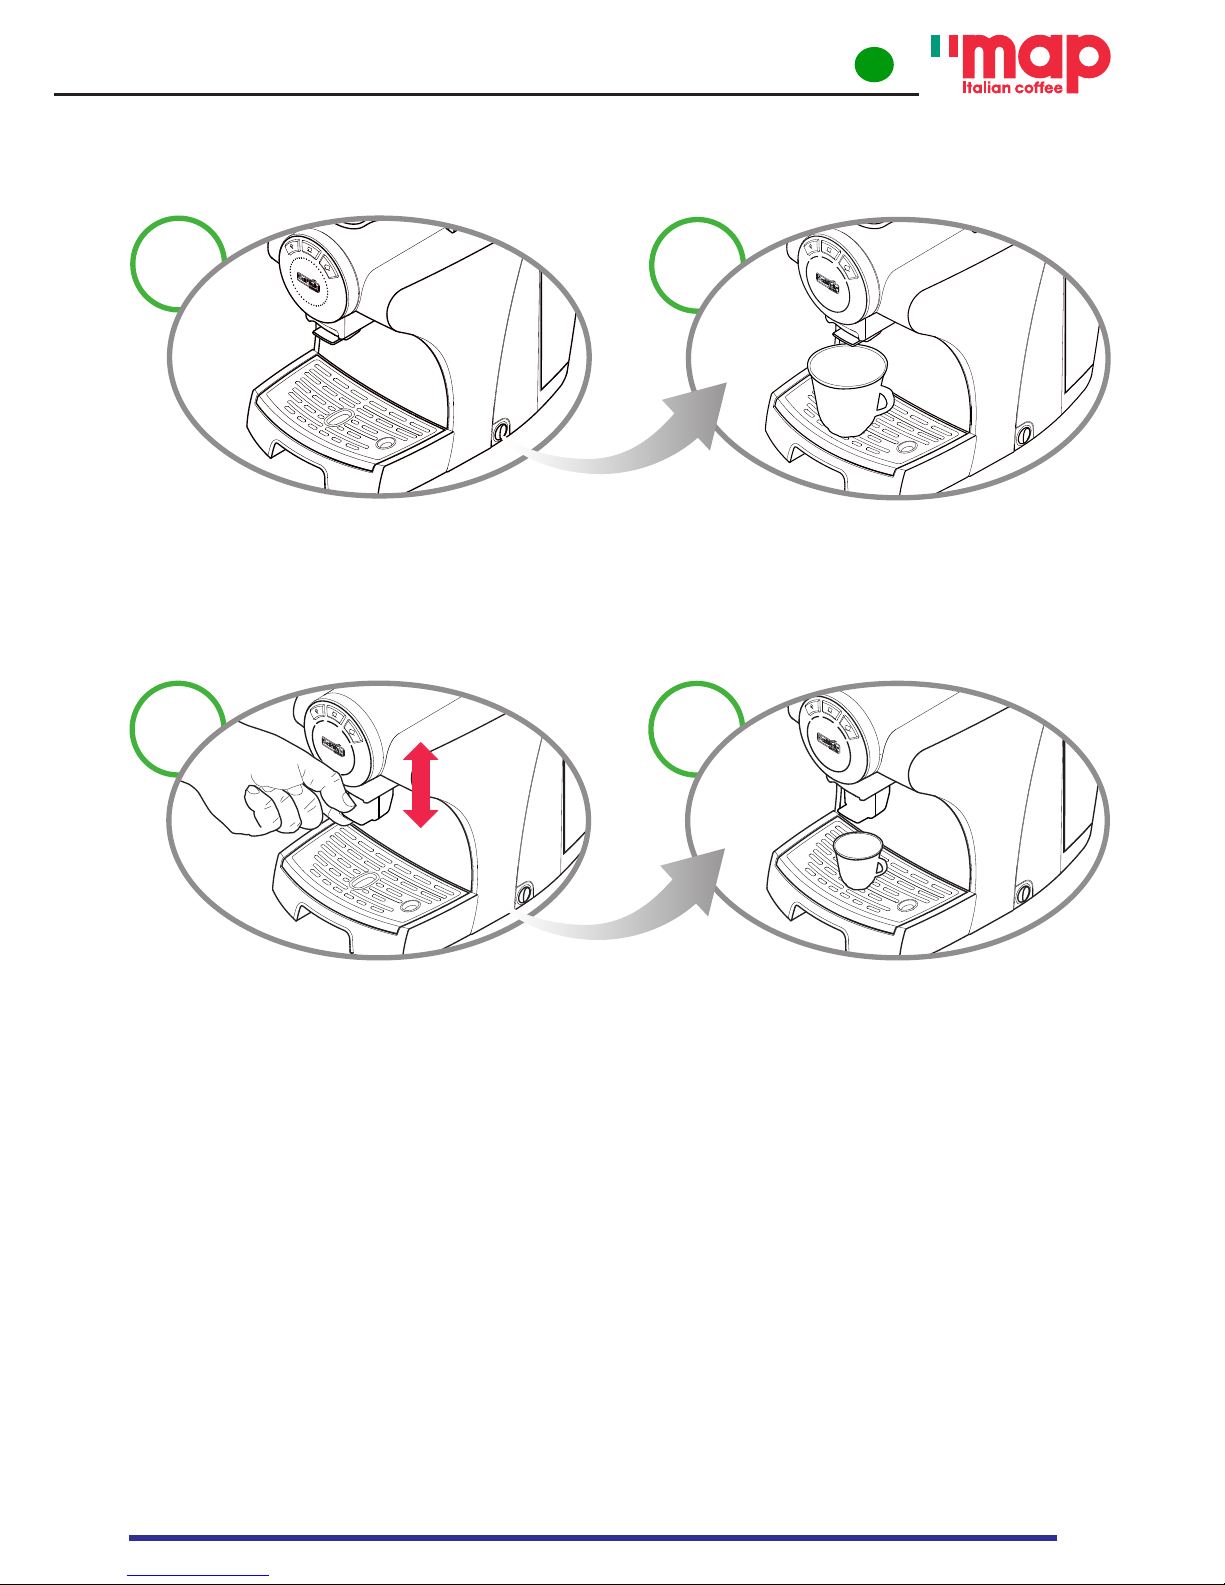
The appliance can be adjusted for the use of
mugs or espresso cups.
The appliance is initially set for the use of large
cups.
To use espresso cups, lower the end part of the
dispensing spout.
In this way you can obtain the best results
when using small espresso cups.
Page 12
12
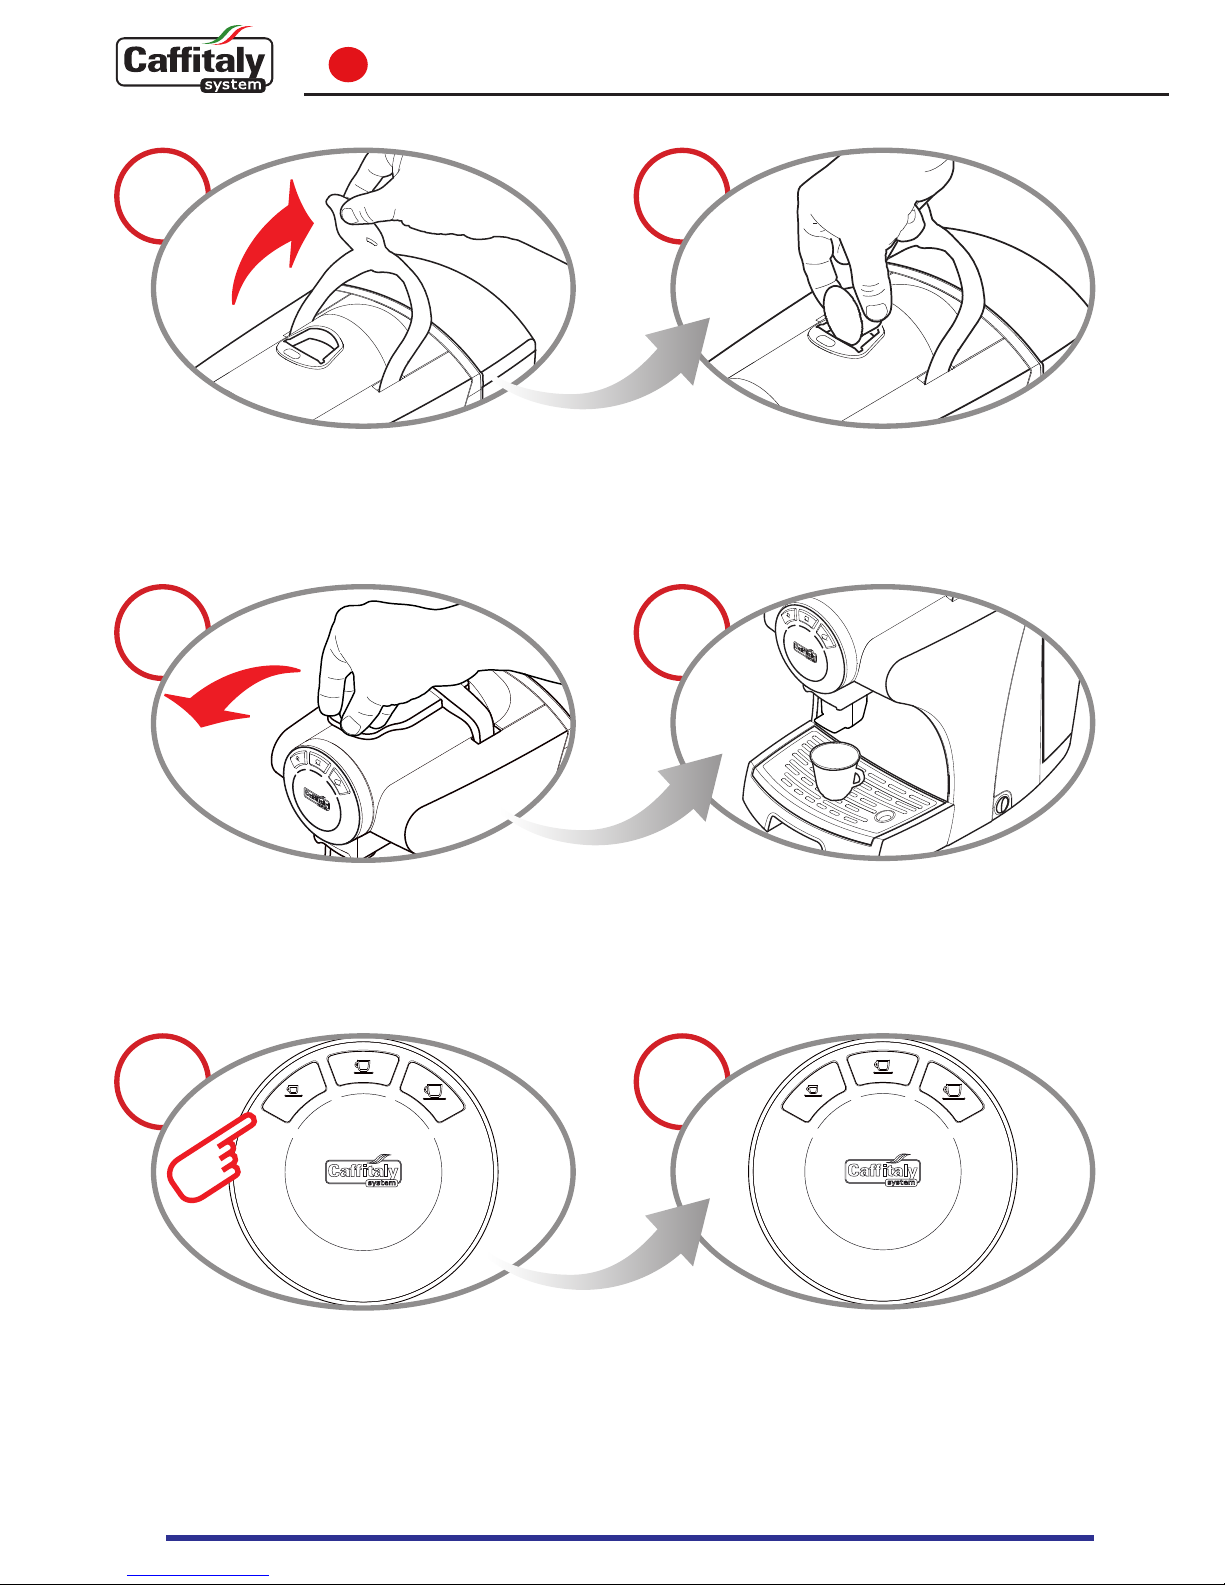
Dispensing coee
5
6
3 4
1 2
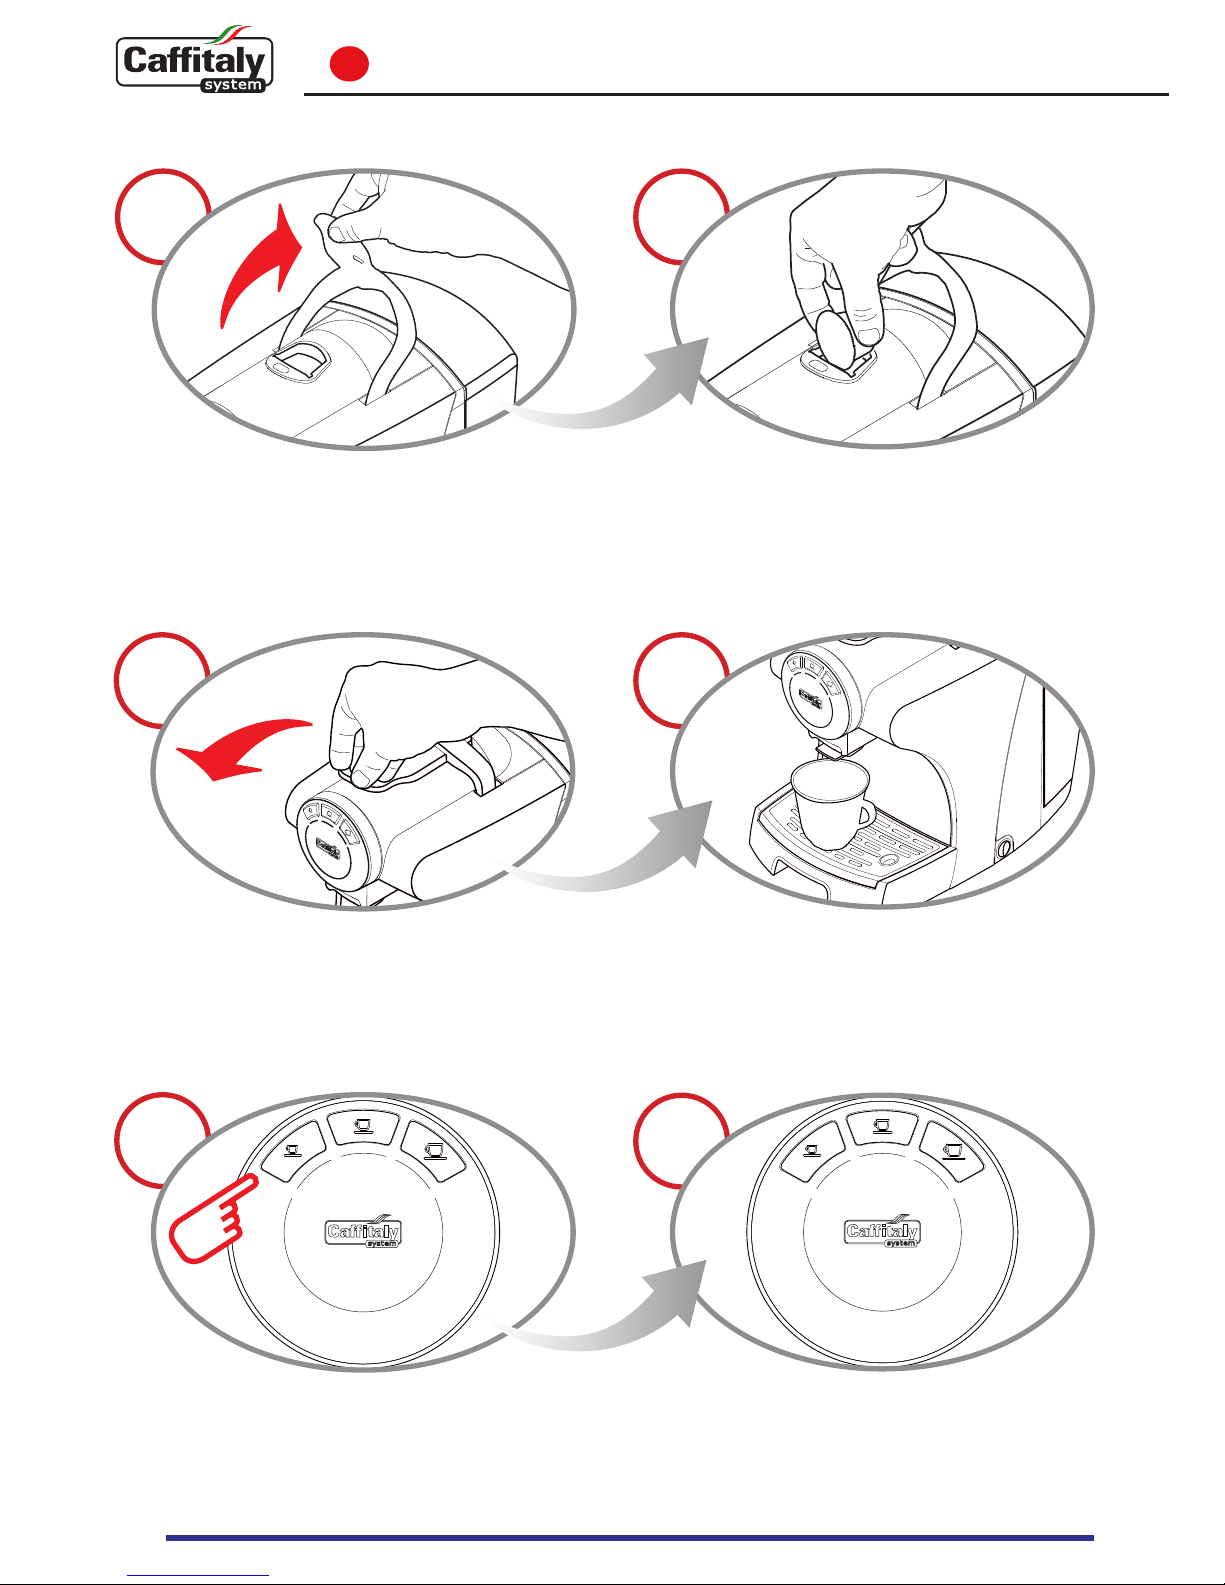
Raise the lever to open the capsule
compartment.
Insert the capsule, pressing it gently into place.
Close the lever fully.
Place a cup or mug under the coee dispensing
spout.
Press and release the button corresponding
to the type of coee you want.
The selected coee button will blink. The
appliance will stop dispensing on reaching the
programmed quantity and
will emit a beep.
5
Page 13
13
Correct use of the buttons
6
Correct use of the buttons
To dispense Espresso or Caè crema, use the “Espresso” or “Long coee” buttons only
(1st and 2nd from the left respectively, lit up in WHITE). The same buttons, depending on the
amount required, should also be used to dispense barley capsules, cocoa and milk.
The “Filter coee” button (3rd from the left, lit in WHITE) should only be used for “Filter coee”
or “Americano” beverages (very light). This button can also be used in conjunction with tea and
chamomile capsules, and general infusions.
Do not use the “Filter coee” button for espresso or intensely-avoured coee: when operating
in this mode, the machine is actually set to a low pressure which reduces foam, weakens the
taste of the coee and could cause interruptions in ow as the product is dispensed."
NOTE:
Traces of the product just dispensed may remain in the circuit of the machine.
When switching from one product to another, in order to fully enjoy the avour of
the beverage we suggest rinsing the machine by pressing the coee button as if
to dispense a coee without inserting a capsule.
6
NOTE:
The quantities of coee dispensed can be programmed according to personal
taste and the size of the cups or mugs used.
Please refer to chapter 7 for programming instructions.
87
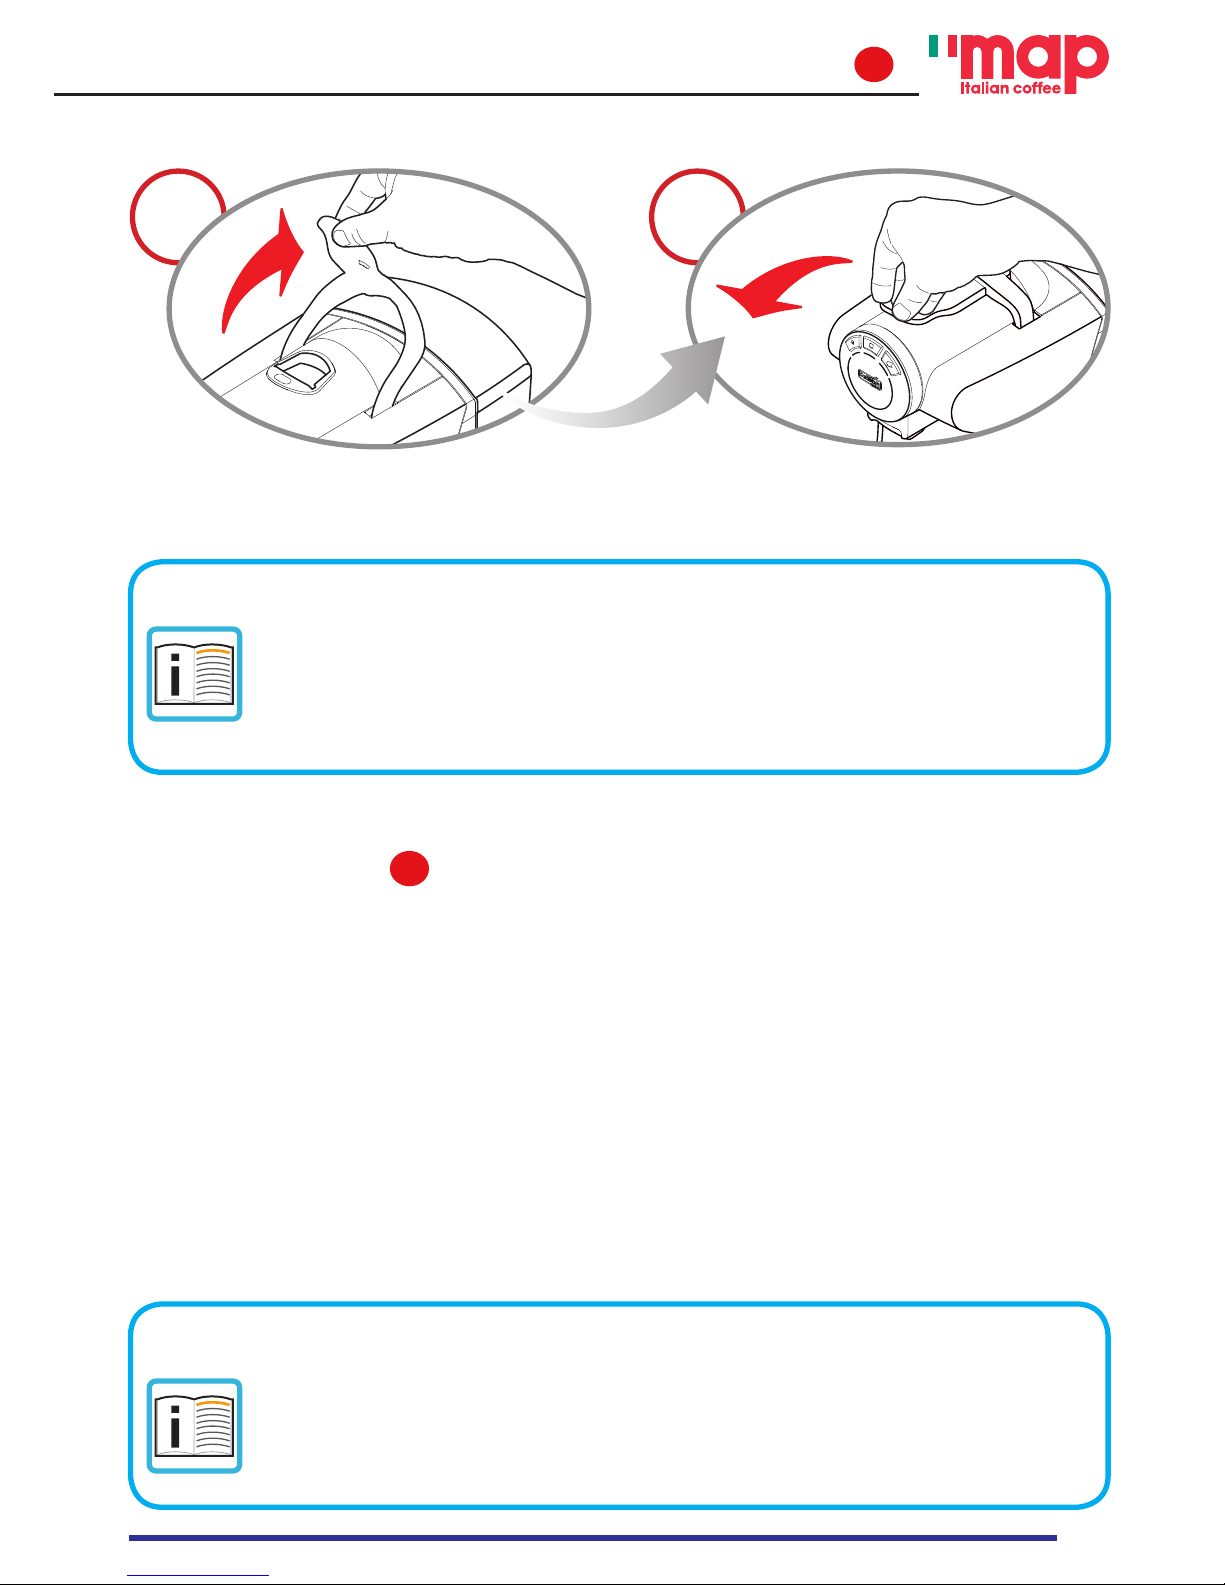
Raise the lever to eject the used capsule into
the drawer.
Close the lever.
Page 14
14
Programming the quantity of coee in a cup
7
6
3 4
1 2
Place a cup or mug under the coee dispensing
spout depending on the type of coee you
wish to program.
Press and hold the desired coee button.
On reaching the desired amount of coee,
release the button. Now the button is
programmed. The quantity of coee
dispensed may be programmed, from a
minimum of 30 ml to a maximum of 250
ml.
Raise the lever to open the capsule
compartment.
Insert the capsule, pressing it gently into place.
Close the lever fully.
5
Page 15
15
Saving energy
8
3
2
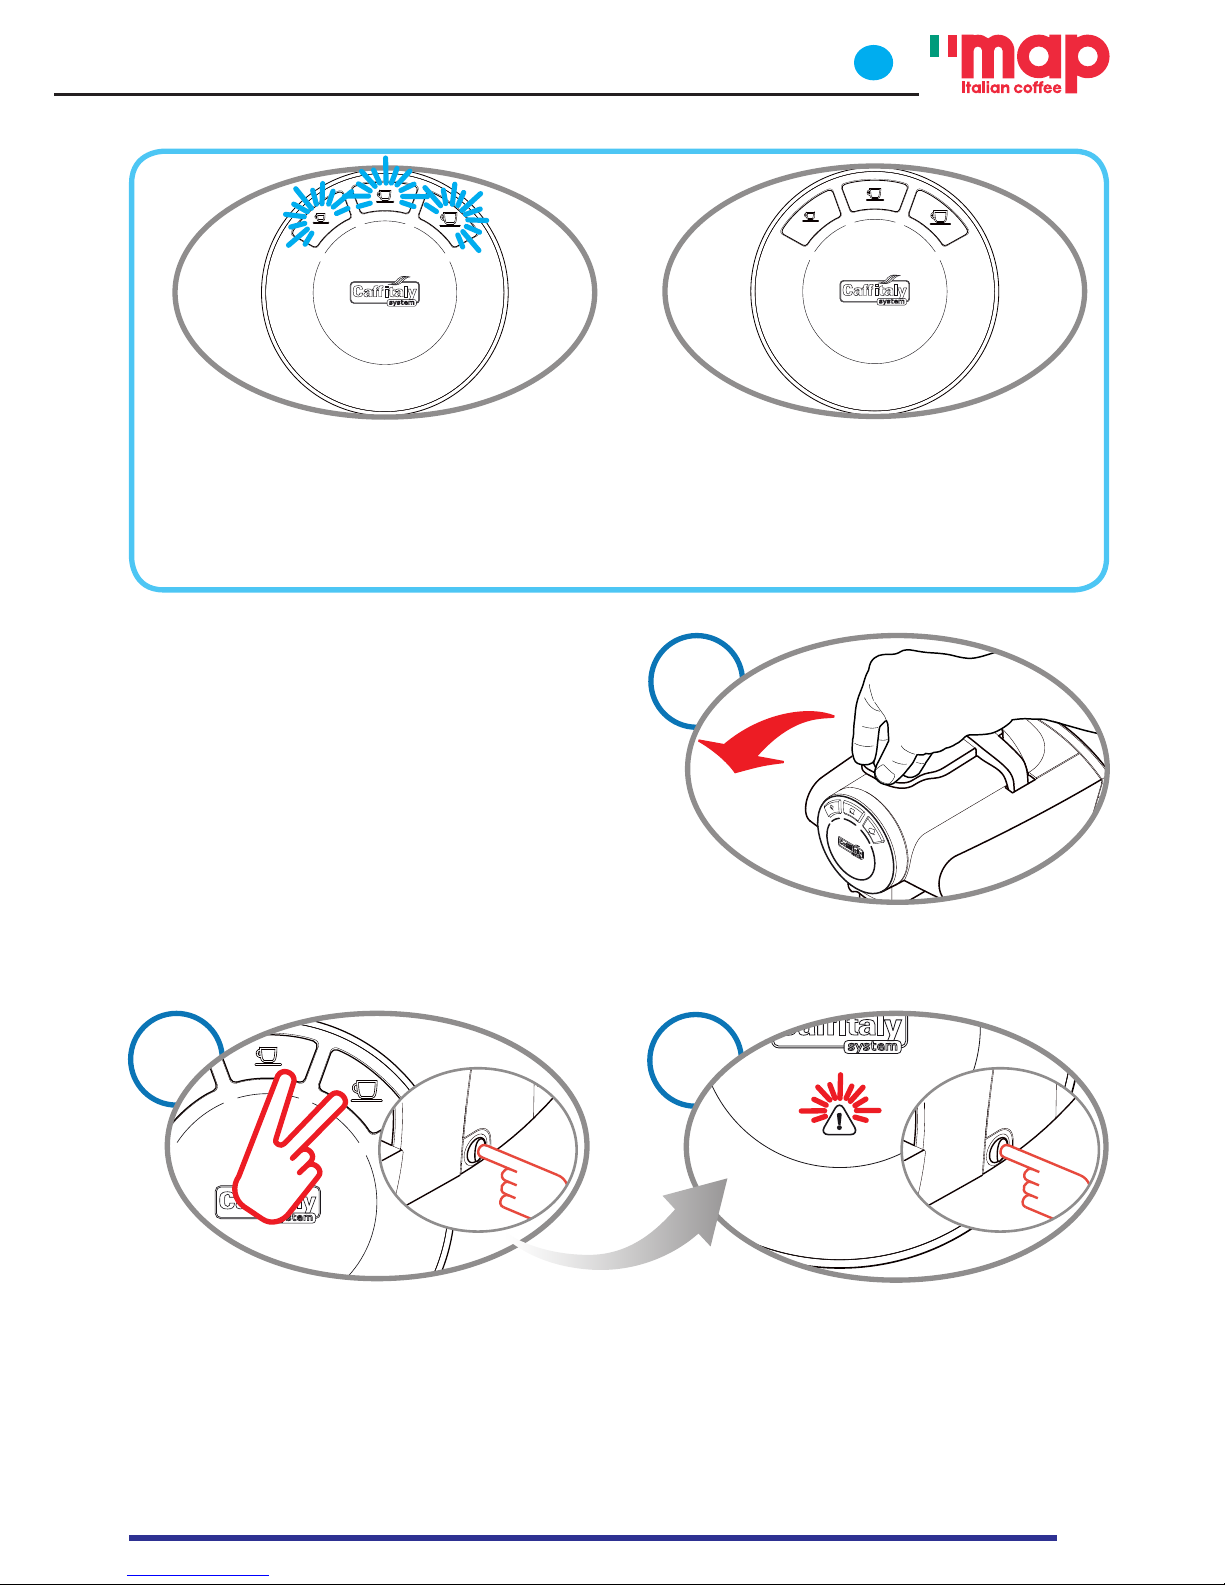
Press and hold the buttons (long coee and
lter coee) and turn on the machine by
pressing the power on/o switch.
Make sure the lever is lowered.
The descaling indicator light will blink three
times in RED and three beeps will be emitted
to conrm deactivation of the "Energy Saving"
function. When the function is reactivated, the
descaling indicator light will blink twice in
RED and two beeps will be emitted.
Turn o the machine, then turn it back on.
To deactivate (or reactivate) the function
saving energy, proceed as follows:
The machine will automatically reduce
consumption one hour after the last use. The
buttons (espresso, long coee, lter coee)
will slowly and sequentially blink with a
WHITE light.
To restore normal operating conditions, press
any button or raise the lever. The appliance will
start warming up. The buttons will be steadily
lit WHITE when the appliance is ready for use.
1
Page 16
16
1
3
2
4
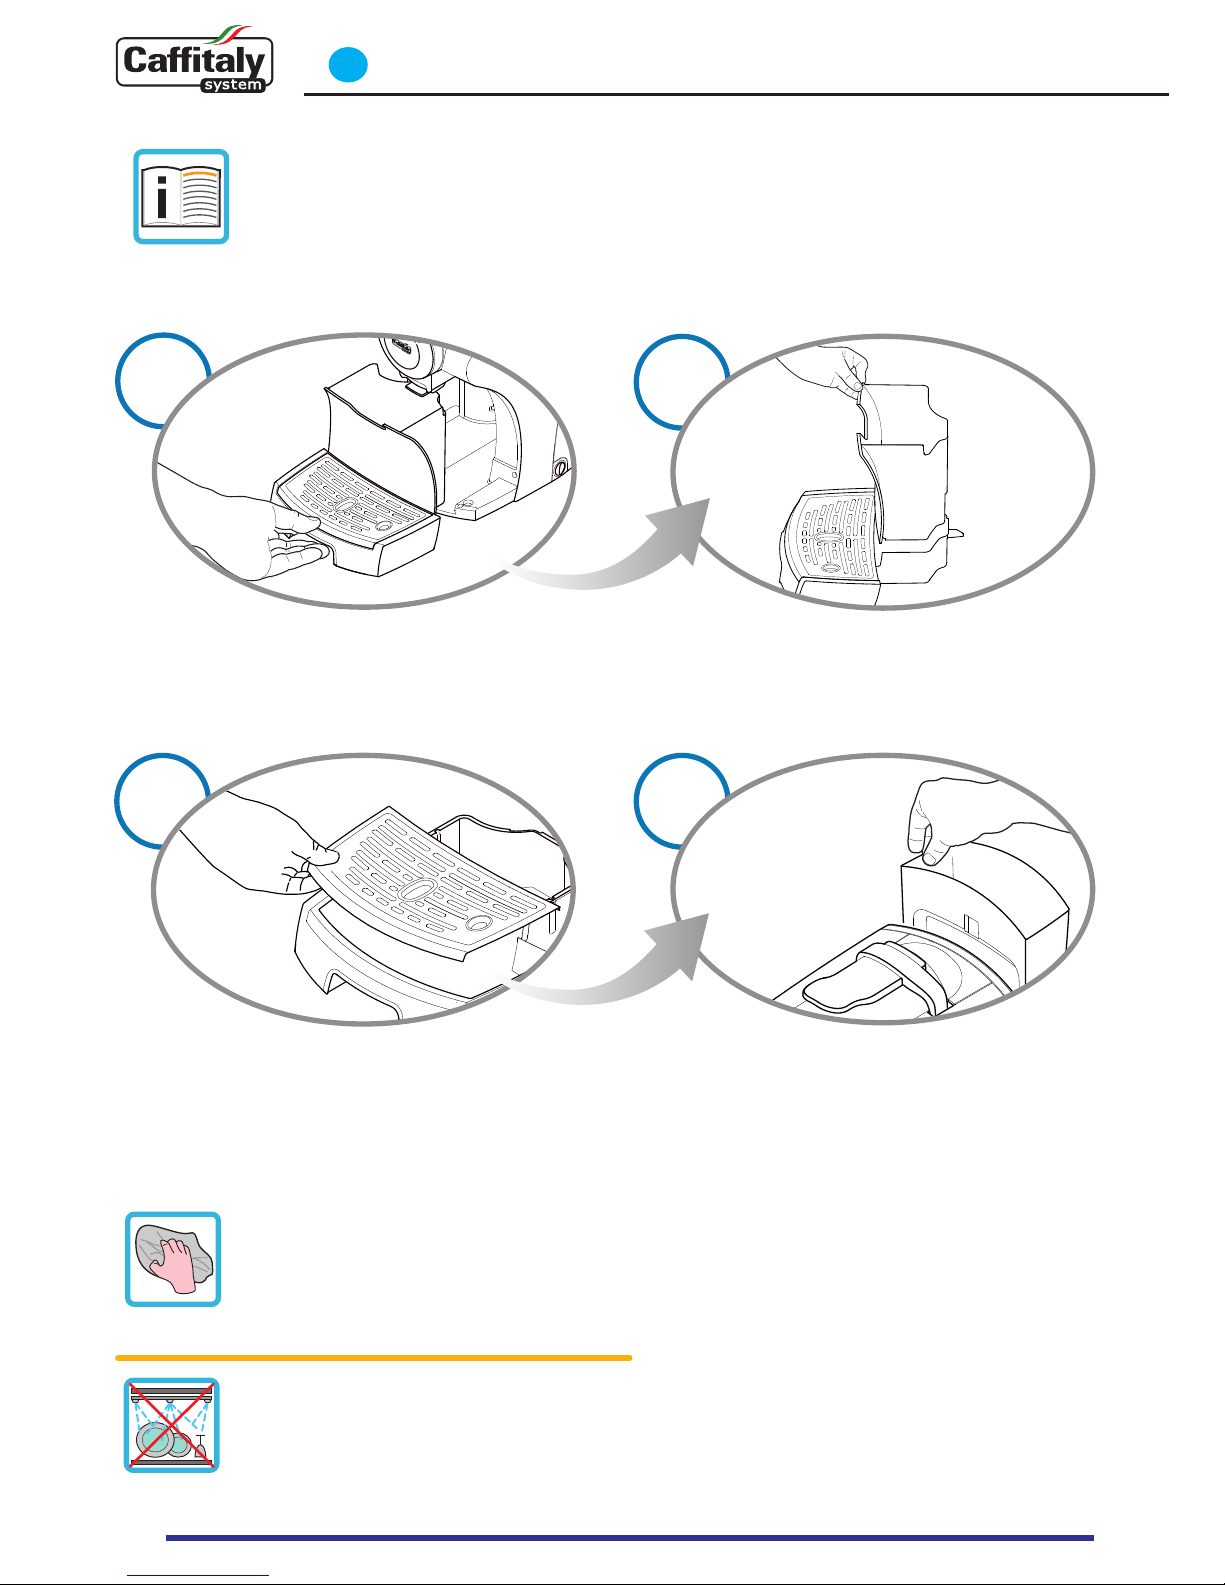
Remove the drip tray and used capsule drawer.
Remove the grid. Empty the drip tray and rinse
it out with water.
Lift the capsule drawer; empty and rinse it.
Remove the water tank. Empty and rinse out
the tank. The water tank is NOT dishwasher
safe.
Daily maintenance
9
The capsule drawer full indicator light may turn on during normal operation. The
operation must be performed when the appliance is on. The count of the capsules
deposited in the drawer is not reset if the capsule drawer is emptied when the
appliance is o. This is why the indicator light might turn on even if the drawer is
almost empty.
Use a soft cloth and a neutral
detergent to clean the surfaces of the
appliance. Do not use jets of water to
clean the appliance.
The plastic parts of the appliance are
not dishwasher safe.
Page 17
17
Descaling
10
1 2
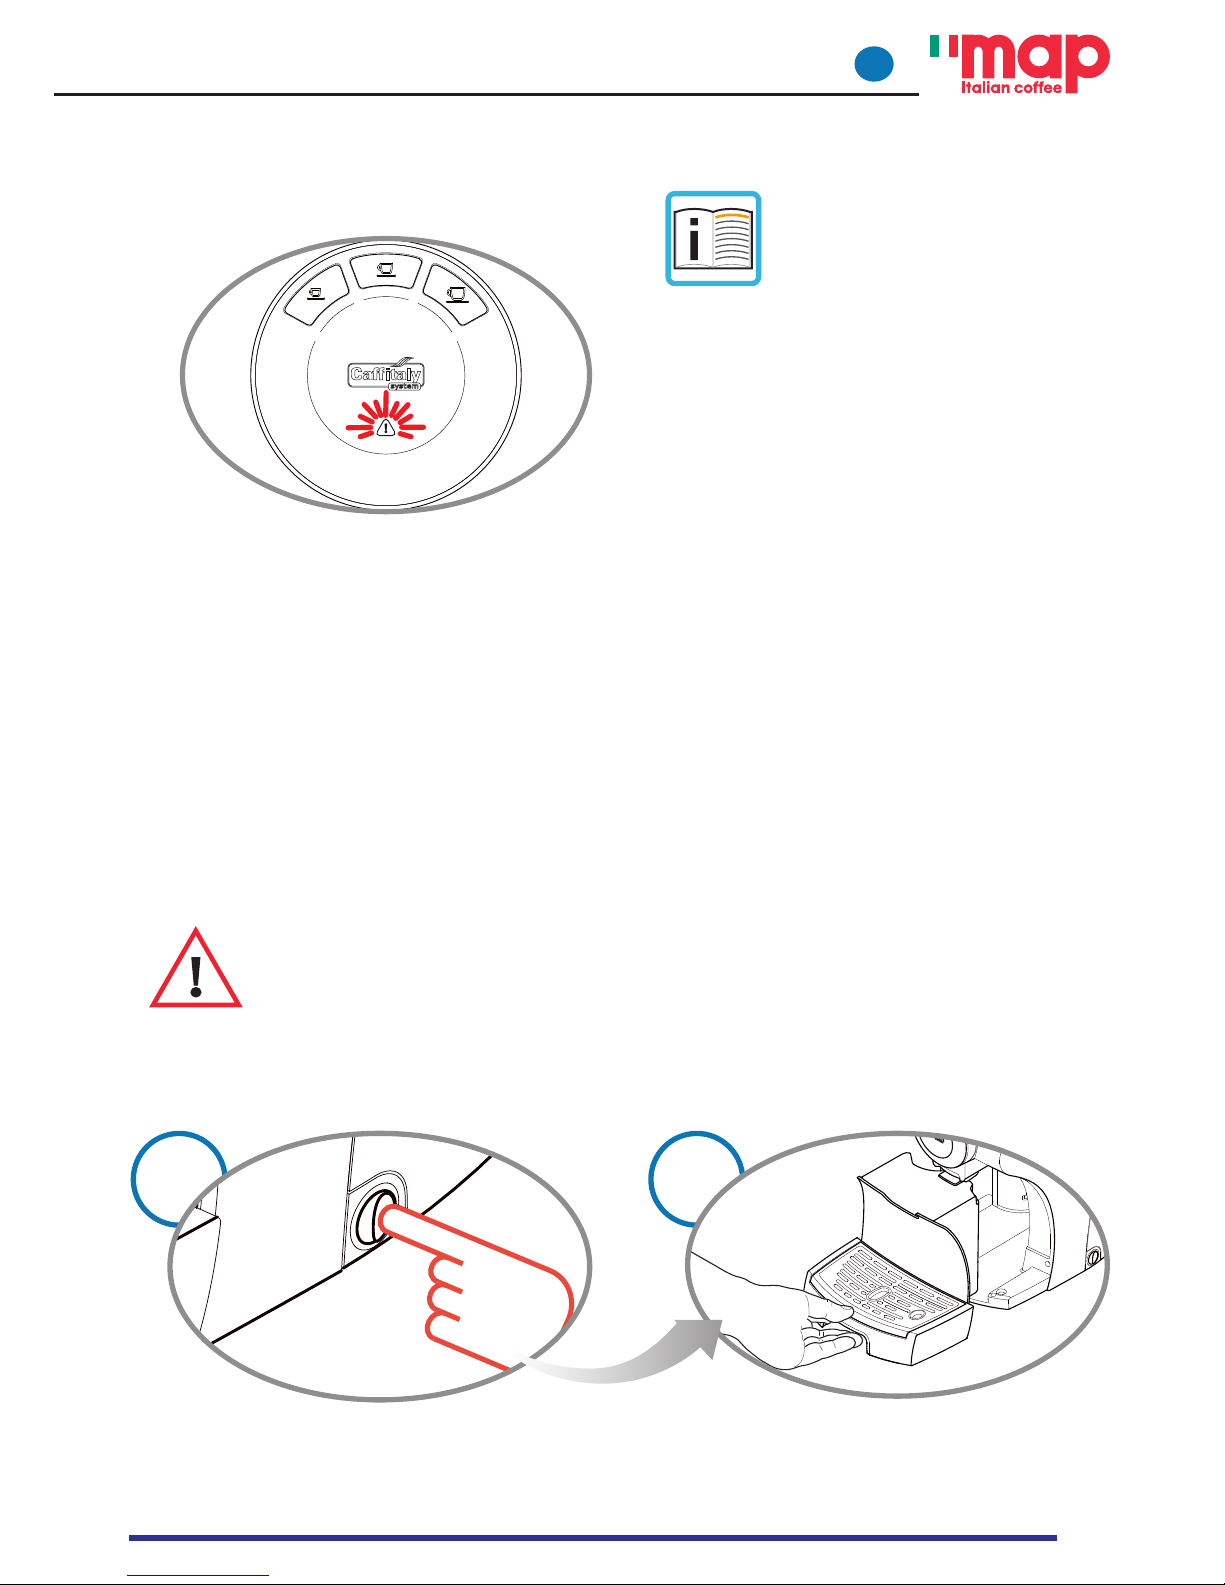
Turn o the machine.
Empty and rinse out the used capsule drawer
and drip tray.
DESCALING SIGNAL
When the descaling blinks YELLOW and
the machine emits 3 beeps, it is advisable to
perform the descaling cycle, as illustrated
below.
The machine features an
advanced program that monitors
how much water is used to
dispense beverages. This
measurement provides the user
with indications as to when the
machine needs to be descaled.
Specic indications are given in
chapter 3.
It is advisable to use the Cata System descaling agent. This has been studied to comply
with the technical characteristics of the appliance, in full observance of consumer safety.
The descaling agent must be disposed of in compliance with manufacturer instructions
and/or with current regulations in force in the country where the appliance is used.
CAREFULLY read the directions for use on the package of the descaling agent.
Avoid contact with eyes, skin and machine surfaces. Switch the appliance o during
descaling, and do not lift the lever.
A person must be present during the operation.
Do not use vinegar: it could damage your appliance!
Page 18
18
Descaling
10
5
7
6
8
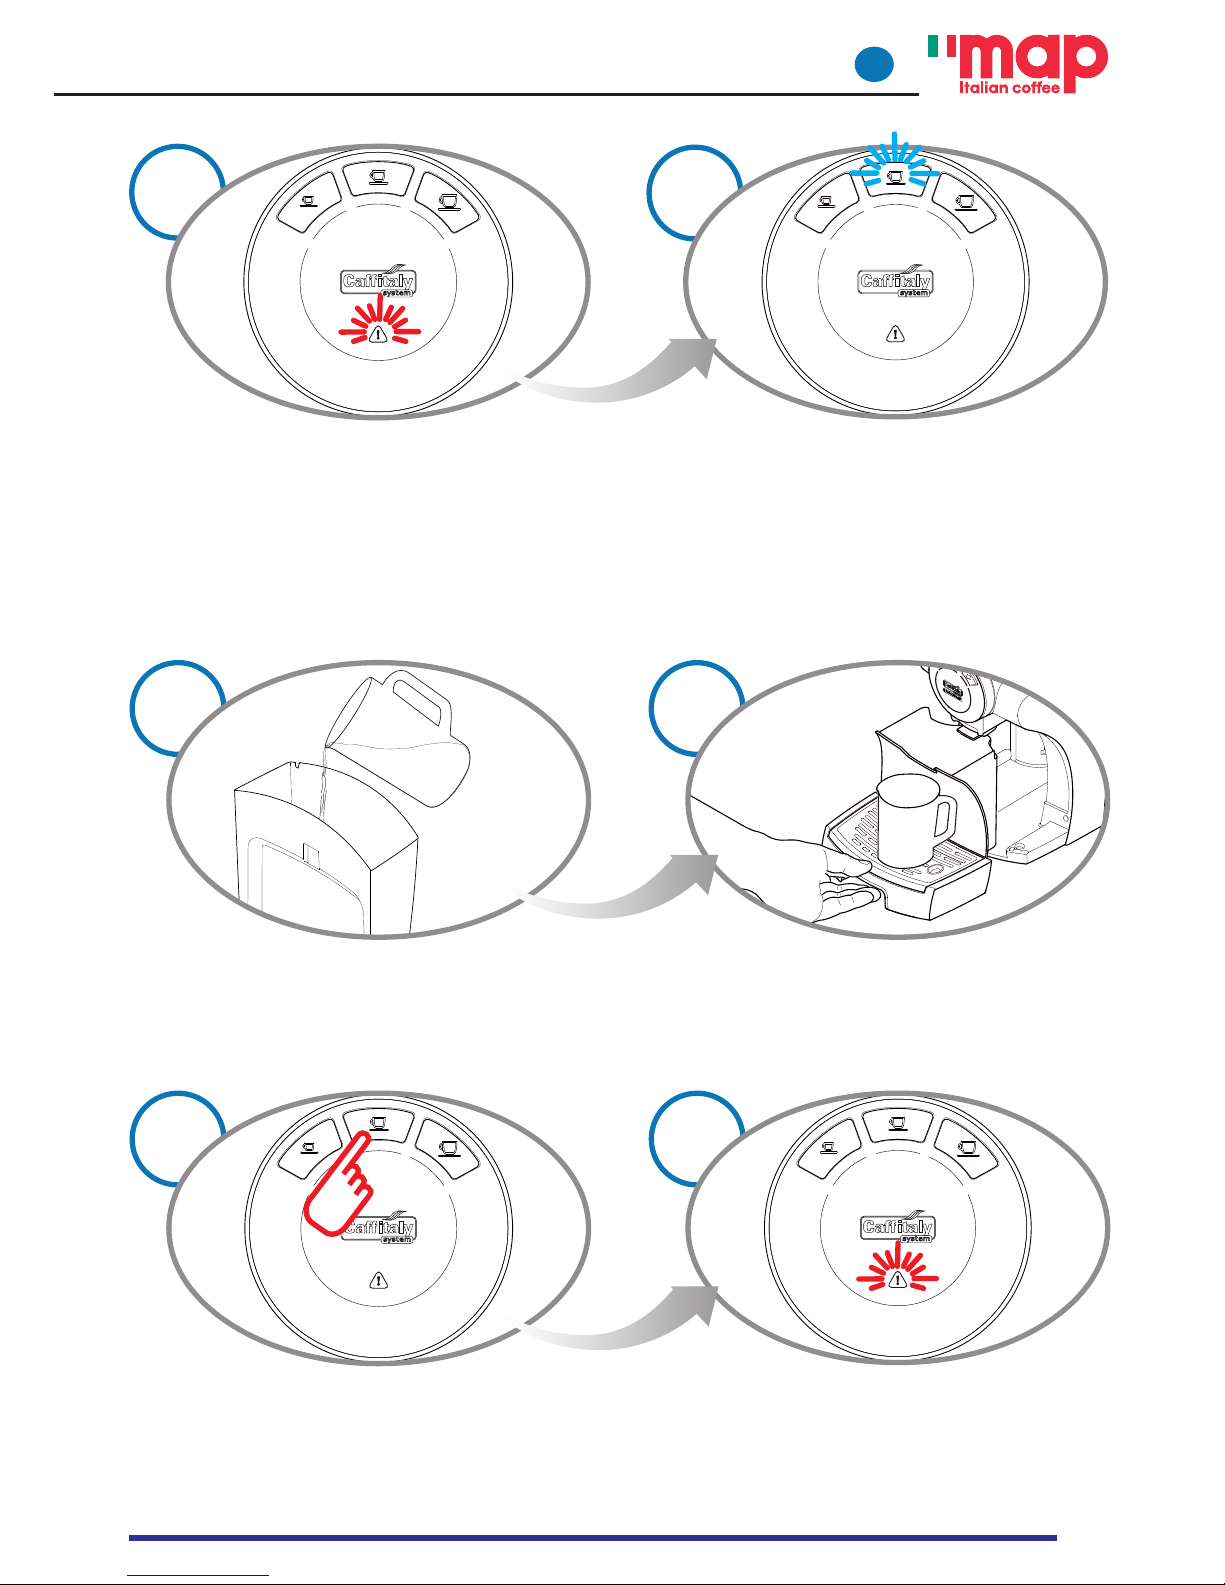
Place a container (at least 1 litre) under the
coee dispensing spout.
Press and hold the buttons (espresso and
long coee) and at the same time turn on the
machine by pressing the power on/o switch.
Make sure the lever is lowered and there are no
capsules inside the capsule compartment.
The long coee button is on, while the
descaling blinks alternately (YELLOW and
RED). Press the long coee button to start the
descaling cycle.
3 4
Remove and empty the water tank.
Mix the contents of one bottle of Cataly with
approximately 750 cc water (a total volume of
1 litre) and pour into the tank.
Page 19
19
Descaling
10
10
The appliance dispenses the descaling solution
at intervals (5 doses with a 4 minute pause
between each one, for a total duration
of about 25 minutes). During this step,
when the buttons must not be pressed,
the descaling indicator light blinks alternately
(YELLOW and RED).
9
13
1211
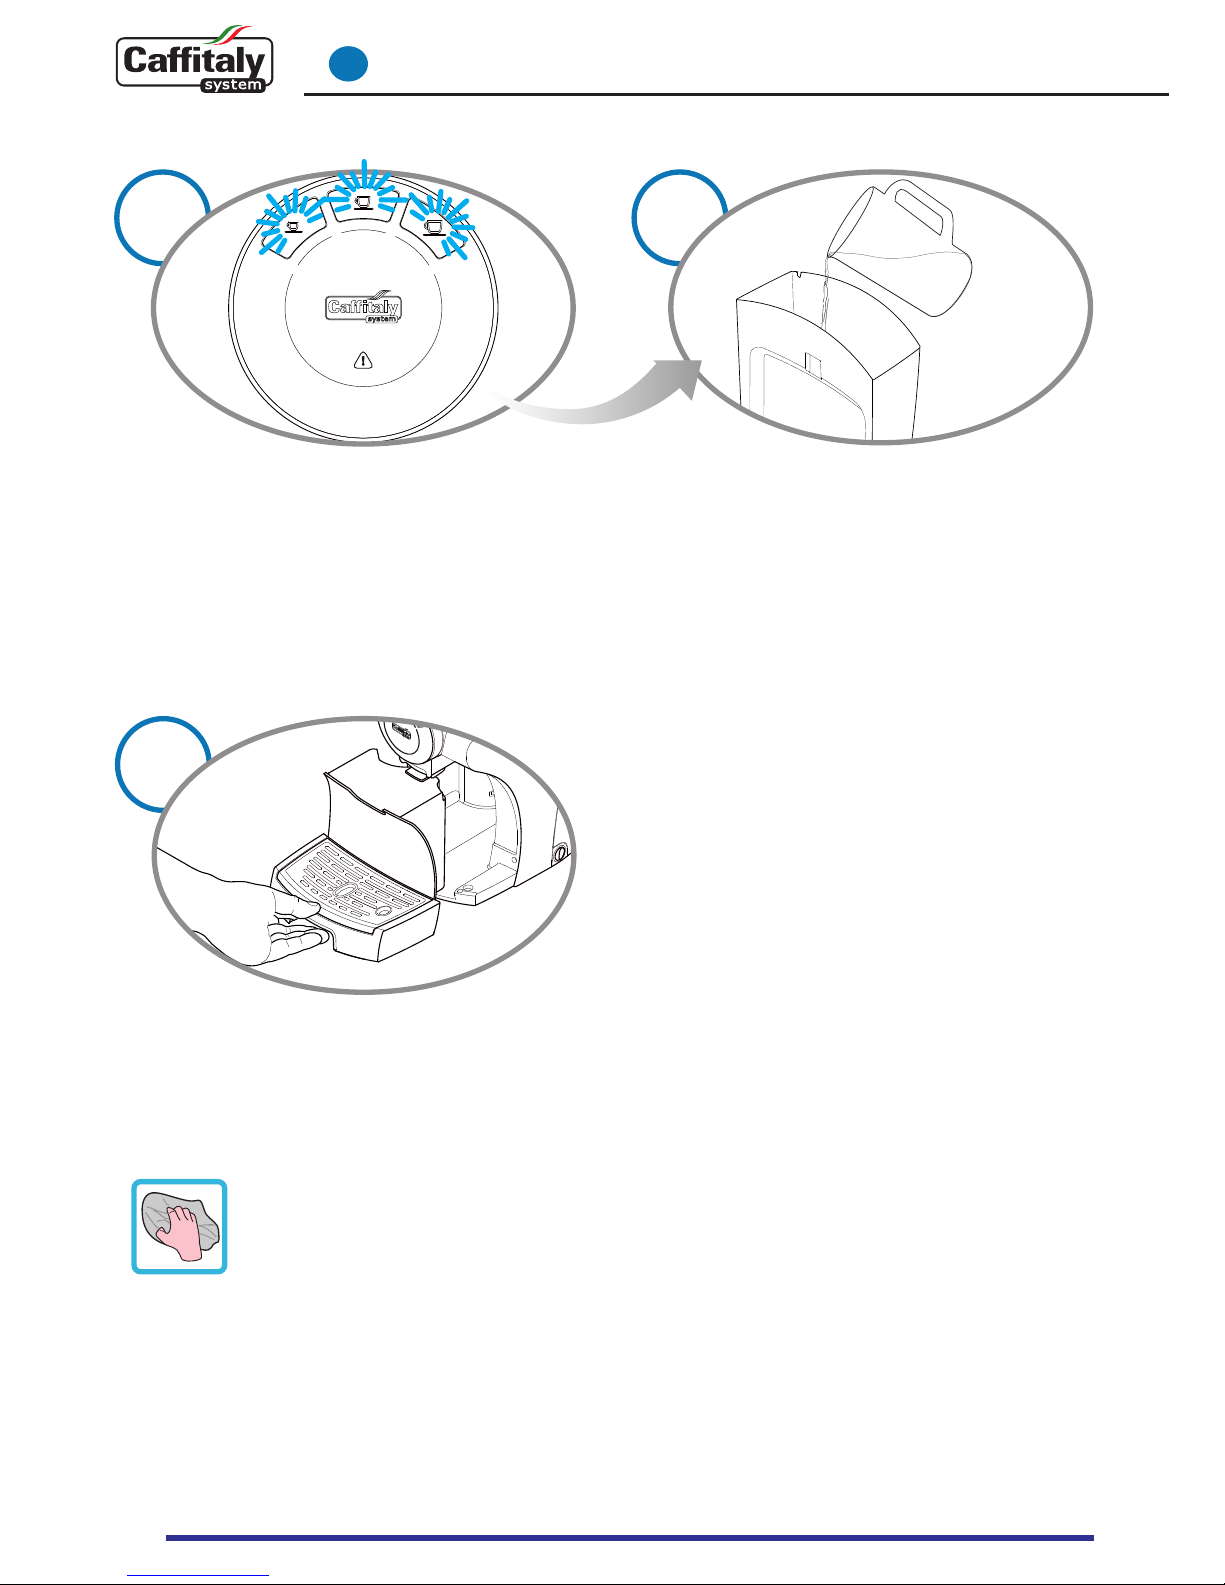
Press the long coee button to start the rinse
cycle.
Empty and rinse out the used capsule drawer,
the drip tray and the 1 litre container used
previously and reposition them correctly.
When the rst step is complete, the long
coee button lights up and a beep is emitted
and repeated. The water tank is empty.
14
Carefully rinse out the water tank and ll it
with fresh drinking water.
Rinse water (about 500 ml) will be run through
the appliance. During this step the descaling
blinks alternately (YELLOW twice and RED
twice).
Page 20
20
Descaling
10
16
Carefully rinse out the water tank and ll it
with fresh drinking water.
17
Empty and rinse out the used capsule drawer
and drip tray.
When the rinse cycle is complete, the machine
emits a beep and the buttons (espresso, long
coee, lter coee) blink at the same time;
lthe machine is warming up.
When the buttons turn on and remain steadily
lit, the appliance is ready for use.
15
Use a soft cloth and a neutral detergent to
clean the surfaces of the appliance.
Page 21
21
11
Troubleshooting
PROBLEM CAUSE SOLUTION
No coee is brewed. The
no water indicator light
blinks RED.
The water tank is empty. Fill the tank with fresh water.
Press a button to reload the circuit.
When the buttons remain steadily lit, the
appliance is ready for use.
The coee is not hot
enough.
Cold cups / mugs.
Scale build-up in machine.
Preheat the cup.
Descale the machine.
The lever cannot be
lowered.
The used capsule drawer is
full. Capsule stuck inside the
machine.
Empty out the used capsule drawer.
Remove the jammed capsule.
The descaling indicator
light is on and steadily lit
in RED.
Temperature sensor is
malfunctioning.
Heating problems.
Take the machine to an Authorised Service
Centre.
When a coee dispensing
button is pressed, the
machine seems to start
running, but stops
without dispensing
coee or after dispensing
only a small amount.
Incorrect quantity programming. Reprogram the quantity corresponding to
that button. See ch. 7.
A very small amount of
coee is dispensed very
slowly.
The Filter coee button has
been used with an espresso
capsule.
Use the Espresso and Long coee buttons.
Page 22
22
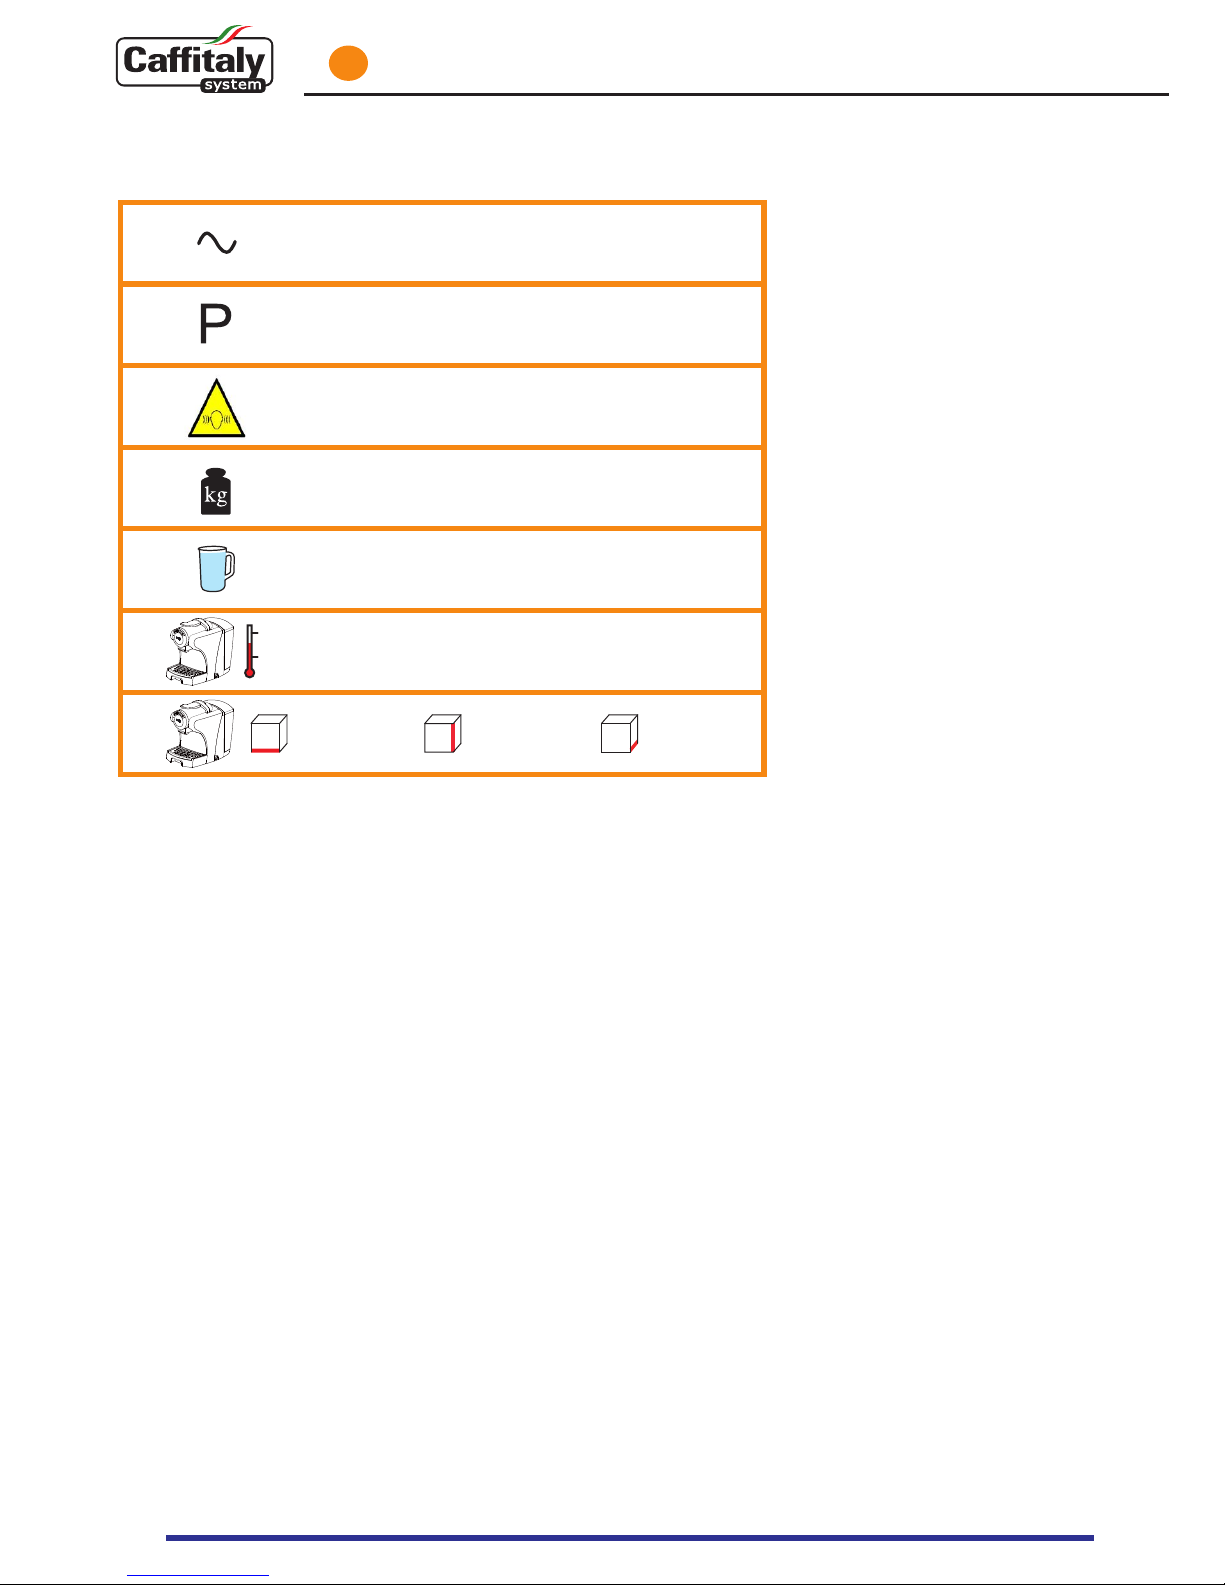
see the data plate on the bottom of the
machine
max. 15 bar
approx. 6 kg
< 70 dB A
2 litres
ambient temperature: 10°C - 40°C
220 mm 290 mm 332 mm
12
Technical data
Page 23

23
 Loading...