

Page 1
© 2006 Mantis, Div. of Schiller-Pfeiffer Inc. All Rights Reserved.
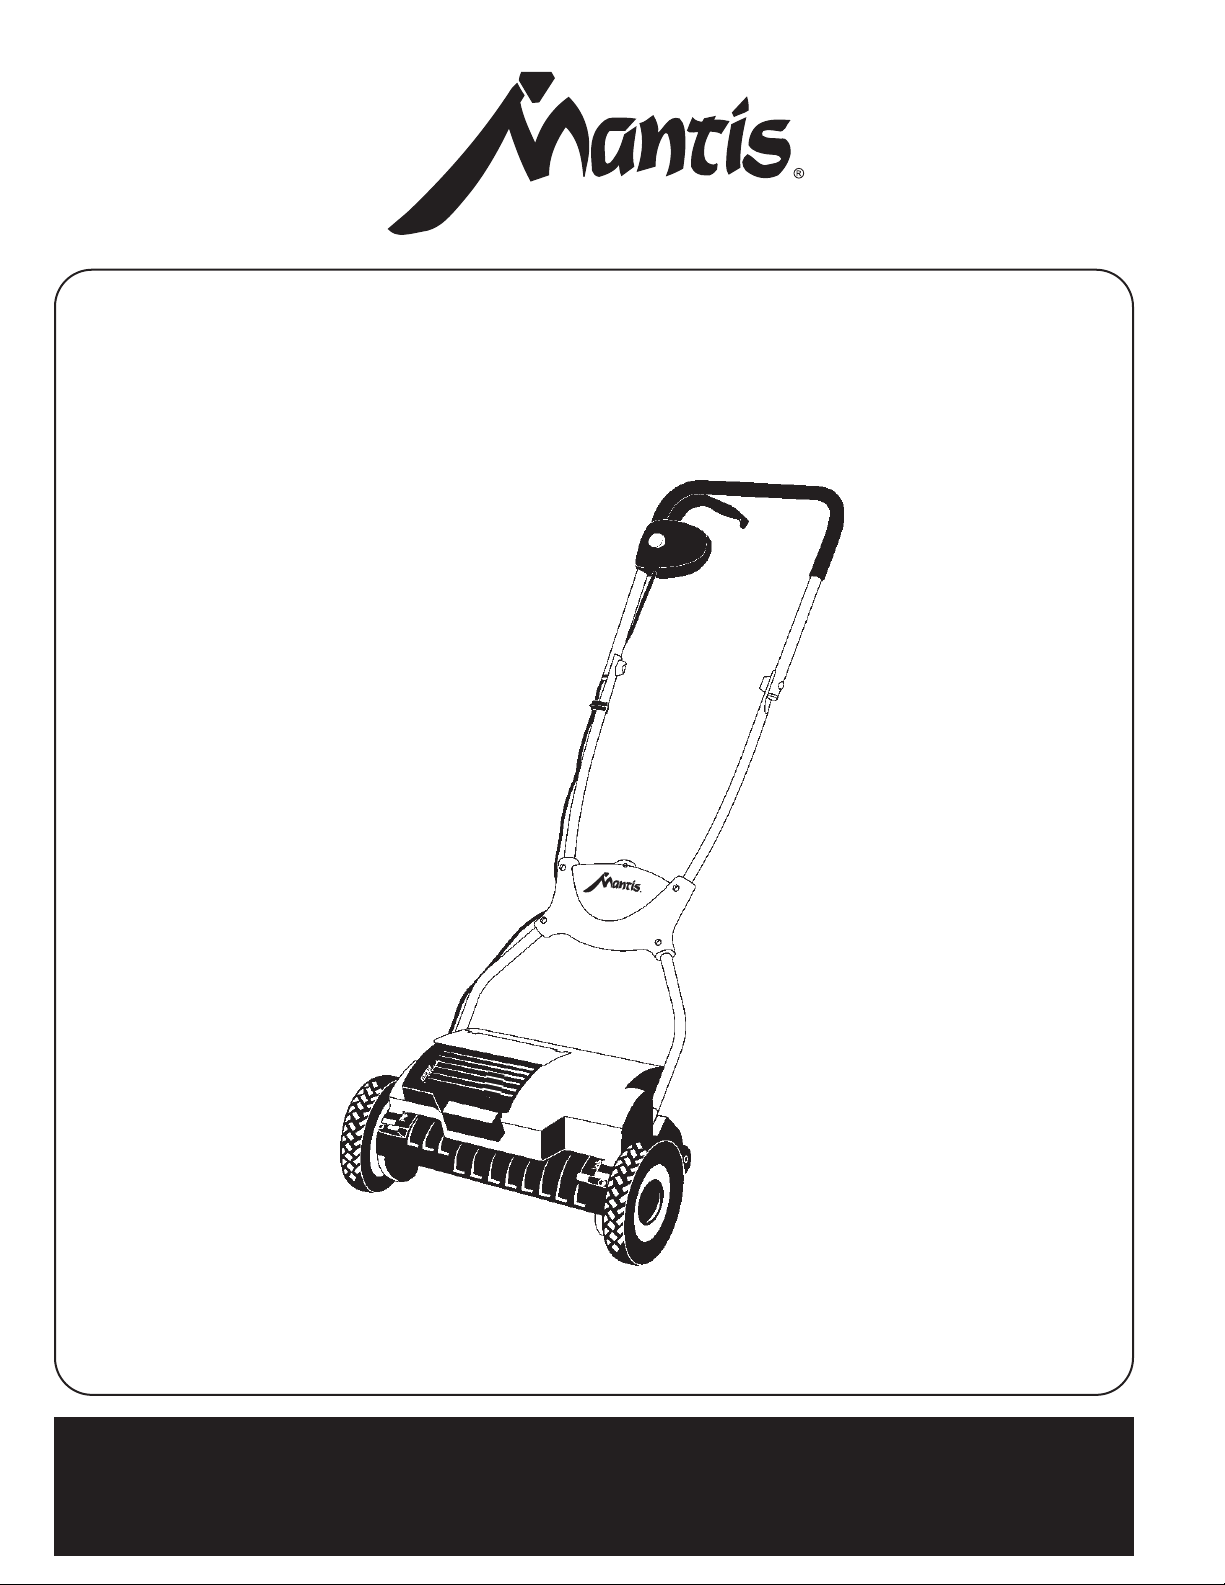
Mantis Reel Mower
Page 2

1
U
S
Table of Contents
Safety Instructions
Safety Decals . . . . . . . . . . . . . . . . . . . . . . . . . . . . . . .1
Assembly Views
Mantis Reel Mower Views . . . . . . . . . . . . . . . . . . . .2
Assembly Instructions
Operating Parts . . . . . . . . . . . . . . . . . . . . . . . . . . . . . .5
Technical Data . . . . . . . . . . . . . . . . . . . . . . . . . . . . . .5
Notes on Operating Instructions . . . . . . . . . . . . . . . .5
Using Your Mantis Reel Mower Correctly . . . . . . . .6
Assembling the Mantis Reel Mower . . . . . . . . . . . .6
Operation
Putting into Operation . . . . . . . . . . . . . . . . . . . . . . . .7
Information Concerning Correct Mowing . . . . . . . .8
Maintenance
Maintenance/Care/Storage . . . . . . . . . . . . . . . . . . . .8
Disposal/Recycling . . . . . . . . . . . . . . . . . . . . . . . . .10
Safety
Instructions for Correct Use/Safety Instructions . .10
Trouble-Shooting
Trouble-Shooting . . . . . . . . . . . . . . . . . . . . . . . . . . .11
Guarantees
Guarantee . . . . . . . . . . . . . . . . . . . . . . . . .Back Cover
Safety Instructions
Please adhere to the following safety instructions on the appliance :
Please read these operating instructions before assembling and using your machine.
Warning! Read instruction
handbook before starting.
Keep bystanders away from the
danger zone.
Warning! Contacts should
never be bridged with metal!
Short-circuit – fire risk!
To avoid damage on the unit:
Never clean your Mantis Reel
Mower with running water, in
particular with water under
high pressure.
Warning! Risk of injury.
Keep fingers and feet away
from sharp cutting tool!
Warning! Remove the battery
from the socket before carrying
out all maintenance work!
Ni-Cd
Disposal of Ni-Cd cells only as per instructions in this booklet.
Page 3
2
U
S
Mantis Reel Mower View
Page 4
3
U
S
Mantis Reel Mower Views
Page 5
4
U
S
Mantis Reel Mower Views
Page 6

5
U
S
Mantis Reel Mower Assembly Instructions
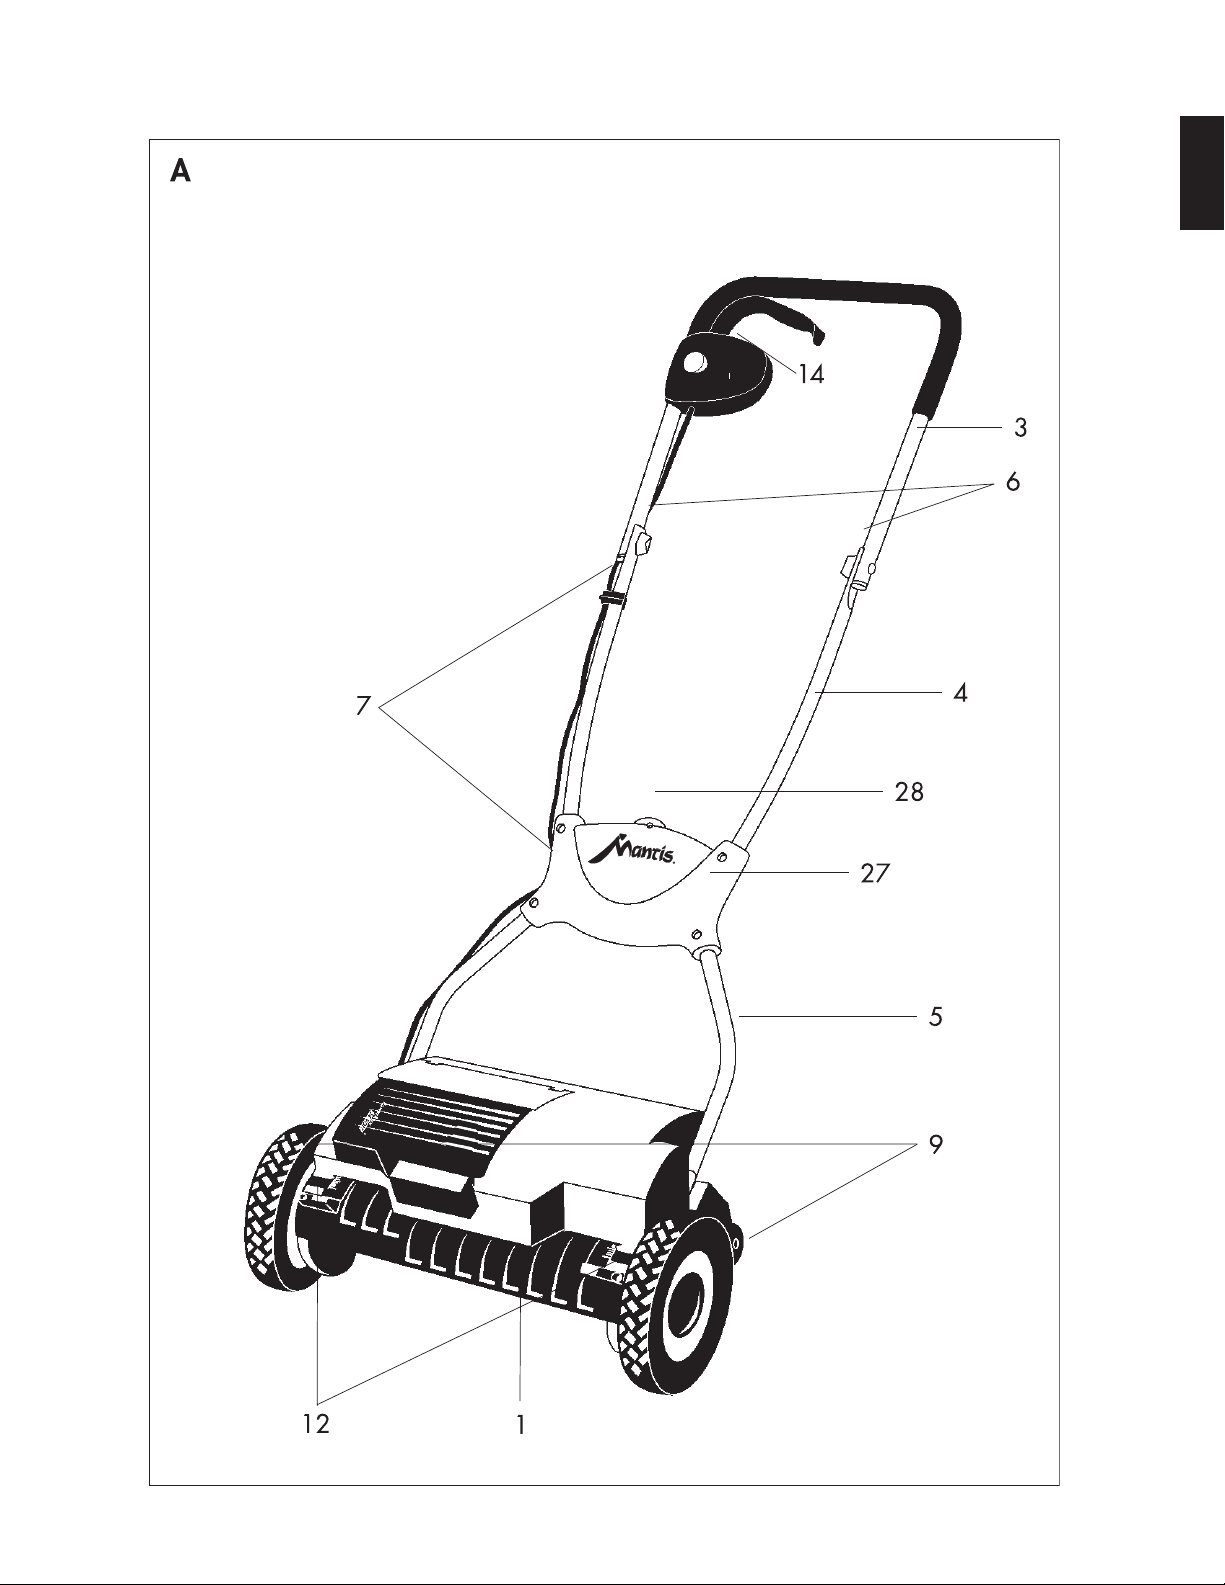
A. Operating Parts (Fig. A – X)
1. Cutting cylinder (Fig. V)
2 Lower blade (Fig. V)
3 Upper section of the guide handle (Fig. A)
4 Middle section of the guide handle (Fig. A)
5 Lower section of the guide handle (Fig. A)
6 Wing nuts with bolts (Fig. A)
7 Cable clip (Fig. A)
8 Cutting height marking arrows (Fig. O1)
9 Fixing nuts (Fig. N)
10 Opening for snug and handle bolts (Fig. D)
11 Handle bolts (Fig. D)
12 Adjusting handles (Fig. O)
13 Cover for harness compartment (Fig. Q)
14 On/off switch (Fig. A)
15 Release knob (Fig. U)
16 Starting handle (Fig. U)
17 Grass catcher (accessory) (Fig. X)
18 Grass catcher holders (Fig. X)
19 Hooks for grass catcher (Fig. X)
20 Battery (Fig. P)
21 Charger LG 24 (24 Volts) (Fig. P)
22 Plug for charger (Fig. P)
23 Charging socket in battery (Fig. P)
24 Contact bar (Fig. S)
25 Thickness gauge (Fig. V)
26 Hexagon thread bolt (to adjust cutting tool) (Fig. V)
27 Node (A)
28 Hooks for grass catcher (A)
B. Technical Data
Mantis Reel Mower
Width of the cutting cylinder 38 cm
Weight without battery approx. 9.5 kg
Working area related emission characteristic value L
pA
1)
69 dB (A)
Guaranteed noise level L
WA
2)
86 dB (A)
Measured noise level L
WA
2)
82.2 dB (A)
Hand-Arm vibrations a
vhw
1)
< 2.5 m/s
2
* Measuring method according to 1)EN 836 2)2000/14/EC
Battery
Battery 20 x 1.2 V NiCd
Voltage/Capacity 24 V / 2.0 Ah
Weight approx. 1.4 kg
Number of possible charges approx. 1,000 times
Charger LG 24
Voltage 230 V / 100 mA
Charging time 12 - 24 hours
Weight 0.2 kg
C. Notes on Operating Instructions
Use these operating instructions to familiarize yourself with the unit, the charging technology, the unit’s features and its proper use
as well as the notes on safety.
FOR SAFETY REASONS, CHILDREN UNDER THE AGE OF 16 OR PEOPLE NOT FAMILIAR
WITH THESE OPERATING INSTRUCTIONS MUST NOT USE THIS MANTIS REEL MOWER.
PLEASE KEEP THESE INSTRUCTIONS IN A SAFE PLACE.
Page 7

6
U
S
D. Using your Mantis Reel Mower Correctly
The Mantis Reel Mower is designed for cutting lawns in and
around the garden. It is not designed for use in public
Facilities, parks, sporting grounds, on roads, in agriculture
or forestry.
It is essential to observe the manufacturer’s operating
instructions to ensure the unit’s proper functioning. The
operating instructions also contain advice for service,
maintenance and repair.
ATTENTION! TO PREVENT INJURY, THE MANTIS REEL MOWER MUST NOT BE USED
FOR TRIMMING BUSHES, HEDGES, SHRUBS, FOR CUTTING AND PRUNING OF CLIMBERS
OR GRASS ON ROOFS OR IN BALCONY BOXES.
ATTENTION! TO PREVENT INJURY,
THE BATTERY MUST ONLY BE USED AS
A POWER SOURCE FOR 24-VOLT TOOLS
MANUFACTURED BY MANTIS.
ONLY THE BATTERY, MANTIS
ARTICLE NO. 65028, INCLUDED IN
THE PACKAGING, CAN BE USED WITH THE
HAND LAWNMOWER.
E. Assembling the Mantis Reel Mower
1. Checking all parts are included
The Mantis Reel Mower box contains the following parts:
• Mantis Reel Mower
• 1 battery
• 1 upper section of the guide handle
• 1 middle section of the guide handle
• 1 lower section of the guide handle
• Assembly parts for the guide handle in a plastic bag
• 1 Charger LG 24 (24 Volt)
• 1 thickness gauge
• Operating instructions
2. Assembling the guide handle (Fig. A – M)
1. Tilt your Hand Lawnmower so that the black rollers face
upwards (Fig. B/C). Fit the lower section of the guide
handle (5) so that the drilled holes (10) are over handle
bolts (11) (Fig. B). Note: Make sure that the groove in the
drilled hole (10) and the locking tab of the handle bolt
(11) meet (Fig. D). WARNING! Do not use excessive
force. First ensure that the recess in the handle and the lug
of the bolt are in alignment and then fix together.
2. Continue assembling the guide handle as follows using
the black central connecting section: Disassemble the
central connecting section (27) (referred to as the "node"
from now on). The front and rear sides of the node are
fastened together by a clip lock to prevent them from
springing open. The clip lock can be found in the recess
on the back of the node. For easier disassembly, release
the clip lock by pushing it outwards. Press the four nuts
into the recesses in the rear section of the node (the side
without the Mantis logo). Gently press in the four nuts so
that they are inserted properly and do not fall out of the
recesses when the node is turned over (Fig. E). Turn the
mower so that the rollers rest on the ground. Prepare the
top and middle sections of the guide handle so that the
sections of the handle overlap as shown in the assembly
diagram (Fig. F). Hold the rear section of the node so that
the grass catcher holder (28) faces upwards and guide the
cable through the cable duct on the left side of the node
(Fig. G) (viewed from below. Pay attention to the length
of the cable!). Now insert both sections of the handle
according to the recesses (Fig. H). Attach the front section
of the node to the rear section of the node. Make sure that
you hear the clip lock snap into place and screw together
both parts of the node using the bolts provided (Fig. I/K).
3. Now attach the middle and top sections of the guide
handle using the bolts and wing nuts provided (Fig. L/M).
WARNING! The cable must not hang down near the
cutting cylinder.
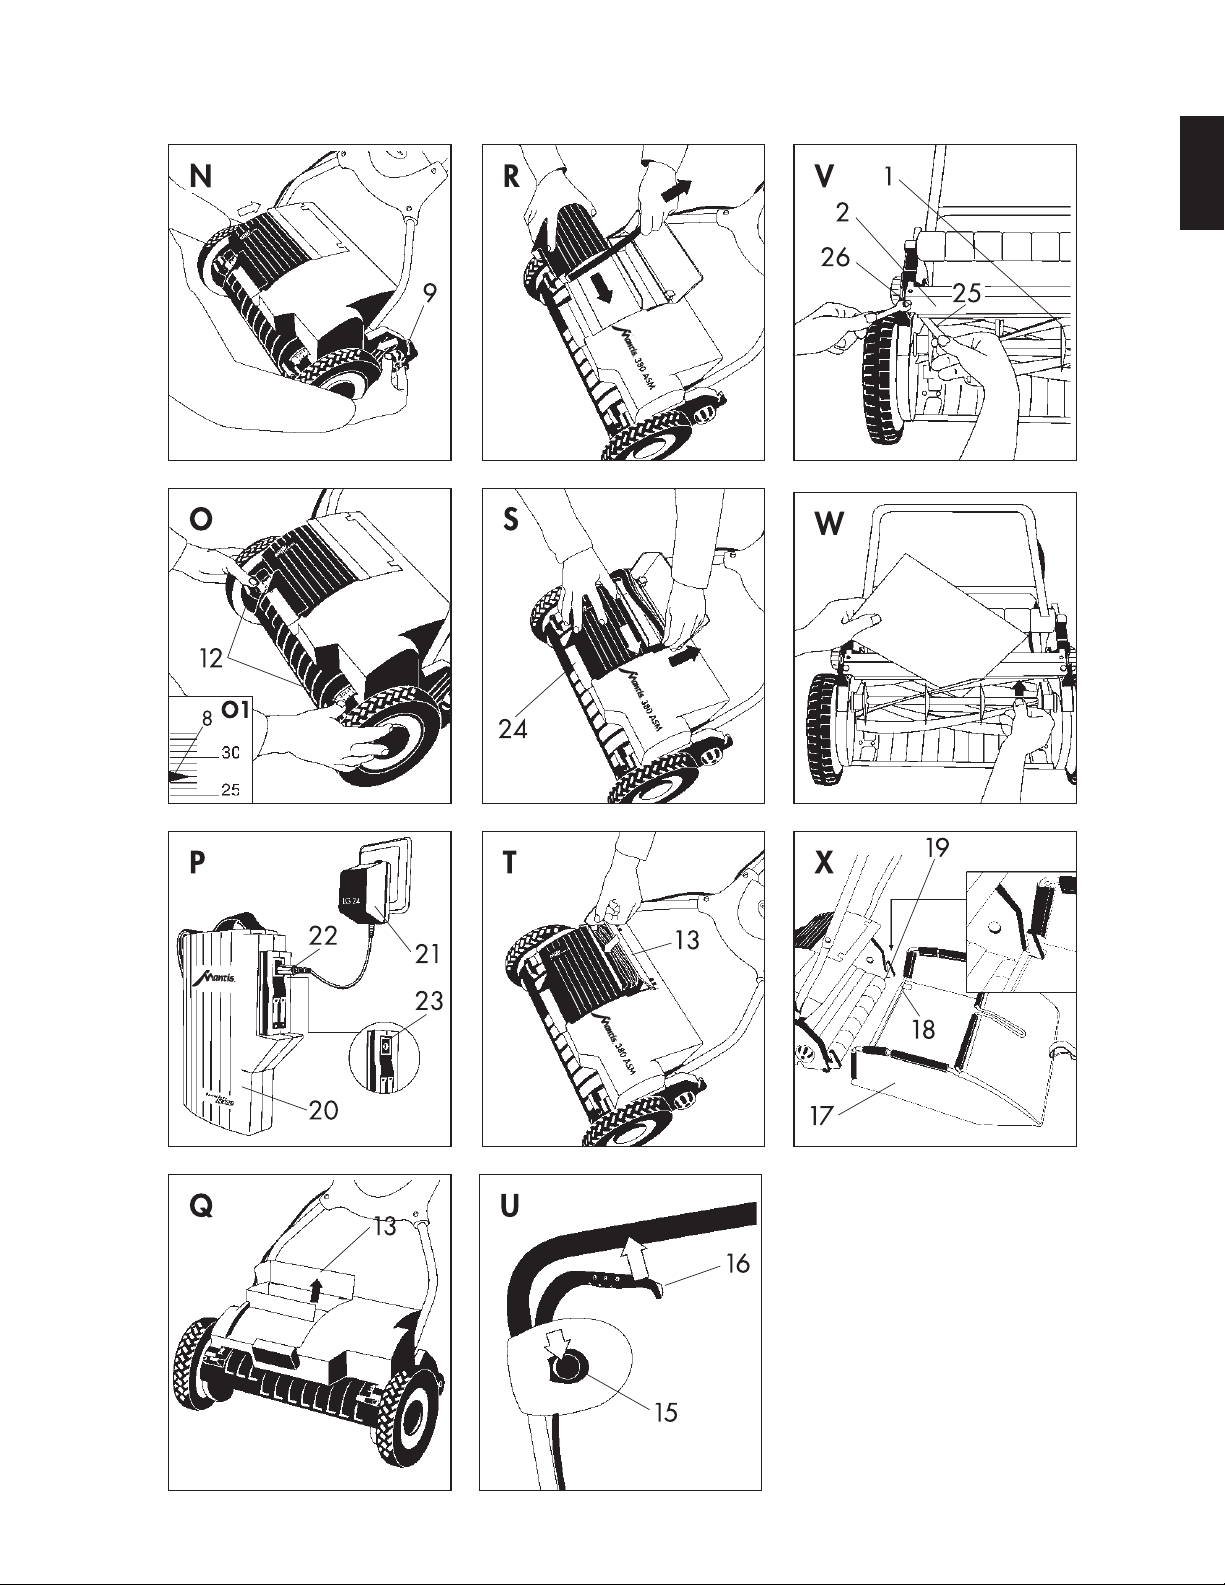
3. Setting the cutting height (Fig. N/O)
Set the cutting height on the Mantis Reel Mower
as follows:
1. Stand the Hand Lawnmower on a flat, solid surface.
2. Position yourself in front of the cutting height scale of
the Mantis Reel Mower (Fig. N).
WARNING! TO PREVENT INJURY,
NEVER SET THE CUTTING HEIGHT WHEN
THE MOTOR IS RUNNING.
Page 8

7
U
S
3. Loosen both fixing nuts (9).
4. With both hands on the adjusting handles (12) set the
cutting height you require (Fig. O):
• Highest cutting height: 45 mm
• Lowest cutting height: 20 mm
NOTE: Make sure that the arrows marking the cutting
height (8) show the same cutting height on both sides of
the scale (Fig. O1).
5. Re-tighten both fixing nuts (9) (Fig. N). NOTE: When
setting the Mantis Reel Mower to a low cutting height,
ensure that the lower blade and cutting cylinder do not
touch the ground if the ground is uneven.
1. Charging the battery (Fig. P)
For technical reasons the battery (20) is not charged.
Consequently, the unit needs to be charged before initial
operation.
For this e
xclusively,
use the Charger LG 24 (21).
Plug the charger (21) into the mains socket and then push the
plug for the charger (22) into the charging socket (23) of the
battery. The charging procedure begins.
Ensure you use the correct mains voltage!
Charging time: approx. 24 hours for the initial charge.
Afterwards, 12 - 24 hours depending on the state of charge.
The battery reaches its full capacity only after numerous
(approx. 5) charging/discharging processes.
2. Connecting the battery (Fig. Q – T)
1. Open the harness compartment (Fig. Q). Hold the battery
in your right hand and use your left hand to pull the
harness to the left so that the ends of the harness lie flat
against the battery (Fig. R).
2. Push the battery into the contact bar (24) until you hear it
click into place (Fig. S).
3. Fold the harness into loops, stow it away in the harness
compartment (Fig. T) and close the cover (13). This also
secures the battery in the contact bar.
3. Starting your Mower (Fig. U)
Start your Mantis Reel Mower as follows:
1. Stand your mower on a level part of the lawn.
2. To start the motor, press and hold down the release knob
(15) (Fig. U) and with the other hand, simultaneously pull
the starting handle (16) towards the cross bar (Fig. U).
3. If you release the starting handle (16) the motor switches
off again.
Attention! Cutting cylinder continue to run for a few seconds
after the motor is switched off. When working with the
Mantis Reel Mower the battery heats up; this is normal and
does not affect its performance.
THE SWITCHES INSTALLED BY THE
MANUFACTURER MUST NOT BE REMOVED
OR BE BRIDGED (EX: BY TAPING DOWN THE
STARTING HANDLE (16) TO THE GUIDE
HANDLE). THIS WILL PREVENT THE MOWER
SWITCHING OFF AUTOMATICALLY, AND
COULD CAUSE FATAL INJURY.
WARNING! BEFORE STARTING YOUR
MANTIS REEL MOWER CHECK FOR FOREIGN
BODIES IN THE CUTTING CYLINDER AND
REMOVE IF NECESSARY.
NEVER CHARGE THE BATTERY
ANYWHERE NEAR EASILY
INFLAMMABLE MATERIALS.
CHARGE THE BATTERY IN A DRY
PLACE AND AWAY FROM DIRECT SUNLIGHT.
THE MAINS PLUG (21) HEATS UP
SLIGHTLY DURING THE CHARGING
PROCEDURE.
CHARGE THE BATTERY FOR 24
HOURS BEFORE USING YOUR MANTIS REEL
MOWER FOR THE FIRST TIME.
DO NOT CHARGE THE BATTERY
WITH CHARGING EQUIPMENT OTHER THAN
THE CHARGER LG 24 SINCE ONLY THIS
CHARGER HAS BEEN SPECIFICALLY ADAPTED
FOR USE WITH THE BATTERY.
THE USE OF OTHER CHARGING UNITS CAN
LEAD TO DAMAGE AND INJURIES.
THE USE OF OTHER CHARGING UNITS MAKES
ALL CLAIMS FOR COMPENSATION NULL AND
VOID AND RELEASES THE MANUFACTURER
FROM ALL GUARANTEE SERVICES.
F. Putting into Operation
Page 9

8
U
S
1. General remarks on the care of lawns
At the beginning of the grass cutting season and with newly
laid lawns, we recommend you select a relatively high cutting
height (e. g. 45 mm) then gradually decrease the cutting
height over time. To maintain a well kept lawn you should
set the cutting height to approximately 25-30 mm.
If possible, mow your lawn once a week. When you mow
your lawn frequently the short roots of the grass grow making
your lawn more resistant.
Always mow your lawn when it is relatively dry. To obtain a
clean cut guide the Mantis Reel Mower in lanes as straight as
possible at a walking pace. Ensure that the lanes overlap by a
few centimeters so that no uncut strips are left behind.
Cut the lawn for the first time in spring when the grass begins
to grow and the lawn can be walked on. If the grass has grown
too long first cut it lengthwise with a high cutting height
setting (approx. 45 mm) and then cut at right angles with the
desired lower cutting height setting (e. g. 25 mm).
The area of lawn you can mow with one charged battery
depends on the height and thickness of the lawn, i.e. the taller
and thicker the lawn, the smaller the area of lawn you can
mow with one fully charged battery.
2. Mowing
TIP: Only cut with a sharp cutting cylinder so that the grass
is not bruised and turn yellow. For a clean cut guide the
Mantis Reel Mower at an appropriate speed in lanes as
straight as possible. NOTE: The Mantis Reel Mower can be
operated with the battery or without as a hand mower.
Always maintain the distance between the cutting cylinder
and user suggested by the guide handle.
When working on inclines always stand diagonally to the
incline in a sturdy, safe stance.
To prevent tripping, take particular care when moving
backwards and when pulling the Mantis Reel Mower.
You may stumble! For information on how to set the cutting
height see section “Setting the cutting height”.
3. Mowing with the grass catcher – Accessory (Fig. X)
Using the Mantis grass catcher saves you having to rake
together the grass cuttings.
To attach the grass catcher hook the grass catcher holders (18)
over the hooks (19) of the Mantis Reel Mower and hook the
carrying strap onto the lower part of the guide handle (27/28).
Note: The height of the grass catcher can be adjusted using
the strap. For the best grass-catching results, push your mower
at a walking pace.
Blockage protection / Circuit breaker
If the mower is blocked by a foreign body or if the motor is
overloaded, the motor is automatically switched off by the
circuit-breaker. Pull the battery out of the contact bar. Remove
the foreign body or the cause for the overload and after a few
seconds restart the mower. If the motor switches off, although
there are no f
oreign bodies in the cutting tool, it is possible
that the cutting height you have selected is too low. Select a
higher cutting height, e. g. 45 mm and then select a lower
cutting height for the second cut.
If the Mantis Reel Mower is overloaded over a longer period
of time the motor may become hot. To protect the motor from
overheating the thermal circuit-breaker switches off the motor.
You can switch on the mower again after approximately
2-5 minutes.
ONLY ATTACH THE GRASS CATCHER
WHEN THE MOTOR IS SWITCHED OFF AND
THE CUTTING TOOL HAS STOPPED MOVING.
WARNING: THE REVOLVING
CUTTING CYLINDER CAN CAUSE INJURIES.
G. Information Concerning Correct Mowing
H. Maintenance / Care / Storage
1. Maintenance
Maintenance includes all jobs which keep your Mantis Reel
Mower in perfect working order. By regularly checking the
unit (firm seating of screw connections, cracks, damage) and
replacing defective or worn parts you can prevent accidents
and failure.
Repairs may only be carried out by Mantis service centers or
authorized Mantis dealers.
BEFORE CLEANING AND SETTING
THE HAND LAWNMOWER, SWITCH OFF THE
MOTOR AND REMOVE THE BATTERY TO
PREVENT STARTING THE MOTOR
UNINTENTIONALLY.
Page 10

9
U
S
2. The battery (Fig. P)
Charging the battery
NOTE: Only charge the battery with the charger supplied!
Using other charging units could lead to damage and injury.
Using a charger other than the Mantis charger supplied
releases Mantis from all liability and warranty claims.
We recommend charging the battery immediately after using
your mower using the supplied charger (21).
IMPORTANT! Never charge the battery after having been
heated up by operation or sun. Let cool down first. Never
expose the battery to direct sunlight while charging. Never
charge the battery anywhere near acids and easily
inflammable materials. Danger of fire!
NOTE: Do not wait until the battery is completely flat before
recharging.
Charge the battery in a dry place as follows (Fig. P):
1. Open the cover of the harness compartment (13).
2. Pull the battery (20) out of the contact bar.
3. Plug the plug (22) of the charger into the charging
socket (23).
4. Then plug the charger (21) into the mains socket.
5. To resume mowing after charging the battery, proceed as
described in section F-2.
IMPORTANT:
• Protect the charging socket (23) against dirt and moisture.
• If the battery capacity is so low that the Hand
Lawnmower switches off automatically then the charging
time is 24 hours.
The battery should be stored at a dry, elevated, frost-free,
locked up place, where children have no access. Avoid direct
sunlight. Always disconnect the battery from tools before
storing to avoid improper use and accidents.
Make sure the surface and the contacts of the battery always
are clean and dry before connecting the charging unit. When
dirty clean them with a soft, dry rag; never use running water.
If you do not use the battery for long periods of time, please
charge it again before using. Since a gradual self-discharge
occurs, charge the battery completely before initial use after
longer periods of storage.
3. The Mantis Reel Mower
Cleaning
After using the mower clean with a moist cloth. Spray the
cutting cylinder and lower blade with an oil of low viscosity
(e.g. spray oil).
Maintenance
The blades, which if cared for properly must only be
sharpened after years, can only be sharpened by authorized
Mantis dealer due to the special sharpening technique. The
mower may only be repaired and the cutting blades may only
be installed by approved specialist workshops.
NOTE: Ensure that all nuts, bolts and screws are tight and
that the mower is in good working order. For safety reasons,
allow all worn out and damaged parts to be exchanged by
Mantis Service or authorized specialist dealers.
To avoid injury and damage to the mower we recommend you
have your mower checked in autumn so that it is ready and
safe to use next season.
Storage
Store your Mantis Reel Mower in a dry, cool place where it is
protected from frost. The mower should be stored out of the
reach of children.
4. Readjusting the cutting tool (Fig. V/W)
The cutting tool of your Mantis Reel Mower was set at an
optimum setting before leaving our factory. However, if the
cut is not clean after using your mower for a longer period of
time, please correct the setting of the lower blade as follows:
1. Switch off the Mantis Reel Mower and pull the battery
out of the contact bar to prevent starting the battery
Lawnmower unintentionally.
2. Push the supplied thickness gauge (25) on the left hand
side between one blade of the cutting cylinder (1) and the
lower blade (2) (Fig. V).
3. Turn the hexagon thread bolt (26) with a 10 mm fork
wrench to the left or to the right until the thickness
gauge closes slightly. Repeat this on the right hand side
of the mower.
4. Turn the cutting cylinder to test the setting. None of the 5
blades of the cylinder must touch the lower blade.
5. When you have adjusted the cutting tool test it using a
piece of newspaper (Fig. W).
WARNING! HANDLE THE CUTTING
TOOL CAREFULLY TO AVOID CUTTING
YOURSELF. WEAR APPROPRIATE GLOVES TO
PROTECT YOUR HANDS.
TO AVOID INJURY TO PERSONS
AND MATERIAL DAMAGE: NEVER CLEAN
YOUR MANTIS REEL MOWER WITH RUNNING
WATER, IN PARTICULAR WITH WATER UNDER
HIGH PRESSURE.
Page 11

10
U
S
These batteries contain nickel/cadmium
cells. After their lifetime has expired, they
may not be disposed of as normal house
rubbish, but must be disposed of properly.
Please return the battery to a Mantis dealer that sells the
battery or take them to a recycling centre that accepts and
recycles rechargeable batteries.
1. Checks Before Each Operation
Inspect the unit before each use. Do not use the Mantis Reel
Mower if safety devices (safety handle; safety cover) and/or
the cutting cylinder are damaged or worn. Never operate the
unit with the safety devices by-passed or missing.
Inspect the area of grass you are going to mow before
beginning work. Remove any foreign objects (e. g. stones,
branches or bones). Check the working area for foreign
objects during work.
The cutting cylinder and the lower blade must be checked
regularly for damage and properly repaired if necessary.
Cutting tools must only be exchanged by Mantis Service or an
authorized specialist dealer.
2. Proper Use / Responsibility
This Mantis Reel Mower can cause serious injuries! You are
responsible for the safety of the working area. To prevent
injuries, never start the motor when the mower is tipped. Risk
of injury. Only use the Mantis Reel Mower for the purposes
specified in these instructions. Only work when visibility is
good.
Guide the mower at a walking pace only. Familiarize yourself
with the surroundings of your working area. Check for
possible risks which might be not audible due to the noise of
the machine.
Wear sturdy shoes and long trousers to protect your legs.
Keep fingers and feet away from the cutting tool. Make sure
that there are no other people (especially children) or animals
anywhere near the working area. Ensure that you have a
secure foothold when working.
ATTENTION! Take extra care when walking backwards. You
may stumble!
If you do come into contact with an obstacle, turn off the
Mantis Reel Mower by pulling the battery out of the contact
bar. Remove the object, then check the mower for damage and
have it repaired if necessary.
3. Interruptions of Work
Never leave the Mantis Reel Mower unattended at the
working area. If you interrupt your work, store the mower in a
safe place. If you interrupt your work to move to another
working area, always switch off your Mantis Reel Mower and
pull the battery out of the contact bar.
4. Check the Environment
Never use the unit when it is raining or in damp or wet areas.
Do not operate your Mantis Reel Mower near swimming
pools or garden ponds.
Please observe the prescribed local quiet times. Keep the
charger in a dry place.
5. Notes on Safety Regarding the battery /
Danger of Fire
Never charge the battery after having been heated up by
operation or sun. Let cool down first.
Never expose the battery to direct sunlight while charging.
Never charge the battery when connected to a 24-Volt tool.
Never charge the battery anywhere near acids and easily
inflammable materials. Danger of fire!
Only use the battery with the specified tools. Under extreme
conditions, some battery acid could escape. This, however,
does not represent a defect. Proceed as follows should the
casing leak:
1. Immediately wash the affected area of the skin with soap
and water.
2. Neutralize the battery acid with vinegar or lemon juice.
3. If battery acid should get into your eyes, rinse your eyes
for at least 10 minutes with fresh water. Then contact
your doctor immediately!
Do not throw the used battery into fire under any
circumstances. Danger of fire!
Contacts should never be bridged with metal or other electric
conducting parts. Short-circuit – fire risk!
I Disposal / Recycling
J. Instructions for Correct Use / Safety Instructions
Page 12

11
U
S
K. Trouble-Shooting
The following table contains the problems most frequently occurring and shows how to remedy them.
Problem Possible Cause Remedy
Abnormal noise. Motor fixing screws or mower casing loose. Tighten screws.
Clattering in the unit.
Metal-like hammering noises. Foreign body blocking the cutting cylinder. Turn off the mower. Pull the battery
out of the contact bar. Remove the foreign
body.
Motor will not start. The battery is not pushed all the way in. Harness is not flat against the battery.
Circuit breaker has been triggered. Wait approx. 2-5 minutes then turn on
the motor again.
Motor turns off. Blocked by foreign body. Switch off the motor. Pull the battery
Blocking protection activated. out of the contact bar. Remove the foreign
body.
The cutting height you have selected is too Let the motor cool for 2 – 5 minutes
low; you are pushing the mower too quickly. then use the mower with a higher cutting
Circuit breaker has been activated. height and reduce the cutting height in
stages until you reach the lower cutting
height you require. Push the mower more
slowly across the lawn.
Battery power too low for cutting height Increase the cutting height and cut the
lawn in stages or charge the battery. (See
Chapter H-2. “The Battery”).
Yellow lawn. Cutting height too low. Increase the cutting height.
Cut not clean. Cutting gap between cutting cylinder and Readjust cutting tool (refer to section H-4).
bottom blade is too wide.
Blades are blunt or damaged. Have the blade replaced at a Service
Centre or by an authorized specialist.
If you have any other problems with your Mantis Reel
Mower, please contact your authorized Mantis dealer
or return the defective unit with a short description of the
problem and, in case of guarantee, with the appropriate
guarantee documents.
We would draw attention to the fact that, under the
product liability legislation, we are not liable for loss or
damage caused by our products when such are caused
by improper repairs or when during an exchange of parts
such parts are used which are not manufactured by or
approved by ourselves, and the repairs are not carried
out by an authorized Mantis dealer. The same restrictions
also apply for supplementary and accessory parts.
Page 13

Page 14

U
S
Specifications, descriptions, and illustrative material in this literature are as accurate as known at the time of publication, but are subject to change without notice.
P/N 13747
1/07
MANTIS
1028 Street Road
Southampton , PA 18966
(215) 355-9700
2 YEAR LIMITED SERVICE & WARRANTY POLICY
FOR PRUNER ATTACHMENT
MANTIS extends this limited warranty against defects in material and workmanship for a period of
two years from the date of purchase, to the first retail purchaser and each subsequent owner during
the warranty period. This warranty covers all portions of the Mantis Pruner Attachment.
MANTIS will repair or replace, at its option, any part or parts of the product proven to be
defective in material or workmanship under normal usage during the warranty period. Warranty
repairs and replacements will be made without charge for parts or labor. All parts replaced under
warranty will be considered as part of the original product, and any warranty on the replaced
parts will expire coincident with the original product warranty. In the event of a defect or
malfunction, the purchaser must send the product, postage paid to:
Mantis
2800 Turnpike Dr.
Suite #1
2800 Commerce Center
Hatboro, PA 19040
MANTIS assumes no responsibility in the event that the product was assembled or used in
noncompliance with any assembly, care, safety, or operating instructions contained in the Owner’s
Manual; was not used with reasonable care; or was misused, used for other than normal or
intended purposes. This warranty does not extend to parts affected or damaged by normal wear
and tear.
MANTIS MAKES NO EXPRESS OR IMPLIED WARRANTIES OR REPRESENTATIONS
EXCEPT THOSE CONTAINED HEREIN. THE DURATION OF ANY IMPLIED WARRANTY,
INCLUDING MERCHANTABILITY AND FITNESS FOR A PARTICULAR PURPOSE, IS
LIMITED TO THE DURATION OF THIS WRITTEN LIMITED WARRANTY. MANTIS
DISCLAIMS ALL LIABILITY FOR INDIRECT AND/OR CONSEQUENTIAL DAMAGES.
SOME
STATES DO NOT ALLOW LIMITATIONS ON
HOW LONG AN IMPLIED WARRANTY
LASTS AND/OR DO NOT ALLOW THE EXCLUSION OR LIMITATION OF INCIDENTAL OR
CONSEQUENTIAL DAMAGES, SO THAT ABOVE LIMITATIONS AND EXCLUSIONS MAY
NOT APPLY TO YOU. THIS WARRANTY GIVES YOU SPECIFIC LEGAL RIGHTS, AND YOU
MAY ALSO HAVE OTHER RIGHTS WHICH VARY FROM STATE TO STATE.
 Loading...