

Page 1
XP Lawn Aerator
Eight gangs of tempered steel
“knives.” These knives cut into
the soil beneath your lawn to let
water and nutrients penetrate
easily, and to encourage deep
drought-resistant root growth.
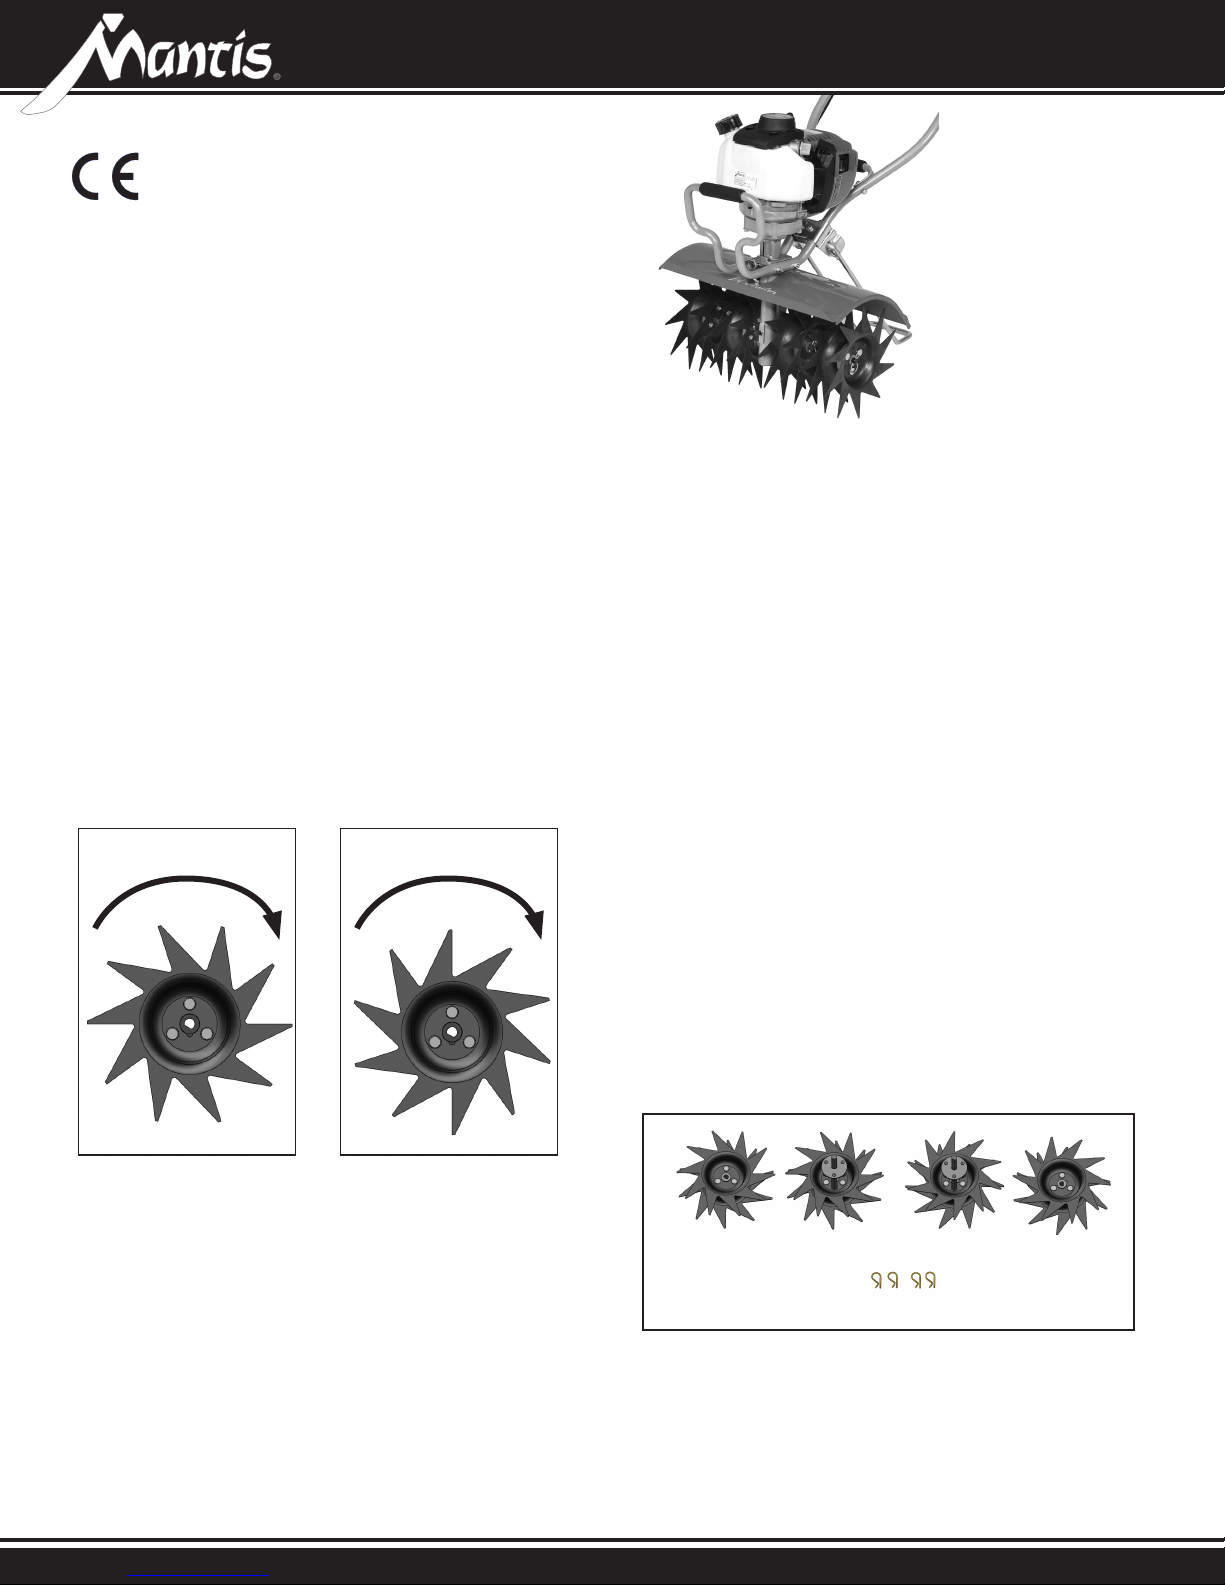
HOW TO MOUNT
Mount the aerator tines so the angled face of the blade
impacts with the earth (Figure 1). This position gives you
aeration 1 to 2 inches deep.
If you mount the tines so the straight face impacts with
the earth, you’ll work deeper (Figure 2). Roughly 2-1/2
to 3-1/2 inches deep. This is all right, but when learning
how to use the aerator blades, it is best to work shallow,
not deep, which is why we suggest to rst use the angle
face setting.
You will notice that if you let the machine run forward it
will tear out dome sized patches of lawn and soil. While
this does give you some aeration, you get the best
results by walking backwards and pulling the machine
as you go.
Figure 1 Figure 2
Rotation Rotation
Regardless of the method you use … Please be
aware that aerating with any machine will make your
lawn somewhat unsightly for about 10 days … The
improvements that you’ll realize in terms of lawn vigor
and color make regular aeration more than worth it.
Remember, however, that aeration is a radical procedure
and your lawn will look unattractive for a few days
… Most of the unsightly aspects of aeration can be
eliminated immediately by raking off your loose surface
earth and irrigating immediately after raking.
The aerator cuts 8 hairline slits roughly 2-1/2 inches
apart and 1-1/2 inches deep. You will get some loose
earth between the slits. If your lawn needs radical
restoration, aerate north to south and then aerate east to
west, giving you a checker board pattern of slits. Leave
the earth where it is until you’ve sown fresh grass seed
and fertilizer along the slits then rake off the loose earth
and you’ll get fresh bands of healthy green grass which
in 3 to 5 weeks will spread over your entire lawn, giving
you a rich carpet of healthy green growth.
OPERATING SUGGESTIONS
Before doing your lawn, a brief review of Basic Lawn
Management is in order. You aerate to give your grass
roots a chance to breathe … You also aerate to allow
irrigation to seep below the soil’s hard crust so your roots
get proper hydration … Many people aerate without
reseeding or fertilizing … This is perfectly acceptable
with a good healthy lawn; however, reseeding and
fertilizing after aerating does give you healthy new
growth which is essential to the maintenance of a
good lawn.
Mantis® XP Lawn Aerator • mantis.com
We recommend that you aerate three times a year,
early spring, mid-summer and early fall only … Aeration
should always follow a thorough program of dethatching.
Used this way, you will have a lawn that will turn your
neighbors green with envy.
p/n 400334
p/n 418-1
p/n 400335p/n 400337 p/n 400338
Page 2
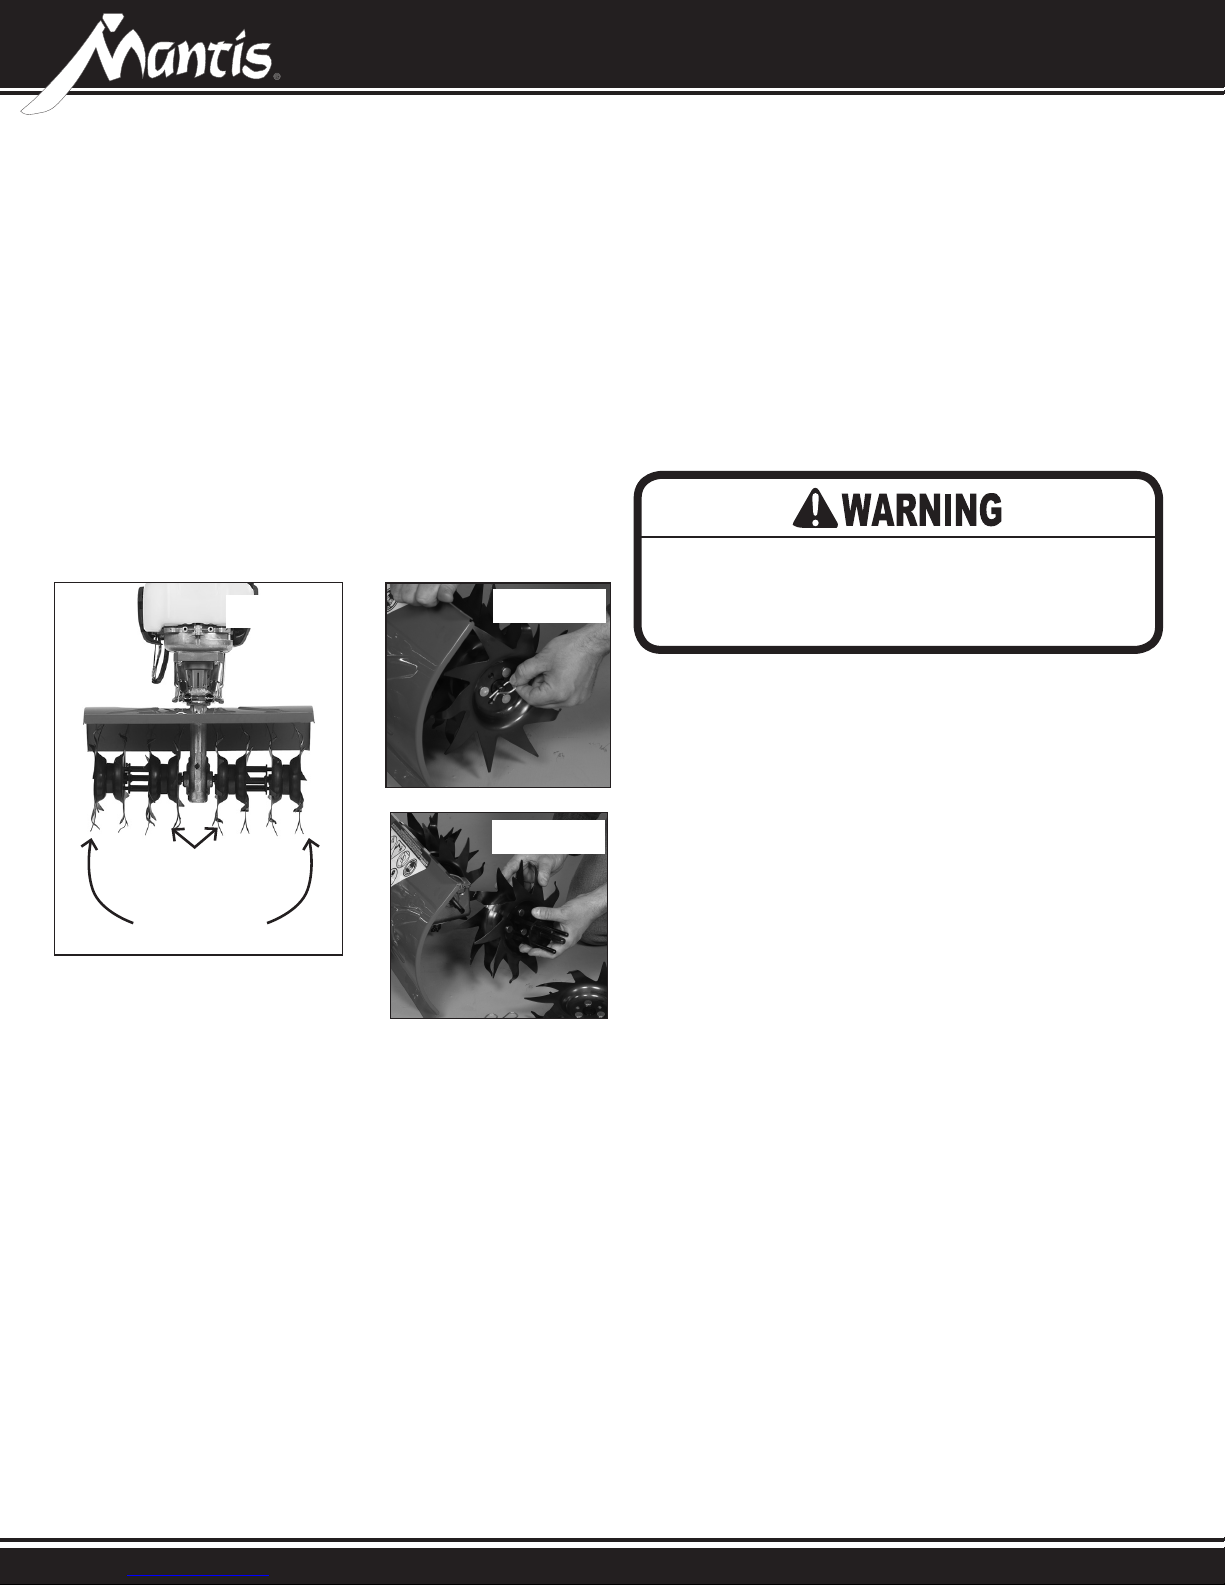
INSTALLATION
1. First, you will need to understand that your Mantis® XP
has an inner and outer set of tines on each side of the
tiller as shown in Figure 3.
2. Make sure the tiller is turned off.
3. Remove the retaining pins from the outer set of tines
(Figure 4) and remove the outer tines.
4. Only after you have removed the outer set of tines,
remove the retaining pins from the inner tines. Remove
the inner tines from the transmission axle. (Figure 5)
axle of the transmission. Install the tine retaining pin.
Repeat for the other side.
6. Place one set of outer aerator tines onto the left side
axle of the inner aerator tines. The “D” shaped hole of
the tine hub should be to the outside. Insert the tine
retaining pin. Repeat for the other side. Make sure to
match the orientation of the outer aerator tines with
the orientation of the inner tines.
5. Place one set of inner aerator tines onto the left side
Figure 3
Figure 4
Figure 5
Inner Tines
Outer Tines
DO NOT reach your ngers and/or hand between
the tine blades. DO NOT attempt to remove
the inner set of tines until you have rst
removed the outer set of tines.
Mantis® XP Lawn Aerator • mantis.com
Original Operating Instructions
Traduction des instructions originales
Übersetzung der originalen Bedienungsanleitung
p/n 410733 Rev. B 4.12.18
© 2018 Schiller Grounds Care, Inc. All Rights Reserved.
Page 3

Aérateur de gazon XP
Huit groupes de « couteaux » en acier trempé.
Ces couteaux entaillent le sol sous le gazon
pour permettre à l’eau et aux éléments nutritifs
d’y pénétrer facilement et pour favoriser la
pousse en profondeur de racines résistantes à
la sécheresse.
MONTAGE
Monter les fraises de l’aérateur de telle façon que l’arête inclinée
de la lame s’engage dans la terre (Figure 1). Cette position
produit une aération de 2,5 à 5 cm de profondeur.
Le montage des fraises de telle façon que l’arête droite
s’engage dans la terre produit un travail plus en profondeur
(Figure 2), de 6 à 9 cm environ. Ce n’est pas un problème mais,
lorsqu’on apprend comment utiliser les fraises de l’aérateur, il
est préférable de ne pas travailler en profondeur, c’est pourquoi
nous conseillons de commencer avec l’arête inclinée vers
l’avant.
On notera que si on laisse la machine fonctionner en marche
avant, elle arrache des morceaux de gazon et de terre de la
taille d’une petite pièce de monnaie. Bien que cela produise
une certaine aération, on obtiendra de meilleurs résultats en
marchant à reculons et en tirant la machine en marche arrière.
Figure 1 Figure 2
Rotation Rotation
Quelle que soit la méthode utilisée, garder à l’esprit qu’après
une aération à la machine, la pelouse ne sera pas très belle
à voir pendant une dizaine de jours... Mais les améliorations
obtenues par une aération régulière en termes de vigueur et
de couleur du gazon en valent largement la peine. Garder
toutefois à l’esprit que l’aération est un procédé radical et
que la pelouse aura une apparence peu attrayante pendant
quelques jours... Une grande partie des aspects peu
esthétiques de l’aération peuvent être immédiatement éliminés
en ratissant les petites mottes de terre puis en arrosant
immédiatement après avoir ratissé.
L’aérateur coupe 8 entailles nes espacées de 6 cm environ
et de 4 cm de profondeur. Il laisse de petites mottes de terre
meuble entre ces entailles. Si la pelouse nécessite une
restauration plus complète, aérer dans la direction nordsud, puis dans la direction est-ouest pour produire un motif
d’entailles en quadrillage. Laisser la terre en place avant
d’avoir répandu les nouvelles semences et l’engrais sur les
entailles puis ratisser la terre meuble pour obtenir des bandes
fraîches de gazon sain et vert qui couvrira toute la pelouse
au bout de 3 à 5 semaines, produisant un abondant tapis de
pousses vertes vigoureuses.
CONSEILS D’UTILISATION
Avant de travailler la pelouse, une revue rapide des principes
de base de la gestion des pelouses s’impose. On aère la
pelouse pour permettre à ses racines de respirer... On l’aère
aussi pour permettre à l’eau de s’inltrer à travers la croûte
dure du sol et assurer une bonne hydratation des racines... Il
est fréquent que les gens aèrent sans appliquer de sursemis
ou d’engrais... Cela est tout à fait acceptable pour une pelouse
en bonne santé; toutefois le sursemis et l’application d’engrais
après aération produit une repousse nouvelle et saine
essentielle au maintien d’une belle pelouse.
Aérateur de gazon Mantis® XP • mantis.fr
Nous conseillons d’aérer trois fois par an, au début du
printemps, au milieu de l’été et au début de l’automne
seulement. Une aération devrait toujours faire suite à un
déchaumage complet. C’est la meilleure façon d’obtenir une
pelouse qui fera « verdir » les voisins d’envie.
réf. 400334
réf. 400337
réf. 418-1
réf. 400338
réf. 400335
Page 4

MISE EN PLACE
1. Le Mantis® XP comporte un jeu intérieur et un jeu extérieur de
fraises de chaque côté, comme illustré à la Figure 3.
2. S’assurer que la machine est à l’arrêt.
3. Retirer les goupilles de retenue du jeu extérieur de fraises
(Figure 4) et déposer les fraises extérieures.
4. Après avoir déposé le jeu extérieur de fraises, retirer les
goupilles de retenue des fraises intérieures. Retirer les fraises
intérieures de l’axe de transmission (Figure 5).
6. Placer un jeu de fraises d’aération extérieures sur l’axe
gauche des fraises d’aération intérieures. Le trou en forme
de D du moyeu de fraise doit être vers l’extérieur. Mettre la
goupille de retenue de fraise en place. Répéter de l’autre
côté. Veiller à ce que l’orientation des fraises d’aération
extérieures correspond à l’orientation des fraises intérieures.
5. Placer un jeu de fraises d’aération intérieures sur l’axe de
transmission gauche. Mettre la goupille de retenue de fraise
en place. Répéter de l’autre côté.
Figure 3
Figure 4
Figure 5
Fraises intérieures
Fraises
extérieures
AVERTISSEMENT
NE PAS placer les doigts ni la main entre les lames
de fraise. NE PAS tenter de déposer le jeu de fraises
intérieures avant d’avoir d’abord déposé le jeu de
fraises extérieures.
Aérateur de gazon Mantis® XP • mantis.fr
Traduction des instructions originales
réf. 410733 Rév. B 4.12.18
© 2018 Schiller Grounds Care, Inc. Tous droits réservés.
Page 5

Rasenlüfter XP
Acht Reihen von „Messern“ aus gehärtetem
Stahl. Diese Messer graben sich in das
Erdreich unter Ihrem Rasen, damit Wasser und
Nährstoffe ungehindert eindringen können.
Auf diese Weise wird ein dürrebeständiges
Wurzelwachstum in großen Tiefen begünstigt.
MONTAGEANLEITUNG
Montieren Sie die Hackelemente des Rasenlüfters so, dass sich
die angewinkelte Seite der Klinge in die Erde gräbt (Abbildung
1). In dieser Stellung wird der Rasen bis zu einer Tiefe von 2,5
bis 5 cm gelüftet.
Wenn Sie die Hackelemente so montieren, dass sich die
gerade Seite in das Erdreich gräbt, arbeiten Sie in größeren
Tiefen (Abbildung 2) – ca. 6,5 bis 9 cm. Das ist im Prinzip
nicht verkehrt, aber nach einigen Erfahrungen mit dem richtigen
Gebrauch der Rasenlüftermesser werden Sie feststellen, dass
das Arbeiten an der Oberäche statt in der Tiefe am besten ist.
Deshalb empfehlen wir anfangs die Einstellung mit angewinkelten
Klingen.
Sie werden feststellen, dass die Maschine im Vorwärtsbetrieb
haubengroße Stücke aus Rasen und Erdreich herausreißt. Damit
ist zwar ein gewisser Lüftungseffekt verbunden, aber die besten
Ergebnisse kommen zustande, wenn Sie rückwärtsgehen und die
Maschine dabei nachziehen.
Abb. 1 Abb. 2
Drehrichtung Drehrichtung
Ungeachtet der von Ihnen bevorzugten Methode sollten Sie
wissen, dass Ihr Rasen nach dem Belüften, egal mit welcher
Maschine, etwa 10 Tage lang nicht besonders attraktiv aussehen
wird. Aber die verbesserte Vitalität und kräftigere Farbe des Rasen
beweisen, wie wichtig eine regelmäßige Belüftung ist. Denken Sie
daran, dass die Belüftung ein ziemlich radikaler Eingriff ist und
Ihr Rasen ein paar Tage lang recht unansehnlich wirken wird. Die
meisten Probleme bezüglich des Erscheinungsbilds nach dem
Belüften lassen sich aber sofort beheben, indem Sie zunächst
das lose Erdreich an der Oberäche rechen und es gleich danach
bewässern.
Der Rasenlüfter nimmt in einem Abstand von ca. 5 cm und einer
Tiefe von knapp 4 cm feine Einschnitte vor. Zwischen diesen
Schlitzen wird ein bisschen lose Erde aufgeworfen. Wenn Ihr
Rasen besonders gründlich belüftet werden muss, arbeiten Sie
von Norden nach Süden und dann von Osten nach Westen,
sodass ein Schachbrettmuster entsteht. Lassen Sie den
Erdboden einfach liegen, bis Sie entlang der Schlitze neuen
Grassamen und Dünger verstreuen. Wenn Sie das lose Erdreich
dann mit dem Rechen verteilen, erscheinen bald schon frische
Reihen gesunden, grünen Grases, die sich in 3 bis 5 Wochen
über ihren ganzen Rasen erstrecken – ein üppiger Teppich aus
neuem, grünem, gesundem Wachstum.
EMPFEHLUNGEN FÜR DIE BEDIENUNG
Bevor Sie Ihren Rasen bearbeiten, sollten Sie sich kurz über
die Grundsätze der Rasenpege informieren. Sie lüften, damit
Ihre Graswurzeln besser atmen können, aber auch deshalb,
weil damit Feuchte unter die harte Kruste des Erdreichs
gelangt und die Wurzeln richtig hydriert werden. Die meisten
Menschen lüften ihren Rasen, ohne ihn nachzusäen oder zu
düngen. Bei einem gesunden Rasen ist das kein Problem,
aber mit Nachsäen und Düngen im Anschluss an das Lüften
wird ein neues, gesundes Wachstum gefördert, was für eine
erfolgreiche Rasenpege entscheidend ist.
Mantis® Rasenlüfter XP • mantis.de.com
Wir empfehlen Ihnen, Ihren Rasen dreimal jährlich zu belüften:
zum Frühlingsanfang, mitten im Sommer und zu Beginn des
Herbstes. Dem Belüften sollte stets ein gründliches Entmoosen
vorausgehen. Wenn Sie diese Empfehlungen beherzigen,
erhalten Sie einen Rasen, bei dem Ihre Nachbarn grün vor Neid
werden.
Teile-Nr. 400334
Teile-Nr. 400337 Teile-Nr. 400338
Teile-Nr. 418-1
Teile-Nr. 400335
Page 6

EINBAU DER HACKELEMENTE
1. Zunächst müssen Sie wissen, dass Ihr Mantis® XP auf
jeder Seite der Fräse über einen Satz innerer und äußerer
Hackelemente verfügt (siehe Abb. 3).
2. Die Gartenfräse muss ausgeschaltet sein.
3. Entfernen Sie die Haltestifte vom äußeren HackelementeSatz (Abb. 4) und entfernen Sie dann die äußeren
Hackelemente.
4. Entfernen Sie erst nach dem Abnehmen des äußeren
Hackelemente-Satzes die Haltestifte von den inneren
Hackelementen und dann die inneren Hackelemente von der
Getriebeachse (Abb. 5).
5. Montieren Sie einen Satz der inneren Hackelemente auf
der linken Getriebeachse. Bringen Sie den Haltestift der
Hackelemente an. Wiederholen Sie diese Arbeitsschritte auf
der anderen Seite.
6. Montieren Sie einen Satz der äußeren Hackelemente auf
der linken Achse der inneren Lüfter-Hackelemente. Das
„D“-förmige Loch in der Hackelement-Nabe muss sich an
der Außenseite benden. Setzen Sie den Haltestift der
Hackelemente ein. Wiederholen Sie diese Arbeitsschritte
auf der anderen Seite. Die Ausrichtung der äußeren
Hackelemente muss mit der Ausrichtung der inneren
Hackelemente übereinstimmen.
Abb. 3
Innere Hackelemente
Äußere
Hackelemente
Abb. 4
ACHTUNG
Nicht mit Fingern oder Händen zwischen die
Hackmesser greifen. Keinen Versuch unternehmen,
die inneren Hackelemente zu entfernen, bevor Sie
nicht die äußeren Hackelemente abgenommen
haben.
Abb. 5
Mantis® Rasenlüfer XP • mantis.de.com
Übersetzung der Original-Bedienungsanleitung
Teile-Nr. 410733 Rev. B 12.04.18
© 2018 Schiller Grounds Care, Inc. Alle Rechte vorbehalten.
 Loading...