

Page 1

Electric Tiller/Cultivator
Operator’s Manual and Safety Instructions for Electric Tiller/Cultivator
Manuel de l’utilisateur et consignes de sécurité pour la motobineuse électrique
MAN 430199
Rev. B 1-24-18
3550
Original Operating Instructions
Traduction des instructions originales
Page 2

Welcome to the World of Mantis Gardening
IMPORTANT MESSAGE
Thank you for purchasing this Mantis tiller/cultivator. You have purchased a world class
product, one of the best designed and built anywhere.
This Operator’s Manual contains Safety instructions. The useful life and good service
you receive from this machine depends to a large extent on how well you read and
understand this manual. Treat your machine properly, lubricate and adjust it as
instructed, and it will give you many years of reliable service.
Your safe use of this Mantis product is one of our prime design objectives. Many safety
features are built in, but we also rely on your good sense and care to achieve accident-free operation. For best protection, study the manual
thoroughly. Learn the proper operation of all controls. Observe all safety precautions. Follow all instructions and warnings completely. Do not
remove or defeat any safety features. Make sure those who operate this machine are as well informed and careful in its use as you are.
Mantis designs and builds its equipment to serve many years in a safe and productive manner. For longest life, use this machine only as directed
in the manual, keep it in good repair and follow safety warnings and instructions. You’ll always be glad you did.
Schiller Grounds Care, Inc.
1028 Street Road
Southampton, PA 18966-4217 U.S.A.
PHONE (800) 366-6268 • FAX (215) 956-3855
PRODUCT REGISTRATION
YOU CAN REGISTER
YOUR MANTIS PRODUCT
ONLINE AT:
SCHILLERGC.COM/REGISTER
TABLE OF CONTENTS
SAFETY RULES & WARNINGS
Special Safety Information ................................................. 3
Safety & Warnings ............................................................. 3
Safety Decal Information ................................................3-4
Safety Do’s and Dont’s .....................................................5
ASSEMBLY
Parts .................................................................................. 6
Technical Specications .................................................... 7
Before Use ......................................................................... 8
Handle Assembly ............................................................ 8-9
Connecting to Power Supply ............................................. 9
OPERATION
Intended Use ................................................................... 10
Wheel Adjustment ............................................................ 10
Starting and Stopping ...................................................... 10
General Operation ........................................................... 11
Tilling ............................................................................... 11
MAINTENANCE AND STORAGE ...................................12-14
CHANGING THE TINES ...................................................... 13
STORAGE ............................................................................ 14
TRANSPORTATION ............................................................. 14
TROUBLESHOOTING ......................................................... 15
RECYCLING AND DISPOSAL ............................................. 15
LIMITED WARRANTY INFORMATION ................BACK PAGE
This Operator’s Manual is an integral part of the machine. Suppliers of both new and
second-hand machines must make sure that this manual is provided with the machine.
THESE INSTRUCTIONS ARE FOR YOUR SAFETY. PLEASE READ THROUGH THEM
THOROUGHLY BEFORE USE AND RETAIN THEM FOR FUTURE REFERENCE.
2 Operator’s Manual
Page 3

Safety Rules & Warnings
Symbols
On the product, the rating label and within these instructions you will find among
others the following symbols and abbreviations. Familiarise yourself with them to
reduce hazards like personal injuries and damage to property.
Lock / to tighten or s ecure.
Symbols
On the product, the rating label and within these instructions you will find among
others the following symbols and abbreviations. Familiarise yourself with them to
reduce hazards like personal injuries and damage to property.
Lock / to tighten or s ecure.
Unlock / to loosen.
Symbols
On the product, the rating label and within these instructions you will find among
others the following symbols and abbreviations. Familiarise yourself with them to
reduce hazards like personal injuries and damage to property.
Lock / to tighten or s ecure.
Unlock / to loosen.
Note / Remark.
Symbols
On the product, the rating label and within these instructions you will find among
others the following symbols and abbreviations. Familiarise yourself with them to
reduce hazards like personal injuries and damage to property.
Lock / to tighten or s ecure.
Unlock / to loosen.
Note / Remark.
Caution / Warning.
Read the instruction manual.
Wear hearing protection.
Wear eye protection.
Wear a dust mask.
Wear protective gloves.
Wear protective, slip-resistant footwear.
Wear tight-fitted protective clothes.
Lock / to tighten or s ecure.
Unlock / to loosen.
Note / Remark.
Caution / Warning.
Read the instruction manual.
Wear hearing protection.
Wear eye protection.
Wear a dust mask.
Wear protective gloves.
Wear protective, slip-resistant footwear.
Wear tight-fitted protective clothes.
Remove plug from the mains immediately if the cable is
damaged or cut.
Do not expose the product to rain or wet conditions (moisture).
Work across the slopes, never up and down.
You will notice throughout this Operator’s Manual Safety Rules and Important Notes. Make sure you understand and obey these
warnings and all instructions for your own protection.
I. SPECIAL SAFETY INFORMATION
Attention: This symbol points out our
important safety instructions.
When you see this symbol,
heed it’s warning!! Stay alert!!
To reduce the potential for accidents, comply
with the safety instructions in this manual.
Failure to comply may result in serious
personal injury, and/or equipment
and property damage.
II. SAFETY & WARNINGS
CALIFORNIA Proposition 65 Warning
Improper use or care of this tiller/cultivator or failure to wear proper
protection can result in serious injury. Read and understand the
rules for safe operation and all instructions in this manual. Wear
hearing and eye protection, proper non-slip footwear, long trousers,
protective covering to contain long hair and protective gloves.
Battery post, terminals, wiring insulation, and related
accessories contain lead and lead compounds,
chemicals known to the Sate of California to cause
cancer, birth defects and other reproductive harm.
WASH HANDS AFTER HANDLING
III. SAFETY DECAL INFORMATION
On the product, the rating label, and within these instructions you will nd among others the following symbols and abbreviations.
Familiarize yourself with them to reduce hazards like personal injuries and damage to property.
Lock / to tighten or secure.
Unlock / to loosen.
Note / Remark.
Caution / Warning.
Read the instruction manual.
Wear hearing protection.
Wear eye protection.
Wear a dust mask.
Wear protective gloves.
Wear protective, slip-resistant footwear.
Wear tight-tted protective clothes.
Remove plug from the mains immediately if the
cable is damaged or cut.
Do not expose the tiller/cultivator to rain or wet
conditions (moisture).
Work across the slopes, never up and down.
3Contact us at www.mantis.com
Page 4

III. SAFETY DECAL INFORMATION (CONTINUED)
Inspect the area where the product is to be used and remove
all objects which can be thrown by the product. If objects are
hidden while operating stop the engine and remove the object.
Inspect the area where the product is to be used and remove
all objects which can be thrown by the product. If objects are
hidden while operating stop the engine and remove the object.
Objects thrown by the product could hit the user or other
bystanders. Always ensure that other people and pets remain
at a safe distance from the product when it is in operation. In
general, children must not come near the area where the
product is.
Keep supply flexible cord away from cutting device.
Cutting device continues to rotate after the product is switched
off. Wait until all machine components have completely
stopped before touching the product.
Pay special attention when working on the cutting device!
Remove plug from the mains immediately if the cable is
damaged or cut.
Keep hands and feet away from sharp rotating parts – danger
of injury! When cleaning, repairing, or inspecting, make certain
the working tool and all moving parts have stopped.
Guaranteed sound power level value in 93dB.
This product is of protection class II. That means it is
equipped with enhanced or double insulation.
WEEE symbol. Waste electrical products should not be
disposed of with household waste. Please recycle where
facilities exist. Check with your Local Authority or local store
Inspect the area where the tiller/cultivator is
to be used and remove all objects which can
be thrown by the tiller/cultivator. If objects are
hidden while operating stop the motor, wait for
moving parts to stop and remove the object.
Objects thrown by the tiller/cultivator could hit
the user or other bystanders. Always ensure
that other people and pets remain at a safe
distance from the tiller/cultivator when it is in
operation. In general, children must not come
near the area where the tiller/cultivator is being
used or stored.
Pay special attention when working on the
cutting device!
Remove plug from the mains immediately if the
cable is damaged or cut.
Keep hands and feet away from sharp rotating
parts – danger of injury! When cleaning,
repairing, or inspecting, make certain the
working tool and all moving parts have
stopped.
Keep extension cord (not supplied) away from
cutting device.
Tines continue to rotate after the tiller/
cultivator is switched off. Wait until all machine
components have completely stopped before
touching the tiller/cultivator.
If the tiller/cultivator is used improperly or
safety precautions are not followed, the users
risk serious injury to themselves, others and
property. Read and understand this manual
before attempting to operate this tiller.
CAUTION!
Moving parts will continue to run for several seconds
after turning off the tiller/cultivator. Wait until the
tines have completely stopped before lifting the tiller/
cultivator or conducting inspection and maintenance.
This product is of protection class II. That
means it is equipped with enhanced or double
insulation.
WEEE symbol. Waste electrical products
should not be disposed of with household
waste. Please recycle where facilities exist.
Check with your Local Authority or local store
for recycling advice.
Some dust and debris created by the use of the tool could contain
chemicals known to the State of California to cause cancer and birth
defects or other reproductive harm. Some examples of these chemicals are:
• Chemicals in fertilizers
• Compounds in insecticides, herbicides and pesticides
• Arsenic and chromium from chemically treated lumber
Your risk from exposure to these chemicals varies, and depends on how
often you do this type of work. To reduce your exposure, work in a wellventilated area and with approved safety equipment, such as dust masks
that are specially designed to lter out microscopic particles.
IV. WARNINGS
Read the instructions carefully. Be familiar with the controls and the proper use of the product.
1. Never allow children or people unfamiliar
with these instructions to use the tiller/
cultivator. Local regulations can restrict
the age of the operator.
2. Keep children, bystanders, and pets
away – All spectators, including pets,
should be kept a safe distance away
from the work area.
3. Keep in mind that the operator or user
4 Operator’s Manual
is responsible for accidents or hazards
occurring to people or property.
4. Dress properly - Always wear proper
non-slip footwear and long trousers while
working. Do not operate the product
when barefoot or wearing open sandals.
Do not wear loose clothing or jewelry
as such articles can become caught in
moving parts. Wear a protective covering
to contain long hair. Wearing protective
gloves is recommended when working
outdoors. Use safety glasses and
hearing protection.
5. Thoroughly inspect the area where the
tiller/cultivator is to be used and remove
all objects which can be thrown by the
product. Thrown objects can cause
serious personal injury and property
damage. Do not allow anyone in front of
a running tiller/cultivator.
Page 5

IV. WARNINGS
6. Before using, always visually inspect
to see that the tines, tine bolts and tine
assembly are not worn or damaged.
Replace worn or damaged tines and
bolts in sets to preserve balance.
7. Maintain the tiller/cultivator with care
– Keep the cutting edges clean for
optimal performance and to reduce the
risk of injury. Inspect the extension cord
periodically and immediately replace it if
damaged. Keep the handles dry, clean,
and free from oil and grease. Follow the
additional recommendations described in
the maintenance section of this manual.
8. Avoid accidental starting – Do not carry
the garden tiller/cultivator with your nger
on the switch. Make sure the switch is off
before plugging-in or unplugging the unit.
9. Do not abuse the cord – Never pull the
tiller/cultivator by the cord or yank the
cord to disconnect it from the receptacle.
Keep the cord away from heat, oil, and
sharp edges.
10. Moving parts – Keep hands and feet
away from moving parts. Keep guards
in place and in proper working order.
11. Do not force the tiller/cultivator – It
will perform better with less likelihood
of personal or mechanical injury if it
is used at the rate for which it was
designed.
12. Do not overreach – Keep proper footing
and balance at all times.
13. On multi-bladed machines, take care as
rotating one tine can cause other tines
to rotate.
14. Keep work area clean and well-lit –
Cluttered, dark areas invite accidents.
Work only in daylight or in good articial
light.
15. Always be sure of your footing on
slopes.
Walk, never run with the tiller/cultivator.
16.
Work across the slopes, never up and
17.
down.
18. Exercise extreme caution when
changing direction on slopes.
19. Do not work on excessively steep
slopes.
20. Use extreme caution when reversing or
pulling the product towards you.
21. Start the motor carefully according to
manufacturer instructions and with feet
well away from the moving tines.
22. Do not put your hands or feet near or
under rotating parts.
23. Never pick up or carry a tiller/cultivator
while the motor is running.
24. Never operate the tiller/cultivator with
defective guards or shields, or without
safety devices, for example deectors
and/or catchers in place.
25. Stop the tiller/cultivator, and disconnect
it from the power supply. Make sure
that all moving parts have come to a
complete stop...
- before unclogging or changing the
tines.
- before checking, cleaning, servicing
or working on the machine.
- after striking a foreign object. Inspect
the tiller/cultivator for damage and
make repairs before restarting and
operating the machine.
- whenever you leave the tiller/
cultivator. Never leave the tiller/
cultivator running when unattended.
26. If the tiller/cultivator starts to vibrate
abnormally (check immediately)
- inspect for damage,
- check for and tighten any loose parts,
- replace or repair any damaged parts
27. Store idle tool indoors – When not in
use, the tiller/cultivator should be stored
indoors in a dry and high or locked-up
place out of the reach of children.
28. Avoid dangerous environments – Do
not use the tiller/cultivator in rain
or in damp or wet locations. Do not
operate the tiller/cultivator in gaseous
or explosive atmospheres or use
the tiller/cultivator near ammable or
combustible liquids. Motors in these
type of tools normally spark, and the
sparks might ignite fumes.
29. Check for damaged parts – Before
further use of the tiller/cultivator, a
guard or other part that is damaged
should be carefully checked to
determine that it will operate properly
and perform its intended function.
Check for alignment of moving parts,
binding of moving parts, breakage
of parts, mounting, and any other
condition that may affect its operation.
A guard or other part that is damaged
should be properly repaired or replaced.
30. Keep the tiller/cultivator free of grass,
leaves, or grease to reduce the chance
of re hazard.
31. The motor housing remains hot for a
short period after the tiller/cultivator is
turned OFF. Allow the motor housing
to cool completely before touching or
storing near combustible material.
32. Do not use near underground electric
cables, telephone, lines, pipes, or
hoses. If in doubt, contact your utility
or telephone company to locate
underground services.
33. Be aware that the tiller/cultivator may
unexpectedly bounce upward or jump
forward if the tines should strike buried
obstacles such as large stones, roots,
or stumps.
34. Don’t grasp the exposed tines or cutting
edges when picking up or holding the
tiller/cultivator.
V. EMERGENCY
Familiarize yourself with the use of this product by reading of this instruction manual completely. Memorize the safety
directions and follow them to the letter. This will help to prevent risks and hazards.
1. Always stay alert when using this tiller/cultivator, so that you can recognize and handle risks early. Watch what you are doing. Use
common sense. Do not operate the tiller/cultivator when you are tired or under the inuence of drugs, alcohol, or other medication.
Fast intervention can prevent serious injury and damage to property.
2. Switch off and disconnect from the power supply if there are malfunctions. Have the tiller/cultivator checked by a qualied professional
and repaired, if necessary, before you operate it again.
3. Please call the Mantis customer service center at 1-800-366-6268 for assistance
.
5Contact us at www.mantis.com
Page 6

Assembly
Your product
3
1
2
15
4
8
5
6
7
9
10
11
12
1. On/off switch
2. Lock-off button
3. Cord retainer
4. Upper handle
5. Power cord with plug
6. Cord clip
7. Middle handle
8. Upper handle knob and bolt (2)
14
13
9. Middle handle knob and bolt (2)
10. Guard
11. Wheels
12. Steel Tines (blades)
13. Gear box
14. Motor housing
15. Two speed switch
6 Operator’s Manual
Page 7

Technical Specications
Symbols
On the product, the rating label and within these instructions you will find among
others the following symbols and abbreviations. Familiarise yourself with them to
reduce hazards like personal injuries and damage to property.
Lock / to tighten or secure.
Unlock / to loosen.
Note / Remark.
Caution / Warning.
Read the instruction manual.
Wear hearing protection.
Voltage/ Frequency 120V /60 Hz
Rated Current 9 (A)
No Load Current 2.5 (A)
Motor Speed 16000r/min
Protection Class Class II or Double Insulated
Number of Tine Speeds 2
Tines Speed I 260 RPM
Tines Speed II 310 RPM
Tilling Width 12” (300mm)
Digging Depth 8” ( 200mm)
Weight 24.4Lbs
Wheels Height adjustment 3 settings
The sound values have been determined according to noise test code given in 2000/14/
consideration. Proper measures include among others regular maintenance and care of the product
EC. The sound intensity level for the operator may exceed 80dB(A) and ear protection
measures are necessary.
Adopt proper measures to protect yourself against vibration exposures. Take the whole work
process including times the tiller/cultivator is running under no load or switched off into
and accessories, keeping hands warm, periodic breaks and proper planning of work processes.
7Contact us at www.mantis.com
Page 8

Assembly
NOTE: Take care of small parts that are removed during
assembly or when making adjustments. Keep them secure to
avoid loss.
bolts,and washers. Tighten the knobs on each side to ensure a secure fit (Fig.
2).
Lock / t o tighten or secure.
Unlock / to loosen.
Note / Remark.
BEFORE YOU START
• Remove packing materials and unpack all parts and lay them
on a at, stable surface.
• Make sure the delivery contents are complete and free of any
damage. If you nd that parts are missing or show damage do not
use the tiller/cultivator but contact the Mantis customer service
center at 1-800-366-6268 for assistance. Using an incomplete or
damaged tiller/cultivator represents a hazard to people and property.
• Ensure that you have all the accessories and tools needed for
assembly and operation. This also includes suitable personal
protective equipment.
The tiller/cultivator must be fully assembled before operation! Do not use tiller/cultivator that is only partly
assembled or assembled with damaged parts! Follow the assembly instructions step-by-step and use the
pictures provided as a visual guide to easily assemble the product! Do not connect the tiller/cultivator to
power supply before it is completely assembled! Failure to comply could result in accidental starting and
serious personal injury.
The tiller/cultivator and the packaging are not
children’s toys! Children must not play with
plastic bags, sheets and small parts! There is
a danger of choking and suffocation!
TILLER/CULTIVATOR ASSEMBLY
NOTE: Take care of small parts that are removed during assembly
or when making adjustments. Keep them secure to avoid loss.
1
2
3
• Connect the upper handle to the middle
• Attach the cable clips to the middle
handle bar
• Secure the middle handle to the lower
handle using the rst set of knobs, bolts,
and plastic washers. Tighten the knobs
on each side to ensure a secure t.
handle using the second set of knobs, bolts
and plastic washers. Tighten the knobs on
each side to ensure a secure t.
8 Operator’s Manual
Page 9

4
bolts and washers. Tighten the knobs on each side to ensure a secure fit (Fig.
3)
WARNING! For your safety, it is required that the plug attached
to this product is always connected to an extension cord! The
extension cord must be suitable for outdoor use with sockets
protected against water splashing! Ensure the extension cord is
of the proper size and type for your product (≥ 0.75 mm²)!
Always use a residual current supply (RCD) protected supply
through the hole on the guard. Pull it over the cord retainer and gently tug on
the cord to ensure that it is firmly secured (Figs. 5).
• Secure the cable inside the cable clips.
CONNECTION TO POWER SUPPLY
For safety reasons the tiller/cultivator is equipped with a short
power cord. Do not connect the tiller/cultivator directly to the power
supply using this power cord. A proper extension cord is required for
operation. Observe the technical requirements for this product when
purchasing an extension cord.
Assembly (Continued)
Make sure all handle knobs are properly tightened
before using the product.
For your safety, it is required that the plug attached to tiller/
cultivator is always connected to an extension cord! The
extension cord must be suitable for outdoor use with sockets
protected against water splashing! Ensure the extension cord
is of the proper size and type for your product (≥ 0.75 mm²)!
Ground fault circuit interrupter (GFCI) protection should be
provided on the circuit(s) or outlet(s) to be used for this electric
tiller/cultivator. Receptacles are available having built-in GFCI
protection and may be used for this measure of safety.
1
• Double the extension cord back,
about 12 inches (30 cm) from the end
and lead the loop through the hole
on the guard. Pull it over the cord
retainer and gently tug on the cord to
ensure that it is rmly secured
Connect the power cord to the socket of the extension cord.
2
Make sure the on/off switch is not squeezed or otherwise engaged.
3
• To prevent the short power cord
from disconnecting from the
extension cord during operation,
use the onboard extension cord
restraint hook and/or make a
knot with the two cords
4
5
6
Use only a UL-, CSA-, or ETL- rated extension
cord for outdoor, all-weather use. Do not use
an extension cord over 100 ft (30m).
Connect the plug of extension cord into a
suitable socket.
Check the voltage! The voltage must
comply with the information on the rating
label! If using an extension cord it must
be suitable for outdoor use with sockets
protected against water splashing.
Your tiller/cultivator is now ready to be used.
Do not abuse the cord. Never pull the tiller/
cultivator by the cord or yank the cord to
disconnect it from the receptacle. Keep the cord
away from heat, oil, and sharp edges.
9Contact us at www.mantis.com
Page 10
Electric Tiller/Cultivator Operation
WARNING!
Always switch the product off and disconnect it from power
supply before making any adjustments!
1.
2.
INTENDED USE
This tiller/cultivator is intended for loosening and working up the soil in a garden and
for tilling coarse soil for mixing in fertilizer, peat and compost in planting areas. This
tiller/cultivator should not be used to till extremely dry or wet soil.
This tiller/cultivator should not be used in rain or humid environments.
For safety reasons it is essential to read the entire instruction manual before rst
operation and to observe all the instructions.
This tiller/cultivator is intended for private household use only, not for any commercial
trade use. It must not be used for any purposes other than those described.
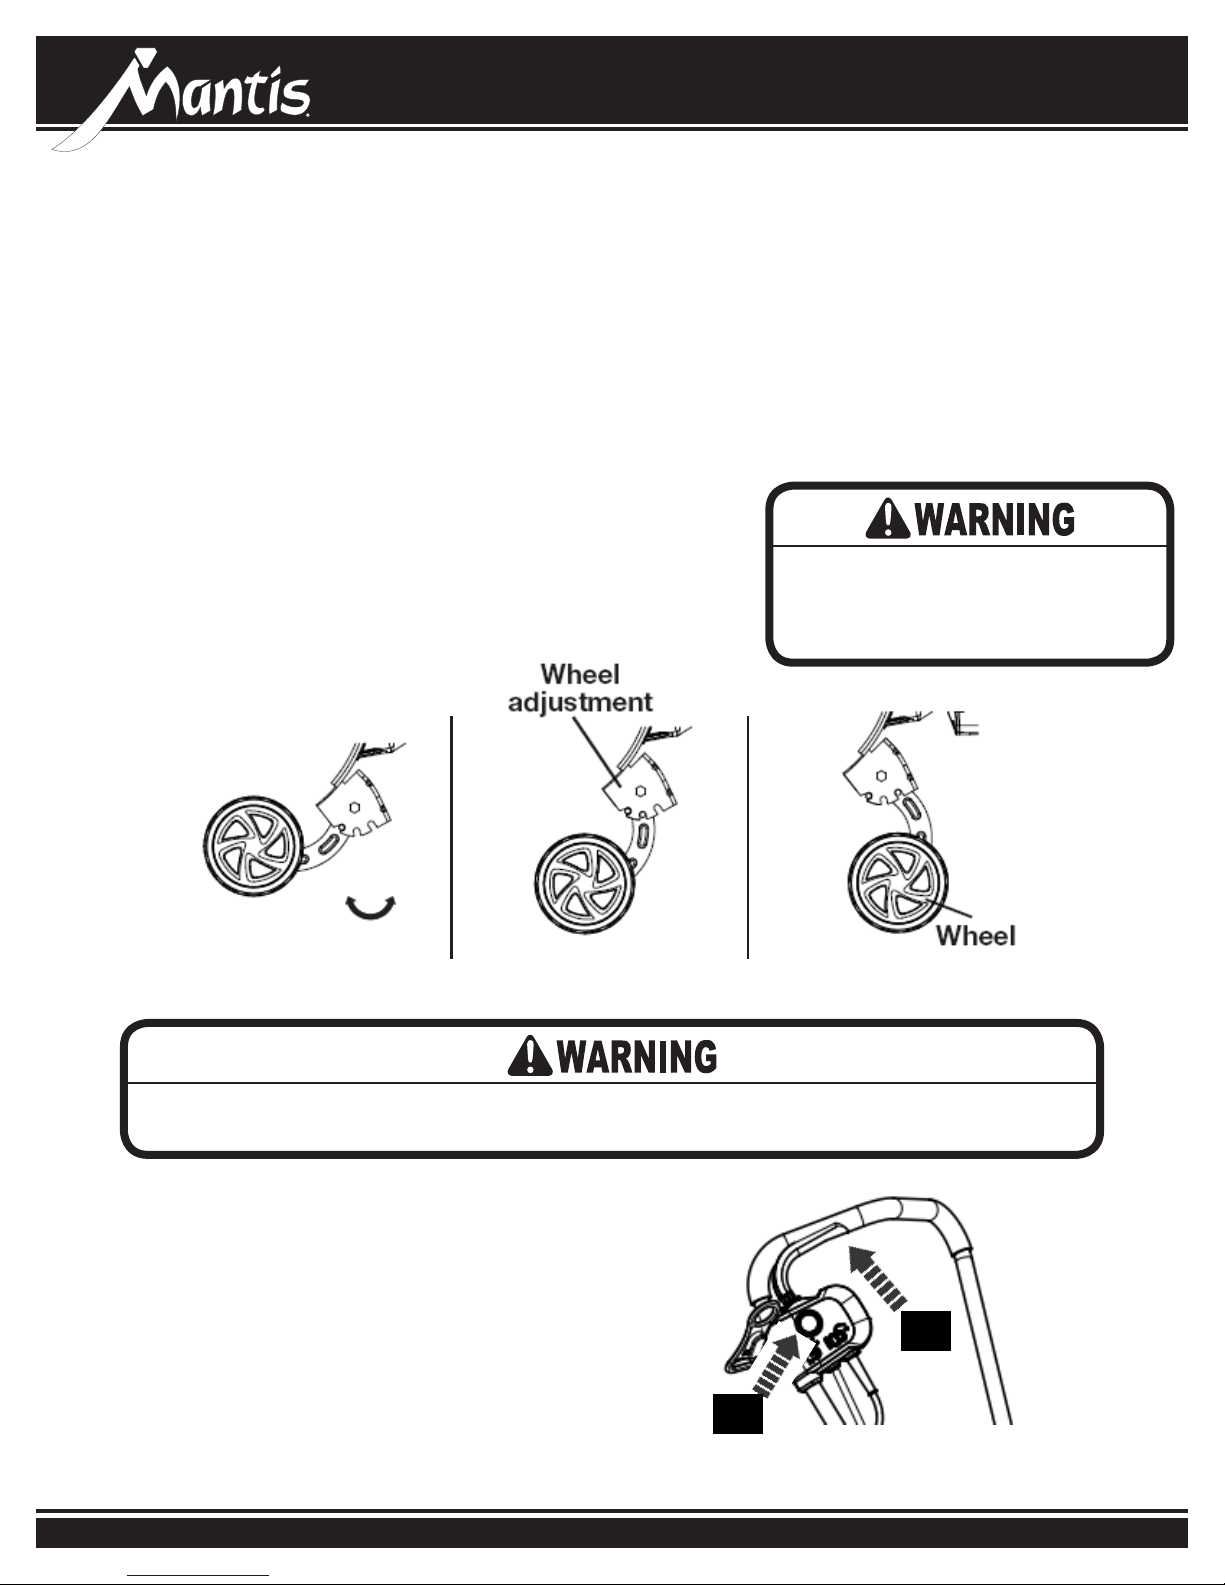
WHEEL ADJUSTMENT
The wheels can be adjusted to 3 positions. Lower the wheel height for shallow soil
penetration. Raise the wheel height for deeper soil penetration.
Adjust the wheels when the tiller/cultivator is off, wait for moving parts to stop and
disconnected from the power supply. Tilt the tiller/cultivator forward to rest on the
motor housing. Grasp the wheel assembly by the axel and pull toward you. Move the
assembly up or down (as needed) and allow the pins on the assembly to slot into one
of the three pre-set positions.
TWO SPEEDS SWITCH
This product features a switch that allows operation
at one of two, preset speeds. The switch is located
on the back of the motor facing the operator. When
set on low speed (I) the digging tines will move
more slowly and deliberately than when set on
high speed (II). Select speed levels based upon
preference relating to job requirements. The speed
switch should only be engaged when the tiller/
cultivator is turned off and in a stationary position.
Always switch the product off and
wait for moving parts to stop.
Disconnect it from power supply
before making any adjustments!
Transport position Work position (low) Work position (high)
The wheels can be adjusted in 3 different positions. Always ensure the wheels are securely locked!
Do not attempt to use the tiller/cultivator with the wheels in any other position or unlocked!
Figure 1
SWITCHING ON/OFF
1. Press the lock-off button and hold it in position (Figure 1, step 1).
2. Squeeze the on/off switch to switch the tiller/cultivator on (Figure 1,
step 2), release the lock-off button afterwards.
3. Release the on/off switch to switch the tiller/cultivator off.
10 Operator’s Manual
Page 11

Electric Tiller/Cultivator Operation (Continued)
ensures that all the ground is tilled without missing any spots.
objects that could damage the product or its engine.
the proper rotation, and it could also cause you to slip and fall.
pressure to the handles (Fig. 10).
WARNING! Never carry this product as the person in fig. 11 is
doing. If you do, and the tines engage, you could suffer serious
injury.
to match sample
Inspect the area where the product is to be used and remove
all objects which can be thrown by the product. If objects are
hidden while operating stop the engine and remove the object.
GENERAL OPERATION
1. Check the tiller/cultivator, its power cord and plug as well as accessories for damage
before each use. Do not use tiller/cultivator if it is damaged or shows wear.
2. Double check that the tines are properly fastened.
3. Always hold the tiller/cultivator by its handles. Keep the handles dry to ensure safe
support.
4. During transportation of the tiller/cultivator, the operator must control the handles with
two hands.
5. Ensure that the air vents are always unobstructed and clear. Clean them if necessary
with a soft brush. Blocked air vents may lead to overheating and damage the product.
6. Switch the tiller/cultivator off immediately and wait for moving parts to stop if you are
interrupted while working by other people entering the working area. Always let the
tiller/cultivator come to a complete stop before taking your eyes off the machine.
7. Do not overwork yourself. Take regular breaks to ensure you can concentrate on the
work and have full control over the tiller/cultivator.
In some countries regulations dene
at what time of the day and on what
special days products are allowed
to be used and what restrictions
apply! Ask your community for
detailed information and observe
the regulations in order to preserve
a peaceful neighborhood and avoid
committing administrative offences!
TILLING
1. Make sure that the working area is clear of stones, sticks, wire or other
objects that could damage the tiller/cultivator or its motor. Be aware that the
tiller/cultivator may unexpectedly bounce upward or jump forward if the tines
should strike buried obstacles such as large stones, roots, or stumps.
2. Do not till very wet soil because it tends to accumulate around the tines,
preventing proper rotation. It could also cause you to slip and fall.
3. Always maintain a rm grip on the tiller/cultivator. For better guidance apply
light pressure to the handles (Figure 2). Hold onto the tiller/cultivator with both
hands during operation. Ensure the grips are dry.
4. Do not try to till too deeply or force the product into soil that is extremely hard
or resistant.
5. Walk the tiller/cultivator backwards through the soil at a normal pace and in as
straight a line as possible.
6. Till in slight overlapping rows. The most effective pattern for tilling soils is
moving the tiller/cultivator up and down in vertical lines, then move the tiller/
cultivator in horizontal lines from left to right (Figure 3). This will keep the rows
even and ensures that all the ground is tilled without missing any spots.
7. Pay special attention when changing direction. Apply light pressure onto the
handle so that the tines are lifted to make a turn. Turn the product around
guided by the wheels. Gradually release pressure and move the tines back to
the ground.
Figure 2
Figure 3
Figure 4
Stop the motor, if the tiller/cultivator strikes a foreign object!
Never carry this tiller/
cultivator as the person in
gure 4 is doing. If you do,
and the tines engage, you
could suffer serious injury.
Switch the tiller/cultivator off, wait for moving parts to stop,
disconnect it from the power supply and let it cool down.
Inspect the tiller/cultivator thoroughly for damage! Have any
damage repaired before restarting! Extensive vibration of the
tiller/cultivator during operation is an indication of damage!
Stop the motor. The tiller/cultivator should be promptly
inspected and repaired!
11Contact us at www.mantis.com
Page 12

Electric Tiller/Cultivator Care
Lock / t o tighten or secure.
Unlock / to loosen.
Note / Remark.
Symbols
On the product, the rating label and within these instructions you will find among
others the following symbols and abbreviations. Familiarise yourself with them to
reduce hazards like personal injuries and damage to property.
Lock / to tighten or secure.
Unlock / to loosen.
Note / Remark.
Caution / Warning.
Read the instruction manual.
Wear hearing protection.
Wear eye protection.
Wear a dust mask.
Wear protective gloves.
AFTER USE
1. Switch the tiller/cultivator off, wait for moving parts to stop, disconnect it from
the power supply and let it cool down.
2. Check, clean and store the tiller/cultivator as described below.
RULES FOR CARE
1. Keep the tiller/cultivator clean. Remove debris from it after each use
and before storage.
2. Regular and proper cleaning will help ensure safe use and prolong the
life of the tiller/cultivator.
3. Inspect the tiller/cultivator before each use for worn and damaged
parts. Do not operate it if you nd broken and worn parts.
GENERAL CLEANING
1. Clean the tiller/cultivator with a dry cloth. Use a brush for areas that
are hard to reach.
2. In particular clean the air vents after every use with a cloth and brush.
3. Remove stubborn dirt with high pressure air (max. 3 bar/40 psi).
NOTE: Do not use chemical, alkaline, abrasive or other
aggressive detergents or disinfectants to clean this tiller/
cultivator as they might be harmful to its surfaces. Do not use
cleaning fluids or solvents or spray the machine down with
water (especially water under pressure) when cleaning the tiller/
cultivator.
Always switch the tiller/cultivator off, wait for
moving parts to stop, disconnect the tiller/
cultivator from the power supply and let the
tiller/cultivator cool down before performing
inspection, maintenance and cleaning work!
Only perform repairs and maintenance
work according to these instructions! All
further works must be performed by a
qualied specialist!
4. Check for worn or damaged parts. Replace worn parts as necessary
or contact the Mantis customer service center at 1-800-366-6268 for
assistance before using the tiller/cultivator again.
UNDERSIDE AND TINES
1. Keep the underside and tines clean and free of debris. Remove soil
with a proper brush or tool.
2. All nuts and bolts must be checked periodically for tightness before
operation. After prolonged use, especially in sandy soil conditions, the
tines will become worn and loose some of the original shape. Tilling
efciency will be reduced and the tines should be replaced.
3. Have worn or damaged tines replaced with new ones of the same
type.
4. To prolong the life span of tines and the tiller/cultivator it is
recommended that the tines are lubricated after each use.
POWER CORD
If the power cord is damaged, it must be replaced by the manufacturer, its service agent or similarly qualied persons in order to avoid
a safety hazard.
Wear protective gloves when working
on the tiller/cultivator or close to it! Use
proper tools to remove debris, e. g. a
wooden stick! Never use your bare hands!
CAUTION!
Moving parts will continue to run for several seconds
after turning off the machine. Wait until the tines have
completely stopped before lifting the tiller/cultivator or
conducting inspection and maintenance.
12 Operator’s Manual
Page 13

Electric Tiller/Cultivator Maintenance
!
!
!
REPAIR
This tiller/cultivator does not contain any parts that can be
repaired by the consumer. For assistance contact the Mantis
customer service center at 1-800-366-6268.
SPARE PARTS/REPLACEMENT PARTS
The following parts of this product may be replaced by the
consumer. Spare parts are available through Mantis customer
service.
Description Model Number
Tine. . . . . . . . . . . . . . . . . . . . . . . . . . . . . . . . . . 8440-990101-01
Bolt . . . . . . . . . . . . . . . . . . . . . . . . . . . . . . . . . . . . . . . . 8NH-08D
Nut . . . . . . . . . . . . . . . . . . . . . . . . . . . . . . . . . . . . . .8SFDD-40D
Always use only original Mantis replacement parts. The use of any unauthorized replacement parts,
attachments or accessories can be dangerous and could cause injury or mechanical damage.
MAINTENANCE
Before and after each use, check the tiller/cultivator for wear and damage. If required, exchange worn or damaged parts for
new ones as described in this instruction manual. Observe the technical requirements.
1. Follow the maintenance and repair instructions for this tiller/cultivator. Never carry out any modications of this product.
Information about maintenance and repair is provided in this user manual.
2. Keep all nuts, bolts and screws tight to ensure the tiller/cultivator is in safe working condition.
3. Make sure that air vents are not covered with debris
4. Replace worn or damaged parts for safe operation.
5. Be sure that tines are clear and can rotate freely – Accumulation of debris around the tines could impair performance or
damage the motor. Inspect and clean the area around the tines before every use.
CHANGING THE TINES
NOTE: The tiller/cultivator is tted with four tilling tines that can
easily be changed in pairs. Always change both tine pairs at the
same time to avoid imbalance and damage to the machine.
To replace the tines, follow the steps below:
1. While standing on a at and stable surface, switch off the
unit, wait for moving parts to stop and remove the plug from
the extension cord.
2. Remove the 2 bolts and 2 nuts, then remove the steel tines
(Figure 5).
Figure 5
3. Clean the drive shaft
4. Place the new tines onto the drive shaft so that the holes on
the tine hub line up with the holes on the drive shaft.
5. Insert the 2 bolts through the holes and secure them with the
2 nuts (Figure 6).
Figure 6
IMPORTANT: The tines must be set in the correct turning
direction. Note the way the old tines came off and replace the
new ones exactly the same way.
13Contact us at www.mantis.com
Page 14

Electric Tiller/Cultivator Maintenance & Storage
VIBRATION AND NOISE REDUCTION
To reduce the impact of noise and vibration emission, limit the time
of operation, as well as wear personal protective equipment.
Take the following points into account to minimize the vibration and
noise exposure risks:
1. Only use the tiller/cultivator as intended by its design and these
instructions.
2. Ensure that the tiller/cultivator is in good condition and well
maintained.
3. Use correct tines and ensure they are in good condition.
4. Keep tight grip on the handle grips.
5. Maintain this tiller/cultivator in accordance with these instructions
and keep tiens well lubricated.
6. Plan your work schedule to spread product use across a longer
period of time.
RESIDUAL RISKS
Even if you are operating this tiller/cultivator in accordance
with all the safety requirements, potential risks of injury and
damage remain. The following dangers can arise in connection
with the use of this product:
1. Health defects resulting from vibration emission if the product is
being used over long periods of time or not properly managed
and maintained.
2. Injuries and damage to property due to broken components or
the sudden impact of hidden objects during use.
3. Danger of injury and property damage caused by thrown objects.
This tiller/cultivator produces an electromagnetic eld during operation! This eld may under some circumstances
interfere with active or passive medical implants! To reduce the risk of serious or fatal injury, we recommend persons
with medical implants to consult their doctor and the medical implant manufacturer before operating this product!
STORAGE
1. Switch the product off, wait for moving parts to stop and disconnect it
from the power supply.
2. Clean the tiller/cultivator as described above.
3. Store the tiller/cultivator in a sheltered, dry, frost-free, well-ventilated
place.
4.
When not in use, the tiller/cultivator should be stored indoors in a dry
and high or locked-up place out of the reach of children.
storage temperature is between 50°F (10°C) and 86°F (30°C).
5. We recommend using the original package for storage or covering the
tiller/cultivator with a suitable tarp or enclosure to protect it against dust.
6. You can store your tiller/cultivator with the handles in an extended
position or folded down (Figure 7). Loosening handle knobs will allow the
handles to fold down as shown.
The ideal
TRANSPORTATION
1. Switch the tiller/cultivator off, wait for moving parts to stop and
disconnect it from the power supply.
2. Attach transportation guards, if applicable.
3. Always carry the
4. Protect the
which may occur during transportation in vehicles.
5. Secure the
tiller/cultivator by its transportation handle.
tiller/cultivator from any heavy impact or strong vibrations
tiller/cultivator to prevent it from slipping or falling over.
Figure 7
14 Operator’s Manual
Page 15

Electric Tiller/Cultivator Troubleshooting
WEEE symbol. Waste electrical products should not be
disposed of with household waste. Please recycle where
facilities exist. Check with your Local Authority or local store
Troubleshooting
Suspected malfunctions are often due to causes that users can x themselves. Therefore check malfunctions using this section. In most cases
the problem can be solved quickly.
Only perform the steps described within these instructions! All further inspection, maintenance and repair work must be performed
by an authorized service center or a similarly qualied specialist if you cannot solve the problem yourself! For assistance contact the
Mantis customer service center at 1-800-366-6268.
Problem Cause Remedy
1. Tiller/cultivator does not start 1.1. Not connected to power supply
1.2. Power cord or plug is defective
1.3. Other electrical defect to the product
2.
Tiller/cultivator
full power
3. Unsatisfactory result 3.1. Tines are dull/damaged
4. Excessive vibration or noise 4.1. Tines are dull/damaged
does not reach
2.1. Extension cord not suitable for
operation with this product
2.2. Power source (e.g. generator) has
too low voltage
2.3. Air vents are blocked
3.2. Tines not suitable for ground material
4.2. Bolts/nuts are loose
1.1. Connect to power supply
1.2. Check by a specialist electrician
1.3. Check by a specialist electrician
2.1. Use a proper extension cord
2.2. Connect to another power
source
2.3. Clean the air vents
3.1. Replace with new tines
3.2. Use product only on suitable
ground
4.1. Replace with new tines
4.2. Tighten bolts/nuts
RECYCLING AND DISPOSAL
The product comes in a package that protects it against damage during shipping. Keep the package until you are
sure that all parts have been delivered and the product functions properly. Recycle the package afterwards.
WEEE symbol. Waste electrical products should not be disposed of with household waste. Please recycle where
facilities exist. Check with your Local Authority or local store for recycling advice.
15Contact us at www.mantis.com
Page 16

LIMITED WARRANTY
MANTIS extends this limited warranty against defects in material and workmanship for a period of two (2) years from the date
of purchase by the original purchaser.
MANTIS will repair or replace, at its option, any part or parts of the product found to be defective in material or workmanship
during the warranty period. Warranty repairs and replacements will be made without charge for parts or labor. All parts replaced
under warranty will be considered as part of the original product, and any warranty on the replaced parts will expire coincident
with the original product warranty. If you think your MANTIS TILLER/CULTIVATOR is defective in material or workmanship, please
contact our Customer Service Department at 1-800-366-6268 or via our Contact Us page on www.mantis.com
Mantis
1028 Street Road
Southampton, PA 18966
USA
You are responsible for pickup and delivery charges; the product must be returned to us postage paid.
MANTIS assumes no responsibility in the event that the product was not assembled or used in compliance with any assembly,
care, safety, or operating instructions contained in the Operator’s Manual or accompanying the product. This limited warranty
does not cover damages or defects due to normal wear and tear, lack of reasonable and proper maintenance, failure to follow
operating instructions or owner’s manual, misuse, lack of proper storage or accidents or routine maintenance parts and service.
This limited warranty shall not be effective if your MANTIS TILLER/CULTIVATOR has been subjected to negligence or has been
repaired or altered by anyone other than an authorized dealer or authorized service center.
You must maintain your MANTIS TILLER/CULTIVATOR by following the mantenence procedures described in the owner’s manual.
Such routine maintenance, whether performed by you or a dealer, is at your expense.
MANTIS MAKES NO EXPRESS OR IMPLIED WARRANTIES, REPRESENTATIONS OR PROMISES EXCEPT THOSE
CONTAINED HEREIN. THERE ARE NO OTHER WARRANTIES, INCLUDING WARRANTIES OF MERCHANTABILITY AND
FITNESS FOR A PARTICULAR PURPOSE. ALL WARRANTIES OTHER THAN THE EXPRESS WARRANTY SET FORTH ABOVE
ARE SPECIFICALLY DISCLAIMED. THE DURATION OF ANY IMPLIED WARRANTY, INCLUDING MERCHANTABILITY AND
FITNESS FOR A PARTICULAR PURPOSE, IS LIMITED TO THE DURATION OF THIS WRITTEN LIMITED WARRANTY. MANTIS
DISCLAIMS ALL LIABILITY FOR INDIRECT, INCIDENTAL AND/OR CONSEQUENTIAL DAMAGES IN CONNECTION WITH
THE USE OF THE MANTIS PRODUCTS COVER BY THIS WARRANTY. SOME STATES DO NOT ALLOW LIMITATIONS ON
HOW LONG AN IMPLIED WARRANTY LASTS AND/OR DO NOT ALLOW THE EXCLUSION OR LIMITATION OF INCIDENTAL
OR CONSEQUENTIAL DAMAGES, SO THAT ABOVE LIMITATIONS AND EXCLUSIONS MAY NOT APPLY TO YOU. THIS
WARRANTY GIVES YOU SPECIFIC LEGAL RIGHTS, AND YOU MAY ALSO HAVE OTHER RIGHTS WHICH VARY FROM
STATES TO STATE.
Specications, descriptions and illustrative material in this literature are as accurate as known at the time of publication, but are
subject to change without notice.
©2017 Schiller Grounds Care, Inc. All Rights Reserved.
Page 17

Motobêche-bineuse électrique
Operator’s Manual and Safety Instructions for Electric Tiller/Cultivator
Manuel de l’utilisateur et consignes de sécurité pour la motobêche-bineuse électrique
MAN 430199
Rév. B 1-24-18
3550
Original Operating Instructions
Traduction des instructions originales
Page 18

Bienvenue dans le monde du jardinage Mantis
MESSAGE IMPORTANT
Merci d’avoir acheté cette motobêche-bineuse Mantis. Vous avez acheté un produit de classe
mondiale, de conception et de fabrication quasiment sans égales.
Ce manuel de l’utilisateur contient des instructions de sécurité. La durée utile et le bon emploi
de cette machine dépendent en grande partie de la manière dont vous avez lu et compris ce
manuel. Veillez à traiter la machine correctement, à la graisser et la régler comme indiqué et
elle vous offrira de nombreuses années de service able.
L’utilisation sans danger de ce produit Mantis est l’un de nos principaux objectifs de conception.
Nous intégrons de nombreux dispositifs de sécurité mais comptons aussi sur votre bon sens et
votre attention pour éviter les accidents. Pour assurer une protection optimale, lisez les manuels
avec attention. Apprenez à utiliser correctement toutes les commandes. Observez toutes les mesures de sécurité. Respectez toutes les instructions et mises
en garde. Ne démontez ou ne désactivez aucun des dispositifs de sécurité. Assurez-vous que tous les utilisateurs de la machine sont aussi bien informés et
prudents dans son emploi que vous.
Mantis conçoit et construit son matériel pour offrir de nombreuses années de service sûr et productif. Pour optimiser la durée de service, utilisez impérativement
cette machine conformément aux instructions des manuels, maintenez-la en bon état et respectez toutes les mises en garde et consignes de sécurité. Vous
ne le regretterez jamais.
Schiller Grounds Care, Inc.
1028 Street Road
Southampton, PA 18966-4217 États-Unis
TÉLÉPHONE (800) 366-6268 • TÉLÉCOPIEUR
(215) 956-3855
ENREGISTREMENT DU
PRODUIT
CE PRODUIT MANTIS PEUT ÊTRE
ENREGISTRÉ EN LIGNE À :
SCHILLERGC.COM/REGISTER
TABLE DES MATIÈRES
RÈGLES DE SÉCURITÉ ET AVERTISSEMENTS
Informations spéciales sur la sécurité .......................................... 3
Sécurité et avertissements ...........................................................3
Identication des autocollants de sécurité ................................3-4
Sécurité - À faire / À ne pas faire ................................................. 5
ASSEMBLAGE
Pièces ..........................................................................................6
Caractéristiques techniques .........................................................7
Avant utilisation ............................................................................ 8
Assemblage ..............................................................................8-9
Raccordement à l’alimentation électrique .................................... 9
Ce manuel fait partie intégrante de la machine. Les fournisseurs de machines neuves
et d’occasion doivent s’assurer que ce manuel est remis avec la machine. CES
INSTRUCTIONS VISENT À LA SÉCURITÉ DES UTILISATEURS. VEILLER À LES
LIRE AVEC ATTENTION AVANT UTILISATION ET À LES CONSERVER POUR TOUTE
RÉFÉRENCE ULTÉRIEURE.
FONCTIONNEMENT
Emploi prévu .............................................................................. 10
Réglage des roues ..................................................................... 10
Mise en marche et à l’arrêt.........................................................10
Fonctionnement général ............................................................ 11
Binage ........................................................................................ 11
ENTRETIEN ET ENTREPOSAGE .............................................12-14
CHANGER LES FRAISES ..............................................................13
ENTREPOSAGE ............................................................................. 14
TRANSPORT ..................................................................................14
DÉPANNAGE .................................................................................. 15
RECYCLAGE ET ÉLIMINATION ..................................................... 15
GARANTIE LIMITÉE ................................. COUVERTURE ARRIÈRE
2 Manuel de l’utilisateur
Page 19

Règles de sécurité et avertissements
Symbols
On the product, the rating label and within these instructions you will find among
others the following symbols and abbreviations. Familiarise yourself with them to
reduce hazards like personal injuries and damage to property.
Lock / to tighten or s ecure.
Symbols
On the product, the rating label and within these instructions you will find among
others the following symbols and abbreviations. Familiarise yourself with them to
reduce hazards like personal injuries and damage to property.
Lock / to tighten or s ecure.
Unlock / to loosen.
Symbols
On the product, the rating label and within these instructions you will find among
others the following symbols and abbreviations. Familiarise yourself with them to
reduce hazards like personal injuries and damage to property.
Lock / to tighten or s ecure.
Unlock / to loosen.
Note / Remark.
Symbols
On the product, the rating label and within these instructions you will find among
others the following symbols and abbreviations. Familiarise yourself with them to
reduce hazards like personal injuries and damage to property.
Lock / to tighten or s ecure.
Unlock / to loosen.
Note / Remark.
Caution / Warning.
Read the instruction manual.
Wear hearing protection.
Wear eye protection.
Wear a dust mask.
Wear protective gloves.
Wear protective, slip-resistant footwear.
Wear tight-fitted protective clothes.
Lock / to tighten or s ecure.
Unlock / to loosen.
Note / Remark.
Caution / Warning.
Read the instruction manual.
Wear hearing protection.
Wear eye protection.
Wear a dust mask.
Wear protective gloves.
Wear protective, slip-resistant footwear.
Wear tight-fitted protective clothes.
Remove plug from the mains immediately if the cable is
damaged or cut.
Do not expose the product to rain or wet conditions (moisture).
Work across the slopes, never up and down.
Le présent manuel de l’utilisateur contient un certain nombre de règles de sécurité et d’avis importants. Pour la protection de tous, veiller à bien
comprendre et respecter ces mises en garde et toutes les instructions.
I. INFORMATIONS SPÉCIALES SUR LA SÉCURITÉ
AVERTISSEMENT
Attention : Ce symbole attire l’attention sur
d’importantes consignes de sécurité. Lorsque
ce symbole est présent, respecter la mise
en garde ! Rester vigilant !
Pour réduire les risques d’accident, respecter les
consignes de sécurité gurant dans ce manuel.
Le non-respect de ces consignes peut entraîner des
AVERTISSEMENT
dommages corporels et matériels graves.
II. SÉCURITÉ ET AVERTISSEMENTS
AVERTISSEMENT
AVERTISSEMENT
Pour écarter les risques de blessure grave, utiliser et entretenir cette
motobêche de façon appropriée et porter une protection adaptée. Lire
et comprendre les consignes de sécurité et toutes les instructions de
ce manuel. Porter la protection auditive et oculaire, des chaussures
antidérapantes adaptées, un couvre-chef pour contenir des cheveux
III. IDENTIFICATION DES AUTOCOLLANTS DE SÉCURITÉ
Les symboles et abréviations suivants sont visibles sur le produit, sur l’étiquette signalétique et dans ce manuel. Veiller à se familiariser avec
eux an réduire les risques de blessures corporelles et de dégâts matériels.
longs et des gants de protection.
Verrouiller / pour serrer ou attacher.
Déverrouiller / pour desserrer.
Note / Remarque.
Attention / Avertissement.
Lire le manuel d’instructions.
Porter une protection auditive.
Porter des lunettes de protection.
Avertissement Proposition 65 de CALIFORNIE
Les cosses de batterie, bornes, gaines de ls et
accessoires associés contiennent du plomb et des
composés de plomb déclarés par l’État de la Californie
responsables de cancer, malformations congénitales et
autres anomalies de la reproduction.
SE LAVER LES MAINS APRÈS MANIPULATION
Porter un masque antipoussière.
Porter des gants de protection.
Porter des chaussures de protection
antidérapantes.
Porter des vêtements de protection serrés.
Débrancher immédiatement la che de la prise
électrique si le cordon est endommagé ou
coupé.
Ne pas exposer la motobêche-bineuse à la
pluie ou à l’humidité.
Travailler perpendiculairement à la pente,
jamais en montée ou en descente.
3Contactez-nous sur www.mantis.fr/nous-contacter/
Page 20

III. IDENTIFICATION DES AUTOCOLLANTS DE SÉCURITÉ (SUITE)
Inspect the area where the product is to be used and remove
all objects which can be thrown by the product. If objects are
hidden while operating stop the engine and remove the object.
Inspect the area where the product is to be used and remove
all objects which can be thrown by the product. If objects are
hidden while operating stop the engine and remove the object.
Objects thrown by the product could hit the user or other
bystanders. Always ensure that other people and pets remain
at a safe distance from the product when it is in operation. In
general, children must not come near the area where the
product is.
Keep supply flexible cord away from cutting device.
Cutting device continues to rotate after the product is switched
off. Wait until all machine components have completely
stopped before touching the product.
Pay special attention when working on the cutting device!
Remove plug from the mains immediately if the cable is
damaged or cut.
Keep hands and feet away from sharp rotating parts – danger
of injury! When cleaning, repairing, or inspecting, make certain
the working tool and all moving parts have stopped.
Guaranteed sound power level value in 93dB.
This product is of protection class II. That means it is
equipped with enhanced or double insulation.
WEEE symbol. Waste electrical products should not be
disposed of with household waste. Please recycle where
facilities exist. Check with your Local Authority or local store
Contrôler la zone où la motobêche-bineuse doit
être utilisée et enlever tous les objets susceptibles
d’être projetés par la machine. Si des objets sont
dissimulés durant l’utilisation, arrêter le moteur,
attendre l’arrêt complet des pièces en mouvement
et enlever l’objet.
Les objets projetés par la motobêche-bineuse
peuvent heurter l’utilisateur ou d’autres personnes
présentes. Toujours maintenir les autres personnes
et animaux à une distance sûre de la motobêchebineuse lorsqu’elle est en marche. En règle
générale, les enfants ne devront pas s’approcher de
l’endroit où la machine est utilisée ou entreposée.
Faire preuve d’attention particulière en travaillant
sur l’outil de coupe !
Débrancher immédiatement la che de la prise
électrique si le cordon est endommagé ou coupé.
Tenir les mains et les pieds à l’écart des pièces
rotatives tranchantes ; danger de blessure ! Lors
du nettoyage, des réparations et des contrôles,
s’assurer que l’outil de coupe et toutes les pièces
mobiles sont à l’arrêt complet.
Tenir le cordon de rallonge (non fourni) à l’écart de
l’outil de coupe.
Les fraises continuent de tourner après la mise à
l’arrêt de la motobêche-bineuse. Attendre l’arrêt
complet de toutes les parties de la machine avant
de toucher la motobêche-bineuse.
AVERTISSEMENT
Pour écarter les risques blessures graves à
soi-même et aux autres et de dégâts matériels,
veiller à utiliser la motobêche-bineuse de
façon correcte et à respecter les consignes de
sécurité. Lire et comprendre ce manuel avant de
tenter d’utiliser la motobêche.
ATTENTION!
Les pièces en mouvement continuent de tourner
pendant plusieurs secondes après la mise à l’arrêt de
la motobêche-bineuse. Attendre que les fraises soient à
l’arrêt complet avant de soulever la motobêche-bineuse
ou de procéder à son contrôle et son entretien.
Ce produit est de classe de protection II. Cela
signie qu’il est équipé d’une isolation double ou
renforcée.
Symbole WEEE. Les appareils électriques en n
de vie ne doivent pas être jetés avec les déchets
ménagers. Veiller à les recycler là où ce service
existe. Obtenir des conseils en matière de recyclage
auprès des autorités locales ou du revendeur local.
AVERTISSEMENT
Certaines poussières et débris produits par l’utilisation de l’outil peuvent contenir
des substances chimiques déclarées par l’État de la Californie responsables de
cancer, malformations congénitales ou autres anomalies de la reproduction. Il peut
notamment s’agir des substances chimiques suivantes :
• Composés chimiques dans les engrais
• Composés dans les insecticides, herbicides et pesticides
• Arsenic et chrome provenant de bois d’œuvre traité
Le risque associé à l’exposition à ces produits varie et dépend de la fréquence
de ce type de travail. Pour réduire l’exposition, veiller à travailler dans un endroit
bien aéré et avec un équipement de sécurité homologué, notamment un masque à
poussière spécialement conçu pour ltrer les particules microscopiques.
IV. AVERTISSEMENTS :
Lire les instructions avec attention. Veiller à se familiariser avec les commandes et la bonne utilisation du produit.
1. Ne jamais permettre aux enfants ni aux
personnes n’ayant pas pris connaissance de
ces instructions d’utiliser la motobêche-bineuse.
La réglementation locale peut imposer des
restrictions relatives à l’âge de l’utilisateur.
2. Tenir les enfants, les autres personnes et
les animaux à l’écart – Toutes les personnes
présentes, ainsi que les animaux doivent se tenir
à une distance sûre de la zone de travail.
3. Garder à l’esprit que l’utilisateur est responsable
des accidents ou des dangers qu’il fait courir aux
4 Manuel de l’utilisateur
personnes ou à aux biens.
4. Porter une tenue adaptée – Toujours porter
des chaussures antidérapantes adaptées et un
pantalon long durant l’utilisation. Ne pas utiliser le
produit pieds nus ou avec des sandales ouvertes.
Ne pas de bijoux ou de vêtements amples car ces
articles peuvent être happés par les pièces en
mouvement. Porter un couvre-chef pour contenir
des cheveux longs. Le port de gants de protection
est recommandé pour travailler à l’extérieur.
Utiliser des lunettes de sécurité et une protection
auditive.
5. Contrôler avec soin la zone où la motobêchebineuse doit être utilisée et enlever tous les objets
susceptibles d’être projetés par la machine. Les
objets projetés peuvent provoquer des blessures
corporelles et dégâts matériels graves. Ne laisser
personne se tenir devant une motobêche-bineuse
en marche.
Page 21

IV. AVERTISSEMENTS :
6. Avant utilisation, toujours vérier visuellement
l’absence d’usure et de dommages des
fraises, des boulons de xation de fraises et
de l’ensemble de coupe. Changer les fraises et
boulons usés ou endommagés par jeu complet
pour maintenir l’équilibre.
7. Entretenir la motobêche-bineuse avec soin –
Maintenir les arêtes tranchantes bien propres
pour assurer un rendement optimal et réduire le
risque de blessure. Contrôler régulièrement la
rallonge électrique et la changer immédiatement
si elle est endommagée. Garder les poignées
sèches, propres et exemptes d’huile et de
graisse. Respecter les recommandations
supplémentaires gurant dans la section
Entretien du présent manuel.
8. Éviter les démarrages accidentels – Ne pas
porter la motobêche-bineuse avec le doigt sur
l’interrupteur. S’assurer que l’interrupteur est
en position d’arrêt avant de brancher ou de
débrancher la machine.
9. Ne pas forcer sur le cordon électrique – Ne
jamais tirer la motobêche-bineuse par le
cordon ni tirer le cordon d’un coup sec pour le
débrancher de la prise de courant. Tenir le cordon
à l’écart de la chaleur, de aques d’huile ou
d’arêtes tranchantes.
10. Pièces en mouvement – Garder les mains et
les pieds à l’écart des pièces en mouvement.
Maintenir les protections en place et en bon état
de marche.
11. Ne pas forcer sur la motobêche-bineuse – Il
fonctionne mieux et présente moins de risques
de blessures ou de dégâts mécaniques s’il est
utilisé à la vitesse pour laquelle il est conçu.
12. Rester d’aplomb – Maintenir en permanence un
pied ferme et un bon équilibre.
13. Sur les machines à plusieurs outils, faire preuve
de précaution car la mise en rotation de l’une
des fraise peut entraîner la rotation des autres.
14. Maintenir la zone de travail propre et bien
éclairée – Les endroits sombres et encombrés
sont propices aux accidents. Ne travailler qu’à
la lumière du jour ou sous une bonne lumière
articielle.
15. Toujours garder le pied ferme dans les pentes.
16. Marcher, ne jamais courir avec le produit.
17. Travailler perpendiculairement à la pente, jamais
18. Faire preuve de grande prudence pour changer
19. Ne pas travailler sur des pentes excessivement
20. Faire preuve de grande prudence lors des
21. Démarrer le moteur avec précaution, en
22. Ne pas placer les mains ni les pieds en dessous
23. Ne jamais soulever ni porter une motobêche-
24. Ne jamais utiliser la motobêche-bineuse avec
25. Arrêter la motobêche-bineuse et la débrancher
- avant de désobstruer ou de changer les
- avant de contrôler, de nettoyer, d’entretenir
- après avoir heurté un objet étranger.
- chaque fois que l’on laisse la motobêche-
26. En cas de vibrations anormales de la
- contrôler l’état,
- contrôler le serrage et serrer les pièces
- changer ou réparer toute pièce
27. Ranger les outils non utilisés à l’intérieur –
en montée ou en descente.
de direction dans une pente.
abruptes.
changements de sens ou en tirant la machine
vers soi.
conformité avec les instructions du fabricant et
en gardant les pieds bien à l’écart des fraises en
mouvement.
ou à proximité d’une pièce en rotation.
bineuse avec le moteur en marche.
des écrans ou capots de protection défectueux
ni sans dispositifs de sécurité, tels que
déecteurs ou récepteurs, en place.
de l’alimentation électrique. S’assurer que toutes
les pièces mobiles sont à l’arrêt complet...
fraises.
ou de travailler sur la machine.
Contrôler l’état de la motobêche-bineuse et
effectuer les réparations nécessaires avant
de la redémarrer et de l’utiliser.
bineuse. Ne jamais laisser la motobêchebineuse en marche sans surveillance.
motobêche-bineuse (vérier immédiatement)
desserrées.
endommagée
28. Éviter les conditions dangereuses – Ne pas
29. Vérier qu’il n’y a pas de pièces endommagées
30. Pour réduire le risque d’incendie, éviter toute
31. Le carter du moteur reste chaud pendant une
32. Ne pas utiliser à proximité de câbles électriques,
33. Garder à l’esprit que la motobêche-bineuse peut
34. Ne pas saisir les fraises ni les arêtes
Lorsqu’elle n’est pas utilisée, la motobêchebineuse devra être rangée à l’intérieur dans un
endroit sec et en hauteur ou verrouillé hors de la
portée des enfants.
utiliser la motobêche-bineuse sous la pluie ni
dans des endroits humides ou mouillés. Ne pas
faire fonctionner la motobêche-bineuse dans
des atmosphères inammables ou explosives
ni l’utiliser à proximité de liquides inammables
ou combustibles. Le moteur de ce type d’outil
produit généralement des étincelles qui peuvent
enammer les vapeurs.
– Avant de réutiliser la motobêche-bineuse,
contrôler avec soin tout capot de protection
ou autre pièce endommagée pour s’assurer
qu’il fonctionnera correctement et remplira
la fonction prévue. Vérier que les pièces en
mouvement sont alignées et non grippées, qu’il
n’y a aucune pièce ou xation cassée ni aucun
autre problème susceptible d’entraver son bon
fonctionnement. Tout capot de protection ou
autre pièce endommagée devront être réparés
ou changés comme il se doit.
accumulation d’herbes, de feuilles ou de graisse
sur la motobêche-bineuse.
courte période après la mise à l’arrêt de la
motobêche-bineuse. Laisser le carter du moteur
refroidir complètement avant de le toucher ou de
la placer à proximité de matières combustibles.
conduites téléphoniques, canalisations ou
tuyaux enterrés. En cas de doute, s’adresser à
la compagnie de téléphone ou de service public
pour localiser les réseaux enterrés.
bondir brusquement vers le haut ou l’avant si les
fraises heurtent un obstacle enfoui tel qu’une
grosse roche, des racines ou une souche.
tranchantes pour soulever ou tenir la
motobêche-bineuse.
V. SITUATION D’URGENCE
Veiller à lire complètement ce manuel d’instructions pour se familiariser avec l’utilisation de cette motobêche-bineuse. Mémoriser les
consignes de sécurité et les suivre à la lettre. Cela permettra d’écarter les risques et dangers.
1. Toujours rester vigilant lors de l’utilisation de cette motobêche-bineuse, an de reconnaître et gérer les risques sans délai. Faire attention à ce que
l’on fait. Faire preuve de bons sens. Ne pas utiliser la motobêche-bineuse dans un état de fatigue ou sous l’emprise de drogues, d’alcool ou de
médicaments. Une intervention rapide peut éviter les blessures graves et les dégâts matériels.
2. Éteindre et débrancher de l’alimentation électrique en cas de problèmes de fonctionnement. Faire contrôler la motobêche-bineuse par un
professionnel qualié et la faire réparer, le cas échéant, avant de la remettre en service.
3. Pour toute assistance, appeler le service après-vente Mantis au 1-800-366-6268
.
5Contactez-nous sur www.mantis.fr/nous-contacter/
Page 22

Assemblage
Your product
3
1
2
15
4
8
5
6
7
9
10
11
12
1. Interrupteur marche/arrêt
2. Bouton de verrouillage
3. Serre-câble
4. Guidon supérieur
5. Cordon électrique avec che
6. Bride de xation du cordon
7. Guidon intermédiaire
8. Bouton et vis du guidon supérieur (2)
14
13
9. Bouton et vis du guidon intermédiaire (2)
10. Carter
11. Roues
12. Fraises en acier (lames)
13. Réducteur
14. Carter du moteur
15. Commutateur deux vitesses
6 Manuel de l’utilisateur
Page 23

Caractéristiques techniques
Symbols
On the product, the rating label and within these instructions you will find among
others the following symbols and abbreviations. Familiarise yourself with them to
reduce hazards like personal injuries and damage to property.
Lock / to tighten or s ecure.
Unlock / to loosen.
Note / Remark.
Caution / Warning.
Read the instruction manual.
Wear hearing protection.
Tension / fréquence 120 V / 60 Hz
Courant nominal 9 A
Courant à vide 2,5 A
Régime du moteur 16 000 tr/min
Classe de protection Classe II ou double isolation
Nombre de vitesses de fraises 2
Vitesse de fraises I 260 tr/min
Vitesse de fraises II 310 tr/min
Largeur de travail 300 mm (12 po)
Profondeur de travail 200 mm (8 po)
Poids 11 kg (24,4 lb)
Réglage de hauteur des roues 3 réglages
Les valeurs acoustiques ont été déterminées selon la norme d’essai de bruit décrite dans 2000/14/
CE. Le niveau d’intensité acoustique pour l’opérateur peut dépasser 80dB(A) et des mesures de
protection auditive sont nécessaires.
AVERTISSEMENT
Adopter les mesures qui conviennent pour se protéger contre l’exposition aux vibrations. Prendre en considération
l’ensemble du processus de travail, y compris les périodes pendant lesquelles la motobêche-bineuse fonctionne à
vide ou qu’elle est à l’arrêt. Les mesures qui conviennent comprennent notamment l’entretien et les soins courants
du produit et des accessoires, le maintien des mains au chaud, des pauses régulières et une bonne planication du
processus de travail.
7Contactez-nous sur www.mantis.fr/nous-contacter/
Page 24

Assemblage
NOTE: Take care of small parts that are removed during
assembly or when making adjustments. Keep them secure to
avoid loss.
bolts,and washers. Tighten the knobs on each side to ensure a secure fit (Fig.
2).
Lock / t o tighten or secure.
Unlock / to loosen.
Note / Remark.
AVANT DE COMMENCER
• Retirer les matériaux d’emballage puis déballer toutes les pièces et les
poser sur une surface plane et stable.
• Vérier que le contenu de la livraison est complet et non endommagé.
Si des pièces manquent ou présentent des dommages, ne pas utiliser la
motobêche-bineuse mais obtenir l’assistance du centre de service aprèsvente Mantis au 1-800-366-6268. L’utilisation d’une motobêche-bineuse
incomplète ou endommagée représente un danger pour les personnes et
les biens.
• Veiller à avoir à disposition tous les outils et accessoires nécessaires
pour l’assemblage et le fonctionnement. Cela comprend notamment un
équipement de protection individuelle adapté.
AVERTISSEMENT
La motobêche-bineuse doit être entièrement assemblée avant utilisation ! Ne pas utiliser une motobêche-
bineuse qui n’est que partiellement assemblée ou qui est assemblée avec des pièces endommagées ! Suivre
les instructions d’assemblage pas à pas et se servir des illustrations en tant que guide visuel pour assembler la
motobêche-bineuse sans difculté ! Ne pas brancher la motobêche-bineuse sur une prise de courant avant qu’elle
soit complètement assemblée ! Le non-respect de ces consignes peut entraîner un démarrage accidentel et des
blessures corporelles graves.
AVERTISSEMENT
La motobêche-bineuse et l’emballage ne sont pas
des jouets d’enfants ! Les enfants ne doivent pas
jouer avec les sachets en plastique, les feuilles
et les pièces de petite taille ! Ils présentent un
danger d’étouffement et de suffocation !
ASSEMBLAGE DE LA MOTOBÊCHE-BINEUSE
REMARQUE : Prendre soin des petites pièces qui sont démontées durant l’assemblage ou lors des
réglages. Les conserver de façon sûre pour éviter de les perdre.
1
Guidon
intermédiaire
2
3
Bouton + vis
Clips de
câble
• Attacher les clips de câble au guidon
intermédiaire
• Attacher le guidon intermédiaire au guidon
inférieur à l’aide du premier jeu de boutons,
vis et rondelles en plastique. Serrer les
boutons des deux côtés pour assurer un
assemblage solide.
Guidon inférieur
• Attacher le guidon supérieur au guidon
Bouton + vis + rondelle
intermédiaire à l’aide du deuxième jeu de
boutons, vis et rondelles en plastique. Serrer
les boutons des deux côtés pour assurer un
assemblage solide.
Guidon supérieur
Guidon intermédiaire
8 Manuel de l’utilisateur
Page 25

4
bolts and washers. Tighten the knobs on each side to ensure a secure fit (Fig.
3)
WARNING! For your safety, it is required that the plug attached
to this product is always connected to an extension cord! The
extension cord must be suitable for outdoor use with sockets
protected against water splashing! Ensure the extension cord is
of the proper size and type for your product (≥ 0.75 mm²)!
Always use a residual current supply (RCD) protected supply
through the hole on the guard. Pull it over the cord retainer and gently tug on
the cord to ensure that it is firmly secured (Figs. 5).
S’assurer que tous les boutons sont bien serrés avant
Clip de câble
Câble
• Attacher le câble à l’aide des clips de câble.
RACCORDEMENT À L’ALIMENTATION ÉLECTRIQUE
Pour des raisons de sécurité, cette motobêche-bineuse est équipée d’un
cordon d’alimentation court. Ne pas brancher la motobêche-bineuse
directement sur une prise de courant à l’aide de ce cordon d’alimentation.
Un cordon de rallonge approprié est nécessaire pour le bon fonctionnement.
Respecter les spécications techniques pour ce produit lors de l’achat d’un
cordon de rallonge.
Assemblage (suite)
AVERTISSEMENT
d’utiliser le produit.
CARACTÉRISTIQUES DU CORDON DE RALLONGE
Longueur du cordon de
rallonge
Calibre A.W.G. :
Jusqu’à 15 m
(50 pi)
> 15 m à 30 m
(> 50 pi à 100 pi)
AVERTISSEMENT
Pour plus de sécurité, la che électrique de cette motobêche-bineuse
devra toujours être branchée sur un cordon de rallonge ! Le cordon
de rallonge doit convenir à une utilisation extérieure avec des prises
à protection contre les éclaboussures d’eau ! S’assurer que le cordon
de rallonge est de calibre et de type adaptés pour le produit (≥ 0,75
mm²) ! Une protection par disjoncteur différentiel (GFCI) doit être
prévue sur le ou les circuits ou prises de courant utilisés avec cette
motobêche-bineuse électrique. Il existe des prises de courant à
disjoncteur différentiel intégré, elles peuvent être utilisées à cette n.
Cordon de
1
rallonge
Attacher le cordon comme sur l’illustration
(B) Brancher la che dans la prise
• Replier le cordon de rallonge à environ
30 cm (12 po) de l’extrémité et faire
passer la boucle à travers l’ouverture
du support de retenue. L’engager sur le
crochet de retenue et tirer légèrement
sur le cordon pour s’assurer qu’il soit
fermement attaché
Brancher le cordon d’alimentation dans la che femelle du cordon de rallonge.
2
Vérier que l’interrupteur marche/arrêt n’est pas enfoncé ni autrement engagé.
3
Cordon de
l’appareil
Support de retenue
du cordon de
rallonge
Cordon de rallonge
• Pour empêcher le cordon électrique
court de se débrancher du cordon
de rallonge durant l’utilisation, se
servir du crochet de retenue de
cordon intégré et/ou nouer les deux
cordons
4
5
6
AVERTISSEMENT
Utiliser exclusivement un cordon de rallonge
classé UL, CSA ou ETL pour une utilisation
extérieure par tout temps. Ne pas utiliser de
cordon de rallonge de plus de 30 m (100 pi).
Brancher la che du cordon de rallonge dans une
prise de courant adaptée.
AVERTISSEMENT
Vérier la tension ! La tension doit
correspondre aux indications sur l’étiquette
signalétique ! Si un cordon de rallonge est
utilisé, il doit convenir à une utilisation
extérieure avec des prises à protection contre
les éclaboussures d’eau !
La motobêche-bineuse est à présent prête à l’emploi.
Ne pas forcer sur le cordon électrique. Ne jamais
tirer la motobêche-bineuse par le cordon ni tirer le
cordon d’un coup sec pour le débrancher de la prise
de courant. Tenir le cordon à l’écart de la chaleur, de
aques d’huile ou d’arêtes tranchantes.
9Contactez-nous sur www.mantis.fr/nous-contacter/
Page 26

Fonctionnement de la motobêche électrique
WARNING!
Always switch the product off and disconnect it from power
supply before making any adjustments!
1.
2.
EMPLOI PRÉVU
La motobêche-bineuse est conçue pour ameublir et travailler la terre dans un jardin et
pour biner les sols grossiers pour y mélanger de l’engrais, de la tourbe et du compost
dans des terrains cultivés. Cette motobêche-bineuse ne doit pas être utilisée pour biner
un sol extrêmement sec ou humide.
Cette motobêche-bineuse ne doit pas être utilisée sous la pluie ou en milieux humides.
Pour des raisons de sécurité, il est indispensable de lire le manuel d’instructions en
entier avant la première utilisation et de respecter toutes les instructions.
Cette motobêche-bineuse est destinée à une utilisation par des particuliers uniquement,
pas à un quelconque usage commercial. Elle ne devra être utilisée à aucune autre n
que celles décrites.
COMMUTATEUR DEUX VITESSES
Ce produit comporte un commutateur qui permet une utilisation
à deux vitesses préréglées différentes. Ce commutateur se
trouve sur l’arrière du moteur lorsqu’on fait face à l’utilisateur.
Lorsqu’il est réglé sur la basse vitesse (I), les fraises tournent
plus lentement et en profondeur que lorsqu’il est en position de
haute vitesse (II). Choisir le niveau de vitesse en fonction des
besoins de la tâche à effectuer. Le commutateur de vitesse
doit être réglé uniquement lorsque la motobêche est à l’arrêt et
en position stationnaire.
RÉGLAGE DES ROUES
Les roues présentent 3 positions de réglage. Abaisser la hauteur des roues pour
pénétrer le sol peu profondément. Relever la hauteur des roues pour pénétrer le sol plus
profondément.
Régler les roues alors que la motobêche-bineuse est à l’arrêt, attendre l’arrêt complet des
pièces en mouvement et débrancher de la prise de courant. Basculer la motobêche vers
l’avant pour l’appuyer sur le carter du moteur. Saisir le système de roues par l’axe et le
tirer vers soi. Déplacer les roues vers le haut ou le bas (selon les besoins) et laisser les
goupilles s’engager dans l’une des trois positions prévues.
Réglage des roues
l’arrêt et attendre l’arrêt complet des pièces en
mouvement. La débrancher de l’alimentation
électrique avant de procéder à tout réglage !
AVERTISSEMENT
Toujours mettre la motobêche-bineuse à
Position de transport
Position de travail
(basse)
AVERTISSEMENT
Les roues présentent 3 positions de réglage. Toujours s’assurer que les roues sont bien
verrouillées ! Ne pas tenter d’utiliser la motobêche-bineuse avec les roues dans une autre position ou
déverrouillées !
MISE EN MARCHE ET À L’ARRÊT
1. Appuyer sur le bouton de déblocage et le maintenir dans cette position
(Figure 1, étape 1).
2. Enfoncer l’interrupteur marche/arrêt pour mettre la motobêche-bineuse en
marche (Figure 1, étape 2), puis relâcher le bouton de déblocage.
3. Relâcher l’interrupteur marche/arrêt pour mettre l’appareil à l’arrêt.
10 Manuel de l’utilisateur
Figure 1
Roue
Position de travail (haute)
Page 27

Fonctionnement de la motobêche électrique (suite)
ensures that all the ground is tilled without missing any spots.
objects that could damage the product or its engine.
the proper rotation, and it could also cause you to slip and fall.
pressure to the handles (Fig. 10).
WARNING! Never carry this product as the person in fig. 11 is
doing. If you do, and the tines engage, you could suffer serious
injury.
to match sample
Inspect the area where the product is to be used and remove
all objects which can be thrown by the product. If objects are
hidden while operating stop the engine and remove the object.
FONCTIONNEMENT GÉNÉRAL
1. Vérier le bon état de la motobêche-bineuse, de son cordon et sa che d’alimentation, ainsi
que des accessoires avant chaque utilisation. Ne pas utiliser la motobêche-bineuse si elle
est endommagée ou présente des signes d’usure.
2. Revérier que les fraises sont correctement attachées.
3. Toujours tenir la motobêche-bineuse par ses poignées. Garder les poignées sèches pour
assurer une prise sûre.
4. Durant le transport la motobêche-bineuse, veiller à tenir les poignées des deux mains.
5. S’assurer que les évents d’air sont toujours propres et dégagés. Le cas échéant, les
nettoyer avec une brosse souple. L’obstruction des évents peut provoquer une surchauffe et
endommager le produit.
6. Mettre la motobêche-bineuse immédiatement à l’arrêt et attendre l’arrêt complet des pièces
en mouvement si le travail est interrompu par des personnes entrant dans l’aire de travail.
Toujours attendre l’arrêt complet de la motobêche-bineuse avant d’ôter les yeux de la
machine.
7. Ne pas forcer à la tâche. Faire des pauses régulièrement pour pouvoir se concentrer sur la
tâche et avoir une maîtrise totale de la motobêche-bineuse.
BINAGE
1. Contrôler la zone de travail pour s’assurer qu’il n’y a pas de pierres, bâtons, ls métalliques
et autres objets susceptibles d’endommager la motobêche-bineuse ou son moteur. Garder
à l’esprit que la motobêche-bineuse peut bondir brusquement vers le haut ou l’avant si les
fraises heurtent un obstacle enfoui tel qu’une grosse roche, des racines ou une souche.
2. Ne pas biner un sol très mouillé car la terre a tendance à s’accumuler autour des fraises et
à empêcher leur bonne rotation. Cela présente aussi un risque de glissement et de chute.
3. Toujours tenir fermement la motobêche-bineuse. Pour mieux le guider, appliquer une légère
pression sur le guidon (Figure 2). Tenir la motobêche-bineuse des deux mains durant
l’utilisation. S’assurer que les poignées sont sèches.
4. Ne pas tenter de biner trop profondément ni de pénétrer de force un sol particulièrement
dur et résistant.
5. Tirer la motobêche-bineuse à reculons à travers le sol à un pas normal et suivant une ligne
aussi droite que possible.
6. Biner des rangées se chevauchant légèrement. Le trajet le plus efcace pour biner la terre
est de déplacer la motobêche-bineuse d’un sens à l’autre suivant des lignes verticales, puis
de le passer suivant des lignes horizontales de gauche à droite (Figure 3). Cela produit des
rangées régulières et assure un binage uniforme du sol sans oubli.
7. Faire particulièrement preuve de précaution lors des changements de direction. Appuyer
légèrement sur le guidon de façon à relever les fraises pour effectuer un virage. Retourner
le produit en se guidant avec les roues. Relâcher progressivement la pression pour
ramener les fraises dans le sol.
AVERTISSEMENT
Dans certains pays, la réglementation
prévoit à quelles heures et quels
jours particuliers les produits peuvent
être utilisés et quelles restrictions
s’appliquent. Se renseigner auprès
de la collectivité locale et respecter
la réglementation an de préserver la
tranquillité du voisinage et d’éviter de
commettre une infraction !
Figure 2
Figure 3
Figure 4
AVERTISSEMENT
Ne jamais porter la motobêche-
bineuse comme la personne
illustrée à la Figure 4. Dans cette
position, la mise en marche
des fraises peut provoquer des
blessures graves.
AVERTISSEMENT
Arrêter le moteur si la motobêche-bineuse heurte un
objet étranger ! Mettre la motobêche-bineuse à l’arrêt, la
débrancher de la prise de courant et la laisser refroidir.
Contrôler avec soin l’état de la motobêche-bineuse.
Faire réparer tout dommage avant de la redémarrer !
Une vibration importante de la motobêche-bineuse
durant la marche indique qu’elle est endommagée.
Arrêter le moteur. Faire contrôler et réparer la
motobêche-bineuse dans les meilleurs délais !
11Contactez-nous sur www.mantis.fr/nous-contacter/
Page 28

Soins de la motobêche électrique
Lock / t o tighten or secure.
Unlock / to loosen.
Note / Remark.
Symbols
On the product, the rating label and within these instructions you will find among
others the following symbols and abbreviations. Familiarise yourself with them to
reduce hazards like personal injuries and damage to property.
Lock / to tighten or secure.
Unlock / to loosen.
Note / Remark.
Caution / Warning.
Read the instruction manual.
Wear hearing protection.
Wear eye protection.
Wear a dust mask.
Wear protective gloves.
APRÈS UTILISATION
1. Mettre la motobêche-bineuse à l’arrêt, la débrancher de la prise de courant et la laisser refroidir.
2. Contrôler, nettoyer et ranger la motobêche-bineuse comme décrit ci-dessous.
RÈGLES CONCERNANT LES SOINS
1. Maintenir la motobêche-bineuse propre. Éliminer les débris après chaque
utilisation et avant de l’entreposer.
2. Un bon nettoyage régulier assurera une utilisation sans danger et prolongera
la durée de vie de la motobêche-bineuse.
3. Contrôler l’état et l’usure de la motobêche-bineuse avant chaque utilisation. Ne
pas l’utiliser si elle comporte des pièces cassées ou usées.
NETTOYAGE GÉNÉRAL
1. Nettoyer la motobêche-bineuse avec un chiffon sec. Utiliser une brosse pour
les surfaces difciles à atteindre.
2. En particulier, nettoyer les évents après chaque utilisation avec un chiffon et
une brosse.
3. Éliminer la saleté résistante avec de l’air sous pression
(3 bar/40 psi maximum).
REMARQUE : Ne pas utiliser de détergents ou désinfectants chimiques,
alcalins ou autrement agressifs pour nettoyer cette motobêchebineuse car cela peut dégrader ses surfaces. Ne pas utiliser de liquides
nettoyants ou solvants ni passer la motobêche-bineuse au jet d’eau
(notamment sous pression) pour la nettoyer.
4. Vérier qu’il n’y a pas de pièces usées ou endommagées. Changer les pièces
usées comme il se doit ou obtenir l’assistance du centre de service aprèsvente Mantis au 1-800-366-6268 avant de réutiliser la motobêche-bineuse.
DESSOUS ET FRAISES
1. S’assurer que le dessous et les fraises sont propres et non obstrués. Enlever
la saleté avec une brosse ou autre outil adapté.
2. Le bon serrage de tous les écrous et vis doit être contrôlé régulièrement
avant utilisation. Après une utilisation prolongée, en particulier dans des sols
sablonneux, les fraises s’usent et perdent légèrement leur forme d’origine. Le
binage est moins efcace et les fraises doivent alors être changées.
3. Faire remplacer les fraises usées ou endommagées par des fraises neuves de
même type.
4. Pour étendre la durabilité des fraises et de la motobêche-bineuse, il est
conseillé de lubrier les fraises après chaque utilisation.
AVERTISSEMENT
Toujours mettre la motobêche-bineuse à l’arrêt,
la débrancher de la prise de courant et la laisser
refroidir avant toute opération de contrôle,
d’entretien ou de nettoyage !
AVERTISSEMENT
Effectuer l’entretien et les réparations
conformément à ces instructions ! Tous les
autres travaux devront être conés à un
spécialiste compétent.
AVERTISSEMENT
Porter des gants de protection pour travailler
sur la motobêche ou à proximité. Utiliser
les bons outils pour éliminer les débris, par
exemple un bâton en bois. Ne jamais le faire à
mains nues !
ATTENTION!
Les pièces en mouvement continuent de tourner
pendant plusieurs secondes après la mise à l’arrêt de
la motobêche-bineuse. Attendre que les fraises soient à
l’arrêt complet avant de soulever la motobêche-bineuse
ou de procéder à son contrôle et son entretien.
CORDON ÉLECTRIQUE
Si le cordon électrique est endommagé, il doit être changé par le fabricant, son représentant de service après-vente ou toute autre personne
également qualiée, an d’éviter tout problème de sécurité.
12 Manuel de l’utilisateur
Page 29

Entretien de la motobêche électrique
!
!
!
RÉPARATIONS
Cette motobêche-bineuse ne contient aucune pièce pouvant être
réparée par l’acheteur. Pour toute assistance, appeler le service
après-vente Mantis au 1-800-366-6268.
PIÈCES DÉTACHÉES / PIÈCES DE RECHANGE
Les pièces suivantes du produit peuvent être changées par l’utilisateur.
Les pièces de rechange peuvent être obtenues auprès du service
après-vente Mantis.
Description Numéro de modèle
Fraise . . . . . . . . . . . . . . . . . . . . . . . . . . . . . . . . . . . . . . 8440-990101-01
Vis. . . . . . . . . . . . . . . . . . . . . . . . . . . . . . . . . . . . . . . . . . . . . . . 8NH-08D
Écrou . . . . . . . . . . . . . . . . . . . . . . . . . . . . . . . . . . . . . . . . . 8SFDD-40D
AVERTISSEMENT
Toujours utiliser uniquement des pièces de rechange Mantis d’origine. L’utilisation de pièces de rechange,
outils ou accessoires non autorisés peut s’avérer dangereuse et provoquer des blessures ou des dommages
mécaniques.
ENTRETIEN
Avant et après chaque utilisation, vérier l’état et l’usure de la motobêche-bineuse. Le cas échéant, remplacer les pièces usées ou
endommagées par des neuves comme indiqué dans le manuel d’instructions. Respecter les spécications techniques.
1. Suivre les instructions d’entretien et de réparation pour cette motobêche-bineuse. Ne jamais apporter de quelconques modications à
ce produit. Les renseignements sur l’entretien et les réparations gurent dans ce manuel de l’utilisateur.
2. Maintenir tous les écrous, boulons et vis bien serrés pour assurer un fonctionnement sans danger de la motobêche-bineuse.
3. S’assurer que les évents ne sont pas obstrués
4. Pour plus de sécurité, changer les pièces usées ou endommagées.
5. S’assurer que les fraises sont dégagées et tournent librement – L’accumulation de débris autour des fraises peut entraver leur
fonctionnement et endommager le moteur. Contrôler et nettoyer le voisinage des fraises avant chaque utilisation.
CHANGER LES FRAISES
REMARQUE : La motobêche-bineuse est équipée de quatre fraises qui
sont faciles à changer par paires. Toujours changer les deux paires de
fraises en même temps pour éviter le déséquilibrage et les dommages de
la machine.
Pour changer les fraises :
1. La machine étant placée sur une surface plane et stable, la mettre
à l’arrêt, attendre l’arrêt complet de toutes les pièces mobiles et
débrancher la che du cordon de rallonge.
2. Retirer les 2 vis et les 2 écrous, puis déposer les fraises en acier
(Figure 5).
Figure 5
2 vis + 2 écrous
3. Nettoyer l’arbre d’entraînement.
4. Placer les fraises neuves sur l’arbre d’entraînement en
alignant les trous dans le moyeu des fraises et ceux de
l’arbre d’entraînement.
5. Enler les 2 vis à travers les trous et les attacher avec les 2
écrous (Figure 6).
Figure 6
Fraises à lames en acier
2 vis + 2 écrous
IMPORTANT : Les fraises doivent être placées dans le bon
sens de rotation. Prendre note de l’orientation des anciennes
fraises et monter les fraises neuves exactement de la même
façon.
Arbre d’entraînement
13Contactez-nous sur www.mantis.fr/nous-contacter/
Page 30

Entretien et entreposage de la motobêche électrique
RÉDUCTION DES VIBRATIONS ET DU BRUIT
Pour réduire l’effet du bruit et des vibrations produits, limiter le temps
d’utilisation et porter un équipement de protection individuelle.
Tenir compte des points suivants pour minimiser les risques d’exposition
aux vibrations et au bruit :
1. Utiliser la motobêche-bineuse uniquement aux ns prévues et
conformément à ces instructions.
2. S’assurer que la motobêche-bineuse est en bon état et bien entretenue.
3. Utiliser les fraises correctes et s’assurer qu’elles sont en bon état.
4. Tenir fermement les poignées.
5. Entretenir cette motobêche-bineuse conformément à ces instructions et
la maintenir bien lubriée (le cas échéant).
6. Planier le travail de façon à étaler l’utilisation du produit sur une durée
plus longue.
RISQUES RÉSIDUELS
Même lorsqu’on utilise cette motobêche-bineuse en respectant
toutes les règles de sécurité, il reste des risques de blessures et
dommages potentiels. Les dangers suivants peuvent se présenter en
rapport avec l’utilisation de ce produit :
1. Problèmes de santé liés aux vibrations émises si la motobêche-bineuse
est utilisée pendant de longues durées ou si elle n’est pas gérée ou
entretenue comme il se doit.
2. Blessures et dégâts matériels provoqués par des outils de coupe
cassés ou le heurt d’objets dissimulés durant l’utilisation.
3. Danger de blessure ou de dégâts matériels par des objets projetés.
AVERTISSEMENT
Cette motobêche-bineuse émet un champ électromagnétique durant la marche ! Sous certaines circonstances, ce
champ peut entraver le fonctionnement d’implants médicaux actifs ou passifs ! Pour réduire le risque de blessure
corporelle grave voire mortelle, nous conseillons aux personnes portant un implant médical de consulter leur médecin
et le fabricant de l’implant médical avant d’utiliser ce produit.
ENTREPOSAGE
1. Mettre la motobêche-bineuse à l’arrêt et la débrancher de l’alimentation électrique.
Attendre l’arrêt complet des pièces en mouvement..
2. Nettoyer la motobêche-bineuse comme décrit ci-dessus.
3. Entreposer la motobêche-bineuse dans un endroit couvert, sec, à l’abri du gel et bien
aéré.
4.
Ranger l’outil non utilisé à l’intérieur – Lorsqu’elle n’est pas utilisée, la motobêchebineuse devra être rangée à l’intérieur dans un endroit sec et en hauteur ou
verrouillé hors de la portée des enfants.
10 °C (50 °F) à 30 °C (86 °F).
5. Nous conseillons d’utiliser l’emballage d’origine ou de couvrir la motobêche-bineuse
d’une bâche ou autre enveloppe pour la protéger contre la poussière.
6. La motobêche-bineuse peut être rangée avec le guidon déployé ou replié (Figure 7).
Desserrer les bouton du guidon pour le replier comme sur l’illustration.
La température idéale d’entreposage est de
TRANSPORT
1. Mettre la motobêche-bineuse à l’arrêt et la débrancher de l’alimentation électrique.
Attendre l’arrêt complet des pièces en mouvement..
2. Attacher les protections de transport le cas échéant.
3. Toujours porter la motobêche-bineuse par sa poignée de transport.
4. Protéger la motobêche-bineuse contre les chocs importants ou les fortes vibrations
susceptibles de se produire durant le transport dans un véhicule.
5. Attacher la motobêche-bineuse pour l’empêcher de glisser ou de se renverser.
Figure 7
14 Manuel de l’utilisateur
Page 31

Dépannage de la motobêche électrique
WEEE symbol. Waste electrical products should not be
disposed of with household waste. Please recycle where
facilities exist. Check with your Local Authority or local store
Dépannage
Les avaries présumées sont souvent liées à des causes pouvant être rectiées par l’utilisateur. Par conséquent, dépanner le produit comme indiqué ci-dessous.
Dans la majorité des cas, le problème peut être résolu rapidement.
AVERTISSEMENT
Effectuer uniquement les opérations décrites dans les présentes instructions ! Toute opération supplémentaire de contrôle, d’entretien
et de réparation devra être conée à un centre de service après-vente agréé ou autre spécialiste également qualié si on ne peut pas
résoudre le problème soi-même. Pour toute assistance, appeler le service après-vente Mantis au 1-800-366-6268.
Problème Cause Correction
1. La motobêche-bineuse ne
démarre pas
2. La motobêche-bineuse n’atteint
pas sa pleine puissance
3. Résultat non satisfaisant 3.1. Fraises émoussées ou endommagées
4. Vibrations ou bruit excessifs 4.1. Fraises émoussées ou endommagées
1.1. Pas branché sur l’alimentation électrique
1.2. Fiche ou cordon électrique défectueux
1.3. Autre problème électrique du produit
2.1. Cordon de rallonge non adapté à une
utilisation avec ce produit
2.2. Tension de la source d’alimentation
(groupe électrogène, p. ex.) trop basse
2.3. Évents d’air obstrués
3.2. Fraises inadaptées au type de terrain
4.2. Vis/écrous desserrés
1.1. Brancher sur l’alimentation
électrique
1.2. Faire contrôler par un électricien
1.3. Faire contrôler par un électricien
2.1. Utiliser un cordon de rallonge qui
convient
2.2. Brancher sur une autre source
d’alimentation
2.3. Nettoyer les évents d’air
3.1. Remplacer par des fraises neuves
3.2. Utiliser le produit sur un terrain qui
convient
4.1. Remplacer par des fraises neuves
4.2. Serrer les vis/écrous.
RECYCLAGE ET ÉLIMINATION
Ce produit est livré dans un emballage qui le protège contre les dommages durant le transport. Conserver l’emballage jusqu’à
s’être assuré que toutes les pièces ont été livrées et que le produit fonctionne correctement. Recycler ensuite l’emballage.
Symbole WEEE. Les appareils électriques en n de vie ne doivent pas être jetés avec les déchets ménagers. Veiller à les
recycler là où ce service existe. Obtenir des conseils en matière de recyclage auprès des autorités locales ou du revendeur local.
15Contactez-nous sur www.mantis.fr/nous-contacter/
Page 32

GARANTIE LIMITÉE
MANTIS accorde la présente garantie limitée contre les vices de matériau et de fabrication pendant une période de deux (2) ans à compter
de la date d’achat par l’acheteur initial.
MANTIS réparera ou remplacera, à sa discrétion, toute pièce du produit présentant un vice de matériau ou de fabrication durant la période
de garantie. Les réparations et remplacements sous garantie seront effectués sans frais de pièces ou de main-d’œuvre. Toutes les pièces
remplacées sous garantie seront considérées comme faisant partie du produit d’origine et la date d’expiration de garantie des pièces remplacées
sera celle de la garantie du produit d’origine. Si vous pensez que votre MOTOBÊCHE-BINEUSE MANTIS présente un vice de matériau ou de
fabrication, veuillez contacter notre service après-vente au 1-800-366-6268 ou sur notre page Nous contacter à www.mantis.com
Mantis
1028 Street Road
Southampton, PA 18966
États-Unis
Les frais d’enlèvement et de livraison sont à votre charge ; le produit doit nous être renvoyé en port payé.
MANTIS décline toute responsabilité dans l’éventualité où le produit n’a pas été assemblé ou utilisé conformément aux instructions d’assemblage,
d’entretien, de sécurité ou d’utilisation gurant dans le manuel de l’utilisateur ou accompagnant le produit. La présente garantie limitée ne couvre
pas les dommages ni les défaillances liés à l’usure normale, à un défaut d’entretien raisonnable et approprié, au non-respect des instructions
d’utilisation ou du mode d’emploi, à un emploi abusif, à un entreposage incorrect ou à des accidents, ni les pièces et les services d’entretien
courant. La présente garantie limitée est annulée si la MOTOBÊCHE-BINEUSE MANTIS a fait l’objet de négligence ou a été réparée ou modiée
par toute personne autre qu’un concessionnaire agréé ou un centre de service après-vente agréé.
Vous devez entretenir votre MOTOBÊCHE-BINEUSE MANTIS conformément aux instructions d’entretien gurant dans le manuel. Cet entretien
courant, qu’il soit effectué par vous-même ou par un concessionnaire, est à votre charge.
MANTIS N’OFFRE AUCUNE GARANTIE EXPLICITE OU IMPLICITE, DÉCLARATION NI ASSURANCE, À L’EXCEPTION DE CELLES
CONTENUES AUX PRÉSENTES. IL N’EST OFFERT AUCUNE AUTRE GARANTIE, NOTAMMENT AUCUNE GARANTIE DE QUALITÉ
MARCHANDE NI D’ADAPTATION À UN EMPLOI PARTICULIER. TOUTES LES GARANTIES AUTRES QUE LA GARANTIE EXPRESSE CIDESSUS SONT SPÉCIFIQUEMENT REJETÉES. LA DURÉE DE TOUTE GARANTIE IMPLICITE, Y COMPRIS DE QUALITÉ MARCHANDE
ET D’ADAPTATION À UN EMPLOI PARTICULIER, EST LIMITÉE À LA DURÉE DE LA PRÉSENTE GARANTIE LIMITÉE. MANTIS DÉCLINE
TOUTE RESPONSABILITÉ POUR TOUS LES DOMMAGES INDIRECTS, ACCESSOIRES OU CONSÉCUTIFS EN RAPPORT AVEC L’EMPLOI
DES PRODUITS MANTIS COUVERTS PAR LA PRÉSENTE GARANTIE. CERTAINS ÉTATS OU PROVINCES N’AUTORISANT PAS LA
LIMITATION DE LA DURÉE D’UNE GARANTIE IMPLICITE ET/OU N’AUTORISANT PAS L’EXCLUSION OU LA LIMITATION DES DOMMAGES
INDIRECTS OU ACCESSOIRES, IL SE PEUT QUE LES LIMITATIONS ET EXCLUSIONS QUI PRÉCÈDENT NE S’APPLIQUENT PAS À VOUS.
LA PRÉSENTE GARANTIE VOUS DONNE DES DROITS PRÉCIS ET IL SE PEUT QUE VOUS AYEZ ÉGALEMENT D’AUTRES DROITS,
SUSCEPTIBLES DE DIFFÉRER D’UNE JURIDICTION À UNE AUTRE.
Les caractéristiques, descriptions et illustrations de ce guide sont exactes au mieux de notre connaissance au moment de la publication, mais
elles sont susceptibles d’être modiées sans préavis.
©2017 Schiller Grounds Care, Inc. Tous droits réservés.
 Loading...