

Page 1
MANTAROBOT™ TELEME
User Guide
And
Operating Manual
20410 Century Boulevard Suite 120 Germantown Maryland 20874
www.MantaroBot.com info@mantarobot.com
MantaroBot™
Phone 301 528 2244 Fax 301 528 1933
Page 2

MANTAROBOT TELEME
User Guide & Operating Manual
Table of Contents
1 Checking the contents of your shipment .............................................................................................. 8
2 Knowing your MantaroBot TeleMe and its limits ................................................................................. 9
2.1 Overview ..................................................................................................................................... 10
2.2 Moving or Shipping the MantaroBot .......................................................................................... 11
2.3 WARNINGS .................................................................................................................................. 12
3 Getting Started .................................................................................................................................... 13
3.1 Attaching the Mast and Device Holder ....................................................................................... 13
3.2 Attaching the Device Holder ....................................................................................................... 13
3.3 Powering On ................................................................................................................................ 14
3.4 Powering Off ............................................................................................................................... 14
3.5 Charging ...................................................................................................................................... 15
3.5.1 Charging TeleMe ................................................................................................................. 15
3.5.2 Charging User Device .......................................................................................................... 15
4 First-Time Setup and Configuration Mode ......................................................................................... 16
4.1 Configure User Device:................................................................................................................ 17
4.1.1 Single Wifi Radio Solution ................................................................................................... 17
4.1.2 Multi-Wifi Radio Solution .................................................................................................... 18
5 MantaroBot Software ......................................................................................................................... 20
5.1 Robot Application Overview ....................................................................................................... 20
5.2 Controller Application Overview ................................................................................................. 20
6 Robot Application ............................................................................................................................... 21
6.1 TeleMe Main Page ...................................................................................................................... 21
6.2 Network Selection Page (sub-menu) .......................................................................................... 23
6.3 Wifi Profile Editor (sub-menu) .................................................................................................... 25
6.4 User Administration (sub-menu) ................................................................................................ 26
6.5 Advanced Settings (sub-menu) ................................................................................................... 27
20410 Century Boulevard Suite 120 Germantown Maryland 20874
www.MantaroBot.com info@mantarobot.com
2 Version 3.1
MantaroBot™
Phone 301 528 2244 Fax 301 528 1933
Page 3

MANTAROBOT TELEME
User Guide & Operating Manual
6.6 About (sub-menu) ....................................................................................................................... 29
6.7 Upgrading the Software .............................................................................................................. 30
7 Controller Application ......................................................................................................................... 31
7.1 Remote PC / Mac Requirements / Web-browser ....................................................................... 31
7.2 Installation & Upgrades .............................................................................................................. 32
7.3 MantaroBot Contact List Configuration ...................................................................................... 32
7.3.1 Creating MantaroBot Contact List ...................................................................................... 34
7.3.1.1 Configure MantaroBot TeleMe Using WebRTC .............................................................. 35
7.3.1.2 Configure MantaroBot TeleMe for MantaroBot Communications Service .................... 38
7.3.1.3 Configure MantaroBot TeleMe for Direct Socket Connection ........................................ 40
7.3.2 Editing MantaroBot Contact List ......................................................................................... 41
7.4 Connecting to a MantaroBot (using Skype as Audio/Video Conferencing Application) ............. 41
7.4.1 The First Time or after Software Updates ........................................................................... 41
7.4.2 Normal Operation ............................................................................................................... 42
7.5 Connecting to a MantaroBot (using Other as the Audio/Video Conferencing Application) ...... 43
7.6 Controlling a MantaroBot ........................................................................................................... 44
7.6.1 Drive Motor Control Pad ..................................................................................................... 44
7.6.1.1 Driving MantaroBot ........................................................................................................ 44
7.6.1.2 Proximity IR Sensors ........................................................................................................ 45
7.6.2 Camera Control ................................................................................................................... 46
7.6.2.1 Pan/Tilt ............................................................................................................................ 46
7.6.2.2 Memory Positions ........................................................................................................... 47
7.6.3 Laser Pointer ....................................................................................................................... 48
7.6.4 Charging User Device .......................................................................................................... 48
7.7 Options – Settings ....................................................................................................................... 49
7.7.1 User Administration ............................................................................................................ 49
7.7.2 Robot Settings ..................................................................................................................... 51
20410 Century Boulevard Suite 120 Germantown Maryland 20874
www.MantaroBot.com info@mantarobot.com
3 Version 3.1
MantaroBot™
Phone 301 528 2244 Fax 301 528 1933
Page 4

MANTAROBOT TELEME
User Guide & Operating Manual
7.7.3 Controller Settings .............................................................................................................. 52
7.7.4 Change Password ................................................................................................................ 53
7.8 Options – Help / About / Accessories ......................................................................................... 54
7.8.1 Help ..................................................................................................................................... 54
7.8.2 About ................................................................................................................................... 54
7.8.3 Accessories .......................................................................................................................... 55
7.9 Miscellaneous ............................................................................................................................. 56
7.9.1 Connection Delay ................................................................................................................ 56
7.9.2 Battery Indicator ................................................................................................................. 56
7.9.3 Wifi Meter ........................................................................................................................... 57
8 Using 3rd Party Accessories ................................................................................................................. 58
8.1 Bluetooth® Headset .................................................................................................................... 58
8.2 Joystick ........................................................................................................................................ 58
9 Maintenance ....................................................................................................................................... 59
9.1 Battery Maintenance .................................................................................................................. 59
9.2 Replacing the Battery .................................................................................................................. 59
10 Warranty ......................................................................................................................................... 60
11 Appendix A ...................................................................................................................................... 61
11.1 Keyboard Mapping ...................................................................................................................... 61
11.2 Joystick Mapping ......................................................................................................................... 61
20410 Century Boulevard Suite 120 Germantown Maryland 20874
www.MantaroBot.com info@mantarobot.com
4 Version 3.1
MantaroBot™
Phone 301 528 2244 Fax 301 528 1933
Page 5
Version
Date
Change Summary
1.0
05/01/2012
- Initial Customer Release.
1.1
10/22/2012
- Added information regarding upcoming support to use video-conferencing
applications other than Skype;
- Fix definition of power switches, added warning to remind user to ensure user
device is properly plugged into device holder.
2.0
11/08/2012
- Now supports other audio/video conferencing applications in addition to
Skype.
2.1
02/13/2013
- Added main page for status indication on the Robot application web interface.
2.2
03/06/2013
- Mac controller now available for TeleMe. Added Mac specific instructions
and guidelines.
2.3
09/04/2013
- Added feature to remotely turn on charging of user device (head) using
internal TeleMe battery while in a call.
- Added more information regarding charging of the TeleMe.
2.4
03/06/2014
- Added basic information on new web-based browser controller, MantaroBot
TeleGo controller (www.mantarobot.com/telego).
- Updated Advanced Setting on the Robot application web interface to include
new links: ‘Advanced Network Configuration’ (allows for Static IP
configuration and ‘Manual Software Update’ (allows for update on closed
networks).
- Replaced Robot Application – Upgrading the Software section with a
reference to a separate more comprehensive document.
- Added information on configuring Wifi on user device based on TeleMes with
Single Wifi or Multi-Wifi Radio solution.
- Added Accessories list on web interface About page.
- Added ability to contact TeleMe (when using direct socket connection) via its
serial name instead of IP address.
2.41
03/28/2014
- Updated broken cross-references
2.42
05/14/2014
- Added more features via the ‘Advanced Network Configuration’ link
(capability to configure network time server and ability to disable Multi-WiFi
radio option)
3.00
01/02/2015
- Skype control path removed (Microsoft ended support)
- Added WebRTC control path
- Added ability to disable 2.4 GHz WiFi band for TeleMes with 2.4 GHz and 5
GHz WiFi cable radio
3.1
04/24/2015
- Added factory reset option
- Config mode now accessible by double-pressing push-button on the head.
- TeleGo now supports administrative functions previously available only using
MANTAROBOT TELEME
User Guide & Operating Manual
5 Version 3.1
20410 Century Boulevard Suite 120 Germantown Maryland 20874
www.MantaroBot.com info@mantarobot.com
Phone 301 528 2244 Fax 301 528 1933
MantaroBot™
Page 6
desktop controller.
MANTAROBOT TELEME
User Guide & Operating Manual
Note: New or significantly modified features from version 3.00 are marked as
20410 Century Boulevard Suite 120 Germantown Maryland 20874
www.MantaroBot.com info@mantarobot.com
6 Version 3.1
MantaroBot™
Phone 301 528 2244 Fax 301 528 1933
Page 7

MANTAROBOT TELEME
User Guide & Operating Manual
Trademark Information
Skype is a trade mark of Skype or its related companies. This product / application has not been checked, verified,
certified or otherwise approved or endorsed by Skype, Skype Communications S.a.r.l. or any of their related
companies.
Skype, associated trademarks and logos and the “S” logo are trademarks of Skype.
Android is a trademark of Google Inc.
Apple, Mac, iPad, iPhone, FaceTime are trademarks of Apple Inc., registered in the U.S. and other countries.
Microsoft, Windows and DirectX are registered trademarks of Microsoft Corporation in the United States and/or
other countries.
Samsung and Galaxy Tab are trademarks of Samsung Electronics Co., Ltd. and/or its related entities.
DISCLAIMER
MantaroBot will not be held responsible for misuse or improper assembly of the telepresence robot that
results in damage or harm to the robot itself, the user device (tablet or smartphone), other people or
the surroundings in which the robot is used.
20410 Century Boulevard Suite 120 Germantown Maryland 20874
www.MantaroBot.com info@mantarobot.com
7 Version 3.1
MantaroBot™
Phone 301 528 2244 Fax 301 528 1933
Page 8

MANTAROBOT TELEME
User Guide & Operating Manual
Thank you for purchasing a MantaroBot TeleMe. Please read the contents of this User Guide completely
before using your MantaroBot.
1 Checking the contents of your shipment
The following items should be in your shipment(s):
1. MantaroBot TeleMe base and user device holder
2. Mast extension 30” long
3. AC/DC Power Adapter (Battery Charger)
4. A CD containing:
a. The MantaroBot TeleMe User Guide (this document)
b. The MantaroBot TeleGo User Guide
c. The TeleMe Assembly Instructions & Quick Start Guide
d. The MantaroBot Controller Application
e. The MantaroBot Docking Station User Guide
f. The MantaroBot TeleMe Robot Application Update Instructions guide
g. TeleMe Packing Instructions
5. Information sheet
6. Other accessories that you may have purchased may also be included in the same shipment.
20410 Century Boulevard Suite 120 Germantown Maryland 20874
www.MantaroBot.com info@mantarobot.com
8 Version 3.1
MantaroBot™
Phone 301 528 2244 Fax 301 528 1933
Page 9
MANTAROBOT TELEME
User Guide & Operating Manual
2 Knowing your MantaroBot TeleMe and its limits
20410 Century Boulevard Suite 120 Germantown Maryland 20874
www.MantaroBot.com info@mantarobot.com
9 Version 3.1
MantaroBot™
Phone 301 528 2244 Fax 301 528 1933
Page 10
MANTAROBOT TELEME
User Guide & Operating Manual
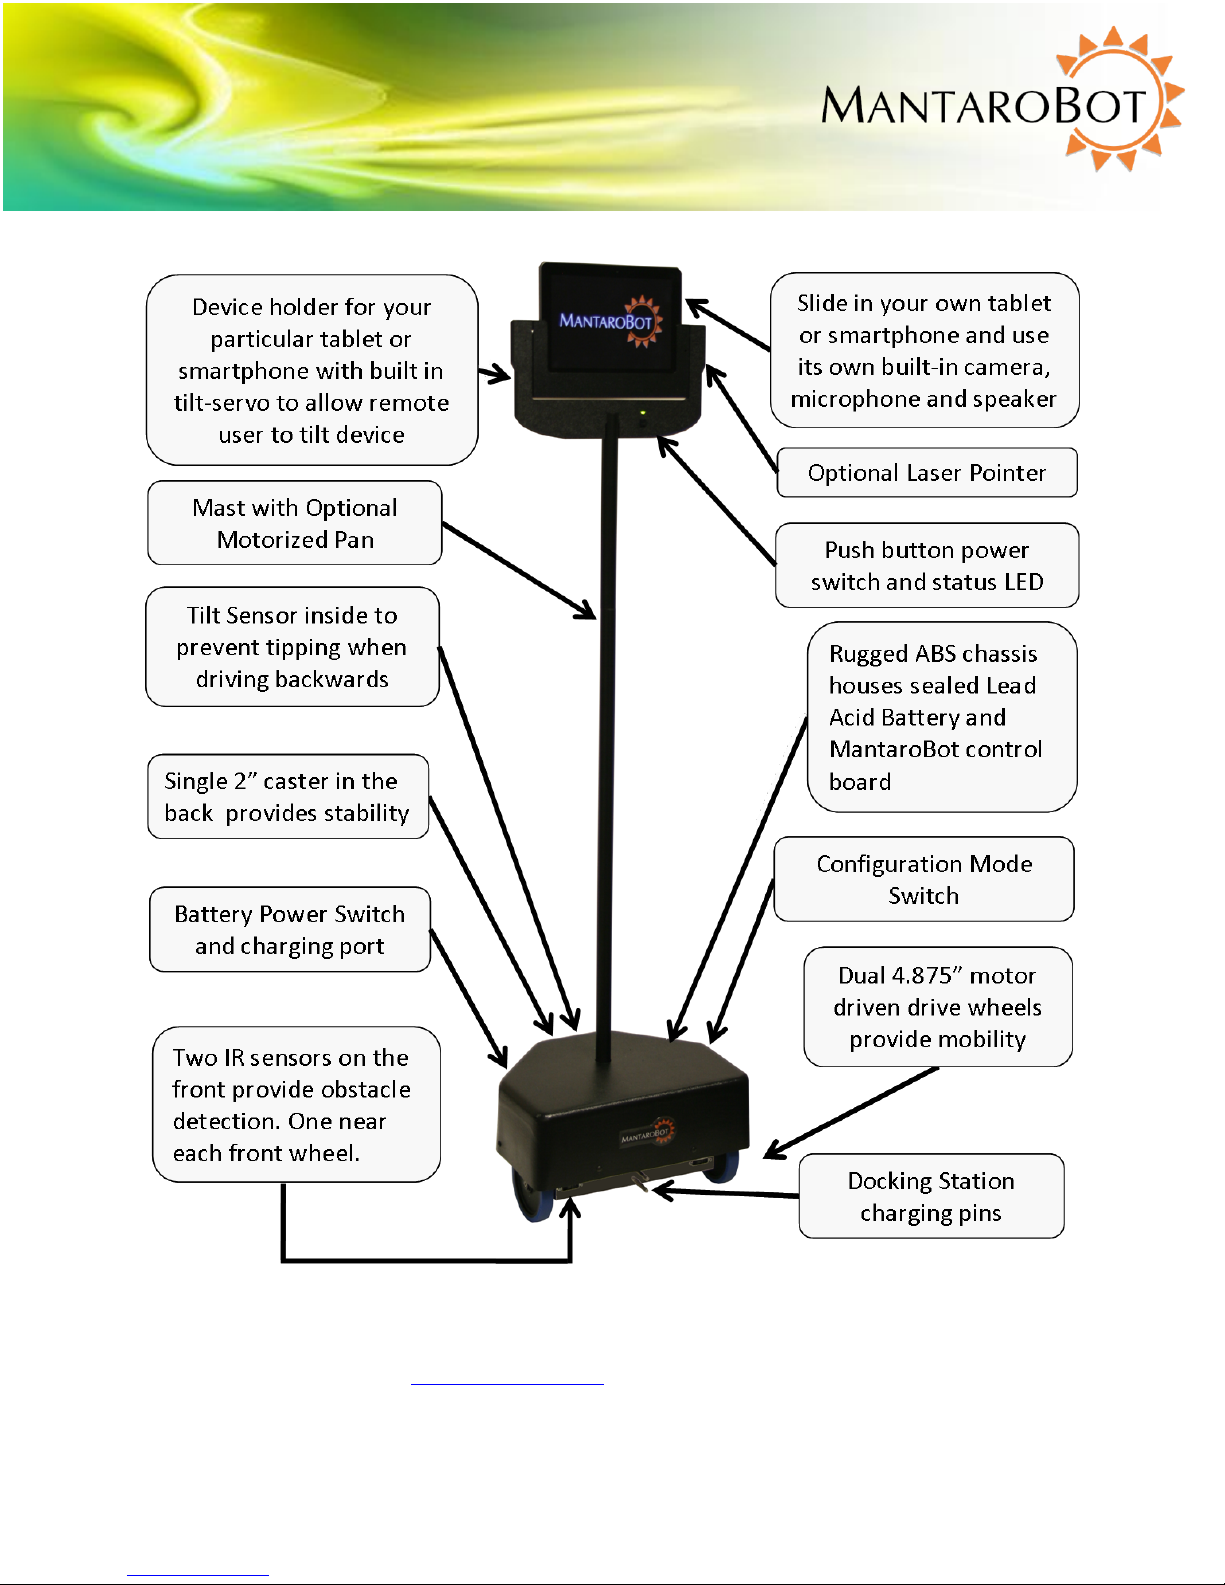
2.1 Overview
The diagram above shows the hardware features of the MantaroBot. Each of these features is discussed
below.
Device Holder – A holder specifically designed to accept the user’s tablet or smartphone (user device)
and function as the “head” of the MantaroBot with its integrated camera, microphone, and speaker.
The holder is comprised of a stationary holder and a bezel that holds the user device.
Video and Audio – The MantaroBot TeleMe utilizes the integrated camera, microphone and speakers of
the user device to provide the teleconferencing capability. The resolution of the video image and audio
quality will depend on the quality of your tablet or smartphone and the communications link quality. To
accommodate slower link speeds or network congestion, the video quality may be automatically
reduced in resolution by the teleconferencing application that you are using.
Tilt Mechanism – The user device holder has a built-in tilt servo mechanism which allows the end user
to tilt up/down the entire tablet/smartphone to provide a wide viewing range.
Battery Power Switch – The Battery Power Switch (rocker style) is located next to the charger input and
is used to connect and disconnect the battery power in the MantaroBot. This switch should be placed in
the OFF position when the MantaroBot is shipped or stored. When in normal use the switch should be
in the ON position.
Power ON/OFF Button and LED Status Indicator – The push button and green LED located on the front
of the holder directly below the user’s device is used to turn the MantaroBot TeleMe on or off (provided
either the Battery Power Switch is ON or the TeleMe is plugged into the external charger). When the
button is pressed it will toggle the power state ON/OFF. When first powered ON, the LED light will turn
on and blink while the TeleMe is booting up and connecting to WiFi. When the boot up process is done,
ascending tones will be heard. When a WiFi connection is established the LED will be on solid. New
feature: Quickly double-pressing the push button switch also allows the TeleMe to enter Configuration
Mode (requires the latest Robot Application Software).
Configuration Mode Switch – This push button switch is located on the bottom left side of the
MantaroBot near the left wheel. It is used to place the TeleMe into configuration mode and will be
discussed in more detail in this user guide. When the TeleMe is in configuration mode the LED will blink
(repeating pattern: two blinks and a pause).
20410 Century Boulevard Suite 120 Germantown Maryland 20874
www.MantaroBot.com info@mantarobot.com
10 Version 3.1
MantaroBot™
Phone 301 528 2244 Fax 301 528 1933
Page 11

MANTAROBOT TELEME
User Guide & Operating Manual
Mast with Motorized Pan Mechanism – Factory available option. The optional pan capability allows the
remote user to rotate the user device in the device holder to look left and right without having to turn
the entire robot. This makes looking left and right faster and easier and is also useful in aiming the
optional Laser Pointer.
Laser Pointer -- Factory available option. The laser pointer is mounted in the holder and can be pointed
and controlled by the remote user using the camera tilt and optional pan functions.
19.5V Charging Input – The Charging Input is located underneath the rear of the MantaroBot. The
MantaroBot should be plugged into the charger whenever it is not in use. The TeleMe can be used in a
call while plugged in, but care must be taken to disconnect the charger before it is driven away.
Docking Station Charging Pins – Two pins are located at the front of the motor bracket that allow the
MantaroBot to be charged in the optional Docking Station. No voltage is present on these pins unless it
is connected to the Docking Station.
Tilt Sensor – Inside the MantaroBot there is a tilt sensor that will stop the MantaroBot from moving if
the user is driving backwards (and into an obstacle) that causes it to tip forward. A message on the
Controller application status bar will also be displayed.
IR Sensors – There are two forward looking obstacle sensors on the MantaroBot that alert the user of
obstacles in front of the MantaroBot. One of the sensors is located near the left wheel and one is
located near the right wheel. If an obstacle is detected a red area will appear in the TeleMe Control
Application and the forward speed of the TeleMe will be reduced.
2.2 Moving or Shipping the MantaroBot
To relocate the MantaroBot manually, lift the MantaroBot by its mast or roll it on its rear caster wheel.
It is not recommended that the MantaroBot be moved manually while resting its drive wheels on the
ground. To transport or ship the MantaroBot, power off the TeleMe as described in Section 3.4.
Disassemble and pack the TeleMe into its original shipping box as described in the “TeleMe Packing
Instructions” document included in the CD that was shipped with your TeleMe.
NOTE: The optional extended battery (LiFePO4) is restricted from being shipped on passenger airplanes.
20410 Century Boulevard Suite 120 Germantown Maryland 20874
www.MantaroBot.com info@mantarobot.com
11 Version 3.1
MantaroBot™
Phone 301 528 2244 Fax 301 528 1933
Page 12
MANTAROBOT TELEME
User Guide & Operating Manual
2.3 WARNINGS
USER DEVICE INSTALLATION – PLEASE ensure that the user device (i.e. tablet or smartphone) is plugged
all the way into the device holder and is fully mated with the docking connector inside the bottom of the
device holder. If a landscape holder was purchased for a user device (e.g. iPad) that has the charging
connector on the short side (normally designed for charging in portrait orientation), please insure the
lock on the back of the holder is turned to the lock position. Improper installation could result in your
device falling out of the holder and breaking!!!
TIPPING HAZARD – The remote operator is responsible for keeping the MantaroBot under control. The
MantaroBot has been designed to reduce the potential of tipping during normal operation. Rapid
accelerating and stopping or sharp turns while moving at full speed may cause the MantaroBot to tip
over and cause injury.
INCLINES – The MantaroBot is intended for indoor applications on level ground. Inclines of more than
10 degrees may cause the MantaroBot to tip over.
DRIVING IN REVERSE – It is not recommended that the MantaroBot be driven in reverse for more than a
short distance. The camera cannot be faced to see in the rearward direction. It is recommended that
the MantaroBot be turned around and driven forward in the direction desired whenever possible. The
MantaroBot is more susceptible to tipping when driven in reverse.
STEPS AND STAIRS – Great care should be taken to avoid driving the MantaroBot down stairs or steps.
The camera should be aimed in the direction that the robot is moving and aimed down such that
obstacles can be readily seen.
CAMERA VIEW – It is the remote user’s responsibility to have an awareness of where the MantaroBot is
being driven. It is recommended that the camera on the user’s device be tilted down such that
obstacles can be readily seen when driving the MantaroBot.
NETWORK DELAY – The video coming from the camera and the robot control commands may travel
through the network with varying amounts of delay. Due to the varying delays, the video you are
viewing may not represent the current location of the TeleMe. Network delays can cause commands
that are sent to the MantaroBot to be buffered and delivered at a later time. When network delays
exceed one second great care is required by the operator to ensure that the TeleMe remains in control.
SECURITY – The MantaroBot has user level password control to help prevent unauthorized access.
However Skype and other video conferencing applications can be configured to various levels of
permission for accepting calls as well. It is recommended that you review the Call Settings for the video
conferencing application in use on your tablet or smartphone.
20410 Century Boulevard Suite 120 Germantown Maryland 20874
www.MantaroBot.com info@mantarobot.com
12 Version 3.1
MantaroBot™
Phone 301 528 2244 Fax 301 528 1933
Page 13
MANTAROBOT TELEME
User Guide & Operating Manual
3 Getting Started
3.1 Attaching the Mast and Device Holder
The MantaroBot TeleMe is shipped from the factory with a short connector tube where the mast is
attached and an 8 pin electrical connector that provides control and power to the holder and user
device. To attach the mast and device holder please refer to the TeleMe Assembly Instructions that
were provided with the shipment.
3.2 Attaching the Device Holder
Device holders are available for several models of tablets and smart phones. To ensure that the device
fits properly in the device holder, make sure that the device holder is the correct model for your device.
Do not attempt to forcefully push, slide, or wedge any device into a device holder, as this will likely
result in damage to either the device holder or tablet or smart phone.
Check the MantaroBot website (www.mantarobot.com) for the list of currently available device holders
and the device models that they are designed to fit. If the device you would like to use is not listed
please email us at info@mantarobot.com.
To install the user device into the device holder, orient the device with the charging connector port
facing towards its mating connector and the screen and camera facing the front of the MantaroBot. This
will ensure that the device is oriented properly, and will properly connect to the charging connector. If a
landscape holder was purchased for a device (e.g. iPad) that has the charging connector on the short
side (normally designed for charging in portrait orientation), then slide the device all the way down in
the holder with the charging connector facing the right side. Once the device is all the way down, slide it
to the right until it is fully seated into the charging connector. Then rotate the lock on the back of the
holder into the lock position. (NOTE: The locked position will not prevent the user from removing the
user device if they pull up on it. It is only intended to prevent the user device from sliding to the left and
falling out during operation)
PLEASE ensure that the user device (i.e. tablet or smartphone) is plugged all the way into the device
holder and is fully mated with the docking connector inside the bottom or side of the device holder (and
lock is in lock position if your device holder has one). Improper installation could result in your device
falling out of the holder and breaking!!!
20410 Century Boulevard Suite 120 Germantown Maryland 20874
www.MantaroBot.com info@mantarobot.com
13 Version 3.1
MantaroBot™
Phone 301 528 2244 Fax 301 528 1933
Page 14

MANTAROBOT TELEME
User Guide & Operating Manual
3.3 Powering On
The battery power switch (rocker style) is located directly behind the motorized wheel on the right side
of the TeleMe. Toggle the switch to the ON position. This will connect the TeleMe’s internal battery and
allow it to supply power to the robot. This switch should be placed in the OFF position when the
MantaroBot is shipped or stored. When in normal use the switch should remain in the ON position.
To power on your TeleMe press the push button on the front of the device holder. A single beep will be
heard and the LED will turn on and blink. The TeleMe will take approximately 30 seconds to boot up.
Once the boot up process is complete, the TeleMe will make a series of ascending tones. Now wait until
the LED is lit solid indicating that a successful Wifi connection was established. If the LED status
indicator is blinking fast (faster than during the boot up process) many times followed by a pause, the
TeleMe needs to be configured for use with a wireless network. To configure the robot for a wireless
network see Section 4.
3.4 Powering Off
To turn the TeleMe OFF, press the button on the device holder. A series of tones will be heard
indicating the button was pressed and the LED will blink while the robot is powering down. Once the
robot is OFF the LED will be off as well. The battery power switch can also be turned off but it is not
necessary unless the robot is being shipped or stored. NOTE: For normal operation, the TeleMe should
remain in the ON position (LED on) during charging. See Section 3.5 for more information.
20410 Century Boulevard Suite 120 Germantown Maryland 20874
www.MantaroBot.com info@mantarobot.com
14 Version 3.1
MantaroBot™
Phone 301 528 2244 Fax 301 528 1933
Page 15

MANTAROBOT TELEME
User Guide & Operating Manual
3.5 Charging
3.5.1 Charging TeleMe
The TeleMe contains an internal rechargeable battery. To charge the battery use one of the following
methods:
1. Manually plug the supplied charger into the 19.5V charging input located underneath the rear of
the TeleMe.
2. Drive the TeleMe into the optional charging docking station such that the two pins located at
the bottom front of the TeleMe plug into the dock.
IMPORTANT NOTE: For the battery charging level to be recorded properly, the TeleMe should be in the
Powered ON state with the LED on the device holder being green. If the TeleMe is charged while being
Powered OFF no damage will occur, however, the charging level indicator on the controller application
will be incorrect. To correct, allow the battery to fully discharge through normal use, and then allow it
to fully charge while ensuring the TeleMe is in the Powered ON state as described above.
IMPORTANT NOTE: Please review Section 9.1 on Battery Maintenance.
3.5.2 Charging User Device
The user device, while plugged into the device holder of the TeleMe, can be charged using one of the
following methods:
1. Whenever the TeleMe is connected to the supplied charger or connected to the charging
docking station, the user device will also be charged.
2. When the TeleMe is not being charged the user device will not be charged as well. However,
while in a call, the remote user has the option of allowing the TeleMe’s internal battery to
charge the user device. See Section 7.6.4 for more information.
NOTE: The user device may or may not charge as quickly in the TeleMe as it may with the charger that
came with your user device.
MantaroBot™
20410 Century Boulevard Suite 120 Germantown Maryland 20874
www.MantaroBot.com info@mantarobot.com
Phone 301 528 2244 Fax 301 528 1933
15 Version 3.1
Page 16

MANTAROBOT TELEME
User Guide & Operating Manual
4 First-Time Setup and Configuration Mode
The MantaroBot comes equipped with a Wifi adapter that must be configured to a network prior to use.
The following steps describe configuring of the TeleMe base for use in a Wifi network when it has not
already been previously configured OR the network that it is configured for is no longer accessible.
Note: Your network must have a connection that will allow use of Skype or your chosen audio/video
conferencing application. Secure closed networks are also supported.
ENTERING CONFIGURATION MODE:
1. Power ON the MantaroBot TeleMe as described in Section 3.3. Wait some time for the LED on
the device holder to either be lit solid on (configured for a Wifi network) or blink fast many
times followed by a pause (not configured for a Wifi network).
2. Locate the Configuration Mode switch (push-button switch) near the left motorized wheel and
press it one time. After a few moments, there should be an audible series of beep-tones
indicating the button was pressed. The LED will be solid on until either the TeleMe enters
Configuration Mode successfully or fails. If the TeleMe enters Configuration Mode successfully
the LED will blink (repeating pattern: two blinks and a pause). If it does not, the LED will blink
fast many times followed by a pause (same sequence as when TeleMe is powered and has no
Wifi connection). If the TeleMe does not go into Configuration Mode, power off the TeleMe and
go back to Step 1.
3. Using a Wifi capable tablet, smartphone, or a computer, browse for available wireless
connections in your area. Make sure the computer or device’s Wifi is enabled, and then look for
the connection named “MantaroBot-TeleMe_<#>”. The <#> at the end of the name will be the
digits at the end of the TeleMe device’s serial number. Select this connection. It is
open/unsecure and requires no password credentials to connect. This is a wireless access point
(network) hosted by the TeleMe itself and will be used only temporarily for configuration.
4. Once the Wifi connection is established, open a web browser on the device used in Step 3
above, type http://192.168.0.1 in the address bar, and hit Enter. The browser will show the
MantaroBot TeleMe main page webpage. Note: On this wireless network that is hosted by the
TeleMe in Configuration Mode, the above IP address will always be the same.
CONFIGURING WIFI ADAPTER:
5. See Section 6.2 for these steps.
CHECK ADVANCED SETTINGS:
6. All of the advanced settings of the TeleMe are configured in the factory. To verify or modify
these settings see Section 6.5.
MantaroBot™
20410 Century Boulevard Suite 120 Germantown Maryland 20874
www.MantaroBot.com info@mantarobot.com
Phone 301 528 2244 Fax 301 528 1933
16 Version 3.1
Page 17
MANTAROBOT TELEME
User Guide & Operating Manual
4.1 Configure User Device:
By following the steps in the previous page, the TeleMe base should now be configured for use. Now, it
is time to configure the user device that will be plugged in to the TeleMe as its head. Follow one of the
two configuration sections below based on if your TeleMe has the Single WiFi Radio or Multi-Wifi Radio.
4.1.1 Single Wifi Radio Solution
The user device (e.g. tablet) used with TeleMes with one single Wifi radio are to be configured as
follows:
1. Configure the Wifi of the user device to use the customer Wifi network (same configuration as
Wifi in the TeleMe base).
20410 Century Boulevard Suite 120 Germantown Maryland 20874
www.MantaroBot.com info@mantarobot.com
17 Version 3.1
MantaroBot™
Phone 301 528 2244 Fax 301 528 1933
Page 18

MANTAROBOT TELEME
User Guide & Operating Manual
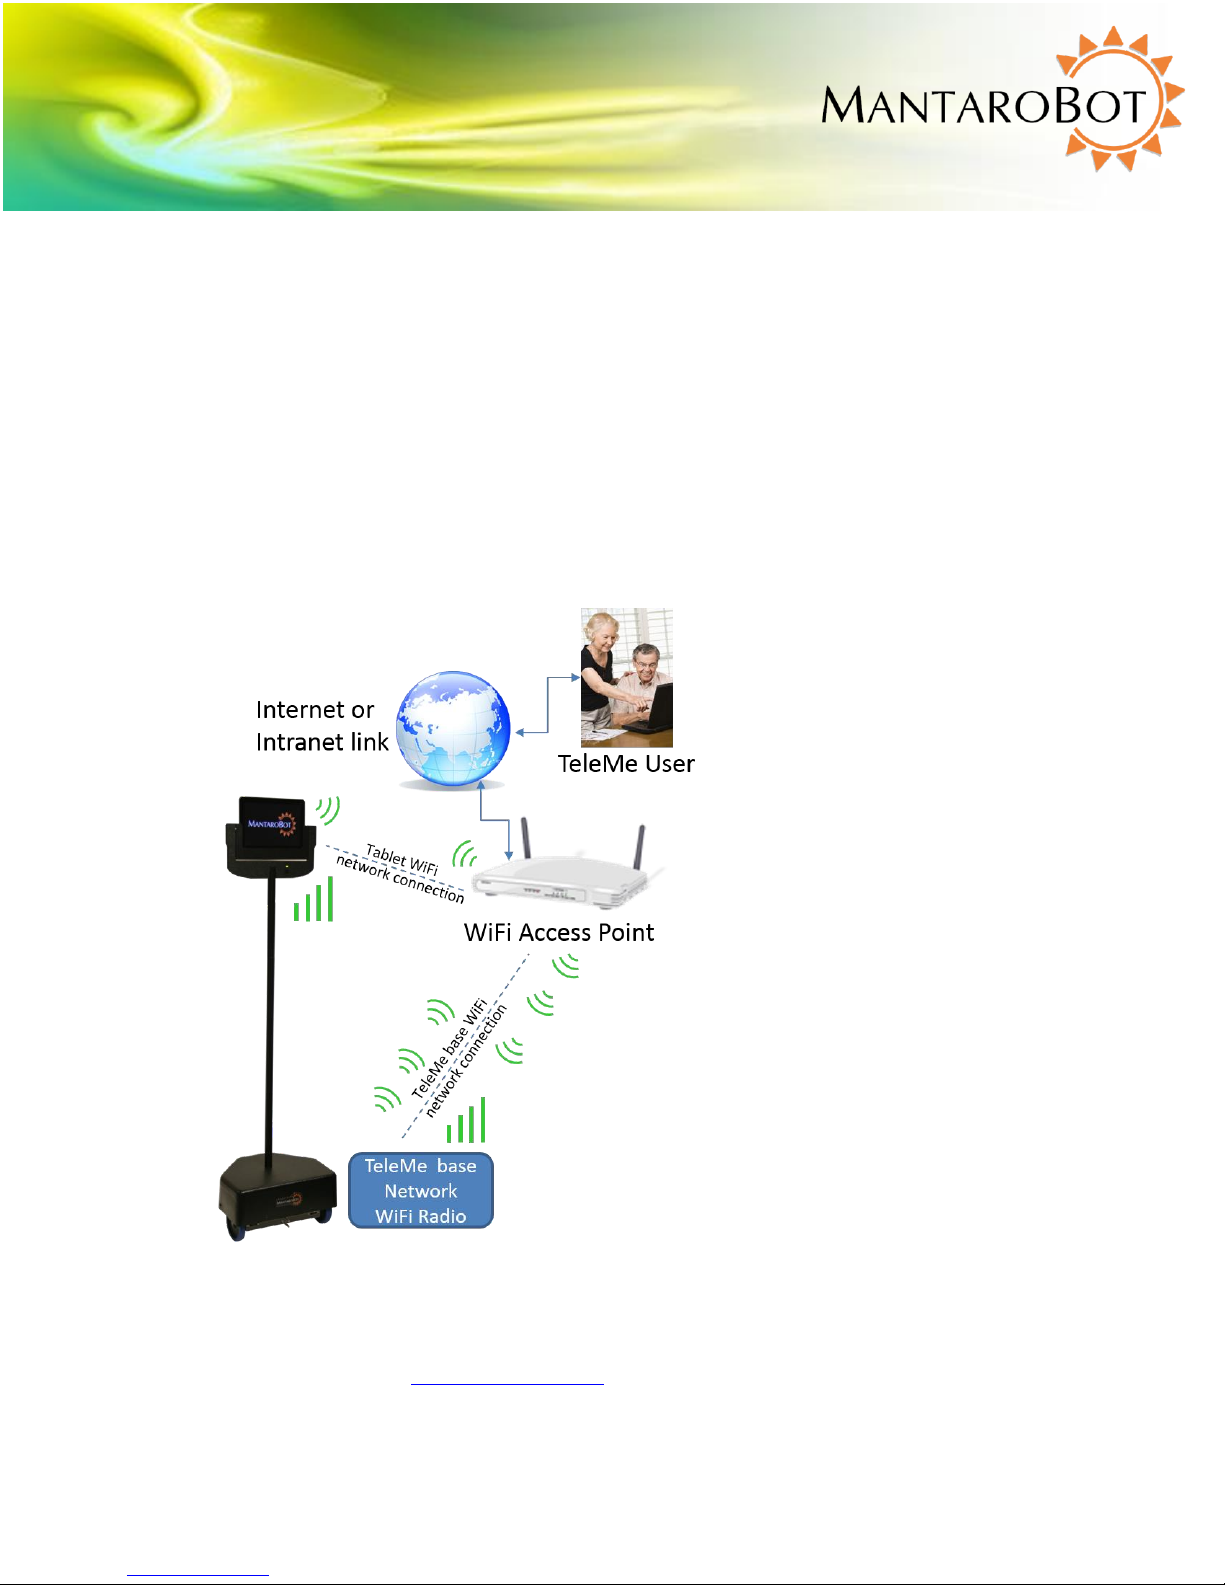
4.1.2 Multi-Wifi Radio Solution
The Multi-Wifi Radio option includes 3 Wifi radios in the TeleMe base. The Local Wifi Radio as shown in
the diagram below is dedicated for use with the user device (e.g. tablet) that is used as the head of the
TeleMe. Some environments where the TeleMe is used are very large and the network may be setup
with multiple Access Points (APs). Some tablets are not very good at keeping an ongoing conference call
from dropping when automatically switching from one AP to another. By configuring the tablet to use
the local Wifi of the TeleMe, the tablet will never have to switch the Wifi network it is listening to. All
data will be routed through the other 2 Network Wifi radios of the TeleMe base which will handle
switching from one AP to another seamlessly. NOTE: The only requirement is that the IP address of the
TeleMe should not change when it goes from one AP to another.
20410 Century Boulevard Suite 120 Germantown Maryland 20874
www.MantaroBot.com info@mantarobot.com
18 Version 3.1
MantaroBot™
Phone 301 528 2244 Fax 301 528 1933
Page 19

MANTAROBOT TELEME
User Guide & Operating Manual
1. Configure the Wifi of the user device to use the Local Wifi Radio in the TeleMe base (as shown in
the picture above). The SSID name and password are configurable in the Advanced Settings
page of the TeleMe web front. For information on the SSID name/password of this Local Wifi
see Section 6.5. (The user is not required to connect the user device to the Local Wifi and can
still configure it to use the customer Wifi network if they choose to.)
2. No further WiFi configuration is required if the steps in Section 4 were followed previously as
both Network Wifi Radios in the TeleMe get configured for the same customer Wifi network.
One of these radios will be active and the second will always be searching for another AP (access
point) that may have a stronger signal strength in the same network. If a stronger signal is
detected, the TeleMe will auto-switch.
20410 Century Boulevard Suite 120 Germantown Maryland 20874
www.MantaroBot.com info@mantarobot.com
19 Version 3.1
MantaroBot™
Phone 301 528 2244 Fax 301 528 1933
Page 20

MANTAROBOT TELEME
User Guide & Operating Manual
5 MantaroBot Software
This section provides an overview of the software needed to use the MantaroBot before providing
further details later in this user guide.
5.1 Robot Application Overview
The MantaroBot Robot application runs on the control hardware located in the base of the MantaroBot
and is already pre-installed. The Robot application is only accessible via a web browser either when the
MantaroBot is in Configuration Mode or when the robot is in the same wireless network as another
computer or WiFi device with browser support. When new software updates are available they can be
installed only by someone local to the MantaroBot, not remotely unless connecting over a VPN
connection (information for updating is provided later). This application is where the TeleMe
configuration and initial user administration must occur for the MantaroBot. A user with administrator
privileges will also be able to perform some administrative tasks remotely using the MantaroBot
Controller application.
5.2 Controller Application Overview
The TeleMe can be remotely controlled either by the Windows desktop installable, MantaroBot
Controller application, or the web browser based MantaroBot TeleGo controller. The requirements of
the devices that can be used to control the TeleMe are described later in this guide. The controller is
used to connect to your MantaroBot for remote use and allows the user to drive the MantaroBot and
hold audio/video (A/V) teleconferences.
NOTE: The desktop installable MantaroBot Controller application for the TeleMe is different than the
MantaroBot Controller application for the MantaroBot Classic TelePresence Robot. If you own a
Classic, you will still have to separately install the Controller application for the TeleMe. Only one
controller application should be running at any given time. The Controller application for the TeleMe
can be used for any of the TeleMe line of products.
Once an administrator user account is created on the MantaroBot Robot application, an administrator
will be able to remotely login to the MantaroBot using this Controller application and perform user and
some robot administration tasks. There are certain configuration parameters that can only be done
from the Robot application.
20410 Century Boulevard Suite 120 Germantown Maryland 20874
www.MantaroBot.com info@mantarobot.com
20 Version 3.1
MantaroBot™
Phone 301 528 2244 Fax 301 528 1933
Page 21

MANTAROBOT TELEME
User Guide & Operating Manual
6 Robot Application
This section will provide important information regarding using the MantaroBot Robot application via a
web browser (mainly for configuration purposes). It will provide details on the TeleMe Main Page
webpage and all sub menu links. Accessing the TeleMe’s web pages can be done one of three ways.
First Method: This method is the easiest and access is gained using the web-based controller, the
MantaroBot TeleGo Controller (www.mantarobot.com/telego), to dial into the TeleMe. Follow the
numbered steps below if the following bullet list of requirements are met:
The current Robot Application version on your TeleMe must be 2.7 or greater
A non-admin or admin user can log in to check status. A user with administrator privileges must
log in to perform any configuration changes or updates.
The computer or device used to dial into the TeleMe must be on the same LAN network as the
TeleMe (could be connecting via a VPN connection)
The TeleMe is already configured and ready to accept calls
The network that the TeleMe is configured for has external internet access
1. Using the MantaroBot TeleGo Controller, call the desired TeleMe.
2. Click on the ‘Options‘ button, select ‘Settings’ and then click on the ‘Controller’ tab.
3. Click on the ‘TeleMe Main Page’ link in the Controller Settings tab. (See TeleGo User Guide for
more details).
Second Method: This method of access is gained by having physical access to the TeleMe and will be the
required method if the TeleMe is not configured for a WiFi network yet. Place the TeleMe into
Configuration Mode as described in the “Enter Configuration Mode” steps of Section 4. Access the
webpages at the link address provided in Section 4.
Third Method: This method of access is gained by a user with administrator privileges calling the robot
using the MantaroBot Controller application while being on the same LAN network that the TeleMe is
currently configured for. See Section 7.7.3 on how to access the web pages using the Controller
Application.
6.1 TeleMe Main Page
The main page of the TeleMe web front will provide status information on the configuration of the
robot. As the pictures shows below, it will show the current IP address of the TeleMe base and Wifi
MantaroBot™
20410 Century Boulevard Suite 120 Germantown Maryland 20874
www.MantaroBot.com info@mantarobot.com
Phone 301 528 2244 Fax 301 528 1933
21 Version 3.1
Page 22

MANTAROBOT TELEME
User Guide & Operating Manual
Network it is connected to. This main page also provides information on the configuration status of the
various Robot Control Path options for the TeleMe. If the TeleMe is configured for a particular Robot
Control path it will be followed by a green check mark, otherwise, it will be followed by a red X. For
more information on Robot Control path see Section 7.3. The date and time shown should be correct
otherwise it needs to be configured in the Advanced Settings section.
The “Main Page”, “Wifi Connection Page”, and “About” page are available without the need for a
username and password. The Wifi Connection page will display all the available non-hidden networks.
20410 Century Boulevard Suite 120 Germantown Maryland 20874
www.MantaroBot.com info@mantarobot.com
22 Version 3.1
MantaroBot™
Phone 301 528 2244 Fax 301 528 1933
Page 23

MANTAROBOT TELEME
User Guide & Operating Manual
However, to configure the TeleMe for a network will require administrator level access. There are other
links at the bottom of the main web page that will also require administrator level access. They will
allow Administrators to perform user administrative tasks and configure advanced settings of the
TeleMe.
6.2 Network Selection Page (sub-menu)
Click on the ‘Wifi Connection Page’ link at the bottom of the webpage and the above webpage will
appear. This Wifi Connection Page (or Network Selection Page) is used to select a new wireless
network for the TeleMe to use. Follow the steps below:
1. When first browsing to this web page, the TeleMe will scan for available networks and will
present a window (see above) listing all the available wireless networks in the MantaroBot
TeleMe’s area. Select the network that the MantaroBot TeleMe should use for normal
operation and click the ‘Connect' button located below the list of connections. You may be
20410 Century Boulevard Suite 120 Germantown Maryland 20874
www.MantaroBot.com info@mantarobot.com
23 Version 3.1
MantaroBot™
Phone 301 528 2244 Fax 301 528 1933
Page 24

MANTAROBOT TELEME
User Guide & Operating Manual
required to enter an administrator username and password. An initial administrator account
was setup prior to the shipment of the TeleMe. This information can be found on the
Information sheet that was shipped with the robot. To connect to a network that is not shown
(e.g. network whose SSID is not broadcasted) click on “Connect to hidden wireless network” and
enter the requested information. Most networks require a network security key or passphrase.
To connect ask your network administrator or Internet service provider (ISP) for the security key
or passphrase.
2. If connecting to the selected network was successful, a series of audible beep-tones will be
heard and the LED will be on solid.
If configuration to a network was unsuccessful, the LED will blink fast many times followed by a
pause (similar to having no Wifi connection). If the robot was in Configuration Mode to start
with, it will return to that mode. If the robot was already configured for a network before trying
to switch to a new network, it will attempt to reconnect to the old network. If that also fails, the
robot will have to be placed into Configuration Mode and the steps in this section will need to
be repeated.
3. At this point, the web browser link may timeout because the TeleMe should be configured for
the new network. The web browser on the device used to configure the TeleMe can be closed.
The TeleMe should now be ready for operation. If the configuration web pages were being
accessed during a call to the TeleMe, the call will disconnect as well because the TeleMe was
reconfigured for a new network. The user will have to call the TeleMe again to use it.
4. If the network selection was done while the TeleMe was in Configuration mode, please turn
the TeleMe power off and then back on using the push button on the device holder.
20410 Century Boulevard Suite 120 Germantown Maryland 20874
www.MantaroBot.com info@mantarobot.com
24 Version 3.1
MantaroBot™
Phone 301 528 2244 Fax 301 528 1933
Page 25

MANTAROBOT TELEME
User Guide & Operating Manual
6.3 Wifi Profile Editor (sub-menu)
To manage the profiles of previously connected networks on the MantaroBot TeleMe, click the link
labeled “Wifi Profile Editor” at the bottom of any of the web pages. A user with administrator privileges
will be requested to login to make any changes. An initial administrator account was setup prior to the
shipment of the TeleMe. This information can be found on the Information sheet that was shipped with
the robot. More user accounts (including administrator accounts) can be setup as described further
below.
Once an administrator has logged in, a list of all currently setup Wifi profiles will be displayed. To delete
any profiles, select it and click the delete button. More profiles are created and added to the list once
the network has been selected for use on the Main page.
20410 Century Boulevard Suite 120 Germantown Maryland 20874
www.MantaroBot.com info@mantarobot.com
25 Version 3.1
MantaroBot™
Phone 301 528 2244 Fax 301 528 1933
Page 26
MANTAROBOT TELEME
User Guide & Operating Manual
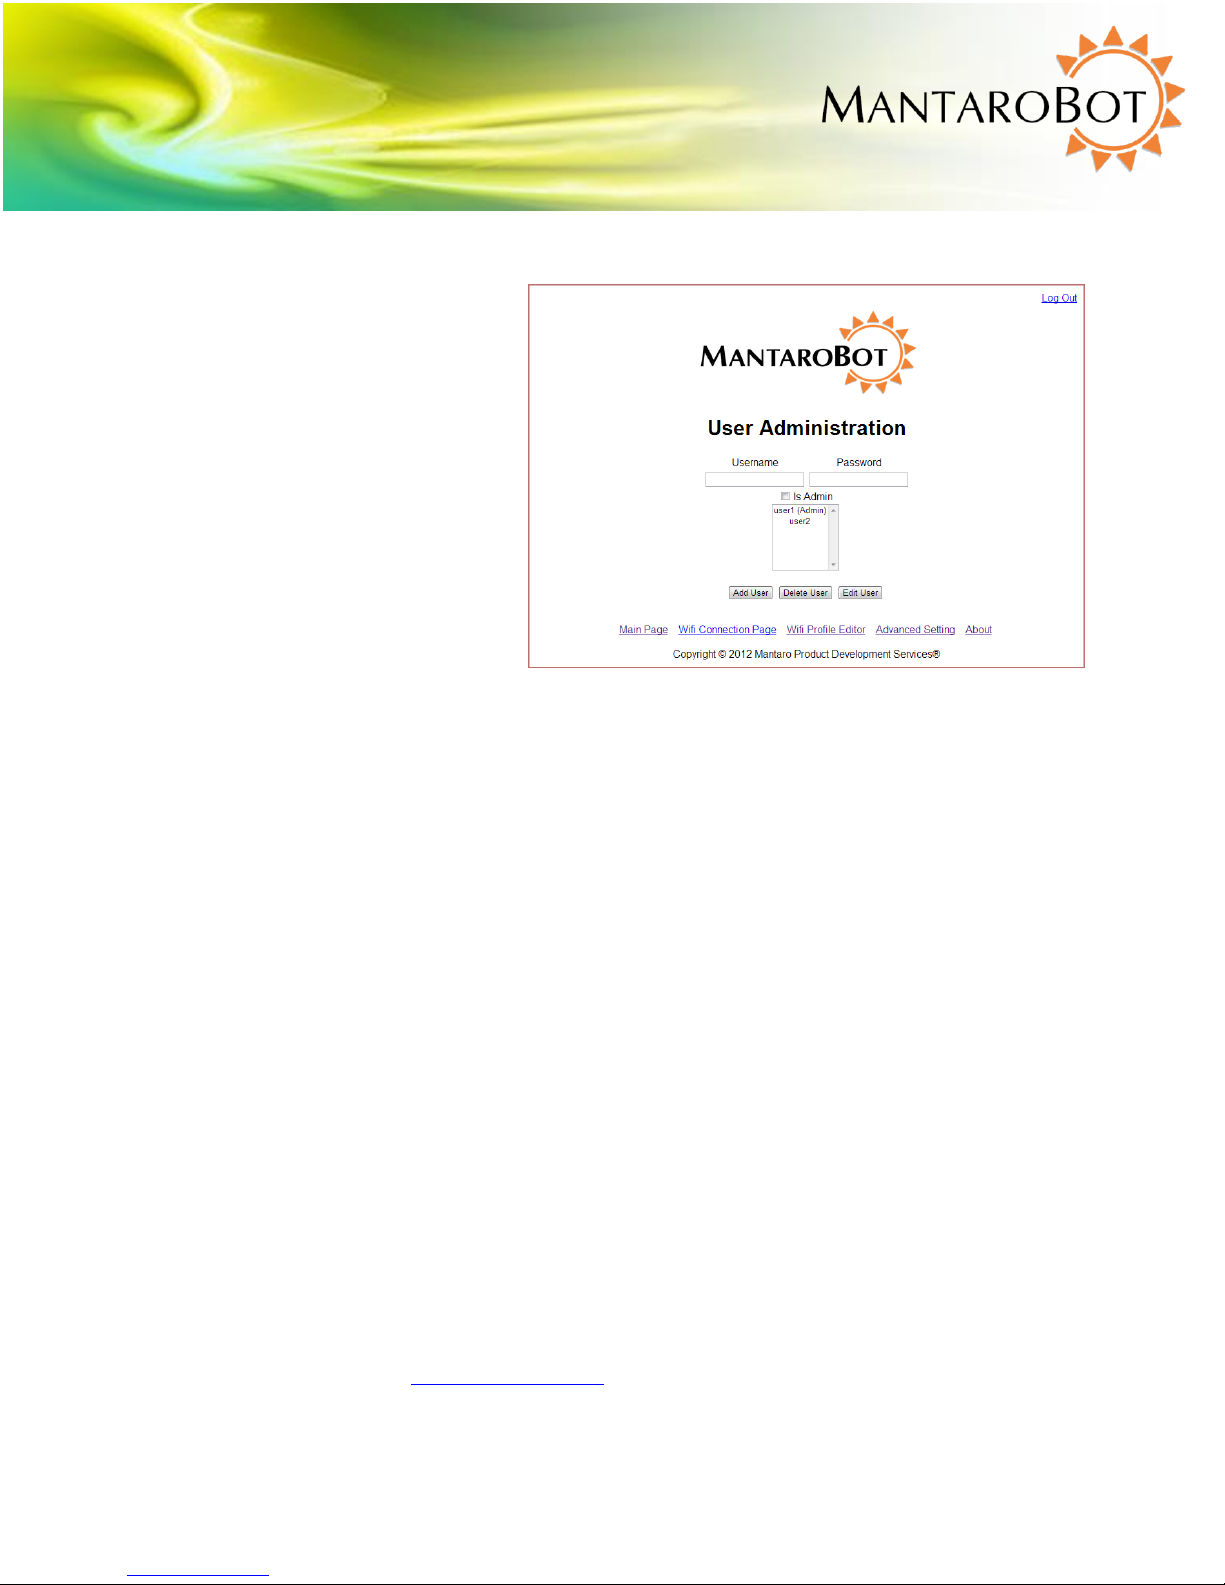
6.4 User Administration (sub-menu)
An administrator can manage user accounts by clicking on the “User Administration” link on the bottom
of any web page and logging in with
their administrator username and
password. Once logged in, a web page
with two boxes labeled “Username” and
“Password” will be displayed. To create
a new user account, enter the desired
login information in these two fields. If
the user should also have administrator
privileges, check the “Is Admin” box.
Once the desired information in
entered, click the “Add User” button
below the displayed list of users.
To delete a user account, highlight the
username in the list of users, and then click “Delete User.” Any administrator accounts can also be
deleted except for the one that is currently logged in. There must always be at least one Administrator
account registered to your device, otherwise it will not function properly.
To make changes to an account, such as password or administrative rights, highlight the username to
edit and click “Edit User”. On the page shown make the changes as desired and then click on “Apply
Changes”.
20410 Century Boulevard Suite 120 Germantown Maryland 20874
www.MantaroBot.com info@mantarobot.com
26 Version 3.1
MantaroBot™
Phone 301 528 2244 Fax 301 528 1933
Page 27

MANTAROBOT TELEME
User Guide & Operating Manual
6.5 Advanced Settings (sub-menu)
There are various other settings
for the MantaroBot TeleMe that
need configuration or can be
modified by an administrator.
These values are set in the factory
but may need to be updated. To
access these settings click on the
“Advanced Setting” link at the
bottom of any web page and the
web page on the right will be
shown. Here the administrator
can edit the Robot Control Path
settings, the System Settings,
Advanced Network Configuration,
and Device Holder settings.
MantaroBot Communications
Service Setting – If a monthly
plan to use the optional
MantaroBot Communications
Service for the Robot Control Path
(more info provided later in this
User Guide) has been purchased,
click ‘Enable MantaroBot
Communication Service’ link. A
new link will be presented
‘Upload a new configuration file
and license key’. Click on that link to upload the configuration file and enter license key that was
provided. The window shown below will appear for entering the information.
MantaroBot™
20410 Century Boulevard Suite 120 Germantown Maryland 20874
www.MantaroBot.com info@mantarobot.com
Phone 301 528 2244 Fax 301 528 1933
27 Version 3.1
Page 28

MANTAROBOT TELEME
User Guide & Operating Manual
Maximum Speed Allowed – The maximum allowed speed for the robot to travel is displayed as a
percentage. 100% is equivalent to approximately 2 feet per second. Select between 40 – 100.
PING disable – Some networks have ping disabled. If so, check the box to disable ping otherwise the
TeleMe’s WiFi radios will be reinitialized every 80 seconds.
Select Time Zone – From the drop-down menu, select the time zone that the robot will reside in.
Incorrect information may cause confusion between local and remote users.
Local Wifi SSID Name/Pass Key – If your TeleMe has the standard single Wifi radio, these fields will not
be present. If your TeleMe has the Multi-Wifi Radio solution, you can configure the SSID name and
password in these fields. By default, the SSID name and password are “teleme_wifi_<##>” where <##>
are the digits at the end of the TeleMe device’s serial number. For information on single and Multi-Wifi
Radio solution please see Section 4.1.1 and 4.1.2.
Advanced Network Configuration – For enabling DHCP (default is enabled), configuring Static IP for the
TeleMe, modifying the IP address of the Local WiFi or disabling Multi-WiFi radio option (for Multi-WiFi
Radio configurations only), disabling 2.4 GHz WiFi Band (for TeleMe with 2.4 GHz and 5GHz WiFi capable
radios), and configuring network time from MantaroBot Name Server or a configurable NTP server, click
the ‘Advanced Network Configuration’ link.
20410 Century Boulevard Suite 120 Germantown Maryland 20874
www.MantaroBot.com info@mantarobot.com
28 Version 3.1
MantaroBot™
Phone 301 528 2244 Fax 301 528 1933
Page 29

MANTAROBOT TELEME
User Guide & Operating Manual
Device Holder Setting – ALL the values in this section will be set by the factory. If a different device
holder is installed other than what is initially shipped with the TeleMe, the user will have to update
these settings.
From the drop-down menu, select the type of user device that will be used as the “head” of the TeleMe.
If an optional laser pointer is installed inside the device holder, also click the check box “Does it have a
laser?”. There is also a Tilt offset correction value for the device holder that must be configured. When
the TeleMe first powers up, the tilt of the device holder should be centered. If it is not, adjust the Tilt
Offset value until it is centered. To test a new tilt offset value, the “Apply Changes” button must be hit.
To save changes on this page, click the “Apply Changes” button otherwise all changes will be lost.
6.6 About (sub-menu)
The “About” link
on the bottom of
any web page will
take the user to
the web page on
the right showing
the version
numbers for the
various
components of the
MantaroBot –
Serial Number,
Robot Application,
Firmware and
Hardware version,
and Hardware
Serial number.
The webpage also provides links to the MantaroBot support website, ability to check for software
updates, and perform Manual Software updates (for TeleMes that are used inside a closed network).
The support site link and check for updates link will only work if the TeleMe is configured for a wireless
network (with external internet access) and is not in Configuration Mode. If the TeleMe is in
20410 Century Boulevard Suite 120 Germantown Maryland 20874
www.MantaroBot.com info@mantarobot.com
29 Version 3.1
MantaroBot™
Phone 301 528 2244 Fax 301 528 1933
Page 30

MANTAROBOT TELEME
User Guide & Operating Manual
configuration mode, there will also be a ‘factory reset’ option that will remove all user accounts and set
them back to the default factory accounts. It will also clear all the WiFi profiles.
6.7 Upgrading the Software
Refer to the “MantaroBot TeleMe Robot Application Update Instructions” document available at
www.mantarobot.com/support.htm under the TeleMe tab or on the CD that was shipped with your
TeleMe.
20410 Century Boulevard Suite 120 Germantown Maryland 20874
www.MantaroBot.com info@mantarobot.com
30 Version 3.1
MantaroBot™
Phone 301 528 2244 Fax 301 528 1933
Page 31

MANTAROBOT TELEME
User Guide & Operating Manual
7 Controller Application
7.1 Remote PC / Mac Requirements / Web-browser
To use the desktop installable MantaroBot Controller application, the computer/device must meet the
following requirements:
Windows PC desktop controller (Mac users should use Web-browser controller):
1. A 32-bit or 64-bit version of Windows XP, Windows 7, or Windows 8 Operating system
2. The latest version of your desired video conferencing application. If you are using Skype on
Windows 8 you should use Skype for Desktop (not Skype Metro).
3. A desktop mouse or joystick (Windows only). (The MantaroBot can be controlled from a touch
pad but it is not recommended.)
4. Headphones and microphone (will improve audio experience)
5. A webcam (if two-way video is desired)
Web-browser controller:
1. A device with a compatible web-browser can use the web-based browser controller,
MantaroBot TeleGo Controller, with a direct socket connection, the MantaroBot
Communications Service, or WebRTC by visiting www.mantarobot.com/telego. WebRTC with
TeleGo requires the use of a browser (e.g. Chrome or Firefox) that supports the WebRTC
protocol.
This user-guide explains all of the functions available in the desktop controller version. Refer to
the TeleGo User Guide available on the support page at www.mantarobot.com for more
information on the TeleGo controller.
Note: It is suggested that a webcam be used at all times such that people interacting with the
MantaroBot can see who is controlling it. This practice improves the interpersonal dynamics and
changes the way the MantaroBot is perceived by those local to it: from a surveillance drone to that
of a person.
20410 Century Boulevard Suite 120 Germantown Maryland 20874
www.MantaroBot.com info@mantarobot.com
31 Version 3.1
MantaroBot™
Phone 301 528 2244 Fax 301 528 1933
Page 32

MANTAROBOT TELEME
User Guide & Operating Manual
7.2 Installation & Upgrades
The MantaroBot Controller application (desktop controller version) can control the TeleMe using a
Direct Socket connection, the MantaroBot Communications Service, or WebRTC. The TeleGo webbased browser controller does not require any updating from the user side. The following steps
describe the installation and/or upgrade process of the MantaroBot Controller application:
1. Install and run the latest version of your choice of audio/video conferencing application if it is
not already installed on your PC. If you plan on using Skype (Skype for Desktop, not Metro, for
Windows 8 systems) or another A/V conferencing application from a separate device other than
the one used to control the TeleMe, please update the application on the appropriate device.
2. Installing the Controller:
<For PC Windows users>: Find the MantaroBot_TeleMe_Controller_Setup_verXXX.exe installer
file and copy / download to your computer. This file is available on the CD that came with the
MantaroBot. This file and any newer versions are also available for download via the support
link on the MantaroBot website at www.MantaroBot.com. Double click on the .exe file to run
the installer.
<For Mac users>: Please use the web-based browser controller, TeleGo, at
www.mantarobot.com/telego. No installation is required.
3. <For PC Windows user>: If this is an upgrade to an existing installation, it is necessary to point
the update to the existing installation path so the files can be replaced.
7.3 MantaroBot Contact List Configuration
Since the release of the TeleMe Controller Application ver 2.0, the MantaroBot TeleMe has the flexibility
to be configured to use one of several available robot control paths to provide the network connection
between the desktop or web-browser controller and the TeleMe. This flexibility allows the use of any
audio/video conferencing application. The configured robot control path is the network connection
which the controller uses to communicate with the TeleMe to control its various robot functions (e.g.
drive, pan/tilt, etc.). The robot control path is an independent communication path from that of the
audio/video conference itself. In fact, the audio/video conference itself can be established from a
separate device than the one running the controller application (e.g. a remote user using an iPad
running FaceTime for the audio/video and simultaneously using a PC or mobile device running the
desktop controller or web-browser TeleGo controller application.)
MantaroBot™
20410 Century Boulevard Suite 120 Germantown Maryland 20874
www.MantaroBot.com info@mantarobot.com
Phone 301 528 2244 Fax 301 528 1933
32 Version 3.1
Page 33

MANTAROBOT TELEME
User Guide & Operating Manual
When adding a robot to the contact list, the user has to select which robot control path will be used for
that particular TeleMe robot. Different TeleMes in the contact list will be configurable for different
control paths. Below are the three available robot control paths and some differences between them.
1. WebRTC
a. Use any application available for the user device for audio/video conferencing
b. Can run audio/video conferencing application from a separate device than the device
running the controller application
c. Uses port 9001 to setup the initial robot control path, but then a direct peer-to-peer
connection will be used to communicate robot control commands (free, no additional
user cost incurred)
d. If using TeleGo controller application, a WebRTC compatible browser must be used (e.g.
Chrome or Firefox) on devices that support WebRTC.
2. MantaroBot Communications Service
a. Use any application available for the user device for audio/video conferencing
b. Can run audio/video conferencing application from a separate device than the device
running the controller application
c. Use MantaroBot Communications Service (cloud based service) for communicating
robot control commands (monthly service plan required – please contact MantaroBot
for more information)
d. Uses port 80 for data transfer alleviating the need of port forwarding for NAT traversal
3. Direct Socket connection
a. Use any application available for the user device for audio/video conferencing
b. Can run audio/video conferencing application from a separate device than the device
running the controller application
c. Uses direct socket connection (port 9000) between MantaroBot and the TeleMe
Controller for communicating robot control commands (free, no additional user cost
incurred)
d. Primary use for within private/corporate networks (including remote user via VPNs)
where traffic does not or can not leave the IT infrastructure
20410 Century Boulevard Suite 120 Germantown Maryland 20874
www.MantaroBot.com info@mantarobot.com
33 Version 3.1
MantaroBot™
Phone 301 528 2244 Fax 301 528 1933
Page 34

MANTAROBOT TELEME
User Guide & Operating Manual
7.3.1 Creating MantaroBot Contact List
To connect to a MantaroBot, you must first add a robot to the contact
list by selecting a control path to use and configure the robot
accordingly. (Picture on the right shows a box with an empty contact
list.)
1. Launch the MantaroBot Controller program.
2. Click on the ‘Add’ button to add your first MantaroBot to the
Controller list. You can add or delete any MantaroBot contact as
necessary.
3. When the ‘Add’ button is clicked, the window shown below will
appear.
MantaroBot™
20410 Century Boulevard Suite 120 Germantown Maryland 20874
www.MantaroBot.com info@mantarobot.com
Phone 301 528 2244 Fax 301 528 1933
34 Version 3.1
Page 35

MANTAROBOT TELEME
User Guide & Operating Manual
4. MantaroBot Controller by default
is set to use MantaroBot
Communications Service for
Robot Control Path and Skype for
Audio/Video Conferencing
Application. However by clicking
Robot Control Path drop down
menu (as shown in the following
picture), ‘Direct Socket’ or
‘WebRTC’ can be selected. You
can select ‘Skype’ or ‘Other’ as
your Audio/Video Conferencing
Application from the other pulldown menu. Make the desired
selection before proceeding.
7.3.1.1 Configure MantaroBot
TeleMe Using WebRTC
1. Verify that ‘WebRTC’ is selected
for Robot Control Path.
2. ‘Skype’ or ‘Other’ can be selected
for the Audio/Video Application.
If you will be using a separate
device to run Skype for the
audio/video conferencing
application then still choose
‘Other’ instead of ‘Skype’. The
‘Skype’ selection for the
Audio/Video Conferencing is for
when the user will be running
both the controller application
and Skype on the same
computer.
3. In the TeleMe Description, type
the name that you want to see
MantaroBot™
20410 Century Boulevard Suite 120 Germantown Maryland 20874
www.MantaroBot.com info@mantarobot.com
Phone 301 528 2244 Fax 301 528 1933
35 Version 3.1
Page 36

MANTAROBOT TELEME
User Guide & Operating Manual
appear in the Controller contact list. This can be any descriptive text you choose (suggestion:
the place where the MantaroBot is physically located).
4. In the MantaroBot TeleMe Serial Number field, type the exact TeleMe Serial Number of the
MantaroBot to be controlled. This name must match the TeleMe Serial Number shown on the
Information Sheet provided with your MantaroBot (e.g. mantarobottelemeXX). It can also be
found on the sticker on the underside of the TeleMe. Press ‘Next’ when complete.
5. If you selected ‘Other’ for audio/video conferencing, skip to step 9.
6. If you selected ‘Skype’ as your choice of audio/video conferencing application AND are not
logged into Skype, a notification window will appear prompting you to do so.
7. In the next window, you may see the message “Waiting for Skype Authorization” similar to the
picture below. If you do follow the directions described in Section 7.4.1 - step #4.
20410 Century Boulevard Suite 120 Germantown Maryland 20874
www.MantaroBot.com info@mantarobot.com
36 Version 3.1
MantaroBot™
Phone 301 528 2244 Fax 301 528 1933
Page 37

MANTAROBOT TELEME
User Guide & Operating Manual
8. Once Skype Authorization is
complete, the TeleMe User Device
Skype Name list will appear. Select
the Skype name of the user device
that will be docked into the selected
TeleMe device holder. This user
device contact list is populated from
the Skype account that the user is
currently logged into. If the user
device is not on the Skype contact list
yet, manually type it into the blank
field below the TeleMe User Device
Skype Name contact list window.
Alternatively, close this window, add
it to the Skype contact list, and
perform this ‘Add’ function again.
Press ‘Next’ when complete.
9. The summary page with the selected settings will be shown similar to the picture below. The
new robot will be added to your list once you press ‘OK’ Button.
MantaroBot™
20410 Century Boulevard Suite 120 Germantown Maryland 20874
www.MantaroBot.com info@mantarobot.com
Phone 301 528 2244 Fax 301 528 1933
37 Version 3.1
Page 38

MANTAROBOT TELEME
User Guide & Operating Manual
7.3.1.2 Configure MantaroBot TeleMe for MantaroBot Communications Service
1. Verify that ‘MantaroBot
Communications Service’ is selected
for Robot Control Path.
2. ‘Skype’ or ‘Other’ can be selected for
the Audio/Video Application. If you
will be using a separate device to run
Skype for the audio/video
conferencing application then still
choose ‘Other’ instead of ‘Skype’.
The ‘Skype’ selection for the
Audio/Video Conferencing is for
when the user will be running both
the controller application and Skype
on the same computer. If you will be
selecting ‘Skype’, please follow the
Skype related instructions from the
previous Section 7.3.1.1.
3. In the TeleMe Description, type the name that you want to see appear in the Controller contact
list. This can be any descriptive text you choose. (suggestion: the place where the MantaroBot is
physically located)
4. In the MantaroBot TeleMe Serial Number
field, type the exact TeleMe Serial Number
of the MantaroBot to be controlled. This
name must match the TeleMe Serial
Number shown on the Information Sheet
provided with your MantaroBot (e.g.
mantarobottelemeXX). It can also be found
on the sticker on the underside of the
TeleMe.
5. Press next. A new window to configure
your controller for the MantaroBot
Communications Service (MCS) will appear.
Please enter the username/password you
would use to connect to this TeleMe and
click the Validate button.
20410 Century Boulevard Suite 120 Germantown Maryland 20874
www.MantaroBot.com info@mantarobot.com
38 Version 3.1
MantaroBot™
Phone 301 528 2244 Fax 301 528 1933
Page 39

MANTAROBOT TELEME
User Guide & Operating Manual
6. If you have a valid user account
on this particular TeleMe the
popup window on the right will
appear. Click ‘OK’. If the
username/password is incorrect
an error window will popup. If
the username/password is
correct but the TeleMe has not
been enabled for MCS, a window will popup asking you to contact your IT administrator.
7. If the TeleMe could not be found
(could be offline) or if the
TeleMe Serial Number is invalid
the following popup window will
appear. Please ensure the
TeleMe is online and that the
serial number is correct and try
again.
8. If the validation process was successful, press ‘Next’ to see the summary page with the current
settings as shown below. The new robot will be added to your list once you press ‘OK’ Button.
MantaroBot™
20410 Century Boulevard Suite 120 Germantown Maryland 20874
www.MantaroBot.com info@mantarobot.com
Phone 301 528 2244 Fax 301 528 1933
39 Version 3.1
Page 40

MANTAROBOT TELEME
User Guide & Operating Manual
7.3.1.3 Configure MantaroBot TeleMe for Direct Socket Connection
1. Verify that ‘Direct Socket’ is selected for
Robot Control Path.
2. ‘Skype’ or ‘Other’ can be selected for
the Audio/Video (AV) Application. If
you will be using a separate device to
run Skype for the AV conferencing
application then still choose ‘Other’
instead of ‘Skype’. The ‘Skype’ selection
for the AV Conferencing is for when the
user will be running the controller app
and Skype on the same computer. If
you will be selecting ‘Skype’, please
follow the Skype related instructions
from the previous Section 7.3.1.1.
3. In the TeleMe Description, type the
name that you want to see appear in
the Controller contact list. This can be
any descriptive text you choose.
(suggestion: the place where the
MantaroBot is physically located)
4. In the TeleMe Basename/IP field, enter
the MantaroBot TeleMe’s serial number
(e.g. mantarobottelemeXX) as the
address of the TeleMe. If your network
does not have external Internet access
to automatically look up the IP, you will
need to enter the IP address of the
TeleMe instead.
5. Press ‘Next’ to see the summary page
with the current settings as shown on
the right. The new robot will be added to your list once you press ‘OK’ Button.
20410 Century Boulevard Suite 120 Germantown Maryland 20874
www.MantaroBot.com info@mantarobot.com
40 Version 3.1
MantaroBot™
Phone 301 528 2244 Fax 301 528 1933
Page 41

MANTAROBOT TELEME
User Guide & Operating Manual
7.3.2 Editing MantaroBot Contact List
Entries in the contact list can be edited by double-clicking on the contact itself and then clicking on the
‘Step 1’ tab that appears in the window that is displayed. The user can easily change any of the
contact’s information except for the Robot Control Path. If you need to change the Robot Control Path
then please delete the contact and create a new one.
7.4 Connecting to a MantaroBot (using Skype as Audio/Video
Conferencing Application)
Please note: Skype for Desktop should be used instead of Skype Metro on PCs.
7.4.1 The First Time or after Software Updates
1. In the MantaroBot Controller window, select the MantaroBot you want to connect to.
2. Enter your username and password and click the “Sign In” button.
3. <For PC Windows users> If it is the first time that this application has been launched on your
computer (or a software update to the Controller application or Skype has just been installed),
observe that the Skype window requests permission to allow access to the MantaroBot
Controller application. Please click on “Allow access” (see the following picture).
20410 Century Boulevard Suite 120 Germantown Maryland 20874
www.MantaroBot.com info@mantarobot.com
41 Version 3.1
MantaroBot™
Phone 301 528 2244 Fax 301 528 1933
Page 42

MANTAROBOT TELEME
User Guide & Operating Manual
4. Once the access has been provided to MantaroBot Controller and the user authenticated, the
MantaroBot will wait for someone local to the MantaroBot to answer the call unless autoanswer is available and configured on the Skype application running on the TeleMe user device.
The person local to the MantaroBot needs to select ‘video’ call on the user device so the remote
person can view video. The remote person should also turn on their video stream in Skype
once the call is connected so there is a two-way video and audio call.
5. Once the call is connected, you will see the control pad as shown on the following page.
6. Before clicking the ‘Sign In’ button in Step #3 above, the ‘Controller Settings’ can be modified by
clicking on the ‘Options’ button on the Login window. The ‘Controller Settings’ can also be
modified after signing on to a MantaroBot. See Section 7.7.3 Controller Settings for more
details.
7.4.2 Normal Operation
1. In the MantaroBot Controller window, select the MantaroBot you want to connect to.
2. Enter your username and password and click the “Sign In” button.
3. Someone local to the MantaroBot must answer the call unless auto-answer is available and
configured on the Skype application running on the TeleMe user device. The person local to the
MantaroBot unit needs to select ‘video’ call so the remote person can view video. The remote
person should also turn on their video stream in Skype once the call is connected so there is a
two-way video and audio call.
4. Once the call is connected, you will see the control pad as shown in the next section.
20410 Century Boulevard Suite 120 Germantown Maryland 20874
www.MantaroBot.com info@mantarobot.com
42 Version 3.1
MantaroBot™
Phone 301 528 2244 Fax 301 528 1933
Page 43

MANTAROBOT TELEME
User Guide & Operating Manual
7.5 Connecting to a MantaroBot (using Other as the Audio/Video
Conferencing Application)
1. Initiate your choice of audio/video conference application call between the remote device and
the user device plugged into the TeleMe as its ‘head’.
2. Run the MantaroBot Controller application if it is not already running. Select the MantaroBot
from the contact list that you want to connect to (should be the same as the one being used for
the audio/video conference call from Step #1 above).
3. Enter your username and
password and click the “Sign In”
button. A notification message
will appear reminding you to
initiate an audio/video
conference call. If you have
already done so then simply
ignore the message and click
‘OK’.
4. Once the robot control path is connected, you will see the control pad as shown in the next
section. Please note: clicking on the ‘End’ button in the control pad shown in the next section
will only terminate the robot control path connection. The audio/video conference call must be
terminated separately.
MantaroBot™
20410 Century Boulevard Suite 120 Germantown Maryland 20874
www.MantaroBot.com info@mantarobot.com
Phone 301 528 2244 Fax 301 528 1933
43 Version 3.1
Page 44

MANTAROBOT TELEME
User Guide & Operating Manual
7.6 Controlling a MantaroBot
The MantaroBot Controller is split into four sections. The left side is the Drive Motor Control Pad, the
middle is for “head” unit Tilt / Pan Control, the right side is for various Options and ending the call, and
the bottom is for providing status and control for additional accessories.
7.6.1 Drive Motor Control Pad
7.6.1.1 Driving MantaroBot
To move the MantaroBot, position your cursor on the center of the left area of the controller and hold
down the left mouse button. Dragging the cursor up will cause the MantaroBot to move forward. The
speed will increase as the cursor is moved further from the center. Moving to the right or left will cause
the MantaroBot to turn right or left. The further the cursor is moved to the left or right the sharper the
turn is made. Similarly, movement in the reverse direction can be made by moving the cursor down the
control pad area. The reverse direction speed is limited to 50% of the forward direction speed.
Moving the cursor to the two small circular areas on either the left or right side of the drive pad will
cause the MantaroBot to pirouette in place in the direction shown by the arrows.
The MantaroBot can also be controlled using a USB joystick (Windows only). Please see Section 8.2 for
more information.
Tip: It is recommended to familiarize yourself with driving the MantaroBot with a mouse first before
using it with a joystick (Windows only).
20410 Century Boulevard Suite 120 Germantown Maryland 20874
www.MantaroBot.com info@mantarobot.com
44 Version 3.1
MantaroBot™
Phone 301 528 2244 Fax 301 528 1933
Page 45

MANTAROBOT TELEME
User Guide & Operating Manual
7.6.1.2 Proximity IR Sensors
The MantaroBot TeleMe is equipped with two obstacle detecting IR sensors. The sensors detect
obstacles approaching the left wheel or the right wheel and will inform the user through the
MantaroBot Controller Drive Motor Control Pad. As the left drive wheel of the robot approaches an
obstacle in the front, a half white bar will appear on the top left of the Drive Motor Control Pad area (as
shown in the following picture), and if the right drive wheel of the robot approaches an obstacle in the
front, a half white bar will appear on the top right of the Control Pad area.
Note: To reduce the likelihood of a high speed collision (e.g. driving the MantaroBot into a wall) a
feature has been included in the MantaroBot that reduces the robot’s forward speed when it detects
an obstacle 30 cm ahead of it. Note forward speed is not reduced if the robot is moving slowly. A red
area will appear on the pad to indicate that the speed has been limited. These sensors will not detect
all types of wall surfaces or prevent the MantaroBot from falling down steps or stairs.
MantaroBot™
20410 Century Boulevard Suite 120 Germantown Maryland 20874
www.MantaroBot.com info@mantarobot.com
Phone 301 528 2244 Fax 301 528 1933
45 Version 3.1
Page 46

MANTAROBOT TELEME
User Guide & Operating Manual
7.6.2 Camera Control
NOTE: References to “Pan” in this section only apply if your TeleMe is equipped with the factory
installed optional Mast with Motorized Pan Mechanism. If your TeleMe does not have this option,
the associated control buttons/slider will be grayed out.
7.6.2.1 Pan/Tilt
The Camera Control buttons allow the user to pan/tilt the “head” of the MantaroBot (which has an
integrated camera) independently of driving the MantaroBot. This is useful in a meeting environment
where you want to observe items or people in the room without driving the MantaroBot around. It is
also necessary to look down to avoid obstacles when driving. The camera will move in the direction of
the buttons. The “Center” button causes the head to re-center from any position.
Another method of moving the camera is to use the two sliders. The horizontal slider actuates the pan
control while the vertical slider actuates the tilt control of the head. This provides users with finer
control of the camera and ability to position it in the desired position with one or two drag operations.
Additionally, the camera can also be controlled with the A-S-D-W-C keys of the keyboard. This is useful
for moving the camera with one hand while driving with a mouse in the other.
A = left
D = right
S = down
W = up
C = center
20410 Century Boulevard Suite 120 Germantown Maryland 20874
www.MantaroBot.com info@mantarobot.com
46 Version 3.1
MantaroBot™
Phone 301 528 2244 Fax 301 528 1933
Page 47

MANTAROBOT TELEME
User Guide & Operating Manual
NOTE: The Camera Pan control should be centered prior to moving the MantaroBot. There is also a
Controller Setting option to ‘Auto-Center’ the camera when driving.
7.6.2.2 Memory Positions
Three memory position buttons on the side of the camera control (M1, M2, M3) are provided to save
and recall three head (camera) positions for easy pointing of the camera. If your MantaroBot does not
have the motorized pan option, the memory buttons can still be used to save/recall the tilt position. To
operate the memory buttons, point the camera to the desired position and press the button for 3
seconds to store the present position. The user is notified via a message on the status bar when the
position is successfully stored.
Any subsequent clicks of the memory button will point the camera to the stored position and the status
bar will indicate that the memory position was recalled.
Additionally, the camera positions can be recalled using the 1, 2, or 3 key on the keyboard. This is useful
for recalling previously stored tilt positions with one hand while driving with a mouse in the other.
Note: The keyboard keys can not be used for saving memory positions. They are for only recalling
memory positions.
1 = recall M1 camera position
2 = recall M2 camera position
3 = recall M3 camera position
20410 Century Boulevard Suite 120 Germantown Maryland 20874
www.MantaroBot.com info@mantarobot.com
47 Version 3.1
MantaroBot™
Phone 301 528 2244 Fax 301 528 1933
Page 48

MANTAROBOT TELEME
User Guide & Operating Manual
7.6.3 Laser Pointer
If the MantaroBot is equipped with a Laser Pointer the “L” button at the bottom of the Controller
window will not be grayed out. Clicking on the “L” with your mouse or alternatively hitting the “L”
button on your keyboard will turn the laser on/off. The laser can be pointed by using the Camera
Control functions and turning it on while the camera is facing the location of interest.
WARNING: Care must be taken to avoid shining the laser at someone’s eyes. This can be dangerous and
may cause permanent eye damage.
7.6.4 Charging User Device
During a call, there may be instances when the internal battery of the TeleMe has plenty of charge but a
person local to the TeleMe may notice that the user device plugged into the device holder is running low
on charge. In those instances, the remote user has the option to charge the user device (only while the
20410 Century Boulevard Suite 120 Germantown Maryland 20874
www.MantaroBot.com info@mantarobot.com
48 Version 3.1
MantaroBot™
Phone 301 528 2244 Fax 301 528 1933
Page 49

MANTAROBOT TELEME
User Guide & Operating Manual
call is on) by drawing power from the TeleMe’s internal battery. To do this, simply click the ‘C’ at the
bottom of the Controller window. When the call ends, the charging of the user device will also end.
If the TeleMe is plugged into a charger, the ‘C’ will be greyed out as the user device is already being
charged.
7.7 Options – Settings
Clicking on ‘Options’ and then ‘Settings’ provides three tabs of menus for User Administration, Robot
Settings, and Controller Settings. The User Administration and Robot Settings tabs will only appear if the
user logged in has administrative privileges.
7.7.1 User Administration
The User Administration tab shows the same functions that were available during configuration mode.
This allows administrators to add, delete, or edit users to the MantaroBot it is currently logged into
while using the MantaroBot Controller. In other words, the user credentials can be changed remotely
without having to physically go to the MantaroBot location and use the MantaroBot Robot application.
This is useful for providing temporary access credentials to a guest or adding a new user. The following
steps describe the procedure:
1. Click on the ‘Options‘ button and select ‘Settings’.
MantaroBot™
20410 Century Boulevard Suite 120 Germantown Maryland 20874
www.MantaroBot.com info@mantarobot.com
Phone 301 528 2244 Fax 301 528 1933
49 Version 3.1
Page 50

MANTAROBOT TELEME
User Guide & Operating Manual
2. Click on the User Administration tab to add or delete users.
3. You will see the current user list in
this dialog box. To add a new user,
fill in the Username and Password
fields. Then select “Is Admin” if
the user is to have administrator
privileges and click on “Add User”.
4. To delete a User, select the user
and click “Delete User”.
5. To edit a user’s information, click
on the user and edit his username
and password. Once you are done
editing press ‘Edit User’ to make
the modification.
Note: The changes to ‘Add User’,
‘Delete User’, or ‘Edit User’ are not
uploaded and saved to the remote
MantaroBot (the robot currently
logged into) until the ‘OK’ button on
the bottom of the window is clicked.
The message, ‘Remote Settings
Updated’, will appear on the
Controller status bar to indicate that
the user names and passwords have
been stored once the ‘OK’ button is
pressed. If the ‘Cancel’ button is
pressed before the ‘OK’ button, all
changes will be lost!
MantaroBot™
20410 Century Boulevard Suite 120 Germantown Maryland 20874
www.MantaroBot.com info@mantarobot.com
Phone 301 528 2244 Fax 301 528 1933
50 Version 3.1
Page 51

MANTAROBOT TELEME
User Guide & Operating Manual
7.7.2 Robot Settings
The Robot Settings tab allows administrators to set the maximum speed (value 40 to 100) of the
MantaroBot currently logged into as well as the Acceleration/Deceleration of the MantaroBot. Similar
to the User Administration tab, changes will not be saved and uploaded to the MantaroBot, until the
‘OK’ button is pressed.
MantaroBot™
20410 Century Boulevard Suite 120 Germantown Maryland 20874
www.MantaroBot.com info@mantarobot.com
Phone 301 528 2244 Fax 301 528 1933
51 Version 3.1
Page 52

MANTAROBOT TELEME
User Guide & Operating Manual
7.7.3 Controller Settings
The Controller Settings tab is accessible to
all users and allows the user to configure
the settings of the MantaroBot Controller
application installed on the remote
computer. NOTE: These settings are not
MantaroBot-specific and will apply
regardless of which MantaroBot the user
is connected to. The Controller Settings
tab is also accessible from the ‘Options’
button on the Login screen.
The user can:
1. Select if the application window is
‘Always on top’ or not.
2. Enable/Disable checking for
software updates when Controller
application launches. Checking for updates for the Robot Application must be done via the
“About” button after logging into a MantaroBot. [Default: Enable]
3. Enable/Disable Auto-Centering pan of camera when the MantaroBot is being driven. Enabling
the auto-center feature will center the camera in the pan direction once the MantaroBot has
reached a predefined speed. The tilt of the camera will not be auto adjusted and will remain
under user control to tilt up/down as the user desires. Recalling memory positions while driving
the MantaroBot will recall the tilt position only. If the TeleMe is not equipped with the pan
feature this setting will not be displayed in the window. [Default: Enable]
4. Set the Drive Pad Sensitivity (turning radius sensitivity) of the Drive Motor Control pad.
5. Drive timeout is a setting related to connection delay. When the Drive timeout crosses the
current setting threshold (equal to a certain connection delay value), the MantaroBot will be
stopped from moving. Set the drive timeout to be high or low depending on the quality of your
connection. If the connection is bad, set the drive timeout to a higher setting to prevent the
MantaroBot from stopping drive movements. However, setting the drive timeout to a high
setting with a bad connection also means that drive control movements could be quite delayed.
MantaroBot™
20410 Century Boulevard Suite 120 Germantown Maryland 20874
www.MantaroBot.com info@mantarobot.com
Phone 301 528 2244 Fax 301 528 1933
52 Version 3.1
Page 53

MANTAROBOT TELEME
User Guide & Operating Manual
6. If you are logged in and on the same local area network (LAN) as the MantaroBot TeleMe (could
be via VPN), the Configuration web pages of the TeleMe can be accessed by clicking on the
“TeleMe Configuration” link. This will launch the web browser on your computer.
7.7.4 Change Password
If you wish to change the
password while operating the
TeleMe, click on “Options”
button and then “Change
Password”.
The window on the right should then appear, asking
you to enter the password of the current user, as well
as the desired new password. You must enter the
same password in both the “New Password” and
“Confirm Password” fields, then click “OK.”
20410 Century Boulevard Suite 120 Germantown Maryland 20874
www.MantaroBot.com info@mantarobot.com
53 Version 3.1
MantaroBot™
Phone 301 528 2244 Fax 301 528 1933
Page 54

MANTAROBOT TELEME
User Guide & Operating Manual
7.8 Options – Help / About / Accessories
7.8.1 Help
The ‘Using Controller’ window selectable from the ‘Options’ button currently provides a link to where
the latest version of this User Guide resides. The ‘About’ and ‘Accessories’ tab can be selected once the
Help window is open.
7.8.2 About
The ‘About’ window selectable from
the ‘Options’ button shows the
version number of the MantaroBot
Controller application and
components of the MantaroBot (if in
an active call). When the controller is
not logged on to any MantaroBot, the
window shows the version number for
MantaroBot Controller application
only. However, once the call is
established, serial number for the
MantaroBot and version numbers for
the remote MantaroBot’s Robot
Application, Firmware, Hardware and
hardware serial number will be
displayed, as well as the device holder
type.
This information is useful in any tech
support inquiries. This window also
provides links to the MantaroBot support site and ability to check for updates. Available updates will be
checked for the MantaroBot Controller and if in a call, will also check for updates for the MantaroBot
itself. Note: Updates that are available for the MantaroBot Robot Application can only be installed by
a user local to the MantaroBot.
20410 Century Boulevard Suite 120 Germantown Maryland 20874
www.MantaroBot.com info@mantarobot.com
54 Version 3.1
MantaroBot™
Phone 301 528 2244 Fax 301 528 1933
Page 55

MANTAROBOT TELEME
User Guide & Operating Manual
7.8.3 Accessories
The ‘Accessories’ window is accessible by first selecting ‘Help’ or ‘About’ from the ‘Options’ button on
the Controller application. Then click on the ‘Accessories’ tab at the top. This window lists all of the
accessories for the MantaroBot the user is currently logged into. Based on the accessories that are
present (absent), the Controller application will enable (grey out) certain features or enable (remove)
certain graphics (e.g. user will not see a pan camera slider if there is no Mast with Motorized Pan
Mechanism installed). NOTE: Optional Extended Battery is not considered an accessory and will not be
displayed on the Accessories list.
20410 Century Boulevard Suite 120 Germantown Maryland 20874
www.MantaroBot.com info@mantarobot.com
55 Version 3.1
MantaroBot™
Phone 301 528 2244 Fax 301 528 1933
Page 56

MANTAROBOT TELEME
User Guide & Operating Manual
7.9 Miscellaneous
This section describes the in-call status information provided at the bottom right of the Controller
application.
7.9.1 Connection Delay
The Connection Delay displays a measurement of the approximate round trip delay from the
MantaroBot Controller application through the network to the MantaroBot. If the network that you are
connected to has significant delays you can compensate by moving the MantaroBot slowly or in short
movements. Any change you may see in the connection delay over time does not indicate an issue with
your MantaroBot. Increasing connection delays only indicates that your wireless and/or internet access
is or has become slow.
7.9.2 Battery Indicator
The battery indicator provides status of the internal MantaroBot battery (it does not provide battery
status for the user device being used as the “head’). A lightning bolt will display in the indicator when
the battery is being charged. When it is not being charged, rolling the mouse over the indicator will
provide remaining time information for the battery.
Below a certain battery charge level, the color of the indicator will turn red and the status bar will show
a message stating “Battery very low. Charge now!” If the battery reaches a very low voltage, the call will
automatically end.
20410 Century Boulevard Suite 120 Germantown Maryland 20874
www.MantaroBot.com info@mantarobot.com
56 Version 3.1
MantaroBot™
Phone 301 528 2244 Fax 301 528 1933
Page 57

MANTAROBOT TELEME
User Guide & Operating Manual
7.9.3 Wifi Meter
The Wifi meter provides Wifi strength information for the location where the MantaroBot is currently
located. It is a good idea to keep the MantaroBot away from an area where Wifi coverage is poor,
otherwise you may lose connection to the MantaroBot and not be able to regain it. Using the Wifi
meter to determine if you are driving into an area with poor coverage will prevent this situation from
occurring.
20410 Century Boulevard Suite 120 Germantown Maryland 20874
www.MantaroBot.com info@mantarobot.com
57 Version 3.1
MantaroBot™
Phone 301 528 2244 Fax 301 528 1933
Page 58

MANTAROBOT TELEME
User Guide & Operating Manual
8 Using 3
The MantaroBot can accommodate the use of several third party accessories. One accessory that can be
quite useful for those local to the MantaroBot is a Bluetooth® Headset. Another is a USB joystick
(Windows only) for the remote user controlling the MantaroBot instead of a mouse. Most user devices
used as the head device in the MantaroBot support Bluetooth audio.
rd
Party Accessories
8.1 Bluetooth® Headset
In situations where the remote user wants to have a more private conversation (rather than his/her
sound coming out of the speakers for everyone to hear), or in noisy environments where the
MantaroBot may be located, using a Bluetooth Headset can be very beneficial. Follow the instructions
that came with the Bluetooth headset for pairing with your user device (tablet / smartphone).
8.2 Joystick
Instead of using a mouse to control the MantaroBot, a USB joystick (Windows only) can be used as well.
The USB joystick must be DirectX compatible.
Note: The USB joystick must be connected prior to launching the MantaroBot Controller Application.
The USB joystick does not work with TeleGo.
The buttons of the joystick have been mapped to control the pan/tilt camera as well as the optional
laser pointer accessory.
Drive: Pan/Tilt Camera Control:
Joystick Up = drive forward DirectX Button 1 = tilt down
Joystick Down = drive reverse DirectX Button 2 = pan right
Joystick Right = turn right DirectX Button 3 = pan left
Joystick Left = turn left DirectX Button 4 = tilt up
DirectX Button 5 = laser on/off
DirectX Button 6 = center pan/tilt
MantaroBot™
20410 Century Boulevard Suite 120 Germantown Maryland 20874
www.MantaroBot.com info@mantarobot.com
Phone 301 528 2244 Fax 301 528 1933
58 Version 3.1
Page 59

MANTAROBOT TELEME
User Guide & Operating Manual
9 Maintenance
9.1 Battery Maintenance
The MantaroBot is equipped with a Sealed Lead Acid Battery. The life of this type of Battery is impacted
by the depth of discharge. To calibrate the battery life indicator on the MantaroBot properly, the
battery should be fully charged the first time the device is connected to a charger or docking station.
Then fully discharge the battery by using the MantaroBot normally before charging it again. This
process is commonly referred to as battery conditioning, which also ensures that the battery itself will
retain the maximum life during each use between charging cycles. This process should only be
performed upon use of a new battery including one that is shipped with the MantaroBot initially. If the
battery is repeatedly fully discharged the life of the battery will be reduced. The MantaroBot should be
fully recharged after each use by connecting it to the charger. The battery charge level can be
determined by connecting to the MantaroBot using the MantaroBot Controller Application. When the
battery level is indicated at the Battery Low level it should be recharged as soon as possible.
If you are going to store the TeleMe or not use it for an extended period the battery should be fully
charged prior to the storage period. After it is fully charged the main power switch on the base should
be set to the OFF position. Note that batteries have an inherent self-discharge rate that will fully
discharge the battery in several months even if the TeleMe is switched off. Even when not in use the
battery should be fully recharged every 3 to 4 months to extend its life.
Note: The MantaroBot should be connected to the charger or Docking Station whenever it is not in
use to keep the battery topped off.
NOTE: The extended battery (LiFePO4), if you have purchased one, is restricted from being shipped on
passenger airplanes.
9.2 Replacing the Battery
The following steps should be followed should it be necessary to replace the battery.
Note: Pushing the MantaroBot without the Battery installed may damage the control circuitry.
1. Remove the six black screws that hold the plastic enclosure to the base
2. Slide the enclosure up the mast to gain access to the battery.
3. Disconnect battery terminals from the battery. Remove Black first then Red.
MantaroBot™
20410 Century Boulevard Suite 120 Germantown Maryland 20874
www.MantaroBot.com info@mantarobot.com
Phone 301 528 2244 Fax 301 528 1933
59 Version 3.1
Page 60

MANTAROBOT TELEME
User Guide & Operating Manual
Note: Place electrical tape on the battery terminals to prevent accidental shorting of the battery
while it is being removed and handled. Shorting the battery terminals can cause a fire or explosive
hazard.
4. Remove 4 nuts holding the battery bracket cover in place.
5. Remove the battery bracket cover and slide the battery up and out.
6. Replace old battery with new battery, put back battery bracket cover and install 4 nuts.
7. Connect the Red wire to the Positive terminal of the battery first then the Black wire to the
battery’s Negative terminal.
8. Slide the enclosure back down over the battery compartment and install the screws removed in
Step #1.
9. Recycle or discard old battery properly.
10. Plug the charger in and charge the battery for at least 8 hours or until fully charged before
driving it on battery power. Refer to previous section for more information.
10 Warranty
MantaroBot warrants the TeleMe (excluding the user selected user device plugged into the device
holder of the MantaroBot) to be free from malfunctions and defects in both materials and workmanship
for 90 days from the date of purchase. If this product is found to be defective within the warranty
period, Mantaro will either repair or replace the product. This warranty does not cover circumstances
beyond the control of Mantaro. We make no other express or implied warranty for this product. Some
states or jurisdictions do not allow exclusion or limitation of incidental or consequential damages, so the
above limitation may not apply to you. Some states or jurisdictions do not allow limitations on how long
an implied warranty lasts, so the above limitation may not apply to you. This warranty gives you specific
rights, and you may have other rights which vary from state to state or by jurisdiction.
MantaroBot™
20410 Century Boulevard Suite 120 Germantown Maryland 20874
www.MantaroBot.com info@mantarobot.com
Phone 301 528 2244 Fax 301 528 1933
60 Version 3.1
Page 61

MANTAROBOT TELEME
User Guide & Operating Manual
11 Appendix A
11.1 Keyboard Mapping
Below is a map for all the keyboard shortcuts that can be used to control the MantaroBot.
Pan/Tilt Camera Control:
A = pan left 1 = recall M1 camera position
D = pan right 2 = recall M2 camera position
S = tilt down 3 = recall M3 camera position
W = tilt up
C = center camera
Laser Pointer:
L = laser on/off
11.2 Joystick Mapping
Below is a map for all the DirectX compatible USB joystick buttons (Windows only) that can be used to
control the MantaroBot using the desktop installable MantaroBot controller application.
Drive: Pan/Tilt Camera Control:
Joystick Up = drive forward DirectX Button 1 = tilt down
Joystick Down = drive reverse DirectX Button 2 = pan right
Joystick Right = turn right DirectX Button 3 = pan left
Joystick Left = turn left DirectX Button 4 = tilt up
DirectX Button 5 = laser on/off
DirectX Button 6 = center pan/tilt
20410 Century Boulevard Suite 120 Germantown Maryland 20874
www.MantaroBot.com info@mantarobot.com
61 Version 3.1
MantaroBot™
Phone 301 528 2244 Fax 301 528 1933
 Loading...