

Page 1
Instrukcja obsługi
User’s Manual
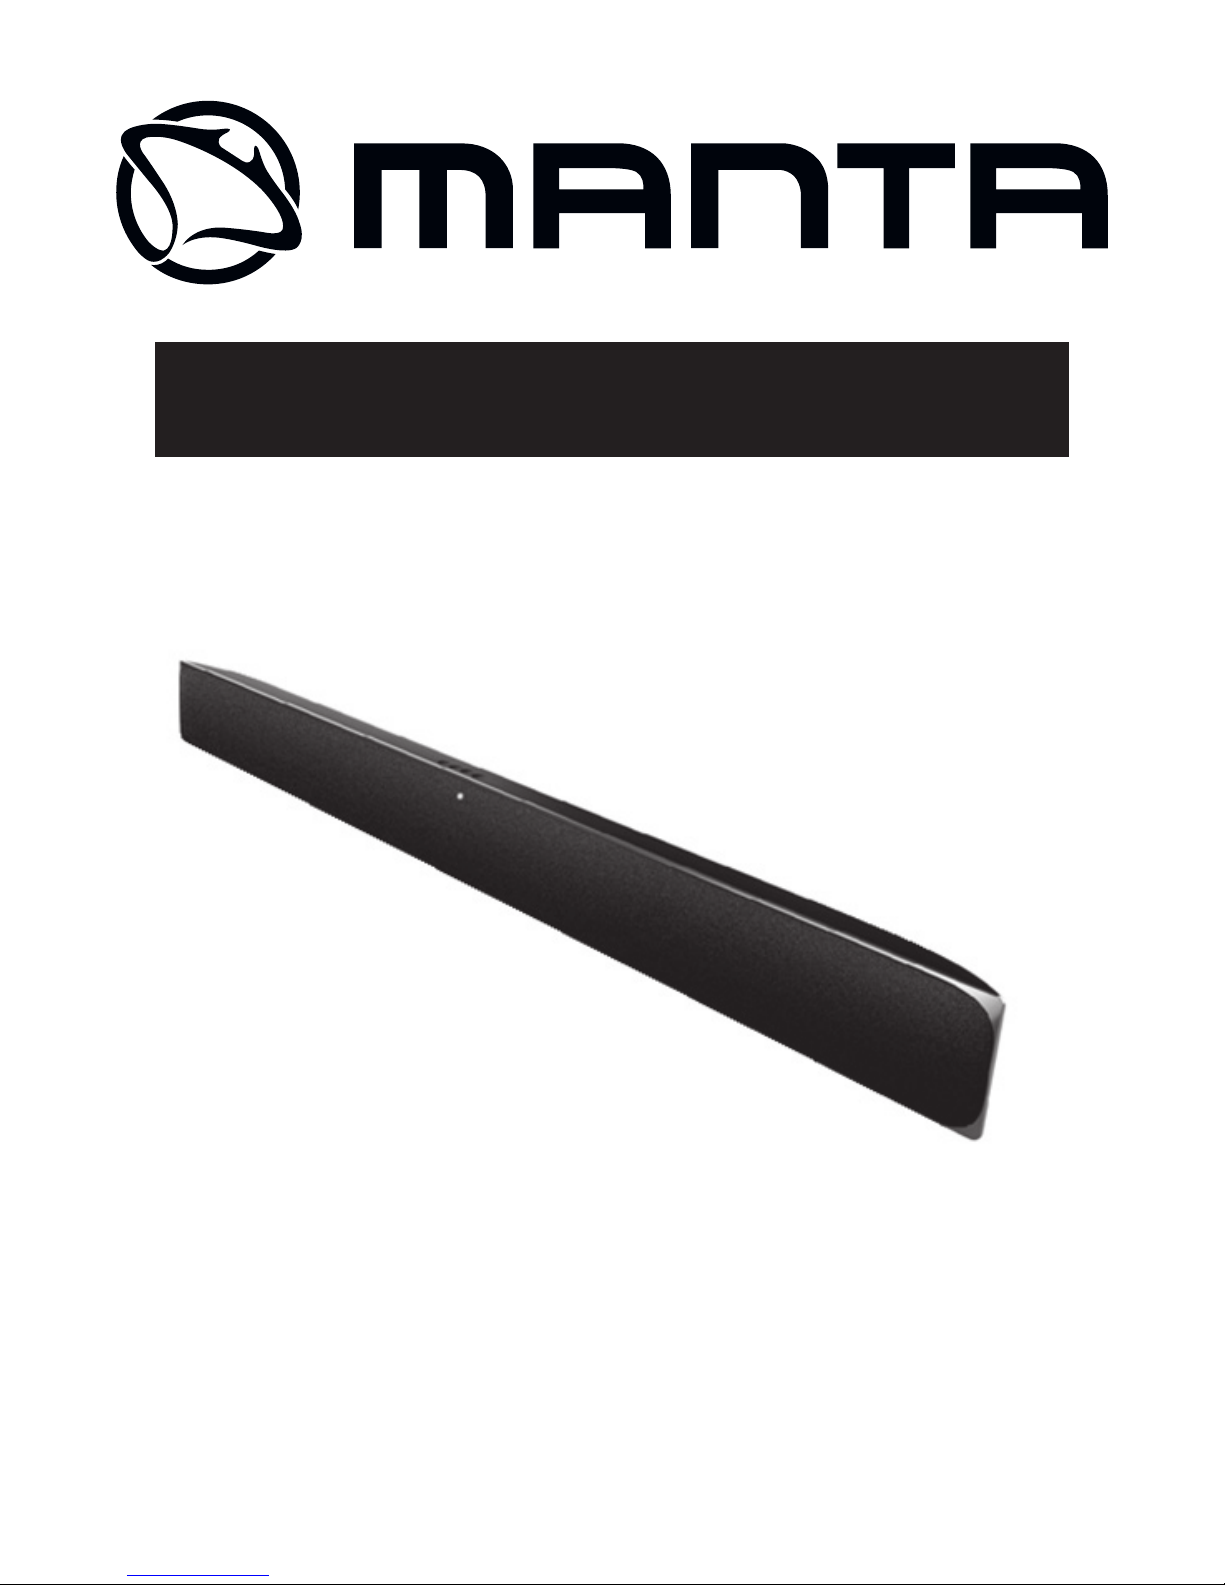
Soundbar
MM291
Page 2

MM 291
2
Instrukcja obsługi
SCHEMAT .............................................................................................................................................................................................................................................. 3
BLUETOOTH ...................................................................................................................................................................................................................................... 5
OPTICAL IN........................................................................................................................................................................................................................................................6
AUX1 .................................................................................................................................................................................................................................................................... 7
AUX2 .................................................................................................................................................................................................................................................................... 8
TRYB NAUKI PILOTA ZDALNEGO STEROWANIA ............................................................................................................................................................................9
MONTAŻ .............................................................................................................................................................................................................................................10
User’s Manual
CHEMAT ..............................................................................................................................................................................................................................................11
BLUETOOTH ....................................................................................................................................................................................................................................13
OPTICAL IN.....................................................................................................................................................................................................................................................14
AUX1 ................................................................................................................................................................................................................................................................ 15
AUX2 ................................................................................................................................................................................................................................................................. 15
TV REMOTE CONTROL LEARNING MODE ...................................................................................................................................................................................... 16
WALL MOUNTED .............................................................................................................................................................................................................................17
Page 3

MM 291
3
Schemet
1
2
4 5
6 7
8
10
9
11
12
10
14
10
12
11
10
13
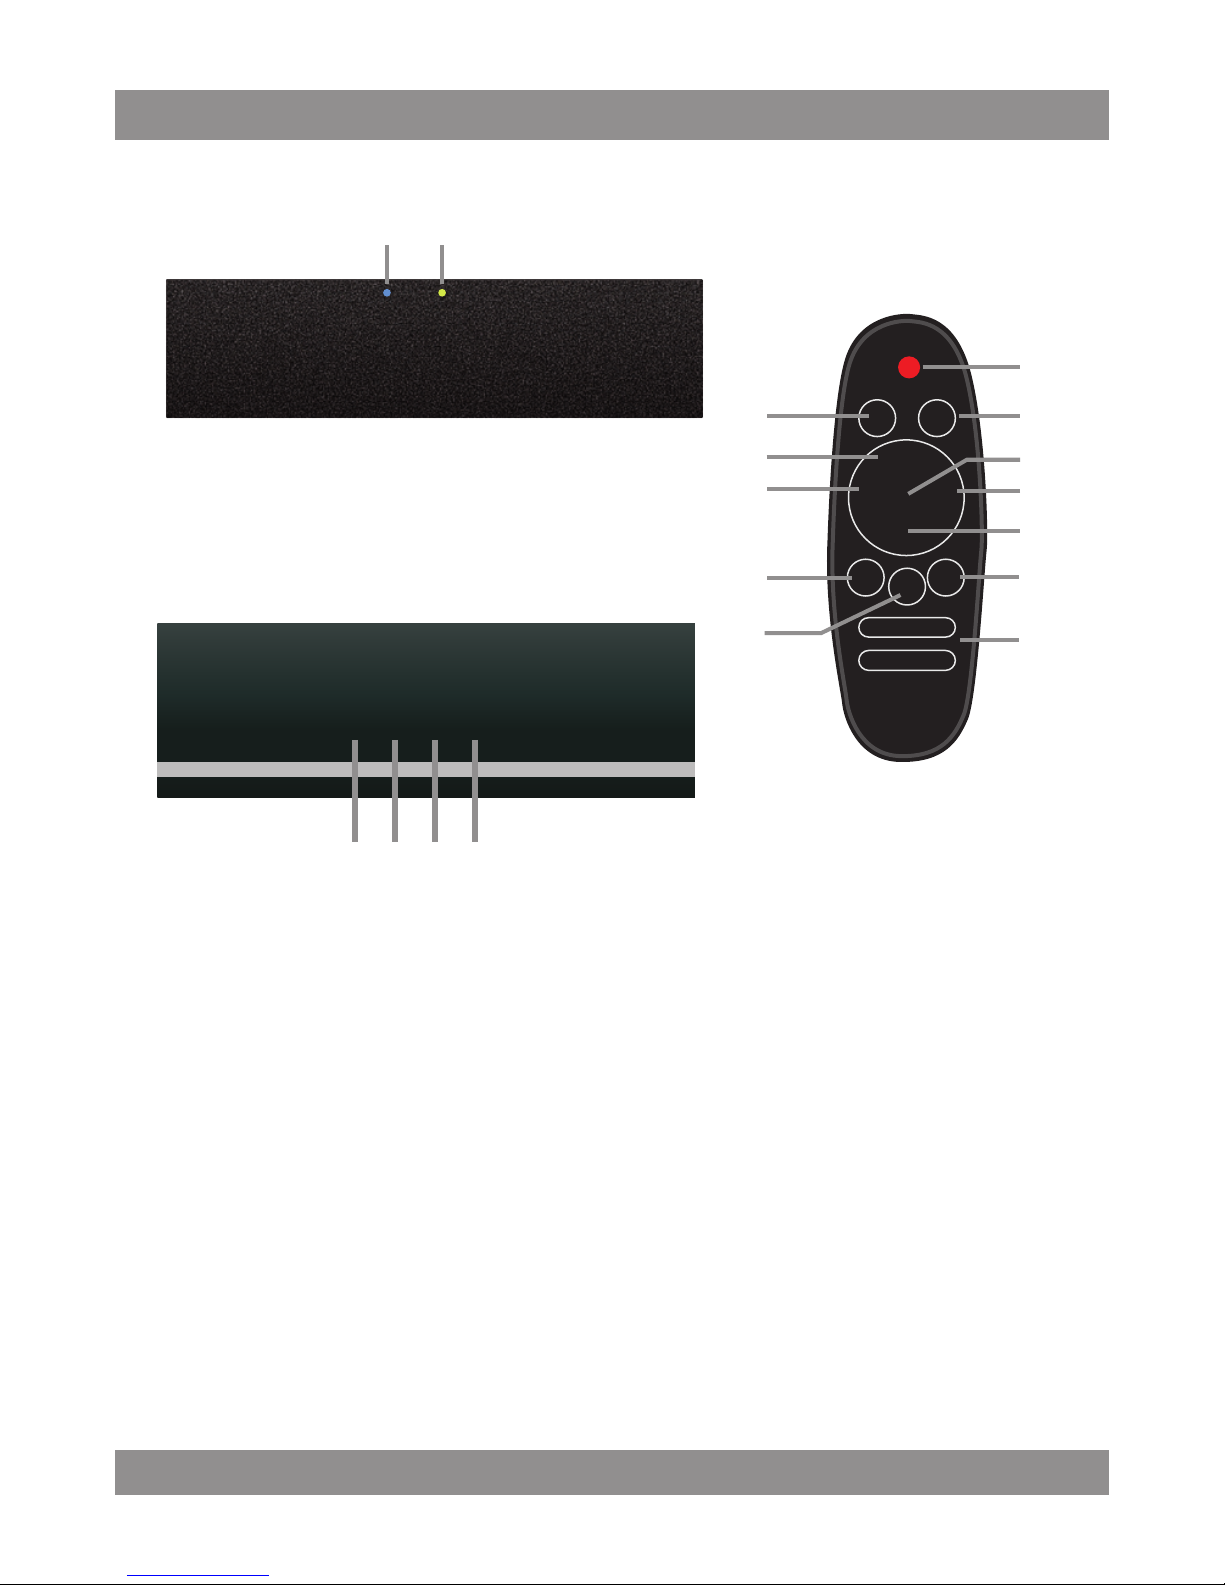
1 Wskaźnik LED Bluetooth
Wskaźnik miga wolno: oczekiwanie na połączenie z urządzeniem
Wskaźnik miga szybko: parowanie z urządzeniem
Wskaźnik świeci stale: połączony z urządzeniem
2. Wskaźnik LED statusu urządzenia
Swieci: przy osiągnięciu max./min. Głośność lub mocy Sub
Miga: podczas odbierania sygnałów z pilota
Wyłączony : gdy soundbar jest wyłączony lub nie wykonywane są
żadne operacje
Page 4

MM 291
4
4. Przycisk zasilania
Naciśnij przycisk aby włączyć Soundbar ON / OFF
5. Przycisk wejścia
Naciśnij wielokrotnie aby zmienić źródło sygnału w następującej
kolejności: Bluetooth >> AUX1 >> AUX2 >> Optical
6. V - Naciśnij przycisk aby zmniejszyć głośność
7.V + Naciśnij przycisk, aby zwiększyć głośność
8. Przycisk zasilania
Naciśnij przycisk, aby włączyć Soundbar ON/OFF
9. Przycisk wyciszania
Naciśnij przycisk aby wyciszyć Soundbar
10 Przyciski EQ
Naciśnij przycisk, aby ustawić inną EQ
11. Bass+/ Naciśnij aby zwiększyć lub zmniejszyć głośność Basu
12. Volume +/ Naciśnij aby zwiększyć lub zmniejszyć głośność Soundbar
13. Bluetooth
Naciśnij przycisk aby wybrać połączenie bluetooth
14. Input button
Naciśnij te przyciski aby wybrać żądany sygnał wejściowy
Page 5
MM 291
5
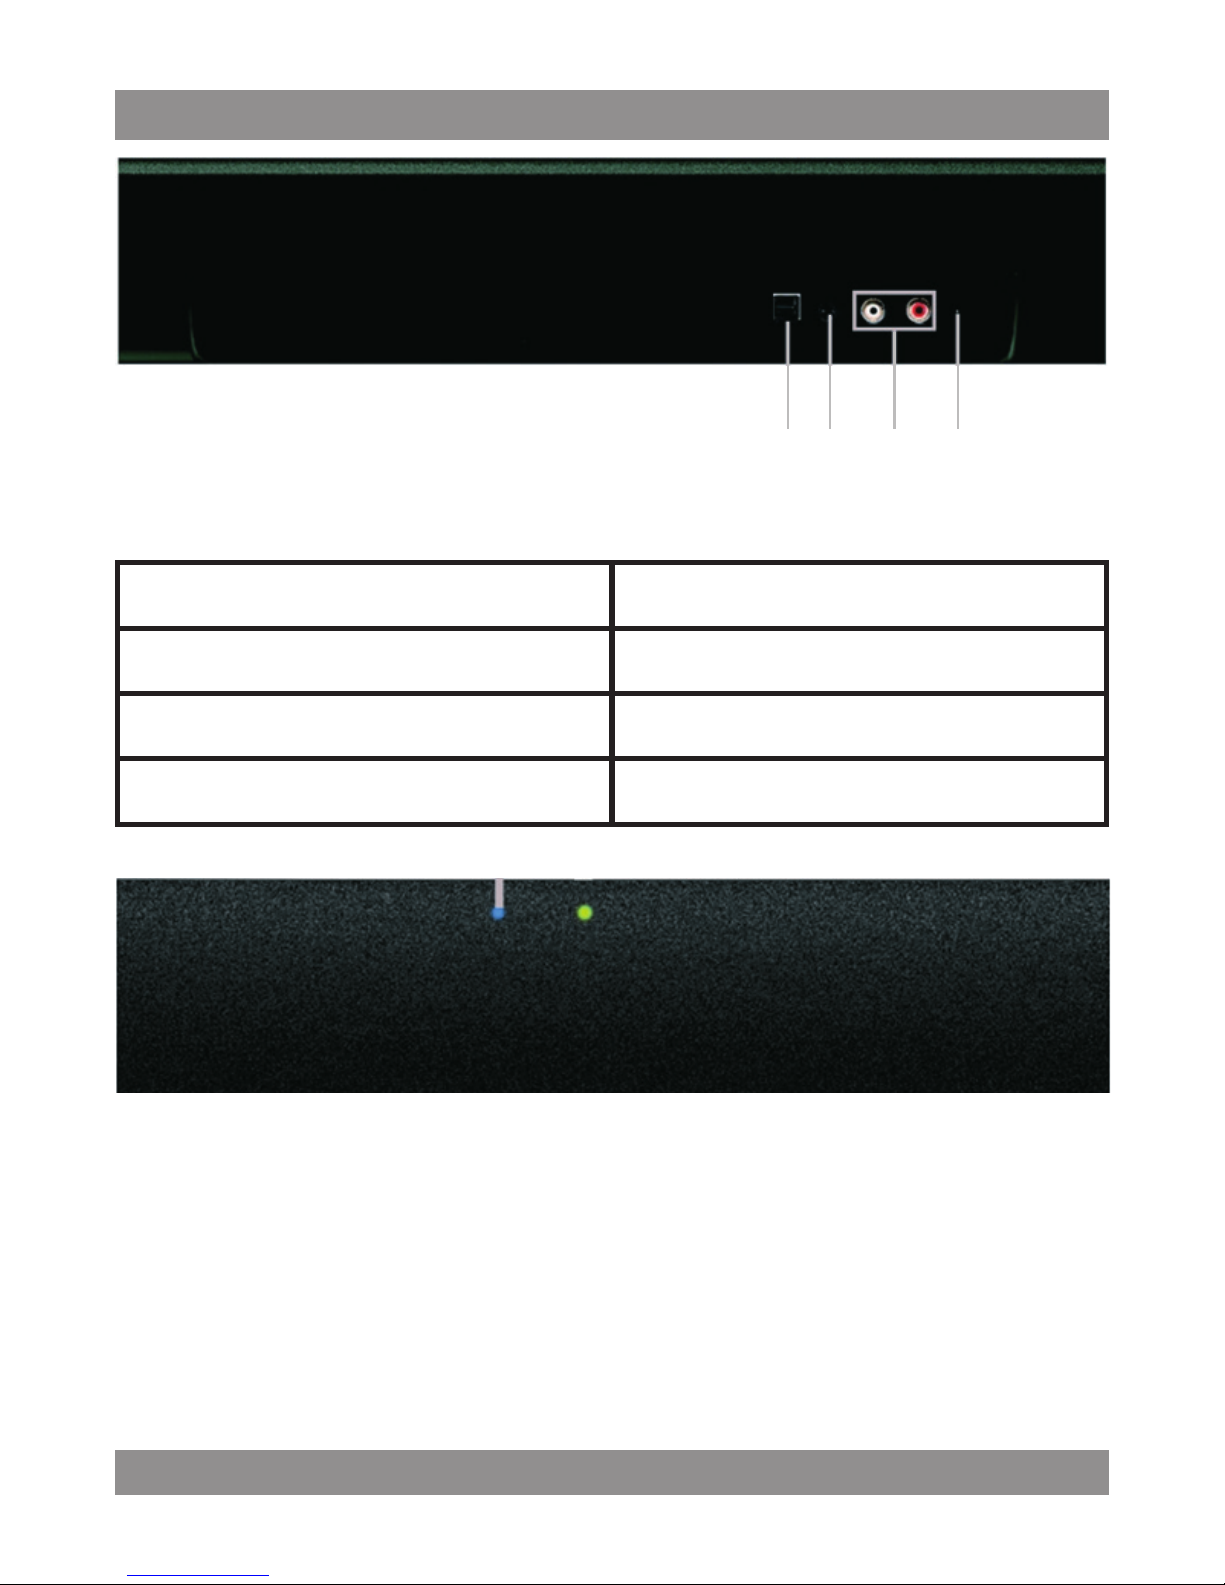
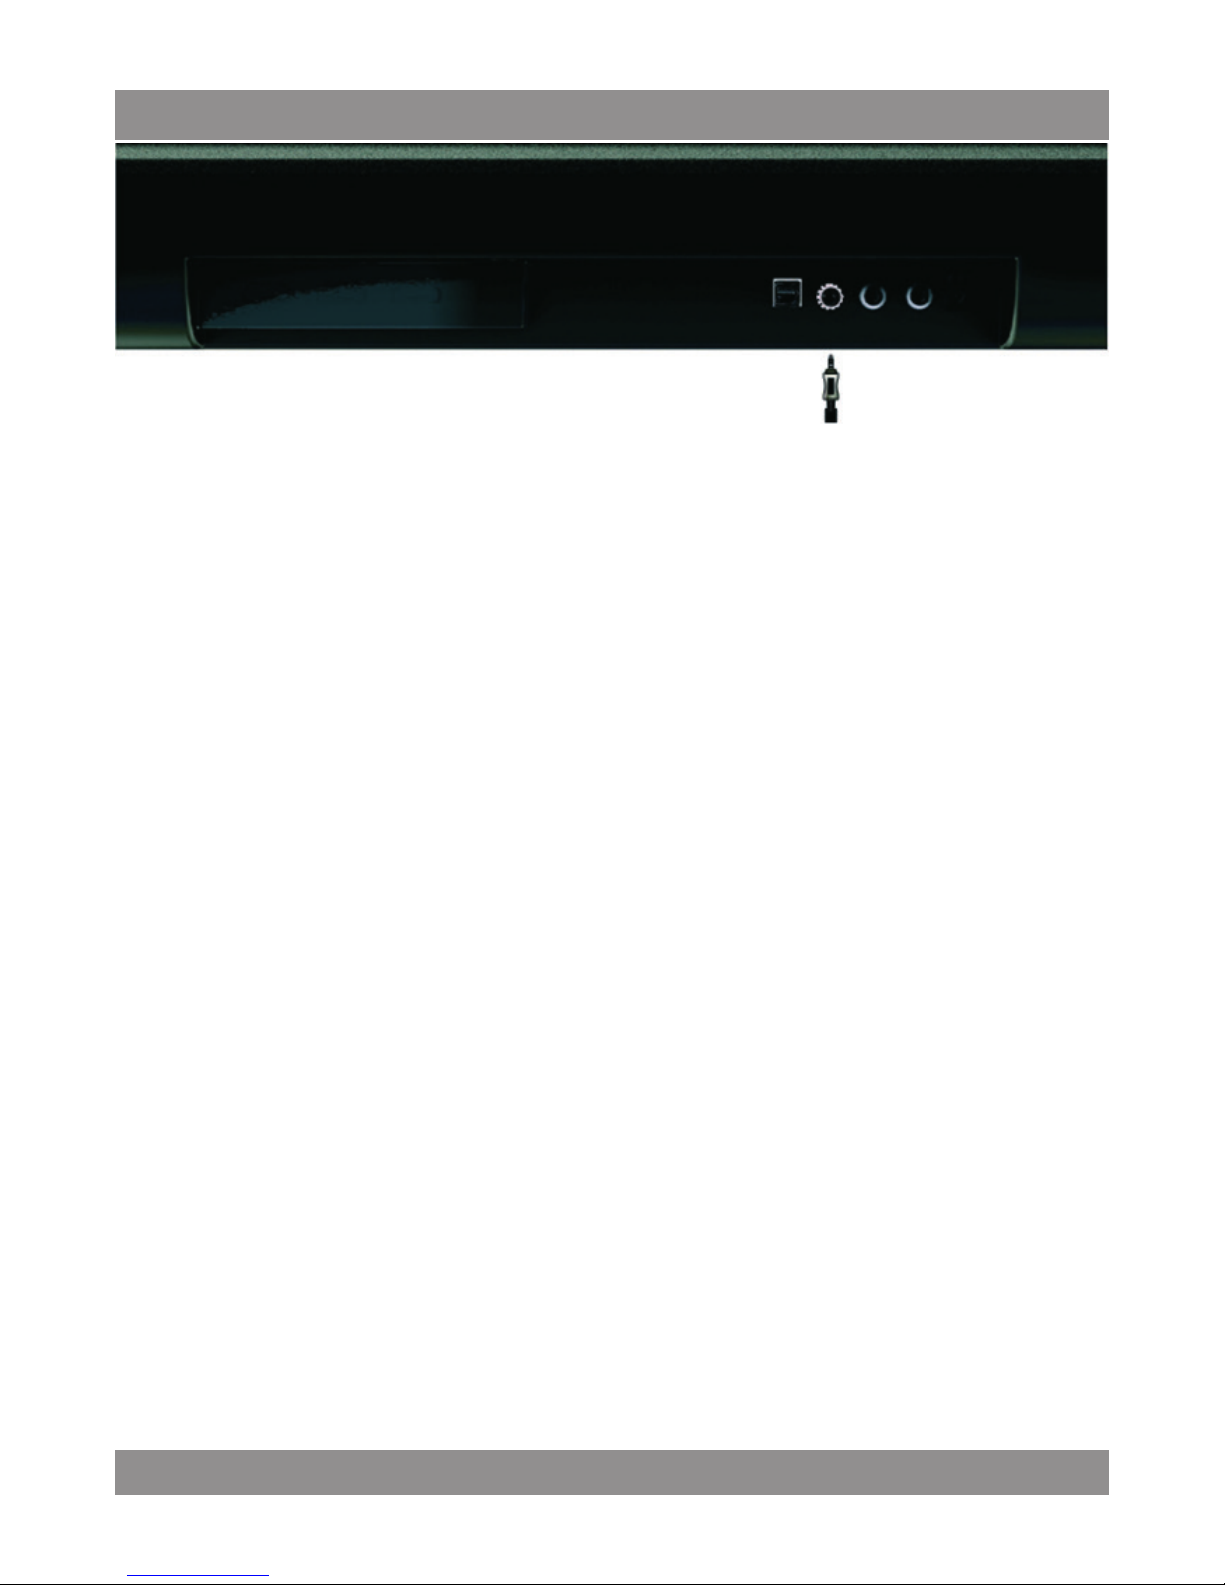
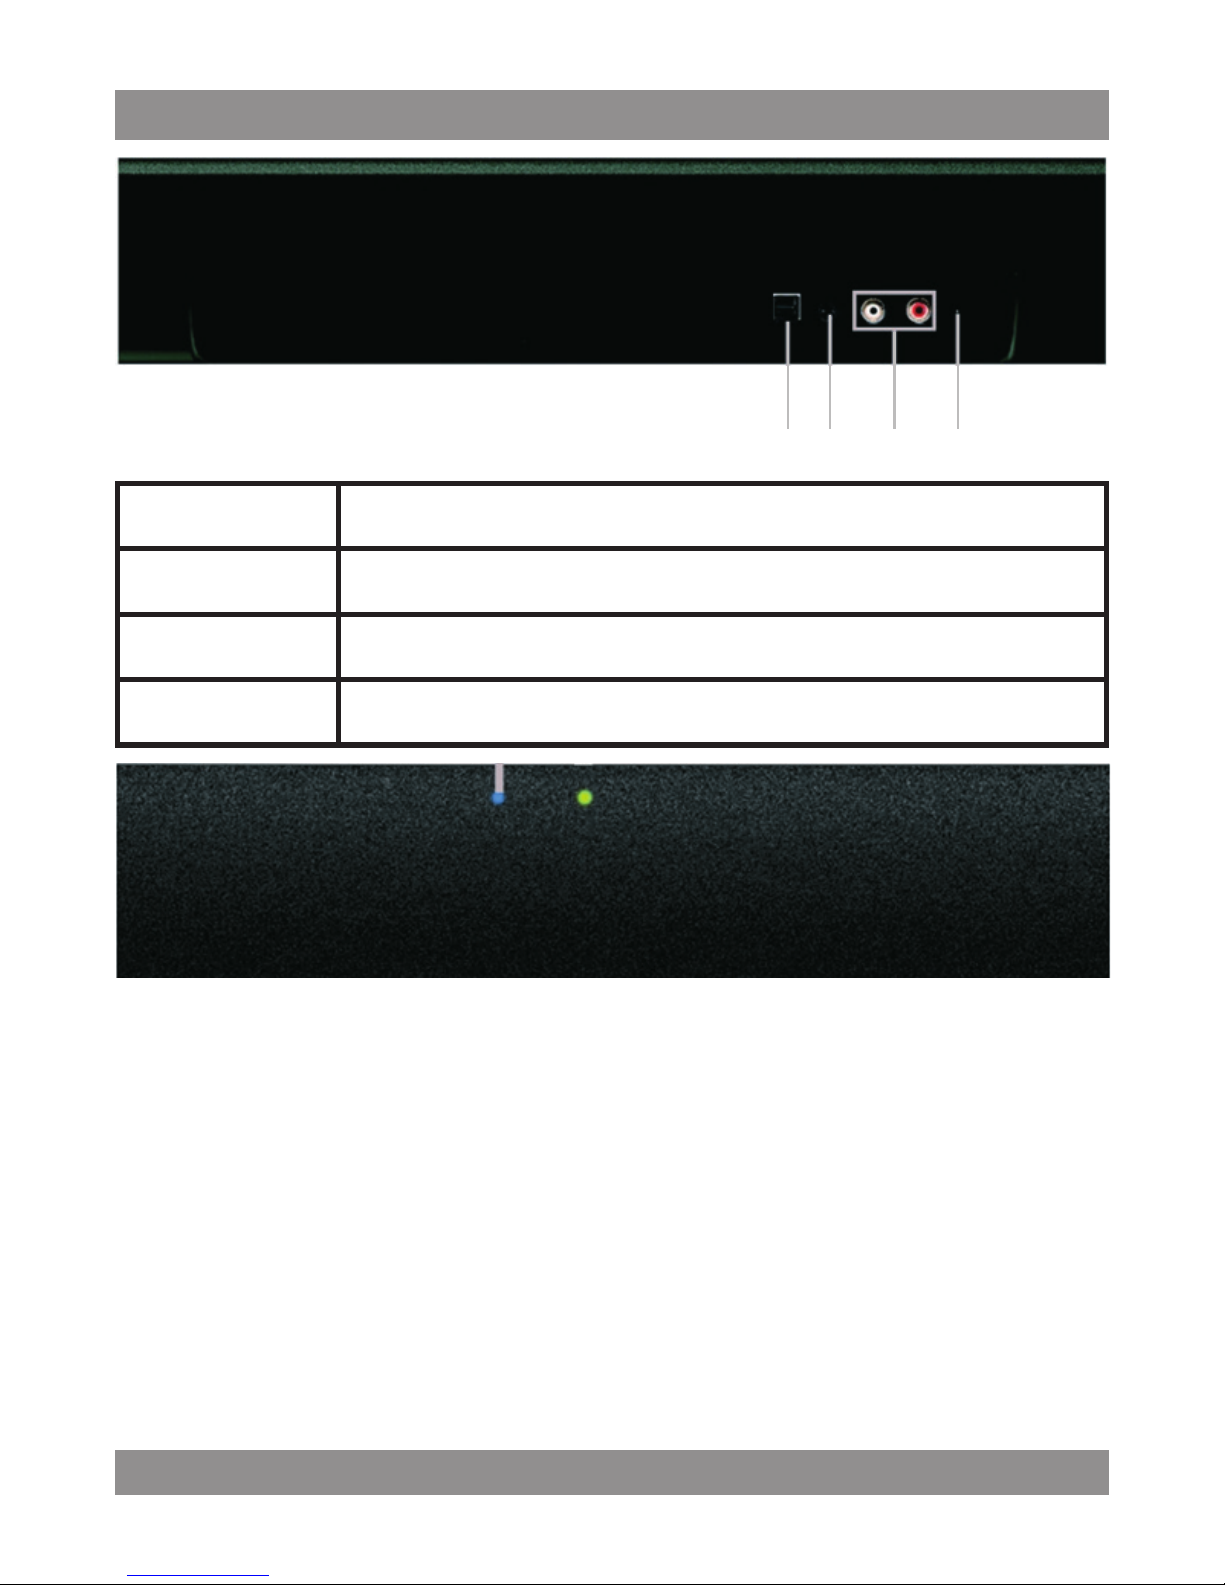
1. OPTICAL IN Wejście optyczne
2. AUX 2 Wejście analogowe RCA
3. AUX 1 Wejście analogowe Jack 3,5mm
4. DC IN Zasilanie
Bluetooth
• Włącz zasilanie urządzenia i Soundbar
•
Wybierz wejście Bluetooth naciskając „INPUT” na panelu Soundbar lub
klawisz na pilocie zdalnego sterowania. Wskaźnik Bluetooth (niebieski)
mignie dwa razy i
2 3 41
Page 6
MM 291
6
•
Tryb parowania: Naciśnij i przytrzymaj przycisk INPUT na panelu Soundbar lub na pilocie zdalnego sterowania, aż wskaźnik Bluetooth
zacznie szybko migać
•
Włącz Bluetooth w urządzeniu które chcesz parować, wyszukaj „Manta
MM291” i naciśnij Połącz, aby sparować urządzenia. Wskaźnik Bluetooth
będzie świecić Stale. Usłyszysz pojedynczy dźwięk
Uwagi
•
Bluetooth jest wyłączony gdy Soundbar jest podłączony za pomocą
innego źródła. Po włączeniu Bluetooth Soundbar będzie starał się połączyć automatycznie z ostatnim używanym urządzeniem. Jeśli urządzenia
nie można wykryć automatycznie przejdź w tryb parowania (wskaźnik
Bluetooth miga szybko), w takim przypadku trzeba powtórzyć krok 3.
•
Soundbar zapamiętuje ostatnio używane urządzenie Bluetooth po
wyłączeniu i po zmianie na inne wejścia.
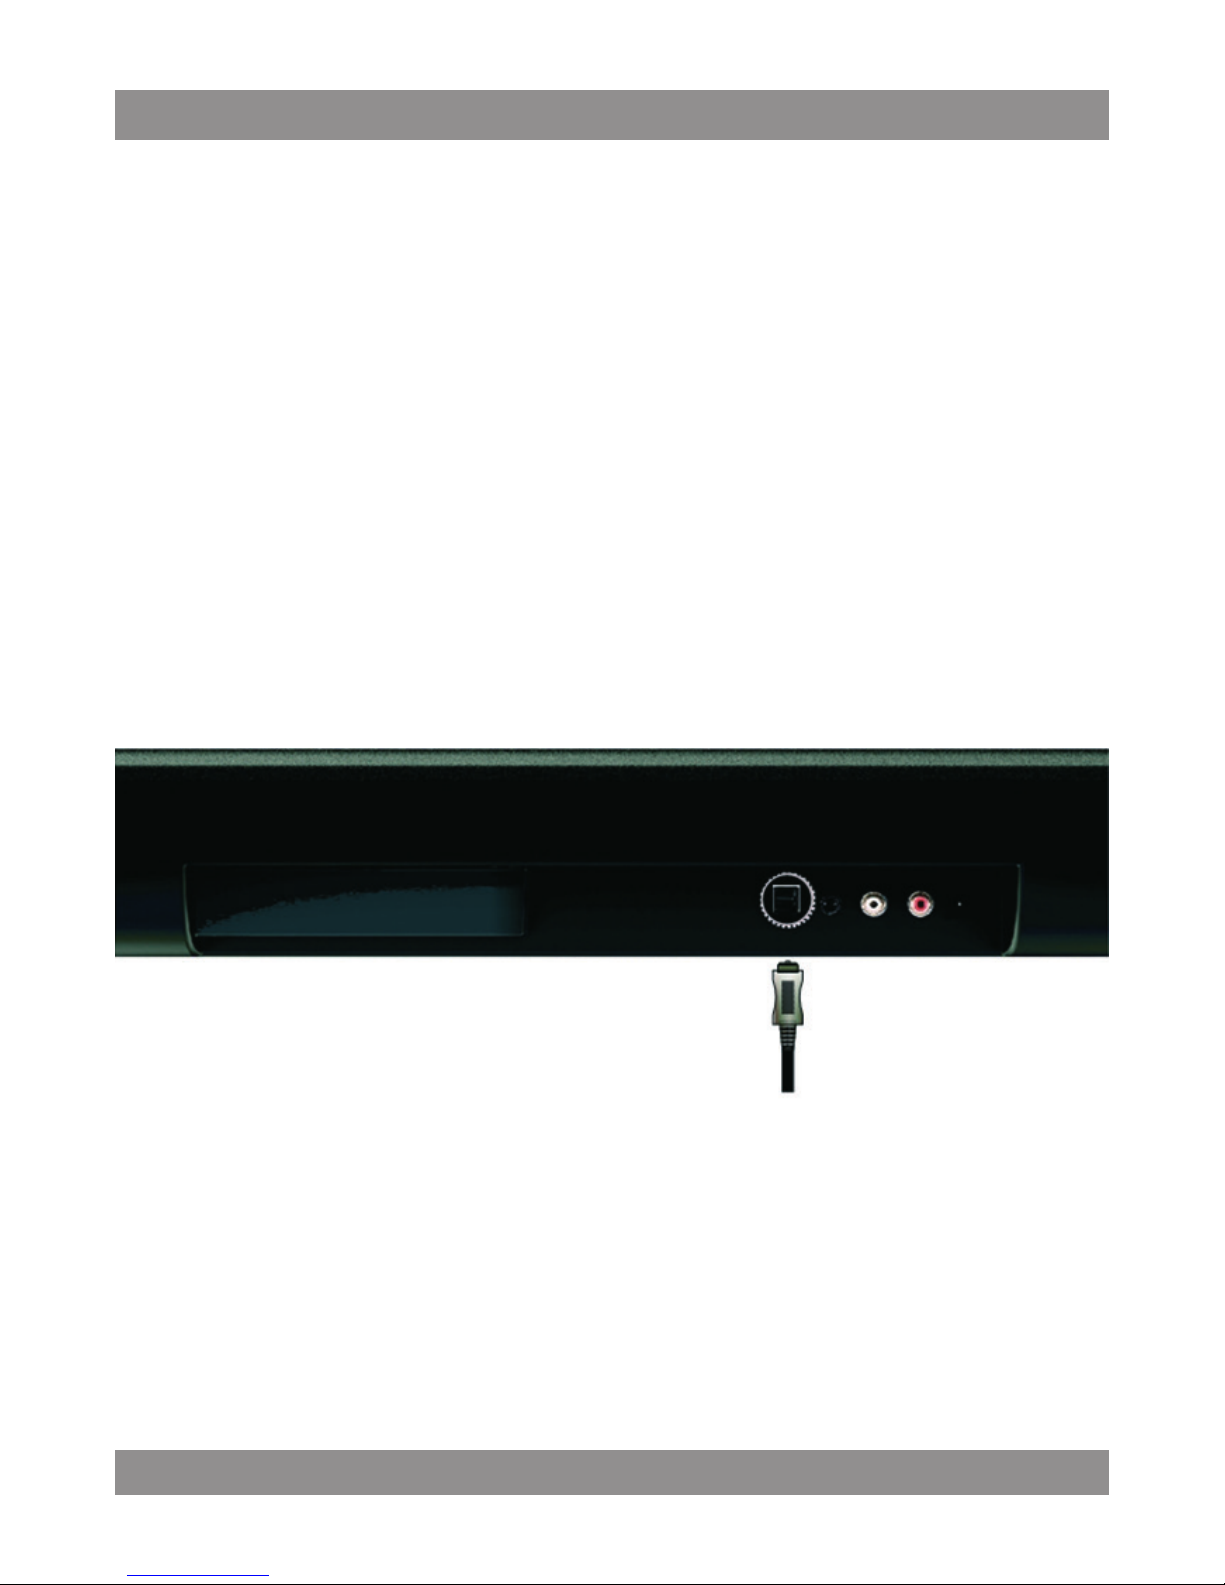
Optical in
• Wyłącz zasilanie urządzenia i Soundbar.
• Podłącz jeden koniec kabla audio do urządzenia.
• Podłącz drugi koniec kabla audio do zestawu SoundBar.
• Włącz zasilanie podłączanego urządzenia i Soundbar.
•
Wybierz wejście OPTICAL poprzez naciśnięcie „INPUT” na panelu
Soundbar lub pilocie
Page 7
MM 291
7
Uwagi: Jeśli nie słychać dźwięku, należy sprawdzić wyjście audio /
dźwięku na urządzeniu, jeśli urządzenie jest wyprowadzanie w DTS lub
Dolby proszę zmienić na PCM
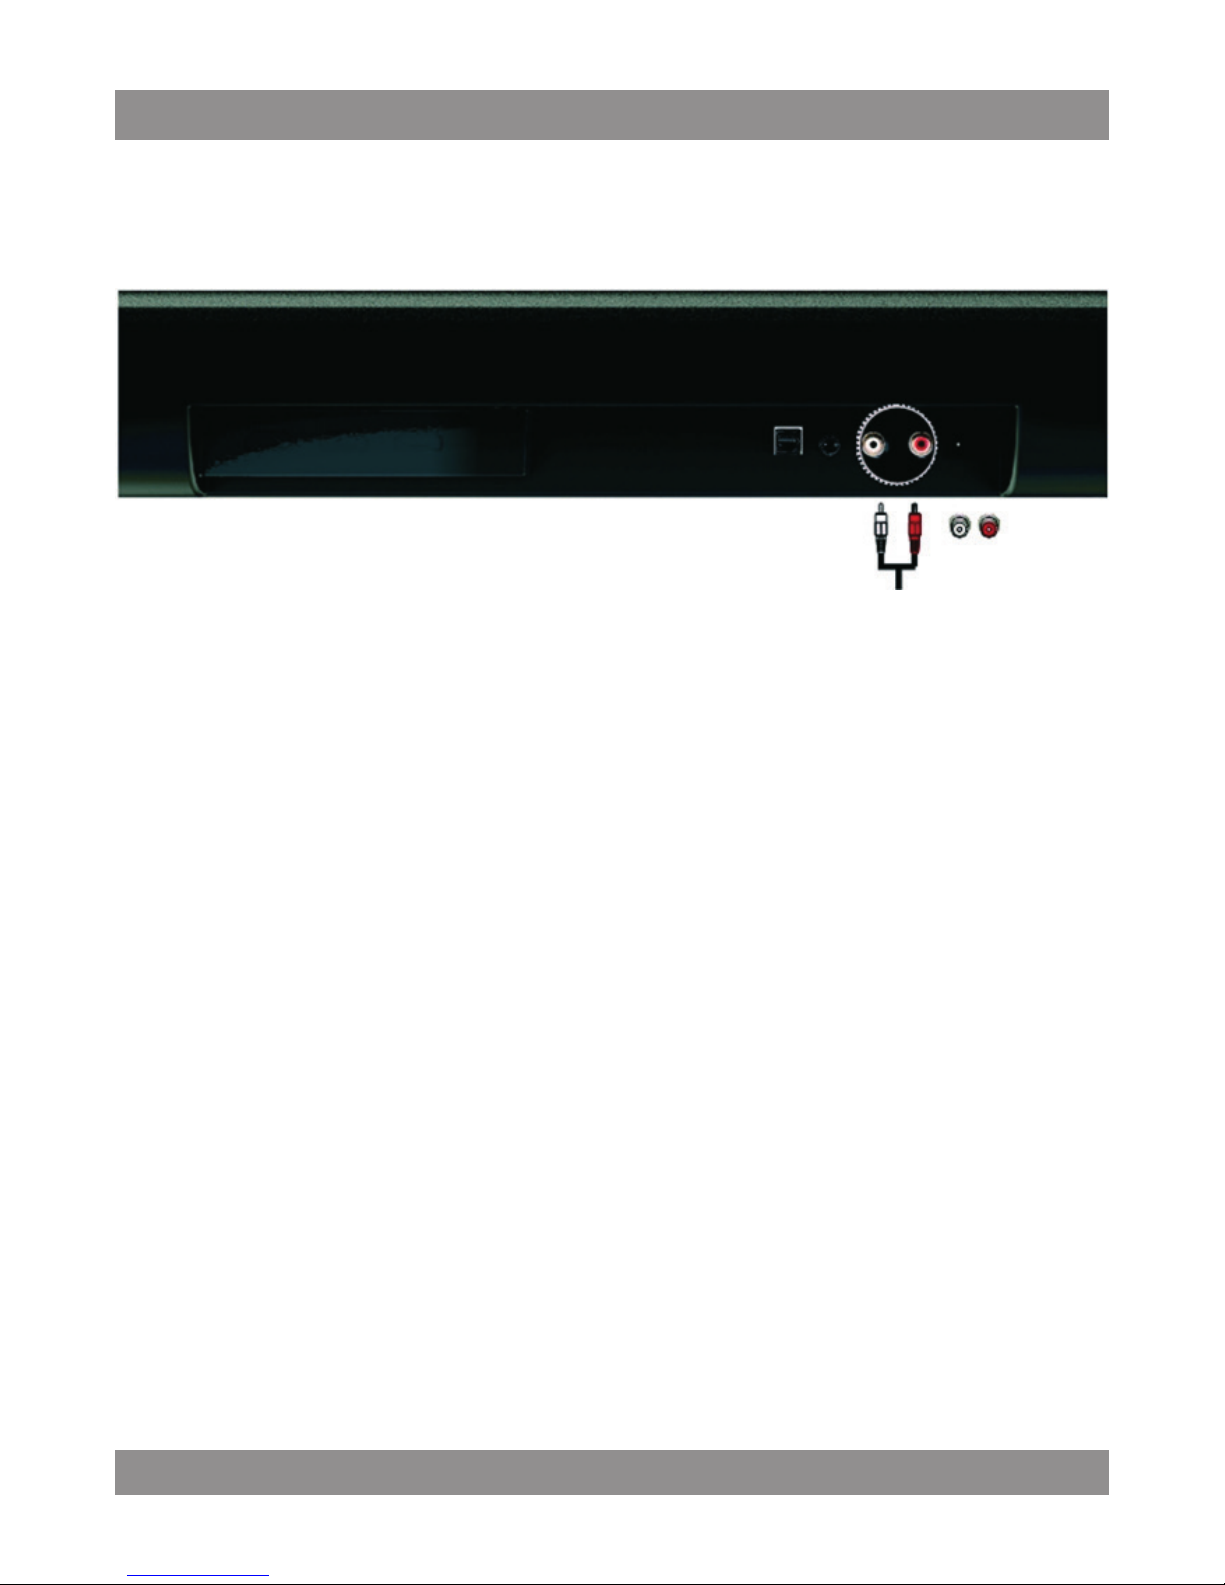
AUX1
• Wyłącz zasilanie urządzenia i Soundbar
• Podłącz jeden koniec kabla audio do urządzenia
• Podłącz drugi koniec kabla audio do zestawu SoundBar.
• Włącz zasilanie podłączanego urządzenia i Soundbar.
•
Wybierz wejście AUX1 poprzez naciśnięcie „INPUT” na panelu Soundbar
lub pilocie.
Uwagi:
Aux1 jest ustawione jako wejście domyślne.
Page 8
MM 291
8
AUX2
• Wyłącz zasilanie urządzenia i Soundbar.
• Podłącz jeden koniec kabla audio do urządzenia
• Podłącz drugi koniec kabla audio do zestawu SoundBar.
• Włącz zasilanie podłączanego urządzenia i Soundbar.
•
Wybierz wejście AUX2 poprzez naciśnięcie „INPUT” na panelu Soundbar
lub pilocie.
Page 9
MM 291
9
Tryb nauki pilota zdalnego sterowania
Ten Soundbar może nauczyć się poleceń pilota od Twojego telewizora
(tylko kod NEC):
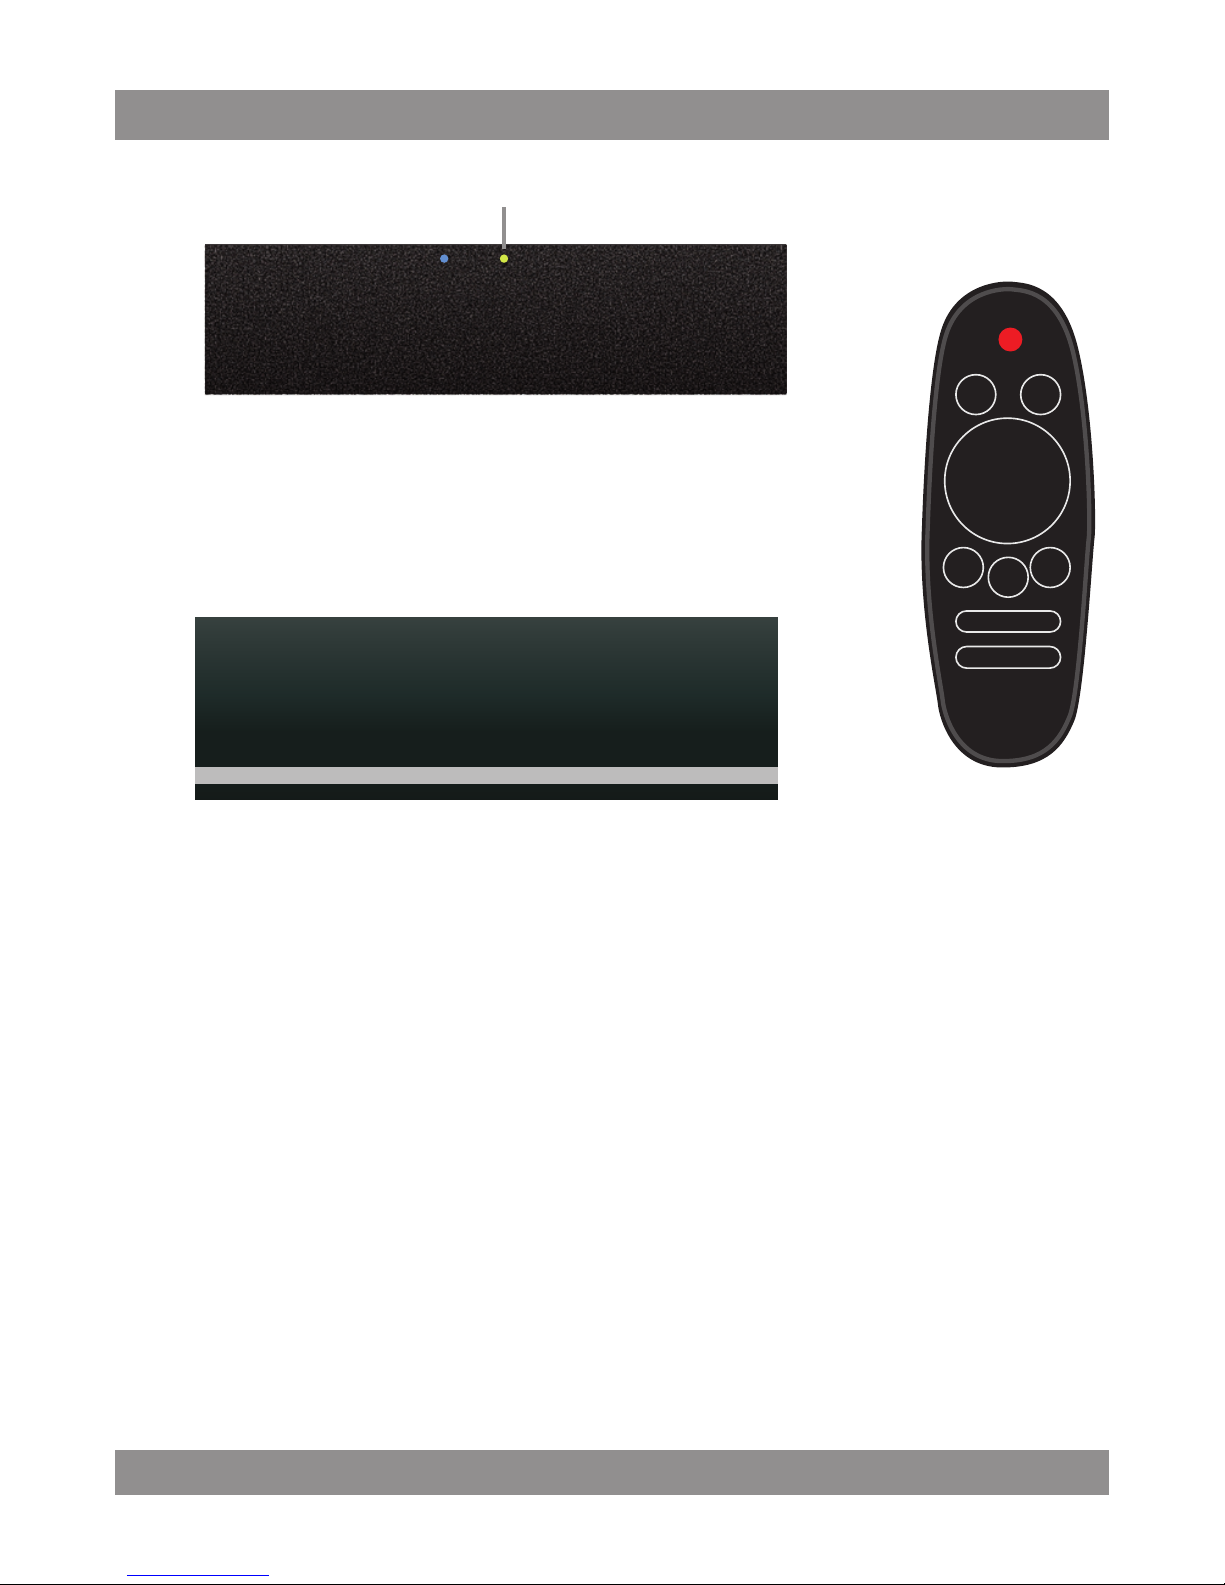
• Wciśnij i przytrzymaj klawisz „Power” na panelu Soundbar w około 5
sekund, aby wejść w tryb uczenia się pilota, Wskaźnik stanu miga powoli.
•
Naciśnij klawisz na Soundbar, który chcesz zaprogramować (Zasilanie,
wejście, VOL-, VOL +), wskaźnik stanu miga szybko.
•
Naciśnij klawisz, który chcesz zaprogramować na pilocie zdalnego
sterowania od telewizora 3 razy, wskaźnik stanu miga po każdym naciśnięciu klawisza. (Uwagi: musisz nacisnąć ten sam przycisk 3 razy,
aby zapisać kod, inaczej Soundbar wyjdzie z trybu uczenia się i trzeba
będzie powtórzyć kroki 1 i 2).
•
Po zapisaniu polecenia Soundbar wyjdzie automatycznie z trybu nauki.
Aby nauczyć się innego klawisza powtórz kroki od 1 do 3.
Wskaźnik statusu
Page 10
MM 291
10
Montaż
•
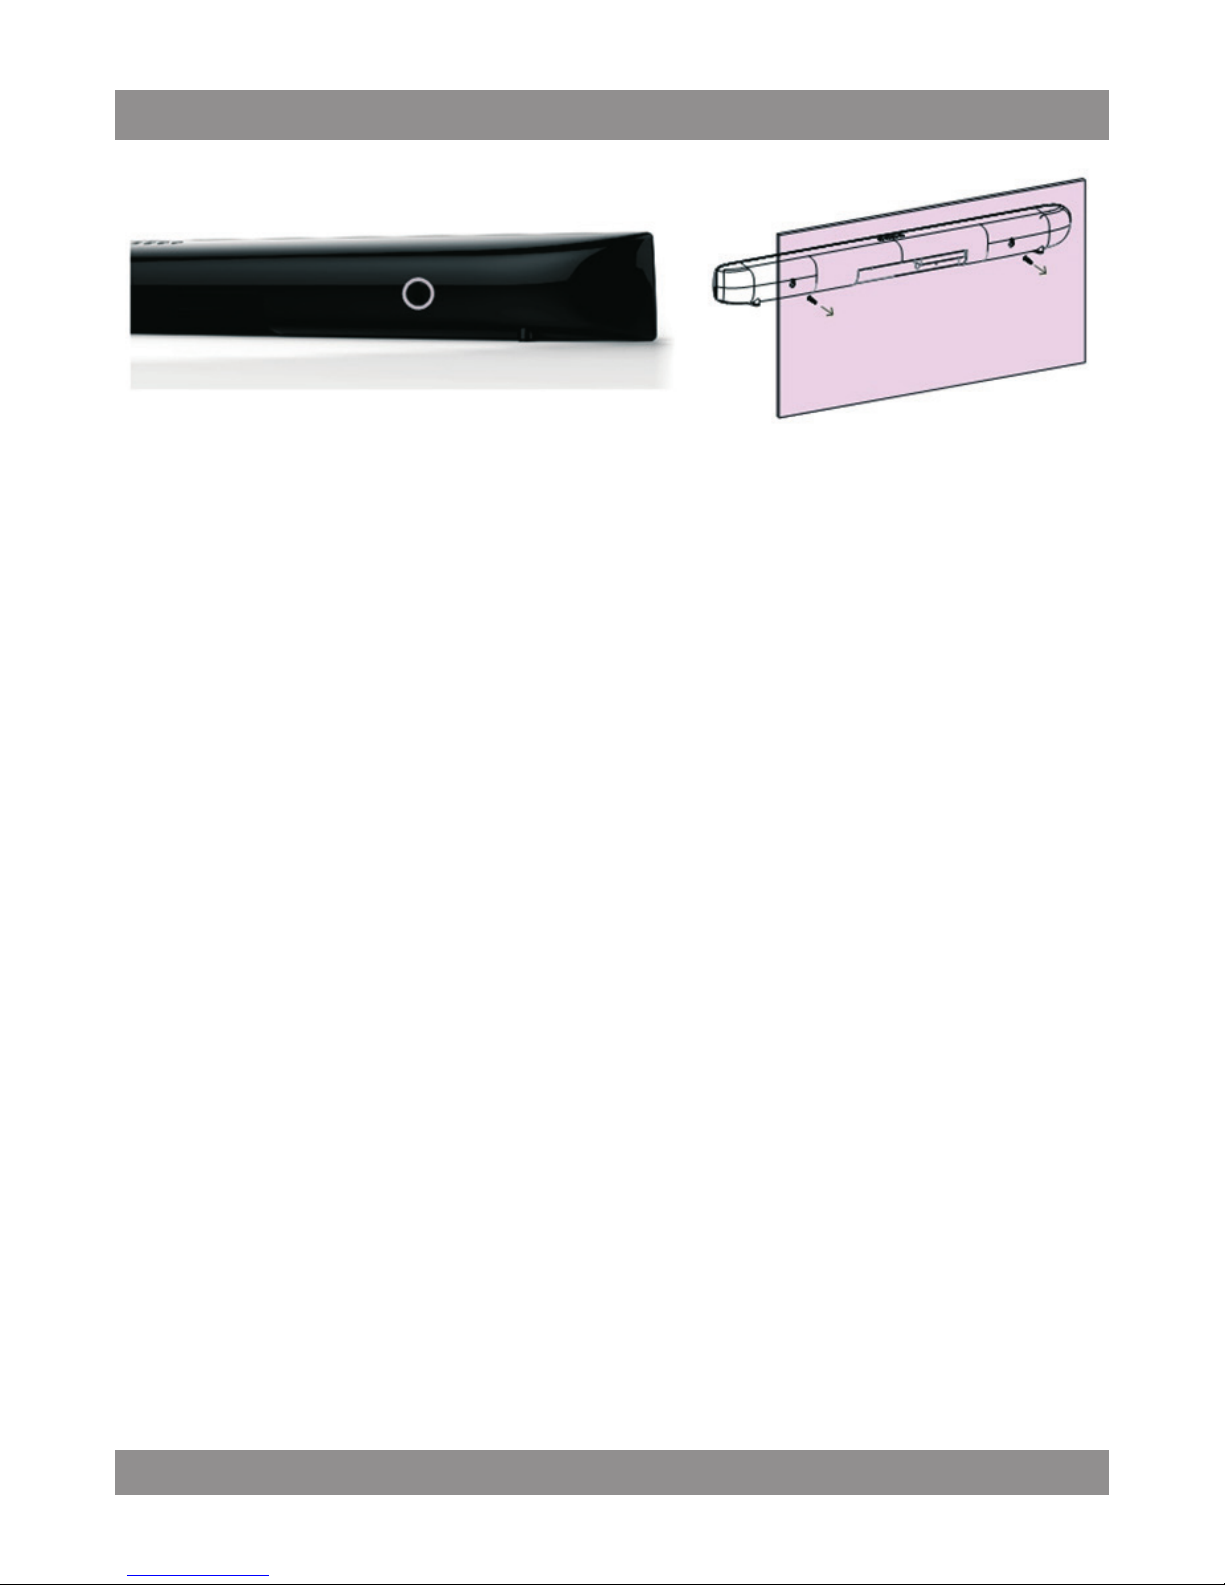
Zmierz odległość między otworami montażowymi na tylnej obudowie
Soundbar (odległość otworów 600mm) i zaznaczyć dokładne rozmiesz
-
czenie otworów na ścianie, na której chcesz zamontować Soundbar
•
Do montażu użyj odpowiednich śrub (brak w zestawie). Dokręcić śrubę
pozostawiając wystarczającą przestrzeń pomiędzy końcówką śruby a
ścianą tak aby dopasować szczeliny montażowe.
• Po umieszczeniu śrub w otworach montażowych zablokuj Soundbar
przesuwając go w dół.
Uwagi:
• Sprawdź czy ściany i śruby montażowe oraz ich mocowania są wystarczająco mocne aby utrzymać Soundbar
• Sugerowany rozmiar śruby jest M5 x 30.
Page 11
MM 291
11
Schemet
1
2
4 5
6 7
8
10
9
11
12
10
14
10
12
11
10
13
1 Bluetooth indicator LED
Slow blinks:waiting for connection from paired device Fast blinks:
searching for new device to be paired
Light steadily:connected to the device
2. Status indicator LED
Lighting:max./min. volume/Sub
Blinks: operating
O : power o/no operation
Page 12

MM 291
12
4. Power button
Press to turn your soundbar On/o
5. Input button
Press repeatedly to step through the input sources in the following
sequence: Bluetooth >> AUX1 >> AUX2 >> Optical
6. V - Press to decrease the volume
7.V + Press to increase the volume
8. Power button
Press to turn your soundbar on/o
9. Mute button
Press to mute the soundbar
10 EQ set button
Press to set dierent EQ
11. Bass+/ Press to increase or decrease the volume of the Bass
12. Volume +/ Press to increase or decrease the volume of the soundbar
13. Bluetooth
Press to select bluetooth input
14. Input button
Press these buttons to select the desired input
Page 13
MM 291
13
1. OPTICAL IN Connect to the digital(optical) output of an external device
2. AUX 2 Connect to the analog output of an external device
3. AUX 1 Connect to the analog output of an external device
4. DC IN Plug the power adapter cable into the AC wall outlet
Bluetooth
• Turn on the power of the device and soundbar
•
Select Bluetooth input by pressing “ INPUT ” on the soundbar or „ “
key on the remote control. The Bluetooth indicator (blue) will blink
twice and you will hear two tones as the indicator begins to blink fast.
•
Pairing mode: Press and hold the Input button on the soundbar or” “on
the remote control until the Bluetooth indicator blink fast.
2 3 41
Page 14
MM 291
14
• Turn on Bluetooth on the device to be paired, search for ‚KS ‚ and press
Connect to pair the device. The soundbar Bluetooth indicator will light
steadily ,you will hear a single tone
• Choose the music and press”Play”in your device
Note
•
Normally Bluetooth is switched o when the soundbar is using another
source. When the soundbar is switched to Bluetooth input it will try to
connect with the last used device automatically. If the device can not
be found,the soundbar will automatically go to pairing mode(Bluetooth
indicator fast blinks ),in this case you do not have to do step 3.
• The soundbar stores the last device used when Bluetooth is switched
o (for example when changing to another input).
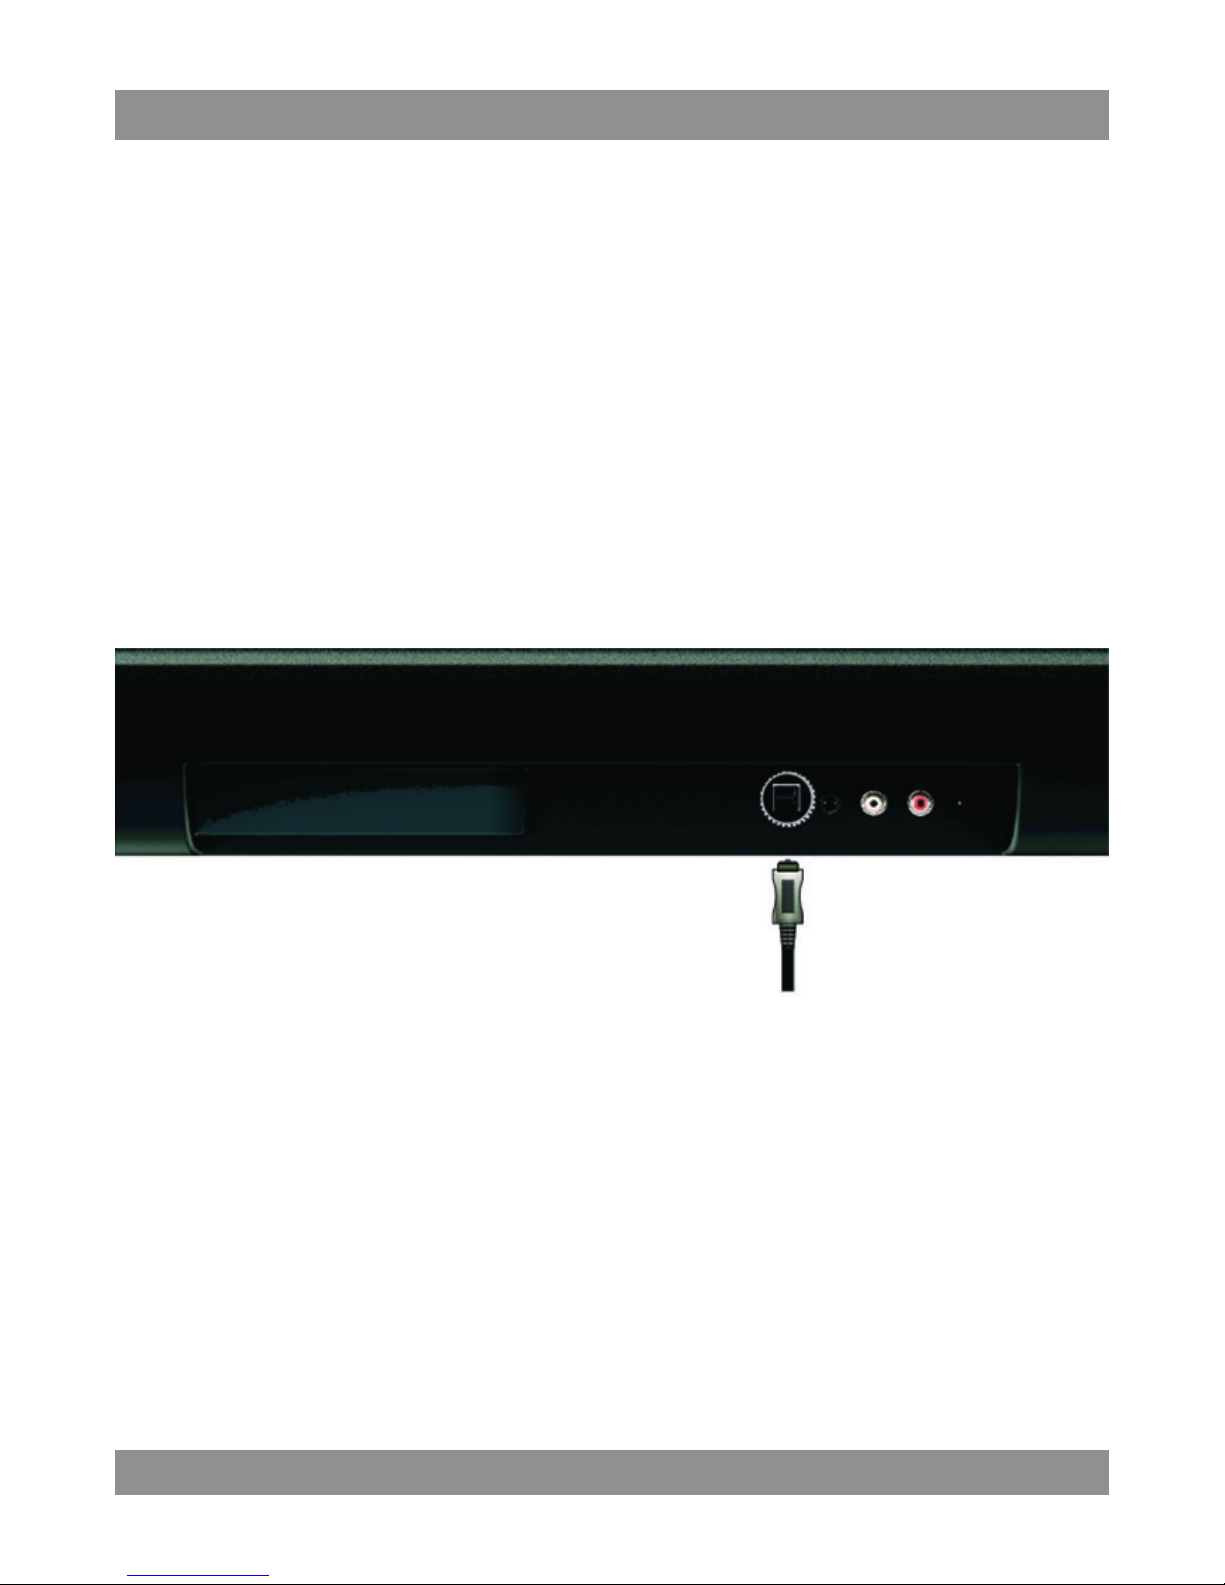
Optical in
• Turn o the power of the device and soundbar
•
Connect one end of the optical cable( not included) to the digital
output of the device.
•
Connect another end of the optical cable to the optical jack on the
soundbar
• Turn on the power of the device and soundbar.
•
Select the optical input by pressing “INPUT ” on the soundbar or “OPT.”
on the remote control.
Note: If there is no sound, check the audio/sound output on the device,
if the device is outputting in DTS or DOLBY, please change to PCM.
Page 15
MM 291
15
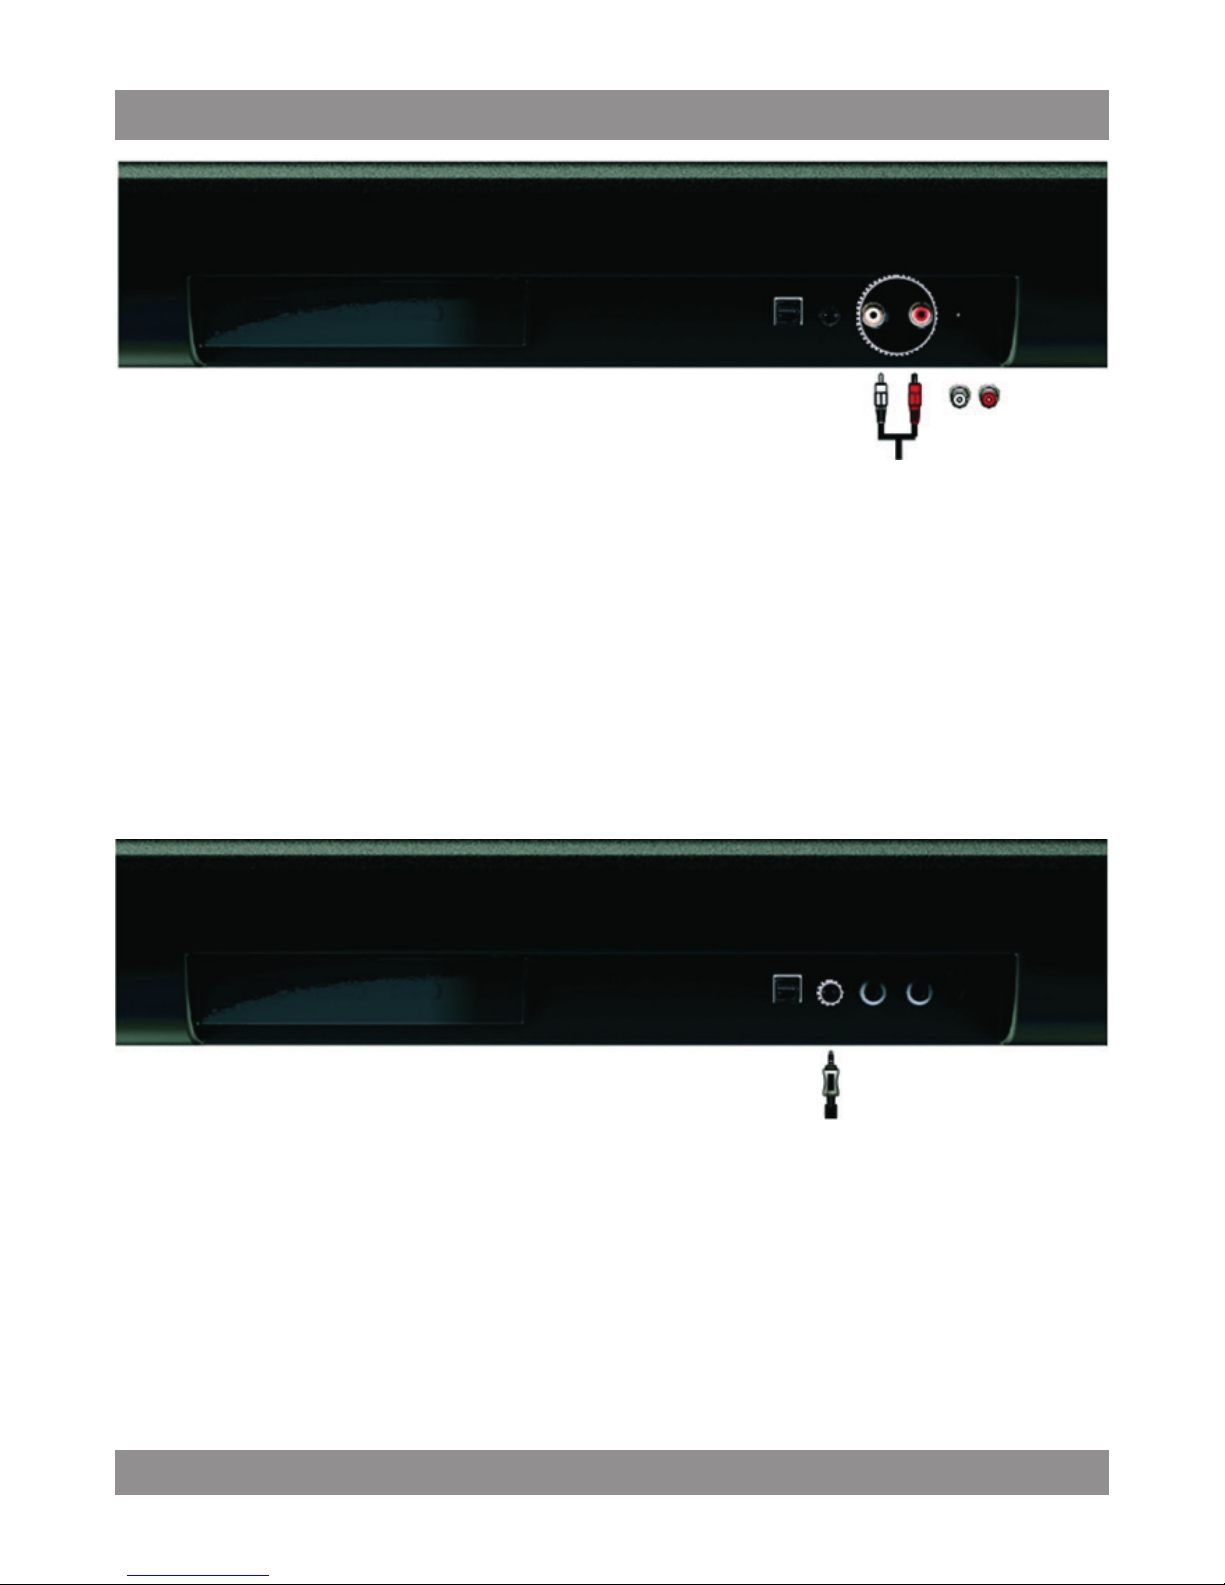
AUX1
• Turn o the power of the device and soundbar
• Connect one end of the audio cable to the device
• Connect another end of the audio cable to the soundbar.
• Turn on the power of the device and soundbar.
•
Select the AUX1 input by pressing “ INPUT ” on the soundbar or“ AUX1”
on the remote control.
Note:
Default AUX1 is the factory input .
AUX2
• Turn o the power of the device and soundbar
• Connect one end of the audio cable to the device
• Connect another end of the audio cable to the soundbar.
• Turn on the power of the device and soundbar.
•
Select the AUX1 input by pressing “ INPUT ” on the soundbar or“ AUX2”
on the remote control.
Page 16
MM 291
16
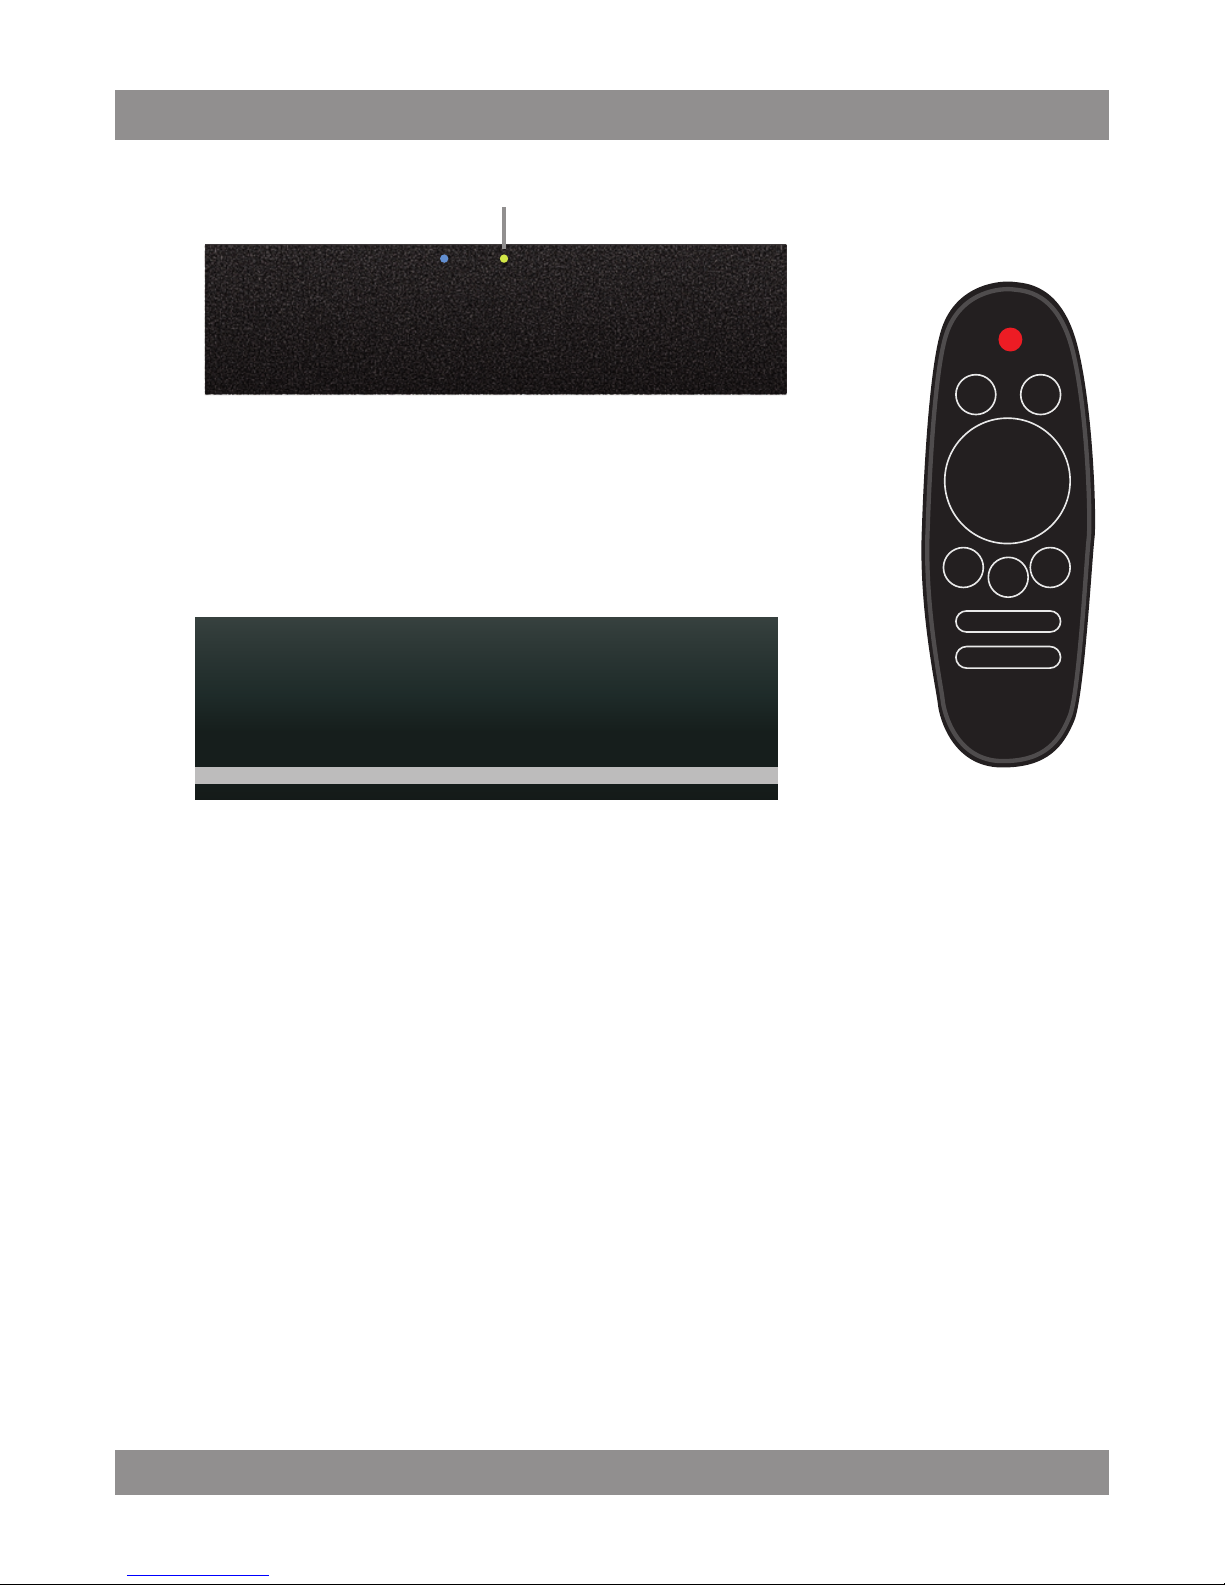
TV remote control learning mode
This soundbar can learn your TV remote control(NEC code only):
• Press and hold the „Power” key on the soundbar for around 5s to enter
remote control learning mode,Status indicator blinks slowly
• Press the key you want to learn on the soundbar
(Power,input,vol-,vol+),Status indicator blinks quickly..
•
Press the key you want to learn in your TV remote control 3times,Status
indicator blinks once each time you press the key. (Note: you must press
the same key 3 times to store the code, otherwise the soundbar will quit
learning mode and you will need to repeat steps 1 and 2).
• After storing the command the unit will quit learning mode automatically. To learn another key, repeat steps 1 to 3.
Status indicator
Page 17
MM 291
17
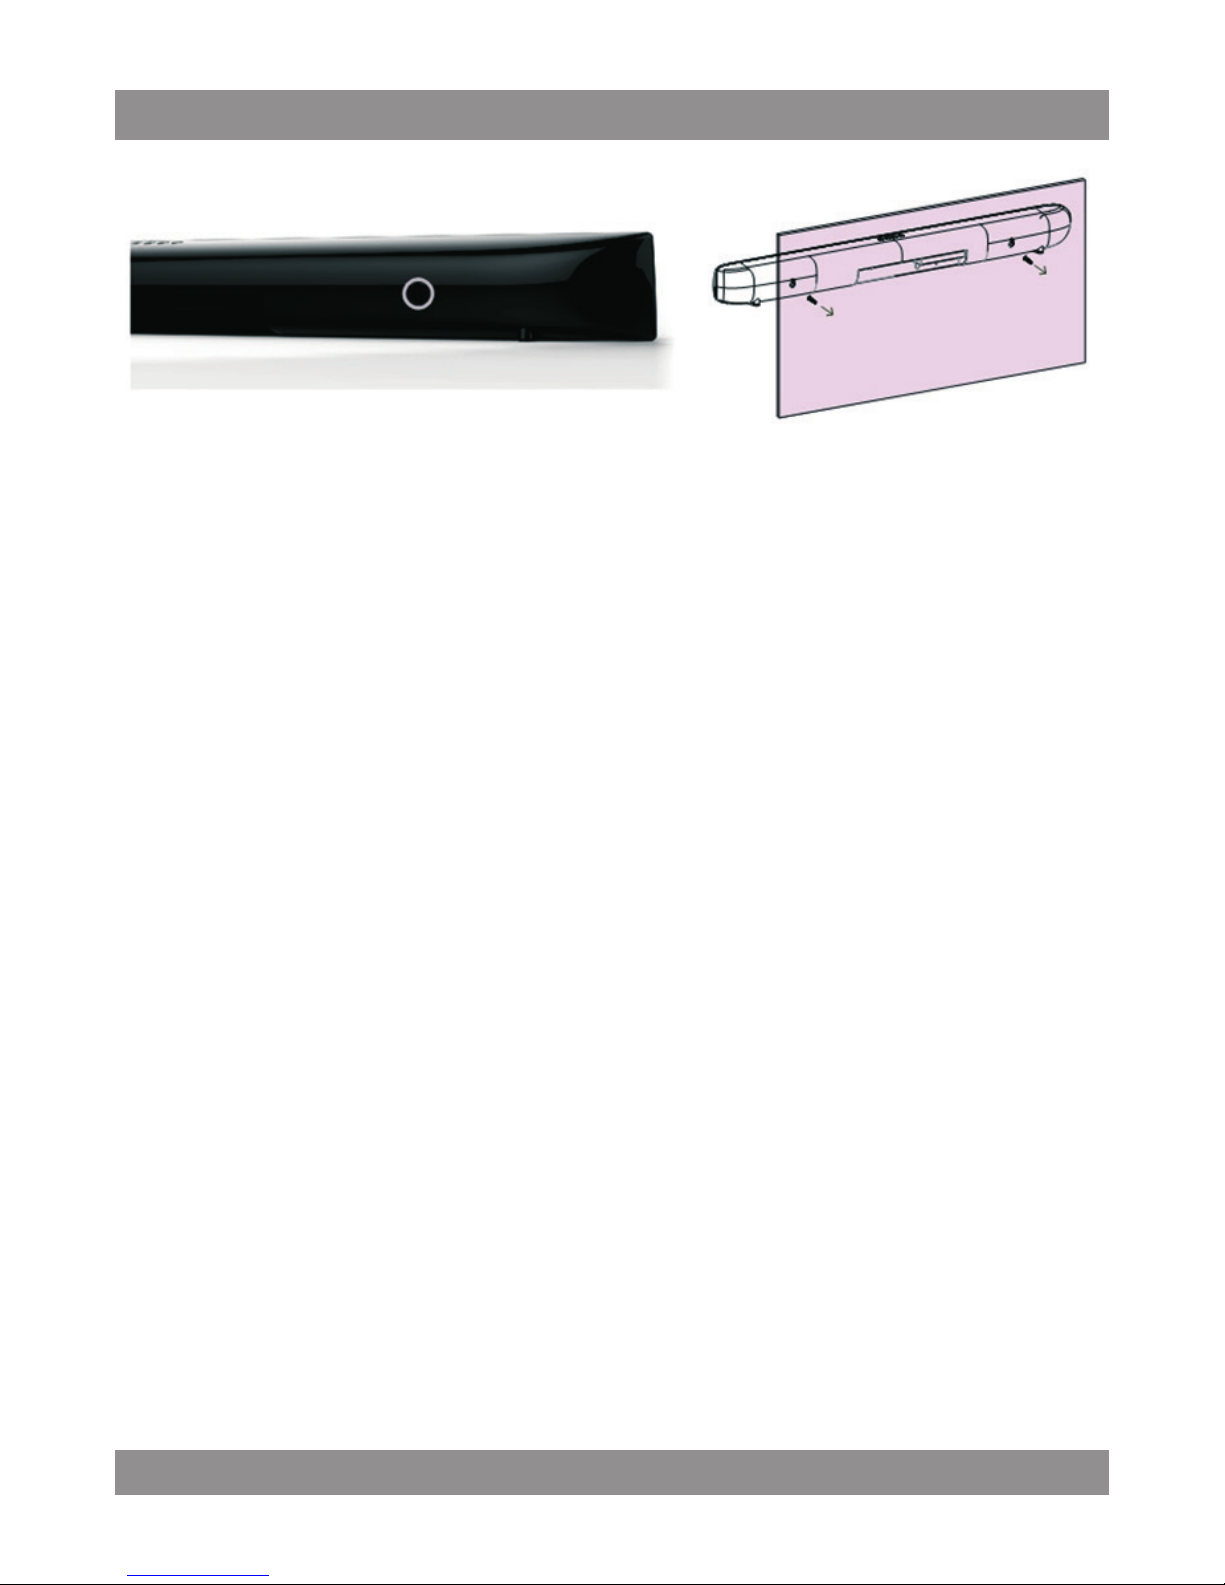
Wall mounted
• Measure the distance between the mounting holes on the rear of the
soundbar (600mm hole distance) and mark the exact hole positions on
the wall where you want to mount it.
•
Use a suitable wall plug and screw (not included). Tighten the screw
leaving enough space between the head and the wall to t into the
soundbar mounting slots.
•
Locate the soundbar over the screw heads and push down gently to x
Note:
•
Please conrm the wall and mounting screws and their xings are strong
enough to support the soundbar
• Suggested screw size is M5 x 30. .
 Loading...