

Page 1

Instrukcja obsługi
User’s Manual
Soundbar
MM290
Page 2

MM 290
2
Instrukcja obsługi
SCHEMAT .............................................................................................................................................................................................................................................. 3
AUX1 ..................................................................................................................................................................................................................................................... 4
AUX2 .................................................................................................................................................................................................................................................................... 5
INSTRUKCJA MONTAŻU UCHWYTU ŚCIENNEGO.........................................................................................................................................................................6
User’s Manual
SCHEMET .............................................................................................................................................................................................................................................. 7
AUX1 ..................................................................................................................................................................................................................................................... 8
AUX2 .................................................................................................................................................................................................................................................................... 9
WALL MOUNTED .......................................................................................................................................................................................................................................10
Page 3
MM 290
3
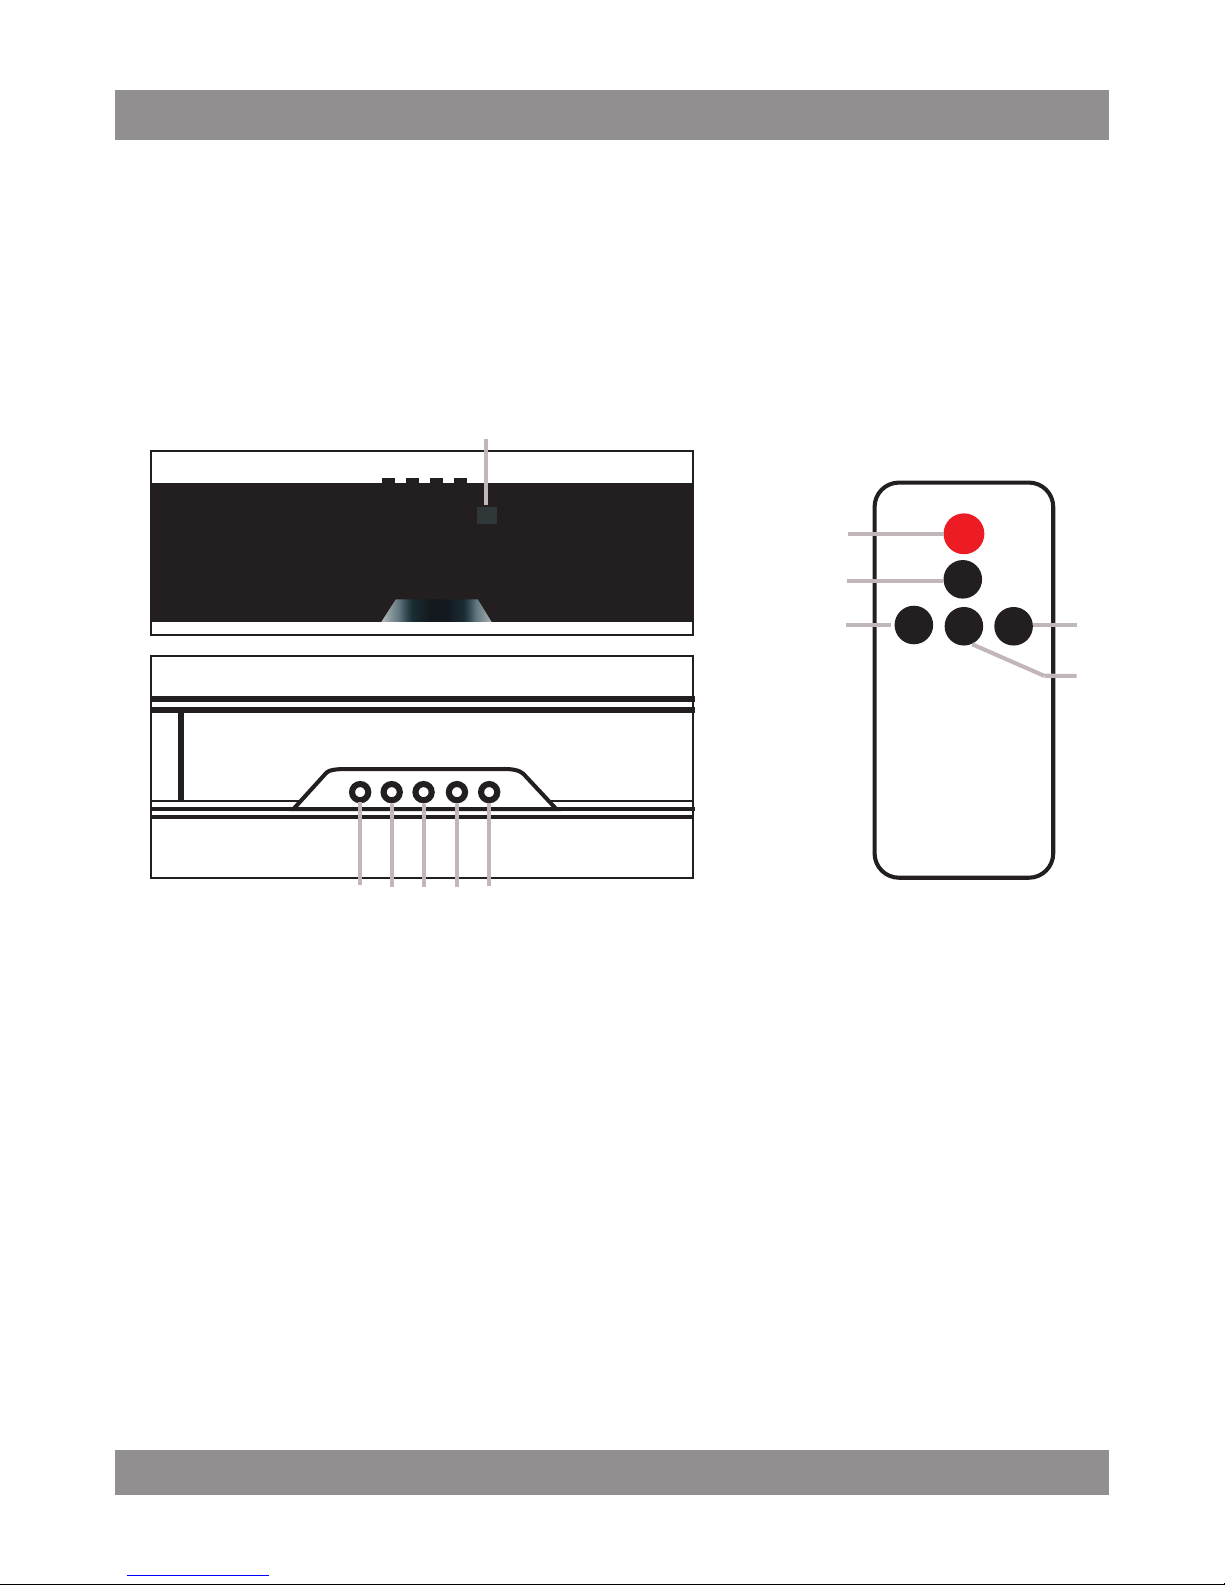
Schemet
1
2 3 4 5
6
2
3
4
5
6
1 Wskaźnik głośności
Wyświetla aktualną głośność
od 0 do 30.
2. Przycisk zasilania ON / OFF
Naciśnij przycisk aby włączyć
Soundbar
3. Przycisk wyboru wejścia
Naciśnij przycisk, aby zmienić
wejście pomiędzy RCA i wejście
audio 3,5 mm
4. Przycisk wyciszania
Naciśnij przycisk, aby wyciszyć
5. V - Naciśnij przycisk aby
zmniejszyć głośność
6. V +
Naciśnij przycisk aby zwiększyć
głośność
Page 4
MM 290
4
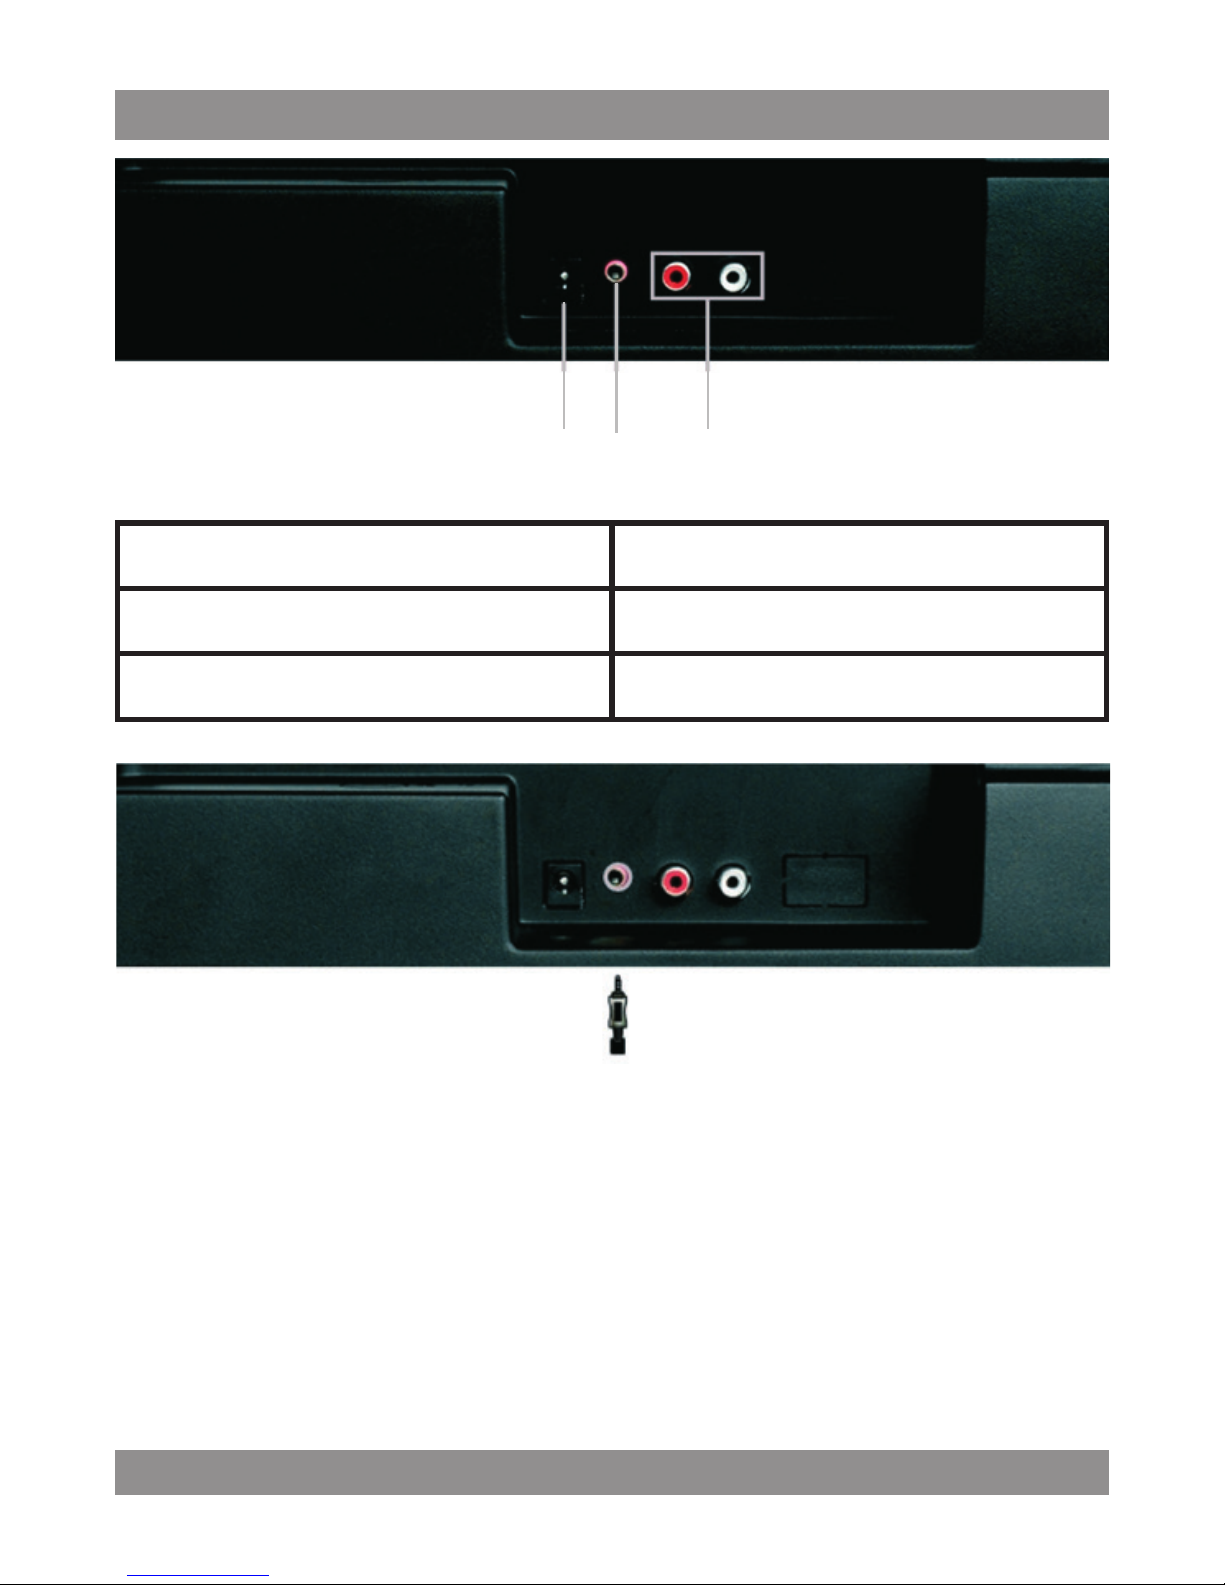
1. DC IN Zasilanie
2. AUX 1 Wejście analogowe Jack 3,5mm
3. AUX 2 Wejście analogowe RCA
Aux1
• Podłącz jeden koniec kabla audio do urządzenia.
• Podłącz drugi koniec kabla audio do zestawu SoundBar.
• Włącz zasilanie podłączanego urządzenia i Soundbar.
•
Wybierz wejście AUX1 poprzez naciśnięcie „INPUT” na panelu Soundbar
lub pilocie.
1
2
3
Page 5
MM 290
5
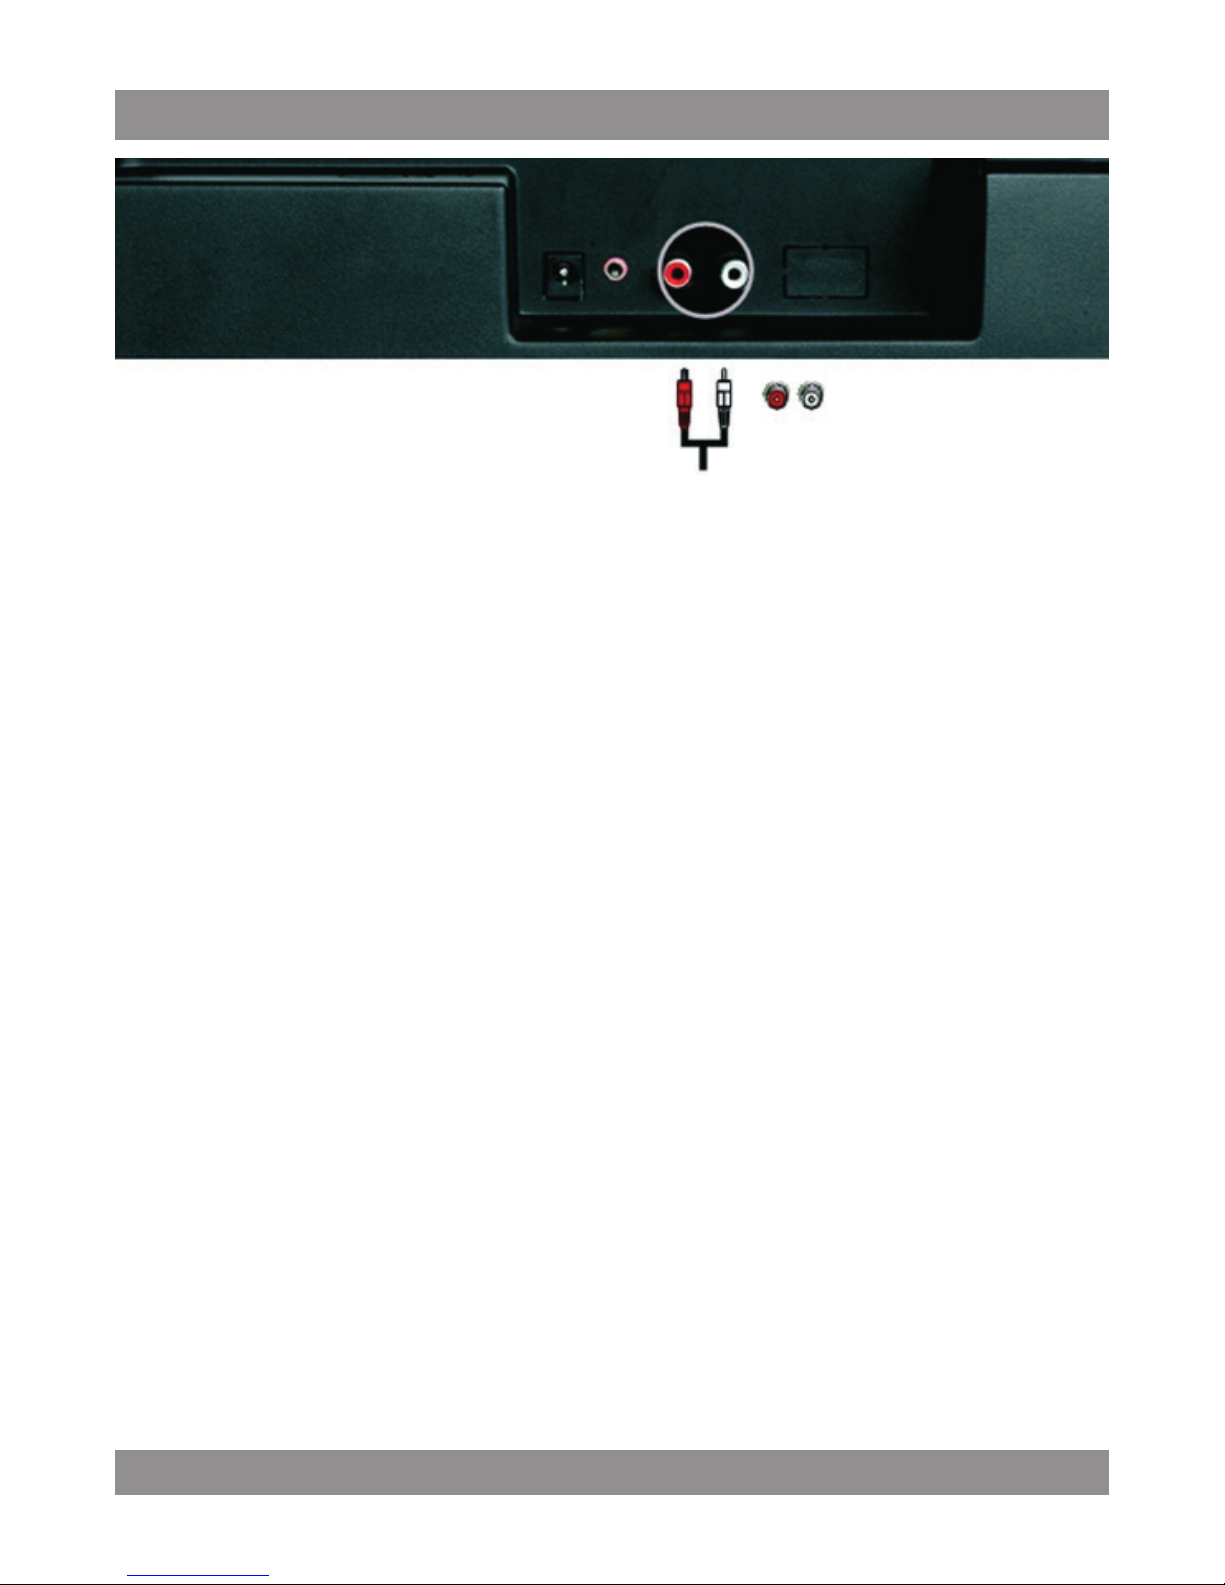
Aux2
• Wyłącz zasilanie urządzenia i Soundbar.
• Podłącz jeden koniec kabla audio do urządzenia.
• Podłącz drugi koniec kabla audio do zestawu SoundBar.
• Włącz zasilanie podłączonego urządzenia i Soundbar.
•
Wybierz wejście AUX2 poprzez naciśnięcie „INPUT” na panelu Soundbar
lub pilocie
Page 6
MM 290
6
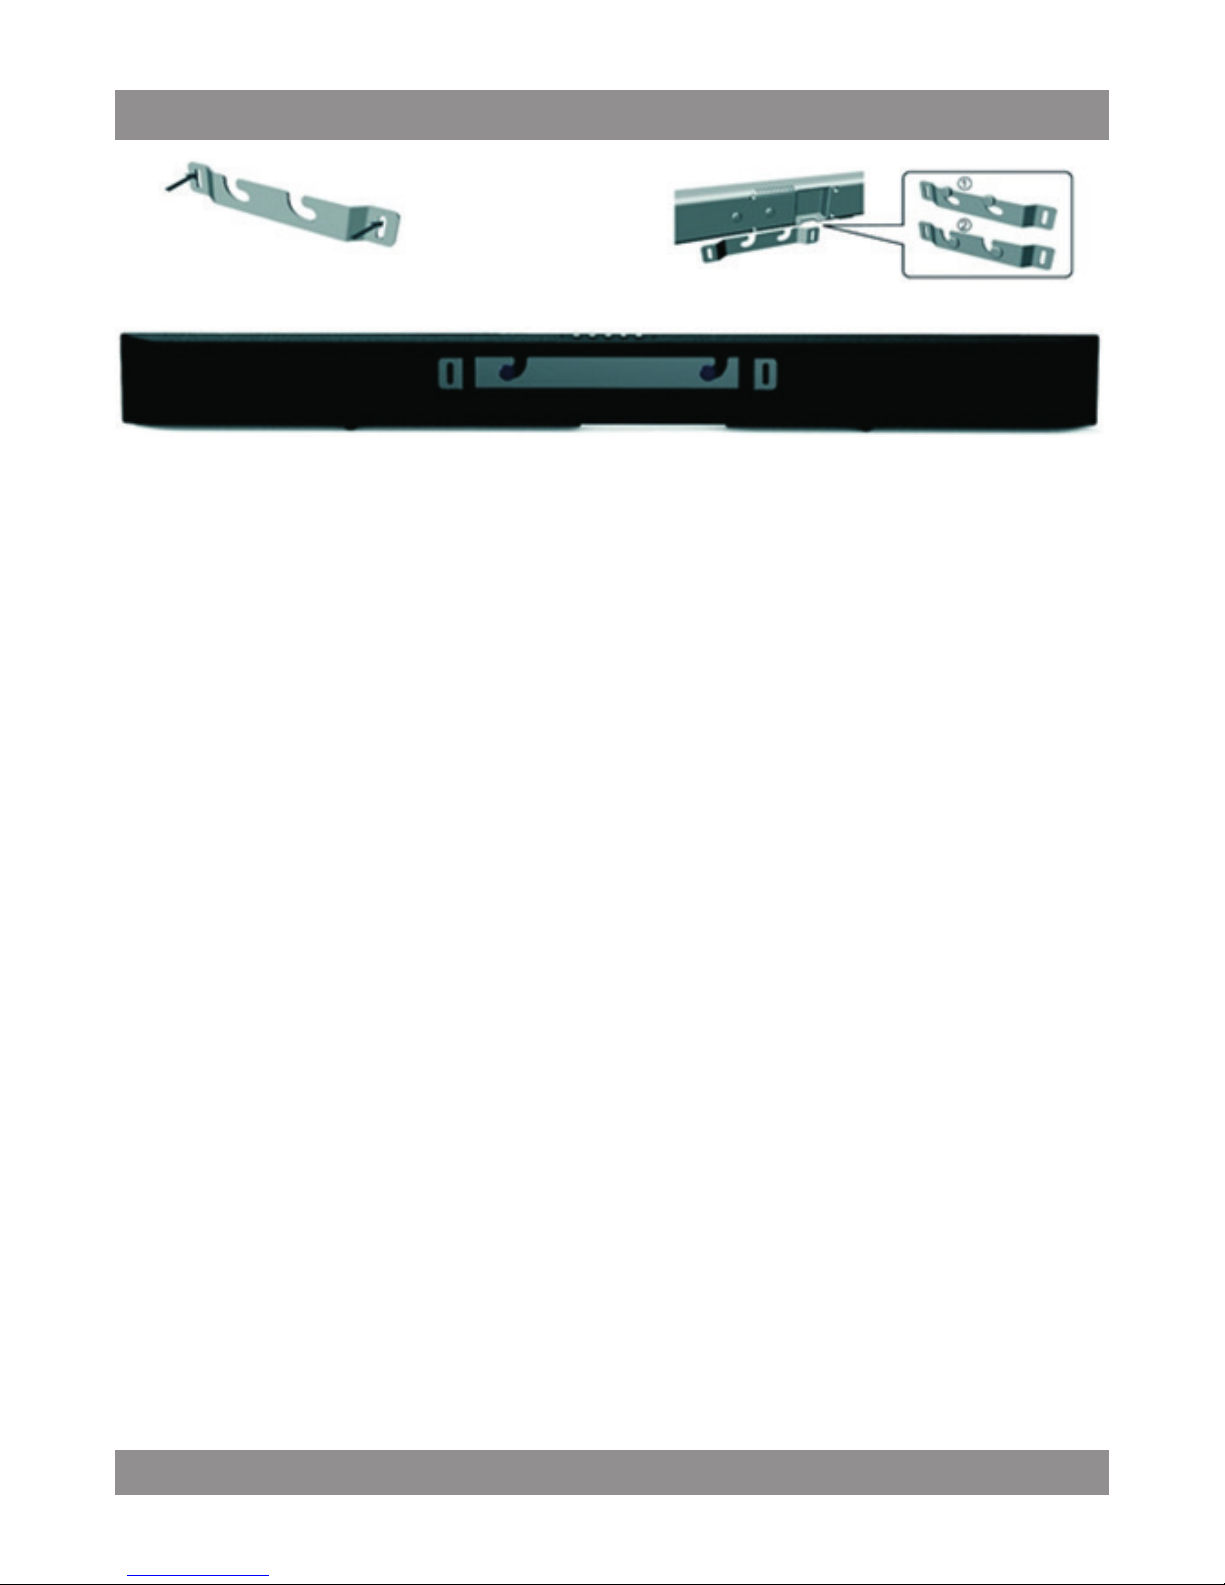
Instrukcja montażu uchwytu ściennego
• Soundbar może być zainstalowany tylko na pionowej ścianie.
• Unikaj instalacji w miejscach szczególnie narażonych na, np. wysoką
temperaturę lub wysoką wilgotność powietrza.
• Sprawdź wytrzymałość ściany, wzmocnij ją jeśli to konieczne,
•
Sprawdź materiał z jakiego zrobiona jest ściana, Do montażu użyj odpowiednich śrub zależnie od tego materiału z którego wykonana jest ściana.
•
Upewnij się, że wszystkie kable łączące Soundbar z innym urządzeniem
są połączone.
• Upewnij się, że Soundbar jest odłączony od zasilania przed montażem
aby uniknąć porażenia prądem.
• Zamontuj uchwyt do ściany przy pomocy dwóch śrub (brak w zestawie) (Rys.1)
•
Zamontuj Soundbar do odpowiednich gniazd montażowych. Upewnij
się, że klip do montażu zjechał na dno szczeliny montażowej (Rys.2)
Page 7
MM 290
7
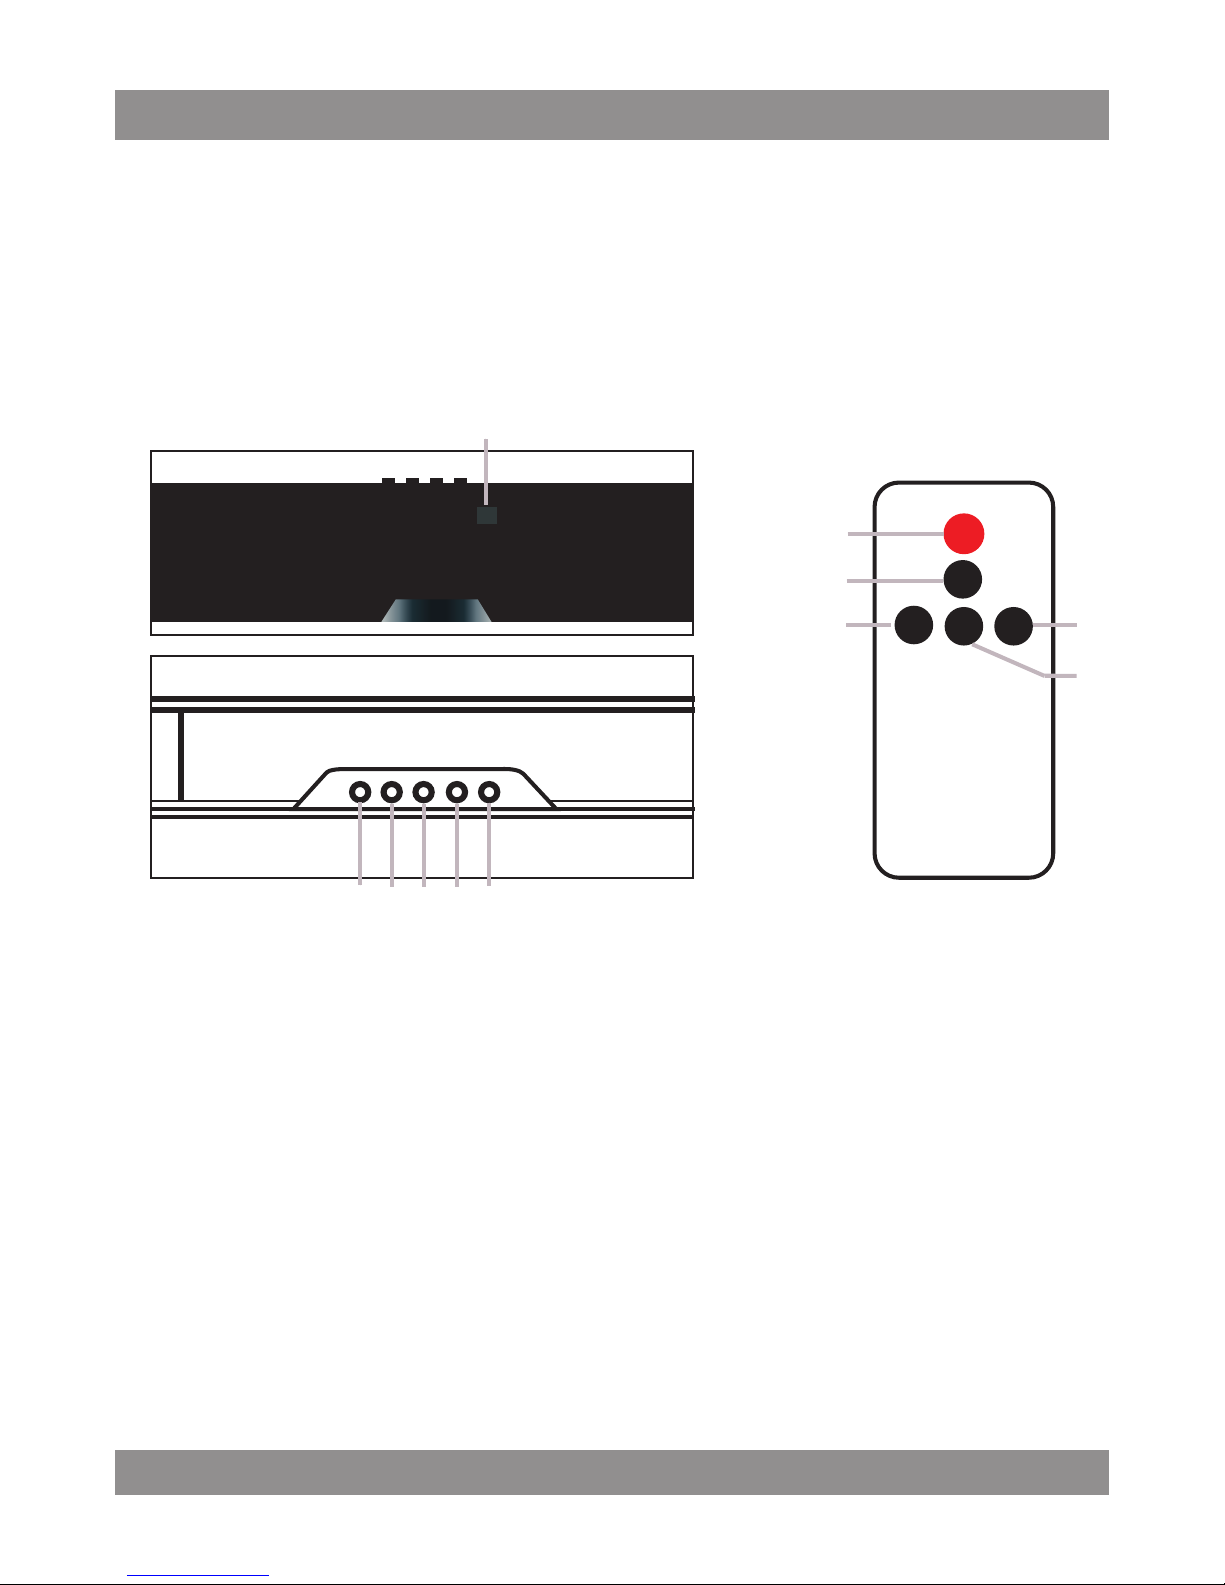
Scheme
1
2 3 4 5
6
2
3
4
5
6
1 Volume indicator
Display the current volum
from 0 to 30.
2. Power button
Press to turn your soundbar
3. Input button
Press to change the input
4. Mute button Press to mute
5. V -Press to decrease the
volume
6. V +Press to increase the
volume
Page 8
MM 290
8
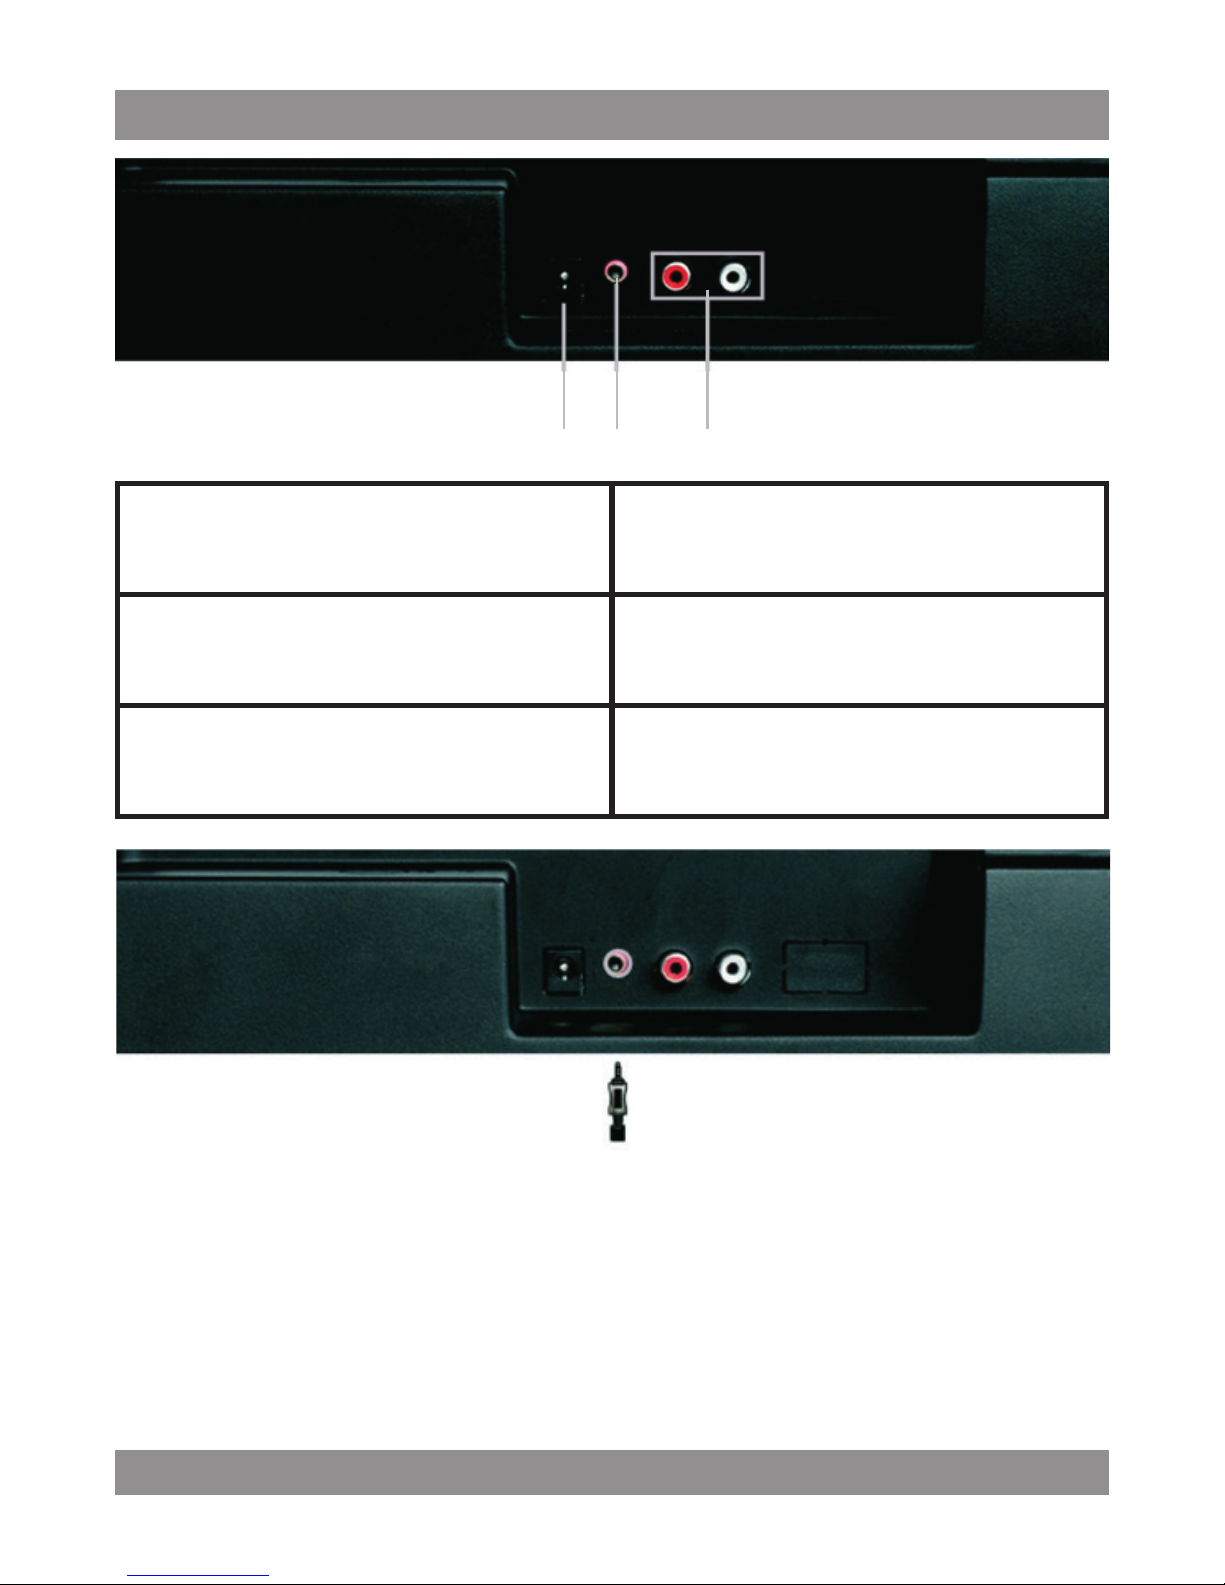
1. DC IN Plug the power adapter cable into
the AC wall outlet
2. AUX 1 Connect to the analog output of
an external device jack 3,5mm
3. AUX 2 Connect to the analog output of
an external device RCA
Aux1
• Turn o the power of the device and soundbar.
• Connect one end of the audio cable to the device.
• Connect another end of the audio cable to the soundbar.
• Turn on the power of the device and soundbar.
•
5 Select the AUX1 input by pressing “ INPUT ” on the soundbar or
remote contro
1 2 3
Page 9
MM 290
9
• Note: Aux1 is factory default input.
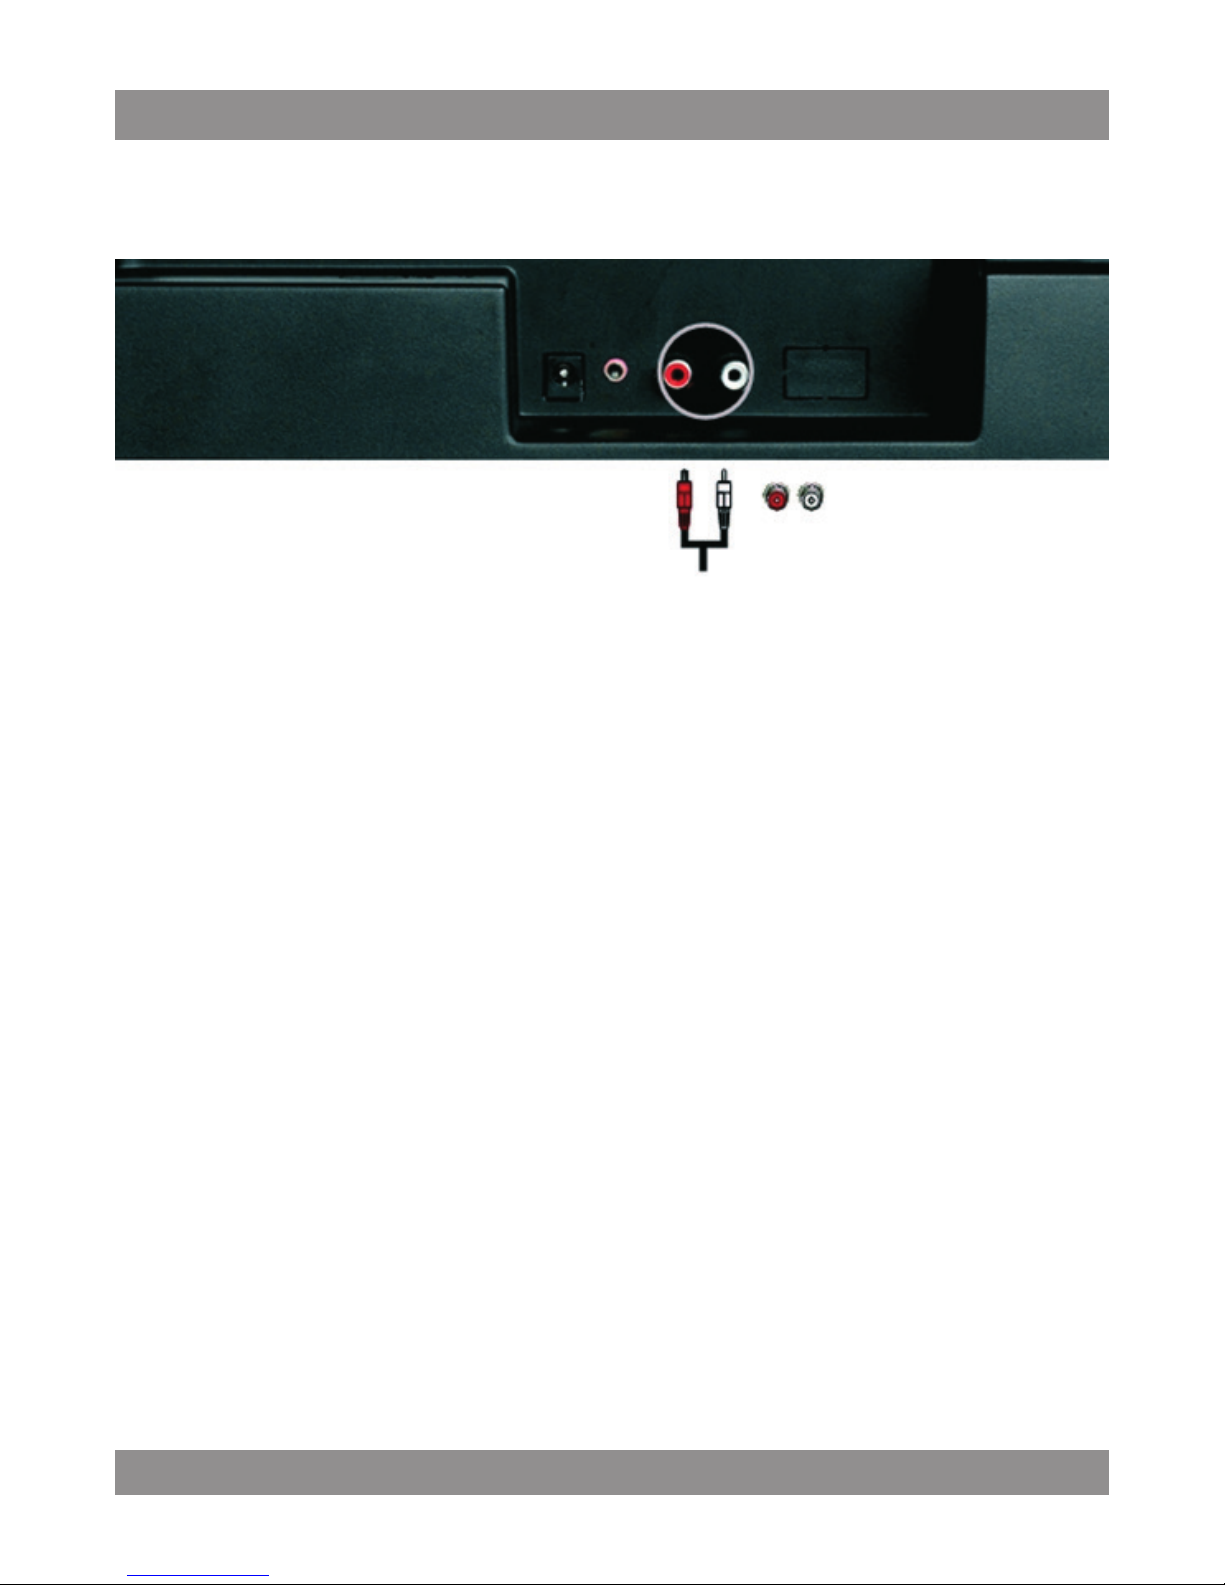
Aux2
• Turn o the power of the device and soundbar.
• Connect one end of the audio cable to the device.
• Connect another end of the audio cable to the soundbar.
• Turn on the power of the device and soundbar.
•
Select the AUX2 input by pressing “ INPUT ” on the soundbar or remote control
Page 10
MM 290
10
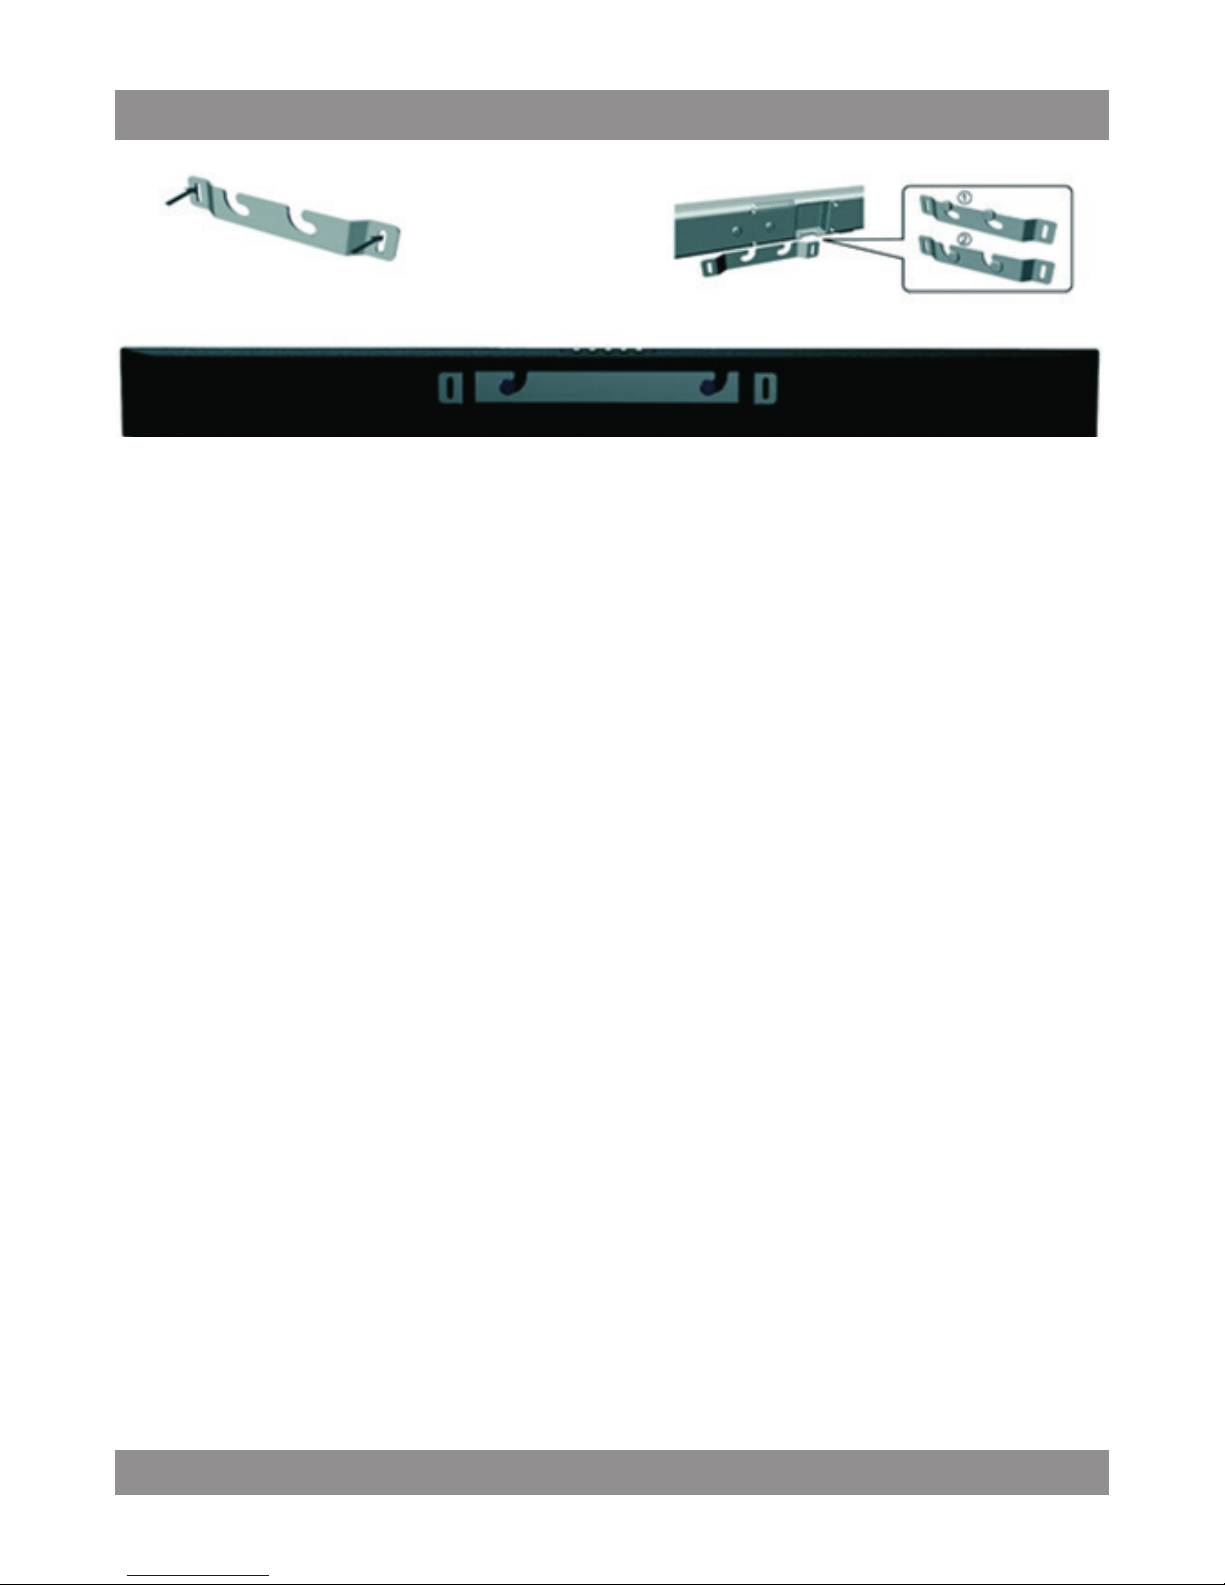
WALL MOUNTED
•
Install Metal Mount Base To x Sound Bar on the wall by using the Metal
Mount Base installation Notication
• Only can be installed on vertical wall.
•
Avoid installing on such wall, e.g., over heat or high humidity,or cannot
hold up the Sound Bar.
• Check the strength of wall, reinforce it if necessary, be sure it can hold
up the Sound Bar before installation.
• Check the raw material of wall, need to buy right screws if the wall was
made of cement, marble or iron sheet.
•
Ensure all cables which connect Sound Bar with other devices are
connected.
•
Ensure power cord is unplugged or the Sound Bar are turned o before
installation to avoid resulting in electric shock.
•
Make the Metal Mount Base vertically to the wall, x it with 2pcs of
screws (not provided)Pic.1
•
Insert the Sound Bar into the corresponding mount slot. Make sure the
mount clip slid to the bottom of the mount slot. This is to ensure the
steady installation. Pic.2
 Loading...