

Instrukcja obsługi
User’s Manual
FatBoy Boombox BT
MM275

MM 275
2
EN
User’s Manual
IMPORTANT NOTES ........................................................................................................................ 3
SCHEMAT ............................................................................................................................................. 5
REMOTE HANDSET..........................................................................................................................7
POWER SOURCE ............................................................................................................................... 9
TURNING THE UNIT ON/OFF ....................................................................................................... 9
TUNING RADIO STATIONS ........................................................................................................11
CD/MP3 OPERATION ............................................................................................................................12
USB OPERATION ..................................................................................................................................... 16
MIC JACK OPERATION..........................................................................................................................17
GUITAR JACK OPERATION .................................................................................................................. 18
SPECIFICATIONS ..................................................................................................................................... 19
Instrukcja obsługi
WAŻNE INFORMACJE ..................................................................................................................21
POŁOŻENIE EMENTÓW STERUJĄCYCH ..............................................................................23
PILOT ZDALNEGO STEROWANIA ...........................................................................................25
ZASILANIE .........................................................................................................................................27
TRYB ODTWARZACZA PŁYT CD I MP3 ...............................................................................32
TRYB USB ...........................................................................................................................................35
TRYB BLUETOOTH® .......................................................................................................................35
TRYB AUX ..........................................................................................................................................37
DZIAŁANIE GNIAZDA MIKROFONU MIC ..........................................................................37
DZIAŁANIE GNIAZDA GITAROWEGO ....................................................................................38
SPECYFIKACJA ................................................................................................................................39
MM 275
3
EN
IMPORTANT NOTES
INTRODUCTION
Thank you for buying this product.
Please read through these operating instructions, so you will know how to operate your
equipment properly. After you finished reading the instructions manual, put it in a safe place
for future reference.
CAUTION
Use of controls or adjustment or performance of procedures other than those specified herein
may result in hazardous radiation exposure.
DANGER
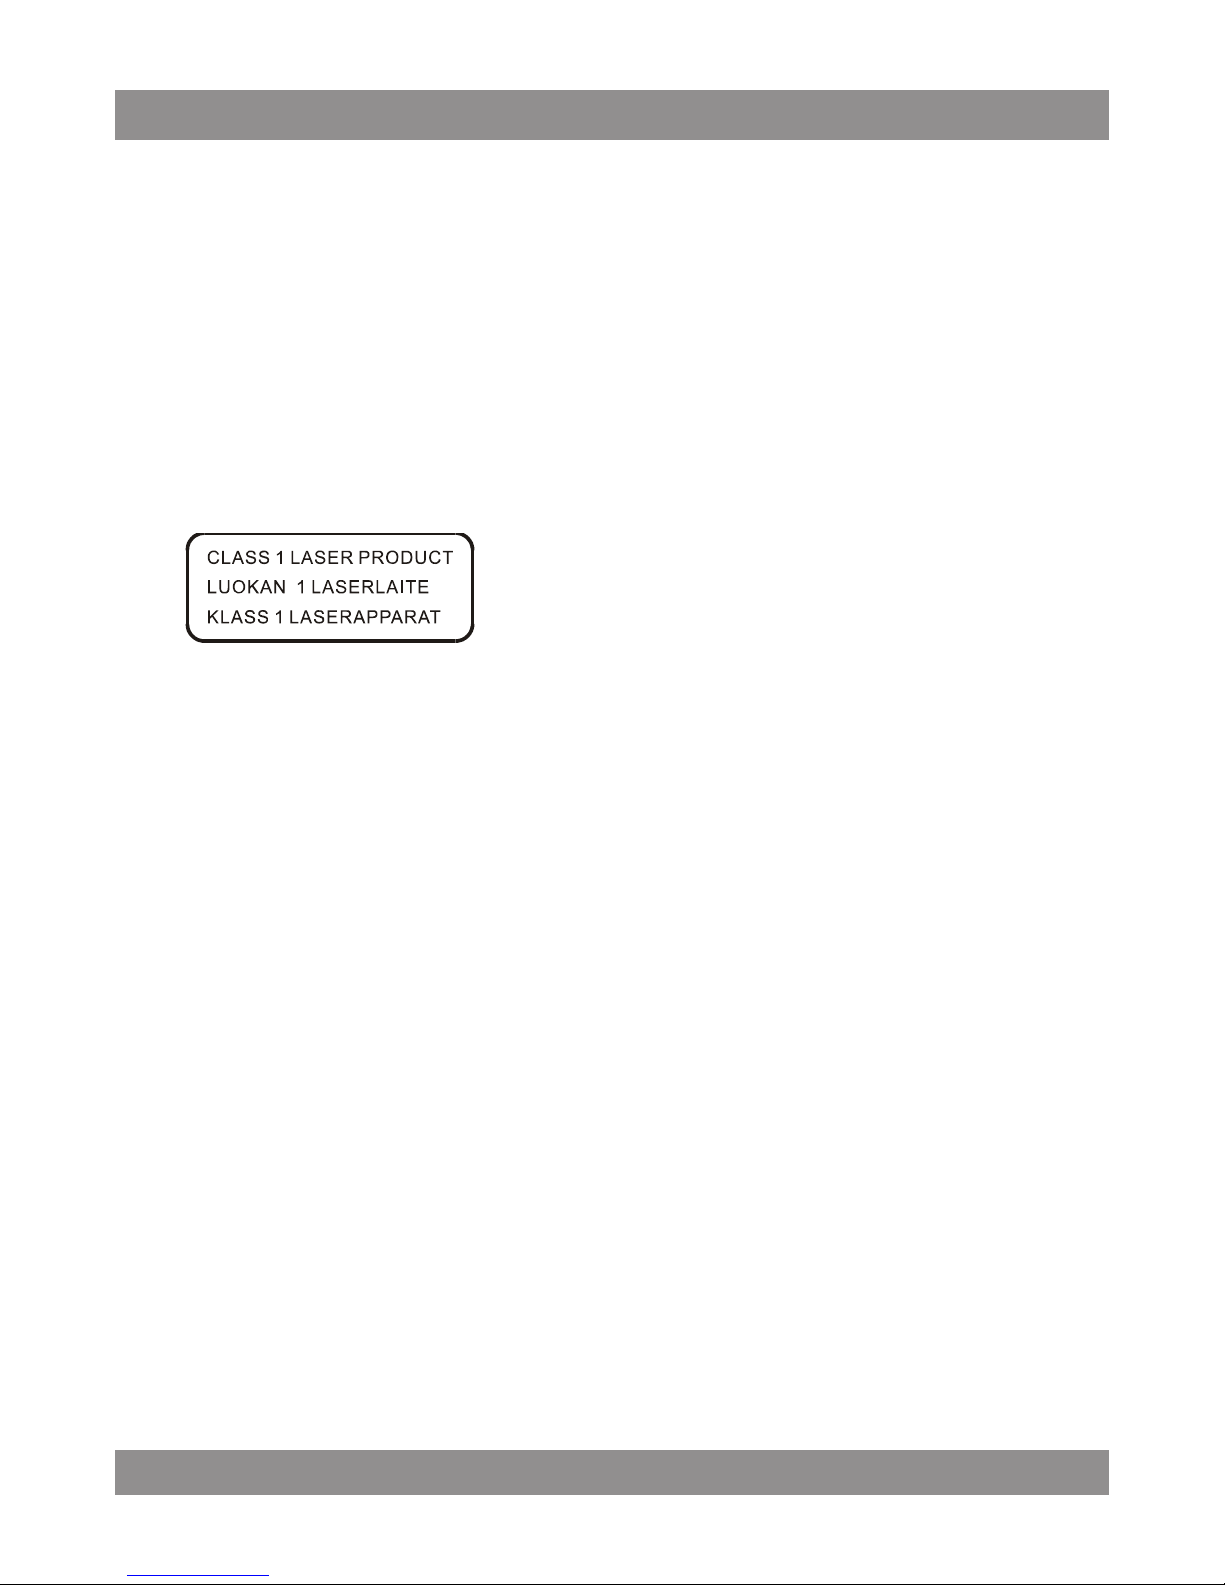
This Compact disc player is classified as a Class 1
LASER PRODUCT.
THE CLASS 1 LASER PRODUCT label is located
on the rear exterior.
NOTE: The manufacturer is not responsible for any radio or TV interference caused by
unauthorized modifications.
Avoid installing the unit in locations described below:
Places exposed to direct sunlight or close to heat radiating appliances such as electric
heaters, or other equipment that radiate too much heat.
Places subject to constant vibration.
Unventilated or dusty places.
Humid or moist places.
Operate buttons and switches as instructed in the manual.
Before turning on the power for the first time, make sure that the power cord is properly
installed.
Store the unit in a cool area to avoid damage from heat.
CAUTION: TO REDUCE THE RISK OF ELECTRIC SHOCK, DO NOT REMOVE THE COVER
(OR BACK). DO NOT OPEN THE UNIT. FOR SERVICE, PLEASE REFER TO
QUALIFIED SERVICE PERSONNEL.
WARNING:
- Remove batteries if exhausted or if they will not be used for a long period.
- The incorrect use of batteries can cause electrolyte leakage and will corrode the
compartment or cause the batteries to burst. Therefore:
Do not mix battery types, e.g., alkaline with zinc carbonate.
When inserting new batteries, replace all batteries at the same time.
MM 275
4
EN
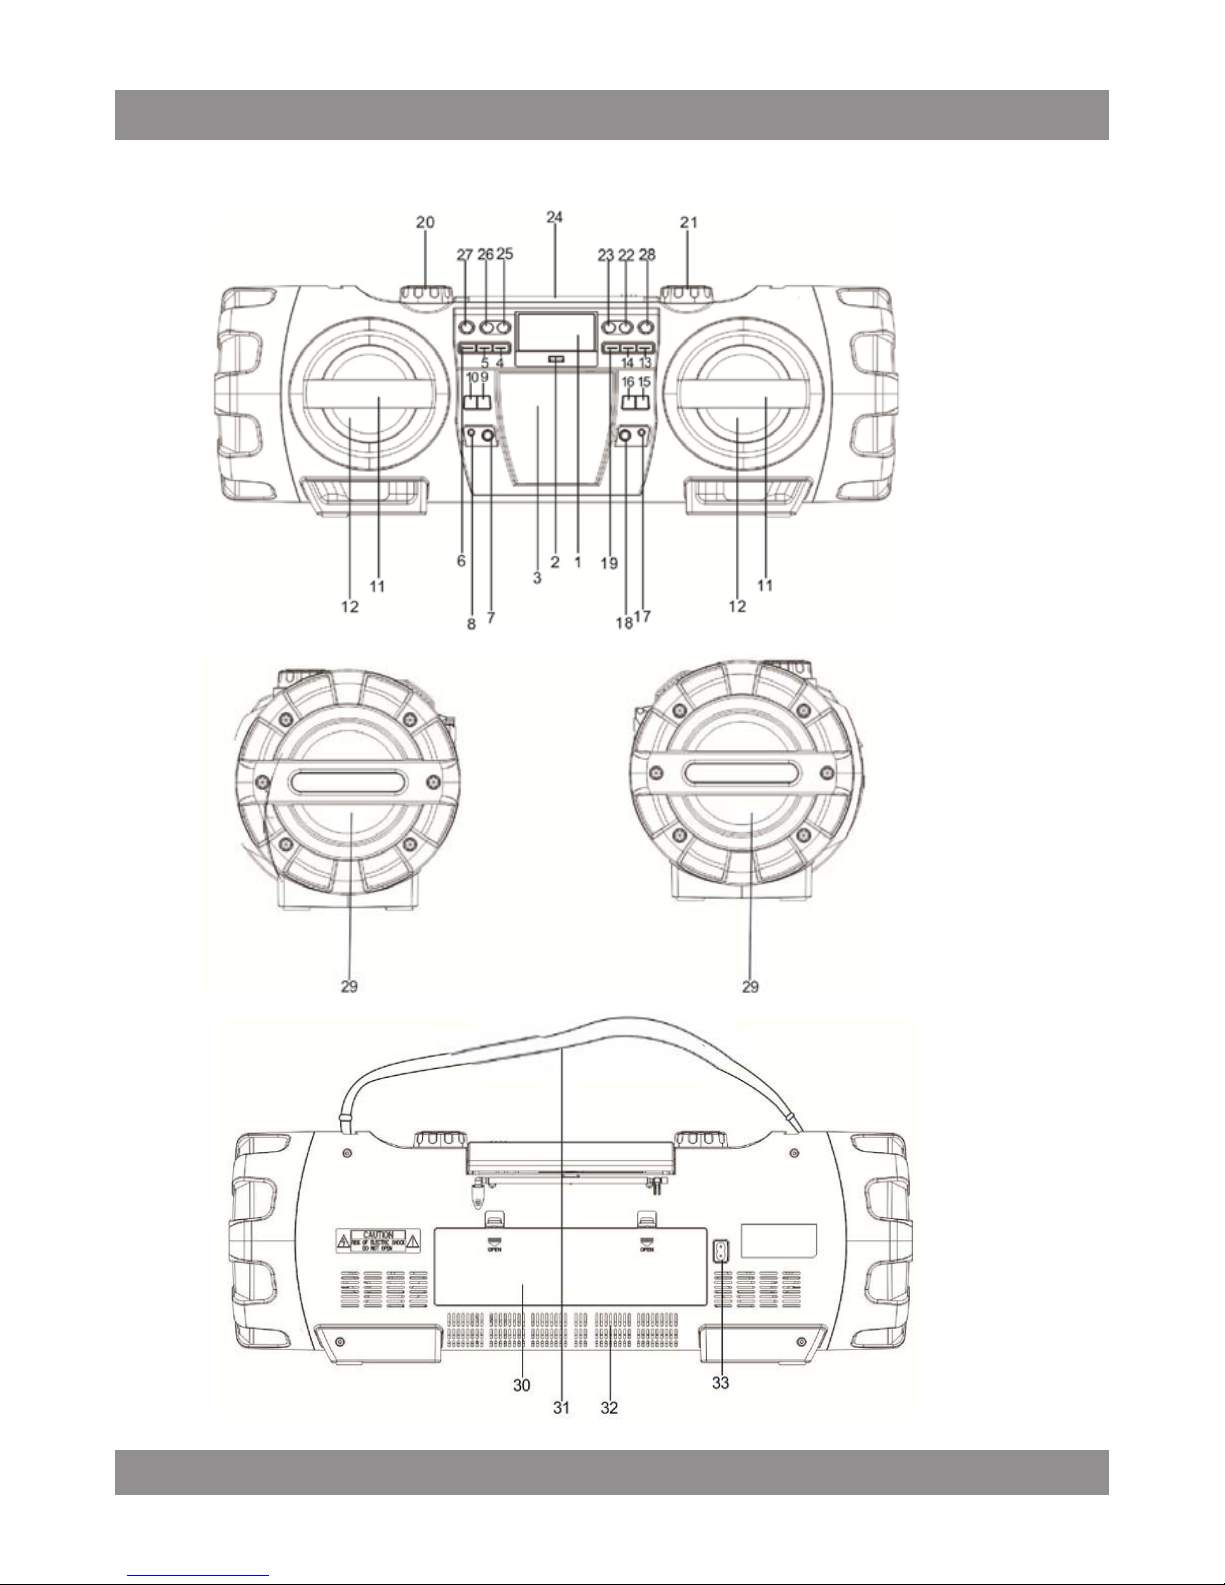
LOCATION OF CONTROLS
MM 275
5
EN
NAMES OF CONTROLS
1. Display
2. USB port
3. Remote control compartment
4. FOLDER/MEM./10 + button
5. FOLDER/MEM./10 - button
6. PROG/P-MODE
button
7. 6.3mm MIC input jack
8. 3.5mm AUX IN jack
9. MIC Volume + button
10. MIC Volume – button
11. Speaker guard
12. Left/Right speakers
13. NEXT/FORWARD button
14. PLAY/PAIR button
15. GUITAR Volume + button
16. GUITAR Volume – button
17. 3.5mm headphone jack
18. 6.3mm guitar input jack
19. PREVIOUS/REVERSE button
20. VOLUME dial
21. TUNING dial
22. STOP button
23. ID3 button
24. Telescopic antenna
25. EQ
button
26. LIGHT button
27. FUNCTION button
28.
POWER/STANDBY button
29. Left/Right Subwoofer
30. Battery compartment door
31. Carrying strap
32. Heat emission vents
33. AC power cable socket
Note:
Please remove the plastic protector from the battery compartment before using for the
first time.
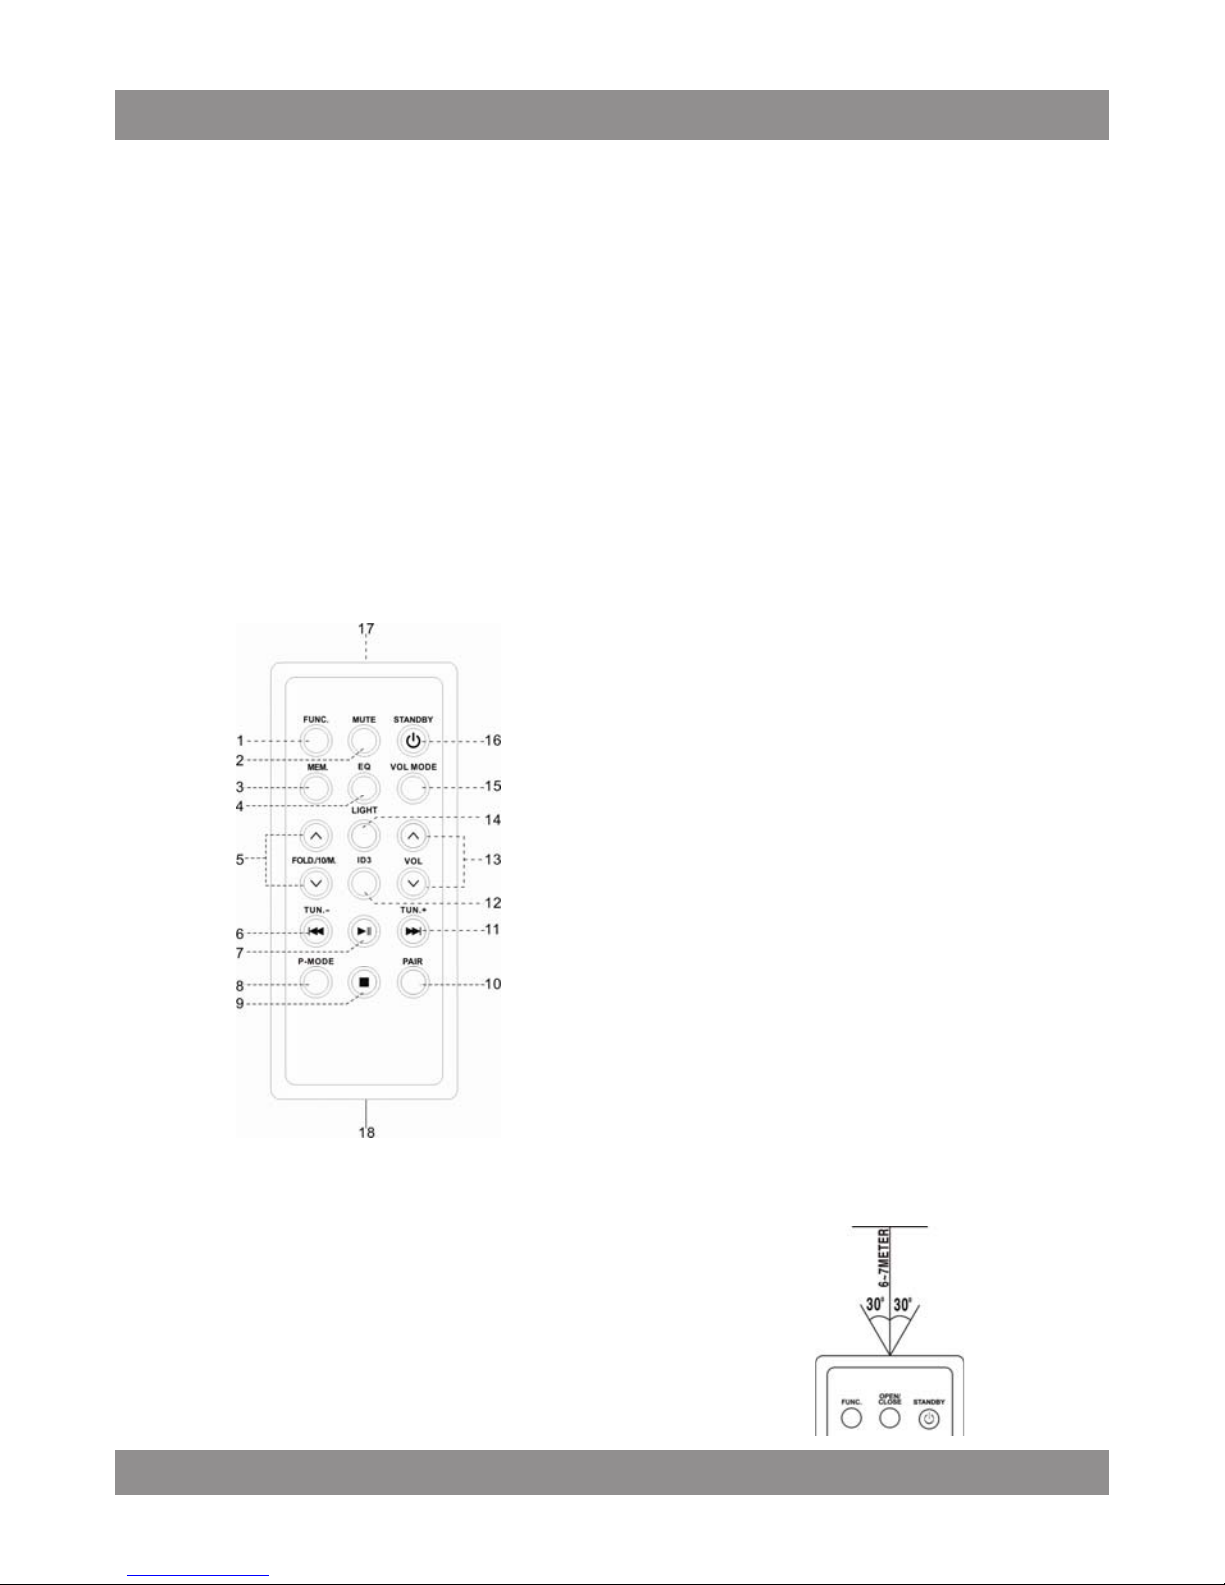
REMOTE CONTROL OPERATION
To operate the unit with the remote control, point the remote
transmitter [17] of the remote control at the IR sensor on the front
display panel of the unit. Press the buttons on the remote control to
use it.
REMOTE HANDSET
1. FUNCTION
2. MUTE
3. MEMORY
4. EQUALIZER
5. FOLDER/ 10/ MEMORY UP & DOWN
6. PREVIOUS/REVERSE and TUNING–
7. PLAY/PAUSE
8. P-MODE (Play mode)
9. STOP
10. PAIR
11. NEXT/FORWARD and TUNING+
12. ID3 (show MP3 info tags)
13. VOLUME UP & DOWN
14. LIGHT
15. VOLUME MODE
16.STANDBY (POWER)
17.
Remote transmitter
18. Battery compartment
MM 275
6
EN
The remote works best at a distance of no further than 5 meters and within 30 degrees to
either side of the sensor. Bright sunlight or other lighting conditions in the room can interfere
with the remote control. If remote operation is unsatisfactory or stops working entirely, try using
a new battery in the remote or try darkening the room.
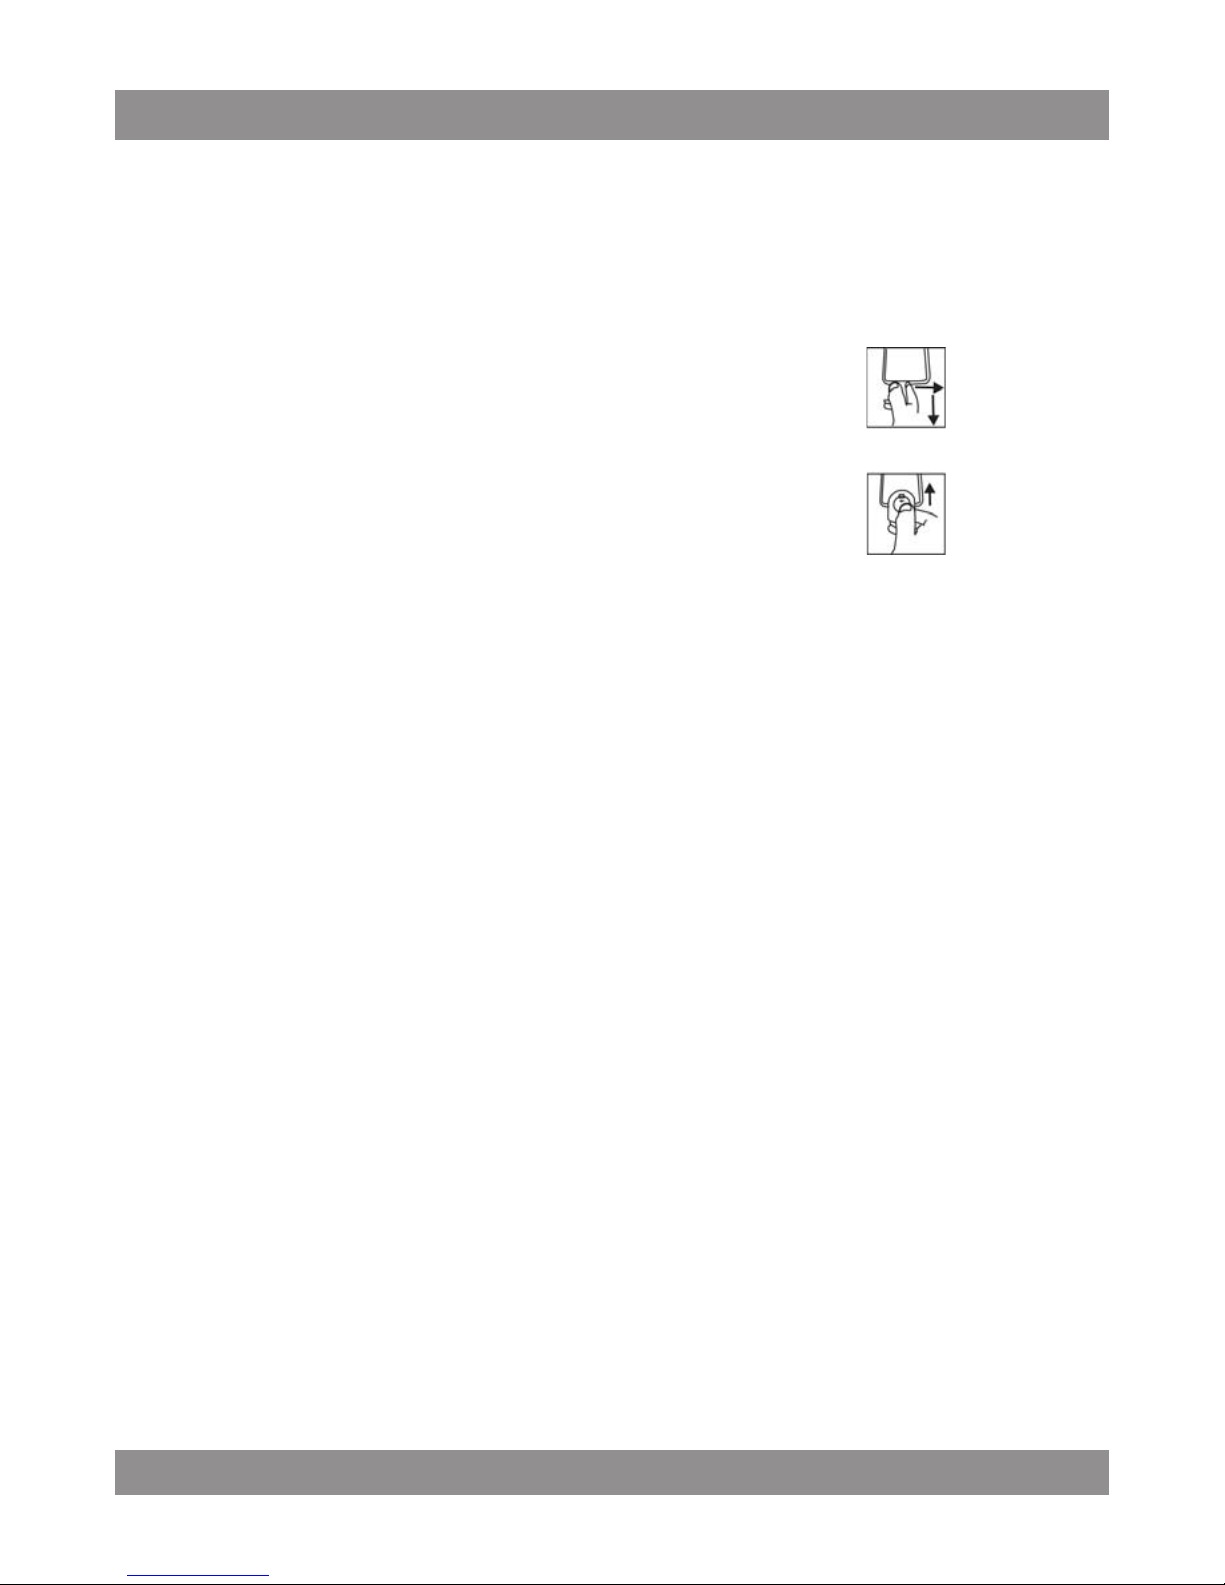
REPLACING THE REMOTE CONTROL BATTERY
The remote control includes one CR2025 (3V) lithium battery.
Remove the plastic protector from the battery compartment before
using the remote for the first time.
To replace the battery, gently push the clasp to the right and then slide
the battery compartment tray out. Remove the old battery and install a
new lithium battery (type CR-2025) in the tray. The positive side of the
battery should face up.
Slide the tray back into the compartment until the clasp clicks into
place.
POWER SOURCE
This unit is designed to operate on or AC/DC electrical systems.
AC OPERATION
Plug one end of the power cord into the AC power input on the unit; plug the other end into a
household AC outlet. (Battery operation will be disabled automatically when AC power is used).
DC OPERATION
Open the battery compartment door [30]. Load 10 pieces of UM-1/D size batteries (not included)
into the compartment, taking care to match the +/– polarities marked inside the compartment.
CAUTION:
Remove batteries if they are empty or not being used for a long period
of time.
Batteries contain chemical substances and should be disposed of
properly. Check your local regulations before throwing batteries in the
trash.

MM 275
7
EN
BASIC FUNCTIONS
TURNING THE UNIT ON/OFF
Press the POWER button on unit or on remote control to turn the unit on or off.
NOTE: In CD/MP3/USB/Bluetooth/Aux in mode, when the unit is not providing the main function
for 15 minutes, the unit will automatically switch into standby mode. To turn on the unit again,
press "STANDBY" button.
ESD hints – The product maybe reset or not reset to operation of control due to electrostatic
discharge, just switch off and reconnect again.
SETTING THE FUNCTION MODE
There are 5 function modes; press the FUNCTION button [27] to change modes. The 5 modes
are:
TUNER: Listen to FM radio broadcasts.
CD: Play compact discs (CD-audio or CD-MP3).
USB: Play MP3s from USB memory sticks.
BLUETOOTH: Stream audio from wireless players with Bluetooth
®
.
The current function mode will be shown on the display [1] when you turn on the boombox.
NOTE:
The unit will automatically switch to AUX mode when a 3.5mm AUX cable is
connected to the AUX input jack [8]. Disconnect the cable to exit AUX mode.
ADJUSTING THE VOLUME
Turn the VOLUME dial [20] on the unit to increase or decrease volume. You may also use the
remote control to adjust the system volume.
EQUALIZER (EQ) FUNCTION
Press the EQ button [25] during playback to change equalizer presets. The presets are: FLAT,
CLASSIC, ROCK, POP, JAZZ, and 3D.
Choose a preset that best matches the style of music that is playing; the presets have been
calibrated to enhance your audio enjoyment.
ID3 (show tag) System
Some MP3 files are encoded with information such as the name of the song, the artist, and the
album. Together, this information is called an "ID3 tag".
Press the ID3 button [23] to cycle through which information to display when playing an MP3 file,
or choose not to show any ID3 information at all.

MM 275
8
EN
HEADPHONE JACK
To use headphones with your Boombox, lower the volume before connecting them to the
3.5mm Headphone jack [17]. Once connected, slowly adjust the volume to a comfortable level.
The speakers will be disabled when headphones are connected.
CAUTION: LISTENING WITH HEADPHONES AT HIGH VOLUME LEVELS MAY
CAUSE PERMANENT HEARING LOSS.
PARTY LIGHT
To change the party light effects, press the LIGHT button [26]. You can choose from different
preset modes.
To disable the party light, press the LIGHT button [26] until the lights turn off and the display [1]
reads “LIGHT OFF”.
FM TUNING MODES (Radio)
Listen to FM radio broadcasts. Press the FUNCTION button [27] until the display [1]
reads TUNER.
To optimize reception when listening to stations on the FM band, extend the
telescopic antenna to its full length.
TUNING TO A RADIO STATION
If you know the station frequency that you want to tune to directly:
Tune to a station by turning the TUNING dial [21]. The station frequency is
shown on the display [1].
To tune to a preset station:
To tune to the next preset station, press the FOLDER/MEM./10 + button [4].
To tune to the previous preset, press the FOLDER/MEM./10 - button [5].
AUTO PRESET MEMORY / SCAN
To scan for stations within reception range and save them to preset memory automatically,
press the PLAY/PAUSE/PAIR button [14]. After the unit is finished scanning, the unit will
automatically tune to preset number 1 (P01).
MANUAL PRESET MEMORY
Choose which stations to save in preset memory instead of scanning automatically.
1. Turn the TUNING dial [21] to tune to the station that you want to save as a preset
(e.g., 93.10).
2. Press the PROG/P-MODE button [6]. “P01” will flash on the display to indicate
that you are saving the station as Preset Memory 01. (To change the preset
memory number, press the FOLDER/MEM/10+ [4] or FOLDER/MEM/10– [5]
buttons.)
3. Press the PROG/P-MODE button [6] to finish saving the station (e.g., P01 is now
set to 93.10).
4. To save another station, repeat steps 1 to 3. You may save up to 30 FM stations.

MM 275
9
EN
CD MODE (CD and MP3 Discs)
Play CDs with audio or MP3 files. Press the FUNCTION button [27] to select “CD” mode.
SUPPORTED DISC FORMATS
This unit can play all digital audio CD/MP3, finalized digital audio CD-Recordable (CD-R) discs,
finalized digital audio CD-Rewritable (CD-RW) discs, and CD-DA formatted digital audio
CD/CD-R/CD-RW discs.
LOADING A DISC
1. Press PUSH TO OPEN on the CD door to open it; the display [1] will read
“OPEN”.
2. Place the compact disc into the tray with the label side facing up.
3. Close the CD door; the display will flash “TOC READ”, and then show the total
number of playable tracks on the disc. Playback will start automatically.
4. To remove the CD, press the STOP button [22] to stop playback. Wait for the CD
to stop spinning completely! Press PUSH TO OPEN on the CD door to open it.
Remove the CD carefully taking care to handle it by its sides.
Notes:
1. Make sure the disc is completely stopped before opening the CD door.
2. To ensure good system performance, wait until the unit reads the disc
completely before doing anything else.
3. If the disc is unreadable or if no disc is loaded in the tray, the display will
read “NO DISC”.
PLAYING A DISC
Playback starts automatically from Track 1 after a compact disc has been loaded and read by
the boombox.
To pause playback, press the PLAY/PAUSE/PAIR button [14]. The current
track time will flash on the display.
To resume playback, press the PLAY/PAUSE/PAIR button [14] again.
To stop playback, press the STOP button [22].
To skip tracks
Press the NEXT [13] or PREV [19] buttons to skip to the next or previous track respectively.
Track numbers are shown on the display.
To scan quickly to a point in a track
Press and hold the NEXT [13] or PREV [19] buttons to quickly scan forward or in reverse
through a track. The track time is shown on the display.
To skip tracks quickly (for MP3 discs, only)
To skip 10 tracks at a time, press the FOLDER/MEM/10+ button [4] to skip forward 10 tracks.
Press the FOLDER/MEM/10– button [5] to skip backwards 10 tracks.
To select a desired folder (for MP3 discs, only)
To select a track in a folder, press and hold the FOLDER/MEM/10+ [4] button each time to skip
forward a folder, then press the NEXT [13] to select desired track.

MM 275
10
EN
PROGRAMING TRACKS
You can create a custom play list from your disc when playback is stopped. You can program up
to 20 tracks for a CD disc and 99 tracks for an MP3 disc
1. While play is stopped, press the PROG/P-MODE button [6]. The display will flash
PROG and show “P01”.
2. Use the NEXT [13]/PREV [19] buttons to select the first track to be saved to the
program list, then press the PROG/P-MODE button [6] to save. The display will
now show the next program number (e.g., “P02”).
3. Repeat step 2 to save more tracks to the program list until all tracks have been
programmed.
4. Press
the PLAY/PAUSE/PAIR button [14] to start playing the program list from
the beginning. The display will show which track is currently playing.
5. Press the STOP button [22] on unit to stop program playback.
To clear the program, open the CD compartment lid, making sure that the disc
has stopped spinning completely before you do so.
REPEAT/RANDOM/INTRO PLAY MODE (P-MODE)
To change the playback mode, press the PROG/P-MODE button [6] during playback; the
display will show the current P-MODE. Modes include repeat, random, and intro.
: Repeat the current track.
DIR: Repeat all of the tracks in the current directory/folder (MP3
playback only).
ALL: Repeat all tracks.
RAN: Play tracks in random order.
INTRO: Play the first 10 seconds of each track.
To return to normal playback, press the PROG/P-MODE button [6] until there are no P-MODE
indicators on the display. P-MODE is also canceled when you stop playback.
USB MODE
Play MP3 files from USB memory sticks. Press the FUNCTION button [27] to select “USB”
mode.
PLAYING MP3s FROM USB MEMORY
1. Connect the USB memory stick to the USB port [2] found on the front of the unit.
The display will show the total number of playable tracks on the USB device.
Playback will start automatically from Track 1.
2. To pause playback, press the PLAY/PAUSE/PAIR button [14]. The current track
time will flash on the display. To resume playback, press the PLAY/PAUSE/PAIR
button [14] again.
3. To stop playback, press the STOP button [22].
To learn more about programming playlists and repeat/random/intro playback modes, please
refer to the CD/MP3 OPERATION section of this manual.
NOTICE:
To prevent harmful interference, always connect USB devices directly to the
unit. Do not use a USB extension cable to connect USB devices to the unit.

MM 275
11
EN
Bluetooth® MODE
Stream audio wirelessly from players with Bluetooth. Press the FUNCTION button [27] to select
"BLUETOOTH" mode.
Wireless players with Bluetooth may include laptops, tablets, smartphones, and more. Make
sure that your player has its Bluetooth radio enabled and that it is set to be discoverable.
CONNECTING A DEVICE FOR THE FIRST TIME (PAIRING)
Before using a wireless device with Bluetooth, you will need to establish a connection between it
and the Boombox. This process is called "pairing" and you will only have to do it once. Once two
devices are paired, they will automatically connect when they detect each other.
1. When you set the Boombox to Bluetooth mode and it does not detect a paired
device, it will automatically switch to pairing mode. (The display will flash
"Bluetooth" and the blue "PAIR" indicator will blink when the Boombox is in pairing
mode.)
2. On your wireless device, go to its Bluetooth settings menu.
3. Have your wireless device "search for devices". Select the boombox (MM275)
when it is found.
4. When pairing is complete, the Boombox will emit a soft tone, the display will stop
flashing, and the blue "PAIR" indicator will light a steady blue.
The boombox will automatically connect to your wireless device next time as long as it has
Bluetooth enabled, is within range, and is set to be visible to paired devices.
Note
:
There are many different Bluetooth enabled devices out there; we cannot provide
instructions for all of them. Please refer to your device manufacturer's instructions
or website to learn more about connecting with Bluetooth.
PLAYING CONNECTED DEVICES
Control playback from your wireless device. The volume level may be controlled by the wireless
device or by turning the VOLUME dial [20].
Basic playback (such as play/pause, next, previous) may also be controlled by the boombox
and its remote control if your wireless device supports it.
AUX IN MODE
Play audio from devices connected to the AUX IN jack [8]. Connect a 3.5mm AUX cable to the
AUX IN jack [8] found on the front of the Boombox and it will switch to AUX mode automatically.
To exit AUX mode, disconnect the cable from the AUX IN jack [8].
1. Connect your audio device to the 3.5mm AUX IN jack [8] found on the front of the
unit with a 3.5mm AUX cable.
2.
Set the volume level of the connected audio device to a comfortable level. Make
additional adjustments to the volume level by turning the VOLUME dial [20] of the
unit.
3. Control playback with your audio device.
 Loading...