

Instrukcja obsługi
User’s Manual
Cosmo Boombox BT
MM272

MM 272
2
User’s Manual
IMPORTANT NOTES .........................................................................................................................................................................................................................3
SCHEMAT .............................................................................................................................................................................................................................................. 5
REMOTE HANDSET ..........................................................................................................................................................................................................................7
BASIC FUNCTION .............................................................................................................................................................................................................................. 8
RADIO OPERATION ........................................................................................................................................................................................................................12
CD/MP3 OPERATION .....................................................................................................................................................................................................................13
SPECIFICATIONS..............................................................................................................................................................................................................................19
Instrukcja obsługi
WAŻNE INFORMACJE....................................................................................................................................................................................................................21
POŁOŻENIE EMENTÓW STERUJĄCYCH ...............................................................................................................................................................................23
PILOT ZDALNY .................................................................................................................................................................................................................................25
FUNKCJE PODSTAWOWE ............................................................................................................................................................................................................27
OBSŁUGA RADIA .............................................................................................................................................................................................................................30
OBSŁUGA PŁYT CD/MP3 ..............................................................................................................................................................................................................32
SPECIFICATIONS..............................................................................................................................................................................................................................39
MM 272
3
IMPORTANT: Please read before using and retain for future reference.
IMPORTANT NOTES
INTRODUCTION
• Thank you for buying this product.
• Please read through these operating instructions, so you will know
how to operate your equipment properly. After you nished reading
the instructions manual, put it in a safe place for future reference
CAUTION
•
Use of controls or adjustment or performance of procedures other than
those specied herein may result in hazardous radiation exposure
DANGER
•
Use of controls or adjustment or performance of procedures other than
those specied herein may result in hazardous radiation exposure
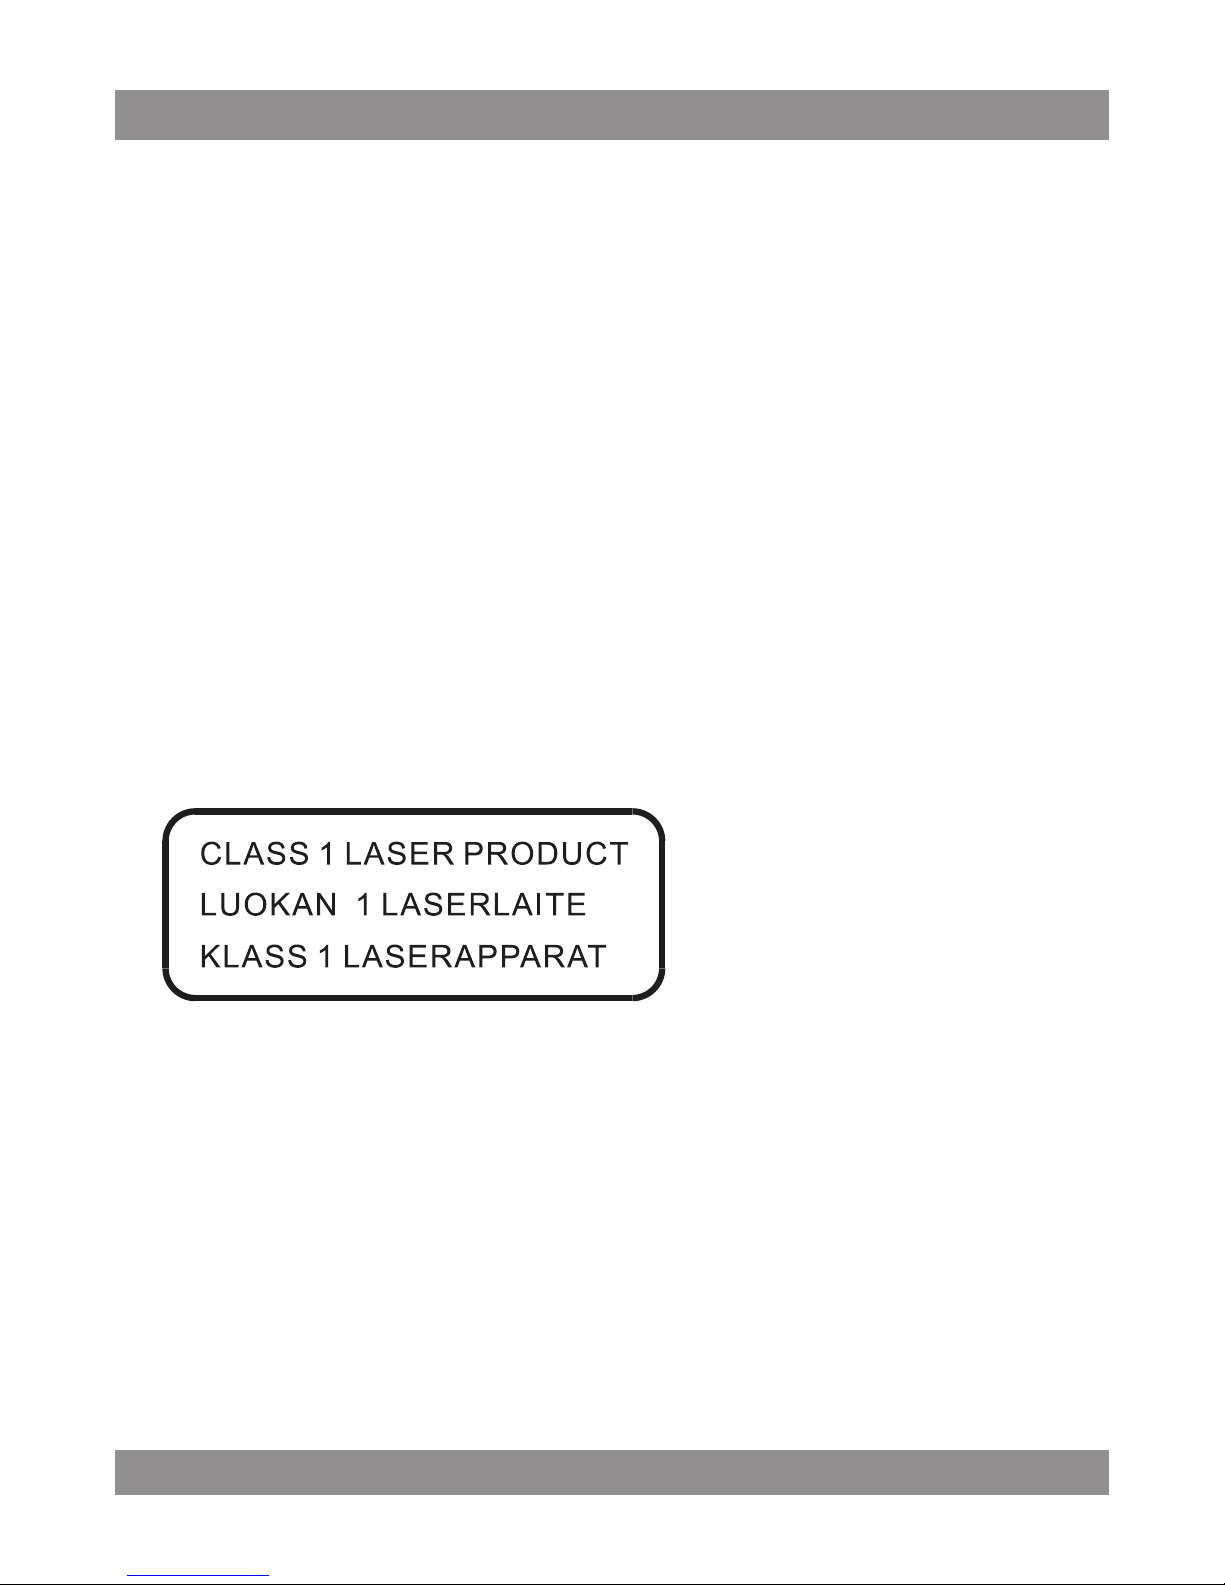
This Compact disc player is classied as a Class 1 LASER PRODUCT.
THE CLASS 1 LASER PRODUCT label is located on the rear exterior
NOTE
•
The manufacturer is not responsible for any radio or TV interference
caused by unauthorized modications.
• Avoid installing the unit in locations described below:
1. Places exposed to direct sunlight or close to heat radiating appliances such as electric heaters, or other equipments that radiate too
much heat.

MM 272
4
2. Places subjected to constant vibration.
3. Unventilated or dusty places.
4. Humid or moist places.
• Operate buttons and switches as instructed in the manual.
•
Before turning on the power for the rst time, make sure that the power
cord is properly installed and the voltage switch is correctly set.
•
Store your CD or other devices in a cool area to avoid damage from heat.
CAUTION
• TO REDUCE THE RISK OF ELECTRIC SHOCK, DO DOT REMOVE COVER
(OR BACK). DO NOT OPEN THE UNIT ANY SERVICING PLEASE REFER TO
QUALIFIED SERVICE PERSONNEL
WARNING
• Remove batteries if exhausted or if they will not be used for a long
period.
• The incorrect use of batteries can cause electrolyte leakage and will
corrode the compartment or cause the batteries to burst. Therefore:
• Do not mix battery types, e.g. alkaline with zinc carbonate.
• When inserting new batteries, replace all batteries at the same time.
MM 272
5
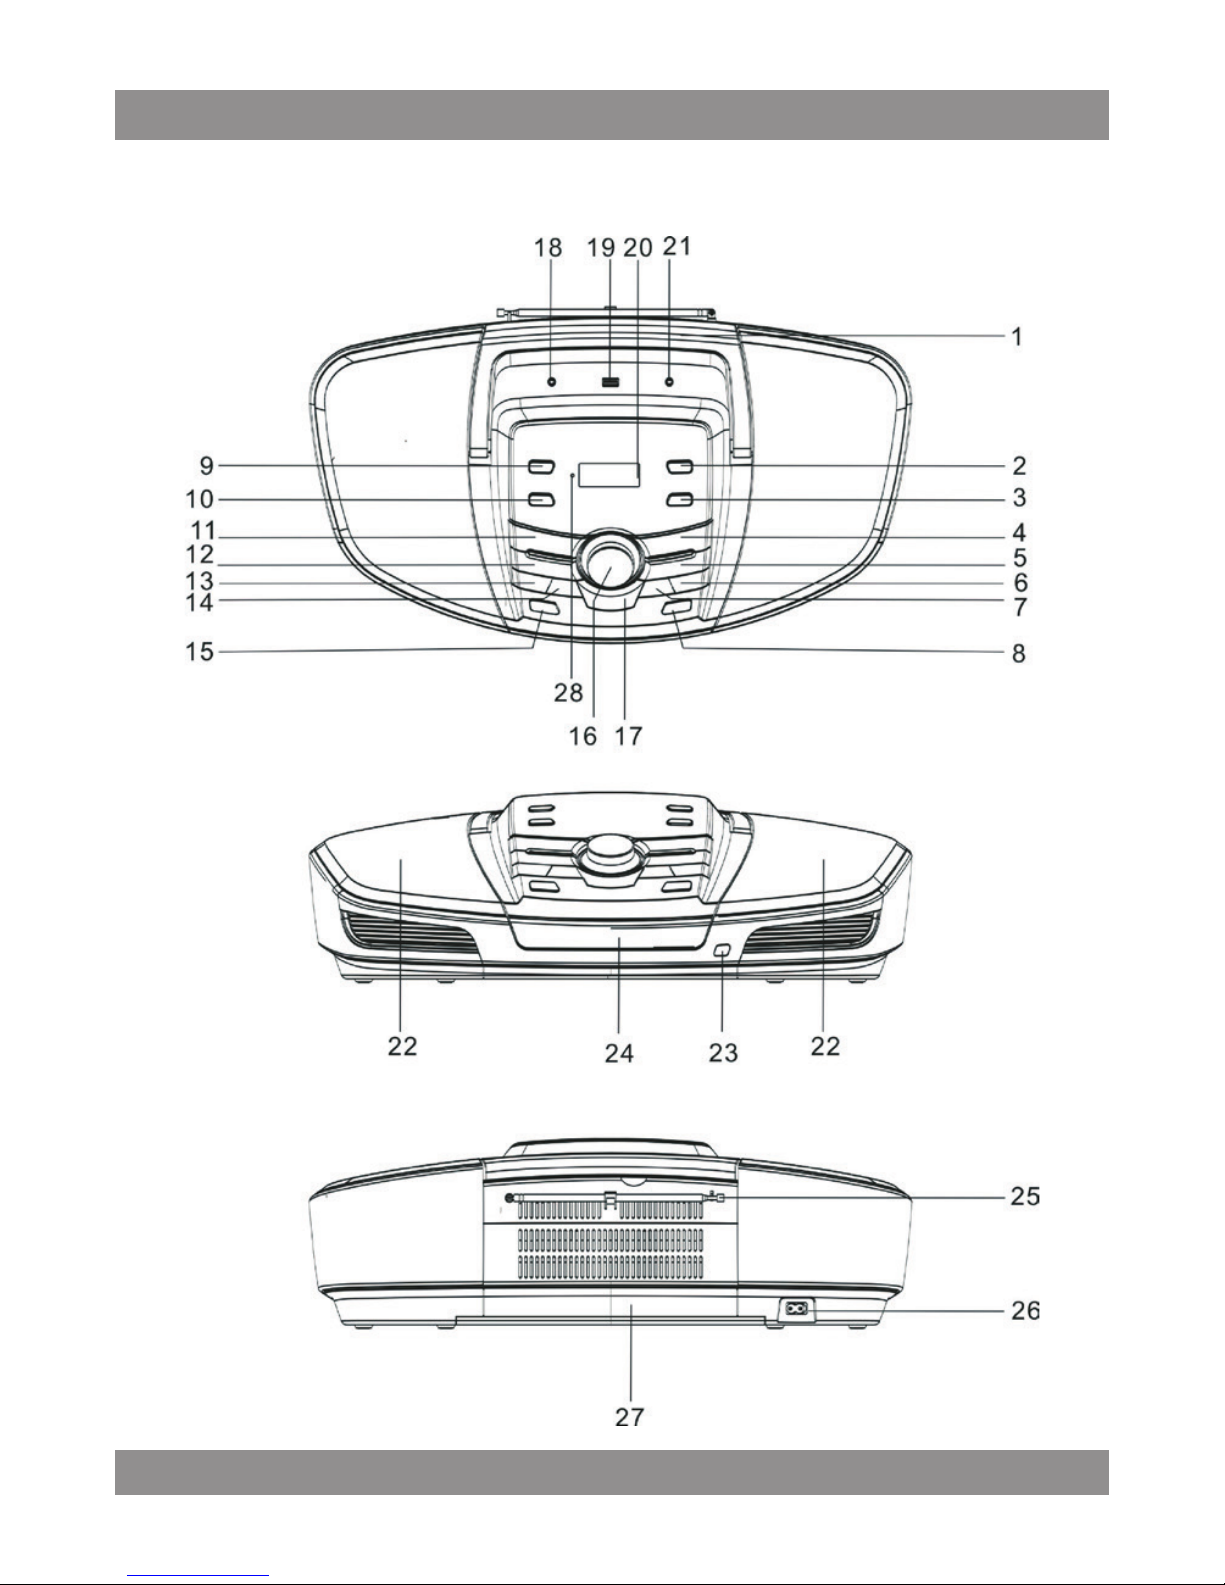
Schemat

MM 272
6
1. HANDLE
2. TIMER BUTTON
3. SET/PAIR/ID3 BUTTON
4. MO/ST./
BUTTON
5. CD PLAY/PAUSE
BUTTONBASS BOOST BUTTON
6. CD SKIP UP
/ TUNING+ BUTTON
7. CD SKIP BACK
/ TUNING- BUTTON
8. OPEN/CLOSE BUTTONFOLD+/+10
9. SLEEP BUTTONSPEAKERS
10. MEMORY BUTTON
11. EQ BUTTON
12. FUNCTION BUTTON
13. FOLD./10/M- BUTTON
14. FOLD./10/M+ BUTTON
15. STANDBY BUTTON
16. VOLUME BUTTON
17. PROG./P-MODE BUTTON
18. PHONES JACK
19. USB PORT
20. LCD DISPLAY
21. AUX IN JACK
22. SPEAKERS
23. REMOTE SENSOR
24. FRONT LOADING CD DOOR
25. FM TELESCOPIC ANTENNA
26. AC SOCKET
27. BATTERY COMPARTMENT
28. PAIR SENSOR
MM 272
7
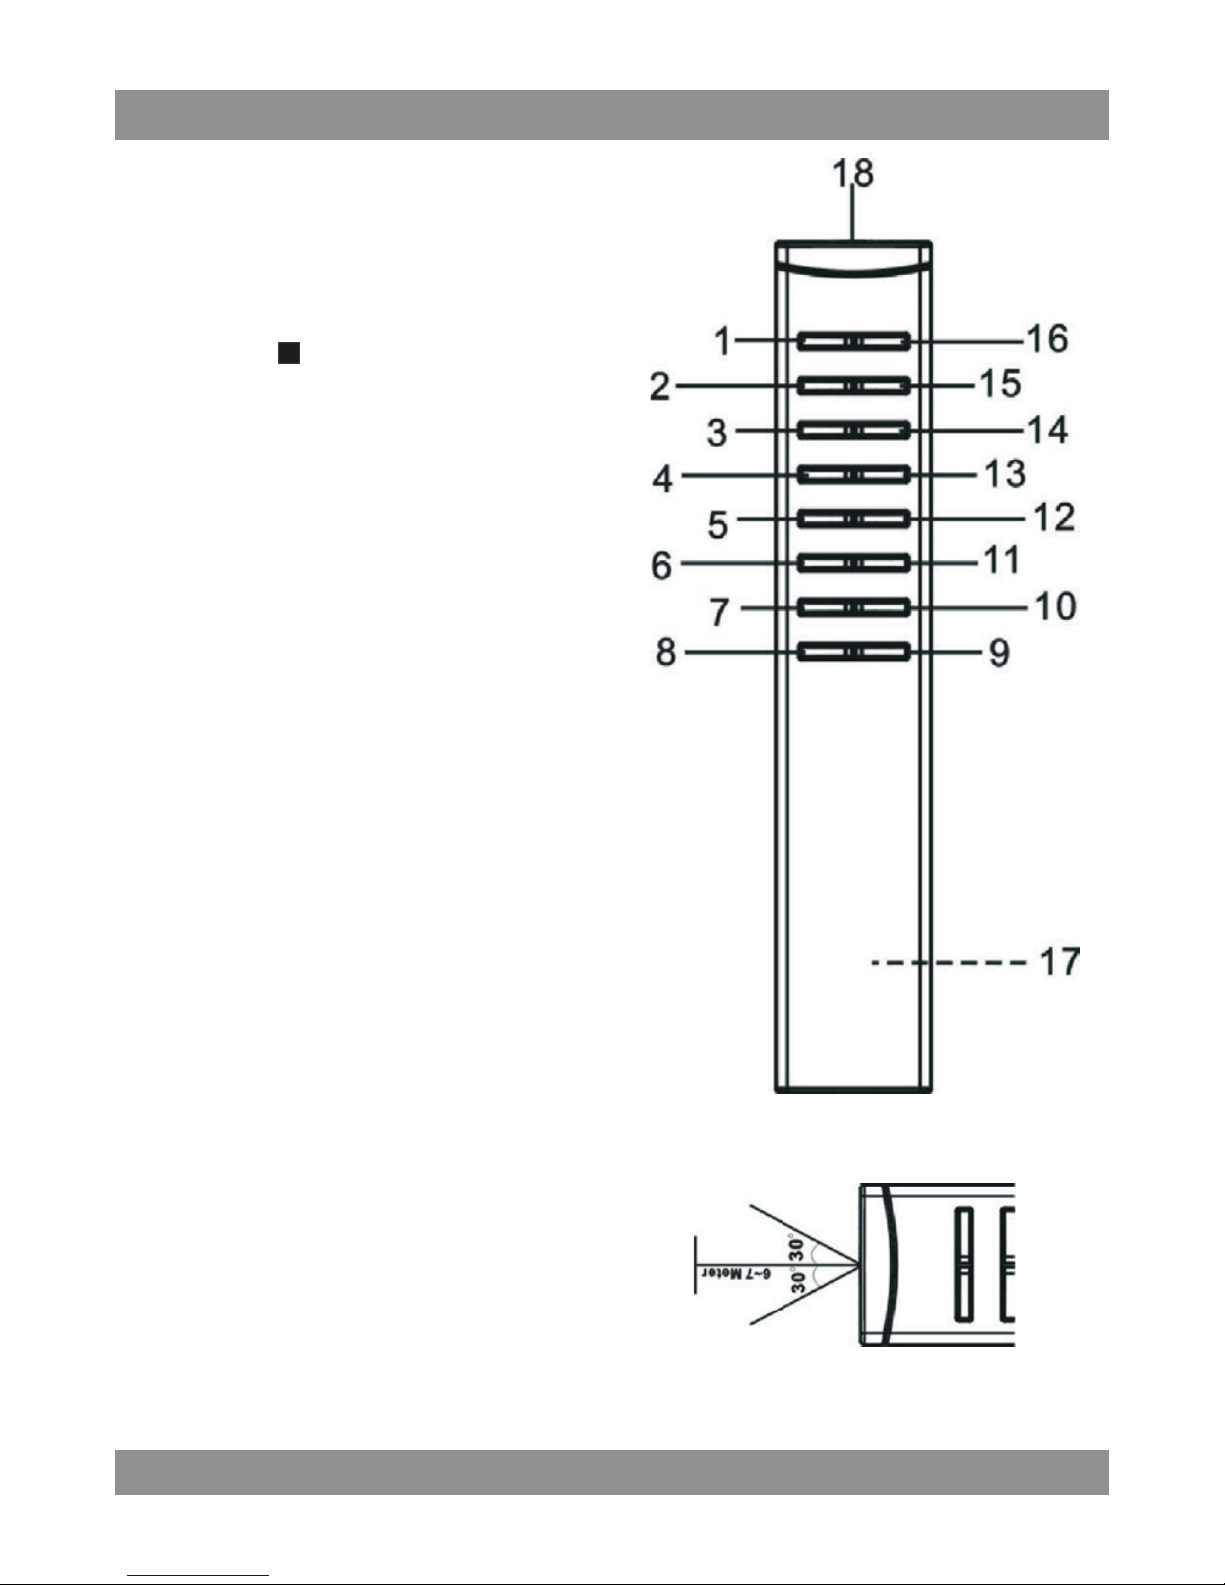
1. FUNCTION KEY
2. TIMER KEY
3. MO/ST./
KEY
4. CD SKIP BACK / TUNING- KEY
5. MEM/FOLD/10 DOWN KEY
6. MEM/PROG./P-MODE KEY
7. MUTE KEY
8. VOLUME DOWN KEY
9. VOLUME UP KEY
10. EQ KEY
11. ID3/PAIR KEY
12. MEM/FOLD/10 UP KEY
13. CD SKIP UP / TUNING+ KEY
14. CD PLAY/PAUSE / SET KEY
15. SLEEP KEY
16. STANDBY KEY
17. BATTERY COMPARTMENT
18. REMOTE SENSER
Note: Please pull battery
protector before using.
REMOTE HANDSET

MM 272
8
POWER SOURCE
This unit is designed to be operated on AC/DC
AC OPERATION
•
Plug the tail of AC power cord into AC socket on unit and the
plug into household AC outlet. The batteries will be automa
tically disconnected. For dual voltage version, make sure that
the AC VOLTAGE SELECTOR is switched to your local voltage
DC OPERATION
•
Open the BATTERY COMPARTMENT DOOR. Install 8pcs UM-1/D size batteries (not included) into compartment. Please follow correct polarities
as indicated
CAUTION
• Remove batteries if they are at or not being used for a long period of
time.
•
Batteries contain chemical substances, so they should be disposed
of properly.
BASIC FUNCTION
SWITCHING ON THE UNIT
•
After connecting the power, the display will show AM 0:00. Remain
this mode,the unit would turn of automatically after 15 minutes. Press
STANDBY button to turn on the unit and press STANDBY button again
to play
• REMARK The product maybe reset or not reset to operation of control
due to electrostatic discharte,just switch o and reconnect again. .
MM 272
9
SETTING THE TIME
Note: Please make sure that all connections have been ready.
•
In standby mode the LCD display will ash 0:00. Press the SET/PAIR/
ID3 button, the display will show the RTC 12 hours or the RTC 24 hours
version. Press SKIP UP/DOWN button on unit or on remote to choose
for the 12 or 24 hour version. Press the SET/PAIR/ID3 button to conrm.
•
After conrm the hours system, the Hour digits will ash, press the
or button on unit or on remote repeatedly to set the clock to
the correct Hour, press the SET/PAIR/ID3 button to conrm. Then the
minute digits will ash, press the
or button on unit on remote
repeatedly to set the clock to the correct Minutes, press the SET/PAIR/
ID3 button again to conrm.
WAKING UP THE MUSIC RADIO/CD/USB
You can set the timer to wake up the Radio, CD/MP3 or USB..
•
After setting the time in standby mode, press and hold the TIMER button
on unit or press TIMER key on remote control to set the desired wake
up time.
•
Enter the desired hour with the or button, press the TIMER button
on unit or on remote control to conrm. Enter the desired minutes with
the or button, press the TIMER button on unit or on remote control
to conrm. Then choose the desired wake up mode (RADIO/CD/USB) by
or button and press TIMER button on unit or on remote control
to conrm.
•
To the pre-set time, the desired wake up mode will turn on automatically.

MM 272
10
SLEEP TO MUSIC TIMER
You can set the sleep timer to automatically turn o the unit during
playback after a set period of time (10, 20, 30… up to 90 minutes).
• During operation, press the SLEEP button on unit or on remote control
repeatedly to select the desired sleep time from 90 minutes to 10 minutes, then stop pressing when the desired sleep time come up, after
about 5 seconds the sleep time will be automatically set and the “SLEEP”
indicator show on the display.
• The RADIO or CD/MP3 or USB or AUX player will continue playing until
the sleep timer counts down to “00” and then turn o automatically.
•
Note: If you are falling asleep to CD/USB/AUX, the sound will stop when
the disc ends, even if a longer sleep time was selected.
TURNING ON THE UNIT
Press the STANDBY button on unit or remote control, then press the
FUNCTION button on unit or remote control to choose FM / CD / USB /
AUX or BLUETOOTH model.
VOLUME ADJUSTING
Rotate the VOLUME button on unit or remote control to increase or
decrease volume.
Press MUTE button on remote control to turn o the sound. Press again
to turn on.
EQ FUNCTION
This unit has a built-in equalizer system, Press EQ button on unit or remote control while playing to select dierent music style (sound tone):
FLA, JAZZ, ROC, CLASS and POP.

MM 272
11
ID3 SYSTEM
When plays a MP3 le, press the SET/PAIR/ID3 button on the unit or ID3/
PAIR key on remote control, it will show “ID3 ON”, if the MP3 le is“ID3
” format, it will automatically search the information of “TITLE NAME”
“ARTIST NAME” and ”ALBUM NAME” and show on the display. Press
the SET/PAIR/ID3 button on the unit or ID3/PAIR key on remote control
again to back to normal display
•
HEADPHONE JACK
For private listening, insert a 3.5mm headphone (not included) into the
HEADPHONE jack. The SPEAKER output would be automatically cut o.
CAUTION: LISTENING AT A HIGH VOLUME OVER A LONG PERIOD IS NOT
GOOD FOR YOUR EARS.
BLUETOOTH OPERATION
•
Press the FUNCTION button on unit or FUNCTION key on remote control
to switch to BLUETOOTH function, the LCD will display “ PAIRING ” and
the light will ash at high speed.
•
Turn on the Bluetooth function on the device, scan the unit “MM272” and
connect, then input the password 0000 if required, the light will light up
to indicate connection done, and the display will show “BLUETOOTH”.
Press Play to start playback. If the unit can’t connect the relative Bluetooth
within 2 minutes, the indicator light will ash each 2’nds. Then press the
SET/PAIR/ID3 button on unit or on remote control to reconnect.
• Rotate the VOLUME knob on unit or VOLUME UP/DOWN key remote
control or the device to your desired level.
•
Press the SET/PAIR/ID3 button on unit or ID3/PAIR key on remote control
to disconnect Bluetooth.
• Note The Bluetooth works best within 10 meters.BASIC FUNCTION
MM 272
12
RADIO OPERATION
TUNING RADIO STATIONS
•
Press the FUNCTION button on unit or remote control to select the
desired wave band: FM .
•
Tune to desired station by pressing the TUN+ / or TUN-/ , the display
will show the band frequency. Example: FM 97.10 MHz
• Extend FM TELESCOPIC ANTENNA to its full length if you are listening
to FM broadcasting. Gently rock the unit back and forth to get the
best reception when you are listening to FM program, or place the
unit in an open location.
Note: The radio function is initially set at STEREO mode, if the broadcasting program is too noisy when you are listening to FM stereo
station, press MO./ST./
button on unit or press MO./ST./ key on
remote to switch to MONO FM.
•
To turn o the radio, press the FUNCTION button to switch to
other functions or press STANDBY button to turn off the unit.
RADIO STATION MEMORY OPERATION
You may pre-store 20 (FM ) radio stations in memory for your preference controlled by remote handset, so as you can listen to your desired
station directly and quickly, no need to tuning and search for again.
• Press FUNCTION button to FM mode.
•
Press MEMORY button on unit or press MEM/PROG./P-MODE key on
remote, “P01 ” will ash on the display. Then press the “TUN+/ ”or “
TUN-/
” button to select the rst desired station.
• Press the FOLD./10/M+ or FOLD./10/M- button unit or - MEM/FOLD./10
+ on remote to choose the desired sequence you want to store, then
 Loading...