

Manta MM270 User Manual

Instrukcja obsługi
User’s Manual
Snow Boombox BT
MM270

MM 270
2
User’s Manual
IMPORTANT NOTES ..................................................................................................................................................................................................................... 3
SCHEMAT .......................................................................................................................................................................................................................................... 5
POWER SOURCE ............................................................................................................................................................................................................................. 6
BASIC FUNCTION .............................................................................................................................................................................................................................. 6
SPECIFICATIONS..............................................................................................................................................................................................................................14
Instrukcja obsługi
WAŻNE INFORMACJE....................................................................................................................................................................................................................16
SCHEMAT ........................................................................................................................................................................................................................................18
ZASILANIE ..........................................................................................................................................................................................................................................20
FUNKCJE PODSTAWOWE ............................................................................................................................................................................................................21
SPECIFICATIONS..............................................................................................................................................................................................................................30

MM 270
3
IMPORTANT: Please read before using and retain for future reference.
FAVOR DE LEER EL MANUAL COMPLETAMENTE ANTES DE OPERAR
ESTE PRODUCTO. CONSERVAR EL MANUAL PARA FUTURAS REFERENCIAS
IMPORTANT NOTES
INTRODUCTION
• Thank you for buying this product.
• Please read through these operating instructions, so you will know
how to operate your equipment properly. After you nished reading
the instructions manual, put it in a safe place for future reference
CAUTION
•
Use of controls or adjustment or performance of procedures other than
those specied herein may result in hazardous radiation exposure
DANGER
•
Use of controls or adjustment or performance of procedures other than
those specied herein may result in hazardous radiation exposure
Use of controls or adjustment
or performance of procedures
other than those specied herein
may result in hazardous radiation exposure
NOTE
•
The manufacturer is not responsible for any radio or TV interference
caused by unauthorized modications.

MM 270
4
• Avoid installing the unit in locations described below:
1. Places exposed to direct sunlight or close to heat radiating appliances such as electric heaters, or other equipments that radiate too
much heat.
2. Places subjected to constant vibration.
3. Unventilated or dusty places.
4. Humid or moist places.
• Operate buttons and switches as instructed in the manual.
•
Before turning on the power for the rst time, make sure that the power
cord is properly installed and the voltage switch is correctly set.
•
Store your CD or other devices in a cool area to avoid damage from heat.
CAUTION
• Remove batteries if exhausted or if they will not be used for a long
period.
• The incorrect use of batteries can cause electrolyte leakage and will
corrode the compartment or cause the batteries to burst. Therefore:
• Do not mix battery types, e.g. alkaline with zinc carbonate.
• When inserting new batteries, replace all batteries at the same time.
MM 270
5
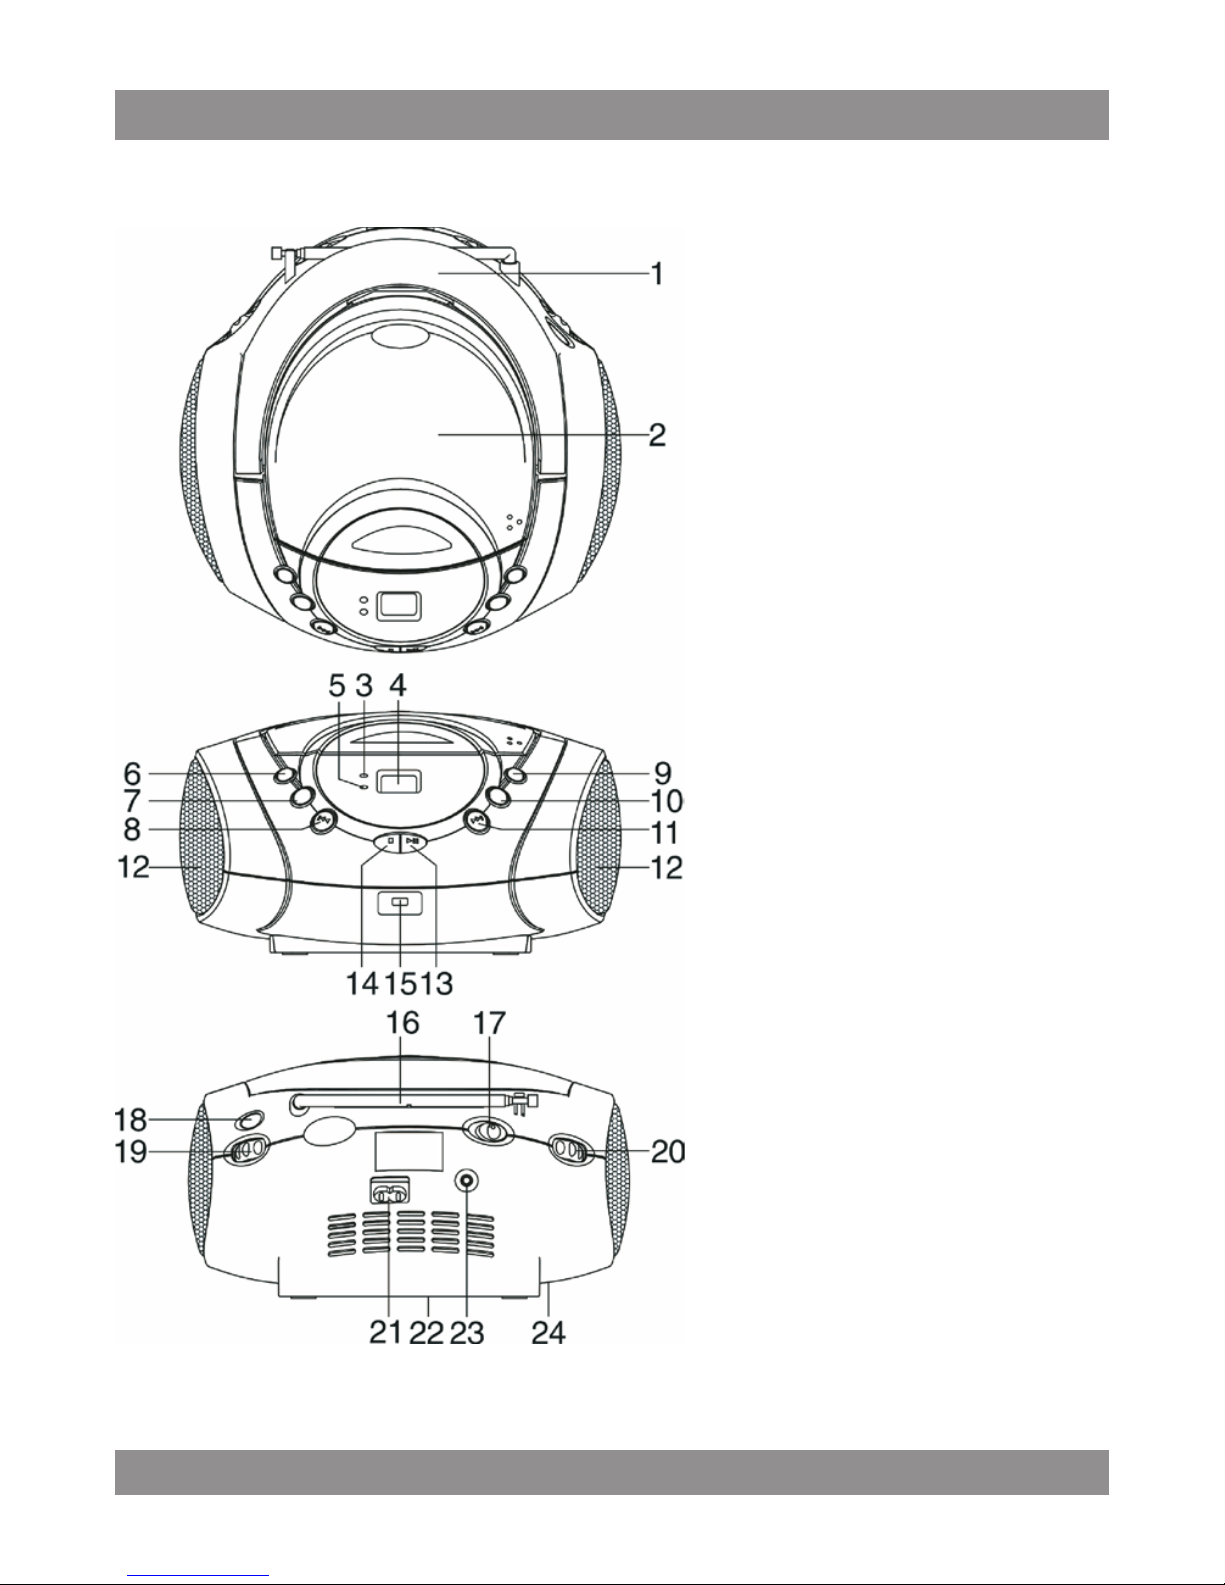
Schemat
1. FOLDING HANDLE
2. CD COMPARTMENT
3. POWER INDICATOR
4. LCD DISPLAY
5. FM STEREO INDICATOR
6. BASS BOOST BUTTON
7. FOLD-/-10 BUTTON
8. CD SKIP/SEARCH
BACKWARD BUTTON
9. CD PROG./P-MODE
10. FOLD+/+10
11. CD SKIP/SEARCH
FORWARD
12. SPEAKERS
13. CD PLAY/PAUSE/
STANDBY
14. CD /USB STOP
15. USB PORT
16. FM TELESCOPIC
ANTENNA
17. FUNCTION SWITCH
18. DIAL SCALE
19. TUNING CONTROL
20. VOLUME CONTROL
21. AC SOCKET
22.
BATTERY COMPARTMENT
23. AUX IN JACK
24. AC VOLTAGE SELECTOR
(For dual voltage version only)

MM 270
6
POWER SOURCE
This unit is designed to be operated on AC/DC
AC OPERATION
•
Plug the smaller end of AC power cord into AC jack on unit and the other bigger end into AC wall outlet. The batteries will be automatically disconnected. For dual voltage version, make sure that the AC voltage selector (located on the bottom of the unit) is switched to your local voltage.(optional)
DC OPERATION
•
Open the BATTERY COMPARTMENT DOOR. Install 6 pcs UM-2/C size
batteries (not included) into compartment. Please follow correct polarities as indicated
CAUTION
• Remove batteries if they are at or not being used for a long period of
time.
•
Batteries contain chemical substances, so they should be disposed
of properly
BASIC FUNCTION
SWITCHING ON THE UNIT
Set the FUNCTION switch to CD/MP3/USB/AUX or RADIO
• NOTE: In CD/MP3/USB/AUX mode when the unit is not providing the
main function for 15 minutes, the unit will automatically switch into
standby mode. To turn on the unit again, press „STANDBY” button or
replug the unit.
•
ESD hints – The product maybe reset or not reset to operation of control
due to electrostatic discharge, just switch o and reconnect again.

MM 270
7
TO ADJUST VOLUME
Rotate the VOLUME CONTROL back and forth to increase and decrease
volume
BASS BOOST SYSTEM
• The BASS BOOST BUTTON controls the bass of the unit. Bass sound is
the lower frequency ranges of sound. The knob can be pushed to OFF
or ON position, When the BASS BOOST is on, the unit boosts (increases)
the sound output of the bass frequencies
USING THE RADIO
TUNING IN RADIO STATIONS
• Move the FUNCTION switch to RADIO position, the POWER indicator
will illuminate.
• Tune to required station by rotating the TUNING KNOB.
• Rotate the VOLUME CONTROL to comfortable volume level.
• Extend the TELESCOPIC ANTENNA to its full length if you are listening
to FM broadcasting.
•
Note: The FM STEREO indicator will be on if you are receiving FM stereo
program.
• Turn o the radio by switching the FUNCTION switch to „OFF” position
USING THE CD/MP3
Discs for Playback
•
This system can playback all digital audio CD, MP3, WMA nalized digital
audio CD-Recordable (CD-R) discs, nalized digital audio CD-Rewritable
(CD-RW) discs and CD-DA format digital audio CD/CD-R/CD-RW discs.

MM 270
8
Loading a disc
Set the FUNCTION switch to CD/MP3/USB/AUX position.
• Open the CD door.
• Place an audio CD into the tray with the label side facing up.
•
Close the CD door. The total number of tracks will appear on the display
after several seconds.
• To remove the CD, press to open CD compartment lid, grasp the CD
by its edges, and carefully take it out.
Note
•
To ensure good system performance; wait until the disc tray completely
reads the disc before proceeding.
• If no disc is loaded into the compartment, or the disc is placed upside
down, the display will show N0D.
PLAYING A DISC
• Press the PLAY/PAUSE/USB button to start playback. The playback
starts from track
1, the “
” indicator is shown on the display. To interrupt playback,
press the PLAY/PAUSE/USB button.
The “
” indicator and the current track will ash on the display. To
resume playback, press the PLAY/PAUSE/USB button again.
• To stop playback, press the STOP button, the total number of tracks
appears on the display

MM 270
9
SELECTING A DESIRED TRACK/PASSAGE
To select a song/track which number exceeds 10, Press the
FOLD+/+10 or FOLD-/-10 button each time to skip forward/backward
10 tracks, then press the CD SKIP FORWARD/BACKWARD button
to select desired track. For example: to select the 17th track, press
FOLD+/+10 button, and then the CD SKIP FORWARD button six times
immediately..
To Select A Desired Folder (for MP3 disc only)
To select a song/track which number exceeds 10, Press the
FOLD+/+10 or FOLD-/-10 button each time to skip forward/backward
10 tracks, then press the CD SKIP FORWARD/BACKWARD button
to select desired track. For example: to select the 17th track, press
FOLD+/+10 button, and then the CD SKIP FORWARD button six times
immediately.
To Select A Desired Folder (for MP3 disc only)
(if the MP3 disc contains more than one folder) To skip to the desired
folder during playback, press and hold the FOLD+/+10 or FOLD-/-10
button for about 2 seconds to skip to next/previous folder.

MM 270
10
PROGRAM TRACKS
Programming tracks of disc are possible when playback is stopped.
Up to CD 20 tracks /MP3 99 tracks can be stored in the memory in any
order.
•
In stop mode, press the PROG./P-MODE button, the PROG will ash and
the P01 indicator will be on.
• Press the CD SKIP/SEARCH FORWARD button to select the rst desired
track to be programmed.
•
Press the PROG./P-MODE button to enter. The display changes to show
P02.
•
Repeat steps 2 & 3 to store other desired tracks until all tracks are
programmed.
• Press the PLAY/PAUSE/USB button to start playback from the rst programmed track.
• Press the STOP button to stop program playback
TO ERASE THE MEMORY PROGRAM
To clear the program, you have two options:
• Press the STOP button when the disc is stopped, or
•
Open the CD compartment lid, program will be erased
 Loading...