

Page 1
RDE 92 711-02-R 01.95
R
Reparaturanleitung
Repair Instructions
Baureihe 31 / Series 31
Nenngrößen 18...140
Sizes 18...140
* auch für
A10 VO ( s. S.2 )/
if its A10 VO see
page 2
A10VSO*
Brueninghaus Hydromatik
Page 2

2
RDE 92 711-02-R 01.95
Brueninghaus Hydromatik
Reparaturanleitung A10 VSO/31
Repair Instruction A10 VSO/31
Inhaltsverzeichnis
Contens
HINWEIS
Teilgeprüfte und vormontierte Original
Brueninghaus Hydromatik, Werk Horb-Baugruppen ermöglichen bei kürzestem Zeitaufwand erfolgreiche Reparaturen.
Besonders rasch erhalten Sie die richtigen
Ersatzteile, wenn Sie uns bei der Bestellung
Typ- und Fabriknummer mit angeben. ( Für
den A 10-Ersatzteilservice wurde ein Schnellversand eingeführt, bitte ggf RD 90124 anfordern.)
Die Reparaturarbeiten sind einfach, trotzdem
sollten Sie unser Angebot zur Schulung nutzen und sich bei uns das notwendige Spezialwissen aneignen.
Die vorliegende Rep.Anleitung kann auch als
Grundlage für die A10VO (Mobilanwendungen) verwendet werden. Sie unterscheidet sich nicht in den Einstellwerten von
der im Stationärsektor verwendeten A10VSO.
INHALT Seite
Page
Inhaltsverzeichnis 2
Schnittbild / Hinweise 3
Ersatzteil kits 4 - 5
Abtriebswelle abdichten 6 - 7
Demontage und Montage der 8 - 14
kompletten Einheit
Hinweise zum Steuerventil 15 - 17
Zerlegen und Reinigen des 18 - 21
Steuerventils
Montage-Abstimmung 22
Einstellhinweise und Prüfung 23
Werkzeuge und Anziehdrehmomente 24
NOTE
Pretested and preassembled Original
Brueninghaus Hydromatik, plant Horb subassemblies make quick and successful
repairs possible
Delivery of the correct spare parts will be
especially quick if you state the type and the
serial number when orderring. ( We created a
A 10-spare part - quick shipping - service,
order RE 90 124 if necessary.)
Although repairs are simple, you are
encouraged to enroll in the repair training
classes offered by Brueninghaus Hydromatik,
plant Horb. This will give you the proper
experience and specialized knowledge to make
your own repairs.
This repairing manual also can be used to
repair the mobile A 10 VO. Adjustments of the
mobile pump are the same like the adjustments
of the stationary units A 10 VSO.
CONTENTS
Contents
Cross Sectional Diagram / Notes
spare parts kits
Sealing the drive shaft
Disassembly and re-assembly
of the complete unit
control valve instructions
Disassembling and cleaning the control
valve
Specification tolerance lists
set up and testing instruction
Tools and tightening torques
Page 3
3
RDE 92 711-02-R 01.95
Brueninghaus Hydromatik
Reparaturanleitung A10 VSO/31
Repair Instruction A10 VSO/31
Schnittbild
Section
NG 100 und 140 mit mechan.
einstellbarem Q min - Anschlag
Size 100 and 140 with stopper
min flow adjustable mechanically
X
Page 4
4
RDE 92 711-02-R 01.95
Brueninghaus Hydromatik
Reparaturanleitung A10 VSO/31
Repair Instruction A10 VSO/31
K1
K2
K3
K4
K5
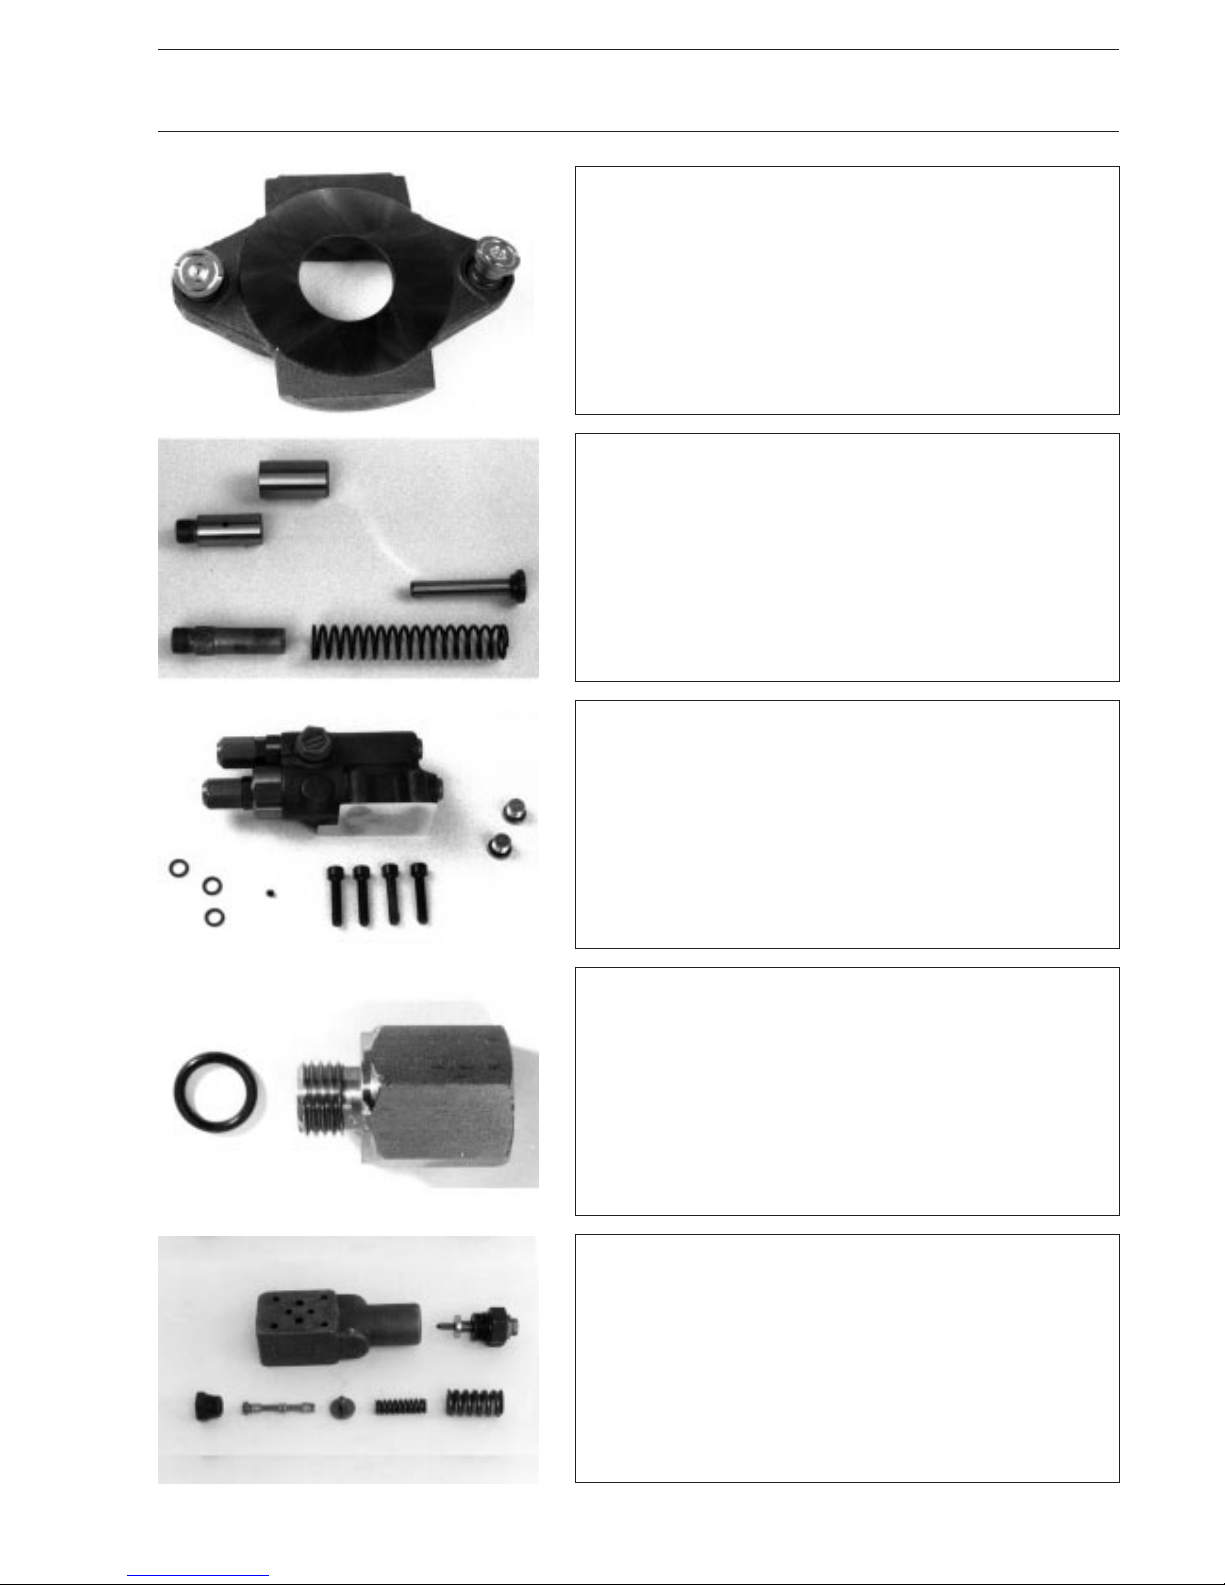
Die Gruppe "Lagersatz Kleinteile" beinhaltet: 2
Kegelrollenlager, 2 Gleitlagerschalen, Abstimmscheibe, Distanzscheibe, Befestigungsschrauben,
diverse Stopfen und Zy-linderstift für Fixierung der
Verteilerplatte.
Contents of kit "bearing set / miscellaneous parts":
2 tapered roller bearings, 2 bearing shells,
adjustment shim, spacer shim, plugs, cylindric pin to
fix the valve plate.
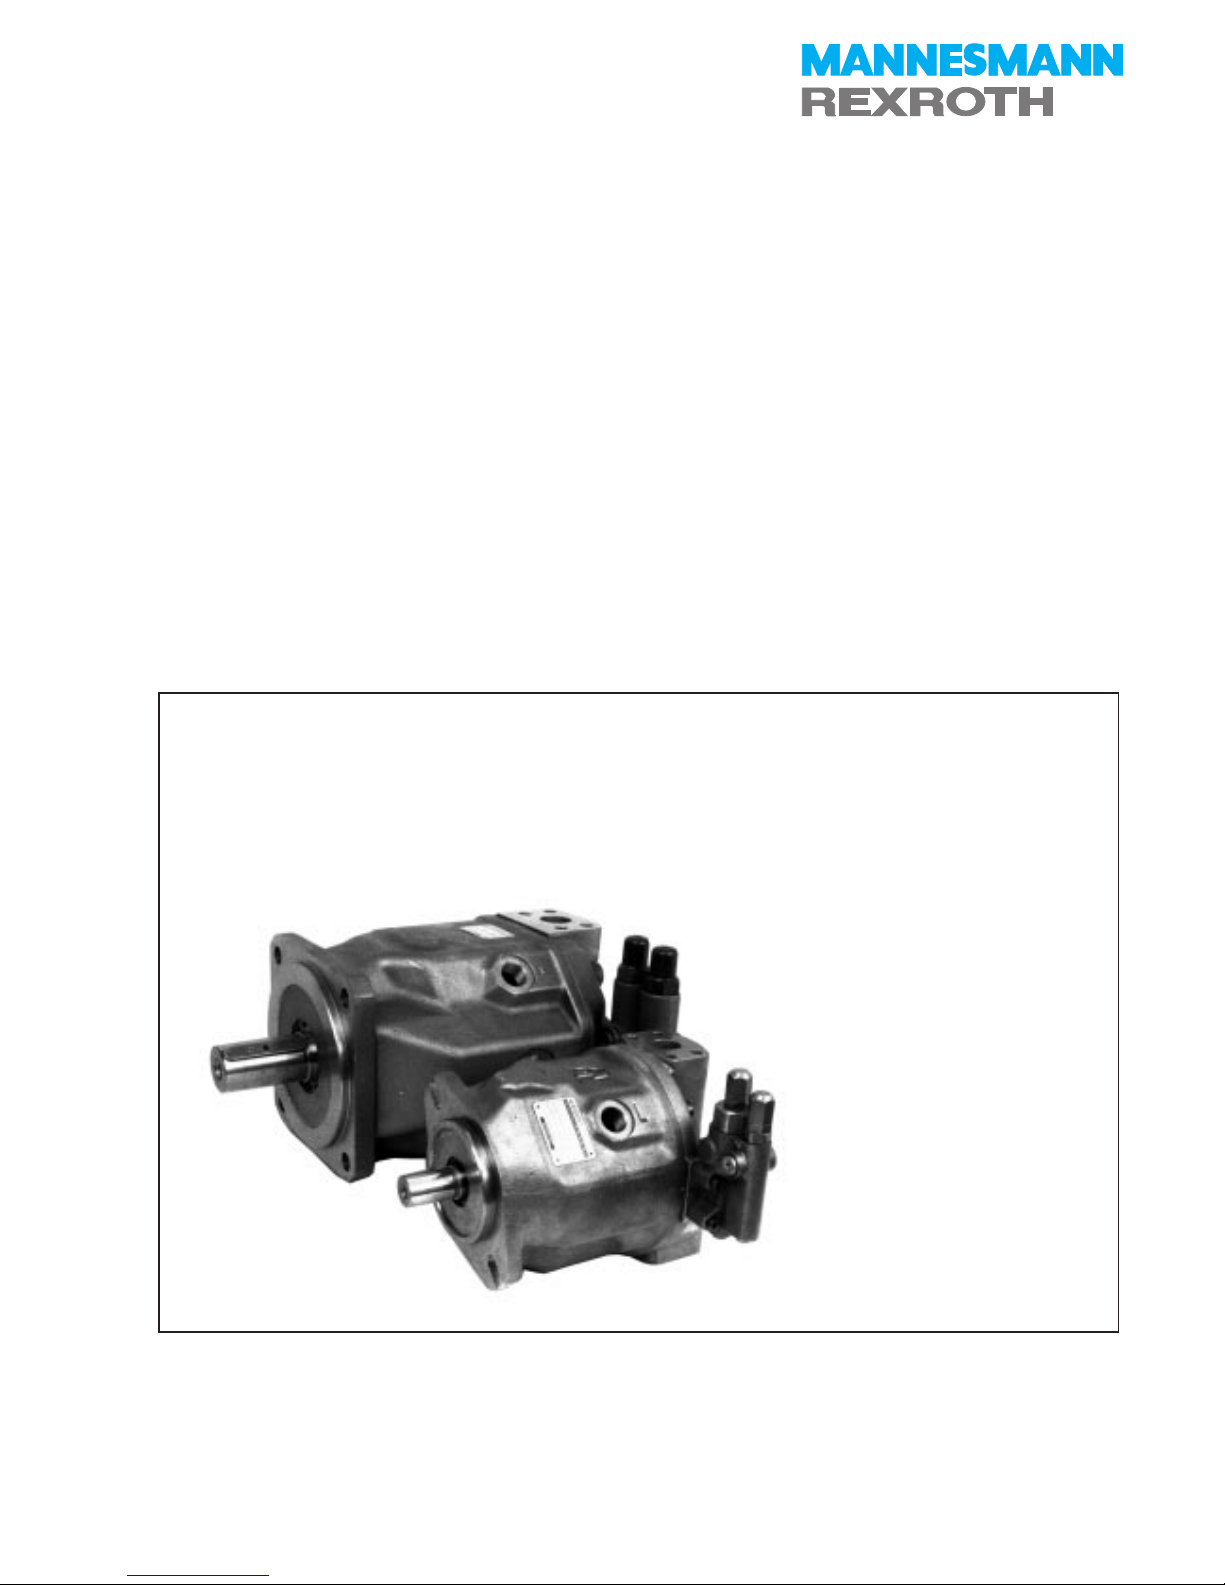
Kompletter Dichtsatz ( Dichtsätze sind typenbezogen
festgelegt, Foto z. B. A 10 VSO 28 DFR, ohne
Steuerventildichtelemente), Werkstoff der Dichtelemente: Wellendichtring in FPM übrige in NBR
Sealing set complelely( sealing sets are based on
the type of the pump, picture shows for example A
10 VSO DFR, without pilot valve seals). Sealing
material: drive shaft sealing ring FPM, others NBR.
Ersatzteil - Kits
Spare part kits
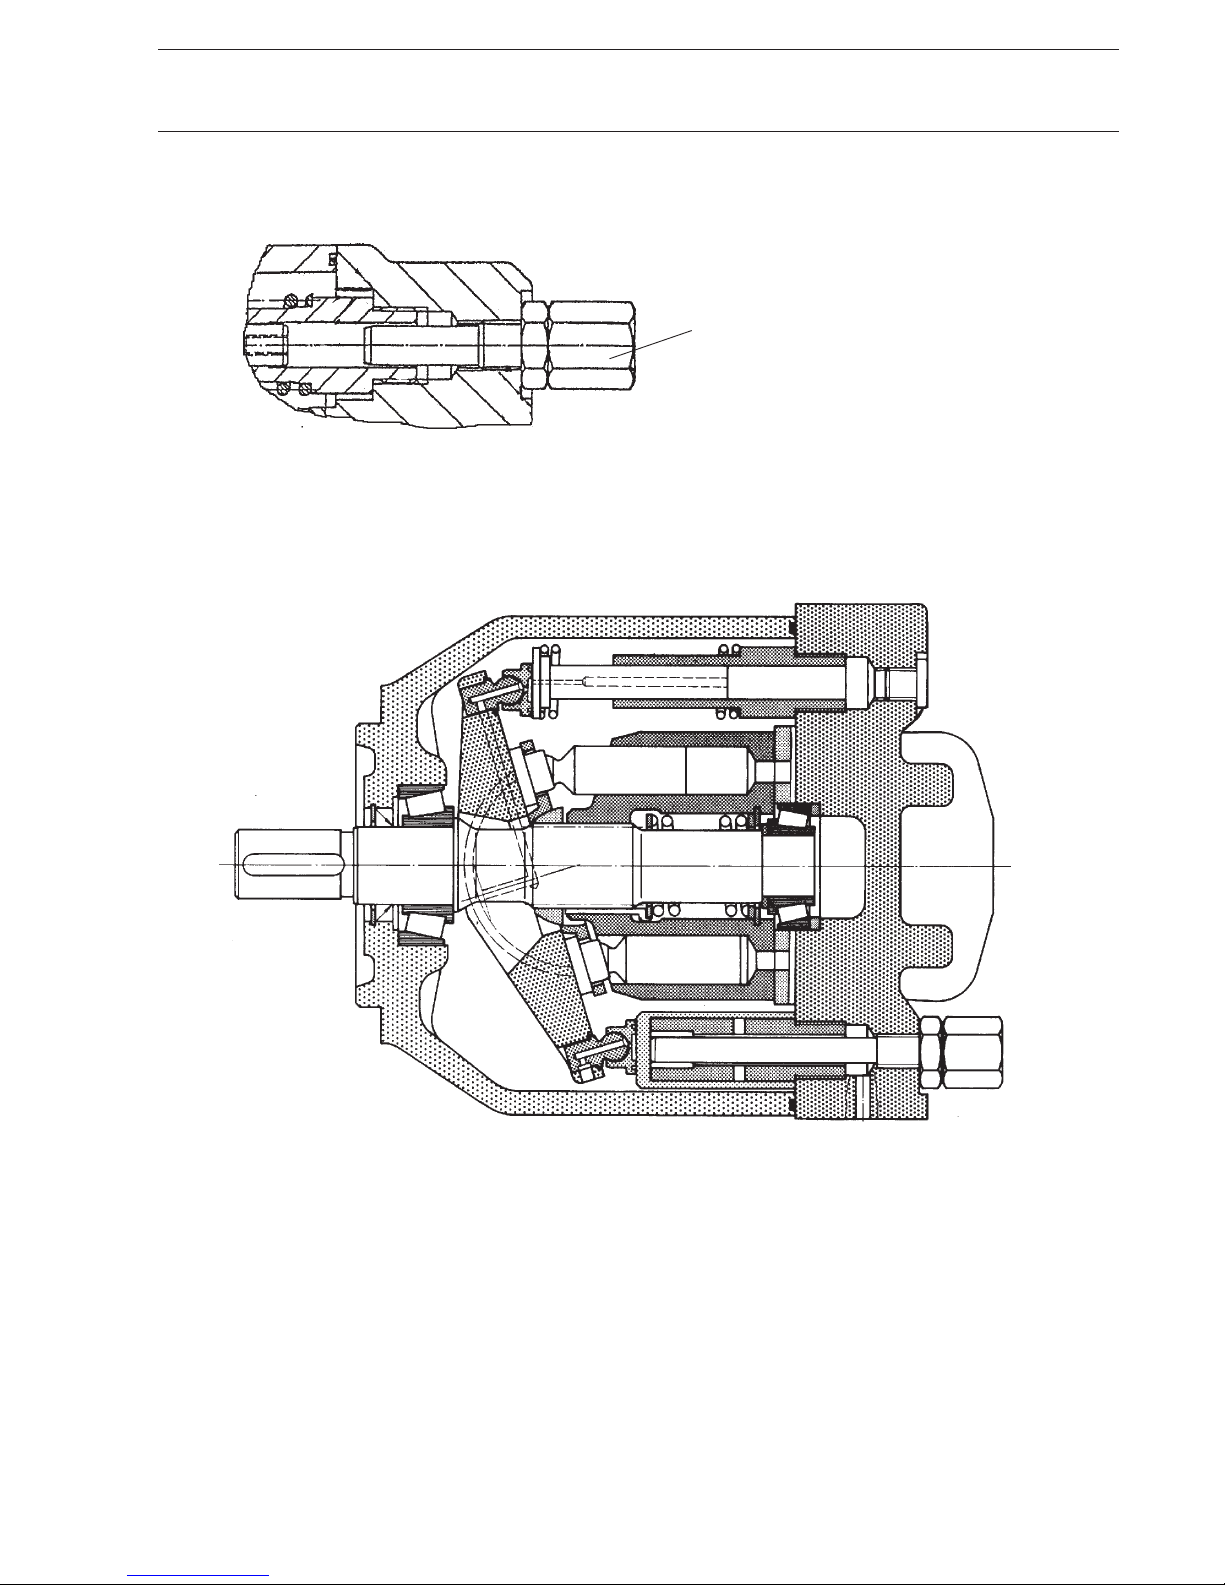
Wie K 1, s. o., jedoch Werkstoff aller Dichtelemente
in FKM.
Same like K 1, see picture on top. Only difference: all
material FKM
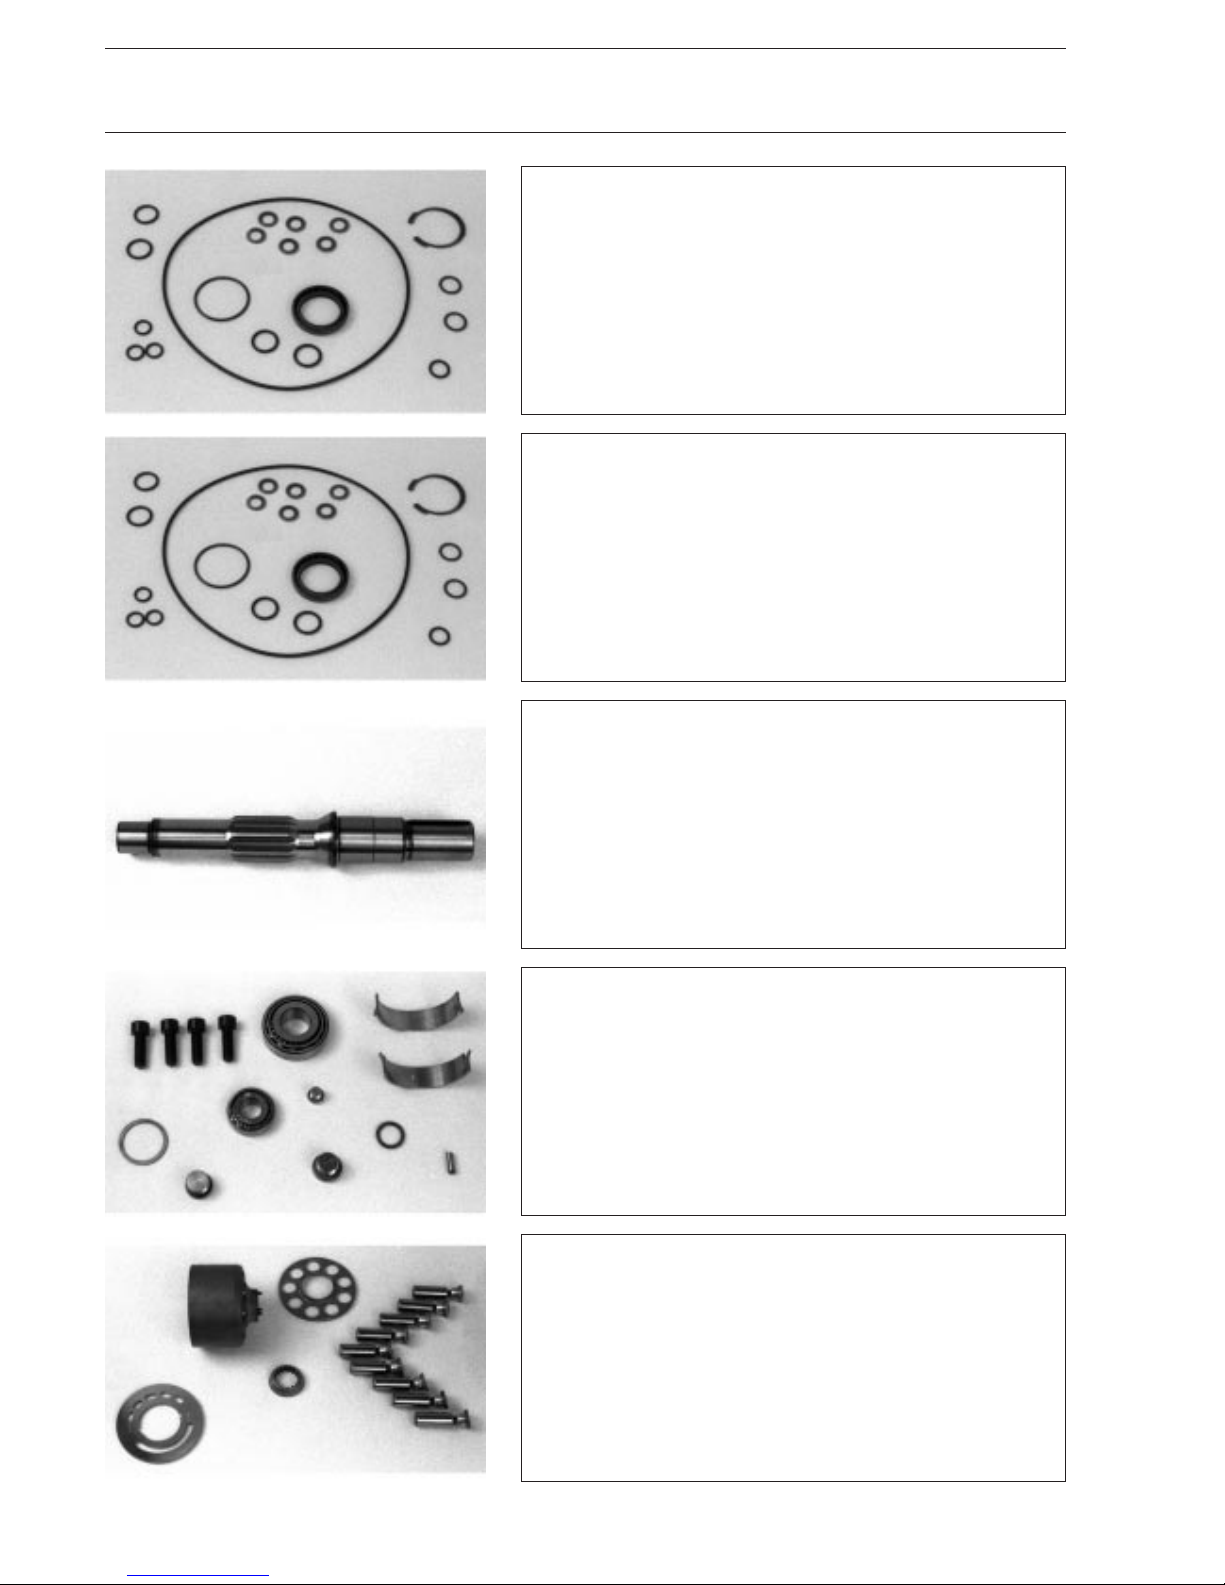
Antriebswelle: im Ersatzteilverkauf werden folgende
Ausführungen angeboten:
ISO - Paßfeder, SAE - Paßfeder, SAE - Zahnwelle
Drive shaft: our spare part supply offers you the
following drive shaft types:
ISO - key design, SAE - key design, SAE - splined
design
Die komplette Rotationsgruppe mit montierten
Hakenstiften im Zylinder wird für Drehrichtung rechts
oder links angeboten.
We offer the rotary group completely with its cylinder
with mounted pressure - pins for cw or ccw rotating
units ( pls order your direction of rotation ).
Page 5
5
RDE 92 711-02-R 01.95
Brueninghaus Hydromatik
Reparaturanleitung A10 VSO/31
Repair Instruction A10 VSO/31
Die Abb. li zeigt die Verstellteile ohne Anschläge.
Ggf können auch Verstellteile mit Anschlägen bezogen werden ( s. dazu auch RD 90 124)
Picture leftt shows the control device parts without
the stopper parts. Order with stopper parts if
necessary ( see RE 90 124 ).
K6
K7
K8
Schwenkwiegen in Standard - Ausführung stehen für
rechte oder linke Antriebsdrehrichtung zur Verfügung. Ebenso wird zusätzlich für leistungsgeregelte
Pumpen die rechte und linke Schwenkwiege angeboten.
We offer swash plates for cw or ccw rotating units
in the serial design or for horse power controlled
pumps by our spare part service.(Order your
direction of rotation)
9*
10*
Als geprüftes und voreingestelltes Ventil kann das Steuerventil für p- und Q-Regelung bezogen werden. Wenige Handgriffe ermöglichen ggf. Modifikationen in der Steuerventilausführung. (Abb. li zeigt Steuerventil für A10 NG 18 bis100;
NG 140 mit Ventil-NG 6 - s. Titelbild bzw. Abb 10* S. 5)
Order a checked and preadjusted pilot valve to control the
pump for pressure compensator and flow control. Easy
handling is possible to convert the design of the pilot valve.
(Picture left shows valve of pump size 18 ..100; size 140 must
have valve size 6 - see cover picture or 10*this page)
Dichtelemente / Ersatzteil-Kits
sealing kits / spare parts kits
Steuerventilausführung für NG 18 bis 100:
X-Adapter am DFR-Steuerventil für metrische
Verrohrung des Steueranschlußes X (ohne Blende).
Pilot valve design 18 to 100:
Adapter without orifice of the DFR - pilot valve, if you
use a metric pilot pipe connection X.
Die Abb. zeigt den zerlegten Druckregler als
Zwischenplat-tenventil (NG 140). Als zweite Ventilachse wird der Förder-stromregler außen am Druckregler angeflanscht.
Picture left shows the pressure compensator
disassembled as a sandwich valve
(of pump size 140). Mount on top of the pressure
compensator housing the valve housing for the flow
control.
Page 6
6
RDE 92 711-02-R 01.95
Brueninghaus Hydromatik
Reparaturanleitung A10 VSO/31
Repair Instruction A10 VSO/31
Sicherungsring ausbauen.
Remove the retaining ring.
Ausbau des WDR mit spitz angeschliffenem Schraubendreher. Achtung: Beschädigung der Welle führt
zur Undichtheit.
Grind screwdriver to disassemble the shaft sealing
ring carefully. Pay attention: Damages of the drive
shaft indicate leakage.
1
2
3
4
5
Hinweis !
Note !
o. Abb.
no picture
Die hier beschriebene Möglichkeit zum Wechsel der
Antriebswellen - Abdichtung stellt nicht die serienmäßige Montage dar. Für sicheres Dichtungsverhalten ist eine Montage des Dichtringes gemeinsam mit dem Kegelrollenlager von innen her durch
das Pumpengehäuse durchzuführen. Soll aus Gründen der Vereinfachung im Reparaturfall die folgend
beschriebene Vorgehensweise durchgeführt werden, so ist beim Ausbau der Dichtung besonders
darauf zu achten, daß die Antriebswelle nicht beschädigt wird.
This discription showes how to change the drive shaft
sealing ring but it isn`t the way of serial assembly.
The sealing ring is assembled together with the taper
roller bearing from inside the pump housing normally
to get a secure sealing condition. If you decide to
repair the pump in the shown way be very careful
while handling so that the drive shaft wouldn`t be
damaged during disassembly of the shaft sealing
ring.
Entfernen der Paßfeder.
Disassemble of the key.
Antriebswelle abdichten
Sealing the drive shaft
Page 7
7
RDE 92 711-02-R 01.95
Brueninghaus Hydromatik
Reparaturanleitung A10 VSO/31
Repair Instruction A10 VSO/31
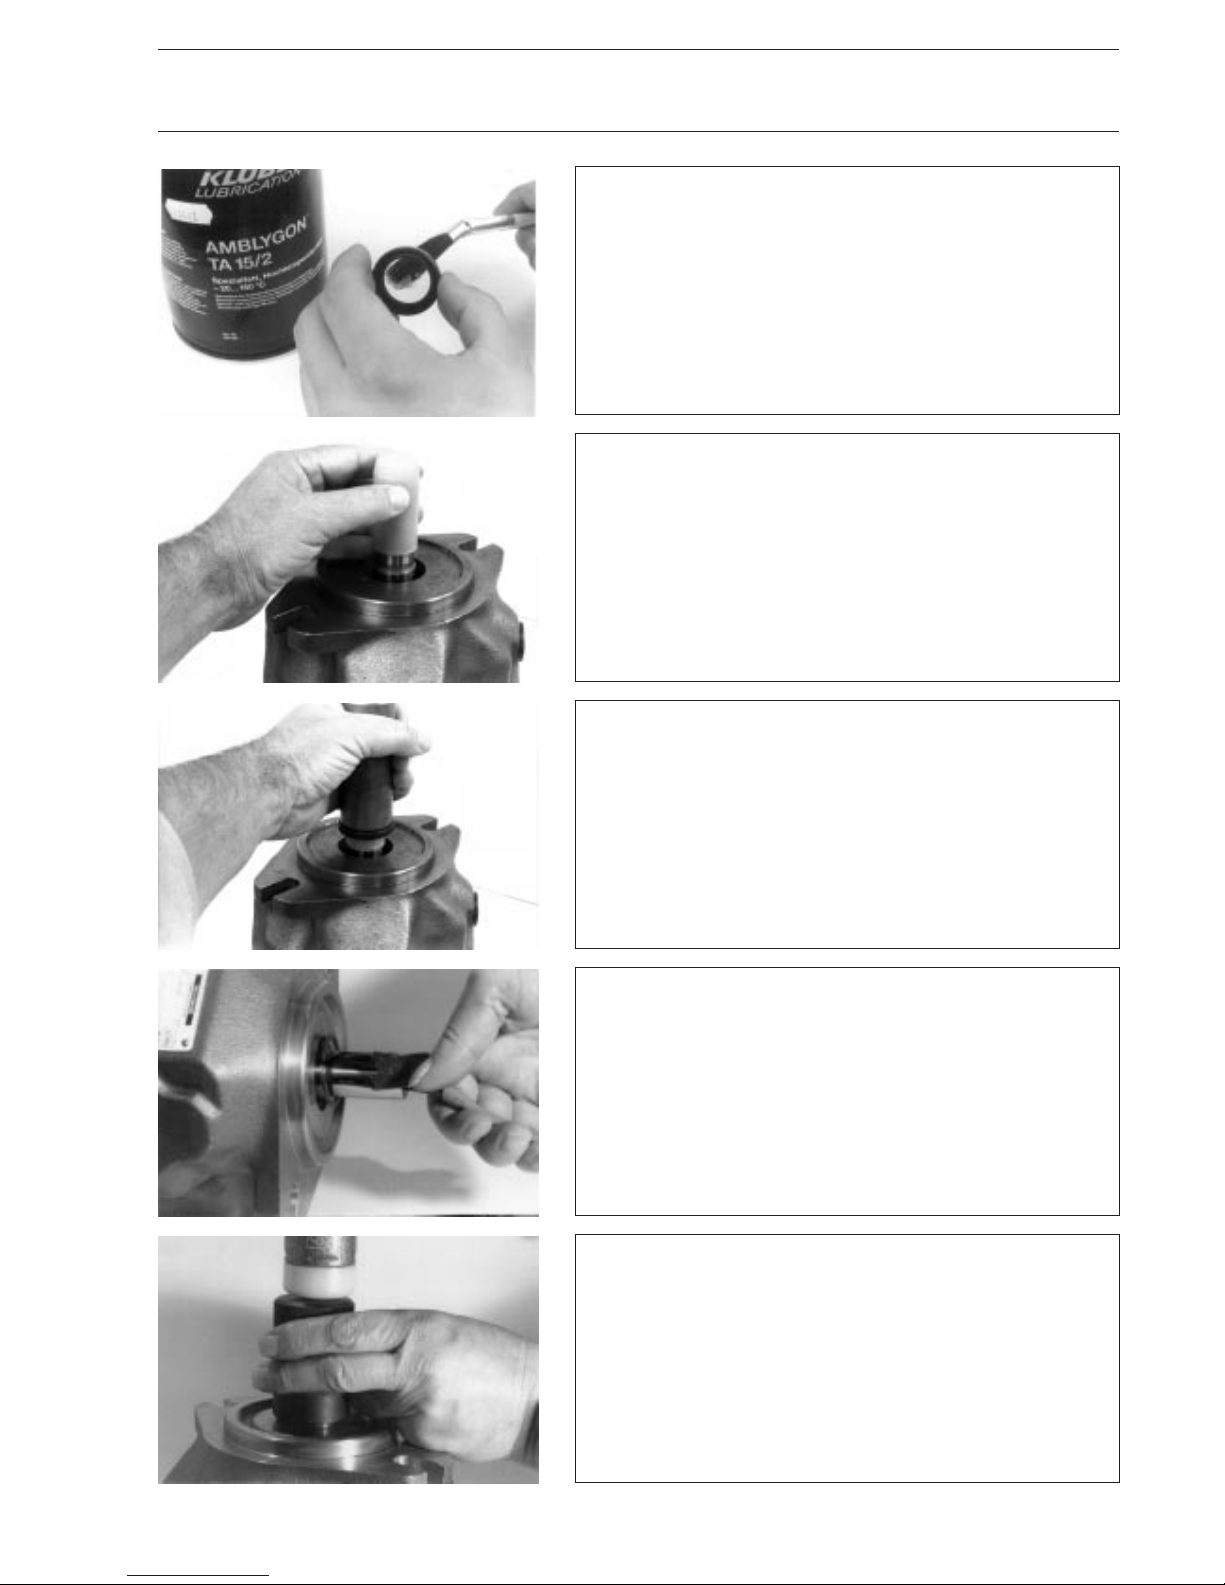
Mit geeignetem Rohr oder größerem Verstellkolben
wird über die Einführhülse der WDR nur so tief montiert, daß der Sicherungsring montierbar ist ( zu tiefes
Montieren führt zum Ausfall: Berührung mit dem
Wellenlager ! )
Use a suitable pipe or use the control piston of a
bigger pump size to mount the shaft seal ring via the
installation tool, but don't push it too deap. If the shaft
seal ring touches the bearing ring you will damage
the seal ring.
Einführhülse für die Montage des WDR aufsetzen:
Hülse 74.0.0655 ( NG 18 )
Hülse 74.0.0656 ( NG 28 )
Hülse 74.0.0657 ( NG 45 )
Hülse 74.0.0658 ( NG 71 )
Hülse 74.0.0659 ( NG 100 )
Hülse 74.0.0660 ( NG 140 )
Use installation tool for the sealing ring ( see tool list
on top ).
6
7
8
9
10
Antriebswelle abdichten
Sealing the drive shaft
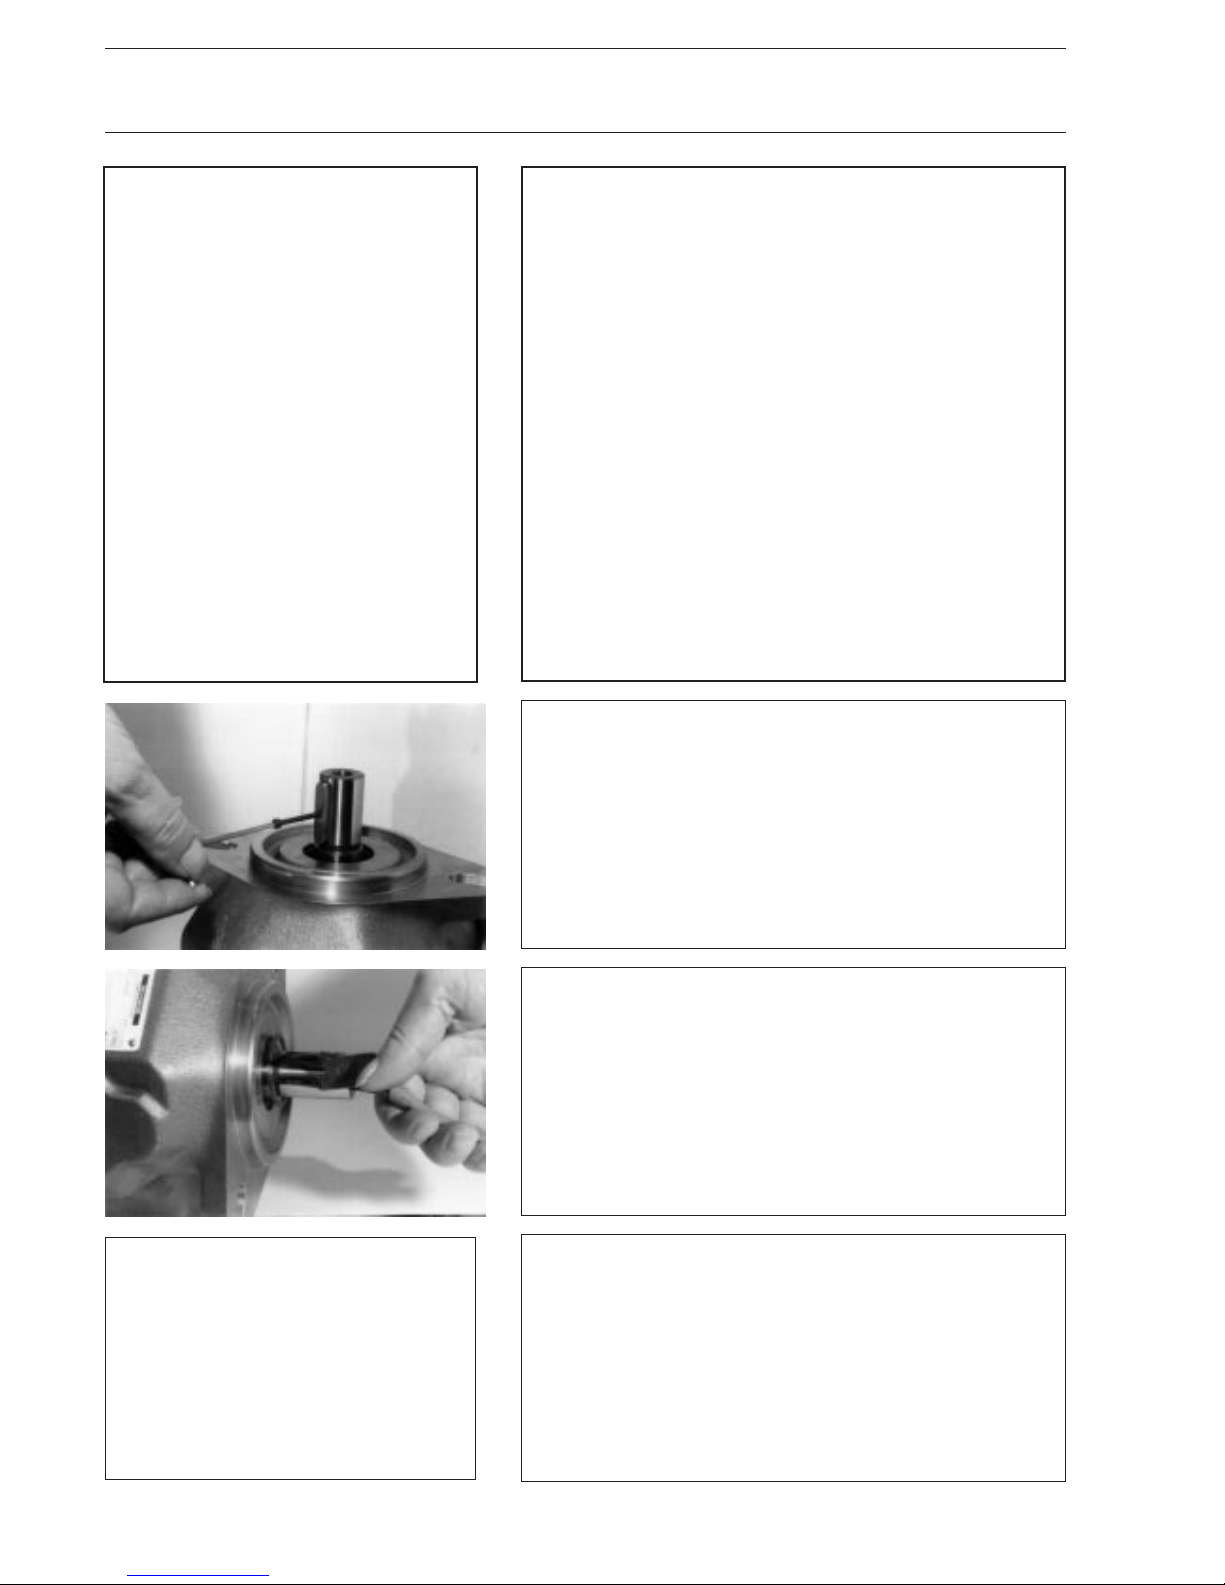
Bevor der neue eingefettete WDR montiert wird ist
eine Kontrolle der Lauffläche, Welle und Gehäuse
vorzunehmen.
Change the shaft seal and check the contact surfaces
( drive shaft and housing ), grease sealing ring
before mounting.
Angaben für
ISO - Wellen /
List shows ISOdrive shaft standard
only
Sicherungsring einsetzen.
Assemble the retaining ring.
Sicherungsring ganz einrasten. Anschließend Montierender Paßfeder mit Hilfe eines Kunststoffhammers.
(o. Abb.)
Assemble the retaining ring. Assemble the key next
by using a plastic hammer. This handling isn't shown
in pictures.
Page 8
8
RDE 92 711-02-R 01.95
Brueninghaus Hydromatik
Reparaturanleitung A10 VSO/31
Repair Instruction A10 VSO/31
11
12
13
14
15
Demontage und Montage der kompl. Einheit
Disassembly and re-assembly of the complete unit
Die folgenden Arbeiten sind beispielhaft an einer NG
45 durchgeführt. Abweichungen für andere NG sind
im Bedarfsfall extra angeführt.
Abbau des Steuerventils.
This manual shows the handling of size 45. If
necessary changes to the other pump sizes are
shown separately.
Disassemble the pilot valve.
Markieren der Anschlußplatte zum Pumpengehäuse
und Lösen der Befestigungsschrauben.
Mark position of the port plate to pump housing and
remove socket screws of the port plate.
Abheben der Anschlußplatte und Verteilerplatte mit
Verstellteilen ( Herunterfallen der Verteilerplatte
durch Festhalten vermeiden).
Remove the port plate together with the valve plate
and control device parts (hold the valve plate so
that the plate can´t fall down )
.
Abheben des Kegelrollenlagers und Abstimmscheibe.
Disassemble taper roller bearing and adjustment
shim.
Triebwerk herausziehen.
Disassemble the rotary group.
Page 9

9
RDE 92 711-02-R 01.95
Brueninghaus Hydromatik
Reparaturanleitung A10 VSO/31
Repair Instruction A10 VSO/31
O - Ring entfernen.
Remove the O - ring.
20
17
16
18
19
Demontage und Montage der kompl. Einheit
Disassembly and re-assembly of the complete unit
Lagerschalen herausheben.
Disassemble beaaring shells.
Kugellager Ab- und Auszieher ( handelsüblich ) für
Kegelrollenlager - Außenring ( antriebswellenseitig ).
Use bearing puller to remove outer bearing race of
front bearing.
Steuerplatte abheben.
Remove the control plate.
Kugellager Ab- und Auszieher ( handelsüblich ) des
Kegelrollenlager - Außenringes (anschlußplattenseitig )
Use bearing puller to remove outer bearing race of rear
bearing.
Page 10

10
RDE 92 711-02-R 01.95
Brueninghaus Hydromatik
Reparaturanleitung A10 VSO/31
Repair Instruction A10 VSO/31
21
22
23
24
25
Demontage und Montage der kompl. Einheit
Disassembly and re-assembly of the complete unit
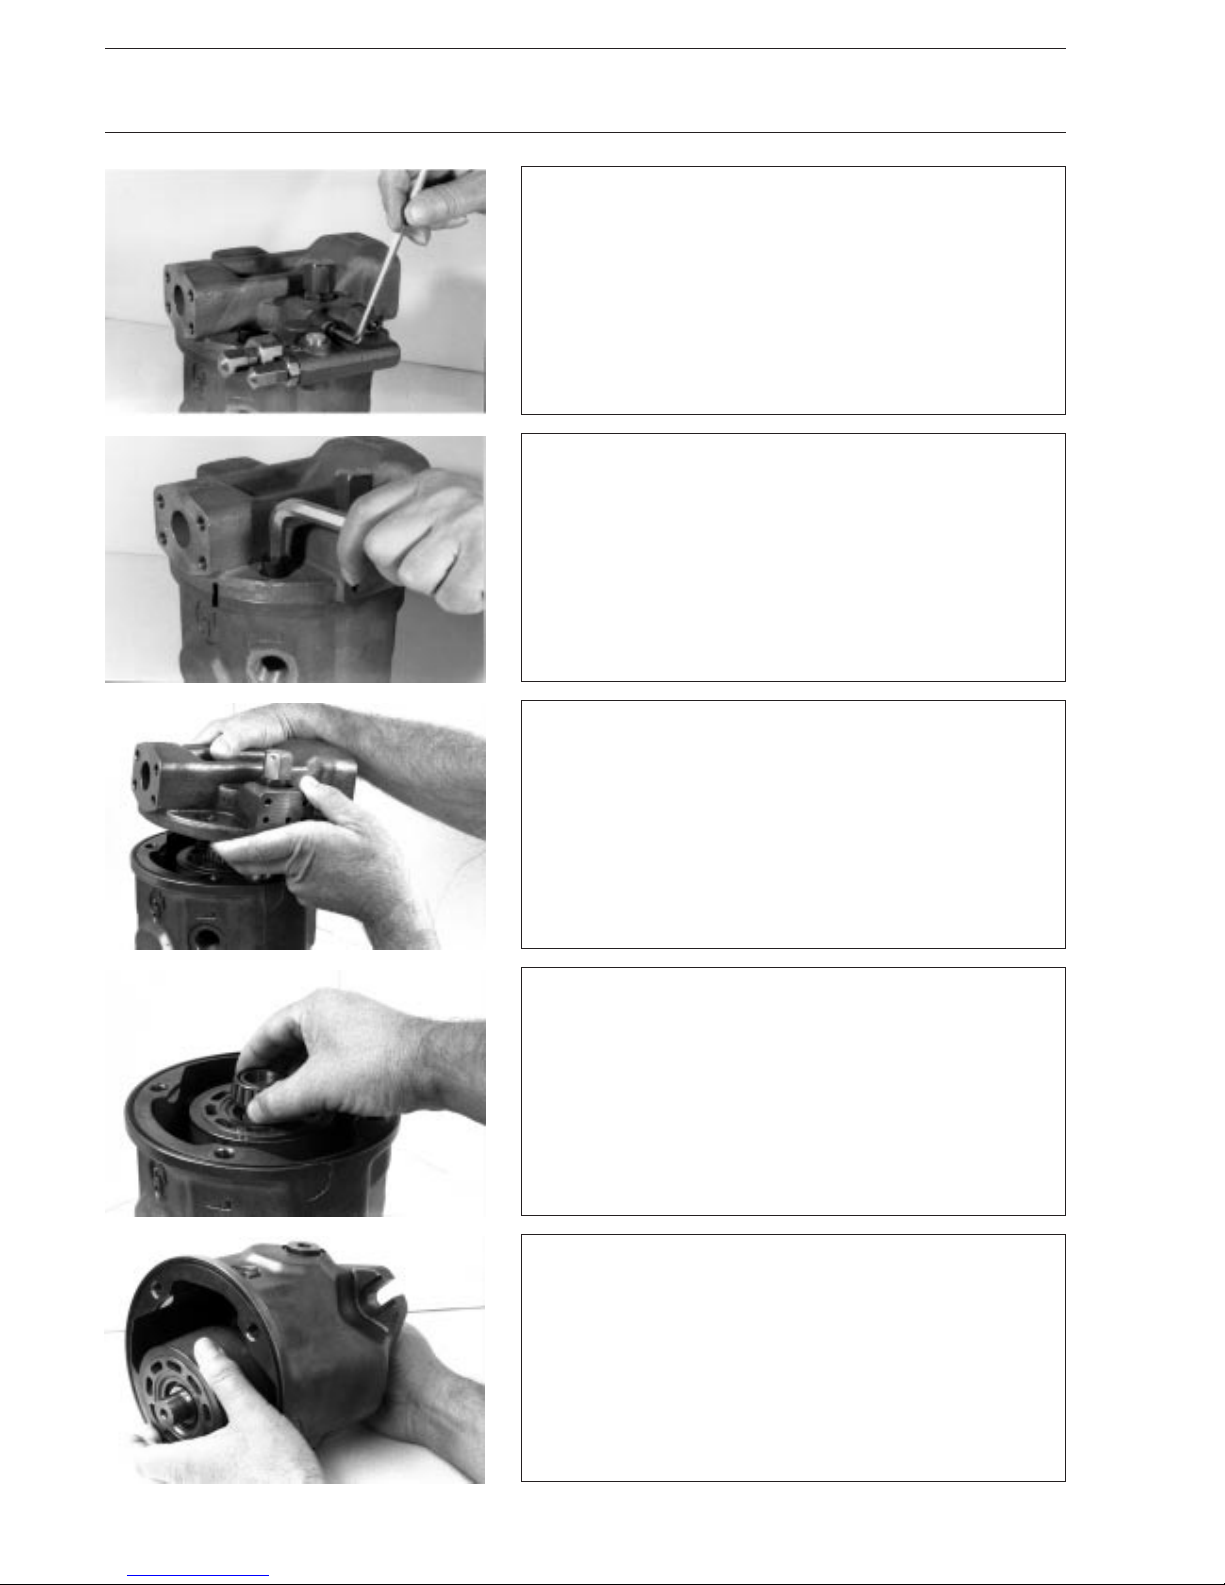
Kolbenführung des Gegenkolbens ausbauen.
Disassembly the guide of opposite piston.
Demontage der Fixiermutter und des Gewindestiftes.
Disassemble the hexagon fixing nut and the
threaded pin.
Demontage der Hutmutter für Gewindestift.
Disassemble the head nut of threaded pin.
O - Ringe entfernen.
Remove the O - rings
Kolbenführung des Verstellkolbens (Einbau
"ventilseitig") ausbauen.
Disassemble the guide of control piston (Mounting
position: pilot valve side).
Page 11

11
RDE 92 711-02-R 01.95
Brueninghaus Hydromatik
Reparaturanleitung A10 VSO/31
Repair Instruction A10 VSO/31
Sicherungsring ausbauen.
Disassemble the retaining ring.
Kolben und Rückzugplatte entfernen.
Remove the pistons and the retaining plate.
26
27
28
29
30
Antriebswelle aus der Rotationsgruppe herausziehen.
Pull out the drive shaft.
Vorspannung der Feder für Ausbau des Sicherungsrings erhöhen (mit Hilfsschraube und Scheiben).
Compress the center spring in order to disassemble
the retaining ring (easy handling by a helping bolt
and shims).
Demontage und Montage der kompl. Einheit
Disassembly and re-assembly of the complete unit
Rückzugkugel entfernen.
Remove the retaining ball.
Page 12

12
RDE 92 711-02-R 01.95
Brueninghaus Hydromatik
Reparaturanleitung A10 VSO/31
Repair Instruction A10 VSO/31
31
32
33
34
35
Demontage und Montage der kompl. Einheit
Disassembly and re-assembly of the complete unit
Hinweis !
Note !
Restliche Einzelteile des Zylinders:Zylinderstifte,
Zylinder, Scheibe, Feder und Sicherungsring.
Remaining parts of the cylinder: pins, cylinder, shim,
spring and retaining ring.
Beim Zusammenbau der Pumpe in umgekehrter
Reihenfolge ist auf die folgeden Punkte zu achten
( 33 - 42 ).
Assemble the pump in reverse order and note the
following ( 33 - 42 ).
Im Graugußgehäuse werden die Kegelrollenlager
mit einer Vorspannung von 0.....0,05 abgestimmt
s.a. S 22.
Taper roller bearing in the cast iron pump housing
must have a initial tension with 0.....0,05 mm ( see
page 22 ).
See picture 34
Port plate ( direction of rotation clockwise ) : Both
piston guides are glued with Loctite.
- Correct position of the valve plate ( clockwise 4
°
):
In case of series 31 the valve plate only can be
installed into the correct position.
- Grease O - rings prior assembly.
Drehrichtung: rechts
Vorbereiten der Anschlußplatte : Führung für Verstellund Gegenkolben mit Loctite einkleben.
- Lagerichtiges Verdrillen der Verteilerplatte in Drehrichtung 4 ° .(Verteilerplatte bei BR 31 nur noch in
Originallage montierbar)
- Befetten der O - Ringe.
Page 13

13
RDE 92 711-02-R 01.95
Brueninghaus Hydromatik
Reparaturanleitung A10 VSO/31
Repair Instruction A10 VSO/31
36
37
38
39
40
Demontage und Montage der kompl. Einheit
Disassembly and re-assembly of the complete unit
Drehrichtung: links
Vorbereiten der Anschlußplatte: Führung für Verstellund Gegenkolben mit Loctite einkleben.
- Lagerichtiges Verdrillen der Verteilerplatte in Drehrichtung 4°. (Verteilerplatte bei BR 31 nur noch in
Originallage montierbar)
- Befetten der O - Ringe
Lagerichtiger Einbau der Schwenkwiege mit großer
Schmiertasche auf der Hochdruckseite, Schwenkwiege für Drehrichtung rechts oder Schwenkwiege für
Drehrichtung links verwenden.
Correct position of cradle ( lubrication bore relief on
the high pressure side ), use cradle for clockwise
rotation, if counter clockwise use cradle for counter
clockwise rotation ( two different sub - assemblies ).
U. U. Nacharbeit der Schwenkwiege im Laufbereich
durch Läppen möglich( Läppdorn zentriert ), jedoch
Auspressen der Anschläge ( Kugelzapfen mit
Gleitschuh ) nicht zulässig ( Riefenbildung beim
Wiedereinbau ).
If it is possible to lap the cradle (sliding area of the
piston shoes ) it can be possible to use the cradle
again. Notice: It isn't allowed to press out the piston
connection parts out of the cradle ( scorings while
fitting ! ).
Falls Zylinder u. Verteilerplatte wiederverwendet
werden ggf. Kontaktstelle Verteilerplatte / Zylinder
nachläppen mit anschließendem Abziehen auf
ebener Unterlage mit 1000er Läpp-Papier.
Connection surfaces between valve plate and
cylinder: if lapping is possible use parts again, but
after lapping procedure use a lapping paper No.1000
to plan the cylinder and valve plate ( plain
underground totally is a must ).
See picture 36
Port plate ( direction of rotation anti-clockwise ): Both
piston guides are glued with Loctite.
- Correct position of the valve plate ( anti-clockwise
4° ): In case of series 31 the valve plate only can be
installed into the correct position.
- Grease O - rings prior assembly
Page 14

14
RDE 92 711-02-R 01.95
Brueninghaus Hydromatik
Reparaturanleitung A10 VSO/31
Repair Instruction A10 VSO/31
42
41
43
Demontage und Montage der kompl. Einheit
Disassembly and re-assembly of the complete unit
Überprüfung der Laufeigenschaft des Gegenkolbens.
Check running conditions of the opposite piston.
Überprüfung der Laufeigenschaft des Verstellkolbens.
Check running conditions of the control piston.
Page 15

15
RDE 92 711-02-R 01.95
Brueninghaus Hydromatik
Reparaturanleitung A10 VSO/31
Repair Instruction A10 VSO/31
Ersatzteil kit: A 10 Steuerventil DFR
Spare parts kit: A 10 control valve DFR
Vorderseite des Beipackzettels aus dem
Ersatzteilpäckchen Steuerventil:
( für NG 18... 100 )
Cover page of the pamphlet out of the
spare part kit control valve:
( pump size 18 to 100 )
2. Ersatzteil - Lieferung /
spare part kit
1. General directions
X
Pos. 2 : 3 O-Ringe /
O-rings
PRP 011-19459
- 514 497 -
Pos. 4 : 2 Stopfen /
plugs
7/16-20 UNF
- 764 647 - MA /
tightening torque :
20 Nm .
Steckschlüssel /
off set hex. box
spanner :
3/16" .
Pos. 3 : 4 Befestigungsschrauben
/
screws
M 6x30 DIN 912 - 900 443 - MA /
tightening torque :
12 Nm .
Steckschlüssel /
off set hex. box
spanner :
5mm
Werkzeuge gehören nicht zum Lieferumfang /
The tools are not included in the supply .
Pos. 5 : Stopfen für Bypaßdüse ( Umbau in
DFR1) /
plug in front of the decompression
orifice if its type DFR1 ( reversion kit ) .
M4x4 DIN 913 - 914 741 - 2er Steckschlüssel /
off set hex. box spanner size
2mm .
( Mit Loctite gesichert /
use Loctite :
Nr.
242 )
Brueninghaus modernized the spare parts service of A10
products so that you will get spare parts much more easyly .
The advertizing folder RD 90124 " A10-spare part-service "
gives you more information . This pamflet out of the spare
part kit " control valve : pressure compensator and flow
control DFR " show on its backside: how to change the design
to the most commen typs of the control valve in an easy way
.
Please note :The valve must be marked with the original
number after its change .
This valve will be delivered only in the Viton-execution (
spare part No.942 581 ) .
Pre-adjustments :
DR-pressure compenator: approx 280 bar
FR-flow control:
∆
p approx 14 bar
Zur wesentlichen Erleichterung der Ersatzteilbeschaffung hat
Brueninghaus den Ersatzteildienst für A10-Produkte modernisiert . Hinweise dazu finden Sie in der Druckschrift RD
90124 " A10-Ersatzteilversorgung " . Der vorliegende
Beipackzettel aus dem Ersatzteil-Päckchen des DFR Steuerventils zeigt auf seiner Rückseite wie die ausgelieferte
Ausführung einfach umgebaut werden kann, in andere ,
gängige Ausführungen .
Bitte beachten : bei Änderung der Ausführung muß das
Ventil umgestempelt werden .
Die gelieferte Ausführung mit der Teile Nr.942 581 wird nur
in Viton-Ausführung verschickt .
Voreinstelldaten :
DR: ca. 280 bar
FR: ∆p ca. 14 bar
1. Allgemeine Hinweise
Page 16

16
RDE 92 711-02-R 01.95
Brueninghaus Hydromatik
Reparaturanleitung A10 VSO/31
Repair Instruction A10 VSO/31
Ersatzteil kit: A 10 Steuerventil DFR (Rückseite Beipackzettel)
Spare parts kit: A 10 control valve DFR ( pamphlets reverse page )
Montagehinweise für die Steuerventilausführungen
Fitting note of the control valve - devices
1X
Steuerventil DFR
pressure compensator and flow control
DFR
Ein X - Anschluß mitPos. 4 verschließen.
One X - port is pluged by Pos. 4 .
MA:21Nm
MA:30Nm
MA:70Nm
gelieferte Ausführung /
supply
1X
Teile Nr.: 942 581
Ersetzt /
substitutes
Perbunan 908 241
Viton
Steuerventil DR
pressure compensator DR
Beide X - Anschlüsse mit
Pos. 4 verschließen
Förderstromregler blockieren .
Both X- ports are pluged by
Pos. 4 . Flow control blocked.
Teile Nr.: 942 581
Ersetzt /
substitutes
Perbunan 907 095
Viton 907 370
X
Steuerventil DR-SO74
pressure compensator DR-SO74
Beide X - Anschlüsse mit
Pos. 4 verschließen ; FR blockieren,
Blende 0,6 mm um 90° verdrehen .
Both X - ports are pluged by
Pos. 4 ; Flow control blocked,
orifice 0,6 mm in closed position ( turn 90
°
)
Teile Nr.: 942 581
Ersetzt /
substitutes
Perbunan 908 242
Viton 939 705
Steuerventil DFR 1
pressure compensator and flow control DFR 1
Ein X - Anschluß mit Pos. 4 verschließen .
Bypaßdüse X - T mit Pos. 5 verschließen .
One X - port is pluged by Pos. 4 . Decompression orifice X-T is pluged by Pos.5.
Teile Nr.: 942 581
Ersetzt :/
substitutes
Perbunan 907 096
Viton 908 384
5
Teile Nr.:
942 581
Ersetzt /
substitutes
Perbunan 907 094
Viton 907 371
Steuerventil DFR-SO74
pressure compensator and flow
control DFR-SO74
Ein X - Anschluß mit
Pos. 4 verschließen .
Blende 0,6 mm um 90° verdrehen .
One X - port is pluged by
Pos. 4 . Orifice 0,6mm in closed
position .
Blende /
orifice 0,6mm
1
X
Einbaulage
der Blende /
position of
the orifice
Page 17

17
RDE 92 711-02-R 01.95
Brueninghaus Hydromatik
Reparaturanleitung A10 VSO/31
Repair Instruction A10 VSO/31
A 10 Steuerventil DFR für NG 140
A 10 control valve DFR of pump size 140
FR
Teile-Nr.
NBR 920 184
FPM 931 668
Teile-Nr.
NBR 920 180
FPM 924 992
DR
Abb. zeigt Zwischenplattenventil (Option)
Shown as sandwich valve (option)
Page 18

18
RDE 92 711-02-R 01.95
Brueninghaus Hydromatik
Reparaturanleitung A10 VSO/31
Repair Instruction A10 VSO/31
46
47
48
49
50
Am komplett montierten Ventil wird mit Hilfe der
Druckluft die Puls.-Blende herausgeblasen: Druckluft
über Bohrung A, T verschlossen. Zur Vermeidung
von Hautkontakt Bewegungsrichtung der Blende
vorher beachten!
Blow out the pulsations orifice by air pressure out of
the complete valve: pressure at drilling A, close
drilling T. Note that there is no skin connection
during blowing,look how the orifice comes out before
blowing!
Zerlegen und Reinigen des Steuerventils
Disassembling and cleaning the control valve
Kontermutter lösen und Gewindestift herausdrehen.
Loosen the lock nut and unscrew threaded pin.
Entfernen der Hutmuttern. Die folgenden Arbeiten
werden erst beim Druckregler, dann beim Förderstromregler durchgeführt.
Remove the hexagon nuts. First disassemble
pressure control, afterwards flow control.
Entfernen der O - Ringe.
Remove the O - rings.
Lösen der Befestigungsschrauben ( siehe S. 15 ).
Loosen socket screws ( see page 15 ).
Page 19

19
RDE 92 711-02-R 01.95
Brueninghaus Hydromatik
Reparaturanleitung A10 VSO/31
Repair Instruction A10 VSO/31
Herausnehmen des Federtellers.
Remove the spring collar.
51
52
53
54
55
Zerlegen und Reinigen des Steuerventils
Disassembling and cleaning the control valve
Verschlußschraube demontieren.
Disassemble the plug.
Herausnehmen des Federtellers.
Remove the spring cup.
Verschlußschraube entfernen.
Disassemble the plug.
Herausnehmen der Federn.
Remove the springs.
Page 20

20
RDE 92 711-02-R 01.95
Brueninghaus Hydromatik
Reparaturanleitung A10 VSO/31
Repair Instruction A10 VSO/31
Zusammenbau des Steuerventils in umgekehrter
Reihenfolge. Dabei ist auf folgende Punkte zu achten ( 60 bis 63 ).
Assemble pilot valve in reverse order and note the
following ( 60 to 63 ).
56
57
58
59
60
Hinweis !
Note !
Zerlegen und Reinigen des Steuerventils
Disassembling and cleaning the control valve
Auswaschen des Steuerventilgehäuses und Einzelteile mit gründlichem Beseitigen des Waschmittels
durch Ausblasen.
Clean housing and parts with clean fluid and dry
with air carefully.
Demontage des Stopfens bzw. der Entlastungsdüse
(im Förderstromregler - Federraum ).
Disassemble the plug or orifice ( spring area of flow
control ).
Sorgfältiger Ausbau des Kolbens.
Be careful while disassembling the piston.
Kontrolle der Düsendurchlässigkeit.
Check the opening of the orifice.
Page 21

21
RDE 92 711-02-R 01.95
Brueninghaus Hydromatik
Reparaturanleitung A10 VSO/31
Repair Instruction A10 VSO/31
Laufeigenschaft der Reglerkolben prüfen, keine
Beschädigungen der Kolben und der Bohrungen.
Check the movement of the pilot valve spools, and
drillings should not be damaged.
61
62
63
64
65
Für die Steuerventilausführung der Pumpen NG 140
sind keine weiteren Angaben gemacht. Sinngemäß
sind die o. a. Hinweise zu beachten.
Pilot valve of pump size 140 doesn't have own
instructions. However see the given hints on top.
Zerlegen und Reinigen des Steuerventils
Disassembling and cleaning the control valve
Siehe S. 17.
see page 17.
Einkleben der Düse ( auf verstopfte Düse ist beim
Klebevorgang zu achten ).
Be careful when loctiting the orifice.
Einstellen des Steuerventils siehe Einstellhinweise
( s. S. 23 ).
For adjustment of the pilot valve see set up
instructions ( page 23 ).
Einstellungen der Bypaßblende (s. auch S. 16):
1) Schlitz in Längsrichtung ( entspr. der Abb. ):
Blende geöffnet.
2) Schlitz quergestellt: Blende geschlossen
Adjustments of the bypass orifice (see page 16, too ):
1) open position of the orifice: like shown on the
picture
2) turn the orifice 90° to close it.
Page 22

22
RDE 92 711-02-R 01.95
Brueninghaus Hydromatik
Reparaturanleitung A10 VSO/31
Repair Instruction A10 VSO/31
Tabelle / Montage - Abstimmung
List / Adjustment of taper roller bearing set
T a b e l l e " mechanische Förderstrombegrenzung" (gültig für Anschlag Q
min
und Q
max
)
L i s t
mechanical flow limiter (both stopper max. and min. flow)
NG /
Size
18 28 45 71 100* 140*
1,09 1,58 3,23 4,69 6,16 7,06
Volumenänderung ( in cm3 ) pro Gewindestiftumdrehung /
Differential volume ( cm3 ) if
you are rotating the threaded pin - each rotation.
* mit vorhandenem einstellbaren Anschlag Q
min
/
mech. stopper min. flow adjustable
Montage - Abstimmung ( Kegelrollenlager ) /
taper roller bearing initial tension
A10VSO Baureihe 31
A10VSO series 31 Hinweis zu den NG 18 und 28/
Note for size 18 and 28:
Abstimmung der Triebwerkslagerung
Die Vorspannung der Triebwerkslagerung muß im Gußgehäuse von 0 bis 0,05 mm durch Abschleifen der Abstimmscheibe Pos. 12 hergestellt werden.
Cast iron housing must have initial tension of the bearings : 0........0,05 mm , grind Pos. 12 if
necessary.
Die Ausmessung muß mit einer
Nullscheibe -Pos. 12- (1,5 ±
0,01 breit) erfolgen, s. u. Einzelheit X. Diese Scheibe wird
nach der Messung entnommen.
Meßwert, Scheibenstärke der
Nullscheibe und erforderliche
Vorspannung ergibt die Stärke
der Abstimmscheibe (Pos. 12).
The smal pump sizes have to
be measured by using a spezial
shim -Pos. 12- with its
tolerance of 1,5
±
0,01, see
detail X. This shim will be
disassembled after the
measurement. Measurement,
thickness of the spezial shim
and necessary pretention all
together makes the thickness of
the adjustment shim (Pos. 12).
Nullscheibe
/
spezial shim
Einzelheit X/
detail X
Page 23

23
RDE 92 711-02-R 01.95
Brueninghaus Hydromatik
Reparaturanleitung A10 VSO/31
Repair Instruction A10 VSO/31
FR: Differenzdruck 14 bar wird eingestellt bei halbem
Schwenkwinkel der Pumpe ( einstellbare Drossel in
der Systemdruckleitung teilweise geschlossen ).
FR: If swivel angle is in the mid position adjust differential pressure 14 bar ( adjustable orifice in the
system pressure line is partly closed).
Mechanische Förderstrombegrenzung: Durch
Drehen am Gewindestift kann der Förderstrom der
Pumpe abhängig von der NG um min. 35% von V
gmax
reduziert werden. (Soll jedoch eine größere Reduzierung des Förderstromes erforderlich werden,
kann auf den Einbau der Kontermutter verzichtet
werden. Bemerkung: Einstellung der Gewindespindel ohne Kontermutter erfolgt unter Betriebsdruck) Einstellwerte siehe Tabelle Seite 22.
Mechanical flow limiter: While screwing in the
threaded pin you will be able to reduce the flow from
Vg max to 35% reduction of V
gmax
dependent on the
size of the pump (If you need more reducton of the
flow, don´t mount the fixing hexagon nut. Note: to
adjust the threaded pin without the fixing hexagon
nut do it by the existence of the working pressure.)
Adjustment list see page 22.
Einstellhinweise
Testing and set up instuctions
DR: bei geschlossener Verbraucherleitung wird der
Regler auf Sollwert eingestellt ( bei DFR einstellbare
Drossel offen, FR-Feder vorgespannt )
DR: When pressure line is closed adjust the
pressure of the controller ( if it's DFR design then
open the adjustable orifice and increase force of the
FR - spring).
Page 24

24
RDE 92 711-02-R 01.95
Brueninghaus Hydromatik
Reparaturanleitung A10 VSO/31
Repair Instruction A10 VSO/31
M
a
Werkzeuge / Hilfswerkzeuge / Anziehdrehmomente
Tools / auxiliary tools / tightening torques
Anziehdrehmomente /
Tightening torques
Festigkeitsklassen /
bolt hardness grade
: 8,8; 10,9; 12,9
Verwendete Loctite-Sorten/
Loctite used
:
alle Abreißstopfen/
for break-off plugs
Nr. 601
sonst /
normaly
Nr. 242
Brueninghaus Hydromatik GmbH, Werk Horb, An den Kelterwiesen 14, D-72160 Horb 1, Telefon (0 74 51) 9 20, Telefax (0 74 51) 82 21
M4 M5 M6 M8 M10 M12 M14 M16 M18 M20 M24 M30
8,8 2,3 5,0 8,5 21 41 72 115 176 240 350 600 1220
10,9 3,2 7,2 12 29 58 100 165 250 350 490 840 1670
12,9 4,1 8,5 14,5 35 70 121 195 300 410 590 990 2000
Ma (Nm) = max. Anziehdrehmoments (geölte Schrauben µ = 0,125)
Ma (Nm) = max. tightening torques (screws lubricated µ = 0,125)
 Loading...