


Your contact person
Mr. Mike Kulossa
Technical Consultant
07159 180 93 -505
07159 180 93 -100
m.kulossa@mannesmann-demag.com
Technical Data
Type MD 340
Article Nr. 60040165
Insert end RS 17,5 x 14,8 x 60
Handle Closed handle
Number of blows 3700 min
Impact energy 5.0 J
Air consumption 0.4 m3/min
Piston diam. 20.0 mm
Piston stroke 48 mm
Length 287.0 mm
Weight 3.40 kg
Hose l.D. 10.0 mm
Connection thread G 1/4" i
Vibration 3,8 m/s
Exposure time 13.9 h
-1
2
Powered by TCPDF (www.tcpdf.org)
Sound 98 dB(A)
All data related to 6.3 bar working pressure.
Subject to technical alterations.
MD Drucklufttechnik GmbH & Co. KG Telefon: +49 (0) 7159-18093-0 E-Mail: info@mannesmann-demag.com

Meißelhammer MD 340
9
chisel hammer 60040 16 5
burineur
Nr.
BENENNUNG DESCRIPTION DESIGNATION
No.
RS17,5x14,8x60
Lager-Nr. St.
Stock-No.
1 Schnellwechselfutter Quick-change chuck mandarin à serrage rapide 60035 25 6 1
1.1 Sicherungsring circlip circlip 60035 30 6 1
1.2 Knopf button bouton 60035 54 6 1
1.3
Haltering retaining ring bague 60035 27 6 1
1.4 Stahlkugel ball bille 60035 39 6 1
1.5 Stahlkugel
1.6 Druckfeder spring ressort 60035 51 6 1
1.7 Bolzen pin cheville 60035 55 6 1
1.8
Haltekappe retaining cap embout de retenue d' outil 60035 26 6 1
2
O-Ring o-ring joint torique 60035 19 6 1
3
Meißelbüchse RS17,5 guide bushing boîte de guidage 60035 22 6 1
4 Zylinder Cylinder Cylindre 60035 23 6 1
5 Ring ring torique 60035 24 6 1
6 Schalldämpferring Silencer ring collier silencieux 60035 21 6 1
7 Kolben piston piston 60035 20 6 1
8
Steuerring control ring bague de commande 60035 18 6 1
Deckel cover couvercle 60035 17 6 1
10 Griff kpl. handle cpl. poignée compl.
10.1 Griff vst. handle poignée 60035 16 5 1
10.2 Drücker trigger gâchette 29900 26 5 1
10.3 Zylinderstift cylindrical pin goupille cylindrique 9315 378 2
10.4 Siebträger vst. screen carrier cpl. filtre support cpl. 41159 00 5 1
10.5 Druckstift pen broche 33751 06 3 1
10.6 O-Ring o-ring joint torique 9319 041 1
10.7 Ventil valve soupape 33751 07 3 1
10.8 Feder spring ressort 9330 015 1
10.9 Verschlussschraube locking screw vis de fermeture 33751 10 3 1
steel ball bille en acier 60035 50 6 4
60035 15 5
Qu.
1
www.MANNESMANN-DEMAG.com info@MANNESMANN-DEMAG.com
Tel. +49 711 88718-0 Fax +49 711 88718-100
Änderungen vorbehalten
02/2016
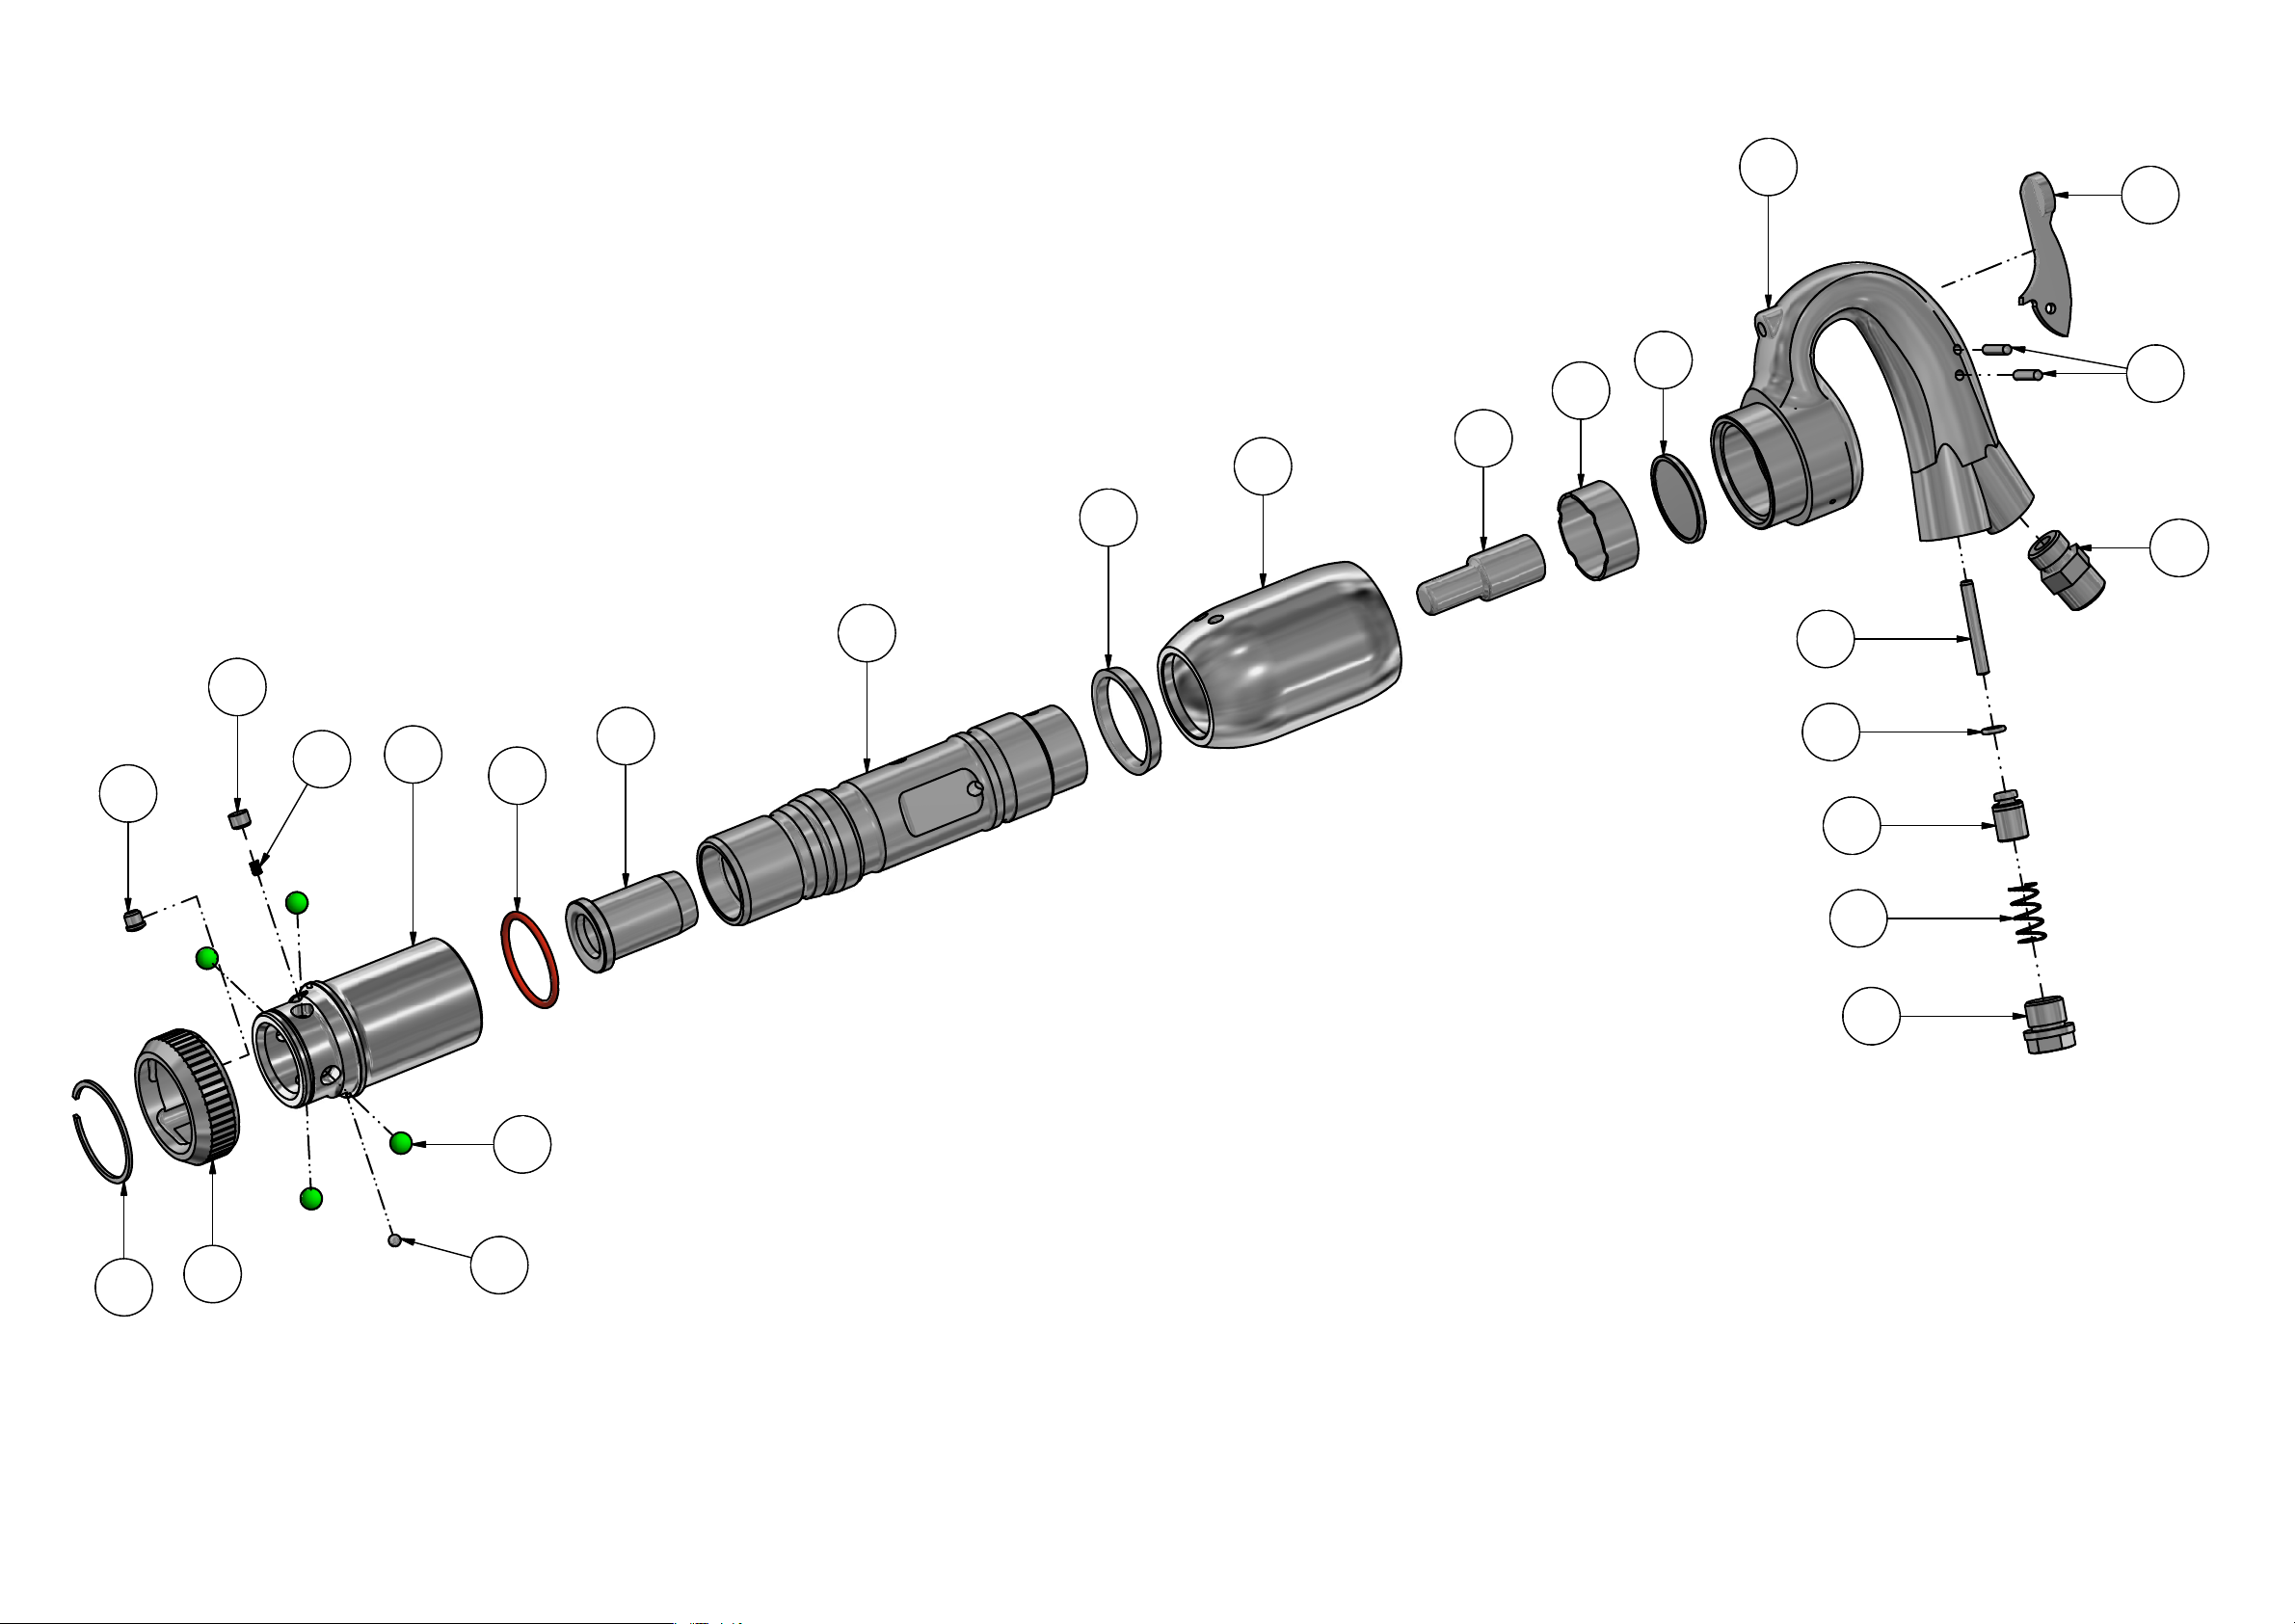
10.1
10.2
1.3
1.6
1.7
1.8
9
8
7
6
5
4
3
2
10.5
10.6
10.7
10.8
10.3
10.4
1.1
1.2
1.4
1.5
10.9
MD 340
60040165
RS 17,5
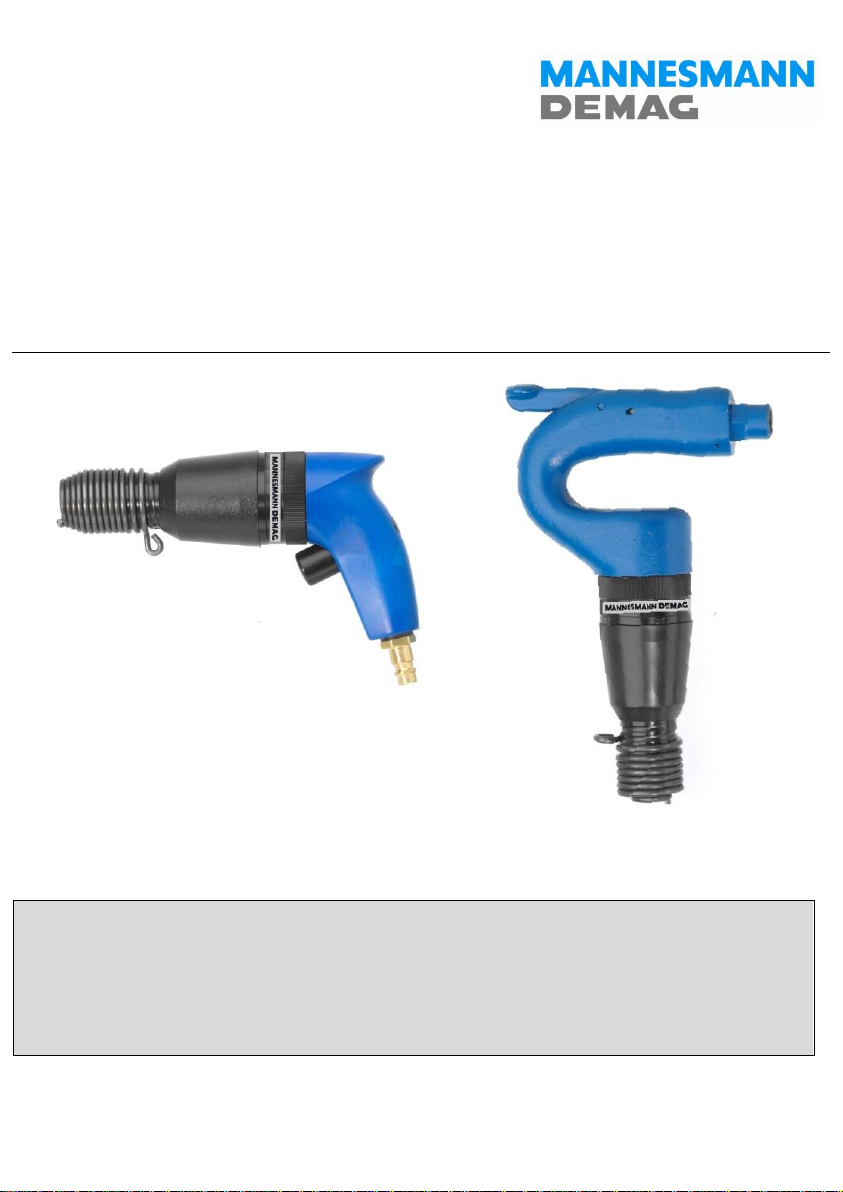
Betriebsanleitung Operating instructions
Meißelhämmer Chisel hammers
Typen – Types
MD 070 | MD 071 | MD 072 | MD 074 | MD 080 | MD 084 | MD 110 |
MD 120 | MD 130 | M 13 | MD 180 | MD 200 | MD 210 | MD 222 |
MD 223 | M 23 | MD 230 | MD 340 | MD 630 | MD 680
05/2019

Inhaltsverzeichnis List of contents
Seite
Page
Betriebsanleitung
Operating instructions
3
Arbeiten mit Druckluftwerkzeugen
Working with Pneumatic Tools
Zu Ihrer Sicherheit
For your safety
4
Weitere Sicherheitshinweise
Further safety instructions
5
Vorgesehener Einsatz
Intended use
Inbetriebnahme
Commissioning
7
Werkzeugwechsel
Changing tools
Handhabung
Handling
8
Arbeitsweise
Operation
9
Wartung
Maintenance
Reparatur
Repair
10
Störungen und Abhilfen
Malfunction and Troubles
Entsorgung
Recycling
Garantie
Warranty
11
Technische Daten
Technical data
2
Arbeiten mit Druckluftwerkzeugen Working with Pneumatic Tools
1 2 3 4 5 6 7
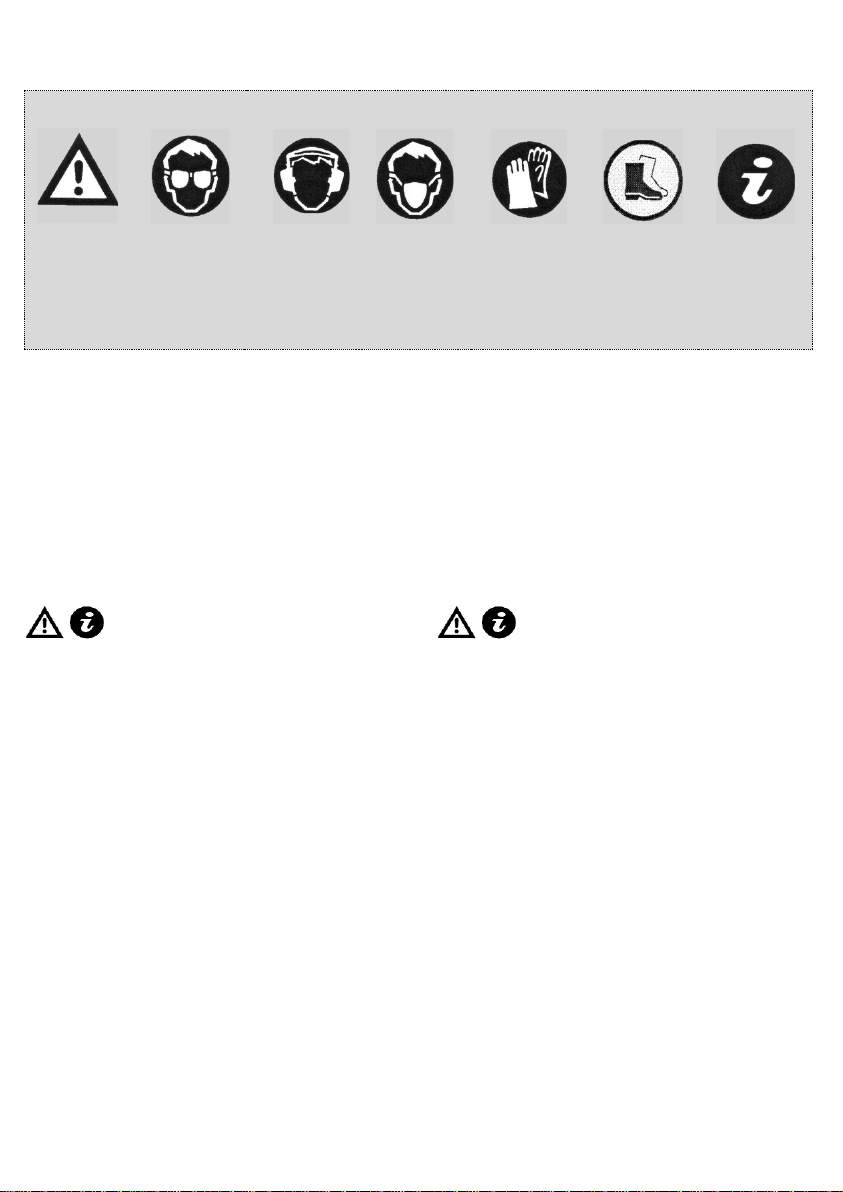
Gefahr
Augenschutz
tragen
Gehörschutz
tragen
Atemschutz
benutzen
Geeignete
Arbeitskleidung tragen
Geeignete
Arbeitskleidung tragen
Information
Danger
Wear eye
protection
Wear ear
protection
Use
respiratory
protection
Wear suitable
work clothing
Wear suitable
work clothing
Information
and safety
advice
1. Gefahrloses Arbeiten mit dem Gerät ist nur
möglich, wenn Sie die Bedienungsanleitung
vollständig lesen und die darin enthaltenen
Anweisungen strikt befolgen.
2. Schutzbrille und Gehörschutz tragen
3. Falls erforderlich Staubmaske und Arbeitshandschuhe tragen.
4. Geeignete Arbeitskleidung und
Sicherheitsschuhe tragen.
1. Safe operation of this machine is possible
only when the operating instructions are
read completely and the instructions
contained therein are strictly observed.
2. Wear safety glasses a hearing protection.
3. If necessary, wear dust mask and gloves.
4. Wear suitable working clothes and safety
shoes.
Zu Ihrer Sicherheit
For your safety
Maschine nur mit ausgeschaltetem Ventil
und eingespanntem Werkzeug an das
Druckluftnetz anschließen!
Vor Start des Drucklufthammers
sicherstellen, dass niemand durch den
anlaufenden Hammer gefährdet werden
kann!
Um ein Hochspringen oder Entgleiten des
Hammers zu verhindern, Drucklufthammer
nicht im Leerlauf betreiben!
Beachten Sie die Gefahr eines
schlagenden Druckluftschlauches!
Vermeiden Sie das Meißeln in der Nähe
von elektrischen Leitungen, die in Wänden
usw. verborgen sein können!
Fließdruck von 6 bar darf während des
Betriebs keinesfalls überschritten werden.
Niederer Betriebsdruck mindert die
Hammerleistung, höherer Betriebsdruck
erhöht übermäßig den Verschleiß und
bringt keine nennenswerte
Leistungserhöhung.
Halten Sie Ihre Hände vom schlagenden
Ende des Einsteckwerkzeuges fern!
The machine must only be connected to
the compressed air system with the valve
switched off and a tool clamped in place!
Before starting the compressed air
hammer, ensure that nobody can be
endangered by starting the hammer!
To prevent rebounding or slipping of the
hammer, do not operate the compressed
air hammer in the idling condition!
Be aware of the danger of a moving
compressed air hose!
Avoid chiseling in the immediate vicinity of
electrical cables which may be concealed
in walls etc.!
A flow pressure of 6 bar must not be
exceeded during operation. A lower
operating pressure reduces the hammer
performance; higher operating pressure
disproportionately increases wear, and
gives no noticeable performance
improvement.
Keep your hands away from the moving
end of the tool attachment!
Nachstehend wichtige Sicherheitssymbole: The following are important hazard symbols:

Beachten Sie die Gefahr von Bruchstücken,
die mit hoher Geschwindigkeit wegfliegen
können! Schirmen Sie durch Schutzwände
andere Arbeitsplätze ab. Die Maschine erst
starten, wenn das Einsteckwerkzeug gegen
ein Werkstück angedrückt wird!
(Leerschläge verkürzen die Lebensdauer
des Werkzeuges)
Verwenden Sie niemals stumpfe oder
abgenutzte Arbeitswerkzeuge.
Be aware of the possible danger of
particles flying out at high speed! Screen of
the protective walls of other working areas.
Only start the machine when the tool
attachment is pressed against a work
piece! (idling operation reduces the
working life of the tool)
Never use blunt or worn tools.
Weitere Sicherheitshinweise
Further safety instructions
Beachten Sie die Gefahr ausgehend von
unerwarteten Bewegungen oder Bruch des
Einsatzwerkzeuges für die unteren
Gliedmaßen!
Beachten Sie die Gefahr von entstehendem
Staub beim Meißeln, der u. U. für die
Bedienperson gesundheitsschädlich sein
kann!
Vorsicht mit langen Haaren. Nur mit eng
anliegender Kleidung arbeiten.
Gerät nur bestimmungsgemäß verwenden.
Gerät nicht ohne die vorgeschriebenen
Sicherheitsvorrichtungen betreiben.
Vor jeder Inbetriebnahme Gerät, Anschluss
und Druckluftschlauch auf Beschädigung
überprüfen.
Druckluft nur bei ausgeschaltetem Gerät
anschließen.
Bei Werkzeugwechsel, Wartung und nach
Gebrauch die Druckluftverbindung trennen.
Gerät nicht am Druckluftschlauch tragen.
Das Werkstück durch geeignete Spann-
bzw. Haltevorrichtungen sichern.
Andere Personen vom Arbeitsbereich
fernhalten.
Arbeitsbereich in Ordnung halten.
Für sicheren Stand sorgen.
Werkzeuge sauber halten.
Reparaturen nur vom Fachmann ausführen
lassen.
Sich wiederholende Bewegungen,
schlechte Körperhaltung und die Belastung
durch Schwingungen, können Schäden an
Armen und Händen hervorrufen.
Be aware of the possible danger of
unexpected movements or breakage of the
tool attachment to the lower limbs!
Be aware of the possible danger of dust
created during chiseling, which may be
harmful to the health of the operator!
Be careful with long hair. Wear only
closefitting clothes while working.
Use the machine only for the purpose
intended.
Do not operate the machine without the
prescribed safety devices.
Before each use of the machine, check the
pressure hoses and the connections from
damage.
Connect pressure lines only when machine
is switched off.
When changing tools, during maintenance
and after use, disconnect the pressure
lines.
Do not carry tools by the pressure hose.
Secure the work piece with suitable
clamping or holding devices.
Keep other persons away from the working
area.
Maintain order in the working area.
Provide for secure footing.
Keep tools clean.
Allow repairs to be performed only by a
qualified technician.
Repetitive work motions, awkward
positions and exposure to vibration can be
harmful to hands and arms.
4

Vorgesehener Einsatz
Intended use
Die Meißelhämmer der Typen MD 070 / MD 071
/ MD 080 werden hauptsächlich in Gießereien
zum Putzen von Gießereierzeugnissen
eingesetzt.
Jeglicher Missbrauch außerhalb der
obengenannten Einsatzgebiete ist ohne
Zustimmung des Herstellers nicht zulässig.
Bei Zuwiderhandlung entfällt jegliche
Haftung für Folgeschäden.
Aus Gründen der Produkthaftung und
Betriebssicherheit müssen alle Änderungen
an der Maschine und/oder Zubehör vom
dafür verantwortlichen Techniker des
Herstellers genehmigt werden.
Für Schäden die durch nicht beachten der
Betriebsanleitung oder unsachgemäße
Reparatur sowie die Verwendung von nicht
Original Ersatzteilen entstehen wird keine
Haftung übernommen. Änderungen, die
dem technischen Fortschritt dienen,
behalten wir uns vor.
Zweckfremder Einsatz führt zur
Unfallgefahr.
Maschine ist gegenüber elektrischen
Kraftquellen nicht isoliert.
Maschine ist nicht zum Gebrauch in
explosionsgefährdeter Atmosphäre
zugelassen.
The chisel hammers of the type MD 070 / MD
071 / MD 080 are mainly used in foundries for
the fettling of foundry products.
Any use other than the fields of application
mentioned above without agreement of
MANNESMANN DEMAG is not permitted.
In case of contravention MANNESMANN
DEMAG cannot be held liable for any
damage
For product liability and operational safety
reasons, all amendments to the machine
and/or accessories must be approved by
the responsible manufacturer’s technician.
No liability will be assumed for any
damage occurred due to non-observance
of the operating instructions or improper
repair work or the use of non-original spare
parts. We reserve the right to make
amendments that serve the purpose of
technical progress.
Improper use may lead to accidents.
Machine is not insulated to electrical
source of power.
The use of machines is not allowed in
potentially explosive atmosphere and
environment.
Inbetriebnahme
Commissioning
Das Werkzeug stets nur nach den jeweils
geltenden Vorschriften für handgeführte
Druckluftwerkzeuge betreiben.
Lesen Sie vor Benutzung den beiliegenden
Sicherheitshinweis.
Vor dem Anschluss der Maschine ist die
Druckluftleitung (der Druckluftschlauch) gut
durchzublasen, um eventuell vorhandene
Schmutzpartikel zu entfernen.
Benutzen Sie eine Wartungseinheit, die so
nahe wie möglich an der Maschine
angebracht sein sollte. Die Ölliefermenge
auf 5-6 Tropfen (1 Tropfen = 15 mm³) pro
Minute einstellen. Wir empfehlen den
Einsatz eines Nebelölers bzw.
Wartungseinheit von MANNESMANN
DEMAG.
Sollte keine Wartungseinheit verwendet
werden, so ist auf jeden Fall ein
The tool must always be operated in
accordance with the relevant applicable
regulations for hand-held compressed air
tools.
Always read the enclosed safety
instructions before use.
Before connecting the machine, the
compressed air line (compressed air hose)
must be blown out thoroughly in order to
remove any particles of dirt present.
Use a maintenance unit, which should be
fitted as close as possible to the machine.
Set the oil delivery quantity to 5-6 drops
per minute (1 drop = 15 mm³). We
recommend the use of a spray oil unit or
maintenance unit supplied by
MANNESMANN DEMAG.
If a maintenance unit is not being used, a
line oil unit must be fitted in front of the

Leitungsöler dem Drucklufthammer
vorzuschalten. Die Einstellung des Ölers ist
richtig gewählt, wenn während des
Betriebes ein leichter Ölnebel am Auspuff
des Schalldämpfers sichtbar ist.
Bei extrem schlechten Einsatzbedingungen
können Spezialschmierampullen verwendet
werden. Wir empfehlen Schmierampullen
Nr. 092 130 30
An der Wartungseinheit einen
Betriebsdruck von max. 6 bar einstellen.
Ölstand kontrollieren und ggf. Öl nachfüllen.
Bei erster Benutzung sowie längeren
Stillstandzeiten 2 – 3 cm3 Öl direkt in den
Schlauchanschluss des Hammers gießen.
Keine beschädigte oder abgenutzte
Druckluft-schläuche sowie Anschlüsse
verwenden. Es muss darauf geachtet
werden, dass alle Schläuche und
Anschlüsse die passende Größe haben.
(siehe Tabelle Technische Daten)
Nur druckfreien Druckschlauch mit
eingespanntem Einsteckwerkzeug an die
Maschine anschließen.
Vor Inbetriebnahme einige Tropfen Öl in
den Lufteinlass des Druckluftwerkzeuges
geben.
compressed air hammer. The setting of the
oil unit is correct when a light oil spray can
be seen at the silencer exhaust during
operation.
In extremely bad working conditions,
special lubricating ampoules can be used.
We recommend lubricating ampoules no.
092 130 30
Set a working pressure of maximum 6 bar
at the maintenance unit.
Check the oil level and top up with oil if
necessary.
When first using the tool or after extended
stoppages, pour 2 - 3 cm3 of oil direct into
the hose connection of the hammer.
Do not use any damaged or worn
compressed air hoses or connection
fittings. Ensure that all hoses and
connections are of the correct size. (See
table under Technical Data)
Only connect unpressurised air hoses to
the machine, with the tool attachment
clamped in place.
Before use, place a few drops of oil in the
air inlet of the pneumatic tool.
Information
Information
Bei Typen M 13 / MD 130
M 23 / MD 230:
Nach mehrstündigem Einsatz vorgenannter
Meißelhämmer muss der Handgriff (bei
Stillstand, hierbei ist der Druckluftschlauch
vom Hammer zu trennen) auf festen Sitz
überprüft werden.
Sollte sich der Handgriff bewegen, muss
dieser nachgezogen werden. Hierzu muss
der Schalldämpfer abmontiert und der
Bolzen in die nächste passende Bohrung
versetzt werden.
For type M 13 / MD 130
M 23 / MD 230:
After several hours of operation the
handles of the a.m. chisel hammers (at still
stand, here the air hose has to be
disconnected from the hammer) have to be
checked whether they are still tight.
Should the handle move, then it has to be
tightened again. Here the silencer has to
be dismounted and the bolt has to be set in
the next fitting borehole.
6

Werkzeugwechsel
Changing tools
Handhabung
Handling
ALLGEMEIN
Vor jedem Werkzeugwechsel Maschine
vom Druckluftnetz trennen.
Nur Einsteckwerkzeuge mit den zu der
Maschine passenden und unbeschädigten
Einsteckende verwenden. Defekte, stumpfe
oder nicht passende Einsteckwerkzeuge
haben Unfallgefahr zur Folge!
Die zum jeweiligen Hammer passenden
Einsteckwerkzeuge finden Sie in unserem
Katalog.
Defekte Einsteckwerkzeuge führen zu
Schäden, Einsteckwerkzeuge und
Schlagfläche des Kolbens müssen
unbeschädigt und plan sein, ansonsten
entstehen Prellschläge, die die
Lebensdauer der Maschine und des
Einsteckwerkzeuges verkürzen.
Prüfen Sie die Halterung regelmäßig auf
Abnutzung und Schäden und beachten Sie
die Gefahr eines Bruches des Meißels
während des Betriebes aufgrund von
Ermüdungserscheinungen.
DRUCKLUFTHAMMER MIT HALTEFEDER (Bild)
Haltefeder vom Zylinder abschrauben,
passendes Einsteckwerkzeug einsetzen
und Pufferring bis an den Bund des
Einsteckwerkzeuges aufstecken und
Haltefeder vollständig auf das Gewinde
aufschrauben.
Ein- und Ausschalten
DRÜCKER
Zum Einschalten Drücker am Griff drücken,
zum Ausschalten Drücker loslassen (AUS).
SCHNELLKUPPLUNG
Wird eine Schnellkupplung für ein schlagendes
Werkzeug benutzt, ist die Kupplung durch
einen Schlauch von 0,5 m Länge vom
Werkzeug zu trennen.
GENERAL
Always disconnect the machine from the
compressed air supply before changing the
tool.
Use only tool attachments with undamaged
insertion fittings matching the machine.
Defective, blunt or incorrect tool
attachments will result in the risk of
accidents!
The tool attachments matching the
relevant hammer can be found in our
catalogue.
Defective tool attachments will lead to
damage; tool attachments and the impact
surface of the piston must be free of
damage, flat and level, otherwise impact
damage will be caused, which reduces the
working life of the machine and the tool
attachment.
Check the holder regularly for wear and
damage, and be aware of the possible
danger of breakage of the chisel during
operation due to metal fatigue.
COMPRESSED AIR HAMMER WITH
RETAINING SPRING (Figure)
Unscrew the retaining spring from the
cylinder, insert a matching tool attachment
and fit the buffer ring up to the flange of the
tool attachment, and screw the retaining
ring fully onto the thread.
Switching on and off
PUSH-BUTTON
To switch on, press the push-button on the
handle, and release the push-button to switch
the machine off.
SNAP COUPLING
If a snap coupling is used with an impact tool,
the coupling must be separated from the tool
by a 0.5 m length of hose.
Arbeitsweise
Operation

Drucklufthämmer erzeugen beim Betrieb
Vibrationen. Unsachgemäße Anwendung
kann zu Schädigung an Armen und
Gelenken des Bedienpersonals führen. Bei
Arbeiten ist auf eine standsichere
Körperhaltung zu achten, um Verletzungen
zu vermeiden.
Zum Arbeiten Drucklufthammer
einschalten, sicher festhalten und in Einsatz
bringen.
Bei Drucklufthämmern ohne Haltefeder und
ohne Schraubkappe, muss das
Einsteckwerkzeug mit der einen Hand
geführt und gehalten werden, während mit
der anderen Hand der Drucklufthammer
sicher gehalten werden muss.
Der Drucklufthammer darf nur bei Stillstand
umgesetzt werden, d.h. wenn der Drücker
nicht betätigt wird und der Drucklufthammer
drucklos ist.
Bei Unterbrechung der Energiezufuhr
(Druckluft) ist der Drücker des
Drucklufthammers loszulassen, um ein
unbeabsichtigtes Starten zu verhindern,
wenn die Unterbrechung beendet ist.
Drucklosen Schlauch lösen,
Einsteckwerkzeug entfernen.
Nach Beendigung des Arbeitsganges muss
der Drucklufthammer so gelagert werden,
dass eine unkontrollierte Inbetriebnahme
unmöglich ist. Dazu Drücker los lassen,
Absperrhahn schließen, drucklosen
Schlauch lösen. Einsteckwerkzeug
entfernen.
Compressed air hammers produce
vibrations during operation. Improper use
can lead to injury to the arms and joints of
the operator. When working with such
tools, always ensure a stable body position
and attitude in order to avoid injury.
When working, switch the compressed air
hammer on, hold it firmly and bring it into
operation.
For compressed air hammers without
retaining spring and screw cap, the tool
attachment must be held and guided with
one hand, while holding the compressed
air hammer firmly and safely with the other
hand.
The compressed air hammer may only be
moved when at a standstill, i.e. when the
push-button is not pressed and when the
compressed air hammer is not under
pressure.
In case of an interruption in the
compressed air supply, the push-button of
the compressed air hammer must be
released immediately, in order to prevent
unintentional starting when the
compressed air supply is restored.
Disconnect the unpressurised hose and
remove the tool attachment.
On completion of the work in hand, the
compressed air hammer must be stored in
such a way as to prevent unintentional
starting. Release the push-button, close
the shut-off valve and remove the
unpressurised hose. Remove the tool
attachment.
8

Wartung
Maintenance
Vor Wartungsarbeiten Meißelhammer vom
Druckluftnetz trennen.
Um eine einwandfreie Funktion und lange
Haltbarkeit der Maschine zu gewährleisten,
sind folgende Hinweise zu beachten:
Prüfen Sie regelmäßig die Wartungseinheit
sowie die Arbeitsluft auf die unter
Inbetriebnahme genannten Punkte.
Wir empfehlen: MANNESMANN DEMAG
Wartungseinheit (siehe Katalog)
Eine ausreichende und ständig intakte
Ölschmierung ist für eine optimale Funktion
von ganz entscheidender Bedeutung.
Wir empfehlen: MANNESMANN DEMAG
Robotöl (siehe Katalog).
Zur Vermeidung von Rostbildung ist der
Drucklufthammer nach, bzw. vor längeren
Stillstandzeiten über die Wartungseinheit
oder mittels 2 – 3 cm³ Öl direkt in den
Schlauchanschluss des Hammers gut
einzuölen. Dies kann auch mittels Spezialöl
oder Schmierampullen erfolgen
Disconnect the chisel hammer from the
compressed air system before undertaking
any maintenance work.
Please observe the following information to
ensure problem-free operation and longlife for the machine:
Regularly check the maintenance unit and
the working air for the points mentioned
below. We recommend MANNESMANN
DEMAG maintenance unit (see catalogue).
It is very important that there is adequate
and continuously intact oil lubrication for
the machine to function properly. We
recommend: MANNESMANN DEMAG
Robotöl (see catalogue).
In order to prevent the formation of rust,
the compressed air hammer must be
properly lubricated after or before
extended stoppages via the maintenance
unit or by pouring 2 - 3 cm³ of oil direct into
the hose connection of the hammer. This
can also be done using special oil or
lubricating ampoules.
Reparatur
Repair
Verwenden Sie nur Original-Ersatzteile.
Damit erhöhen Sie die Sicherheit sowie
Laufzeit der Maschine.
Bei Nichtverwendung von Originalteilen
entfällt die Garantieleistung.
Reparaturen sollten nur von geschultem
Personal durchgeführt werden. Bei Fragen
wenden Sie sich an den Hersteller oder an
den nächsten autorisierten Fachhändler.
Auf Wunsch können Ersatzteillisten
nachgereicht werden.
Only use original spare parts. This will
increase the safety and life of the machine.
The warranty will become void if
original parts are not used.
Repairs should only be performed by
trained personnel. If you have any
questions, please contact the manufacturer
or your nearest dealer.
Spare parts may be supplied on request.

Störungen und Abhilfen
Malfunction and Troubles
Störung
Mögliche
Ursache
Abhilfe
Fault
Possible
cause
Remedy
Hammer defekt
eingerostet
ölen
hammer
defective
due to rust
lubricate with oil
Steuerung
verschlissen
reparieren
lassen
worn control
mechanism
have it repaired
Kunde
demontiert und
falsch montiert
erneut
montieren;
reparieren
lassen
wrongly
assembled by
customer after
stripping down
Assemble
again; have it
repaired
Kolben,
Kolbenbahn
und
Meißelbuchse
verschlissen
reparieren
lassen
worn piston,
piston track an
chisel socket
have it repaired
Druckfeder im
Griff defekt
erneuern
defective
pressure spring
in handle
replace
Kolbenbahn
verschmutzt
säubern, ölen
dirty piston
track
clean and oil it
Hammer läuft
unruhig
Steuerplatte
defekt, zu viel
Öl
reparieren
lassen
hammer does
not run
smoothly
defective hollow
spool valve, too
much oil
have it repaired
Schlagleistung
zu gering
Zu wenig Luft,
Sieb verstopft
Energiequelle
nachprüfen,
Sieb säubern
strike rate too
low
too little air,
blocked sieve
check power
supply, unblock
sieve
Hammer bläst
Luft
Fremdkörper in
Kolbenbahn
demontieren.
säubern
hammer
blowing air
Foreign matter
in piston track
Dismantle and
clean
Entsorgung
Recycling
Zur Entsorgung ist die Maschine vollständig
zu demontieren, zu entfetten und nach
Materialarten getrennt der
Wiederverwertung zuführen.
To dispose of the machine, dismantle
completely, degrease and send the
different materials separately for recycling.
Garantie
Warranty
Für die Maschinen gewährt der Hersteller
eine Garantie von 12 Monaten auf Materialund Konstruktionsfehler.
Schäden, die auf Abnutzung, Überlastung
oder unsachgemäße Behandlung sowie auf
Nichtbeachtung der Bedienungsanleitung
zurückzuführen sind, bleiben von der
Garantie ausgeschlossen.
Beanstandungen können nur anerkannt
werden, wenn das Gerät unzerlegt an
den Hersteller gesandt wird und
Originalersatzteile verwendet werden.
The manufacturer provides a 12-month
warranty for the machine on all material
and design errors. Damage which arises
due to wear, over-use or improper handling
and non-observance of the operating
instructions are not covered by the
warranty. Claims can only be processed
if the appliance is returned to the
manufacturer in an assembled state.
The warranty will become void if
original parts are not used.
10
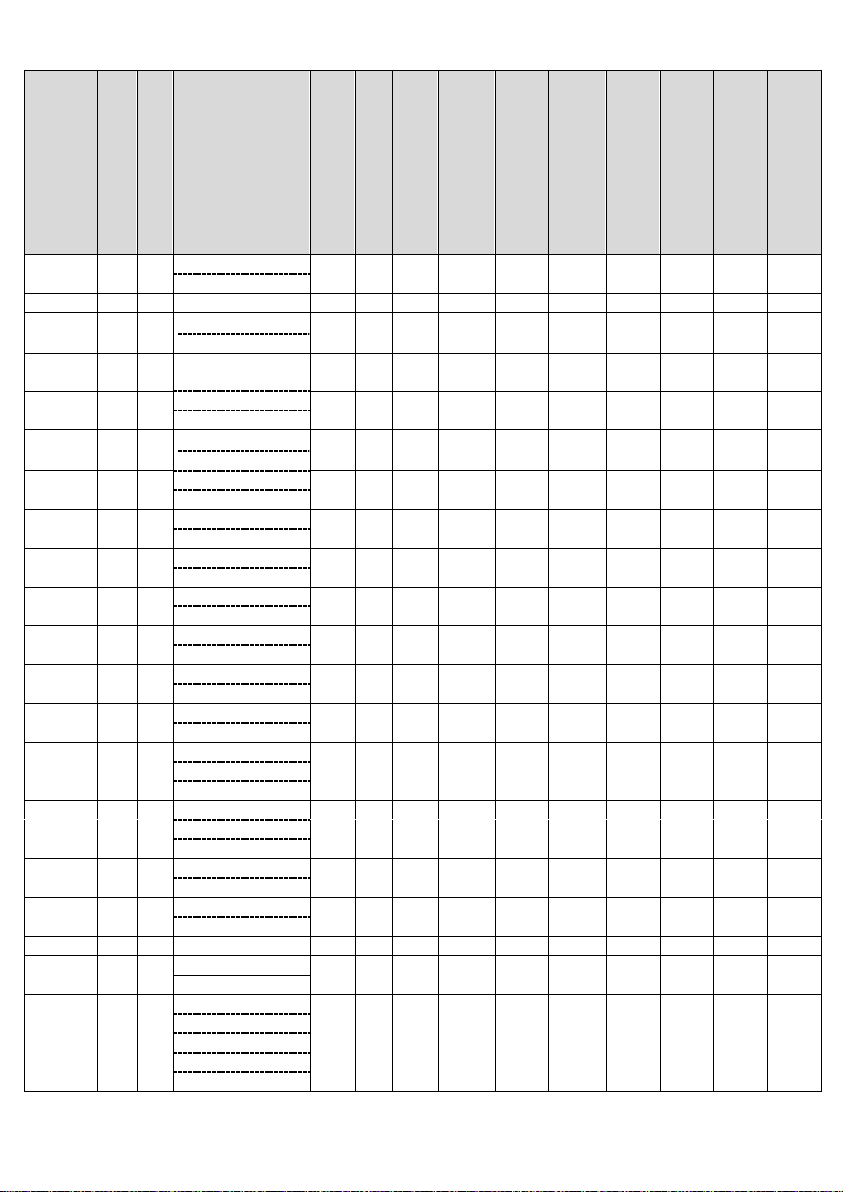
Technische Daten / Technical data
Type
Halt
efeder
Chisel retaining spring Schraubkappe Einsteckende Insert end
Gewicht
(kg)
Net weight
Länge in
(mm
)
Overall length
Luftverbrauch
(l/sec)
Air consumption Schlagzahl
(1/min
)
Number of blows
(pm)
Kolbenhub
(mm
)
Piston stroke Luftanschluss Connection thr
ead
Schlauch l. W. (mm) Hose I.D. Vibrationen (
m/s²)
Vibrations
Expositionszeit (
h)
Exposure time Schalldruckpegel (db(A)) Noise level
MD 070
●
R 10,3x36
0,7
170
3,3
6.500
30
G 1/4"i
8
3,02
21,93
98
S 12,5x36
MD 071
● S 12,5x10,5
0,8
180
3,3
6.500
30
G 1/4"i
8
4,60
9,45
98
MD 072
●
R 10,3x36
S 12,5x10,5
0,70
190 5 3300
46
G 1/4 8 - - -
MD 074
●
S 12,5x10,5x50
S 14,3x12,5x50
0,7
175
5,5
4600
31
G 1/4"i
8
9,90
2,00
96
MD 080
●
R 10,3x36
0,8
190
5,6
6.500
45
G 1/4"i
8
3,30
18,37
98
S 12,5x36
MD 084
●
R 10,3x36
S 12,5x36
0,8
193
5,6
4400
45
G 1/4"i
8
9,10
2,40
95
MD 110
●
R 10,3x36
1,0
205
6,3
6.500
30
G 1/4"i
8
2,50
32,00
98
S 12,5x36
MD 120
●
R 10,3x36
1,1
235
5,3
4.400
45
G 1/4"i
8
4,25
11,07
98
S 12,5x36
MD 130
●
S 12,5x10,5x50
1,3
200
5,0
4.400
40
G 1/4"i
10
7,00
4,11
104
S 14,3x12,5x50
M 13
●
S 12,5x10,5x50
1,3
200
5,0
4.400
40
G 1/4"i
10
7,00
4,11
104
S 14,3x12,5x50
MD 180
●
R 14,3x50
1,8
270
6,0
3.400
60
G 1/4"i
10
11,41
1,54
100
S 14,3x12,5x50
MD 200
●
S 12,5x10,5x50
2,1
270
5,0
3.600
48
G 1/4"i
10
3,50
17,20
98
S 14,3x12,5x50
MD 210
●
R 14,3x50
2,1
320
6,0
2.350
90
G 1/4"i
10
9,31
2,31
97
S 14,3x12,5x50
M 23
●
R 14,3x50
2,3
205
5,5
2.700
40
G 1/4"i
10
7,40
3,61
102
S 12,5x10,5x50
S 14,3x12,5x50
M 230
●
R 14,3x50
2,3
205
5,5
2.700
40
G 1/4"i
10
7,40
3,61
102
S 12,5x10,5x50
S 14,3x12,5x50
MD 222
●
R 14,3x50
3,1
310
6,0
3.200
60
G 1/4"i
10
9,29
2,32
100
RS 14,3x12,5x50
MD 223
●
R 14,3x50
3,4
358
6,0
2.300
90
G 1/4"i
10
10,55
1,80
100
RS 14,3x12,5x 50
MD 340
● S 17,5x14,8x60
3,4
287
6,0
3.700
48
G 1/4"i
10
3,80
13,85
98
MD 630
●
RS 17,5x14,8x60
6,3
381
14,0
3.300
71,0
G 3/8"i
13
16,00
1,25
105
RS 20x17x60
MD 680
●
RS 17,5x14,8x60
6,8
433
15,8
1.650
101,5
G 3/8"i
13
14,00
1,50
103
R 20x60
RS 20x17x60
S 22x82
R 25x75

Die in der Tabelle “Vibration” angegebenen
Werte wurden im Laborversuch nach den
vorgeschriebenen Normen durchgeführt.
Die Werte können bei verschiedenen Werkern
z. B. durch Abstützung, Körperhaltung sowie bei
unterschiedlichen zu bearbeitenden
Werkstücken different sein.
Wir können deshalb nicht für körperliche
Folgeschäden für die von uns angegebenen
Werte gegenüber den tatsächlichen
Belastungswerten haftbar gemacht werden.
Diese in der vorliegenden Bedienungsanleitung
aufgeführten Werkzeuge können das Hand-ArmVibration-Syndrom auslösen, sofern die Tätigkeit
nicht in ausreichendem Maße geregelt wird.
Die Richtlinien hierzu finden Sie unter EU
Vibration „2002/44 EG“
The values shown in table “Vibration” are
the result of laboratory tests according to
the corresponding norms and regulations
The values may differ for various workers
e.g. by support, posture or differently to be
processed work pieces.
Therefore we can not be held liable for
consequential injuries which may occur as
a result of deviations from the values
indicated by us to the actually existing
values in the application.
The tools listed in this manual may cause
the Hand-Arm Vibration Syndrome (“white
finger disease”) in the case that the work is
not controlled sufficiently.
The corresponding guidelines can be found
at EU Vibration “2002/44 EG”
Vibrations-Norm: EN ISO 28927-10
Schallpegel: ISO 15744
12


Druckluft-Industriewerkzeuge | Druckluft-Motoren
MD Drucklufttechnik GmbH & Co.KG
Postfachadresse:
Postfach 2001, 71268 Renningen
Hausanschrift:
Rosine-Starz-Straße 16
71272 Renningen
Telefon +49 7159 18093-0
Telefax +49 7159 18093-100
info@mannesmann-demag.com
www.mannesmann-demag.com
 Loading...