

Page 1
OWNER'S MANUAL
MANLEY
TNT
MICROPHONE
PREAMPLIFIER
MANLEY
LABORATORIES, INC.
MANLEY LABORATORIES, INC.
13880 MAGNOLIA AVE.
CHINO, CA. 91710
TEL: (909) 627-4256
FAX: (909) 628-2482
Page 2

CONTENTS
SECTION PAGE
INTRODUCTION 3
BACK PANEL & CONNECTING 4
FRONT PANEL 5,6,7,8
CREDITS 8
THE MASSIVE PASSIVE
BEGINNINGS, THE SUPER PULTEC 9
THE PASSIVE PARAMETRIC 10
WHY PASSIVE, WHY PARALLEL 11
PHASE SHIFT, WHY TUBES 12
CURVES 13 to16
TUBE LOCATIONS, ETC 17, 18
EQUALIZING
EQUALIZERS (GENERAL) 19
EQUALIZER TECHNIQUES 20 to 24
TRANSLATIONS 25
TROUBLESHOOTING 26, 27
MAINS CONNECTIONS 28
SPECIFICATIONS 29
WARRANTY 30
WARRANTY REGISTRATION 31
APPENDIX 1 - EXAMPLE SETTINGS 32
APPENDIX 1 - TEMPLATE FOR STORING SETTINGS 33
Page 3

THANK YOU !
For choosing the Manley TNT Microphone Preamplifier. The name of this mic preamplifier “TNT” is a
reference to the two different channels, one that is
for a variety of preamps as a means of getting a variety of sounds and tones from the start. Of course, mic
selection and mic position can produce a wider variety of colors, but once that is locked in, the preamp
choice can be a significant factor in some sessions and that subtle difference in others.
The designer considers the reference to TNT (the explosive) might be a bit apropos too. Both share a
reputation as a relatively powerful and particularly useful tool for the ‘difficult’ tasks while being relatively
safe (well, much safer and more stable than Nitro-Glycerine, its main component). Manley would like to
thank Steve Pogact for suggesting the name.
Most mic preamps are stereo, which is fine when one needs to record true stereo with matched mics (few
are), but the most common situations where one can compare and choose a particular preamp, are the often
the more relaxed overdubs. These are typically single miked or multi-miked where each mic might be a
different type and different distance from the source. So the TNT might be the ideal cost-effective solution
for these situations – maximum choices & minimum cost and rack space and where you need to know you
are using the one of the best.
Some people use the TNT simply because it offers two different sounds and is different from their other
preamps. Some people choose it because each channel may be a contender for the highest caliber preamp
in either the “tube category” or “solid-state category” and they demand the best. And some users just like
the unique controls and features. Of course, given a variety of sounds and features, different people will
gravitate to one side or the other and one feature or another. This is to be expected and probably encouraged,
however let us emphasize that we encourage you to dig in, use it to its fullest and form you own opinions
and methods that work for you.
INTRODUCTION
Tube and the other No Tube. We see people today hungry
GENERAL NOTES
LOCATION & VENTILATION
The Manley TNT must be installed in a stable location with ample ventilation. It is recommended, if this
unit is rack mounted, that you allow enough clearance on the top of the unit such that a constant flow of
air can move through the ventilation holes. Airflow is primarily through the back panel vents and out
through the top.
You should also not mount the TNT where there is likely to be strong magnetic fields such as directly over
or under power amplifiers or large power consuming devices. The other gear's fuse values tend to give a
hint of whether it draws major power and is likely to create a bigger magnetic field. Magnetic fields might
cause a hum in the preamp and occasionally you may need to experiment with placement in the rack to
eliminate the hum. In most situations it should be quiet and trouble free.
WATER & MOISTURE
As with any electrical equipment, this equipment should not be used near water or moisture.
SERVICING
The user should not attempt to service this unit beyond that described in the owner's manual.
Refer all servicing to your dealer or Manley Laboratories. The factory technicians are available for
questions by phone (909) 627-4256, or (928) 425-9333 or by email at <service@manleylabs.com>. Fill
in your warranty card! Check the manual - Your question is probably anticipated within these pages......
3
Page 4

THE BACK PANEL
SERIALNUMBER
+4UNBALANCED
+4 BAL
-10UNBALANCED
OUTPUT MODE
MANLEY LABORA TORIES, INC
13880 MAGNOLIA AVE., CHINO, CA 91710
PHONE (909) 627-4256 F AX(909) 628-2482
SERIAL NUMBER
FUSE 1A @ 1 17V
FUSE .5A @ 220V
www.manleylabs.com
+4UNBALANCED
CAUTION -RISK OF ELECTRIC SHOCK. DO
NOT OPEN. REFER SERVICING TO
CAUTION: RISK OF ELECTRIC SHOCK. DO
QUALIFIEDPERSONNEL ONLY
TRANSFORMER & XLR
DESIGNEDBY HUTCH
TNT
DOES NOT BYP ASS
TRANSFORMER
ISOLATED
CHANNEL 2
OUTPUT
TRANSFORMERLESS
OUTPUT
OUTPUT
MIC
MIC
N9512422
1
TRANSFORMERLESS
OUTPUT
+4 UNBALANCED
OUTPUT
DESIGNED BY HUTCH
OUTPUT
TRANSFORMER & XLR
BYPASS
DOES NOT BYP ASS
TRANSFORMER & XLR
OUTPUT MODE
+4 UNBALANCED
+4 BAL
-10 UNBALANCED
MANLEY LABORA TORIES INC
.
TNT
www.manleylabs.com
N9512423
OUTPUT MODE
+4 UNBALANCED
-10 UNBALANCED
10
+4 BAL
+4 UNBALANCED
OUTPUT
TRANSFORMER & XLR
BYPASS
67
DESIGNED BY HUTCH
5
4
SERIAL NUMBER
MANLEY LABORA TORIES INC
13880 MAGNOLIA AVE., CHINO, CA 91710
PHONE (909) 627-4256 F AX(909) 628-2482
23
.
1
FUSE 1A @ 1 17V
FUSE .5A @ 220V
CAUTION: RISK OF ELECTRIC SHOCK. DO
NOT OPEN. REFER SERVICING TO
QUALIFIEDPERSONNEL ONLY
8
TRANSFORMERLESS
OUTPUT
DOES NOT BYP ASS
TRANSFORMER & XLR
9
First connect all the cables, then turn on the power, wait 30 seconds, then have fun, as if we had to tell you....
1) POWER CONNECTOR. First verify the POWER SWITCH on the front panel is off (CCW). Use the power cable supplied with your
TNT. One end goes here and the other end goes to the wall outlet. You know all this.
2) VOLTAGE LABEL (ON SERIAL STICKER). Just check that it indicates the same voltage as is normal in your country. It should
be. If it says 120V and your country is 220V, then call your dealer up. If it says 120V and you expect 110 it should work fine.
3) FUSE. Unplug the power cable first. The Fuse Cap needs a push then turn a quarter twist CCW to pull off. Fuses are meant to "blow"
when an electrical problem occurs and is essentially a safety device to prevent fires, shocks and big repair bills. Only replace it if it has
"blown" and only with the same value and type (2A slow-blow for 120V, 1A slow-blow for 220V). A blown fuse either looks blackened
internally or the little wire inside looks broken. A blown fuse will prevent all the LEDS from lighting and will prevent any power and audio.
4) TUBE CHANNEL XLR JACK INPUT. ( Left) Accepts balanced or unbalanced sources. The pin out is as follows: PIN 2 = Positive
= Hot, PIN 3 = Negative = Low or ground, PIN 1 = Chassis Ground. Be sure that the PIN 3 is connected to the negative or ground and
not "open" or a 6dB loss or loss of signal will happen. This input is transformer coupled. Switching PHANTOM POWER on, puts
approximately 48 volts via 6.8k resistors (double regulated 46-47 vdc typical) on pins 2&3.
5) TUBE CHANNEL XLR JACK OUTPUT. (Channel One or Left) Transformer Balanced and Floating. Only for +4dBu pro levels.
The pin out is as above. NOTE: Inserting a 1/4" plug into the "UNBALANCED OUTPUT" jack disables this XLR output !
6) TUBE CHANNEL PHONE JACK OUTPUT. (Channel One or Left) Unbalanced output only. Factory set-up for +4dBu pro levels
and mono or 2 conductor plugs. NOTE: Inserting a 1/4" plug into this jack disables the XLR output because it switches the transformer
out of the circuit to prevent any loading. This 1/4" output should be used if the goal is to record as clean and tight a low end as possible
from tubes. This jack also should be considered if the destination or cables present a difficult load for the XLR transformer output (high
capacitance from long cables, or low resistance from 600 ohm vintage gear or more transformers).
7) COOL CHANNEL XLR JACK INPUT. ( Left) Accepts balanced or unbalanced sources. The pin out is as follows: PIN 2 = Positive
= Hot, PIN 3 = Negative = Low or ground, PIN 1 = Chassis Ground. Be sure that the PIN 3 is connected to the negative or ground and
not "open" or a 6dB loss or loss of signal will happen. This input is transformer coupled. Switching PHANTOM POWER on, puts
approximately 48 volts via 6.8k resistors (double regulated 46-47 vdc typical) on pins 2&3.
8) COOL CHANNEL XLR JACK OUTPUT. (Channel One or Left) Transformer Balanced and Floating. The pin out is as above. The
1/4" jack has no effect on this XLR (both can be used at once) but the OUTPUT MODE switch should be properly set (generally +4
Balanced for maximum headroom) however it is worth mentioning that a transformer floating output is equally happy driving balanced
or unbalanced inputs. But we will remind you that most unbalanced inputs are designed for -10 levels so in order for TNT's levels and
LEDs towork as designed, if the desination is -10 consumer level the switch should be set for "-10 unbalanced" (usually ;>)
9) COOL CHANNEL PHONE JACK OUTPUT. (Channel One or Left) Balanced or Unbalanced output so a 2way or 3way(stereo)
plug can be used. Factory set-up for +4dBu pro levels. This 1/4" output should be used if the goal is to record as clean and tight a low
end as possible (transformerless). This jack also should be considered if the destination or cables present a difficult load for the XLR
transformer output (high capacitance from long cables, or low resistance from 600 ohm vintage gear or more transformers). The OUTPUT
MODE switch should be properly set (depending on the destination and wires) because these outputs do not use cross-coupled op-amps
and are designed to properly drive either balanced or unbalanced systems providing the switch is properly set.
10) OUTPUT MODE SWITCH. Sets both the output level and whether both the XLR and 1/4" jack are balanced or unbalanced.
Normally this switch should be in the "+4 BAL" or Center position. Some PRO gear may prefer the "+4 unbalanced" position but this
style of input is becoming increasingly rare, however because the TNT loses 6 dB of headroom in this mode, it can be used for creative
"drive" cleverness. Similarly the "-10 UNBALANCED" mode loses another 6 dB of headroom when 'mismatched' in typical +4 balanced
systems. However, this mode is more likely to find service because a fair amount of semi-pro and consumer gear with RCA jack inputs
are compatible with this level and 1/4" plug to RCA plug adapters are very common.
4
Page 5
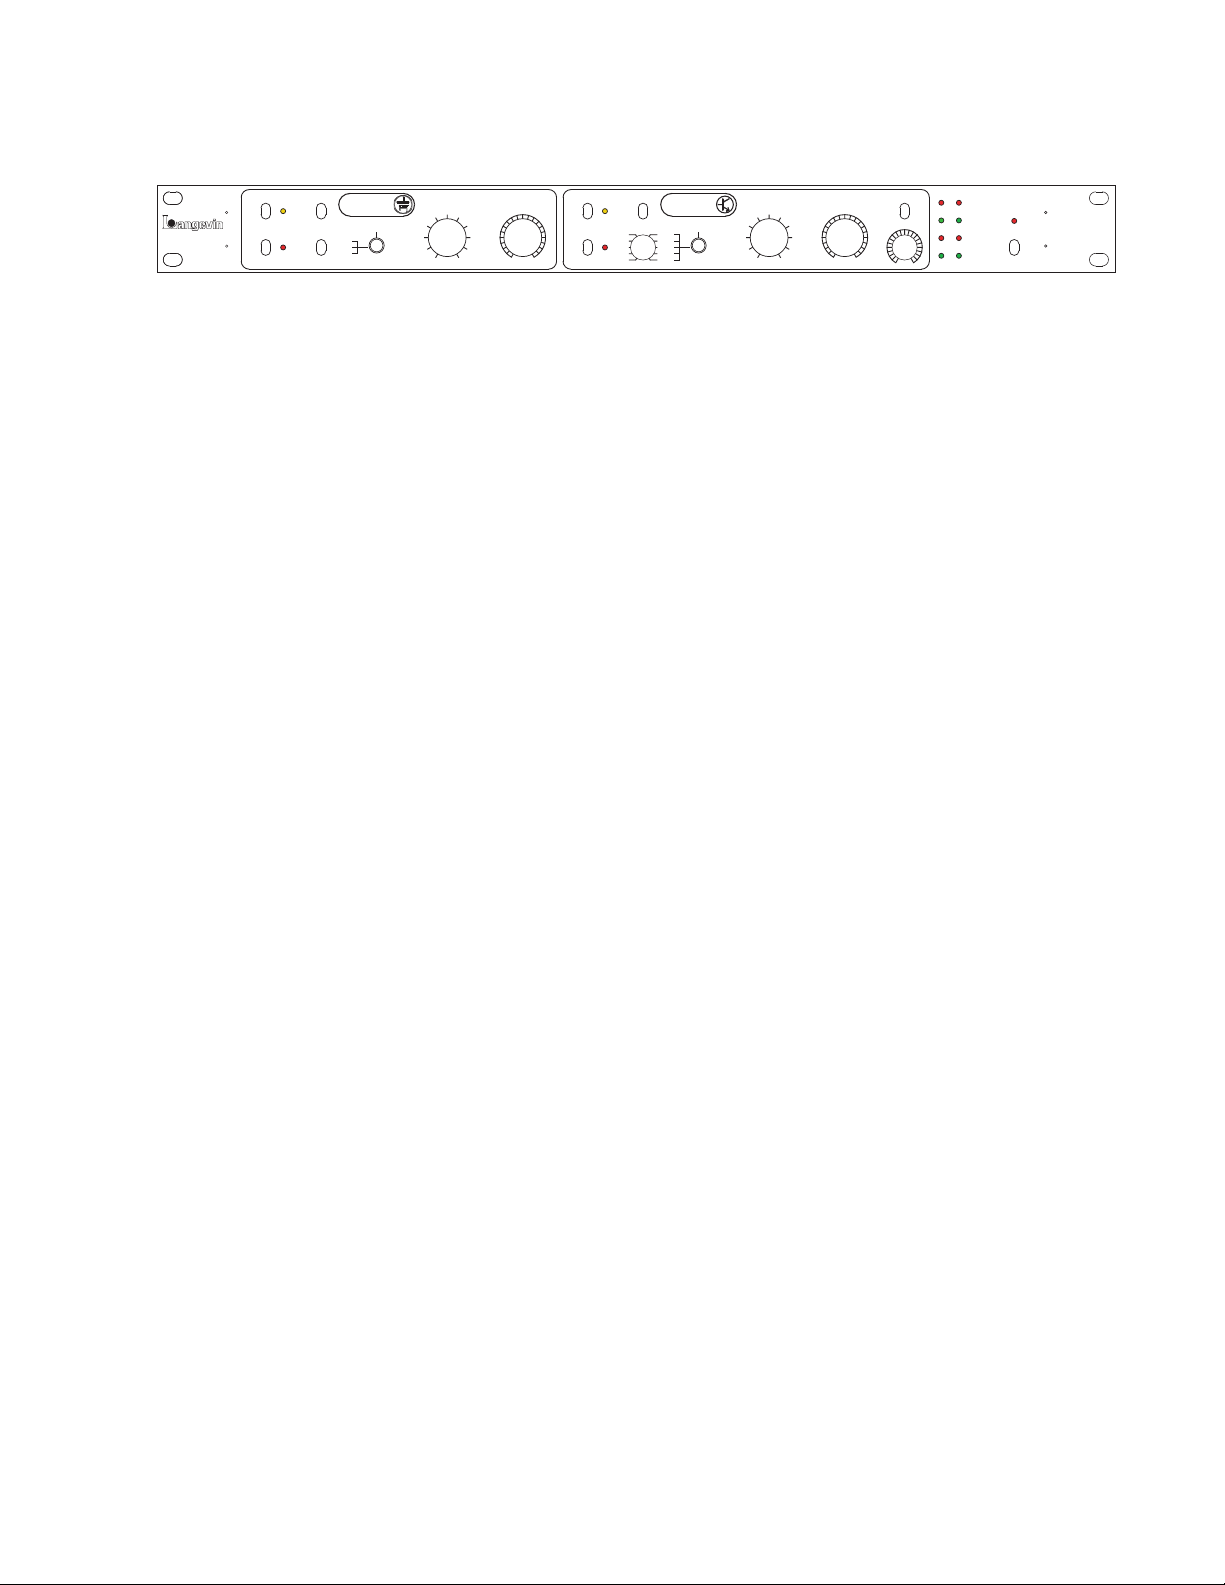
THE FRONT PANEL
5/5
/
6,*
287387
,1387
32:(5
21
2))
V
V
&/($1
,521
75,0*$,1
,167580(17
),/7(5
+]
+]
)/$7
3+$1720
3+$6(
21
2))
75,0*$,1
,167580(17
0(*
0(*
.
.
),/7(5
+]
)/$7
3+$1720
3+$6(
21
2))
F
.
0
0
.
.
0
0
%<0$1/(</$%6
78%(
&+$11(/
&22/
&+$11(/
&2/25
,03('$1&(
7
,03('$1&(
7
3
%
3
%
3
%
3
%
1
3
5
4
2
679
8
10
11 12
13
141516 1817
TUBE CHANNEL
1) PHANTOM POWER: Toggle up turns 48 volt phantom power on (and the amber LED) which is needed for most FET condensor
microphones. Turn your monitors down because it may make a big 'POP'. Avoid patching the mic lines if phantom is turned on. Some
ribbon mics can be damaged if phantom is on and cables or patches are changed, so don't use phantom with ribbons - or be careful.
2) PHASE SWITCH: Reverses the polarity (180 degrees) of the microphone signal. Sometimes needed in situations where two mics
are used and sometimes useful for vocals when headphones are used. Red LED is ON when PHASE switch is engaged.
3) HIGH PASS FILTER: Toggle up engages a basic 80 Hz filter, Used to remove excess lows, rumble and some air conditioning noise.
4) IMPEDANCE SWITCH: 3 position toggle changes the loading characteristics presented to the microphone or instrument. This can
subtly change the sound of the mic. "2400" ohms is considered normal or typical. "10K" is a lighter load and may be appropriate for some
sounds and often for ribbon mics. "600" ohms may tighten up the lows on some mics. Unlike many Impedance switches, the volume will
not change by 6 dB, and will stay relatively constant making comparisons easier. The numbers to the right of the switch indicate the
impedance given on the 1/4" Instrument Input, where 1 Meg simulateds a typical amp. Higher usually means brighter.
5) INSTRUMENT INPUT: Plug your guitar or bass in here. A plug inserted in this jack will disable the XLR Microphone Input.
6) GAIN SWITCH: This rotary switch sets the gain for the first amplification stage. The steps range from +20 dB to +70 dB and when
used with the TRIM (below) provides a range of +10 to +80 dB of gain. The bottom two LEDs (see #17) indicate "signal present" and
"overload" of this first stage. If internal jumpers are properly set, one can turn this switch higher for overdrive and turn down the GAIN
TRIM to optimise the level again. If the jumpers are set for "clean" then it may be difficult to overdrive this stage.
7) GAIN TRIM POT: This pot is typically used to finely adjust the gain as needed for the recording device or converter. The two top
LEDs are associated with this knob, and are intended to help set optimal levels, which are well (about 10dB) below when the TNT clips.
COOL CHANNEL
8) PHANTOM POWER: Toggle up turns 48 volt phantom power on (and the amber LED) which is needed for most FET condensor
microphones. Turn your monitors down because it may make a big 'POP'. Avoid patching the mic lines if phantom is turned on. Some
ribbon mics can be damaged if phantom is on and cables or patches are changed, so don't use phantom with ribbons - or be careful.
9) PHASE SWITCH: Reverses the polarity (180 degrees) of the output signal.
10) HIGH PASS FILTER: Toggle middle position is a 120 Hz HP filter, Toggle up engages a less drastic 60 Hz filter.
11) IMPEDANCE SWITCH: This is a 5 position rotary switch that both controls the loading on a connected microphone and internally
directs and shares the signal between two different preamp circuits or topologies. The least amount of loading is the 2 MEG setting and
the next setting marked 2K (2000 ohms) might be considered traditional or typical (most preamps were designed for 2000 to 3000 ohms).
Both of these two only use the cascode FET preamp. The next two settings share both the cascode FET preamp and the current mode
preamp, 600 and 300. The final setting, 300C, only uses the current mode preamp and relays bypass the sub-circuit used for mixing the
preamps, so it has some purist function.
12) INSTRUMENT INPUT: Plug your guitar or bass in here. A plug inserted in this jack will disable the XLR Microphone Input.
13) GAIN SWITCH: This rotary switch sets the gain for the first amplification stage. The steps range from +20 dB to +70 dB and when
used with the TRIM (below) provides a range of +10 to +80 dB of gain. The bottom two LEDs (see #17) indicate "signal present" and
"overload" of this first stage. Use this switch in conjunction with the 60's-70's switch and the LEDs to control the amount of color or
distortion. In this situation the GAIN SWITCH becomes a "drive" control too.
14) GAIN TRIM POT: This pot is typically used to finely adjust the gain as needed for the recording device or converter. The two top
LEDs are associated with this knob, and are intended to help set optimal levels, which are well (about 10dB) below when the TNT clips.
15) COLOR SWITCH: With the switch in 60's or 70's, a circuit is added that is designed to clip in an interesting way that somewhat
simulates the way magnetic tape, and guitar amps clip. Use the GAIN SWITCH to control the depth of distortion. In general best results
are obtained when the desired effect is subtle and this circuit is just lightly driven and obvious distortion is minimal. Of course, sometimes
more drastic effects are desired and the GAIN SWITCH can be turned up. Thicker distortion may take several processors.
The 60's - 70's switch can alter the highs depending on drive levels.
16) IRON EFFECT: This knob adjusts how audible the output transformer may be from exagerated at +3 to near zero at 0 and even
becoming inverse or the opposite of a transformer at -1. This control is essentially "out-of-circuit" with the knob straight up (12:00) (like
an EQ). The knob controls several subtle effects including low frequency level, low frequency distortion, high frequency level and high
frequency dynamics. This control is often subtle and somewhat signal dependent.
17) LED LEVEL INDICATORS: Simple indicators to show signal presence, first stage clipping, and more or less appropriate levels
for the next device. See page 000 for more deatails.
18) POWER SWITCH: With this switch UP, LEDs should come on and maybe sounds might come out the back XLRs......
5
Page 6

6
Page 7

7
Page 8

BEGINNINGS
The TNT project began due to requests from fans of the
SLAM! and in particular Lynn Fuston of 3D Audio Inc.
The request was simply “Can you bring out just the
SLAM! Mic preamps without the Limiters and other
features. Then came the 3D Audio bulletin board "Dream
Pre-Your ideas wanted" thread which had a lot of great
ideas and diverse opinions. Perhaps the most obvious
theme was that engineers were now using several mic
preamps at their disposal for a variety of colors like they
had always done with mics. This was actually a pretty
new trend in '92. How about a box with a few different
preamp topologies for different sounds?
At the 3D Preamp Summit, the topic of "vintage-style"
electronics came up, not because of huge desire from the
engineers but more as a designer topic relating the
headaches of recreating transformers and obsolete parts
accurate enough to be comparable to the original.
However where there was interest in old school style was
when the recording engineers began to talk about how
they did those classic 60's sessions, and the focus was on
production technique and war stories rather than
components and gear. Maybe the engineers were
saturated with recreations of old gear and were craving
both the magic of old sessions and yet new exciting toys
to do their job with tomorrow. A bit of both.
We began to experiment with some simple discrete
preamp design concepts and breadboarded a few
approaches. Hutch had also had developed the "Rapture"
gain stage intended for a proposed digital converter that
was impressively un-colored and which became the
standard against which other 'experiments' were
compared.
Then the 3D mic preamp summit "Preamps in Paradise"
happened January 2004. This was a historic event in
Tennessee with a panel of 10 notable preamp designers,
and 7-10 famous engineers known with reputations as
preamp connoisseurs. Amongst fascinating stories and
a sharing of approaches, this designer was hearing a
chorus of requests, a short list that included “variable
impedance – but minus the typical gain changes” and
“some new useful control or knob”. Up to then, the solid
state preamp we were working on was envisioned as a
typical minimalist ‘2 knob’ discrete channel in some
ways similar to the tube side borrowed from SLAM!.
But the engineers were asking for more control, and
were describing approaches based on sonic
characteristics such as clean / not so clean, bright / not
so bright, transformer or transformerless and this
resonated with the designer’s session experience.
Designers talk about discrete topologies, tube types and
transformer details but recording engineers talk about
sounds and controls and session techniques.
The initial concept of the TNT was to put two very
different mic preamp technologies in the same box, and
that each were to be as simple as "plug in a mic and it
sounds fine", without a lot of controls to get in the way.
In the end, the TNT did get new features and controls
such as the IRON knob, 60's - 70's switch and its unique
impedance control. And these were largely due to
engineer's requests from the "Preamps in Paradise"
event.
So we went back to the ol' drawing board and back to the
lab bench and experimented with a variety of circuits
and topologies, but this time holding truer to the end
result the user would appreciate rather than the internal
workings that might have buzz word appeal. Already the
SLAM! preamp was not "all-tube" but more of a hybrid
FET-Tube cascode, so why stick to "all-discrete" or
"vintage-clone" when the engineers seemed to be just
concerned with sound or tone and occasionally hoped
they could get a few new controls if possible.
The TNT solid state side evolved into a mix of discrete,
and op-amps plus it ended up with the Rapture Amp for
the line driver. Why this mix? Just our choice based on
listening comparisons where our choices generally
favored the cleaner or most true to the source as a base.
The users could always add stuff that gave some color
or texture onto that base and we provided a few too.
We did come up with a few controls that gave some
possibilities for "tints" or "flavors" that could be dialed
in. For the most part these were designed to be subtle
rather than drastic because the TNT is a mic preamp and
not an EQ or a typical processor. In fact even the
IMPEDANCE switches were designed to not mangle
the sound in unintended ways - they should be "just"
impedance controls without baggage. Some users may
expect bigger sonic changes from huge impedance
changes or major audible effects from varying the IRON
content, but the folklore surrounding those ideas is
maybe more dramatic than reality. These controls were
designed to reflect reality which seemed appropriate on
a high end Mic Pre and tend to be more like tweaks and
trims. And this was more in-line with the original
concept of a basic good plug in a mic and go preamp.
8
Page 9

The TNT was getting interesting. We now had a tube
preamp from the SLAM! on one side plus two solid state
preamps working together on the other side, and each of
those 3 circuits had a unique sound or subtle flavor yet
there was some common theme or style.
The tube channel is based on a JFET / Vacuum Tube
Triode cascode circuit that is quite unusual in that it is
a blend of old and new components. The cascoded
combination allows for high gain, low noise and low
distortion without using negative feedback.
On the solid state channel, one of the preamps also uses
JFETs in a cascode topology. The high impedance
circuit operates in the voltage mode. The ideal voltage
amplifier would have infinite input impedance and the
current flow would be zero. We use a paralleled cascaded
ultra-low-noise FET / op-amp circuits and the TNT
requires a pair of those hybrids for balancing (8 discrete
matched FETs). There are a few interesting twists here
too. When phantom power is engaged, it uses the
conventional 6.8 k-ohm phantom power resistors plus
the usual DC blocking capacitors. So even if the
impedance switch is set to 2 Meg Ohms, the phantom
circuit limits the impedance down to about 14 kohms.
But if phantom is turned off, TNT removes those
resistors (rather than switching them to ground, as is
standard procedure) and bypasses the DC blocking
caps, so that you truly have 2 meg input impedance and
DC coupling restored. And no free lunch here either.
Compared to the current mode amplifier, the voltage
mode amplifier typically tends to have opposite
characteristics in terms of its strengths and weaknesses.
The low impedance circuit is based on a special Lundahl
transformer designed to operate in the current mode.
This allows the transformer to work down to near DC
yet be very small physically. This was paired with an
ultra-low noise, ultra-low distortion op-amp that won in
our listening tests.
By combining the JFET and Current mode preamps we
were able to create a variable impedance that uniquely
sensed and amplified both voltage and current. And this
in turn provided much better gain consistancy while
usually sounding a bit better than either approach alone.
In other words the volume didn't jump or shift as the
impedance control was changed unlike most (or all)
other approaches. Some switch transformer taps, but
transformer frequency response is very source dependent.
And some preamps had 20 dB gain changes as the
impedance knob was adjusted.
Now that users can accurately hear and compare the
effect of variable impedance without huge gain changes
and without significant frequency response changes, it
becomes truly interesting to hear what effects there are.
In most cases these effects are not life changing. Even
where low impedance settings seem to affect the damping
or tightness a dynamic or ribbon mic might exhibit, one
then may be faced with an unfamiliar sound from a
familiar mic. This may be a good thing sometimes, but
often one picks a familiar mic for its familiar sound. And
one may hear similarly questionable highs in the high
impedance settings. One might hear excess sibilance or
harshness that may be due more to cables and cable
distance than anything else. In the end, one may be most
comfortable with the two middle settings of 600 and
2400 as the idea of extreme impedances gradually lose
appeal.
Maybe the TNT might be viewed as a bit of a mythbuster in regards to "variable impedance". Yes, it is
sometimes useful - but can often be subtle - not exactly
the most important feature for a mic preamp.
And then the basic premise of a tube preamp and solid
state preamp being very different sounding animals
might be a myth too. At one time we had both preamps
tuned and adjusted to be extremely clean and transparent.
One might guess that two transparent gain stages
regardless of the technologies might sound the same,
which was essentially inaudible. We had to go backward
and re-introduce some of the "flaws" to recreate some of
the creative differences that we all expected. We added
some internal jumpers that essentially un-trim the tube
bias trimmer pots that are tweaked to set up minimum
distortion.
Same thing with the IRON control..... So much has been
said about the sound of transformers lately that many
people expect that one component to almost be responsible
for every products signature sound - wrong ! Sorry
another myth. Most modern transformers are pretty
transparent when used properly.
In fact, we had to use several techniques just to make the
IRON control 'audible' including designing the
transformer with unusually low permeability laminations,
driving it with a non-optimum source, and forcing DC
into a tertiary winding to create more distortions. In other
words it was a bit of a fight to make it audible enough to
wrap a control circuit around it.
9
Page 10

Perhaps it is because those near opposite characters of
the two circuits, that when combined or blended the
audible benefits and strengths of each prevail, while the
weaknesses of each are minimized. Of course, the better
each circuit is optimized, the closer they tend to meet in
the middle (transparency). Perhaps it is because the
approach of respecting both voltage and current, it
results in a form of optimal power transfer. Optimal
power transfer is a very old topic in electronics and it
relates to the old 600 ohm impedances pro audio inherited
from the telephone industry and the 75 ohm terminations
we need to be concerned with for word clock and video
lines. Maybe with complex sources, there is valuable
information carried both in voltage and in current and
maybe most mic pre inputs are not as simple as a basic
resistor. In other words, to some degree a typical
microphone is a complex source (especially dynamic,
ribbon and transformer coupled condensor mics) and a
typical mic preamp input may also be a complex load
(especially if it is transformer coupled) and the cable and
connections between the two might also be viewed as a
combination of resistance, capacitance, inductance and
distance. So maybe it is all too complex to grasp without
some serious computer modelling, but maybe it can be
easy enough just to hear in some situations - and we''ll
leave that up to you.
We would like to speculate that one of the complexities
that you might experience will be cable length. While we
were designing the TNT we noticed excess high frequency
sibilence coming in at the highest impedance settings.
We finally traced it to the mic cables that we were using.
If we doubled the length, the problem doubled and if we
used a very short cable the problem disappeared. And
the problem wasn't apparent at low impedance settings.
OK but why? Here is where we have to speculate.
At low Z settings, it may be akin to our old 600 ohm
terminated lines that pro audio inherited from the
telephone industry. And that standard was set up to
reduce echoes in early long distance lines. It also
resembles the 50 ohm or 75 ohm terminated lines used
for video and word clock where cable reflections impact
high frequencies. Normally we don't consider audio
frequency cable reflections to be a concern because they
don't seem to affect the 20 kHz frequency response or
square waves on our 'scopes. So our speculation might
be a question. How far do these cable reflections need to
decay (in dBs given that -60 dB is 1/1000) before they
do not intersect with our abilities to perceive transients?
Or how many microseconds of reflections and down to
what dB? Just use a shorter cable.
Impedance Issues and Microphones
OK, the above might be a bit of technical mumbo-jumbo
and what you really want to know is what to expect and
listen for when you change the impedance switch in your
session. Simply, at very high impedance settings, there
are usually a little more highs. At low impedance
settings, with dynamic and ribbon mics the bottom often
tightens up. In the middle impedance settings, the preamp
may sound closest to what you have grown to expect
with that mic because most mic preamps are medium
impedance and typically 1000 – 3000 ohms.
With high impedance settings, one may be affecting the
mic and cable in a few ways. First, with transformer
coupled mics like most dynamic, ribbon and tube
condenser mics, one might be setting up a high frequency
peak in the mic’s transformer that may have been
intended for 1 kohm to 3 kohm preamp impedances. The
opposite is also common, where very low impedances
may cause the transformer to roll-off highs earlier than
the designer intended (yeah, but its your mic and your
session, so choose the setting with your ears). The other
effect, goes back to that rambling about cables and time
domain effects. Listen carefully for excessive sibilance
and what might be described as an artificial harshness,
and what perhaps the most finely honed ears will hear as
time-smearing in the top octaves. This effect is directly
related to cable type and length, and once you lock into
it, you can prove it by doubling (or halving) the cable
length. Even better is moving the TNT into the studio
once you have your settings, and using a 4 to 8 foot cable
from the mic to the preamp. It seems puny low level mic
signals are more fragile to these effects than hotter line
level (and robust line driver driven) signals but we don’t
know why. Give it a try. If this seems a bit inconvenient
for level tweaks, add a simple passive variable attenuator
(fader or pot) in the control room near your converter (if
it has inconvenient input level adjustments) if you are a
purist, or use the compressor or EQ gain controls, if
you’re not. The TNT has quite a bit of headroom (except
in 60’s / 70’s mode) so there won’t be much chance of
overloading it and the real thing to keep an eagle eye on
is the analog to digital converter at the end of the chain
Away from the extremes, the 2K (2000 ohms) setting
represents the standard impedance of most mic preamps
and what most microphones are designed to drive. In
other words, its safe, and maybe a bit ‘vanilla’ and this
isn’t a bad thing. The 600 ohm setting is also pretty safe
and may have some advantages because it gets closer to
a 50/50 blend of voltage and current mode preamps.
10
Page 11

At very low impedance settings with dynamic and
ribbon mics another effect can come into play. Damping
is a term normally associated with speakers that refers
to the fact that a dynamic speaker comes to rest faster
and is better controlled when connected to a very low
impedance amp. (It was one of the biggest selling-point
features when early solid-state amps with tons of negative
feedback first came out.) Damping often has a dramatic
effect on a speaker’s frequency response and is one
reason why some speakers work better with solid state
and some better with tube amps (they were designed to,
or what they were designed with). A similar effect often
happens with dynamic mics and the bottom tightens up
at low impedances. Whether this is desirable tends to
depend on whether you are aiming for a tight and
probably ‘truer-to-the-source’ sound or the sound of the
mic that you and the world is more familiar with and
might be viewed as more authentic or traditional. You
might even use the tight 300 ohm settings for tubby
instruments and the 2K setting for drier sources and
mics.
To complicate matters further, it depends on the mic.
Modern FET condenser direct coupled (transformerless)
mics are mostly immune to whatever setting impedance
you select, (though you might isolate some of those cable
and preamp circuit effects described above) so expect
generally very subtle or negligible differences. At worst,
with loud sources and lowest impedances you might
introduce early clipping with the occasional FET
condenser mic. Tube condenser mics are fairly immune
but the impedance may affect the frequency response of
the transformer. And with ribbon mics, one concern
might be getting enough highs to start with, so you might
want to especially watch out for losing highs while you
focus on the tighter bottom with low impedances. But
the good news is that ribbon mics tend to be famously
forgiving when boosting the highs with a good EQ so it
may be easy to “get the cake and eat it” this time.
And for those who just don’t want to be bogged down by
any technical issues and complications: you are in luck
again – just turn the knob and pick the setting that
sounds best for this track. In fact, this is the best advice
for those that love all the technical explanations too, and
when you get down to the session, the most important
thing is to listen and choose based on the heart and the
tapping foot rather than the intellect and some words in
a manual or web-site. Remember the music, remember
to listen. The old adage remains valid “If it sounds good,
it is good”.
We touched on using the impedance switch by ear and
how the low impedance settings may be tighter in the
lows, the medium impedance settings might be the ticket
for the advantages of blended preamp those settings
represent typical mic pre impedances and how the
highest impedance may be useful for squeezing the last
drop of highs (but not necessarily the most accurate
highs).
One way (not the only way) to approach the
IMPEDANCE switch is to begin at the middle or “600”
setting. Listen to what you get. If the sound strikes you
as OK but already a bit bright, then try the lower
impedance settings. If your first impression is that this
instrument/mic sounds good but a little dark, then try the
higher settings. Quite likely, your first impression is that
it won’t sound exactly OK or good enough, so the best
advice, is that you should be really be out in the studio
adjusting the mic position and you are not at a point
where the subtle effects of adjusting preamp impedance
will help enough. Maybe you started off on the wrong
foot, or wrong mic in this case. You might try approaching
mics the same way as the IMPEDANCE switch. If the
instrument is hard sounding, try a softer sounding mic,
and vice versa. When you have a bright stinging
instrument, maybe you don’t want to use the brightest
mic in the brightest position and coupled to a bright
preamp in its brightest setting, followed with EQ in
maximum “air” settings. The real trick to getting “air”
is letting that track and the others to “breathe”, give it
some room to move, rather than add some electronic
artifacts. It doesn’t take Einstein to suggest sounds or
tones in a song are “relative” (and so is volume).
A proven approach, is first to listen to the instrument in
the studio, walking around, getting a handle on where it
sounds best and how the tone changes around the
instrument. We do that because instrumental projection
isn’t necessarily obvious and because it gives you a
starting point and the information needed to tweak mic
positions. Then one might choose a microphone or 3 and
maybe based on complementary characteristics. We
might also suggest experimenting with mic positions by
ear rather than by the eyes, or ego. One might say the
first task of an engineer is re-creating the sound that the
musician is hearing and intended. The second task might
be understanding the musician intended it to sound
better than what he got in the room and that maybe
something larger than life (as opposed to squashed and
smaller) might be what the sound becomes in the mix.
Some of you laugh and say "Not my clients, not my
mixes!" One can hope.
11
Page 12

The Tube Channel
The left side (T) or channel one, is almost an exact
replica of the SLAM! Mic Preamplifier and audio path.
The only differences are the addition of the Impedance
switch and an additional shunt regulator on the phantom
power. The latter reduces noise and provides a softerstart & off with the phantom power switching – less
thump and less chance of input transformer
magnetization.
After being introduced, the SLAM! Immediately
developed a reputation as one of the best and easiest to
use tube mic pres. It seems to particularly shine on the
traditionally most difficult sources like sax, brass, raspy
vocals and most percussion. It might not be the first
choice for those looking for a dramatically colored
preamp or those looking for gobs of tube-warmth
(distortion) and it isn’t a one-trick-pony that stamps its
own personality on every sound. However, it does have
both an input transformer (Lundahl) and output
transformer (the one we developed for the SLAM!) and
it does have two stages using tubes and it is true classA from input to output, so yeah, it does have some
character and tube-magic, and a tasteful amount of
warmth. In other words, clean but not sterile, and it is
neither flavor-less nor overbearing. Perhaps, the simplest
description from a reviewer both describes this tube
preamp’s ‘sound’ and the designer’s actual intention –
“Just plug in a mic and it sounds great”.
There are twin tube gain stages based on one of most
rave-reviewed hi-fi phono preamps ever, “the Manley
Steelhead”. These gain stages can be described as JFETTube cascode amplifiers. The FET is the first stage to
keep the noise floor low, and the tube provides the bulk
of the voltage gain. The beauty is that the FET and tube
are so arranged to cancel the distortion of the other
(complementary). The topology and balancing of this
circuit has such low distortion that there is no need for
negative feedback, (which might be appreciated by
audiophiles). The circuit is also set up to compensate for
both FET and tube variations and their drift.
This preamp also tends to have a great deal of headroom
in most situations. While one can push the first stage
hard to get some clipping when desired, one really has to
try hard – this preamp wasn’t designed to be an expensive
fuzz-box. On the other hand, this is why it tends to work
so well with difficult complex-wave sources and why it
succeeds as a “plug the mic in and hit record” preamp.
Are there any tricks to using it, anything in particular to
be concerned about or suggestions about its care and
feeding? Practically none. Set the GAIN TRIM knob to
near the middle or straight up as a starting point, turn the
monitors down when plugging in a mic cable or switching
phantom on or off (as usual), adjust the GAIN rotary
switch to get an good level, hit record. The 4 LEDs on
the far right are intended as a rough starting point to set
that “good level” but there is ample headroom and low
noise in the preamp that the LEDs mostly serve as
‘signal present’ and ‘overload indicators’.
The IMPEDANCE switch can be set to taste. Probably
the 4K setting may be the brightest or hardest, and the
600 setting the softest or phat-est. It affects the instrument
¼” jack that way too when fed by magnetic pick-ups. It
probably won’t have any effect on guitars or basses that
have internal preamps, or after pedals, and probably no
effect on synths. And on that note, before you write off
a mono preamp as a last resort for synths because they
all have stereo outputs – usually you can plug into just
its left output and get the full sound, save a track, and not
be semi-forced into yet another wide spread left-right
synth sound. In the mix, give it a position, and add some
good convolution reverb (especially authentic rooms),
and maybe it will begin to resemble a real-life instrument
and not a ‘stereo-type’ wash.
There are two outputs, a balanced XLR and an
unbalanced ¼” jack. They sound a bit different and you
can get a little variation of tone that way too. The XLR
has a transformer in the path so it may sound a little
“warmer”, softer, rounder and fatter, more ‘vintage’ or
‘classic’. The ¼” output interrupts the feed to the
transformer and the XLR, and sonically it might be
called a hair brighter, harder, more transparent, or
accurate, depending on who is trying to describe subtle
little details in sounds, what aspect they are focusing on
and what instrument is being fed through it. Of course
life is never quite that simple, there is a variable that can
affect the XLR output and cause all the above
generalizations to be thrown out the window.
Transformers are dependant on the load. For example,
if there is appreciable capacitance in the cable because
it is a few hundred feet long, it’ll probably cause some
high frequency resonance (a few dB boost). label it or
defining hard and fast rules for recording music (other
than to impress your clients, of course).
12
Page 13

Tube Channel Contunued
If the transformer is driving some heavy resistive load
like some piece of vintage gear still set up for 600 ohms
then you can expect some high frequency roll-off and
maybe a shift in the distortion and clipping towards the
tubes and away from the transformer. Maybe the best
approach, is just to listen and compare, pick the best
sounding output for this track, and don’t worry about
trying to label it or defining hard and fast rules for
recording music (other than to impress your clients, of
course).
Tubes will need to be replaced occasionally. Sometimes
they last a few months, sometimes 30 or 40 years so
about the only thing we can tell you is replace them when
they get noisy, microphonic or the preamp stops passing
signal. Generally, there won’t be a major advantage with
new tubes, broken in tubes, or esoteric and rare expensive
tubes and in fact any of these might be worse. Here is the
thing – there are 2 trims for the 2 JFET-Tube stages that
adjust the bias and thus set the distortion null point.
Inserting a fresh tube might require adjusting both of
those trims, and that really should be done by a technician
with a distortion meter for the best results. And there are
another two trimmers that are “fine gain adjustments”
for each stage, and while less critical, should be tweaked
with fresh tubes. In other words, the performance of this
preamp is equally dependent on the tubes and the
trimmer tweaks, and the tweaks are there to get ideal
performance from a variety of tubes and compensate for
drift in a tube over decades. The JFETS used as the first
stage relax the requirements for a super-low-noise, lowmicrophonic, expensive esoteric tube and allow those
pesky trimmers that should optimize for a good variety
of 12AX7A’s.
So the preceding paragraph was aimed at those who like
to buy $300 tubes on ebay, and that’s OK, but most of
us (and Manley Labs) tend to just use the $15 to $30 ones
and get as good performance because we follow the
procedures. And those who just need to change a 12AX7A
and don’t have access to a distortion meter or don’t have
the time, generally, it will work just fine and the difference
between tweaked-out and not, will be negligible – You
see, the circuits are also set up to self-adjust to a large
degree, so you can sweat the details or not, and usually
be OK. And changing tubes is almost as easy as changing
a light bulb, about as easy as changing a 9 volt battery
in stomp-box and a whole lot easier than changing a
transistor or chip, especially if its surface-mount. Your
grandfather probably fixed the family TV any number
of times. Relax.
About the only other “tricks” we might add here are
more general and apply to most preamps and not just the
TNT. Avoid plugging in mics, cables, mic patches, etc
when phantom power is turned on (and especially if the
monitors are up). What can and often does happen is that
one “leg” of the balanced line (Pin 2 or Pin 3) connects
first, which can put a spike of 48 volts through a
transformer and magnetize it. This has been known to
damage ribbon mics and there are usually transformers
in ribbon mics, dynamic mics, many condenser mics and
of course many preamps, the TNT Tube side included.
There are some engineers that like to demagnetize input
transformers on preamps before big sessions. Probably
a small, weak cassette tape-head demagnetizer won’t be
too effective because virtually all mic pre input
transformers are mu-metal shielded, but the bigger pro
head de-magnetizers, carefully and slowly brought near
and away from the transformer is probably a good thing
to do as yearly maintenance. One might also feed in a
strong (say +25 dB) low frequency tone and slowly
decrease its level to zero once in a while and get similar
benefits. As far as those dynamic and ribbon mics and
their transformers, best not to try because they also need
those permanent magnets (in the capsules). It might be
worth checking with the manufacturer on transformer
coupled condenser mics, but probably they would rather
you not take a chance or risk breaking something. So lets
repeat, avoid plugging in mics, mic patches etc with
phantom on so that you never have to worry about it.
And lets also take the devil’s advocate point of view to
balance the issue. Originally phantom power was called
“phantom” for a reason and most consoles of the 70’s
and 80’s (before external mic pres) didn’t have an on-off
switch for phantom power, per channel or even global –
it was always on. For 99% of us who were there, we
always turned down monitors when changing mics, and
we didn’t think to de-mag anything except tape heads
and we occasionally made great sounding records. Back
then, we weren’t looking for ‘air’, ‘warmth’ or ‘loud’,
we were just having fun capturing first takes, hopefully
exciting performances, and experimenting with mic
choice and positions.
A real good trick with mic preamps, console channels,
etc that isn’t mentioned nearly enough has to do with the
PHASE switch. It is relevant here because we expect the
TNT will often be a first choice for vocals and many
simple overdubs. In a single mic situation, you in the
control room probably won’t be able to hear any
difference with the phase switch in one position or the
other so you might write it off as insignificant.
Page 14

Consider the singer, headphones on, and getting a blend
of their voice through bone conduction and those phones.
All too often there is something in the chain with a
polarity problem and it is usually a vintage mic or the
headphones but can also be caused by a wiring mistake
or a power amp. Did you ever get one of those vocalists
that continually complained about her voice in the cans?
Did you try flipping the phase? One way will be thin and
weird and the other will be hopefully better, but only the
person in front of the mic can say. Might be worth
singing into the mic yourself, phones on, before the
session while somebody in the control room flips the
switch for you. And while you’re there, check out that
headphone mix and level, and the room temperature and
creature comforts. This will give you a bit more chance
to work with the talent in the beginning of the session to also see if there is some choice reverb in the phones
that helps her perform and hit those notes. Either that or
spend more time auto-tuning later. These ‘tricks’ are not
only limited to vocal sessions because a lot of times, the
talent is hearing a blend between the live room sound and
the headphone feed, but the benefits of good sound in the
talent’s phones can be subtle, if you as the engineer are
focused on the ‘sounds’ in the control room, because the
benefits tend to be in the performances. One might also
consider that one’s skills as an engineer is often more
related to the performances and hit records that they
have been ‘lucky’ enough to record, than how great the
mix was. Makes one wonder about little things like
phase switches, and using gear versus choosing gear.
As a matter of fact, one can view the TNT as a single
piece of relatively simple gear that offers a fair number
of tints to explore and use. But that is the key! One has
to really dig in and explore the options and approach it
like an instrument with many possibilities. Though it
may be just another preamp that you try for 1 minute and
see if it delivers a sound that you like, it should be
approached as an instrument that needs some time to
learn. After all there is a variety of settings on the Tube
Channel, another bunch of settings to explore on the
Cool Channel and maybe the sound that you are looking
for is really there with a little coaxing in mic choice and
positioning choice and maybe even some coaching of the
talent to get that sound. Maybe one of the biggest tricks
that we can share is that it isn't just the gear, it is how one
uses it. And before that, it is about the source, the
musician, the music and the instrument and the room,
and you working with all those factors before going
crazy with choosing between 8 different preamps. The
preamp does represent many tints, but not prime colors.
More "Techniques" from other sources
For a really great source of tricks and techniques like
these, there are too few books. An Australian engineer,
who worked at Air Studios with Sir George Martin and
even has a forward by him, has written one of the best
books. The author is Michael Paul Stavrou and it is
called “Mixing with your Mind”
www.mixingwithyourmind.com, (Flux Research Pty
Ltd, P.O. Box 397, Mosman NSW 2088 Australia) The
inspiring part is that much of his focus deals with the
counter-intuitive and non-geeky approaches that were
learned the hard way through 20+ years of experience.
For those struggling with technology, it may suggest
that some fresh techniques that reduce technodependence, and for those that “just go for it” it may
enlighten them to very practical acoustic and signal flow
thoughts explained in easy visual metaphors. You may
be approaching the task of recording in one way, and this
book can pull you into a completely opposite alternative,
which of course lets you then roam that entire space
between your preconceptions and his. And because it
really is difficult to describe sounds in ways that
everybody understands, some of the labels and
categorizations tend to be personalized and this makes
for a great read.
Beyond that, it helps to know that "Stav" tends to be a
brilliant recordist who truly gets results on tape that
most of us would be jealous of - so he knows and has
taken the time to share in print - very rare.
On the other hand, we might suggest avoiding the dry
technical literature that seems to be the majority of the
recent texts on recording technology. Those might be
handy if you can make a living debating math minutiae
or you are curious about those chips in the box you
bought. However most of them are almost useless for
both the recording engineer and the gear designers, and
often cloud the real issues rather than help. When it
comes to audio engineering, it mostly comes down to the
ears and making tasteful decisions. It may be more an art
than a science. It is not "paint-by-numbers".
The point is this: If you are hungry for knowledge and
you search books and bulletin boards and magazines, it
all helps. What helps most is advice from guys doing
what you want to do and are experienced in deeply and
(importantly) are getting obviously good sounding results.
Artistic mentorship is at least as valuable as it ever was,
and is a huge advantage if you can get it.
Page 15

THE COOL CHANNEL
Solid State or Right Channel
The No Tubes side of the TNT gives you a range of
colors and might even be considered a contrast to the
Tube side. Or maybe not - If one has strong ideas that
tubes and transistors sound vastly different then the
TNT might be a little unsettling. For what it is worth
both the Tube side and Solid State side of the TNT are
pretty clean representatives of their technologies.
The IRON control may also be subtle in many situations
because it uses the actual output transformer (which
starts off pretty good) rather than a fake simulation just
labeled to suggest a sound. The IRON control practically
removes all audible effects of the real output transformer
in the "0" setting and that can be easily verified by
comparing the ¼” transformerless output to the XLR
transformer output.
On the other hand it is extremely easy to find a variety
of "personality preamps" using tubes (we make a few
too) that all sound different from each other. Similarly
there are many different solid state or discrete sounds. It
largely depends on topologies, parts choice (especially
transformers) and a variety of other choices a desinger
might make (or a cloner might copy).
As a “clean” preamp (CLEAN setting and IRON set
fully counter-clockwise) we think the TNT Cool Channel
may be hard to beat for sheer transparency and lack of
electronic artifacts, especially in the 300 and 600 ohm
impedance settings. It is also designed to be useful as a
fuzz-box or distortion device (60’s or 70’s setting,
INPUT GAIN hot, GAIN TRIM fully counter-clockwise.
It won’t simulate a Marshal stack or analog tape with
VU’s buried deep in the red but it shares some of those
characteristics and might be an alternative sound and at
least sounds better than most preamps driven hard. Or
it can give you a range of subtle flavors just as a basic
preamp with the IMPEDANCE and IRON knobs, and/
or by using the 60’s & 70’s settings but driven lightly
and before obvious distortion. These colors are set up to
be easy and obvious to use, even though they are for the
most part subtle. In fact, considering that this is really
just a Mic Pre, and not a compressor or EQ, it seemed
most appropriate to not go overboard and make it into an
full blown processor, but rather give the user more
control than is usual yet keeping it within a ‘safe’ realm
where it is unlikely one will screw up a recording doing
something that can’t be un-done. That ‘subtlety’ might
be obvious in the IMPEDANCE switch, that unlike
other preamps that may have a 6 dB gain change from
one setting to the next, and again, the TNT is designed
to have maybe one dB of gain change from one extreme
to the other, with most mics. We consider this important
for selecting which impedance to use. Alternatively,
comparing settings with radically different volumes
makes the process near impossible to do especially when
the differences tend to be subtle.
Just a little note on the subtleties of the Impedance and
Iron controls: Maybe other units have more dramatic
changes when you adjust similarly labeled controls and
maybe what you are hearing then is flaws in the
implementations or parts they use. We try not to do that,
and we won’t con you and we did put some effort into
maintaining constant levels as these controls are adjusted.
We also try to maintain similar frequency responses
when impedance is changed, where others don’t. So the
TNT knobs do what they say they do, and don’t add
strange misleading effects (for a change).
The NT preamp starts as 3 gain stages. 2 are identical
and symmetrically used for opposite phases (XLR pin
2 and pin 3, ie; balanced) and are voltage amplifiers like
99% of all mic preamps. Unlike 99%, these voltage
amplifiers are very high impedance (2 meg ohms) and
exhibit very low capacitance and inductance, not that
microphones need or are designed for that light of a load,
but occasionally there are audible benefits. The third
initial gain stage is a transformer input current-mode
amplifier, which might be considered a rare technology
in a mic pre and nearly opposite to the voltage amplifier
topologies. These 3 preamps are variously selected and
combined with the deceptively simple IMPEDANCE
switch. Rather than a resistor that just shorts out the
signal for lower Z, that resistor feeds the current mode
amplifier in the TNT, and the part of the signal that is
normally thrown away is amplified and mixed back in.
On the IMPEDANCE switch there are 5 positions.
Furthest counter-clockwise is the “300C” setting , and
next is the “300” setting. What is the difference? The
“300C” position is only the current mode preamp by
itself. The “300” setting uses both the current mode and
the voltage mode preamps and is closest to a good 50/50
blend. The next setting “600” restricts some of the mic’s
signal from going into the current stage and more is
available for the voltage stage, and the blend is closer to
30/70. The 2000 ohm setting and the 2 meg settings only
use the voltage preamp.
Page 16

The Impedance switch also has markings on the right
hand side that are for the INSTRUMENT input only.
How a magnetic pick-up reacts somewhat depends on
the impedance it is driving. This effect is diluted because
most guitars and basses have those volume and tone
controls that pretty much set the maximum impedance
the pickup will ‘see’. The pickups also have to drive a
length of cable, which often has appreciable capacitance
and may roll off some highs. A fun trick for a session
instrument is to bypass the volume and tone controls
(maybe on a switch??), just leaving the pickup switch
and jack, and then using a fairly short low capacitance
cable into a variable impedance preamp like the TNT. In
that situation the IMPEDANCE switch becomes very
dramatic and the high impedance settings like “3 meg”
and “10 meg” often get bright enough to sound much
more acoustic-like. Typical authentic guitar amp tones
are the 300K and 1 meg settings. The 100K setting may
be similar (thick and un-bright) whether the volume
control bypass mod is there or not. Guitars and basses
with “active pickups” (battery included) and guitars
feeding stomp boxes before the TNT, should be mostly
immune to the IMPEDANCE switch settings and the
100K setting may have marginally less noise.
After the preamps are selected or are combined in a very
transparent summing amp, the next stage is the “60’s /
70’s module” that contains a fairly simple class-A alldiscrete circuit, and is inserted when the 60’s or 70’s
switch selected or relay-bypassed when that switch is set
to “CLEAN”. The module is meant to simulate some of
the qualities of vintage discrete non-linearities, tape
overload (what some call tape compression), and changes
the frequency response slightly. It is not meant as a
straight simulation of any particular piece of vintage
gear, and is meant to evoke some general characteristics
of those eras and give the user a few more variations in
the ol’ tool-kit. The 60’s/70’s switch also adds DC bias
to the output transformer to further simulate some old
technologies (and which can be further adjusted with the
IRON control). If sufficient interest is shown, Manley
may be able to offer alternative “modules”, as this block
is easily removed and replaced.
One is the IRON knob, which compares the input and
output of the transformer, derives an error signal, which
is then sent to the IRON pot, that acts much like an EQ
boost/cut pot with zero ‘effect’ at 12:00 or straight up.
This way the user can reduce the effect of the transformer
to near inaudibility or exaggerate it or just leave it as it
is where this addional circuit is essentially bypassed and
the transformer output is just pure conventional
transformer and the ¼” output is just clean and unaffected.
In fact, if you use the ¼” output and adjust the IRON
control counter-clockwise, you get an effect that might
be called “Anti-Iron” and could practically reduce the
effect of a transformer in the next piece of gear following
TNT, such as a compressor – kind of like “cleaner than
clean”.
The other circuit wrapped around the RAPTURE AMP
is the OUTPUT MODE switch on the back panel.
Rather than use the conventional cross-fed feedback
output that many use to make a balanced output a bit
fool-proof and simulate a transformer and how it
accommodates balanced and unbalanced inputs, we
have this switch. Why? For one thing, we have the real
transformer, for another, those circuits are inherently
usually within .5 dB of being called an oscillator, and
thirdly, the switch is 3 position, so we can properly
accommodate +4 unbalanced, +4 balanced, and –10
unbalanced – all driven low impedance, high current
(full headroom down to 50 ohms) and unconditionally
stable. One might also note that these two outputs are
isolated and can serve to drive two separate distant
destinations easily.
The RAPTURE AMP itself was the result of months of
auditioning almost every discrete op-amp and gain stage
and every chip op-amp known to us to ever be used for
an audio product or published DIY project. And we
experimented with most of the tricks used to further
enhance all of these op-amps. In the end, we found a
circuit that was practically unique in its lack of artifacts
and sonic purity. After all those months of R&D, it was
decided that it should go in a block of epoxy.
Then the signal hits the GAIN TRIM conductive plastic
pot, and is routed to the RAPTURE AMPS, which are
the final line drivers in this preamp. It drives the ¼”
output directly and the output transformer (custom
designed and manufactured in house for the TNT) for
the XLR output Two controls are wrapped around the
RAPTURE AMP.
A similar routine of comparing the whole TNT preamp
to a lot of known expensive reference preamps was
performed while also continually comparing the raw
source to the preamps attenuated. Lets just say we are
confident that it is a winner and particularly true to the
source. Hope you like it
Page 17

Any particular tips using the NT channel?
Techniques specific to the solid-state side of the TNT
are not daunting. Most likely the first thing to get your
attention will be the LED metering because it is a bit
unusual. The two bottom LEDs show the first few stages
of the preamps or what is going on with the stepped gain
switch but BEFORE the Gain Trim knob. The top two
LEDs show that Gain Trim Knob and the final output.
The bottom GREEN LED shows "SIGNAL PRESENT".
The RED LED above it shows when one is beginning to
distort the preamp or the 60's - 70's circuit. So use this
RED LED to help set how much "OVERDRIVE" and a
typical setting makes that LED flash about 50% of the
time - but trust your ears - too much overdrive may be
hazardous to ones career as an engineer. You can't undo
mic pre distortion.
The top two LEDs are for the final output and the Green
LED is intended to show a good level to your converter
and the RED LED is intended to indicate probable A to
D converter overload. Originally we had that RED LED
indicate when the Preamps began to clip but they tended
to stay dark, so now they just help set a level for the next
piece in the chain.
A good starting point for the 11 position GAIN switch
is “counter-clockwise” and the GAIN TRIM should be
set at roughly 12:00 or straight up. Turn up the GAIN
switch until you are getting a good level. You might use
the 4 LEDs on the TNT. The first or bottom is a “signal
present indicator” and lights up about 20 dB below
optimum levels. The second from the bottom LED
shows clipping in the first stages and follows the GAIN
switch but is before the GAIN TRIM pot. In normal
clean operation this LED shouldn’t light up and is
typically ‘skipped’. Where it will come in particularly
handy is if you are operating the preamp to deliberately
over-drive it by turning down the GAIN TRIM pot and
turning up the GAIN switch. It should be kept in mind
that this won’t be easy in CLEAN mode but it becomes
quite easy in 60’s and 70’s modes. An interesting sound
is when that second LED is just occasionally flashing in
the 60’s/70’s modes, and the distortion is subtle, and
creates a psycho-acoustic effect of “character”,
“richness” and a 3D effect. When that LED is glowing
steadily, the distortion should pretty obvious. The LEDs
are designed to flash on both positive and negative
peaks, and slowly fade. A lot of peaks are too fast to see
when the LED directly displays peaks and the fade gives
some clues to the duration and musicality.
The top two LEDs are set to show output levels at the
output jacks. These are factory set up for +14 dB and
+20 dB over our standard +4 dBm so are technically at
+18 dBm and +24 dBm. Most A to D converters are set
up for +16, +18 or +20 so those two LEDs should get
you to a reasonable starting point and give you a pretty
good idea when clipping is likely. Of course, you really
do need to watch those A to D meters, or tape machine
VU meters as the final judge, especially when you have
processing between the preamp and recording device.
However, if need be, there are internal trims for the LED
thresholds, so one can set up the LEDs for particular
needs. It might be noted that there is no LED to indicate
when the TNT clips – because it clips at over +30 dBm
which is probably higher than 98% of the gear it might
be driving. It seemed more useful to indicate where the
next device is likely to run out of headroom, besides
using the TNT for its own overdrive effects is covered
by LED #2.
If you tend to want the Cool Channel to be generally your
"clean preamp" and intend to use it as a reference
especially for acoustic instruments, then you might want
to consider using the 1/4" output as the main output
because the output transformer is not in that path. And
keeping it clean, you may want to leave the "IRON"
knob set at 12:00 or straight up. Turning the knob either
counter clockwise or clockwise introduces some subtle
transformer color. Now if there is another transformer
down the chain in another piece of gear (or even a
magnetic tape recorder), the counter clockwise settings
may help minimize it's contribution. You might be able
to use the 60's - 70's switch if you keep the Input OL
(overload) LED off by keeping the Gain Switch lower
and the Gain Trim higher or near its max of +10 dB.
If you want the Cool Channel to be multi-tinted then
maybe the XLR output should be your choice. Then
experiment with all the preamp's controls keeping in
mind that moving a microphone by a few inches might
affect the color more, maybe a different mic might be
more significant a variation, and once you hit "record"
the player's tone and volume usually change anyways.
Page 18

Like most mic preamps, the TNT has high-pass filters to
remove unwanted low frequencies. The most common
situations to use it is for vocals to minimize “pops”,
wind noise and air conditioning rumble or leakage, or for
sounds that have little low frequency information
anyways, like acoustic guitar or high hats. The basic
idea is removing the garbage before it gets recorded.
You just might want to compare the effect of a good
analog high pass filter compared to the standard digital
ones and also check out what happens when both are
used, from time to time. There are some engineers that
use a combination of a high pass filter and a low
frequency boost EQ, to get a tight fat bottom. For that
situation, we might suggest, auditioning the combination
but recording only the high pass filter, saving the boost
EQ for playback and refining in the mix.
There is a 3 way toggle labeled “CLEAN”, “70’s”,
“60’s”. The CLEAN setting has the TNT operate in a
standard clean mode. In fact, we probably could have
labeled it “damn stunningly clean” if there was enough
panel space. Tell tale things to listen for if you want to
compare clarity are ‘harshness in the highs’ ‘smoothness
and liquidity in the mids’ but also ‘snap and punch’ and
‘dynamics in the deep lows’. It is hard to overdrive this
mode. We should point out, that for “absolute clean” use
the ¼” output, and the IRON knob set to 1 (12 o-clock,
straight up) to avoid any transformer coloration. And
“virtually absolute clean” is using the XLR transformer
output along with the IRON knob set to –1 or fully
counter-clockwise. This method compensates for the
transformer. Often the 300 setting on the IMPEDANCE
switch sounds slightly clearer as well. And while we are
at it, if pure-clean is the goal, choose your mic carefully,
and avoid processing or choose it extra carefully because
it all adds up, and nothing is perfect – in other words,
maybe use nothing, except a great passive ribbon mic,
TNT and a great converter running at 192K.
So if you are comparing preamps someday, your natural
tendency may be to set everything as flat and level as
possible on each one, use the same mic and try to judge
which basic sound you prefer. If it seems you tend to
pick expensive transformerless discrete preamps, the
TNT should do well that way. However if you tend to
prefer color boxes, then maybe you should be working
with the TNT controls, setting up modes and gains
appropriately. Otherwise it would be like comparing a
several different cars without adjusting the seats or
mirrors. Even if the range of colors isn't drastic, one is
still expected to adjust to taste.
While the CLEAN mode is a relay bypass of an additional
module, simply selecting “60’s” or “70’s” engages this
special module. It is a discrete class-A circuit meant to
simulate some of the stronger characteristics of circuits
and analog tape of those eras. The most important thing
that we must point out is that it is purposely very level
dependent and that it is between the two gain controls so
that the user can drive it as hard or soft as they want to
get a pretty wide variation in tones. Driving it very
lightly by keeping the GAIN switch lower and the GAIN
TRIM way up, mostly affects the EQ and introduces a
faster roll-off in the deep lows and some shaping in the
highs, so that there is a subtle “presence” boost. Driving
it a little harder is particularly interesting and one begins
to hear typical vintage sounds including 3D depth,
richness and edge and a little further becomes a bit
ballsy, aggressive and forward. The trick is careful
adjustments of those gain controls and mic technique to
land in the “sweet spot”. This module can also be driven
quite hard and be used for some obvious dirt and you
may find that that the character of the distortion is unlike
most clipped electronics and perhaps smoother, like
analog tape or a guitar amp. For the best overdriven
guitar effects, you may want to combine TNT with some
good stomp boxes driving into the instrument input, and
some EQ at the TNT output, and you might try feeding
a real speaker/room/mic or convolution reverb so that it
doesn’t end up too dry and clinical.
There isn’t much that can be said about the difference
between the 60’s and 70’s settings. “60’s” has subtler
shaping in the distortion and should sound brighter when
pushed hard. “70’s” uses more drastic shaping and
forces the output transformer to be biased, much like
some famous old British console electronics of that
period. One might say the “60’s” setting is more like
tubes and tape, and the “70’s” more like discrete and
transformer, depending how one associates tones. In
both cases, the distortion starts off mostly even order
and becomes more odd order as it is pushed harder. Both
tend to help get hotter levels due to softness of the
clipping character. Both are pretty easy to overdrive and
require care to avoid effects that cannot be undone. Keep
in mind, that usually an instrument starts softer and gets
louder during the song and during the session and that
our ears become less sensitive & critical as the session
wears on. When in doubt, back down the GAIN switch
one notch – better safe than sorry.
Page 19

The IRON knob may disappoint some who expect a
radical and obvious effect. It can be subtle, especially
for mid-range dominant sounds like vocals and guitars
because for the most part a transformer affects the
extreme lows, extreme highs and to some degree the
dynamics. This control is build around the actual output
transformer and lets face it, a good audio transformer
shouldn’t be particularly colored and messy. On the
other hand, it has always been the transformers in
vintage gear that helped then sound warm, smooth and
round, yet were quite OK at passing audio pleasantly
and without major damage. The IRON control allows
you to adjust the “Transformer Contribution” from near
zero audible effect, through to “typical” at 12:00, and
further to where the effect is exaggerated and practically
tripled, which by the way, is still not always obvious.
At very low frequencies a transformer can be said to
have 3 significant effects: 1) it rolls off the subsonic
frequencies starting around 10 Hz, which is audible due
to the phase shift that happens mostly below 50 Hz,
which acts to slightly delay the extreme lows. 2)
Hysteresis shapes the waveform for low level, low
frequency signals, putting a couple of bends around the
zero-crossing, which simply adds harmonics. 3) Hot
low frequency signals, can cause the transformer to
saturate or overload, again causing harmonics, and may
cause earlier roll-off, and more phase shift. It is in the
transformer design details that set the amount and
balance between those effects, and mostly a function of
the core lamination material and size (weight or bulk),
but also a function of the number of turns of wire, and
how the transformer is driven, and the expected load.
We design and manufacture these transformers in house
at Manley Labs.
At very high frequencies, the biggest effect is a ultrasonic roll-off. This can be as gentle as 6 dB per octave
for several octaves but typically becomes 18 dB per
octave. In fact, the way that capacitance between
windings and leakage inductance interact, usually creates
a significant bump in the frequency response somewhere
between 30 kHz and 100 kHz, which is then tamed as
standard procedure, by adding a resistor and capacitor
at the output or secondary, leaving a smooth predictable
roll-off usually around 80k – 120 kHz. This still leaves
some phase shift in the 5k - 20kHz range which is
audible and gives one the impression that the highs are
softer and don’t extent to infinity.
This may surprise some people, but some designers and
researchers including yours truly, have experimented
and determined for themselves, at least, that we might
need a frequency response out to 500kHz or 1 megaHz
to completely avoid any audible phase shift in analog
audio circuits and where absolute transparency is the
goal. Then again, our ears adjust rapidly to rather
drastic roll-offs even as low as 10kHz and we often
choose a rolled-off high frequency response as being
more pleasant and comfortable. And some might say,
“no microphone or speaker can reproduce those
frequencies, so why bother?” but these effects are
relative and additive, so every little bit may be audible
for those that can compare. And considering the best
audio systems only approximate full range live
performances, then maybe one of the significant reasons,
is these infra-sonic and ultra-sonic roll-offs happening
too early, causing phase shift in the audible spectrum
and audible time smear. Dynamic performance is another
reason, but lets not dwell on that now. Given the
capabilities of modern audio, and the demands of the
audience, much of the goal is creating illusions and
emotional impact. This is how we should approach the
controls on the TNT, and maybe what should become
the criteria for choosing it against other preamps.
By now, you have probably correctly guessed that
turning the IRON control counter-clockwise results in a
cleaner, tighter bottom and extension in the highs.
Turning the IRON control clockwise results in a rounder,
smoother, warmer and softer tone. The mids won’t be
affected much, and mostly only in a relative way
compared to the lows and highs, but if your ears are
great, you might notice a subtle effect with IRON
maxed, where the mids arrive slightly before the lows
and highs and that this is a big part of the vintage sound.
And if you have been reading carefully, the transformer
is biased in “70’s” mode so the IRON control will have
a slightly different (and greater) effect. You may have
also picked up that the IRON knob acts like an EQ knob,
where it has near zero effect as a circuit when the knob
is straight up at 12:00.
We also mentioned that the ¼” output does not use the
transformer but is affected by the IRON knob. As
before, the IRON circuit is essentially bypassed when
the knob is straight up. Turning it counter-clockwise
introduces the transformer correction circuit, and with
this output, creates an Anti-IRON effect. Extreme highs
and lows are boosted slightly. As the Iron knob is turned
up, you introduce the effects of a transformer into a
transformerless output.
Page 20

The ¼” transformerless output has a switch on the back
panel that allows it to PROPERLY drive +4 dBm
balanced inputs, +4 dBm (pin 2 hot) unbalanced inputs
(rare enough), and –10 dBu unbalanced inputs. In each
case, a very stable very and low output impedance is
given that does not suffer and cause common mode
rejection problems when driving less than perfect cables
and inputs. Typical cross-coupled line drivers magnify
their source resistors while attempting to deal with
imbalances, which only magnifies common mode
rejection problems. For example, a great input stage
may have a CMRR spec of 60 dB at 1kHz, (and not in
the specs is that this typically drops to 30 dB at 20K,
may or may not be 80 dB at 60 Hz, and may be 30 dB
at 10 Hz), but CMRR is more dependent on the output
impedance match of the device driving it, and that 60 dB
spec can drop to 20 dB when there is a 10% difference
between source resistance from Pin1 & Pin2. Crosscoupled line drivers create CMRR problems for the sake
of idiot-proofing and people using funky cables and
adapters. The TNT just uses a switch.
Please note that the tube (T) channel has a different
output arrangement, uses different technology, has a ¼”
output that is only unbalanced and doesn’t have the back
panel switch, yet the ¼” output will still be OK to drive
balanced inputs especially if one is trying to avoid
transformers today.
Transformers have traditionally been great at the idiotproofing aspect and are very “forgiving” and solve more
practical connection issues than they create. However,
the back panel switch does have an effect on the XLR
transformer output. For both ¼” and XLR outputs, in
the “+4 balanced” mode, headroom reaches +30 dBm
comfortably, but drops to +24 dBm when the switch is
set to “+4 unbalanced”, which probably close to
maximum level of most A to D converters. This might
be used to choose which box clips first and best. The
impedance on pin2 and pin3 remains equal and constant
and low, so it will work better than most balanced
outputs into a balanced input even though it is labeled
“unbalanced”. In other words, when the switch is set for
“unbalanced”, it will drive both balanced and unbalanced
inputs fine, and unbalanced inputs at the right level (no
6 dB drop), but does have 6dB less headroom, which
should still be good enough in most situations (balanced
into balanced is the best choice generally). In the “-10
unbalanced” mode the ¼” jack drops the appropriate 12
dB (not 14) and the XLR drops 6 dB. Much semi-pro
and most consumer gear is happiest with –10 dBu
signals, but you may need a ¼” to RCA adapter. Again
this can be used in some situations other than “standard
procedures”. One can use one output to drive an input in
one room, the other to a different room (like an amp in
the studio or a remote truck) and avoid a lot of hassle
with splitter boxes or ground loops and interaction.
Page 21

THE GUTS
3
1) To Open: Disconnect the AC Power cable, let sit 15 minutes to allow the power supply capacitors to discharge. Remember
there are high voltages (300VDC) used in the TNT and that the capacitors may continue to hold a charge after power is removed
- BE CAREFUL! We suggest using gloves and/or "one hand only" when the top is off.
Remove the single Philips Machine screw located on the top perforated panel (towards the back and center). Slide the perforated
panel towards the back.
2) Replacing Tubes: The tubes are marked as to their type 12AT7 (for voltage gain) and 7044 (for line drivers). Another
warning: Tubes get HOT. Let them cool before you attempt to touch them. Wiggle the tube back and forth as you pull it up.
If you suspect a tube, you can swap it with a spare tube. If the problem disappears, you were right, it is that tube. If not, try
swapping the other tube. It is a good idea to have a few spare tubes for emergencies as this will fix better than 90% of most
problems and eventually (maybe 30 years) any tube used regularly will burn out and need replacing.
3) Changing the TUBE CHANNEL character. There is a set of 4 small switches in one package called a DIP SWITCH
(S1) located near the 12AT7 tube (between the tube and the TRIM pot). Each of the 4 tiny switches is OFF when the slide
is towards the front panel and ON when pushed towards the back panel. For each, OFF represents "CLEAN". And for each
"ON" is used to add a particular distortion color. The first (most left) switch de-tunes the first stage bias which increases the
tube distortion (the BIAS trims MUST be set with the switches set OFF). The next tiny switch does the same thing for the
second tube stage. Typically only one of those first two switches are switched ON for a richer tube sound. The third tiny switch
makes the output transformer distort a little more and with the switch ON some direct current is fed through a special winding.
In fact that distortion is primarily in the lowest octaves but the harmonics tend to manifest a few octaves higher in the midlows, and is one of those things that some call "warmth" - but be careful, it is just distortion that might not be universally
wonderful. The fourth switch is for users who expect that a tube preamp is all about driving the input hard for distortion which
is pretty standard for a guitar amp, but never was particularly standard for tube mic preamps. In fact, the TNT has so much
headroom that it tends to be a challenge to drive into distortion, so we added this switch, which makes it a whole bunch easier.
NOTE: Please power down the TNT for a few minutes before opening the cover and changing any of these switches (and we
suggest one at a time, then listen). If changed and the TNT is powered up and monitors on, there may be a large speaker killing
thumps and maybe 30 seconds before the TNT stabilizes. And this is why they couldn't be front panel controls.
These 4 switches were an after-thought. The TNT Tube Channel near the end of the design ended up so transparent that it
and the solid state channel sounded almost identical (not intended). So we "gain staged" the same as the SLAM! pre and
returned it to its roots. And we added that little group of switches because we know some of you actually want the clean tube
preamp that is in SLAM! (a fast, transparent tube preamp can be a lovely musical thing) and some of you want the Tube
Channel to be the "character" or "warmth" or "colored" or "ballzy" preamp. OK, these switches should help "personalize" the
Tube Channel.
As a compromise we generally factory set switches #2 and #4 on which should be moderately "colored".
17
Page 22

TRIMMER ADJUSTMENTS FOR THE TUBE CHANNEL
Again, we remind you that there are some big volts (400 volts DC) present inside the chassis and a signifiicant shock
risk exists if the covers are off. This is especially important considering one needs to be poking around with meter
probes and small screwdrivers with the unit powered up for adjustments. In other words, do you consider yourself
a competant technician? Do you have the experience and proper tools?
These really should be done by a trained technician with a good sine wave generator and distortion analyzer,
oscilloscope and AC voltmeter preferably with a dB scale. If the 12AT7 is replaced these adjustments should be
done once the tube has burnt in for at least 1 hour, but 24 hours is better.
Starting with a 1kHz +4 dBm sine into the MIC input XLR and a distortion analyser on the output.
GAIN SWITCH at 20 (CCW), Front Panel GAIN TRIM pot at 0 (12:00). The 4-way DIP switch S1 should be set
with all 4 switches off or towards the front panel. Set them back after the tweaks.
VR1 - Sets the first stage BIAS. This will affect gain and distortion and it is a DC capacitor smoothed "null" trim
that takes some time to settle - be slow & patient. At the factory, this trim is adjusted for minimum distortion
measuring at TP1 (near the GAIN TRIM pot). If one does not have a distortion analyser, set the DC voltmeter to
the highest scale (up to 400 volts may be possible) and carefully measure TP6 and adjust VR1 for 195-200 volts
DC. The distortion null should be near the maximum gain of this circuit and a setting not corresponding with
maximum gain (broad peak) indicates VR3 may be out too.
VR2 - GAIN TRIM for first stage. This trimmer only has about 1dB of range so it is not a critical step. Manley
measures TP1 for -2 dB below unity. For example if 1.0 volt is fed to the input, VR2 is adjusted for 0.79 volts at
TP1 with the front panel gain trim at 12:00 - or 1 volt with that pot at +10.
VR4 - Second stage bias. Adjust VR4 for minimum distortion at the output. Note that if VR1 is set wrong and some
distortion is happening in the first stage then adjusting VR4 only may just be partially cancelling some of the first
stage's even order distortion. Better to get both stages as clean as possible. The final distortion figure should null
out below -75dB and -80dB or .01% would be considered excellent for a tube pre that uses no significant feedback.
And if a distortion analyser is not available, TP5 should be trimmed for 195-200 volts DC.
VR3 - Main Gain Trim (2 dB range). This is for final gain calibration. With the front panel gain switch set for 20
dB, 1 volt in should give 10 volts out the back panel XLR. And +4dBu in should give +24 dBu out.
TP4- Is used with a scope to verify the FET gain stage (Q1) is working.
TRIMMER ADJUSTMENTS FOR THE COOL CHANNEL
R168- IRON NULL, Oscillator at 300 Hz, Iron knob at 12:00, Oscilloscope on C42
Adjust R168 for lowest level or null. Verify turning IRON knob left or right that signal increases.
The following trims affect meters on both channels. 60-70 switch in "CLEAN".
R157- Set XLR output for +22 dBu, Adjust R157 for onset of top RED (+22) LED
This LED can be set to match your converter OVERLOAD LED (0dB full scale).
R158- Set XLR output for +10 dBu, Adjust R157 for onset of GREEN (+10) LED
R159- Set XLR output for +27 dBu, Adjust R157 for onset of RED "OL" LED (#2 from bottom)
18
Page 23

However at the same time the TNT became a bit of a myth buster. The IRON control remained rather subtle for
two reasons - 1) Contrary to folk-lore, a good transformer does not have a lot of color and won't dramatically change
the sound (even when 'exagerated') and 2) Dramatic effects probably don't belong on a mic preamp anyways
because part of the goal is to keep a mic preamp a reasonably 'safe' and predictable gain stage. So the reality is that
modern transformers are far less a n audible effect than many realize and most are indeed subtle. Of course, one
can still get low permeability steel laminations and have a far less transparent transformer made which will tint
every sound with the same color.
The second myth may have to do with how much impedance affects the mic. The myth is largely due to other
preamps that 1) change the gain at every setting making comparisons difficult, 2) some preamps re-configuring
the input transformer so that it is driven non-optimally so that its frequency response becomes non-flat. In other
words, the impedance switch became an unintended or poorly designed EQ.
25
Page 24

TROUBLE-SHOOTING
There are a number of possible symptoms of something not quite right, some may be interfacing, others we will touch
on as well. If you suspect a problem the following paragraphs should help.
NO POWER, NO INDICATORS, NADA - Probably something to do with AC power. Is it plugged in? Check the fuseon
the back panel. A blown fuse often looks blackened inside or the little wire inside looks broken or it's resistance measures
higher than 2 ohms. A very blackened fuse is a big hint that a short occured. Try replacing the fuse with a good one of the
same value and size. If it blows too, then prepare to send the unit back to the dealer or factory for repair. The fuse is a protection
device and it should blow if there is a problem. If the unit works with a new fuse, fine, it works. Sometimes fuses just blow
for unknown reasons.
LIGHTS BUT NO SOUND - First try plugging the in and out cables into each other or some other piece of gear to verify
that your wires are OK. If not fix them or replace them. Assuming that cables passed sound - it probably is still a wiring thing.
The output XLRs are transformer balanced which require both PIN 2 and PIN 3 to be connected somewhere. When driving
an unbalanced input ( inserts on some consoles) PIN 3 needs to be grounded or connected to PIN 1. Same with the unbalanced
1/4 inch jacks - if driving a balanced input you can't ignore the negative side. It needs to be connected to the sleeve of the phone
plug. Another way to do basically the same thing is join PIN 1 and PIN 3 on the XLR male at the destination. Easiest way
- Use the balanced with balanced, unbalanced with unbalanced. That is why the options are there.
LEVELS SEEM TO BE WRONG, NO BOTTOM - Several possible scenarios. Manley uses the professional standard of
+4 dBm = Zero VU = 1.23 volts AC RMS. A lot of semi-pro gear uses the hi-fi reference of -10 dBm = Zero VU. This is a
14 dB difference that will certainly look goofy and may tend to distort. Often there are switches on the semi-pro gear to choose
the pro reference level. If the loss looks close to 6 dB and it sounds thin then one half of the signal is lost. The cause is probably
wiring again. One of the two signal carrying wires (the third is ground / shield on pin 1) is not happening. Check the cables
carefully because occasionally a cable gets modified to work with a certain unit and it seems to work but its wrong in other
situations. If only one side of the TNT exhibits this problem, it may be a problem in the TNT. See the next item.
ONE SIDE WORKS FINE BUT THE OTHER SIDE IS DEAD - Let's assume this is not wiring. We are pretty sure it is
the TNT. If it were solid state you would generally send it back for repair. Being a tube unit, you can probably find the problem
and fix it yourself in a few minutes. Not too many years ago, even your parents could "fix" their own stuff by taking a bag
of tubes down to the corner and checking the tubes on a tube tester - but these testers are hard to find today. A visual inspection
can usually spot a bad tube just as well. Be careful - there are some high voltages inside the chassis and tubes can get pretty
warm, but if you can replace a light bulb you should be able to cruise through this. Before you remove a tube, just take a
look at them powered up. They should glow a bit and they should be warm. If one is not, you have already found the problem.
The tube's filament (heater) is burnt out or broken like a dead light bulb. The other big visual symptom is a tube that has
turned milky white - that indicates air has gotten into the tube or we've joked "the vacuum leaked out". Either way replace
the tube. Manley can ship you a tested one for a reasonable price. Before you pull a tube, pull the power out, let the unit sit
and cool and discharge for a minute or two, then swap the new tube in, then power, then check. Gentle with those tubes, don't
bend the pins by trying to insert the tube not quite right. A little rocking of them as you pull them out or put them in helps.
The two taller tubes are the same so you can swap them. If the problem follows the tube you found the problem - a bad tube.
No soldering, no meters, one screwdriver - easy. See page 17 for a diagram of tube locations.
HUM - Once again - several possibilities - several cures. Most likely it is a ground loop. Ideally each piece of gear should
have one ground connection and only one. However, the short list of grounds include the AC mains plug, the chassis bolted
to a rack with other gear, each input and each output. The two most common procedures are: try a 3 pin to 2 pin AC adapter
(about a dollar at the hardware store).This while legal in many countries can be dangerous- We went one better; Method two
- On the back panel loosen the GROUND TERMINALS and slide the small metal ground strap to one side. This is way better
than "method one" because it is safer and removes another possible source - the chassis grounding via the rack. Method three
- cutting the shield on oneend of each cable. This is done by some studios at every female XLR to "break" all ground loops.
All the other gear in the rack is "dumping" ground noise onto the ground. Try removing the EQ from the rack so that it is not
touching any metal. You just may have cured a non-loop hum. Some gear radiates a magnetic field and some gear (especially
if it has audio transformers or inductors) might receive that hum. A little distance was all it took. The Massive Passive is full
of inductors and audio transformers which have the potential of hum pick-up from other units however they are run "hot" to
minimise this possibility. It is worth a few placement experiments if you notice hum especially in EQ mode (not bypass).
26
Page 25

IT MAKES NOISES WHEN THE FRONT PANEL IS TAPPED - An easy one. Some tubes become microphonic over
time. That means they start acting like a bad microphone. Vibration has caused the supports for the little parts in the tube to
loosen and now the tube is sensitive to vibration. Easy - Replace the tube. Which one? The one that makes the most noise when
you tap it. Usually this will be one of the smaller (gain stage) tubes closest to the front. The Massive Passive will have to be
on, connected and speakers up but not too loud for the sake of your speakers.
IT GOT HISSY - Also easy. This is again a common tube symptom. You could swap tubes to find the bad boy, but an educated
guess is OK too. Generally the first tube in the path is the one with the most gain and dealing with the softest signals. The
usual suspect is the shorter tubes - the 5751/12AX7 voltage amplifiers. You may find that you need to choose the quietest
tube out of several of that type - like we do at the factory.
DISTORTION - This might be a tube. Swapping is a good way to find out. It may be a wiring thing or mismatch as well.
Wiring problems usually accompany the distortion with a major loss of signal. Mismatches are a bit tougher. The Massive
Passive has a high input impedance and low output impedance that can drive 600 ohm inputs of vintage "style" gear. Best
place to start is check your settings and meters. It may not be your first guess.
GETTING DISTORTION WHEN WE BOOST A LOT. No doubt. The Massive Passive by itself should have enough
headroom so that mega-boosts won't cause clipping in it, however, it can push out about +37dBv, 10 or 15 dB more than
most gear can accept without clipping. You're gonna have to turn something down, whether it is the signal feeding the EQ,
the "Gain Trims" on the EQ's front panel or the input levels of the next piece. That last option may not help if there is any
op-amps before its own volume control and unfortunately that is pretty common.
DC OR SOMETHING AT THE OUTPUT THAT IS INAUDIBLE - The 1/4" unbalanced outputs have a frequency
response that goes way down to below 1 Hz. A little very low frequency noise may be seen as speaker movement when
monitors are pushed to extreme levels. The XLRs do not exhibit this because the transformers filter below 8 Hz. Also the
unbalanced outputs do not like long cheap high capacitance cable. Occasionally a very high frequency oscillation (200 kHz
to 400 kHz) may occur in these conditions. Once again use the XLR outputs. Problem solved.
THE GAIN SEEMS OUT OF CALIBRATION - Wait a bit and see if it just needs to warm up. There are only two trimmers
inside and they are for adjusting the gain of the two channels up or down a few dB. More than that and you either have a bad
cable or bad tube.
Once in a while we get a call from a client with a "digital studio" with confusion about levels. They usually start out by using
the digital oscillator from their workstation and finding pegged VU meters the first place they look and they know it can't be
the workstation. Even a -6 level from their system pegs the meters. Some of you know already what 's going on. That -6 level
is referenced to "digital full scale" and the computer might have 18 or 18.5 or 20 dB of headroom built in. That -6 level on
the oscillator is actually a real world analog +12 or +14 and those VU meters don't really go much further than +3. There are
a few standards and plenty of exceptions. One standard is that normal (non-broadcast) VU meters are calibrated for 0VU =
+4 dBm =1.228 volts into 600 ohms (broadcast is sometimes +8dBm). Another standard is that CDs have a zero analog
reference that is -14 dB from digital full scale or maximum. This allows sufficient peak headroom for mixed material but
would be a bad standard for individual tracks because they would likely distort frequently. This is why digital workstations
use higher references like 18 and 20 - to allow for peaks on individual sounds. It may be too much in some cases and too little
in others. Add two other sources of confusion. Peak meters and VU meters will almost never agree - they are not supposed
to. A peak meter is intended to show the maximum level that can be recorded to a given medium. VU meters were designed
to show how loud we will likely hear a sound and help set record levels to analog tape. By help, we mean that they can be
only used as a guide combined with experience. They are kinda slow. Bright percussion may want to be recorded at - 10 on
a VU for analog tape to be clean but a digital recording using a good peak meter should make the meter read as high as possible
without an "over". Here is the second confusion: There aren't many good peak meters. Almost all DATs have strange peak
meters that do not agree with another company's DAT. One cannot trust them to truly indicate peaks or overs. Outboard digital
peak meters (with switchable peak hold) that indicate overs as 3 or 4 consecutive samples at either Full Scale Digital (FSD)
are the best. They won't agree with VU meters or Average meters or BBC Peak Programme (PPM) meters either. Each is a
different animal for different uses. When in doubt, use the recorder's meters when recording - they "should" be set up and
proper for that medium. Also important - if your DAC has gain trims, and these trims are "out" it can cause distortion,
confusion, and a variety of mis-matches. If you don't have calibration tapes or sources - get them, and if you do have them
- learn how to use them, and definately use them. Don't guess, especially if you suspect a significant problem. This is not the
type of thing "phone support" is usually good at finding. We have seen guys spend thousands on new gear only to find out
a little screwdriver trim would have solved their problems.
27
Page 26

Audio Precision 06/26/06 18:06:03
TUBE CHANNEL DIST ORTION FFT
-20
-30
-40
-50
-60
-70
-80
d
-90
B
-100
-110
-120
-130
-140
-150
-160
Audio Precision 06/26/06 17:55:1 1
2k 16k4k 6k 8k 10k 12k 14k
Hz
FFT SPECTRUM of THD Residual @ 1kHz
TUBE CHANNEL DRIVEN JUST 2 dB HOTTER
-20
-30
-40
-50
-60
-70
-80
d
-90
B
-100
-110
-120
-130
-140
-150
-160
2k 16k4k 6k 8k 10k 12k 14k
The TOP graph shows the distortion harmonics just prior to full clipping.
Notice both even and odd harmonics and a smooth decay of upper harmonics.
The BOTT OM graph shows just slightly hotter signal brings the unit into
deeper clipping and the symmetrical clip brings in more odd harmonics
and involves more upper harmonics.
These graphs illustrate that tube circuits do not just create even harmonics
and that they don’t just create low order harmonics, nor does clipping just produce
odd harmonics. It is a little more complex
than that. It depends on the topology ,
circuit details, levels and measurement techniques.
What matters in this case is the lack of harmonics before clipping (low THD) which
is not graphed here because it is just a boring noise floor
Page 27

-20
-30
-40
-50
-60
-70
-80
-90
-100
-110
-120
-130
-140
-150
-160
60s Switch ONSET OF DIST ORTION SPECTRUM
2k 16k4k 6k 8k 10k 12k
14k
-20
-30
-40
-50
-60
-70
-80
-90
-100
-110
-120
-130
-140
-150
-160
2k 16k4k 6k 8k 10k 12k
14k
60s - 70s SWITCH FREQUENCY RESPONSE AT V ARIOUS GAINS & COMPENSA TED with TRIM POT
+10
+8
+6
+4
+2
+0
-2
-4
-6
-8
-10
20 20k50 100 200 500 1k 2k 5k 10k
70s Switch ONSET OF DIST ORTION SPECTRUM
0 dB REFERENCE IS ROUGHL Y AT ONSET OF DIST ORTION AND WHEN OL LED BEGINS TO LIGHT
Hz
60 -5dB
70 -5dB
70 0dB
060 dB
007 +1 dB
60 +10dB
Page 28

100
0.5
0.2
0.1
0.05
0.02
0.01
COOL CHANNEL
Gain Switch @ 20, Gain Trim @ 0. 4x IRON SETTING S + BYP ASS
THD+N Ampl vs AMPLITUDE at 25 Hz
50
20
10
5
2
1
IRON 1
IRON 0
IRON -1
T
IRON +3
1/4” OUT
0.003
-20 +20-15 -10 -5 +0 +5 +10 +15
INPUT LEVEL.
dBV
(CLIP)
TUBE CHANNEL
THD+N Ampl vs AMPLITUDE
100
50
20
10
5
2
1
%
0.5
0.2
0.1
0.05
0.02
0.01
0.003
-20 +10-18 -16 -14 -12 -10 -8 -6 -4 -2 -0 +2 +4 +6 +8
TRAN
IRON DIP3
dBV
(SAT)
25HZ 1/4”
1K 1/4”
Page 29

Microphone Output Impedance
Worst case would be very low source impedance which corresponds
with 4 dB gain change across the 5 IMPEDANCE SWITCH settings.
Best case would be 200 to 600 ohms mic output impedance which
corresponds with 1-2 dB gain change across the 5 switch settings
-3 dB
+3 dB
COOL CHANNEL IMPEDANCE SWITCH RELATIVE LEVELS
5
4
3
2
-1
-2
-3
-4
-5
1
0
0 50 150 250 600
2M
2K
600
300
300C
Page 30

MAINS CONNECTIONS
Your TNT has been factory set to the correct mains voltage for your country. The voltage
setting is marked on the serial badge, located on the rear panel. Check that this complies with
your local supply.
Export units for certain markets have a moulded mains plug fitted to comply with local requirements. If your unit does not have a plug fitted the coloured wires should be connected to
the appropriate plug terminals in accordance with the following code.
GREEN/YELLOW EARTH
BLUE NEUTRAL
BROWN LIVE
As the colours of the wires in the mains lead may not correspond with the coloured marking
identifying the terminals in your plug proceed as follows;
The wire which is coloured GREEN/YELLOW must be connected to the terminal in the plug
which is marked by the letter E or by the safety earth symbol or coloured GREEN or GREEN
and YELLOW.
The wire which is coloured BLUE must be connected to the terminal in the plug which is
marked by the letter N or coloured BLACK.
The wire which is coloured BROWN must be connected to the terminal in the plug which is
marked by the letter L or coloured RED.
DO NOT CONNECT/SWITCH ON THE MAINS SUPPLY UNTIL ALL OTHER
CONNECTIONS HAVE BEEN MADE.
Note: This unit has been factory wired for your country. If you plan to take the unit to
countries with a different mains voltage you will need to send the Limiter to Manley Labs
for the correct power transformer - or use AC voltage converters. See page 17 to convert
this unit for a different mains voltage.
28
Page 31

SPECIFICATIONS
MANLEY TNT MICROPHONE PREAMP
TUBE CHANNEL (Left Channel)
GAIN RANGE +10 dB to +80 dB (20-70dB in 5 dB steps)
MIC INPUT IMPEDANCE 600, 2400, 10,000 Ohms
INSTRUMENT INPUT IMPEDANCE 300K,1Meg, 3 Meg Ohms
FREQUENCY RESPONSE (-1 dB) 10 Hz to 30 kHz
(-3dB) 5 Hz to 45 kHz
THD & NOISE (1 kHz @ 20 dB gain) .035% typical (-68 dB)
NOISE FLOOR -60 dB typical referenced to +4dBm
EIN -120 dB
SIGNAL TO NOISE @ 70 dB Gain 95dB (TRIM has major effect)
MAXIMUM OUTPUT (1% THD) BALANCED +4 31 dBu
COOL CHANNEL (Right or Solid State Channel)
GAIN RANGE +10 dB to +80 dB (20-70dB in 5 dB steps)
MIC INPUT IMPEDANCE 300, 600, 2000, 2 Meg Ohms
INSTRUMENT INPUT IMPEDANCE 100K, 300K,1Meg, 3 Meg, 10 Meg Ohms
FREQUENCY RESPONSE (-1 dB) 15 Hz to 30 kHz
(-3dB) 5 Hz to 50 kHz
THD & NOISE .01% typical (-80 dB)
(no distortion products measurable, noise dominates measurement)
NOISE FLOOR -66 dB typical referenced to +4dBm
EIN -126 dB
SIGNAL TO NOISE @ 70 dB Gain 85dB (TRIM has little effect)
MAXIMUM OUTPUT (1% THD) BALANCED +4 30 dBu
UNBALANCED +4 24 dBu
UNBALANCED -10 16 dBu
DISTORTION @ 1K WITH 60' / 70's SWITCH 1.5% typical with LED onset (+4 dBu out)
3% typical with LED fully lit (+7 dBu out)
GENERAL
POWER REQUIREMENTS 30 WATTS
FUSE For 120 VAC - 2 AMP SLO-BLO
For 220 VAC - 1 AMP SLO-BLO
PHYSICAL
SIZE 19" x 11" x 1.75"
WEIGHT 11 POUNDS
SHIPPING BOX 22.5" x 14.5" x 8"
SHIPPING WEIGHT 16 POUNDS
(preliminary specs & subject to change)
29
Page 32

WARRANTY
All Manley Laboratories equipment is covered by a limited warranty against defects in materials and
workmanship for a period of 90 days from date of purchase to the original purchaser only. A further
optional limited 5 year transferrable warranty is available upon proper registration of ownership within
30 days of date of first purchase.
Proper registration is made by filling out and returning to the factory the warranty card attached to this
general warranty statement, along with a copy of the original sales receipt as proof of the original date
of purchase, or registration can be made online in the Tech Support section of www.manleylabs.com.
This warranty is provided by the dealer where the unit was purchased, and by Manley Laboratories,
Inc. Under the terms of the warranty defective parts will be repaired or replaced without charge,
excepting the cost of tubes. Vacuum tubes and meter or badge lamps are warranted for six months
provided the warranty registration is completed as outlined above.
If a Manley Laboratories product fails to meet the above warranty, then the purchaser's sole remedy
shall be to first obtain a Repair Authorisation from Manley Laboratories and return the product to
Manley Laboratories, where the defect will be repaired without charge for parts and labour. All returns
to the factory must be in the original packing, accompanied by the Repair Authorisation, and must be
shipped to Manley Laboratories via insured freight at the customer's own expense. Factory original
packaging can be ordered from Manley Labs. Customer will be charged for new factory original
packaging if customer fails to ship product to Manley Labs in the original factory packaging. After
repair, the product will then be returned to customer via prepaid, insured freight, method and carrier to
be determined solely by Manley Laboratories. Manley Laboratories will not pay for express or
overnight freight service nor will Manley Laboratories pay for shipments to locations outside the USA.
Charges for unauthorized service and transportation costs are not reimbursable under this warranty,
and all warrantees, express or implied, become null and void where the product has been damaged by
misuse, accident, neglect, modification, tampering or unauthorized alteration by anyone other than
Manley Laboratories.
The warrantor assumes no liability for property damage or any other incidental or consequental
damage whatsoever which may result from failure of this product. Any and all warrantees of
merchantability and fitness implied by law are limited to the duration of the expressed warranty. All
warrantees apply only to Manley Laboratories products purchased and used in the USA. All
warrantees apply only to Manley Laboratories products originally purchased from an authorised
Manley dealer. Warranties for Manley Laboratories products purchased outside the USA will be
covered by the Manley Importer for that specific country or region. "Grey Market" purchases are not
covered by any warranty. In the case that a Manley Laboratories product must be returned to the
factory from outside the USA, customer shall adhere to specific shipping, customs, and commercial
invoicing instructions given with the Return Authorisation as Manley Laboratories will not be
responsible for transportation costs or customs fees related to any importation or re-exportation
charges whatsoever.
Some states do not allow limitations on how long an implied warranty lasts, so the above limitations
may not apply to you. Some states do not allow the exclusion or limitation of incidental or
consequential damages, so the above exclusion may not apply to you. This warranty gives you specific
legal rights and you may also have other rights which vary from state to state.
For Tech Support and Repair Authorisation, please contact:
MANLEY LABORATORIES, INC.
13880 MAGNOLIA AVE.
CHINO, CA. 91710 USA
TEL: (909) 627-4256
FAX: (909) 628-2482
email: service@manleylabs.com
30
Page 33

WARRANTY REGISTRATION
We ask, grovel and beg that you please fill out this registration form and send the bottom half to:
MANLEY LABORATORIES
REGISTRATION DEPARTMENT
13880 MAGNOLIA AVE.
CHINO CA, 91710 USA
Or you may FAX this form in to: +1 (909) 628-2482 or you may fill in the online warranty
registration form found in the Tech Support section of our website www.manleylabs.com or you can
be really diligent and register your warranty three times to see if we get confused!
Registration entitles you to product support, full warranty benefits, and notice of product
enhancements and upgrades, even though it doesn't necessarily mean that you will get them (Just
kidding!) You MUST complete and return the following to validate your warranty and registration.
Thank you again for choosing Manley gear and reading all the way through The Owner's Manual.
(We really mean that sincerely, the bit about thanking you for choosing our gear. THANK YOU!!!)
MODEL _______________ SERIAL #__________________
PURCHASE DATE ______________ SUPPLIER ______________________
--------------------------------------------------------------------------------------------------------
PLEASE DETACH THIS PORTION AND SEND IT TO MANLEY LABORATORIES
MODEL _______________ SERIAL #__________________
PURCHASE DATE ______________ SUPPLIER ______________________
NAME OF OWNER _______________________________________________
ADDRESS ______________________________________________________
CITY, STATE, ZIP ________________________________________________
EMAIL: ________________________________________________________
TELEPHONE NUMBER___________________________________________
COMMENTS OR SUGGESTIONS?__________________________________
________________________________________________________________
31
Page 34

Page 35

 Loading...