

MMAANNIIWWAAYY
SSMMAARRTT LLAAMMPP SSPPEEAAKKEERR
IInnssttrruuccttiioonn MMaannuuaall
PLEASE READ BEFORE OPERATING THIS EQUIPMENT.
Model: MW-L1

IMPORTANT SAFETY INSTRUCTIONS
When used in the directed manner, this unit has been designed and manufactured to ensure your
personal safety.
However, improper use can result in potential electrical shock or fire hazards. Please read all safety and
operating instructions carefully before installation and use, and keep these instructions handy for future
reference. Take special note of all warnings listed in these instructions and on the unit.
Water and Moisture
The unit should not be used near water. For example: near a bathtub, washbowl, kitchen sink, laundry
tub, swimming pool or in a set basement.
Ventilation
The unit should be situated so that its location or position does not interfere with its proper ventilation.
For example, it should not be situated on a bed, sofa, rug or similar surface that may block the ventilation
openings. Also, it should not be placed in a built-in installation, such as a bookcase or cabinet, which
may impede the flow of air through the ventilation openings.
Heat
The unit should be situated away from heat sources such as radiators, heat registers, stoves or other
appliances (including amplifiers) that produce heat.
Power Source
The unit should be connected to a power supply only of the type described in the operating instructions
or as marked on the appliance.
Power Cord Protection
Power supply cords should be routed so that they are not likely to be walked on or pinched by items
placed upon or against them. It is always best to have a clear area from where the cord exits the unit to
where it is plugged into an AC outlet.
Cleaning
The unit should be cleaned only as recommended. Object and Liquid Entry Care should be taken so that
objects do not fall and liquids are not spilled into any openings or vents located on the product.
Attachments
Do not use attachments not recommended by the product manufacturer.
Lightning and Power Surge Protection
Unplug the unit from the wall outlet. This will prevent damage to the product due to lightning and
power-line surges.
Overloading
Do not overload wall outlets, extension cords, or integral convenience receptacles as this can result in a
risk of fire of electric shock.
Damage Requiring Service
This unit should be serviced by qualified service personnel when:
The power supply cord or plug has been damaged.
Objects have fallen into or liquid has been spilled into the enclosure.
The unit has been dropped or the enclosure damaged.
The unit exhibits a marked change in performance or does not operate normally.
Periods of Nonuse
If the unit is to be left unused for an intended period of time, such as a month or longer, the power cord
should be unplugged from the unit to prevent damage or corrosion.
Servicing
The user should not attempt to service the unit beyond those methods described in the user’s operating
instructions.
Service methods not covered in the operating instructions should be referred to qualified service
personnel.
PACKAGE CONTENTS
1 x LED Bluetooth Speaker
1 x AC-DC Adapter
1 x 3.5mm Audio Cable
1 x Instruction Manual
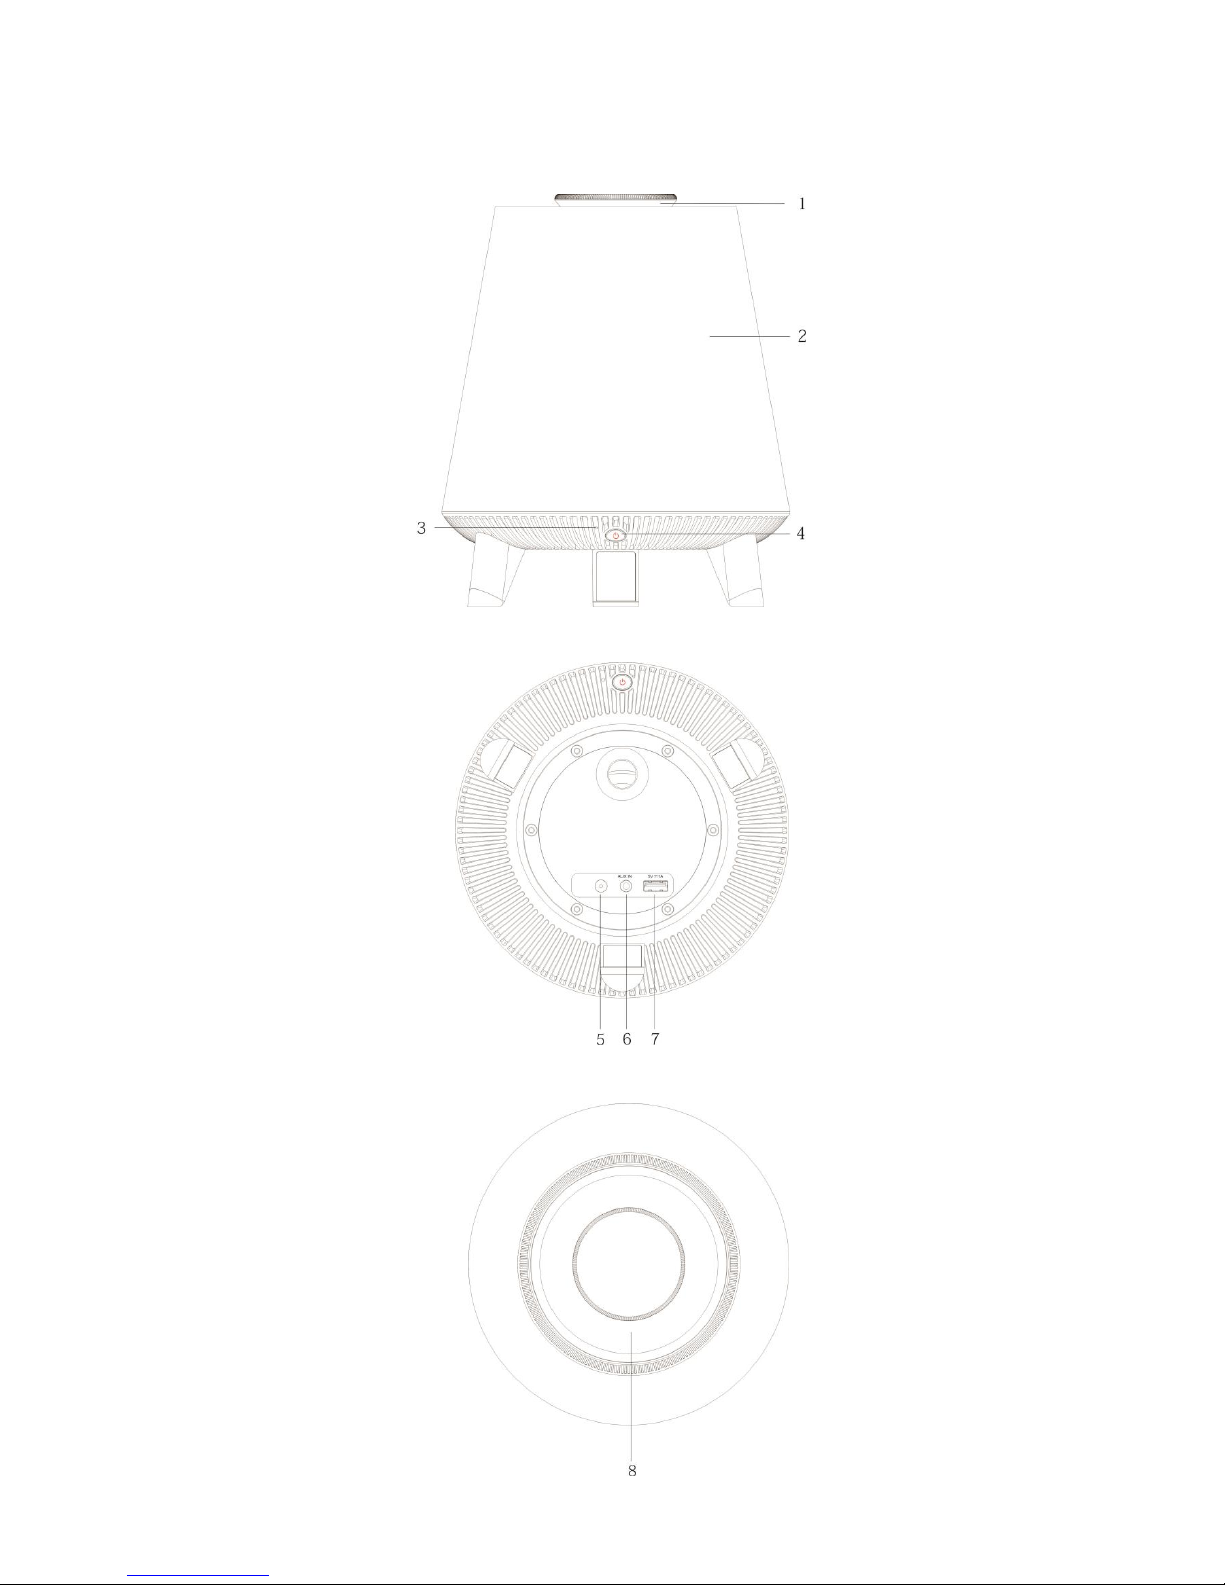
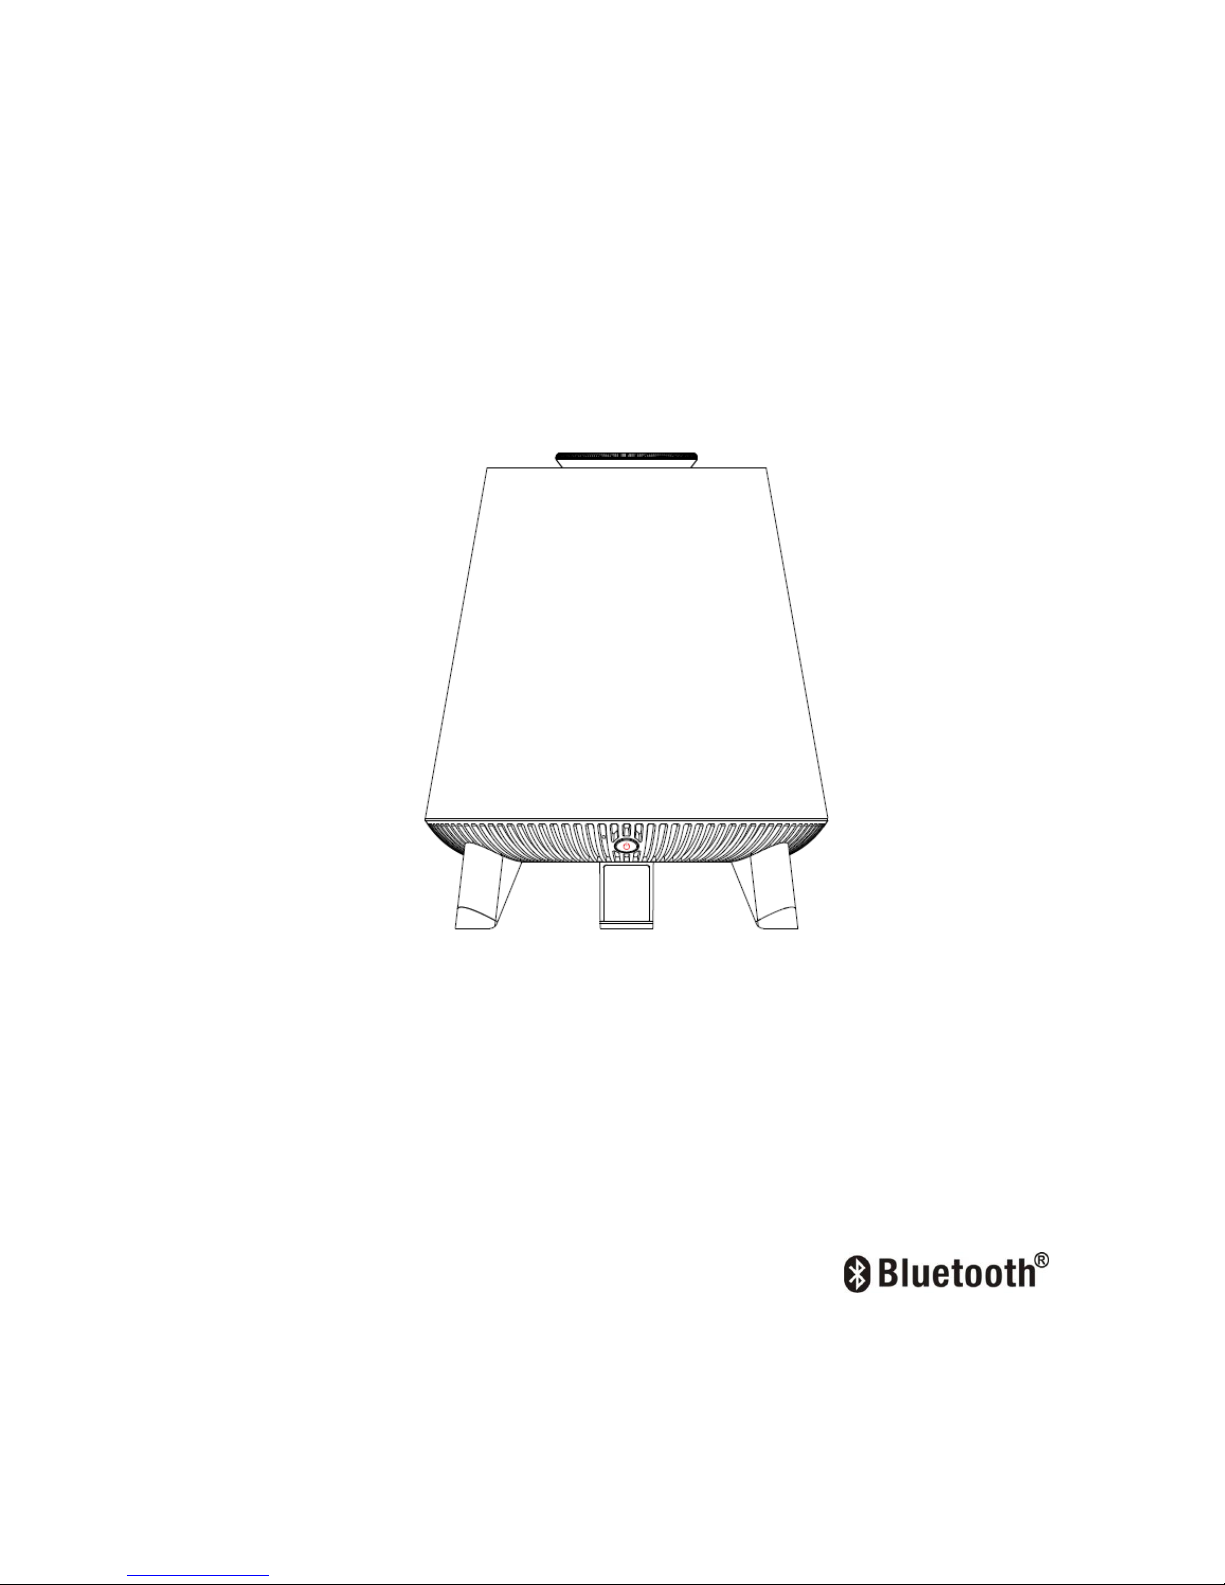
LOCATION OF CONTROLS
Front View
Bottom View
Top View

1. LED/Volume control button
a. Short tap this button continously to change the color of LED light, then rotate it within
2 seconds to adjust brightness of the light.
b. In Bluetooth playback mode: rotate it to adjust the volume, press and hold this
button(> 2 seconds ) to play/pause current playback.
c. In Bluetooth mode: when receiving an incoming call on your cell phone, tap this
button once to answer the phone, tap this button again to end the call.
2. Lamp shade
3. Built-in microphone
4. Power On/Off button
Press and hold this button to turn the unit On or Off.
Short press to switch on/off the light during power on mode.
5. DC Jack(12V, 1.5A)
6. Aux-in Jack
7. USB charging socket (Output: 5V,1A)
8. Operating mode indicator
Start-Up of the Device/Introduction
Choose a suitable location for the device. Suitable would be a dry, level, non-slip surface.
CAUTION:
Do not carry the device by the control knob!
Power Supply
The unit is powered by an external AC-DC power adapter with an output of 12V DC / 1.5A
(included).
1. Make sure the grid voltage corresponds to the figures on the rating plate.
2. Connect the device with the plug connector by inserting its plug into the "DC 12V" jack of
the device.
3. Insert the grid plug into a properly installed three prong socket.
CAUTION:
Only use the supplied power adaptor for this device. Do not use for other devices.
Only use power adaptor with 12V( )other adaptors may cause damage to the
device.
NOTE:
Disconnect from mains power supply during longer periods of non-use.
USB Charging Socket
You can charge your smartphone through this jack. Use the USB cable of your smartphone
for the connection.
NOTE:
-Due to the different smartphone types that are offered today, and their different charging
capacities, the loading duration is dependent on the smartphone used and its operating
condition.
-Due to the design only a power supply of 1A can be ensured. Devices such as tablets PCs
that need charging currents of up to 2500mA, cannot be charged.
-A playback of audio-files through this connector is not possible
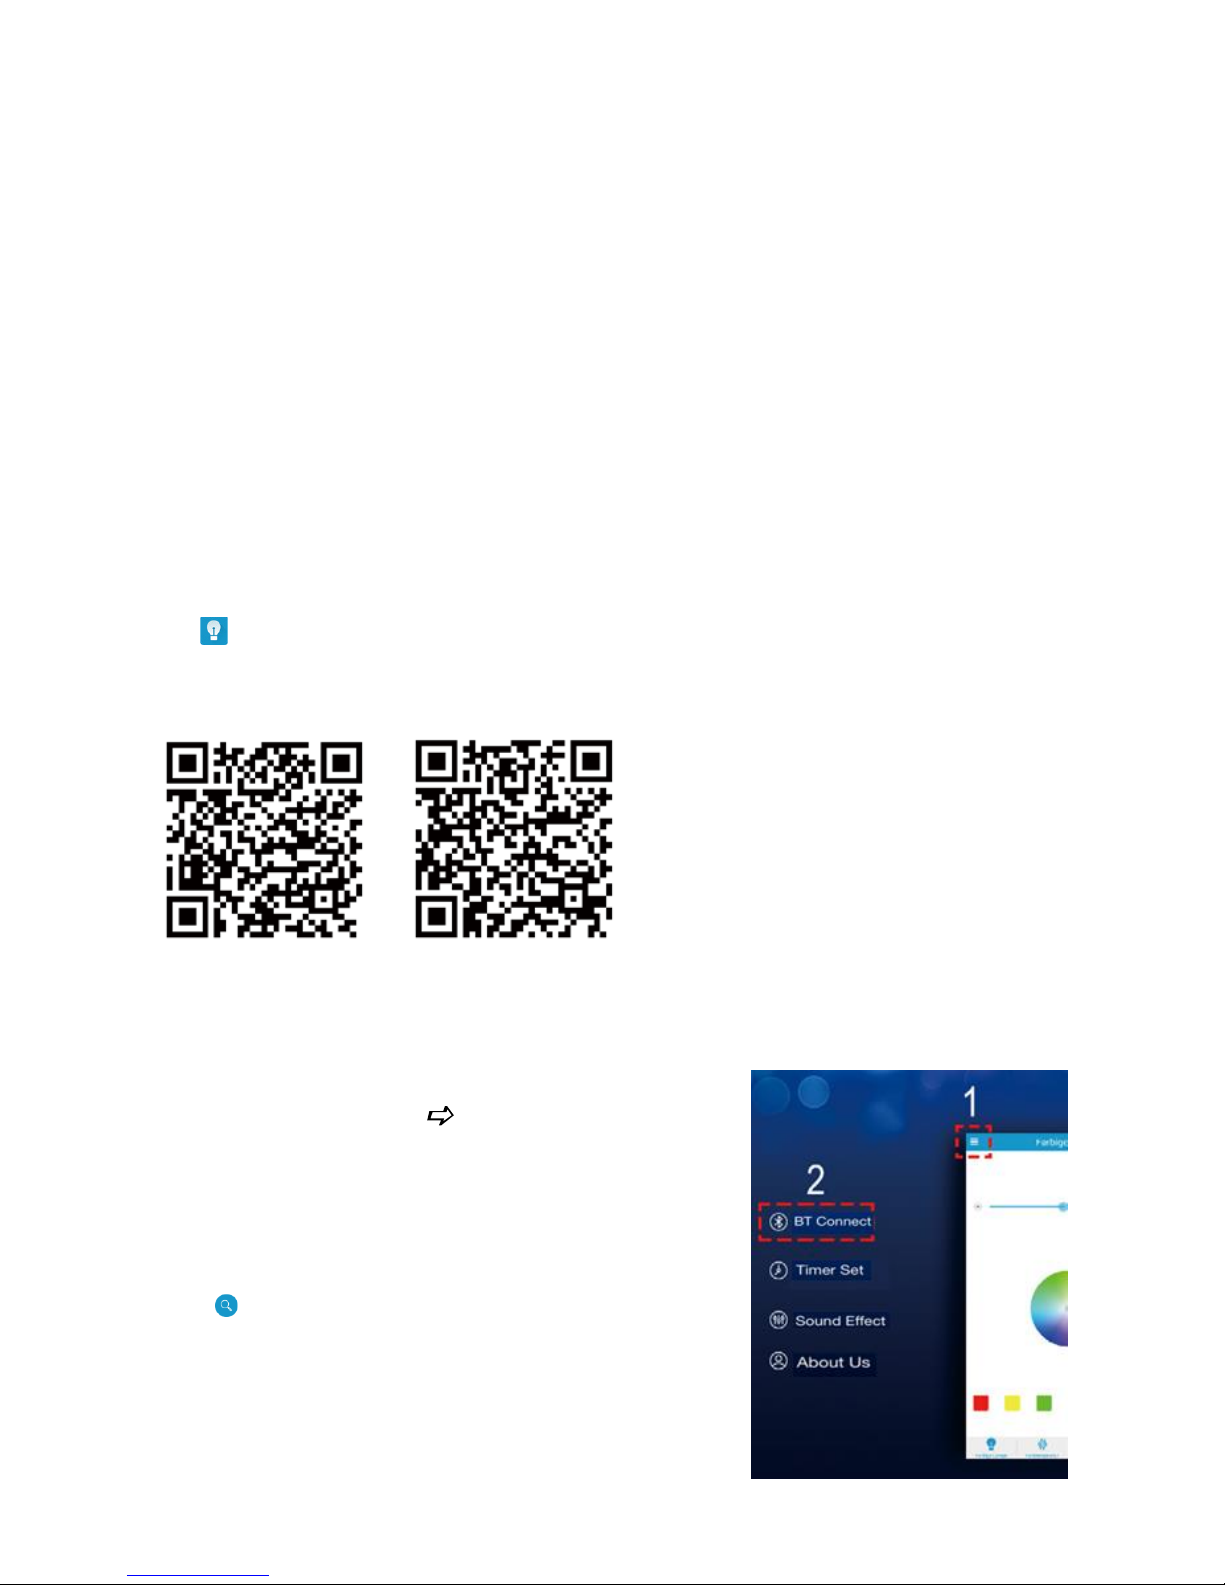
App Information:
You can also download the appropriate app to this device on your smartphone or tablet PC.
The app gives you additional control options (amongst others, 3 alarm times and a sleep
timer).
The iLink app is available for android and iOS. Scan the corresponding QR code to go
directly to the download.
NOTE: Depending on the provider, downloading the app may require payment.
Google Play App Store
Important Note for Operation via App
Once you are connected as described in the chapter
“Playing Back Music Files” “Wireless via Bluetooth”
you must connect the app with the device.
1. Open the app.
2.Click on the icon menu (1).
3.Select the menu item for the Bluetooth connection(2).
4.Should the device not appear in the list, click the search
icon
5.Connect the app with the device by clicking on
“AKBT80 Light”.
6.Now you can operate the device using the app.
Basic Operation
1.Turn on the unit by pressing and hold the button on the bottom of the unit,the LED
light will be on,meanwhile, the Operating mode indicator will flash in blue
2. Short tap the LED/Volume control button once, then rotate it to adjust brightness of the
LED light.
3. Short tap the LED/Volume control button continously to change the color of LED light in
the following cyclical manner:
White—> Warm White—>Green—>Cyan—>Purple—>Blue—>Color Auto change
4. Short press the button on the to switch off/on the LED light
5.Press and hold the button to turn the unit off.
OPERATING THE SPEAKER IN BLUETOOTH MODE
This device offers you the possibility to use a Bluetooth enabled device. The functional
radius is limited to approx.10 metres depending on the surroundings and the unit used.
Due to the different device manufacturers, models, and software versions, a full
functionality cannot be guaranteed.
Pairing (Linking) A Bluetooth Enabled Cell Phone or Other Bluetooth Enabled Device
To The Speaker
If the speaker has never been paired with a Bluetooth device before, you need to follow the
pairing instructions below to link the speaker with your Bluetooth device.
1. When the speaker is turned on, the Operating mode Indicator flashes in blue. The
speaker is ready to pair (link) with your Bluetooth device.
2. Activate Bluetooth on the compatible device, and set it to search for compatible devices.
3. Select the speaker name:" MW-L1" from the list of found devices.
Tips: Only one playback unit can be connected to the speaker. If the speaker is already
connected to another playback unit, the speaker will not appear in the BT selection list.
4. If your device asks for a passkey (depending on the device manufacturers, model, and
software version), then enter digits “0000” (four zeros) and press OK.
5. If pairing has been carried out successfully, a beep sound is heard, meanwhile, the Blue
colour indicator stops flashing.
If the speaker has been paired with the Bluetooth device before, you need to follow
the pairing instructions below to link the speaker with your Bluetooth device.
1. After turning on the speaker, the speaker will search for the last paired device. The
operating mode indicator will flash in blue. If the unit finds the paired Bluetooth device, a
beep sound is heard and operating mode indicator will keep in blue and stop flashing.
2. After successfully pairing (linking), you can begin playing music from your Bluetooth
device wirelessly to the speaker.

3. Rotate the LED/Volume control button to adjust the volume to adjust to the desired
volume level, while the volume level reaches its maximum level, a “di” sound will be
heard.
4. Press and hold the LED/Volume control button for 2 seconds to play/pause current
playback.
5. To stop the unit, press and hold the button to turn the unit off.
NOTES:
To be able to transfer audio data, Bluetooth needs to stay activated in your player,
observe the operation manual of your player.
If a mobile phone on which you are playing music receives a call, the music will be
interrupted. The sound however is not played back via the speaker. After you have ended
the call, the devices are connected to each other again and playback continues.
The player will be disconnected when your device is moved beyond the operational range.
If you want to reconnect your device to this player, place it within the operational range.
If the device is moved beyond the operational range, when it is brought back, please
check if the device is still connected to the player.
If the connection is lost, follow the instructions above to pair your device to the player
again.
Using the Unit as a Hands-free Bluetooth Speakerphone
1. Link your cell phone to the LED speaker via Bluetooth as described above.
2. When receiving an incoming call on your cell phone, short tap the LED / Volume control
button on the unit to switch the incoming call from cell phone to the speaker. Complete
your call using the built-in microphone and speaker.
3. Adjust the volume control of your cell phone to obtain the desired sound level.
4. To end the call, just tap the LED / Volume control button again, the call will end. If you
were playing music from your cell phone to the speaker before answering the call, the
music will automatically resume playing when you hang up.

OPERATING THE SPEAKER IN AUX-IN MODE
If you are using an iPod, MP3/MP4 player or other mobile phone which cannot connect this
unit via Bluetooth directly, you can still play it on the speaker via an audio connecting cable.
1. Plug one end of the 3.5mm audio cable (included) into the headphone or line out jack on
your player; plug the other end of cable into the unit AUX-IN jack of the speaker.
2. Turn on the external audio source and play your device.
3. Press and hold the button to turn on the unit, the operating mode indicator will light
up in Red.
4. The volume level can now be controlled through the main unit. Operate all other
functions on the external device as usual.
Notes:
1. If you're connected to the Line out Jack of your external device, then you only need to
adjust the volume control of this speaker. If you're connected to the Headphone Jack of
your external device, then you may need to adjust both the volume control of your
external device and the volume control of this unit to find the most desirable volume
setting.
2. Press the Power ON/OFF button to turn off the unit when you finish listening.
3. Don't forget to switch off the power of your external device as well.
Troubleshooting Guide
Should you experience difficulties in the use of this player, please refer to the following
chart.
Fault
Cause
Solution
Unit cannot be
operated.
Unit crashes and “hangs”
Disconnect from the mains for around 5
seconds. Then switch the unit on again.
No audio signal via
the Bluetooth
connection
Speaker is not paired to
the audio source.
Check whether a connection exists. If
necessary, pair the speaker again to the
audio source.
Volume too low
Increase the volume on the speaker
Increase the volume on the audio
source.
Speaker cannot be
connected
Pairing does not work
Check whether the audio source
supports the A2DP protocol
Audio source is switched
off
Switch on the audio source
Bluetooth is switched off
at the audio source.
Switch on the Bluetooth function in the
audio source.
Bluetooth version is not
supported.
Use a different playback unit.
Poor sound quality
from a Bluetooth®
device
Bluetooth device is almost
out of range of the LED
speaker
Move your Bluetooth device
closer to the LED speaker

Specification
Power adaptor (included)
Input AC 100-240V ~ 50/60Hz
Output DC 12V 1.5A
Power Consumption
19W
Standby Power Consumption
<0.5W
Output Power(RMS)
10W
Frequency Response
40Hz-18KHz
Signal to Noise Ratio (SNR)
> 80dB
Bluetooth Version
V 4.0
Bluetooth operation range
Up to 10 metres, straight line distance and no obstacles
LED Numbers
18 (White)/18 (Warm White)/ 9 (RGB)
Working Temperature
0℃~ +35℃
Working Humidity
20%~80%
The right to make technical and design modifications in the course of continuous product
development remains reserved.
This device has been tested according to all relevant current CE guidelines, such as
electromagnetic compatibility and low voltage directives, and has been constructed in
accordance with the latest safety regulations.
NOTE: This equipment has been tested and found to comply with the limits for a Class B
digital device, pursuant to Part 15 of the FCC Rules. These limits are designed to provide
reasonable protection against harmful interference in a residential installation. This
equipment generates, uses and can radiate radio frequency energy and, if not installed and
used in accordance with the instructions, may cause harmful interference to radio
communications. However, there is no guarantee that interference will not occur in a
particular installation.
If this equipment does cause harmful interference to radio or television reception, which
can be determined by turning the equipment off and on, the user is encouraged to try to
correct the interference by one or more of the following measures:
-- Reorient or relocate the receiving antenna.
-- Increase the separation between the equipment and receiver.
-- Connect the equipment into an outlet on a circuit different from that to which the receiver
is connected.
-- Consult the dealer or an experienced radio/TV technician for help.

CAUTION: Any changes or modifications not expressly approved by the party
responsible for compliance could void the user’s authority to operate the equipment.

L
L
U
U
MMIIN
N
,
,
PLE
A
PPoorrt
t
a
I
I
n
n
A
SE REA
D
AAMM
L
bbllee
L
L
ssttrru
u
c
c
BEFOR
E
LLiiffees
s
t
t
EEDD
B
B
ttiioonn
M
M
OPERA
T
yylleess
lluueet
t
o
o
aan
n
u
u
ING THI
S
ootthh
S
S
aall
EQUIPM
M
o
ppeea
a
k
k
ENT.
del: AL-
L
eerr
MGR

IMPORTANT SAFETY INSTRUCTIONS
When used in the directed manner, this unit has been designed and manufactured to ensure your
personal safety.
However, improper use can result in potential electrical shock or fire hazards. Please read all safety and
operating instructions carefully before installation and use, and keep these instructions handy for future
reference. Take special note of all warnings listed in these instructions and on the unit.
Water and Moisture
The unit should not be used near water. For example: near a bathtub, washbowl, kitchen sink, laundry
tub, swimming pool or in a set basement.
Ventilation
The unit should be situated so that its location or position does not interfere with its proper ventilation.
For example, it should not be situated on a bed, sofa, rug or similar surface that may block the ventilation
openings. Also, it should not be placed in a built-in installation, such as a bookcase or cabinet, which
may impede the flow of air through the ventilation openings.
Heat
The unit should be situated away from heat sources such as radiators, heat registers, stoves or other
appliances (including amplifiers) that produce heat.
Power Source
The unit should be connected to a power supply only of the type described in the operating instructions
or as marked on the appliance.
Power Cord Protection
Power supply cords should be routed so that they are not likely to be walked on or pinched by items
placed upon or against them. It is always best to have a clear area from where the cord exits the unit to
where it is plugged into an AC outlet.
Cleaning
The unit should be cleaned only as recommended. Object and Liquid Entry Care should be taken so that
objects do not fall and liquids are not spilled into any openings or vents located on the product.
Attachments
Do not use attachments not recommended by the product manufacturer.
Lightning and Power Surge Protection
Unplug the unit from the wall outlet. This will prevent damage to the product due to lightning and
power-line surges.
Overloading
Do not overload wall outlets, extension cords, or integral convenience receptacles as this can result in a
risk of fire of electric shock.
Damage Requiring Service
This unit should be serviced by qualified service personnel when:
The power supply cord or plug has been damaged.
Objects have fallen into or liquid has been spilled into the enclosure.
The unit has been dropped or the enclosure damaged.
The unit exhibits a marked change in performance or does not operate normally.
Periods of Nonuse
If the unit is to be left unused for an intended period of time, such as a month or longer, the power cord
should be unplugged from the unit to prevent damage or corrosion.
Servicing
The user should not attempt to service the unit beyond those methods described in the user’s operating
instructions.
Service methods not covered in the operating instructions should be referred to qualified service
personnel.
PACKAGE CONTENTS
1 x LED Bluetooth Speaker
1 x AC-DC Adapter
1 x 3.5mm Audio Cable
1 x Instruction Manual

LOCATI
O
Front Vi
e
Bottom
V
Top Vie
w
N OF CO
w
iew
NTROLS

1. LED/
Vo
a. S
h
2 second
s
b. I
n
button
(
c. In
button on
c
2. Lamp
s
3. Built-i
n
4. Po
w
Press an
d
Short pre
s
5. DC Ja
c
6. Aux-in
7. USB c
h
8. Opera
t
Start-U
p
Choose a
CAUTIO
N
Do not ca
Power
S
The unit i
s
(included
)
1. Make
s
2. Conne
c
the devic
e
3. Insert t
CAUTIO
N
Only use
Only use
device.
NOTE:
Disconne
c
lume co
n
ort tap thi
s
to adjust
Bluetoot
h
> 2 sec
o
Bluetooth
e to ans
w
hade
microp
h
er On/O
f
hold this
s to swit
c
k(12V, 1.
5
Jack
arging s
o
ing mod
e
of the
D
suitable l
o
:
rry the de
v
upply
powered
.
ure the gr
i
t the devi
c
.
he grid pl
u
:
the suppli
e
power ad
a
t from m
a
trol butt
o
button c
o
brightnes
s
playbac
k
nds ) to pl
mode: w
h
er the ph
o
one
f button
button to
t
h on/off th
A)
cket (Ou
indicato
r
evice/I
n
cation for
ice by th
e
by an ext
e
d voltage
e with th
e
g into a p
r
d power
a
ptor with
1
ins power
n
ntinously
t
of the lig
h
mode: r
o
y/pause
c
en recei
v
ne, tap th
urn the un
e light dur
i
put: 5V,1
troduct
i
the devic
e
control k
n
rnal AC-
D
orrespon
d
plug con
n
operly ins
t
daptor fo
r
2V(
supply du
o change
t
t.
tate it to
urrent pl
a
ing an in
c
is button
a
it On or O
f
ng power
A)
on
. Suitabl
e
ob!
C power
a
s to the f
i
ector by i
n
alled thre
e
this devi
c
)othe
r
ring longe
he color
o
adjust th
e
yback.
oming ca
gain to en
f.
on mode.
would be
dapter wi
gures on
t
serting it
s
prong s
o
e. Do not
u
adaptor
s
r periods
o
f LED ligh
t
volume,
l on your
d the call.
a dry, lev
e
h an outp
u
he rating
p
plug into
cket.
se for ot
h
may cau
s
f non-use
.
, then rot
a
press an
d
cell phon
e
l, non-sli
p
ut of 12V
D
late.
the "DC 1
2
er device
s
e damag
e
.
te it withi
n
hold thi
s
, tap thi
s
surface.
C / 1.5A
V" jack o
f
.
to the

USB C
h
You can
c
for the co
NOTE:
-Due to t
h
capacitie
s
condition.
-Due to t
h
that need
-A playba
App Inf
o
You can
a
The app
g
timer).
The iLi
directly t
o
NOTE: D
e
Goo
g
Importa
Once you
“Playing
B
you must
1. Open t
h
2.Click o
n
3.Select t
h
4.Should
t
icon
5.Conne
c
“AKBT80
6.Now yo
u
arging
S
harge yo
u
nnection.
e differen
t
, the loadi
e design
o
charging
c
ck of audi
o
rmatio
n
lso downl
o
ives you
a
nk app is
a
the down
l
pending
o
le Play
nt Note
f
are conn
e
ack Musi
c
connect t
h
e app.
the icon
m
he menu i
t
the devic
e
t the app
w
Light”.
can ope
r
ocket
r smartph
o
smartph
o
ng durati
o
nly a pow
urrents o
f
-files thro
:
ad the a
p
dditional
c
vailable f
o
oad.
n the pro
v
A
or Ope
r
cted as d
e
Files”
e app wit
h
enu (1).
em for th
e
not appe
a
ith the d
e
ate the d
e
ne throu
g
ne types t
n is depe
n
er supply
o
up to 25
0
ugh this c
o
propriate
a
ontrol opt
r android
ider, dow
n
pp Store
ation vi
a
scribed i
n
“Wireles
s
the devi
c
Bluetoot
h
in the lis
vice by cli
c
vice usin
g
h this jac
k
hat are of
f
dent on t
h
f 1A can
b
0mA, can
n
nnector i
s
pp to this
ions (amo
and iOS.
S
loading t
h
App
the chap
t
via Bluet
o
e.
connecti
o
t, click the
cking on
the app.
. Use the
ered toda
y
e smartp
h
e ensure
d
ot be cha
not possi
device on
gst other
s
can the
c
e app ma
y
er
oth”
n(2).
search
SB cabl
e
, and thei
r
one used
. Devices
rged.
ble
your sma
r
, 3 alarm
orrespond
require
p
of your s
m
different
c
and its op
e
such as t
a
tphone or
times and
ing QR c
o
ayment.
artphon
e
harging
rating
blets PC
s
tablet PC
.
a sleep
de to go

Basic
O
1.Turn on
light will
b
2. Short t
a
LED light
.
3. Short t
a
the follow
White—>
4. Short p
r
5.Press an
d
OPERA
T
This devi
c
radius is l
Due to th
e
functional
Pairing (
L
To The S
If the spe
a
pairing in
s
1. When
speak
e
2. Activa
t
3. Selec
t
Tips: Onl
y
connecte
d
4. If you
r
softw
a
5. If pairi
colour
If the sp
e
the pairi
n
1. After t
u
opera
t
beep
s
2. After
s
devic
e
peratio
n
the unit b
y
e on,mea
n
p the LE
D
p the LE
D
ing cyclic
a
Warm Whi
ess the
hold the
ING T
H
e offers y
o
imited to
a
different
ity cannot
inking)
A
peaker
ker has n
tructions
b
the spea
k
r is read
y
te Bluetoo
the spea
k
one play
b
to anoth
e
device a
s
re versio
n
ng has be
e
indicator
s
aker has
g instruc
rning on
t
ing mode
ound is h
e
uccessfull
wirelessl
y
pressing
while, th
e
/Volume
/Volume
c
l manner:
te—>Gree
n
button on
t
button
E SPEA
K
u the po
s
pprox.10
m
device m
a
be guara
n
Bluetoot
ever been
elow to li
n
er is turne
to pair (li
n
th on the
c
er name:"
ack unit
c
r playbac
k
ks for a p
a
), then en
t
n carried
tops flas
h
been pair
tions bel
o
he speak
e
indicator
w
ard and
o
y pairing (
to the sp
e
and hold
t
Operati
n
control b
u
ontrol b
u
—>Cyan
—
he to swit
c
to turn the
ER IN
B
sibility to
u
etres de
p
nufacture
r
teed.
h Enable
d
paired wi
t
k the spe
on, the
O
k) with y
o
ompatible
AL-LMG
R
an be con
unit, the
sskey (de
er digits “
0
out succe
s
ing.
d with t
h
w to link
r, the spe
ill flash in
perating
m
linking), y
o
aker.
he bu
mode
i
tton onc
e
tton conti
>Purple
—
h off/on th
unit off.
LUETO
se a Blue
t
ending o
n
s, models
Cell Ph
o
h a Bluet
o
aker with
y
perating
m
ur Blueto
o
device, a
n
" from th
e
nected to
speaker
w
pending o
000” (fou
r
sfully, a
b
e Blueto
o
the spea
k
aker will s
e
blue. If th
e
ode indic
a
u can be
g
t
ton on th
e
ndicator
, then rot
a
nously to
c
>Blue—>
C
e LED lig
h
OTH M
O
ooth ena
b
the surro
, and soft
w
ne or Oth
oth devic
e
our Bluet
o
ode Indi
c
th device.
d set it to
list of fou
the speak
e
ill not app
e
n the devi
c
zeros) a
n
eep soun
d
th devic
e
er with y
o
arch for t
unit find
s
tor will k
e
in playing
bottom o
f
will flash i
te it to adj
hange th
e
olor Auto
c
t
DE
led devic
e
undings a
n
are versi
o
r Blueto
o
before, y
o
oth devic
e
ator flash
e
search fo
r
nd device
s
r. If the s
p
ar in the
B
e manufa
d press O
K
is heard,
before,
y
ur Bluet
o
e last pai
the paire
d
ep in blue
music fro
m
the unit,t
h
n blue
ust bright
n
color of
L
change
. The fun
c
d the uni
t
ns, a full
th Enabl
e
u need t
o
.
s in blue.
compatib
l
.
eaker is
a
BT selecti
o
cturers, m
K.
meanwhil
e
ou need
t
oth devi
c
red devic
e
Bluetoot
h
and stop
f
your Bl
u
e LED
ess of th
e
ED light i
n
tional
used.
d Devic
e
follow th
e
The
e devices
.
lready
n list.
odel, and
, the Blu
e
o follow
e.
. The
device,
a
lashing.
etooth

3. Rotat
e
volum
e
heard.
4. Press
playb
a
5. To st
o
NOTES:
• To be
a
observ
e
• If a m
o
interru
p
the call
,
• The pla
If you
w
• If the d
check i
f
• If the c
o
again.
Using th
e
1. Link yo
u
2. When r
e
button
your ca
3. Adjust
t
4. To end
were pl
music
w
the LED/
V
level, w
h
and hold t
ck.
p the unit,
able to tr
a
the oper
a
bile phon
e
ted. The s
the devic
e
yer will be
ant to rec
o
evice is
m
the devic
e
nnection
Unit as
a
r cell pho
ceiving a
on the un
i
ll using th
e
he volum
e
the call, j
u
aying mu
s
ill autom
a
olume c
o
ile the vol
u
he LED/
Vo
press an
d
nsfer au
d
tion man
u
on whic
ound how
e
s are co
n
disconne
c
nnect yo
u
oved be
y
is still co
is lost, fo
l
Hands-f
r
ne to the
L
n incomin
g
t to switc
h
built-in
m
control o
f
st tap the
ic from y
o
tically res
u
ntrol bu
t
me level
lume co
n
hold the
io data,
B
al of your
h you are
ver is not
nected to
ted when
y
r device t
o
ond the o
nnected t
o
low the in
ee Bluet
o
ED spea
k
call on y
o
the inco
m
icrophone
your cell
p
LED / Vo
l
ur cell ph
me playi
n
ton to adj
u
reaches it
s
trol butt
o
button t
o
luetooth
player.
playing
m
played b
a
each othe
your devi
c
this play
e
perational
the play
e
structions
oth Spea
er via Blu
e
ur cell ph
o
ing call f
r
and spea
hone to
o
ume con
t
one to th
e
g when y
o
st the vol
maximu
m
n for 2 se
turn the
u
needs to
usic rec
e
ck via the
r again an
d
e is move
d
r, place it
range, w
h
r.
above to
kerphone
tooth as
d
ne, short
om cell p
h
ker.
btain the
d
rol butto
n
speaker
u hang u
p
me to ad
j
level, a
“
conds to
p
nit off.
stay activ
a
ives a ca
peaker.
A
playbac
k
beyond t
h
within the
en it is b
pair your
escribed
a
tap the L
E
one to th
e
esired so
u
again, th
before an
s
.
ust to the
“di” soun
d
lay/pause
ted in y
o
ll, the mu
s
fter you h
a
continue
s
he operati
o
operation
rought ba
c
device to
bove.
D / Volu
m
speaker.
nd level.
e call will
e
wering t
h
desired
will be
current
ur player
,
ic will b
e
ve ende
d
.
nal rang
e
al range.
k, pleas
e
the playe
r
e contro
l
Complet
e
nd. If yo
u
e call, th
e
.

OPERAT
I
If you ar
e
unit via B
l
1. Plug o
your
p
2. Turn
o
3.
Press
up in
R
4. The v
o
functi
o
Notes:
1. If you
'
adjust
your
e
extern
settin
g
2. Press
t
3. Don't
f
Trouble
Should y
o
chart.
Fault
Unit cann
operated.
No audio
the Bluet
o
connectio
Speaker
c
connecte
d
Poor sou
n
from a Bl
u
device
NG THE
S
using an
uetooth di
ne end of
t
layer; plu
g
n the ext
e
and hold
t
ed.
lume lev
e
ns on the
re connec
t
the volu
m
xternal de
al device
a
.
he Power
orget to s
shootin
g
u experie
n
ot be
signal via
oth
n
annot be
d quality
etooth®
PEAKE
R
iPod, MP3
/
rectly, yo
u
he 3.5m
m
the othe
r
rnal audi
o
he bu
t
l can now
external
d
ed to the
e control
o
vice, then
nd the vo
ON/OFF
b
witch off t
Guide
ce difficu
l
Unit cra
s
Speake
r
the audi
Volume
Pairing
d
A
udio
s
off
Bluetoo
t
at the a
u
Bluetoo
t
support
e
Bluetoo
t
out of
r
speake
r
IN AUX-
MP4 play
e
can still
p
audio ca
b
end of c
a
source a
n
ton to tur
n
be control
evice as
u
Line out J
a
f this spe
a
you may
n
lume cont
r
utton to t
u
he power
o
ties in the
Cause
hes and
“
is not pai
o source.
too low
oes not
w
ource is
s
h is swit
c
dio sourc
e
h versio
n
d.
h device i
s
ange of
t
IN MOD
E
r or other
lay it on t
h
le (includ
e
ble into t
h
d play yo
u
on the u
n
led throu
g
sual.
ck of you
ker. If yo
eed to ad
j
ol of this
u
rn off the
f your ex
t
use of thi
s
hangs”
red to
ork
witched
hed off
.
is not
s almost
he LED
mobile p
h
e speake
r
d) into th
e
e unit AU
X
r device.
it, the op
e
h the mai
n
r external
u're conn
e
j
ust both
t
nit to fin
d
unit whe
n
ernal dev
i
player, p
l
Disconne
c
seconds.
T
Check wh
necessar
y
audio sou
Increase
t
Increase
t
source.
Check wh
supports
t
Switch on
Switch o
n
audio sou
Use a diff
e
Move you
closer to
t
one whic
h
via an au
d
headpho
n
-IN jack
o
rating mo
d
unit. Op
e
device, th
e
cted to th
e
he volum
e
the most
you finis
h
ce as well
.
ease refe
r
Sol
u
t from th
e
hen swit
c
ether a co
, pair the
s
rce.
he volum
e
he volum
e
ether the
a
he A2DP
p
the audio
the Blue
rce.
rent play
b
r Bluetoot
h
he LED s
p
cannot c
o
io conne
c
e or line
o
f the spe
a
de indicat
o
rate all o
t
n you onl
Headph
o
control o
f
desirable
listenin
g.
.
to the foll
tion
mains fo
r
h the unit
nnection
e
peaker a
g
on the s
p
on the a
u
udio sou
r
rotocol
source
tooth fun
c
ack unit.
device
eaker
nnect thi
s
ting cable.
ut jack o
n
ker.
r will ligh
t
her
y need to
ne Jack o
f
your
volume
owing
around 5
on again.
xists. If
ain to the
eaker
dio
ce
tion in th
e

Specifi
c
Power ad
Power C
o
Standby
P
Output P
o
Frequenc
y
Signal to
Bluetooth
Bluetooth
LED Nu
m
Working
T
Working
H
The right
develop
m
This devi
c
electrom
a
accordan
c
NOTE: T
h
digital de
v
reasonab
l
equipme
n
used in a
c
communi
c
particular
If this eq
u
can be d
e
correct th
e
-- Reorie
n
-- Increas
-- Conne
c
is connec
t
-- Consul
t
ation
aptor (incl
u
nsumptio
n
ower Co
n
wer(RMS
y Respon
s
Noise Rati
Version
operation
bers
emperatu
umidity
to make t
e
ent remai
n
e has be
e
gnetic co
m
e with th
e
is equipm
ice, purs
u
e protecti
o
t generat
e
cordance
ations. H
o
installatio
n
ipment do
termined
b
interfere
t or reloc
a
e the sep
a
t the equi
p
ted.
the deale
ded)
sumption
)
e
o (SNR)
r
ange
re
chnical a
n
s reserve
n tested
a
patibility
a
latest sa
f
ent has b
e
ant to Pa
r
n against
s, uses a
n
with the i
n
wever, th
e
.
es cause
h
y turning
nce by on
e
te the rec
e
ration bet
w
ment into
r or an ex
p
Input
A
Output
19W
<0.5W
10W
40Hz-1
> 80d
B
V 4.0
Up to 1
18 (W
h
0℃~ +
20%~
8
d design
m
.
ccording t
o
nd low v
o
ety regula
t
en tested
15 of the
harmful i
n
d can rad
i
struction
s
re is no
g
armful int
the equip
m
or more
o
iving ant
e
een the
e
an outlet
o
erienced
r
C 100-24
0
DC 12V
8KHz
0 metres,
ite)/18 (
W
35℃
0%
odificati
o
all relev
a
ltage dire
c
ions.
and foun
d
FCC Rul
e
terferenc
e
ate radio
f
, may cau
s
uarantee
t
erference
ent off a
n
f the foll
o
nna.
quipment
n a circui
radio/TV t
e
V ~ 50/6
0
1.5A
straight li
n
arm Whit
e
ns in the
c
nt curren
t
tives, an
d
to compl
y
s. These l
in a resid
requency
e harmfu
l
hat interf
e
to radio o
r
d on, the
u
wing mea
s
and recei
v
t
different
f
chnician
f
Hz
e distanc
e
)/ 9 (RGB
)
ourse of
c
CE guide
l
has been
with the l
i
imits are
d
ntial inst
a
nergy an
d
interfere
n
rence will
television
ser is en
c
ures:
er.
rom that t
o
or help.
and no o
ontinuous
lines, suc
h
construct
e
imits for a
esigned t
o
llation. T
h
, if not in
s
ce to radi
o
not occur
reception
ouraged
t
o which th
bstacles
product
as
d in
Class B
provide
is
talled an
d
in a
, which
o try to
e receiver

CAUTION: Any changes or modifications not expressly approved by the party
responsible for compliance could void the user’s authority to operate the equipment.
 Loading...