

Page 1
HI-SPEED
USB 2.0
AUDIO/VIDEO
GRABBER
USER
MANUAL
MODEL 164115
MAN-164115-UM-0807-02
Page 2

Page 3
INTRODUCTION
Thank you for purchasing the MANHATTAN® Hi-Speed USB 2.0 Audio/Video Grabber, Model
164115. Ideal for sharing favorite video clips or “snapshots” through email or on the Web, the
MANHATTAN Hi-Speed USB 2.0 Audio/Video Grabber records and processes data from a
camcorder, VCR, TV or other media device equipped with S-video or RCA outputs. A singlebutton control with LED indicators activates a built-in chip that encodes directly in MPEG
1/2/4 format.
The easy-to-follow instructions in this user manual help make setup and operation quick and
simple, so you’ll also soon be enjoying the benets of these additional features:
• Fast, stable Hi-Speed USB 2.0 connection helps improve and maintain high recording quality
• Full-version software with advanced editing, conversion, titling and preview functions adds
transitions, special effects and music
• Compact, lightweight design and easy installation ideal for travel and notebook computers
• Plug and Play; Windows compatible — requires no batteries or external power
• Lifetime Warranty
Minimum Recommended System Requirements
• Hi-Speed USB 2.0-equipped computer with CD-ROM (for software installation)
• 256 MB RAM, 1 GB free HD space, sound card (AC97 compatible), graphics card (DirectX
9.0c compatible) and Pentium 4 (1 GHz) or above
• Windows 2000/XP/Vista operating system
Package Contents
• Hi-Speed USB 2.0 Audio/Video Grabber
• RCA extension cable
• Ulead VideoStudio 9 SE software and driver CDs
• User manual
NOTE: Some of the screen images have been modied to t the format of this manual.
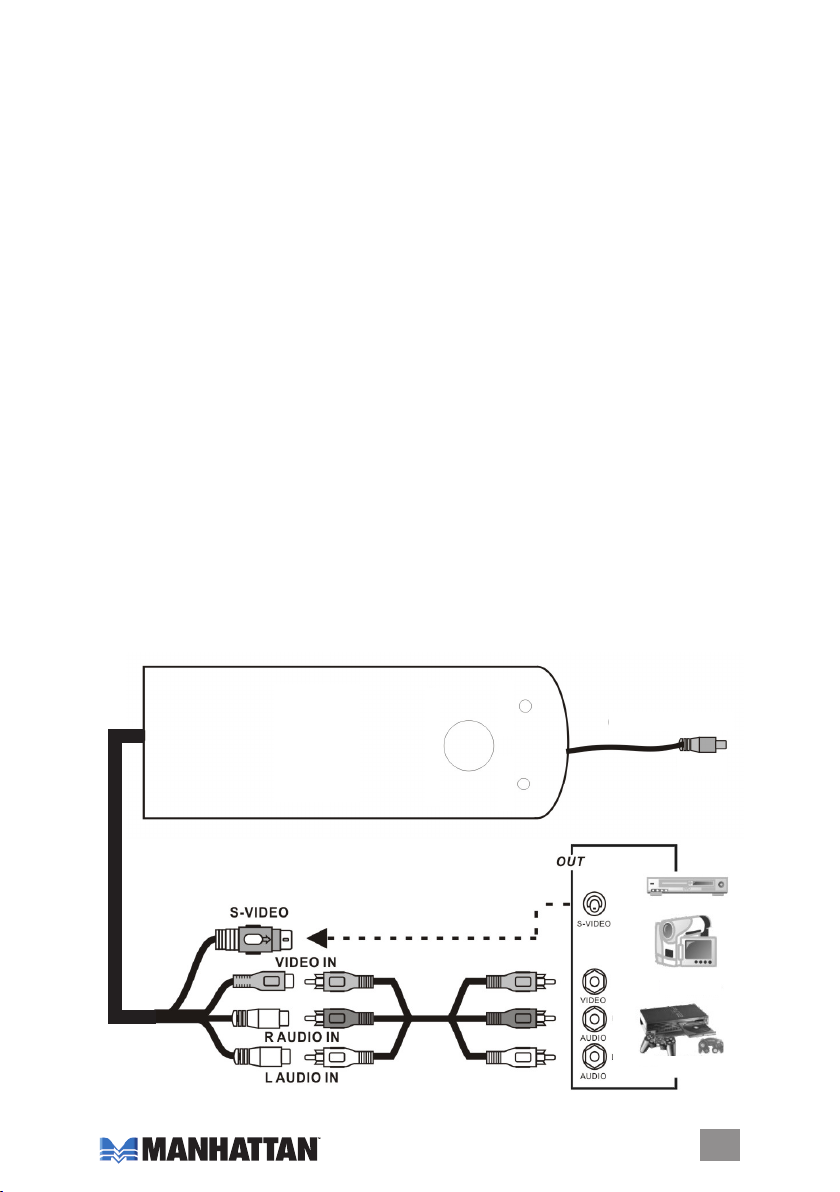
AUDIO/VIDEO
GRABBER
HI-SPEED
USB 2.0
REC or SNAPSHOT
REC POWER
To PC USB 2.0
USB 2.0
VCR
Camcor der
Video G ames
3
Page 4
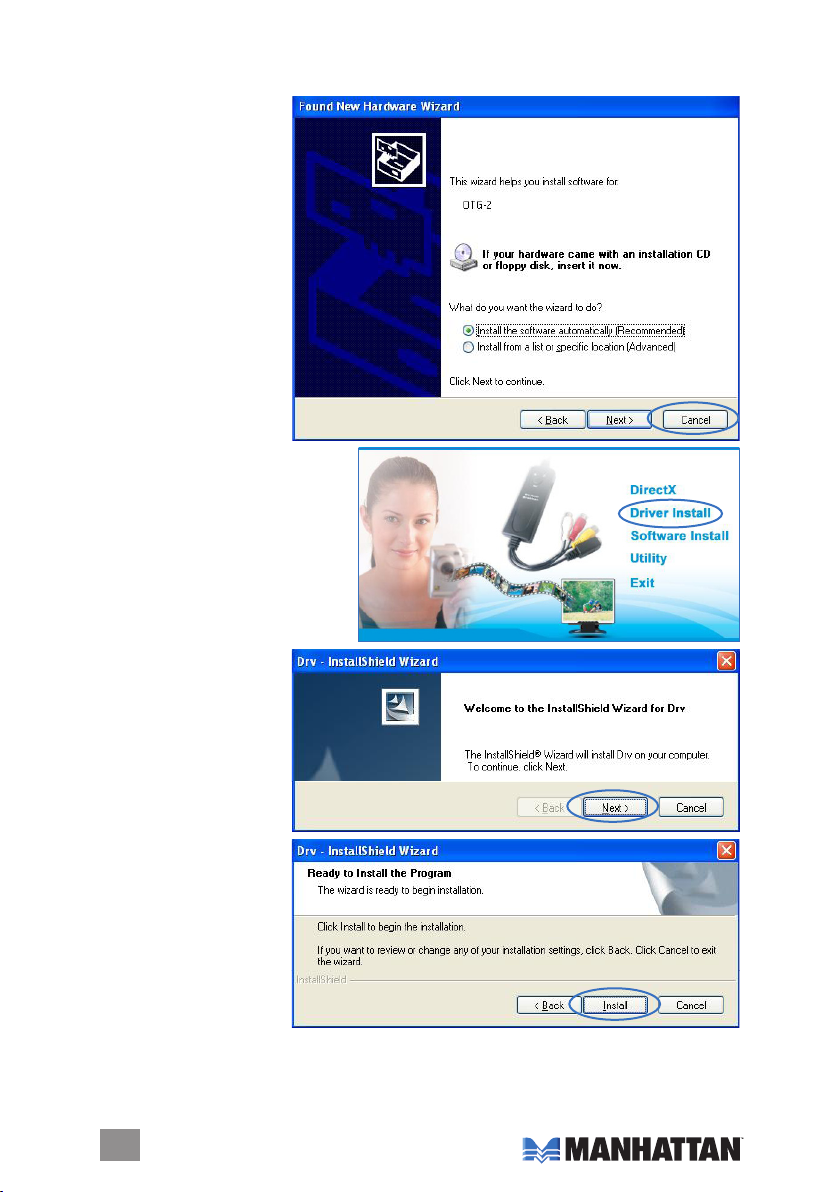
DRIVER INSTALLATION
1. Connect the Hi-Speed
USB 2.0 Audio/Video
Grabber to the computer.
If the device has been
connected properly, the
Found New Hardware
Wizard welcome screen
displays (right). Click
“Cancel.”
2. Insert the enclosed software CD in
the CD- ROM drive to display the
initial menu.
3. Click “Driver Install” (right) or run
Driver\Setup.exe.
4. With the Drv-InstallShield
Wizard welcome screen
displayed, click “Next.”
5. With the Drv-InstallShield
Wizard install screen
displayed, click “Install.”
6. If Software Installation and/or Hardware Installation warning screens appear (referring to the
initial status of Windows testing), click “Continue Anyway” on both screens.
7. Click “Finish” to complete the driver installation.
4
Page 5

APPLICATION INSTALLATION
1. With the main menu screen displayed (as shown in Steps 2 and 3 of Driver Installation on
the previous page), click “Software Install” or run “One Touch Video Capture\Setup.exe” to
install the application.
2. When the Choose Setup Language prompt displays,
select a language from the drop-down menu and
click “OK.”
3. If DirectX 9.0 isn’t installed at this point, an Information
prompt will display. Click “OK” and the system will install
DirectX 9.0 automatically.
4. With DirectX 9.0 installed, a Windows Media Tools Setup screen displays the license
agreement for you to read. Click “Yes” to continue.
5. When the Setup Complete screen displays to indicate that Windows Media Tools installation
is complete, click “OK.”
6. Two Windows
Media Format
9 Series
Runtime Setup
prompts will
display. Click
“Yes” on the rst/welcome prompt
(above right); then click “OK” on the
subsequent “Runtime Setup has
completed” prompt (right).
Set up MS Dire ctX 9.0 rst.
7. When the InstallShield Wizard welcome screen displays, click “Next” to continue with the
installation.
8. The InstallShield
Wizard Choose
Destination Location
screen will display.
Click “Next” to select
the default location
(right) listed in the
Destination Folder
panel; or click
“Browse” for other
options (then click
“Next” after
selecting an
alternate location).
5
Page 6

9. On the Select
Components screen,
highlight the grabber
listed in the selection
eld (as shown at
right) and click “Next.”
10. When the Start
Copying Files
screen displays,
click “Next” to
continue. During
the le-copying
process, a Setup
Status screen
displays to indicate
progress.
11. When the Hardware
Installation warning
prompt displays,
click “Continue
Anyway.”
12. When the Setup
Finished screen
displays to indicate that installation is complete, select “Yes, I want to restart my
computer now” and click “Finish.” The grabber icon (right) will appear on the
desktop.
13. With the installation
complete, conrm the
success of the procedure
by going to the control
panel and selecting
“System,” then ”System
Properties,” then “Device
Manager.” You should see
the drivers listed.
6
Page 7

USER INTERFACE
Minimize
Full screen/window/video desktop
Exit
About
Play
recorded
les
Jump
to last
channel
Jump
to next
channel
Stop Play Pause Fast
reverse
Status window
Fast
forward
Snapshot
Settings
Record
Stop
recording
Setup
Click on the Settings button (top right in the image above) to display the Setup screen. Four
menu tabs on the Setup screen present the setup options: Video, Capture Button, Snapshot
and Record.
7
Page 8

Video
Video Format: Make a selection from the drop-down menu (NTSC or PAL). Normally, the device
will automatically select the proper format.
Input Source: The default setting is “Composite.”
Picture Adjustment (color): Slide the controller left or right as desired; click “Default” to return
the settings to those shown above.
Capture Button (optional
setting)
Option: Select “Snapshot”
(to capture a picture) or
“Capture video” to capture
video les.
Snapshot (optional
setting)
Format: Select “BMP” or
“JPG.”
Save folder: Click “Browse”
to change the destination
location.
Record
Format: Select from among the
eight options listed. The default
setting is “VCD.”
Save folder: Click “Browse” to
change the destination location.
8
Page 9

Mouse Controls/Menu Options
Right-click on the mouse to display a quick-reference menu guide.
Most Top: Positions the TV window at the top of the screen.
Full screen: Enlarges the window to full screen. Double-click on the screen to return to window
mode.
Panel: Displays/hides the One Touch Grabber interface.
Video Input: Select the video source: Video Composite or S-Video. The default is Video
Composite.
Video model: Change the video format to one of the PAL/NTSC/SECAM options.
Record: Record TV programming.
Stop Record: Stop recording. During Play, this option is unavailable (as indicated by gray
display).
About: The model version and copyright information.
Exit: Exit the application.
Record/Playback
The Hi-Speed USB 2.0
Audio/Video Grabber
supports MPEG-1 and
MPEG-2 formats to save
disk space when recording
TV or audio. (See the
reference chart at right.)
Clicking the Snapshot icon
(see Page 7) while viewing
captures the picture and
saves it as a .bmp le.
Clicking the Play Recorded
Files icon (see Page 7)
displays the Open screen
and the destination
location of previously saved les.
To play a recorded le, select it and
double-click or select it and click
“Open.”
Video Audio
bitrate bitrate
Format Resolution (Mbps) (bps) Disk Space
NTSC DVD 720 x 480 6 224 2.6 GB/hr
NTSC SVCD 480 x 480 2.42 224 1 GB/hr
NTSC VCD 320 x 240 1.15 224 600MB/hr
PAL DVD 720 x 576 6 224 2.6 GB/hr
PAL SVCD 480 x 576 2.42 224 1 GB/hr
PAL VCD 352 x 288 1.15 224 600 MB/hr
AVI 352 x 288 224
MPEG-4 352 x 288 224
WMV 352 x 288 1.2 224 Around 650 MB/hr
MP3 224
WMA 224
9
Page 10

SPECIFICATIONS
Standards and Cer tications
• USB 1.1, USB 2.0, NTSC, PAL, FCC, CE
General
• Video system: NTSC, PAL, SECAM (automatic detection)
• Motion capture formats: DVD, SVCD, VCD, MPEG1/2/4, AVI, WMV, WMA, MP3
• Still image formats: JPEG, BMP
• Resolution:
- NTSC, 720 x 480 @ 30 fps
- PAL, 720 x 576 @ 25 fps
• Inputs: S-video, RCA audio and video
• Chipset: Philips 7113
• Ulead VideoStudio 9 SE software included (full version)
• Windows XP/Vista compatible
• Cables:
- USB, 1.1 m (44 in.)
- Audio/video, 7.6 cm (3 in.)
- RCA extension, 1 m (40 in.)
• 9.5 x 3.1 x 1.3 cm (3.75 x 1.25 x 0.5 in.); 73.7 g (2.6 oz.)
10
Page 11

Page 12

MANHATTAN® offers a complete line
of PC Components, Peripherals, Cables and Accessories.
Ask your local computer dealer for more information
or visit us online at
www.manhattan-products.com
All products mentioned are trademarks or registered trademarks of their respective owners.
Copyri ght © MANHATTAN
 Loading...