

Page 1
For up-to-date product information visit us at www.manhattan-digital.net
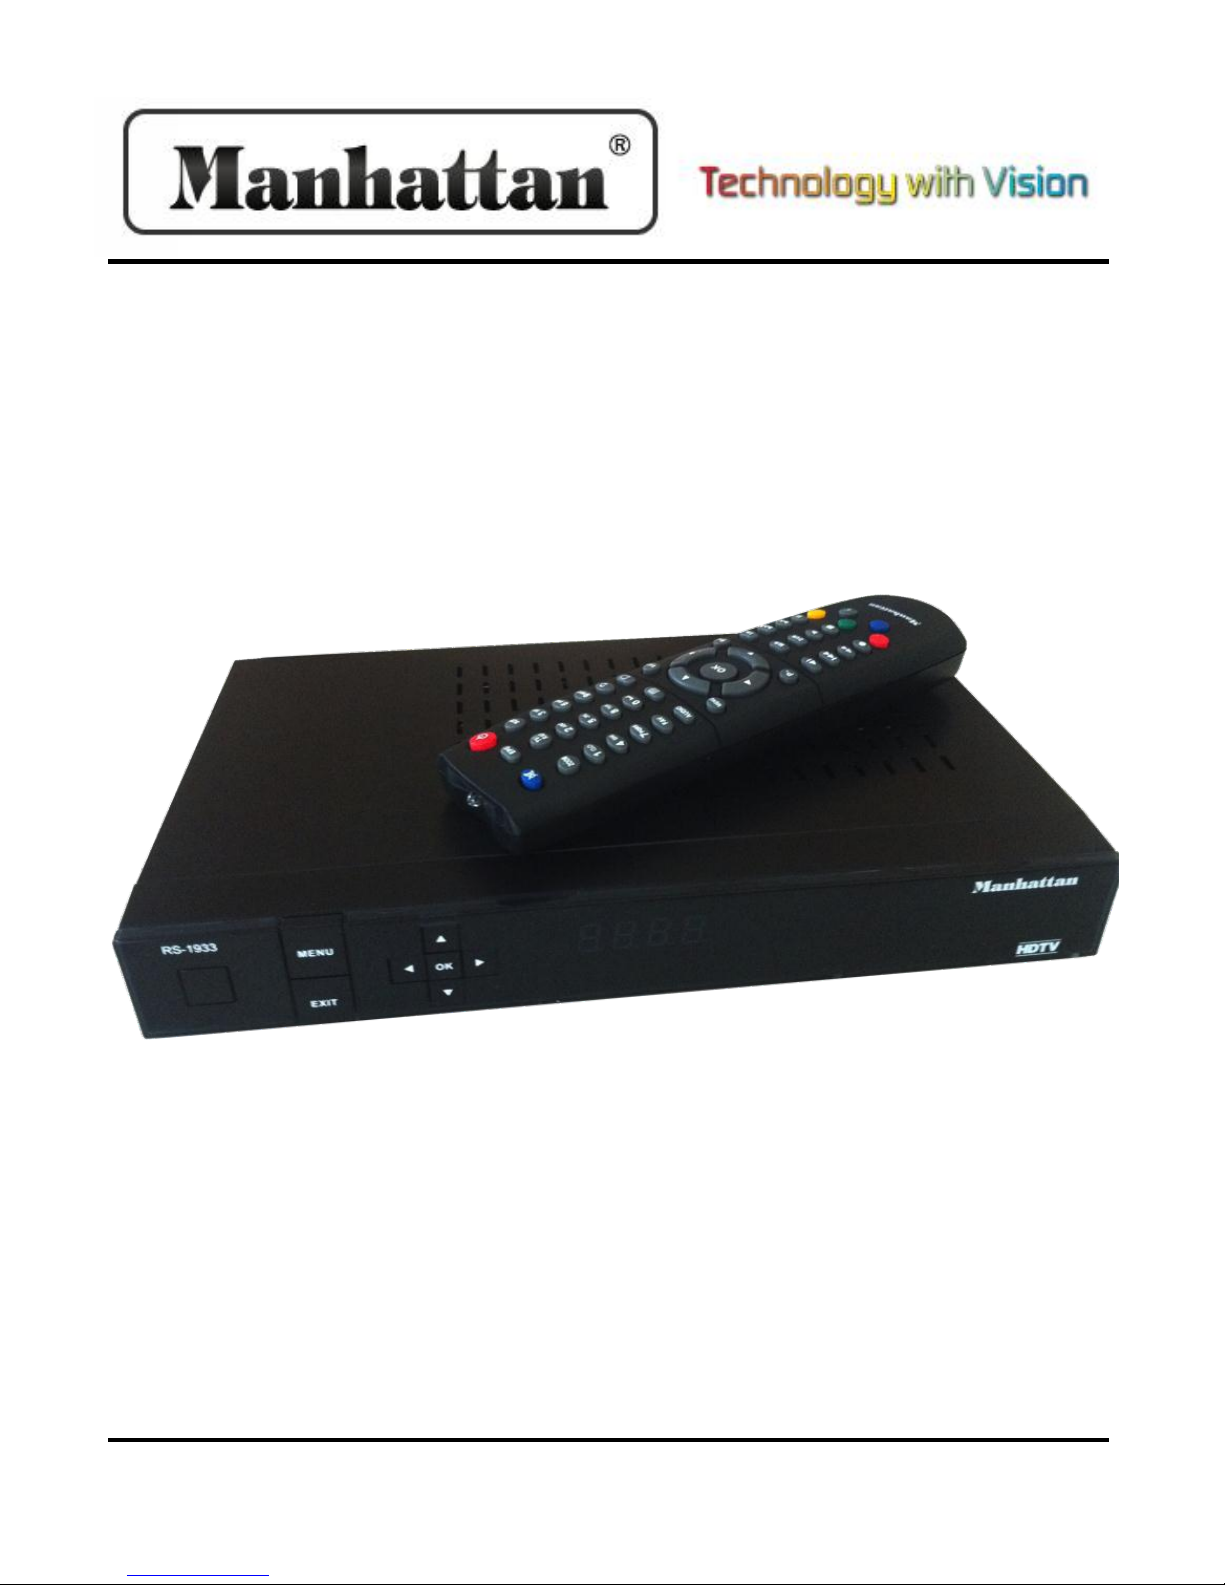
RS-1933 High Definition Set Top Box
User Manual
Version 1.2
Page 2
DANGEROUS
IMPORTANT OPERATING
INSTRUCTIONS
WARNING:
To reduce the risk of electrical shock, do not open the cabinet.
Do not place where contact with water or immersion is possible. Avoid
exposure to moisture.
Do not place near fire or open flames. Avoid exposure to excessive heat.
Slots and openings in the cabinet are provided for ventilation. Do not
block these openings.
The unit should be connected only to the required power supply, as
described in instructions or as marked on the unit. If not sure, contact
your local dealer or power company.
Contact your local dealer for technical service if opening is required.
NOTE:
To ensure proper use, read this manual carefully and retain for further
reference.
Power off the unit when cleaning. You may clean the cabinet, panel, and
remote control with a soft cloth lightly moistened with mild detergent
solution. Allow to dry before powering on.
I RS-1933 User Manual
Page 3

Technical Specifications
Audio
MPEG-1 Layers 1,11,11
MPEG-2 Layer 2
MPEG-2 AAC LC and LC and AAC+
MPEG-4 AAC L@ 2-Channels / 5.1 Channel MPEG-4
AAC+SBR 2-Channel
Mono, dual Mono, Stereo, Joint Stereo
Dolby digital ACS-3 through SPDIF Coaxial output
Video
MPEG-1 (SD)
MPEG-2 MP@ML (SD) and MP@HL (HD)
MPEG-4p 10 (H.264) MP@L3 (SD) and MP@L4.1
Video Format 4.3, 16.9, with Pan Scan Letterbox
Up-scaling of SD video on HD output
Down-scaled HD video on SD output
Supported Resolutions: 1080i /720p /480p /576p
/480i /576i
Front Panel
8 Button Keys
4 digit Seven Segment Display
Rear Panel
IF in loop through
1 x HDMI with HDCP
1 x Coaxial SPIDF
1 x USB 2.0 port
1 x PCMCIA Interface Slot
Power on/off switch
Accessories
Handset with batteries
TV Reception
DVBS2 Tuner, Single HDTV Decoder with CI
System Resources
ALi 3602 Chipset
2 MByte Flash Memory
5000 C/Ku channel format
NTSC composite output
64 satellites and 8 favorite groups settings
Recall last channel
16 Day EPG
8 event timers. Count-down timer
Update firmware through USB port
Language support: English, French, German,
Russian, Arabic, Portuguese, Turkish, Spanish,
Polish, and Italian
Dolby ASC-3 through Co-axial SPDIF port
Teletext up to 800 pages
OSD Transparency, 10-40%
Video resolution switch on remote
User can change Background graphics
Wake-up Channel Default by user
DiSEqC 1.0 – off, 1/2-2/2, ¼-4/4
DiSEqC 1.2, Positioner. Satellite selectable with
limits
DiSEqC 1.3 Support USAL for dish satellite
programming
Polarization H/V Auto
DVB-S Auto Scan @ 50 TP/S
Signal strength and quality level support
IF loop-through for multiple receivers
DVR Function;
Through USB port
Up to 2.0 TB hard disk capability. Will separate files
after 1 TB
Identifies program, music, and JPEG files
independently
Identifies free space, record time and size
Time record. Can record in a set time
Can set FF & RW times in 30s, 1m, 5m, 10m
Play, pause, and stop function with jump selection
User can lock, delete, or rename recorded files
Browse records and preview files
User can sort by date and time
Hard Drive not included
Specifications
RS-1933 User Manual II
Page 4
1. Getting Started
Contents
1
1
Contents
4
4
6
7
7
9
10
10
10
11
12
12
13
5. System Setup
14
14
14
14
15
15
16
16
17
17
18
18
18
18
18
18
19
22
22
22
22
22
23
23
24
26
1. Front panel
2. Remote Controller
3. Connecting
2. Basic Operations
1. Turning on
2. Power
3. Channel Up/Down
4. Volume Up/Down
5. Number Keys
6. Mute
7. Pause
8. Recall
9. Favorite
10. Audio
11. Information
12. EPG
13. TV/Radio
14. Channel List
15. Sleep
16. Page Up/Down
17. Text
18. Subtitle
19. Resolution
20. Menu
21. Size
22. Exit
3. Menu Operations
1. Menu
2. Edit Channel
2.1 TV Channel List
2.2 -Favorite
2.3 -Lock
2.4 -Skip
2.5 -Move
2.6 -Edit
3. Radio Channel List
4. Delete All
4. Installation
1. Installation
2. Antenna Connection
3. Satellite List
4. Antenna Setup
5. Satellite Search
6. Multi-Satellite Search
7. TP List
III RS-1933 User Manual
10
1. System Setup
1
4
4
4
4
4
4
4
4
4
5
5
6
6
6
6
6
6
6
6
6
2. Language
3. TV System
4. Local Time Setting
5. Timer Setting
6. Parental Lock
7. OSD Setting
8. Favorite
9. Other
6. Tools
1. Tools
2. Information
3. Factory Setting
4. Upgrade By USB
5. Common Interface
6. USB
7. REC
1. REC
2. Record Manager
3. Storage Information
4. HDD Format
5. DVR Configuration
6. Jump
8. Tips
9. Warranty
7
7
7
7
8
8
8
9
Page 5
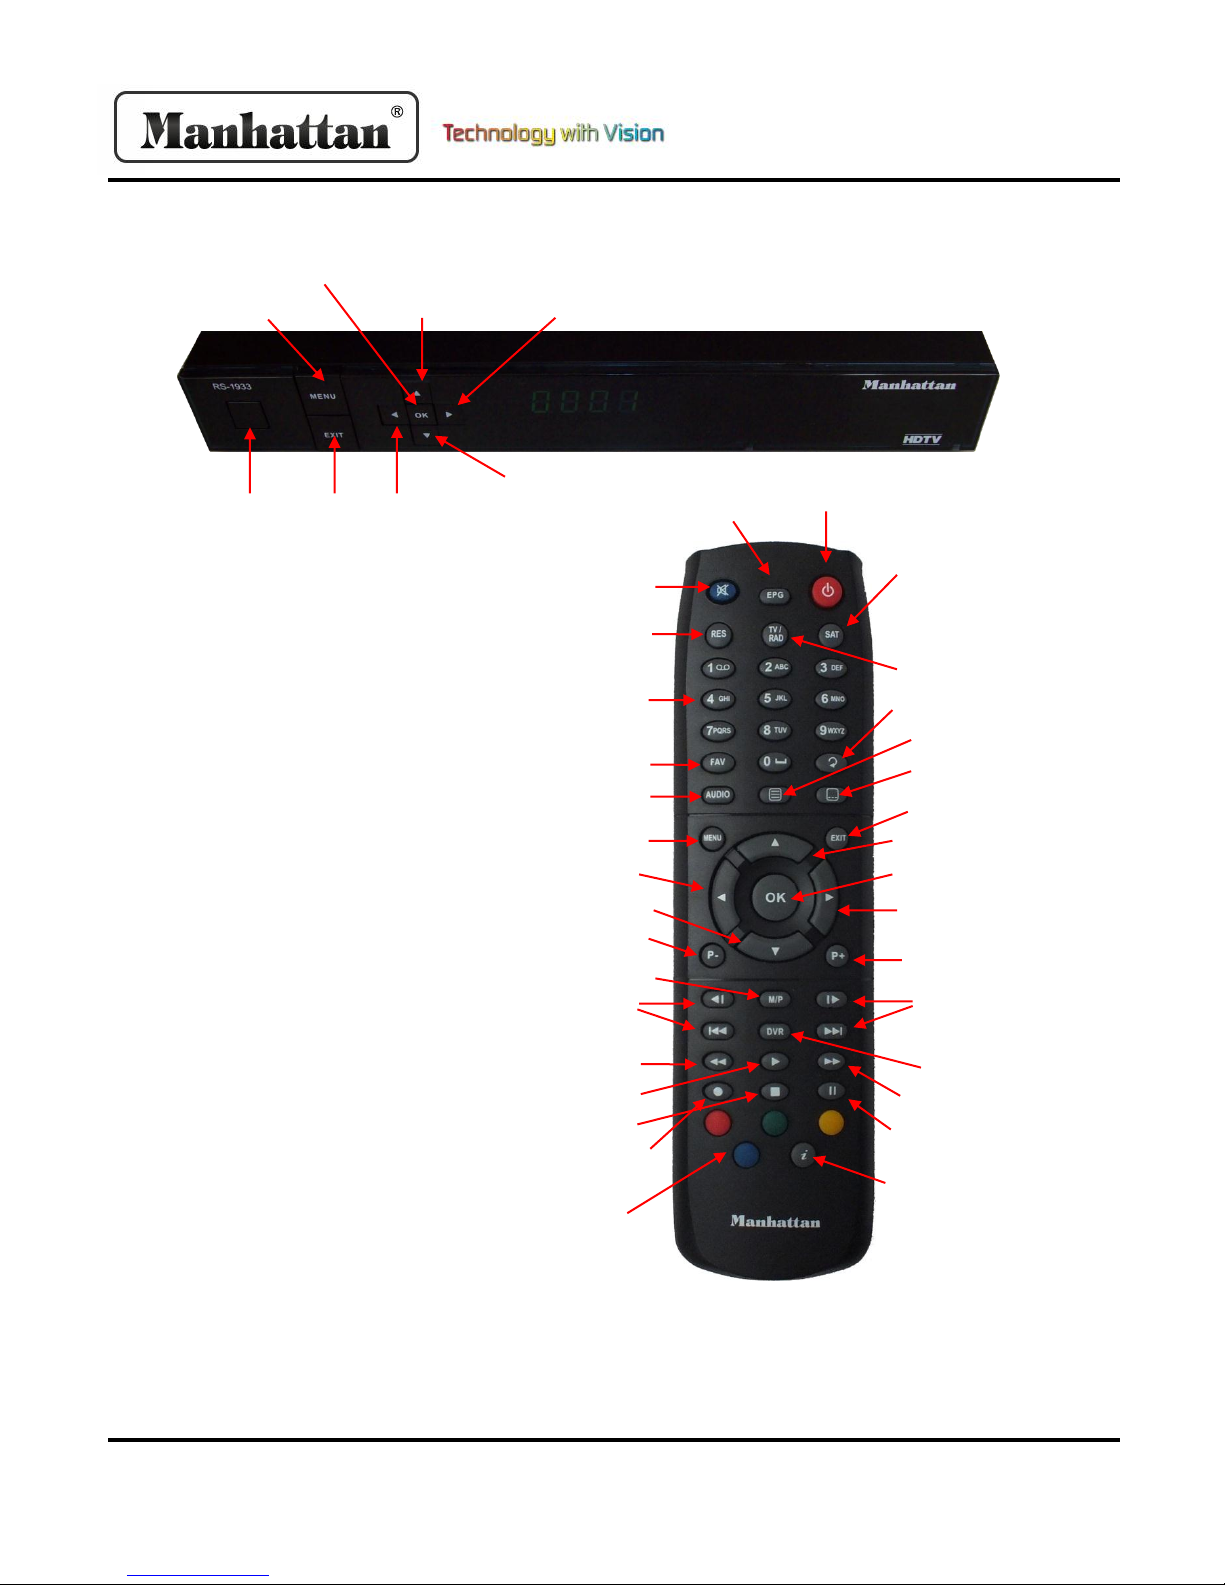
Power
Mute
Resolution
EPG
Satellite
Favorite
Audio
TV/Radio
Recall
Page Down
Page Up
Menu
Exit
Up/Channel Up
Right/Volume Up
Number Keys
Multi Picture
Skip Forward
Pause
Skip Back
Down/Channel Down
Record
Information
DVR
Left/ Volume Down
Fast Forward
Stop
Play
Rewind
Color Keys
Power
OK/Select
Exit
1. Front Panel
2. Remote Control
Up/Channel Up
Left/Volume Down
Down/Channel Down
Right/Volume Up
OK/Select
Getting Started
Text
Subtitle
RS-1933 User Manual 1
Page 6
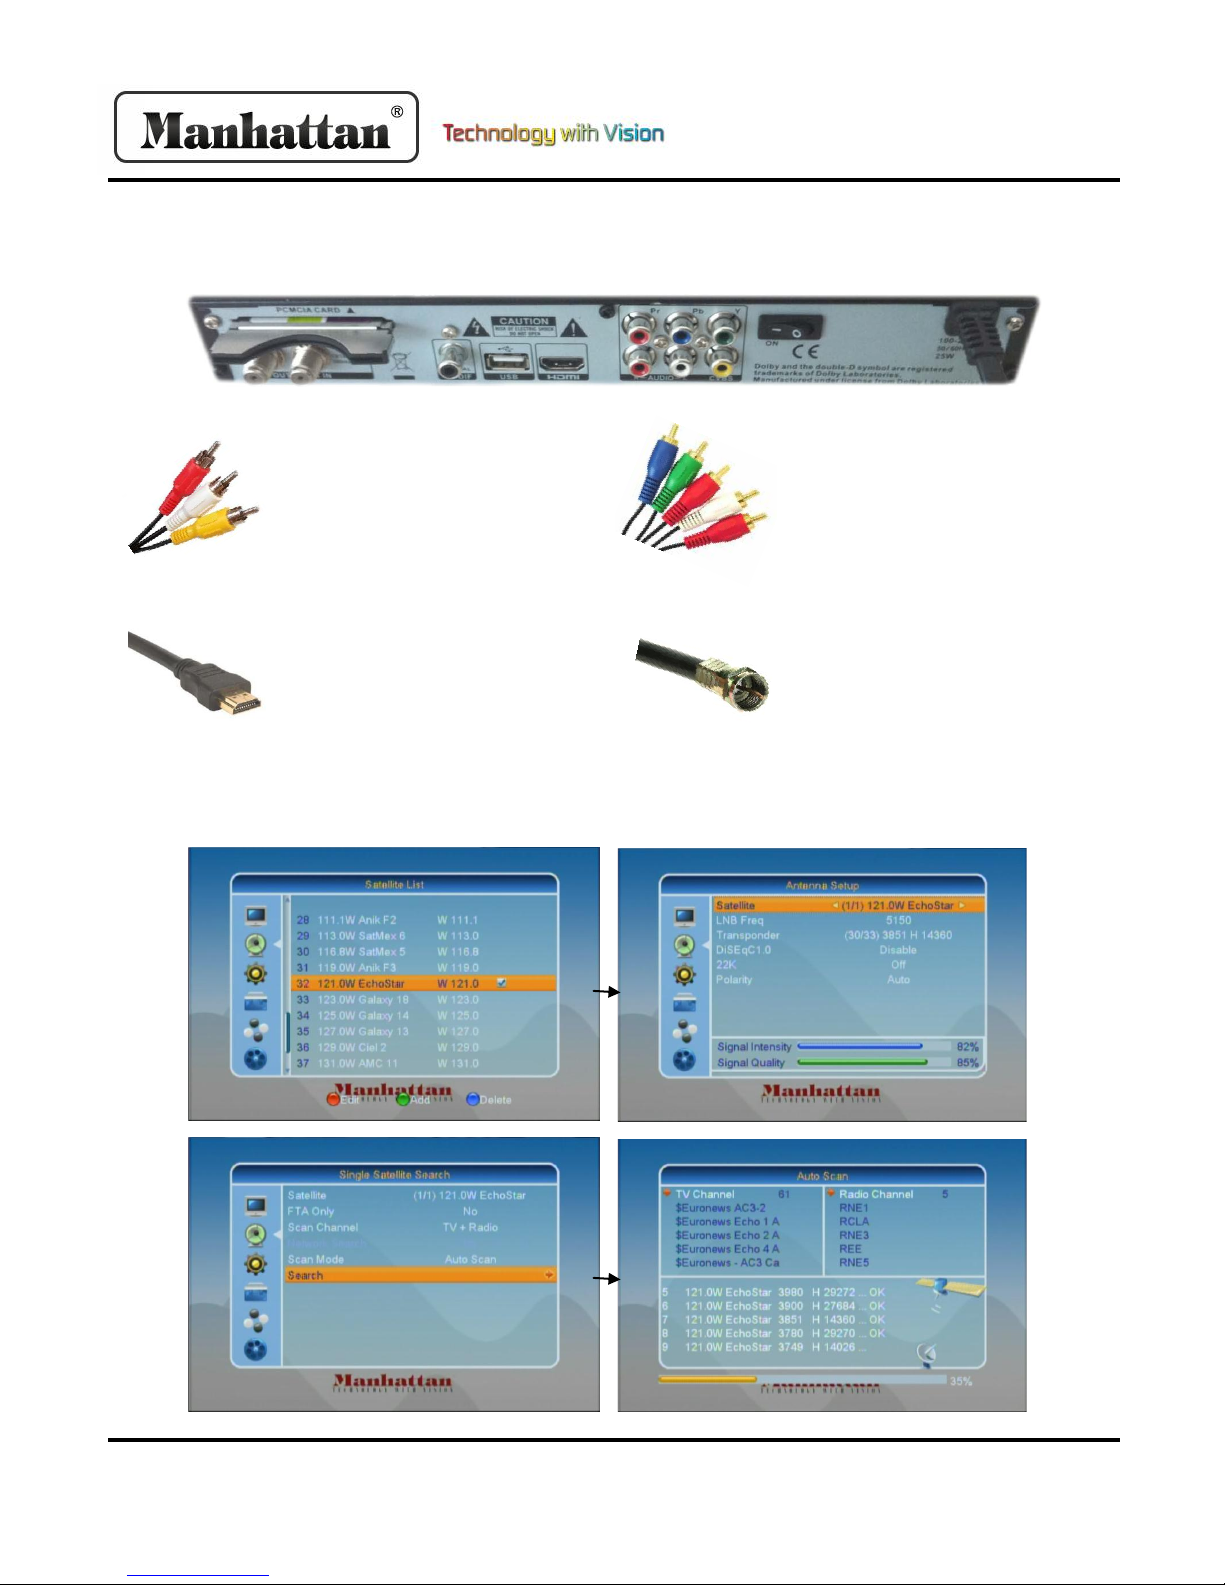
3. Connecting
If your TV is standard definition and
does not have component input,
please use a 3 lines cable (red, white,
yellow) to connect to your STB’s CVBS,
left and right analog audio port, as well
as to your TV’s corresponding ports.
If your TV is standard or high definition
and has component input ports, you
can connect your STB to your TV with a
5 lines cable (red, green, blue/ red,
white)
If your TV is high definition and has a
HDMI input port, connect your STB to
your TV with an HDMI cable. This
allows for maximum resolution to be
displayed on your television.
Connect your satellite antenna cable
to your STB’s ‘SAT IN’ port. Then, turn
on your TV and select the appropriate
input on your television.
Turn on your STB power, select a satellite in the “Satellite List” menu, and then enter the antenna setup to
configure exact parameters of this antenna. Select “Single Satellite Search”, then “Auto Scan” to search programs.
Getting Started
2 RS-1933 User Manual
Page 7
Getting Started
that you will be using on your system, and uncheck anything that may be checked but not used. While there may be over
3. Connecting Cont.
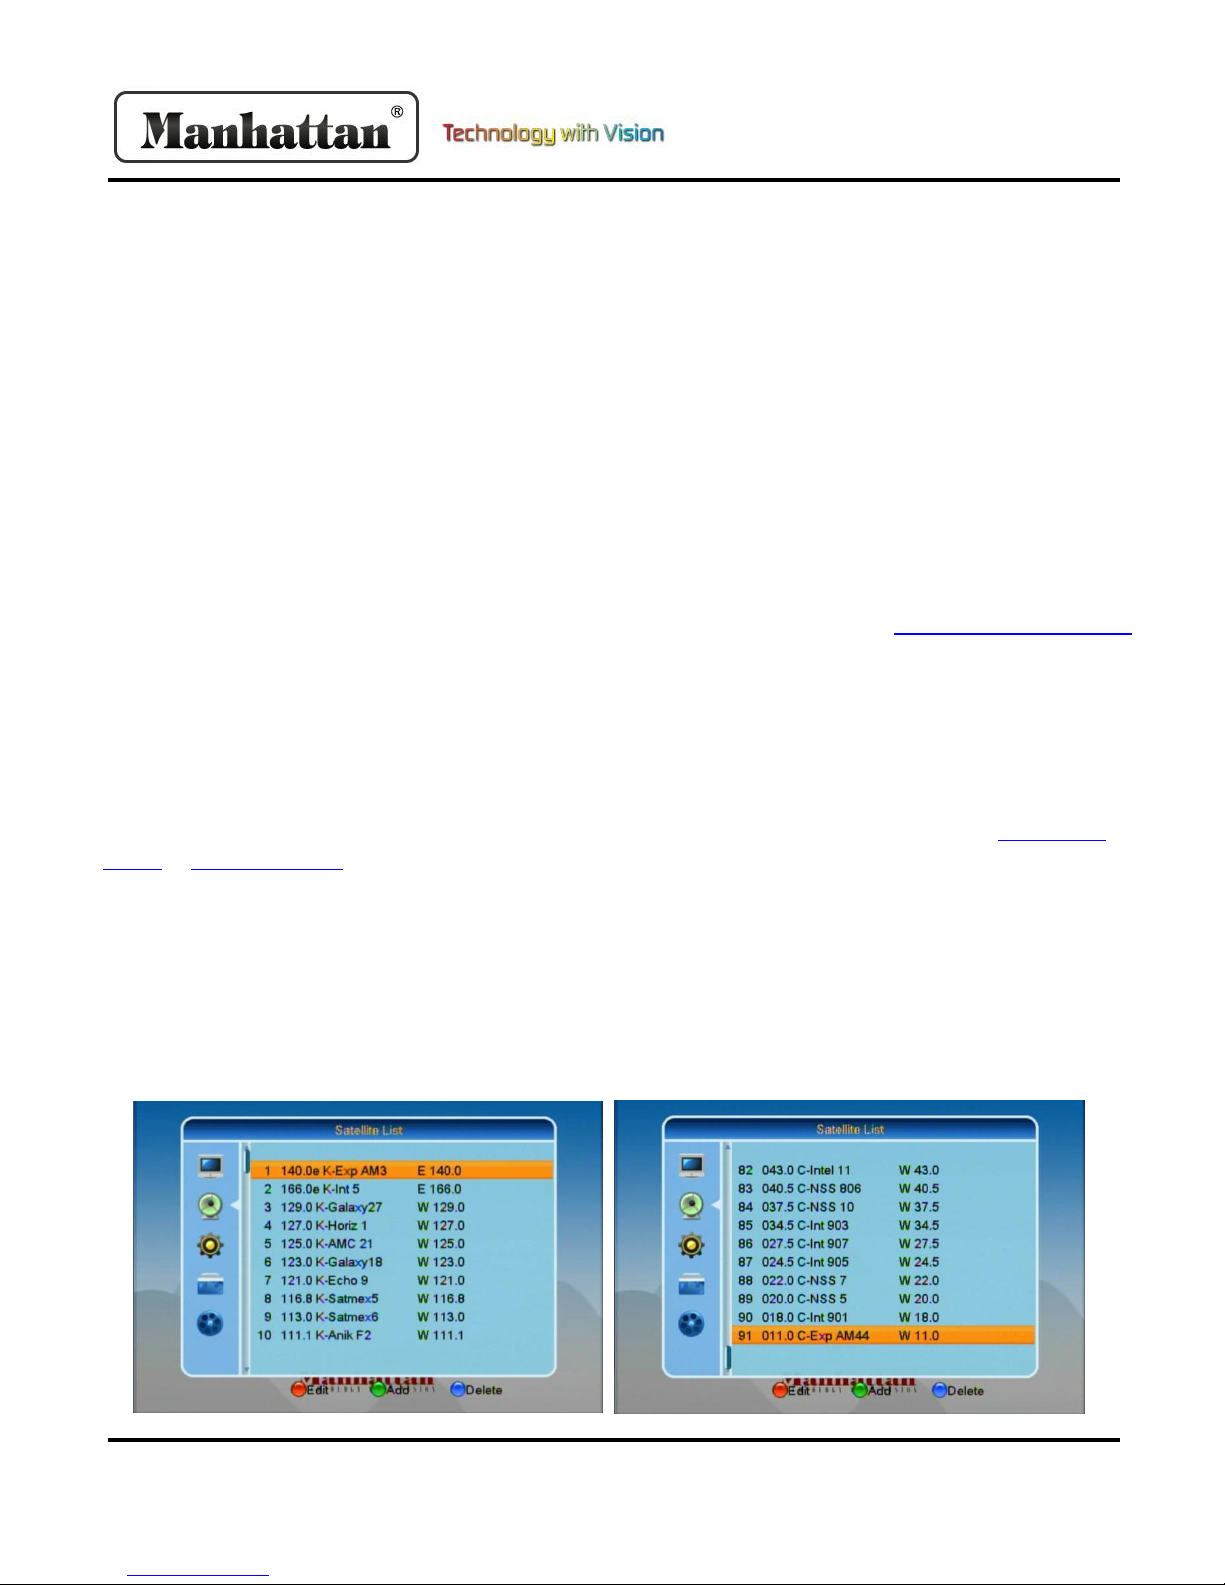
The Manhattan RS-1933 receiver has a capacity for up to 100 satellites in memory. Standard factory settings include
over 90 satellites on both C and Ku-band, from 128 East to 1 West longitude. This allows North American users on both
the Pacific (Alaska and Hawaii) and Atlantic (Canada’s Maritimes) coasts to use the same memory configuration. This
standard setup lists satellites from West to East, Ku-band followed by C-band. A few selected transponders are included
with each satellite to allow you to get started. A few channels from popular satellites are also included, but you must do
a scan to create full channel lists once you connect your system. Go into the receiver Menus and check the satellites
90 satellites in the receiver memory, only those satellites that have been selected and actually have at least one channel
scanned or inputted into the memory in advance will appear when you press the LIST button.
Those using an IRD receiver such as a 4DTV may prefer to have satellites listed in order, but with C and Ku-band from
an orbital location listed next to each other. You can go to the Manhattan-Digital website at www.manhattan-digital.net
and visit our SUPPORT section to obtain a factory download file in the MIX format, which alternates C and Ku listings in
this manner. Such a download can be transferred to a USB memory stick to update your receiver.
Whichever method that you use, once it is installed, you have several choices on how to scan for active satellite
channels. One can do an AUTO SCAN, which searches all frequencies on each polarity, then creates a channel list. Auto
Scan can be quite time consuming and sometimes less than accurate unless a system is perfectly aligned. Alternatives
include the manual entry of additional Transponder information from references on the Internet such as www.global-
cm.net or www.lyngsat.com and others. You can then use the Preset Scan mode to more quickly scan for signals. An
Auto Scan attempted AFTER first doing a Preset Scan should be faster, since the Preset Scan has already found a number
of transponders. All of this scanning does take time, and if you would like another alternative to reduce the effort
needed to create a channel list, there is the availability of Preloaded Memory Updates, sold by select Manhattan-Digital
dealers. Such an update would normally include a consecutive listing of ALL known transponders containing FTA
channels, allowing you to immediately do a Preset Scan on each polarity after loading this update into the receiver. Such
updates are done on a frequent basis to keep the database up-to-date. Please contact Manhattan-Digital by Email at the
contacts listed on the website if you would like the name of a dealer that can provide this service.
RS-1933 User Manual 3
Page 8
Basic Operations
1. Turning On
In full screen, press the [Up/Down] buttons to switch
In full screen, press the [Left/Right] buttons to adjust
In full screen, use the [Number] keys on your remote
show up on screen. Press the button again to restore
picture will be paused. The sound on the channel will
8. Recall
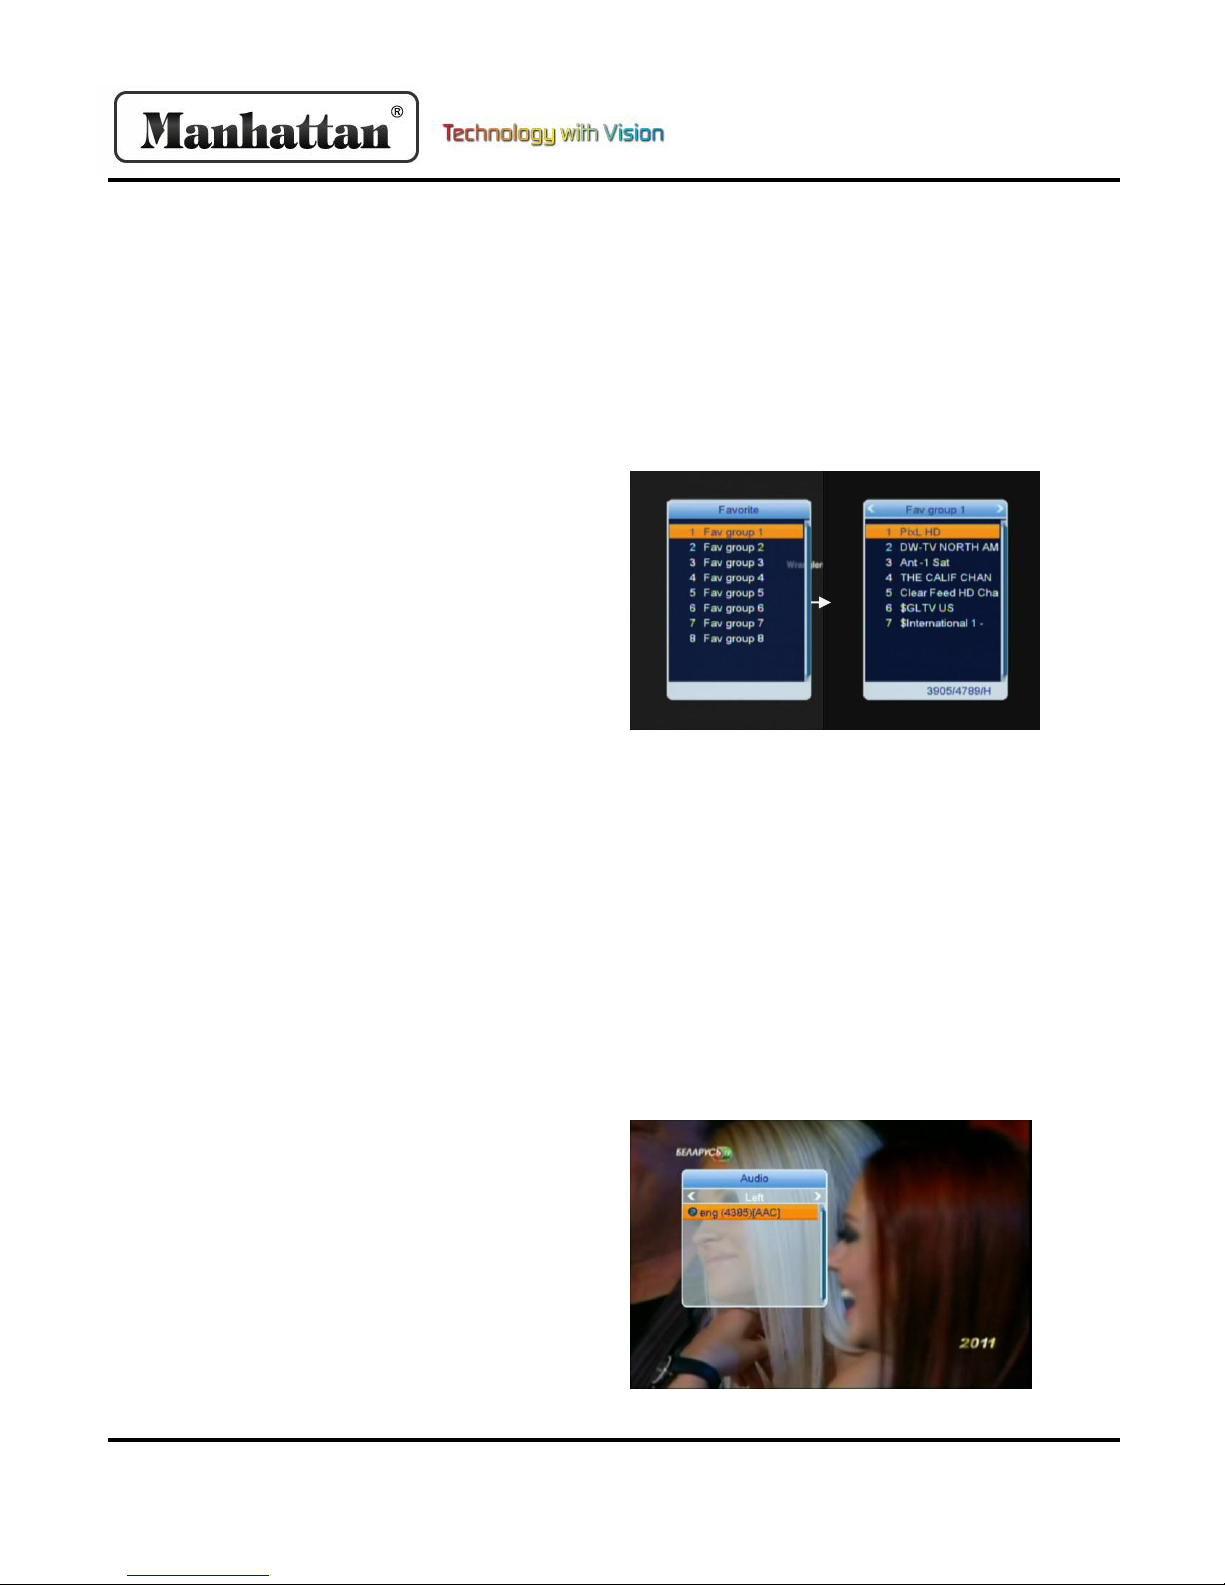
9. Favorite
group. Press [Left] to select a different group. Hit the
10. Audio
First, turn on the main power by flipping the switch
on the back of the device to the ‘on’ position. When
the device is first used, it will either display no
channels, or the first channel from the default
channel list. If the STB has been set up previously, it
will display the last channel before turning off.
2. Power
When the power is switched ‘on’ on the back of the
STB, pressing the power buttons on the front panel
and remote control will enter standby mode. In
standby, pressing the power button will call back the
unit and play the previous channel. Disconnecting
the unit will end the standby state.
3. Channel Up/Down
between channels.
4. Volume Up/Down
the volume. This controls the volume output of the
STB.
5. Number Keys
Pressing the [Recall] button will switch to the
previous channel you played.
In full screen, pressing the [Favorite] key will display
a favorite window on the left side of your screen. If
you have not set any favorite channels, your screen
will display no favorite channels.
In the favorite window, you can move up and down
and select a group by using [Up/Down] keys and
pressing the [OK] button. Once you select a group,
you can scroll through the favorite channels in that
[Exit] button to return to full screen. Setting up
favorite channels is discussed further.
control to input channel number and press the [OK]
button to switch.
6. Mute
Press the [Mute] button to mute the sound on it will
the sound.
7. Pause
In full screen, press the [Pause] button, and the
continue. Pressing the [Pause] button again will
resume to the current playing picture.
4 RS-1933 User Manual
In full screen, pressing the [Audio] button will open
the audio menu. You can modify the audio track by
pressing [Up/Down] and the audio mode by pressing
[Left/Right]
Mode: Left, Right, Stereo, Mono
Page 9
Basic Operations
11. Information
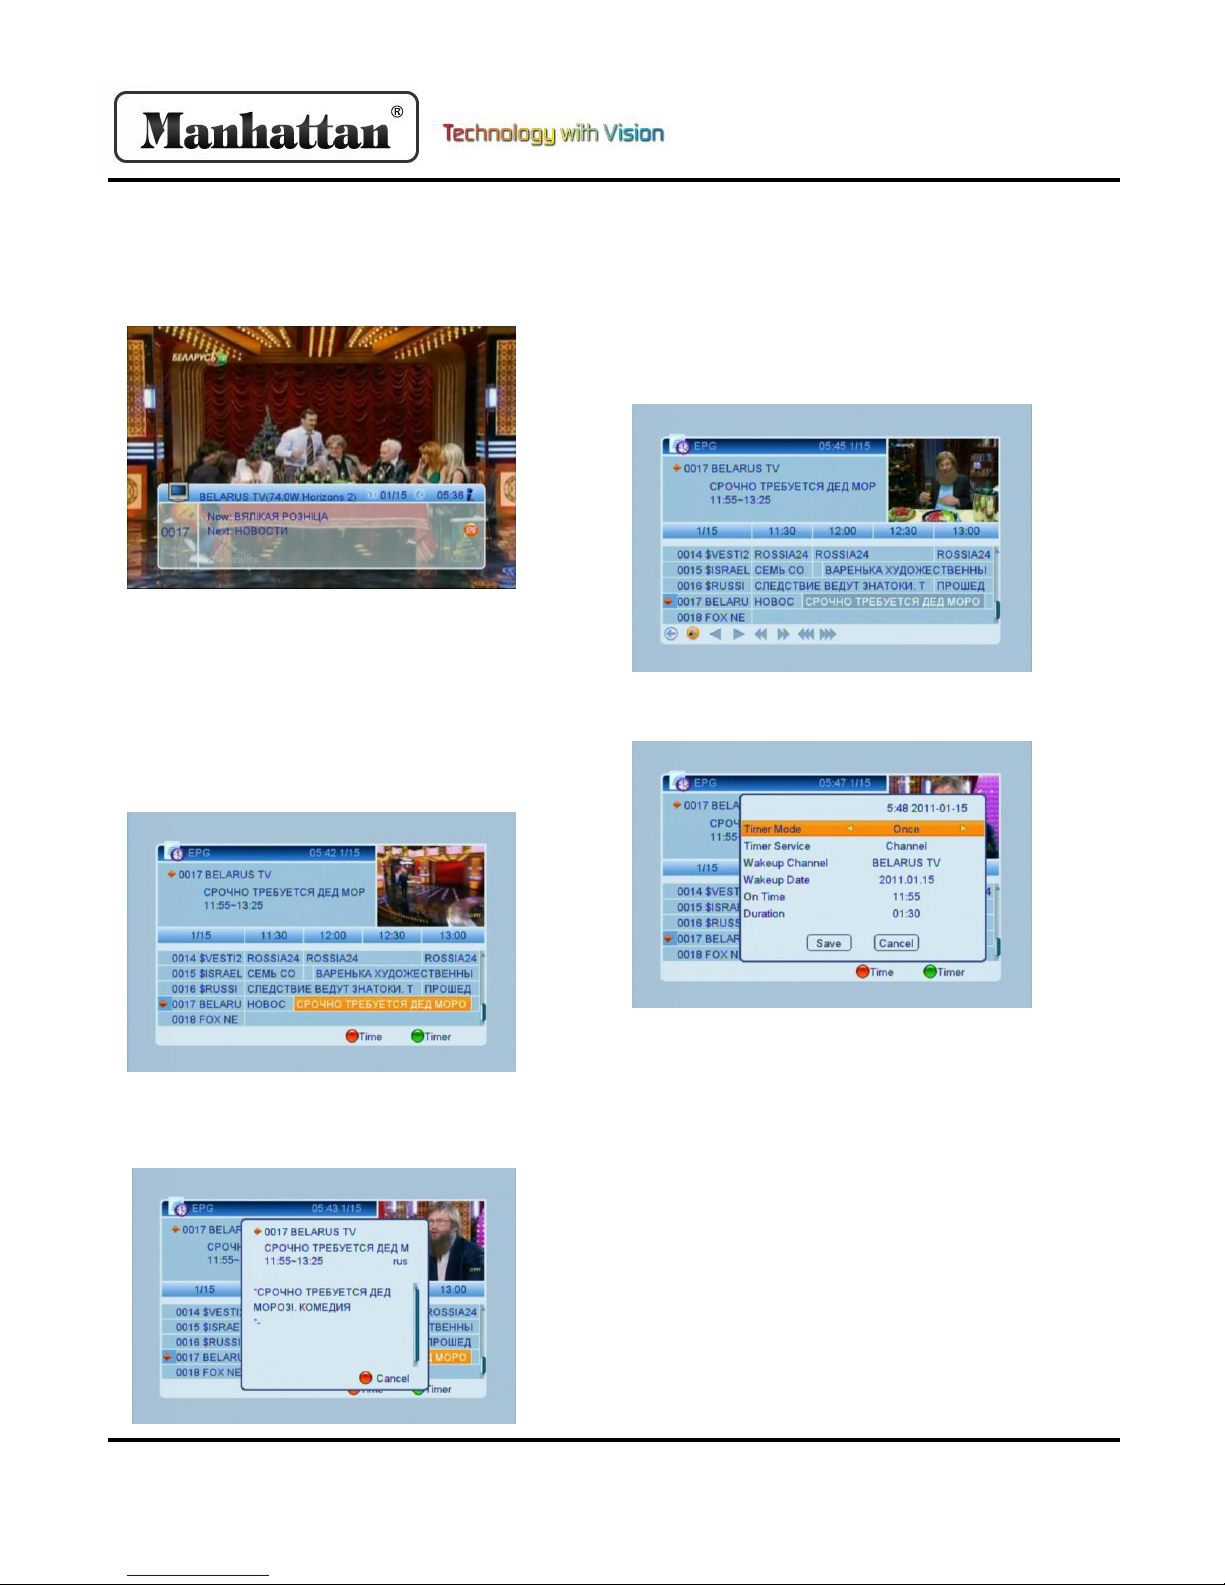
12. EPG
listings and starting and ending times for all available
12. EPG Cont.
[Left/Right] to select back/current time/last program
just a few channels here, including RUSSIA TODAY on
In full screen, pressing the [Info] key will open the
information window. The window displays
parameters of current channel.
The EPG (Electronic Program guide) helps you
navigate channels through all the possible viewing
options. It supplies information such as channel
channels. Press the [EPG] key to display [EPG]
screen.
Pressing the [Red] button in the EPG menu will
display the “Time Bar Menu”. You can press
or -0:30/next program or +0:30/2:00/+2:00/last
day/next day. Press [Up/Down] to change channel.
Pressing the [Green] key in EPG menu will open
timer menu. User can set time as desired.
Pressing the [OK] button in each item will display
more detailed information. Press the red button to
cancel.
In EPG Menu, press [Exit] to close screen.
Note: EPG will function only when the programmer
of the channel that you are viewing provides and
supports the guide with information. EPG use is very
common outside of North America, but is limited to
Ku-band satellite Galaxy 19 at 97 West.
RS-1933 User Manual 5
Page 10

Basic Operations
the channel list. Press the [Left/Right] keys to change
channel. If the channel has no teletext information, it
20. Menu
Pressing the [Menu] key will open the menu, exit the
13. TV/Radio
In TV mode, pressing the [TV/Radio] button will
switch to radio. In radio mode, pressing the button
again will bring you back to TV mode.
14. Channel List
In full screen, pressing the [OK] button will bring up
satellite. Press [Up/Down] keys to highlight and
select channel by pressing the [OK] button.
15. Sleep
This function can set sleep timer. When you set a
sleep timer and the time arrives, the system will
enter standby automatically. You can set the sleep
timer between off and 10/30/60/90/120 minutes.
16. Page Up/ Down
In “Channel List”, the [Page Up] and [Page Down]
keys will skip pages in the list. In full screen, it will
change the satellite directly.
current menu to last menu, or close the window.
21. Satellite
Press the [Sat] key to select the Satellite
22. Exit
Press the [Exit] key to return to the previous menu
or close window.
17. Text
Press the [Text] key to open the teletext page on a
will display no teletext data on the screen.
18. Subtitle
Press the [Subtitle] key in full screen to switch
subtitles on/off.
19. Resolution
Press the [Res] key in full screen to show the current
video output resolution. Press this key again to
switch between video output resolution by the
sequence 576i > 480i > 576p > 480p > 720p_50 >
720p_60 > 1080i_25 > 1080i_30
6 RS-1933 User Manual
Page 11

Menu Operations
1. Menu
among: “TV Channel, Radio Channel, and Delete All”.
2.1. Cont.
implement corresponding functions in Channel List.
When you press the [Menu] key, it will enter the
menu screen like shown below.
Use the [Up/Down] keys to switch between the
menu pages “Edit Channel, Installation, System
Setup, Tools, and Game, and Record”. Press [OK] or
[Right] to enter “Edit Channel”. If menu lock is on, it
will display a dialogue for the user to key in
password. The default password is “0000”.
2. Edit Channel
Press the [Up/Down] keys to select menu items
Press [Left] or [Exit] key to go back to main menu.
2.1. TV Channel List
When you enter the “Channel List” menu, it will
display like below.
You can press [Page Up/Down] to implement the
page up and down function. Use [Left/Right] keys to
switch “Program Group” You can press [Menu] or
[Exit] to go back to “Channel Edit” menu. Color Keys
2.2. Favorite
Pressing the [Favorite] key, then [OK] will open up
the favorite menu like shown below.
You can highlight between 8 favorite groups by
pressing [Up/Down] and [OK] to make a favorite
mark on the left side of selected Favorite group.
Pressing [OK] again on a marked Favorite group will
remove the mark. After marking, press [Exit] to
return to Channel List and a favorite mark will show
beside the channel.
2.3. Lock
You can move the highlight using [Up/Down] and
[OK] to preview current program in side preview
window.
RS-1933 User Manual 7
Pressing the [Red] key will enter lock mode.
Page 12

Menu Operations
2.5. Cont.
alphabetical order, Free/Scramble: Free channels will
2.3. Cont.
Use [Up/Down] to move the highlight, and select
channel with [OK]. A dialogue will display to enter
password. The default password is “0000”. If you
input the correct password a lock will appear beside
the channel. After you save and exit the menu, you
will be requested to input password when watching
a locked channel.
2.4. Skip
Pressing the [Green] key will enter “Skip” mode.
This will allow you to move selected channel to
desired position. Press [OK] key to confirm your
decision.
2.6. Edit
Pressing the [Blue] key will open “Edit” menu.
Pressing [Exit] will exit the “Edit Channel” menu.
Sort:
You can move the highlight using [Up/Down] and
[OK] to make a skip mark on the right side of the
channel. After you save and exit the menu, the
channel will be skipped when change channels in full
screen.
2.5. Move
Pressing the [Yellow] key will enter “Move” mode.
Pressing the [Red] key will open the sort window
like above. There are 4 different ways to sort;
Name(A-Z): Alphabetical order, Name(Z-A): Reverse
appear in the front or sequence and scrambled at
the rear, and Lock: Accumulated locked channels in
the last of TV Channel List.
Edit:
In the “Edit Channel” menu, press the [Green] key,
then use [Up/Down] to move highlight and press
[OK] to open rename window. It shows like below.
Use [Up/Down] to move the highlight and [OK] to
select a channel and make a moving mark.
8 RS-1933 User Manual
Page 13

Menu Operations
4. Delete All
4. Cont.
be deleted. If you select “No”, or press the [Exit] key,
2.6. Cont.
Pressing the [Red] key will switch capitals on. The
[Green] key can delete the character on the cursor.
The [Yellow] key will save the operation, and the
[Blue] key will cancel the operation.
Delete:
Press the [Blue] key, move the highlight with the
[Up/Down] keys, and select with [OK] to make a
delete mark on the side of selected channel. After
you save and exit the “Edit Channel” menu, the
marked channel will be deleted.
3. Radio Channel List
The operation of the “Radio Channel List” is basically
the same as the “TV Channel List”, with one point
different; Radio has no video information, so it will
always display the logo on the upper right preview
window.
The warning message will inquire you to delete all
channels or not. If you select “Yes”, all channels will
you can exit the function without saving.
Press the [OK] key, and it will show a warning
message like shown below.
RS-1933 User Manual 9
Page 14

Installation
1. Installation
3. Cont.
Use [Up/Down] keys from the menu and select
“Installation” with the [OK] or [Right] key. If menu
lock is on, it will display a dialogue for the user to
enter password. The default password is “0000”.
Press the [Red] key and you will enter the “Edit
Satellite” menu. You can edit the satellite name and
longitude.
Use [Up/Down] to select menu items and the left or
exit key to return to the main menu.
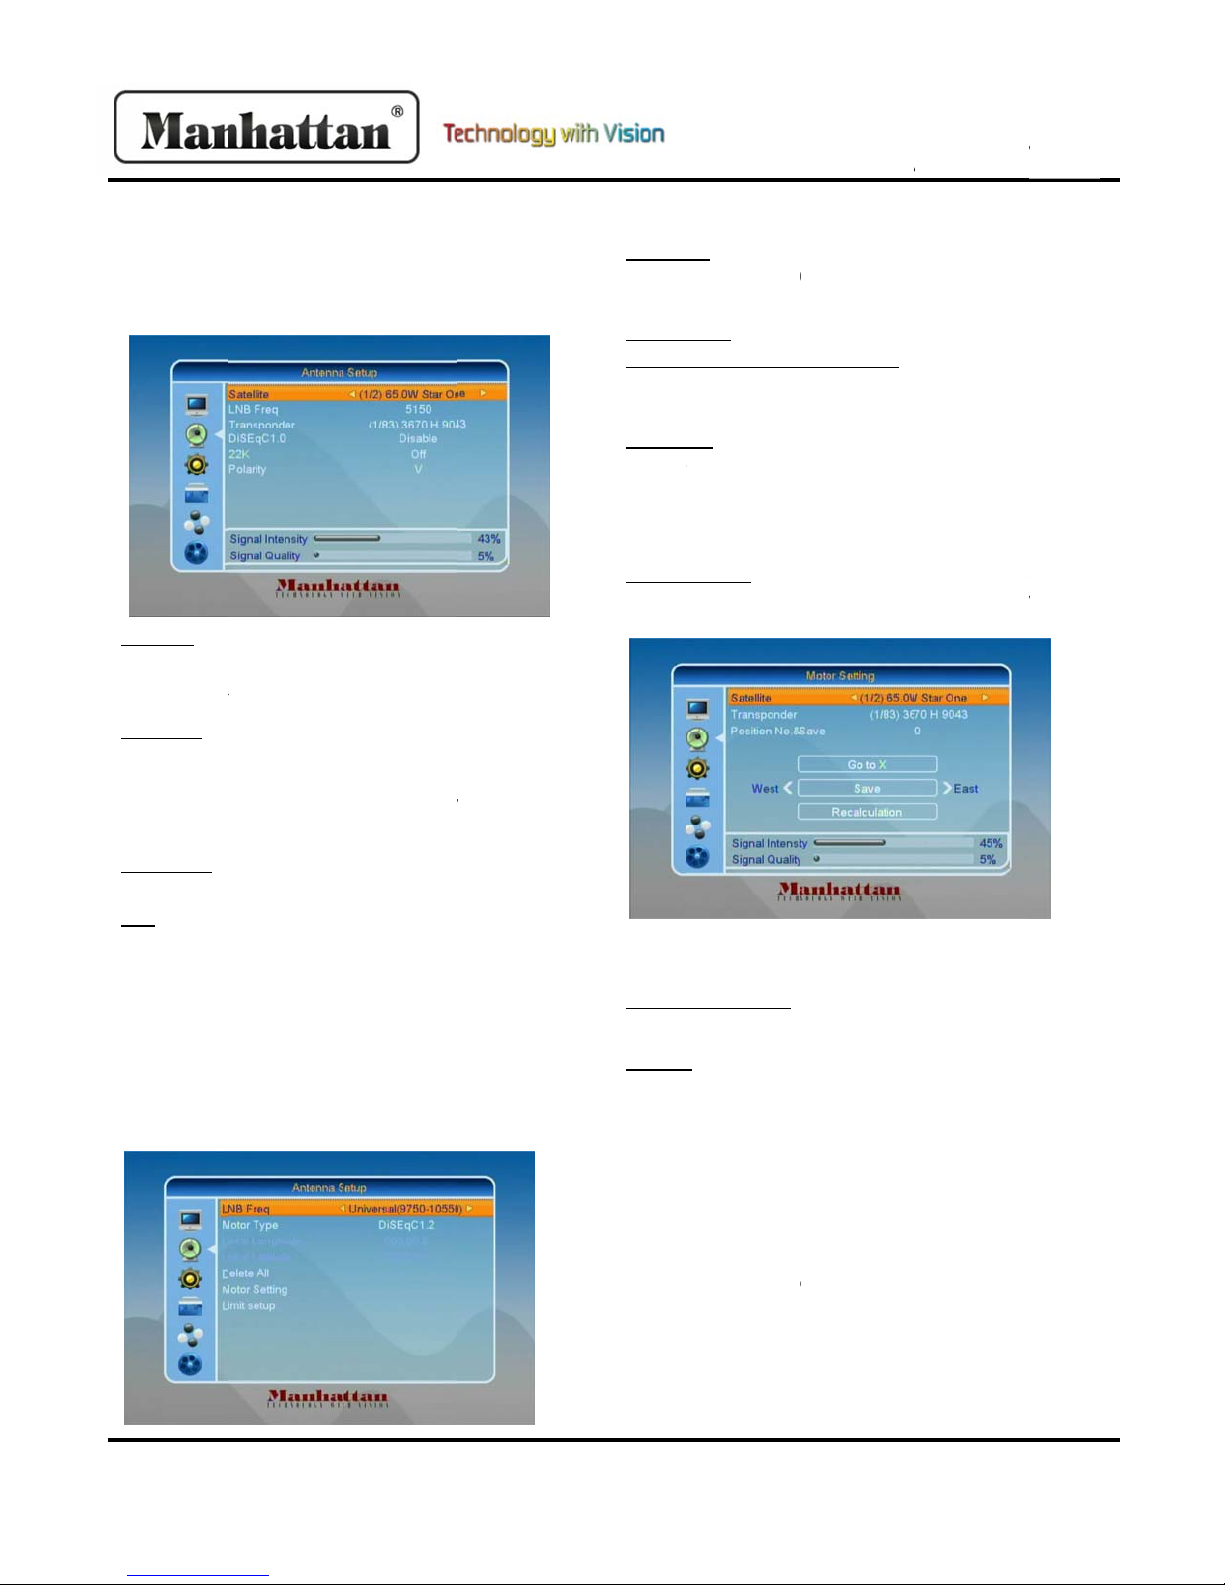
2. Antenna Connection
When you enter the Antenna Connection menu, it
will display like the screen below:
Press [Left/Right] to select LNB option between
“Fixed Antenna” and “Motor Antenna.”
3. Satellite List
When you enter the “Satellite List” menu, it will
display like the screen below:
Press the [Green] key and you will enter the “Add
Satellite” menu like shown below:
Press the [Yellow] key, and you will be asked “Are
you sure to delete?” Select “Yes” to delete the
satellite and “No” to cancel the operation.
10 RS-1933 User Manual
Page 15
R
s
t
”
t
l
t
m
0
0
0
Y
w
n
e
f
e
t
”
l
u
n
e
]
t
n
5
0
L
/
t
u
l
e
e
t
a
R
5
7
/
e
/
n
p
o
t
r
i
s
m
y
/
5
o
s
l
b
u
e
e
p
b
X
g
n
e
h
c
e
d
r
e
5
0
n
C
c
b
p
i
o
C
i
y
e
t
g
n
]
M
d
d
o
s
2
0
K
e
y
a
h
E
b
e
o
Y
“
W
h
h
o
e
t
k
e
s
i
0
1
U
d
w
o
e
t
&
s
O
o
w
4.An
FixedAnte
Ifyouselect
Connection
Satellite:In
switchsatel
youtoselec
LNBFreq:In
selectpara
9750/1000
11250/113
(9750‐1060
DiSEqC1.0:
optionsbet
22K:Youca
andoff.Wh
receiveTVa
switchedof
0kport.
MotorAnt
Ifyouselec
Connection
ennaSet
nna:
“FixedAnte
menu,itwil
hisitem,pr
itesand[OK
directly.
thisitem,pr
eter.Optio
/10050/104
0/5150‐575
)
oucanuse[
eendisable
usethe[Lef
nthisitemi
ndradioinp
,receiverwi
nna:
“MotorAnt
menu,itwil
p
na”in“Ant
ldisplaylike
ss[Left/Righ
willenters
essing[Left/
sare:5150/
0/10600/10
/5750‐5150
eft/Right]k
LNB1/LNB2
/Right]keys
switchedo
tfrom22K
lreceiveinf
nna”in“An
ldisplaylike
nna
elow:
]keyswill
tellitelistfo
ight]keysw
750/5950/
00/10750/
Universal
ystoswitch
LNB3/LNB4.
toswitchon
,receiverwi
ort.Ifitemi
rmationfro
enna
elow:
In
tallat
4.
MotorAnt
LNBT
10450
5750/
Motor
LocalL
thisop
keyst
Delete
positio
Ifyou
youwi
availa
Motor
longit
liketh
ll
Use[L
ll
orres
Positio
[Num
Goto
X”or“
Aftery
youca
andus
savet
“Recal
pe:5150/57
10600/1070
750‐5150/U
Type:DiSEq
ongitude/Lo
tionisavaila
input.
All:Thisopti
ns.Itwilldis
elect“Yes”,
llcancelthe
lein“DiSEq
Setting:Ifyo
de/Latitude
screenbelo
ft/Right]ke
onder.
nNo.&Save:
er]keystos
:Press[OK]
otorefere
ouselect“Sa
movetheh
[Left/Right
eposition.
ulation”an
nnaCont.
0/5950/975
0/10750/11
iversal(975
1.2/USALS
alLatitude:I
le.Press[O
onwilldelet
layan“Are
twilldelete
peration.T
1.2”mode.
uselect“DiS
snotavaila
w.
sand[OK]k
Youcanuse
lectinputp
oopenlist.
ce”.
tellite”and
ighlightto
tomovedis
ovethehig
press[OK]t
0/10000/10
50/11300/5
‐10600)
fyouselect
]anduse[N
allsatellite
ousure...”
llpositions.
isitemisonl
EqC1.2”,Loc
le.Itwillsho
ytochange
[Left/Right]
sitionnumb
oucanselec
PositionNo.
est/Save/Ea
handpress[
lightto
recalculate
on
50/
50‐
SALS,
umber]
ialogue.
If“No”,
y
al
up
satellite
r
r.
“goto
Save”,
tline
K]to
.
S‐1933U
erManua
Setth
move
“Moto
screen
satellite’slo
ishautomat
rSetting”an
likeonthef
callongitud
ically.Move
press[OK]
llowingpag
/latitude.US
hehighlight
ey,itwillsh
:
ALScan
to
wthe
11
Page 16

Installation
4. Motor Antenna Cont.
5. Single Satellite Search
Satellite: In this item, press [Left/Right] keys to select
5. Single Satellite Search Cont.
6. Multi Satellite Search
channels” or “scan free channels”. If you select “Yes”,
Switching satellite can move the dish to the right
place.
Limit Setup:
Press the [OK] key otherwise to select directly.
FTA Only: Press [Left/Right] key to scan all channels
or scan free channels. If you select “Yes”, it will scan
free channels only.
Scan Channel: Press [Left/Right] keys to select scan
TV + radio channels, or only TV/radio channels.
Network Search: Press [Left/Right] keys to select
network search or not. You can only do network scan
when you select “Preset Scan”.
Scan Mode: You can select “Auto Scan” to blind scan
or select “Preset Scan” to scan all preset TPs.
Search: Move highlight to “Search” and press [OK] to
start scanning. The next screen will display the
process and the current scanning channel.
In the “Single Search” menu, press [Exit] key to draw
back from scanning and meanwhile saving the
current value.
When you set “Limit Setup” to “West Limit/East
Limit”, you can move the highlight to “Limit Setup”
Line and move the dish to east or west by pressing
[Left/Right] keys manually. When you are moving
the target place, press [OK] key to save the point.
When you enter “Single Search” menu, it will display
like the screen below:
satellite to scan.
When you enter the “Multi Search” menu, it will
display like the screen below:
Satellite: In this item, press [OK] key to see the
selected satellite. The system will use DiSEqC1.0/
DiSEqC1.2/USALS function to search satellite and
scan channels. It will scan all the satellites displaying
in the bottom box.
FTA Only: Press [Left/Right] keys to select “scan all
it will scan free channels only.
Scan Channel: Press [Left/Right] keys to select scan
TV + Radio Channels, or just TV/Radio channels.
Network Search: Press [Left/Right] to select network
search or not.
12 RS-1933 User Manual
Page 17

Installation
6. Multi Satellite Search Cont.
In “Multi Search” menu, press [Exit] key to draw back
7. TP List
Use the [Left/Right] keys to switch satellite. Press the
7. TP List Cont.
Scan Mode: You can select “Auto Scan” to blind scan
or select “Preset Scan” to scan all preset TPs.
Search: Move highlight to “Search” on press [OK] to
start scanning.
from scanning while saving the current value.
When you enter to “TP List” menu, it will display like
the screen below:
Pressing the [Yellow] key will open a dialogue asking
you to confirm whether to delete current TP. Select
“Yes” and you will delete the highlighted channel.
Select “No” to cancel the operation.
[Red] key to open “Edit TP” menu. User can edit TP
info. Frequency:”3000~13450 MHz”, Symbol Rate:
“1000~45000Ks/s”.
Press the [Green] key to open “Add TP” menu. User
can add a new TP.
Pressing the [Blue] key will display a dialogue box.
You can select “FTA Only, Scan Channel, Network
Search” items, then move highlight to “Yes” button
and press [OK] to begin search.
RS-1933 User Manual 13
Page 18

System Setup
1. System Setup
Delete All.” Use [Left] or [Exit] key to go back to main
English, Polish, German, Russian, Arabic, Portuguese,
2. Language Cont.
audio language for choosing. By this function you can
channel does not have the suited audio language, the
system will compare automatically with second audio
Audio” system will play the second audio language as
When you enter “System Setup” menu, the screen
will display like below:
Use the [Up/Down] keys to select pages among:
“Edit Channel, Installation, System, Tools, and
Record”. Press [OK] or [Right] key to enter “System
Setup”. If menu lock is on, it will display a dialogue
for the user to enter password. The default
password is “0000” Use [Up/Down] keys to select
menu items among: “TV Channel, Radio Channel and
menu.
First Audio: Some channels have more than one
set the audio for this channel. If the playing channel
has the same audio as the “First Audio” you set,
system will play this audio language by default. If the
language.
Second Audio: If the channel has no corresponding
audio with “First Audio”, but has it for “Second
default. If no audio language corresponds with the
“Second Audio”, then the default language of the
current channel will be played automatically.
Teletext: You can set teletext language. If the
streams have this language you will see the teletext
in the language you set.
Pressing the [Exit] key will draw back from
“Language” menu.
3. TV System
When you enter the “TV System” menu, you will see
the screen like below:
2. Language
When you enter the “Language” menu, it will display
like the screen below:
Language: Use [Left/Right] keys to select menu
languages. The selection on languages include:
Turkish, Spanish, Polish, and Italian.
Video Resolution: This option is for switching the
outputting video resolution. Highlight and use the
Left/Right keys to switch video resolution By Source/
By Native/576i/ 576P/720P_50/720P_60/1080i_25/
1080i_30. This effect is equal to pressing the [Res]
key in full screen. By source means system will set
the resolution according to the program it is playing.
By Native means the system will be set according to
the TV’s maximum supported resolution.
14 RS-1933 User Manual
Page 19

System Setup
3. TV System Cont.
4. Local Time Setting
4. Local Time Setting Cont.
Setting]. Press [OK]. Use the [Down] key to highlight “GMT
If you are observing “Summer Time”, move down so that it
Aspect Mode: This option is for switching the screen
aspect ratio mode. The following options are provided:
4:3 PS/4:3 LB/16:9/Auto. You can press the [Left/Right]
keys to select each mode. “16:9” will provide a pillar
box mode, which means the user uses a 16:9 display
but sees a full 4:3 picture. The system will force press
wide screen picture to be narrow with black bands on
the left and right side. “Auto” will not do any system
aspect translation. 4:3 and 16:9 aspects work best on
the appropriate displays.
Video Out: This is for setting the HDMI video output
mode. It has the following options: RGB- Normal, RGBExpand, YCbCr4:4:4 and YCbYr4:2:2. You can press
[Left/Right] keys to select each mode circularly.
Digital Audio Out: This is for setting both the SPDIF and
HDMI’s digital output mode. It has the options LPCM
and BS Out, and Auto. You can use the [Left/Right] keys
to select each mode. “LPCM Out” means system will
decode no matter AC3 or PCM audio track data to be
LPCM, digital audio decoder or HDMI TV will get LPCM
digital audio data. “BS Out” means system won’t do
AC3 decode just output AC3 RAW data to SPDIF and
HDMI. “Auto” means system will detect which the
connected HDMI TV can decode and then output that
data. If HDMI TV can decode SC3, system will just
output RAW data, if HDMI TV can decode LPCM only,
the system will just decode AC3 or LPCM to be LPCM
and then output. Press [Exit] to draw back from TV
System Menu.
SETTING THE CLOCK TO LOCAL TIME:
Using the Remote, press [Menu] once, then use [Down]
until you get to “System Setup”. Press the [Right] key to
highlight, and the [Down] key to reach “Local Time
Usage”. Move left or right until ‘GMT Usage” is “User
Define”. Move down to “GMT Offset’ and press [Left] to
reach your Time Zone. (Eastern is UTC-5:00, Central is
UTC-6:00, Mountain is UTC-7:00, Pacific is UTC-8:00)
is switched to ON. Press [Exit] until you get out of all
menus. Turn power OFF to test clock setting.
Region: Use the [Left/Right] keys to set your region.
GMT Usage: This item is used for opening the usage of
GMT. You can press the [Left/Right] keys to switch on
and off.
GMT Offset: This item is only valid when the setting of
“GMT Usage” is on. You can press [Left/Right] keys to
switch “GMT Offset” value, with the range -12:00 ~ +
12:00 increase each half hour progressively.
Summer Time: This item only valid when the setting of
“GMT Usage” on. When “Summer Time: is on, it will
add one hour to the time.
Date/Time: These items are valid only when the setting
of GMT Usage is off. You can press the [Left/Right] keys
moving the highlight and use the number keys to input
directly. If the current channel provides the correct
time information, you will see the current time when
you enter the “Time” menu. If the channel does not
provide time information, you have to input it
manually.
Use the [Exit] key to draw back from time menu.
5. Timer Setting
Select “Timer Setting item and press [OK] key to enter
“Timer List” menu.
RS-1933 User Manual 15
Page 20

System Setup
5. Timer Setting Cont.
You can press [Up/Down] keys to select a timer, then
Wakeup Channel: Press [OK] key to enter channel list
6. Parental Lock Cont.
finish saving and draw back to “System Setup” menu,
the [Enter] key to open timer menu.
Current time information will display on the first
column. If the current time is incorrect, please
modify the time information in the “Time” item.
Timer Mode: The modes to set the timer include
“Off, Once, and Daily.”
and select channel that you want to set.
Wakeup Date: Use the [Number] keys to input your
wakeup date.
On Time: Use [Number] keys to input your wakeup
time. Once the time is up, no matter what state the
system is in, it will automatically switch to the
channel you want and start to play.
Duration: After you set a time for “Duration” item,
once the time is up, the system will automatically
switch to standby mode. If you do not want to work
this function, set the duration to 00:00.
Move the highlight to “Save” button and press [OK]
key to save timer. Select “Cancel” or press [Exit] key
to cancel the operation.
6. Parental Lock
In the “Parental Lock” line, press the [OK] key and a
dialogue will ask you to input the password. Default
password is “0000”. When you input the correct
password, you will see a screen like shown:
Menu Lock: This is for determining that when users
wish to enter “Edit Channel/Installation/Tools”
menu, whether you have to enter a password or not.
If the setting of “Menu Lock” is set “Yes”, the user
will have to key in the password. If set “No”, it will
unlock.
Channel Lock: Determines whether the user wishes
to play the locked channels by inputting password or
not. If the setting is set to “Yes”, channels with the
lock mark will display a dialogue on the screen and
ask for password. If this setting is set to “No”, the
lock function will be disabled.
New Password: This is used for revising password.
You can input the new password in this item by using
the [Number] keys. After you fill the 4 digital
numbers, the highlight will auto skip to “Confirm
Password” and ask you to input the password again.
If the password is correct, the screen will display a
message of “Saving Data, Please Wait…” After you
the revising is complete.
Use the [Exit] key to draw back “Parental Lock”
menu.
7. OSD Setting
When you enter “OSD Setting” menu, you will see a
screen like on the following page.
16 RS-1933 User Manual
Page 21

System Setup
7. OSD Setting Cont.
OSD Transparency: You can press [Left/Right] keys to
8. Favorite Cont.
OSD Timeout: When you switch channels in full
screen, it will show some information about the
current channel on the lower part of the screen. To
set the duration of the information that shows on
the screen, you can press the [Left/Right] keys to
select the time. The range of duration is 1 second ~
10 seconds.
select the values. There are 5 levels of transparency:
No (no transparency function), 10%, 20%, 30%, and
40%.
Press [Exit] key to draw back from the “OSD Setting”
menu.
8. Favorite
When you enter the “Favorite” menu, it will display
like the screen below:
Pressing the [Red] key will switch to capital or not.
Pressing the [Green] key will delete the character.
The [Yellow] key will save the operation. The [Blue]
key will cancel the operation.
9. Other
LNB Power: You can set this option to “On” or “Off”.
If the setting is set to “On” the receiver will supply
power to the satellite antenna. “Off” will not supply
power to the antenna.
Channel Play Type: This can set the channel play
type. You can set the playing channels as “Free,
Scrambled, or All” For example, if you select “Free”,
all scrambled channels will be skipped when you
change channels by using the [Up/Down] keys.
When you press the [OK] key, you can rename the
favorite group’s name. It will display a dialogue as
shown:
RS-1933 User Manual 17
Press [Exit] key to draw back from “Other” menu.
Page 22

Tools
1. Tools
password is “0000”. Press [Up/Down] to select menu
3. Factory Setting Cont.
Interface” will enter the CAM card information Menu
When you enter the “Tools” menu, it will display like
the screen below:
Use the [Up/Down] keys to select “Tools” from the
menu page options. Press [OK] or the [Right] key to
enter “Tools”. If the menu lock is on, a dialogue will
display for user to enter password. The default
items. Press [Left] or [Exit] key to return to the main
menu.
2. Information
When you enter the “Information” menu, you will
see the screen like below:
If you select “Yes”, all the revised parameters of the
receiver will reset to the default value. Please use
this function carefully. If you select “No” or press
[Exit], you can draw back without saving.
4. Upgrade By USB
Open “Upgrade By USB” menu from “Tools” It will
display like below:
The screen displays the items as “BootLoader, HDCP,
MAINCODE, LOGO, DefaultDB, UserDB” information.
Press the [Exit] key to draw back from the “Tools”
menu.
3. Factory Setting
When you press [OK] key in the “Factory Setting”
item, it will show a warning message inquiring you
“The operation will load default and erase all the
channels that user added. Continue?”
18 RS-1933 User Manual
Upgrade Mode has only 1 option: “All Code”, which
means that you can only upgrade the whole file to
your STB’s flash. Please rename your new fw file
name to be the format “all*.bin”, * means any other
string is acceptable, but the initial 3 letters must be
“all” and the extension name must be “.bin”. Then
press OK key to start upgrade by USB.
5. Common Interface
Pressing [OK] key when you highlight “Common
select as shown:
Page 23

Tools
5. Common Interface Cont.
have a different menu. Entering “Change CA PIN” can
change the pin code of the CA card in this CAM card.
6. USB Cont.
bar with the [Up/Down] or [Page Up/Down] keys. Go
Use the [Up/Down] keys to select slot 1 or slot 2.
Press [OK] key again to enter the card information.
USB menu will be disabled when no USB device is
plugged. Media Play List will not be saved when USB
plug out, stand by, or power off. The USB will display
as shown below:
You can preview the picture at the top right corner if
the scroll bar is on the picture files (JPG,BMP), and a
logo will show when on MP3 files. Move the scroll
In the CAM card information menu, you can select
each item by pressing [Up/Down] keys and [OK] to
enter. This information menu format and string is
according to CI card itself. So, a different card may
6. USB
USB menu will be automatically shown when you
insert U disk to USB port except “Auto scan, Multi
Picture, or Upgrade”.
into subdirectory when you press the [OK] key in the
file directory, play the selected file when scroll bar is
on the file, and you will automatically return to the
USB menu after play is over.
Color key operation:
Green key: Put the selected file to play list when you
press the [Green] key, meanwhile showing “Add to
Play List”. This display will disappear after a short
duration, and the file will be added into MP3play list
if it is one MP3 file, and to image play file for one
image file.
Yellow key: All the MP3 files in the current directory
are added into MP3 play list by [Yellow key], and
screen will display “Add to Play List”. Display will
disappear after a short duration.
Blue key: All the image files in current directory are
added into image play list by Blue key, and screen
will display “Add to Play List”. The display will
disappear after a short duration.
RS-1933 User Manual 19
Page 24

Tools
6. USB Cont.
Blue key: Delete all the files with blue key. A dialogue
6. USB Cont.
Red key: One operation window will show: “please
select play list”. You can select Music or Image play
by Left/Right keys, and open the selected play list by
pressing the OK key. If there is no file, it will display
“This type of play list does not exist”
Music play operation:
If you select music, and MP3 play list menu is
activated, it will display like below:
Red key: Play the first music file by pressing the Red
key. Play the file selected with scroll bar with OK.
Green key: Change play mode with Green key. Play
mode includes: Sequential, Random, Single repeat,
All repeat.
Yellow key: Delete the selected file with Yellow key.
After you begin to play MP3, it will show the MP3
info like pictured above. Press the [Pause] key to
pause. Press the [Play] key to play current track..
Press the [Stop] key to stop and return time to
00:00. Press the [Previous] button once to skip to
beginning of track, or twice to skip to previous track.
Press the [Next] key to go to next file. Press the
[Forward] key to go forward 20 seconds. Press the
[Back] key to go back. Jump to beginning or end if
there is less than 20 seconds to the beginning or end
of the music file. Return to USB list when play is over
or press the [Exit] key.
Image view operation:
If the image view function is selected, a menu will
display like shown below:
will display asking “are you sure’ before the
operation. If you select “Yes”, all files will be deleted
and the play list window will close.
20 RS-1933 User Manual
Red key: Image browsing starts after you press the
[Red] button, or play selected image with [OK] key.
You will return after view is over or press [Exit] key.
Page 25

Tools
6. USB Cont.
Green key: The [Green] key will open setup menu like
Yellow key: Delete selected image with the [Yellow]
key
Blue key: Pressing the [Blue] key will delete all the
image files in play list. The system will display a
dialogue to remind you “Are you sure?” before the
operation. If you select “Yes” all files will be deleted.
“No” will cancel the operation.
below:
Use the [Up/Down] keys to move the scroll bar, and
[Left/Right] keys to switch options.
Size: Real: Show the real size if the image is less than
full screen size.
Full: Full screen display. Full is default.
Time: 0 ~ 10 seconds. 2 seconds is default.
Move the scroll bar to the “Save” icon and press [OK]
to save. Select [Exit] and [OK] to exit without saving.
When in slideshow, press [Left/Right] to go to
previous/next image.
RS-1933 User Manual 21
Page 26

REC
1. REC
When you enter the “REC” menu, it will display like
the screen below:
Use the [Up/Down] keys to select “REC” from the
menu pages. Press [OK] or [Right] key to enter
“REC”. If menu lock is on, a dialogue will display for
user to key in password. The default password is
“0000”. Use the [Up/Down] and [OK] keys to select
menu items. Press [Left] or [Exit] key to go back to
main menu.
2. Record Manager
Lock: Press the [Green] key to lock a program on
HDD. If you want to cancel lock, press the [Green]
key again. You will be asked to enter password. Once
you enter the correct password, it will cancel the
lock feature for the program.
Delete: Press the [Blue] key to make a delete mark
next to the highlighted program. If you want to
cancel the delete operation, press the [Blue] key
again. When you exit “Record Manager” menu, the
delete mark will be deleted automatically.
2. Record Manager Cont.
Rename:
Press the [Red] key to rename the highlighted
program. It will display a “Rename” window. You can
press the [Red] key again to switch to capital letters.
The [Blue] key will delete character. [Yellow] key will
save the operation. [Blue] key will cancel the
modification.
3. Storage Information
Move the highlight to “Storage Information” and
press the [OK] key. It will display “Storage
Information” like shown below:
4. HDD Format
Press the [Yellow] key under “Storage Information”
to open “Format” window. Use the [Left/Right] keys
to select disk mode and select “OK’ to format. Select
“Cancel” or press the [Exit] key to cancel the
operation.
22 RS-1933 User Manual
Page 27

REC
4. HDD Format Cont.
5. DVR Configuration
Move the highlight to “DVR Configuration” and press
[OK] key. It will display as shown below:
Use the Left/Right keys to switch timeshift “On/Off”.
If timeshift is set “On”, it will timeshift the program
when the user watches TV. Press [Info] key to see
timeshift OSD like shown below:
5. DVR Configuration Cont.
You can use [Left/Right] keys to move the slide. You
cannot exceed the current time. Press [OK] key to
play from the current point selected. You can also
use the [Pause] and [Previous/Next] keys. Time
Shifting is only available when USB HDD is connected
to system and read/write speed is high enough.
Press the [Stop] key the first time to end the playing
mode. Pressing [Stop] a second time will stop the
recording.
6. Jump
Move the highlight to “Jump” and press the [OK] key.
It will display “Jump” as shown below:
Use the [Left/Right] keys to switch the jump time.
The options are 30s, 1m, 5, 10m, and 30m. When you
play the recorded program, use the [Previous/Next]
keys to jump programs.
RS-1933 User Manual 23
Page 28

Tips
Random Tips for Improving Your Experience with the Manhattan RS-1933
Receiver:
There are firmware updates available on the Manhattan-Digital website, released after initial production of
any Satellite, Transponder and Channel information that you have in your receiver, but once it is installed, this
right to select the above product-glass.abs file. Drop down to START and press OK on the remote control. Let
renamed copy onto your USB stick, and confirm that the newly created DUMP file.bin is also on the USB stick.
Future updates and news can be found on the Manhattan-Digital website at www.manhattan-digital.net
Disclaimer:
Users accept all responsibility for the results of any do-it-yourself downloading procedures.
If you do not feel comfortable using computers, USB sticks and other devices used for file transfers, please
contact a professional that has experience in such matters and can guarantee their work. Manhattan-Digital
warranties will be voided through the use of unauthorized third party files. Know what you are doing and
only use files authorized or released by Manhattan-Digital.
the RS-1933 receiver, in an effort to update and improve operating features, as well as fix software “bugs”
that have been discovered. Version 3.2, released on September 1, 2011, includes the important feature of
uploading, making it possible to save existing satellite memory files to a USB memory stick, as well as
download updates the same way. We suggest that you update to at least this level of firmware so that there
is minimal future need to manually update entire files. Updating to Version 3.2 and later versions will erase
will be a problem of the past, and future updates will literally take seconds to process.
Instructions on Updating Your Receiver
Press MENU button and look for TOOLS header, dropping with down arrow if necessary. Enter TOOLS
section and select INFORMATION. Study the entry to the right of MAIN CODE, which will give you the latest
firmware version such as LRJM 3.2 (version 3.2) and a release date. This will confirm the status of your
receiver. If you need to update, download from the Manhattan-Digital website, and unzip the file. From the
files that are unzipped, save a copy of the “product-glass” abs file, onto your USB stick. Insert the USB stick
into the USB port on back of the RS-1933 receiver. Power on the receiver if not already turned on. Once
receiver has booted up, press MENU and go to TOOLS submenu. Drop down and select the UPGRADE BY USB
option. Upgrade Mode should be in ALLCODE. Move highlighter bar to Upgrade File and then toggle left or
the receiver update. It should power off afterwards and then turn itself back on. Go to TOOLS section of
menu and select INFORMATION to check that the new update version number is to the right of MAIN CODE.
Exit out and set up your receiver’s satellite configurations.
If you have Version 3.2 or higher number, and have set up your satellites and transponders to your liking,
as well as custom channel scans and edits, you can now save them in an abs file as a backup. Press MENU.
Select TOOLS submenu and drop down to DUMP TO USB. After entering this Dump Menu, scroll through the
options until you see “USER DB” listed in the Dump Mode line. Select START and press OK with the remote
control, and wait for receiver to save. This will create a file of all satellites, transponders and scanned
channels, and should be saved with the name S-3602_all_dump.bin.
You can use this or any other similar backup file to merge with future firmware updates. If you have done
some customizing and would like to merge this information found in your receiver with a new firmware
update, first confirm that you have the Product Glass.abs file for that update (which you might want to
rename with your computer with something such as V3.4 DATE.abs (use the current date). Load the
24 RS-1933 User Manual
Page 29

Tips
Reloading to Merge Satellite and Firmware Info
Drop down to START and press OK on the remote control. Let the receiver do its updating and wait for it to
brand, but in all cases you should first format the external hard drive before starting any recording. There is a
Press MENU, and then go to TOOLS submenu, followed by UPGRADE BY USB option.
Scroll over until you see ALLCODE in the Upgrade Mode line near top of screen.
Move highlighter bar to Upgrade File and toggle left or right to select above product-glass.abs file.
power off and then back on. Go back to the UPGRADE BY USB option.
Scroll over until you see USER DB in the Upgrade Mode line near top of the screen.
Toggle until you find the user file (S-3602_all_dump.bin). Select START, press OK on remote control and
confirm to burn flash. Flash should burn and receiver will re-boot.
Satellite/Transponder/Channel data should now be merged with current firmware file.
Press MENU-select TOOLS and check INFORMATION to confirm update version # in MAIN CODE.
Exit out afterwards and resume normal operation.
RECORD and DVR Operation
Study the brief descriptions of functions in the Manhattan RS-1933 user manual, and confirm that your
settings and accessories are appropriate for the purpose that you intend to accomplish.
USB Memory Sticks are limited in storage capacity and in most cases will not function for High Definition
mode recording. You may see a prompt on the screen telling you that USB Speed is too low. For normal
standard definition recording, we recommend a minimum of a 4 Gb memory stick for excerpting a few
episodes of a show. If you intend to do HD recording, or any archiving that requires substantial memory
capacity, it is suggested that a large external hard drive of at least 500 Gb be considered. Results will vary by
link on how-to format hard drives on this website. It should also be noted that the maximum capacity that
the RS-1933 receiver will properly function with is 2 Terabytes, and files are separated after 1 Terabyte.
In addition to recording programming received via satellite, the receiver also has the ability to play music
and JPEG files such as photographs, if connected via the USB port to an external hard drive or memory stick.
Operation can be described as intuitive, with simple pressing of the record button on the remote control
starting a recording event. Study the remote control diagram in the receiver manual if unfamiliar with button
placement or function, and become comfortable with menu operation. There are readouts of available free
space, record time and file size in the DVR section. Playback and previewing can be assisted by customizing
Fast-Forward (FF) and Rewind (RW) times, which can be set for intervals of 30 seconds, 1, 5 and 10 minutes.
Once you have mastered such basic recording operation, you can then consider timed recording. If you
depend upon the receiver clock to set a timed recording, be aware that the clock’s accuracy depends upon
the receiver being tuned to a live signal with a time reference, or you can also manually set the time. Please
note that some channels from outside of North America use their local time reference, so check the display
on the menu screen. Setting the clock manually can be done by going into Menu to SYSTEM SETUP. Press
Right arrow to highlight in gold, and the Down arrow to reach Local Time Setting. Press OK. Scroll down so
that GMT USAGE is highlighted. Move left or right until this is changed to USER DEFINE. Scroll Down to GMT
OFFSET and then Left to reach your time zone. Turn Summer Time ON if observed. Exit out of all menus and
Save. Turn power OFF to test the clock setting.
RS-1933 User Manual 25
Page 30

Warranty
Warranty
Manufactured under license from Dolby Laboratories. Dolby and
Manhattan-digital warrants this product Manhattan RS-1933 satellite receiver. Free from defects in
workmanship and materials for 1 year for the date of the original purchase. During the warranty
period, Manhattan-digital will provide free of charge both parts and labor to correct defects in the
workmanship and material,
This warranty does not cover damage due to lightning, power surges, fire, flood, or other acts of
God. Warranty does not cover abnormal conditions, improper use, improper installation or any
modification done to its hardware and software. Warranty is void if any repair is done without
proper authority or by an authorized service center by Manhattan-digital.
Manhattan-digital liability under this warranty is limited to servicing of Manhattan RS-1933 satellite
receiver, if returned to a Manhattan-digital’s authorized service center under a Return
Authorization number given by service center. Freight must be prepaid in compliance with repair
warranty.
Manhattan-digital authorized service center is;
Grandview Satellite
3859 E. Grandview Rd.
Phoenix, AZ 85032
twitulski@cox.net
twitulski@manhattan-digital.net
the double-D symbol are trademarks of Dolby Laboratories.
2 RS-1933 User Manual
Page 31

Notes:
RS-1933 User Manual 2
 Loading...