

Page 1
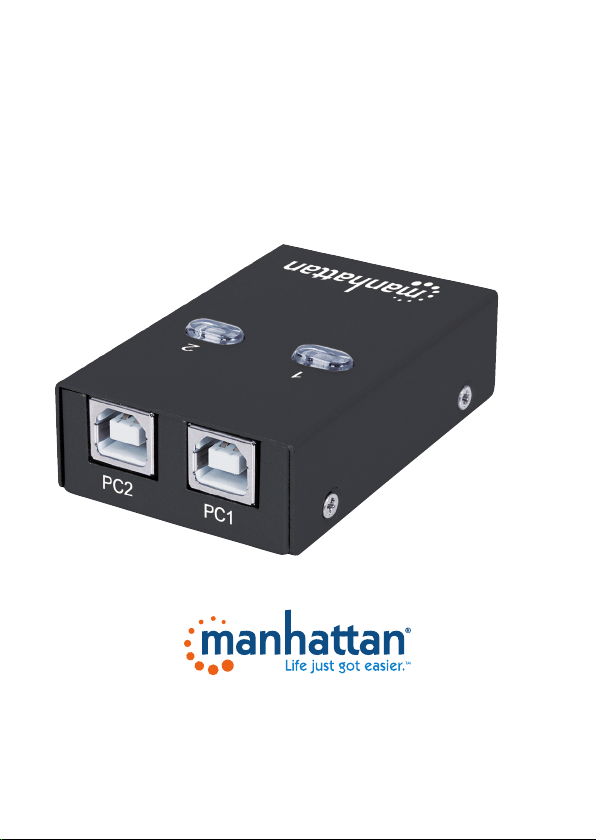
HI-SPEED USB 2.0
AUTOMATIC
SHARING SWITCH
INSTRUCTIONS
MODEL 162005
manhattanproducts.com
Important: Read before use. • Importante: Leer antes de usar.
MAN-162005-UM-ML1-0715-04-0
Page 2
Hi-Speed USB 2.0 Automatic Sharing Switch English
Hardware Installation / Connections
Before installing the switch, make sure all computers and
peripherals to be connected are turned off.
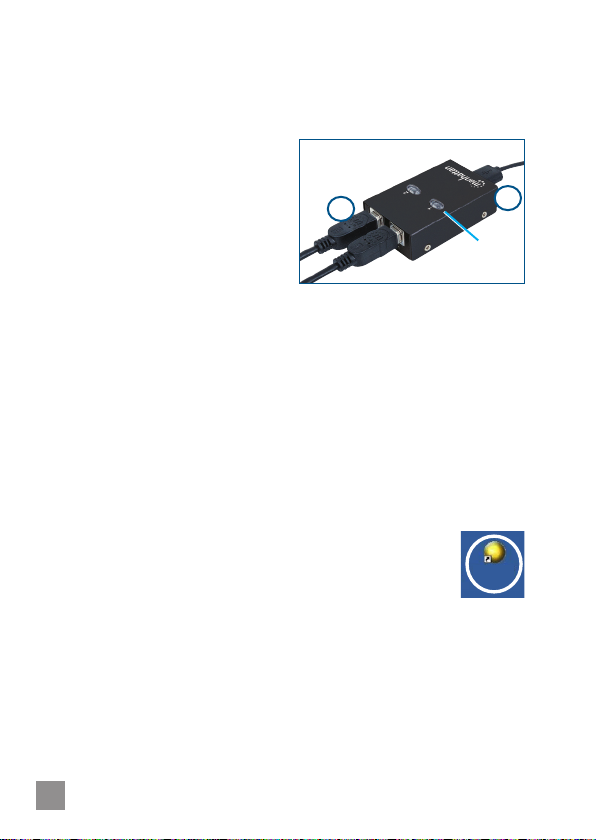
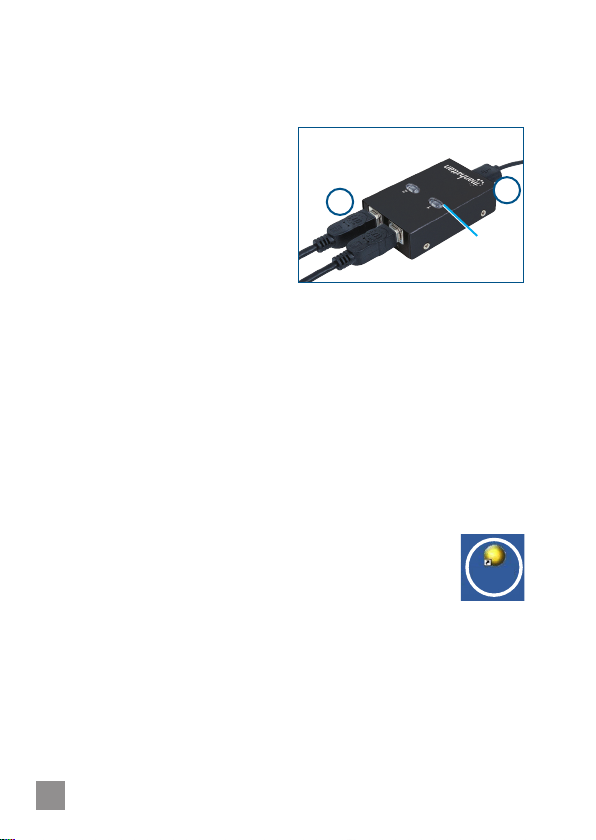
1. Connect the two computers to
Device p ort
Ports 1 & 2 on the switch.
2. Connect the device port on the
switch to the selected USB
Computer
port
1
2
device (cable included).
3. Power on the computer(s) and
the connected USB device.
Select b utton /
LED indicator
Software Installation
The USB Sharing application on the included CD offers a
convenient on-screen option (PCs only) for switching the
computer source that’s directed to the connected peripheral
device (instead of manually pressing the Select buttons on the
top of the switch itself).
1. Insert the included software CD into your CD-ROM drive and
follow the on-screen instructions. Note: If installation doesn’t
begin automatically, open Windows Explorer, navigate to your
CD-ROM drive and double-click the setup.exe file.
2. When the Maintenance Complete screen displays, click Finish.
Close any open windows, then reboot your computer.
3. After the reboot, a USB Sharing shortcut will appear
on the desktop, and an indicator icon will appear in
the lower-right corner (as shown in the sample
USB
Sharing
images in Operation below).
Software Uninstall
You can uninstall the software from “Add or Remove Programs”
in the Control Panel. Click Add or Remove: The Choose Setup
Language screen will display. Click OK. When the Confirm File
Deletion prompt displays, click OK to confirm, then click Finish.
2
ENGLISH
Page 3
Operation
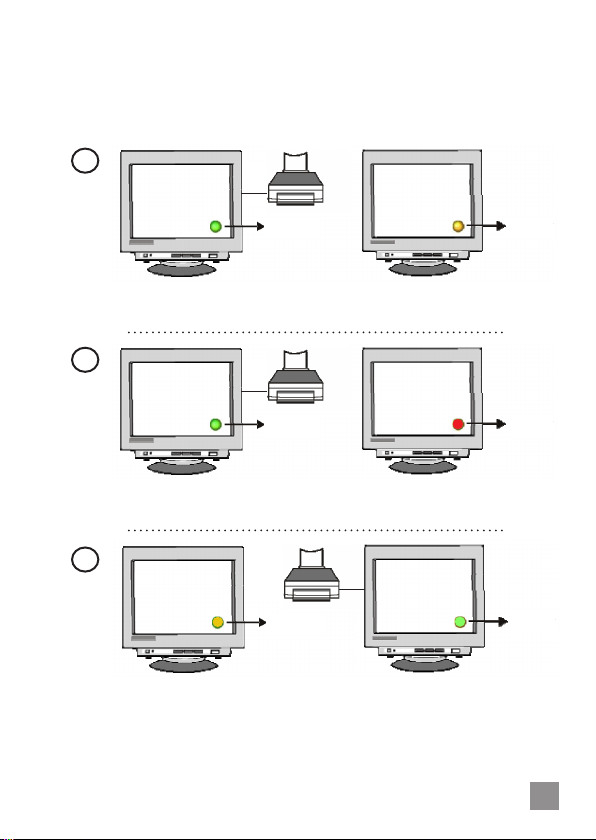
Any connected USB device will link to the computers connected
to Port 1 and Port 2 of the switch. The computer connected to
Port 1 will be the active link until the USB device is redirected to
another connected computer.
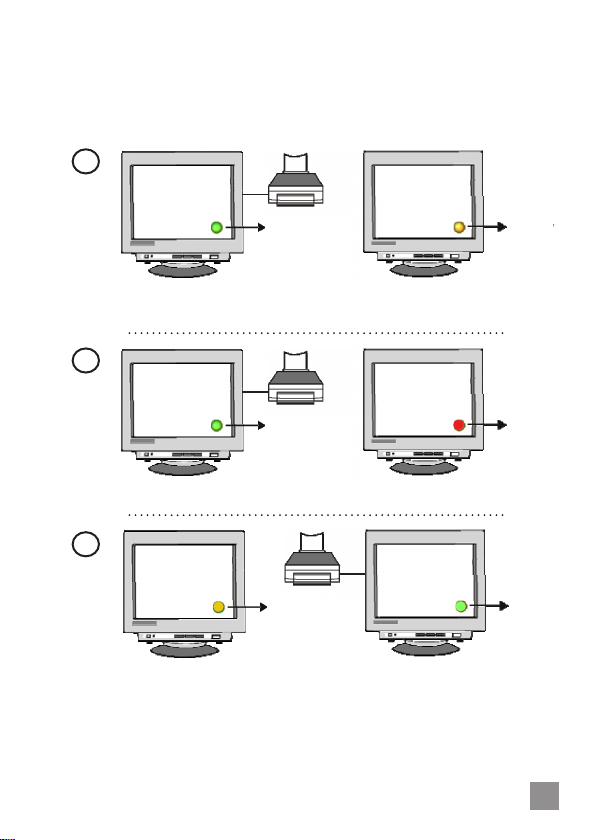
1
COMPUTER
A
Green
COMPUTER
B
Yellow
Computer A is connected to — and is
ready to use — the USB device.
To make Computer B ready to use the USB
device, right-click the on-screen indicator
icon or press Ctrl/F11.
2
COMPUTER
A
Green
Computer A is currently using the USB device.
COMPUTER
B
While the USB device is being used by
Computer A, switching to another computer
(such as Computer B) is not allowed.
3
COMPUTER
A
Yellow
To make Computer A ready to use the USB
device, right-click the on-screen indicator
icon or press Ctrl/F11.
COMPUTER
B
Computer B is connected to — and is ready
to use — the USB device.
For specifications, go to manhattanproducts.com.
ENGLISH
Red
Green
3
Page 4
Hi-Speed USB 2.0 Automatischer Sharing Switch Deutsch
Hardwareinstallation / Anschlüsse
Bevor Sie den Switch installieren, achten Sie darauf, dass alle
verbundenen Computer und Peripheriegeräte ausgeschaltet sind.
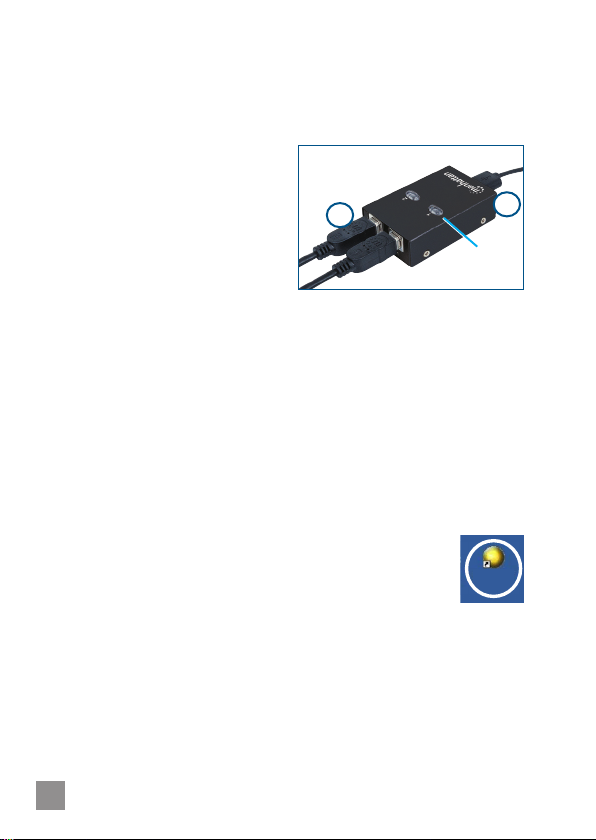
1. Sie zwei PCs an die Ports 1-2 des Switches anschließe.
2. Verbinden Sie den Geräte-Port
des Switches mit einem USB-
Gerät (Kabel liegt bei).
3. Schalten Sie den Computer und
das angeschlossene USB-Gerät
ein.
Computer-Port
1
Geräte-Port
2
Auswahltaste /
LED
Softwareinstallation
Die USB-Sharing-Anwendung auf der beiliegenden CD bietet
eine komfortable On-Screen Option (nur PCs) um zwischen der
Computerquelle umzuschalten, der das Peripheriegerät
zugewiesen ist (statt manuell die Select-Tasten auf den Switchen
zu betätigen).
1. Legen Sie die beiliegende Software-CD ein, und folgen Sie den
Bildschirm-anweisungen. Hinweis: Wenn die Installation nicht
automatisch startet, öffnen Sie den Windows Explorer, wählen Sie
das CD-Laufwerk aus und doppelklicken Sie auf die Datei
setup.exe.
2. Klicken Sie im letzen Schritt auf Finish. Schließen Sie alle
geöffneten Fenster, dann starten Sie Ihren Computer neu.
3. Nach dem Neustart finden Sie ein “USB Sharing”-
Verknüpfungssymbol auf Ihrem Desktop in der rechten
unteren Ecke (siehe Abschnitt “Verwendung”).
USB
Sharing
Softwaredeinstallation
Sie können die Anwendung über die Systemsteuerung
deinstallieren. Klicken Sie in der Systemsteuerung unter
“Software” auf Programme ändern oder entfernen, dann auf
den entsprechenden Eintrag in Liste, dann auf OK, schließlich auf
Finish.
4
DEUTSCH
Page 5
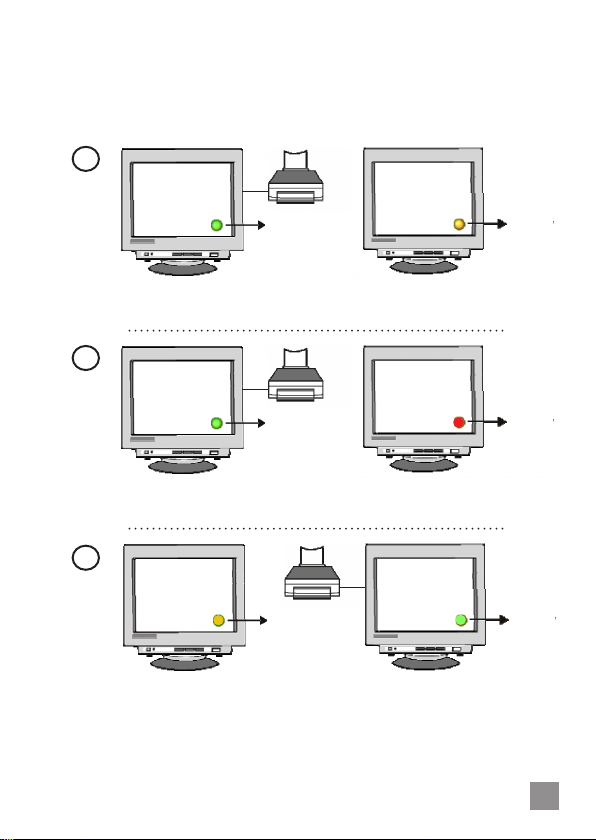
Verwendung
Jedes angeschlossene USB-Gerät ist mit den Computern an Port
1 und 2 des Switches verbunden. Der Computer an Port 1 ist der
aktive Link bis das USB-Gerät zu einem anderen angeschlossenen
Computer umgeschaltet wird.
1
COMPUTER
A
Grün
COMPUTER
B
Gelb
Computer A ist an das USB-Gerät angeschlossen und kann auf dieses zugreifen.
Damit Computer B auf das USB-Gerät
zugreifen kann, rechtsklicken Sie auf das
Symbol oder drücken Sie Ctrl/F11.
2
COMPUTER
A
Grün
Computer A verwendet aktuell das USBGerät.
COMPUTER
B
Während Computer A auf das USB-Gerät
zugreift, ist das Umschalten zu einem
anderen Computer nicht möglich.
3
COMPUTER
A
Gelb
Damit Computer A auf das USB-Gerät
zugreifen kann, rechtsklicken Sie auf das
Symbol und drücken Sie Ctrl/F11.
COMPUTER
B
Computer B ist an das USB-Gerät
angeschlossen und kann auf dieses
zugreifen.
Die Spezifikationen finden Sie auf manhattanproducts.com.
DEUTSCH
Rot
Grün
5
Page 6

Switch Automático para compartir dispositivos USB de Alta Velocidad 2.0
Español
Instalación de Hardware / Conexiones
Antes de instalar el interruptor, asegúrese de que todos los
ordenadores y los periféricos a conectar están apagados.
1. Conecte hasta dos computadoras
en los puertos 1 y 2 del switch.
2. Conecte el dispositivo en el
puerto del switch y seleccione el
Dispositivo USB (cable incluido).
3. Encienda el equipo o equipos y
el dispositivo USB conectado.
Puerto
computadora
1
Puerto de dispositivo
Boton selector /
LED indicador
2
Instalación del Software
La aplicación Sharing USB incluida en el CD ofrece una opción
conveniente en pantalla (PCs únicamente) para cambiar entre la
computadora origen y direccionarla hacia el dispositivo periférico
conectado (en lugar de presionar manualmente el botón
Seleccionar en la parte superior del switch).
1. Inserte el CD del software en la unidad de CD-ROMy siga las
instrucciones en pantalla. Nota: Si la instalación no comienza
automáticamente, abra el Explorador de Windows, vaya a la
unidad de CD-ROM y haga doble clic en el archivo setup.exe.
2. Cuando aparezca la pantalla de mantenimiento completo, haga
clic en Finalizar. Cierre todas las ventanas abiertas, a
continuación, reinicie el equipo.
3. Después del reinicio, un acceso directo USB
compartido aparecerá en el escritorio, y un icono
indicador en la esquina inferior derecha (como se
USB
Sharing
muestra en las imágenes).
Desinstalar Software
También puede desinstalar el software desde “Agregar o quitar
programas” del Panel de control. Haga clic en Agregar o quitar:
El programa de instalación Seleccione el idioma de la pantalla se
mostrará. Haga clic en Aceptar. Cuando el archivo muestra
Confirmar eliminación del sistema, haga clic en Aceptar, a
continuación, haga clic en Finalizar.
6
ESPAÑOL
Page 7
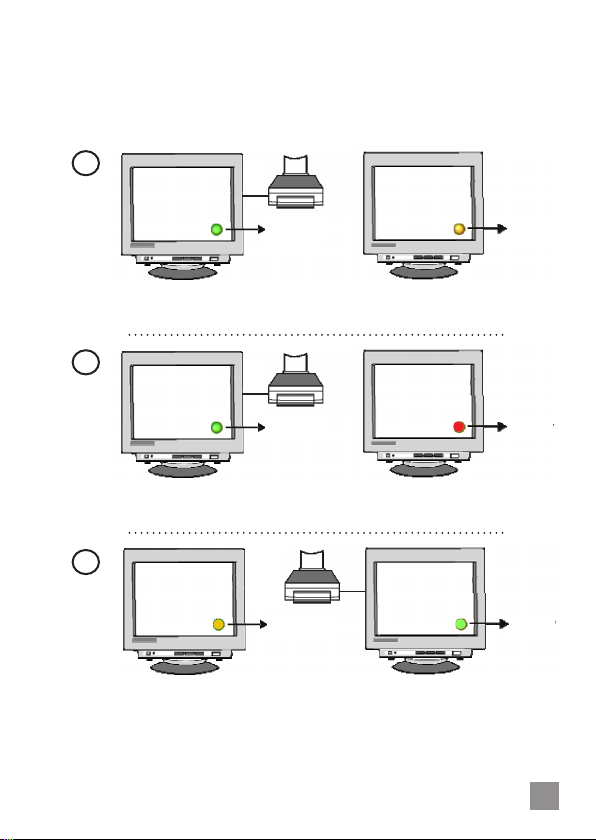
Operación
Cualquier dispositivo USB conectado se enlazan con los
ordenadores conectados a Puerto 1 y Puerto 2 del interruptor. El
ordenador conectado al puerto 1 será el enlace activo hasta que
el dispositivo USB es redirigido a otro equipo conectado.
1
COMPUTADORA
A
Verde
COMPUTADORA
B
Amarillo
Computadora A esta conectada — y
listo para usar — el dispositivo USB.
Para hacer la computadora B esté lista para
usar el dispositivo USB, haga clic en el icono
indicador en la pantalla o presione Ctrl/F11.
2
COMPUTADORA
A
Verde
Computadora A esta actualmente el
dispositivo USB.
COMPUTADORA
Si bien el dispositivo USB está siendo utilizado
por el equipo A, el cambio a otro equipo (por
ejemplo, equipo B) no está permitido.
B
3
COMPUTADORA
A
Amarillo
Para que la computadora esté lista para
usar el dispositivo USB, haga clic en el icono
indicador en la pantalla o pulse Ctrl/F11.
COMPUTADORA
Computadora B está conectada — y listo
para usar — el dispositivo USB.
B
Para mas especificaciones, visite manhattanproducts.com.
ESPAÑOL
Rojo
Verde
7
Page 8
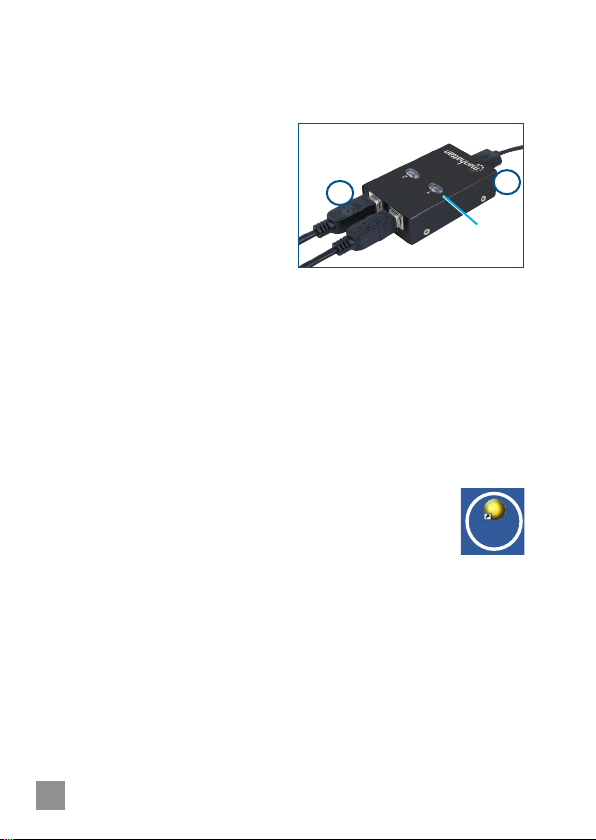
Commutateur de partage automatique USB 2.0 haut débit Français
Installation matérielle / connexions
Avant l’installation du commutateur, assurez-vous que tous les
ordinateurs et périphériques à connecter sont éteints.
1.
Connectez les deux ordinateurs à
ports 1 et 2 sur le commutateur.
2. Connectez le port dispositif du
commutateur au dispositif USB
Port ordinateur
1
Port dispositif
2
sélectionné (câble est inclus).
3. Démarrez le(s) ordinateur(s) et
le dispositif USB connecté.
Bouton de
sélection /
voyant DEL
Installation du logiciel
L’application “USB Sharing” sur le CD inclus offre une option
(seulement PCs) pour commuter la source d’ordinateur qui est
dirigée au périphérique connecté (au lieu d’appuyer sur les
boutons de sélection sur le commutateur).
1. Insérez le CD de logiciel inclus et suivez les instructions sur
l’écran. Remarque: Si l’installation ne commence pas
automatiquement, démarrez l’Explorer Windows, accédez votre
lecteur CD-ROM et double-cliquez sur le fichier setup.exe.
2. À la dernière étape, cliquez sur Finish. Fermez toutes les fenêtres
ouvertes, puis redémarrez votre ordinateur.
3. Après le redémarrage, un raccourci “USB Sharing”
apparaît sur
apparaît à droite en bas
votre bureau et un symbole d’affichage
(cf. section “Utilisation”
USB
Sharing
ci-dessous).
Désinstaller le logiciel
Vous pouvez désinstaller le logiciel via le panneau de configuration.
Dans “Programme et fonctionnalités”, vous trouvez l’entrée et
pouvez la désinstaller en cliquant sur OK. Après, cliquez sur OK à
nouveau pour confirmer le processus, puis cliquez sur Finish.
8
FRANÇAIS
Page 9
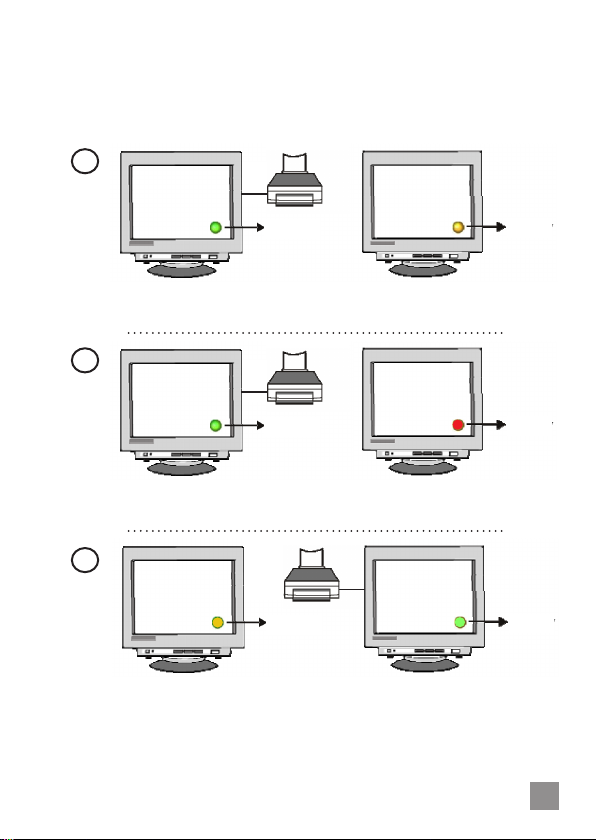
Utilisation
Chaque disposif USB connecté va lier aux ordinateurs connectés
au port 1 et 2 du commutateur. L’ordinateur connecté au port
1 est le lien actif jusqu’à le dispositif USB est redirigé à un autre
ordinateur connecté.
1
ORDINATEUR
A
Ver te
ORDINATEUR
B
Jaune
Ordinateur A est connecté au dispositif
USB et est prêt à l’utiliser.
Pour rendre ordinateur B prêt à utiliser le
dispositif USB, cliquez-droit sur le symbole
d’affichage ou appuyez sur Ctrl/F11.
2
ORDINATEUR
A
Verte
Ordinateur A est en train d’utiliser le dispositif
USB.
ORDINATEUR
B
Pendant que le dispositif USB est utilise par
ordinateur A, commuter à un autre ordinateur
(comme ordinateur B) n’est pas permis.
3
ORDINATEUR
A
Jaune
Pour rendre ordinateur A prêt à utiliser le
dispositif USB, cliquez-droit sur le symbole
d’affichage ou appuyez sur Ctrl/F11.
ORDINATEUR
B
Ordinateur B est connecté au dispositif USB
et est prêt à l’utiliser.
Vous trouvez les spécifications sur manhattanproducts.com.
FRANÇAIS
Rouge
Verte
9
Page 10
Przełącznik automatyczny Hi-Speed USB 2.0 Polski
Podłączenie
Przed podłączeniem przełącznika upewnij się, że wszystkie
urządzenia, która zamierzasz podpiąć, mają wyłączone zasilanie.
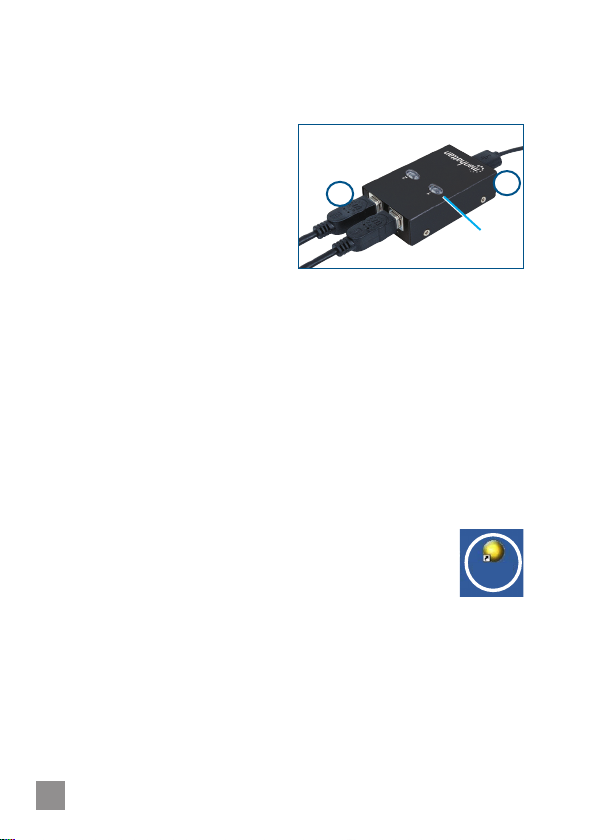
1. Podłącz odpowiednio 2
komputery do portów 1-2.
2. Podłącz współdzielone
urządzenie USB do
odpowiedniego portu
przełącznika (kabel w zestawie).
3. Włącz zasilanie komputerów i
podłączonego urządzenia.
Port p odłączenia
komputera
1
Port p odłączenia
urząd zenia USB
2
Podświetlany
diodow o przycisk
przełą czania
Instalacja oprogramowania
Aplikacja „USB sparing” umożliwia wybór aktywnego komputera
(mającego w danej chwili bezpośrednie połączenie z urządzeniem
współdzielonym) z poziomu systemu, bez konieczności używania
klawiszy na przełączniku. Aplikacja ta przeznaczona jest tylko dla
systemów Windows.
1. Umieść załączoną płytę z oprogramowaniem w napędzie CD/
DVD-ROM komputera i postępuj zgodnie z wyświetlanym
instrukcjami. W przeciwnym razie należy ręcznie uruchomić plik
„setup.exe” znajdujący się na płycie.
2. Kiedy pojawi się okno z informacja o zakończeniu instalacji,
kliknij Zakończ (Finish) i zrestartuj komputer.
3. Po ponownym uruchomieniu komputera na pulpicie
pojawi się skrót do aplikacji „USB sharing”. Jednocześnie
w lewym dolnym rogu ekranu pojawi się wskaźnik
USB
Sharing
statusu podłączenia (tak jak opisano na przykładzie
poniżej).
Deinstalacja oprogramowania
Oprogramowanie możemy odinstalować w zakładce Dodaj lub
usuń programy (w systemie Vista/7 „Programy i funkcje”), w
„Panelu sterowania”.
10
POLSKI
Page 11
Użytkowanie
Podłączone do przełącznika urządzenie USB może współpracować w
danym momencie z jednym z 2 (lub 4) podłączonych komputerów.
Domyślnie aktywne jest połączenie z komputerem podłączonym
do portu 1.
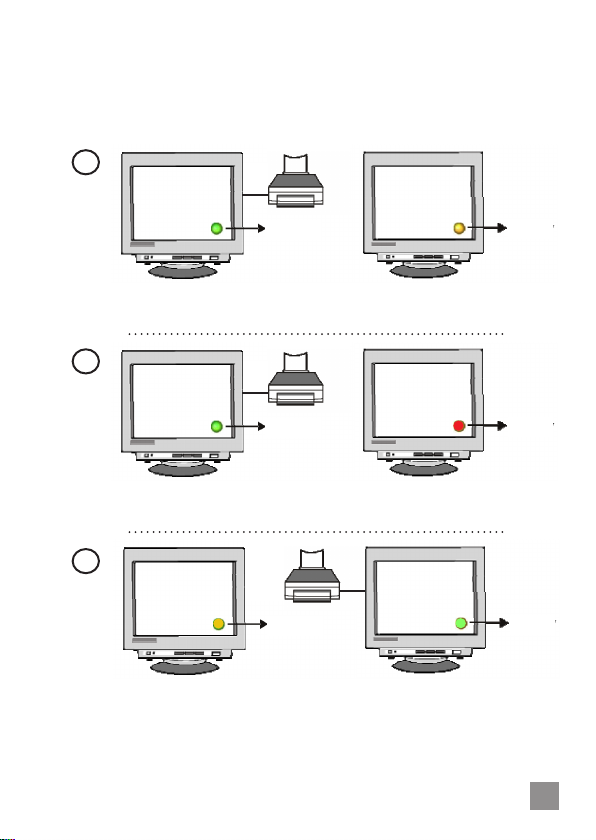
1
KOMPUTER
A
Zielona
KOMPUTER
B
Żółta
Komputer A jest podłączony do
urządzenia USB. Urządzenie jest gotowe
do użycia.
Aby podłączyć komputer B do urządzenia USB, należy
kliknąć prawym klawiszem myszki na ikonę wskaźnika
statusu podłączenia lub wcisnąć CTRL/F11.
2
KOMPUTER
A
Zielona
Komputer A korzysta z urządzenia USB.
KOMPUTER
B
W tym momencie nie jest możliwe
przełączenie na komputer B.
3
KOMPUTER
A
Żółta
Aby podłączyć komputer A do urządzenia USB, należy
kliknąć prawym klawiszem myszki na ikonę wskaźnika
statusu podłączenia lub wcisnąć CTRL/F11.
KOMPUTER
B
Komputer B jest podłączony do urządzenia
USB. Urządzenie jest gotowe do użycia.
Pełną specyfikację produktów znajdą Państwo na stronie
manhattanproducts.com.
POLSKI
Czerwona
Zielona
11
Page 12
Switch Automatico Hi-Speed USB 2.0 Italiano
Installazione Hardware / Connessioni
Prima di installare lo switch, assicurarsi che tutti i computer e le
periferiche da connettere siano spente.
1. Collegare i due computer alle
porte 1 & 2 dello switch.
2. Collegare la porta della periferica
sullo switch alla periferica USB
selezionata (cavo incluso).
3. Accendere i computer e la
periferica USB selezionata.
Porta d el
computer
1
Porta della periferica
2
Tasto Selezio ne /
indicatore LED
Installazione del Software
L’applicazione di condivisione USB presente sul CD incluso offre
una pratica opzione on-screen (solo PC) per commutare la
sorgente del computer che è diretta alla periferica connessa
(invece dei dover premere manualmente un tasto direttamente
sulla switch).
1. Inserire il CD incluso contenente il software all’interno del CD ROM e seguire le istruzioni sullo schermo. Nota: Se l’installazione
non parte automaticamente, aprire Windows Explorer, navigare
nel CD-ROM drive e cliccare due volte su setup.exe file.
2. Quando compare la schermata di Maintenance Complete
(manutenzione completa), cliccare Finish (termina). Chiudere
qualsiasi finestra aperta, quindi ravviare il computer.
3. Dopo aver riavviato, una piccola immagine di
condivisione USB apparirà sulla desktop, ed una icona
indicatrice comparirà nell’angolo in basso a destra
USB
Sharing
(come mostrato nell’ immagine sotto).
Disinstallazione del Software
Si può disinstallare il software da “Add or Remove Programs”
(aggiungi o rimuovi programmi) nel Pannello di Controllo.
Cliccare su Add or Remove (aggiungi o rimuovi): apparirà la
schermata di scelta della lingua. Cliccare OK. Quando compare il
prompt di conferma della cancellazione del file, cliccare OK per
confermare, quindi cliccare Finish (termina).
12
ITALIANO
Page 13
Funzionamento
Qualsiasi periferica USB collegata si connetterà ai computer collegati alla Porta 1 e alla Porta 2 dello switch. Il computer connesso
alla Porta 1 risulterà come collegamento attivo fino a quando la
periferica USB non è reindirizzata ad un altro computer connesso.
1
COMPUTER
A
Verde
COMPUTER
B
Giallo
Computer A è connesso alla periferica
USB — ed è pronto all’uso — .
Per rendere il Computer B pronto all’uso della periferica USB, cliccare con il tasto destro del mouse
sull’icona sullo schermo oppure premere Ctrl/F11.
2
COMPUTER
A
Verde
Computer A sta correntemente usando la
periferica USB.
COMPUTER
B
Siccome la periferica USB è utilizzata dal
Computer A, la commutazione ad un altro
computer (come il Computer B) non è permessa.
3
COMPUTER
A
Giallo
Per rendere il Computer A pronto per usare la periferica USB, premere con il tasto destro del mouse
sull’icona presente sullo schermo o premere Ctrl/F11.
COMPUTER
B
Il Computer B è collegato alla periferica USB
— ed è pronto all’uso — .
Per ulteriori specifiche, visita il sito manhattanproducts.com.
ITA LI ANO
Rosso
Verde
13
Page 14
Disposal of Electric and Electronic Equipment per the European Union’s WEEE Directive: 2012/19/EU
English: This symbol on the product or its packaging indicates that this product shall not be treated
as household waste. Instead, it should be
taken to an applicable collection point for
the recycling of electrical and electronic
equipment. By ensuring this product is disposed of correctly, you will help prevent potential
negative consequences to the environment and
human health, which could otherwise be caused
by inappropriate waste handling of this product.
If your equipment contains easily removable batteries or accumulators, dispose of these separately
according to your local requirements. The recycling
of materials will help to conserve natural resources.
For more detailed information about recycling of
this product, contact your local city office, your
household waste disposal service or the shop
where you purchased this product. In countries
outside of the EU: If you wish to discard this product, contact your local authorities and ask for the
correct manner of disposal.
Deutsch: Dieses auf dem Produkt oder der Verpackung angebrachte Symbol zeigt an, dass
dieses Produkt nicht mit dem Hausmüll entsorgtwerden darf. In Übereinstimmung mit der
Richtlinie 2012/19/EU des Europäischen Parlaments und des Rates über Elektro- und Elektronik-Altgeräte (WEEE) darf dieses Elektrogerät
nicht im normalen Hausmüll oder dem Gelben
Sack entsorgt werden. Wenn Sie dieses Produkt
entsorgen möchten, bringen Sie es bitte zur
Verkaufsstelle zurück oder zum RecyclingSammelpunkt Ihrer Gemeinde.
Español: Este símbolo en el producto o su embalaje indica que el producto no debe tratarse
como residuo doméstico. De conformidad con la
Directiva 2012/19/UE de la UE sobre residuos de
aparatos eléctricos y electrónicos (RAEE), este
WASTE ELECTRICAL & ELECTRONIC EQUIPMENT
producto eléctrico no puede desecharse se con
el resto de residuos no clasificados. Deshágase de
este producto devolviéndolo a su punto de venta
o a un punto de recolección municipal para su
reciclaje.
Français: Ce symbole sur Ie produit ou son emballage signifie que ce produit ne doit pas être
traité comme un déchet ménager. Conformément
à la Directive 2012/19/UE sur les déchets d’équipements électriques et électroniques (DEEE), ce
produit électrique ne doit en aucun cas être mis
au rebut sous forme de déchet municipal non
trié. Veuillez vous débarrasser de ce produit en
Ie renvoyant à son point de vente ou au point de
ramassage local dans votre municipalité, à des fins
de recyclage.
Italiano: Questo simbolo sui prodotto o sulla relativa confezione indica che il prodotto non va trattato come un rifiuto domestico. In ottemperanza
alla Direttiva UE 2012/19/UE sui rifiuti di apparecchiature elettriche ed elettroniche (RAEE), questa
prodotto elettrico non deve essere smaltito come
rifiuto municipale misto. Si prega di smaltire il
prodotto riportandolo al punto vendita o al punto
di raccolta municipale locale per un opportuno
riciclaggio.
Polski: Jeśli na produkcie lub jego opakowaniu
umieszczono ten symbol, wówczas w czasie utylizacji nie wolno wyrzucać tego produktu wraz z
odpadami komunalnymi. Zgodnie z Dyrektywą
Nr 2012/19/UE w sprawie zużytego sprzętu elektrycznego i elektronicznego (WEEE), niniejszego
produktu elektrycznego nie wolno usuwać jako nie
posortowanego odpadu komunalnego. Prosimy
o usuniecie niniejszego produktu poprzez jego
zwrot do punktu zakupu lub oddanie do miejscowego komunalnego punktu zbiórki odpadów
przeznaczonych do recyklingu.
Nort h & South Ame rica
IC Intracom Americas
550 Commerce B lvd.
Oldsmar, FL 34 677
USA
Printed on recycled paper.
14
Asia & Africa
IC Intraco m Asia
4-F, No. 77, Sec. 1, Xintai 5th R d.
Xizhi Dis t., New Taipei Cit y 221
Taiwan
Europe
IC Intracom Europe
Löhbach er Str. 7
D-58 553 Halve r
Germany
Page 15
English: For warranty information, go to manhattanproducts.com/warranty.
Deutsch: Garantieinformationen finden Sie unter manhattanproducts.com/warranty.
Español: Si desea obtener información sobre la garantía, visite manhattanproducts.com/warranty.
Français: Pour consulter les informations sur la garantie, visitez manhattanproducts.com/warranty.
Polski: Informacje dotyczące gwarancji znajdują się na stronie manhattanproducts.com/warranty.
Italiano: Per informazioni sulla garanzia, accedere a manhattanproducts.com/warranty.
En México: Póliza de Garantía Manhattan — Datos del importador y responsable ante el consumidor IC Intracom
México, S.A.P.I. de C.V. • Av. Interceptor Poniente # 73, Col. Parque Industrial La Joya, Cuautitlán Izcalli, Estado de
México, C.P. 54730, México. • Tel. (55)1500-4500
La presente garantía cubre los siguientes productos contra cualquier defecto de fabricación en sus materiales y
mano de obra.
A. Garantizamos los productos de limpieza, aire comprimido y consumibles, por 60 dias a partir de la fecha de entrega,
o por el tiempo en que se agote totalmente su contenido por su propia función de uso, lo que suceda primero.
B. Garantizamos los productos con partes móviles por 3 años.
C. Garantizamos los demás productos por 5 años (productos sin partes móviles), bajo las siguientes condiciones:
1.
Todos los productos a que se refiere esta garantía, ampara su cambio físico, sin ningún cargo para el consumidor.
2. El comercializador no tiene talleres de servicio, debido a que los productos que se garantizan no cuentan con
reparaciones, ni refacciones, ya que su garantía es de cambio físico.
3. La garantía cubre exclusivamente aquellas partes, equipos o sub-ensambles que hayan sido instaladas de
fábrica y no incluye en ningún caso el equipo adicional o cualesquiera que hayan sido adicionados al mismo
por el usuario o distribuidor.
Para hacer efectiva esta garantía bastará con presentar el producto al distribuidor en el domicilio donde fue adquirido o en el domicilio de IC Intracom México, S.A.P.I. de C.V., junto con los accesorios contenidos en su em-
paque, acompañado de su póliza debidamente llenada y sellada por la casa vendedora (indispensable el sello y
fecha de compra) donde lo adquirió, o bien, la factura o ticket de compra original donde se mencione claramente
el modelo, número de serie (cuando aplique) y fecha de adquisición. Esta garantía no es válida en los siguientes
casos: Si el producto se hubiese utilizado en condiciones distintas a las normales; si el producto no ha sido operado conforme a los instructivos de uso; o si el producto ha sido alterado o tratado de ser reparado por el consumidor o terceras personas.
REGULATORY STATEMENTS
WARRANTY INFORMATION
This equipment has been tested and found to comply with the limits for a Class B digital device, pursuant to
Part 15 of Federal Communications Commission (FCC) Rules. These limits are designed to provide reasonable protection against harmful interference in a residential installation. This equipment generates, uses
and can radiate radio frequency energy, and if not installed and used in accordance with the instructions
may cause harmful interference to radio communications. However, there is no guarantee that interference
will not occur in a particular installation. If this equipment does cause harmful interference to radio or
television reception, which can be determined by turning the equipment off and on, the user is encouraged to try to correct the interference by one or more of the following measures: reorient or relocate the
receiving antenna; increase the separation between the equipment and the receiver; connect
equipment to an outlet on a circuit different from the receiver; or consult the dealer or an
experienced radio/TV technician for help.
English: This device complies with the requirements of directives 2014/53/EU and/or 2004/
108/EC & 2006/95/EC. The Declaration of Conformity for this product is available at:
Deutsch: Dieses Gerät enspricht den Direktiven 2014/53/EU und/oder 2004/108/EC & 2006/
95/EC. Die Konformitätserklärung für dieses Produkt finden Sie unter:
Español: Este dispositivo cumple con los requerimientos de las Directivas 2014/53/UE y/o 2004/108/EC &
2006/95/EC. La declaración de conformidad para este producto esta disponible en:
Français: Cet appareil satisfait aux exigences des directives 2014/53/UE et/ou 2004/108/CE & 2006/95/CE.
La Déclaration de Conformité pour ce produit est disponible à l’adresset :
Polski: Urządzenie spełnia wymagania dyrektyw 2014/53/UE i/lub 2004/108/EC & 2006/95/EC. Deklaracja
zgodności dostępna jest na stronie internetowej producenta:
Italiano: Questo dispositivo è conforme alle direttive 2014/53/UE e/o 2004/108/EC & 2006/95/EC. La
dichiarazione di conformità per questo prodotto è disponibile al:
FCC Class B
CE (RE / EMC / LVD)
manhattanproducts.com
15
Page 16

All trademarks and trade names are the property of their respective owners.
Alle Marken und Markennamen sind Eigentum Ihrer jeweiligen Inhaber.
Todas las marcas y nombres comerciales son propiedad de sus respectivos dueños.
Toutes les marques et noms commerciaux sont la propriété de leurs propriétaires respectifs.
Tutti i marchi registrati e le dominazioni commerciali sono di proprietà dei loro rispettivi proprietari.
Wszystkie znaki towarowe i nazwy handlowe należą do ich właścicieli.
Manhattan is a trademark of IC Intracom, registered in the U.S. and other countries.
© IC Intracom. All rights reserved.
 Loading...