

Page 1
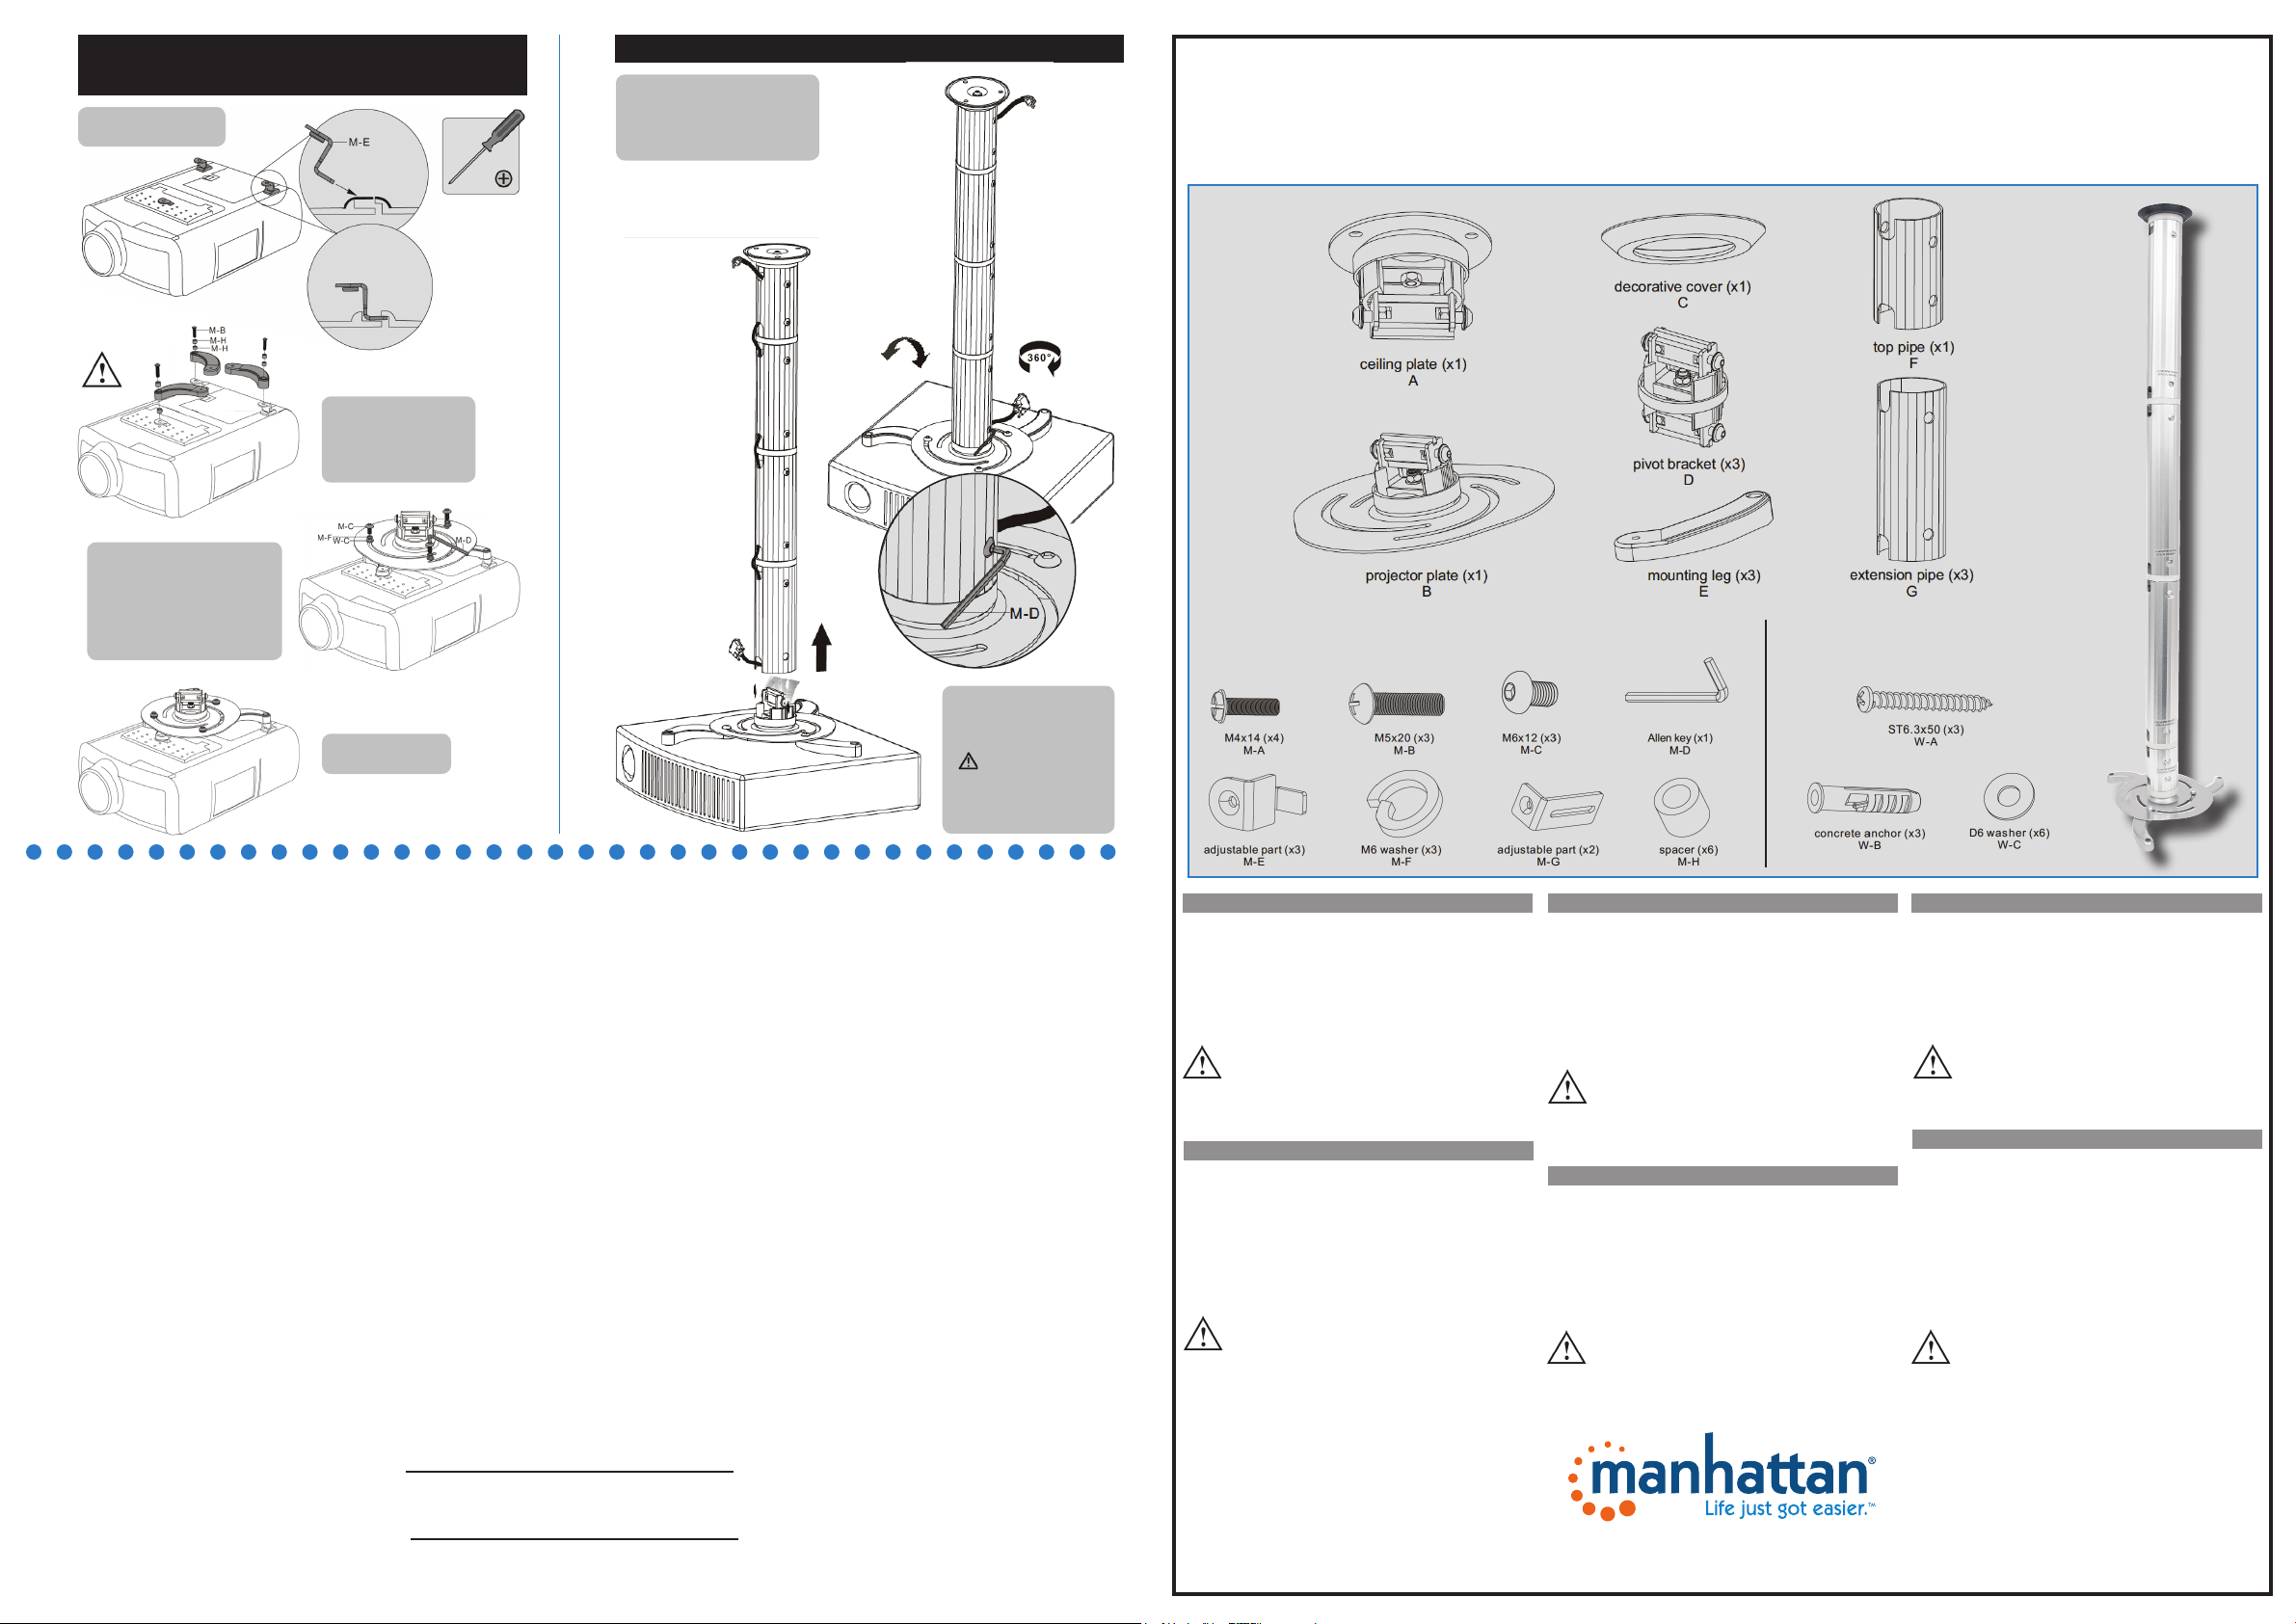
Attach the mounting legs and projector
3C
plate (Philips)
Insert the 3 adjustable
parts on the projector.
Attach the projector to the mount and adjust
4
Press the 2 bolts in at the same
time and connect the projector
plate to the bottom extension
pipe. Repeat for each section
of pipe.
¡
UNIVERSAL PROJECTOR CEILING MOUNT
INSTALL GUIDE MODEL 424820
¡
Screw the legs into the
mounting holes on the
projector. Note: Do not
tighten the screws at
this point.
• Position the projector plate
on the mounting legs as
close as possible to the
projector’s center of gravity.
• Align the legs with the slots
on the plate and secure the
plate to the legs.
Now tighten all 6
screws on the legs.
3C
Deutsch – Anbringung der Montagefüße und Beamerplatte (Philips): Bringen Sie die drei
justierbaren Teile am Beamer an. Schrauben Sie die Füße in die Montagevertiefungen des Beamers. Hinweis: Ziehen Sie die
Schrauben jetzt noch nicht fest. Platzieren Sie die Beamerplatte so zentral wie möglich auf den Montagefüßen am Beamer.
Richten Sie die Montagefüße mit den Einkerbungen der Platte aus und fixieren Sie die Platte an den Montagefüßen. Ziehen
Sie alle sechs Schrauben an den Montagefüßen fest.
Español – Fije las patas de montaje y placa (Philips): Coloque las 3 piezas ajustables al proyector.
Atornille las patas de montaje en los orificios del proyecto. Nota: No apriete los tornillos aun. Coloque la placa del proyector
en las patas de montaje lo más cerca posible del centro del proyec tor. Alinee las patas con las ranuras de la placa y fije la
placa a las piernas. Ahora apriete los 6 tornillos de las patas.
Français – Fixez les pieds de montage et la plaque pour projecteur (Philips) : Insérez les
3 pièces réglables sur le projecteur. Vissez les pieds dans les trous de montage du projecteur. Remarque : ne serrez pas les
vis à ce stade. Positionnez la plaque pour projecteur sur les pieds, aussi près que possible du centre de gravité du projecteur.
Alignez les pieds sur les encoches de la plaque et fixez la plaque aux pieds. Serrez maintenant les 6 vis sur les pieds.
Polski – Montaż nóżek mocujących do projektora (Philips): Umieść 3 elementy regulacyjne w
odpowiednich otworach projektora. Przykręć nóżki do otworów montażowych w projektorze. Uwaga: Nie należy dokręcać
mocno śrub na tym etapie montażu. Umieść uchwyt projektora na nóżkach jak najbliżej środka ciężkości projektora. Dopasuj
otwory w nóżkach oraz uchwycie i skręć całość. Teraz należy dokręcić wszystkie sześć śrub.
Italiano – Fissare i piedini e la placca al proiettore (Philips): Inserire le 3 parti regolabili sul
proiettore. Avvitare i piedini sui fori di montaggio sul proiettore. Nota: Non stringere le viti in questo momento. Posizionare
la placca sui piedini di montaggio il più vicino possibile al centro di gravità del proiettore. Allineare le gambe con le
scanalature sulla piastra e assicurare quest’ultima sui piedini. Stringere ora tutte le 6 viti sui piedini.
English: For warranty information, go to manhattan- products. com/warrant y.
Deutsch: Garantieinformationen finden Sie hier unter manhattan -product s.com/warra nty.
Español: Si desea obtener información sobre la garantía, visite manhattan- products .com/warrant y.
Français: Pour consulter les informations sur la garantie, rendez vous à l’adresse manhattan- products. com/warrant y.
Polski: Informacje dotyczące gwarancji znajdują się na stronie manhattan- products .com/warran ty.
Italiano: Per informazioni sulla garanzia, accedere a manhattan- products. com/warrant y.
En México: Póliza de Garantía Manhattan – Datos del importador y responsable ante el consumidor IC Intracom México,
S.A.P.I. de C.V. • Av. Interceptor Poniente # 73, Col. Parque Industrial La Joya, Cuautitlan Izcalli, Estado de México, C.P. 54730,
México. • Tel. (55)1500-4500
La presente garantía cubre los siguientes productos contra cualquier defecto de fabricación en sus materiales y mano
de obra.
A. Garantizamos los productos de limpieza, aire comprimido y consumibles, por 60 dias a partir de la fecha de entrega, o
por el tiempo en que se agote totalmente su contenido por su propia función de uso, lo que suceda primero.
B. Garantizamos los productos con partes móviles por 3 años.
North & South America
IC Intracom Americas
550 Commerce Blvd.
Oldsmar, FL 34677
All trademarks and trade names are the property of their respective owners.
Alle Marken und Markennamen sind Eigentum I hrer jeweiligen Inhaber.
Todas las marcas y nombres comerciales son propiedad de sus respectivos dueños.
© IC Intracom. All rights reserved. Manhattan is a trademark of IC Intracom, registered in the U.S. and other countries.
WARRANTY INFORMATION
Asia & Africa
IC Intracom Asia
Far Eastern Technology Center
USA
7-F No. 125, Section 2, Da Tong Rd.
Shijr, Taipei • Taiwan, ROC
-10˚–10˚
• Turn all the pipe bolts
counterclockwise to
tighten the entire pipe
assembly.
Important: Make sure
the projector is securely
locked in place before
releasing it.
• Position as desired.
4
Deutsch – Anbringung des Beamers an der Deckenplatte und Justierung: Drücken Sie die
zwei 2 Schrauben gleichzeitig herunter und verbinden Sie die Beamerplatte mit dem unteren Verlängerungsrohr. Drehen Sie
alle Schrauben gegen den Uhrzeigersinn, um den gesamten Rohrverbund festzuziehen. Wichtig: Achten Sie darauf, dass der
Beamer sicher fixiert ist. Richten Sie ihn dann wie gewünscht aus.
Passen Sie den Neigungswinkel wie gewünscht an.
Español – Coloque el proyector al soporte y ajuste: Presione los 2 tornillos al mismo tiempo y conecte
el proyector a la base del tubo inferior. Repita para cada sección de la tubería. D e vuelta a todos los pernos del tubo en sentido
a las agujas del reloj, para apretar todo el conjunto de la tubería. Importante: Confirme de que el proyector está asegurado
antes de soltarlo. Posicione según lo desee.
Français – Fixez le projecteur au support de montage au plafond : Appuyez simultanément sur
les deux boulons et raccordez la plaque du projecteur au tube d’extension inférieur. Répétez l’opération pour chaque partie du
tube. Important : assurez-vous que le projecteur est correctement fixé avant de le lâcher. Ajustez à votre convenance.
Polski – Montaż projektora do uchwytu oraz regulacja: Wciśnij jednocześnie dwie śruby i połącz
dolną rurę z uchwytem projektora. Powtórz czynność dla każdej z rur. Skręć wszystkie śruby ruchem przeciwnym do
wskazówek zegara aby zabezpieczyć całą konstrukcję. Ważne: Upewnij się, że projektor jest bezpiecznie zamocowany i nie
stwarza zagrożenia. Ustaw pożądaną pozycję.
Italiano – Attaccare il proiettore alla staffa a soffitto e regolare: Premere le 2 viti
contemporaneamente e collegare la placca del proiettore alla par te superiore dei tubi di espansione. R ipetere per ciascuna
sezione dei tubi. Girare tutti i bulloni del tubo in senso antiorario per stringere l’intero gruppo di tubi. Importante: Assicurarsi
che il proiettore sia bloccato in posizione stabile e sicura prima di rilasciarlo. Posizionare come desiderato.
C. Garantizamos los demás productos por 5 años (productos sin partes móviles), bajo las siguientes condiciones:
1. Todos los productos a que se reere esta garantía, ampara su cambio físico, sin ningún cargo para el consumidor.
2. El comercializador no tiene talleres de ser vicio, debido a que los productos que se garantizan no cuentan con
reparaciones, ni refacciones, ya que su garantía es de cambio físico.
3. La garantía cubre exclusivamente aquellas partes, equipos o sub-ensambles que hayan sido instaladas de fábrica
y no incluye en ningún caso el equipo adicional o cualesquiera que hayan sido adicionados al mismo por el usuario
o distribuidor.
Para hacer efectiva esta garantía bastará con presentar el producto al distribuidor en el domicilio donde fue adquirido o
en el domicilio de IC Intracom México, S.A.P.I. de C.V., junto con los accesorios contenidos en su empaque, acompañado
de su póliza debidamente llenada y sellada por la casa vendedora (indispensable el sello y fecha de compra) donde lo
adquirió, o bien, la factura o ticket de compra original donde se mencione claramente el modelo, número de serie (cuando
aplique) y fecha de adquisición. Esta garantía no es válida en los siguientes casos: Si el producto se hubiese utilizado en
condiciones distintas a las normales; si el producto no ha sido operado conforme a los instructivos de uso; o si el producto
ha sido alterado o tratado de ser reparado por el consumidor o terceras personas.
Europe
IC Intracom Europe
Löhbacher Str. 7
D-58553 Halver
Germany
Toutes les marques et noms commerciaux sont la propriété de leurs propriétaires respectifs.
Tutti i marchi registrati e le dominazioni commerciali sono di proprietà dei loro rispettivi proprietari.
Wszystkie znaki towarowe i nazwy handlowe należą do ich właścicieli.
Package M Package W
English
• Handle all parts with care and check the parts list to ensure nothing
is missing.
• Be sure that you understand all instructions before you begin
assembly, as additional safety notes may be presented.
• If you are uncertain about this product’s assembly or the reliability
of any supporting structure, consult a qualied source.
• Do not use this product for any purpose other than that for which
it is intended. Manhattan cannot be held responsible for damage
or injury resulting from improper assembly, mounting or use.
WARNING! This mount must be securely attached. If the
mount is not properly installed, it may fall and cause injury
and damage. If the hardware you need for your installation
is not included, consult your local hardware store for proper mounting hardware.
For specifications, go to manhattan-products.com.
• Sprawdź wszystkie dostępne elementy z ulotką upewniając się, że nic zego nie brakuje.
• Przed rozpoczęciem montażu upewnij się, że rozumiesz wszystk ie
instrukcje oraz dodatkowe informacje dotyczące bezpieczeństwa.
• Jeśli nie jesteś pewien co do montażu tego produktu lub powierzchni
do której produkt ma być przymocowany, zasięgnij porady u autory zowanego źródła.
• Nie uż ywaj tego produktu do jakichkolwiek innych celów niż jest
przeznaczony. Manhattan nie ponosi odpowiedzialności za szkody
powstałe w wyniku niewłaściwego montażu oraz za szkody powstałe
w wyniku wykorzystywania produktu niezgodnie z przeznaczeniem.
UWAGA! Uchwyt musi być solidnie przymocowany. Niewłaściwe
zamontowany może spaść powodując uszkodzenia oraz
zagrożenie. W razie potrzeby należ y zaopatrzyć się w odpowiedni sprzęt dla właściwego montażu uchw ytu.
Specykacja techniczna produktu dostępna jest na stronie manhattan-
products.com.
Important: Read before use. • Importante: Leer antes de usar.
Safety Cautions
Polski
Środki bezpieczeństwa
Deutsch
• Behandeln Sie die beiliegenden Teile vorsichtig und überprüfen Sie
anhand der Teileliste, dass keines fehlt.
• Lesen Sie alle Anweisungen vor dem Zusammenbau sorgfältig durch,
teilweise können zusätzliche Sicherheits-hinweise enthalten sein.
• Wenn Sie sich beim Zusammenbau dieses Produkts oder bei der
Stützlast der tragenden Struktur unsicher sind, ziehen Sie einen Fach-
mann hinzu.
• Nutzen Sie dieses Produkt nicht für einen anderen Verwendungszweck
als in dieser Anleitung beschrieben. Manhattan übernimmt keine
Haftung für Sach- oder Personen-schäden, die durch unsachgemäßen
Zusammenbau, Montage oder Nutzung entstehen.
ACHTUNG! Diese Halterung muss sicher befestigt werden. Wird
sie nicht ordnungsgemäß angebracht, k ann sie herunterfallen
und Schäden und Verletzungen verursachen. S ollte Sie für die
Installation spezielle Materialien benötigen, welche nicht im Lieferum-
fang enthalten sind, so wenden Sie sich bitte an Ihren lokalen Baumarkt.
Die Spezikationen nden Sie auf manhattan-products.com.
Sicherheitshinweise
Français
• Utilisez toutes les pièces avec soin et vér iez avec la liste de pièces que
la livraison est complète.
• Assurez-vous que vous comprenez toutes les instructions avant de
commencer l’assemblage car des consignes de sécurité supplémentaires
peuvent être présentées.
• Si vous êtes incertain de l’assemblage du produit ou de la abilité de la
structure supportant, veuillez vous adresser à un spécialiste qualié.
• Utilisez le support exclusivement en conformité avec l’usage prévu.
Manhattan ne se porte pas garante en cas de dommages résultant
d’un assemblage, montage ou utilisation non conforme.
ATTENTION! Ce support de montage doit être attaché fermement. S’il n’est pas installé correctement, il peut tomber et causer
du dommage. Si le matériel vous avez besoin pour votre installa-
tion n’est pas inclus, consultez votre quincaillerie locale pour le matériel
nécessaire.
Vous trouvez les spécifications sur manhattan-products.com.
Précautions de sécurité
manhattan-products.com
Español
• Maneje todas las partes con cuidado y asegúrese que no falta nada de
la lista de contenido.
• Antes de ensamblar, procure haber entendido todas las instrucciones,
así como las notas de seguridad que le presentamos.
• Si no está seguro acerca de como ensamblar el producto o de la abili-
dad de la estructura de soporte, consulte a una persona calificada.
• No utilice este producto para ningún otro propósito que el que se
pretende. Manhattan no se hace responsable de daños o lesiones
resultantes de un ensamble montaje o uso inadecuado.
!ADVERTENCIA! Este montaje debe ser firmemente asegurado.
Si el montaje no es instalado apropiadamente puede causar daños
o lesiones. Si el hardware necesario para la instalación no está
incluido, consulte a su tienda local por el hardware necesario.
Para más especificaciones, visite manhattan-products.com.
Precauciones de Seguridad
Italiano
• Maneggiare tutte le parti con cura e vericare la lista delle parti per
assicurarsi che nulla sia mancante.
• Prendere visione delle istruzioni di montaggio ed assicurarsi di averle
comprese completamente prima di iniziare l’assemblaggio, prestare
attenzione anche alle note supplementari di sicurezza che possono
essere fornite.
• Se non siete completamente sicuri in merito all’assemblaggio del
prodotto o all’affidabilità della struttura di supporto, consultate un
esperto.
• Non utilizzato questo prodotto per scopi diversi da quelli per cui è
stato progettato. Manhattan non può essere ritenuta responsabile per
danni o lesioni provocati da un assemblaggio, un montaggio o un uso
improprio.
ATTENZIONE! Questo supporto deve essere fissato saldamente.
Se il supporto non è installato correttamente, potrebbe cadere
e causare danni e lesioni. Se l’hardware di cui necessitate per
l’installazione non è incluso, consultare un rivenditore locale per individuare il materiale hardware di montaggio più adeguato.
Per ulteriori specifiche, visitate il sito manhattan-products.com.
Avvertenze di sicurezza
MAN-424820-QIG-ML1-0314-05-0
Page 2
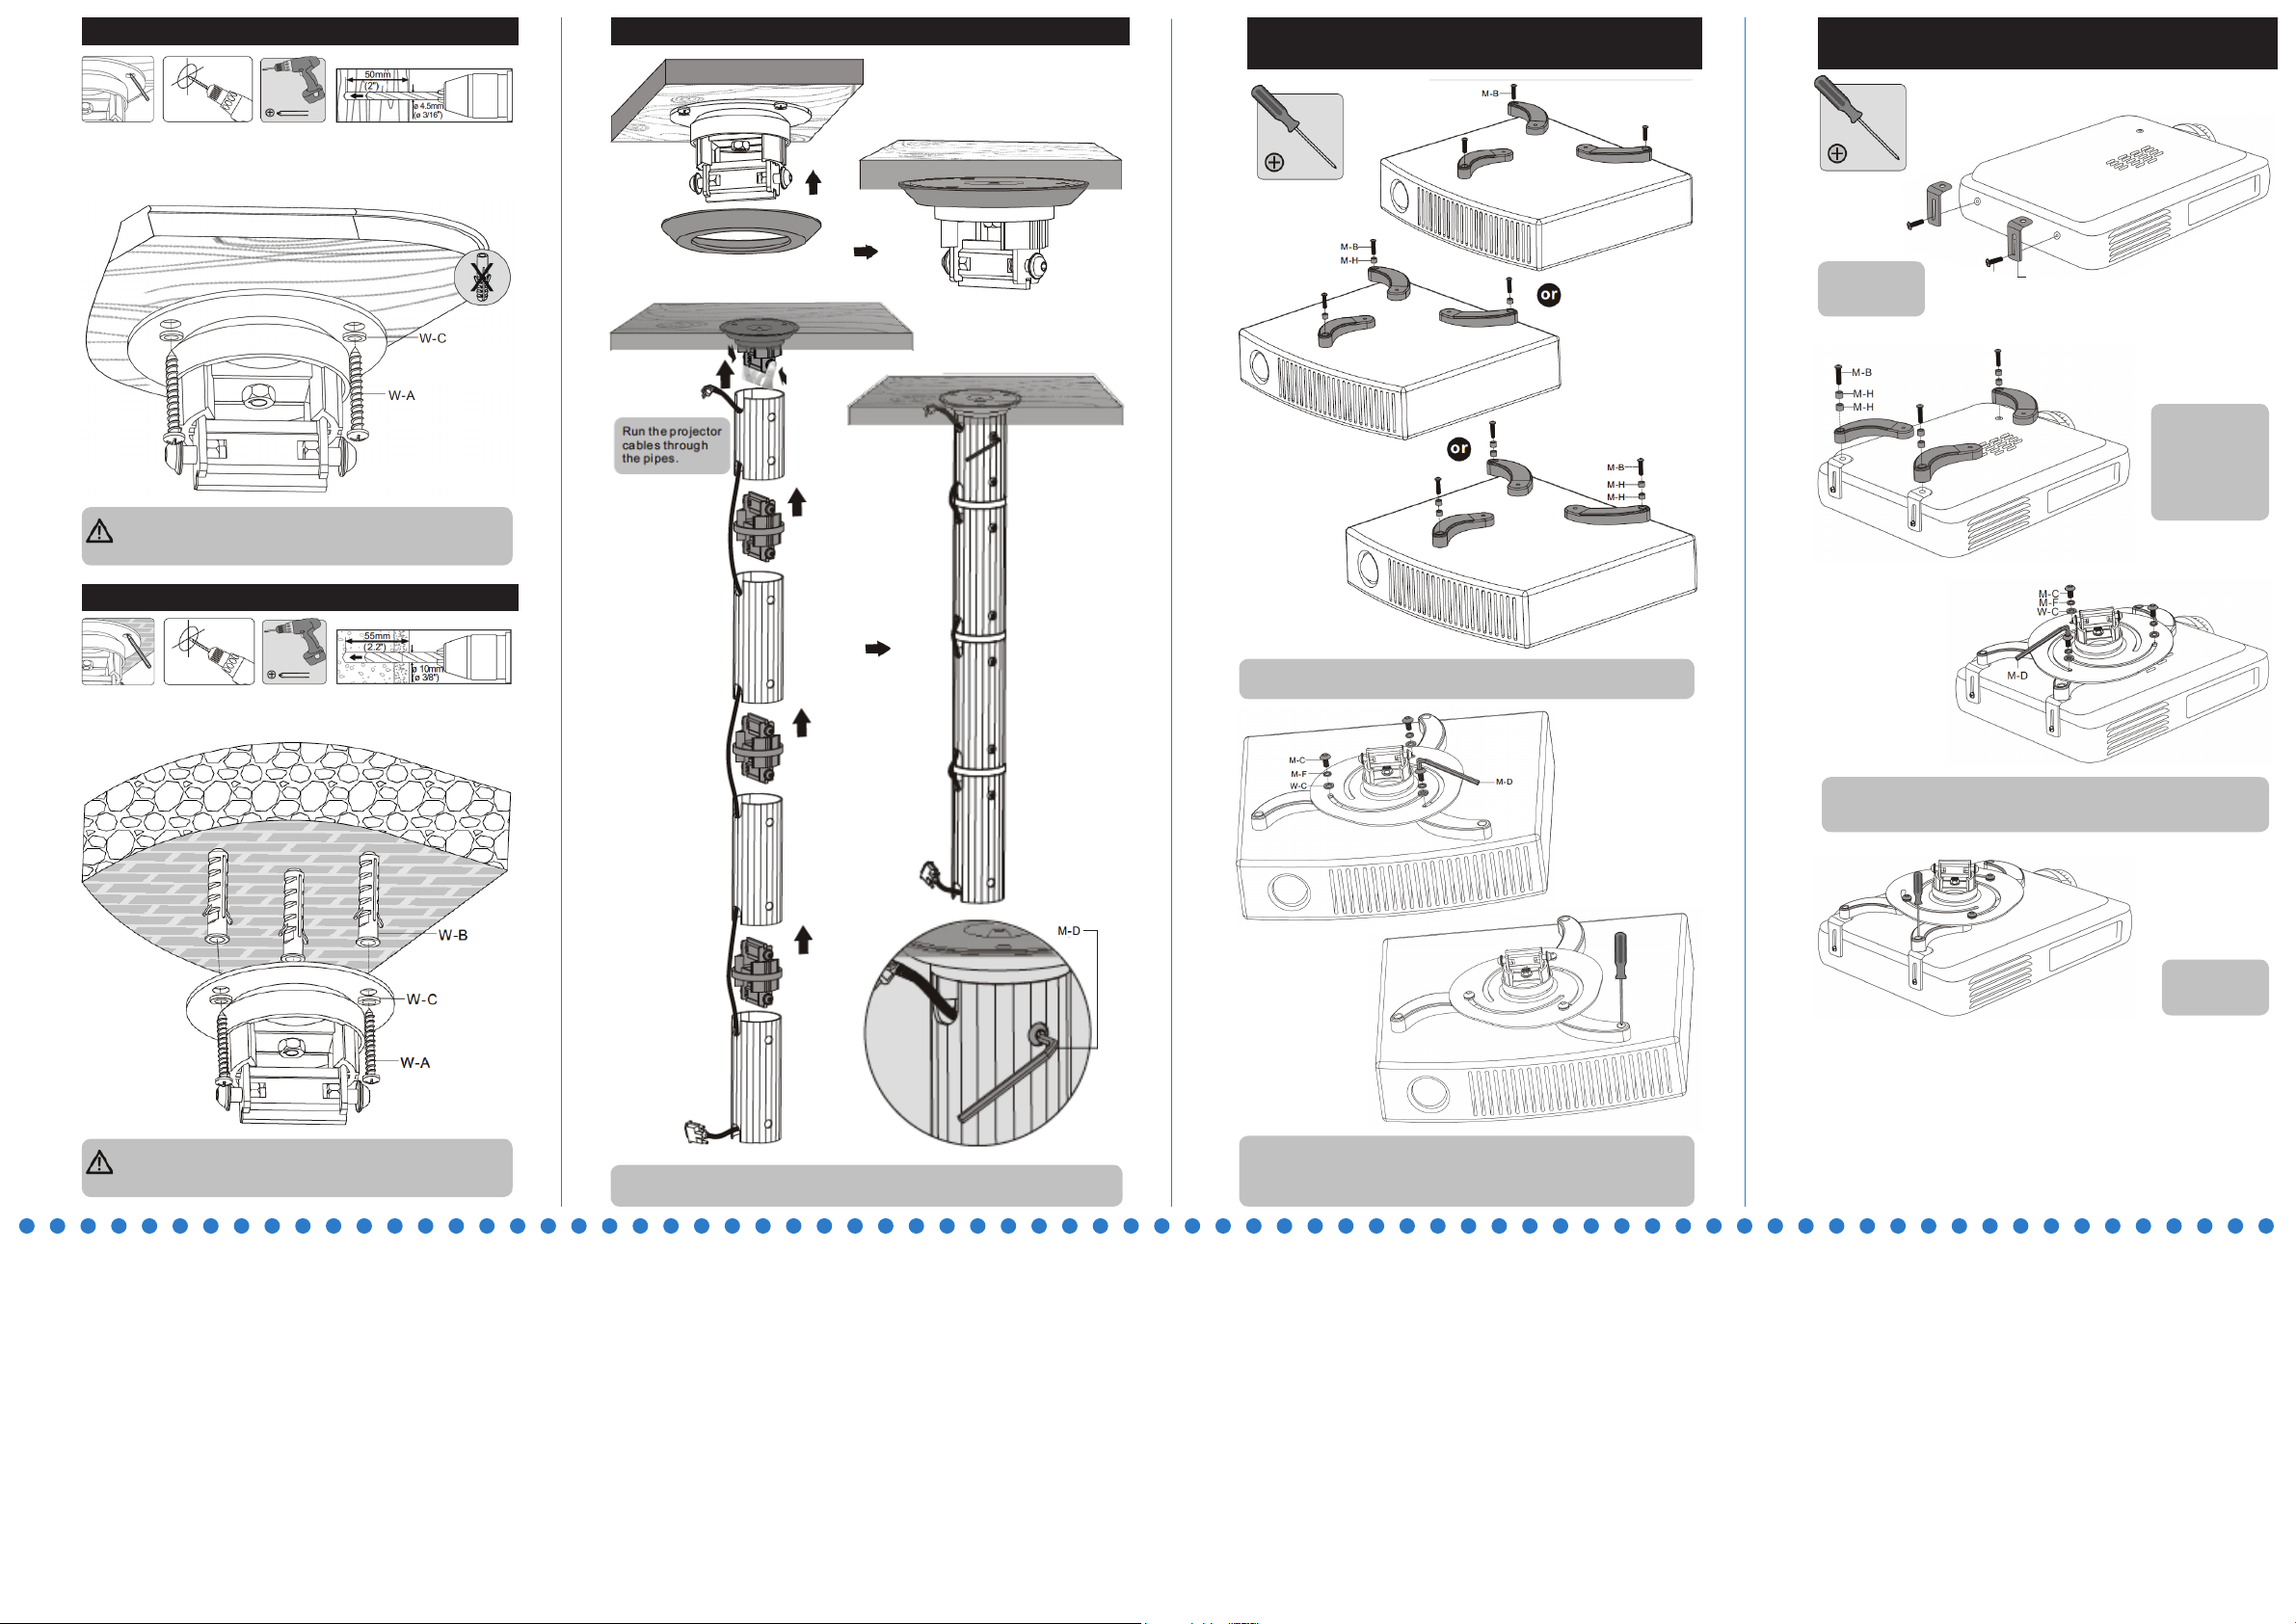
1A
For wood mounting
Install the decorative cover and pipes
2 3B
3A
Attach the mounting legs and projector
plate (most brands)
Attach the mounting legs and projector
plate (Toshiba)
1B
position of the
mounting holes
For other mounting surfaces, installers are responsible for providing
the proper hardware to safely support the combined weight of the
ceiling mount and all attached components.
Drill pilot holesMark the
Screw the
plate into the
ceiling
For solid brick and concrete mounting
position of the
mounting holes
Drill pilot holesMark the
Screw the
plate into the
ceiling
Screw the legs into the mounting holes on the projector. Note: Do not
tighten the screws at this point.
Attach the 2
adjustable parts
to the projector.
M-A
M-G
Screw the legs
into the mounting
holes on the
projector. Note:
Do not tighten
the screws at this
point.
For other mounting surfaces, installers are responsible for providing
the proper hardware to safely support the combined weight of the
ceiling mount and all attached components.
1A / 1B
Deutsch – Zur Montage auf Holz (1A); zur Montage auf Stein oder Beton (1B) : Markieren Sie exakten
Positionen der Montagelöcher. Bohren Sie die Löcher. Schrauben Sie die Deckenplatte an die Decke. Hinweis: Bei anderen Oberflächen
sind die Monteure für die Bereitstellung der geeigneten Teile verant wortlich, die die Traglast von Deckenhalterung und montierten
Komponenten sichern.
Español – Para montaje en madera (1A); montaje en ladrillo y concreto (1B): Encuentre y marque
exactamente los orificios de montaje. Perfore los orificios y atornille la placa en el techo. Nota: Para otras superficies, los instaladores son
responsables de proporcionar el material adecuado para soportar el peso del soporte en el techo como todos los componentes instalados.
Français – Pour un montage sur bois boulonné (1A; pour un montage sur briques pleines ou
béton (1B) : Définissez et marquez l’emplacement exact des trous de montage. Percez les trous de guidage. Vissez la plaque de
montage au plafond sur le plafond. Remarque : Sur d’autres surfaces de montage, il incombe aux installateurs de fournir la visserie
appropriée pour sécuriser le poids combiné du support de montage au plafond et de tous les composants fixés dessus.
Polski – Montaż w profilach z drewna (1A); montaż w ścianie z cegły i betonu (1B): Znajdź i oznacz
odpowiednią lokalizację na otwory montażowe. Nawierć otwory. Przykręć uchwyt do sufitu. Uwaga: W przypadku montażu do innych
powierzchni odpowiedzialność za dobór odpowiednich narzędzi zapewniających bezpieczeństwo w trakcie montażu oraz po jego
zakończeniu ponosi instalator.
Italiano – Montaggio su legno (1A); montaggio su mattoni pieni e cemento (1B): Individuare la
posizione esatta dei fori di montaggio e segnarla. Praticare i fori. Avvitare la placca a soffitto al soffitto. Nota: Per le altre superfici di
montaggio, gli installatori sono responsabili a reperire l’adeguato material di fissaggio che permetta di sostenere in sicurezza il peso del
supporto a soffitto combinato con il peso dei componenti ad esso fissati.
Press the 2 bolts in at the same time and connect the extension pipes to the ceiling
plate. Turn all the pipe bolts counterclockwise to tighten the entire pipe assembly.
2
Deutsch – Installation der Blende und Rohre: Führen Sie die
Beamerkabel durch die Rohre. Drücken Sie die zwei Schrauben gleichzeitig herunter
und verbinden Sie die Verlängerungsrohre mit der Deckenplatte. Drehen Sie alle
Schrauben gegen den Uhrzeigersinn, um den gesamten Rohrverbund festzuziehen.
Español – Instale la tubería y la cubierta decorativa: Pase los
cables a través de las tuberías. Presione los tornillos al mismo tiempo, conecte los tubos
en la placa de techo. De vuelta a todos los pernos del tubo en sentido a las agujas del
reloj, para apretar todo el conjunto de la tubería.
Français – Installez le capot décoratif et les tubes : Faites passer les
câbles du projecteur par les tubes. Appuyez simultanément sur les 2 boulons et raccordez
les tubes d’ex tension à la plaque de montage au plafond. Serrez tous les boulons.
Polski – Montaż pierścienia maskującego oraz rur: Przeciągnij
przewody od projektora przez środek rur. Wciśnij jednocześnie dwie śruby i połącz górną
rurę z uchwytem sufitowym. Skręć wszystkie śruby ruchem przeciwnym do wskazówek
zegara aby zabezpieczyć całą konstrukcję.
Italiano – Installazione del coperchio di copertura e dei tubi:
Far passare i cavi del proiettore attraverso i tubi. Premere le 2 viti contemporaneamente
e collegare i tubi di estensione alla placca a soffitto. Girare tutti i bulloni del tubo in
senso antiorario per stringere l’intero gruppo di tubi.
3A
Deutsch – Anbringung der Montagefüße und Beamerplatte (für die meisten Marken): Schrauben Sie
die Füße in die Montagevertiefungen des Beamers. Hinweis: Ziehen Sie die Schrauben jetzt noch nicht fest. Platzieren Sie die Beamerplatte
so zentral wie möglich auf den Montagefüßen am Beamer. Richten Sie die Montagefüße mit den Einkerbungen der Platte aus und fixieren
Sie die Platte an den Montagefüßen. Ziehen Sie alle sechs Schrauben an den Montagefüßen fest.
Español – Fije las patas de montaje y placa (aplica a la mayoría de las marcas): Atornille las patas de
montaje en los orificios del proyecto. Nota: No apriete los tornillos aun. Coloque la placa del proyector en las patas de montaje lo más cerca
posible del centro del proyector. Alinee las patas con las ranuras de la placa y fije la placa a las piernas. Ahora apriete los 6 tornillos de las
patas.
Français – Fixez les pieds de montage et la plaque pour projecteur (pour la plupart des marques) :
Vissez les pieds dans les trous de montage du projecteur. Remarque : ne serrez pas les vis à ce stade. Positionnez la plaque pour projecteur
sur les pieds, aussi près que possible du centre de gravité du projec teur. Alignez les pieds sur les encoches de la plaque et fixez la plaque aux
pieds. Serrez maintenant les 6 vis sur les pieds.
Polski – Montaż nóżek mocujących do projektora (większość producentów): Przykręć nóżki do otworów
montażowych w projektorze. Uwaga: Nie należy dokręcać mocno śrub na tym etapie montażu. Umieść uchwyt projektora na nóżkach jak
najbliżej środka ciężkości projektora. Dopasuj otwory w nóżkach oraz uchwycie i skręć całość. Teraz należy dokręcić wszystkie sześć śrub.
Italiano – Fissare i piedini e la placca al proiettore (per la maggior parte delle marche): Avvitare i
piedini sui fori di montaggio sul proiettore. Nota: Non stringere le viti in questo momento. Posizionare la placca sui piedini di montaggio il
più vicino possibile al centro di gravità del proiettore. Allineare le gambe con le scanalature sulla piastra e assicurare quest’ultima sui piedini.
Stringere ora tutte le 6 viti sui piedini.
• Position the projector plate on the mounting legs as close as possible to
the projector’s center of gravity.
• Align the legs with the slots on the plate and secure the plate to the legs.
• Now tighten all 6 screws on the legs.
3B
Deutsch – Anbringung der Montagefüße und Beamerplatte (Toshiba): Bringen Sie die zwei justierbaren Teile
am Beamer an. Schrauben Sie die Füße in die Montagevertiefungen des Beamers. Hinweis: Ziehen Sie die Schrauben jetzt noch nicht fest.
Platzieren Sie die Beamerplatte so zentral wie möglich auf den Montagefüßen am Beamer. Richten Sie die Montagefüße mit den Einkerbungen
der Platte aus und fixieren Sie die Platte an den Montagefüßen. Ziehen Sie alle sechs Schrauben an den Montagefüßen fest.
Español – Fije las patas de montaje y placa (Toshiba): Coloque las 2 piezas ajustables al proyector. Atornille las patas
de montaje en los orificios del proyecto. Nota: No apriete los tornillos aun. Coloque la placa del proyector en las patas de montaje lo más cerca
posible del centro del proyector. Alinee las patas con las ranuras de la placa y fije la placa a las piernas. Ahora apriete los 6 tornillos de las patas.
Français – Fixez les pieds de montage et la plaque pour projecteur (Toshiba) : Fixez les deux pièces réglables
sur le projecteur. Vissez les pieds dans les trous de montage du projecteur. Remarque : ne serrez pas les vis à ce stade. Positionnez la plaque pour
projecteur sur les pieds, aussi près que possible du centre de gravité du projecteur. Alignez les pieds sur les encoches de la plaque et fixez la
plaque aux pieds. Serrez maintenant les 6 vis sur les pieds.
Polski – Montaż nóżek mocujących do projektora (Toshiba): Zamocuj 2 elementy regulacyjne do projektora.
Przykręć nóżki do otworów montażowych w projektorze. Uwaga: Nie należy dokręcać mocno śrub na tym etapie montażu. Umieść uchwyt
projektora na nóżkach jak najbliżej środka ciężkości projektora. Dopasuj ot wory w nóżkach oraz uchwycie i skręć całość. Teraz należy dokręcić
wszystkie sześć śrub.
Italiano – Fissare i piedini e la placca al proiettore (Toshiba): Attaccare le 2 parti regolabili al proiettore. Avvitare
i piedini sui fori di montaggio sul proiettore. Nota: Non stringere le viti in questo momento. Posizionare la placca sui piedini di montaggio il
più vicino possibile al centro di gravità del proiettore. Allineare le gambe con le scanalature sulla piastra e assicurare quest’ultima sui piedini.
Stringere ora tutte le 6 viti sui piedini.
•
Position the projector plate on the mounting legs as close as possible to
the projector’s center of gravity.
• Align the legs with the slots on the plate and secure the plate to the
Now tighten all
6 screws on the
legs.
STEP 4
legs.
¡
 Loading...