

Page 1

HI-SPEED USB TO
SATA /IDE ADAPTER
USER MANUAL
MODEL 179195
manhattanproducts.com
MAN-179195-UM-0914-10
Page 2
INTRODUCTION
Thank you for purchasing the Manhattan® Hi-Speed USB to SATA/IDE Adapter,
Model 179195.
This convenient device connects SATA, SATA-enhanced, IDE and enhanced-IDE
hard disks to desktop and notebook computers using a USB port. And with its
convenient built-in, one-touch copy feature, you can more easily transfer, share
and back up les or store large le archives on external drives.
By following the instructions in this user manual, you’ll soon be enjoying these
popular features:
• Supports data transfer SATA speeds up to 1.5 Gbps and Hi-Speed USB speeds
up to 480 Mbps
• Supports 48-bit LBA (Logical Block Addressing)
• Fits external SATA and IDE hard drives up to 5.25”
• Plug and play – Windows, Mac and Linux compatible and hot-swappable
• Lifetime Warranty (For a complete list of country-specic warranties, go to
manhattanproducts.com/warranty.)
System Requirements
• Available USB type-A port
• Windows XP/Vista/7/8
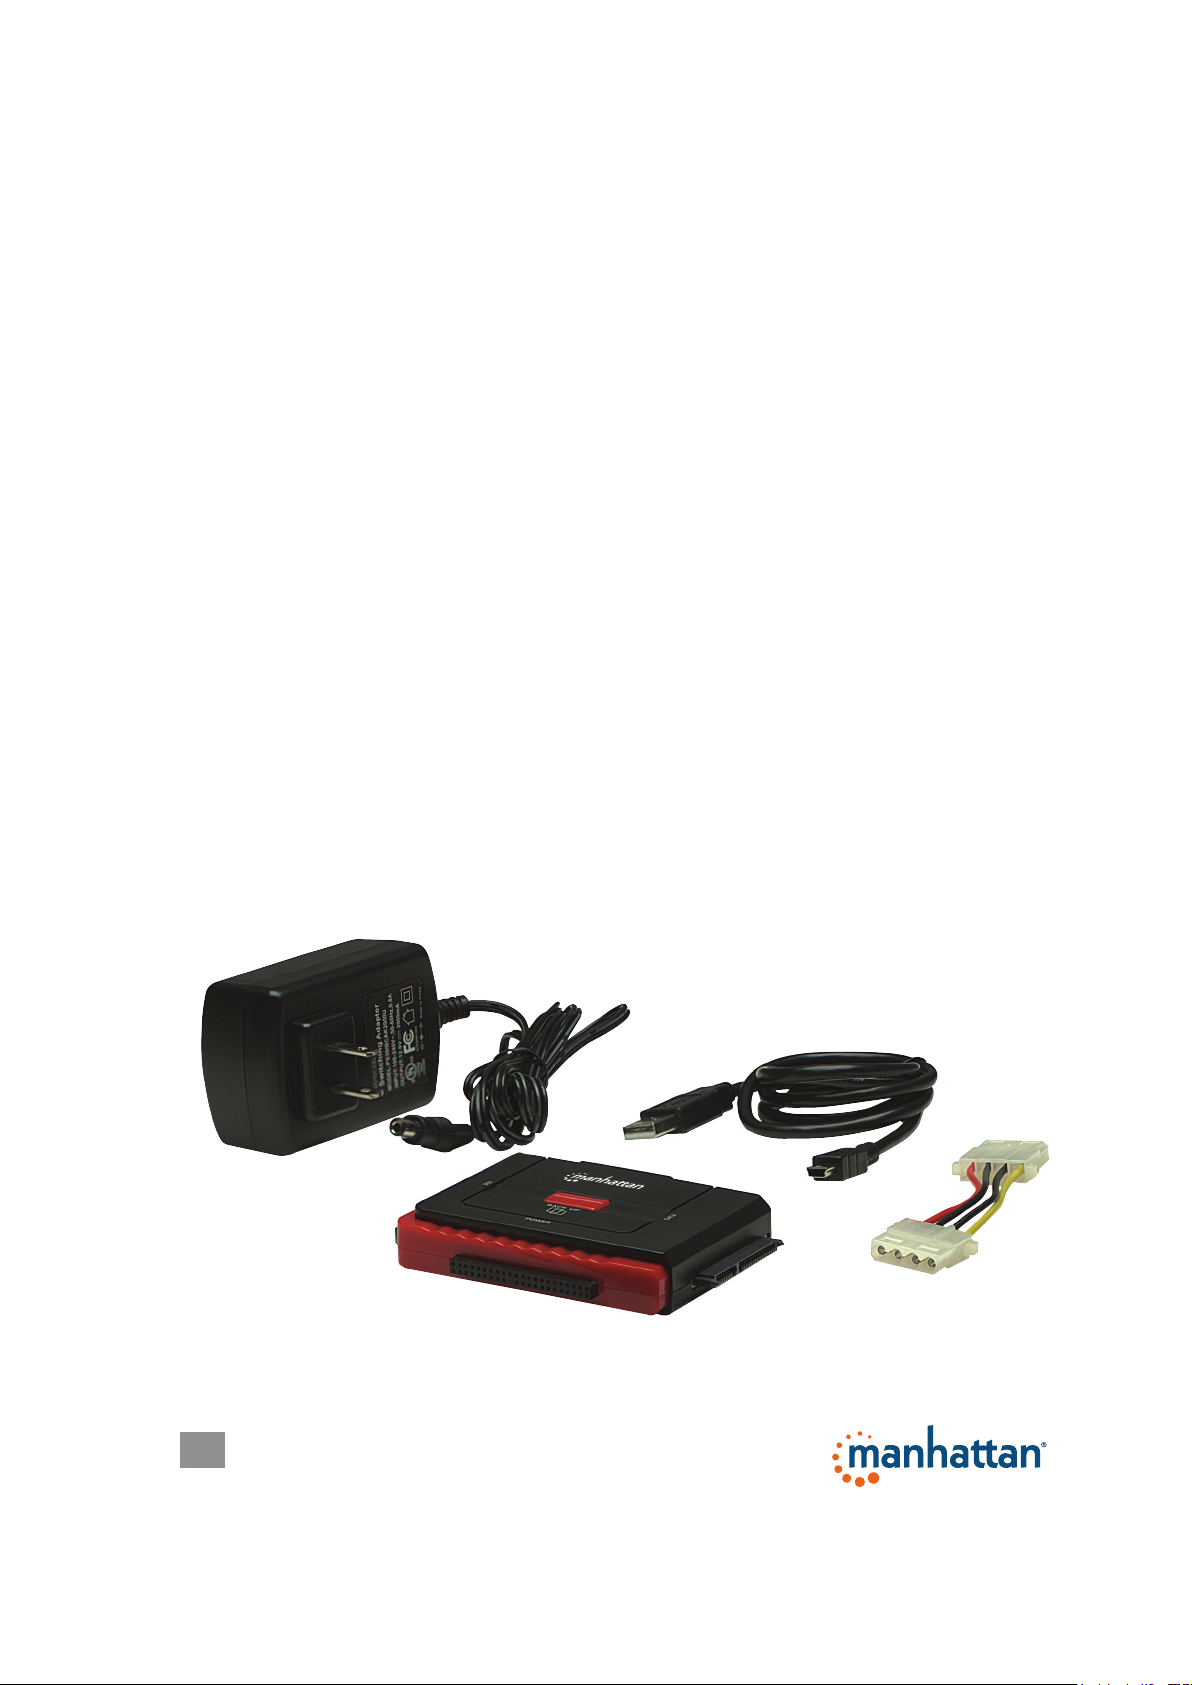
Package Contents
• Hi-Speed USB to SATA/IDE Adapter
• USB cable, 80 cm (31.5 in.)
• 4-pin power cable, 10 cm (4 in.)
• Power adapter, 1.5 m (59 in.)
• Software CD with user manual; multilanguage quick install guide
Power adapter
USB cable
4-pin power cable
2
Page 3
HARDWARE INSTALLATION
1. Always connect the Hi-Speed USB to SATA/IDE Adapter to the HDD port rst,
then to the computer’s USB port. NOTE: If using the included 4-pin internal
power cable instead, turn off the PC before connecting. Windows will detect a
new device and automatically install the driver.
2. To verify the connection, go to Start / Control Panel / Device Manager. Open
“Hard disk controllers” to display the newly added hard disk drive.
3. If connecting to a new hard disk drive, use Device Manager or enter the
command <diskpart> to initialize and set its capacity. Format the HDD using
standard procedures. If its icon appears on the desktop but you can’t nd it
listed, check the following:
• The HDD has been properly installed; and
• The HDD is set in the Master position.
SOFTWARE INSTALLATION
These steps are for the installation of the convenient one-touch backup software.
NOTE: This software doesn’t support Mac operating systems. Some images may
look different on your computer, as your software version may be slightly different
than the one represented here.
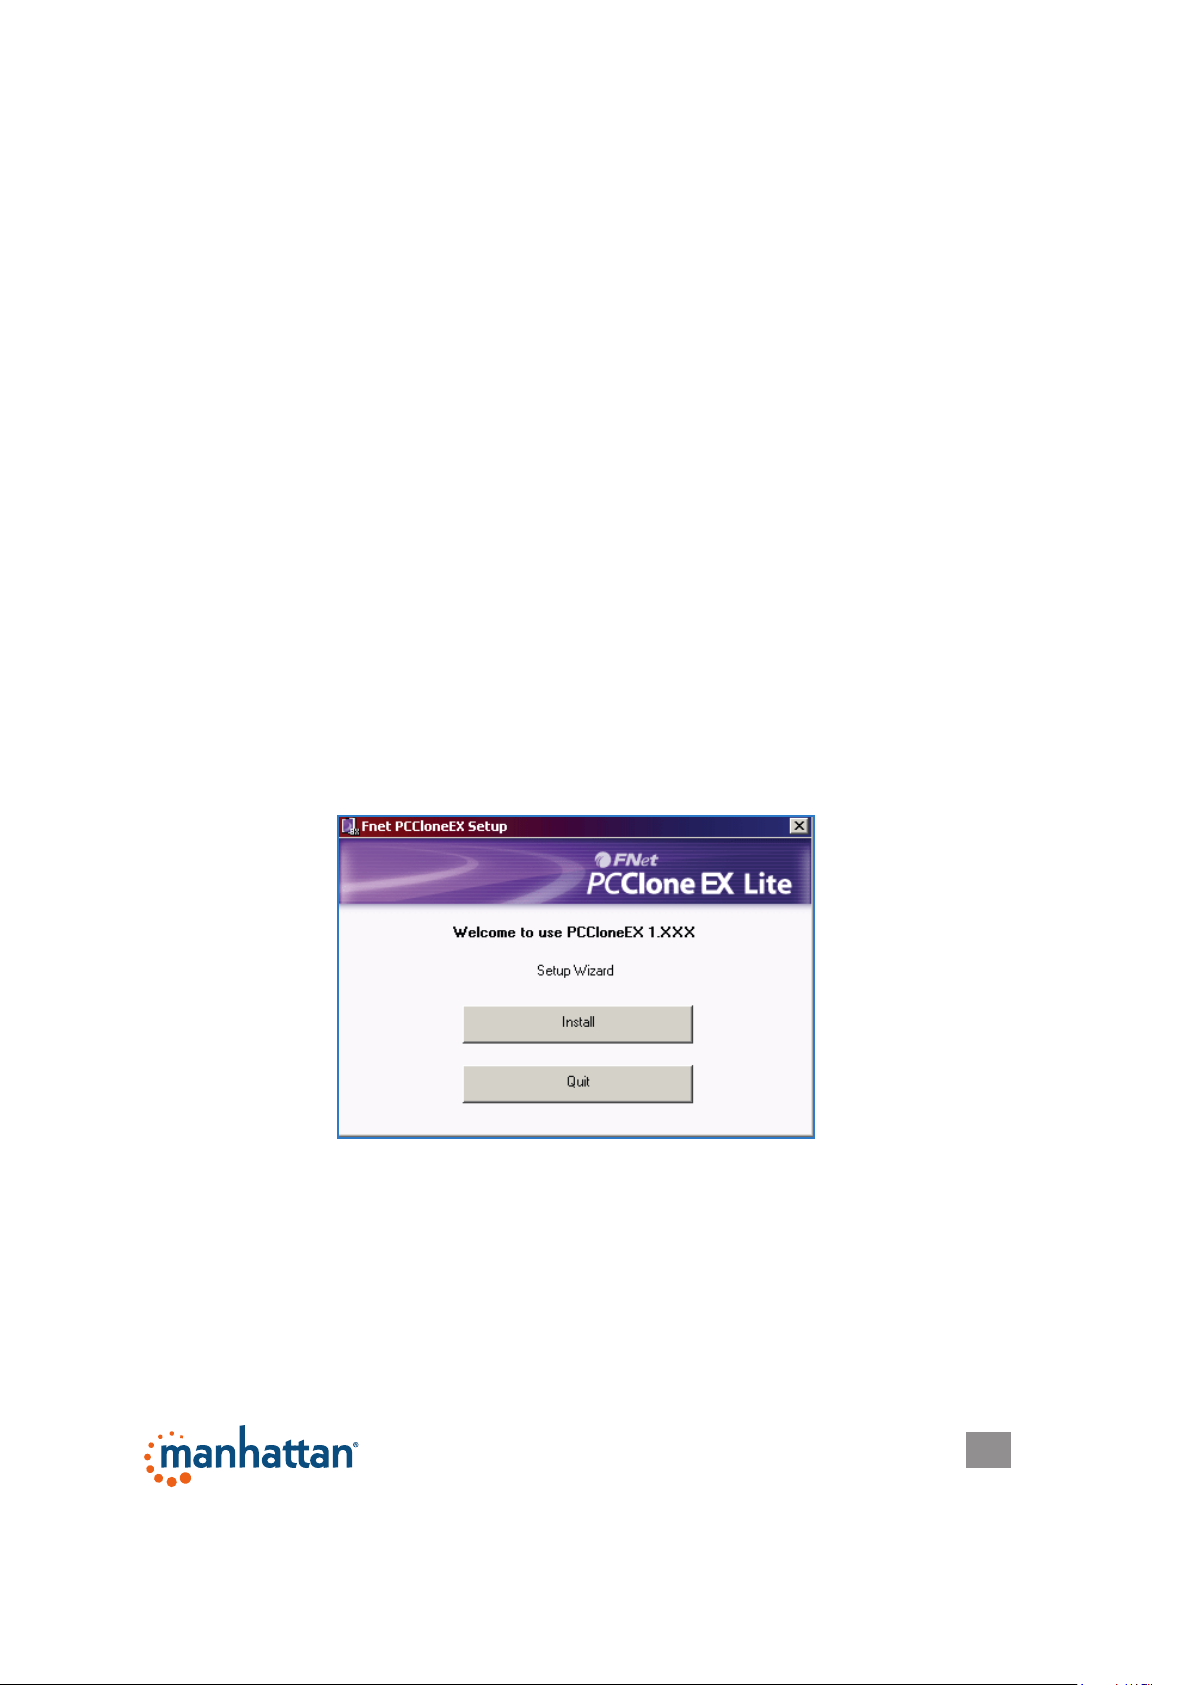
1. Load the included software CD. The PC Clone EX setup wizard’s Welcome
screen will display automatically. Click “Install” to continue.
3
Page 4
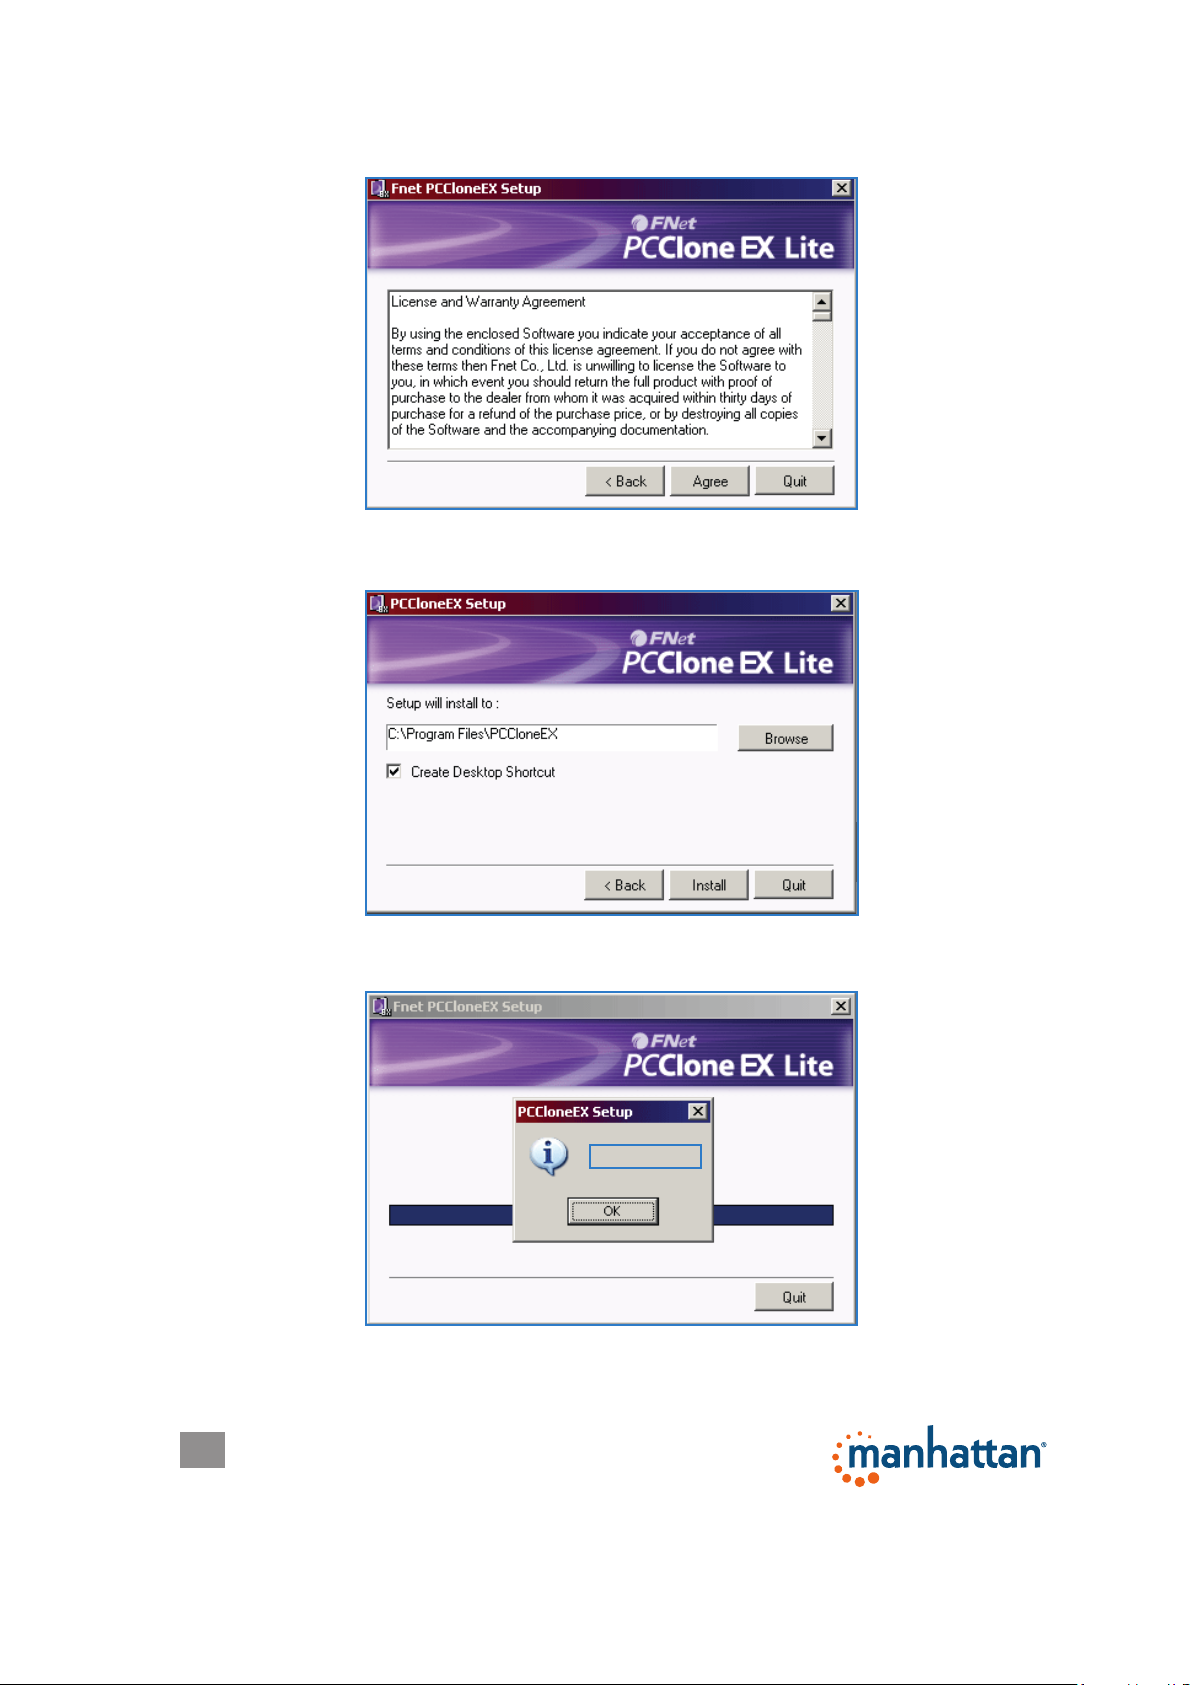
2. When the License and Warranty Agreement displays, click “Agree” to continue.
3. Enter the desired pathway for the installation or click “Browse” to nd a current
folder. Click “Install” to continue.
4. The nal Setup screen will display a progress status bar. When nished, the
wizard will display an “Install complete!” message. Click “OK” to exit the wizard.
Install Complete!
4
Page 5
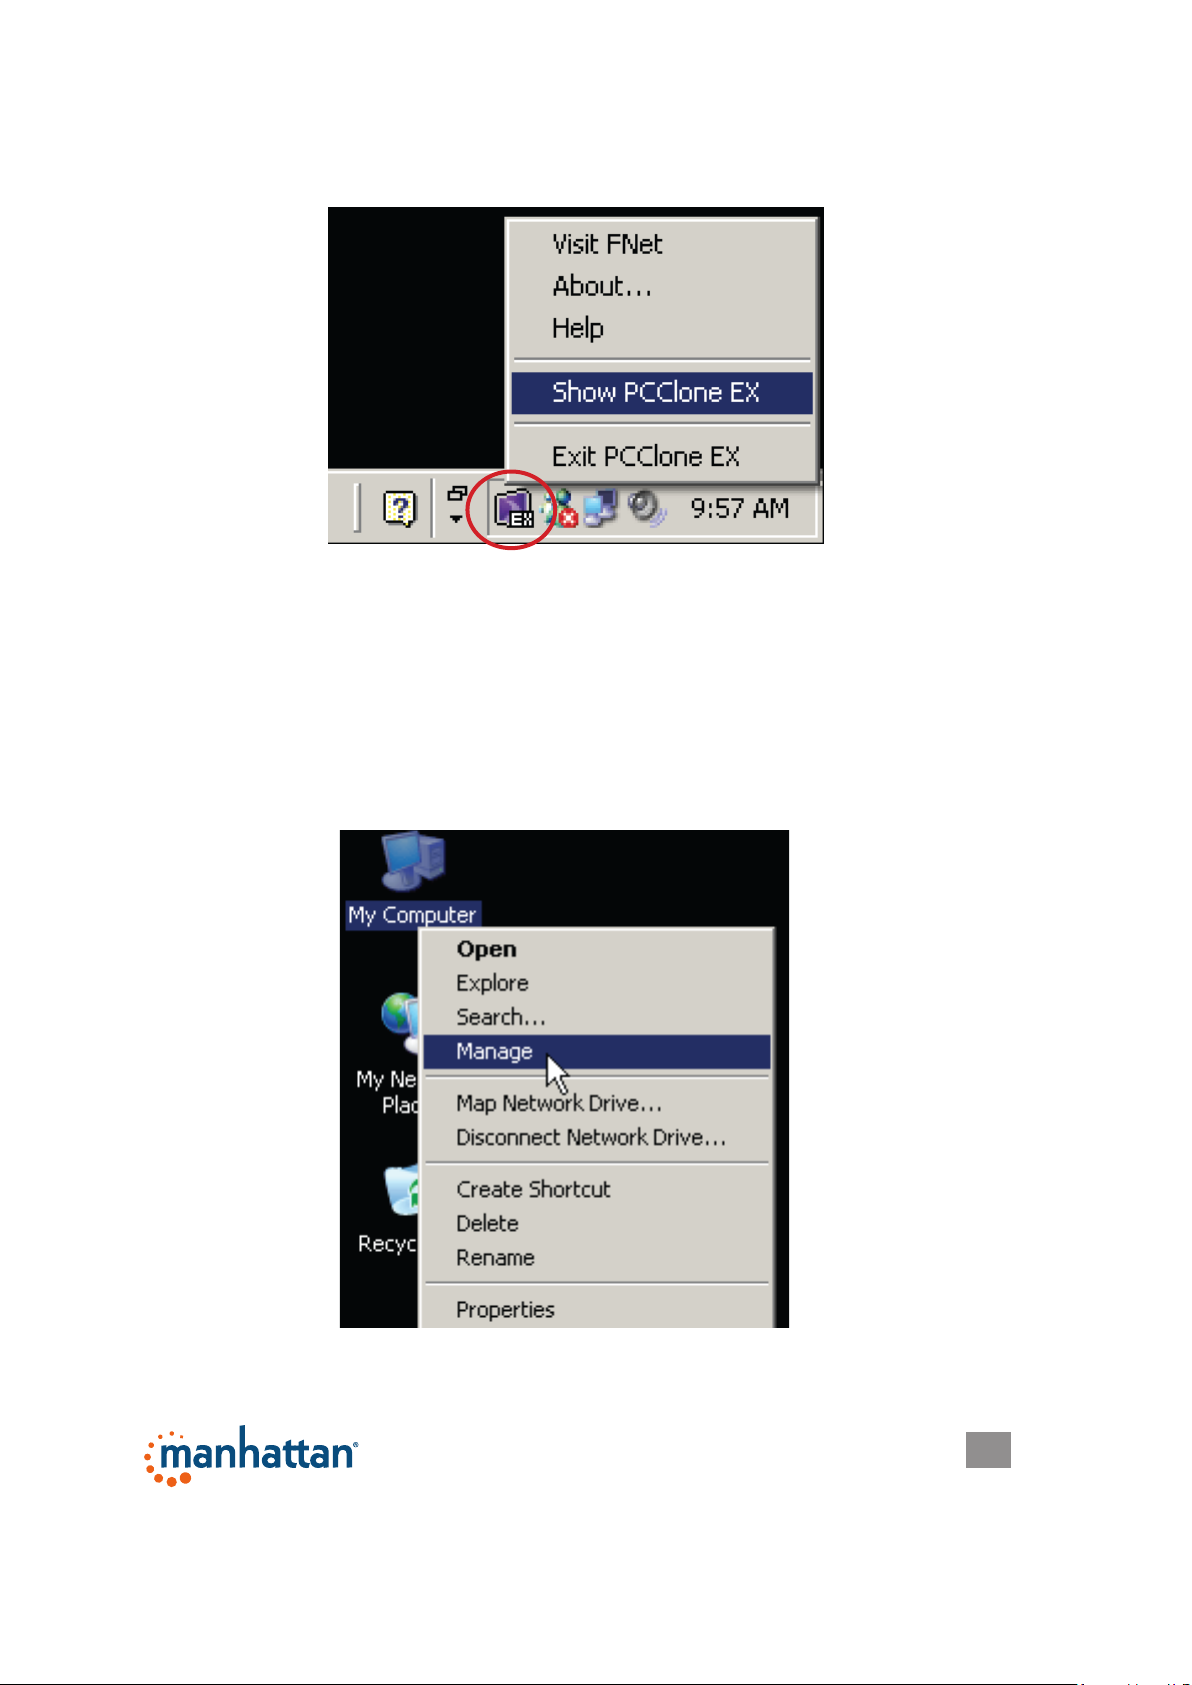
5. The PC Clone EX icon will appear in the system tray. To open the program, you
can double-click the icon or right-click to display the menu option for selection.
CREATING PARTITIONS
NOTE: If the hard drive you have placed in the enclosure (the drive that you are
copying data to) has already been partitioned, you can proceed to the next section.
1.
With the adapter plugged into a USB port on your computer and powered
Hardware Installation above), right-click My Computer on your desktop and go
to Manage. (Or go to Start / Control Panel / Administrative Tools / Computer
Management.)
on (see
5
Page 6
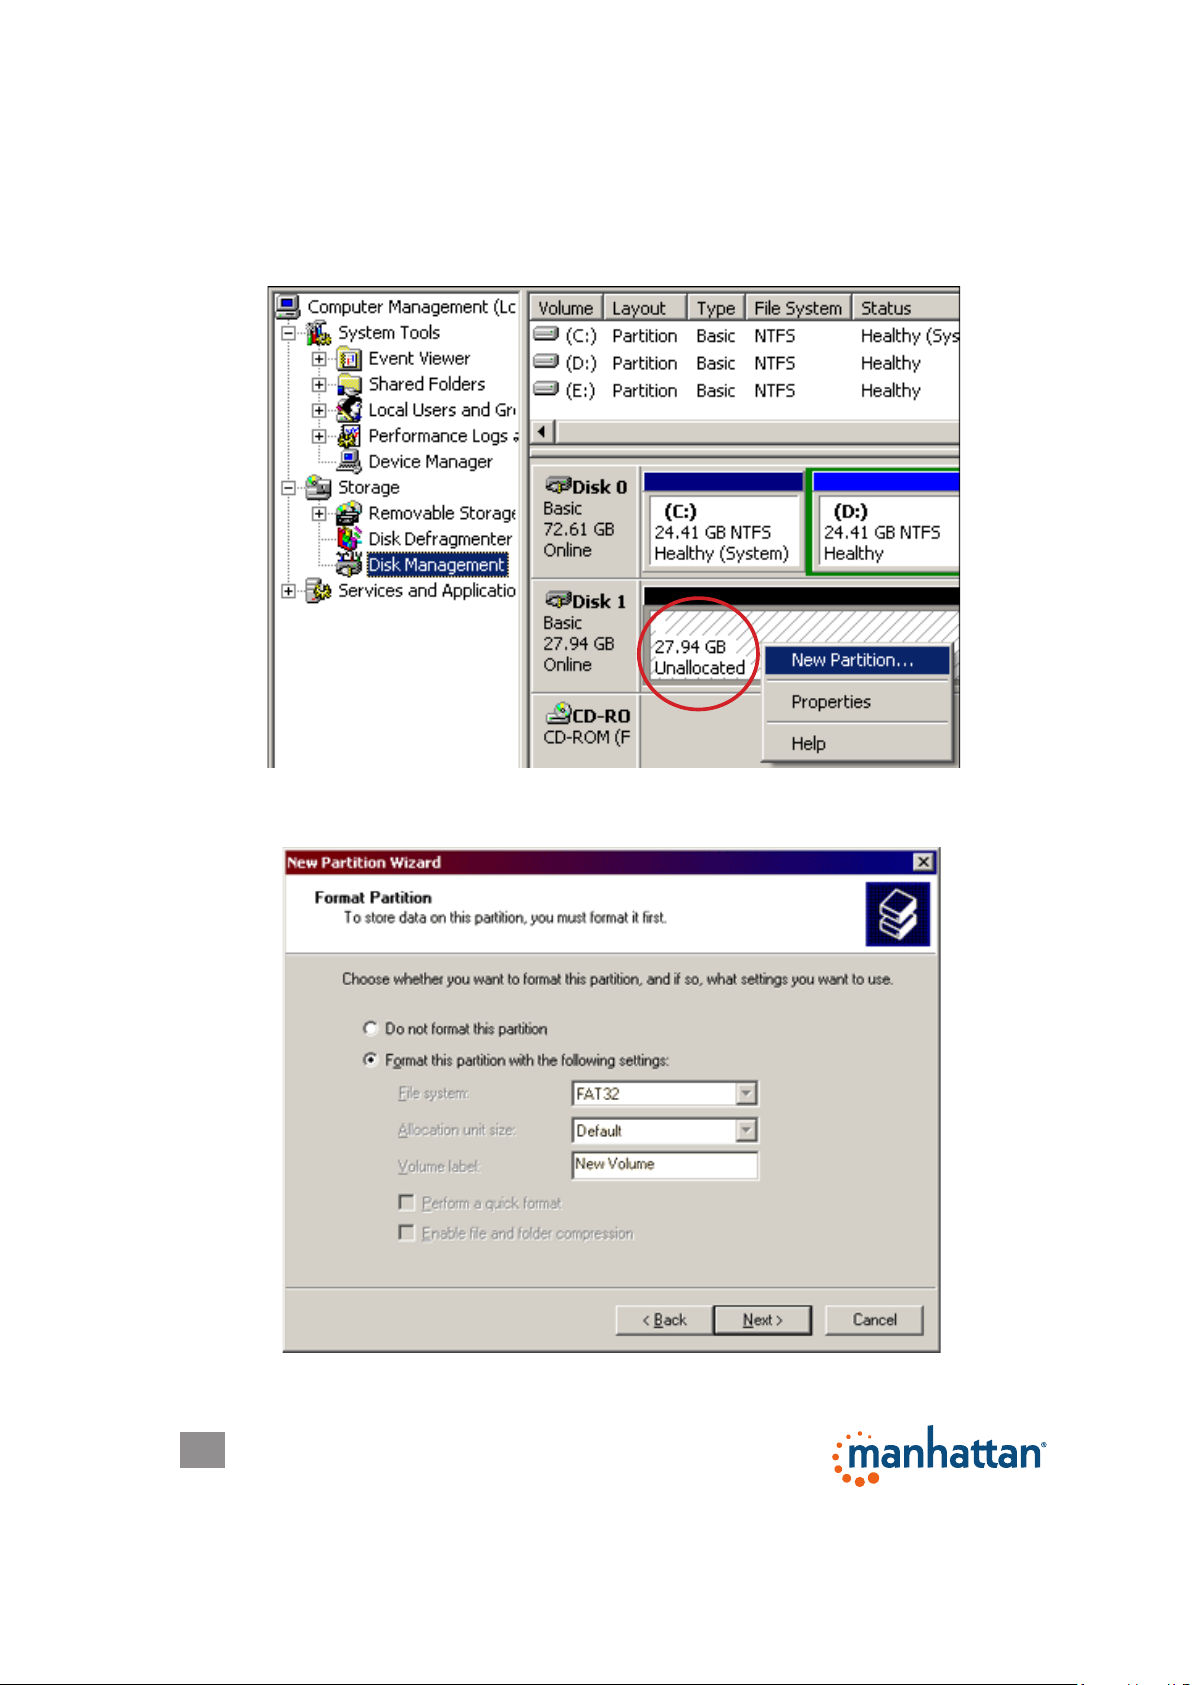
2. In the left-hand le directory, click/select “Disk Management” so its screen
displays on the right. Right-click on the disk identied as “Unallocated,” then
click/select “New Partition...” from the pop-up menu. NOTE: To conrm that the
drive you’ve placed in the enclosure is indeed the unallocated disk, disconnect
the USB cable and see if the corresponding “Unallocated” text disappears.
3. With the Format Partition screen displayed, select your preferred settings, then
click “Next” to continue.
6
Page 7

OPTION: An alternative pathway for accessing the formatting options is through
Start on your desktop, then All Programs / PCCloneEX / FNet FAT32 Format. The
formatting details and instructions will appear on the screens that display.
FAT32 FORMAT UTILITY
With the increases in drive capacities, the FAT32 Format Utility in older operating
systems is unable to support data transfers in excess of 32 GB. The solution is
to use the FNet formatting utility on the enclosed CD, which can quickly format a
disk for as much as 4 TB (4,000 GB). Note that all data already on the disk will be
deleted.
1.
Connect the HDD to the adapter and turn on the computer.
2. Open PC Clone EX and select Visit FNet.
Visit FNet
Show PCClone EX
7
Page 8

3. Conrm that the elds for USB Device and Drive to Format display your
preferences and click Start.
4. Select “Quick Format” and click Start. Remember, all data previously loaded
on the receiving HDD will be deleted.
8
Page 9

5. A Status screen will display the progress of the formatting.
6. When the Format Complete message displays, click OK. The selected disk has
been formatted with the FAT32 le system.
9
Page 10

ONE-TOUCH BACKUP FUNCTION
To use any of the features available with this function, be sure the adapter is
plugged into a USB port on your computer and powered on, and that a backup
drive has been properly loaded in the enclosure. NOTE: Before backing up les
for the rst time using this device, it’s recommended that the function parameters
be set on the File Backup Settings screen in the PC Clone EX
program.
1. With the PC Clone EX program open and the disk connected to
the adapter (see Hardware Installation above), press the Back Up
button on the adapter.
2. A Files Backup Conrm screen will display. Click Backup to continue.
3. While the backup procedure is in progress, the PC Clone EX icon will ash in
the system tray and a status uplate will display every 10 seconds until the
backup is complete.
Quick Launch
The Quick Launch screen displays automatically when the PC Clone EX program
is opened. From here, you can directly execute the File Backup function by clicking
on the boxed icon (5 in the image below) or select one of the other menu options:
1 Quick Launch
2 File Backup
10
3 File Manager
4 Setup
5 Quick File Backup
6 Minimize
7 About
8 Help
Page 11

Quick File Backup
1. As mentioned above, you can click on the Quick File Backup icon (5) when you
rst open the program and are presented with the Quick Launch screen. NOTE:
If using the backup function for the rst time, you may want to rst go to Setup
to establish your preferred function parameters. Setup is where a hot key can
be created for even quicker use of the backup function.
2. With your les selected for backup, click OK when prompted.
11
Page 12

3. When the le backup begins, a status bar displays to indicate the progress of the
procedure. When the “Backup nished!” prompt displays, click “OK.”
File Manager
Managing les in PC Clone EX is just like managing les in Windows Explorer. Just
drag les between the xed device and the drive attached to the adapter.
Setup
You can select your preferences on this screen before you begin backing up les.
Options include creating a hotkey: a single command used to initiate the backup
function.
Hotkeys
Click Edit and enter any combination of keys (using Control and/or Shift and/or Alt
keys plus any number, letter or function key) in the text eld to the left.
12
Page 13

Files Backup Type
Select “Add les to existing backup” to back up additional les; select “Discard and
replace existing backup” to completely re-copy selected les.
Other
You can select “Quick le backup double conrm” so that a conrmation box will
display whenever you use a hot key to initiate a backup. (This is enabled by
default.) The other on-screen Setup options are self-explanatory.
File Backup
If you’re navigating back from another menu screen and want to proceed with a le
backup, click on the File Backup icon. This screen lets you do a backup or restore.
Backing Up Files
1. In the left-hand (Files Backup) window, select the folders/drives to be copied
from the source device. Click the File Backup icon (1) to continue.
13
Page 14

2. With your les selected for backup, click OK when prompted.
3. When the le backup begins, a status bar displays to indicate the progress of the
procedure. When the “Backup nished!” prompt displays, click “OK.”
4.
Conrm that the selected items now appear in the right-hand (USB Device) window.
14
Page 15

IMPORTANT: A root directory (FNet) folder will display in the USB Device window.
This is where all the backed-up les are stored, so be careful not to delete it
unintentionally.
Restoring Files
1. In the event you need to copy les from the backup drive to the original source
device (to replace lost or damaged originals, for example), select the items in
the right-hand (USB Device) window and click the Restore icon (2).
15
Page 16

2. When the “Are you going to restore?” prompt displays, click OK.
3. When the “Restore Finished!” message displays, click OK. The selected items
will appear in the left-hand (File Backup) window.
Deleting Files
1. Select a le (or les) you want to delete in the USB Device window.
2. Right-click your mouse to display the “Delete select les” option. Select this
option, and all highlighted les will be removed.
16
Page 17

OPTION: To remove all les that have been backed up, you can simply select the
root directory (FNet) folder, then right-click for the delete option.
17
Page 18

SPECIFICATIONS
Standards and Certications
• USB 2.0
• USB 1.1
• Complies with ATA/ATAOI-100 spec v1.0 standards
• SATA 1.0
• FCC
• CE
• EuP
• WEEE
General
• USB 2.0 Standard-A male; SATA L-type male; IDE 40-pin; IDE 44-pin ports
• Hi-Speed USB transfer interface
• 480 Mbps maximum transfer rate
• Supports SATA, enhanced-SATA, IDE and enhanced-IDE drives
Power Supply
• Input: 100 – 240 VAC; 50/60 Hz maximum 0.8 A
• Output: 12 V / 2 A
• Cable: 1.5 m (59 in.)
Physical
• 9.8 x 7 x 1.8 cm (3.8 x 2.75 x 0.7 in.)
• Cables: USB, 80 cm (31.5 in.); 4-pin power, 10 cm (4 in.)
• Weight: 270 g (9.5 oz.)
System Requirements
• Available USB type-A port
• Windows XP/Vista/7/8
Package Contents
• Hi-Speed USB to SATA/IDE Adapter
• Software CD with user manual; multilanguage quick install guide
© IC Intracom. All rights reserved.
Manhattan is a trademark of IC Intracom, registered in the U.S. and other countries.
18
 Loading...