

Page 1
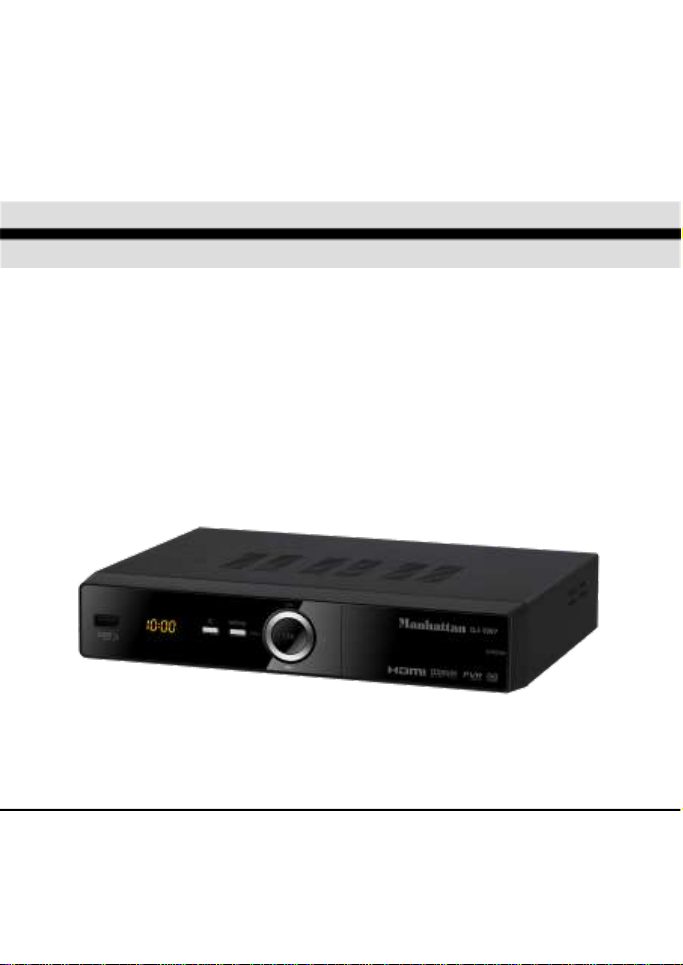
User Manual
Of Digital Set Top Box
Manhattan DJ-1997
Please read this User Manual carefully to ensure proper use of this product
and keep this manual for future reference.
Page 2

Table of Contents
Important Safety Instructions……..........................................................................1
Front an d Rear Panel Illustration........................................................................2
Remote Controller.............................................................................................3
Connections.................................................................................................... .5
Quick Installation.................................................................................................6
DTV Operation....................................................................................................9
Multimedia................................................................................ ......................19
DVR................................................................................................................21
Troubleshooting .................................................................................. .........24
Specifications..................................................................................................25
Page 3
Important Safety Instructions
*Warning: To reduce the risk of electric shock, do not remove the cover or back.
There are no user-serviceable parts inside. Refer servicing to qualified personnel.
*Warning: To prevent fire or electric shock hazard, do not expose the unit to rain or
moisture.
*Do not expose the Adaptor and Set top box to water (dripping or splashing) and no
objects filled with liquids, such as vases, should be placed on the unit.
*Keep the Set top box away from direct sunlight and heat source such as radiators
or stoves.
*Do not block the ventilation openings. Slots and openings on the unit are provided for
ventilation. The openings should never be blocked by placing your Set top box on a
cushion, sofa or other similar surface.
*Do not place the Set top box on unstable cart, stand, tripod, bracket or table.
The unit may fall, resulting in possible damage or injury.
*Only us e the AC adapter included with Set top box. Using any other adapter will void
your warranty.
*Unplug the power from the outlet when the unit is not in use.
*Attention should be drawn to the environmental aspects of battery disposal.
*WARNING: The battery (battery or batteries or battery pack) shal l not be exposed to
excessive heat such as sunshine, fire or the like.
*WARNING: Excessive sound pressure from earphones or headphones can cause
hearing loss.
*WARNING: Only use attachments/accessories specified provided by the
manufacturer, the Set top box is supplied by AC adapter, the AC adapter is used as
disconnect device, the disconnect device shall remain readily operable.
Caution: Danger of explosion if battery is incorrectly replaced, replaced only with
the same or equivalent type (Lithium battery)
The symbol indicates that dangerous voltages constituting a risk of electric
shock are present within this unit.
The symbol indicates that there are important operating and maintenance
instructions in the literature accompanying this unit.
The USB memory stick should be plugged in the unit directly. USB
extension cable should not be used to avoid failing of data transferring
and interference caused.
This marking indicates that this product should not be disposed with other
household wastes throughout the EU. To prevent possible harm to the
environment or human health from uncontrolled waste disposal, recycle it
responsibly to promote the sustainable reuse of material resources.
To return your used device, please use the return and collection systems
or contact the retailer where the product was purchased.
They can take this product for environmental safe recycling.
1
Page 4
Front an d Rear Panel Illustration
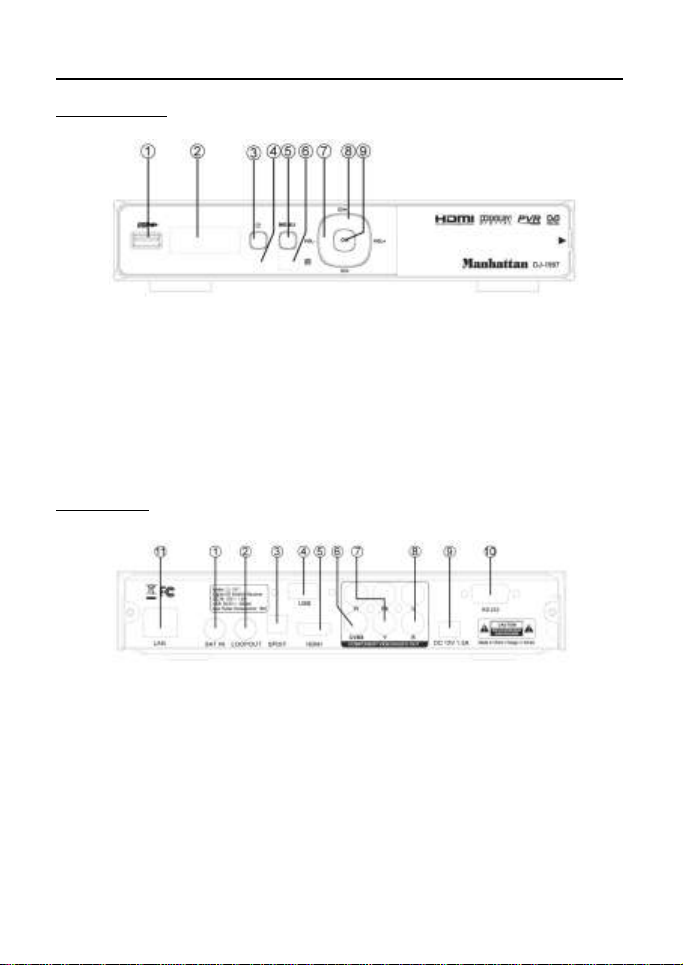
1. Front Panel
1. USB JACK: Used to connect to an external USB 2.0 device.
2. LED DISPLAY: Used to display the time or channel information.
3. STANDBY: Used to switch the set top box to on or standby.
4. STANDBY INDICATOR: Used to visually show power state of the STB.
5. MENU: Turns on main menu.
6. REMOTE CONTROL SENSOR: Used to receive the signal from the remote control.
7. VOL +/-: Used to increase/decrease the volume without using the remote
control.
8. CH +/-: Selects the next/previous Channel without using the remote control.
9. OK: Confirms an entry or selection.
2. Rear Panel
1. LNB IN: This socket connects the LNB to receive the signal.
2. LOOP OUT: This socket will bypass the RF signal to either your TV or another
video system.
3. SPDIF: This socket connects to an optical socket on your surround sound system.
4. USB JACK: Used to connect to an external Wi-Fi Antenna for Internet use.
5. HDMI OUT: This socket connects to HDMI in device.
6. CVBS: This socket outputs composite video signal.
7. Y/Pb/Pr: These sockets connect to your TV component input terminals.
8. AUDIO L/R: This socket outputs analog audio L/R adapter.
9. DC IN 12V: This is used to connect the 12V DC adapter.
10. RS232: Connect to serial port of PC for software update.
11. LAN: Connect to RJ45 cable for internet connection
2
Page 5

Remote Controller
.
1. LED display lights to verify remote operation
2. Enter the Manual Timer Setting menu
3. Display Media Player for Videos / Photos / Music
4. Page Down in a List and DVR Scan Rewind
5. Skip Rewind
6. Play DVR / Media
7. Freeze Video or Pause DVR / Media
8. Display DVR Recordings List
9. Display Satellite List
10. Display the Main Menu Screens
11. Change Channel or Menu Navigation Up / Down
12. Display Channel Banner, 2x for Program EPG,
3x for Service Information
13. Display Electronic Program Guide (if provided)
14. Increase / Decrease Volume
15. Numeric / Alpha Keys for direct Channel Chang
-e and Menu Setting
16. Mute or Enable Muted Audio
17. Select Standby or Operation Mode
18. Select to open IPTV press OK for menu
19. Display a Full Screen Signal Meter
20. Page Up in a List and DVR Scan Forward
21. Skip Forward
22. Stop DVR Play or Record / Stop Media Playback
23. Start DVR Manual Record
24. Select the Favorite List Mode
25. Magnify a Portion of the Screen
26. Exit Screens or Functions
27. Display the Channel List or Accept a Menu Item
28. Increase / Decrease Volume or Menu Navigation
Left / Right
29. Return to Previous Channel
30. Change Channel Up / Down
31. Select Alternative Language / Audio Mode / Sound Track
32. Select to View TV or Listen to Radio Channels
3
Page 6
Remote Controller
Installing the Batteries
Remove the battery cover from the remote control and put 2xAAA size batteries
inside the compartment.
The diagram inside the battery compartment shows the correct way to install the
batteries.
1. Open the cover
2. Install batteries
3. Close the cover
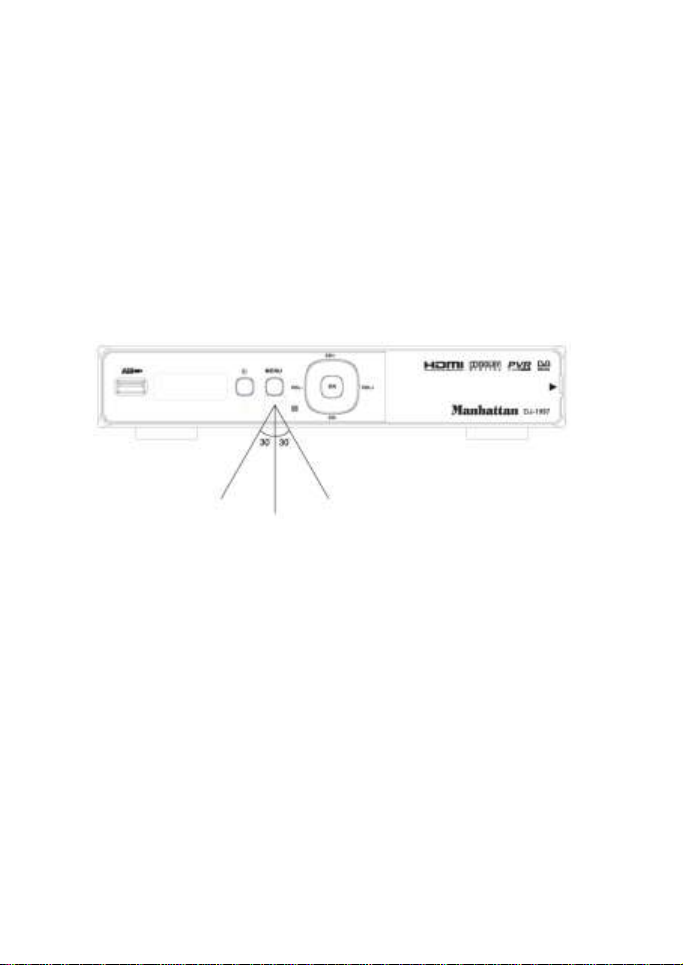
Using the Remote Control
To use the remote control, point it towards the front of the digital set top box.The
remote control has a range of up to 7 meters from the set top box at an angle of up
to 60 degrees. The remote control will not operate if its path is blocked.
Note:
Sunlight or very bright light will decrease the sensitivity of the remote control.
4
Page 7
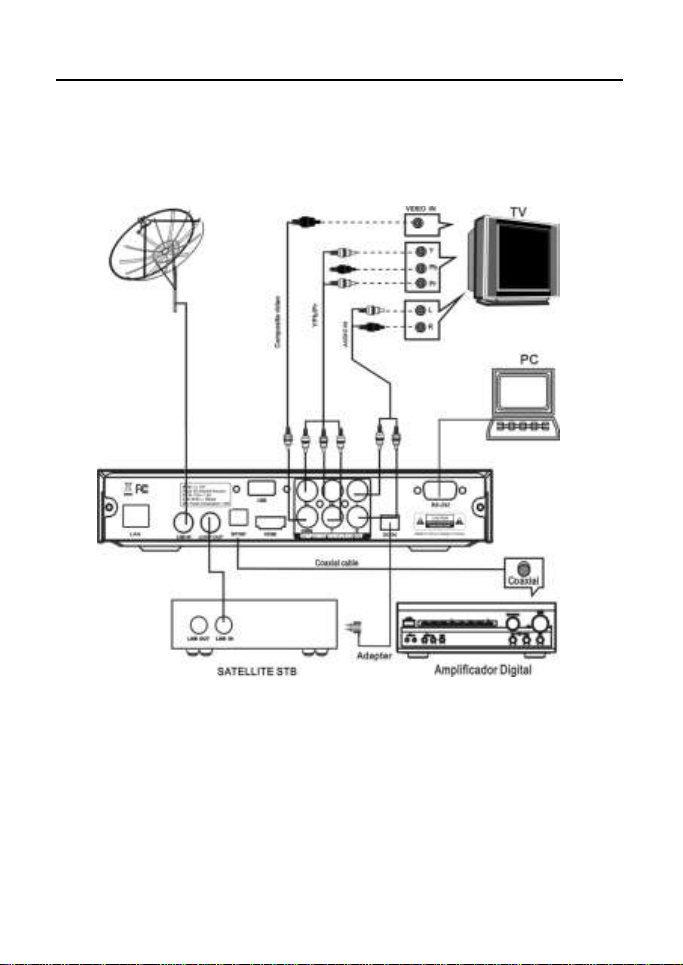
Connections
Caution:
Make sure to check the voltage specification of the wall outlet is the same rating with
the receiver. To prevent the risk of electric shock, do not open the cover or the back
of the receiver.
Note:
When connecting the receiver to other equipment, e.g., TV, VCR and amplifier,
make sure to refer to relevant user manual for instruction. Also, make sure you
disconnect al l the equipments from the mains supply before the connection.
5
Page 8
Quick Installation
(1) Unplug the set-top box and television.
(2) Connect the antenna to the RF input of the box with coaxial cable.
(3) Connect the audio out port and video out port on the box to the audio in port and
video in port on the television respectively using audio/video cables.
(4) Plug and power on the set-top box and television.
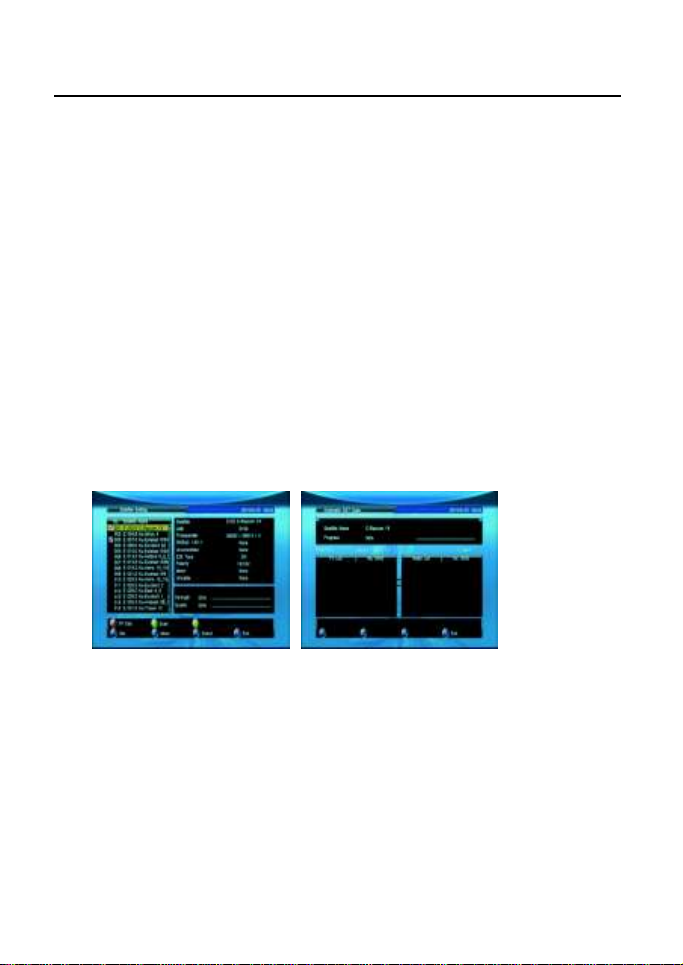
Program Scanning
Satellite Setting
In Installation page, select Satellite Setting and press <OK>.
In the page displayed, you can use the <Left/Right> buttons to change the mode,
and set the proper satellite parameters.
(1) Press <Up/Down> to select among satellites.
(2) Press <OK> to confirm the selection of the currently focused satellite.
(3) Press <Right> to go to the satellite parameter setting page.
(4) Press <Red> to go into the SAT/TP Manager page.
(5) Press <Green> to go into the Automatic SAT Scan page.
(6) Press <Yellow>Goto position when motor is Diseqc1.2/USALS.
Note: Only the satellite checked in the setup manual can be scanned. You cannot
scan an unchecked sat.
Notice: Motor setting: Switch focus to motor items, switch to Disqc1.2/USALS , press
<OK> enter Motor setting Page, after set Disqc1.2/USALS ,you must Press Store
save it .Unicable setting : As Motor setting.
Satellite Find
This feature provides you a way to make sure whether your satellite dish is properly positioned
and directed to your desired satellite base on the signal level of the preset TP. Before
proceeding, you need to make sure all the parameters for satellite connection are set correctly.
For the parameter setting for a dedicated connection mode.
(1)After finishing the satellite parameter setting, select the Satellite Find and press
< OK> in the Installation page. This will open the Satellite Find page.
(2)Press < OK> , and select your desired satellite from the satellite list.
(3)Using < Left/ Right> buttons to set the TP value.
(4)Set the Beep Tone to either ON or OFF using < Left/ Right> buttons.
6
Page 9

(5)Adjust and fix the position and direction of your satellite dish so you can get the optimized
signal Strength and Quality values.
Notice: If your satellite dish is a motorized one, you can adjust the dish position through the
DiSEqC 1.2 setup page.
Channel Scanning
1. Automatic Sat Scan
With the Auto SAT Scan function, you can perform TV-channel scanning on one or
more satellites. Before proceeding, you need to make sure all the parameters for
satellite connections ar e set correctly. For the satellite parameter setting for a
dedicated connection mode.
(1)After the satellite parameter setting, press <Green>. The Auto Sat Scan page
will appear.
(2)Press <Up/Down> buttons to select the Program to set the type of the program
you want to scan. The program type has tw o options, Free only and All.
(3)Press <Up/Down> to select the NIT mode. Search and add the TPs by referencing
to the satellite NIT Table, and scan for th e program channels from all th e TPs.
(4)If your intention is to scan one specific satellite, you need to specify it first.
(5)Press <Up/Down> buttons to select your Scan Mode. The options here include:
Default TP Mode: Scan only the channels from preset Tps, and will not tr y to add a
One TP Mode: Search and add one TP by referencing to the satellite NIT Table,
Blind Mode: Automatically search Tps in the IF range, and scan the TV-channels
(6)Press <Up/Down> to confirm your Scan Select. In here, you can
choose to apply the scan on one or more satellites to scan.
(7)Press <Green> button. Start scan
new TP.
and scan for the program channels from the TP.
available form the Tps found.
7
Page 10

2. Manual Scan
This feature provides you a way to scan channels from the TPs specified by your
own customized settings such as Frequency, Symbol Rate, Polarity, NIT, and
Program. Before proceeding, you need to make sure al l the parameters for
satellite connections are se t correctly. For the parameter setting for a dedicated
connection mode.
(1)After the parameter setting, press <OK>. The Manual Scan page will be open.
(2)Press <OK>, and select your desired satellite from the satellite list.
(3)Using the <0~9> keys to set your desired Frequency and symbol rate, range
from 0 to 65535.
(4)Using the <Left/ Right> buttons to set Polarity, NIT, Program type.
(5)After finishing above-mentioned settings, Press <Green>. Then, the Manual Scan
will start.
3. Satellite/TP Management
This manager provides features including add, delete, and edit for you to manage
your satellites and TPs thereof.
(1)Move the focus to your desired satellite name and then press the color key to open
the satellite manager page.
(2)Press < Red> to start editing the selected satellite by using the < Left/ Right>
buttons to set the options.
(3)Press < Yellow> to add new satellite, an d use the < Left/ Right> buttons to set the
options.
(4)Press < Blue> to delete the selected satellite.
(5)Move the focus to your desired TP, and press the color key to go into the TP
Manager page.
(6)Press < Red> to start editing the selected TP by using the < Left/ Right>
buttons to set the options
(7)Press < Yellow> to add new TP, and use the < Left/ Right> buttons to se t the
options.
(8)Press < Blue> to delete the selected TP.
(9)Press < Green> to bring out the Automatic SAT Scan page.
8
Page 11

Page 12

DTV Operation
Main menu
When your set-top box is power on, a press on the Menu button will bring out the Main
Menu. In this menu, press <Exit> button to switch into the TV's Normal Play mode.
Here, yo u can further select the operation mode for your set-top box using the
<TV/Radio> button. For example, if you select TV or Radio, the box will go into
Normal Play mode and start playing your desired program. And this is only one of the
many features available here.
(1)Press < Menu> button to enter into the Main Menu page.
(2)Press < Info> button. A message box with the version information of your
set- top box will appear. But you must scroll down to information title and by
pressing t he “O K” bu tto n.
Channel
In the Channel menu, you can edit the channels that you want to play in the
Normal Play mode. The functions available her e include TV channel editor,
Radio channel editor, and EPG.
TV/Radio Channel Editor
(1)Press <Menu> to open the Main menu.
(2)Select th e item Channel using <Left/Right> buttons.
(3)Select TV/Radio channel editor, the TV/ Radio List will appear and allows you to
manage your desired programs.
Press <Favorite> buttons to set/cancel TV/Radio channel favorite type Press
<Red/Green/Yellow/Blue> buttons to select the TV List option Edit/Lock/Del/Top.
1. Favorite: you can manage and add your favorite channel into eight preset
groups, are simply numbered 1-8.
(1)Press < Favorite> to bring out the favorites list.
(2)Press < Up/Down > to select your desired channel.
(3)Press < Left/ Right> buttons to select your desired favorite list.
(4)Press < OK> to add the channel to the selected list.
(5)Press < Exit> to save the list.
(6)Press < OK> to confirm th e save, or < Exit> to cancel it.
If you want to add more channel to favorite lists, please repeat steps (4)~(6).
2. Edit
(1)Press < Red> to Edit TV/Radio channel name.
(2)Press < Green> to move TV/Radio channel position in the list
(3)Press < Yellow> to sort TV/Radio channel in the list
(4)Press < Green> to set /cancel TV/Radio lis t skip status, then yo u cannot find in
the list except skip list.
9
Page 13

3.Lock: Press <Green> to set/cancel tv/radio list lock status.
4.Del:Press <Yellow> to set/cancel tv/radio list del status ,when you exit TV/Radio
list edit , the result will saved.
5.Top: Press <Blue> to set/cancel tv/radio list lock status.
Guide
The Guide page, also known as EPG (Electronic Program Guide), provides you
not only the program guide and program information but also the feature for you
to make an appointment to watch and schedule the program recording.
(1)In the Channel page, select EPG using the < Left/ Right> buttons.
(2)Press < OK> , and the TV Guide page will appear.
In Normal Play mode, yo u can press <EPG> to enter into the guide page directly.
1.Service List: you can select channels to view the EPG information.
Notice:
(1) If the channel you select provides no EPG information, then a message
No EPG Event will appear.
(2) With < Red/Blue> buttons you can scroll the pages up and down.
(3) With < Yellow> button you can directly enter into the Advance Timer setup page.
For details about the timer setting.
2. Event List:
It will show the events scheduled for the channel listed in th e Guide.
(1) Press <Left/Right> to move the focus from Service List to Event list.
(2) Press <Left/Right> buttons to select the event date you want to check .
(3) Press <Up/Down/Page up/Page Down> to scroll through the Event List to check
your desired event.
3. Event Book:
You can schedule your desired Event there for watching or recording it.
(1) Select your desired Event.
(2) Press< Yellow> button to enter into Advanced timer page to schedule the Event.
4. Event Detail:
You can select an event there, to check its introduction.
(1)Select th e event that you want to view.
(2)Press <OK> to show the details about the event.
(3)Press<Page up/Page Down> to scroll the details.
(4)Press<Yellow> button to enter into Advance Timer page to schedule the Event.
For details about advanced timer, view details on page 13.
Multimedia
In Multimedia menu, you can play your multimedia files, for more details, please
refer to the sections regarding MM and DVR.
Network Setting
The unit can support Wired Network and Wireless Network, and the Wireless
Network is inserted inside.
10
Page 14

(1)Wired Network
If you want to use W ired Network, you first enter main menu to set Network interface
in Wired Network, and there ar e two modes.
[AUTO], it will automatically get IP address to connect.
[Manual], you need manually input IP address, Net Mask address, Gateway
address and DNS address.
(2)Wireless Network
If you want to use W ireless Network, you first enter main menu to set Network
interface in Wireless Network, and select Wireless Network item and press OK
button to get hot point. If you can get any hot point, press RED button to refresh it.
You select one hot point and press BLUE button to connect it.
System Setting
In System Setting menu, you can change the system parameters and configure your
set-top box.
(1) Press < Menu> button to open the main menu.
(2) Select System Setting using < Left/Right> buttons.
(3) Press <Up/Down>to select your desired submenu, where the options are
Language, OSD Style, Time, TV Setup, Adv Timer, Parental control, Update&
Backup, and Factory setting.
(4) Press < OK> to enter into the selected submenu.
Notice:
(1) In the System Setting menu, you can us e <Up/Down> buttons to switch between
the System Setting submenus.
(2)The system setting submenus available here includes: Language/OSD Style/Time/
TV Setup/ADV Timer/Parental control, Update & Backup and Factory setting.
Language
In Langua ge menu, you can switch OSD language/audio language (TV program must
supports multi audio language)/subtitle language (TV program support multi subtitle
language).
OSD Style
You can set the OSD display options, including the transparency and banner display
time.
Time
1. GMT Setting: Turning ON/OFF the GMT function determines whether or not your
set-top box refreshes its system time according to the PTS (Program
Transport Stream) time field of the current program.
(1) If yo u set the option to ON, the system time will synchronize to the PTS time
field the current program; otherwise, the system time will refresh itself with
the PTS time only onc e after power on.
(2) GMT setting is ON by default.
2. Time Zone: you can set your time zone here to display the local time.
(1) This feature is available only when the GMT setting is set to ON; if the GMT is
off, the system will skip this option when you tr y to select it using < Up/ Down>
buttons.
(2) The change of Time Zone will immediately reflect the system time.
11
Page 15

3. Set Date: you can set the system date here. When the GMT is off
(1) The setting range is from 1970/01/01 to 2038/03/31. Any date before 1970/01/01
will be set to 1970/01/01, and any date after 2038/03/31 will be set to 2038/03/31.
(2) Any change made here will be immediately reflected to the system.
4. Set Time: You can set the system time here when the GMT is off
(1)The setting range is from 00:00 to 23:59. Any time value after 23:59 will be set to
23:59.
(2)Any change made here will be immediately reflected to the system setting.
5. Sleep Time: You can set the maximum amount of time your set-top box spends in
sleep mode. In the sleep mode, your box will suspend all outputs including audio and
video.
(1) After setting the Sleep Time, it will display the remaining time before entering the
sleep mode.
(2) The default setting of Sleep Time is OFF.
TV Setup
In TV Setup submenu, you can select the TV output mode.
1.TV Format: you can select the TV format for your TV shows. This feature supports
4 :3LB, 4 :3PS, 1 6:9LB, and 1 6:9FIT.
2. TV Mode: you can select the TV mode for your TV shows from the options,
including PA L and NTSC. However, you have to make sure your TV supports the
mode you select.
(1) Any change made here will be immediately reflected to the output mode.
(2) After any change made here, the TV Resolution will automatically change to the
respective default value, 576i for PA L and 480i for NTSC.
(3)The default setting of TV Mode is PA L.
(4) Currently this option is fixed to PAL and cannot be changed.
3. This feature supports formats such as SCART (CVBS), SCART (RGB), and H DMI.
(2) Before you connect the video outputs of your set-top box to the video inputs of
your TV, please make sure the inputs and outputs are consistent with your setting
made here.
(3) The default setting of Video Output is Scart ( CVBS) if there is no HDMI connection
between your box and TV; otherwise, the default setting i s H DMI.
(4) If there i s n o HDMI connection between y our b ox and TV, yo u will not be
allowed to set the output format to HDMI.
(5) When they co-exists a HDMI and a SCART connection, if your box detected
that the TV is set to HDMI mode, it will switch to HDMI output mode automatically.
(6) If t his feature is set to SCART (CVBS), or SCART (RGB), th e TV Resolution
will automatically change to the respective default value, 576i f or PAL and 480i f or
NTSC.
(7) Any change made here will take at least one second to be applied.
4. TV Resolution: you can set the resolution for your video output.
(1) If this feature is set to SCART (CVBS), or SCART (RGB), the TV Resolution
cannot be changed.
12
Page 16

(2) When this feature is set to HDMI, the available resolution options for
PA L mode are 720p_50Hz, 1080i_50Hz,1080p_50Hz, and AUTO, and for
NTSC mode are 720p_60Hz, 1080i_60Hz, 1080p_60Hz, and AUTO, while
you are not allowed to switch to the resolutions not supported by your T V.
(3) If there is HDMI connection between your box and TV, the default setting
of TV Resolution is AUTO; otherwise, the default setting is 576i.
(4) Any change made here will take at least one second to be effective.
5. Digital Audio Output: you can set the format for your digital audio output.
(1) The options available here are LPCM and RAW.
(2) The default Digital Audio Output is LPCM.
6. Power On at: By setting this option to TV or Menu, you can set your box
to show TV or Main menu the next time it turns on.
7. Auto Switch off: you can set the time for how long your set-top box will wait for
the signal from the remote controller before it enters into sleep mode automatically.
The timer will start counting at once when there is no remote controller operation.
When the timer expires, the set-top box will go in to sleep mode.
8. TV Brightness: you can set the brightness of the display, where the greater the
value the higher the brightness.
9. TV Contrast: you can set the contrast of the display, where the greater the value
the higher the contrast.
10.TV Saturation: you can set the saturation of the display, where the greater the
value the higher the saturation .
Advance Timer
With this feature you can schedule up to 10 events. The event timers can turn on or
record a specific channel for the amount of time you set.
1. Add Event: you can schedule an event here.
2. Edit Event: yo u can edit the existing events here.
3. Delete Event: you can delete an existing event.
(1)Press < Red> button to delete the event.
(2)Press<OK> button to confirm your delete operation.
After an event is deleted successfully, the other events in the list will be sorted
automatically by their start time.
Notice:
(1)When your new event conflicts with an existing event in some way, for example,
a time-range overlap, a message box will appear to notify such confliction and the
attempt fails.
(2)After your new event is added successfully, the events in the list will be sorted
automatically by their start time, earliest first.
(3)When manually entering a channel number, if the number exceeds maximum
channel number available here, the system will automatically adjust the number to a
proper one.
13
Page 17

(4)There are two advance timer modes, Schedule and Recorder. Schedule: as soon
as the sc heduled start time is reached, your set-top box will switch to Normal Play
mode, and start playing the scheduled program. If Recorder: if the scheduled
program and the program currently playing are received from the same TP, then the
recording will start in background.
4. Activate Event
When it is time for an event to start, a schedule timer will expire, and it will activate
the relative event.
(1) Switch between the channels in the same TP. If the channels you switch to the
one not in the same TP, it will trigger a message prompting if yo u want to stop the
event.
(2)When the event reaches its end time, it will notify you by triggering an event end
message.
Notice:
(1)If your set-top box activates an event while it is in the sleep mode, it will go back to
the sleep mode after the event ends.
(2)For an event that is set to “ o nc e” mode, it will be deleted from the event lis t after
it ends. For an event that is set to other modes (Daily/Weekly/Weekend-day/
Weekday), its start time will be set to the next date automatically after the completion
of current execution. To stop the event, you are required to delete it from the list
manually.
(3)When an event of Recording reaches its start time, a no-device message will be
triggered with the event being suspended if the system detects no storage device.
You can restore the recording event by plugging a storage device in the box before
the end time.
Parental control
In Parental Control submenu, you can set the channel and censorship locks, and
change your password (initial value:0000) here.
1. Menu Lock: you can set the menu lock on/off.
When this feature is set to ON, yo u will be required to enter password when you are
trying to enter into the submenus in Setup page, such as Installation, Channel,
Multimedia, System Setting, and Others.
2. Channel Lock
Channel Lock: yo u can set th e channel lock ON/OFF.
(1)When it is set to ON, you are required to enter your password when you are trying
to open the TV list and Radio List.
(2)When it is set to ON, you are required to enter your password when you are
trying to enter into the setup submenus such as Installation, Channel, Multimedia,
System Setting, and Others.
3. Censorship Lock:
You can set the rating for th e censorship lock feature.
(1) The program comes with its rating info. If the rating is higher than the one you
made here, your TV screen will only show a Censorship Lock message, instead of
playing the program.
(2) If this feature is set to Total Block, all the programs will be blocked. In this case,
your TV screen will only show a message notifying the censorship lock has blocked
the program.
14
Page 18

4. Change Password
You can change your password here.
After restoring to factory default, this feature will be set to NO, and the password
will be 0000 again.
Update& Backup
In the Update&Backup submenu, you can choose to update your set-top box
software applications. Or read software and database from set top box
.
1. USB Upgrade
You can upgrade your set-top box software applications using USB devices.
(1) Enter into the upgrade page.
(2) Select the directory.
(3) Move the focus to the file list.
(4) Select your upgrade file (*.ssu).
(5) Press < OK> button to start the upgrade.
2. Image Backup: you can backup your set-top box software applications to your
USB device.
(1)Enter into the backup page.
(2)Select th e content you want to backup.
(3)Select th e backup path
(4)Press < OK> button to confirm your selection
(5)Press <Left/Right> buttons to move the focus to the file list.
(6)Press <OK> button to start your backup.
Factory Setting
You can restore the settings to default factory value for your set-top box.
All the changes have been made will be replaced by their default values, and the
channel data will be clear. You can revert back to original SW without new
channels added. Or reset SW with added channels.
Notice:
(1) After restoring to default factory value, the reservation information stored in the
Advance Timer feature will all be deleted.
(2) All channel information stored in the system will be deleted.
(3) All the changes you have made to the setting will restore back to default.
(4) The program type and program number, which construct the program information,
will show TV and 0 respectively.
Others
You can access here to some auxiliary functions, including YouTube.
YouTube: you can watch YouTube video when yo u connect internet.
15
Page 19

Playback
You can select to watch TV or listen to the radio in Normal Play mode. Since watching
TV an d listening to the radio in Normal Play mode ar e identical in their ways of
operating, in this section we will focus on how to watch TV.
In Normal Play mode, Press <TV/Radio> to switch between TV and Radio programs.
Program Info
The Banner provides the program info including the channel number, program name,
favorite list, date and time, previous/next event, lock status, scramble status, subtitle,
and teletext.
(1)Press < Info> to bring out the banner.
(2)Press < Info> again to show the Event Detail.
(3)Press < Info> again to show the signal information.
Switch Channel
You can press <Up/Down/Ch+/Ch->or enter a channel number to switch channel.
Notice:
(1)If the channel number you enter does not exist, your set-top box will ignore it.
(2)When a recording event is proceeding, you can switch channel only with
< Ch.+/Ch.-/Up/Down >but not < 0~9/OK>. However, if you switch to a channel in
a different TP, the recording event will abruptly abort.
Recall
You can press Recall button to switch directly back to the channel you previously
watched.
Notice:
(1) The channel you switch back to with <Recall> button is the one you previously
watched.
(2) This Recall function will not apply between a TV channel and radio channel.
(3) If yo u stay on a channel without an y switching operation previously, there will be
no response when you press the return button.
Ok list
In the Normal Play mode. Press <OK>button, you can enter ok list.
Through this list, you can check, switch and search among programs.
(1) Press <Green> and a software keyboard will appear.
(2) Press <Up/Down/Left/Right/OK> to enter the channel name.
(3) Press <Exit> to complete the name entering, and the screen will go back to the
List page.
16
Page 20

(4) Press <Left/Right> to select the search mode, Search Forward or Search
Backwards.
(5) Press<OK>to start your search.
Notice:
(1)If your search completes successfully, the channel you search for will be
highlighted and start playing in the screen window. If your search fails, th e highlight
will stay on the current channel playing in the screen window.
(2)The search scope is restricted to the current service group, not the entire channel
list. If the channel you ar e searching for does not exist in the current channel list, the
search would fail.
(3)When there is a recording in progress, OK list will onl y list the channels in the
current TP, and you can switch among channels in the TP.
Volume Adjust
You cannot only adjust the volume but also mute it. In the mute mode, any attempt to
adjust the volume will cancel the mute.
1.Press < Vol- / Vol+ / Left/Right> to adjust the volume.
2.Press < Mute> to mute your system.
Pause
You can pause the playback, Press <Yellow/Pause> to pause the playback.
Notice:
In pause status, you can press any button to resume the playback.
Audio Language
In Normal Play mode, you can press <Audio> button to switch the audio language and
sound mode (LR/LL/RR). If you set your language in Main Menu->Language
-> Audio Language, the language will become the default language for your channel.
1.Press <Audio> to bring out the Audio setup page.
2.Press <Up/ Down> button to set your language or sound mode.
3.Press <Exit> to close the setup page.
17
Page 21

Notice:
(1) Any change in Audio Language setting will also trigger an appropriate change in
Audio PID field.
(2) The options for Sound Mode are LL, RR , and LR.
Switch among Your Favorites
In Normal Play mode, yo u can press <Fav Up/Down> button to switch among your
favorite lists. For details about how to set your favorites.
1. Press < Favorite> to select your favorite list.
2. Press < CH+/CH-/Up/Down> to switch among the channels in the list.
Notice:
(1)You can get proper response when pressing < Favorite> only if there ar e some
favorite lists already available; otherwise, you will get a Fav Off message.
(2)When switching to a favorite list, the first channel in the list will start playing.
Teletext
In Normal Play mode, yo u can choose to open the teletext when you are watching
program.
1.Press < Teletext> to open the teletext.
2.Press < OK> to switch the OSD Transparency for your teletext page.
3.Press < Info> to enlarge the teletext interface.
4.Press < Left/ Right> to change 1 page at a time, and < Up/ Dow> button to change
100 pages at a time.
Subtitle
You can set and display the subtitle when watching TV.
1. Press< Subtitle>to open Subtitle setup page.
2. Press< Up/Down>to select your subtitle language.
3. Press< OK/Exit>to close Subtitle setup page.
Teletext Subtitle
You can choose to display your desired teletext subtitle when you ar e watching TV.
1. Press < Subtitle> to open Subtitle setup page.
2. Press < Left/ Right> button to select TTX Subtitle.
3. Press < Up/ Down> to select your desired language.
4. Press < OK/ Exit> to close the setup page.
Notice:
You can setup and display the TT X subtitle only if your program provides such in its
content.
Channel Status
This function provides you information about the status fo r the current channel
1.No Signal:
When the set-top box receives no signal, a no-signal message will appear.
2.No Service
When there is no program available from the channel or database, a no-service
message will appear
2.Scrambled Service
You cannot watch a scrambled channel without paying for it. How to get the service,
please contact your service provider.
4. Channel Lock
You have to enter the correct password to watch a channel whose Channel Lock is
set to ON.
18
Page 22

Multimedia
Movie
Movie Thumbnail/ Folder
In Main menu, select Multimedia > Movie, and press <OK>.
In the thumbnail page, the available button operations ar e as followed:
<Menu>: this allows you to go back to Main menu.
<Red>: enter Movie play option setting.
(1)Random: Random play movie order on /off
(2)Repeat: Repeat play movie order all / off/ one
(3)Text Encode: You can specify the coding for the add-on subtitle files.
<Green>: switch between Thumbnail and Folder
<Left/Right>: when the focus is not on the Function Bar, they are for you to select
folders or files in the file system. An d when the focus is on the
Function Bar, they are for you to switch among the sub-option available there.
<Up/Down>: when the focus is not on the Function Bar, they are for you to select
folders or files in the file system.
Movie Play
In Movie thumbnail or file page, select a playable file, and then press <OK>.
This will open the Movie Play page.
<Red>: ON/OFF Random play movie
<Green>: switch Text Encode
<Repeat>: switch repeat play option All/Off/One
<Goto>: Press <Goto>. This will bring out a time input box.
Here you can input the time frame from which you want your player to continue
playing. However, if the time frame you input is invalid, the player will keep its
current playing.
<Left/Right>: with these buttons you can select the value for the option.
<Menu>: allows you to exit the movie play page and back to Main menu.
<Audio>: This function is for you to switch between audio channels. And will not be
enabled unless the file currently in play is provided with audio channels.
If the file comes with only one audio channel, this function will be set to that channel
and will not respond when you press on
<SUBTITLE>: With this function you can select your desired subtitle language if
the file currently in play comes with subtitle files.
Notice:
(1)The available option will be OFF if your movie file comes with no subtitle.
(2)The subtitle will show garbled characters if yo u fail to set the corresponding text
encode.
19
Page 23

Music
Music Thumbnail/Folder
In Main menu, select Music from the MULTIMEDIA, and then press <OK> to enter
into th e music Folder mode In the thumbnail /Folder page, the available button
operations ar e as followed:
<Menu>: this allows you to go back to Main menu.
<Red>: enter Music play option setting.
1. Random play Music order on /off
2. Repeat play Music order all /off/one
3. Info Option when music playing, display music info or lyrics.
4. Display when music playing, display Cover or EQ <Green>: switch between
Thumbnail and Folder.
Music Play
Music Play Page: In Music thumbnail page, when the focus is on the File item, a
press on <OK> will open the Music play page.
<Red>: ON /OFF Random play movie.
<Green>: switch Display mode.
<Yellow>: switch Info Option mode.
<Repeat>: switch repeat play option All/Off/One.
Photo
Photo Thumbnail / Folder
<Menu>: this allows you to go back to Main menu.
<Red>: enter photo play option setting. Random: Random play photo order on /
off Repeat: Repeat play photo order on/ off
Interval Time: select display timer when switch photo
Effect: effect play photo on/off
<Green>: switch between Thumbnail and Folders
Photo Play
In t he photo thumbnail / folder page, move the focus to the File item and press
< OK>. This will open the photo play page.
<Left/right>: turn left/right the phot when play photo.
<Green>: Play music when play photo
<Yellow>: vol<Blue>: vol+
20
Page 24

DVR
DVR Features
DVR provides following features:
1. Support one-path TS recording.
2. Support time-shift function.
3. Support program playback functions including pause, fast forward/backward
(2x, , 32x) , and slow forward/ backward (1/2, 1/4).
4. Support background recording in same TP.
5. Support radio program recording.
6. Provide functions to format external USB/SD/HD devices.
7. Support file formats: FAT32/NTFS.
8. Provide functions to record audio, video, teletext, subtitle, an d so on.
Recoding
Manual Recording
In normal play mode,<Rec> start recording function.
Recorder Setting -> one Button Recording is ON: Start the recording immediately,
Recorder Setting -> one Button Recording is OFF: Set the
Duration, and press
<OK> to start the recording. If it is Recoding, you can reset the recording duration
<Stop> stop recording function.
Notice:
(1)If the subtitle of the program is already turned on, the recorded time in the
upper-left corner will appear awhile and then change into a red circle indicating the
recording is in progress, and you can bring recorded time out for a check by pressing
any button.
(2)If the recording duration is reached, the recording will automatically stop, and the
system will go back to Normal Play mode.
Reservation recording
You can plan a reservation recording by setting the date, time, and channel. When
the time arrives, the system will automatically switch to the channel and start
recording. There ar e two ways to make such reservation: EPG and Advance Ti mer.
1. Advance Timer: Please see 3.4.5 advance timer
2. EPG : After pressing <Yellow> in the EPG page, yo u can plan a reservation
recording by setting the time and channel, as shown below:
21
Page 25

Timeshift
Button
Functions
FB button
Fast backward in X2/X4/X8/X16/X32 mode
Stop button
Stop the timeshift function
Play button
Start playing
FF button
Fast forward in X2/X4/X8/X16/X32 mode
Slow button
Slow forward in x1/2/x1/4 mode
Teletext button
Open the Teletext setup page
Subtitle button
Open the Subtitle setup page
Mute button
Mute the system
Timeshift feature
Multimedia -> Recorder Setting ->Timeshift ( Auto/Pause/Off).
Auto: the system automatically enters timeshift status when you go into Normal
Play mode.
Pause: While watching live program in Normal Play mode, you can pause the
playback with <Pause> button. Then once you restore the playback by pressing
<Play> button, the system goes into the timeshift status. The stored time-shift data
will be deleted after you exit from the timeshift status.
Off: During a recording in progress, you can enable the timeshift status only by
pressing <Pause>.
Timeshift function
The time in the upper-left corner shows the recorded length.
The time in the lower left corner shows the time gap between the time frames
of your playback and the live program.
The time in the lower right corner shows the available buffering length of the
timeshift function.
The available buttons here are listed as below:
22
Page 26

Record List Page
Button Functions
Red button
Rename a recorded file
Green button
Format an external device and set the device type, slot,
and partition
Yellow button
Selected recorded file
Blue button
Del recorded file selected
Up/down/Left/right
button
Switch among the channels
Left/right button
When the focus in on the device type, you can switch
among available device options.
OK button (Select )
When the focus is on Function Bar >enable arrow key,
this is used to confirm the selection with a check mark.
OK button
When the Function Bar is hidden, this is used as a
play/pause button in the preview mode.
(Play /pause)
Play button
Start playing the selected file in full screen.
<Red>
Goto, yo u can playback the current file from the time frame you
specified, as shown below:
After you enter a valid time, your player will continue playing
from the input time. However, if the time frame entered is not a
valid one, the player will ignore it and keep playing.
<Green>
Step by setup play recorded file. You can exit the Step
function and resume playing by pressing <Menu>
<Yellow>
Zoom+ If you switch to a next file in the zoom+ mode, you
will automatically exit the zoom+ mode During the zoom-in
mode you can scroll the image content with
<Up/Down/Left/Right >.
<Blue>
Zoom- If you switch to the next file in the zoom-
mode, you will automatically exit the zoom- mode.
<Vol+/->
When in playback mode, you can press <Vol+/-> or
<Left/Right>
<Info>
Open the Info page directly. Display playing recorded file
information
This page will list out all the available recorded files. The available buttons here are
listed as below:
Press <OK> to activate the preview function, the selected file will be played in the
small screen in the lower right corner.
The renamed file name will be saved once you exit the Edit function.
Recorded File Play
In Record list page, press on <Play> will start playing in full screen.
23
Page 27

Troubleshooting
Problem
Potential Reasons
What to do
No picture
Power isn't connected
Connec t the power
The power switch is not on
Switch on the power
Screen shows
No Signal
Not connect DVB-S cable
Plug in the DVB-S cable
Incorrect setting
Set up correct parameter
No sound from
speaker
No or incorrect connection
with audio cable
Connect the audio cable
correctly
Mute the sound
Switch on the correct
volume control
Incorrect sound track
Try another sound track
Only sound,
no image on
the screen
No or incorrect connection
with AV cable
Connect the audio cable
correctly
The program is a radio
program
Press <TV/RADIO> ke y to
shift into TV mode
Remote control
unit is not workable
The battery is exhausted
Change new battery
Remote control unit is not
in the right opposite of the
front panel or too far from
it
Adjust the way of holding
remote control unit and
near from the panel
The image stop
suddenly or mosaic
The signal is too weak
Strengthen the signal
24
Page 28

Specifications
Item
Specification
Tuner
Frequency Range
Input Impedance
950MHz to 2150MHz
75Ohms unbalanced
Signal Input Level
-65 ~ -25dBm
Symbol Rate
2-45Mbps
LNB Power
13/18V,Max 500mA
Demodulation
Demodulator
QPSK/8PSK
FEC
1/2,2/3,3/4,5/6,7/8,8/9,9/10
Connections
LNB IN
F connector
LOOP OUT
F connector
Y/Pb/Pr
Connect to your TV component input
terminals
COAXIAL
RCA, for SPDIF digital audio output
HDMI
Connects to HDMI in device.
RS232
Used fo r data transport
USB
Connect to an external USB 2.0
device.
Power
Input
DC 12V
Consumption
Max 18W
Display
Decoder Module
PAL,NTSC
Resolution
720X576(PAL),720X480(NTSC),
720P,1080i
Decoding
Aspect Rate
4:3(Letterbox, Pan& Scan)16:9
Video
MPEG2 Transport MP@ML.HL
MPEG4 AVC/H.264 HP@L4
Audio
MPEG2 Audio Layer I&II
Others
Compliance
ETSI/EN 300421 DVB-S compliant
Sound Mode
Right, Left, Stereo
*Specifications are subject to change without further notice
[Service]
Grandview Satellite
3859 East Grandview Ave.
Phoenix, AZ. 85032
TEL 602-363.1875
25
 Loading...