

Page 1

WEBCAM 500
USER MANUAL
MODEL 460729
MAN-460729-UM-0613-01
Page 2

INTRODUCTION
Thank you for purchasing the Manhattan® Webcam 500, Model 460729.
With simple, operation and easy-to-use software, the camera’s 5.0-megapixel
(software enhanced) CMOS lens captures crisp and clear images and smooth,
steady video to share with family and friends. The compact size, attractive nish
and plug-and-play installation make it a good accessory for desktop and notebook
computers.
The included software easily captures and shares videos and still frames in
common AVI video, BMP and JPG formats. Its lightweight and compact size
provides easy storage and transport for use almost anywhere with a hinged clip
that positions and adjusts the camera on a desk, monitor or notebook computer.
By following the instructions in this user manual — or the simpler setup procedure
in the printed quick install guide included with the product — you’ll soon be
enjoying these additional features:
• Automatic color equalizing, exposure and brightness balance adjustments
• Saturation, contrast, sharpness controls
• Plug and Play installation – Windows compatible
• Lifetime Warranty (For a complete list of country-specic warranties, go to
manhattan-products.com/warranty.)
Package Contents
• Webcam 500
• Quick install guide
System Requirements
• IBM PC-compatible computer or notebook with USB port
• Pentium 200 or higher CPU
• Windows Vista/7/8
• 20 MB of HDD space
• VGA display card for DirectX
2
Page 3
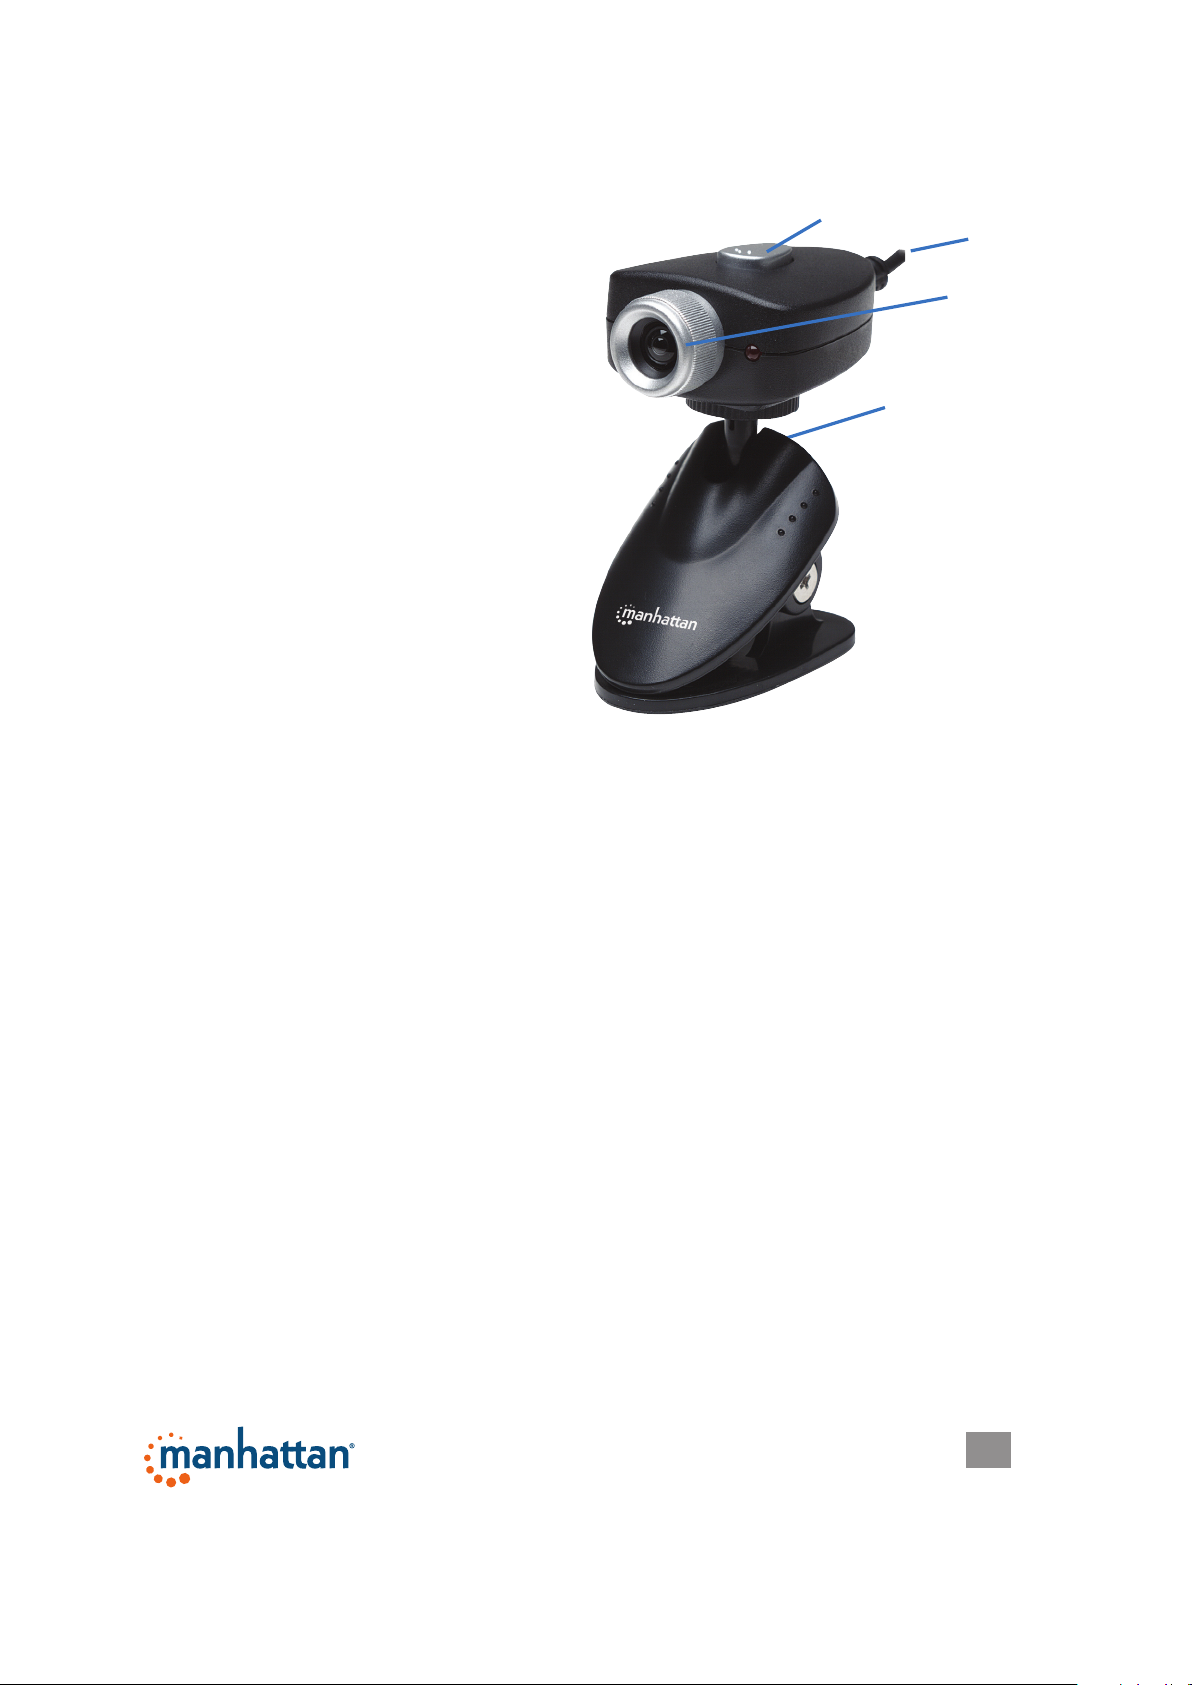
INSTALLATION
1. With your computer on, plug the
camera into a USB port on the
PC/notebook/netbook.
2. Use the clip on the camera base to
position the camera as desired.
Top-mount snapshot button
USB
cable
Focus
ring
NOTE: You may prefer to wait until
you are adjusting the focus ring
during the software installation so
Base with clip
you can view the camera image.
(See the procedures below in
Software Installation.)
3. Press the snapshot button to
capture and le still images.
(Refer to the Capture section in
Operation.)
To protect your camera:
• Avoid dropping, jostling or otherwise
mishandling it, as this can affect its
performance.
• Do not place it in extremely hot, cold or dusty environments. A soft cotton cloth
is recommended for cleaning the lens and/or any other optical components
• Prevent camera contact with sharp items (even ngernails) or coarse or wet
materials.
3
Page 4

OPERATION
1. Connect the camera to your computer through a USB port. The installation
procedure will run automatically and display a series of screens.
2. Follow the on-screen instructions for the InstallShield Wizard.
3. Go to Start on your desktop, then Programs. Select “Webcam/Webcam Video Cap” to display the initial menu screen and active camera image (below).
File (F) Device (D) Options (O) Capture (R) Preview (P) Help (H)
The Menu bar is at the top of the image screen. To the lower left of the image is
information about what camera is being used and the frame rate per second. The
feature items on the menu bar — File, Device, Options, Capture and Preview —
give you access to the various settings that let you congure your camera for
optimal enjoyment.
4
Page 5

File
• Set Capture File Folder
When this option is selected, a window will open so you can select a location
for saving captured video. This only needs to be done once: The VideoCap
software program will continue to write to the same folder each time a video is
saved.
• Set Snapshot File Folder
When this option is selected, a window will open so you can select a location for
saving captured snapshots to. This only needs to be done once: The VideoCap
software program will continue to write to the same folder each time a
snapshot is saved.
• File Index Reset
This resets the location of the video and snapshot save locations.
• Exit
This exits and shuts down the application
Device
This will display a list of available video input devices and audio input devices.
When you make your selections, a check mark will appear next to each active
device.
Options
• Preview
If this option is selected, the video seen by the camera is displayed in the main
screen. If there is no check mark next to Preview, the image on the main screen
will not be updated. If video is captured, it will show what is being captured in
the main window, even if Preview is not checked.
• Video Capture Filter
When this option is selected, the Properties box will open. These options are
used to edit the appearance and behavior of the video. Different versions of the
software may provide various tabs and selections, but the options are the same.
The various tabs will contain options to adjust the appearance of the images
(such as color, brightness and hue), image orientation, special effects, framing,
face tracking and PTZ features. NOTE: Depending on the camera model, not
all features may be active.
• Video Capture Pin
This option allows for the conguration of the video stream properties. Unlike
Filter, this has options such as frame rate, compression and output size settings.
5
Page 6

• Audio Capture Filter
This allows the conguration of audio input properties. If no audio is selected in
Devices, the options will not be available. Properties of the line-in audio and
the master input can be edited for treble, base and volume.
Capture
This menu presents a list of various capture options. Still frame resolutions can be
selected, and the active resolution will be displayed with a check mark. There are
options for audio recording, frame rate, video format and maximum length (in time)
of video capture. It is where you can congure the settings for taking snapshots,
starting video capture and stopping video capture.
Preview
This menu option will provide different resolutions for the Preview screen. The
window will resize itself automatically when a new resolution is selected.
Help
This option provides the version information of the software.
6
Page 7

SPECIFICATIONS
Standards and Certications
• USB 1.1
• CE
• RoHS
• WEEE
Lens
• CMOS Sonix 201 DSP color sensor; 300k pixels (software enhanced; interpolated
to 5.0 M pixels)
• Lens: F2.2 1/4-inch lens with focus ring
• Image Focus: 50 mm to innity
Image
• Maximum resolution up to 2560 x 1920
• Format: AVI, JPG, BMP
• Color depth: 24-bit true color
General
• Automatic color equalizing, exposure and brightness balance adjustments
• Top-mount snapshot button
• Viewing angle: 55˚ horizontal
• Built-in compression ratio (BMP)
Physical
• Adjustable clip base; cable, 1.4 m (4.5 ft.)
• Dimensions: 15.25 x 3.8 x 8.25 cm (6 x 1.5 x 3.25 in.)
• Weight: 68 g (2.4 oz.)
System Requirements
• IBM PC-compatible computer or notebook with USB port
• Pentium 200 or higher CPU
• Windows Vista/7/8
• 20 MB of HDD space
• VGA display card for DirectX
7
Page 8

© IC Intracom. All rights reserved. Manhattan is a trademark of IC Intracom, registered in the U.S. and other countries.
 Loading...