

Page 1
HD WEBCAM
760 PRO XL
USER MANUAL
M O D EL 4 6 0 521
MAN-460521-UM-0513-03
Page 2

Page 3

INTRODUCTION
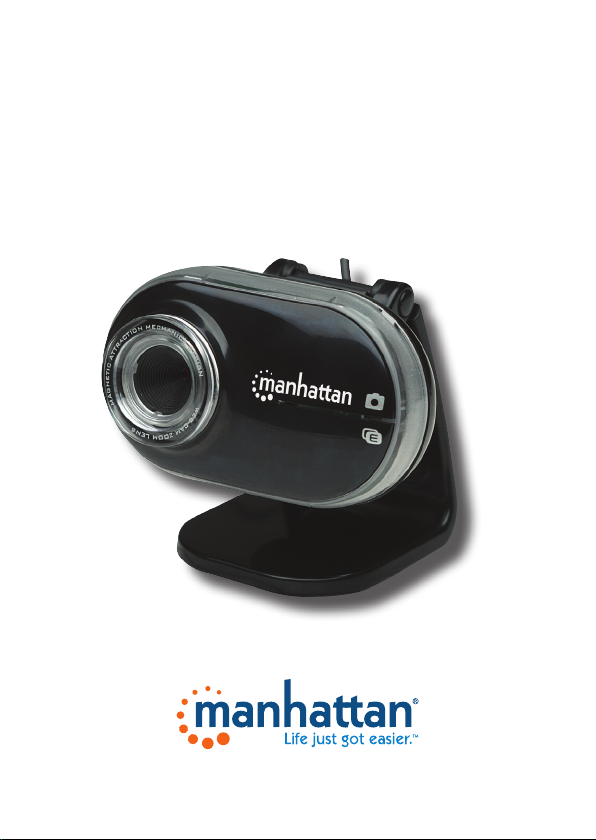
Thank you for purchasing the Manhattan® HD Webcam 760 Pro XL,
Model 460521. Quickly and simply, you can improve all of your online
communications, instant messaging, VoIP and social media with highquality photos and video, and better color. With Plug and Play and
Windows and Mac compatibility, it’s ready to go and easy to use, with
included software that simplies settings and operation.*
The easy-to-follow instructions in this manual help make the setup
quick and simple, so you’ll also soon be enjoying the benets of these
additional features:
• Easily capture, record and share widescreen HD photos and video up
to 720p – upload to Facebook, YouTube and more
• 16 megapixel image resolution with powerful 4x digital zoom function
and built-in microphone
• Face tracking, automatic color, exposure and brightness levels
maximize clarity in varying light conditions
• Personalize conversations and images with special video and frame
effects
• Versatile base with clip and swivel magnetic mount ideal for at-panel
and other displays
• Lifetime Warranty
NOTE: Some screen images have been modied to t the manual format.
System Requirements
• Windows XP/Vista/7/8 or Mac 10.4.8
* Software enhancements/features not compatible with Mac systems
• IBM PC with USB interface
• Pentium 200 or higher CPU
• CD-ROM
• 200 MB free disk space
• 32 MB RAM
3 3
Page 4
INSTALLATION
Driver
Prior to installing the driver:
• Close any open software applications on your computer;
• Un-install any previously installed camera software or drivers;
• Disable any anti-virus software and any established rewall; and
• Ensure that the camera is not connected to the computer’s USB port
at this time.
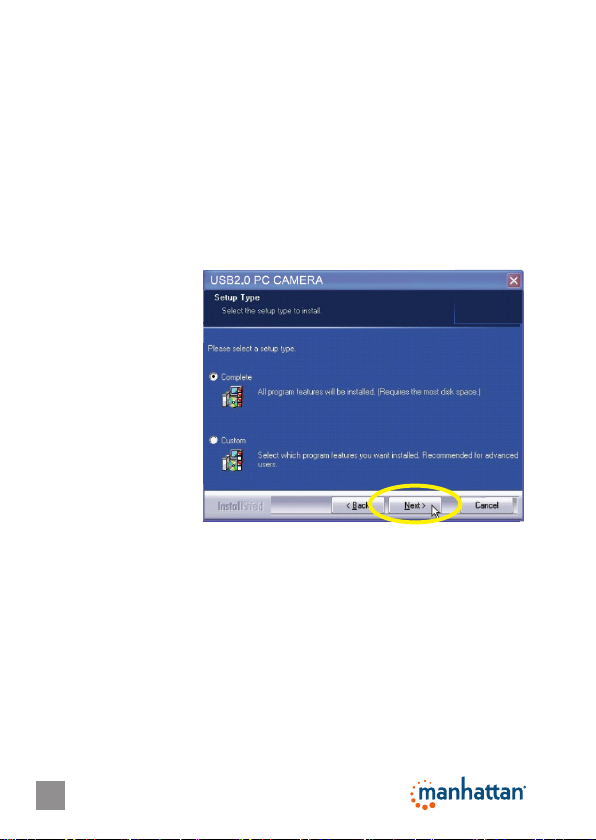
With your computer turned on, insert the included CD in the CD-ROM
drive. The installation interface will automatically display.
1. When presented with
the rst InstallShield
Wizard screen
prompt, click “Driver.”
2. On the subsequent
screens, click “Next”
or “Continue Anyway”
to proceed with the
driver installation.
3. When the InstallShield
Wizard prompts you
with a screen saying
the installation is
complete, click “Finish.”
Hardware
1. Connect the camera to your computer’s USB port.
2. After a few seconds, the computer’s operating system will nd and
recognize the connected camera, initially displaying a Welcome to
the Found New Hardware Wizard screen. Click “Next.”
3. On subsequent screens, click “Next” or “Continue Anyway” to proceed
with the installation.
4. When the Found New Hardware Wizard prompts you with a screen
that says the software installation is complete, click “Finish.”
44
Page 5

Installation Verication
1. From the desktop, go
to My Computer, then
Properties.
2. Select/click on the
Hardware tab, then
click “Device Manager”
to display your list of
application folders.
3. Conrm the camera
(or “Touch Cam”)
le appears in the
Imaging Devices
fo ld er. NOTE: Make
sure the folder doesn’t
have an exclamation
point (!) next to it
(which indicates an
improper installation).
4. From the desktop, go to Control
Panel, then click on Sounds
and Audio Devices.
5. Select/click on the Audio tab.
6. In the Sound Recording panel,
select “USB Camera” from the
Default Device drop-down
menu in order to activate the
camera’s built-in microphone.
5
5
Page 6

OPERATION
Quick-Access Controls
In addition to a convenient exterior focus
ring, this camera features a pair of
icons that let you quickly perform a
couple of popular functions without
the need to access a software menu.
• Press the camera icon to take a snapshot.
• Press the “E” (“effects”) icon to move
through a 26-option menu of useful frame
styles and special effects (ranging from “Postcard” to “Merry Christmas”
and from “Aged Photo” to “Mosaic,” as displayed below in Advanced
Settings on the Effects screen).
Advanced Settings
To make any changes to the camera settings (image controls and
modes and such) or to take advantage of the variety of effects (special
effects and frame options), open the AMCap application (which may be
found in your Control Panel settings or on your desktop, depending on
your operating system). For example:
• To stabilize the video (if needed),
go to Options, then to Video
Capture Filter, and select the
Settings tab to change between
“50 Hz” and “60 Hz” to improve
your results (see the screen
image on the next page).
• To establish a new location for
storing AVI images, go to File,
then Set Capture.
• To select a video output size,
go to Options, then to Video
Capture Pin (which then displays the Stream Format screen and the
Output Size drop-down menu, among several other Video Format and
Compression options).
Adjustable focus ring
Snapshot
Effects
666
Page 7

7
Page 8

FREQUENTLY ASKED QUESTIONS
Q What can be done to rectify a dropped frame or video lag?
A The camera automatically activates White Balance and Exposure
(both displayed on the Auto Mode Control panel of the Settings screen)
when lighting is determined to be insufcient. If continuity or delay
problems occur, deselect the “Auto” option for Exposure.
8
Page 9

Q When using MSN, why isn’t my voice heard?
A The built-in microphone probably isn’t activated. Check the “Sounds
and Audio Devices Properties” folder in the Device Manager or Control
Panel and make sure that “USB Camera” is elected as the Default
Device drop-down menu option in the Sound Recording panel. You
can also make sure that your Instant Messenger software is defaulted
to recognize the camera. Also, conrm that the other IM user has
the same software version and not one that’s incompatible.
Q How do I take 1.3-megapixel snapshots?
A In the AMCAP application, go to Options, then Video Capture Pin to
display the Stream Format screen. In the Output Size eld, select
“640 x 480” (VGA). Then return to Options and go to Video Capture
Filter. In the Image Control panel, set the VGA/SXGA slide bar to
“SXGA” (all the way to the right, which equates to 1280 x 960 pixels).
Q After inserting the installation CD, the autorun program doesn’t
work in Windows Vista, 7 or 8. How do I get the camera to install?
A This is an issue involving how these operating systems handle
the autorun.exe le. To install the software and drivers, you’ll need to
manually open the disk.
1. Right-click the My Computer icon and select “Explore.”
2. Browse the CD drive and right-click the setup program.
3. Select “Run as administrator”; the installation will begin.
4. Follow the prompts to complete the installation.
9
Page 10

SPECIFICATIONS
Standards and Certications
• USB 2.0
• CE
• FCC
• RoHS
• WEEE
Lens
• CMOS 1/6” color sensor; 1.3 megapixels 720p (software enhanced;
interpolated to 16 megapixels) with 4x digital zoom
• Lens: plastic, 6 mm (0.25 in.); 64° angle; manual focus with ring
• Image focus: 30 mm to innity
Image
• Photo and video recording maximum resolution up to 3200 x 2400
(software enhanced)
• Supports video transfer rates up to 30 fps (640 x 480 resolution,
VGA), 10 fps (1280 x 1024, VGA)
• Format: MPEG
• Color depth: 24-bit true color
General
• Manual focus, color equalizing, exposure and brightness balance
adjustments
• Built-in microphone with top-mount snapshot button
• Built-in compression ratio (JPG)
Physical
• USB cable, 1.2 m (4 ft.)
• Dimensions: 82 x 50 x 46 mm (3.2 x 2 x 1.8 in.)
• Weight: 80 g (2.8 oz.)
10
Page 11

Manhattan is a trademark of IC Intracom, registered in the U.S. and other countries.
© IC Intracom. All rights reserved.
 Loading...