

Page 1
UNIVERSAL FLAT-PANEL INSTALL GUIDE
TV CEILING MOUNT
a
b
x 2
c
d
1A
e
M4x12
x 4
f
M5x12
x 4
g
M6x12
x 4
h
M8x16
x 4
English: Read all Safety Cautions listed in these instructions before proceeding with the installation of this product.
Deutsch: Bitte lesen Sie alle Sicherheitsanweisungen sorgfältig durch, bevor Sie mit der Installation dieses Produkts beginnen.
Español: Lea todas las precauciones de seguridad listadas en estas instrucciones antes de instalar el producto.
Français: Veuillez lire toutes les précautions de sécurité avant de commencer l’installation de ce produit.
Polski: Przed rozpoczęciem montażu produktu zapoznaj się ze wszystkimi informacjami dotyczącymi bezpieczeństwa, które zawarte są w niniejszym dokumencie.
Italiano: Leggere attentamente tutte le avvertenze e le precauzioni di sicurezza elencate in queste istruzioni prima di procedere all’installazione del prodotto.
M4
M6
i
M4x30
x 4
j
M5x30
x 4
k
M6x35
x 4
l
M8x40
x 4
m
M4
x 4
n
M5
x 4
o
M6
x 4
p
M8
x 4
1B
MODEL 423625
q
M4/5
x 4
r
M6/8
x 4
s
M4/5
x 8
t
M6/8
x 18
u
M8x90
x 4
v
M10x80
x 4
w
x 4
x
x 3
y
x 5
M4
z
x 2
aa
bb
cc
M6
WARRANTY INFORMATION
English: For warranty information, go to manhattan-products.com/warranty.
Deutsch: Garantieinformationen finden Sie hier unter manhattan-products.com/warranty.
Español: Si desea obtener información sobre la garantía, visite manhattan-produc ts.com/warranty.
Français: Pour consulter les informations sur la garantie, rendezvous à l’adresse
manhattan-products.com/warranty.
Polski: Informacje dotyczące gwarancji znajdują się na stronie manhattan-products.com/warranty.
Italiano: Per informazioni sulla garanzia, accedere a manhattan-products.com/warranty.
En México: Pó
IC Intracom México, S.A.P.I. de C.V. • Av. Interceptor Poniente # 73, Col. Parque Industrial La Joya,
Cuautitlan Izcalli, Estado de México, C.P. 54730, México. • Tel. (55)1500-4500
La presente garantía cubre los siguientes productos contra cualquier defecto de fabricación en sus
materiales y mano de obra.
A. Garantizamos los productos de limpieza, aire comprimido y consumibles, por 60 dias a partir de la
fecha de entrega, o por el tiempo en que se agote totalmente su contenido por su propia función
de uso, lo que suceda primero.
B. Garantizamos los productos con partes móviles por 3 años.
C. Garantizamos los demás productos por 5 años (productos sin partes móviles), bajo las siguientes
condiciones:
liza de Garantía Manhattan — Datos del importador y responsable ante el consumidor
manhattan-products.com
North & South America
IC Intracom Americas
550 Commerce Blvd.
Oldsmar, FL 34677
USA
All trademarks and trade names are the property of their respective owners.
Alle Marken und Markennamen sind Eigentum Ihrer jeweiligen Inhaber.
Todas las marcas y nombres comerciales son propiedad de sus respectivos dueños.
Toutes les marques et noms commerciaux sont la propriété de leurs propriétaires respectifs.
Wszystkie znaki towarowe i nazwy handlowe należą do ich właścicieli.
Tutti i marchi registrati e le dominazioni commerciali sono di proprietà dei loro rispettivi proprietari.
© IC Intracom. All rights reserved. Manhattan is a trademark of IC Intracom, registered in the U.S. and other countries.
Asia & Africa
IC Intracom Asia
Far Eastern Technology Center
7-F No. 125, Section 2, Da Tong Rd.
Shijr, Taipei
Taiwan, ROC
1. Todos los productos a que se reere esta garantía, ampara su cambio físico, sin ningún cargo
para el consumidor.
2. El comercializador no tiene talleres de servicio, debido a que los productos que se garantizan
no cuentan con reparaciones, ni refacciones, ya que su garantía es de cambio físico.
3. La garantía cubre exclusivamente aquellas partes, equipos o sub-ensambles que hayan sido
instaladas de fábrica y no incluye en ningún caso el equipo adicional o cualesquiera que
hayan sido adicionados al mismo por el usuario o distribuidor.
Para hacer efectiva esta garantía bastará con presentar el producto al distribuidor en el domicilio
donde fue adquirido o en el domicilio de IC Intracom México, S.A.P.I. de C.V., junto con los accesorios
contenidos en su empaque, acompañado de su póliza debidamente llenada y sellada por la casa
vendedora (indispensable el sello y fecha de compra) donde lo adquirió, o bien, la factura o ticket de
compra original donde se mencione claramente el modelo, número de serie (cuando aplique) y
fecha de adquisición. Esta garantía no es válida en los siguientes casos: Si el producto se hubiese
utilizado en condiciones distintas a las normales; si el producto no ha sido operado conforme a los
instructivos de uso; o si el producto ha sido alterado o tratado de ser reparado por el consumidor o
terceras personas.
Europe
IC Intracom Europe
Löhbacher Str. 7
D-58553 Halver
Germany
M5
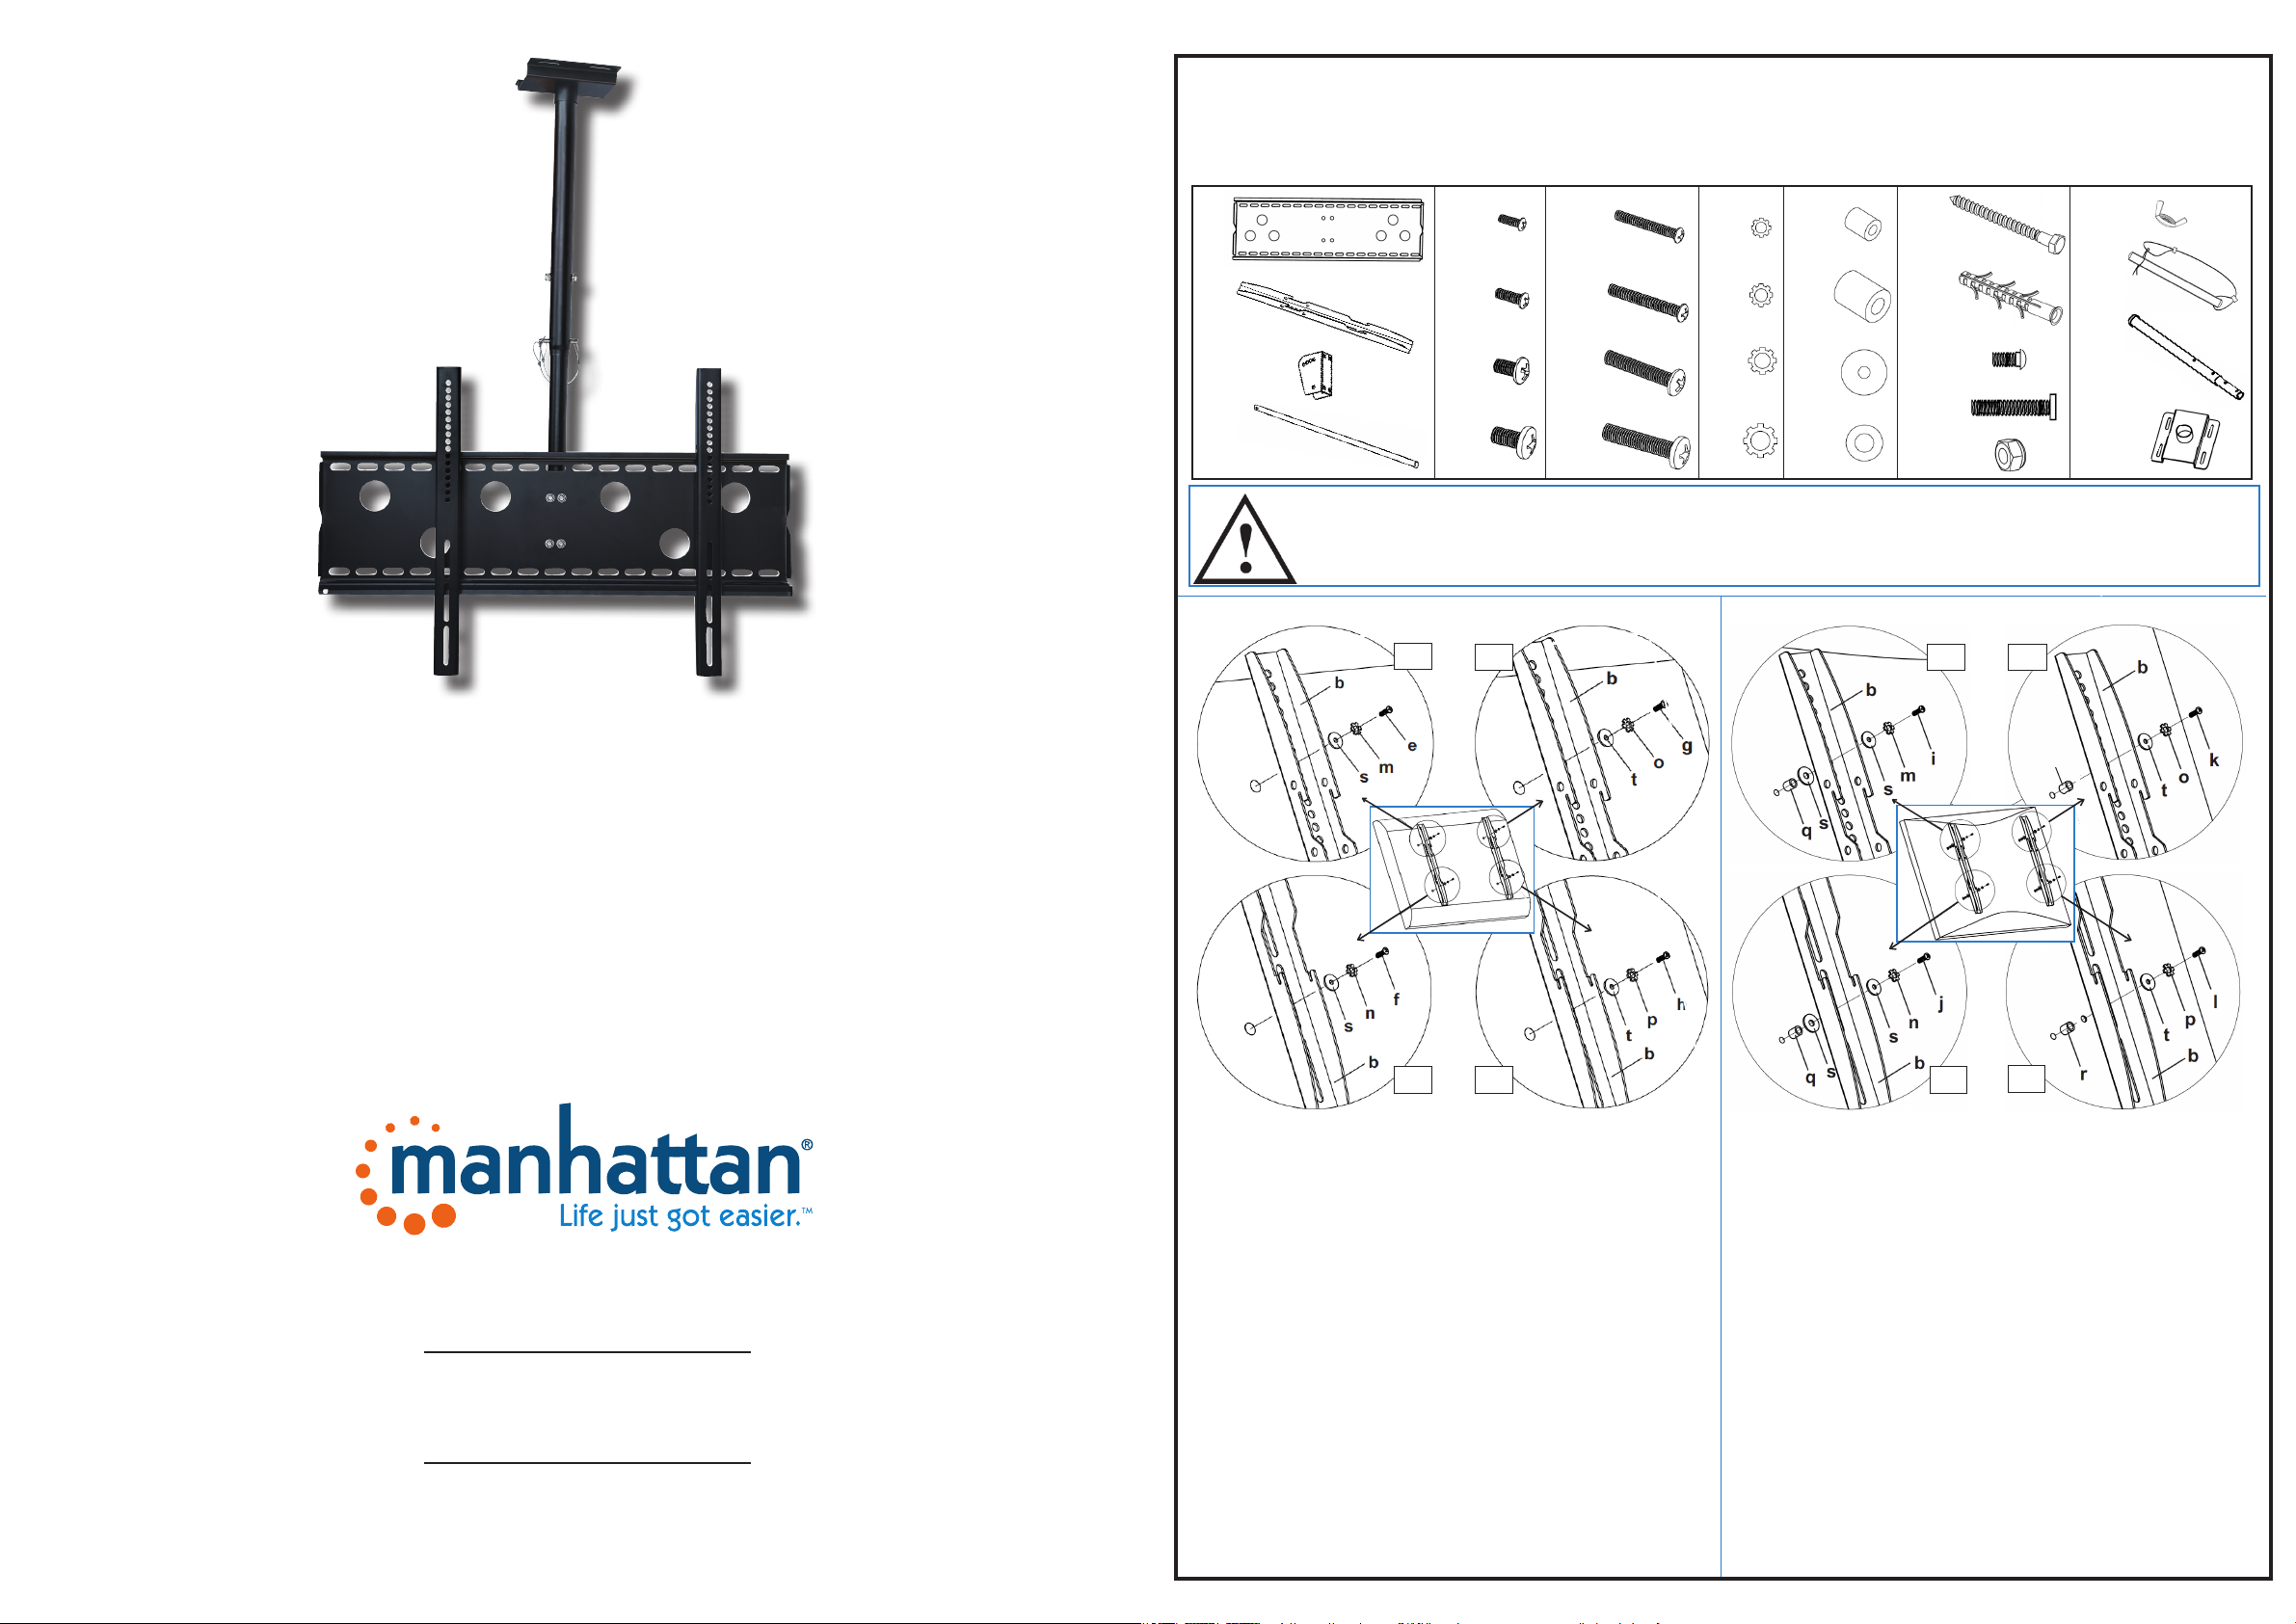
English — Mounting the monitor brackets to a TV with a flat back:
Determine which bolts (diameter e, f, g or h) fit your TV and use the matching washers to attach the brackets (b). Make
sure the brackets are centered vertically and level with each other.
Deutsch — Anbringung der Halterungen an einem Bildschirm mit flacher Rückseite:
Prüfen Sie, welche Bolzen (Durchmesser e, f, g oder h) zu Ihrem Bildschirm passen und verwenden Sie die jeweiligen
Muttern, um die Halterungen (b) zu befestigen. Achten Sie darauf, dass die jeweiligen Halterungen genau parallel
angebracht sind.
Español — Montaje de los soportes del monitor a una TV con espalda plana:
Determine cuales tornillos (diámetro e, f, g o h) ajustan a su TV y utilice las arandelas para fijar los soportes (b).
Asegúrese de que los soportes estan centrados verticalmente y alineados uno con otro.
Français — Montage des supports à un écran avec un arrière plat:
Déterminez quels boulons (diamètre e, f, g ou h) accueillent votre écran et utilisez les écrous respectifs pour fixer les
supports (b). Vérifiez que les supports sont fixés exactement parallèles.
Polski — Montaż uchwytów do telewizora z płaskim panelem tylnim:
Sprawdź, które śruby (średnica e, f, g lub h) pasują do otworów w telewizorze; użyj odpowiedniej podkładki i przymocuj
uchwyty (b). Upewnij się, że uchwyty są wyśrodkowane w poziomie i w pionie.
Italiano — Montaggio delle staffe su una TV con il retro piatto:
Determinare quali viti (diametro e, f, g o h) si adattano alla tua TV ed utilizza le corrispondenti rondelle per fissare le
staffe (b). Assicurarsi che le staffe siano entrambe centrate verticalmente e a livello.
M8
r
M5
English — Mounting the monitor brackets to a TV with a curved back:
Determine which bolts (diameter i, j, k or l) fit your TV and use the matching washers and spacers to attach the brackets
(b). Make sure the brackets are centered vertically and level with each other. NOTE: For M4/5 bolts (i, j), 2 (s) washers are
used, as shown.
Deutsch — Anbringung der Halterungen an einem Bildschirm mit gewölbter Rückseite:
Prüfen Sie, welche Bolzen (Durchmesser i, j, k oder l) zu Ihrem Bildschirm passen und verwenden Sie die jeweiligen Muttern
und Abstandshalterungen, um die Halterungen zu befestigen (b). Achten Sie darauf, dass die Halterungen genau paralle l
angebracht sind. HINWEIS: Für M4/5-Bolzen (i, j), werden 2 Muttern (s) wie auf der Abbildung verwendet.
Español — Montaje de los soportes del monitor a una TV con espalda concava:
Determine cuales tornillos (diámetro i, j, k o l) ajustan a su TV y utilice las arandelas para fijar los soportes (b). Asegúrese
de que los soportes estan centrados verticalmente y alineados uno con otro. NOTA: Para los tornillos M4/5 (i, j), se usarán
2 (s) arandelas, como se muestra.
Français —
Déterminez quels boulons (diamètre i, j, k ou l) accueillent votre écran et utilisez les écrous et entretoises respectifs pour
fixer les supports (b). Vérifiez que les supports sont fixés exactement parallèles. REMARQUE: Pour les boulons M4/5 (i, j),
2 rondelles (s) sont utilisées comme sur l’image.
Polski — Montaż uchwytów do telewizora z nierównym panelem tylnim:
Sprawdź, które śruby (średnica i, j, k lub l) pasują do otworów w telewizorze; użyj odpowiedniej podkładki oraz dystansów i przymocuj uchwyty (b). Upewnij się, że uchwyty są wyśrodkowane w poziomie i w pionie. UWAGA: Do śrub M4/5
(i, j) użyte są 2 (s) podkładki, jak pokazano na zdjęciu..
Italiano — Montaggio delle staffe su una TV con retro curvo:
Determinare quali viti (diametro i, j, k o l) si adattato alla tua TV ed utilizza le corrispondenti rondelle e distanziatori per
fissare le staffe (b). Assicurarsi che le staffe siano entrambe centrate verticalmente e a livello. NOTA: Per le viti M4/5 (i, j),
devono essere utilizzate 2 rondelle (s) come mostrato nell’immagine.
Montage des supports à un écran avec un arrière incurvé
M8
:
MAN-423625-QIG-ML1-0613-02-0
Page 2
2
English — Attaching the ceiling plate to the ceiling:
• Insert the extension pole (bb) through the ceiling plate (cc) and slide the plate to the top of the extension pole.
• Gauging where you want the TV / monitor to be positioned, use the ceiling plate (cc) as a template to mark where the 4 holes for the lag bolts
(u) need to be drilled in the ceiling.
• Using a 10 mm (3/8”) masonry bit, drill holes at least 75 mm (3”) deep, then insert an anchor (w) into each hole. Make sure the anchor is
seated completely flush with the concrete surface even if there is a layer of drywall or other material in front.
• Attach the ceiling plate (cc) — with the extension pole still inserted through it — to the ceiling using the 4 lag bolts (u) and washers (t).
NOTE: You may wish to use a level to ensure the pole is straight before fully tightening all the bolts.
Deutsch — Anbringung der Deckenhalterung an der Decke:
• Führen Sie die Verlängerungsstange (bb) durch die Deckenplatte (cc) und schieben Sie die Platte ans obere Ende der Verlängerungsstange.
• Bei der Positionsbestimmung für den Bildschirm, verwenden Sie die Deckenplatte (cc) als Schablone, um die 4 Löcher für die Sechskantschrauben
(u) zu bohren.
• Verwenden Sie ein 10-mm-Bohrerbit und bohren Sie Löcher mit mindestens 75 mm Tiefe. Setzen Sie dann einen Dübel (w) in jedes Loch ein.
Achten Sie darauf, dass jeder Dübel vollständig eben in der Betonoberfläche liegt, selbst, wenn darüber noch eine Schicht Gips o. ä. liegt.
• Befestigen Sie die Deckenplatte (cc) — immer noch mit der Verlängerungsstange darin — an der Decke. Verwenden Sie dazu die 4
Sechskantschrauben (u) und Unterlegscheiben (t). HINWEIS: Mit einer Wasserwaage können Sie bestimmen, ob die Stange gerade hängt,
bevor Sie die Schrauben festziehen.
Español — Fijando la placa de techo al techo:
• Inserte el poste extensión (bb) a través de la placa de techo (cc) y deslice la placa hasta la parte superior del poste.
• Mida donde desee que se coloque la TV/monitor, utilice la placa de techo (cc) como una plantilla para marcar donde serán
taladrados los 4 hoyos para los pernos de fijación (u).
• Utilizando una broca de mampostería de 10 mm (3/8”), taladre hoyos por lo menos a 75 mm (3”) de profundidad, entonces
inserte un taquete (w) en cada hoyo. Asegúrese que el taquete está al ras de la superficie de concreto, incluso si hay capas
de yeso u otro material.
• Fije la placa de techo (cc) — con el poste extensión aun insertado a través de la placa — al techo utilizando los 4 tornillos
de fijación (u) y sus arandelas (t). NOTA: Use un nivel para asegurarse de que el poste está alineado antes de apretar los
tornillos.
Français — Fixer la plaque de plafond au plafond:
• Insérez la tige de rallonge (bb) dans la plaque de plafond (cc) et poussez la plaque vers le haut de la tige de rallonge.
• Jaugez où vous voudriez positionner l’écran et utilisez la plaque de plafond comme forme de référence (cc) pour marquer
où les 4 trous pour les vis à tête hexagonale (u) seront percés au plafond.
• Utilisez un foret 10 mm, percez des trous d’au moins 75 mm, puis insérez une cheville (w) dans chaque trou. Vérifiez que la
cheville est insérée platement dans la surface même s’il y a une couche de béton ou d’autre matériel au-dessous.
• Fixez la plaque de plafond (cc) — avec la tige de rallonge encore insérée — au plafond en utilisant les 4 vis à tête
hexagonale (u) et rondelles(t). REMARQUE: Vous pourriez utiliser un niveau à bulle pour vérifier que la tige est fixée
correctement avant de serrer toutes les vis.
Polski — Montaż uchwytu sufitowego:
• Włóż rozsuwany pręt (bb) przez otwór mocowania sufitowego (cc), następnie przesuń mocowanie do końca pręta.
• Wybierz miejsce, w którym ma być przymocowany telewizor/monitor. Użyj mocowania sutowego (cc) jako szablonu, aby
zaznaczyć miejsca na 4 otwory, w które zostaną wkręcone śruby (u).
• Przy użyciu wiertarki z wiertłem o średnicy 10 mm (3/8”) nawierć otwory o głębokości co najmniej 75 mm (3”), następnie
w każdy otwór włóż kołek rozporowy (w). Upewnij się, że kołki nie wystają poza płaszczyznę sufitu, nawet jeśli z przodu
znajduje się warstwa z gips kartonu lub innego materiału.
• Przykręć mocowanie sutowe – wraz z rozsuwanym prętem – do sutu używając 4 śrub (u) oraz podkładek (t). UWAGA:
Przed dokręceniem wszystkich śrub zaleca się użycie poziomicy w celu zapewnienia pionu prętowi.
Italiano — Fissare la placca al soffitto:
• Inserire il palo di prolunga (bb) attraverso la placca a soffitto (cc) e far scorrere la placca partendo dalla parte alta del palo
di prolunga.
• Valutare dove desiderate posizionare la TV/monitor, utilizzare la placca a soffitto (cc) come una dima per segnare dove
praticare con il trapano i fori sul soffitto per le 4 viti autofilettanti (u).
• Utilizzando una punta da muro da 10 mm (3/8”), praticare i fori di almeno 75 mm (3”) di profondità, quindi inserire un
tassello (w) all’interno di ciascun foro. Assic urarsi che il tassello sia inserito completamente e a livello con la superficie del
muro di cemento anche se c’è uno strato di cartongesso o di altro materiale superficiale .
• Fissare la placca al soffitto (cc) — con il palo di prolunga inserito attraverso la placca stessa — utilizzando le 4 viti
autofilettanti (u) e le rondelle (t). NOTA: Se desiderate potete utilizzare una livella per assicurarvi che il palo è fissato in
posizione dritta prima di procedere a stringere completamente le viti di fissaggio.
3
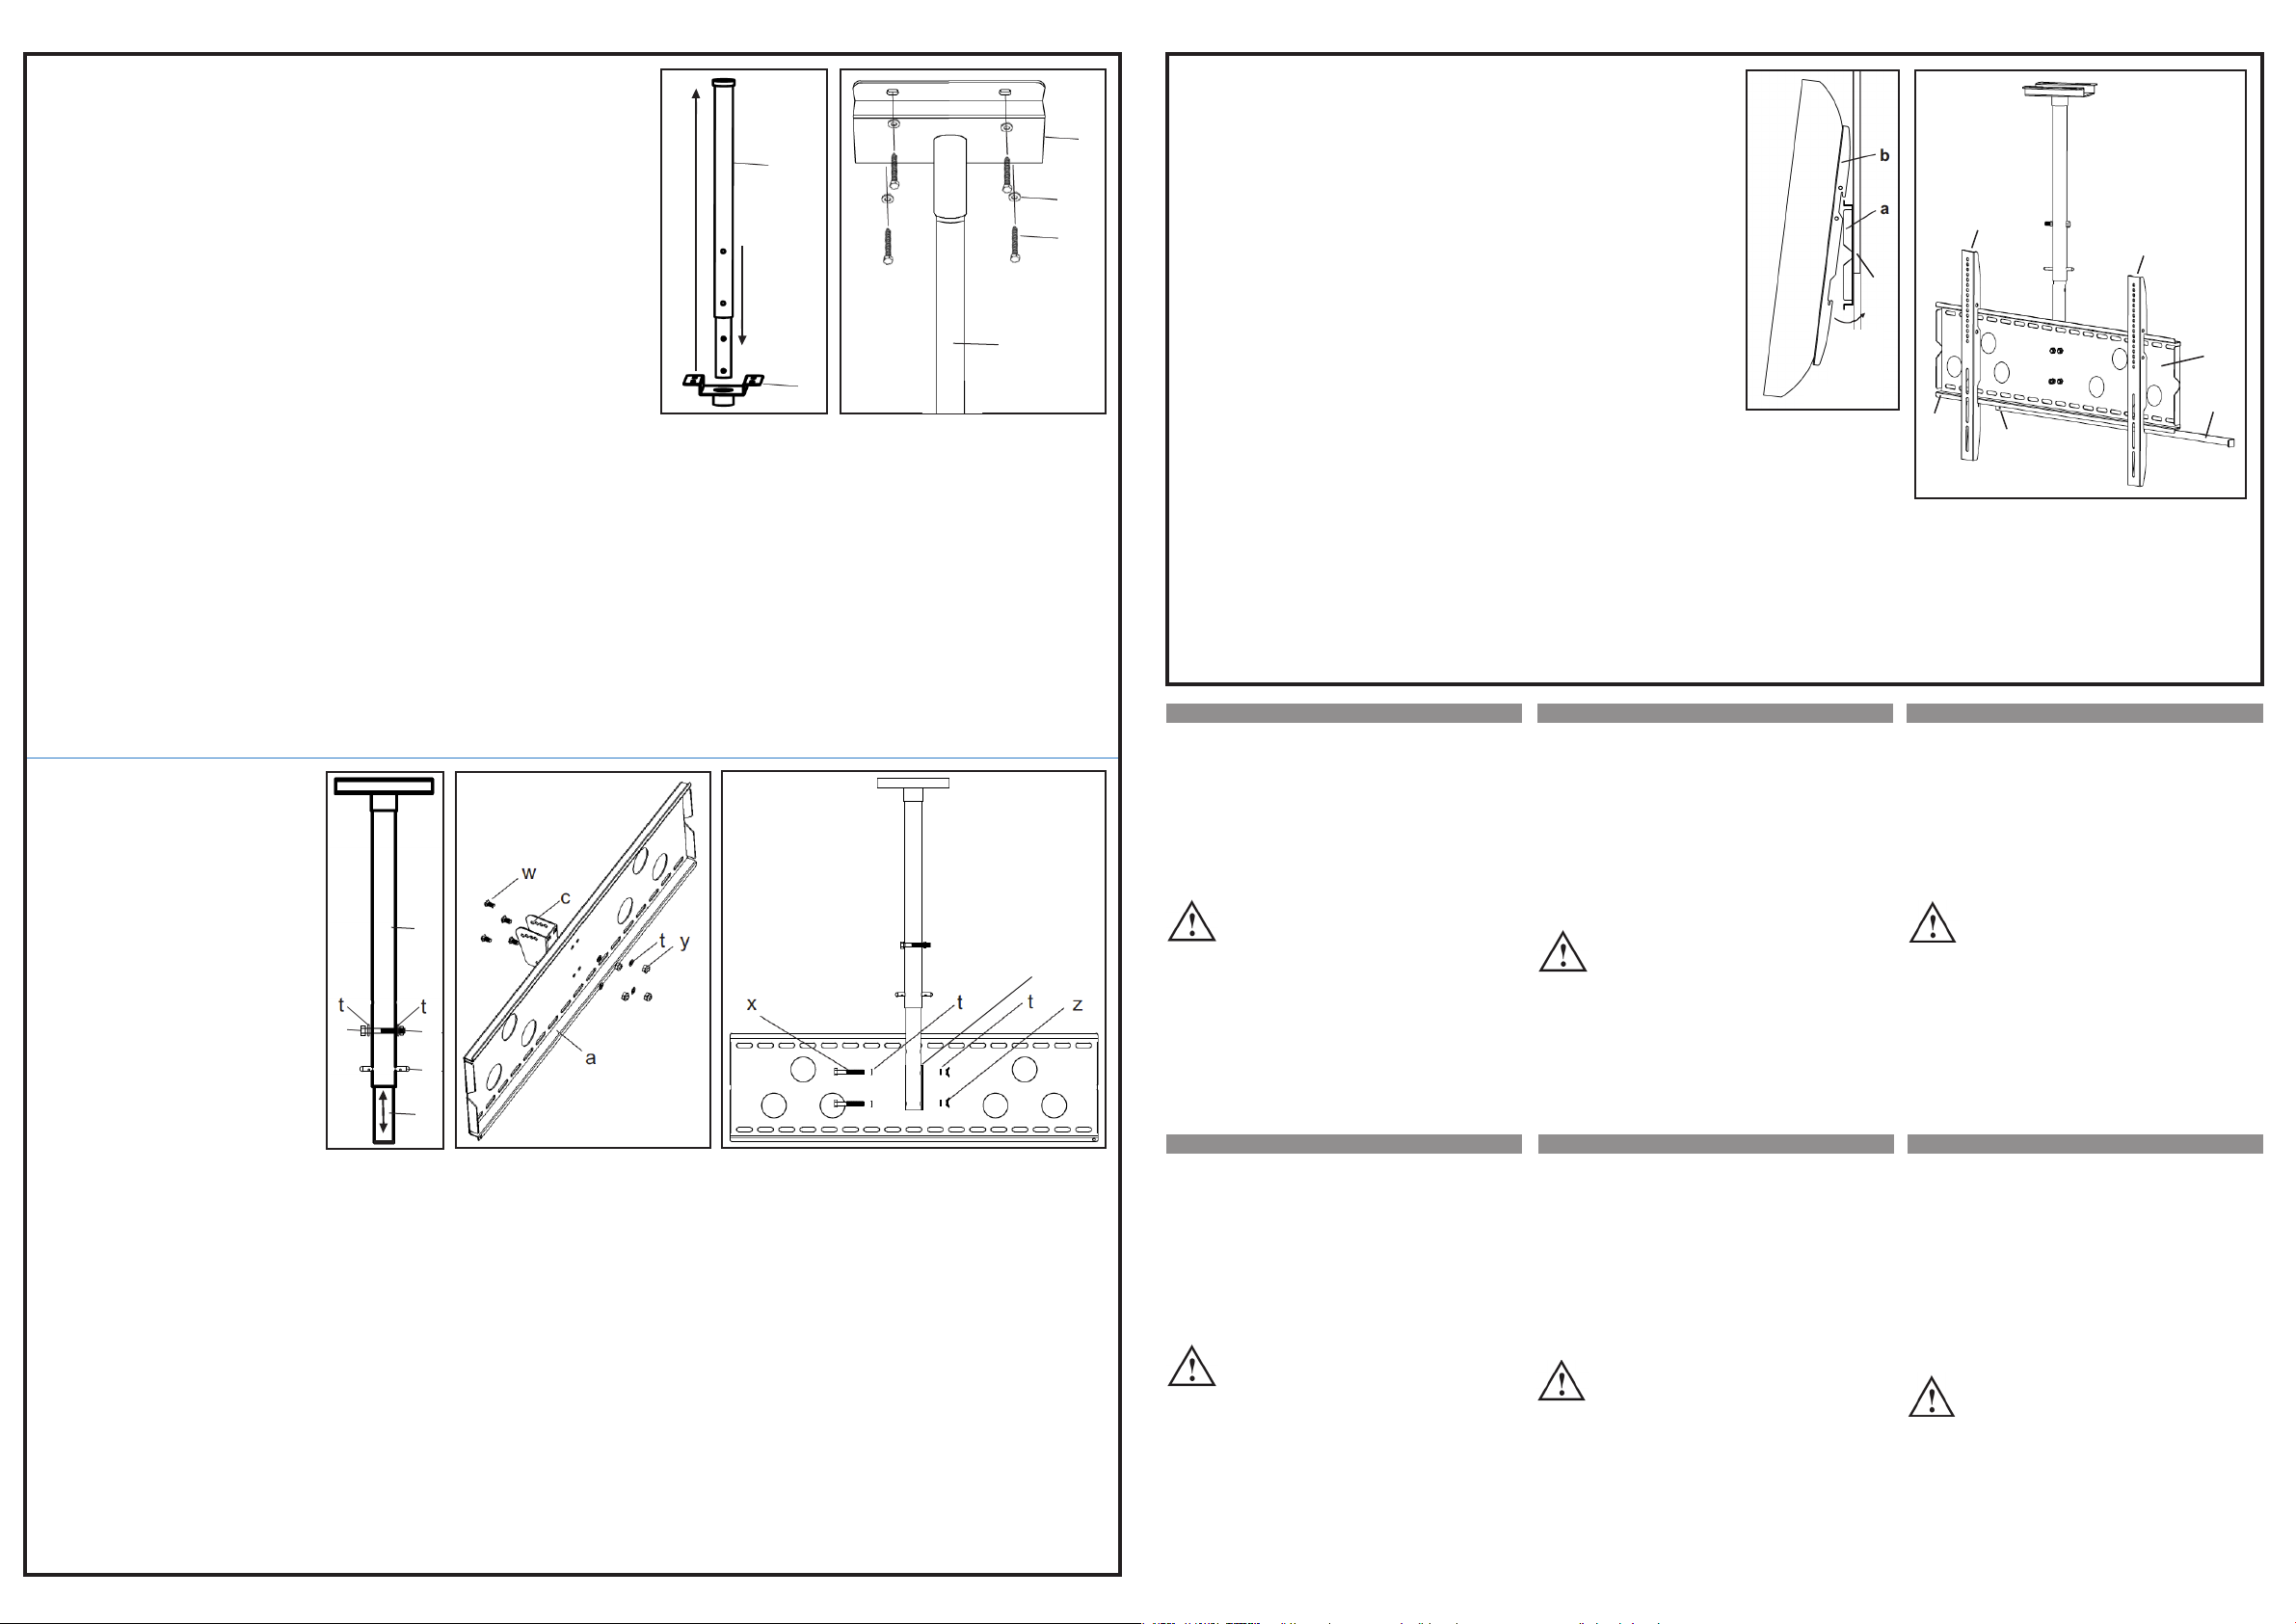
English — Completing the ceiling mount
assembly:
• Determine how far from the ceiling you need the extension pole
to reach so the TV/monitor will be at the desired height. Align
the appropriate holes in the bottom section (ff) of the pole with
the upper holes in the top section (gg) and secure the bottom
section in place with a long bolt (x), 2 M6/M8 washers (t) and a
hex nut (y). Insert the security pin (aa) through the lower holes
of the top section.
• Using 4 short bolts (w), 4 hex nuts (y) and 4 M6/M8 washers (t),
attach the connector (c) to the mounting plate (a).
• Select one of the 4 pairs of holes on the connector (c) to set the
mounting plate (a) at the desired angle for tilting the TV/
monitor, then attach the connector to the end of the extension
pole (ff) using 2 long bolts (x), 4 M6/M8 washers (t) and 2 wing
nuts (z).
Deutsch — Fertigstellung des Zusammenbaus:
• Legen Sie die Länge der Verlängerungsstange fest, um den
Bildschirm in der gewünschten Höhe zu positionieren. Richten
Sie die jeweiligen Löcher des unteren Teils (ff) auf den Löchern
des oberen Teils (gg) aus und sichern Sie den unteren Abschnitt mit einem langen Bolzen
(x), 2 M6/M8-Unterlegscheiben (t) und einer Sechskantmutter (y). Setzen Sie den
Sicherheitsstift (aa) in den unteren Löchern des oberen Endes ein.
• Verwenden Sie die 4 kurzen Bolzen (w), 4 Sechskantmuttern (y) und 4 M6/M8
Unterlegscheiben (t), um das Verbindungsstück (c) an der Halterungsplatte (a) zu befestigen.
• Wählen Sie eines der 4 Lochpaare des Verbindungsstücks (c) aus, um die Montageplatte (a)
in den gewünschten Neigewinkel für den Bildschirm zu bringen, dann befestigen Sie das
Verbindungsstück an dem Ende der Verlängerungsstange (ff). Verwenden Sie dazu 2 lange
Bolzen (x), 4 M6/M8 Unterlegscheiben (t) und 2 Flügelmuttern (z).
Español — Completando el montaje al techo:
• Determine que tan lejos del techo se necesita el poste extensión para que el TV/monitor
este a la altura deseada. Alinee la sección inferior (ff) a los hoyos apropiados del poste con
los hoyos de la sección superior (gg) y asegure la parte inferior con un tornillo largo (x), 2
arandelas M6/M8 (t) y una tuerca (y). Inserte el pin de seguridad (aa) a través de los hoyos
inferiores desde la parte superior.
• Utilizando 4 tornillos cortos (w), 4 tuercas (y) y 4 arandelas M6/M8 (t), fije el conector (c)
a la placa de montaje (a).
• Seleccione uno de los 4 pares de hoyos en el conector (c) para ajustar la placa de montaje
(a) al ángulo deseado para la inclinación del TV/monitor, entonces fije el conector al final
del poste extensión (ff) utilizando 2 tornillos largos (x), 4 arandelas M6/M8 (t) y 2 tuercas
de mariposa (z).
x
gg
y
aa
ff
Français — Compléter l’assemblage du support:
• Déterminez à quelle hauteur vous voudriez positionner l’écran et sortez la
rallonge respectivement. Alignez les trous de la partie inférieure (ff) de la
tige avec les trous de la partie supérieure (gg) et fixez la partie inférieure
avec un long boulon (x), 2 rondelles M6/M8 (t) et un écrou à tête
hexagonale (y). Insérez une pointe de sécurité (aa) dans les trous inférieurs
de la partie supérieure.
Polski — Zakończenie montażu uchwytu sufitowego:
• Określ, jaką długość powinien mieć rozsuwany pręt, aby telewizor/monitor
znajdował się na pożądanej wysokości. Dopasuj odpowiednie otwory
dolnej (ff) oraz górnej (gg) części rozsuwanego pręta i zabezpiecz
wkładając w otwór długą śrubę (x); użyj 2 podkładek (t) M6/M8 oraz
nakrętki (y), aby wszystko skręcić. Włóż sworzeń bezpieczeństwa w dolne
otwory górnej części pręta.
Italiano — Completare l’assemblaggio:
• Determinare la distanza dal soffitto del tubo di prolunga in modo che la TV/
monitor sarà posizionata all’altezza desiderata. Allineare i fori appropriati
nella sezione inferiore (ff) del palo con i fori superiori presenti nella sezione
più in alto (gg) ed assicurare la sezione in basso con una vite lunga (x), 2
rondelle M6/M8 (t) e un dado a brugola (y). Inserire lo spillo di sicurezza
(aa) attraverso i fori più in basso della sezione superiore del tubo.
bb
t
u
bb
cc
c
• Utilisez 4 courts boulons (w), 4 écrous à tête hexagonale (y) et 4 rondelles
M6/M8 (t) pour fixer le connecteur (c) à la plaque de montage (a).
• Sélectionnez un des 4 couples de trous au connecteur (c) pour ajuster la
plaque de montage (a) à l’inclinaison souhaité de l’écran, puis fixez le
connecteur au bout de la tige de rallonge (ff) en utilisant 2 longs boulons
(x), 4 rondelles M6/M8 (t) et 2 écrous papillon(z).
• Użyj 4 krótkich śrub (w), 4 nakrętek (y) oraz 4 podkładek (t) M6/M8, aby
przykręcić łącznik (c) płyty montażowej (a).
• Wybierz jedną z 4 par otworów na łączniku (c), aby ustawić odpowiedni
kąt nachylenia płyty, do której przymocowany będzie telewizor/monitor,
następnie przykręć łącznik do końcówki rozsuwanego pręta (ff) używając 2
długich śrub (x), 4 podkładek (t) M6/M8 oraz 2 nakrętek motylkowych (z).
• Usando 4 viti corte (w), 4 dadi esagonali (y) e 4 rondelle M6/M8 (t), fissare
il connettore (c) alla placca a muro (a).
• Selezionare una delle 4 coppie di fori sul connettore (c) per posizionare la
placca a muro (a) con l’angolo desiderato per inclinare la TV/monitor,
quindi fissare il connettore alla parte terminale del tubo di prolunga (ff)
usando 2 viti lunghe (x), 4 rondelle M6/M8 (t) e 2 dadi a farfalla (z).
cc
4
English — Setting the monitor on the mounting plate and inserting the locking bar:
CAUTION! Always get assistance when lifting heavy objects
such as your TV/monitor.
• Hook the monitor brackets (b) over the top of the mounting
plate (a) and gently allow the bottom of the TV/monitor to
swing onto the bottom of the mounting plate.
Deutsch — Befestigen Sie den Bildschirm an der Halterungsplatte und setzen Sie die
Verriegelungsstange ein:
ACHTUNG! Lassen Sie sich beim Heben von schweren
Gegenständen wie Ihrem Fernseher oder Monitor immer von
einer weiteren Person helfen.
• Hängen Sie die Bildschirmhalterungen (b) an der Oberseite der
Halterungsplatte (a) ein und lassen Sie die Unterseite des
Bildschirms vorsichtig an die Unterseite der Halterungsplatte
herabgleiten.
Español — Sujeción del monitor a la placa de montaje e inserción de la barra de seguridad:
¡PRECAUCIÓN! Pida ayuda siempre que vaya a cargar objetos pesados como su
TV/monitor.
• Enganche los soportes del monitor (b) en la parte superior de la placa de montaje
(a) y suavemente permita que la parte inferior del TV/monitor oscile en la parte
inferior.
Français — Fixer l’écran à la plaque de montage et
insérer la tige de verrouillage:
ATTENTION! Laissez vous assister en élevant des lourds objets comme votre
écran/télé.
• Attachez les supports pour l’écran (b) en haut de la plaque de montage (a) et
permettez la partie inférieure de l’écran d’ abaisser doucement.
• Insérez la tige de verrouillage (d) derrière les emplacements à la partie inférieure
des supports pour l’écran (b) afin que la tige se trouve derrière l’arête (dd) de
la plaque de montage (bb) OPTION: Dès que la tige de verrouillage est
placée, une serrure de sécurité (pas incluse) peut être insérée (ee).
English
Safety Cautions
• Handle all parts with care and check the parts list to ensure
nothing is missing.
• Be sure that you understand all instructions before you begin
assembly, as additional safety notes may be presented.
• If you are uncertain about this product’s assembly or the
reliability of any supporting structure, consult a qualied source.
• Do not use this product for any purpose other than that for
which it is intended. Manhattan cannot be held responsible for
damage or injury resulting from improper assembly, mounting
or use.
WARNING! This TV mount must be securely attached to
the ceiling. If the mount is not properly installed, it may
fall and cause injury and damage. The enclosed hardware
and mounting components are not designed for installation
on ceilings with steel studs. If the hardware you need for your
installation
proper mounting hardware.
is not included, consult your local hardware store for
Required Tools
• Power drill • Phillips screwdriver • 10mm (3/8”)
• Wrench • Level masonry bit
For specifications, go to manhattan-products.com.
Français
•
Utilisez toutes les pièces avec soin et vériez avec la liste de pièces
que la livraison est complète.
Précautions de sécurité
• Assurez-vous que vous comprenez toutes les instructions avant
de commencer l’assemblage car des consignes de sécurité
supplémentaires peuvent être présentées.
• Si vous êtes incertain de l’assemblage du produit ou de la
fiabilité de la structure supportant, veuillez vous adresser à un
spécialiste qualié.
• Utilisez le support exclusivement en conformité avec l’usage
prévu. Manhattan ne se porte pas garante en cas de dommages
résultant d’un assemblage, montage ou utilisation non conforme.
ATTENTION! Ce support doit être fixé fermement au
plafond. S’il n’est pas installé correctement, il peut tomber
et causer du dommage. Le matériel d’installation inclus
n’est pas conçu pour le montage à des plafonds avec des poutrelles
d’acier. Si le matériel d’installation que vous requérez n’est pas inclus,
veuillez-vous adresser à votre revendeur local
Outils requis
• Foreuse • Tournevis phillips • Niveau à bulle
• Clé Allen • Foret à 10 mm (pour la bâtisse)
Vous trouvez les spécifications sur manhattan-products.com.
• Insert the locking bar (d) through the slots on the bottom of
the monitor brackets (b) so the locking bar sits behind the
bottom lip (dd) of the mounting plate. OPTION: Once the
locking bar is in place, a padlock (not included) can be
inserted (ee) for added security.
• Setzen Sie die Verriegelungsstange (d) in der Schiene an der
Unterseite der Bildschirmhalterungen (b) ein, so dass die
Verriegelungsstange hinter der Kante (dd) der Halterungsplatte
sitzt. OPTION: Sobald die Verriegelungsstange eingesetzt
ist, können Sie diese zusätzlich mit einem Schloss (ee) sichern
(nicht im Lieferumfang enthalten).
• Inserte la barra de seguridad (d) a través de los orificios de la parte inferior de los
soportes del monitor (b) tal que la barra de seguridad se asiente detrás de la
muesca (dd) de la placa de montaje. OPCIONAL: Una vez que la barra de
seguridad este en su lugar, se puede insertar un candado (no incluido) para mayor
seguridad (ee).
Polski — Mocowanie monitora do uchwytu:
UWAGA! Poproś kogoś o pomoc podczas podnoszenia ciężkich
przedmiotów takich jak telewizor, czy monitor.
• Załóż uchwyty monitora (b) na górną część płyty montażowej (a) i
pozwól, aby spodnia część telewizora/monitora delikatnie opadła w
stronę płyty.
• Wsuń rygiel (d) w szczelinę w dolnej części uchwytów monitora (b)
tak, aby rygiel złapał za dolną wargę (dd) płyty montażowej. OPCJA:
Dla zwiększenia bezpieczeństwa rygiel można zabezpieczyć (ee)
przed wysuwaniem się (w zestawie nie ma zabezpieczenia).
• Behandeln Sie die beiliegenden Teile vorsichtig und überprüfen
Sie anhand der Teileliste, dass keines fehlt.
• Lesen Sie alle Anweisungen vor dem Zusammenbau sorgfältig
durch, teilweise können zusätzliche Sicherheits-hinweise enthalten
sein.
• Wenn Sie sich beim Zusammenbau dieses Produkts oder bei der
Stützlast der tragenden Struktur unsicher sind, ziehen Sie einen
Fachmann hinzu.
•
Nutzen Sie dieses Produkt nicht für einen anderen Verwendungs zweck als in dieser Anleitung beschrieben. Manhattan übernimmt
keine Haftung für Sach- oder Personen-
unsachgemäßen Zusammenbau, Montage oder Nutzung entstehen.
WARNUNG! Die Bildschirmhalterung muss sicher an der
Decke befestigt werden. Wird sie nicht ordnungsgemäß
angebracht, kann sie herunterfallen und Schäden und
Verletzungen verursachen. Die beiliegenden Montageteile sind
nicht geeignet für die Befestigung an Decken, die Stahlträger
enthalten. Sollten die Teile, die Sie benötigen nicht im Lieferumfang
enthalten sein, wenden Sie sich für entsprechendes Montagezubehör
bitte an Ihren lokalen Händler.
• Bohrmaschine • Kreuzschraubenzieher
• Sechskantschlüssel • Wasserwaage • 10-mm-Bohrerbit
Die Spezikationen nden Sie auf manhattan-products.com.
• Sprawdź wszystkie dostępne elementy z ulotką upewniając się,
że niczego nie brakuje.
•
Przed rozpoczęciem montażu upewnij się, że rozumiesz wszystkie
instrukcje oraz dodatkowe informacje dotyczące bezpieczeństwa.
• Jeśli nie jesteś pewien co do montażu tego produktu lub
powierzchni do której produkt ma być przymocowany, zasięgnij
porady u autoryzowanego źródła.
• Nie używaj tego produktu do jakichkolwiek innych celów niż
jest przeznaczony. Manhattan nie ponosi odpowiedzialności za
szkody powstałe w wyniku niewłaściwego montażu oraz za
szkody powstałe w wyniku wykorzystywania produktu niezgodnie
z przeznaczeniem.
UWAGA! Uchwyt musi być solidnie przymocowany do
sutu. Niewłaściwe zamontowany może spaść powodując
uszkodzenia oraz zagrożenie. Dołączone narzędzia oraz
elementy montażowe nie są przystosowane do mocowania
.
uchwytu w sufitach ze stali. W razie potrzeby należy zaopatrzyć
się w odpowiedni sprzęt dla właściwego montażu uchwytu.
• Wiertarka elektryczna • Wkrętak Phillips • Wiertło 10 mm (3/8”)
• Klucz / nasadki • Poziomica
Specykacja techniczna produktu dostępna jest na stronie
manhattan-products.com.
Sicherheitshinweise
Benötigte Werkzeuge
Środki bezpieczeństwa
Wymagane narzędzie
b
pole
dd
Italiano — Fissare il monitor alla placca a muro ed inserire la
barra di bloccaggio:
PRUDENZ! Richiedere sempre l’assistenza di qualcuno quando si devono sollevare oggetti
pesanti come TV/monitor.
• Agganciare le stae del monitor (b) sulla parte alta della placca a muro (a) e permettere alla
parte bassa della TV/monitor di oscillare delicatamente sulla parte bassa della placca a muro.
• Inserire la barra di bloccaggio (d) attraverso le scanalature sulla parte inferiore delle staffe
per il monitor (b) così che la barra si posizioni dietro i bordi inferiori (dd) della placca di
montaggio. OPZIONE: Appena la barra di bloccaggio è posizionata, può essere inserito
anche un lucchetto (non incluso) (ee) per incrementare il livello di sicurezza.
Deutsch Español
ee
Precauciones de Seguridad
• Maneje todas las partes con cuidado y asegúrese que no falta
nada de la lista de contenido.
• Antes de ensamblar, procure haber entendido todas las
instrucciones, así como las notas de seguridad que le presentamos.
• Si no está seguro acerca de como ensamblar el producto o de la
fiabilidad de la estructura de soporte, consulte a una persona
calificada.
•
No utilice este producto para ningún otro propósito que el que
se pretende. Manhattan no se hace responsable de daños o
schäden, die durch
lesiones resultantes de un ensamble montaje o uso inadecuado.
!ADVERTENCIA! Este montaje de TV debe ser rmemente
asegurado al techo. Si el montaje no es instalado
apropiadamente puede causar daños o lesiones. El
hardware incluido y los componentes de montaje no están
diseñados para su instalación en techos con postes de acero. Si
el hardware necesario para la instalación no está incluido, consulte
a su tienda local por el hardware necesario.
• Taladro • Destornillador Phillips • Juego de llaves inglesas
Herramientas Requeridas
• Nivel • Broca de 10mm (3/8”) para mampostería
Para más especificaciones, visite manhattan-products.com.
Polski
Italiano
Avvertenze di sicurezza
• Maneggiare tutte le parti delicatamente e verificare la lista delle
parti per assicurarsi che nulla sia mancante.
• Prendere visione delle istruzioni di montaggio ed assicurarsi di
averle comprese completamente prima di iniziare l’assemblaggio,
poiché potrebbero essere fornite anche delle note supplementari
di sicurezza.
•
Se non siete completamente sicuri in merito all’assemblaggio del
prodotto o all’affidabilità della struttura di supporto, consultate
esperto.
•
Non utilizzare questo prodotto per scopi diversi da quelli per cui è
stato progettato. Manhattan non può essere ritenuta responsabile
per danni o lesioni provocati da un assemblaggio, un montaggio
o un uso improprio.
ATTENZIONE! Questo supporto per la TV deve essere
ssato in modo sicuro al sotto. Se il supporto non è
correttamente installato, potrebbe causare lesioni o
danni. L’hardware incluso e I component di montaggio non sono
adatti per il montaggio su soffitti con intelaiatura in acciaio. Se
l’hardware di cui necessitate per l’installazione non è incluso,
consultare un rivenditore locale per individuare il materiale
hardware di montaggio più adeguato.
Utensili richiesti
• Trapano • Cacciavite a croce • Livella • Chiavi
• Punta da muro da 10mm (3/8”) per il trapano
Per ulteriori specifiche, visitate il sito manhattan-products.com.
b
a
d
un
 Loading...