

Page 1

MULTI-PORT
DOCKING
STATION
WITH
ENHANCED
VIDEO
USER
MANUAL
MODEL 179102
MAN-179102-UM-0608-01
Page 2

Page 3

INTRODUCTION
Thank you for purchasing the MANHATTAN® Multi-Port Docking Station with Enhanced
Video, Model 179102.
This handy device replicates a wide range of ports with a single USB connection so you can
easily install additional peripherals with a convenient all-in-one solution. Combined with primary,
extended, rotation and mirror functions, it helps increase productivity, improve “desktop”
arrangements and extend the visual work area across dual monitors with less overlapped
windows, fewer hidden palettes and better-organized views. Its enhanced capabilities provide
SVGA and widescreen resolution support up to 1920 x 1200 in 16-bit color and standard
monitor resolutions up to 1600 x 1200 in 16/32-bit color.
A four-port Hi-Speed USB 2.0 hub with RJ45 10/100 Mbps network, SVGA (HD15 female),
stereo headset and microphone ports help notebook computer users to quickly reconnect
to home/ofce-based peripherals. Desktop computer users can bring additional, convenient
ports to the front of the case to help reduce tangled cables for a neater workspace. USB 1.1
compatibility supports older devices and provides Hi-Speed USB 2.0 data transfer speeds up
to 480 Mbps for external storage, printing and other activities
The easy-to-follow instructions in this user manual help make setup and operation quick and
simple, so you’ll also soon be enjoying the benets of these additional features:
• Provides four Hi-Speed USB 2.0, two audio, one 10/100 Mbps RJ-45 and one SVGA ports
to connect additional peripherals
• Plug and Play – Windows compatible
• Lifetime Warranty
NOTE: Some screen images have been modied to t the format of this user manual.
Regulatory Statements
FCC
This equipment has been tested and found to comply with Part 15 of the FCC Rules. Operation
is subject to the following two conditions:
• This device may not cause harmful interference; and
• This device must accept any interference received, including interference that may cause
undesired operation.
CE
This equipment is in compliance with the requirements of the following regulations:
EN 55022: CLASS B (2006); IEC/EN 61000-3-2 (2006), IEC/EN 61000-3-3 (1995+A1:2001+A2:2005);
EN 55024 (1998+A1 :2001+A2 :2003); (IEC/EN 61000-4-2 (1995+A1:1998+A2:2001) /-3
(2006)/-4 (2004)/-5 (2006)/-6 (1996+A1:2001)/-11 (2004))
C-Tick
This equipment is in compliance with the requirements of the following regulations:
EN 55022: CLASS B (2006); AS/NZS CISPR22 © IEC: 2005
VCCI
This equipment is in compliance with the requirements of the following regulations:
CISPR 22 © IEC: 2005
3
REGULATORY STATEMENTS
Page 4

TABLE OF CONTENTS
INSTALLATION ..................................................................................................................... 5
Windows 2000/XP ........................................................................................................ 5
Driver Installation ..................................................................................................... 5
Driver Installation Verication .................................................................................. 7
Driver Uninstallation ................................................................................................ 8
Windows Vista .............................................................................................................. 9
Driver Installation ..................................................................................................... 9
Driver Installation Verication ................................................................................ 10
Driver Uninstallation ...............................................................................................11
DEVICE FUNCTIONS ..........................................................................................................11
FREQUENTLY ASKED QUESTIONS & OPERATION TIPS ...............................................14
SPECIFICATIONS ................................................................................................................15
section page
4
CONTENTS
Page 5

INSTALLATION
The four steps below comprise the basic procedure for quick installation. Detailed procedures
for specic operating systems are presented in subsequent sections. NOTE: Do not connect
the Multi-Port Docking Station to your computer before completely installing the device’s driver
(from the included CD). Also, do not use any power adapter other than the one included with
this product.
1. Insert the driver CD and follow the on-screen instructions.
2. Restart the computer.
3. Connect the second monitor to the VGA (DB15) connector of the Multi-Port Docking
Station and turn the monitor on.
4. Plug the Multi-Port Docking Station into an available USB 2.0 port. When nished, you
should see the extended display on the second monitor.
Windows XP/2000
Driver Installation
Installing the device driver enables your computer’s operating system to recognize the docking
station and its ports once it’s connected. Check your operating system and refer to the
appropriate installation procedure (here, or below for Windows Vista) to begin installing the
device driver. Make sure the Multi-Port Docking Station is unplugged from your PC or notebook
computer before executing the setup program.
1. Insert the included CD into the CD-ROM drive. The setup program should be launched
automatically. If the setup program does not begin automatically, go to Start, then Run,
then enter “D:\Disk 1\Setup.exe” (where D: is the path of your CD-ROM drive); click “OK.”
2. When the InstallShield Wizard welcome screen displays, click “Next” to continue.
3. When the License
Agreement screen
displays and you
have reviewed its
contents, select “I
accept the terms
of the license
agreement” and
click “Next.”
5
INSTALLATION
Page 6

4. Hardware and/or
software installation
warning screens
may appear in
Windows XP (like
the example shown
at right). Click
“Continue Anyway”
to proceed; there’ll
be no affect on the
driver installation
or the operation of
the device.
5. When the
InstallShield Wizard
Complete screen
displays, select “Yes, I want to restart my computer now” and click “Finish” to reboot.
6. Connect the Multi Port Docking
Station to your PC
or notebook
computer. When
the Found New
Hardware Wizard
screen appears (in
Windows XP),
select “Yes, now
and every time I
connect a device”
and click “Next” to
continue.
7. Select “Install
the software
automatically”
and click “Next”
to continue.
6
INSTALLATION
Page 7

8. In Windows XP, you
may see the warning
screen shown at
right displayed.
Click “Continue
Anyway”; it won’t
affect installation
or the operation of
the device.
9. Click “Finish” to
complete the installation.
Driver Installation Verication
To conrm that the above installation procedure was successful, follow these steps:
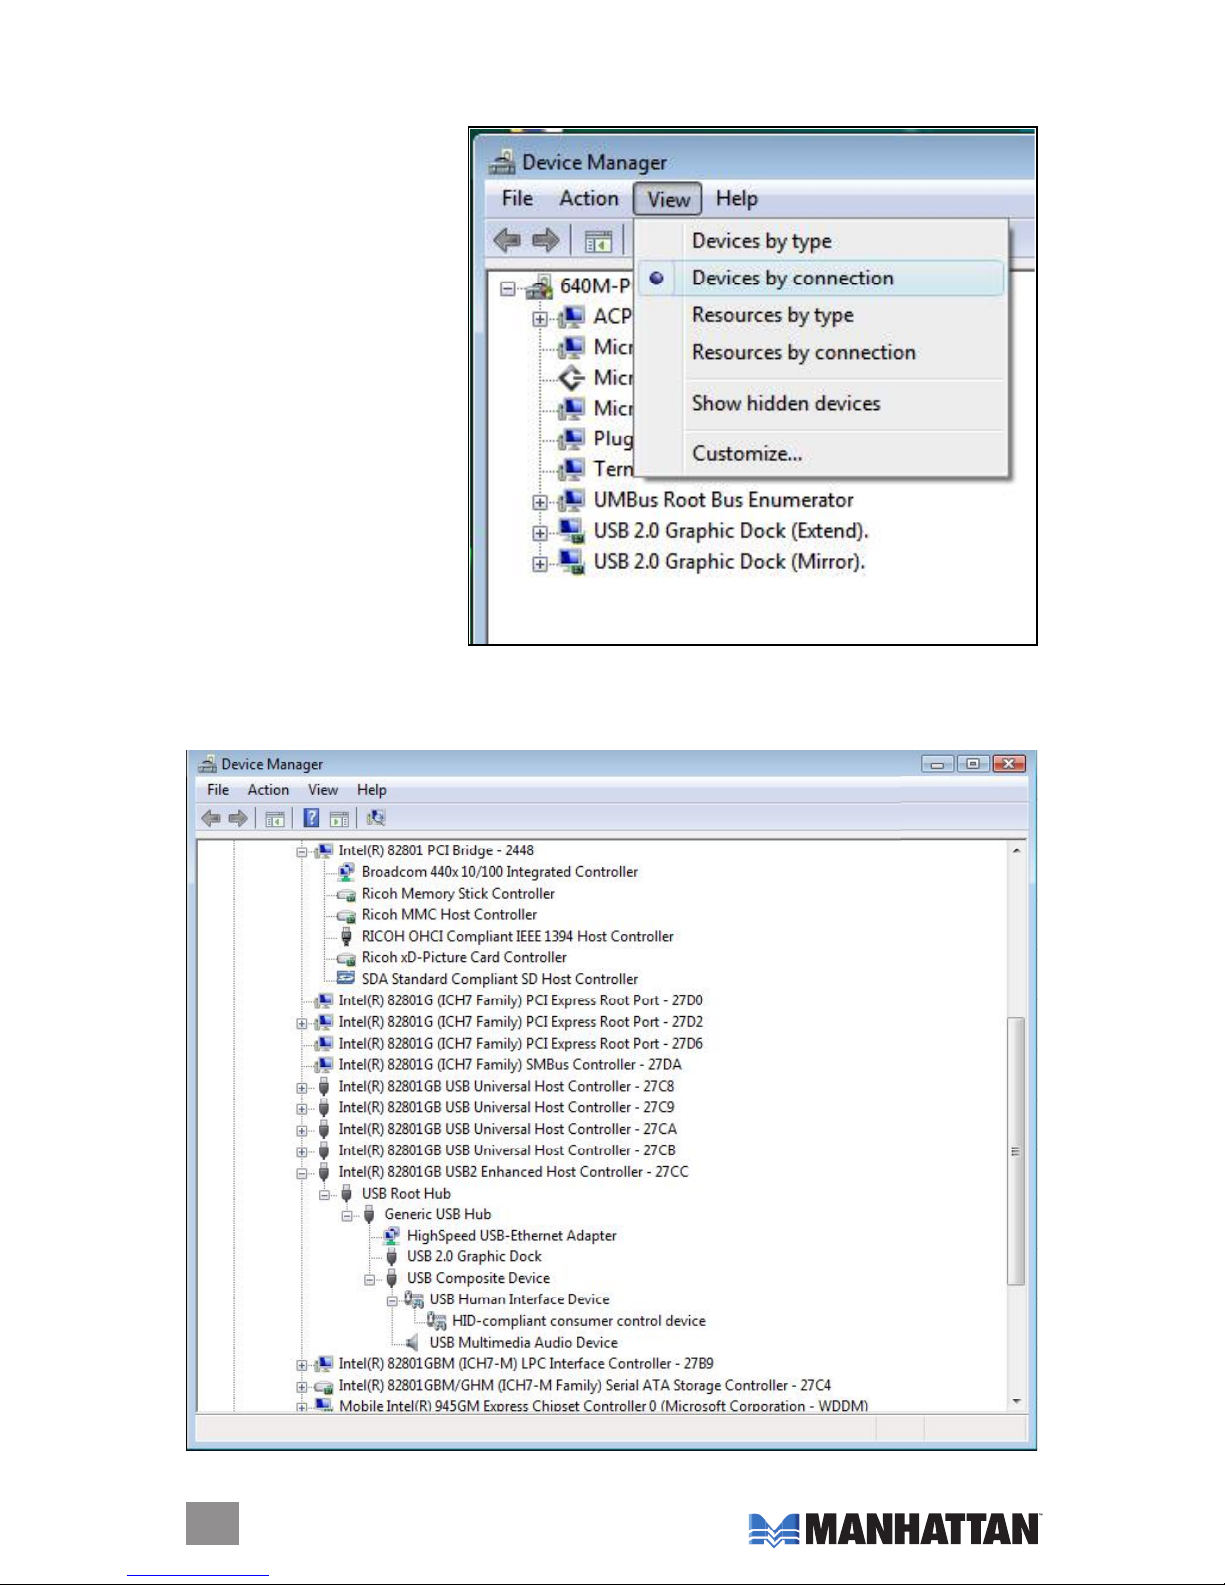
1. In the desktop Start menu, go to
My Computer → Control Panel →
System → Hardware → Device
Manager. Click “View” and select
“Devices by connection.”
2. Click “Standard Enhanced PCI to USB Host Controller,” then click “USB Root Hub.” The
Device Manager screen (below) will display “Generic USB Hub,” where you should see the
New Hardware devices, including the Multi-Port Docking Station (“USB 2.0 Graphic Dock”).
7
INSTALLATION
Page 8

Driver Uninstallation
Prior to removing the device driver from your computer, be sure that the Multi-Port Docking
Station has been disconnected from your PC or notebook.
1. In the desktop Start menu, go to Settings (in a classic Start menu only) → Control Panel →
Add or Remove Programs. Select “USB 2.0 Graphic Dock (version number)” and click
either “Change” or “Remove.”
2. On the Conrm Uninstall prompt that
displays, click “OK” to continue.
3. On the subsequent Driver Uninstall
screen, select “Yes, I want to restart
my computer now”; click “Finish” to
reboot, completing the driver uninstall.
8
INSTALLATION
Page 9

Windows Vista
Driver Installation
Installing the device driver enables your computer’s operating system to recognize the docking
station and its ports once it’s connected. Check your operating system and refer to the
appropriate installation procedure (here, or above for Windows 2000/XP) to begin installing the
device driver. Make sure the Multi-Port Docking Station is unplugged from your PC or notebook
computer before executing the setup program.
1. Insert the included CD into the CD-ROM drive. The setup program should be launched
automatically. If the setup program does not begin automatically, go to Start, then Run,
then enter “D:\Disk 1\Setup.exe” (where D: is the path of your CD-ROM drive); click “OK.”
2. When the InstallShield Wizard welcome screen displays, click “Next” to continue.
3. When the License
Agreement screen
displays and you
have reviewed its
contents, select “I
accept the terms
of the license
agreement” and
click “Next.”
4. When the Windows
Security warning
screen displays,
click “Install this
driver software
anyway” to proceed;
there’ll be no affect
on the driver
installation or the
operation of the
device.
5. When the
InstallShield Wizard
Complete screen
displays, select “Yes, I want to restart my computer now” and click “Finish” to reboot.
9
INSTALLATION
Page 10
Driver Installation Verication
To conrm that the above installation procedure was successful, follow these steps:
1. In the desktop Start menu,
go to My Computer →
Properties → Device
Manager. Click “View” and
select “Devices by
connection.”
2. Click “Intel® 82801GB USB2 Enhanced Host Controller-27CC,” then click “USB Root Hub.”
The Device Manager screen (below) will display “Generic USB Hub,” where you’ll see the
New Hardware devices, including the Multi-Port Docking Station (“USB 2.0 Graphic Dock”).
10
INSTALLATION
Page 11

Driver Uninstallation
Prior to removing the device driver from your computer, be sure that the Multi-Port Docking
Station has been disconnected from your PC or notebook.
1. In the desktop Start menu, go to Settings → Control Panel (in a classic Start menu only) →
Programs and Features. Select “USB 2.0 Graphic Dock (version number)” and click “Uninstall.”
2. On the Conrm Uninstall
prompt that displays, click “OK”
to continue.
3. On the subsequent Driver
Uninstall screen, select “Yes,
I want to restart my computer
now”; click “Finish” to reboot,
completing the driver uninstall.
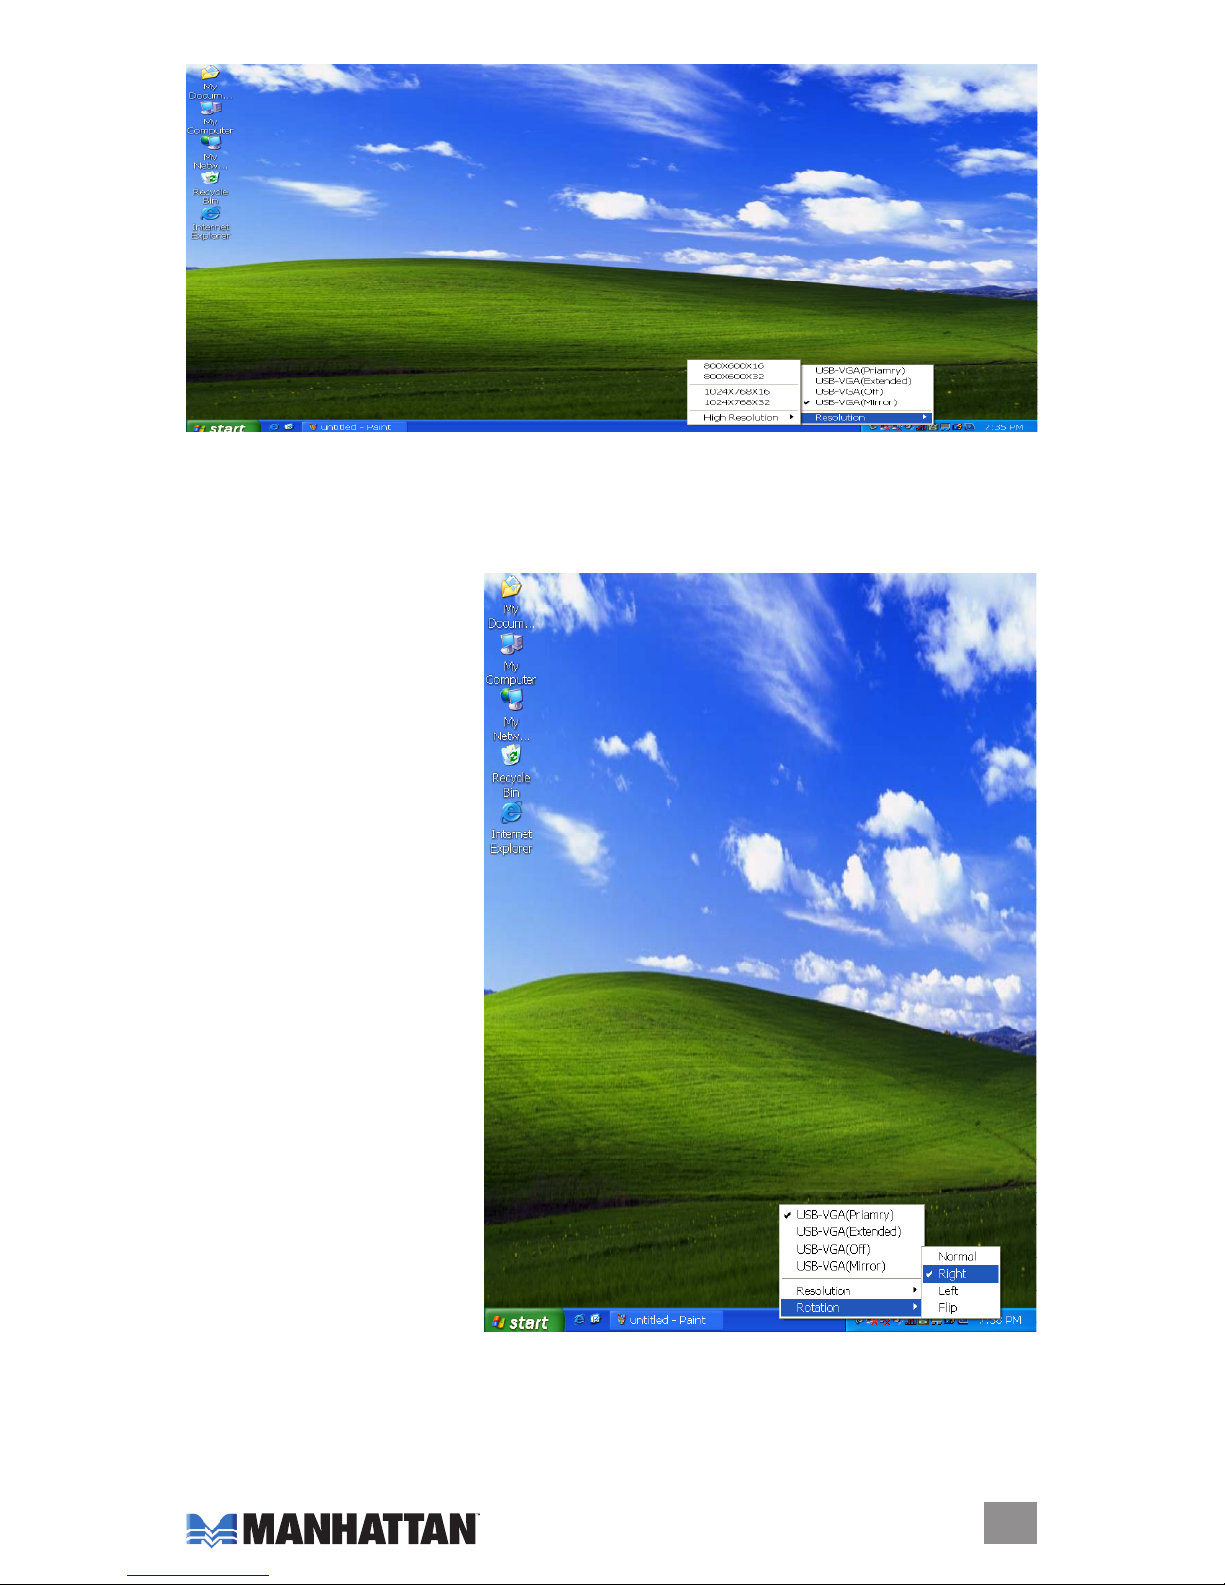
FUNCTIONS
The Multi-Port Docking Station works
with LCD or CRT monitors. Click the UVD
icon to choose one of three modes:
Primary, Extended and Mirror (plus Off
and Rotation options).
Clicking the UVD icon
also provides access to
the Resolution options,
which can be changed
here or by going to
Display Properties/
Settings (see below).
11
FUNCTIONS
Page 12

Primary Mode
The system’s main graphics adapter will automatically switch to act as the secondary graphics
adapter, and the main screen will now work as the extended desktop. The monitor connected
to the Multi-Port Docking Station will now act as the primary Windows desktop. NOTE: Some
display utilities and drivers found with certain AGP (accelerated graphics port) and built-in
display adapters may prevent this option from working on some systems. You can disable the
other utility program (usually in the same toolbar located on the bottom-right corner of the
desktop) to make this function work properly.
Extended Mode
By default, the monitor connected to the Multi-Port Docking Station will work as the “extended”
desktop, which expands the primary Windows desktop of your system. You can change the
relative position of this extended desktop in Display Properties/Settings.
Mirror Mode
In this mode, the Windows desktop will be replicated, or “mirrored,” to the secondary CRT/LCD
monitor. The screen resolution setting on the secondary monitor will follow the primary screen’s
resolution. If the selected resolution setting is not supported by the primary screen, however,
a warning dialog box will be displayed and the suggested screen resolution will be shown.
12
FUNCTIONS
Page 13
Off
This option simply disables the Multi-Port Docking Station.
Rotation
This presents further options —
“Right,” “Left,” “Flip” or “Normal”
— for setting the orientation of
the secondary CRT/LCD
monitor in Extendedor Primary
mode.
13
FUNCTIONS
Page 14

FAQ
Following are some frequently asked questions — and answers — regarding the installation
or operation of the Multi-Port Docking Station.
Q: Why can’t I make the Hi-Speed Multi-Port Docking Station the primary display?
A: Some video card manufacturers include a utility that prevents other video cards from being
set as the primary card. Check the bottom- right corner taskbar for the utility, and disable
the utility before designating the Multi-Port Docking Station as the primary display.
Q: Why won’t my DVD player work when I move it over to the extended display?
A: Some DVD playback software packages don’t support playing on a second display adapter
of any kind. You can try opening the program in the secondary display rst before playing
the DVD.
Q: Why won’t my video play on Media Player if I move it over to the extended desktop?
A: Check that you’ve moved the Media Player window completely over to the second screen.
Q: Why doesn’t my mouse move past the right side of the screen as it should on an
extended desktop?
A: Check the display settings and make sure that your display No. 2 is on the right side of
display No. 1. You can rearrange how Windows treats displays in relation to each other in
Display Properties/Settings.
Q: Why are there are lines running horizontally up and down my screen?
A: This is due to a low refresh rate setting. You can change this by going to Display Properties/
Settings → Advanced Settings. NOTE: Make sure you select the USB 2.0 VGA device rst
and not set the refresh rate higher than what your monitor can support, as this can damage
your monitor. You can also try to reset/refresh/resynchronize your monitor.
Q: Why doesn’t Direct3D work?
A: This is a current limitation of the Multi-Port Docking Station. Check for driver updates in the
future to add support for this. If your application requires this, use the main display adapter.
OPERATION TIPS
Following are some tips that may help if you are experiencing any difculties using the MultiPort Docking Station. Contact your dealer for additional assistance, if needed.
• Check to make sure that all connectors are plugged in correctly.
• Make sure that the USB port that you are using is USB 2.0.
• Try a different USB 2.0 port and/or computer.
• Check to see that the monitor is connected correctly and the power is on.
• Try connecting the adapter directly to the computer instead of through a hub.
• Unplug all other USB devices from the system.
• Make sure to restart your computer after the driver installation.
• Unplug the adapter and re-insert it.
• Check the Web site to make sure you have the latest drivers.
• Reset/refresh/resynchronize your monitor.
• Selecting Primary mode may disable the main system display on certain Intel graphics
solution-based computer systems.
• If you have problems during the boot-up process, start your computer in Safe mode and
uninstall the driver. Hold the CTRL key until the Windows startup menu appears and select
“Safe Mode.”
14
FAQ / TIPS
Page 15

SPECIFICATIONS
General
• Four-port Hi-Speed USB 2.0 hub
• (1) RJ45 10/100 Mbps network port
• (1) SVGA (HD15 F) port
• (1) stereo headset jack
• (1) microphone jack
• Windows 2000/XP/Vista compatible
• USB cable, 100 cm (39 in.)
• 8 x 2.75 x 0.78 in (20.4 x 7 x 2 cm); 7.8 oz. (221 g)
Supported Resolutions
• For Widescreen Monitor:
16:10; 1920 x 1200; 16 bits
16:9; 1920 x 1080; 16 bits
16:10; 1680 x 1050; 16/32 bits
16:10; 1440 x 900; 16/32 bits
16:10; 1280 x 800; 16/32 bits
15:9; 1280 x 768; 16/32 bits
• For Standard Monitor:
5:4; 1280 x 1024; 16/32 bits
4:3; 1600 x 1200; 16/32 bits
4:3; 1400 x 1050; 16/32 bits
4:3; 1280 x 960; 16/32 bits
4:3; 1152 x 864; 16/32 bits
4:3; 1024 x 768; 16/32 bits
4:3; 800 x 600; 16/32 bits
Package Contents
• Multi-Port Docking Station with Enhanced Video
• USB cable and power adapter
• User manual and driver CD
15
SPECIFICATIONS
Page 16

www.manhattan-products.com
Copyright © MANHATTAN
All products mentioned are trademarks or registered trademarks of their respective owners.
MANHATTAN® offers a complete line of PC Components,
Peripherals, Cables and Accessories. Ask your local computer dealer for more
information or visit us online at
 Loading...