

Page 1
Flyte Wireless Headset
User Manual
MOD EL 178136
manhattan-products.com
MH-178136-UM-ML1-1112-02-0
Page 2
WARRANTY INFORMATION
English: For warranty information, go to
Deutsch: Garantieinformationen finden Sie unter
En México: Póliza de Garantía Manhattan — Datos del importador y responsable
ante el consumidor IC Intracom México, S.A.P.I. de C.V. • Av. Interceptor Poniente #
73, Col. Parque Industrial La Joya, Cuautitlán Izcalli, Estado de México, C.P. 54730,
México. • Tel. (55)1500-4500
La presente garantía cubre los siguientes productos contra cualquier defecto de
fabricación en sus materiales y mano de obra.
A. Garantizamos los productos de limpieza, aire comprimido y consumibles, por 60
dias a partir de la fecha de entrega, o por el tiempo en que se agote totalmente su
contenido por su propia función de uso, lo que suceda primero.
B. Garantizamos los productos con partes móviles por 3 años.
C. Garantizamos los demás productos por 5 años (productos sin partes móviles),
bajo las siguientes condiciones:
1. Todos los productos a que se reere esta garantía, ampara su cambio físico, sin
ningún cargo para el consumidor.
2. El comercializador no tiene talleres de servicio, debido a que los productos que
Español: Si desea obtener información sobre la garantía, visite
Français: Pour consulter les informations sur la garantie, visitez
manhattan-products.com/warranty
se garantizan no cuentan con reparaciones, ni refacciones, ya que su garantía es
de cambio físico.
3. La garantía cubre exclusivamente aquellas partes, equipos o sub-ensambles
que hayan sido instaladas de fábrica y no incluye en ningún caso el equipo
adicional
o distribuidor
Para hacer efectiva esta garantía bastará con presentar el producto al distribuidor
en el domicilio donde fue adquirido o en el domicilio de IC Intracom México,
S.A.P.I. de C.V., junto con los accesorios contenidos en su empaque, acompañado
de su póliza debidamente llenada y sellada por la casa vendedora (indispensable
el sello y fecha de compra) donde lo adquirió, o bien, la factura o ticket de compra original donde se mencione claramente el modelo, número de serie (cuando
aplique) y fecha de adquisición. Esta garantía no es válida en los siguientes casos:
Si el producto se hubiese utilizado en condiciones distintas a las normales; si el
producto no ha sido operado conforme a los instructivos de uso; o si el producto
ha sido alterado o tratado de ser reparado por el consumidor o terceras personas.
o cualesquiera que hayan sido adicionados al mismo por el usuario
Polski: Informacje dotyczące gwarancji znajdują się na stronie
Italiano: Per informazioni sulla garanzia, accedere a
.
WASTE ELECTRICAL & ELECTRONIC EQUIPMENT
English: This symbol on the product or its packaging indicates that this product shall not be treated as household waste. Instead, it should be taken to an applicable
collection
consequences
contains easily removable batteries or accumulators, dispose of these separately according to your local requirements. The recycling of materials will help
to conserve natural resources. For details about recycling this product, contact your local city office, your household waste disposal service or the shop
where you purchased this product. Outside the EU: To discard this product, contact your local authorities and ask for the correct manner of disposal.
Deutsch: Dieses auf dem Produkt oder der Verpackung angebrachte Symbol zeigt an, dass dieses Produkt nicht mit dem Hausmüll entsorgt werden darf. In Übereinstimmung mit der Richtlinie 2002/96/EG des Europäischen Parlaments und des Rates über Elektro- und Elektronik-Altgeräte (WEEE) darf dieses Elektrogerät nicht
im normalen Hausmüll oder dem Gelben Sack entsorgt werden. Wenn Sie dieses Produkt entsorgen möchten, bringen Sie es bitte zur Verkaufsstelle zurück oder zum
Recycling-Sammelpunkt Ihrer Gemeinde.
Español: Este símbolo en el producto o su embalaje indica que el producto no debe tratarse como residuo doméstico. De conformidad con la Directiva 2002/96/CE
de la UE sobre residuos de aparatos eléctricos y electrónicos (RAEE), este producto eléctrico no puede desecha se con el resto de residuos no clasificados. Deshágase
de este producto devolviéndolo a su punto de venta o a un punto de recolección municipal para su reciclaje.
Français: Ce symbole sur Ie produit ou son emballage signifie que ce produit ne doit pas être traité comme un déchet ménager. Conformément à la Directive
2002/96/EC sur les déchets d’équipements électriques et électroniques (DEEE), ce produit électrique ne doit en aucun cas être mis au rebut sous forme de déchet
municipal non trié. Veuillez vous débarrasser de ce produit en Ie renvoyant à son point de vente ou au point de ramassage local dans votre municipalité, à des fins
de recyclage.
Polski: Jeśli na produkcie lub jego opakowaniu umieszczono ten symbol, wówczas w czasie utylizacji nie wolno wyrzucać tego produktu wraz z odpadami komunalnymi. Zgodnie z Dyrektywą Nr 2002/96/WE w sprawie zużytego sprzętu elektrycznego i elektronicznego (WEEE), niniejszego produktu elektrycznego nie
wolno usuwać jako nie posortowanego odpadu komunalnego. Prosimy o usuniecie niniejszego produktu poprzez jego zwrot do punktu zakupu lub oddanie do
miejscowego komunalnego punktu zbiórki odpadów przeznaczonych do recyklingu.
Italiano: Questo simbolo sui prodotto o sulla relativa confezione indica che il prodotto non va trattato come un rifiuto domestico. In ottemperanza alla Direttiva UE
2002/96/EC sui rifiuti di apparecchiature elettriche ed elettroniche (RAEE), questa prodotto elettrico non deve essere smaltito come rifiuto municipale misto. Si prega
di smaltire il prodotto riportandolo al punto vendita o al punto di raccolta municipale locale per un opportuno riciclaggio.
Disposal of Electric and Electronic Equipment (applicable in the European Union and other European countries with separate collection systems)
point for the recycling of electrical and electronic equipment. By ensuring this product is disposed of correctly, you will help prevent potential negative
to the environment and human health, which could otherwise be caused by inappropriate waste handling of this product. If your equipment
REGULATORY STATEMENTS
This equipment has been tested and found to comply with the limits for a Class B digital device, pursuant to Part 15 of Federal Communications Commission (FCC)
Rules. These limits are designed to provide reasonable protection against harmful interference in a residential installation. This equipment generates, uses and can
radiate radio frequency energy, and if not installed and used in accordance with the instructions may cause harmful interference to radio communications. However,
there is no guarantee that interference will not occur in a particular installation. If this equipment does cause harmful interference to radio or television reception,
which can be determined by turning the equipment off and on, the user is encouraged to try to correct the interference by one or more of the following measures:
reorient or relocate the receiving antenna; increase the separation between the equipment and the receiver; connect the
equipment to an outlet on a circuit different from the receiver; or consult the dealer or an experienced radio/TV technician.
English: This device complies with the requirements of R&TTE Directive 1999/5/EC. The Declaration of Conformity for this product is available at:
Deutsch: Dieses Gerät enspricht der Direktive R&TTE Direktive 1999/5/EC. Die Konformitätserklärung für dieses Produkt nden Sie unter:
Español:
Este dispositivo cumple con los requerimientos de la Directiva R&TTE 1999/5/EC. La declaración de conformidad para este producto esta disponible en:
Français: Cet appareil satisfait aux exigences de la directive R&TTE 1999/5/CE. La Déclaration de Conformité pour ce produit est disponible à l’adresset :
Polski: Urządzenie spełnia wymagania dyrektywy R&TTE 1999/5/EC. Deklaracja zgodności dostępna jest na stronie internetowej producenta:
Italiano: Questo dispositivo è conforme alla Direttiva 1999/5/EC R&TTE. La dichiarazione di conformità per questo prodotto è disponibile al:
This headset features aptX® and AAC audio coding for superior sound quality, and also supports virtual 3D surround sound technology.
Dieses Headset unterstützt aptX® und AAC-Audiocodierung sowie Virtual 3D Surround Sound für höchste Klangqualität.
Estos audífonos Bluetooth implementan tecnologías como aptX® y codificación de audio AAC para una calidad superior de sonido, también soportan la tecnología de sonido surround 3D
de forma virtual.
Ce casque a codage audio aptX® et AAC pour une qualité de son supérieure, et prise en charge de la technologie 3D Virtual Surround.
Słuchawki obsługują kodowanie audio aptX® oraz AAC dla zapewnienia doskonałej jakości dźwięku, obsługują także technologię wirtualnego dźwięku przestrzennego 3D.
Questa cuffia Bluetooth è dotata del codec audio aptX® e del formato di compressione audio AAC per una qualità audio superiore, e supporta anche la tecnologia virtual 3D surround sound.
2
FCC Class B
CE / R&TTE
manhattan-products.com
Page 3
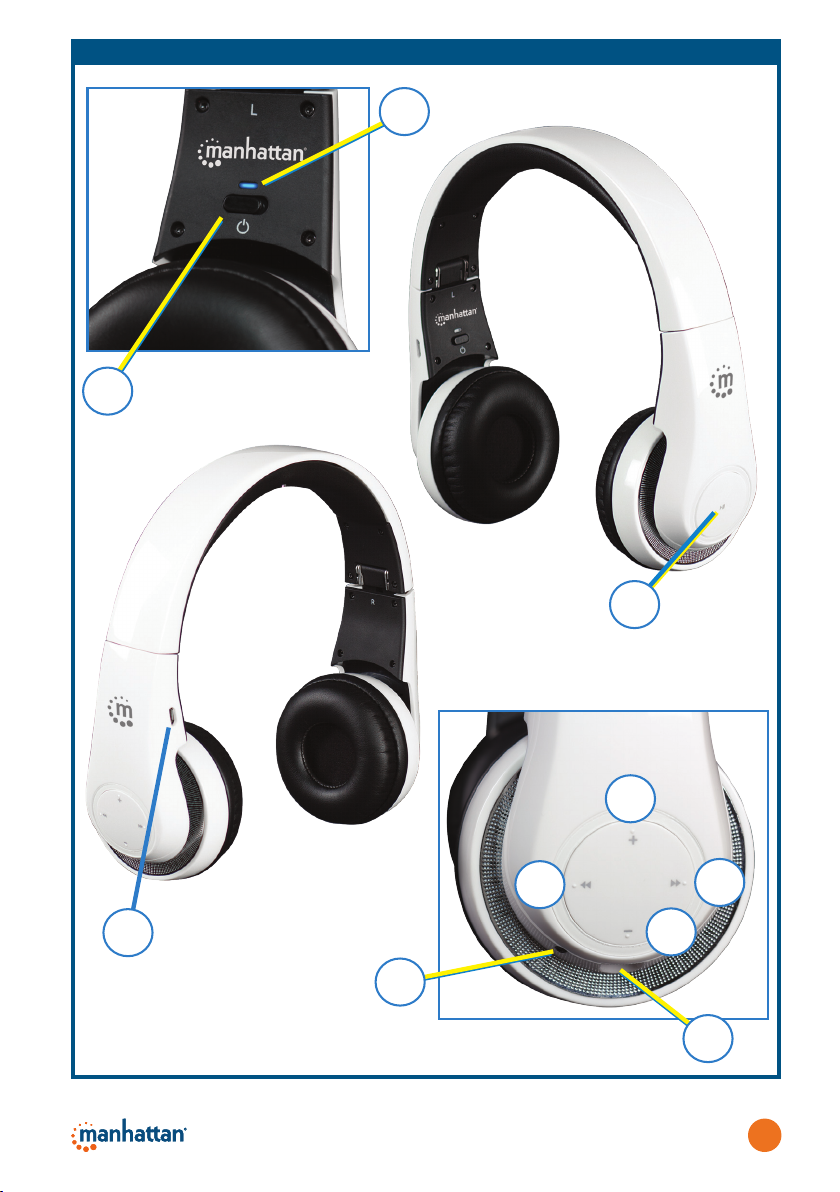
On/Off switch
J
FLYTE WIRELESS HEADSET
LED
H
K
Play/Pause
multifunction
II
u
Micro USB port
A
Microphone
G
B
+
tt
D
–
3.5mm stereo port
C
uu
E
F
3
Page 4

Initial Setup
Connecting
You can connect the headset two ways to enjoy audio:
• Create a wireless connection to a mobile device or computer that features Bluetooth wireless
technology (see Bluetooth Pairing below); or
• Use the included 3.5mm stereo cable to connect (F) to an audio source (which doesn’t require
charging the battery first). Note: The function buttons — Play/Pause (K), Volume Up/Down (B,C)
and Previous/Next (D,E) — work only during Bluetooth wireless operation.
Built-in Battery Charging
Prior to initial use as a wireless headset, the built-in battery needs to be charged. A full charge can take
up to 3 hours, but you can listen to music or make phone calls while charging (the audio device is
displayed in the computer).
1 Use the included USB-to-micro USB cable to
connect the headset (A) to a powered
computer.
2 The LED (H) lights red while charging and turns
off when the charge is complete. Note: The LED
Mode Description
Standby Flashes blu e once
every 5 se conds
Low batte ry Flas hes red every 5
seconds w ith a vocal
prompt eve ry 60
seconds
LED Indications
Mode Description
Incoming c all Flashe s blue rapidly
Charging Lights red
Powering on Flashes blue
Powering off Flashes red
Pairing Alternately flashes
red and blu e
flashes red to indicate low voltage (with a vocal prompt every 60 seconds). Re-charge the battery
as soon as you can. For details, see About the Battery below.
Bluetooth Pairing & Wireless Operation
This product utilizes the latest in Bluetooth wireless technology; wireless performance may vary from
device to device. If using this product with a Mac or PC, ensure that your Bluetooth driver is up to
date. If it isn’t, visit your computer manufacturer’s website for details and updates.
1 Set the headset’s On/Off switch (J) to On (Standby mode).
2
Press the uII (K) and – (C) buttons simultaneously for about 3 seconds, until the LED (H) alternately
flashes red and blue.
3 Referring as needed to the manual of your phone, tablet, computer, etc., activate your device’s
Bluetooth function and search for Bluetooth devices. Note: Be sure that you are familiar with the
Bluetooth operation of your source device.
4 Once the device finds “Flyte Wireless Headset,” an on-screen prompt will ask if you’re ready for
pairing. Click or press OK or Confirm to continue. Note: If the device prompts you to enter a PIN,
enter 0000 and click or press Yes or Confirm to continue.
• After a successful connection is made, the LED (H) will flash blue 3 times, then flash once every 5
seconds. If the pairing has failed and the LED is still alternately flashing red and blue, the pairing
procedure needs to be re-initiated on your source device.
Making Voice-Activated Calls
In Standby mode, double-press the uII button (K) and listen for the beep that indicates you can start
to voice dial for hands-free operation. Note: Not all phones feature this option. If this option is available,
speak the name of the person you wish to call into the microphone (G) and the call should be placed.
4
ENGLISH
Page 5

About the Battery
This headset is powered by a rechargeable battery. Keep the following in mind to maximize the life of
your headset.
• A new battery attains its optimal level of performance (its ability to fully power the headset) only
after two or three complete charge and discharge cycles. The battery can be charged and discharged
hundreds of times , but it will eventually wear out.
•
When not charging the battery, disconnect the headset from any power source. Do not leave a fully
charged battery connected to a charging circuit since overcharging may shorten battery life.
• If a fully charged battery is left unused, it will fully discharge over a period of time.
•
Leaving the headset exposed to extremes in temperature for any length of time, such as in a parked
car during summer or winter, will reduce the battery life and capacity. Ideally, the battery
temperature should be maintained at 15-25˚C (59-77˚F).
• As with any batteries, do not dispose of the headset in a fire or anywhere it could be expected to
catch fire, as the built-in battery could explode.
Operating Tips
The effective Bluetooth wireless range of the Flyte is approximately 10 m / 33 ft. If you’re unable to
connect the headset to a device:
• Make sure that the headset is fully charged, switched on, paired with the device and indicating a
successful connection.
• Make sure the device’s Bluetooth function is activated.
•
Check that the distance between the headset and the device is no more than 10 m / 33 ft., and that
there are no obstructions such as walls or other active wireless items between two devices that
could interfere with the signal.
• Bluetooth music devices or Bluetooth / Bluetooth stereo transmitter music devices must support
Bluetooth A2DP and Bluetooth AVRCP.
• Not all phones feature the function that allows the headset to be switched from music to calls.
• If the headset is paired to more than one device at the same time, it will only connect to the device
with the strongest signal.
Operation Steps
Power on Set the On /Off switch to the On p osition. The L ED lights blue
for 3 seconds with an audio confirmation.
Power off Set the On/Off s witch to the Off pos ition. The LED li ghts red
for 3 seconds with an audio confirmation.
Pairing Turn the headp hones on, then pr ess the
for about 3 s econds (until the L ED alternately fl ashes red and
blue).
Answer / En d a call Briefly pre ss the Multifun ction butt on.
Reject a c all Pr ess the Multifu nction butt on for about 2 se conds (until
you hear a be ep), then release t o reject the cal l.
Voice dial* In Standby mode, double-press the
the beep t hat indicates you c an start to voi ce dial. *Not all
phones fe ature this optio n.
Last number redial In Sta ndby mode, pres s the
(until you hea r a beep), then relea se to redial the la st
outgoing number.
Play / Pause Briefly pr ess the
u
II
button f or about 2 secon ds
u
II
button to p lay or pause music .
Quick Reference Guide
u
II
and – buttons
u
II
button a nd listen for
Operation Steps
Increase volume During a ca ll or while liste ning to music, bri efly press + to
increase t he volume in incre mental steps . A beep indicat es
the maxim um level.
Decrease volume During a c all or while liste ning to music, br iefly press – to
decreas e the volume in incr emental steps . A beep indica tes
the minimum level.
Previous Briefly pr ess tt to play the pre vious song in a pl aylist.
Next Briefly pr ess uu to play the ne xt song in a play list.
Voice transfer During a call, p ress the Multif unction but ton for about 2
seconds (unt il you hear a beep). T he beep indica tes you can
switch the call between phone and headphones.
Microphone mute Press – fo r 2 seconds (until you h ear a beep) to switc h the
Mute func tion on or off.
•
You can enable t he 3D surround so und feature by pre ssing tt for 1 second. Press
uu for 1 secon d turn the feature o ff.
• The Aux In feat ure allows a direc t 3.5mm audio in terface in cas e the Bluetooth
functi on is unavailabl e or the headset ’s battery is l ow.
ENGLISH
5
Page 6

Ersteinrichtung
Verbindung
Sie haben zwei Möglichkeiten, um an diesem Headset Audio zu nutzen:
• Stellen Sie eine kabellose Bluetooth-Verbindung zu einem bluetoothfähigen Mobilgerät oder
Computer her (siehe Abschnitt Bluetooth-Verbindung); oder
• Schließen Sie das Headset über das beiliegende 3,5mm-Stereokabel (F) an eine Audioquelle an
(hierfür muss der Akku nicht aufgeladen werden). Hinweis: Die Funktionstasten — Play/Pause (K),
Lauter/Leiser (B,C) und Vorheriger/Nächster Track (D,E) — funktionieren nur im Bluetooth-Betrieb.
Aufladung des integrierten Akkus
Vor der ersten Verwendung als kabelloses Headset muss der integrierte Akku aufgeladen werden.
Eine vollständige Aufladung dauert
bis zu drei Stunden, aber Sie können während des Ladevorgangs
Musik hören oder telefonieren (das Audiogerät wird auf Ihrem Computer angezeigt).
1 Schließen Sie das Headset (A) über ein USB-auf-Micro-USB-Kabel an einen eingeschalteten
Computer an.
2
Die LED (H) leuchtet während des Akkuladevorgangs
rot und erlischt, wenn der Akku vollständig geladen
ist. Hinweis: Die LED blinkt rot, um einen niedrigen
Ladezustand anzuzeigen (mit einem akustischen
Modus LED-Aktivität
Standby Blinkt alle 5 Sekunden
blau
Schwacher A kku Bli nkt alle 5 Seku nden
rot plus akustisches
Signal alle 60
Sekunden
LED-Anzeigen
Modus LED-Aktivität
Eingehender Anruf Blinkt blau (schnell)
Lädt Leuchtet rot
Einschalten Blinkt blau
Ausschalten Blinkt rot
Verbinden Blinkt we chselnd rot
und blau
Signal alle 60 Sekunden). Laden Sie den Akku sobald wie möglich wieder auf. Details finden Sie im
unten stehenden Abschnitt Über den Akku.
Bluetooth-Verbindung & kabelloser Betrieb
Dieses Produkt verwendet die aktuellste Bluetooth Wireless Technologie. Die kabellose Performance
kann von Gerät zu Gerät abweichen. Falls Sie dieses Produkt mit einem Mac oder PC verwenden, stellen Sie sicher, dass sich der Bluetooth-Treiber Ihres Geräts auf dem neuesten Stand befindet. Details
und Treiber-Updates finden Sie auf der Webseite Ihres Computerherstellers.
1 Stellen Sie den Ein-/Ausschalter (J) des Headsets auf “On” (Standby-Modus).
2
Drücken Sie die Tasten uII (K) und – (C) gleichzeitig ca. 3 Sekunden lang, bis die LED (H) wechselnd
rot und blau
blinkt.
3 Aktivieren Sie die Bluetooth-Funktion Ihres Handys, Tablets, Computers etc. (lesen Sie ggf. das
Handbuch) und suchen Sie nach Bluetooth-Geräten. Mehr über den Bluetooth-Betrieb Ihres
Quellgeräts finden Sie im jeweiligen Handbuch.
4 Sobald Ihr Gerät das “Flyte Wireless Headset” erkennt, werden Sie gefragt, ob Sie dieses verbinden
möchten. Klicken Sie auf OK oder Bestätigen, um fortzufahren. Hinweis: Wenn Sie aufgefordert
werden, einen PIN einzugeben, verwenden Sie den PIN “0000” und klicken Sie auf Ja oder Bestätigen,
um fortzufahren.
• Wenn die Verbindung erfolgreich hergestellt wurde, blinkt die LED (H) drei mal blau und blinkt
dann alle fünf Sekunden. Sollte die Verbindung nicht hergestellt werden und die LEDs immer noch
abwechselnd rot und blau blinken, muss der Verbindungsvorgang auf Ihrem Quellgerät erneut
initialisiert werden.
Anrufe per Sprachaktivierung
Drücken Sie im Standby-Modus zwei mal auf die uII Taste (K). Ein akustisches Signal zeigt Ihnen an,
dass Sie Sprachwahl für den freihändigen Betrieb nutzen können. Hinweis: Nicht alle Handys
6
DEUTSCH
Page 7

beherrschen diese Funktion. Wenn sie auf Ihrem Handy verfügbar ist, sprechen Sie den Namen der
Person, die Sie anrufen möchten in das Mikrofon (G) und der Anruf sollte durchgeführt werden.
Über den Akku
Dieses Headset enthält einen aufladbaren Akku. Bitte beachten Sie dazu folgende Hinweise:
• Ein neuer Akku bietet optimale Leistung (d. h. die bestmögliche Stromversorgung des Headsets)
nach zwei oder drei vollständigen Lade- und Entladevorgängen. Der Akku kann viele hundert Male
aufgeladen werden, wird mit der Zeit aber
an Leistung verlieren.
• Wenn Sie den Akku gerade nicht aufladen, trennen Sie das Headset von der Stromquelle. Belassen
Sie einen vollständig aufgeladenen Akku nicht an einer Stromquelle, da dies die Akkulebensdauer
verkürzen kann.
• Wenn der Akku nicht genutzt wird, entlädt er sich mit der Zeit von allein.
• Wird der Akku über einen längeren Zeitraum extremen Temperaturen ausgesetzt, z. B. in einem
geparkten Wagen im Sommer oder Winter, reduziert dies die Akkuleistung und -lebensdauer.
Idealerweise sollte die Akkutemperatur zwischen 15 und 25˚C gehalten werden.
• Wie mit allen Akkus sollten Sie darauf achten, dass Sie nicht in offenes Feuer geraten, da dabei
Explosionsgefahr entsteht.
Bedienungstipps
Die effektive kabellose Bluetooth-Reichweite des Flyte beträgt ca. 10 m. Sollten Sie das Headset nicht
einwandfrei via Bluetooth nutzen können:
•
Achten Sie darauf, dass das Headset vollständig geladen, eingeschaltet und über Bluetooth mit Ihrem
Gerät verbunden ist und dabei eine erfolgreiche Verbindung angezeigt wird.
• Achten Sie darauf, dass die Bluetooth-Funktion des Geräts aktiviert ist.
•
Achten Sie darauf, dass die Entfernung zwischen dem Headset und dem Quellgerät nicht mehr als
10 m beträgt und dass sich keine Störfaktoren wie Wände oder zu viele aktive kabellose Geräte
dazwischen befinden.
•
Möchten Sie Bluetooth-Musikgeräte oder Bluetooth Stereo Transmitter für Musikgeräte verwenden,
müssen diese Bluetooth A2DP und Bluetooth AVRCP unterstützen.
• Nicht alle Handys unterstützen die Funktion, die Sie das Headset von Musik zu Anrufen wechseln lassen.
• Wenn Sie versuchen das Headset mit mehr als einem Gerät gleichzeitig zu verbinden, verbindet es
sich automatisch nur mit dem Gerät mit der höchsten Signalstärke.
u
II
u
II
. Sie hören da nn
Kurzübersicht
Funktion Schritte
Lautstärke
erhöhen +, um die Lautstärke schrittweise zu erhöhen. Ein Piepton signalisiert
die Maximalstufe.
Lautstärke
senken –, um die Lautst ärke schritt weise zu senke n. Ein Piepton sig nalisiert di e
und – ca.
Minimalstufe.
Vorheriger
Track
Nächster Track
Sprach- Drücken Si e während eine s Anrufs die Mul tifunktio nstaste ca. 2
übertragung Sekunden (bis Sie einen Piepton hören). Der Piepton signalisiert, dass
Sie den Anruf zwischen Handy und Headset umschalten können.
Mikro Halten Sie – 2 Sekunden gedrückt (bis Sie einen Piepton hören), um
stummschalten
•
Halt en Sie uu erneut 1 Se kunde lang ged rückt, um die Fu nktion ausz uschalten.
•
fall s Sie kein Bluetoo th-Gerä t zur Verfügung h aben oder der A kkuladezustand niedrig ist.
Drücken Si e während eines A nrufs oder b eim Musik hören k urz die Taste
Drücken Si e während eines A nrufs oder b eim Musik hören k urz die Tast e
Drü cken Sie tt , um den vorherigen Track in einer Playlist auszuwählen.
Drücken Sie uu, um den nächs ten Track in einer Play list auszuwäh len.
die Stummschaltungsfunktion zu (de-)aktivieren.
Halten Sie tt 1 Sekunde lang gedrückt, um die 3D-Surround-Sound-Funktion zu aktivieren.
Der Audioeingang ermöglicht eine direkte Verbindung über ein Kabel mit 3,5mm-Stecker
Funktion Schritte
Einschalten Stelle n Sie den Ein/Ausscha lter auf “On”. Die LED le uchtet 3 Sekund en
blau und Sie erhalten eine akustische Bestätigung.
Ausschalten Stellen Si e den Ein/Ausschalt er auf “Off”. Die LED le uchtet 3 Sekun den
rot und Sie erhalten eine akustische Bestätigung.
Verbinden Schalten Si e das Headset e in und halten Sie d ann die Tasten
Anruf Drücken Sie kurz die Multifunktionstaste.
annehmen/
beenden
Anruf Drück en Sie die Multif unktionst aste ca. 2 Sekun den (bis Sie eine n
abweisen
Sprachwahl* Im Stan dby-Modus , drücken Sie zwe imal die Taste
einen Piep ton hören. *Di ese Funktion w ird nicht von alle n Handys
unterstützt.
Wahlwiederholung
ausgehende Nummer erneut zu wählen.
Play / Pause
3 Sekunde n lang gedrück t (bis die LED abw echselnd rot un d blau blinkt).
Piepton hö ren) und lassen Sie s ie dann los, um den A nruf abzuweis en.
Halten Sie di e Taste
(bis Sie eine n Piepton hören), la ssen Sie sie dann l os, um die letz te
Drücken Si e kurz die Taste
u
II
im Standby-Modus ca. 2 Sekunden ge drückt
u
II,
um Musik abzu spielen ode r zu pausieren.
DEUTSCH
7
Page 8

Configuración inicial
Modo Conexión
Puede conectar los audífonos de dos maneras para disfrutar del sonido:
• Creando una conexión inalámbrica a un dispositivo móvil o computadora que cuente con
tecnología Bluetooth (vea la sección Emparejamiento Bluetooth más abajo), o
• Utilizando el cable estéreo de 3.5mm (F) y conectándolo a una fuente de audio (No es necesario
cargar la batería en este modo). Nota: Los botones de función — Reproducir/Pausa (K), Subir/Bajar
Volumen (B,C) y Anterior/Siguiente (D,E) — trabajan solo en modo Bluetooth.
Carga de la Batería Integrada
Antes de utilizar los audífonos en modo inalámbrico, la batería integrada necesita recargarse. Una carga
completa puede tomar hasta 3 horas, pero puede escuchar música o realizar llamadas telefónicas
mientras se esta cargando (los audífonos se muestran en los dispositivos de audio de la computadora).
1 Utilice el cable incluido USB a micro USB para
conectar los audífonos a una (A) computadora
encendida.
2 El LED (H) enciende en rojo mientras se carga y
se apaga cuando termina de cargar. Nota: El
Modo Descripción
En espera Pa rpadea en azul u na
vez cada 5 segun dos
Batería ba ja Parp adea en rojo cad a
5 segundo s con un
anuncio de v oz cada
60 segundos
LED parpadeara en rojo indicando un bajo
voltaje (con una alerta auditiva cada 60 segundos). Recargue la batería tan pronto sea posible. Para
Indicadores LED
Modo Descripción
Llamada Parpadea en azul
entrante rápidamente
Cargando Enciende en rojo
Encendido Parpadea en azul
Apagado Parpadea en rojo
Emparejando
entre rojo y a zul
Parpadea alternando
más detalles, revise el apartado Acerca de la Batería.
Emparejamiento Bluetooth y Operación Inalámbrica
Este producto utiliza lo último en tecnología Bluetooth; el rendimiento puede variar de dispositivo a
dispositivo. Si utiliza este producto con una Mac o PC, asegúrese que su controlador Bluetooth está
actualizado. Si no es así visite el sitio del fabricante para más detalles y actualizaciones.
1 Fije el interruptor de encendido de los audífonos (J) en On (modo de espera).
2
Presione los botones uII (K) y – (C) simultáneamente y manténgalos así cerca de 3 segundos, hasta
que el LED (H) comience a parpadear alternando entre rojo y azul.
3 Refiérase de ser necesario al manual de su teléfono, tableta, computadora, etc., para activar la
función Bluetooth del dispositivo, puede buscar por Dispositivos Bluetooth. Nota: Asegúrese estar
familiarizado con el modo de operación Bluetooth de su dispositivo.
4 Una vez que el dispositivo encuentre a “Flyte Wireless Headset,” le preguntará si esta listo para
emparejar. Haga clic o presione Aceptar o Confirmar para continuar. Nota: Si el dispositivo solicita
un PIN, ingrese 0000 y haga clic en Aceptar o Confirmar para continuar.
• Después de conectar exitosamente, el LED (H) parpadeará 3 veces en azul, después lo hará una vez
cada 5 segundos. Si el emparejamiento falla y el LED sigue parpadeando alternadamente entre rojo
y azul, comience nuevamente el procedimiento de emparejamiento desde su dispositivo.
Llamadas por Activación de Voz
En modo de espera, presione dos veces el botón uII (K) escuchará un pitido que le indicará que puede
comenzar la llamada en modo manos libres. Nota: No todos los teléfonos cuentan con está opción. Si
la opción esta disponible, diga el nombre de la persona a la que desea llamar al micrófono (G) deberá
de ocurrir la marcación.
8
ESPAÑOL
Page 9

Acerca de la Batería
Estos audífonos Bluetooth son alimentados por una batería recargable. Tome en cuenta lo siguiente
para incrementar la vida útil de sus audífonos.
• Una batería nueva alcanza sus niveles óptimos de rendimiento (su habilidad para alimentar
completamente los audífonos) después de dos o tres ciclos de carga y descarga. La batería puede
ser cargada y descargada cientos de veces, pero eventualmente se desgastará.
• Cuando no este cargando la batería, desconecte los audífonos de cualquier fuente de poder. No
deje una batería completamente cargada en un circuito de carga ya que la sobrecarga puede
acortar la vida útil de la batería.
•
Si una batería completamente cargada esta en desuso, se descargará completamente a
•
Si expone los audífonos a temperaturas extremas por algún periodo de tiempo, es como estacionar
tiempo.
un auto durante mucho tiempo en verano o invierno, se reduce la vida y capacidad de la batería.
Idealmente, la temperatura de la batería debería estar entre
15 a 25˚C (59 a 77˚F).
• Así como con cualquier batería, no arroje los audífonos al fuego o en un lugar que pudiera ser
inflamable, ya que los componentes de la batería podrían estallar.
Consejos de Operación
El rango efectivo del Bluetooth de los audífonos Flyte es de aproximadamente 10m / 33 ft. Si no
puede conectar los audífonos a su dispositivo:
• Asegúrese de que los audífonos están completamente cargados, encendidos y emparejados con
el dispositivo e indicando una conexión exitosa.
• Verifique que la función Bluetooth del dispositivo esta activa.
•
Revise si la distancia entre los audífonos y el dispositivo no es mayor a 10 m / 33 ft., además de que
no existan obstáculos como paredes u otros dispositivos inalámbricos activos entre los dispositivos
que puedan interferir con la señal
•
Los reproductores Bluetooth, dispositivos o estéreo transmisores Bluetooth deben soportar Bluetooth
A2DP y Bluetooth AVRCP.
•
No todos los teléfonos soportan la función que permite a los audífonos alternar entre música y llamadas.
•
Si los audífonos están emparejados a más dispositivos al mismo tiempo, solo se conectará al
dispositivo con la señal más fuerte.
Operación Pas os a seguir
Encender Fije el inter ruptor de encen dido en la posici ón On. El LED se
Apagar Fije el interrupt or de encendido e n la posición Off. El L ED se
encende rá en rojo por 3 seg undos con una confi rmación de
audio antes de apagarse.
Emparejamiento
botones
alternan do entre rojo y azu l).
Contestar/Colgar
una llamada
Rechazar una Presione el bo tón multifunci ón durante 2 segu ndos (hasta
llamada e scuchar un piti do), entonces suelte p ara rechaza r llamada.
Marcaci ón por En modo de esp era, presion e dos veces el botó n
voz* escuchar á un pitido para i niciar la marcaci ón por voz.* No todo s
los teléfonos cuentan con esta opción.
Remarcar En modo de esp era, presion e el botón
(hasta es cuchar un pitid o), entonces suelte el b otón para
remarcar al último número.
• Puede activar el sonido surround 3D presionando
• La entrada au xiliar permi te conectar un a fuente de audio d e 3.5mm en caso de q ue la función de Bl uetooth no este d isponible o la b atería este baja .
encende rá en azul por 3 se gundos con una confi rmación de audi o.
Encienda los audífonos, después presione simultáneamente los
u
II
y – durante 3 se gundos (hasta q ue el LED parpad ee
Presione brevemente el botón multifunción.
.
Guía Rápida de Referencia
u
II se
u
II
durante 2 se gundos
tt
durante 1 se gundo. Presion e uu durante 1 se gundo para apa gar esta funci ón.
Operación Pa sos a seguir
Reproducir/ Presione b revemente el bo tón
Pausar música.
Subir volumen Du rante una llamad a o mientras escu cha música, pres ione
pitido in dica el nivel máx imo.
Bajar volumen Durant e una llamada o mien tras escucha mús ica, presion e
indica el nivel mínimo.
Anterior Presione brevemente tt
la lista de reproducción.
Siguiente Presione brevemente uu para reproducir la siguiente canción de
la lista de reproducción.
Transferir voz
cambiar la l lamada entre el te léfono y los aud ífonos.
Silenciar Presione – durante 2 seg undos (hasta es cuchar un pitid o) para
micrófono enmu decer o activ ar el micrófono.
brevemente + para incrementa r el volumen con ca da toque.
brevemente – para reducir el volu men con cada toq ue. Un pitido
Durante una llamada, presione el botón multifuncional durante
2 segundos (hasta escuchar un pitido). El pitido indica que puede
u
II
para repr oducir o pausar l a
Un
para repr oducir la canci ón anterior de
ESPAÑOL
9
Page 10

Configuration initiale
Raccordement
Vous avez deux possibilités pour le raccordement du casque :
• Créer une connexion sans fil à un appareil mobile ou un ordinateur portable qui dispose de la
technologie sans fil Bluetooth (voir la section Appariement Bluetooth ci-dessous) ; ou
• Utiliser le câble stéréo 3,5 mm inclus pour connecter (F) à une source audio (dans ce cas, il n’est pas
nécessaire de charger la batterie au préalable). Remarque : les boutons de fonction (Lecture/Pause
(K), Volume – Plus/Moins (B, C) et Précédent/Suivant (D, E)) ne fonctionnent que lorsque le mode
Bluetooth sans fil est utilisé.
Chargement de la batterie intégrée
La batterie intégrée doit être chargée avant la première utilisation du casque en mode sans fil. Un
chargement complet peut prendre jusqu’à 3 heures, mais vous pouvez écouter de la musique ou
passer des appels téléphoniques pendant le chargement (le dispositif audio apparaît sur l’ordinateur).
1
Utilisez le câble USB vers micro USB pour raccorder
le casque (A) à un ordinateur sous tension
2 Le voyant DEL (H) est rouge lors du chargement
et s’éteint lorsque celui-ci est terminé. Remarque :
le voyant DEL clignote en rouge pour indiquer
Mode Descr iption
.
Veille Clign ote en bleu to utes les 5
secondes
Batte rie faibl e Clig note en roug e toutes le s 5
secon des avec une i nvite
vocal e toutes les 6 0 second es
Indications relatives au voyant DEL
Mode Descr iption
Appel entrant Clignote en bleu
rapidement
Chargement S’allume en rouge
Mise sous tension Clignote en bleu
Mise hors tension Clignote en rouge
Appariement Clignote en rouge et bleu
une tension basse (avec une invite vocale toutes les 60 secondes). Rechargez la batterie dès que
possible. Pour plus d’informations, consultez la section À propos de la batterie ci-dessous.
Appariement Bluetooth et fonctionnement sans fil
Ce produit utilise la dernière technologie sans fil Bluetooth ; les performances sans fil peuvent varier
d’un appareil à un autre. Si vous utilisez ce produit avec un Mac ou un PC, assurez-vous que votre
pilote Bluetooth est à jour. Dans le cas contraire, rendez-vous sur le site Web du fabricant de votre
ordinateur pour obtenir plus d’informations et des mises à jour.
1 Placez l’interrupteur marche/arrêt (J) du casque en position marche (mode veille).
2
Appuyez simultanément sur les boutons uII (K) et – (C) pendant environ 3 secondes, jusqu’à ce que
le voyant DEL (H) clignote en rouge et bleu
3
Activez la fonction Bluetooth de votre appareil et recherchez les dispositifs Bluetooth. Si nécessaire,
reportez-vous au manuel de votre téléphone, tablette, ordinateur, etc. Remarque : il est important
de bien connaître le fonctionnement Bluetooth de votre dispositif source.
4
Une fois que le dispositif détecte “
Flyte Wireless Headset
demande si vous êtes prêt à procéder à l’appariement. Cliquez ou appuyez sur OK ou sur Confirm
pour continuer. Remarque : si le dispositif vous invite à entrer un numéro d’identification personnel,
saisissez 0000 et cliquez ou appuyez sur Ye s ou sur Confirm pour continuer.
•
Une fois la connexion établie, le voyant DEL (H) clignote en bleu 3 fois, puis clignote toutes les 5
secondes. Si l’appariement a échoué et que le voyant DEL continue de clignoter en rouge et bleu,
vous devez relancer la procédure d’appariement sur votre dispositif source.
Effectuer des appels par commande vocale
En mode veille, appuyez deux fois sur le bouton uII (K) et attendez le signal sonore vous indiquant que
vous pouvez commencer à procéder à la numérotation vocale pour un fonctionnement en mains libres.
Remarque : tous les téléphones ne disposent pas de cette option. Si elle est disponible, prononcez le
nom de la personne que vous voulez appeler dans le microphone (G) et l’appel sera effectué.
.
”, un message apparaît à l’écran et vous
10
FRANÇAIS
Page 11

À propos de la batterie
Ce casque est alimenté par une batterie rechargeable. Prenez en compte les éléments suivants afin
d’optimiser la durée de vie de votre casque.
•
Une batterie neuve atteint son niveau de performance optimal (sa capacité à fournir une alimentation
maximale au casque) uniquement après deux ou trois cycles de chargement et de déchargement
complets. La batterie peut être chargée et déchargée des centaines de fois, mais elle s’use inévitablement.
• Lorsque la batterie n’est pas en cours de chargement, débranchez le casque de toute source
d’alimentation. Ne laissez pas une batterie complètement chargée branchée sur un circuit de charge :
toute surcharge peut réduire la durée de vie de la batterie.
• Si une batterie chargée n’est pas utilisée, elle se déchargera complètement après un certain temps.
• L’exposition du casque à des températures extrêmes pendant un certain temps, par exemple dans
une voiture en stationnement en été ou en hiver, entraînera une réduction de la durée de vie et des
capacités de la batterie. La température de la batterie doit être maintenue à 15-25 ˚C (59-77 ˚F).
• Comme pour tout appareil contenant une batterie, ne jetez pas le casque dans un feu ni dans un
endroit ou il risquerait de s’enflammer : la batterie intégrée risquerait d’exploser.
Conseils d’utilisation
La portée sans fil Bluetooth du casque Flyte est d’environ 10 m (33 ft). Si vous ne parvenez pas à
raccorder le casque à un dispositif :
•
Vérifiez que le casque est chargé, en marche, apparié au dispositif et qu’il indique qu’une connexion
est établie.
• Assurez-vous que la fonction Bluetooth du dispositif est activée.
•
Les récepteurs de musique Bluetooth ou les émetteurs de musique stéréo Bluetooth/Bluetooth
doivent prendre en charge les profils Bluetooth A2DP et Bluetooth AVRCP
.
• Les récepteurs de musique Bluetooth ou les émetteurs de musique stéréo Bluetooth/Bluetooth
doivent prendre en charge les profils Bluetooth A2DP et Bluetooth AVRCP.
• Les téléphones ne disposent pas tous d’une fonction permettant de basculer entre la musique et
les appels avec le casque.
• Si le casque est apparié à plusieurs dispositifs en même temps, il se connectera uniquement au
dispositif émettant le signal le plus fort.
Fonctionnement Étapes
Mise sou s tension Placez l’inter rupteur marc he/arrêt en po sition march e. Le voyant DEL
s’allume en bl eu pendant 3 se condes avec un e confirmatio n audio.
Mise hors tension Placez l’i nterrupteur m arche/arrêt e n position ar rêt. Le voyant DE L
Appariement Mett ez le casque so us tension, pu is appuyez sur l es boutons
pend ant environ 3 se condes (ju squ’à ce que le voy ant DEL cligno te
en rouge et b leu.
Répondre/mettre Appu yez brièveme nt sur le bouton M ultifunc tion.
fin à un appe l
Refuse r un appel Appuyez sur le bouton Multifunction pendant environ 2 secondes
(jusqu’à ce que vous entendiez un signal sonore), puis relâchez-le
pour refuser l’appel.
Numérotation En mode veille, a ppuyez deu x fois sur le bout on
vocale* si gnal sonore vo us indiquant qu e vous pouvez co mmencer à
procéder à la numérotation vocale. *Tous les téléphones ne
disposen t pas de cette opt ion.
Recomposition En m ode veille, ap puyez sur le bou ton
du dernier seconde s (jusqu’à ce q ue vous entendi ez un signal son ore), puis
numéro relâchez-le pour recomposer le dernier numéro sortant.
Lecture/Pause Appuyez bri èvement sur le b outon
s’allume en ro uge pendant 3 s econdes avec u ne confirmatio n audio.
Guide de référence rapide
u
II et attendez le
u
II
pendant environ 2
u
II
pour lire de la m usique ou
Fonctionnement Étapes
mettre l e dispositif en p ause.
Augmenter Lors d’un appe l ou lorsque vo us écoutez de la m usique, appu yez
le volume brièvement sur + pour augmenter le volume par incréments. Un
signal sonore indique le niveau maximal.
Diminuer Lors d’un ap pel ou lorsq ue vous écoute z de la musique, ap puyez
u
II
et –
le volume brièveme nt sur – pour diminu er le volume pa r incrément s. Un signal
sonore indique le niveau minimal.
Précédent Appuyez brièveme nt sur tt pour lire la ch anson précé dente d’une
playlist.
Suivant Appuyez br ièvement sur uu pour lire la ch anson suivan te d’une
playlist.
Transfert vocal
2 seconde s (jusqu’à c e que vous entend iez un signal so nore). Le
signal son ore indique q ue vous pouvez b asculer l’app el entre le
téléphone et le casque.
Coupure du Appuyez sur – pen dant 2 seconde s (jusqu’à c e que vous entend iez
microphone un signal so nore) pour act iver ou désac tiver le mode muet.
• Vous pouvez ac tiver la fonc tion de son sur round 3D en appu yant sur
s econde. Pour dé sactiver ce tte fonct ion, appuyez s ur uu pendant 1 secon de.
• Si la foncti on Bluetooth n’es t pas disponib le ou que la bat terie du casqu e est
déchargé e, la fonction Aux In offre une entrée auxiliaire audio directe de 3,5 mm.
Lors d’un ap pel, appuye z sur le bouton Mu ltifunc tion pendant e nviron
tt
pendant 1
FRANÇAIS
11
Page 12

Ustawienia początkowe
Podłączenie
Aby cieszyć się doskonałym dźwiękiem, słuchawki można podłączyć na dwa sposoby:
•
Tworząc bezprzewodowe połączenie z urządzeniem mobilnym lub komputerem, który wyposażony
jest w technologię Bluetooth (zobacz temat Parowanie Bluetooth poniżej), lub
• Podłączając dołączony kabel stereo 3,5 mm (F) do źródła dźwięku (nie jest wymagane, aby
akumulator był naładowany). Uwaga: Przyciski funkcyjne – Odtwarzanie/Pauza (K), Głośniej/Ciszej
(B,C) oraz Poprzedni/Następny (D,E) działają tylko w trybie połączenia Bluetooth.
Ładowanie wbudowanego akumulatora
Przed pierwszym użyciem w trybie słuchawek bezprzewodowych wbudowany akumulator musi
zostać naładowany. Ładowanie do pełnego poziomu może zająć do około 3 godzin, jednak w trakcie
ładowania można słuchać muzyki lub wykonywać połączenia (urządzenie audio będzie wykrywane
przez komputer).
1 Użyj dołączonego kabla USB na micro USB, aby
podłączyć słuchawki (A) do zasilonego komputera.
2 Dioda (H) świeci się na czerwono podczas
ładowania i gaśnie po jego zakończeniu. Uwaga:
Dioda miga na czerwono sygnalizując niski poziom
naładowania akumulatora (z krótkim sygnałem dźwiękowym co 60 sekund). Należy naładować akumulator,
Try b Opis sygnalizacji
Gotowości Miga na nie biesko co
5 sekund
Niski poziom
naładowania
akumulato ra dźwię kową co 60
sekund
Ładowanie Świeci na czerwono
Sygnalizacja diodowa
Miga na cz erwono co 5
sekund z sygnalizacją
Try b Opis sygnalizacji
Połącz enie Sz ybko miga na
przychodzące niebiesko
Włączanie Miga na niebiesko
Wyłąc zanie Miga na cze rwono
Parowanie Naprzemiennie
miga na czerwono
i niebiesko
jak tylko będzie to możliwe. Aby uzyskać więcej informacji, przeczytj temat O akumulatorze poniżej.
Parowanie Bluetooth & Obsługa bezprzewodowa
Produkt ten wykorzystuje najnowszą technologię bezprzewodową Bluetooth; w zależności od
urządzenia bezprzewodowa wydajność może być różna. W przypadku używania tego produktu z
komputerem Mac lub PC, upewnij się, że masz zainstalowany aktualny sterownik Bluetooth. Jeśli tak
nie jest, wejdź na witrynę producenta komputera po aktualizację tego sterownika.
1 Ustaw przełącznik On/Off (J) słuchawek w pozycji On. (Tryb gotowości).
2
Wciśnij jednocześnie i przytrzymaj przez około 3 sekundy przyciski uII (K) oraz – (C) aż dioda (H)
zacznie naprzemiennie migać na czerwono i niebiesko
.
3 W razie potrzeby zapoznaj się z instrukcją obsługi telefonu, tabletu, czy komputera, aby włączyć
w nim funkcję Bluetooth i wyszukiwanie urządzeń Bluetooth. Uwaga: Upewnij się, że jesteś
zaznajomiony z obsługą Bluetooth w urządzeniu źródła dźwięku.
4
Gdy urządzenie znajdzie „
Flyte Wireless Headset
”, na ekranie wyświetlone zostanie zapytanie o
gotowości do parowania. Wybierz OK lub Potwierdź, aby kontynuować. Uwaga: Jeśli urządzenie
poprosi o podanie kodu PIN, wpisz 0000 i wybierz Tak lub Potwierdź, aby kontynuować.
• Po udanym nawiązaniu połączenia dioda (H) mignie na niebiesko 3 razy, następnie będzie migać
jednokrotnie co 5 sekund. Jeśli nawiązanie połączenia się nie powiodło, dioda w dalszym ciągu będzie
migać naprzemiennie na czerwono i niebiesko, procedura parowania musi zostać powtórzona.
Wykonywanie połączeń za pomocą wybierania głosowego
W trybie gotowości słuchawek dwukrotnie wciśnij przycisk uII (K) i poczekaj na sygnał dźwiękowy,
który sygnalizuje możliwość rozpoczęcia wybierania głosowego. Uwaga: Nie wszystkie modele
telefonów obsługują tę funkcję. Jeśli funkcja jest dostępna, wypowiedz do mikrofonu (G) nazwę
osoby do której chcesz zadzwonić, a połączenie powinno zostać nawiązane.
12
POLSKI
Page 13

O Akumulatorze
Słuchawki zasilane są poprzez wbudowany akumulator. Aby zmaksymalizować żywotność
akumulatora, stosuj się do poniższych wskazówek.
•
Nowy akumulator osiąga optymalny poziom wydajności (maksymalnie długi czas zasilania słuchawek)
dopiero po dwóch, trzech pełnych cyklach naładowania i rozładowania. Akumulator może być
ładowany i rozładowywany setki razy, ale z biegiem czasu ulegnie zużyciu.
•
Gdy akumulator nie jest w trakcie ładowania, odłącz słuchawki od źródła zasilania. Nie pozostawiaj
podłączonego w pełni naładowanego akumulatora, ponieważ przeładowanie skraca jego żywotność.
• Jeśli w pełni naładowany akumulator nie jest używany, z biegiem czasu ulegnie samoczynnemu,
całkowitemu rozładowaniu.
• Pozostawianie słuchawek narażonych przez dłuższy czas na ekstremalne temperatury, np. w
zaparkowanym samochodzie podczas lata lub zimy, spowoduje zmniejszenie pojemności oraz
żywotności akumulatora. Idealna temperatura dla akumulatora wynosi około 15 – 25˚C.
• Podobnie jak w przypadku innych akumulatorów i baterii, nie należy wrzucać słuchawek do ognia,
ani gdziekolwiek gdzie mogłyby ulec zapaleniu się i spowodować eksplozję akumulatora.
Wskazówki
Efektywny zasięg Bluetooth słuchawek Flyte wynosi około 10 m. Jeśli nie jesteś w stanie nawiązać
połączenia pomiędzy słuchawkami a urządzeniem, upewnij się że:
•
Słuchawki są w pełni naładowane, włączone, sparowane z urządzeniem oraz sygnalizują nawiązanie
połączenia. Funkcja Bluetooth w urządzeniu jest włączona.
• Odległość pomiędzy słuchawkami i urządzeniem nie przekracza 10 metrów oraz czy pomiędzy
urządzeniami nie ma żadnych przeszkód, takich jak ściany lub innych aktywnych urządzeń
bezprzewodowych, które mogą powodować zakłócenie sygnału.
• Urządzenie Bluetooth odtwarzające dźwięk lub transmiter Bluetooth muszą obsługiwać Bluetooth
A2DP oraz AVRCP.
• Nie wszystkie telefony wyposażone są w funkcję pozwalającą na przełączanie się pomiędzy
rozmową telefoniczną a odtwarzaniem muzyki.
•
Jeśli słuchawki są sparowane z więcej niż jednym urządzeniem w tym samym czasie, zostaną
połączone z urządzeniem o najsilniejszym sygnale.
Funkcja Czynność
Włączanie Ustaw prze łącznik On /Off w pozycji On . Dioda zaświ eci się na 3
sekundy na niebiesko oraz słyszalny będzie sygnał dźwiękowy.
Wyłączanie Usta w przełącz nik On/Off w poz ycji Off. Dioda za świeci się na 3
sekundy na czerwono oraz słyszalny będzie sygnał dźwiękowy.
Parowanie Włącz słu chawki, nastę pnie wciśnij i prz ytrz ymaj przez 3 se kundy
przyciski
naprzemiennie na czer wono i niebiesko).
Obieranie / Wciśnij na krót ko przycisk wi elofunkcyj ny.
Kończenie
połączenia
Odrzucenie Wciśnij i prz ytrzy maj przez oko ło 2 sekundy pr zycisk
połączenia wielofunkcyjn y (aż usłyszy sz sygnał dź więkowy), a nastę pnie
zw olnij, aby odr zucić połąc zenie.
Wybieranie W trybi e gotowości słu chawek, dwuk rotnie naciśnij p rzycisk
głosowe* poc zekaj na sygna ł dźwiękowy, ws kazujący, że możn a rozpocząć
w ybieranie gł osowe. *Nie wsz ystkie tel efony obsługu ją tę funkcję.
Wybieranie W trybi e gotowości słu chawek wciśnij i pr zytrz ymaj przez oko ło
ostatniego 2 sekundy przycisk
numeru następnie zwol nij, aby wybr ać ostatni nume r wychodząc y.
Odtwarzanie /
Pauza odtwar zanie muzyki.
u
II
oraz – (do momentu a ż dioda zacz nie migać
u
II
(aż usłys zysz sygna ł dźwiękow y), a
Wciśnij na kró tko przycisk
u
II
, aby rozpo cząć lub wstr zymać.
Skrócona Instrukcja Obsługi
Funkcja Czynność
Pogłaśnianie Pod czas rozmow y lub odtwar zania muzy ki wciskaj stop niowo
przycisk +, aby zwięks zać poziom gł ośności. Sygnał d źwiękowy
oznacza poziom maksymalny.
Przyciszanie Podcz as rozmowy lu b odtwarz ania muzyki w ciskaj stopni owo
przycisk –, aby zmniej szyć poziom g łośności. Sygna ł dźwiękowy
oznacza poziom minimalny.
Poprzedni Wc iśnij na krótko pr zycisk tt, aby przejść do poprzedniego utworu
na liście odtwarz ania.
Następny Wciśnij na k rótko przyc isk uu, aby przejść do następnego utworu
na liście odtwarz ania.
Przełączanie W trakcie połąc zenia wciśnij i pr zytrz ymaj przez ok oło 2 sekundy
dźwięku przyc isk wielofun kcyjny (aż usły szysz sygn ał dźwiękow y). Sygnał
dźwiękowy sygnalizuje, że można przełączyć rozmowę pomiędzy
telefonem a słuchawkami.
u
II
i
Wyciszenie Wciśnij i pr zytrz ymaj przez o koło 2 sekund y przycisk – (aż
mikrofonu usłys zysz sygna ł dźwiękow y), aby wyłącz yć lub włącz yć mikrofon.
•
Można włą czyć funkcję d źwięku 3D wcis kając na 1 sekund ę przycisk tt.
Wciśnięcie pr zycisku uu
• Port wejści owy Aux pozw ala na przewod owe połącze nie do źródła dź więku
pr zez złącze ja ck 3,5 mm w przy padku, gdy ni e można użyć tra nsmisji Bluetoo th
lub gdy poziom naładowania akumulatora słuchawek jest niski.
wyłącza funkcję.
POLSKI
13
Page 14

Settaggio Iniziale
Connessione
Si può connettere la cuffia in due diverse modalità:
•
Creare una connessione wireless Bluetooth con una periferica mobile o un computer che supportino
la tecnologia wireless Bluetooth (vedere Bluetooth Pairing sotto); o
• Usare il cavo stereo da 3.5mm per collegarla (F) ad una sorgente audio (che non richiede di caricare
prima la batteria). Nota: I tasti funzione — Play/Pausa (K), Volume su/giù (B,C) e Precedente/
Successivo (D,E) — lavorano solamente durante l’attività Bluetooth wireless.
Ricarica dalla batteria incorporata
Prima di utilizzare la cuffia come periferica wireless, è necessario effettuare la ricarica della batteria
incorporate. Una carica completa può richiedere fino a 3 ore, ma è possibile utilizzare la cuffia per
ascoltare musica o effettuare telefonate anche durante la ricarica (la periferica audio è visualizzata sul
computer).
1 Utilizzare il cavo USB-a-micro USB incluso per
collegare la cuffia (A) ad un computer alimentato.
2 Il LED (H) si illumina di rosso durante la carica e
si spegne non appena la periferica è carica. Nota:
La spia lampeggiante rossa indica che la batteria
Modalità Descrizione del LED
Standby Lampeggi a in blu una
volta ogni 5 secondi
Batter ia Lampeggia in ros so ogni
scarica 5 sec ondi con un avv iso
sonoro ogni 60 secondi
Ricarica Illuminato di rosso
Indicazioni dei LED
Modalità Descrizione del LED
Chiamata Lampeg gia in blu
entrante rapidamente
Acceso L ampeggia di bl u
Spento Lam peggia di rosso
Pairing Lampeggia di rosso e
blu (alternativamente)
è scarica (con un avviso sonoro ogni 60 secondi). Ricaricare la batteria non appena possibile. Per
ulterior dettagli, fare riferimento alla sottostante sezione inerente alla Batteria.
Bluetooth Pairing & Funzionamento Wireless
Questo prodotto utilizza la più recente tecnologia wireless Bluetooth; le prestazioni wireless possono
variare da periferica a periferica. Per utilizzare questo prodotto con un computer Mac o PC, assicurarsi
che il driver Bluetooth sia aggiornato. Nel caso non lo fosse, visitare il sito Web del produttore del
computer per ulteriori dettagli e aggiornamenti.
1 Posizionare l’interruttore della cuffia (J) su On (acceso). (Standby)
2
Premere i tasti uII (K) e – (C) contemporaneamente per circa 3 secondi, fino a quando il LED (H)
lampeggia alternativamente in rosso e blu
3
Facendo riferimento a quanto indicato nel manuale d’istruzione del telefono, tablet, computer ecc.
attivare la funzione Bluetooth della periferica e ricercare periferiche Bluetooth. Nota: assicuratevi
di avere familiarità con il funzionamento Bluetooth della vostra periferica.
4
Appena la periferica trova la “
richiede la conferma per procedere al pairing. Cliccare o premere OK o Confirm per continuare. Nota:
Flyte Wireless Headset
se viene richiesto un codice PIN, inserire 0000 e cliccare o premere
•
Dopo che è stata stabilità la connessione, il LED (H) lampeggerà di blu per 3 volte, quindi lampeggerà
ogni 5 secondi. Se il pairing non è avvenuto con successo e il LED lampeggia ancora alternativamente
di rosso e blu, la procedura di pairing deve essere rilanciata sulla periferica sorgente.
Effettuare telefonate tramite chiamata vocale
In modalità Standby, premere due volte il tasto uII (K) e attendere di udire il beep che indica la
possibilità di utilizzare la chiamata vocale per il funzionamento hands-free. Nota: Non tutti i telefoni
supportano questa opzione. Se questa opzione è disponibile, pronunciare il nome della persona che
si desidera contattare all’interno del microfono (G) e la telefonata dovrebbe partire.
.
,” apparirà un avviso sullo schermo che
Yes
o
Confirm
per continuare.
14
ITALIANO
Page 15

Batteria
Questa cuffia è alimentata da una batteria ricaricabile. Tenere in mente le seguenti caratteristiche per
garantire una lunga vita alla cuffia.
•
Una batteria nuova raggiunge il suo livello ottimale di prestazione (la sua capacità di alimentare
completamente la cuffia) solo dopo due o tre cicli complete di carica/scarica. La batteria può essere
caricata e scaricata centinaia di volte, ma con l’uso si esaurisce.
•
Quando non si carica la batteria, scollegare la cuffia da qualsiasi fonte di alimentazione. Non lasciare
una batteria completamente carica collegata a un circuito di carica poiché una carica eccessiva può
ridurre la durata della batteria.
• Se una batteria completamente carica è lasciata inutilizzata, si scarica completamente in un certo
periodo di tempo.
•
Lasciare la cuffia esposta a condizioni di temperature estreme per un lungo periodo di tempo, come
all’interno di un’auto parcheggiata durante l’estate o in pieno inverno, riduce la vita e la capacità
della batteria. Idealmente, la temperatura della batteria dovrebbe essere mantenuta tra
15-25˚C.
• Come per tutte le batterie, tenere lontana la cuffia dal fuoco o da qualunque situazione o corpo
pericoloso che potrebbero provocare incendi dal momento che la batteria incorporata potrebbe
esplodere.
Suggerimenti per il funzionamento
L’effettivo campo operativo del wireless Bluetooth della cuffia Flyte è approssimativamente di 10m /
33 ft. Se non siete in grado di collegare la cuffia ad una periferica:
• Assicurarsi che la cuffia sia completamente carica, accesa, accoppiata alla periferica e che il pairing
sia avvenuto con successo. Assicurarsi che la funzione Bluetooth della periferica sia attiva.
• Verificare che la distanza tra la cuffia e la periferica non sia superiore ai 10 metri e che non ci siano
ostacoli come muri o altre apparecchiature wireless attive tra le due periferiche che potrebbero
interferire con il segnale.
• Le periferiche musicali Bluetooth o i trasmettitori stereo musicali Bluetooth devono supportare i
profili Bluetooth A2DP e Bluetooth AVRCP.
• Non tutti i telefoni sono dotati della funzione che permette alla cuffia di commutare tra musica e
telefonate.
• Se la cuffia è accoppiata contemporaneamente a più di una periferica, si connetterà solamente alla
periferica con il segnale più forte.
Funzione Procedimento
Accensione Regolare l’int erruttore ne lla posizione d i accensione On. I l led blu
si a ccende per 3 seco ndi con una confer ma audio.
Spegnimento Reg olare l’inter ruttore nell a posizione di sp egnimento Off. Il l ed
ro sso si accende per 3 s econdi con una con ferma audio.
Pairing
(fin o a quando il led lam peggia alter nativamente in r osso e blu).
Rispondere/ Premere per poco tempo il tasto Multifunzione.
Chiudere una
chiamata
Rifiutare una Premere il tas to Multifunz ione per circa 2 se condi (fino ad udir e
chiamata il beep), quindi rilasciare il tasto per rifiutare la chiamata.
Voice dial* In modalità St andby, premere due v olte il tasto
di u dire il beep che in dica che si può eff ettuare la chia mata
vo cale. * Non tut ti i telefoni sup portano que sta funzion e.
Richiama In modalità Stan dby, premere il tast o
(fin o ad udire il beep), qu indi rilasciar e per ricompor re l’ultimo
nu mero in uscita.
Play/pause Prem ere per poco tem po il tasto
p er mettere in pa usa.
Accendere l e cuffie, quindi pr emere i tasti
u
Guida rapida di riferimento
u
II e – per circa 3 secon di
u
II e attendere
u
II per circa 2 se condi
II
per ascol tare la musica o
Funzione Procedimento
Alzare Durante un a telefonata o m entre si sta ascol tando musica,
il vol ume premere brevemente + per aumentare i l volume in modo
gr aduale. Un bee p indica il raggi ungimento del li vello massimo.
Abbassare
Dur ante una telefo nata o mentre si st a ascoltando mu sica,
il volume premere brevemente – per ridurre il volum e in modo gradua le.
b eep indica il ra ggiungimento d el livello minim o.
Precedente Premere p er poco tempo tt per ascol tare la precede nte canzone
in una playlist.
Successiva Premere per p oco tempo uu per ascol tare la canzone s uccessiva
in una playlist.
Trasferimento Du rante una telefo nata, premer e il tasto Multif unzione per ci rca
chiamata 2 secondi (fin o ad udire il beep). I l beep indica ch e si può trasfer ire
la te lefonata tra i l telefono e le cu ffie.
Mute del
Premere – per 2 second i (fino ad udire il be ep) per attivar e o
microfono
disatt ivare il Mute del m icrofono.
•
E’ possibil e abilitare la f unzione audio s urround 3D prem endo tt per 1 secondo.
Premere uu per 1 secon do per disatt ivare la funzi one.
•
L’ingresso Aux In p ermette di uti lizzare dire ttamente un’ interfaccia a udio esterna
da 3. 5mm nel caso in cu i la funzione Bl uetooth non sia d isponibile o ne l caso in
cu i la batteria de lla cuffia sia scari ca.
Un
ITALIANO
15
Page 16

North & South America
IC Intracom Americas
550 Commerce Blvd.
Oldsmar, FL 34677
USA
All trademarks and trade names are the property of their respective owners. For specifications, go to manhattan-products.com.
Alle Marken und Markennamen sind Eigentum Ihrer jeweiligen Inhaber. Die Spezifikationen finden Sie auf manhattan-products.com.
Todas las marcas y nombres comerciales son propiedad de sus respectivos dueños. Para más especificaciones, visite manhattan-products.com.
Toutes les marques et noms commerciaux sont la propriété de leurs propriétaires respectifs. Vous trouvez les spécifications sur manhattan-products.com.
Wszystkie znaki towarowe i nazwy handlowe należą do ich właścicieli. Pełną specyfikację produktu znajdziecie Państwo na stronie manhattan-products.com.
Tutti i marchi registrati e le dominazioni commerciali sono di proprietà dei loro rispettivi proprietari. Per ulteriori specifiche, visita il sito manhattan-products.com.
© IC Intracom. All rights reserved. Manhattan is a trademark of IC Intracom, registered in the U.S. and other countries.
Asia & Africa
IC Intracom Asia
Far Eastern Technology Center
7-F No. 125, Section 2, Da Tong Rd.
Shijr, Taipei • Taiwan, ROC
Europe
IC Intracom Europe
Löhbacher Str. 7
D-58553 Halver
Germany
 Loading...