

Page 1

MLXL
WireLess
Laser Mini Mouse
user ManuaL
Model 177474
ENGLISH
DEUTSCH
ES PAÑOL
FRANÇAIS
POLSKI
ITALIANO
MAN-177474-UM-ML-0510-01
Page 2

MLXL Wireless Laser Mini Mouse • User Manual English
Thank you for purchasing the MANHATTAN® MLXL Wireless Laser Mini Mouse, Model
177474. To view a datasheet with a full list of features and specications, go to
www.manhattan-products.com.
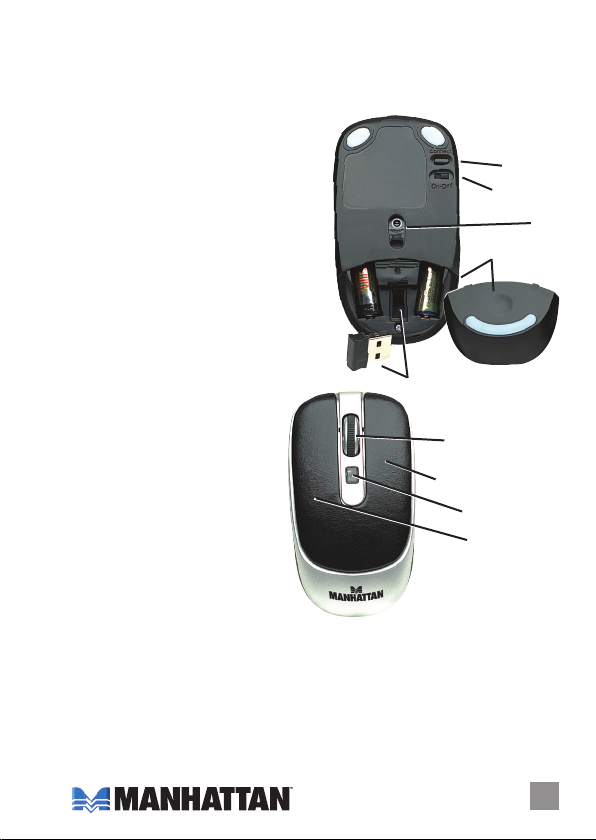
Installation
1. Press the battery compartment cover on
the underside of the mouse and slide the
cover o.
2. Insert the two AAA rechargeable batteries
(included) and replace the cover.
3. Set the On/O switch on the underside
to On. The Resolution button LED will
ash a few times to conrm the mouse
The low-friction base
smoothly glides over
work surfaces .
Connect button
On/O switch
Laser
Battery compartment
& cove r
has power.
4. Plug the USB micro receiver into a USB
port to complete the installation.
Operation
• Press or click as indicated below to use
the various features and functions.
• When battery power is low, the
Resolution button LED will ash.
• The Sleep function will turn the
mouse o after about 8 minutes
of inactivity. Click or scroll to
re-activate the mouse. During
outdoor transport or extended
periods of non-use, set the
On/O switch on the underside
to O.
• Click the DPI Resolution button
to cycle through the 800, 1200
and 1600 DPI settings.
• If the automatic connection
USB micro receiver & stora ge slot
Roll the sc roll w heel forw ard or back
to move through a document or
scre en. Ke ep it p ress ed whi le
movi ng the mous e to
auto-scroll.
Righ t-cl ick to v iew p op- up
menu s in yo ur pro gram s.
Resolution button & LED
Left-click to select on-screen
Styl ish sp lit le athe r des ign
Plug and Play installation —
Windows & Mac compatible
options.
between the mouse and its receiver is lost, simply press both the scroll wheel and the
Connect button on the underside to reset. This may take up to 15 seconds.
Operating Suggestions
• For safety reasons, do not look directly at the laser light on the underside.
• To maintain an eective wireless operating range of up to 7 m (30 ft.), keep a clear
path between the mouse and its receiver.
2
ENGLISH
Page 3
MLXL Wireless Laser Mini Maus • Handbuch Deutsch
Vielen Dank für den Kauf der MANHATTAN® MLXL Wireless Laser Mini Maus, Modell
177474. Das Datenblatt mit einer vollständigen Liste aller Eigenschaften und
Spezikationen nden Sie unter www.manhattan-products.com.
Installation
1. Entfernen Sie die Akkuabdeckung auf der
Unterseite der Maus, indem Sie sie bei
leichtem Druck nach hinten schieben.
2. Setzen Sie die beiden beiliegenden Akkus
ein und dann die Abdeckung wieder auf.
3. Stellen Sie den Ein/Aus-Schalter auf der
Unterseite auf “On”. Die Auösungs-LED
blinkt ein paar Mal, um zu bestätigen, dass
Die fast reibungsfreie
Unterseite gleitet weich
über die Arbeitsäche.
Connect-Taste
Ein/Aus-Scha lter
Laser
Akkufach & Abdeckung
die Maus mit Energie versorgt wird.
4. Verbinden Sie den Mikroempfänger mit
einem USB-Port, um die Installation
abzuschließen.
Bedienung
• Drücken Sie die Tasten, um ihre
diversen Funktionen auszulösen.
• Niedrige Akkukapazität wird durch
Blinken der LED angezeigt.
• Die Sleep-Funktion schaltet die
Maus nach ca. 8 Minuten Inaktivität
aus. Klicken oder crollen Sie, um sie
zu reaktivieren. Bleibt die Maus für
längere Zeit ungenutzt, schalten
Sie sie über den Ein/Aus-Schalter
auf der Unterseite aus.
• Drücken Sie auf die Auösungstaste,
um zwischen den Auösungen 800,
1200 und 600 DPI umzuschalten.
• Scheitert die automatische Verbindung
zwischen Maus und Empfänger, halten Sie das Mausrad und die Connect-Taste gedrückt,
um einen Reset durchzuführen. Dieser Vorgang kann bis zu 15 Sekunden dauern.
USB-Mikroempfänger & Staufach
Drehen Sie das Mausrad , um eine
Bildschirm- oder Dokumentenansicht
zu bewegen. Halten Sie das Mausrad
gedrückt und bewegen Sie
gleichzeitig die Maus für die
Auto-Scroll-Funktion.
Rechtsklick, um Kontex tmenüs
in Ih ren Pr ogram men z u ön en.
Auösung wechseln
& LED
Linksklick , für gängige
Auswahlfunktionen.
Attraktives Kunstleder-Design
Plug and Play installation —
Windows- und MAC-kompatibel
Bedienungshinweise
• Schauen Sie aus Sicherheitsgründen nicht direkt in den Laser auf der Unterseite.
• Um eektiven kabellosen Betrieb bis zu 7 m zu gewährleisten, halten Sie den Bereich
zwischen Maus und Empfänger frei.
DEUTSCH
3
Page 4

Mini Ratón Láser Inalámbrico MLXL • Manual del usuario Español
Gracias por comprar el Mini Ratón Láser Inalámbrico MLXL MANHATTAN®, modelo
177474. Para ver una cha tecnica con una lista completa de caracteristicas y
especicaciones, visite www.manhattan-products.com.
Instalación
1. Presione el compartimiento de baterias
debajo del ratón y deslice la tapa.
2. Inserte las dos baterias recargables AAA
(incluidas) y coloque la tapa.
3. Seleccione el switch On/O de abajo en
On. El LED del boton de resolución
parpadeara varias veces para conrmar
que el ratón esta energizado.
4. Conecte el receptor micro USB en un
Base de baja fricci ón que se
desl iza su avem ente so bre
la supercie de trabajo.
Boton connect
Switch On/O
Laser
Compartimiento de
baterias
& tapa
puerto USB para completar la instalación.
Operación
• Presione o haga clic como se indica para
usar las variadas caracteristicas y funciones.
• Cuando la bateria esta baja, parpadea el
boton de resolución.
• La funcion de Sleep se activa
despues de aprox. 8 minutos de
inactividad. Haga Clic en el boton
Scroll para re-activar el ratón.
Durante el transporte ó periodos
largos de no uso, seleccione el
switch On/O en la parte inferior
en O.
• Haga clic en el boton de resolución
para ajustar la resolución a 800,
1200 y 1600 DPI.
• Si la conexión automatica entre eI
ratón y el receptor se pierde, solo
presione el boton scroll y el boton de connect de la parte inferior para restearlo. Esto
Micro recepto r USB & ranura de almacenaje
Gire la rueda de desplazamiento hacia
dela nte o h acia a trás p ara de spla zars e
por un documento o una pantalla.
Mantenga la rueda de desplazamiento
presionado mientras mueve el ratón
Compatible con Windows y Mac
para auto-scroll.
Haga clic d ere cho p ara ve r
los menúsemergentes
en sus prog rama s.
LED & b oton d e reso luci ón
Haga clic i zqui erdo p ara
seleccionar opciones
en la pantalla.
Elegante diseño en piel
Insta laci ón “P lug an d Play ” —
puede tomar hasta 15 segundos.
Sugerencias de Operación
• Por razones de seguridad, no mire directamente a la luz del laser de abajo.
• Para mantener un alcance efectivo de funcionamiento 7 m, mantenga un espacio
libre entre el ratón y su receptor.
4
ESPAÑOL
Page 5

Mini-souris laser sans l MLXL • Manuel de l’utilisateur
Français
Merci d’avoir choisi la Mini-souris laser sans l MLXL MANHATTAN®, modèle 177474.
Pour la che technique avec une liste complète de fonctions et spécications, visitez
www.manhattan-products.com.
Installation
1. Enlevez le couvercle au dessous de la
souris en le pressant et poussant en
même temps.
2. Insérez les deux batteries AAA (inclus)
et replacez le couvercle.
3. Activez le commutateur marche-arrêt au
dessous de la souris. Le DEL de résolution
clignote quelques fois an de conrmer
que la souris est alimentée.
Base l arge à faib le fr icti on,
qui glisse facilement sur
la surface de travai l.
Bouton connect
Commutateur
marche-arrêt
Laser
Compartiment de
batterie &
couvercle
4. Connectez le micro-récepteur USB à un
port USB an de compléter l’installation.
Utilisation
• Cliquez sur les boutons an de déclencher
leurs diérentes fonctions.
• Quand la batterie est faible, le DEL
de résolution clignote.
• La fonction “Sleep” éteint la souris
après environ 8 minutes
d’inactivité. Cliquez ou délez
an de réactiver la souris. Si la
souris n’est pas utilisée plus
longtemps, éteignez la souris
par le commutateur marche-arrêt
au dessous de la souris.
• Cliquez sur le bouton de résolution
an de changer la résolution entre
800, 1200 et 1600 DPI.
• Si la connexion automatique entre
Micro-récepteur USB & compartiment
Tourn ez la m olet te de souri s an d e
déler l’achage d’un document
ou d’ un sit e Web. A ppuy ez-l a
const amme nt et b ouge z la so uris
pour la fonction délement auto.
Clic droit an d ’ach er
des m enus d e cont exte .
Bouton de résolution
& DEL
Clic gauche pour activer des
fonctions à l’écran.
Desi gn en c uir at trac tif
Installation Plug-and-Play,
compatible Windows et Mac
la souris et le récepteur échoue, pressez simplement la molette de souris et le bouton
“Connect” au dessous de la souris en même temps pour un reset. Cela peut durer
jusqu’à 15 secondes.
Conseils d’utilisation
• Ne regardez pas directement dans le rayon laser au dessous de la souris.
• An de maintenir une portée sans l eective jusqu’à 7 m, ne placez pas d’objets
entre la souris et son récepteur.
FRANÇAIS
5
Page 6

Myszka laserowa bezprzewodowa Mini MLXL • Instrukcja Użytkownika Polski
Dziękujemy za zakup Myszki laserowej bezprzewodowej Mini MLXL MANHATTAN®,
model 177474. Pełna specykacja produktu dostępna jest na stronie www.manhattanproducts.com.
Instalacja
1. Zdejmij pokrywę kieszeni na akumulatory.
2. Włóż dwa naładowane akumulatory typu
AAA (w komplecie) i zamknij pokrywę.
3. Ustaw przełącznik On/O w pozycji On.
Dioda umieszczona w przycisku zmiany
rozdzielczości powinna zamigać kilkukrotnie
sygnalizując, że urządzenie ma zasilanie.
Podstawka ułatwiająca
poślizg myszy po
powierzchni.
Przycisk połąc zenia
Przełącznik On/O
Kieszeń na akumulatory
Laser
oraz pokrywa
4. Wepnij mikro odbiornik USB do wolnego
portu USB komputera.
Opis funkcji
• Wszystkie cechy myszki oraz funkcje
przycisków opisano poniżej.
• Gdy poziom naładowania akumulatorów
będzie niski, zacznie migać dioda
umieszczona w przycisku zmiany
rozdzielczości.
•
Funkcja oszczędzania energii wyłączy
myszkę po 8 minutach bezczynności.
Aby ponownie włączyć urządzenie,
wystarczy kliknąć dowolny klawisz
myszki. Do transportu oraz przy
dłuższych okresach nie korzystania
z myszki zaleca się jej wyłączenie
poprzez ustawienie przełącznika
On/O w pozycji O.
• Przycisk do zmiany rozdzielczości
przełącza sekwencyjnie między
Mikr o odb iorn ik USB o raz sl ot do
jego przechowywania
Rolk a „scr oll ” – służ y do p rzew ijan ia
dokumentów. Wciśnięcie i
przytrzymanie rolki spowoduje
włączenie funkcji „auto-scroll” –
prze wija nie w g órę i w dół,
zgodnie z ruchem myszy
Praw y prz ycis k mysz y –
rozw ija m enu ko ntek stowe .
Regulacja rozdzielczości
oraz d iod a LED
Lew y prz ycis k mysz y – w ybie ranie
lub zaznaczanie elementów.
Styl owe, skóro pod obne w zorn ict wo
Insta lacj a Plug and Pl ay; ws pół praca z
systemami Windows oraz Mac
rozdzielczościami w kolejności 800, 1200 oraz 1600 DPI.
• Połączenie myszki z odbiornikiem USB nawiązywane jest automatycznie. W przypadku
zerwania tego połączenia, należy zrestartować urządzenie wciskając jednocześnie
rolkę „Scroll” i przycisk połączenia na spodzie myszki. Reinicjowanie połączenia może
zająć do 15 sekund.
Zalecenia eksploatacyjne
• Nie kierować promienia lasera umieszczonego na spodzie myszki w stronę oczu.
• Aby uzyskać maksymalny zasięg połączenia myszki z odbiornikiem (do 7 m), należy
zapewnić dobrą widoczność pomiędzy urządzeniami
6
POLSKI
Page 7

Mini Laser Mouse MLXL Wireless • Manuale d’istruzione Italiano
Grazie per aver scelto il Mini Laser Mouse MANHATTAN®, modello 177474. Per prendere
visione della scheda completa del prodotto con tutte le caratteristiche e le speciche,
vi consigliamo di visitare il sito www.manhattan-products.com.
Installazione
1. Premere il coperchio dello scomparto
batterie nella parte inferiore e farlo scorrere
verso l’esterno.
2. Inserire due batterie ricaricabili AAA
(incluse) e rimettere il coperchio.
3. Posizionare su On l’interruttore presente
sulla parte inferiore. Il LED del tasto di
risoluzione si illuminerà velocemente per
La ba se a bas so at trito
scivola uniformemente
sull a supe rc ie di l avoro .
Tasto di connessione
Interruttore
Laser
Scomparto barrerie e
coperchio
confermare l’accensione del mouse.
4. Inserire il micro ricevitore USB nella porta
USB per completare l’installazione.
Funzionamento
• Premere o cliccare come indicato sotto per
utilizzare le varie caratteristiche e funzioni.
• Quando la batteria è scarica, il LED del
tasto di risoluzione lampeggerà.
• La funzione Sleep permetterà di
spegnere il mouse dopo circa 8
minuti di inattività. Cliccare o usare
lo scroll per riattivare il mouse.
Durante il trasporto o per prolungati
periodi di inutilizzo, selezionare la
posizione O per l’interruttore nella
parte inferiore del mouse.
• Cliccare il tasto di risoluzione DPI
per settare il ciclo attraverso 800,
1200 e 1600 DPI.
• Se si perde la connessione automatica
Micro ricevito re USB & suo alloggiamento
Ruot are la r otel la di s crol l avant i o
indietro per mouoversi all’interno
del documento o sullo schermo.
Mantenerla premuta mentre si
muov e il mo use pe r auto -sc roll .
Tasto de stro del m ouse p er
visu aliz zare i pop -up menu dei
Puls ante d i riso luzio ne & LE D
Tasto si nist ro pe r sel ezio nare
Installazione Plug and Play -
compatibile Windows & Mac
programmi.
le op zion i sull o sch ermo .
Aspe tto m ode rno gr azie
al rivestimento tipo pelle
tra il mouse e il ricevitore, semplicemente premere sia la rotella di scroll che il testo di
connessione presente nella parte inferiore per resettare. Questo potrebbe richiedere
no a 15 secondi.
Suggerimenti di funzionamento
• Per ragioni di sicurezza, non guardare direttamente la luce del laser nella parte inferiore.
• Per mantenere un eettivo raggio operativo senza li no a 7 m, mantenere libera
la traiettoria tra il mouse e il suo ricevitore.
ITALIANO
7
Page 8
WASTE ELECTRICAL & ELECTRONIC EQUIPMENT
(applicable in the European Union and other European countries with separate collection systems)
ENGLISH
This symbol on the product or its packaging indicates that this product shall not be treated as household waste.
detailed information about recycling of this product, contact your local city oce, your household waste
disposal service or the shop where you purchased this product. In countries outside of the EU: If you wish
to discard this product, contact your local authorities and ask for the correct manner of disposal.
dEutScH
Dieses auf dem Produkt oder der Verpackung angebrachte Symbol zeigt an, dass dieses Produkt nicht mit
dem Hausmüll entsorgt werden dar f. In Übereinstimmung mit der Richtlinie 2002/96/EG des Europäischen
Parlaments und des Rates über Elektro- und Elektronik-Altgeräte (WEEE) darf dieses Elektrogerät nicht
im normalen Hausmüll oder dem Gelben Sack entsorgt werden. Wenn Sie dieses Produkt entsorgen
möchten, bringen Sie es bitte zur Verkaufsstelle zurück oder zum Recycling-Sammelpunkt Ihrer Gemeinde.
ESPAñOL
Este símbolo en el producto o su embalaje indica que el producto no debe tratarse como residuo doméstico.
De conformidad con la Directiva 2002/96/CE de la UE sobre residuos de aparatos eléctricos y electrónicos
(RAEEI), este producto eléctrico no puede desecha se con el resto de residuos no clasicados. Deshágase
de este producto devolviéndolo al punta de venta o a un punta de recogida municipal para su reciclaje.
FRANçAIS
Ce symbole sur Ie produit ou son emballage signie que ce produit ne doit pas être traité comme un
déchet ménager. Conformément à la Directive 2002/96/EC sur les déchets d’équipements électriques
et électroniques (DEEE), ce produit électrique ne doit en aucun cas être mis au rebut sous forme de
déchet municipal non trié. Veuillez vous débarrasser de ce produit en Ie renvoyant à son point
de vente ou au point de ramassage local dans votre municipalité, à des ns de recyclage.
ItALIANO
Questo simbolo sui prodotto o sulla relativa confezione indica che il prodotto non va trattato come un riuto
domestico. In ottemperanza alla Direttiva UE 2002/96/EC sui riuti di apparecchiature elettriche ed
elettroniche (RAEEI), questa prodotto elettrico non deve essere smaltito come riuto municipale misto. Si
prega di smaltire il prodotto riportandolo al punto vendita o al punto di raccolta municipale locale per un
opportuno riciclaggio.
POLSkI
Jeśli na produkcie lub jego opakowaniu umieszczono ten symbol, wówczas w czasie utylizacji nie wolno
wyrzucać tego produktu wraz z odpadami komunalnymi. Zgodnie z Dyrektywą Nr 2002/96/WE w sprawie
zużytego sprzętu elektrycznego i elektronicznego (WEEE), niniejszego produktu elektrycznego nie wolno
usuwać jako nie posortowanego odpadu komunalnego. Prosimy o usuniecie niniejszego produktu
poprzez jego zwrot do punktu zakupu lub oddanie do miejscowego komunalnego punktu zbiórki
odpadów przeznaczonych do recyklingu.
Disposal of Electric and Electronic Equipment
Instead, it should be taken to an applicable collection point for the recycling of electrical and
electronic equipment. By ensuring this product is disposed of correctly, you will help prevent
potential negative consequences to the environment and human health, which could other wise
be caused by inappropriate waste handling of this product. If your equipment contains easily
removable batteries or accumulators, dispose of these separately according to your local
requirements. The recycling of materials will help to conserve natural resources. For more
8
Page 9

WARRANTY INFORMATION
ENGLISH —
dEutScH —
ESPAñOL —
www.manhattan-products.com/warranty.
FRANçAIS —
www.manhattan-products.com/warranty.
POLSkI —
www.manhattan-products.com/warranty.
ItALIANO —
EN MéXIcO: Poliza de Garantia MANHATTAN — Datos del importador y responsable ante el consumidor
IC Intracom México, S.A. de C.V. • Av. Interceptor Poniente # 73, Col. Parque Industrial La Joya, Cuautitlan
Izcalli, Estado de México, C.P. 54730, México. • Tel. (55)1500-4500
La presente garantía cubre los siguientes productos contra cualquier defecto de fabricación en sus
materiales y mano de obra.
A. Garantizamos los productos de limpieza, aire comprimido y consumibles, por 60 dias a partir de la fecha
de entrega, o por el tiempo en que se agote totalmente su contenido por su propia función de uso,
lo que suceda primero.
B. Garantizamos los productos con partes moviles por 3 años.
C. Garantizamos los demas productos por 5 años (productos sin partes moviles), bajo las siguientes
condiciones:
1. Todos los productos a que se reere esta garantía, ampara su cambio físico, sin ningún cargo para
el consumidor.
2. El comercializador no tiene talleres de servicio, debido a que los productos que se garantizan no
cuentan con reparaciones, ni refacciones, ya que su garantía es de cambio físico.
3. La garantía cubre exclusivamente aquellas partes, equipos o sub-ensambles que hayan sido instaladas
defábrica y no incluye en ningún caso el equipo adicional o cualesquiera que hayan sido adicionados
al mismo por el usuario o distribuidor.
Para hacer efectiva esta garantía bastara con presentar el producto al distribuidor en el domicilio donde
fue adquirido o en el domicilio de IC Intracom México, S.A. de C.V., junto con los accesorios contenidos
en su empaque, acompañado de su póliza debidamente llenada y sellada por la casa vendedora
(indispensable el sello y fecha de compra) donde lo adquirió, o bien, la factura o ticket de
compra original donde se mencione claramente el modelo, numero de serie (cuando aplique) y
fecha de adquisición. Esta garantia no es valida en los siguientes casos: Si el producto se hubiese
utilizado en condiciones distintas a las normales; si el producto no ha sido operado conforme a los
instructivos de uso; ó si el producto ha sido alterado o tratado de ser reparado por el consumidor ó
terceras personas.
For warranty information, go to www.manhat tan-products.com/warrant y.
Garantieinformationen nden Sie unter www.manhattan-products.co m/warranty.
Si desea obtener información sobre la garantía, visite
Pour consulter les informations sur la garantie, visitez
Informacje dotyczące gwarancji znajdują się na stronie
Per informazioni sulla garanzia, accedere a www.manhat tan-product s.com/warranty.
9
Page 10

FEDERAL COMMUNICATIONS COMMISSION
REGULATORY STATEMENT
Fcc class B
This equipment has been tested and found to comply with the limits for a Class B digital device,
pursuant to Part 15 of Federal Communications Commission (FCC) Rules. These limits are designed
to provide reasonable protection against harmful interference in a residential installation. This
equipment generates, uses and can radiate radio frequency energy, and if not installed and used
in accordance with the instructions may cause harmful interference to radio communications.
However, there is no guarantee that inter ference will not occur in a particular installation. If this
equipment does cause harmful interference to radio or television reception, which can be determined
by turning the equipment o and on, the user is encouraged to tr y to correct the interference by one or
more of the following measures:
• Reorient or relocate the receiving antenna.
• Increase the separation between the equipment and the receiver.
• Connect the equipment to an outlet on a circuit dierent from the receiver.
• Consult the dealer or an experienced radio/TV technician for help.
R&TTE
ENGLISH
This device complies with the requirements of the R&TTE Directive 1999/5/EC.
dEutScH
Dieses Gerät enspricht der Direktive R&TTE Direktive 1999/5/EC.
ESPAñOL
Este dispositivo cumple con los requerimientos de la Directiva R&TTE 1999/5/EC.
FRANçAIS
Cet appareil satisfait aux exigences de la directive R&TTE 1999/5/CE.
POLSkI
Urządzenie spełnia wymagania dyrektywy R&TTE 1999/5/EC.
ItALIANO
Questo dispositivo è conforme alla Direttiva 1999/5/EC R&TTE.
10
Page 11

Page 12

Peripherals, Cables and Accessories. Ask your local computer dealer for more information
MANHATTAN® oers a complete line of PC Component s,
or visit www.manhattan-products.com.
All p roduc ts men tione d are tr adema rks or r egist ered tr adema rks of their r espec tive ow ners .
MANHATTAN® bietet ein vollständiges Sortiment an PC-Komponenten, Peripherie, Kabel
und Zubehör. Weitere Informationen erhalten Sie von Ihrem Händler oder auf
Alle genannten Produkt- oder Firmennamen sind eingetragene Marken oder Marken der
MANHATTAN® ofrece una línea completa Comp onentes para PC, Periféricos, Cables y
Accesorios. Consulte a su distribuidor local para más información ó visitenos
Todos los productos mencionados son marcas comerciales o marcas registradas de sus
MANHATTAN® ore un assor timent compl et de com posan ts de PC , des p ériph érique s,
Tous les produits mentionnés sont des marques commerciales ou des marques déposées
MAN HATTAN® to komple tna lin ia Komp onent ów PC, P eryf eriów, K abli o raz Akc esorió w.
Poproś lokalnego dealera o więcej informacji lub odwiedź stronę
Wszystkie nazwy handlowe i towarów są nazwami i znakami towarowymi
MAN HATTAN® o re una l inea co mplet a di com ponen ti per P C, per iferi che, cav i e acce ssori.
Chie di mag giori i nform azion i al tuo r ivend itore d i compu ter o vis ita il s ito
www.manhattan-products.com.
jeweiligen Firmen.
www.manhattan-products.com.
respectivos propietarios.
des câbles et des accessoires
www.manhattan-products.com.
de leurs propriétaires respectifs.
www.manhattan-products.com.
zastrzeżonymi odpowiednich rm odnośnych właścicieli.
www.manhattan-products.com.
Tutti i prod otti s opra citati sono m archi d i fabb rica o marchi regis trati depos itati d ai pro priet ari.
Cop yrigh t © MAN HAT TAN
 Loading...