

Page 1
DRIVE ENCLOSURE
QUICK INSTALL GUIDE
MODEL 130288 HISPEED 3.5”
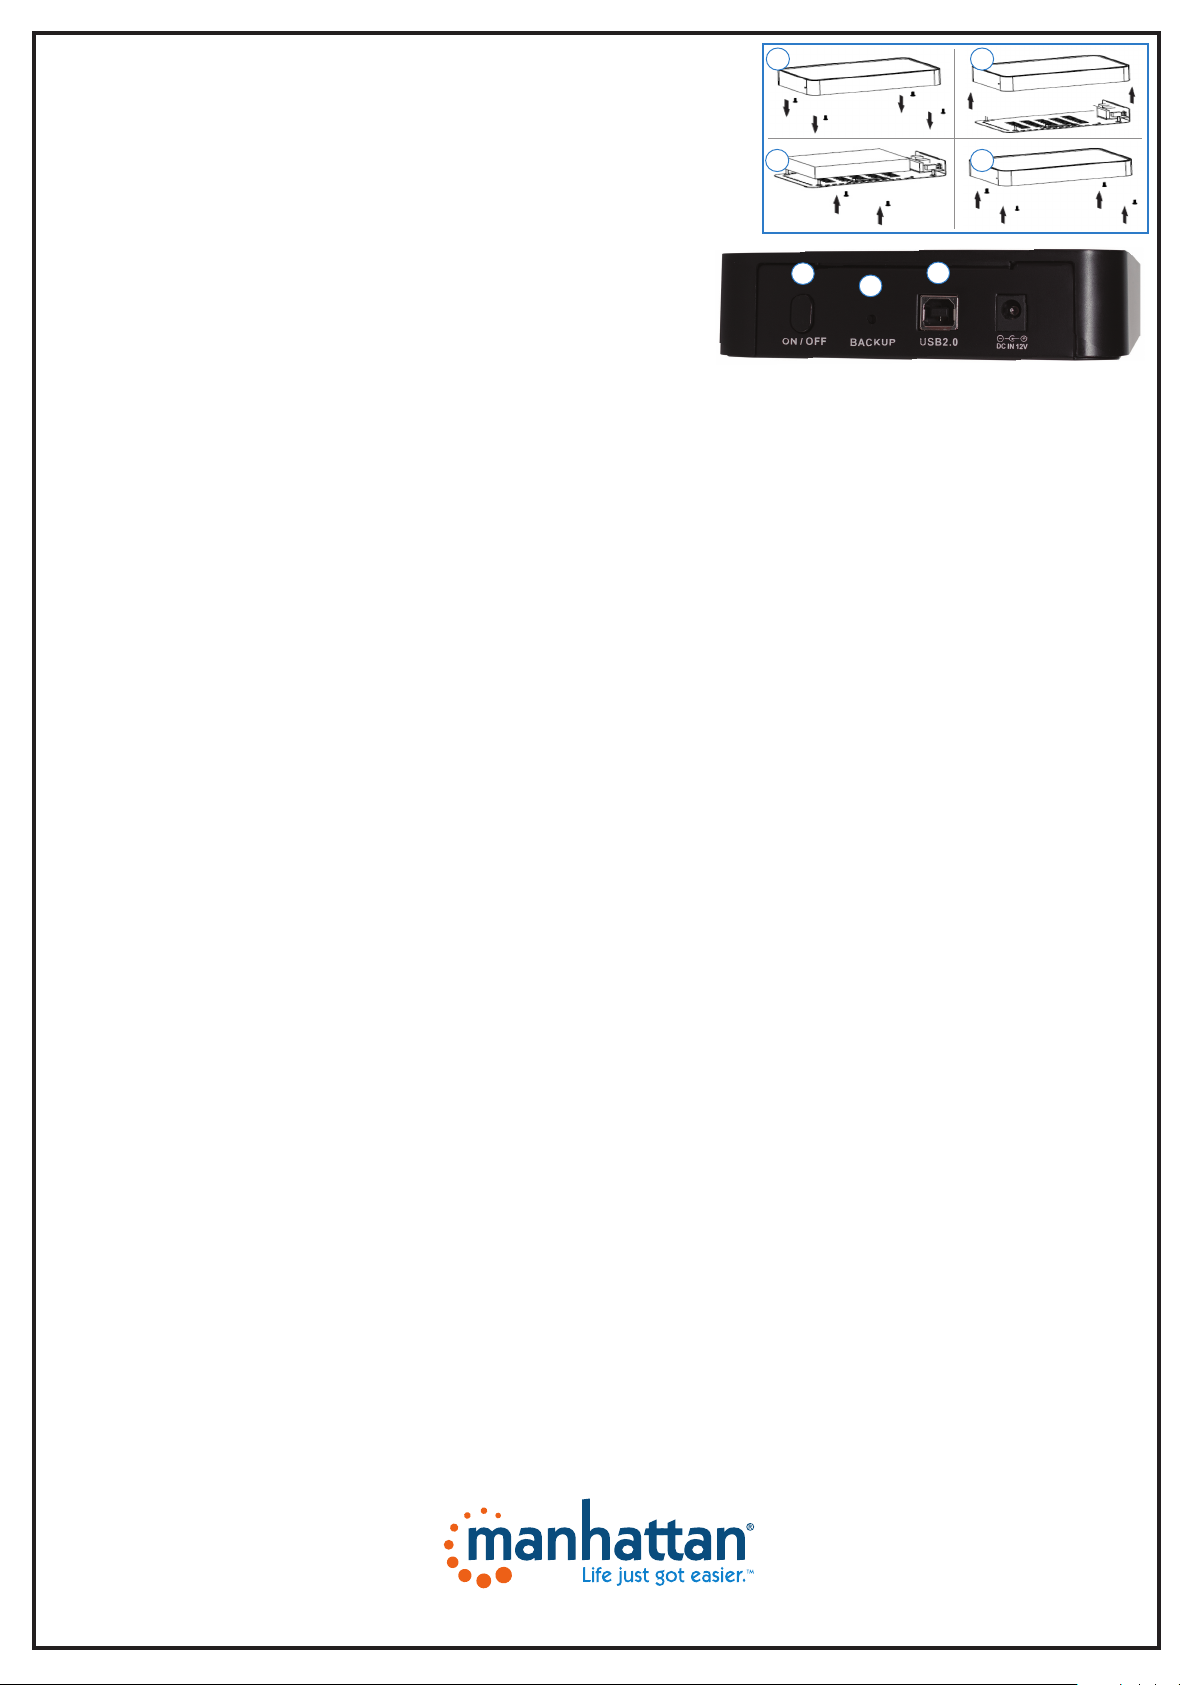
A B
C D
This guid e presents the b asic steps to set up a nd operate this d evice. For
detail ed installati on instructi ons and specifi cations, refe r to the user manual
at manhattan-products.com.
Hardware and Driver Installation
1 Rem ove the 4 screws on th e bottom of the e nclosure (A) and lif t off the
top (B).
2 Conn ect the hard dr ive to the SATA data and power conn ectors on th e
enclosure, then secure it to the enclosure using the included screws (C).
3 Re-assemble the enclosure (D) using the 4 scre ws in Step 1.
4
Using the in cluded USB cabl e, connect the e nclosure (E) to a USB por t on
the computer.
5 Pres s the Power butto n (F). Confirm the Power LED l ights.
Your system w ill automatical ly detect the n ew hardware and co mplete the
setup, con firmed when “US B Mass Storage Dev ice” displays in th e Device
Manager folder.
Software Installation
Note: This s oftware do esn’t suppor t Mac operati ng systems.
DEUTSCH – Festplattengehäuse
Diese Kurzanleitung zeigt die grundlegenden Schritte
zur Einrichtung und Inbetriebnahme dieses Geräts.
Für genaue re Anweisungen nu tzen Sie bitt e das
Handbuch, verfügbar auf manhattan-products.com.
Hardware- und Treiberinstallation
1 Ent fernen Sie die 4 S chrauben an der U nterseite des
Gehäuse s (A) und nehmen Sie di e Oberseite a b (B).
2 Sch ließen Sie die Fes tplatte an die SATA-Dat en- und
Stromsteckverbinder des Gehäuses an, dann fixieren
Sie sie mit de n beiliegen den Schrauben (C).
3 Se tzen Sie das Geh äuse (D) mit den 4 Schrau ben aus
Schrit t 1 wieder zusam men.
4
Schließ en Sie das Gehäus e (E) mit dem beiliegenden
USB-K abel an den USB- Port Ihres PC s an.
5 Dr ücken Sie den Net zschalter (F). Pr üfen Sie, ob die
Power-LED leuchtet.
Sobald d as Laufwerk a n Ihren PC angesch lossen ist,
erkennt Ih r System die neue Ha rdware automati sch
und führt die Installation durch. Anschließend
befindet sich der Eintrag “USB-Massenspeicher” in der
Gerätemanager-Liste.
Softwareinstallation
Hinweis: Die “One-Touch Copy”-Eigenschaft wird auf
Mac-Systemen nicht unterstützt.
1 Legen Si e die beiliege nde Softw are-CD ein . Der PC
Clone Installationsassistent startet automatisch .
Hinweis: Is t dies nicht der Fall, k önnen Sie ihn übe r
die Datei “setup.exe” starten.
2 Kl icken Sie auf Installieren.
3 Wenn die Lizenzvereinbarung eingeblendet wird,
klicken Si e auf Weiter.
4 Kl icken Sie erneut a uf Installieren.
5 Wenn die Meldung Installation abgeschlossen
ersche int, klicken Sie a uf OK.
6 Do ppelklicken S ie auf das Symbol PC C lone EX auf
Ihrem Des ktop, um das Prog ramm zu start en (oder
über Star t / Programme / P C Clone EX LIte).
Dateisicherung
1 Wenn d as Backup-P rogramm geöff net ist und der
Startbildschirm erscheint, wählen Sie das
Zielver zeichnis, dan n klicken Sie auf Sav e.
2 Wenn das erste Backup-Bestätigungsfenster
eingeblendet wird, klicken Sie auf Ja.
3 Wenn Sie die zweite Backup-Bestätigung erhalten,
klicken Si e auf OK oder drücken S ie die Backup-
Taste am Festplattengehäuse.
4 Wenn die “Completed without Error”-Nachricht
ersche int, klicken Sie a uf Schließen, um den Backup-
Vorgang abzuschließen.
• Sobald Sie Ihre Backup-Optionen ausgewählt haben,
können Sie e infach die Back up-Taste am Festplat ten-
gehäuse (G) d rücken, um Datei en zu kopieren.
FRANÇAIS – Boîtier pour lecteur de disque
Ce guide dé crit les bases p our configurer e t utiliser cet app areil. Pour des
instructions et spécifications détaillées, veuillez lire le manuel de
l’utilisateur, disponible sur manhattan-products.com.
Installation matériel et pilote
1 Dév issez les 4 vis au de ssous du boîti er (A) et soulevez l e surface (B).
2
Connec tez le disque dur au x connecteur s de donnés et ali mentation
SATA
dans le boî tier, puis fixez le ave c les vis incluse s (C).
3 Uti lisez les 4 vis de l ’étape 1 pour assem bler le boîti er (D).
4 Uti lisez le câble US B inclus pour conn ecter le boî tier (E) au port U SB de
votre ordinateur.
5 Appuyez s ur le bouton marc he/arrêt (F). Confirm ez que la DEL est al lumée.
Dès que le B oîtier est conn ecté à votre ord inateur, votre syst ème identifie
et installe le pilote automatiquement. Après que l’installation soit
complèt e, l’entrée “Appareil U SB de mémoire de ma sse” apparaî t dans la
liste du Gestionnaire du périphérique.
Software Installation
Remarqu e: Cette fonc tion (copie en une tou che) non prise en ch arge par
les systèmes Mac.
1 Ins érez le CD de logic iel inclus. L’assistant d ’installatio n PC Clone
s’affiche auto matiquement . Remarque: Si ce n’est p as le cas, vous
pouvez l ’accéder via le fichi er “setup.exe”.
2 Cli quez sur Installer.
3 Qua nd le Contrat de Lic ense s’affiche, cliqu ez sur Prochain pour
continuer.
4 Cli quez sur Installer à nouveau.
5 Qua nd le message In stallation Com plète s’affiche, cli quez sur OK pour
quitter.
6
Quand le symbole PC Clone EX s’affiche sur le bureau, double-cliquez-le
pour lanc er le programe (ou a ccédez-le vi a Démarrer / Prog rammes /
PC Clone E X LIte).
Archiver des fichiers
1 Qua nd le programm e d’archivage es t ouvert et l’écr an initial s’affiche,
sélec tionnez où vous vo udriez sauve garder vos donn és, puis clique z
sur Enregistrer.
2 Quand le premier message de confirmation sur l’archivage s’affiche,
cliquez su r Oui.
3 Quand le deuxième message de confirmation sur l’archivage s’affiche,
cliquez su r OK ou appuyez sur le b outon Backup su r le boîtier.
6 Quand le message “Completed without Error” s’affiche, cliquez sur
Fermer pour finir le pro cessus d’archiva ge.
• Dès que vous avez séle ctionné vos options d’arc hivage, vous pouvez
simplem ent appuyer sur l e boîtier (G) pour co pier des fichier s.
1
Load the in cluded soft ware CD. The PC Clo ne setup
wizard w ill automatica lly display. Note: If th e wizard
doesn’t s how, you can open it th rough the “setup. exe”
file on your desktop.
2 Click Install.
3 Wh en the License Agre ement display s, click Agree to
continue.
4 Click Install again.
5 Wh en the Installat ion Complete me ssage displays , click
OK to exit.
6 Wh en the PC Clone EX ic on displays on the d esktop,
double -click it to lau nch the program (or g o to Start / Progr ams / PC
Clone EX LI te on your deskt op).
Backing Up Files
1 Wh en the backup pro gram is opene d and the initial sc reen displays,
se lect where yo u want to store your d ata, then click S ave.
2 Wh en prompted wit h the first backu p confirmation wi ndow, click Yes .
ESPAÑOL – Gabinete para Disco Duro
Esta guí a presenta los pa sos básicos para i nstalar este
disposit ivo. Para ver una hoj a de datos con la list a completa
de carac terísticas y es pecificacio nes, revise el m anual de
usuario disponible en manhattan-products.com.
Montaje e Instalación del Disco
1 Re tire los 4 tornill os de la parte inf erior del gabin ete
(A) y retire la par te superior (B).
2 Con ecte el disco dur o al conector SATA de datos y
energía en el gabinete, asegúrelo al gabinete
utilizando los tornillos incluidos (C).
3 Ens amble nuevame nte el gabinete (D) uti lizando los 4
tornillos del Paso 1.
4 Uti lice el cable USB in cluido, conec te el gabinete (E) a
un puer to USB en la computa dora.
5
Presione e l botón de encen dido (F). Verifique que e l
LED de encen dido se ilumina
Una vez que e l gabinete esta co nectado a la Pc , el
sistema detectara automáticamente el nuevo hardware
y complet ará la instala ción, confirme qu e en el
adminis trador de disp ositivos se mues tre “USB Mass
Storage Device”.
Instalación del Software
Nota: La c aracteríst ica de copia con un s olo toque no es
soportada en sistemas Mac.
1 Inser te el CD del soft ware incluid o. El asistente de
instala ción para PC Clon e se mostrará e n pantalla. Not a:
POLSKI – Obudowa do dysków
Ta instrukcja pr zedstawia p odstawowe kro ki konfigurac ji i obsługi
urządzenia. Szczegółowe instrukcje instalacji i specyfikacji można znaleźć
na stronie manhattan-products.com.
Podłączenie oraz instalacja sterownika
1 Od kręć 4 śrubki z najdujące się na sp odniej częśc i obudowy (A),
następn ie zdejmij jej gór ną część (B).
2 Pod łącz dysk tw ardy do portu S ATA oraz zasila nia w obudowie,
następnie przykręć dysk do obudowy używając dołączonych śrubek (C).
3 Załóż górną część obudowy (D) i zabezpi ecz ją śrubk ami.
4
Przy uż yciu dołąc zonego kabl a podłącz ob udowę (E) do wolneg o portu
USB komputera.
5
Włącz ur ządzenie p rzyciskie m Power (F). Sprawdź, c zy zapalił a się dioda
sygnalizacyjna.
System auto matycznie w ykryje n owe urządzen ie i zainstalu je odpowiedn ie
sterowniki. Poprawność instalacji można sprawdzić w panelu „Menadżer
urząd zeń” – obudowa poj awi się na liście jak o „Urządzeni e magazynują ce
USB ”.
Instalacja oprogramowania
Uwaga: Op rogramowani e nie jest obsłu giwane prze z systemy Mac.
1
Załaduj dołączoną płytę CD z oprogramowaniem. Automatycznie
powini en zostać wyś wietlony inst alator PC Clone . Uwaga: Jeśli ins talator
nie zostanie wyświetlony automatycznie, uruchom „setup.exe” z
zawar tości pły ty CD
2 Click Install.
3
Zaakcept uj warunki umow y licencyj nej, wciśnij Agree, aby kon tynuować.
4 Ponownie wciśnij Install.
5 Po pojawieniu się komunikatu o zakończeniu instalacji wciśnij OK.
6 Uru chom program z i kony PC Clone EX na pu lpicie (lub z menu S tart ->
Programy -> PC Clo ne EX).
Kopia zapasowa plików
1 Gd y program jest u ruchomiony i w yświetlone j est menu poc zątkowe,
wybie rz docelowe mi ejsce zapisu da nych, a następnie wc iśnij Save.
2
Po pojawieniu się pierwszego komunikatu o wykonaniu kopii wciśnij Yes.
3 Po pojawieniu się drugiego komunikatu o wykonaniu kopii kliknij OK
lub wciśnij przycisk Backup na obudowie.
4 Po po jawieniu się komu nikatu „Comple ted without err or” wciśnij
Close, aby zakońc zyć proces w ykonywani a kopii zapasow ej.
• Po skonfigurowaniu opcji wykonywania kopii, można po prostu wcisnąć
przycisk Backup na obudowie (G) aby skopiowa ć pliki.
.
F
3 Wh en prompted wit h the second Back up confirmatio n, click OK or press
the Backu p button on the e nclosure.
4 Wh en the “Complete d without Error ” message disp lays, click Close to
finish the b ackup operati on.
• Once you’ve se lected your b ackup options , you can simply pr ess the
Backup bu tton on the enc losure (G) to copy files.
.
G
Si el asiste nte no se muestra , puede abrir el a rchivo
“setup.exe” directamente desde el disco de instalación.
2 Haga cli c en Instalar.
3 Cuando aparezca el Acuerdo de Conformidad de la
licencia , haga clic en Acordar para continuar.
4 Haga cli c en Instalar nuevamente.
5 Cuando ap arezca el mens aje de Instala ción
Complet ada, haga clic en Ac eptar para salir.
6
haga dobl e clic para abri r el programa (o hag a clic en
el botó n Inicio / Todos los pro gramas / PC Clone E X Lite).
Respaldo de Archivos
1 Cuando el p rograma para r espaldar este a bierto y se
muestre l a pantalla de ini cio, seleccion e la ubicación
para guar dar sus archivos, y h aga clic en Guardar.
2 Apare cerá un aviso para co nfirmar el resp aldo, haga
clic en Si.
3 Apa recerá un segu ndo aviso para con firmar el
respald o, haga clic en Acepta r o presione el botón
“Backup” del Gabinete.
4 Cuan do se muestre el m ensaje “Compl eted without
Error”, haga c lic en Cerrar para terminar la operación
de respaldo.
•
gabinete (G) para copiar lo s archivos.
E
El icono de PC C lone EX deber á aparecer en el es critorio,
Una vez que haya seleccionado las opciones de respaldo,
puede simplemente presionar el botón “Backup” del
ITALIANO – Box per unità
Questa g uida fornisce gl i elementi basi lari per set tare e far funzi onare la
periferica. Se desiderate dettagliate informazioni in merito alle istruzioni
di instal lazione e le spe cifiche, vi consi gliamo di prend ere visione del
manuale d’istruzione presente sul sito manhattan-products.com.
Installazione dell’hardware e dei driver
1 Rimuovere le 4 viti dal fondo dell’alloggiamento (A) e sollevar e la parte
superiore (B).
2 Coll egare il disco ri gido al connet tore SATA di alimentazion e e dati
dell’allo ggiamento, po i fissare il disco all ’alloggiamen to con le viti in
dotazi one usando il ca cciavite incluso n ella confezio ne (C).
3 Riassembla re l’alloggiamento (D) utiliz zando le 4 viti de llo step 1.
4 Uti lizzare il cavo U SB incluso per col legare il box (E) all a porta USB del
comp uter.
5
Premere il t asto di accensio ne (F). Verificare che il L ED di accensione si
illumini.
Appena il b ox viene connes so al PC, il siste ma automaticam ente rileva
il nuovo hard ware e complet a il settaggi o, confermando q uando l “USB
Mass Stora ge Device” appa re nella carte lla di Gestion e delle Perifer iche.
Installazione del Software
Nota: Ques to software n on support a i sistemi opera tivi Mac.
1
Inserir e il CD incluso conten ente il soft ware. La proced ura guidata di
instal lazione per PC C lone verrà visu alizzata au tomaticamente .
2 Cliccar e Install.
3 Quand o appare l’accordo d i licenza, clicc are Agree per continuare.
4 Cliccar e nuovamente Install.
5
Quando co mparirà sullo s chermo il mess aggio di instal lazione avve nuta,
cliccare OK per uscire.
6 Quand o l’immagine PC Cl one EX verrà vi sualizzata s ulla schermat a del
deskt op, cliccare due vo lte sull’icona p er lanciare il pro gramma (oppure
andare su St art / Programs / P C Clone EX Lite nel v ostro deskto p).
Backup dei file
1 Quand o il programma di b ackup è apert o e viene visualiz zata la
scherma ta iniziale, se lezionare dov e si desidera mem orizzare i d ati,
quindi cliccare su Save.
2 Quand o appare sullo sch ermo la prima ri chiesta di conf erma backup,
cliccare Yes.
3 Qua ndo viene rich iesta la secon da conferma di ba ckup, cliccare OK o
premere i l pulsante di Back up sul dispositi vo.
4 Quando compare il messaggio “Completed without Error”, cliccare
Close per termin are l’operazio ne di backup.
• Dopo aver sel ezionato le opz ioni di backup, è su fficiente preme re il
pulsante B ackup sul dispo sitivo (G) per copiare i fi le.
Important: Read before use. • Importante: Leer antes de usar.
manhattan-products.com
MH-130288-QIG-ML1-0213-02-0
Page 2
WASTE ELECTRICAL & ELECTRONIC EQUIPMENT
Disposal of Electric and Electronic Equipment
(applicable in the European Union and other European countries with separate collection systems)
ENGLISH
This symbol on the product or its packaging indicates that this product
shall not be treated as household waste. Instead, it should
be taken to an applicable collection point for the recycling
of electrical and electronic equipment. By ensuring this
product is disposed of correctly, you will help prevent
potential negative consequences to the environment and
human health, which could otherwise be caused by
inappropriate waste handling of this product. If your equipment
contains easily removable batteries or accumulators, dispose of
these separately according to your local requirements. The
recycling of materials will help to conserve natural resources. For
more detailed information about recycling of this product, contact
your local city office, your household waste disposal service or
the shop where you purchased this product. In countries outside
of the EU: If you wish to discard this product, contact your local
authorities and ask for the correct manner of disposal.
DEUTSCH
Dieses auf dem Produkt oder der Verpackung angebrachte Symbol
zeigt an, dass dieses Produkt nicht mit dem Hausmüll entsorgtwerden
darf. In Übereinstimmung mit der Richtlinie 2002/96/EG des
Europäischen Parlaments und des Rates über Elektro- und
Elektronik-Altgeräte (WEEE) darf dieses Elektrogerät nicht
im normalen Hausmüll oder dem Gelben Sack entsorgt werden.
Wenn Sie dieses Produkt entsorgen möchten, bringen Sie es bitte zur
Verkaufsstelle zurück oder zum Recycling-Sammelpunkt Ihrer Gemeinde.
ESPAÑOL
Este símbolo en el producto o su embalaje indica que el producto
no debe tratarse como residuo doméstico. De conformidad con la
Directiva 2002/96/CE de la UE sobre residuos de aparatos
eléctricos y electrónicos (RAEE), este producto eléctrico no puede
desecharse se con el resto de residuos no clasificados. Deshágase
de este producto devolviéndolo a su punto de venta o a un punto de
recolección municipal para su reciclaje.
FRANÇAIS
Ce symbole sur Ie produit ou son emballage signifie que ce
produit ne doit pas être traité comme un déchet ménager.
Conformément à la Directive 2002/96/EC sur les déchets
d’équipements électriques et électroniques (DEEE), ce produit
électrique ne doit en aucun cas être mis au rebut sous forme de
déchet municipal non trié. Veuillez vous débarrasser de ce
produit en Ie renvoyant à son point de vente ou au point de
ramassage local dans votre municipalité, à des fins de recyclage.
WARRANTY INFORMATION
ENGLISH —
DEUTSCH —
ESPAÑOL —
FRANÇAIS —
warranty.
POLSKI —
ITALIANO —
EN MÉXICO: Póliza de Garantía Manhattan — Datos del importador y responsable ante el consumidor
IC Intracom México, S.A.P.I. de C.V. • Av. Interceptor Poniente # 73, Col. Parque Industrial La Joya, Cuautitlán
Izcalli, Estado de México, C.P. 54730, México. • Tel. (55)1500-4500
La presente garantía cubre los siguientes productos contra cualquier defecto de fabricación en sus
materiales y mano de obra.
A. Garantizamos los productos de limpieza, aire comprimido y consumibles, por 60 dias a partir de la fecha
de entrega, o por el tiempo en que se agote totalmente su contenido por su propia función de uso,
lo que suceda primero.
B. Garantizamos los productos con partes móviles por 3 años.
For warranty information, go to manhattan-products.com/warranty.
Garantieinformationen finden Sie unter manhattan-products.com/warranty.
Si desea obtener información sobre la garantía, visite manhattan-products.com/warranty.
Pour consulter les informations sur la garantie, visitez manhattan-products.com/
Informacje dotyczące gwarancji znajdują się na stronie.manhattan-products.com/warranty.
Per informazioni sulla garanzia, accedere a manhattan-products.com/warranty.
ITALIANO
Questo simbolo sui prodotto o sulla relativa confezione indica che il
prodotto non va trattato come un rifiuto domestico. In ottemperanza
alla Direttiva UE 2002/96/EC sui rifiuti di apparecchiature elettriche
ed elettroniche (RAEE), questa prodotto elettrico non deve essere
smaltito come rifiuto municipale misto. Si prega di smaltire il prodotto
riportandolo al punto vendita o al punto di raccolta municipale locale
per un opportuno riciclaggio.
POLSKI
Jeśli na produkcie lub jego opakowaniu umieszczono ten symbol,
wówczas w czasie utylizacji nie wolno wyrzucać tego produktu wraz
z odpadami komunalnymi. Zgodnie z Dyrektywą Nr 2002/96/WE
w sprawie zużytego sprzętu elektrycznego i elektronicznego (WEEE),
niniejszego produktu elektrycznego nie wolno usuwać jako nie
posortowanego odpadu komunalnego. Prosimy o usuniecie
niniejszego produktu poprzez jego zwrot do punktu zakupu
lub oddanie do miejscowego komunalnego punktu zbiórki
odpadów przeznaczonych do recyklingu.
C. Garantizamos los demás productos por 5 años (productos sin partes móviles), bajo las siguientes
condiciones:
1. Todos los productos a que se refiere esta garantía, ampara su cambio físico, sin ningún cargo para
el consumidor.
2. El comercializador no tiene talleres de servicio, debido a que los productos que se garantizan no
cuentan con reparaciones, ni refacciones, ya que su garantía es de cambio físico.
3. La garantía cubre exclusivamente aquellas partes, equipos o sub-ensambles que hayan sido instaladas
de fábrica y no incluye en ningún caso el equipo adicional o cualesquiera que hayan sido adicionados
al mismo por el usuario o distribuidor.
Para hacer efectiva esta garantía bastará con presentar el producto al distribuidor en el domicilio donde
fue adquirido o en el domicilio de IC Intracom México, S.A.P.I. de C.V., junto con los accesorios contenidos
en su empaque, acompañado de su póliza debidamente llenada y sellada por la casa vendedora
(indispensable el sello y fecha de compra) donde lo adquirió, o bien, la factura o ticket de compra
original donde se mencione claramente el modelo, número de serie (cuando aplique) y fecha de
adquisición. Esta garantía no es válida en los siguientes casos: Si el producto se hubiese utilizado
en condiciones distintas a las normales; si el producto no ha sido operado conforme a los instructivos
de uso; o si el producto ha sido alterado o tratado de ser reparado por el consumidor o terceras personas.
REGULATORY STATEMENTS
FCC Class B
This equipment has been tested and found to comply with the limits for a Class B digital device, pursuant
to Part 15 of Federal Communications Commission (FCC) Rules. These limits are designed to provide
reasonable protection against harmful interference in a residential installation. This equipment
generates, uses and can radiate radio frequency energy, and if not installed and used in accordance
with the instructions may cause harmful interference to radio communications. However, there is
no guarantee that interference will not occur in a particular installation. If this equipment does
cause harmful interference to radio or television reception, which can be determined by turning the
equipment off and on, the user is encouraged to try to correct the interference by one or more of
the following measures: reorient or relocate the receiving antenna; increase the separation between
the equipment and the receiver; connect the equipment to an outlet on a circuit different from the
receiver; or consult the dealer or an experienced radio/TV technician for help.
North & S outh Americ a
IC Intracom Americas
550 Commerce Blvd.
Oldsmar, FL 34 677
USA
All trademarks and trade names are the property of their respective owners.
Alle Marken und Markennamen sind Eigentum Ihrer jeweiligen Inhaber.
Todas las marcas y nombres comerciales son propiedad de sus respectivos dueños.
Toutes les marques et noms commerciaux sont la propriété de leurs propriétaires respectifs.
Tutti i marchi registrati e le dominazioni commerciali sono di proprietà dei loro rispettivi proprietari.
Wszystkie znaki towarowe i nazwy handlowe należą do ich właścicieli.
Asia & Afr ica
IC Intraco m Asia
Far Easter n Technology Cent er
7-F No. 125, Sect ion 2, Da Tong Rd.
Shijr, Taipei
Taiwan, ROC
R&TTE
English: This device complies with the requirements of R&TTE Directive 1999/5/EC.
The Declaration of Conformity for this product is available at:
Deutsch: Dieses Gerät enspricht der Direktive R&TTE Direktive 1999/5/EC.
Die Konformitätserklärung für dieses Produkt finden Sie unter:
Español: Este dispositivo cumple con los requerimientos de la Directiva R&TTE 1999/5/EC.
La declaración de conformidad para este producto esta disponible en:
Français: Cet appareil satisfait aux exigences de la directive R&TTE 1999/5/CE.
La Déclaration de Conformité pour ce produit est disponible à l’adresset :
Polski: Urządzenie spełnia wymagania dyrektywy R&TTE 1999/5/EC.
Deklaracja zgodności dostępna jest na stronie internetowej producenta:
Italiano: Questo dispositivo è conforme alla Direttiva 1999/5/EC R&TTE.
La dichiarazione di conformità per questo prodotto è disponibile al:
manhattan-products.com
Europe
IC Intracom Europe
Löhbach er Str. 7
D-58553 Halver
Germany
Printed on recycled paper.
manhattan-products.com
© IC Intracom. All rights reserved. Manhattan is a trademark of IC Intracom, registered in the U.S. and other countries.
 Loading...