

Page 1

mangOH™ Red
Getting Started—WPx5xx +
Linux Dev Machine + CLI
41110481
Rev 2
Contents subject to change
Page 2

mangOH Red Getting Started
Important
Notice
Limitation of
Liability
Due to the nature of wireless communications, transmission and reception of data can
never be guaranteed. Data may be delayed, corrupted (i.e., have errors) or be totally
lost. Although significant delays or losses of data are rare when wireless devices such
as the Sierra Wireless modem are used in a normal manner with a well-constructed
network, the Sierra Wireless modem should not be used in situations where failure to
transmit or receive data could result in damage of any kind to the user or any other
party, including but not limited to personal injury, death, or loss of property. Sierra
Wireless accepts no responsibility for damages of any kind resulting from delays or
errors in data transmitted or received using the Sierra Wireless modem, or for failure
of the Sierra Wireless modem to transmit or receive such data.
The information in this manual is subject to change without notice and does not
represent a commitment on the part of Sierra Wireless. SIERRA WIRELESS AND ITS
AFFILIATES SPECIFICALLY DISCLAIM LIABILITY FOR ANY AND ALL DIRECT,
INDIRECT, SPECIAL, GENERAL, INCIDENTAL, CONSEQUENTIAL, PUNITIVE OR
EXEMPLARY DAMAGES INCLUDING, BUT NOT LIMITED TO, LOSS OF PROFITS
OR REVENUE OR ANTICIPATED PROFITS OR REVENUE ARISING OUT OF THE
USE OR INABILITY TO USE ANY SIERRA WIRELESS PRODUCT, EVEN IF
SIERRA WIRELESS AND/OR ITS AFFILIATES HAS BEEN ADVISED OF THE
POSSIBILITY OF SUCH DAMAGES OR THEY ARE FORESEEABLE OR FOR
CLAIMS BY ANY THIRD PARTY.
Notwithstanding the foregoing, in no event shall Sierra Wireless and/or its affiliates
aggregate liability arising under or in connection with the Sierra Wireless product,
regardless of the number of events, occurrences, or claims giving rise to liability, be in
excess of the price paid by the purchaser for the Sierra Wireless product.
Patents This product may contain technology developed by or for Sierra Wireless Inc.
This document contains information which is proprietary to Sierra Wireless Inc. and is
licensed pursuant to Creative Commons Attribution 4.0 International License.
Document
details
Title: mangOH Red Getting Started —WPx5xx + Linux Dev Machine + CLI
Author: Sierra Wireless
Source: http://mangoh.io/
Copyright © August 23, 2017 Sierra Wireless. Licensed under the Creative Commons Attribution
4.0 license, http://creativecommons.org/licenses/by/4.0/
Disclaimer Indicate any modifications made to the original document.
Trademarks mangOH™ and the mangOH logo are trademarks of Sierra Wireless.
Other trademarks are the property of their respective owners.
Rev 2 8/23/17 2 41110481
Page 3

Revision
History
Preface
Revision
number
1 August 2017 Document created
Release date Changes
Rev 2 8/23/17 3 41110481
Page 4

Contents
Getting Started . . . . . . . . . . . . . . . . . . . . . . . . . . . . . . . . . . . . . . . . . . . . . . . . . . . . . . . . . . . . 6
Minimum System Requirements . . . . . . . . . . . . . . . . . . . . . . . . . . . . . . . . . . . . . . . . . . . . . 6
Quick Start Contents . . . . . . . . . . . . . . . . . . . . . . . . . . . . . . . . . . . . . . . . . . . . . . . . . . . . . . 6
Before You Begin . . . . . . . . . . . . . . . . . . . . . . . . . . . . . . . . . . . . . . . . . . . . . . . . . . . . . . . . . . 8
Set Up Your mangOH Red Hardware. . . . . . . . . . . . . . . . . . . . . . . . . . . . . . . . . . . . . . . . . . . 9
mangOH Layout. . . . . . . . . . . . . . . . . . . . . . . . . . . . . . . . . . . . . . . . . . . . . . . . . . . . . . . . . . 9
Hardware Setup. . . . . . . . . . . . . . . . . . . . . . . . . . . . . . . . . . . . . . . . . . . . . . . . . . . . . . . . . 10
Prepare Your Linux Dev Machine For Legato Development. . . . . . . . . . . . . . . . . . . . . . . 17
Prepare Dev Machine For Application Development. . . . . . . . . . . . . . . . . . . . . . . . . . . . . 17
Build and Install the Development Environment . . . . . . . . . . . . . . . . . . . . . . . . . . . . . . . . 17
Prepare Your mangOH Red For Development . . . . . . . . . . . . . . . . . . . . . . . . . . . . . . . . . . 23
Build and Install Legato Platform and mangOH Red Platform on Target . . . . . . . . . . . . . 23
How to Update Module Firmware . . . . . . . . . . . . . . . . . . . . . . . . . . . . . . . . . . . . . . . . . . . 26
Connect To Mobile Networks. . . . . . . . . . . . . . . . . . . . . . . . . . . . . . . . . . . . . . . . . . . . . . . . 29
Connect To a Mobile Network . . . . . . . . . . . . . . . . . . . . . . . . . . . . . . . . . . . . . . . . . . . . . . 29
Connect to the IoT Cloud . . . . . . . . . . . . . . . . . . . . . . . . . . . . . . . . . . . . . . . . . . . . . . . . . . . 34
Register and connect to AirVantage . . . . . . . . . . . . . . . . . . . . . . . . . . . . . . . . . . . . . . . . . 34
Register with AirVantage . . . . . . . . . . . . . . . . . . . . . . . . . . . . . . . . . . . . . . . . . . . . . . . .34
Connect to AirVantage . . . . . . . . . . . . . . . . . . . . . . . . . . . . . . . . . . . . . . . . . . . . . . . . .38
Rev 2 8/23/17 4 41110481
Page 5

Contents
Develop and Test applications. . . . . . . . . . . . . . . . . . . . . . . . . . . . . . . . . . . . . . . . . . . . . . . 42
Develop using the CLI—Command Line Inte rpreter . . . . . . . . . . . . . . . . . . . . . . . . . . . . . 42
Configure the Dev Machine’s Terminal Windows for Development . . . . . . . . . . . . . . .42
Update an Installed Application . . . . . . . . . . . . . . . . . . . . . . . . . . . . . . . . . . . . . . . . . . .43
Update and Install a New Application . . . . . . . . . . . . . . . . . . . . . . . . . . . . . . . . . . . . . .47
Update Legato Application Framework. . . . . . . . . . . . . . . . . . . . . . . . . . . . . . . . . . . . . . . . 50
Update the Legato AF on Your Dev Machine . . . . . . . . . . . . . . . . . . . . . . . . . . . . . . . . . . 50
Tips. . . . . . . . . . . . . . . . . . . . . . . . . . . . . . . . . . . . . . . . . . . . . . . . . . . . . . . . . . . . . . . . . . . . . 53
Finding your SIM’s APN. . . . . . . . . . . . . . . . . . . . . . . . . . . . . . . . . . . . . . . . . . . . . . . . . . . 53
Using the Linux Terminal program. . . . . . . . . . . . . . . . . . . . . . . . . . . . . . . . . . . . . . . . . . . 53
Useful commands for this tutorial (and more) . . . . . . . . . . . . . . . . . . . . . . . . . . . . . . . . . . 54
Definitions . . . . . . . . . . . . . . . . . . . . . . . . . . . . . . . . . . . . . . . . . . . . . . . . . . . . . . . . . . . . . 55
Rev 2 8/23/17 5 41110481
Page 6
1: Getting Started
Now that you have your mangOH™ Red, it’s time to start using it.
Important: Use this guide only if you are using a native Linux development system (Ubuntu
is recommended).
This guide includes instructions for native Linux® development machines using CLI (Command
Line Interpreter).
This Getting Started guide takes you from assembling your mangOH Red and setting
up your computer for mangOH development, through to installing and running
applications and sending data to the IoT Cloud via AirVantage, Sierra Wireless’ cloudbased services platform for over-the-air (OTA) device management.
To get started with Windows systems, or for other mangOH Red resources (guides,
tutorials, etc.), visit mangoh.io/mangoh-red-resources.
1.1 Minimum System Requirements
1
Make sure your computer meets the minimum suggested requirements for application
development with the mangOH Red.
Table 1-1: Minimum System Requirements
Linux
O/S Ubuntu 16.04
CPU Dual core @ 2.6 GHz
RAM 4GB
HDD 10 GB free space
Note: The instructions in this guide have been tested on Ubuntu 16.04. If you choose to use a
different distribution (e.g. Debian, Fedora, etc.), you may need to adjust commands, set
permissions, etc. If you need assistance, please check out the forum at forum.mangoh.io.
1.2 Quick Start Contents
Important: Carefully follow the procedures as described—each section builds on earlier
procedures and results. If you skip steps or use alternate methods, you may have difficulty
completing the tutorial.
Rev 2 8/23/17 6 41110481
Page 7

This quick start guide includes:
• Before You Begin on page 8
• Step-by-step tutorial:
· Set Up Your mangOH Red Hardware on page 9
· Prepare Your Linux Dev Machine For Legato Development on page 17
· Prepare Your mangOH Red For Development on page 23
· Develop and Test applications on page 42Connect To Mobile Networks on
page 29
· Connect to the IoT Cloud on page 34
• Things to do after the tutorial:
· Develop and Test applications on page 42
· Update Legato Application Framework on page 50
• Tips on page 53
Rev 2 8/23/17 7 41110481
Page 8
2: Before You Begin
Before you begin, here are a few items that you might find helpful:
• Some terminology:
· "CF3"—The mangOH Red supports CF3 (Common Form Factor) embedded
modules, such as the WP8548 and HL8548.
Throughout this tutorial, "CF3" refers to the module that comes with your
mangOH Red kit.
· "Dev(elopment) machine"— Your Linux computer
· "Target"—The CF3 module in your mangOH Red.
• Some symbols:
· ’$’, ’#’— Command prompts.
· ’$’—Command prompt when you are logged in to a device as a regular
user.
· ’#’—Command prompt when you are logged in as the ’root’ user.
Note: In the examples in this document, you will be logged in as a regular user on
your dev machine (command prompt will be ’$’), and logged in as the root user on
the target (command prompt will be ’#’).
· ’~’, "$HOME"—Your ’home directory’ on your dev machine.
• Command examples— Many steps in this guide require you to enter commands in
a terminal window. These commands are shown like this:
$ ping 192.168.2.2
# cd ~
2
Note: You can copy commands from this guide and paste them in to your terminal
window to save time and avoid typing errors. Do not include the command prompt
when you copy/enter commands. (In the first example above, you would enter "ping
192.168.2.2", not "$ ping 192.168.2.2".)
• CF3 module default credentials and IP address (used to connect to the target
from the dev machine):
· USB ECM IP address—192.168.2.2
· User name—root
· Password—<none>
• Terminal window tips:
· Shortcut to open a terminal window (on the default Unity desktop used in
Ubuntu Linux)— Ctrl+Alt+T
· Cancel command to break out of a running process— Ctrl+C
· minicom exit command— Ctrl+A, then press X
Rev 2 8/23/17 8 41110481
Page 9

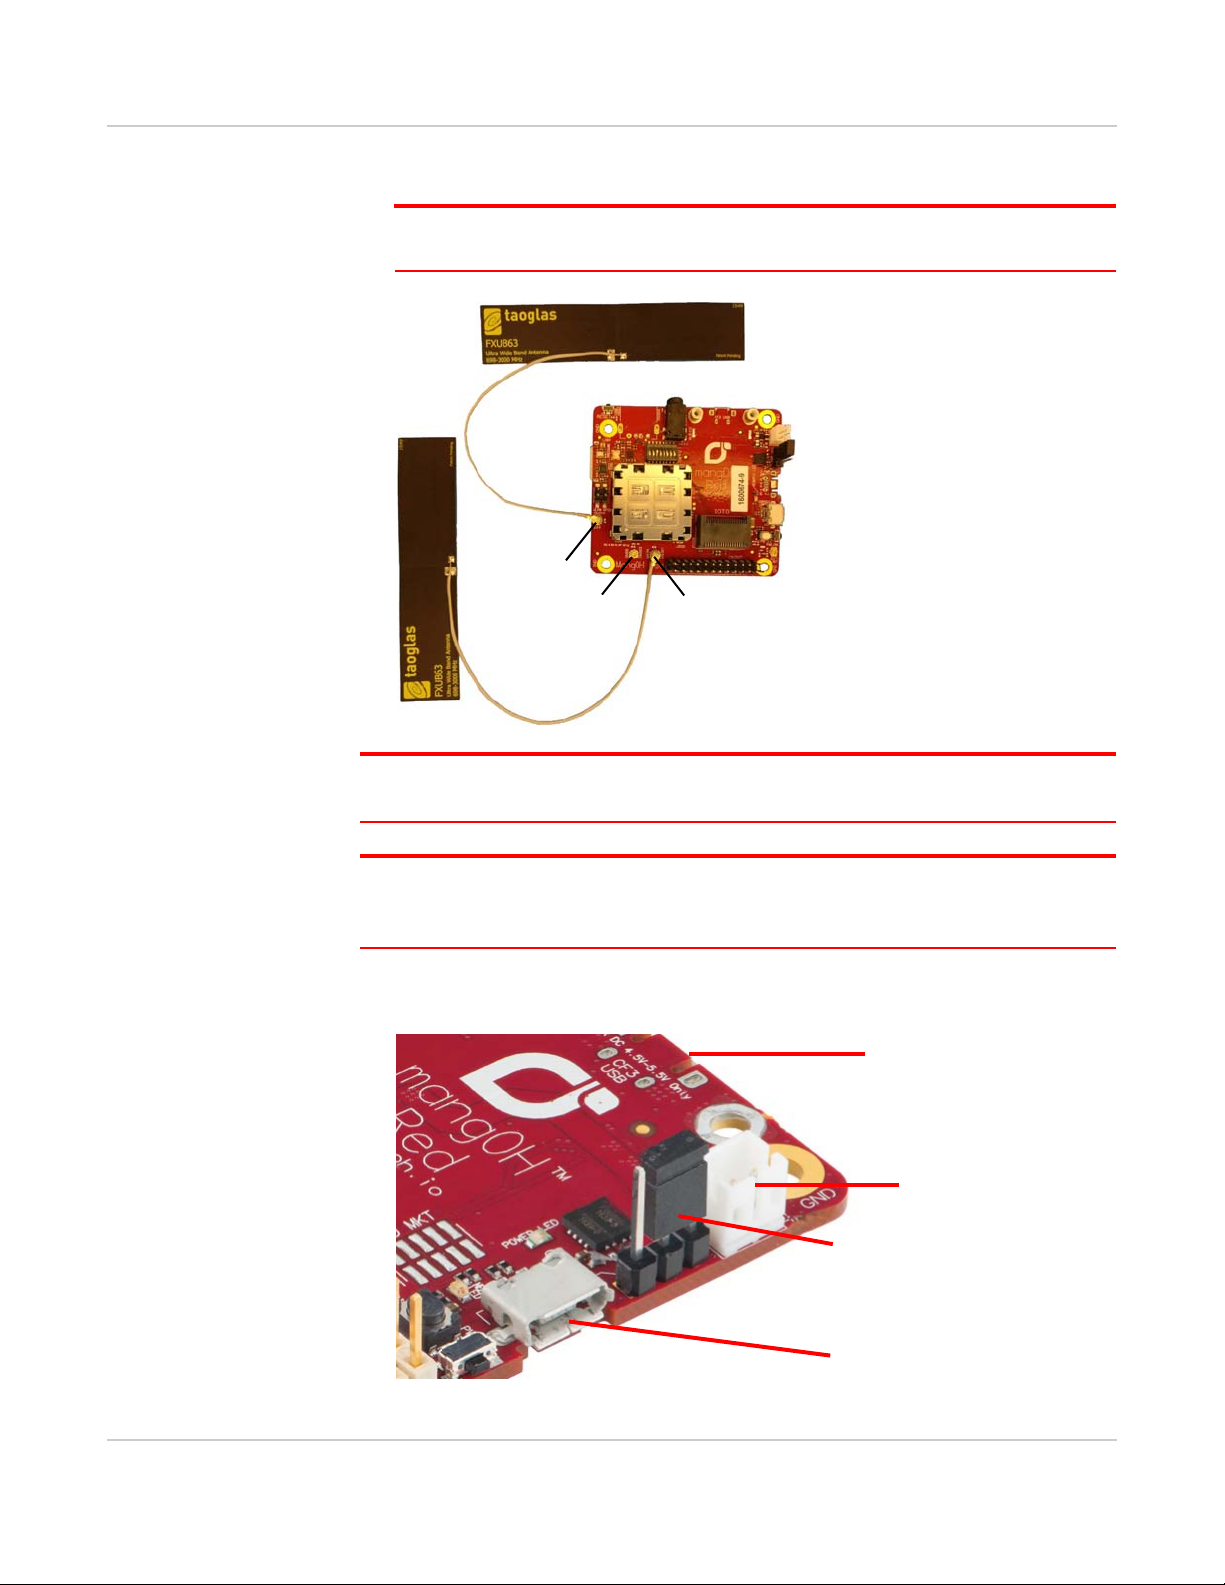
3: Set Up Your mangOH Red Hardware
CF3 USB connector
(bottom side of board)
CONSOLE USB connector
Power Header
and jumper
SIM card slot
(bottom side of board)
SW401 dipswitches
Module slot
Diversity antenna
connector
Main antenna
connector
In this chapter, you will set up your mangOH Red to begin developing applications.
A typical mangOH Red kit includes:
• mangOH Red board
• CF3 (Common Form Factor) module, cover, and release tool
• micro-USB cables (2)
• Antenna (main)
• Antenna (diversity)— Included if the CF3 module supports LTE
• Sierra Wireless micro-SIM
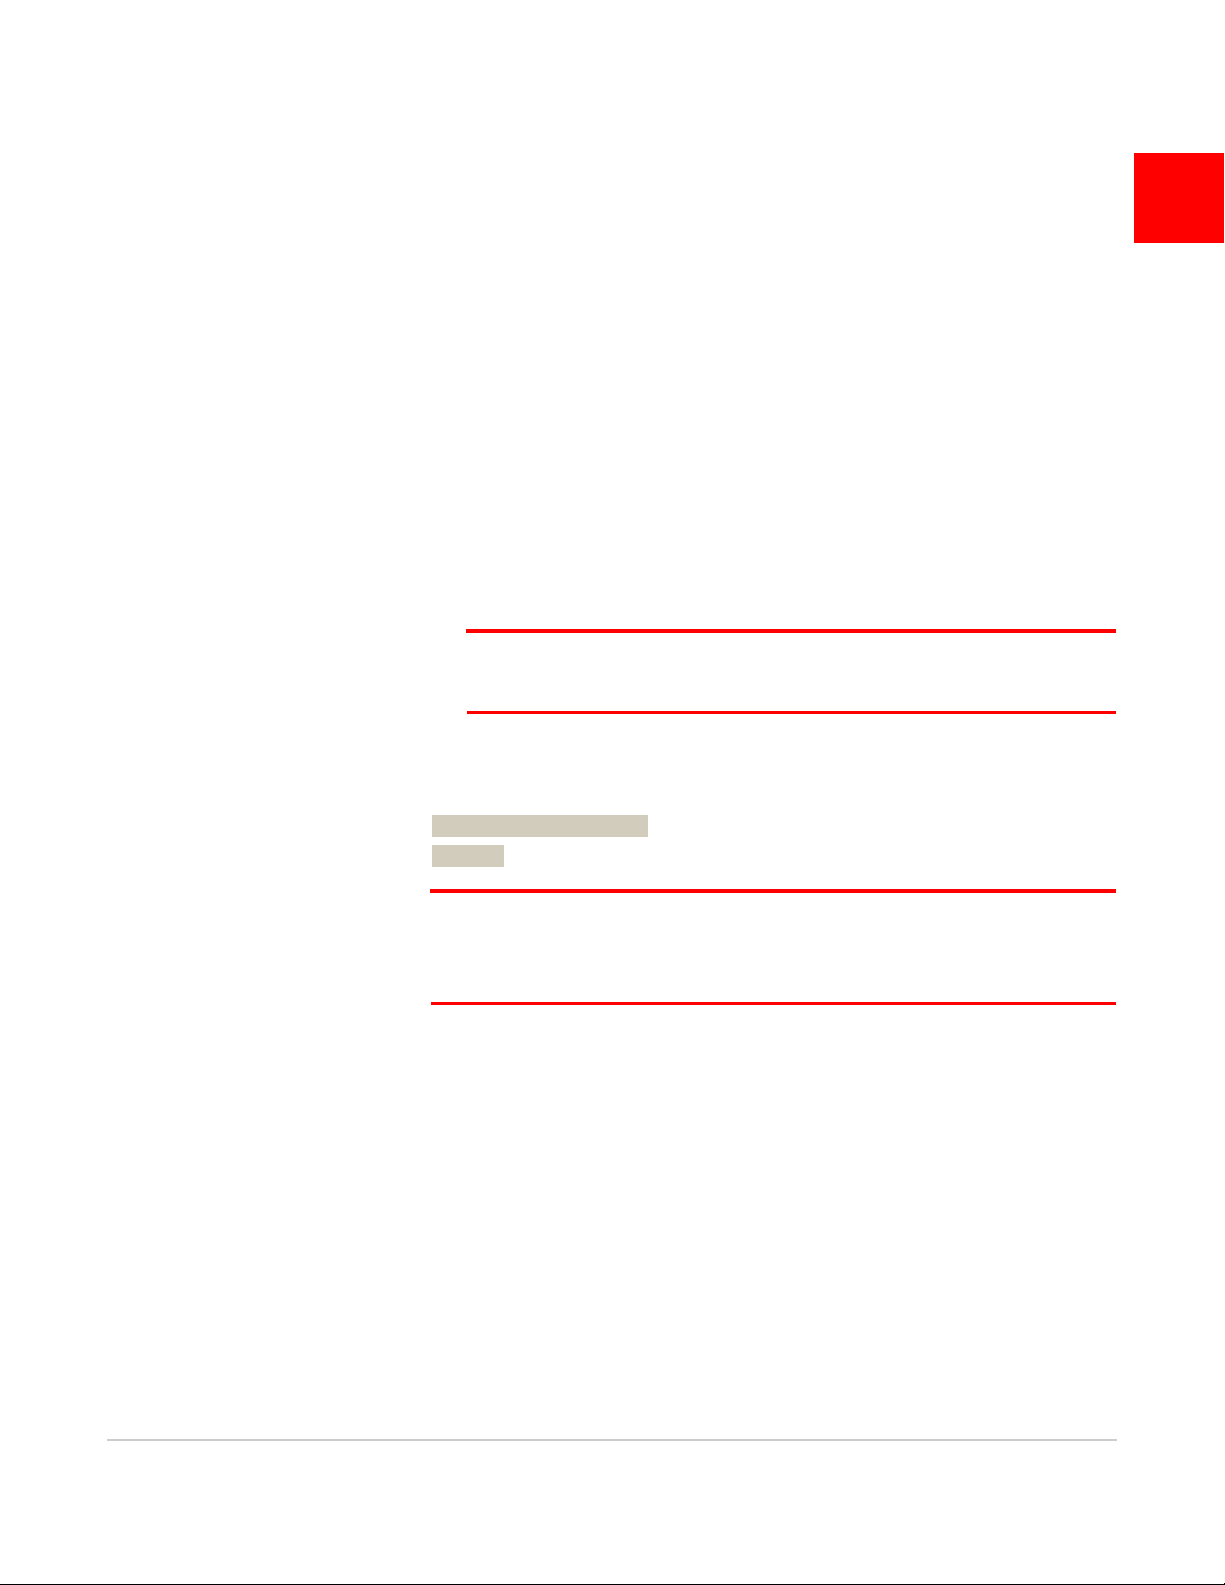
3.1 mangOH Layout
The following image indicates where you will connect typical kit components to the
mangOH Red— follow the instructions in Hardware Setup on page 10 for the proper
setup procedure.
3
Rev 2 8/23/17 9 41110481
Page 10
mangOH Red Getting Started
The triangle on the label
matches the position of the
triangle on the socket.
The triangle on the label
matches the position of the
circle on the cover.
3.2 Hardware Setup
To set up the mangOH Red board:
1. Insert the CF3 module— Hold the module above the socket and line up the
triangles on the module and socket. The module will drop straight into the socket.
(Position matters!)
2. Hold the module cover over the module and line up the circle on the cover with
the triangle on the label, then press the cover (on the edges) into place.
Rev 2 8/23/17 10 41110481
Page 11
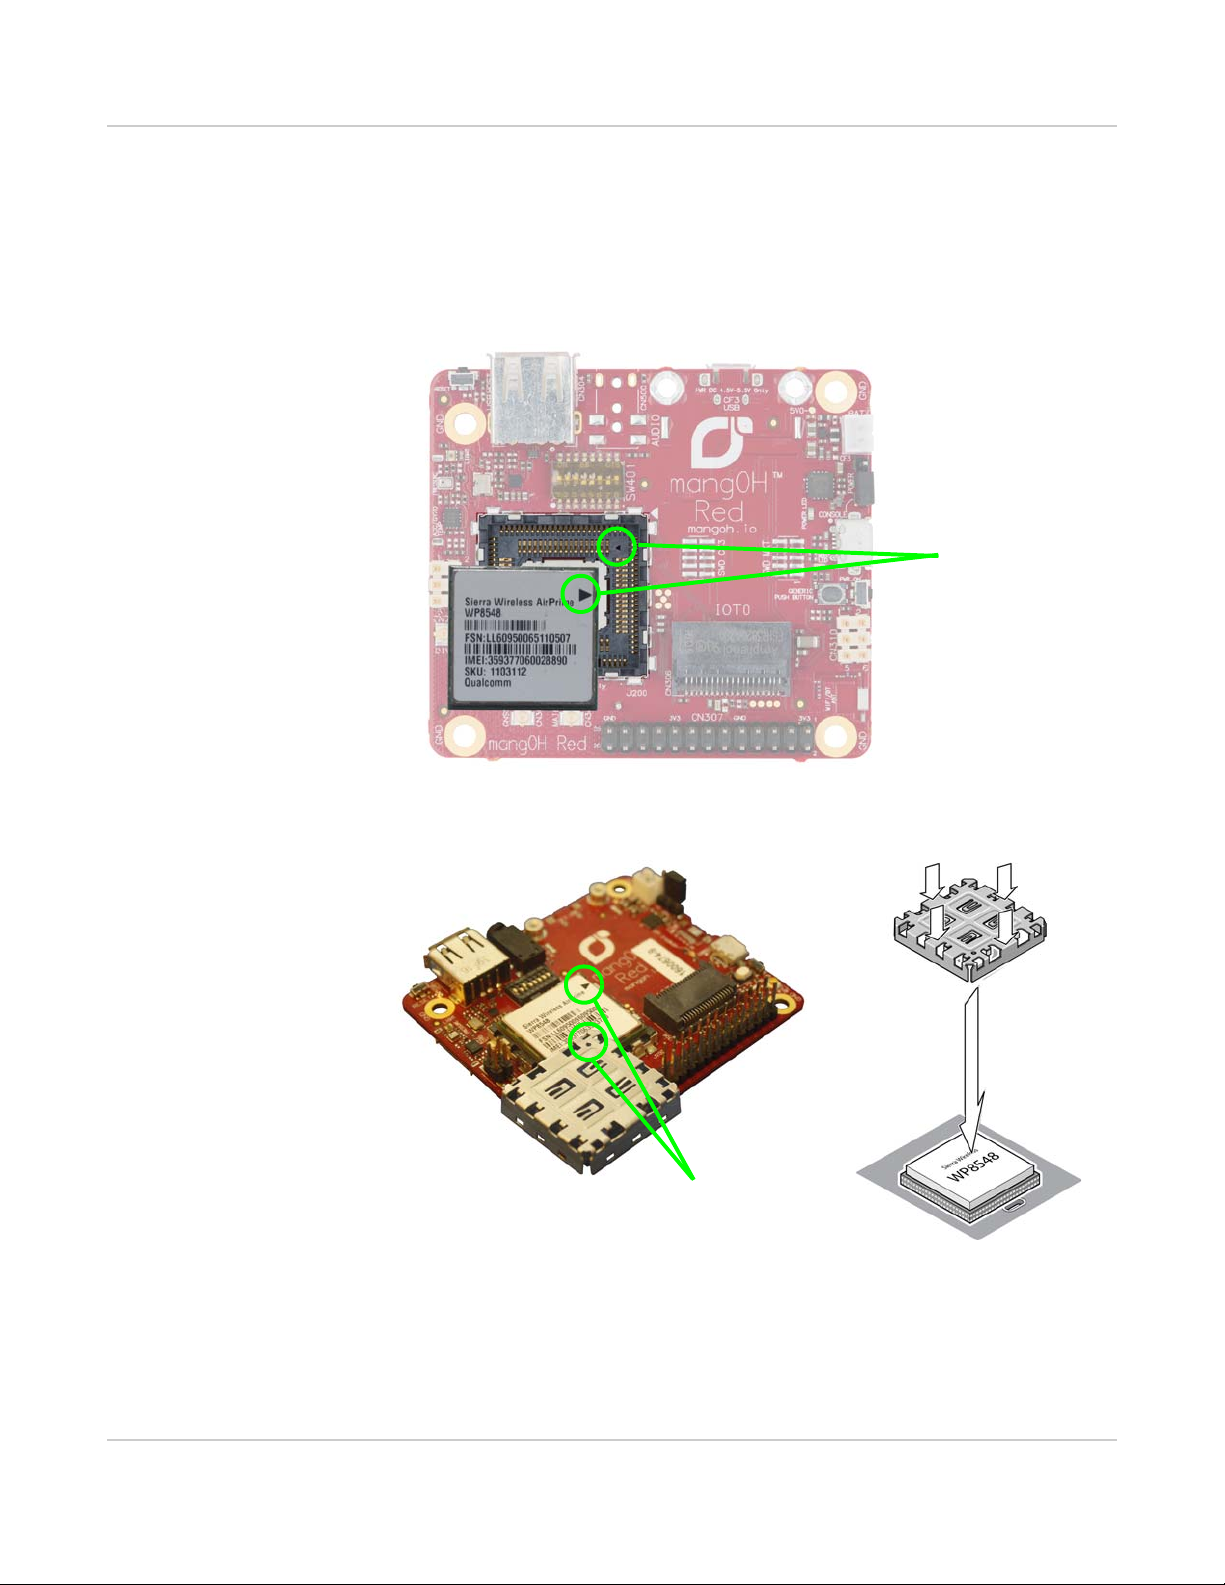
3. Remove the protective film from the dipswitches:
Remove this film
Note the location of the notched corner.
Inserted in bottom part of slot
4. Make sure the dipswitches are set as follows:
· ON—1,3,8
· OFF—2,4,5,6,7
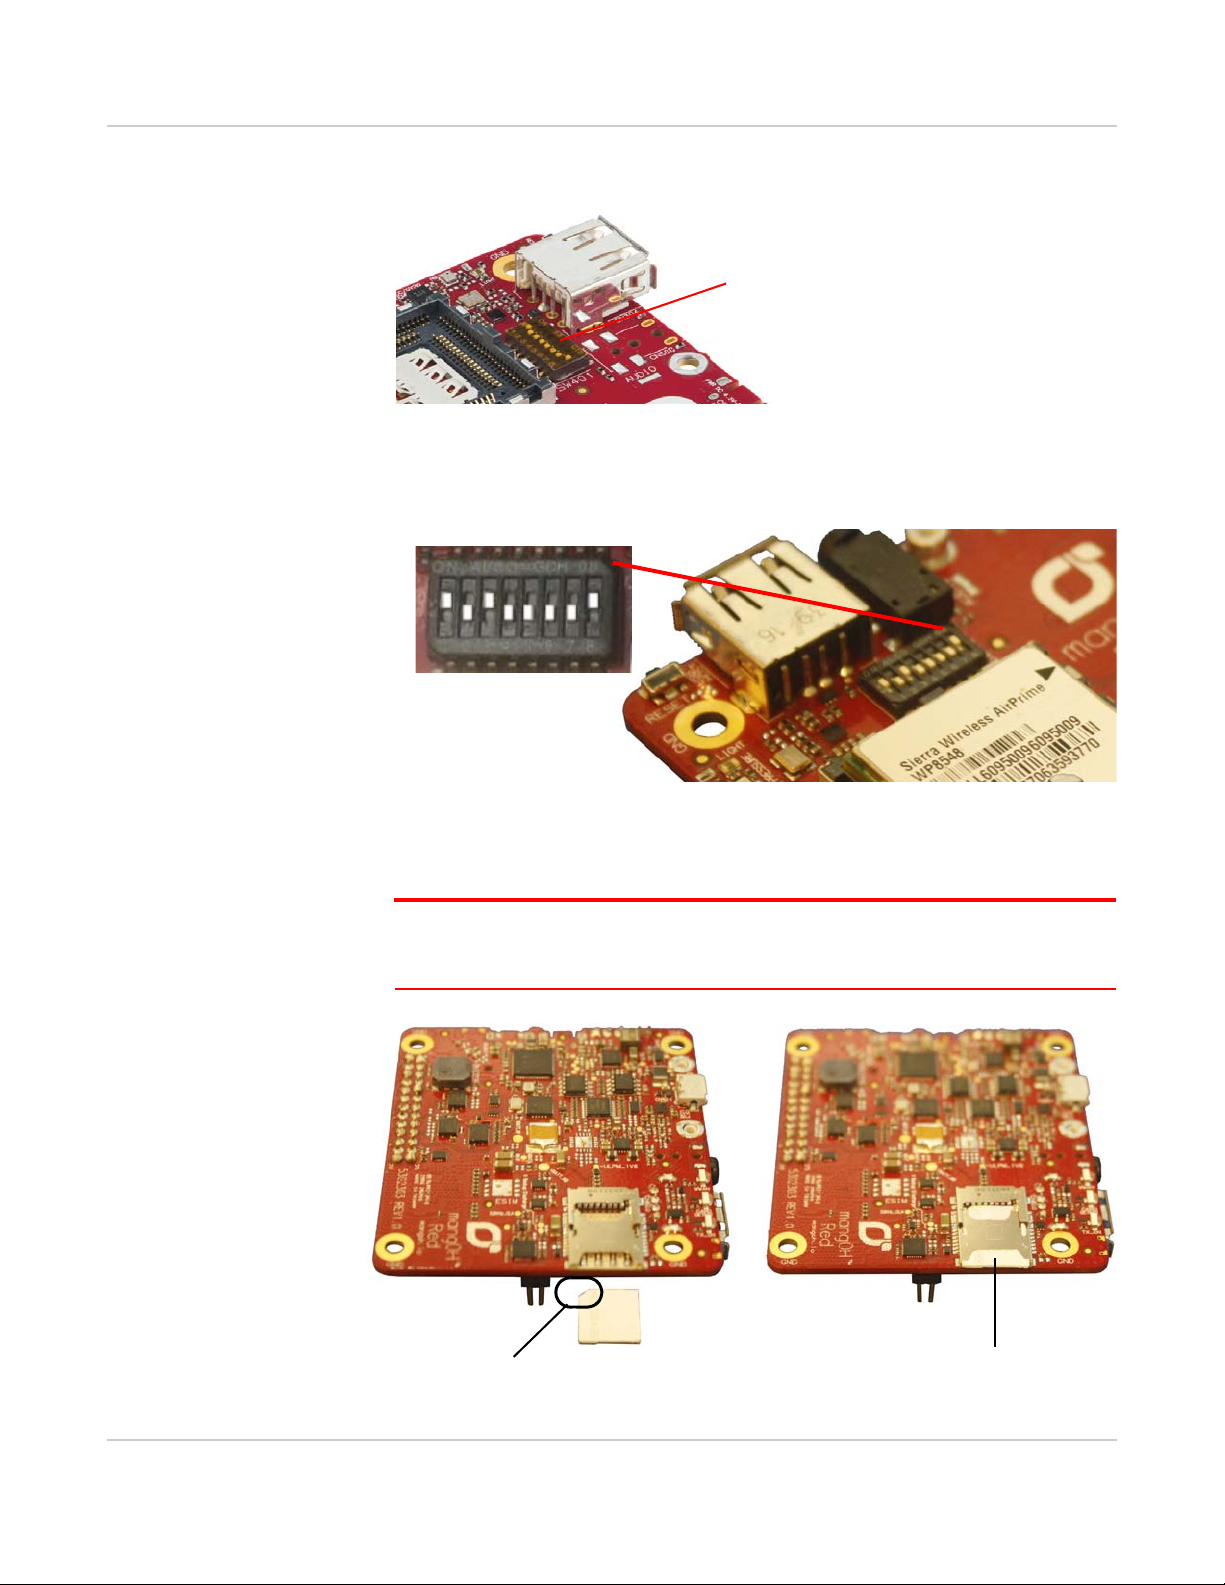
5. Insert a micro-SIM in the slot on the bottom side of the mangOH Red. You can
use the Sierra Wireless micro-SIM that is included in the kit, or another micro-SIM
that has been activated by a mobile network provider.
Note: If you do not have an activated micro-SIM, you can still continue with the tutorial, but
will not be able to complete the following sections: Co nnect To Mobile Networks on
page 29 and Connect to the IoT Cloud on page 34.
Rev 2 8/23/17 11 41110481
Page 12
mangOH Red Getting Started
Main
GNSS
Diversity
CF3 USB power (jumper on pins
closest to battery connector)
CF3 USB connector
(bottom side of board)
CONSOLE USB connector
Battery connector
6. Attach the main antenna and (for LTE CF3 modules) the diversity antenna.
Note: The main antenna is required if you want to connect the mangOH Red to a mobile
network in Connect To Mobile Networks on page 29.
Tip: If you have trouble connecting an antenna, make sure it is positioned directly on the
connector and push straight down. The antenna will not connect at an angl e.
Note: The mangOH Red has two USB connectors. CF3 USB is used for SSH connections, AT
commands, and firmware downloads, and CONSOLE_USB is used for serial USB connections
for debugging and to access the module’s console.
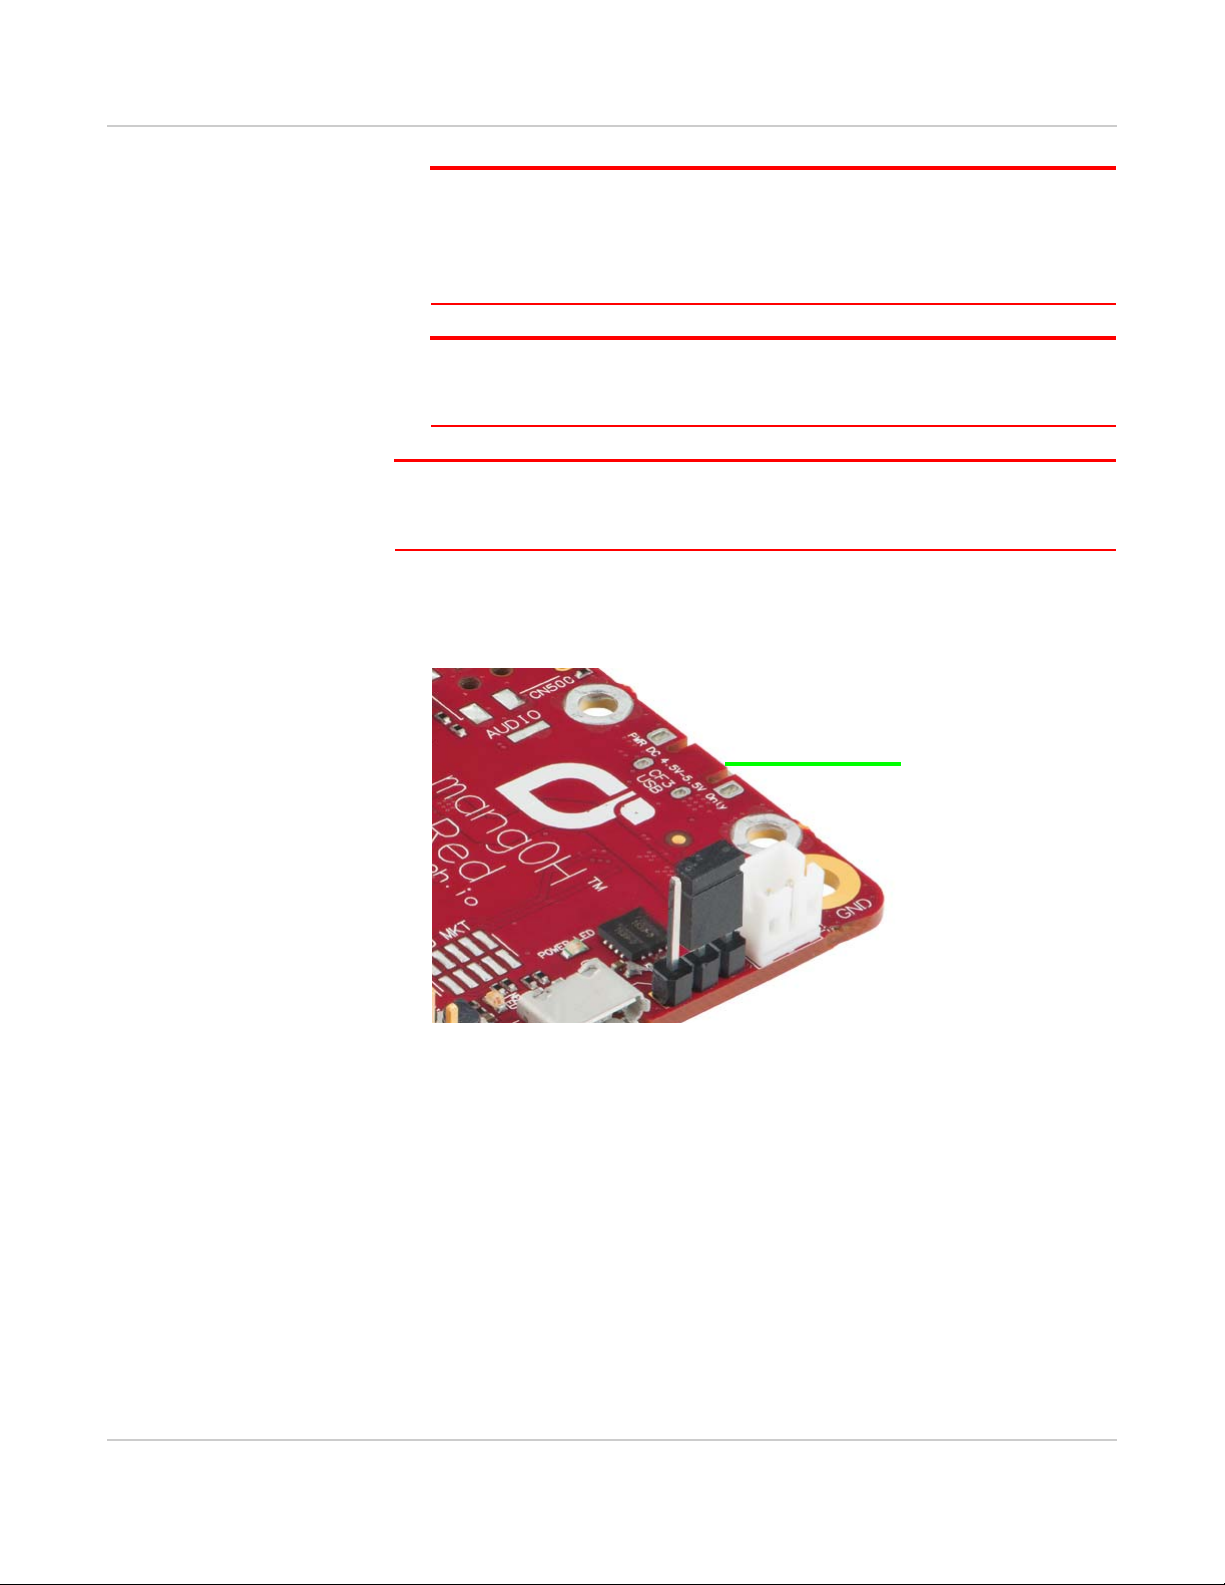
7. Move the power select jumper to select the CF3 USB connector—in this guide,
power is supplied from the dev machine’s USB port to this connector.
Rev 2 8/23/17 12 41110481
Page 13
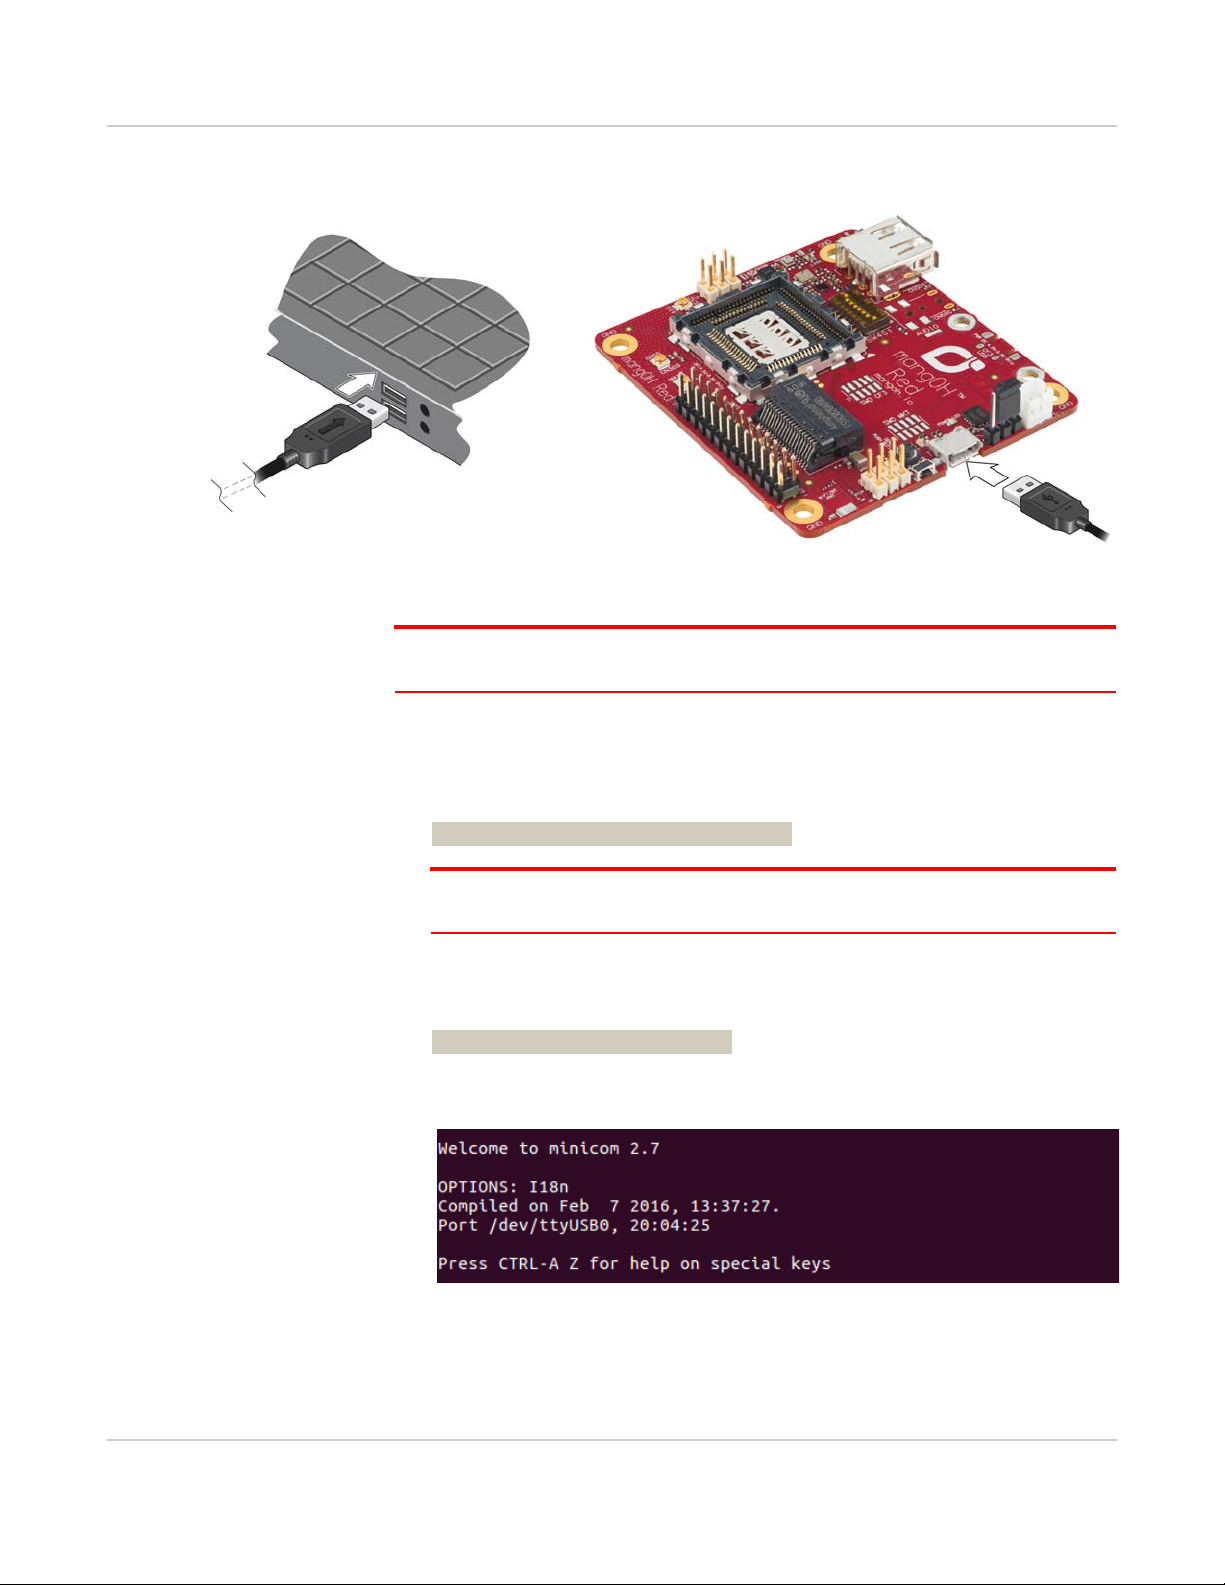
8. Use a micro-USB cable to connect the CONSOLE USB connector to a USB port
on your dev machine.
9. Open a terminal window on the dev machine— this window will be used to display
the target’s console messages (kernel messages, warnings, etc.).
Note: Depending on your desktop, a terminal window may be opened using a keyboard
shortcut (e.g. Ctrl+Alt+T for the Ubuntu Unity desktop), or an icon or menu item .
10. Connect to the target’s Linux console as follows:
a. In the terminal window, enter the following command to install the minicom
application on your dev machine (if it is not already there), and follow any
prompts that may appear:
$ sudo apt-get install minicom
Note: ’sudo’ tells the dev machine to run the command as the ’superuser’. Each time
you use sudo, you must enter your dev machine’s password to continue.
b. Connect to the target’s Linux console via the USB serial port (which
enumerated when you connected the CONSOLE USB connector to the dev
machine):
$ minicom -D /dev/ttyUSB0
A welcome message appears, and the window will show console messages
when the mangOH Red powers on in the next step.
Rev 2 8/23/17 13 41110481
Page 14
mangOH Red Getting Started
CF3 USB connector
(bottom side of board)
11. Power up the mangOH Red:
Note: The USB serial port enumerates as ttyUSB0 because you connected
CONSOLE USB to the host before connecting CF3 USB to the host (which you will do
later). However, if you connected CF3 USB first, it would enumerate ttyUSB0,
ttyUSB1, and ttyUSB2. Then when CONSOLE USB is connected, it will enumerate as
ttyUSB3.
Note: You can exit minicom at any time—the purpose of showing it here is to demonstrate how to display console messages for debugging purposes. To exit minicom,
press Ctrl+A, then press X. When prompted, select Yes to leave minicom.
Note: Through the rest of this guide, examples use terminal windows connected via ssh,
but a console connection could also be used. However, only one console conn ection can
be opened at any time since it locks the USB serial port.
a. Use a micro-USB cable to connect the CF3 USB connector to a USB port on
the dev machine.
Rev 2 8/23/17 14 41110481
Page 15
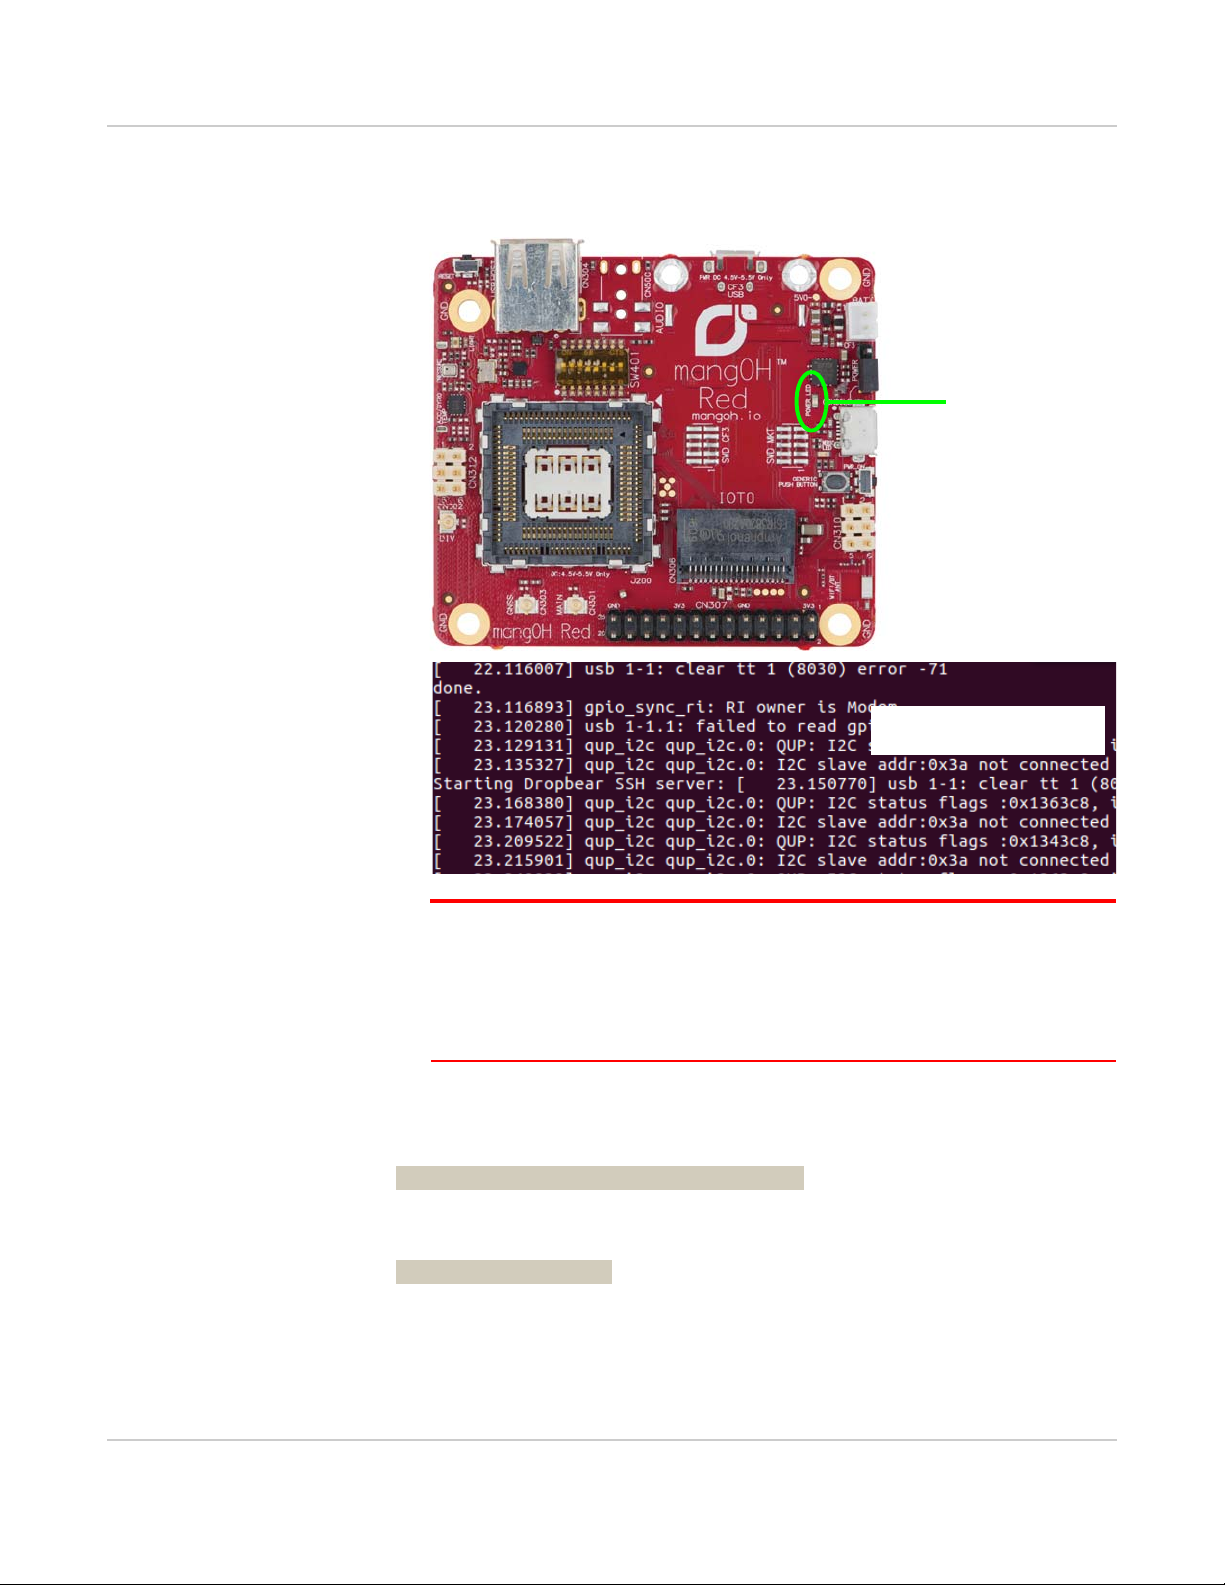
When the mangOH Red is powered, the Power LED turns solid green and
Power LED
Console messages describing
module boot-up process
startup messages will appear in the terminal window that you connected to
the target’s console in Step 10.
Note: For future reference, the mangOH Red’ s power supply (USB port on your dev
machine, or an AC adapter) connects to the board via either USB connector—
CF3 USB or CONSOLE USB (depending on the jumper position on the power
header). If an AC adapter is connected to CF3 USB, SSH/AT connections are not
possible; if it is connected to CONSOLE USB, serial USB connections are not
possible.
12. On the dev machine, open another terminal window.
13. Make sure the modemmanager package is removed from your system (this
package causes problems with mangOH Red if it is not removed):
$ sudo apt-get remove modemmanager
14. Wait 10-15 seconds for the mangOH Red to enumerate.
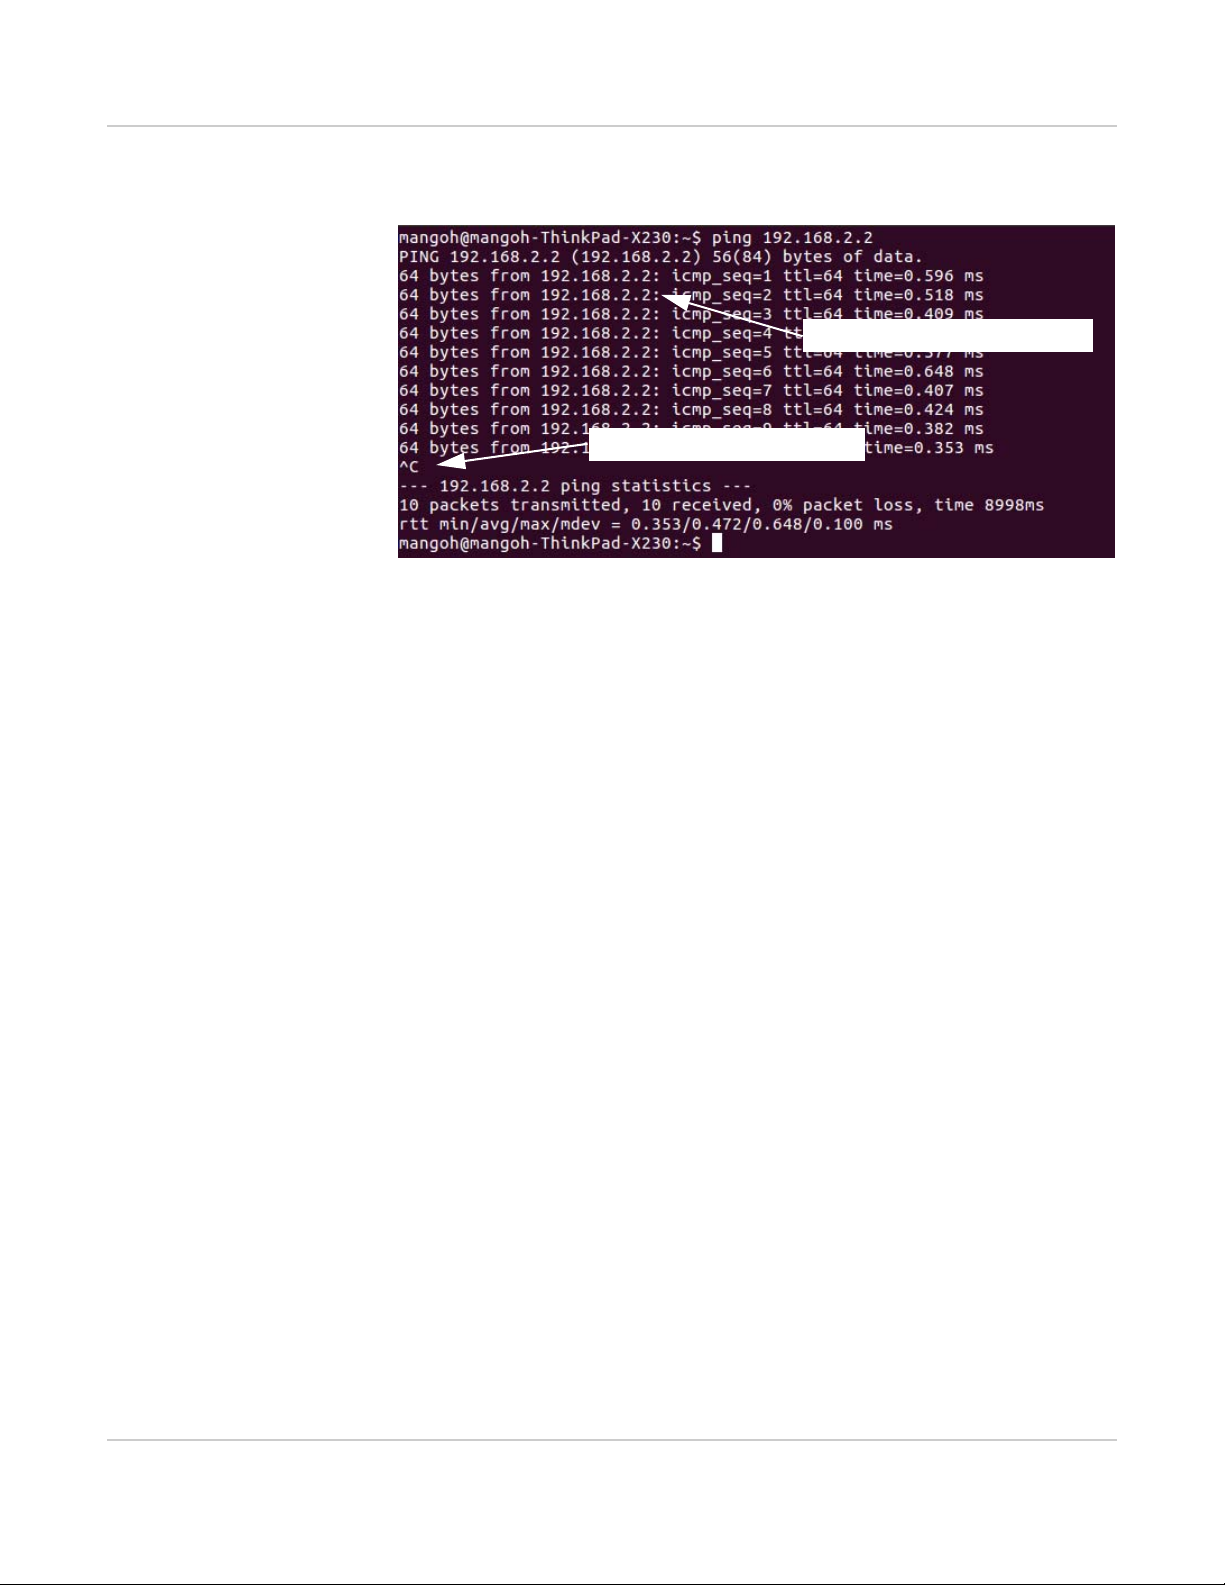
15. Test the CF3_USB connection:
$ ping 192.168.2.2
Rev 2 8/23/17 15 41110481
Page 16
mangOH Red Getting Started
Ctrl+C pressed to cancel ping
Replies received, connection working
Now you are ready to Prepare Your Linux Dev Machine For Legato Development on
page 17.
You should receive ping responses. Press Ctrl+C to cancel the ping request and
return to the command prompt.
Rev 2 8/23/17 16 41110481
Page 17
4: Prepare Your Linux Dev Machine For Legato Development
In this chapter, you will prepare your dev machine for Legato application development
by setting up the development environment with required applications and packages.
Important: To install and use the development environment, your dev machine must meet
the requirements in Table 1-1 on page 6.
4.1 Prepare Dev Machine For Application Development
After preparing your mangOH Red hardware in Set Up Your mangOH Red Hardware
on page 9, you can prepare your dev machine for application development:
Important: Download, installation and use of Legato Application Framework and Platform
Services is subject to the Legato License and Open Source Licenses. (Note: These links
automatically download the licenses as PDF files.)
4
4.2 Build and Install the Development Environment
In this section you will build and install the environment to develop applications for the
CF3 module used in your mangOH Red. The environment includes:
• Legato toolchain— Tools and libraries used to build the Legato Platform for your
CF3 module. The Legato toolchain is module-specific; you must make sure you
install the toolchain designed for your module.
• mangOH Red platform— Drivers for on-board components, and a basic
device-to-cloud application.
To build and install the development environment on your dev machine:
1. Open a terminal window.
2. Install packages required for the development environment:
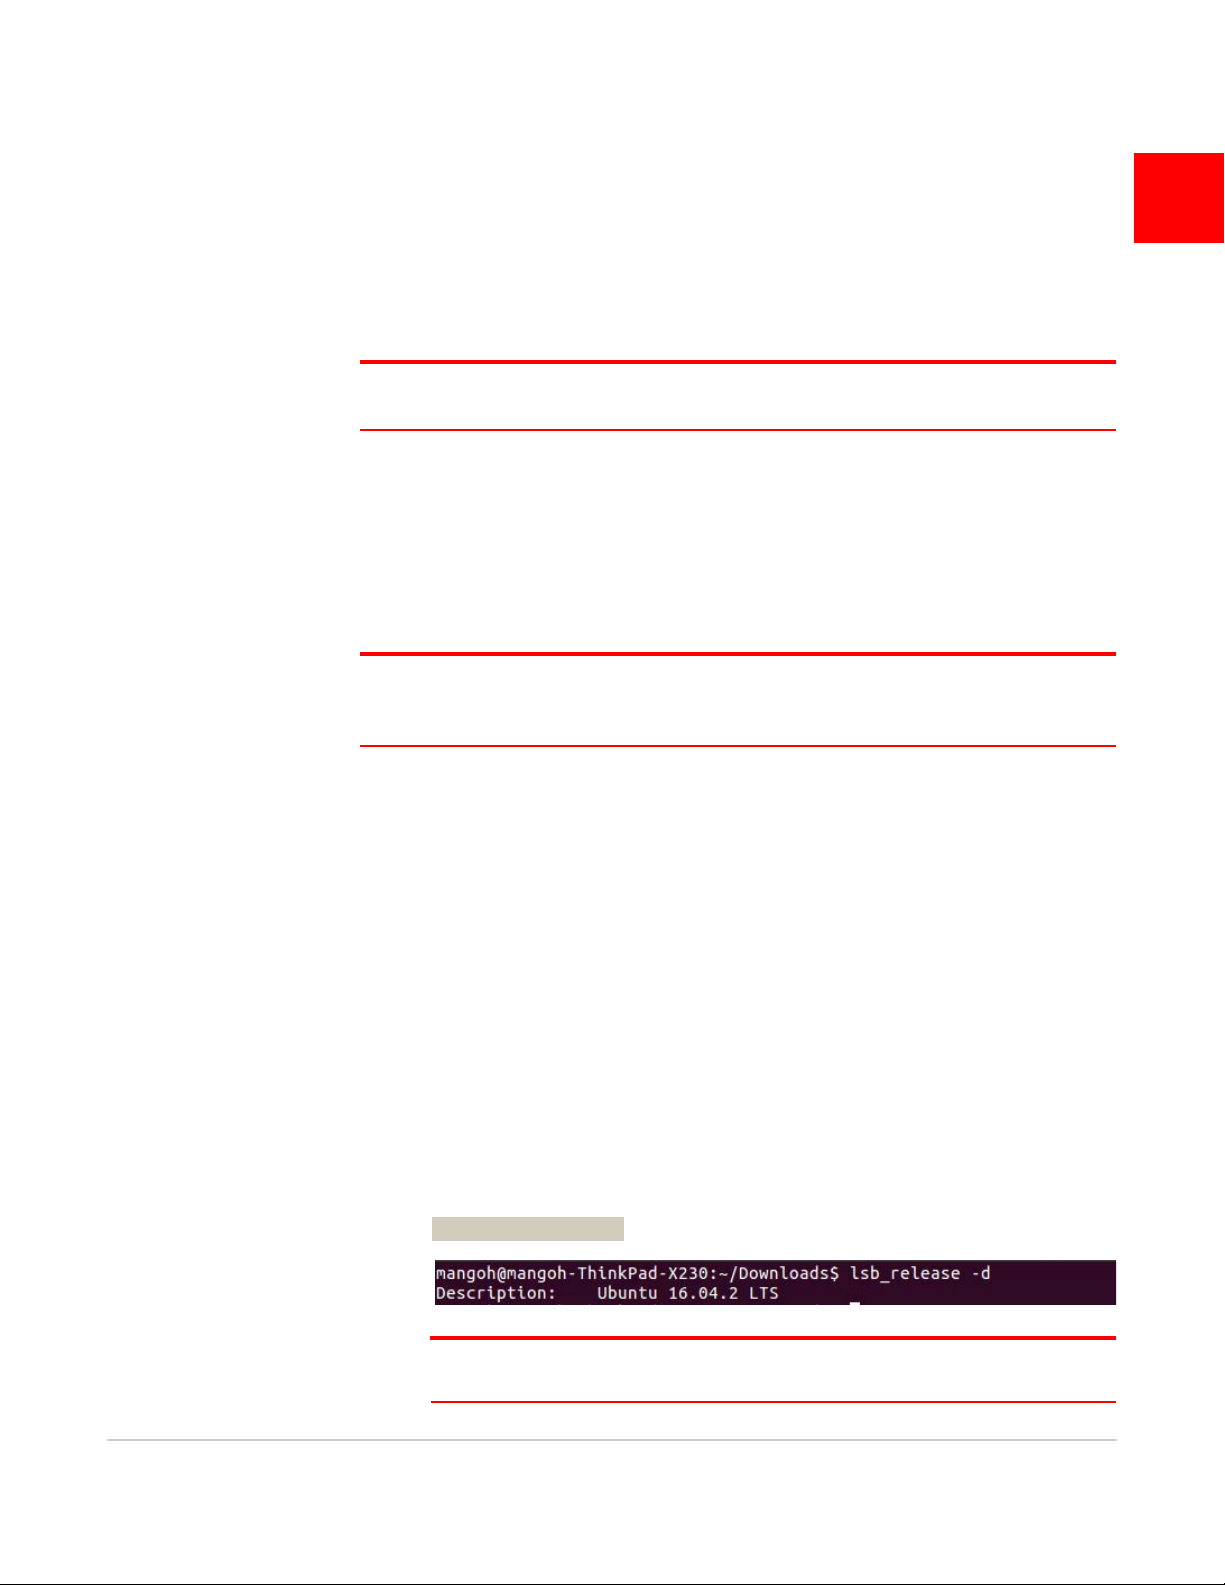
a. Display your Ubuntu version:
$ lsb_release -d
Note: If the version is less than 16.04, upgrade your operating system to 16.04 or
higher, then continue with these instructions.
Rev 2 8/23/17 17 41110481
Page 18

mangOH Red Getting Started
When prompted to continue,
type Y and press Enter.
Installation messages
Actual messages displayed will vary
depending on which packages are
already installed
The command worked (value = 0).
Any other value (2, 100, etc.) would
mean the command failed.
3. Check whether your dev machine is 32-bit or 64-bit:
4. Install several packages that are required for the Legato Platform and the
$ uname -m
The dev machine’s hardware type appears —e.g. "x86_64" is a 64-bit system.
mangOH Red platform— enter the following command and follow any prompts
that appear:
$ sudo apt-get install build-essential openjdk-8-jre \
libwebkitgtk-1.0-0 python python-jinja2 cmake \
git subversion libsdl-dev diffstat texinfo gawk \
chrpath wget cpio vim zsh bash ninja-build screen \
sshpass bc python-git unzip libxml2-utils gcovr \
libcurl4-gnutls-dev zlib1g-dev libbz2-dev \
bsdiff libssl-dev zip autoconf automake
Note: The ’\’ at the ends of the lines tells the system that the command continues on
the next line. When you run this command (and any others in this guide that use the
’\’), you can copy and paste the full command (including ’\’ characters) in your terminal
window. If you type the command manually all on one line, do not type the ’\’
characters.
5. As shown in the previous step, the output you see when you run some commands
may be different from the examples shown. To check if a command succeeded or
failed, enter the following command:
$ echo $?
Rev 2 8/23/17 18 41110481
Page 19

If the value returned is ’0’, the command succeeded. If it is any other value, the
Click Download on the latest (newest)
32-bit or 64-bit toolchain link
command failed.
6. If your dev machine is 64-bit, install additional dependencies:
$ sudo apt-get install lib32z1 lib32ncurses5
7. Build the Legato toolchain (SDK):
a. If you have previously installed Legato toolchains, make sure you do not have
any old toolchain files ("poky*.sh") in your Downloads directory
(e.g. ~/Downloads), and remove any changes that may have been made to
your .bashrc file:
i. Go to your Downloads directory:
$ cd ~/Downloads
ii. Either move or delete any old toolchain files:
Delete files:
$ rm poky*
Move files:
$ mkdir old_toolchains
$ mv poky* old_toolchains
iii. Edit your ~/.bashrc file, comment out any items at the bottom of the file
that begin with "LEGATO", and save and close the file.
b. Go to http://source.sierrawireless.com/resources/legato/downloads and click
the latest Legato (32-bit or 64-bit) toolchain download link (the link is to a .sh
file).
Note: You must register on the Source for an account before you can download files.
c. Click Download.
d. If prompted, save the file to your Downloads folder. (e.g. ~/Downloads)
Rev 2 8/23/17 19 41110481
Page 20

mangOH Red Getting Started
e. In the terminal window, open the folder and run the file.
(In the command below, replace <file_name> with the actual file name.
e.g. If the file name is "poky-swi-ext-sample-1.7.3.sh", the command would be
"bash poky-swi-ext-sample-1.7.3.sh"):
$ cd ~/Downloads
$ bash <file_name>
f. When prompted to enter a target directory for the SDK, press Enter to accept
the default (/opt/swi/y17-ext).
g. When prompted to install or (possibly) replace the SDK, type ’Y’ and press
Enter.
When finished, installing, the message "SDK has been successfully set up
and is ready to be used." will appear.
h. Configure the toolchain to make it available for use in generating the
mangOH Red platform and the kernel modules that it references:
$ export PATH=$PATH:/opt/swi/y17-ext/sysroots/\
x86_64-pokysdk-linux/usr/bin/\
arm-poky-linux-gnueabi
$ cd /opt/swi/y17-ext/sysroots/\
armv7a-vfp-neon-poky-linux-gnueabi/usr/\
src/kernel
$ sudo chown -R $USER .
$ ARCH=arm CROSS_COMPILE=arm-poky-linux-gnueabi- \
make scripts
$ sudo chown -R root .
Rev 2 8/23/17 20 41110481
Page 21

8. Install the repo application, which will be used to clone the Legato file repository:
Platform downloads to ~/mangOH_work.
,
If you don’t put a name here, it
downloads to mangOH (the name of the
directory on github).
Returns to command prompt with no
,
error messages.
$ sudo apt-get install repo
Note: This may take a few minutes to run.
9. If the install in Step 8 failed because phablet-tools was previously installed:
a. Enter the following command:
$ sudo apt-get remove --purge phablet-tools && \
apt-get install repo
b. Go back to Step 8.
10. If you have not used git or git-repo to clone a project before, identify yourself as
follows:
$ git config --global user.email "youremail@example.com"
$ git config --global user.name "your.name"
11. Download the mangOH platform files into a working directory—enter the following
command and either replace <mangOH_work_directory> with a new directory
name (e.g. "mangOH_work"), or remove it (to use the default directory name
"mangOH").
$ cd ~
$ git clone --recursive https://github.com/mangOH/\
mangOH <mangOH_work_directory>
Note: <mangOH_work_directory> is optional—if not used, a working directory is created
with the same name as the repository (in this case, "mangOH").
Rev 2 8/23/17 21 41110481
Page 22

mangOH Red Getting Started
12. Add an environment variable (shortcut) for the mangoh work directory:
Now that the Legato development environment is installed, you can Prepare Your
mangOH Red For Development on page 23.
a. Edit your ~/.bashrc file (the startup script that runs when you open a terminal
window) and add the following line at the end of the file:
export MANGOH_ROOT=~/mangOH_work
Note: . If you downloaded into a different directory name in Step 11, replace
"mangOH_work" with that name in the above export statement:
b. Save and close the file.
c. Run the script to set the new environment variable for your current window:
$ . ~/.bashrc
Important: Make sure you include the ’.’ (period) at the beginning of the
command. This command runs the script in the open terminal window; you will
not have to run it in new windows.
Rev 2 8/23/17 22 41110481
Page 23

5: Prepare Your mangOH Red For Development
Most recent release
In this chapter, you will update the CF3 module on your mangOH Red with the basic
mangOH Red platform (application suite).
5.1 Build and Install Legato Platform and
mangOH Red Platform on Target
Now that your dev machine has its development environment set up, you can build
and install the Legato Platform and mangOH Red Platform application suites onto
your target (the CF3 module in your mangOH Red):
1. Get the Legato Application Framework (AF):
a. Go to http://legato.io/legato-docs/latest/aboutReleaseInfo.html to get the
version number of the most recent release.
5
Rev 2 8/23/17 23 41110481
b. Download the framework files into a working directory (for example,
"legato_framework")— Replace the release number in the ’repo’ command
with the most recent release (this example downloads version 17.07.1):
i. Create a working directory below your home directory to hold the
framework files (for example, "legato_framework"):
$ mkdir ~/legato_framework
Note: Through the rest of this guide, "legato_framework" is assumed to be the file
you created. If you used a different name, make sure to use that name in any
commands that refer to legato_framework.
ii. Download the framework files into the work directory:
$ cd ~/legato_framework
$ repo init -u git://github.com/legatoproject/\
manifest -m legato/releases/17.07.1.xml
$ repo sync
Page 24

mangOH Red Getting Started
IMEI
IMEI
Ignore these toolchain warnings.
Note: This may take several minutes to run.
2. In a terminal window, build and install the Legato AF:
$ cd legato
$ make clean && make wp85 && source bin/configlegatoenv
Rev 2 8/23/17 24 41110481
Page 25

3. Go to the mangoh work directory and build the platform:
$ cd $MANGOH_ROOT
$ make red_wp85
Note: This may take several minutes to run.
Note: In the command "make wp85", ’wp85’ indicates the target type on which the
applications will run. If a different module type is used, the make command must be
modified to indicate the correct type. For example, if the CF3 module is a WP7602, the
target must be changed from "wp85" to "wp76". This applies to all make commands
described in this guide.
4. Verify that the update file mangOH_Red.wp85.update was created:
$ ls -al *.update
5. Make sure the mangOH board is powered on and is connected to your dev
machine—the board is connected if you receive ping responses:
$ ping 192.168.2.2
Press Ctrl+C to return to the command prompt.
6. Follow the steps in How to Update Module Firmware on page 26 to make sure
you have the latest firmware on the CF3 module.
7. Install the mangOH_Red platform on your mangOH board:
$ instsys mangOH_Red.wp85.update 192.168.2.2
Important: Before you can install the platform you just built (using the most recent
Legato framework) onto your mangOH Red, you must make sure you also have the latest
firmware—the platform is built to work on the matching firmware.
Rev 2 8/23/17 25 41110481
Page 26

mangOH Red Getting Started
If gpioExpanderServiceRed, mqttClient,
and redSensorToCloud are listed, the
install succeeded.
8. Verify the mangOH platform apps installed correctly:
If the applications install successfully, the last message shown will be
"SUCCESS Done".
a. Connect to the mangOH Red:
$ ssh root@192.168.2.2
b. Show the list of installed apps to confirm the build and install succeeded:
# app status
If the following apps appear in the list, the build and install succeeded:
Now that the mangOH Red platform is installed, you will learn how to Connect To
Mobile Networks on page 29.
5.2 How to Update Module Firmware
Use the following procedure to update your module firmware, and you can use it
again when new firmware versions are released:
1. Check the firmware version on your module:
a. Open a terminal window.
b. Connect to the mangOH Red:
$ ssh root@192.168.2.2
c. The following message appears if you are using your CF3 module for the first
time (modules are shipped without a password).
Rev 2 8/23/17 26 41110481
Page 27

For now, type 3 and press Enter, then type Y and press Enter to be reminded
IMEI
FSN
Firmware version
the next time you connect.
Note: After completing this tu torial, you should select an appropriate login authentication method (ssh keys or password) from this menu—see legato.io/legato-docs/
latest/basicTarget.html for details.
d. Display information about the CF3 module:
# cm info
e. Make note of your Firmware version, IMEI, and FSN. You will use all of these
in this guide.
f. Disconnect from the mangOH Red:
# exit
2. Go to https://source.sierrawireless.com and do the following:
a. In the Devices section, click AirPrime.
b. Click WP series.
c. Click your module type.
d. In the Software download section, click Firmware to display the list of
available firmware packages.
e. In the Combined Images table, compare the Firmware version for the Generic
carrier with your module’s firmware version:
· If your version is the same as the Generic version — The firmware does
not need to be updated. Continue to the next section (Build and Install
Legato Platform and mangOH Red Platform on Target).
· If your version is lower than the Generic version —Continue to Step f to
update your firmware.
f. In the Binaries column for the Generic carrier, click Download.
g. Make sure the mangOH Red is connected to the dev machine with a
mini-USB cable.
Rev 2 8/23/17 27 41110481
Page 28

mangOH Red Getting Started
3. As indicated in the response on the previous step, wait (1–2 minutes) while the
4. Verify that the firmware updated:
5. If you did this firmware update as part of the instructions in Build and Install
h. In the terminal window, go to the Downloads folder and install the new
firmware (replace <file> with the name of the file that you downloaded):
$ cd ~/Downloads
$ fwupdate download <file> 192.168.2.2
Note: This will take several minutes to run.
module reboots with the new firmware. (If you still have your console terminal
window open, you will see when the device has finished rebooting.)
a. Connect to the mangOH Red:
$ ssh root@192.168.2.2
b. Display information about the CF3 module and confirm the new Firmware
version is listed:
# cm info
c. Disconnect from the mangOH Red:
# exit
Legato Platform and mangOH Red Platform on Target on page 23, go to Step 7
on page 25.
Rev 2 8/23/17 28 41110481
Page 29

6: Connect To Mobile Networks
Note the location of the notched corner.
Inserted in bottom part of slot
In this chapter, you will learn how to connect the mangOH Red to a mobile network.
When the mangOH_Red has a data connection, you can transmit data, including onboard sensor readings, to the IoT cloud.
6.1 Connect To a Mobile Network
To connect to a mobile network, you must have an activated micro-SIM in the
mangOH Red.
6
1. If you do not have a micro-SIM in the mangOH Red, insert one before continuing:
a. Disconnect the power from the mangOH Red (remove the jumper from the
power header, or unplug the micro-USB cable that is providing power).
b. Insert a micro-SIM in the slot on the bottom side of the mangOH Red. You
can use the Sierra Wireless micro-SIM that is included in the kit, or another
micro-SIM that has been activated by a mobile network provider.
c. Reconnect the power (plug in the micro-USB cable or insert the jumper on the
power header on the same pins it was removed from in step a. The Power
LED will light immediately.
Note: You must disconnect the power before sw itching SIMs so the mangOH_Red can
detect the SIM while powering on.
2. Connect to the target’s console:
a. On the dev machine, open a terminal window.
b. Connect to the target:
$ ssh root@192.168.2.2
Rev 2 8/23/17 29 41110481
Page 30

mangOH Red Getting Started
Example response when
Power is OFF
Example response when
Power is ON, Status is Searching
Example response when
Power is ON, Status is Registered
3. Turn on the target’s radio (modem);
4. Display the status of the target’s radio:
# cm radio on
# cm radio
5. If the:
· Power is OFF—Turn on the radio and then repeat Step 4:
# cm radio on
· Power is ON and Status is ’searching’— Wait 10–15 seconds while the radio
searches for a network to register on, then repeat Step 4.
· Power is ON and Status is Registered— Continue to Step 6.
Rev 2 8/23/17 30 41110481
Page 31

6. Check the connection status:
Example response when
Not connected, APN is set
Example response when
Not connected, no APN
Example response when
Connected
# cm data
a. If "Connected" is:
· "no", and APN has a value— The mangOH Red is ready to connect to the
network. Go to Step 7.
· "no", and APN is blank — You must set the APN. Continue to the next step
(step b).
· "yes"—The mangOH Red is connected to the network. Go to Step 8.
b. If you need to set the APN, replace "<your apn>" with the actual APN in the
following command:
# cm data apn <your_apn>
Note: The APN for the Sierra Wireless SIM is internet.sierrawireless.com.
Note: If your mobile network operator uses different APNs for 3G and LTE, make sure
to use the APN for the correct network based on your CF3 module type. For example,
the WP8548 is a 3G-only module that does not support LTE—the APN for the network
operator’s 3G network should be used.
Rev 2 8/23/17 31 41110481
Page 32

mangOH Red Getting Started
If you do not know the APN for your SIM:
i. Get your Home Network Operator name:
# cm sim info
ii. Search the Internet for the APN for your Home Network Operator (for
example, search for "I TIM APN").
iii. Set the APN as described above.
c. Check the connection status again to make sure you set the APN correctly:
# cm data
7. Set up a data connection to the mobile network:
# cm data connect
Several status messages will appear—if the connection succeeds, all the messages indicate "ok".
8. Test the data connection:
a. When the command prompt reappears, verify that the connection is
working—’ping’ a URL that you know is working (e.g. mangoh.io,
google.com, etc.).
# ping mangoh.io
When ping responses (e.g. "64 bytes from 35.164...") appear, the connection
is working. (Responses may take 10–15 seconds to being appearing.)
Rev 2 8/23/17 32 41110481
Page 33

b. Stop the ping command when responses begin to appear—Press Ctrl+C to
return to the command prompt.
Note: If no responses appear within 30 seconds, press Ctrl+C , make sure the
antenna is connected, and go back to Step 4 and try again. If you still cannot get a
response, power cycle the mangOH_Red and start the procedure again.
9. Now that you know how to start a data connection, you will be able to transmit
data to the IoT cloud. (In the next section, you will set up your free account on the
Sierra Wireless AirVantage IoT Acceleration Platform.)
For now, enter the disconnect command to close the data connection while you
set up your AirVantage account:
# cm data connect -1
Now that you know how to start (open) and stop (close) a data connection, you are
ready to Connect to the IoT Cloud on page 34 and begin sending data to the ’cloud’.
Rev 2 8/23/17 33 41110481
Page 34

7: Connect to the IoT Cloud
In this section, you will register your device with Sierra Wireless’ AirVantage IoT
Acceleration platform (a cloud-based service to collect data from your device), and
begin submitting your mangOH Red’s on-board sensor data.
7.1 Register and connect to AirVantage
Your mangOH Red kit includes a free account on the AirVantage IoT Acceleration
Platform for your CF3 module. This platform provides Sierra Wireless’ cloud-based
services for over-the-air (OTA) device management and application enablement.
These services provide the infrastructure for you to build, connect, and operate your
IoT applications in a single platform.
Note: You can register up to five devices (CF3 modules and other supported devices) on your
free account.
To use AirVantage, you must register your device and then connect your
mangOH Red to the AirVantage server.
7.1.1 Register with AirVantage
7
1. In a browser, go to https://eu.airvantage.net/accounts/signup?type=Mangoh.
Rev 2 8/23/17 34 41110481
Page 35

2. In the MangOH Signup area, enter your:
· First and last names
· Email address—Address to use as your AirVantage username.
Important: Use a valid address—This is your username for accessing AirVantage,
and is needed to complete the registration process.
· Account name —A descriptive name to identify this AirVantage account. Use
a unique name such as a combination of your company name, the project
name, your name, etc.
· Phone number— Use international format (for example, for North American
phone numbers, use "001" plus the 10-digit area code and phone number).
3. Review the Terms of Service and select "I agree to the Terms of Service".
4. Click Signup.
An email is sent automatically to your email address with a confirmation link.
5. Open the email and click the link to confirm your signup request.
Rev 2 8/23/17 35 41110481
Page 36

mangOH Red Getting Started
6. When your browser opens to confirm the signup request, enter a password that
7. Click Save.
8. Enter your account’s email address and password, and click Log In.
satisfies the requirements shown on-screen, and re-enter it to confirm.
If your password is acceptable, the AirVantage Login screen appears.
9. If you did not record your device’s FSN and IMEI earlier (in Build and Install
Legato Platform and mangOH Red Platform on Target on page 23):
a. Open a terminal window and connect to the device:
$ ssh root@192.168.2.2
b. Display the device information (including the FSN and IMEI):
# cm info
Rev 2 8/23/17 36 41110481
Page 37

10. In the Register mangOH window in your browser, enter your device’s information:
Monitor system
· Serial Number—Enter the module’s FSN.
· IMEI/ESN—Enter the module’s IMEI.
· Name—(Optional) Enter a descriptive name for the device (e.g.
"Test Device 1", "Parking Meter", etc.)
· Pre-configure system— Do not select this option.
11. Click Register.
The device appears in the ’Registered systems’ section at the bottom of the
screen.
Note: The displayed Type may say ’mangOH Green’—this does not affect the module
registration.
12. Now that your device is registered, click the monitor icon at the right side of your
device entry ( ) to go to the System Details screen (see next step).
13. The System Details screen displays widgets reporting information about your
device, communications received from it, running applications, etc.
The areas shown below (Last Communication and System Info) are both blank
because you have not connected your mangOH Red to AirVantage yet. Leave this
browser window open and continue to Connect to AirVantage on page 38.
Rev 2 8/23/17 37 41110481
Page 38

mangOH Red Getting Started
System Info
(Details about the CF3
Last Communication
(When you have your
device registered, your
most recent
module in your mangOH
will appear here.)
communication will
appear here.
7.1.2 Connect to AirVantage
Now that you are registered on AirVantage, connect your mangOH Red to the
AirVantage server and begin transmitting data:
1. On the dev machine, open a terminal window.
2. Connect to the mangOH Red:
$ ssh root@192.168.2.2
3. The mangOH Red platform that you installed earlier includes an application that
reports sensor data from your mangOH Red to the IoT cloud. Start the application
to send data to AirVantage, and confirm that it started running:
# app start redSensorToCloud
# app status
Rev 2 8/23/17 38 41110481
Note: redSensorToCloud automatically opens a data connection, so you do not need to
use "cm data connect".
Page 39

4. In your browser, refresh the AirVantage System Details screen.
System Info
(Information about
the CF3 module in
your mangOH board)
Last Communication
(Shows when your
board last communicated
with AirVantage, and
the type of
communication.
For example, this CF3
communicated its
Registration.
Last Communication
Shows your most recent
sensor data.
The System Info section now shows details about your module, and the Last Communication section shows your Registration connection or sensor data, whichever
was most recently received.
Rev 2 8/23/17 39 41110481
Page 40

mangOH Red Getting Started
Timeline has sorting
options to choose the
data to display.
This example shows the
two most recent sets of
sensor data. The second
set is expanded to show
each sensor reading.
5. To see details on all transmissions received, click Timeline.
6. To stop sending data, and to confirm the app has stopped:
# app stop redSensorToCloud
# app status
Note: redSensorToCloud automatically closes the data connection, so you do not need to
use "cm data connect -1".
You have now registered and connected your device to AirVantage, and completed
the mangOH Red Fundamentals tutorial. For more information on the mangOH
platform, visit mangoh.io.
Rev 2 8/23/17 40 41110481
Page 41

To begin developing simple applications or modifying existing applications, work
through the examples in Develop and Test applications on page 42.
Rev 2 8/23/17 41 41110481
Page 42

A: Develop and Test applications
In this section, you will learn how to develop applications in the Legato development
environment, install them onto your mangOH Red, and test that they run.
Legato provides two interfaces for developing applications:
• CLI—Command Line Interpreter in a terminal window.
• Developer Studio—A GUI (Graphical User Interface) development environment.
This section describes development using CLI.
Note: You will be updating application source code in this section. Use whichever editor you
prefer—these instructions do not refer to a specific editor.
Tip: This tutorial touches on the basics of using the Legato development environment. After
completing the examples in this chapter, see http://legato.io/legato-docs/latest/mangOH_devel-
opers.html for detailed references, forums, etc.
A.1 Develop using the CLI—Command Line Interpreter
A
A.1.1 Configure the Dev Machine’s Terminal Windows for Development
Note: If you installed Legato to a subdirectory of your home directory using a different name
than ’legato’, replace "~/legato" with "~/<yourDirectory>" in the commands in this secti on.
To use the CLI in a terminal window to compile and build applications, you must
configure the window to work with Legato tools.
The easiest way to do this is to define a short ’alias’ in your ~/.bashrc file (the startup
script that runs each time you open a new terminal window) that you can use to run
the required commands (instead of entering the commands manually every time):
To modify your .bashrc (you only need to do this once on your dev machine):
1. Open a terminal window.
2. Edit your ~/.bashrc file and add the following lines at the end of the file:
alias cfglegato=\
"pushd . && cd ~/legato_framework/legato && source ./bin/configlegatoenv ; popd"
3. Save and close the file.
4. Run the script to set the new environment variable for your current window:
$ . ~/.bashrc
Rev 2 8/23/17 42 41110481
Page 43

Important: Make sure you include the ’.’ (period) at the beginning of the command. This
Power is OFF
command runs the script in the open terminal window; you will not have to run it in new
windows.
Now each time you open a new terminal window, you can:
1. Enter the alias (cfglegato) to configure the window:
$ cfglegato
Note: One of the things the command does is check to see which toolchains you have
on your development machine and warns you about any that are missing. Since you
have loaded only the wp85 toolchain, warnings appear about the others. You can ignore
these messages.
2. Confirm that the environment was set correctly:
$ echo $LEGATO_ROOT
If a directory path appears, the command worked. If no value was returned, there
was a problem with the command— make sure that you entered the alias correctly, using the actual directory name that you used to install Legato.
Note: You can also use the command "~/legato_framework/legato/bin/legs" to configure the
terminal, but this starts a new shell session—your command history and any environment
variables you have set will be lost.
A.1.2 Update an Installed Application
As you saw when you set up your AirVantage account, one of the mangOH platform
applications loaded on your device in Build and Install Legato Platform and mangOH
Red Platform on Target on page 23 was redSensorToCloud. This application reports
sensor readings to the cloud (e.g. AirVantage) every two minutes.
In this section you will increase the reporting frequency of the redSensorToCloud
application and install the new version on the mangOH Red.
To update redSensorToCloud:
1. On the dev machine, open a new terminal window.
Rev 2 8/23/17 43 41110481
Page 44

mangOH Red Getting Started
2. Configure the window for development— enter the following command (that you
3. Go to the folder containing the application’s source code:
4. The source code components for this application are in two sub-folders—
5. Open and edit the source code (avPublisher.c) with your preferred editor—two
previously set up in Configure the Dev Machine’s Terminal Windows for Devel-
opment on page 42):
$ cfglegato
$ cd $MANGOH_ROOT/apps/RedSensorToCloud
avPublisherComponent and sensorsComponent. The code that controls the
publishing frequency is in avPublisherComponent—go to that folder:
$ cd avPublisherComponent
values must be updated to adjust the reporting frequency:
a. Search for the variable declaration for MaxIntervalBetweenPublish.
static const int MaxIntervalBetweenPublish (120)
b. Change the interval value to 30— This increases the reporting frequency to at
least once every 30 seconds from once every 120 seconds.
c. Search for the variable declaration for TimeToStale.
static const int TimeToStale (60)
d. Change the stale value to 30— This decreases the length of time a sensor
reading is considered to be ’current’ before a new sensor reading must be
taken.
e. Save your changes and exit the editor.
At this point, you have modified the redSensorToCloud application’s source code.
Now you have to build (compile) it.
This application was created as part of the mangOH Red platform; to rebuild the
application, you will rebuild the whole system (Legato Platform and mangOH Red
platform). This method is suggested when applications may interact with each other. If
only one application is rebuilt, it may not work properly with other applications that it
depends on (or that depend on it).
To rebuild the Legato Platform and mangOH Red platform, including
redSensorToCloud with your changes, and install it onto your mangOH Red:
6. Build and install the mangOH Red platform:
$ cd $MANGOH_ROOT
$ make red_wp85
Rev 2 8/23/17 44 41110481
Page 45

Note: This may take several minutes to run.
Note: This ’make’ command uses the Makefile in $LEGATO_ROOT to build the entire
system.
7. Verify that the update file mangOH_Red.wp85.update was created:
$ ls -al *.update
8. Make sure the mangOH board is powered on and is connected to your dev
machine—the board is connected if you receive ping responses:
$ ping 192.168.2.2
Press Ctrl+C to return to the command prompt.
9. Install the Project mangOH applications on your mangOH board:
$ instsys mangOH_Red.wp85.update 192.168.2.2
If the applications install successfully, the last message shown will be
"SUCCESS Done".
10. After the installation is done, open a terminal window and connect to the
mangOH Red:
$ ssh root@192.168.2.2
Rev 2 8/23/17 45 41110481
Page 46

mangOH Red Getting Started
2 minutes interval
30 seconds interval
11. By default, redSensorToCloud is installed but not started. Start the application to
send data to AirVantage:
# app start redSensorToCloud
Note: redSensorToCloud automatically opens a data connection, so you do not need to
use "cm data connect".
In your AirVantage account, you will start to see sensor reports appearing on your
new schedule—on the Timeline screen you can compare the timestamp intervals
for new reports compared to reports received before you made your changes.
12. When you’re ready to stop sending data:
# app stop redSensorToCloud
Note: redSensorToCloud automatically closes the data connection, so you do not need to
use "cm data connect -1".
Rev 2 8/23/17 46 41110481
Page 47

A.1.3 Update and Install a New Application
When you installed Legato, sample application files were also stored. In this section,
you will build and then install the "hello world" application on the target.
Build (compile) an application on the dev machine and install it on the target:
1. On the dev machine, open a new terminal window.
2. Set up the window for CLI development as described in Configure the Dev
Machine’s Terminal Windows for Development on page 42.
3. Go to the sample application directory for Hello World:
$ cd $LEGATO_ROOT/apps/sample/helloWorld
4. Compile the application.
$ make wp85
Note: This ’make’ command uses the Makefile in the current directory to build onl y the
sample application. It does not build the entire system like the ’make’ command in Update
an Installed Application on page 43.
5. Verify that the update file helloWorld.wp85.update was created:
$ ls -al
6. Install the application on the target:
$ app install helloWorld.wp85.update 192.168.2.2
Note: This application will remain on the target until you either specifically remove it, or
until the next time you reinstall the system on the target.
Log in to the target and run the application:
1. Set up a window to show the application’s output (the "Hello World" application
writes to a log file) as follows:
a. Open a new terminal window (referred to as LOG_TERM in this procedure).
Rev 2 8/23/17 47 41110481
Page 48

mangOH Red Getting Started
Hello World application
2. Run the application:
b. Connect to the target:
$ ssh root@192.168.2.2
c. Watch the log file and show when a message from "hello world" appears:
# logread -f | grep "Hello"
Note: Nothing will appear to happen until you run the Hello World application in the
next step. Leave this command running until after you see the Hello World output,
then you can press Ctrl+C to cancel it and return to the command prompt.
a. Open a terminal window to run the application (referred to as APP_TERM in
this procedure).
b. Connect to the target:
$ ssh root@192.168.2.2
c. Check that the application is installed:
# app status
The "hello world" application should appear in the list with a status of
’Running’. The application was built to run automatically; when you write your
own applications, you can make them install without running, if you prefer.
d. Stop the application (so you can restart it and see the output):
# app stop helloWorld
Rev 2 8/23/17 48 41110481
Page 49

e. Run the application and see that it outputs a "Hello, world." message to the
LOG_TERM terminal window:
# app start helloWorld
f. (Optional) If you want to see information about the application, enter the
following command:
# app info helloWorld
g. In the LOG_TERM terminal window, press Ctrl+C to return to the command
prompt.
You have now successfully compiled a working application, and installed, stopped,
and run it on the module.
Note: To learn more about the Legato development environment, visit http://legato.io/legato-
docs/latest/.
Rev 2 8/23/17 49 41110481
Page 50

B: Update Legato Application Framework
Currently installed Legato AF version
As part of the Build and Install Legato Platform and mangOH Red Platform on Target
on page 23 process, you downloaded and installed the latest version of the Legato
Application Framework (AF).
When new versions of the framework are released, you can install them on your dev
machine using the procedure below.
B.1 Update the Legato AF on Your Dev Machine
To update the Legato AF on your dev machine:
1. Open a terminal window.
2. Configure your environment for development:
$ cfglegato
3. Check the version of the Legato AF that is currently installed:
$ cd $LEGATO_ROOT/..
$ ls -al .repo
B
The installed version is indicated in the manifest.xml link.
4. Go to http://legato.io/legato-docs/latest/aboutReleaseInfo.html to get the version
number of the most recent release.
Rev 2 8/23/17 50 41110481
Page 51

5. If your release is older (lower version number) than the most recent release:
Most recent release
a. Download the framework files into your working directory (for example,
"legato_framework")— Replace the release number in the ’repo’ command
with the most recent release (this example downloads version 17.07.1):
Note: Through the rest of this guide, "legato_framework" is assumed to be the file
you created. If you used a different name, make sure to use that name in any
commands that refer to legato_framework.
i. Optionally, rename your existing legato folder so that you can restore the
current framework if necessary at a later point (replace <version> with
your current Legato AF version in the following command):
$ mv legato legato_<version>
ii. Download the framework files into the work directory:
$ repo init -u git://github.com/legatoproject/\
manifest -m legato/releases/17.07.1.xml
$ repo sync
Rev 2 8/23/17 51 41110481
Page 52

mangOH Red Getting Started
IMEI
IMEI
Note: This may take several minutes to run.
6. Build and install the Legato AF:
$ cd legato
$ make clean && make wp85 && source bin/configlegatoenv
Rev 2 8/23/17 52 41110481
Page 53

C: Tips
C
C.1 Finding your SIM’s APN
Your SIM provider should give you the APN that you use to connect to their network. If
you don’t have the APN, you should be able to find it online.
Common APNs:
· Rogers Wireless—"internet.com"
· Others—Search the Internet for "<provider> APN". For example, "Rogers
Wireless APN"
C.2 Using the Linux Terminal program
Ubuntu includes a terminal emulator, which is labeled as "Terminal" in the desktop
environment. The emulator allows you to execute command-line programs that
interact with the Legato framework tools on your dev machine and the CF3 module in
the mangOH Red.
For this tutorial, here are some useful tips:
• Open a terminal window. For example, in the Unity desktop shell used by default
on Ubuntu Linux, do this using either of these methods:
· Click the Search icon and type "terminal", then run the application that is
listed.
· Press Ctrl+Alt+T
• Open a new tab in a window—Press Ctrl+Shift+T
• Change a tab name in a window—Right-click in the tab and select Set Title.
• Copy text from a window— Highlight the text and press Ctrl+Insert.
• Paste text into a window — Press Shift+Insert.
• For in-depth detail, refer to https://help.ubuntu.com/community/UsingTheTer-
minal.
Rev 2 8/23/17 53 41110481
Page 54

mangOH Red Getting Started
C.3 Useful commands for this tutorial (and more)
The following table describes the Legato and Linux commands used in this tutorial,
plus other useful commands.
Table C-1: Legato commands
Command types Command Description
Versioning cm info Display the modules model, IMEI, FSN (serial number), and firmware
legato version Display the Legato framework version.
Radio cm radio Display the radio status.
cm radio on
cm radio off
Refer to cm radio (http://legato.io/legato-docs/latest/toolsTarget_cm.html#toolsTarget_cm_radio) for
more details and command options.
Data connections cm data
cm data info
cm data apn <yourAPN> Set the APN for your profile to the APN from your SIM provider.
cm data connect Start a data connection.
cm data connect <timeout> Start a data connection (keep trying for up to <timeout> seconds).
Refer to cm data (http://legato.io/legato-docs/latest/toolsTarget_cm.html#toolsTarget_cm_data) for
more details and command options.
SIM cm sim info Display information about the SIM.
cm sim status Display the SIM status
cm sim enterpin Enter a SIM PIN code to be able to use the SIM.
and bootloader versions.
Enable or disable the radio.
Display information about the current profile in use.
Refer to cm sim (http://legato.io/legato-docs/latest/toolsTarget_cm.html#toolsTarget_cm_sim) for
more details and command options.
Applications app status Display the status of installed applications (running, stopped).
app start <appName>
app stop <appName>
app remove <appName>
Refer to app (http://legato.io/legato-docs/latest/toolsTarget_app.html) for more details and command
options.
Start, stop, or remove an application.
Rev 2 8/23/17 54 41110481
Page 55

Table C-2: Linux commands
Command types Command Description
Packages add-apt-repository Add a package repository to your list of locations where the apt-get
apt-get update Update the list of repositories to include those you added with add-apt-
apt-get install Search the repositories for a package, and install it.
update-alternatives TBD
package management tool searches for the packages you request.
repository.
C.4 Definitions
Table C-3: Definitions
Term Definition
sudo Allows you to run commands that require another user’s security
Legato Application
Framework (AF)
Legato Platform Legato Application Framework, Platform services, and a
privileges. In this tutorial, the sudo command is used to run
commands that require root/admin privileges.
Collection of daemons (Supervisor, Config tree, service directory ,
etc.), liblegato, and tools that provide a framework for developing
and installing apps on modules (e.g. WP8548)
toolchain (applications) running on top of a supported operating
system (e.g. Linux or RTOS).
Platform Services Collection of apps installed with the Legato Application
wget Gets files from a web server
IDE perspective A defined layout of the IDE. Each perspective will show different
IDE view A panel of information. For example, a directory structure, a
Framework to provide connectivity to module hardware. Platform
Services exposes APIs for developers to connect apps running
on the hardware to the Cloud.
view (panel) combinations.
panel for entering Terminal commands, etc.
Rev 2 8/23/17 55 41110481
 Loading...