

Page 1

Discovering Mandrakelinux
Mandrakelinux 10.1
http://www.mandrakesoft.com
Page 2

Discovering Mandrakelinux: Mandrakelinux 10.1
Published September 2004
Copyright © 2004 Mandrakesoft SA
by Camille Bégnis, Christian Roy, Fabian Mandelbaum, Roberto Rosselli del
Turco, Marco De Vitis, Alice Lafox, John Rye, Wolfgang Bornath, Funda
Wang, Patricia Pichardo Bégnis, Debora Rejnharc Mandelbaum, Mickael
Scherer, Jean-Michel Dault, Lunas Moon, Céline Harrand, Fred Lepied,
Pascal Rigaux, Thierry Vignaud, Giuseppe Ghibò, Stew Benedict, Francine
Suzon, Indrek Madedog Triipus, Nicolas Berdugo, Thorsten Kamp, Fabrice
Facorat, Xiao Ming, and Snature
Legal Notice
This manual is protected under Mandrakesoft intellectual property rights. By reproducing,
duplicating or distributing this manual in whole or in part, you explicitly agree to conform to
the terms and conditions of this license agreement.
This manual may be freely reproduced, duplicated and distributed either as such or as part of a
bundled package in electronic and/or printed format, provided however that the following
conditions are fulfilled:
• That this copyright notice appears clearly and distinctively on all
reproduced, duplicated and distributed copies.
• That the “front cover texts” below, About Mandrakelinux, page 1, and the
section stating the names of authors and contributors are attached to the
reproduced, duplicated or distributed version and remain unchanged.
• That this manual, specifically for the printed format, is reproduced
and/or distributed for noncommercial use only.
The express authorization of Mandrakesoft SA must be obtained prior to any other use of any
manual or part thereof.
“Mandrake”, “Mandrakesoft”, “DrakX” and “Linux-Mandrake” are registered Trademarks in
the US and/or other countries. The related “Star logo” is also registered. All rights reserved. All
other copyrights embodied in this document remain the property of their respective owners.
Front-cover texts
Mandrakesoft October 2004
http://www.mandrakesoft.com/
Copyright © 1999-2004 by Mandrakesoft S.A. and Mandrakesoft Inc.
Page 3

Tools Used in The Making of This Manual
This manual was written in XML DocBook. The set of files involved were managed using
Borges (http://www.mandrakelinux.com/en/doc/project/Borges/). The XML source files
were processed by xsltproc, openjade and jadetex using a customized version of Norman
Walsh’s stylesheets. Screen shots were taken using xwd or GIMP and converted with convert
(from the ImageMagick package). All these programs are free software and are available in
your Mandrakelinux distribution.
Page 4

Page 5

Table of Contents
Preface . . . . . . . . . . . . . . . . . . . . . . . . . . . . . . . . . . . . . . . . . . . . . . . . . . . . . . . . . . . . . . . . . . . 1
1. About Mandrakelinux . . . . . . . . . . . . . . . . . . . . . . . . . . . . . . . . . . . . . . . . . . . . 1
1.1. Contacting the Mandrakelinux Community . . . . . . . . . . . . . . . . 1
1.2. Join the Club . . . . . . . . . . . . . . . . . . . . . . . . . . . . . . . . . . . . . . . . . . . . . . . 1
1.3. Subscribe to Mandrakeonline . . . . . . . . . . . . . . . . . . . . . . . . . . . . . . 2
1.4. Purchasing Mandrakesoft Products . . . . . . . . . . . . . . . . . . . . . . . . 2
1.5. Contribute to Mandrakelinux . . . . . . . . . . . . . . . . . . . . . . . . . . . . . . 2
2. About this Quick-Startup Guide . . . . . . . . . . . . . . . . . . . . . . . . . . . . . . . . . . . 3
I. Installing Mandrakelinux . . . . . . . . . . . . . . . . . . . . . . . . . . . . . . . . . . . . . . . . . . . . . . 5
1. Installation Warning . . . . . . . . . . . . . . . . . . . . . . . . . . . . . . . . . . . . . . . . . . . . . . 5
2. Before Installation. . . . . . . . . . . . . . . . . . . . . . . . . . . . . . . . . . . . . . . . . . . . . . . . .7
2.1. Configuring your BIOS . . . . . . . . . . . . . . . . . . . . . . . . . . . . . . . . . . . . 7
2.2. Creating a Floppy Boot Disk . . . . . . . . . . . . . . . . . . . . . . . . . . . . . . . 8
2.3. Supported Hardware . . . . . . . . . . . . . . . . . . . . . . . . . . . . . . . . . . . . . 10
3. Installation with DrakX . . . . . . . . . . . . . . . . . . . . . . . . . . . . . . . . . . . . . . . . . . 13
3.1. The Mandrakelinux Installer . . . . . . . . . . . . . . . . . . . . . . . . . . . . . . 13
3.2. Choosing your Language . . . . . . . . . . . . . . . . . . . . . . . . . . . . . . . . . 15
3.3. License Terms of the Distribution . . . . . . . . . . . . . . . . . . . . . . . . . 18
3.4. Installation Class . . . . . . . . . . . . . . . . . . . . . . . . . . . . . . . . . . . . . . . . . 18
3.5. Configuring the Keyboard . . . . . . . . . . . . . . . . . . . . . . . . . . . . . . . . 20
3.6. Partitioning Your Disk . . . . . . . . . . . . . . . . . . . . . . . . . . . . . . . . . . . . 21
3.7. Multiple CD-ROM Installation . . . . . . . . . . . . . . . . . . . . . . . . . . . . 23
3.8. Root Password. . . . . . . . . . . . . . . . . . . . . . . . . . . . . . . . . . . . . . . . . . . . 23
3.9. Adding a User . . . . . . . . . . . . . . . . . . . . . . . . . . . . . . . . . . . . . . . . . . . . 25
3.10. Installing a Bootloader . . . . . . . . . . . . . . . . . . . . . . . . . . . . . . . . . . . 27
3.11. Checking Miscellaneous Parameters . . . . . . . . . . . . . . . . . . . . . 28
3.12. Installing Updates from the Internet . . . . . . . . . . . . . . . . . . . . . 34
3.13. It’s Over! . . . . . . . . . . . . . . . . . . . . . . . . . . . . . . . . . . . . . . . . . . . . . . . . 35
3.14. How to Uninstall Linux . . . . . . . . . . . . . . . . . . . . . . . . . . . . . . . . . . 36
II. Discover . . . . . . . . . . . . . . . . . . . . . . . . . . . . . . . . . . . . . . . . . . . . . . . . . . . . . . . . . . . . . 37
4. Migrating to Linux from Windows®and Mac OS®X. . . . . . . . . . . . . .37
4.1. Where’s my...? . . . . . . . . . . . . . . . . . . . . . . . . . . . . . . . . . . . . . . . . . . . . 37
4.2. A Brave New World! . . . . . . . . . . . . . . . . . . . . . . . . . . . . . . . . . . . . . .41
5. Linux for Beginners . . . . . . . . . . . . . . . . . . . . . . . . . . . . . . . . . . . . . . . . . . . . . . 43
5.1. Introduction . . . . . . . . . . . . . . . . . . . . . . . . . . . . . . . . . . . . . . . . . . . . . . 43
5.2. The Boot-Loader Menu . . . . . . . . . . . . . . . . . . . . . . . . . . . . . . . . . . . 43
5.3. Getting Ready for your Session . . . . . . . . . . . . . . . . . . . . . . . . . . . 43
5.4. Beginning your Session . . . . . . . . . . . . . . . . . . . . . . . . . . . . . . . . . . . 44
v
Page 6

5.5. Using your Graphical Environment . . . . . . . . . . . . . . . . . . . . . . . 47
5.6. Logging Out of your Session . . . . . . . . . . . . . . . . . . . . . . . . . . . . . . 51
6. Where to Get Documentation . . . . . . . . . . . . . . . . . . . . . . . . . . . . . . . . . . . . 53
6.1. Mandrakelinux-Specific Documentation . . . . . . . . . . . . . . . . . . 53
6.2. GNU/Linux Useful Resources . . . . . . . . . . . . . . . . . . . . . . . . . . . . 54
III. Use . . . . . . . . . . . . . . . . . . . . . . . . . . . . . . . . . . . . . . . . . . . . . . . . . . . . . . . . . . . . . . . . . . 57
7. Using KDE . . . . . . . . . . . . . . . . . . . . . . . . . . . . . . . . . . . . . . . . . . . . . . . . . . . . . . 57
7.1. Discovering the K Desktop Environment . . . . . . . . . . . . . . . . . . 57
7.2. Personalizing your Desktop. . . . . . . . . . . . . . . . . . . . . . . . . . . . . . . 60
7.3. KDE Sessions . . . . . . . . . . . . . . . . . . . . . . . . . . . . . . . . . . . . . . . . . . . . . 64
8. Konqueror . . . . . . . . . . . . . . . . . . . . . . . . . . . . . . . . . . . . . . . . . . . . . . . . . . . . . . . 65
8.1. Managing your Files . . . . . . . . . . . . . . . . . . . . . . . . . . . . . . . . . . . . . . 65
8.2. Browsing the Web . . . . . . . . . . . . . . . . . . . . . . . . . . . . . . . . . . . . . . . . 69
9. Writing E-mails with KMail . . . . . . . . . . . . . . . . . . . . . . . . . . . . . . . . . . . . . . 77
9.1. Configuring KMail. . . . . . . . . . . . . . . . . . . . . . . . . . . . . . . . . . . . . . . .77
9.2. KMail’s Interface . . . . . . . . . . . . . . . . . . . . . . . . . . . . . . . . . . . . . . . . . 81
9.3. Composing a Message . . . . . . . . . . . . . . . . . . . . . . . . . . . . . . . . . . . . 83
10. Office Work . . . . . . . . . . . . . . . . . . . . . . . . . . . . . . . . . . . . . . . . . . . . . . . . . . . . . 85
10.1. Word Processor . . . . . . . . . . . . . . . . . . . . . . . . . . . . . . . . . . . . . . . . . . 85
10.2. Spreadsheet . . . . . . . . . . . . . . . . . . . . . . . . . . . . . . . . . . . . . . . . . . . . . 90
vi
Page 7

List of Tables
8-1. Konqueror Sidebar Icons . . . . . . . . . . . . . . . . . . . . . . . . . . . . . . . . . . . . . . . . . . . . 66
8-2. Konqueror’s Web Browser Tool Bar Buttons . . . . . . . . . . . . . . . . . . . . . . . . . . 70
9-1. KMail’s Toolbar Buttons . . . . . . . . . . . . . . . . . . . . . . . . . . . . . . . . . . . . . . . . . . . . . 82
9-2. Message-Compose Toolbar Buttons . . . . . . . . . . . . . . . . . . . . . . . . . . . . . . . . . . 83
10-1. Suggested Styles . . . . . . . . . . . . . . . . . . . . . . . . . . . . . . . . . . . . . . . . . . . . . . . . . . . 87
List of Figures
2-1. The Rawwrite Program . . . . . . . . . . . . . . . . . . . . . . . . . . . . . . . . . . . . . . . . . . . . . . . 9
3-1. Very First Installation Welcome Screen . . . . . . . . . . . . . . . . . . . . . . . . . . . . . . . 13
3-2. Available Installation Options . . . . . . . . . . . . . . . . . . . . . . . . . . . . . . . . . . . . . . . 14
3-3. Choosing the Default Language . . . . . . . . . . . . . . . . . . . . . . . . . . . . . . . . . . . . . 15
5-1. The Mandrakefirsttime Wizard . . . . . . . . . . . . . . . . . . . . . . . . . . . . . . . . . . . . . . 45
5-2. The Login Window . . . . . . . . . . . . . . . . . . . . . . . . . . . . . . . . . . . . . . . . . . . . . . . . . . 46
5-3. The KDE Desktop . . . . . . . . . . . . . . . . . . . . . . . . . . . . . . . . . . . . . . . . . . . . . . . . . . . 47
5-4. KDE File Manager . . . . . . . . . . . . . . . . . . . . . . . . . . . . . . . . . . . . . . . . . . . . . . . . . . . 49
5-5. KDE’s Virtual Desktop Buttons . . . . . . . . . . . . . . . . . . . . . . . . . . . . . . . . . . . . . . 50
7-1. The KDE Desktop . . . . . . . . . . . . . . . . . . . . . . . . . . . . . . . . . . . . . . . . . . . . . . . . . . . 57
7-2. The KDE Panel . . . . . . . . . . . . . . . . . . . . . . . . . . . . . . . . . . . . . . . . . . . . . . . . . . . . . . 58
7-3. Changing KDE’s Color Scheme . . . . . . . . . . . . . . . . . . . . . . . . . . . . . . . . . . . . . . 60
7-4. Changing KDE’s Background Wallpaper . . . . . . . . . . . . . . . . . . . . . . . . . . . . . 61
7-5. Available Screen Resolutions List . . . . . . . . . . . . . . . . . . . . . . . . . . . . . . . . . . . . 63
7-6. Accept New Resolution Settings? . . . . . . . . . . . . . . . . . . . . . . . . . . . . . . . . . . . . 63
8-1. Konqueror . . . . . . . . . . . . . . . . . . . . . . . . . . . . . . . . . . . . . . . . . . . . . . . . . . . . . . . . . . 65
8-2. Konqueror as a Web Browser . . . . . . . . . . . . . . . . . . . . . . . . . . . . . . . . . . . . . . . . 69
8-3. Konqueror’s Bookmarks Manager Dialog . . . . . . . . . . . . . . . . . . . . . . . . . . . . 72
8-4. Konqueror’s Browser Tabs. . . . . . . . . . . . . . . . . . . . . . . . . . . . . . . . . . . . . . . . . . .73
8-5. Plugins Settings under Konqueror . . . . . . . . . . . . . . . . . . . . . . . . . . . . . . . . . . . 74
9-1. Setting General User Parameters . . . . . . . . . . . . . . . . . . . . . . . . . . . . . . . . . . . . . 77
9-2. Setting the Outgoing Mail Server . . . . . . . . . . . . . . . . . . . . . . . . . . . . . . . . . . . . 78
9-3. Configuring a POP3 Mail Account . . . . . . . . . . . . . . . . . . . . . . . . . . . . . . . . . . . 80
9-4. Mail Client Interface . . . . . . . . . . . . . . . . . . . . . . . . . . . . . . . . . . . . . . . . . . . . . . . . . 81
9-5. The Message-Compose Window. . . . . . . . . . . . . . . . . . . . . . . . . . . . . . . . . . . . . 83
10-1. OpenOffice.org Writer’s Main Window . . . . . . . . . . . . . . . . . . . . . . . . . . . . . 86
10-2. Rows, Columns and Cells . . . . . . . . . . . . . . . . . . . . . . . . . . . . . . . . . . . . . . . . . . 90
10-3. Simplifying Data Entry Using Auto-Completion . . . . . . . . . . . . . . . . . . . . 92
10-4. Using a Function in a Formula . . . . . . . . . . . . . . . . . . . . . . . . . . . . . . . . . . . . . . 93
10-5. Choosing the Chart Type . . . . . . . . . . . . . . . . . . . . . . . . . . . . . . . . . . . . . . . . . . . 95
10-6. A 3D Chart Inside the Spreadsheet . . . . . . . . . . . . . . . . . . . . . . . . . . . . . . . . . 95
vii
Page 8

viii
Page 9

Preface
1. About Mandrakelinux
Mandrakelinux is a GNU/Linux distribution supported by Mandrakesoft S.A.
which was born on the Internet in 1998. Its main goal was and still is to
provide an easy-to-use and friendly GNU/Linux system. Mandrakesoft’s two
pillars are open source and collaborative work.
1.1. Contacting the Mandrakelinux Community
The following are various Internet links pointing you to various Mandrakelinuxrelated sources. If you wish to know more about the Mandrakesoft company,
connect to our web site (http://www.mandrakesoft.com/). You can also
check out the Mandrakelinux distribution web site (http://www.mandrakelinux.
com/) and all its derivatives.
Mandrakeexpert (http://www.mandrakeexpert.com/) is Mandrakesoft’s support platform. It offers a new experience based on trust and the pleasure of
rewarding others for their contributions.
We also invite you to subscribe to the various mailing lists (http://www.
mandrakelinux.com/en/flists.php3), where the Mandrakelinux community
demonstrates its vivacity and keenness.
Please also remember to connect to Mandrakesecure (http://www.mandrakesoft.
com/security). It gathers all security-related material about Mandrakelinux
distributions. You will find security and bug advisories, as well as security
and privacy-related articles. A must for any server administrator or user concerned about security.
1.2. Join the Club
Mandrakesoft offers a wide range of advantages through its Mandrakeclub
(http://www.mandrakeclub.com):
• download commercial software normally only available in retail packs,
such as special hardware drivers, commercial applications, freeware, and
demo versions;
1
Page 10

Preface
• vote for and propose new software through a volunteer-run RPM voting
system;
• access more than 50,000 RPM packages for all Mandrakelinux distributions;
• obtain discounts for products and services on Mandrakestore (http://
store.mandrakesoft.com);
• access a better mirror list, exclusive to Club members;
• read multilingual forums and articles.
By financing Mandrakesoft through the Mandrakeclub you will directly
enhance the Mandrakelinux distribution and help us provide the best possible GNU/Linux desktop to our users.
1.3. Subscribe to Mandrakeonline
Mandrakesoft offers a very convenient way to keep your system up to date
automatically, keeping away bugs and security holes. Visit the Mandrakeonline Web site (https://www.mandrakeonline.net/) to learn more about this
service.
1.4. Purchasing Mandrakesoft Products
Mandrakelinux users may purchase products on-line through the Mandrakestore (http://store.mandrakesoft.com/). You will not only find Mandrakeli-
nux software, operating systems and “live” boot CDs (such as Move), but also
special subscription offers, support, third-party software and licenses, documentation, GNU/Linux-related books, as well as other Mandrakesoft goodies.
1.5. Contribute to Mandrakelinux
The skills of the many talented folks who use Mandrakelinux can be very useful in the making of the Mandrakelinux system:
• Packaging. A GNU/Linux system is mainly made of programs picked up
on the Internet. They have to be packaged in order to work together.
• Programming. There are many, many projects directly supported by Man-
drakesoft: find the one which most appeals to you and offer your help to
the main developer(s).
2
Page 11

Preface
• Internationalization. You can help us in the translation of web pages,
programs and their respective documentation.
• Documentation. Last but not least, the manual you are currently reading
requires a lot of work to stay up-to-date with regard to the rapid evolution
of the system.
Consult the development projects (http://www.mandrakesoft.com/labs/) page to learn more about how you can contribute to the evolution of Mandrake-
linux.
2. About this Quick-Startup Guide
Welcome, and thank you for choosing Mandrakelinux! This Quick-Startup Guide will help you understand the installation basics of a GNU/Linux distri-
bution, give you pointers as to what you need to do before actually installing the Mandrakelinux operating system (OS), as well as initiate you to the
GNU/Linux environment.
We will first tell you about technical procedures you should follow (“Insta-
llation Warning”, page 5). This is not mandatory, but let us just say we highly
recommend that you follow these instructions! We will talk about data back-
up, scandisk, defrag, and the like.
We cover topics such as BIOS configuration, boot disks and supported hardware in “Before Installation”, page 7.
Then comes the chapter you have been waiting for: “Installation with DrakX”,
page 13. This utility is designed to guide you during the installation process.
After that we discuss the Linux paradigm by comparing it to Windows®and
Mac OS®in “Migrating to Linux from Windows®and Mac OS®X ”, page 37.
The next chapter (“Linux for Beginners”, page 43) was written especially to
help out new users. In it we describe the first steps a new user must master
and we explain concepts such as “logging in/out”, the boot-loader menu,
and more.
We then guide you through a fairly exhaustive list of documentation sources
which you can consult in order to attain a better Linux knowledge (“Where
to Get Documentation”, page 53). A Mandrakelinux-specific section points to
numerous in-house resources which you can find on the Net.
3
Page 12

Preface
In the last chapter (Browsing the Web, page 69) we explain how to browse the
Internet with the Konqueror application.
The last part (Use) gives you a short description of the following daily applications:
• the KDE graphical environment in “Using KDE”, page 57;
• the Konqueror file manager and web browser (see Managing your Files, page
65, and Browsing the Web, page 69);
• the KMail mail client (“Writing E-mails with KMail”, page 77);
• as well as two of OpenOffice.org’s components (see Word Processor, page 85,
and Spreadsheet, page 89).
Enjoy your reading!
4
Page 13

Chapter 1. Installation Warning
This installation guide only covers the most common steps of the installation process. If you plan on using Windows®as well as GNU/Linux by dualboot (meaning being able to access either OS on the same computer), please
note that it is easier to install Windows®before GNU/Linux. If Windows®is
already set up on your system, and you’ve never installed GNU/Linux before, DrakX –– Mandrakelinux’s installation program –– will have to resize your
Windows®partition. This operation can be harmful to your data. Therefore,
you must perform the following steps before proceeding:
• you must run scandisk on your Windows
®
computer. The resizing program can detect some obvious errors, but scandisk is better suited for this
task;
Before using scandisk (or defrag) make sure your screen saver and
any other program that might write to the hard disk is turned off.
To obtain even better results, you should run scandisk or defrag
from Windows®’s “Safe Mode”.
• For maximum data security, you should also run defrag on your partition.
This further reduces the risk of data loss. This isn’t mandatory, but it’s
highly recommended. Doing so will make the resizing process much faster
and easier.
• The ultimate insurance against problems is to always back up your data!
Of course, you should back up your data on another computer, upload
your back-ups on the web, on a friend’s computer, etc. Do not back it up
onto the computer on which you want to install GNU/Linux.
If neither scandisk nor defrag are installed within Windows®, please refer to
the Windows®documentation for instructions on installing them.
5
Page 14

Chapter 1. Installation Warning
NTFS Partitions. Windows®2000, NT and XP users should
remain careful: even though DiskDrake (through the ntfsresize application) is able to resize NTFS partitions, it’s highly
recommended that you back up your data before starting
the installation. Please see the Linux-NTFS site (http://
linux-ntfs.sourceforge.net/info/ntfs.html##2.6) as well
as the NTFS Resize FAQ (http://mlf.linux.rulez.org/mlf/
ezaz/ntfsresize.html) for more information on the subject.
Windows®users can also use Partition MagicTM(http://www.
symantec.com/partitionmagic/) to resize their NTFS partitions
under Windows®.
6
Page 15

Chapter 2. Before Installation
This chapter covers issues which should be addressed before you start your
new Mandrakelinux installation. Make sure you read it completely since it will
save you a lot of time. Also back up your data (on a different disk to the one
you will install the system into) and plug in and turn on all your external
devices (keyboard, mouse, printer, scanner, etc.).
2.1. Configuring your BIOS
The BIOS (Basic Input/Output System) is used to find the device on which
the operating system is located and starts it up. It’s also used for the initial
hardware configuration and hardware low-level access.
The appearance of plug’n’play devices and their widespread use means that
all modern BIOSes can initialize these devices. In order for Linux to recognize
plug’n’play devices, your BIOS must be configured to initialize them.
Changing your BIOS’ settings is usually performed by holding down the
Del key (some BIOSes use the F1, F2, F10 or Esc keys instead) right after
the computer is switched on. Unfortunately, there are many types of BIOSes.
Therefore you will have to look for the appropriate option yourself. It’s often
called PNP OS installed (or Plug’n’Play OS installed). Set this option to No
and the BIOS will then initialize any plug’n’play devices, which helps Linux to
recognize them.
All recent systems can boot from a CD-ROM. Look for Boot sequence or First
boot device in the BIOS’ features setup, and set the CD-ROM as the first one.
If your system can’t boot from a CD-ROM you will need to use a floppy boot
disk.
If you want to use a parallel printer connected locally to your machine, make sure the parallel port mode is set to ECP+EPP (or at least
to one of ECP or EPP) and not to SPP, unless you have a really
old printer. If the parallel port is not set this way you might still be
able to print, but your printer will not be detected automatically
and you will have to configure it by hand. Also make sure the printer
is properly connected to your machine and powered on beforehand.
7
Page 16

Chapter 2. Before Installation
2.2. Creating a Floppy Boot Disk
If your system cannot boot from the CD-ROM you will need to create a
floppy boot disk. The CD-ROM contains all of the image files and utility
programs needed to do so.
The floppy boot disk images are in the CD-ROM’s install/images/ directory.
The following is a list of different images and their respective installation
methods:
cdrom.img
To install from a local IDE or SCSI CD-ROM drive.
network.img and network_drivers.img
To install from an NFS, FTP, HTTP repository on your local LAN or via
a PPPoE (DSL line) network connection. The network configuration of
the machine on which you wish to install may be manual or automatic.
Please make sure that you make both floppies.
pcmcia.img
Use this image if the installation medium is reached through a PCMCIA
card (network, CD-ROM, etc.).
Some PCMCIA devices now use common network drivers. If the
PCMCIA device does not work, try again with network.img and
network_drivers.img.
hd_grub.img
Use this image if you want to perform the installation from a hard disk.
You need to copy the contents of the CD onto the hard drive (either on a
FAT, ext2FS, ext3FS or ReiserFS partition). At the hd_grub customization
site (http://qa.mandrakesoft.com/hd_grub.cgi) there is a little tool
which may prove helpful for customizing your boot floppy.
The images/alternatives/* directory provides more or less the same boot
images, but with a different (older) kernel. Actually it provides a 2.4 kernel
(Mandrakelinux 10.1 onwards uses kernel 2.6) which might help you to get
started on older systems.
8
Page 17
Chapter 2. Before Installation
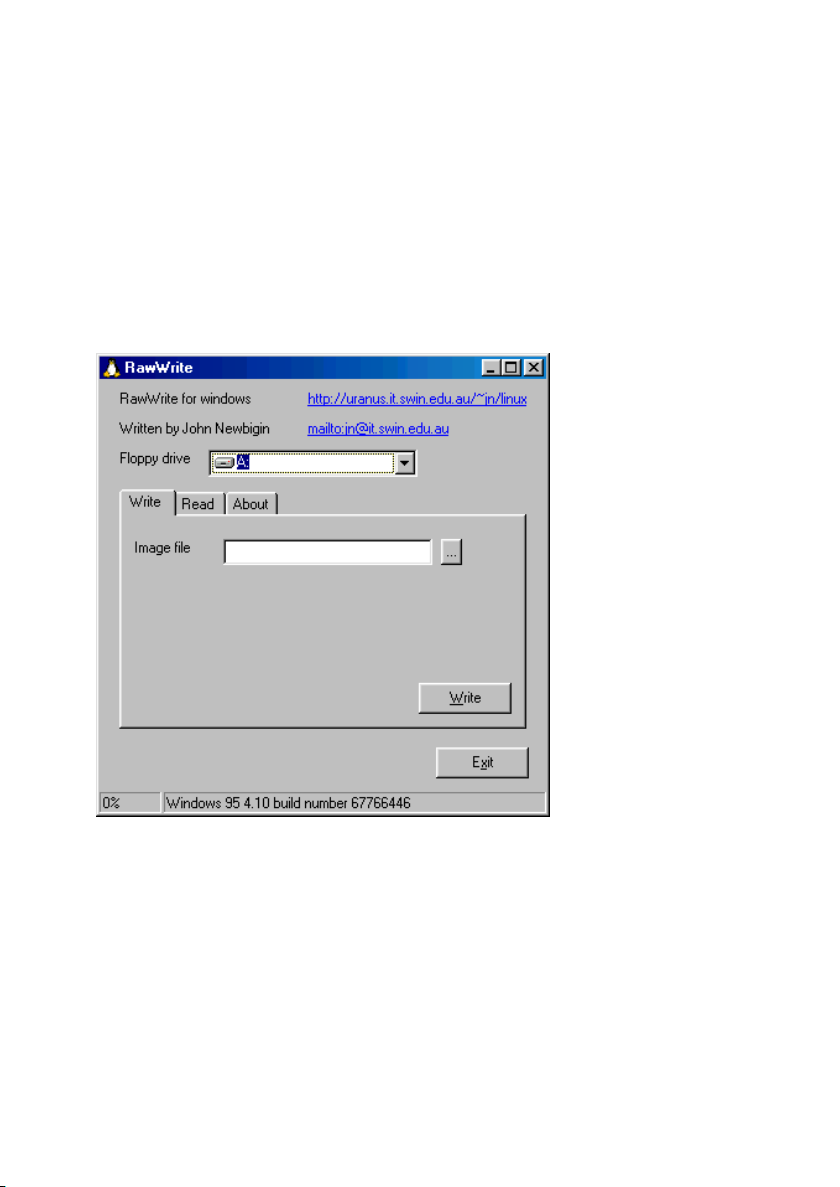
2.2.1. Creating a Boot Disk With Windows
In order to do so, you need to use the rawwrite program. You will find it in
the CD-ROM’s dosutils/ directory.
You may have noticed that there is a DOS version of the same program called
rawrite. In fact, this is the original version of the program. rawwrite is a
graphical front-end to it.
Start the program, as shown in figure 2-1.
Figure 2-1. The Rawwrite Program
Select the boot image to be copied and the target device. In almost every case,
the target device is the A: drive (that is, the first floppy disk drive).
Then if you have not already done so, insert an empty disk into your chosen
floppy drive and click on the Write button. When completed click on the
Exit button: now you have a floppy boot disk to install your Mandrakelinux
distribution.
9
Page 18

Chapter 2. Before Installation
2.2.2. Creating a Floppy Bo ot Disk From GNU/Linux
If you already have GNU/Linux installed (another version, or on another
machine, etc.), then carry out the following steps:
1. Mount the CD-ROM, if needed. Let us suppose that the mount point is
/mnt/cdrom.
2. Log in as root (to do so, open a terminal window, run the su command
and enter root’s password).
3. Insert an empty diskette into the floppy drive and type:
$ dd if=/mnt/cdrom/images/cdrom.img of=/dev/fd0 bs=512
When this operation is completed, your floppy boot disk will be ready
for use.
Replace /dev/fd0 with /dev/fd1 if you are using the second floppy
drive and, of course, the name of the image with the one you want.
2.3. Supported Hardware
Mandrakelinux can handle a large number of hardware devices, and the list is
far too long to be quoted in its entirety. Nevertheless some of the steps we
describe will help you to find out if your hardware is compatible. It will also
guide you in configuring some problematic devices.
You may also consult an up-to-date list of supported hardware on the
Mandrakelinux Hardware Database (http://www.mandrakelinux.com/en/
hardware.php3) web site.
USB devices: support for USB 1.x and USB 2.0 is now extensive. Most peripherals are fully supported. You can obtain the list of supported hardware
on the Linux-USB device overview (http://www.qbik.ch/usb/devices/) site.
10
Page 19

Chapter 2. Before Installation
Legal Disclaimer: The Mandrakelinux Hardware Database contains
information about hardware devices which have been tested and/or
have been reported to function properly with Mandrakelinux. Due
to the wide variety of system configurations, Mandrakesoft cannot
guarantee that a specific device will work properly on your system.
2.3.1. Notes About Winmodems
winmodems are also called controller-less modems or software modems. Support for these peripherals is improving. Drivers do exist, but most of them
are in binary form and available only for newer kernel versions.
If you have a PCI modem, look at the output of cat /proc/pci run as the
root user. This will tell you the I/O port and the IRQ of the device. Then use
the setserial command (for our example, the I/O address is 0xb400, the
IRQ is 10 and the modem will be the 4thserial device) as follows:
setserial /dev/ttyS3 port 0xb400 irq 10 UART 16550A
Then try to query your modem using minicom or kppp. If it does not work,
you may have a software modem. If it does work, create the /etc/rc.d/rc.
setserial file and place the appropriate setserial command line in it.
If you happen to have a software modem in your machine, and you have a
Mandrakeclub account, you might find an RPM package that supports your
modem. You can also take a look at the linmodems (http://linmodems.
org/) web site.
11
Page 20

Chapter 2. Before Installation
12
Page 21
Chapter 3. Installation with DrakX
3.1. The Mandrakelinux Installer
With the Mandrakelinux DrakX installation program, it doesn’t matter whether
you’re a newbie or a GNU/Linux guru. DrakX’s job is to provide you with a
smooth installation and an easy transition to Mandrakelinux’s latest version.
DrakX will work best if all of your hardware is connected to your
computer and powered on during the installation. Printers, modems,
scanners and joysticks are just a few examples of peripherals which
DrakX can automatically detect and configure as Mandrakelinux is
being installed.
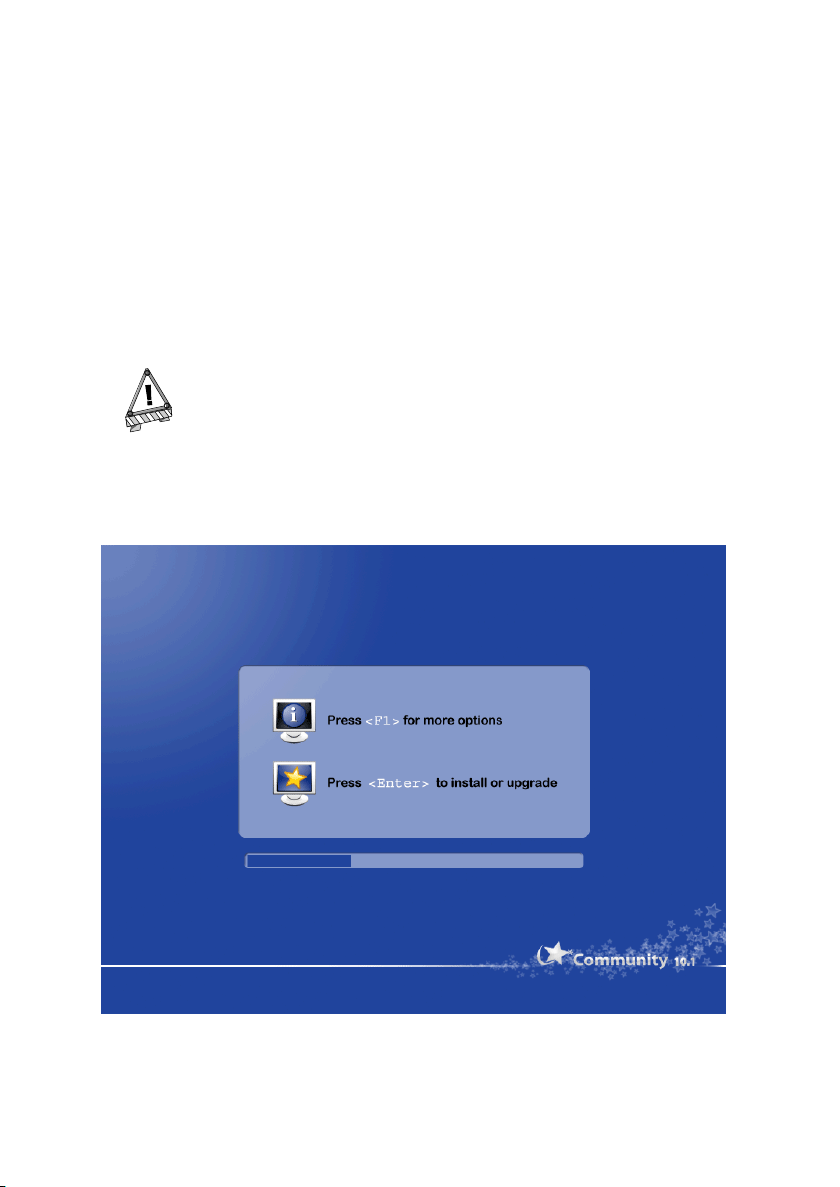
Figure 3-1. Very First Installation Welcome Screen
13
Page 22
Chapter 3. Installation with DrakX
The first screen you see displays information and installation options (figure
3-1). Allowing the installation to continue will simply begin the installation
in normal or “linux” mode. Next we’ll go over some options and parameters
which you can pass to the installation program if you run into problems.
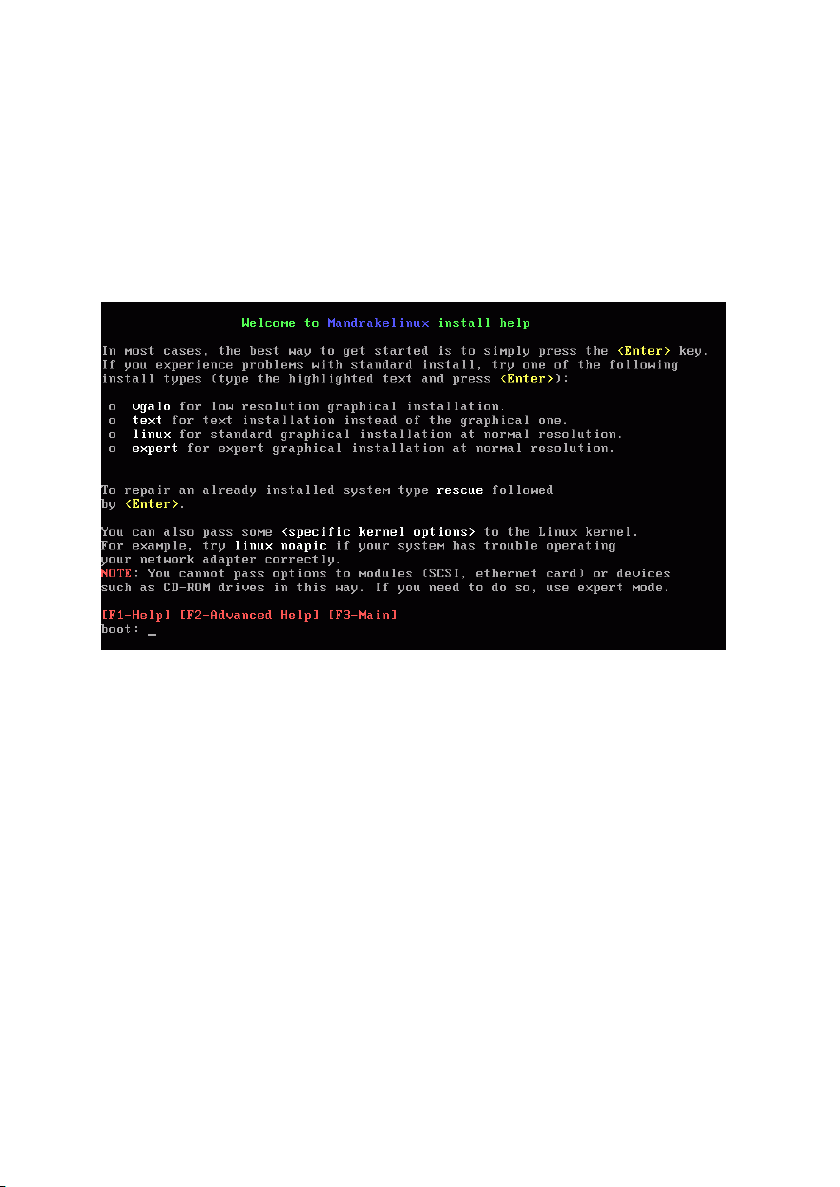
Pressing F1 will open a help screen (figure 3-2). Here are some useful options
to choose from:
Figure 3-2. Available Installation Options
• vgalo: if you have tried a default installation and didn’t see the graphical
interface (figure 3-3) you can try to run the installation in low resolution
mode. This happens with certain types of video cards. With Mandrakelinux
we give you a number of options to work around problems related to older
hardware. To try the installation in low resolution mode, type vgalo at the
prompt.
• text: if your video card is very old and the graphical installation doesn’t
work at all, you can always choose to install in text mode. Since all video
cards can display text, this is the “last resort” kind of installation. However
don’t worry: it’s unlikely that you’ll need this option.
• noauto: in some rare cases, your PC may appear to freeze or lock up during
the hardware detection phase. If that happens, adding the word noauto
as a parameter will tell the installation program to bypass hardware detection. With that option DrakX won’t scan for hardware. Therefore you
14
Page 23

Chapter 3. Installation with DrakX
will need to manually specify hardware parameters later in the installation process. The noauto parameter can be added to the previous modes,
so depending on your hardware you may have to specify:
boot: vgalo noauto
to perform a low resolution graphical installation without DrakX performing a hardware scan.
• kernel options: most machines don’t require specific kernel options. Due
to bugs in the design or in the BIOS, there have been a few cases of motherboards incorrectly reporting the amount of memory installed. If you need
to manually specify the amount of DRAM (which stands for Dynamic Random Access Memory) installed in your PC, use the mem= xxxM parameter.
For example, to start the installation in normal mode with a computer containing 256 MB of memory, your command line would look like this:
boot: linux mem=256M
Now let’s move on to the actual installation process. When the installer starts,
you will see a nice graphical interface (figure 3-3). On the left will be the various installation steps. The installation will occur in two phases: installation,
then configuration. The list on the left displays all the steps. The current step
is marked by a highlighted bullet.
Each step may present various screens. Surfing between those screens is made possible through the Next and Previous buttons. Additionally an Advanced
button may be available to show more advanced configuration options. Note
that most of the latter should only be handled by expert users. But there’s no
harm in looking at them!
The Help button will show explanations concerning the current installation step.
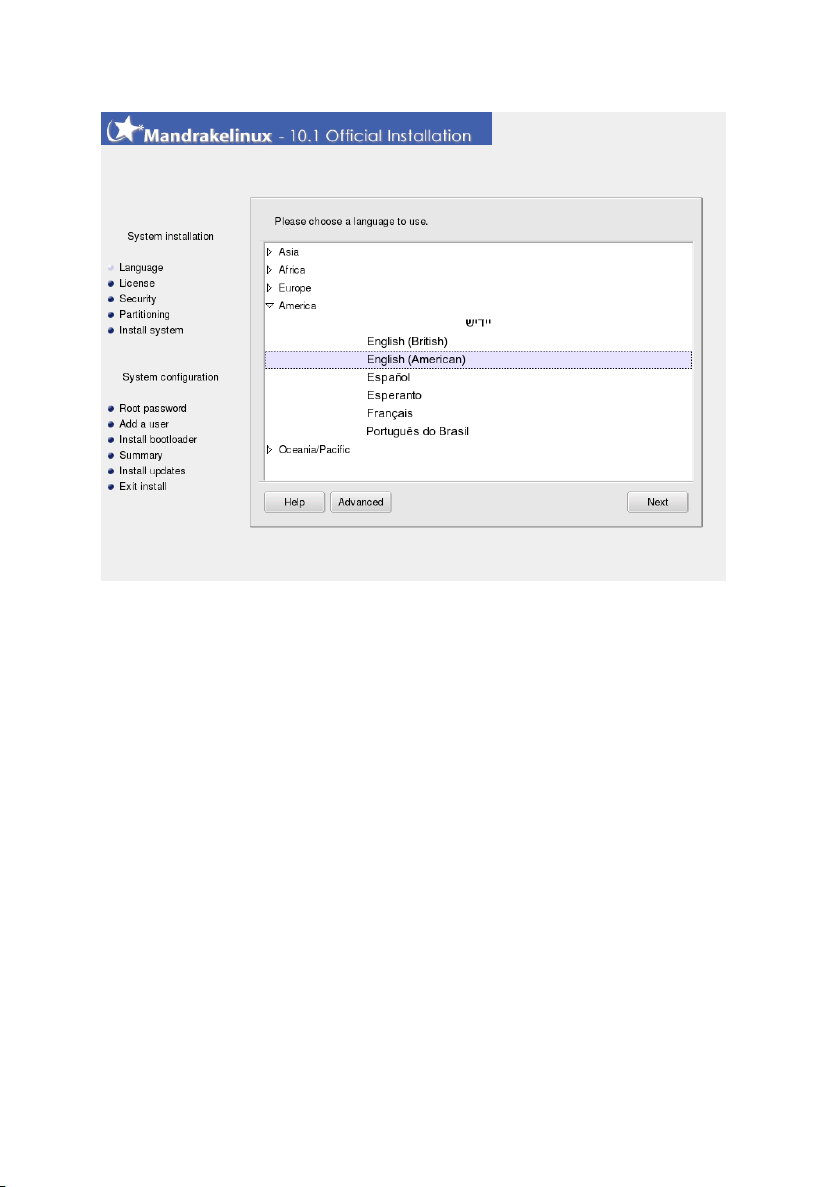
3.2. Choosing your Language
The first step is to choose your preferred language.
15
Page 24
Chapter 3. Installation with DrakX
Figure 3-3. Choosing the Default Language
Your choice of preferred language will affect the installer, the documentation,
and the system in general. First select the region you’re located in, then the
language you speak.
Clicking on the Advanced button will allow you to select other languages to
be installed on your workstation, thereby installing the language-specific files for system documentation and applications. For example, if Spanish users
are to use your machine, select English as the default language in the tree
view and Espa˜nol in the Advanced section.
16
Page 25

Chapter 3. Installation with DrakX
About UTF-8 (unicode) support: Unicode is a character encoding
intended to cover all existing languages. However full support for
it in GNU/Linux is still under development. For that reason, Mandrakelinux’s use of UTF-8 will depend on the user’s choices:
1. If you choose a language with a strong legacy encoding
(latin1 languages, Russian, Japanese, Chinese, Korean,
Tha¨ı, Greek, Turkish, and most iso-8859-2 languages),
the legacy encoding will be used by default.
2. Other languages will use Unicode by default.
3. If two or more languages are to be installed, and those
languages are not using the same encoding, then Unicode
will be used for the whole system.
4. Finally, Unico de can also be forced for use throughout the
system at a user’s request by selecting the Use Unicode
by default option independently of which languages have
been chosen.
Note that you’re not limited to choosing a single additional language. You
may choose several, or even install them all by selecting the All languages
box. Selecting support for a language means translations, fonts, spell checkers, etc. will also be installed for that language. Make sure you select all
languages that are likely to be useful on the machine now, it may be difficult
to configure support for languages not chosen at install time at a later time.
To switch between the various languages installed on your system,
you can launch the localedrake command as root to change
the language used by the entire system. Running the command
as a regular user will only change the language settings for that
particular user.
17
Page 26
Chapter 3. Installation with DrakX
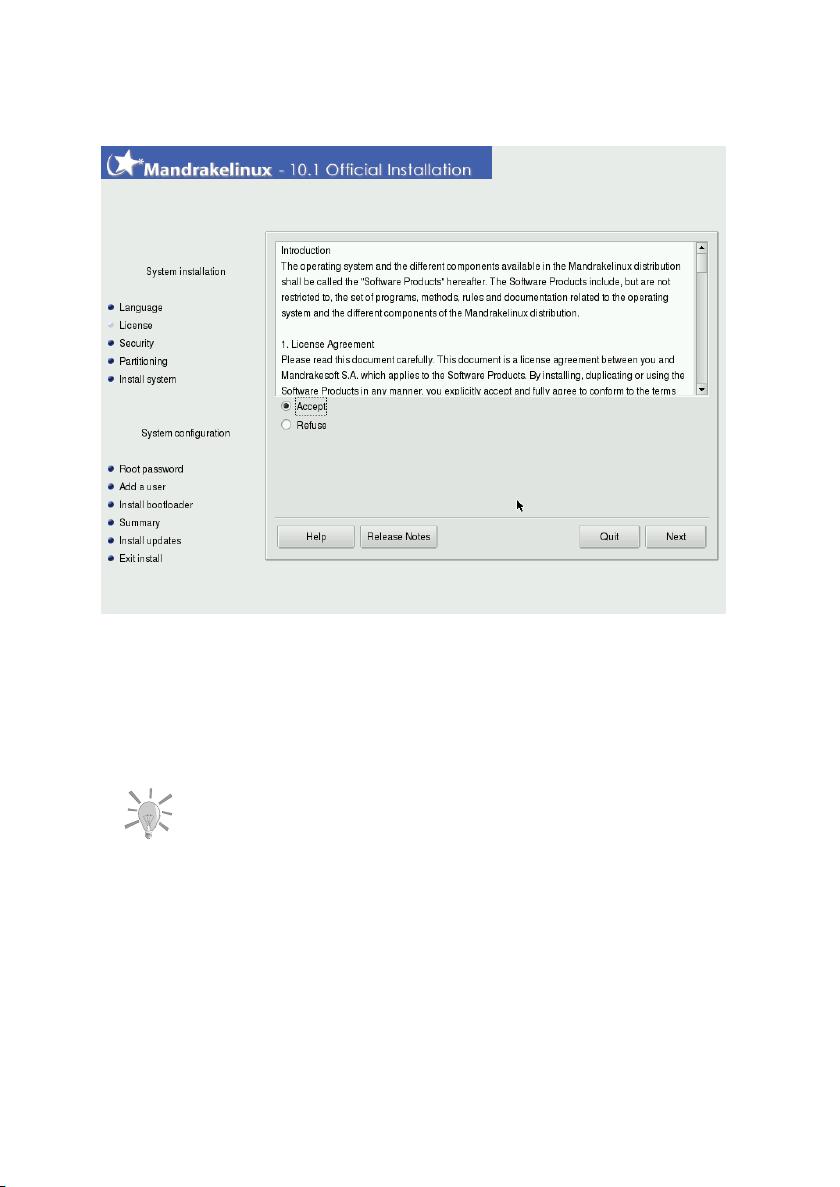
3.3. License Terms of the Distribution
Before continuing, you should carefully read the terms of the license. It covers the entire Mandrakelinux distribution. If you agree with all the terms it
contains, select Accept and click on Next. If not, clicking on Quit will reboot
your computer.
If you are curious about any technical changes which have occurred
in the distribution since the last release, you can click on the Release
Notes button to display them.
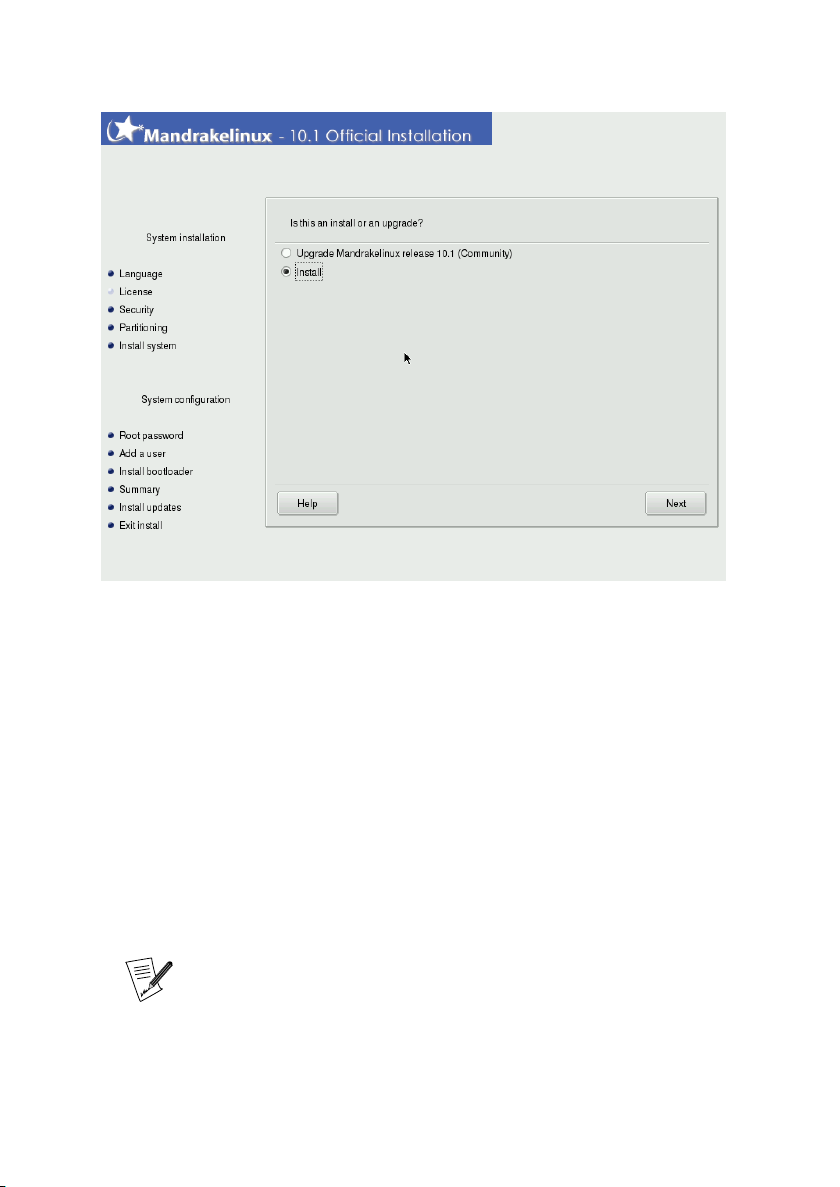
3.4. Installation Class
This step is activated only if an existing GNU/Linux partition has been found
on your machine.
18
Page 27
Chapter 3. Installation with DrakX
DrakX now needs to know if you want to perform a new installation or to
upgrade your existing Mandrakelinux system:
• Install. For the most part, this completely wipes out the old system. Ho-
wever, depending on your partitioning scheme, you can prevent some of
your existing data (particularly /home directories) from being overwritten.
If you wish to change how your hard drives are partitioned, or to change
the file system, you should use this option.
• Upgrade.This installation class allows you to update the packages currently
installed on your Mandrakelinux system. Your current partitioning scheme
and user data won’t be altered. Most of the other configuration steps remain available and are similar to a standard installation.
Using the“Upgrade”option should work fine on Mandrakelinux systems running version 9.2 or later. Performing an upgrade on versions prior to Mandrakelinux version 9.2 is not recommended.
19
Page 28
Chapter 3. Installation with DrakX
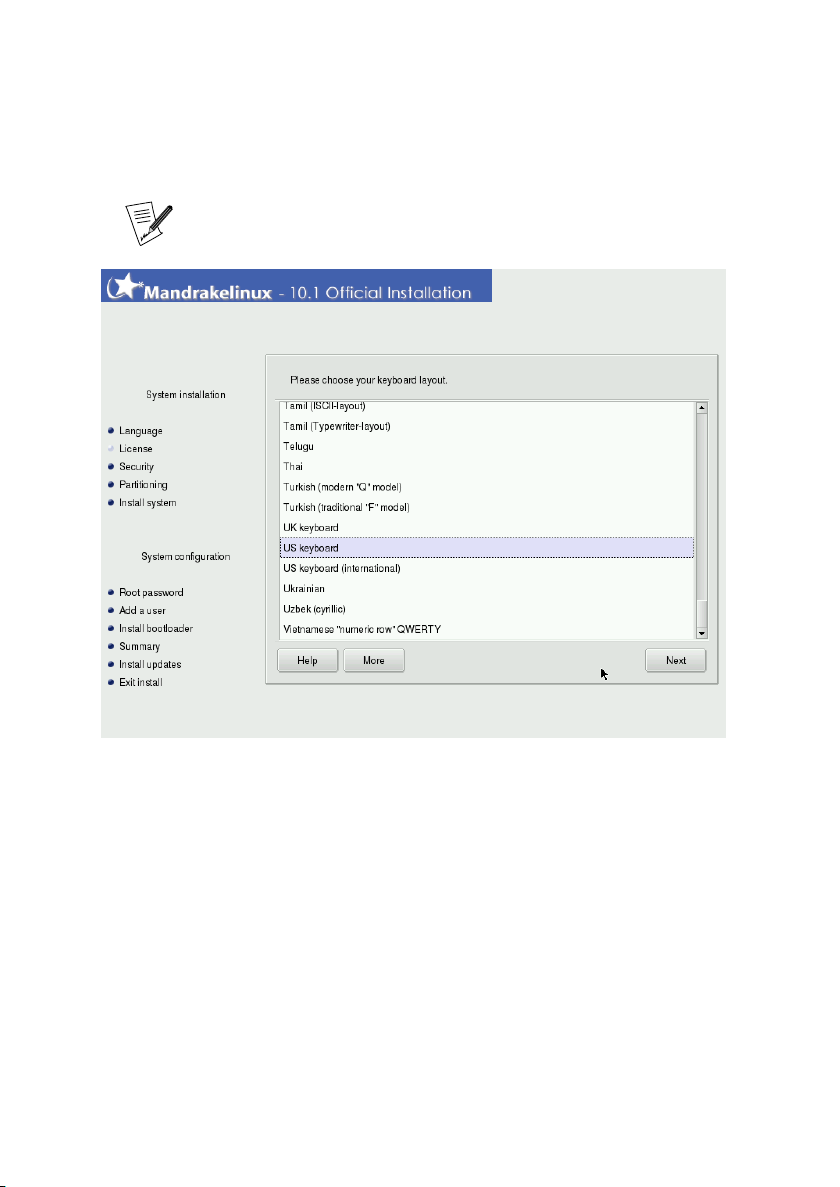
3.5. Configuring the Keyboard
This step only shows if your language settings do not match one
single keyboard. Otherwise, your keyboard map is automatically
selected.
Depending on the language you chose (Choosing your Language, page 15),
DrakX will automatically select a particular type of keyboard configuration.
Check that the selection suits you or choose another keyboard layout.
Also, you may not have a keyboard which corresponds exactly to your language: for example, if you are an English-speaking Swiss native, you may
have a Swiss keyboard. Or if you speak English and are located in Québec,
you may find yourself in the same situation where your native language and
country-set keyboard don’t match. In either case, this installation step will
allow you to select an appropriate keyboard from a list.
Click on the More button to be shown a list of supported keyboards.
If you choose a keyboard layout based on a non-Latin alphabet, the next dialog will allow you to choose the key binding which will switch the keyboard
between the Latin and non-Latin layouts.
20
Page 29
Chapter 3. Installation with DrakX
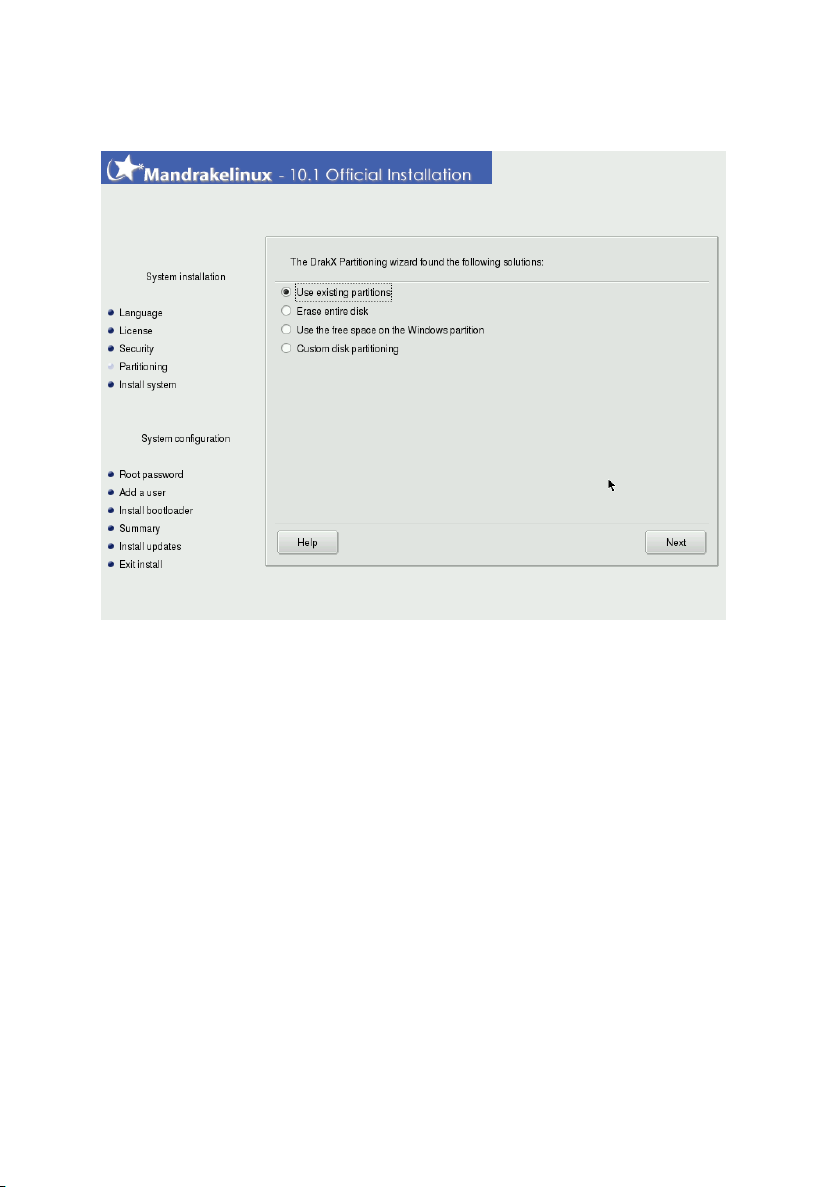
3.6. Partitioning Your Disk
You now need to decide where you want to install Mandrakelinux on your
hard drive. If your hard drive is empty or if an existing operating system is
using all the available space you will have to re-partition the drive. Basically,
partitioning a hard drive means to logically divide it up in order to create the
space required for your new Mandrakelinux system.
Because the process of partitioning a hard drive is usually irreversible and
can lead to data loss, partitioning can be intimidating and stressful for the
inexperienced user. Fortunately, DrakX includes a wizard which simplifies
this process. Before continuing with this step, read through the rest of this
section and above all, take your time.
Depending on the configuration of your hard drive, several options are available:
• Use free space. This option will perform an automatic partitioning of your
blank drive(s). If you use this option there will be no further prompts.
• Use existing partition. The wizard has detected one or more existing Linux
partitions on your hard drive. If you want to use them, choose this option.
You will then be asked to choose the mount points associated with each of
21
Page 30
Chapter 3. Installation with DrakX
the partitions. The legacy mount points are selected by default, and for the
most part it’s a good idea to keep them. You will also be asked to choose
the partitions to be formatted or preserved.
• Use the free space on the Windows partition. If Microsoft Windows
®
is insta-
lled on your hard drive, you might have to create free space for GNU/Linux.
To do so, you can delete your Microsoft Windows®partition and data (see
the “Erase entire disk” solution below) or resize your Microsoft Windows
FAT or NTFS partition. Resizing can be performed without the loss of
any data, provided you’ve previously defragmented the Windows®partition. Backing up your data is strongly recommended. Using this option
is recommended if you want to use both Mandrakelinux and Microsoft Win-
dows®on the same computer.
Before choosing this option, please understand that after this procedure,
the size of your Microsoft Windows®partition will be smaller then when
you started. You’ll have less free space under Microsoft Windows®to store
your data or to install new software.
• Erase entire disk. If you want to delete all data and all partitions present
on your hard drive and replace them with Mandrakelinux, choose this option. Be careful because you won’t be able to undo this operation after you
confirm.
®
If you choose this option, all data on your disk will be deleted.
• Remove Windows(TM). This option appears when the hard drive is enti-
rely taken by Microsoft Windows®. Choosing this option will simply erase
everything on the drive and begin fresh, partitioning everything from scratch.
If you choose this option, all data on your disk will be lost.
22
Page 31

Chapter 3. Installation with DrakX
• Custom disk partitioning. Choose this option if you want to manually par-
tition your hard drive. Be careful: it is a powerful but dangerous choice
and you can very easily lose all your data. That’s why this option is only
recommended if you have performed custom disk partitioning before, and
have enough GNU/Linux experience. For more instructions on how to use
the DiskDrake utility, refer to the Managing Your Partitions section in the
Starter Guidethe Managing Your Partitions section in the Starter Guide.
3.7. Multiple CD-ROM Installation
The Mandrakelinux installation is distributed on several CD-ROMs. If a selected package is located on another CD, DrakX will eject the current CD and
ask you to insert the required one. If you do not have the requested CDROM at hand, just click on Cancel, and the corresponding packages will not
be installed.
3.8. Root Password
23
Page 32

Chapter 3. Installation with DrakX
This is the most crucial decision point for the security of your GNU/Linux
system: you must enter the root password. Root is the system administrator
and is the only user authorized to make updates, add users, change the overall system configuration, and so on. In short, root can do everything! That’s
why you must choose a password which is difficult to guess: DrakX will tell
you if the password you chose is too simple. You’re not forced to enter a password, but we strongly encourage you to do so. GNU/Linux is just as prone
to operator error as any other operating system. Since root can overcome all
limitations and unintentionally erase all data on partitions by carelessly accessing the partitions themselves, it is important that it be difficult to become
root.
The password should be a mixture of alphanumeric characters and at least
8 characters long. Never write down root’s password — it makes it far too
easy to compromise your system.
One caveat: don’t make the password too long or too complicated because
you must be able to remember it!
The password won’t be displayed on screen as you type it. To reduce the
chance of a blind typing error you will need to enter the password twice. If
you do happen to make the same typing error twice, you will have to use
this “incorrect” password when you try to connect as root, at least for the
first time.
If you want an authentication server to control access to your computer, click
on the Advanced button.
If your network uses either LDAP, NIS, PDC Windows Domain, or Active Directory authentication services, select the appropriate one for authentication.
If you don’t know which one to use, you should ask your network administrator.
24
If you happen to have problems with remembering passwords, or
if your computer will never be connected to the Internet and you
absolutely trust everybody who uses your computer, you can choose
to have No password.
Page 33

Chapter 3. Installation with DrakX
3.9. Adding a User
GNU/Linux is a multi-user system which means each user can have his or her
own preferences, own files and so on. But unlike root, who is the system
administrator, the users you add at this point won’t be authorized to change
anything except their own files and their own configurations, so protecting
the system from unintentional or malicious changes which could have a serious impact on it.
You will have to create at least one regular user for yourself — this is the
account which you should use for routine, day-to-day usage. Although it’s
very easy to log in as root to do anything and everything, it may also be very
dangerous! A very simple mistake could mean that your system won’t work
any more. If you make a serious mistake as a regular user, the worst that can
happen is that you’ll lose some information, but you won’t affect the entire
system.
The first field asks you for a real name. Of course, this is not mandatory —
any name will do. DrakX will use the first word you type in this field and
copy it, all in lowercase, to the Login name field, which is the name this user
will enter to log onto the system. If you like, you may override the default
and change the user name. The next step is to enter a password. From a
25
Page 34

Chapter 3. Installation with DrakX
security point of view, a non-privileged (regular) user’s password is not as
crucial as the root password, but that’s no reason to neglect it by making it
blank or too simple: after all, your files could be the ones at risk.
Once you click on Accept user, you can add other users. Add a user for each
one of your friends, your father, your sister, etc. Click Next when you’re finished adding users.
Clicking the Advanced button allows you to change the default
shell for that user (bash by default).
When you’re finished adding users, you’ll be proposed to choose a user who
will be automatically logged into the system when the computer boots up. If
you’re interested in that feature (and don’t care much about local security),
choose the desired user (if more than one regular user is defined) and select a
window manager, then click on Next. If you’re not interested in this feature,
uncheck the Do you want to use this feature? box.
26
Page 35

Chapter 3. Installation with DrakX
3.10. Installing a Bootloader
A bootloader is a small program which is started by the computer at boot time. It’s responsible for starting up the whole system. Normally, the bootloader installation is totally automated. DrakX will analyze the disk boot sector
and act according to what it finds there:
• if a Windows
®
boot sector is found, it will replace it with a GRUB/LILO boot
sector. This way you will be able to load either GNU/Linux or any other OS
installed on your machine.
• if a GRUB or LILO boot sector is found, it will replace it with a new one.
If DrakX can’t determine where to place the boot sector, it will ask you where
it should place it. Generally, the First sector of drive (MBR) is the safest place.
Choosing Skip won’t install a bootloader. Use this option only if you know
what you’re doing.
27
Page 36

Chapter 3. Installation with DrakX
3.11. Checking Miscellaneous Parameters
3.11.1. Summary
As a review, DrakX will present a summary of information it has gathered
about your system. Depending on the hardware installed on your machine,
you may have some or all of the following entries. Each entry is made up
of the hardware item to be configured, followed by a quick summary of the
current configuration. Click on the corresponding Configure button to make
any changes.
• Keyboard: check the current keyboard map configuration and change it if
necessary.
• Country / Region: check the current country selection. If you’re not in
the country selected by DrakX, click on the Configure button and choose
another. If your country isn’t in the list shown, click on the More button to
get a complete country list.
• Timezone: by default, DrakX deduces your time zone based on the country
you have chosen. You can click on the Configure button here if this is not
28
Page 37

Chapter 3. Installation with DrakX
correct.
• Mouse: verify the current mouse configuration and click on the button to
change it if necessary.
• Printer: clicking on the Configure button will open the printer configuration
wizard. Consult the corresponding chapter of the Starter Guide for more
information on how to set up a new printer. The interface presented in our
manual is similar to the one used during installation.
• Sound card: if a sound card is detected on your system, it will be displayed
here. If you notice the sound card isn’t the one actually present on your
system, you can click on the button and choose a different driver.
• TV card: if you have a TV card, this is where information about its configu-
ration will be displayed. If you have a TV card and it isn’t detected, click
on Configure to try to configure it manually.
• Graphical Interface: by default, DrakX configures your graphical interface in
800x600 or 1024x768 resolution. If that doesn’t suit you, click on Configure
to reconfigure your graphical interface. You can click on Help from within
the configuration wizard to benefit from full in-line help.
• Network: if you wish to configure your Internet or local network access,
you can do so from here. Refer to the printed documentation or use the
Mandrakelinux Control Center after the installation has finished to benefit
from full in-line help.
• Proxies: allows to configure HTTP and FTP proxy addresses if the machine
you’re installing on is to be located behind a proxy server.
• Security Level: this entry allows you to redefine the security level.
• Firewall: if you plan to connect your machine to the Internet, it’s a good
idea to protect yourself from intrusions by setting up a firewall. Consult
the corresponding section of the Starter Guide for details about firewall settings.
• Bootloader: if you wish to change your bootloader configuration, click this
button. This should be reserved to advanced users. Refer to the printed
documentation or the in-line help about bootloader configuration in the
Mandrakelinux Control Center.
• Services: through this entry you can fine tune which services will be run on
your machine. If you plan to use this machine as a server it’s a good idea
to review this setup.
29
Page 38

Chapter 3. Installation with DrakX
3.11.2. Time Zone Options
This dialog appears after selecting a new time zone in the time zones list.
After you’ve chosen the location nearest to your time zone, two more options
are shown.
GNU/Linux manages time in GMT (Greenwich Mean Time) and translates
it to local time according to the time zone you selected. If the clock on your
motherboard is set to local time, you may deactivate this by deselecting Hard-
ware clock set to GMT, which will let GNU/Linux know that the system clock
and the hardware clock are in the same time zone. This is useful when the
machine also hosts another operating system.
The Automatic time synchronization option will automatically regulate the system clock by connecting to a remote time server on the Internet. For this feature to work, you must have a working Internet connection. We recommend
that you choose a time server located near you or the generic World Wide
entry which will select the best server for you. This option actually installs a
time server which can be used by other machines on your local network as
well.
30
Page 39

Chapter 3. Installation with DrakX
3.11.3. Configuring X, the Graphical Server
X (for X Window System) is the heart of the GNU/Linux graphical interface
on which all the graphical environments (KDE, GNOME, AfterStep, Window-
Maker, etc.) bundled with Mandrakelinux rely on.
You will see a list of different parameters which you can change in order to
optimize your graphical display.
Graphic Card
If everything works fine, the installer should detect and configure the
graphic card installed on your machine. If the detection or configuration
is incorrect, you can choose the card installed on your system from a list.
In the situation where different servers are available for your card, with
or without 3D acceleration, you’re asked to choose the server which best
suits your needs.
31
Page 40

Chapter 3. Installation with DrakX
Monitor
If the installer fails to detect or configure your monitor properly, you can
choose from this list the monitor which is connected to your computer.
Resolution
Here you can choose the resolutions and color depths available for your
graphics hardware. Choose the one which best suits your needs (you
will be able to make changes after the installation). A sample of the chosen configuration will be shown in the monitor picture.
Test
Depending on your hardware, this entry might not appear.
The system will try to open a graphical screen at the desired resolution.
If you see the test message during the test and answer Yes, then DrakX
will proceed to the next step. If you don’t see it, it means that some
part of the auto-detected configuration was incorrect and the test will
automatically end after 12 seconds and return you to the menu. Change
settings until you get a correct graphical display.
Options
This step allows you to choose whether you want your machine to automatically switch to a graphical interface at boot. Obviously, you may
want to check No if your machine is to act as a server, or if you were not
successful in getting the display configured.
32
Page 41

Chapter 3. Installation with DrakX
3.11.4. Selecting Available Services at Boot Time
This dialog is used to select which services you wish to start at boot time.
DrakX will list all services available on the current installation. Review each
one of them carefully and uncheck those which aren’t needed at boot time.
A short explanatory text will be displayed about a service when it
is selected. However, if you’re not sure whether a service is useful
or not, it is safer to leave the default behavior.
At this stage, be very careful if you intend to use your machine as
a server: you probably don’t want to start any services which you
don’t need. Please remember that some services can be dangerous
if they’re enabled on a server. In general, select only those services
you really need.
33
Page 42

Chapter 3. Installation with DrakX
3.12. Installing Updates from the Internet
By the time you install Mandrakelinux, it’s likely that some packages will have
been updated since the initial release. Bugs may have been fixed, security
issues resolved, etc... To allow you to benefit from these updates, you’re now
able to download them from the Internet. Select Yes if you have a working
Internet connection and you want to install any updated packages now, or
No if you prefer to install updated packages later.
Choosing Yes will display a list of web locations from which updates can
be retrieved. You should choose one near to you. A package-selection tree
will appear: review the selection, and press Install to retrieve and install the
selected package(s), or Cancel to abort.
34
Page 43

Chapter 3. Installation with DrakX
3.13. It’s Over!
There you are. The installation is now complete and your GNU/Linux system
is ready to be used. Just click on Reboot to restart the system. Don’t forget
to remove the installation media (CD-ROM or floppy). The first thing you
should see after your computer has finished doing its hardware tests is the
boot-loader menu, which gives you the choice between the OSes your system
can boot.
3.13.1. Advanced Options
The Advanced button shows two more buttons to:
1. Generate auto-install floppy: enables you to create an installation floppy
disk which will automatically perform a whole installation, similar to
the one just finished, without the help of an operator.
Note that two different options are available after clicking on that button:
• Replay. This is a partially automated installation. The partitioning step
is the only interactive procedure.
35
Page 44

Chapter 3. Installation with DrakX
• Automated. Fully automated installation: the hard disk is completely
rewritten, all data is lost.
This feature is very handy when installing on a number of similar machines. See the Auto install (http://www.mandrakelinux.com/
drakx/auto_inst.html) section on our web site for more information.
2. Save packages selection1: saves a list of the packages selected in this ins-
tallation. To use this selection with another installation, insert the floppy
and start the installation. At the prompt, press the F1 key, type linux
defcfg="floppy" and press the Enter key.
3.14. How to Uninstall Linux
If for any reason you want to uninstall Mandrakelinux, you can do so. The
process of uninstalling Mandrakelinux is done in two steps:
Removing partitions on your hard drive will inevitably result in the
loss of all data stored on those partitions. Please make sure you’ve
backed up all of the data you want to keep before proceeding.
1. Delete all partitions related to Mandrakelinux on your hard drive (usually
partitions hosting ext3 file systems and the Swap partition) and — optionally — replace them with a single partition using DiskDrake.
2. Remove the bootloader, LILO in this example, from the Master Boot Record (MBR). To do so, execute lilo -U in a console, as root. Doing this
will not only uninstall LILO but will also restore the previous master boot
record, if any.
If you have a different boot loader, please refer to its documentation to
determine how to regenerate the master boot record.
1. You need a FAT-formatted floppy. To create one under GNU/Linux, type mformat
a: or, as root, fdformat /dev/fd0 followed by mkfs.vfat /dev/fd0.
36
Page 45

Chapter 4. Migrating to Linux from Windows
®
and Mac OS®X
This chapter is aimed at users migrating from Windows®or Mac OS®X.
Instead of presenting the various applications in depth, it tries to answer
the most common questions and/or issues former Windows®or Mac OS®X
users might ask.
4.1. Where’s my...?
Experienced Windows®and Mac OS®X users are normally accustomed
to certain functions and/or concepts which are often treated differently in
GNU/Linux.
4.1.1. Start Menu
In Windows®, most applications and system tools are accessed through the
so-called Start Menu; this concept remains more or less the same, except it’s
now called the Main Menu: in KDE you open it by clicking on the yellow star
at the bottom left of your screen.
For users coming from Mac OS®X, Mandrakelinux’s Main Menu can be considered as a replacement for functions from both the Apple Menu, located at
the far left of the menu bar, and the Applications folder available in the Finder.
4.1.2. Applications
The wide variety of applications is a large differentiator between GNU/Linux
and Windows®. Mandrakelinux installs many more applications onto your system, and clicking on the main menu will give you a wide range of choices
depending on what you would like to do. There are many fully-fledged applications available to accomplish many common tasks such as office work
(word processing, spreadsheets, presentations), e-mail handling, web browsing, etc.
Mac OS®X users may find similarities between Mac OS®X and GNU/Linux
applications, because Mac OS®X is based on BSD®, a UNIX®-like system
on which GNU/Linux is also based. Moreover, other applications designed
for the desktop have been ported to, or are available under, the X11 implementation available for Mac OS®X.
37
Page 46

Chapter 4. Migrating to Linux from Windows®and Mac OS®X
You may also install a large number of applications through the RpmDrake
utility
4.1.3. Control Panel/System Preferences
The Control Panel in Windows®and the System Preferences utility in Mac OS
X are replaced by the Mandrakelinux Control Center under Mandrakelinux. It
can be accessed by choosing Administer your system→Configure your computer
in the main menu. Through this interface, you have the ability to modify
most of your system’s settings with graphical tools.
4.1.4. DOS Shell
GNU/Linux is still very fond of shell environments. Unlike Windows®the po-
pularity of the shell is not fading away as is evident by the availability of the
shell in Mac OS®X. By default, Mandrakelinux installs bash, a truly powerful
shell environment. You can access it by opening the main menu and choosing
Administer your system→Use a terminal emulator.
Almost none of your DOS commands or functions will work in a
Linux shell. Take a look at the Introduction to the Command Line
chapter in the Reference Manual to discover their equivalents and
much, much more. Have fun, you now have a real shell to hand!
®
4.1.5. Network Neighborhood
GNU/Linux uses TCP/IP by default, not SMB (the Windows®network pro-
tocol), so there’s nothing like a network neighborhood icon to give you a
view of the network you’re in. However, you may use the LinNeighborhood
application to give you similar functionality.
Konqueror can also accomplish the same tasks. Just type smb:/ in the location
bar, and all of the shared Windows®resources on the network will appear.
Please remember that for this to work, the samba-client package must be
installed.
38
Page 47

Chapter 4. Migrating to Linux from Windows®and Mac OS®X
4.1.6. C: Drive
The “lettered drive” is a concept exclusive to Windows®. On UNIX®systems,
the drive notion (C:, D:, ..., Z:) is replaced by “mount points”. From a user
perspective, you’re always accessing directories. Your system will use configuration files to instruct the file system how to “load” all relevant disks,
disk partitions and remote systems, and then assign them to a specified directory, generally under the /mnt directory. While this concept is similar to
that found in Mac OS®X, it is slightly different. What is mounted under
/mnt with GNU/Linux is mounted under /Volumes in Mac OS®X but is made available as a “root file system” in the Finder.
4.1.7. CD-ROM Drives
The same concept as for C: applies here. CD-ROMs are mounted in /mnt/
cdrom. To access the CD-ROM, just click on the desktop icon and the CD-
ROM’s contents will appear in a new window.
Things are a bit different for audio and data CDs: upon inserting an
audio CD in the drive, the CD player is automatically loaded and
starts playing. Please see the Audio, Movie and Video Applications
chapter of the Starter Guide.
4.1.8. Floppy Disk Drives
Like CD-ROMs and disk partitions, floppy disks are mounted and will appear on /mnt/floppy. This feature directly supports reading Windows®diskettes.
Icons are displayed on your desktop to access all your removable
media devices: floppy, CD-ROM, ZIP, USB keys, and others.
39
Page 48

Chapter 4. Migrating to Linux from Windows®and Mac OS®X
4.1.9. My Documents
Under Mandrakelinux every user has a directory called Documents/ located in
their home directory. For example, user Peter should store its documents in
/home/peter/Documents/
The home directory concept is equivalent to the C:\Winnt\Profiles\user_
name\ or C:\Documents and Settings\user_name\ directories in Windows
NT®, Windows®2000 and Windows®XP and is explained in “Using KDE”,
page 57.
Under Mac OS®X this is very similar. The home directory’s equivalent is
/Users/user_name and it also contains a directory called Documents.
4.1.10. The Applications Needed to Open Some Kinds of Document
GNU/Linux can open most standard file formats: PNG pictures, Rich Text
Format texts, PostScript printouts, etc. These file formats should always be
preferred as they facilitate exchange of data between applications, and they
ensure your freedom to change to another application and do not lock you
into a given operating system.
You may also have many files in proprietary formats such as Microsoft®Excel
or Microsoft®Word documents. OpenOffice.org is just one application which
can handle many popular formats for office applications (see Word Processor,
page 85 and Spreadsheet, page 89).
40
We are specifically mentioning office documents because they are
important. Due to space constraints we cannot cover every single Windows®application and its GNU/Linux equivalent. However,
there is a high probability that you will find GNU/Linux equivalents
for all the programs you used under Windows®or Mac OS®X. To
get an idea of GNU/Linux equivalents of Windows®applications,
you can consult this table of equivalents (http://linuxshop.ru/
linuxbegin/win-lin-soft-en/table.shtml).
Page 49

Chapter 4. Migrating to Linux from Windows®and Mac OS®X
4.2. A Brave New World!
Now that you have found your way around GNU/Linux, here is a brief
presentation of the features which make excellent reasons to migrate to
GNU/Linux.
4.2.1. A Multi-User Environment
GNU/Linux, like Mac OS®X, is based on UNIX®. This basically implies a
shift in the structure of your environment, from a single workstation to a
multi-user architecture and implies very thorough user management. Each
file, service and application is exclusively allocated to a user or a group of
users, according to its nature. For example, every user has his or her own
personal directory, containing personal data and personal configuration files,
which can be made inaccessible (even invisible) to other users.
4.2.2. Multiple Tasking
GNU/Linux has always been a very strong operating system for multi-tasking
(running many applications concurrently). Although other operating systems have made great progress, GNU/Linux remains a leader in this domain.
4.2.3. Multiple Desktops
With GNU/Linux, KDE and GNOME give you as many desktops as necessary
to work with, instead of just a single desktop. Users who like to have numerous applications running at the same time will greatly appreciate this
feature since it makes for a much cleaner working environment.
4.2.4. Full Desktop Customization
Regarding aesthetics, GNU/Linux truly rocks! Not only can you choose between KDE or GNOME and many other window managers, but you can also highly customize their appearance with themes. Themes go beyond just
the initial look and feel: actually, everything you see can be modified, from
the background image to the behavior of applications when they are closed,
which is truly unique.
41
Page 50

Chapter 4. Migrating to Linux from Windows®and Mac OS®X
See the themes page on Freshmeat (http://themes.freshmeat.net/) for
available designs.
4.2.5. Thousands of Free Applications
By far, the GNU/Linux community is the most generous one. Given a specific
problem, you will most likely find a script or an application to answer your
needs, for free! Also, Mandrakelinux includes hundreds of applications not
documented in this book, so do not be shy, try them out. You’ll most probably
be surprised by the extent of the possibilities GNU/Linux offers.
GNU/Linux also offers advanced server functionality, such as the ability to
host mail or web page servers “out of the box”.
4.2.6. No More Reboots!
Windows®and Mac OS®(although this has largely been addressed in Mac
OS®X) users know the level of frustration generated by crashing systems.
Even though GNU/Linux is not perfect, its stability is one of its strongest
points. Sometimes, applications crash, but rarely do they take the operating
system down with them.
We hope this rapid tour will help you truly appreciate GNU/Linux’s strengths.
Do not be afraid to explore further!
42
Page 51

Chapter 5. Linux for Beginners
5.1. Introduction
This chapter was written for inexperienced GNU/Linux users. If you know
how to “log in and out”, use KDE and know where your applications reside
on your Mandrakelinux system, skip ahead to the next chapter. If not, read
on! After reading this chapter, all subsequent chapters will make much more
sense to you.
If you are an experienced Windows®or Mac OS®user, refer to
“Migrating to Linux from Windows®and Mac OS®X ”, page 37,
which will ease the transition between those operating systems and
GNU/Linux.
5.2. The Boot-Loader Menu
When you reboot your computer after completing your Mandrakelinux installation, you will first see a menu containing three or more items called the
bootloader menu. This allows you to boot your GNU/Linux system, or any
other operating systems you may have already installed, as well as some
special options.
The number of items and their names will vary depending on your particular
configuration. The one we are interested in at the moment is obviously the
one labeled linux, which will start your Mandrakelinux system. It is the default
item unless you manually configure it differently. All you need to do is to
wait a few seconds — you will see a countdown at the bottom of the screen —
or press Enter, and Mandrakelinux will start loading. You can select a different
item by using the arrow keys on your keyboard and pressing the Enter key.
5.3. Getting Ready for your Session
GNU/Linux is a multiuser system. This means that more than one user can
access the same machine, each with the ability to keep his or her own data
and configuration files private and protected from other users. To be able to
43
Page 52

Chapter 5. Linux for Beginners
do this, different user accounts must be created by the administrator. The administrator is called root, whose password has been set during installation,
and who has no restrictions at all on the system.
It’s also important to understand the terms “to log in” and “to log out”. To log
in means to identify yourself to the computer. Think of it as a security officer
verifying who you are before letting you in. After logging in, the system takes
a number of actions in order to give you access to the system’s resources. By
logging in, you start a so-called “session”.
When you log out you are telling the system you no longer need to use its
resources. Your personal session is closed, you exit the graphical interface
and the login screen appears once more.
Although these definitions are valid within the scope of this chapter,
they are oversimplified. As you read the following chapters, you will
better understand these concepts, their advantages and options.
5.4. Beginning your Session
We assume that you are sitting in front of a running Mandrakelinux computer
which, when turned on, automatically displays the graphical login screen. If
this is not the case and you are facing a black screen with something like:
Mandrakelinux release 10.1 (Official) for i586
Kernel 2.6.8.1-10mdk on an i686 / tty1
machine_name login:
with a flashing cursor, type your user name (as defined during installation
or by your system administrator), then your password. You should now be
“logged in”. Now type startx and the graphical interface will be launched
(KDE by default, see “Using KDE”, page 57).
5.4.1. The Mandrakefirsttime Wizard
The first time you access your Mandrakelinux system, you will encounter the
Mandrakefirsttime Wizard (figure 5-1). It will help you register your product
and set up a Mandrakeclub account.
44
Page 53

Chapter 5. Linux for Beginners
If you are using the download edition of Mandrakelinux, you will first
be asked to fill out a questionnaire which will help Mandrakesoft
understand its user-base better.
Figure 5-1. The Mandrakefirsttime Wizard
You will now be prompted to create a personal Mandrakeclub account, which
will give you instant access to the many valuable on-line services offered
by Mandrakesoft, such as special commercial software downloads (complete with automatic download and install procedures), dedicated multilingual
forums, the option to vote for your favorite software packages to be included
in the Mandrakelinux distribution, special discounts, and more. Your Mandra-
kelinux package includes a trial Mandrakeclub account, so you can evaluate
the many available services and then later extend your account if you like
their features (and we are sure you will!).
Moreover, if you already have a Mandrakeclub account or are going to activate
45
Page 54

Chapter 5. Linux for Beginners
one now, Mandrakefirsttime Wizard will also help you configure your system
to allow easy downloading and installation of special updates from the Man-
drakeclub web site directly, using our user-friendly Software Manager. Please
remember that e-mail addresses and user names are unique on Mandrakeclub,
so you will not be able to open a trial account if you are already subscribed.
5.4.2. Identifying Yourself
You are currently in front of the following display (figure 5-2). To log into the
system, you need to supply both your login name and password.
Figure 5-2. The Login Window
The login procedure takes place in four simple steps:
1. Click on the icon corresponding to your login name.
2. Type your secret password once that field is displayed
1. The actual password will not be displayed but will be replaced by little stars (*).
Remember: passwords under GNU/Linux are case sensitive, which means that if your
password is Very_Secret and you type Very_secret, access will be denied!
1
46
Page 55

Chapter 5. Linux for Beginners
3. Choose your favorite graphical environment from the Session type pulldown menu2. The session you last chose is selected by default, but if this
is the first time that you have logged in, the default environment is KDE.
4. Finally click on the Login button to begin your session. Be patient! It may
take a few seconds before your desktop is ready to be used.
If you are the only user of your new Mandrakelinux system, and you are annoyed by having to type your login name and password every time you start
a new session, there is a way to avoid this step: by booting directly into your
favorite desktop environment. This feature is known as auto-login.
Be careful with this option as no password will be asked for, therefore anybody can access your system.
5.5. Using your Graphical Environment
5.5.1. The Mandrakelinux Desktop
All modern graphical environments share a common set of features: a main
menu, a desktop area with some icons, a panel, etc. In the following paragraphs we will describe the elements which compose the desktop environment.
2. This step is optional and allows you to choose a specific graphical environment.
While we encourage you to try the various available choices so you can find the one
you prefer, we strongly suggest you start with either KDE.
47
Page 56

Chapter 5. Linux for Beginners
Figure 5-3. The KDE Desktop
1. Icons are located on the left of the screen and in the bar at the bottom of
the screen. These are enhanced by a short description beneath them (the
icon’s title or name). Clicking on an icon either launches a program or
opens a folder. In both cases a window will appear on the desktop.
2. The panel is located in the lower part of the screen. It provides quick
access to useful tools such as a Terminal, a web browser, etc. Each icon
symbolizes an application (or program). Just move your mouse cursor
over one of the icons and leave it there for a few seconds. A yellow help
balloon will appear to describe the icon’s function.
3. The icons and the panel do not float on the screen: they are “stuck” on
something called the desktop, also called the background. In a sense,
the desktop is where everything you see or use lives. Move your mouse
cursor to a free area on the desktop (i.e. where there is nothing) and rightclick: a menu will appear which will give you access to several more
functions.
48
Page 57

Chapter 5. Linux for Beginners
5.5.2. Accessing Applications
To access all of the software you installed during the installation process, click on the main menu. The applications are organized by tasks,
so finding the program you are looking for is pretty easy.
5.5.3. Opening a Window on the Desktop
If you click on the icon on the desktop labeled as Home this window
will appear:
Figure 5-4. KDE File Manager
You just launched a file manager called Konqueror. The window which pops
up displays the content of your Home directory. This is where all of your personal documents and files are stored: only you can access them.
A window is composed of several parts. On top is the title bar. It shows the
name or title of the application you launched and, possibly, the name of the
document you are working on. It can be in two different states:
• Active. (full-colored title bar) This means you are currently using it.
• Inactive. (shaded title bar)The program is running, but you are not inte-
racting with it at the moment.
49
Page 58

Chapter 5. Linux for Beginners
Just under the title bar is the menu bar. In our example, it contains menus
named Edit, View, and so on. Click on Edit. A list of items will appear in a
drop-down menu, each one giving you access to one of the program’s functions.
Below the menu bar is the application’s tool bar. It consists of one or more
rows of icons, each one equivalent to an item in one of the application’s dropdown menus: you can consider them as a shortcuts to frequently-accessed
program features, which can be found elsewhere in the menu bar.
The status bar usually sits at the bottom of the window. In it you will find
information about the program’s activity. Not all programs offer this feature,
but if the one you are using does, remember to check it from time to time.
5.5.4. Managing Desktops
We introduced the desktop to point out the area of the screen where all objects are placed. Now look at the panel at the bottom of the screen. You can
see a group of desktop buttons:
Figure 5-5. KDE’s Virtual Desktop Buttons
These buttons give you access to virtual desktops, which are identical copies
of the desktop you see after you have logged in. You will find more information about the handling and usage of virtual desktops in “Using KDE”, page
57.
Click on the button labeled 2: as you can see, the window you opened before
disappears. You didn’t close it, you simply switched desktops. Click on the
button labeled 1. The previous desktop will be displayed.
This feature called virtual desktops is very handy. It allows you to open several windows and to organize them as you wish.
You can also change which virtual desktop a window is currently in. This
may be handy to logically organize your work by desktop, for instance moving all network related windows into desktop 2, all multimedia applications
into another desktop, and so on.
50
Page 59

Chapter 5. Linux for Beginners
So with KDE, right-click on the window’s title bar and a pull-down menu
will appear containing an item named To Desktop. Just point to this item and
a list of your virtual desktops will appear. Simply choose the virtual desktop
that you want to move it to.
5.6. Logging Out of your Session
When you are finally done using your computer, don’t forget to tell the system you are leaving, that is remember to log out in a proper manner.
Logging out can be carried out in many ways: from the main menu, or from
the menu that appears when you right-click on the desktop.
Whichever method you use, the screen will shade and a little box will pop up
with options. If you click on OK you will quit the current session and, after
all of your windows and the desktop itself have closed, you will be returned
to the login screen.
However there are two other options available in the confirmation window:
you can choose to shutdown the system (power off the computer), as well as
reboot your system. Again, just click on the OK button after you’ve selected
the desired option.
This is the correct and safe way to shut down or reboot your system. You
should never try to do it by pushing your computer’s power button because
this can lead to serious problems such as file-system corruption or the loss of
data.
51
Page 60

Chapter 5. Linux for Beginners
52
Page 61

Chapter 6. Where to Get Documentation
Apart from the manuals included with Mandrakelinux, documentation is avai-
lable from many sources. The next few pages contain suggestions which you
might find useful.
6.1. Mandrakelinux-Specific Documentation
6.1.1. Mandrakesoft’s Own Documentation
Some of those manuals may be available in your Mandrakelinux pack, in the
mandrake_doc-en package. Once this is installed, you will have a new menu entry: More Applications+Documentation→Mandrakelinux documentation in
English.
This section lists all the documentation which Mandrakesoft produced for the
current release:
• Starter Guide. This manual is intended to get you going with Mandrakeli-
nux. It includes basic topics which should be of interest to new GNU/Linux
users, as well as configuration procedures for the most important elements
of Mandrakelinux.
• Reference Manual. Available on-line and in the Mandrakelinux –– Power-
Pack Edition, this document covers advanced GNU/Linux operations and
system administration.
6.1.2. Internet Resources
Internet information sources are widespread and many web sites devoted
to GNU/Linux and its use or configuration exist. However, some sources of
information are better than others.
Your preferred source of information should be the Mandrakelinux official
web site (http://www.mandrakelinux.com/). In particular, check out the
support section (http://mandrakeexpert.com).
On the other hand, many unofficial sources can also be of value. For one
there is the Mandrake Community Twiki (http://mandrake.vmlinuz.ca/
bin/view/Main/WebHome). It offers a lot of resources and gives information
and documentation which can certainly interest Mandrakelinux users.
53
Page 62

Chapter 6. Where to Get Documentation
6.1.2.1. Mandrakeclub
If you’re familiar with Mandrakelinux’s web sites, you probably know about
Mandrakeclub (http://mandrakeclub.com/). It’s the meeting point for all
Mandrakelinux users. On it you will find questions along with their answers,
suggestions and news related to Mandrakelinux and GNU/Linux. You will be
able to express your opinions and influence future development of Mandra-
kelinux. If you’re not yet a member, we encourage you to join.
One specific area of the Club is of particular interest: the Mandrakeclub Knowledge Base (http://kb.mandrakeclub.com/) is the Mandrakelinux
user’s database. It is probably the largest collection of Mandrakelinux-related
documentation on the web.
It collects submissions by Mandrakelinux users. It also features a discussion
forum and a community newsletter. The articles are targeted towards beginners and semi-advanced users. They don’t simply repeat what may be read
somewhere else. Their aim is to be practical.
Topics range from administrative issues, such as the handling of the shell, to
the tweaking of X’s performance, GNU/Linux’s graphical subsystem.
6.1.2.2. Mandrakesecure
The Mandrakesoft Security Advisories (http://www.mandrakesoft.com/
security/) website (formerly known as Mandrakesecure) is Mandrakesoft’s
very own security site which covers package vulnerabilities.
6.2. GNU/Linux Useful Resources
In this section we present resources useful for any GNU/Linux distribution.
Most are not written specifically for Mandrakelinux, but might prove useful
likewise.
54
Page 63

Chapter 6. Where to Get Documentation
6.2.1. The /usr/share/doc Directory
Most packages include their own documentation in one of /usr/share/doc’s
sub-directories, which will be named after the specific package. Mandrakeli-
nux’s own documentation, when installed, is available in the /usr/share/
doc/mandrake/ directory.
6.2.2. The Man Pages
The Manual Pages (also known as “man pages”) are a set of documents
which you can read in order to better understand GNU/Linux commands.
The latter are usually issued through a “command line” and allow great control over your system (see the Introduction to the Command Line chapter
of the Reference Manualsee the Introduction to the Command Line chapter of
the Reference Manual). Although these man pages might seem discouraging
at first, they offer great detail and we encourage you to browse through them
when a problem occurs.
This should be your primary source of information on a day-to-day basis.
Almost all commands have a manual page. Other items, such as certain configuration files, library functions for programmers and others system aspects
also have their own man pages.
Man page contents are arranged in different sections. References to these are
made in the following manner: for example, open(2), fstab(5) will respectively refer to the open page in section 2 and the fstab page in section 5.
To display a manual page in a terminal (or shell), type man. The syntax for
obtaining a man page is:
man [options] [section] <manual page>
man also has documentation, which can be obtained by typing man man. Manual pages are formatted and then displayed using the less pager.
The names of the manual pages and their relevant sections appear at the top
of each page. At the bottom of the page you will find references to other
pages with related subjects (usually in the SEE ALSO section).
You can start by consulting the pages related to the different commands covered in the Reference Manualthe Reference Manual: ls(1), chmod(1), etc.
55
Page 64

Chapter 6. Where to Get Documentation
If you cannot find the right manual page — for example, you want to use the
mknod function in one of your programs but you end up on the mknod command page — make sure you spell out the section explicitly. In our example:
man 2 mknod. If you forgot the exact section, man -a mknod will read through
all the sections looking for pages named mknod.
You can also display man pages in Konqueror by using the man:/
prefix in your URL. For example, to display the man page for fstab(5), type in the Location field: man:/fstab(5)
56
Page 65

Chapter 7. Using KDE
7.1. Discovering the K Desktop Environment
This chapter will introduce the K Desktop Environment (KDE) and its panel. It will also talk about the concept of virtual desktops, how to navigate
through and manage them and session support.
7.1.1. The Desktop
Figure 7-1. The KDE Desktop
KDE follows the modern desktop paradigm. In the above figure you see the
desktop itself with some icons on it, while the panel sits at the bottom. However, it introduces something new if you come from the Windows®world:
virtual desktops (see Virtual Desktops, page 59)
The icons on the desktop represent files, directories, applications, devices,
web pages (actually, the page’s URL), etc. Almost “everything” can be placed
57
Page 66

Chapter 7. Using KDE
on it. Different actions are associated to icons. For example: clicking on a text
file opens it into a text editor, clicking on a web page opens the URL inside
Konqueror (see Browsing Web Pages, page 67), and so on.
Here are some of your desktop’s default icons, along with a brief explanation
for each of them.
Home. Gives access to all your personal files. Under UNIX®-like
operating systems (Mandrakelinux is one of them), every user has a personal
directory usually named /home/user_name where user_name is the user ’s
login name.
Trash. Gives access to all deleted files (the equivalent of Windows®’
Recycle Bin). Please bear in mind that files can be deleted without being thrown into the trash can (“direct” file deletion) so some deleted files might
not be accessible through the trash can.
Dynamic Icons for Removable Media. There will be icons for
removable devices on your system (CD-ROM drive, floppy disk drive,
ZIP/JAZ drives, etc.). Clicking on a device icon opens the medium inside
that device. An error message may also be shown if there is no medium present or if the medium can not be read for some reason.
7.1.2. The Panel
Figure 7-2. The KDE Panel
The panel is the bar which sits at the bottom of your desktop1which contains
the following main components:
The Main Menu. Allows you to access the software installed on
your system. It is the equivalent of Windows®’s Start menu. Programs are
1. By default the panel is at the bottom, but it may be placed on any border of the
desktop.
58
Page 67

Chapter 7. Using KDE
arranged into convenient categories so you can quickly and easily find the
application you want to run.
Show Desktop. Use this to minimize all currently opened windows. Pressing it again will restore the windows to the state they were previously in. Handy when you your desktop is so full of opened windows and
that you want to access, for example, a folder on your desktop.
Desktop Switching Applet. Makes switching between virtual
desktops as easy as one, two, three. See Virtual Desktops, page 59 for more
information.
Screen Resolution Applet. Allows you to change the screen resolu-
tion. With higher resolutions you will have more space to run applications on
your desktop. See Changing Screen Resolution, page 62, for more information.
7.1.3. Virtual Desktops
Virtual desktops give you more room to place your windows; they also allow
you to better organize your windows by task.
Think of virtual desktops as having several screens available but with only
one monitor. By default, there are two virtual desktops. To add or remove
virtual desktops right-click on the desktop switching applet and select Con-
figure Virtual Desktops from the pop-up menu. Using the slider at the top of
the configuration dialog will allow you to select up to 16 virtual desktops.
Press OK once you are satisfied with your settings.
By default, virtual desktops are named Desktop N, where N is the desktop
number. To give more meaningful names to your virtual desktops (such as
Work, Play, Internet...), right-click on the desktop switching bar and select
Configure Virtual Desktops from the pop-up menu. Click in the input field of
the desktop for which you wish to change the name and type in the new one.
Pressing Apply will make the changes effective immediately. Press OK once
you are satisfied with your settings.
When you log in into KDE the last virtual desktop you were in when you
closed your last session is opened. To switch between virtual desktops just
59
Page 68

Chapter 7. Using KDE
click on the desktop number in the desktop switching applet et voilà !
7.2. Personalizing your Desktop
7.2.1. Changing your Desktop’s Appearance
Figure 7-3. Changing KDE’s Color Scheme
To change the desktop color scheme choose Administer your system→Configure
your desktop from the main menu. Choose LookNFeel→Colors from the control
center that appears.In the Color Scheme list are predefined color schemes.
Select the one you like and click on Apply.
You can also define your custom color scheme by clicking on the element
you want to change (for example, Active Window to change the active window colors) or selecting it in the Widget Color pull-down list. Once the element (widget) is selected, click on the color bar to open KDE’s color selection
dialog, choose the color you like and click on OK to apply it.
Clicking on Save Scheme will allow you save the color scheme for later use;
you will be prompted for the scheme name, fill it and click on OK. Clicking
60
Page 69

Chapter 7. Using KDE
on Remove Scheme will remove the currently selected color scheme.
You are not asked for confirmation before removing a color scheme.
Therefore use the Remove Scheme button carefully.
Figure 7-4. Changing KDE’s Background Wallpaper
To change the desktop background, choose Administer your system→Configure
your desktop from the main menu. In the control center that appears, select
LookNFeel→Background. Select the background picture option in the Background section and background scaling, colors and blending in the Options
section.
Click on the Advanced Options button to adjust settings such as an external
program to draw the background, the cache size for images, etc.
61
Page 70

Chapter 7. Using KDE
All desktop background settings can be applied on a per-desktop
basis using the Setting for desktop pull-down list. Please note that
doing so consumes more memory.
7.2.2. Managing Desktop Icons
Adding Icons. To add an icon on the desktop simply right-click on the desktop’s background. A pull-down menu will appear in which you must choose
Create New. Another menu will appear in which you must select the type of
object to create on your desktop:
• Folder creates a new folder on your desktop where you can store files.
• File→Link to Application creates an application launcher. When you click on
it, the application will run as if you called it from a menu or the command
line. Use it to have quick access to the applications you use most.
• File→Link to Location (URL) creates an icon giving you direct access to an
URL (typically a web page or a web site). Use it to add icons the sites you
visit the most on your desktop.
The above list is not extensive. Actually, the choices you have in
the menu will depend on the software you have installed on your
system.
Please bear in mind that the forms you will have to fill to complete the icon
adding operation are different for each kind of object being created. However, their options are fairly simple.
Modifying Icons. Right-click on the icon you want to modify and select Pro-
perties from the menu. You will then be able change the title (the string dis-
played under the icon), the icon picture itself, and other properties of that
type of object (folder, application, URL, etc.). Once you are satisfied with
your settings, click on the OK button.
Removing Icons. To remove an icon, right-click on it and select Delete from
the menu that pops up to delete it permanently, or Move to Trash (from where
you can restore it later on). In either case, you will be asked to confirm before
proceeding.
62
Page 71

Chapter 7. Using KDE
7.2.3. Changing Screen Resolution
Figure 7-5. Available Screen Resolutions List
Clicking on the screen resolution changer applet will show you the list of all
available sizes and refresh rates for your video card and monitor combination (see figure 7-5). The active screen size and refresh rate are marked with
a tilde.
To change any parameter, simply select it from the list and a window will pop
up asking you if you are satisfied with the settings (see figure 7-6). If you click
on the Accept Configuration button, the settings will be applied immediately,
otherwise the previous settings are retained.
Figure 7-6. Accept New Resolution Settings?
63
Page 72

Chapter 7. Using KDE
The higher the refresh rate, the steadier the image. Select the
highest refresh rate possible for your video card and monitor combination to put less strain on your eyes.
To make the settings persist between sessions, choose Configure display from
the menu and make sure that both Apply settings on KDE startup and Allow
tray application to change startup settings are checked, otherwise your screen
resolution settings will be lost when you quit your session.
7.3. KDE Sessions
KDE and its applications support sessions. This feature allows the system to
save the state of all applications that are in use when the user logs out of the
desktop environment, and to restore them when the user logs back in.
Please bear in mind that non-KDE applications, and even some
KDE ones, may have limited session support. The degree of session
recovery is up to the application, ranging from just opening the
application again, to opening it along with all the files that were
open inside that application.
By default, KDE automatically saves sessions whenever you log out of the
desktop environment. To change the default behavior, open the Session Manager (Administer your system→Configure your desktop from the main menu. In
the control center that appears, select Components→Session Manager), make
your choices and click on the OK button once you are satisfied with your
settings. They will be effective the next time you log into KDE.
64
Page 73

Chapter 8. Konqueror
8.1. Managing your Files
File managers have grown to become multi-tasking applications, which do
not only take care of basic tasks such as copying and moving files around. In
fact, with Konqueror you are able to manage your files, browse a LAN, play
MP3s, surf on the web (Konqueror only), and more.
In this section, we take for granted that you have used a file manager before,
and that it is not necessary to describe elementary features. We will talk about
Konqueror which is KDE’s default file manager.
8.1.1. Main Window
You access your file manager by clicking on the Home icon located on the top
left of your desktop.
Figure 8-1. Konqueror
65
Page 74

Chapter 8. Konqueror
The lower part of the window displays the current folder’s contents (by default, what your home directory contains). Each file or sub-directory is represented by an icon, although you can change that view through the View→
View Mode menu . That main view may also contain a sidebar (refer to Side-
bar, page 66).
8.1.2. Sidebar
A sidebar may appear on the left side of the main view. The first time you
launch Konqueror you will not see it. To show/hide it, select Window→Show
Navigation Panel (or use the F9 key.
Here are short definitions of the icons in Konqueror’s sidebar:
Icon Meaning
Show Navigation Panel. This icon lets you change the
sidebar view, add new folders, and more.
Bookmarks. Where you can store your preferred web and
FTP sites.
Devices. Gives you access to the CD-ROM, Floppy, and
removable devices (such as USB keys under the Hard disk
entry), and Remote Shared folders, such as NFS or SMB
shares.
History. A list of the folders and network (web, FTP, etc.)
sites you have visited during the current session.
Home Directory. Represents your personal folder in which
you organize your personal files.
Network. Gives you access to FTP archives as well as to
Mandrakelinux- and KDE-specific web sites (of course, you
can add or delete entries too).
Root Folder. Lets you access your whole tree structure.
Usually, you do not have sufficient rights to manipulate
files outside your home directory. Only the system
administrator (root) possesses the rights to do so.
Services. Gives you access to the Audio CD Browser, Devices,
Fonts, the LAN Browser and the Print System Browser.
66
Page 75

Chapter 8. Konqueror
Table 8-1. Konqueror Sidebar Icons
8.1.3. Copying, Moving, Linking and Deleting Files
Copying Files. Let’s imagine you want to copy test.png to the Documents fol-
der. With Konqueror, you first need to access the Window→Split View
Left/Right (or press the Ctrl-Shift-L keys) menu or the Window→Split View
Top/Bottom (or press the Ctrl-Shift-T keys) menu. Your window will be du-
plicated and you will be able to drag’n’drop the test.png image file into the
Documents folder. Once you let go the file on the folder, a pop up menu will
ask you whether you want to move, copy or link the file.
There are many ways to manipulate files within your file manager. Drag’n’drop, keyboard shortcut combinations, opening two file
managers, etc. Choose the method you prefer (check out the Edit
menu).
Moving Files. The same principle applies to moving files around. Instead,
select Move Here from the pop-up menu once you release the file.
Linking Files. Linking files allows you to access them without actually copying them all around your home directory. Let’s imagine one of your files is
deeply buried into the /home/queen/Music/Artists/FavoriteArtist/ directory and you want to access it quickly. Here’s how to proceed. With Kon-
queror simply drag it to the desired location, release the mouse button and
select Link Here.
Deleting Files. There are “safe” and “unsafe” ways to delete files. The safe
way would be to move it to the Trash, while the unsafe one would be to
delete it for good directly. To delete a file, select it and press the Del key. To
restore it, double-click on the Trash icon on your desktop and drag the file(s)
back into your browser. To delete trashed files, simply Empty Trash Bin by
right-clicking on the Trash icon. To delete a file directly, right-click on it and
select Delete.
8.1.4. Browsing Web Pages
If you frequently browse through directories containing HTML files, for
example your distribution’s documentation, these directories generally contain a file called index.html.
67
Page 76

Chapter 8. Konqueror
Let’s take the /usr/share/doc/HTML/ directory as an example.Click on
index.html and Konqueror will display that file’s contents, and you can
browse through the documentation, as if you were on the web.
Browsing the web with Konqueror is as easy as using a “real” web browser.
Just type in the URL of the site you want to visit in the location bar and surf.
8.1.5. File Sharing
This feature allows you to share your documents with other people on the local network and access documents other people share. It also enables system
administrators to provide users with common repositories where everyone
can add, modify and consult files.
8.1.5.1. Sharing Files
If file sharing is activated through the Mandrakelinux Control Center you can
right-click on folders in your Konqueror window and choose Share. It allows
you to share one or as many folders as you like through NFS1or Samba2.
8.1.5.2. Browsing Shared Files with Konqueror
For LAN browsing to work, make sure the lisa package is installed.
If not, you will have to start the lisa service after installing it.
You can browse all available shared files on the network by opening the LAN
Browser section in the Services sidebar. All machines offering shared files will
1. NFS (Network File System) allows you to share, export/import files from/to
your computer in a networked environment. Although the NFS setup is easier than
the Samba one, it can only be used within a UNIX®-based system (like GNU/Linux).
Moreover, NFS is an insecure protocol and should be used exclusively in a secure
local environment.
2. SMB is a protocol by which PCs share resources such as files and printers. Win-
dows®and GNU/Linux (through Samba) and OS/2 operating systems, among others,
support the SMB protocol. It can be considered an alternative to Netware and NFS.
68
Page 77

Chapter 8. Konqueror
appear as folders under this section. Inside the host name folder appears one
folder per protocol supported by this machine. Those may be:
FISH
This protocol relies on ssh communications. So every local machine having an ssh server running on it will allow you to connect to it (providing proper authentication) and browse all the folders you have access
to.
NFS
Under this Remote Share folder the shares provided by UNIX®machines
will be displayed.
SMB
Shares provided by Windows®or SMB-enabled machines will show up
under this Remote Share folder.
8.2. Browsing the Web
8.2.1. Konqueror’s Web Browser Interface
You can launch the Konqueror web browser by clicking on this icon
on your desktop or by selecting Surf the Internet→Browse the Web from the
main menu. Then type in an URL in the Location bar.
69
Page 78

Chapter 8. Konqueror
Figure 8-2. Konqueror as a Web Browser
Tool bar. Contains all buttons used to navigate and perform common actions
(see Surfing the Web, page 70).
Location Bar. Where you enter a site’s URL (or a local file using file:// as
the protocol part of the URL).
Bookmarks Bar. Contains buttons which give you quick access to your bookmarked (favorite) sites.
Page Display Area. Where the contents of the web sites and local files you
browse are displayed.
8.2.2. Surfing the Web
The following table summarizes the most commonly used navigation buttons Konqueror’s web browser provides.
70
Page 79

Chapter 8. Konqueror
Button Keyboard
Shortcut
Alt-left_arrow
Alt-right_arrow
F5
Esc
Table 8-2. Konqueror’s Web Browser Tool Bar Buttons
Function
Go back. Returns to the page visited before
the current one. By clicking on it more than
once, you can go back more than one page,
but some pages use automatic redirection so
this might not always work. Keeping this
button pressed (or clicking on the little black
triangle on its right) will show you a list of all
the URLs you can access through this feature.
Go forward. Returns to the page visited after
the current one being visited. The same
back-button considerations apply.
Reload. Refreshes the current page. By
default, Konqueror will first look for the page
in the browser’s cache (on-disk temporary
storage space) and use the local copy. Press
the Shift key while clicking on the reload
button to force Konqueror to fetch the page
from the Internet.
Stop. Aborts transferring the currently
requested object and will therefore cancel the
page currently being loaded. Notice that we
use the word “object” instead of “page”. This
is due to the fact that web pages are not only
HTML code but images and maybe other
media too.
8.2.3. Managing Bo okmarks
Bookmarks store the URLs of your favorite web sites so you don’t have to
type their address again when you want to access them. You can classify
them by subject, category, etc. To record a bookmark, simply press Ctrl-B. It
will appear in the Bookmarks menu so you can recall it later to come back to
that page.
71
Page 80

Chapter 8. Konqueror
Your Mandrakelinux system already has some bookmark categories predefined which you can use as a guide to arrange yours. Selecting Bookmarks→
Edit Bookmarks from the browser’s menu will open the bookmarks manager
shown in figure 8-3.
Figure 8-3. Konqueror’s Bookmarks Manager Dialog
Bookmarks are arranged as a tree, with all operations taking place on the
currently selected tree node. The following operations are available:
• Create Folder. Click on this button to create a new folder. A dialog
will pop up asking you for the folder’s name: fill it and click on OK. Use
folders to group bookmarks by subject, category, etc. Keyboard shortcut:
Ctrl-N.
• Create Bookmark. Click on this button to create a new bookmark
entry. A new entry will be added below the current node or inside the
current folder. Click in the Bookmark or URL column and type the name
and address of that site at the bottom of the Bookmark Editor. Click on the
save button (top left) to confirm the addition.
• Delete Object. Click on this button to delete the currently selected
object: either a bookmark, a separator or a folder. You won’t be asked for
confirmation, the object will be deleted immediately. Keyboard shortcut:
Del.
72
Page 81

Chapter 8. Konqueror
• Insert Separator. Select Insert→Insert Separator from the menu to add a se-
parating line below the current node. Keyboard shortcut: Ctrl-I.
• Rename. Click on a bookmark or a folder and change the Name value at
the bottom of the Bookmark Editor. Keyboard shortcut: F2.
• Change URL. Same procedures as for renaming a bookmark. Keyboard
shortcut: F3.
Bookmarks can be exported to different browser formats. Feel free to explore
the File→Export menu. A standard dialog will pop up asking you for the
bookmark’s file name (for example bookmarks.html for Mozilla). Type the
file name and click on the Save button. Some export entries may not pop
up the dialog. In those cases, bookmarks will automatically be exported to a
location dependent of the browser format.
Bookmarks can also be imported from different browser’s formats through
the File→Import menu.
Both export and import file dialogs are “intelligent”, in the sense
that they will start from the current directory and will show the file
types which best fit the menu entry you’ve selected.
Once you are satisfied with your changes, click on this button to store
the new bookmarks. Keyboard shortcut: Ctrl-S.
8.2.4. Tabbed Browsing
Figure 8-4. Konqueror’s Browser Tabs
Konqueror’s web browser allows you to browse many web pages at a time by
using a very nice feature called tabbed browsing. Instead of opening a new
browser window every time you want to view another page you can open a
new tab.
Clicking on this button in the tool bar, or choosing Location→New Tab
from the menu will create and open a new tab. You can now input the URL or
select a bookmarked site to browse that site. Keyboard shortcut: Ctrl-ShiftN.
73
Page 82

Chapter 8. Konqueror
Clicking on this button in the tool bar will close the currently displayed
tab. Click on a tab’s title to display the contents of that specific tab. Keyboard
shortcut: Ctrl-W.
8.2.5. Konqueror Web Browser and Plugins
Figure 8-5. Plugins Settings under Konqueror
Plugins are programs which let your browser handle content other than
HTML and graphics, such as animations, streaming audio, Java applets, and
more. Konqueror uses Mozilla and netscape plugins. Select Settings→Configure
Konqueror from the menu and open the Plugins section to set Konqueror’s plugins’ preferences (see figure 8-5).
After you have (optionally) downloaded and installed the corresponding
plugins, click on the Scan for New Plugins button to have Konqueror recog-
74
Page 83

Chapter 8. Konqueror
nize and set up the installed plugins: all directories listed in the Scan Folders
list will be searched for.
You can view which plugins are set up in the Plugins tab. By default, only the
Netscape Plugins (which give Konqueror access to Mozilla’s and netscape’s
plugins) is installed. Once you’re satisfied with the settings, click on OK to
make them effective.
75
Page 84

Chapter 8. Konqueror
76
Page 85

Chapter 9. Writing E-mails with KMail
There are many graphical mail clients under GNU/Linux: KMail, Evolution,
Mozilla Messenger, etc. KMail is a graphical mail client under GNU/Linux. It’s
integrated into a groupware client named Kontact. This chapter will describe
how to configure and use KMail to compose, read and organize your e-mail
messages.
You can launch KMail by selecting Internet→Mail→KMail from the
main menu. As we proceed, please note that only the minimum configuration steps will be explained in this section. Feel free to explore the various
configuration options.
9.1. Configuring KMail
The first time you run KMail, the configuration window opens automatically.
Otherwise, click on Settings→Configure KMail to bring up the configuration
window. It is organized as a list of categories (on the left) and the configuration options for each of those categories (on the right). First, an identity
must be defined under the Identities category. KMail offers you a template for
the default identity based on your system’s account data (login, name, etc.).
Click on the Modify button and, in the General tab, fill Your name, Organization
and Email address with your data (see figure 9-1).
1
1. If you have more than one e-mail address, for example one for your work and a
private one, it is useful to create a different identity for each of them.
77
Page 86

Chapter 9. Writing E-mails with KMail
Figure 9-1. Setting General User Parameters
Use the Cryptography, Advanced and Signature tabs to set up other parameters such as different “Reply-To” addresses, a GPG key for secure messages
transmission, and so on. Once you are satisfied with your settings, click on
OK and then on Apply: your default identity will be defined.
To configure the mail servers, select the Network category. In the Sending tab
click on the Add button, select SMTP as the transport type and click on OK.
In the General tab, fill the Name field with a meaningful name for this server
and the Host field with the SMTP server’s name or IP address (see figure 9-2).
The remaining fields can be left with their default values.
78
Page 87

Chapter 9. Writing E-mails with KMail
Figure 9-2. Setting the Outgoing Mail Server
For security reasons, it may be that the outgoing mail server you use
needs authentication. If this is the case, check the Server requires
authentication box and complete the login and password provided
by your ISP or network administrator.
To receive mail, you need to create at least one account. In the Receiving tab
click on the Add button, select POP3 as the account type2and click on OK.
In the General tab, complete the Name field with a meaningful one for this
account and the Host field with the name or IP address of the POP3 server.
Your ISP should have provided you with an e-mail user name and password
which have to be entered in the Login and Password fields. Put a check mark
in the Store POP Password in configuration file to avoid having to type the
2. Since almost all ISPs provide POP3 accounts to retrieve mail, we used it in our
example. If you have another account type, such as an IMAP (Internet Mail Access
Protocol) one, the configuration will differ slightly.
79
Page 88

Chapter 9. Writing E-mails with KMail
password each time messages are retrieved (see figure 9-3). Click on OK to
add the account.
Figure 9-3. Configuring a POP3 Mail Account
If you have a permanent network connection (such as DSL or cablemodem) checking the Enable interval mail checking box and selecting a period (in minutes) using Check interval will tell KMail to
fetch messages periodically.
If you want KMail to handle more than one mail account just repeat the above
procedure for each extra account. Once you are satisfied with your settings,
click on OK. KMail is now ready to read and send mail on the Internet.
80
Page 89

9.2. KMail’s Interface
Chapter 9. Writing E-mails with KMail
Figure 9-4. Mail Client Interface
If the kontact package is not installed, the Kontact buttons on the
left won’t show.
Toolbar. This is where the main action buttons lie. See table 9-1.
Messages List. Where information (subject, date, sender, etc.) about messa-
ges stored in the currently selected folder is displayed.
Message View Pane. Where the currently selected message’s contents are
displayed.
Folders List. Where all folders are listed. The default folders are inbox (inco-
ming messages), outbox (unsent templates), sent-mail (already sent messages), trash (deleted messages) and drafts (messages drafts).
Kontact Buttons. KMail is now a component of Kontact. On the left of the
interface you have buttons to access Kontact’s components.
81
Page 90

Chapter 9. Writing E-mails with KMail
The following table shows the most important buttons available in KMail’s
toolbar, their equivalent keyboard shortcuts and a brief explanation of the
functions they provide.
Button Keyboard
Function
Shortcut
Compose a New Message. You will need to
Ctrl-N
complete the To and Subject fields in the
message-compose window.
Get new messages for all defined e-mail
accounts. Keep this button pressed to display a
Ctrl-L
list of all defined accounts; select the one you
want to get mail from in order to retrieve
messages only for that account.
Reply to the author of the selected message. A
R
message-compose window will pop up with
some fields already set.
Forward (send to a third party) the selected
F
message. You will need to fill in the To field in
the message-compose window.
Delete the selected messages. Deleted messages
are moved to the Trash folder. You can recover
D
messages moved into the trash folder, but
deletion from the Trash folder cannot be undone:
be careful!
Table 9-1. KMail’s Toolbar Buttons
82
Most of those buttons have a little black arrow on their right bottom
corner. That means that a menu with additional related actions can
be displayed by pressing the mouse button a little longer.
Page 91

Chapter 9. Writing E-mails with KMail
9.3. Composing a Message
Figure 9-5. The Message-Compose Window
Toolbar. This is where the main composing buttons reside. See table 9-2
Message Body. The area where you will type the contents of your message.
Message Recipients. The list of all recipients of this message. By default, the
following options are shown:
• To: the “principal” intended recipient of this message.
• Cc (Carbon Copy): not-hidden “secondary” intended recipient(s) of this
message. All recipients will have access to the mail addresses to which
this message is sent.
Select View→BCC from the menu to show the BCC (Blind Carbon
Copy) field. These recipients are also “secondary” but are hidden
from the other recipients of this message. No recipients of the message will have access to the other mail addresses to which this
message was sent.
The following table shows the buttons which are mostly used in the messagecompose window, their equivalent keyboard shortcuts and a brief explanation of the functions they provide.
83
Page 92

Chapter 9. Writing E-mails with KMail
Button Keyboard
Shortcut
Ctrl-Enter
Table 9-2. Message-Compose Toolbar Buttons
Function
Sends the message immediately (your network
connection must be active). A copy of the
message will be kept in the Sent-messages
folder.
Queue the message. The message will be saved
in the Outbox folder and will be sent the next
time you request mail to be sent (File→
Send Queued Messages).
Attach a file to the message. This function is also
accessible through the Attach→
Attach File menu. A standard file dialog will pop
up. Select the file you want to attach and click on
OK. Repeat for multiple files.
84
Page 93

Chapter 10. Office Work
10.1. Word Processor
This section will give you a brief introduction to OpenOffice.org Writer’s word
processing functions.
In order to make the text a little easier to read, we will alternate
between the popular OOo acronym and the very long, yet full and
correct OpenOffice.org name.
10.1.1. OpenOffice.org Writer
OpenOffice.org Writer is the part of the OpenOffice.org suite which provides
the word processing functions. OpenOffice.org Writer can read most popular
Office formats, easing the transition from, and ensuring compatibility with,
other Office suites.
10.1.1.1. Starting
To launch OpenOffice.org Writer, select Office→Wordprocessors→OpenOffice.org
Writer from the main menu.
You can also open it from any other OOo application screen, by selecting
File→New→Text Document, which will open a blank OOo Writer document.
When you first launch OpenOffice.org Writer, a dialog will show up asking
you whether you prefer to use the Microsoft®or OpenOffice.org format to save
your files.
Your decision depends on whether you plan to exchange a lot of files with
people who only use Microsoft®tools. If this is the case, click Use the Microsoft
® Word file format, but be warned that it is not perfectly supported. Also this
is only the default format and can always be overridden by changing the File
type in the Save as dialog.
85
Page 94

Chapter 10. Office Work
10.1.1.2. Interface
Figure 10-1. OpenOffice.org Writer’s Main Window
10.1.2. Using the Word Processor
10.1.2.1. Styles
Word processor users often waste a lot of time formatting (changing paragraph alignment, font family, weight and size, etc.) their documents instead
of using that time to concentrate on document structure and document content writing.
Styles provide a structure-centric approach to writing documents with a
word processor, while normalizing document formatting and layout, and easily automating the generation and maintenance of table of contents (TOC).
In OpenOffice.org Writer, styles are handled using the Stylist.
86
Page 95

Chapter 10. Office Work
Clicking on this icon in the tool bar will open it. It can also be opened
by choosing Format→Stylist from the menu bar, or by pressing the
F11 key.
When you have a... Then apply the ... style
Chapter Title Heading 1
Section Title Heading 2
Sub-Section Title Heading 3
Sub-Subsection Title Heading 4
Paragraph Default, Text Body, First Line Indent
List Item Standard, Text Body, Text Body Indent
Table 10-1. Suggested Styles
Use the styles listed in table 10-1, as a guide. Select the region of the document to apply the style to, and in the Stylist window, double-click on the style
you want to apply to that region.
The styles you use from the Stylist automatically become available
in the styles drop-down list (the first one in the format bar), so you
have the most used styles handy.
10.1.2.2. Margins
You can always adjust margins by hand with the ruler, but if you want to
format a long document, this may not be the best solution. This is where the
Stylist comes in handy.
By clicking on this icon in the Stylist, you will access the page formatting section of the Stylist. First, make a copy of the Default style:
1. Right-click on the Default item in the stylist.
2. Choose New... from the menu which pops up.
3. Assign a Name to your new style. The Next Style field will be updated
accordingly when you select it. For the purpose of this example, Default
Copy will be used as the style name.
87
Page 96

Chapter 10. Office Work
4. Click on OK to insert your new style into the list of available styles.
Then, right-click on your newly created style item and choose Modify... from
the pop-up menu. The Page Styles: Default Copy window will appear. Open
the Page tab and modify the margins to your liking.
This is the same as choosing the Format→Page menu.
While looking at the Page Styles: Default Copy window, you probably noticed
that you could modify many formatting elements such as the Background,
Header, Footer, etc. For example, if 90% of your work with a word processor
consists of writing business letters with a predefined format, you could set it
up right now, thereby saving lots of time.
If you modify an existing style, you will overwrite that style’s original
settings. If you feel that you have made a mistake, simply click on
the Reset button to return to the last saved settings.
10.1.2.3. Lists
Sometimes paragraphs contain element lists, to enumerate the properties of
an object (“unordered” or “bullet” list), or the steps to be performed in order
to accomplish some task, (an “ordered” or “numbered” list, for instance).
Clicking on this button will format the selected text into an
unordered list. Selecting the list items and choosing Format→
Numbering/Bullets from the menu will allow you to change the bu-
llet type from a predefined set.
Clicking on this button will format the selected text into an ordered
list. The same rules as for unordered lists apply regarding to the
numbering format.
88
Page 97

Chapter 10. Office Work
10.1.2.4. Page Headers and Footers
By default page headers and footers are common to all pages of a document.
Use them to describe certain aspects about the document’s content, for example: page number, total number of pages, chapter, section, document’s title,
etc.
Choosing Insert→Header→Default from the menu will add a page header to
your document, and choosing Insert→Footer→Default will add a page footer
to your document. Just type the header/footer text you want to be shown
or use one or more of the Insert→Fields menu items to compose the header/footer.
10.1.3. Going Further
If you wish to learn more on the usage of OpenOffice.org Writer, you should
consult the tutorial available on the OpenOffice Support (http://www.
openofficesupport.com/writertutorial.html) Web site.
Also don’t hesitate to refer to the OpenOffice.org Writer’s help which is accessible through the Help→Contents menu. You are bound to find the answers
to your questions. Topics are accessible through a table of contents, an index
is available as well, as a contextual search tool.
OpenOffice.org Writer is able to export your documents in PDF
format (File→Export as PDF). This allows you to publish your
documents in the Adobe®Reader®format.
10.1.4. Conclusion
Word processing could be considered as one of the most performed actions
with a personal computer. As you have read above, OpenOffice.org Writer
is a tool which not only gives you everything you need to create simple or
complex documents, but is also compatible with existing Office file formats.
Enjoy creating your documents with OpenOffice.org Writer!
89
Page 98

Chapter 10. Office Work
10.2. Spreadsheet
This section will give you a brief introduction to OpenOffice.org Calc’s
spreadsheet functions.
We take for granted that you know why you intend to use a spreadsheet and
will not delve deeply into application-specific (accounting, financial, simulation, etc.) considerations.
10.2.1. What’s a Spreadsheet?
Spreadsheets are electronic replacements for an accountant’s ledger book
and calculator. This software uses columns and rows to allow math operations to be performed on previously entered data. Nowadays, spreadsheets
do a lot more as they are often used as (very) simple databases or as a charts
and graphs application, even though that was not the original intention of
such software.
Figure 10-2. Rows, Columns and Cells
Rows are named 1, 2, etc. Columns are named A, ..., Z, AA, AB, etc. The intersection of a row and a column is a cell, and its name is composed of the
column and row attributes, for example: C3 (shown in figure 10-2). OpenOffi-
ce.org Calc highlights the active row and column names.
10.2.2. Using the Spreadsheet
To launch OpenOffice.org Calc, select Use office tools→Create a spreadsheet
from the main menu.
90
Page 99

Chapter 10. Office Work
When you first launch OpenOffice.org Calc, a dialog will show up asking you
whether you prefer to use the Microsoft®or OpenOffice.org format to save
your files.
Your decision depends on whether you plan to exchange a lot of files with
people that use only Microsoft®tools. If this is the case, click Use the Micro-
soft® Excel file format, but be warned that it is not perfectly supported. Also
note that this is only the default format and can always be overridden by
changing the File type in the Save as dialog.
OpenOffice.org Calc is an enterprise-ready spreadsheet application and includes many features way beyond the scope of this document. Consult Going
Further, page 96, for more information on how to make full use of OpenOffi-
ce.org Calc.
The following sections will explore basic functions such as entering data and
formulas in the spreadsheet and adding graphics to represent that data. An
example of an imaginary company’s monthly expenses and sales figures will
be used.
10.2.2.1. Entering Data
To enter data into a cell (either text or numbers) use the arrow keys to navigate to that cell or click in the cell and type the data in it, pressing the Enter
key when you are finished. You can also use the Tab key or the Shift-Tab
keys to move to the cell on the right or on the left, respectively.
The auto-completion feature simplifies data entry. Auto-completion “guesses” the next cell’s data using the current cell’s value as a base. It works
not only for numeric data, but also for the days of the week, the months
of the year, and others. Generally speaking, any kind of data which can be
associated to a series of consecutive integral numbers can be entered using
auto-completion.
To use auto-completion put your mouse over the cell “handle” (the little
black square located at the bottom right of the cell border), click on it and
drag the cell. The cell values will be shown in a tool-tip (see figure 10-3). Once the desired final value is shown, release the mouse button and the cells
will be completed.
Cell data can also be sorted according to different criteria (by column or row,
depending on how you arrange your data). To do so, first select the cells you
91
Page 100

Chapter 10. Office Work
Figure 10-3. Simplifying Data Entry Using Auto-Completion
want to sort and then open the sort options dialog choosing Data→Sort from
the menu.
Make sure you also select columns and rows which act as“headers”
for the data (in our example, the column B which contains the
months) in order for those to “follow” the sorting of the data.
In the Sort Criteria tab select the columns/rows to sort data by and the sort
order Ascending or Descending. The Options tab contains custom sort order
settings, whether to perform a case sensitive sort or not and the direction of
the sorting (top to bottom sorts data disposed in columns and left to right
sorts data disposed in rows), among others. Click on the OK button once you
are satisfied with the options and the selected cells will be sorted.
10.2.2.2. Adding Formulas
Formulas can be used to “automate” the spreadsheet allowing you, for example, to run complex simulations. Within cells, formulas are defined by preceding all cell data with the = sign. Anything else is treated as “static” data.
92
 Loading...