

Mando Footloose How To Use Manual

Mando Footloose user manual
2
Welcome!
You are the owner of
‘Mando Footloose’,
the city’s latest
transport system that will
change your lifestyle.”
“
This manual is prepared for you to use Mando Footloose properly
and give helpful tips for adjusting and maintaining the product.
It is very important to read this manual before using
Mando Footloose, so you can fully understand the product.
Please notice the safety information and warnings shown
throughout the manual. This will prevent injury or problems during
the operation of Mando Footloose.
If you need more information or have any additional inquiry, please
contact the store.
If there is any discrepancy between this manual and “parts
information from the manufacturer”, it is recommended to follow
“parts information from the manufacturer”.
Thank you for purchasing Mando Footloose and congratulations on
your wise choice.
Advantages of Mando Footloose
• Compact and refined design
• New generation of transport
• Comfortable ride
Contents
A. Introduction
A-1 Mando Footloose parts identification ————— 0 3
A-2 Checking the components
——————————— 04
B. Items to be checked before riding —— 05
C. Adjustment of the product
C-1 Adjustment of seat height
———————————— 06
C-2 Adjustment of handlebar
———————————— 07
C-3 Adjustment of brake
—————————————— 08
D. Folding instructions
How to fold / tips for folding —————————————— 0 9
E. Riding instructions
E-1 How to ride ———————————————————— 10
E-2 Description of HMI display
——————————— 10
E-3 Setting the HMI modes
————————————— 11
F. Battery and charging
F-1 About battery maintenance ——————————— 1 2
F-2 About replacing the battery
——————————— 1 2
F-3 Description of the battery
———————————— 13
F-4 Before charging the battery
——————————— 14
F-5 Appropriate places for charging
———————— 15
F-6 Charging instructions
—————————————— 16
F-7 How to check the charging status
——————— 17
F-8 Duration of charging
——————————————— 17
G. How to use the product properly
For the proper use of the product —————————— 18
H. Accessories ———————————————————— 2 1
I. Guarantee of quality
I-1 Application and limitation of the warranty——— 2 4
I-2 Registration of a genuine product
——————— 2 5
J. Specification ———————————————————— 25
Mando Footloose user manual
02
English
A new way of moving
03
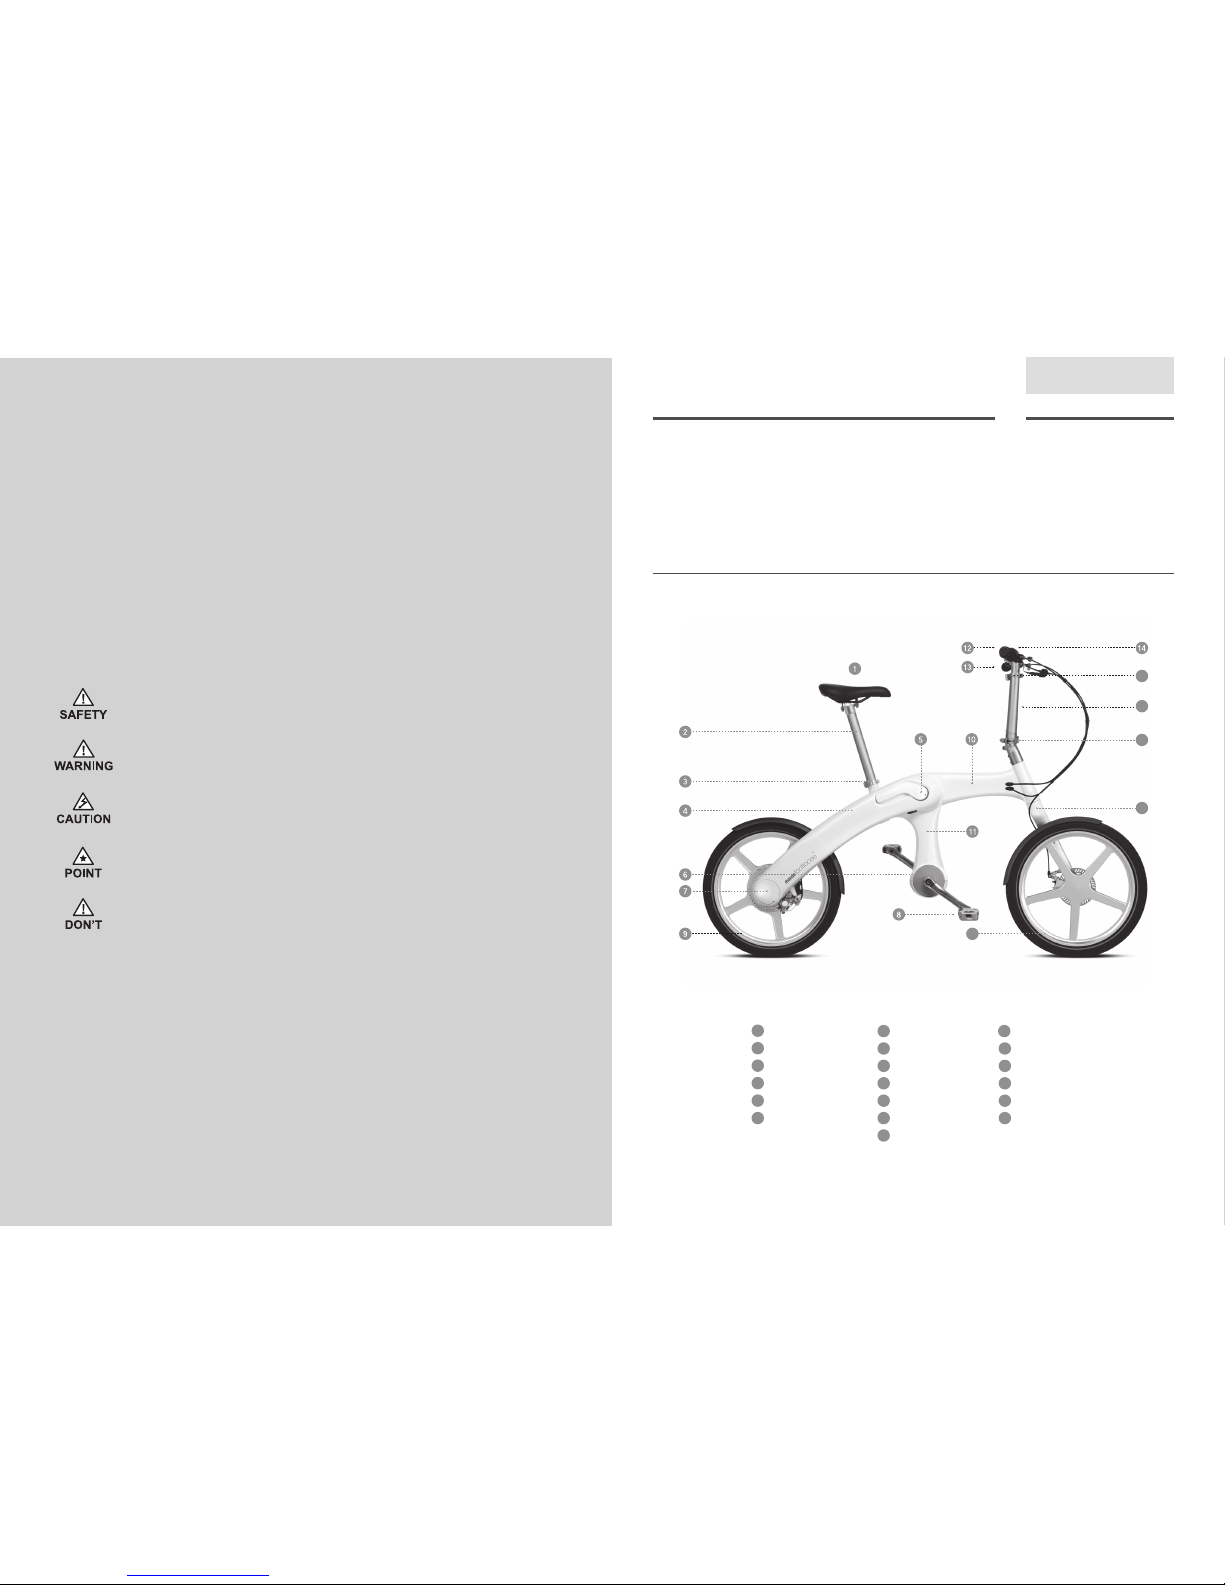
Mando Footloose parts identification
A-1
Seat
Seatpost
Seatpost clamp
Rear frame
Folding lever
Alternator
Motor
Pedal
Rear wheel
Front frame
Center frame
HMI
(Information Display)
Throttle lever
Handle grip
Handlepost height clamp
Handlepost
Handlepost folding clamp
Fork
Front wheel
15
16
17
18
19
14
7
8
9
10
11
12
13
1
2
3
4
5
6
Symbol Description
Safety: It represents safety warnings that may affect safety.
Warning: It represents cases which may cause death or serious injury
/ injury due to inappropriate handling.
Caution: It represents cases which may cause damage to the product due
to inappropriate handling.
Point: It represents key points for proper operation and maintenance.
Don’t: It represents actions that should be avoided for safety.
18
17
19
15
16
Mando Footloose user manual
04
English
A new way of moving
05
1. Tire pressure
45~55psi (MAX 70psi) / Use a proper pump when pumping air into the tires.
(The number is based on the original tire installed to the product. Air pressure
may vary with the type of tire)
- Excessive air pressure -> Uncomfortable riding quality
- Insufficient air pressure -> May cause a flat tire or inflexible handling.
2. Battery energy check
- The remaining amount of energy in the battery can be checked on the HMI
screen.
(For more information about charging the battery, please refer to ‘F. Battery
and Charging’)
3. Brakes
- Check that front and rear brakes work properly.
(Front brake -> left lever, rear brake -> right lever)
It works the opposite way in the U.K., Singapore and several
other countries.
- Practice braking by gripping the brake levers gently.
(Abrupt use of the brakes may cause injuries)
4. Seat height and handle height / adjustment and locking
- Incorrect seat height and handle height may cause uncomfortable riding and
handling and reduce a rider’s coordination of the bike which may potentially
cause injuries.
(For more information about adjusting seat height and handle height, please
refer to ‘C. Adjustment of the Product’)
- When the handlepost clamp / handlepost folding lever is not fixed tightly the
steering might be affected.
(The rider may lose balance and get injured)
5. Changing operating modes
- Practice changing the operating modes before riding. (For more information
about HMI setting including switching operating modes, please refer to ‘E.
Riding Instructions’)
6. Other safety checklist
- During night riding, ensure that the front / rear reflectors are fixed, clean and
working properly for identification and safety. Additional lighting is essential
in most countries by law.
- Ensure that your shoe strings are tied. (Untied shoe strings may be caught
up by a pedal or crankshaft)
- Ensure that each part of the bike is fastened properly for operation.
(Check the tightness and operation of all parts including the brake cable and pedals)
Loosely fixed screws or bolts may cause injury and excessively tight screws
or bolts may affect operation and cause damage to the product.
- Ensure that the front / rear wheels are correctly aligned.
-> Bounce the front / rear wheels by lifting it up 2~3 inches off the ground.
-> Rock the front / rear wheels side to side. If any movements or wobbles
are detected, do not operate the product.
B
Items to be checked
before riding
Before every ride, it is important to carry out a safety check to avoid any
problems.
Manipulating the brake lever
HMI-battery
Handlepost folding lever
HMI-Operating mode
If any defect listed in the checklist is
found, please contact the store.
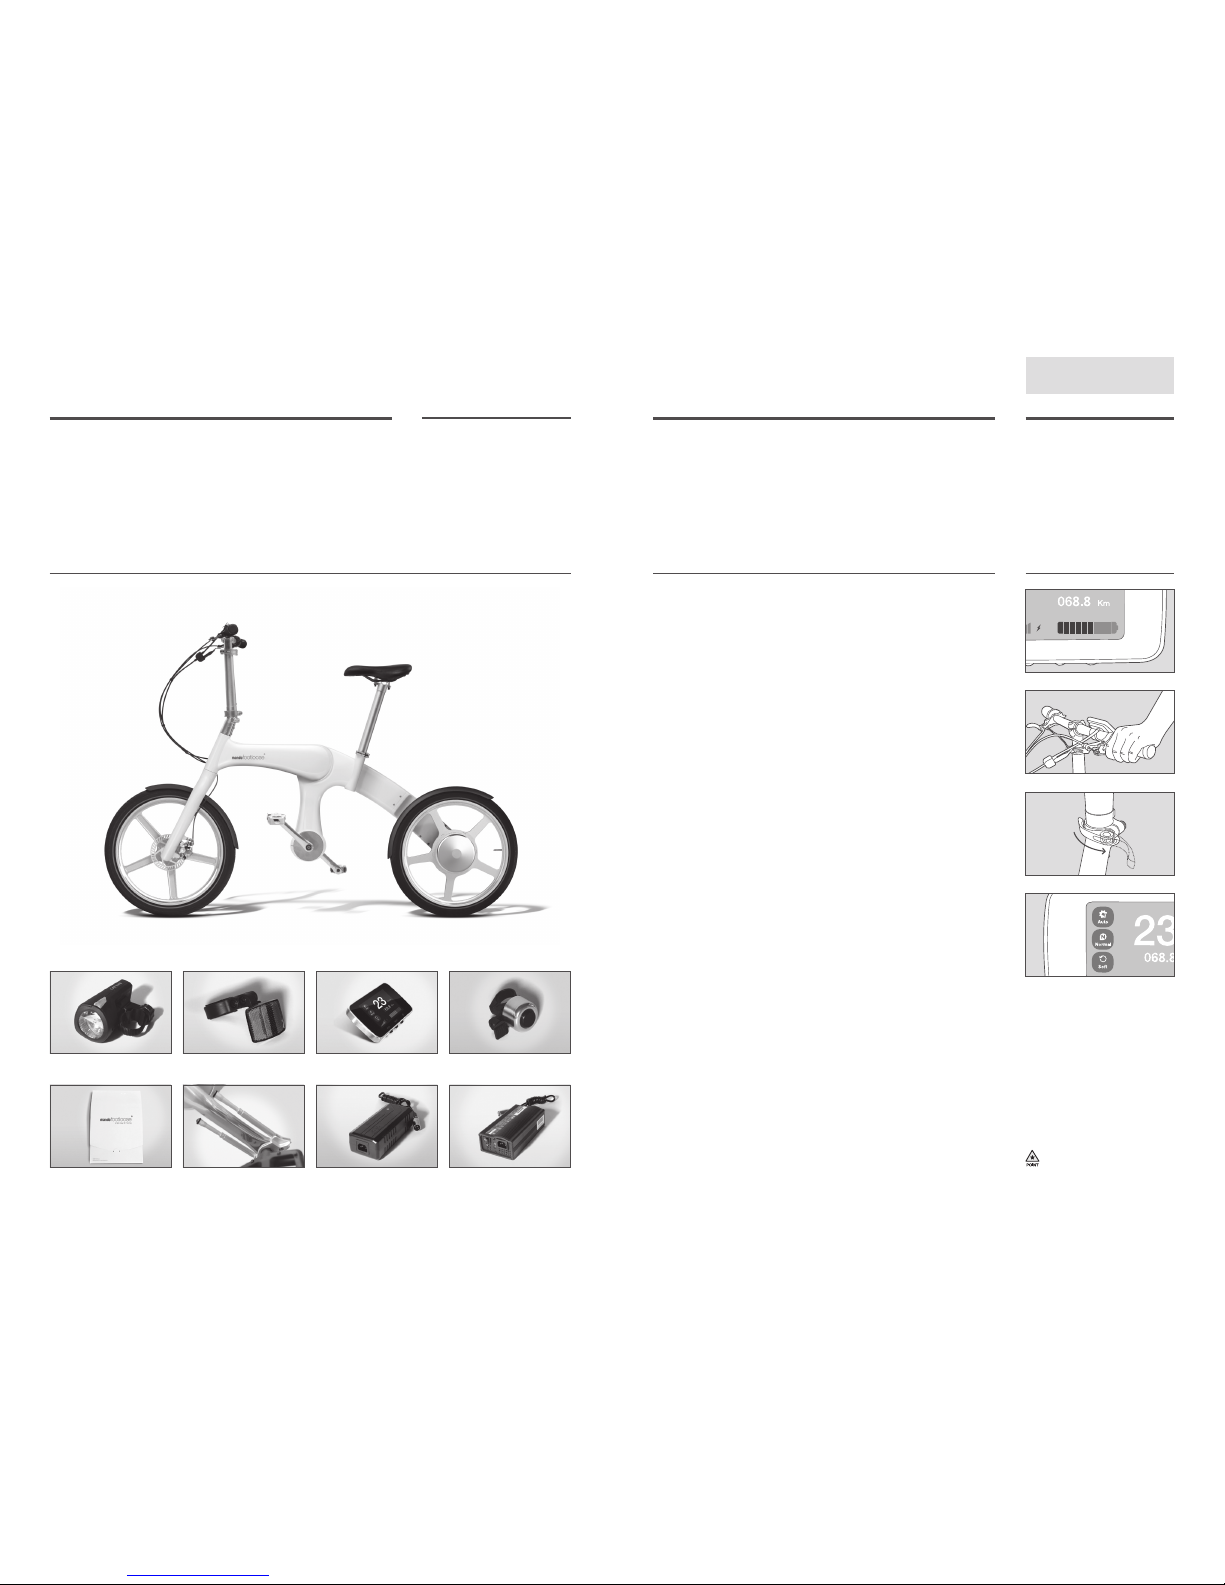
Mando Footloose body
HMI (Information display) Bell Light Rear reflector
General battery charger
High speed battery charger
(sold separately)
Introduction
Checking the components
Before riding, check the components included in the box.
* The components of this product may be changed, without prior notice, to improve the function of the product.
A-2
User manual Stand
Mando Footloose user manual
06
English
A new way of moving
07
Adjustment of the
product
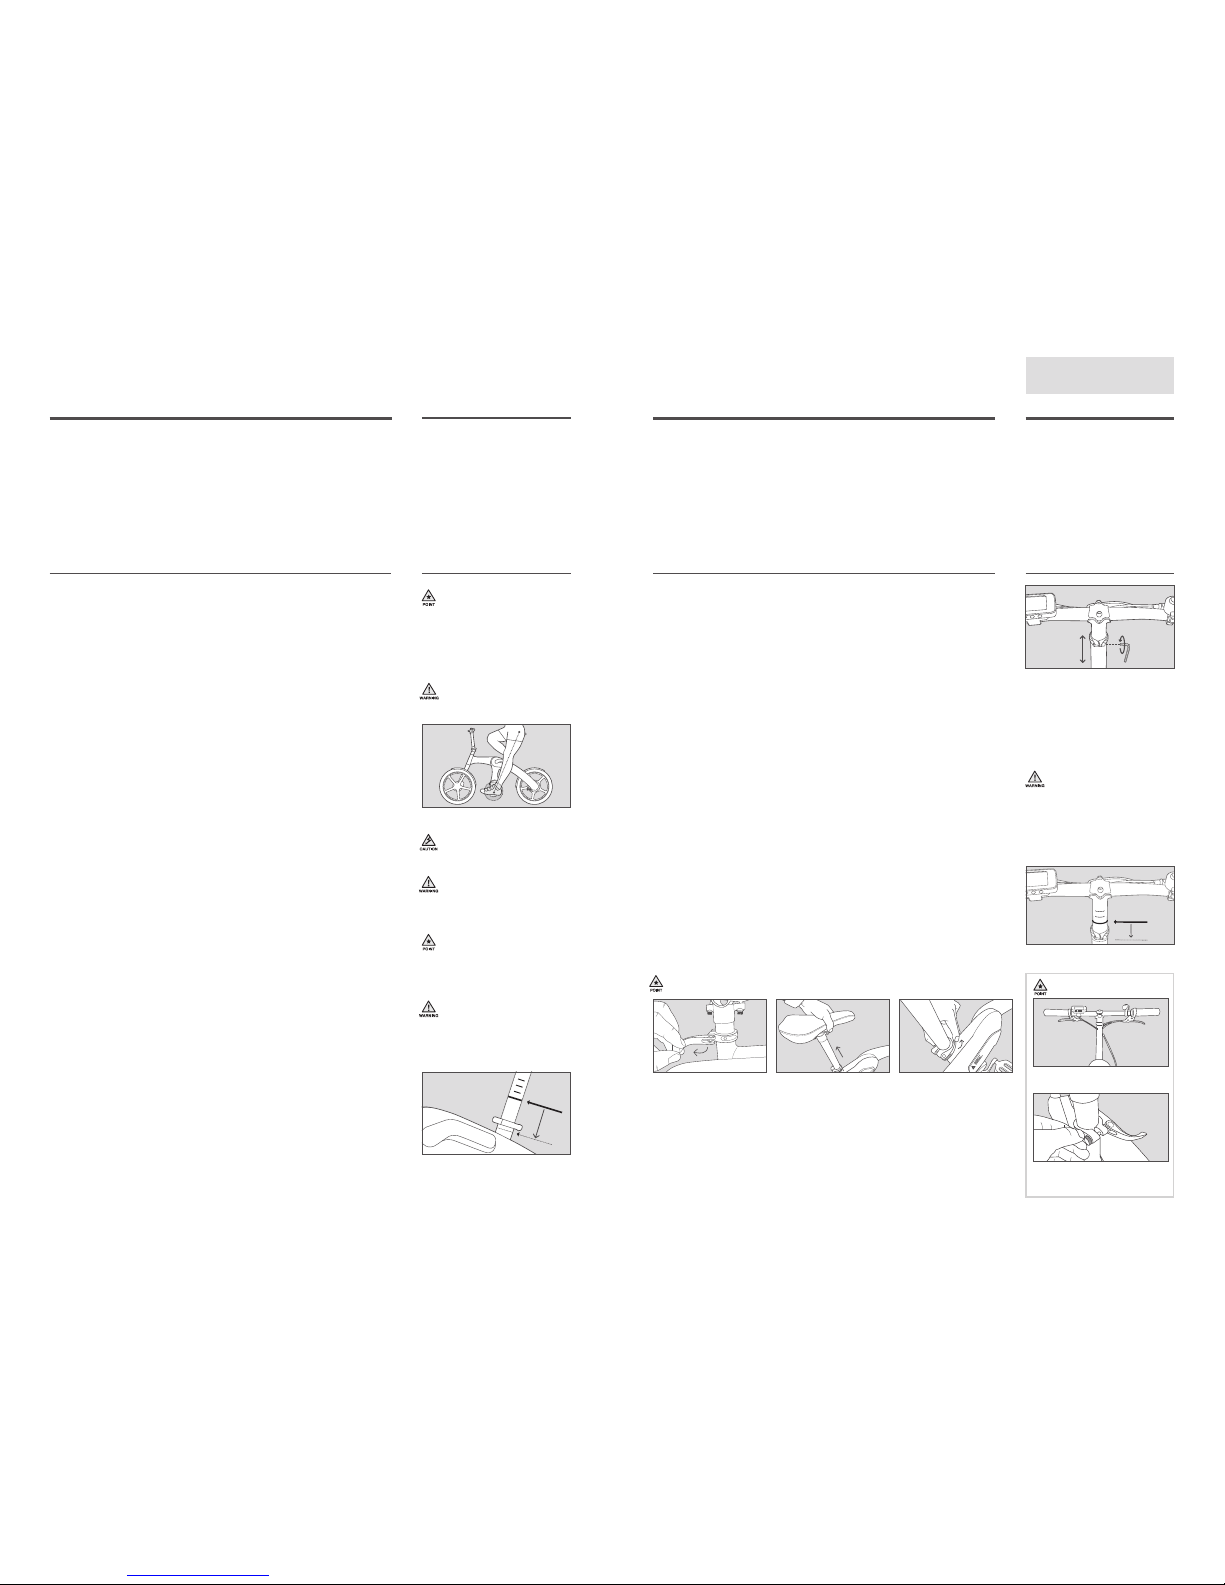
Adjustment of the handlebar
Mando Footloose has a foldable handle system for which you can adjust
the angle of the handlebar and its height.
1.Setting the handle height
The height at which a rider feels comfortable when going up and down a
slope or cornering
- If the handle is too low you may experience backache, neck pain or wrist
pain during a ride.
- If the handle is too high you may find the handling is unsteady during a ride.
2. How to adjust the handle height
- Loosen the lever of the handlepost clamp located under the handlebar.
- Adjust the handle to the desired height.
- After ensuring the alignment of the handle, tighten the clamp lever.
- Note : The tightness of the lever may be adjusted with the adjustment of a
screw on the other side of the clamp to the lever.
3. Finding the right angle of the handlebar
While holding the handlebar with the clamp bolts, set the angle of the handle
at which you can perform throttling and braking comfortably. Then re-tighten
the clamp bolts.
- If the angle of handle is not properly set, it may cause finger or wrist pain.
- Place fingers on the brake levers and adjust the angles so they lie parallel to
the extension line of the arm.
- Setting the angle of brake lever: Adjust it with the brake lever clamp bolts.
- Setting the angle of the throttle lever: Adjust it with the throttle bolts.
4. Adjustment of the brake lever
If it is hard to grab the handle due to your hand size, it is encouraged to
contact the store or a specialist to adjust the lever reach.
C-2
1) Check whether the sit front is on
the straight line with the handle post.
2) If the sit moves or goes down with the
lever closed, turn the nut beside the
clamp to clockwise
Note
It is important to adjust the brake properly so you can easily reach the brake
lever. It is recommended to set the brake
at which produces the best braking
power within the adjustment range of
the brake lever reach.
• If the brake lever reach is too short:
you may find it too stiff or hand pain.
• If the brake lever reach is too long:
it may not produce the best braking power.
Minimum insertion line
Handlepost clamp
How to adjust the seat post
1) Open the seat clamp lever
completely.
2)Adjust the height of the seat
post that fits the user (Do not
pull out the seat post beyond
the minimum insertion depth).
3)Clo se th e le ver.
Adjustment of seat height
For riding Mando Footloose, it is important to place the seat properly and
adjust the height. When adjusting the seat, adjust (1) the height first and then
(2) the front and back part of the seat.
1. Adjusting the seat up and down
How to check the seat height
1) Sit on the seat.
2) Put one heel on the pedal.
3) Adjust the seat height so that your heel is parallel to the axis of pedal and
you can almost straighten your leg (However, it is not recommended to
straighten your leg completely).
4) Get into and off from the seat when the product is standing.
Enquire at the store to learn how to adjust the optimum seat height. If you
would like to adjust the seat height by yourself, you have to ensure the following.
5) Ensure that the seatpost clamp is tightened properly.
6) Ensure that the seat post is not above the ‘minimum insertion’ line.
7) Ensure that the seat is not twisted to one side.
8) Ensure that the seat is properly clamped to the seatpost.
2. Adjusting the seat forward and backward
As the seat is adjustable in forward and backward directions, it enables an
optimal seat position.
For proper operation and better charging efficiency when pedaling with
Mando Footloose, it is recommended to set the pedal position so it can rotate
continuously. Adjust the seat forward and backward by aligning the imaginary
line vertically drawn from knee cap with the axis of pedal. Within this range,
find the most comfortable position.
3. Adjusting the seat angle
Most riders prefer the seat parallel to the ground. However, some prefer to
raise or lower the front part of the seat. If you have pain while sitting on the
seat, lowering the front part of the seat may help reduce it (however, the
center of gravity may move to the front).
The seat fastening clamp of Mando Footloose is in the form of 2 bolts; 1
at the front and 1 at the back. Adjust the seat to ensure that the seat lies
horizontally or at a preferred angle by screwing the front and back bolts in
turns. A little difference gives a large effect on the performance and comfort of
Mando Footloose.
Although the seat height has been properly adjusted, you may feel uncomfortable while riding if the slope and front/back position of the seat are not
balanced. Also, the seat provided with the product may not fit to your body. In
this case, it is encouraged to ask assistance of a specialist at the store.
C-1
Adjustment of the
product
The first point to consider before a ride
is to adjust Mando Footloose to your
body. Proper adjustment allows comfortable riding and safety. Should you have
any difficulty with the adjustment, please
contact the store. Even though you
have completed the fitting (adjustment
of Mando Footloose to yourbody) with
proper skills and tools, it is encouraged to
confirm your adjustment with the store.
Adjustment of the seat
Minimum insertion line
If Mando Footloose is improperly fitted,
you may lose control or get injured such
as joint injury during a ride.
The seat is designed for general sizes;
therefore, it does not correspond to every
rider’s pelvic shape and sitting habits. If
you are unable to find a comfortable position, and it causes consistent pain even
after seat adjustment, it is encouraged to
replace it with another type of seat.
After seat adjustment ensure that it is secured properly before riding. before riding. Loosely placed seat clamp or seatpost clamp may cause damage to the
seatpost. Due to this damage, you may
lose control and fall off the bike.
In some cases, riding with a improperly
positioned seat may cause minor or severe injury (e.g. It may chafe skin and
cause prostate pain/numbness, knee
pain, etc) Should you feel uncomfortable
or have pain, stop riding and visit the
store for specialist assistance.
Tighten clamp bolts properly. Loosely
screwed bolts may cause wobbling and
fatigue during a ride, or may cause you to
fall off from the bike.
 Loading...