


ENGLISH
Article Nr. 462001-50000
The PULSE Barryvox®is designe d for ski,
snowboard, snowshoe, and snowmobile
travel off maintained trails. All winter sport
activities are inherently da ngerous.
Knowledge and experie nce are e ssential to
reduc e the risk of i njury or even deat h.
Do not enter avalanche terrain without an
exper ienced gu ide or equi valent tr aining.
Apply common sen se at all times. Never
pursu e t hese activities alone .
DO NOT use the device in avalanche t errain
befor e you have read and understood the
manua l! Improper use can serious ly compromi se the performa nce and safety of the
devic e.
IMPORTANT:
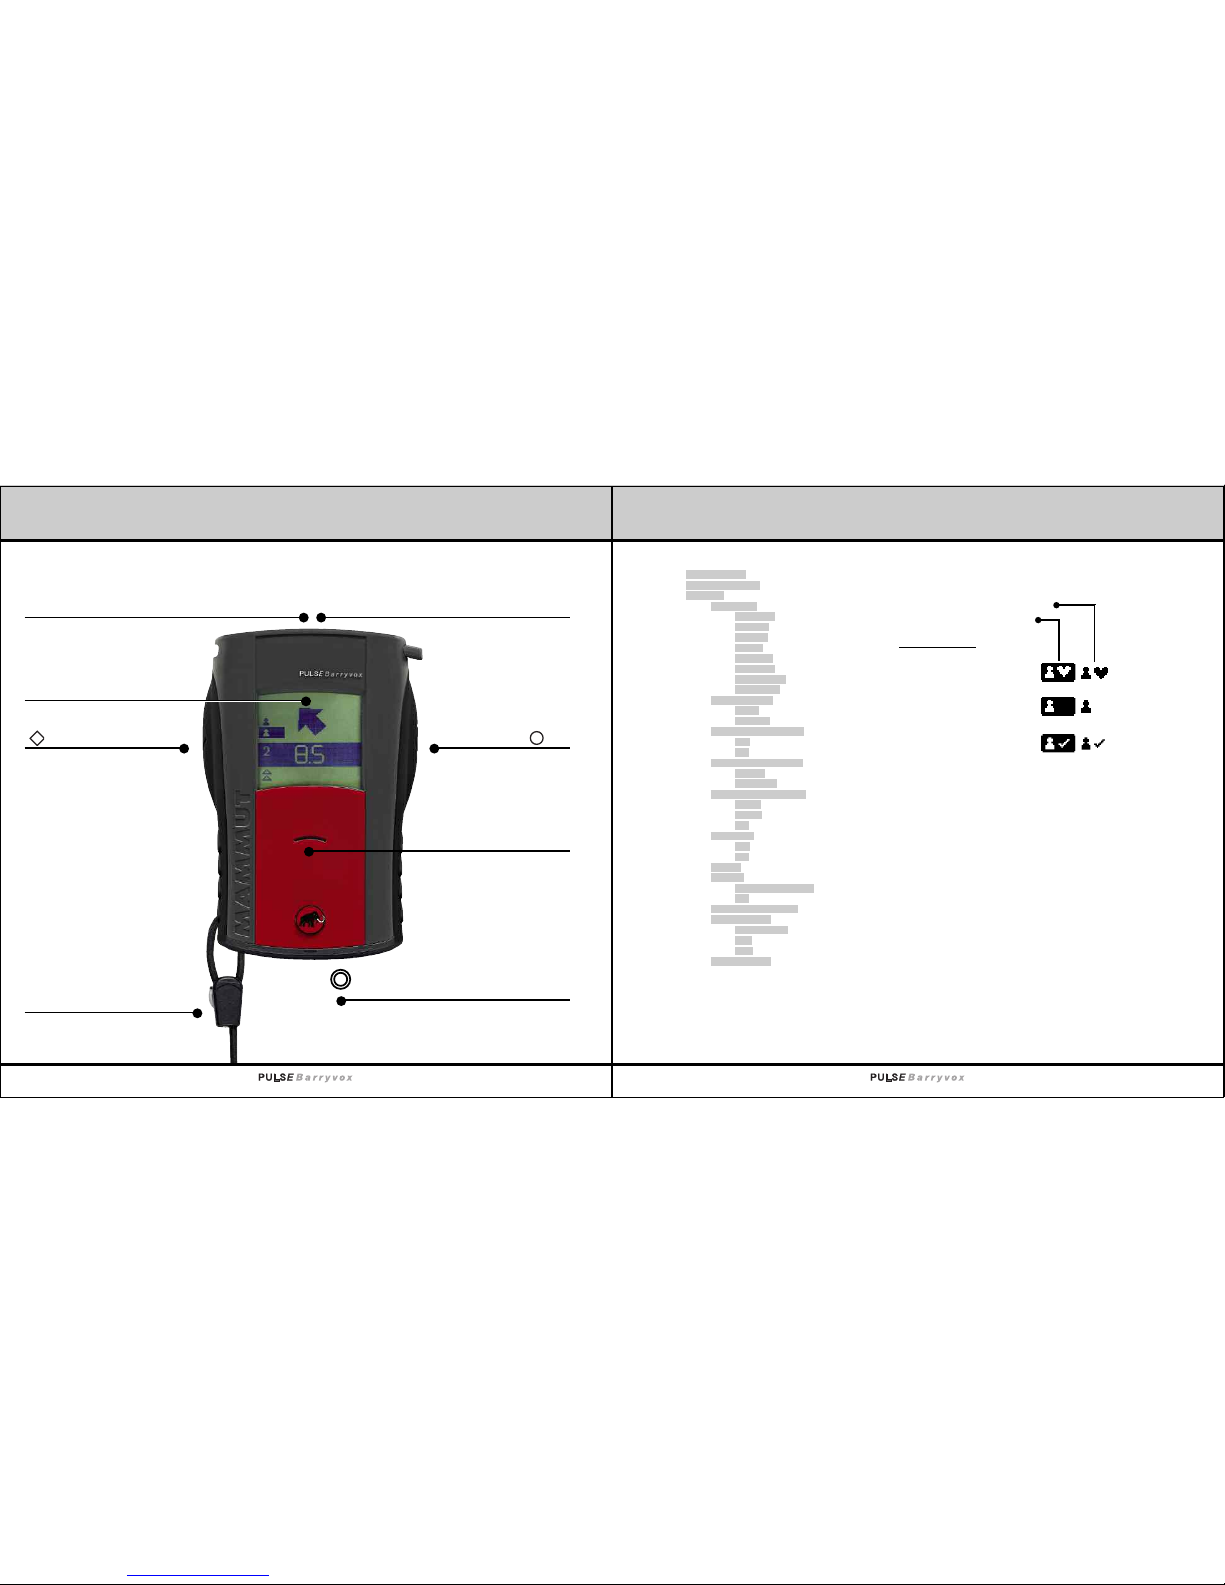
Front view Over v i e w
Group check
Vital sensor test
Settings
Language
German
English
French
Italian
Spanish
Swedish
Norwegian
Japanese
Analog mode
Auto
Manual
Audio support < 3m
On
Off
Pinpoint view < 3 m
Cross
Direction
Auto-revert to SEND
8 min
4 min
Off
Vital data
On
Off
Owner
W-Link
Available regions
Off
Calibrate compass
Maintenance
Next check
SW
HW
Reset device
Default factory settings in bold print
Information on the buried subjects for the rescuer
Burie d s ubject not s elected
Burie d s ubject selected
Burie d s ubject:
Incre ased
chanc es of s urvival
Unkno wn
chanc es of s urvival
Alrea dy
located
The black highlight indicates which buried subject you
are curre ntly looking for.
Earphone jack
Wrist loop
-Key
-Key
Display
SEND-Control LEDMain switch
Speaker

Registration and Service
Service Centers Infor mation and p rices for maintenance and repair as well as a list
of all service centers worldwide are a vailab le at:
www.mammut.ch /barryvox (-> Service)
Switz erland Mammu t S ports Group AG, Ind ustriestrasse Birren, CH-570 3 Seon
Phone : +41 ( 0)62 769 83 88, Fax: +4 1 ( 0)62 769 83 11
email : info@mamm ut.ch
Europ e and Mammut Sports Group GmbH, Postfach 1817, D-87700 Memmingen
count ries not Phone : +49 ( 0) 8331 83 92 2 40, Fax: +4 9 (0) 8331 83 92 22 9
liste d email : germany@mammut. ch
USA Mammu t S ports Group I nc., 135 Northsi de Drive, Shelburne, V T 0 5482
Phone : +1 802 9 85 50 5 6, Fa x: +1 8 02 985 91 4 1
email : info@mamm utusa.com
Regis ter you r PULSE Barryvox®today !
By registering your device, you will gain exclusive access to the Barryvox Community. We will remind you when
to have your device servi ced and provide you with technical ti ps, the l atest insights o n a valanche theory, as well
as information about the availability of s oftware updates. If you register now, several servi ces will be free of
charge!
www. m a m m u t . c h / b a r r yv o x
Regis ter your PULSE Barryvox®at:
Ava l a n c h e R i s k M a n a g e m e n t
Avalanche Training Cente rs
In «Avala nche Training Centers» in Andermatt, D avos,
Mürre n a nd Zinal (Switzerland ), L a G rave and Courcheve l ( France) as we ll as Lech (Austria), Mammut
offer s y ou the realistic opportun ity to experience
avalanche searc h a nd rescue using a valanche transceive rs in a test area. In addition to comprehe nsive
infor mation on th e assessment of a valanc he danger,
perma nently installed , sn ow-cov ered transmitters
can be activa ted randomly and searched for.
For years, Mammut has been heavily involved in
«Aval anche Risk Management» [a.r.m.] with the
objec tive to increase the safety of all winter sports
enthu siasts by pr oviding better equip ment, knowhow transfer, an d f ocused training.
Rescu e Bundl e
Besides knowledge and extensive experience, equipment is the most important element of comprehensive
safety: In addition to the PULSE Barryvox®, Mammut
offers a complete «Rescue Bundle» consisting of a
probe pole, an avalanche shovel, and an emergency
blanket – all stowed in a backpack.
Addit ional information on [ a.r.m.] or Mammut products can be fo und at: www.mammu t.ch

Welcome
1
Congr atulations on the purchase of you r new
PULSE Bar ryvox®.
This user manual explains the functionality and use of
the PULSE Barryvox®. The PULSE Barryvox®is a revolutionary avalanche transceiver, which you will understand quickly and which is very easy to use.
A transceiver does not protect you against
avalanches!
As a winter outdo or enthusiast, you must conside r all
possi ble avalan che prevention measur es and plan
your trip s c arefully. Com panion rescue – the worst
case – must be practiced frequently. Under the stress
of an acciden t, this is the only way you will be able to
locate and dig out a companion quickly and efficiently. Despite practice and all the technolo gical
advan cements, by far not all of the complete ly buried
avalanche victi ms are rescued! An avalanche buri al is
always life threate ning.
Impor tant information on these topics can be found in
the chapters on compani on rescue and avala nche
theor y.
PULSE Barryvox®– Made in Switzer land
Our herit age is compell ing. Mammut and Barr yvox
follo w the time-hon ored tradition of world-cl ass precisio n p roducts m ade in Switzerland. From its design
to its engine ering and production, this device is complete ly Swiss-made.
This devi ce is c ompati ble with all avala nche transceive rs that comply with the EN 3 00718 standard and
opera te on a frequency of 457 kHz.
In additi on to t he user manual, the Appl icatio n S afety
Guide of the Barryvox contains comprehe nsive
instr uctions on t he safe use and maintenance of your
trans ceiver as we ll as p ossible sources of interference. Special considerations are include d for efficient
fleet manageme nt.
(www.barryvox.com or www.mammut.ch/barryvox)
© Copyright by Ascom (Schweiz) AG.
All rights reserved. Text, text excerpts, imagesand diagrams are
all subject to copyright. No part may be reproducedor copied
without written permission from the publisher.
[ Photo: Patrice Schreyer ]

2
Ta b l e o f Content s Operation
3
Front view
Welcome
1. Operation .... ...... ..... ...... ..... ...... ...... ..... ...... ..... ...... ..... ...... ..... ...... ...... ..... ...... ..... ...... .. 3
2. Setup.... ...... ..... ...... ...... ..... ...... ..... ...... ..... ...... ..... ...... ...... ..... ...... ..... ...... ..... ...... ..... ..... 5
3. Send Mo de (SEND) ...... ...... ..... ...... ...... ..... ...... ..... ...... ..... ...... ..... ...... ..... ...... ..... ...... ..... 10
4. Search Mode (SE ARCH) .... ...... ..... ...... ..... ...... ...... ..... ...... ..... ...... ..... ...... ..... ...... ..... ...... . 11
Searc h P hases .... . ..... ...... ..... ...... ..... ...... ..... ...... ...... ..... ...... ..... ...... ..... ...... ..... ...... ..... .. 11
Stand ard Mode ....... ...... ..... ...... ...... ..... ...... ..... ...... ..... ...... ..... ...... ..... . ..... ...... ..... ...... .... 13
Analo g M ode ... ...... ..... ...... ..... ...... ...... ..... ...... ..... ...... ..... ...... ..... ...... ...... ..... ...... ..... ..... 21
5. Advanced Features .... ...... ..... ...... ..... ...... ...... ..... ...... ..... ...... ..... ...... ..... ...... ..... ...... ..... 26
6. Additional In formation ... ..... ...... ..... ...... ...... ..... ...... ..... ...... ..... ...... ..... ...... ..... ...... ..... . 33
7. Companion Res cue .... ...... ..... ...... ..... ...... ..... . ..... ...... ..... ...... ..... ...... ..... ...... ..... ...... ..... 38
8. Introduction to Avalanc he Theory .... ...... ..... ...... ..... ...... ..... ...... ..... ...... ..... ...... ..... ...... .. 46
Index ....... ...... ..... ...... ...... ..... ...... ..... ...... ..... ...... ..... ...... ...... ..... ...... ..... ...... ..... ...... ..... ...... .. 50
Over view
1. Operation
1.1 Main Switch OFF / SEND / SEARCH
The main switch is located on the top side of the device. It can be moved by pressing down on the button. By
applying lateral pressure to the switch, it can be set to SEND at any time. In the left switch position, the transceiver
is OFF, in the center position, it is in SEND mode, and in the right position, the SEARCH mode is activated.
To get into the OFF position, an additional safety button must be pressed down, as well.
Always make sure that the switch locks into posit ion mechanically to avoid an undesired change of mode.
OFF
OFFSEND SEARCH
OFFSEND SEARCH
OFF -> SEND SEND -> OFF
OFFSEND SEARCH
SEARCH
OFFSEND SEARCH
SEND -> SEARCH SEARCH -> SEND

4
Operation Setup
5
1.2 Use of Keys
The PULSE Barryvox® clearly excel s t hrough its e ase
of use. The device is operat ed using the two later al
keys. The curren t f unction of t he keys is always
shown a t t he bottom of the display. On the left , the
funct ion of the left -key is shown; on the right, you
will see the func tion of the right -ke y. If the text is
cente red, either key can be pressed to a ctivat e t he
funct ion.
Examp les:
Two Function s
Right - key:
✓ Mark
Left - key:
Move the selection
Both keys simultaneously:
Back
Left or right key:
Group check
One Funct ion
Speci al Functions
2. Setup
2.1 Initial Setup
Befor e y ou use the device for the first time, remove
the prote ctive foil on the f ront side and stick the
emerg ency plan on the back of the batter y compartment lid.
2.1.1 Insert / Replace Batteries
Only u se alka line LR 03/AAA batteries. Always
inser t 3 new batterie s of the same type.
Never use rec hargeable batteries a nd always
repla ce all the batteries at the same time.
Make sure the l id is properly closed and that the
devic e a nd the batteri es stay dry. Periodic ally inspect
the battery compartment. Clean or dr y it, if needed,
since moisture can c ause corrosion. Avoid touchi ng
the conta cts with your hands.
When stor ing or not using the transceiver for an
exten ded period of time (in the summer), remove the
batteries and leave the battery compartment open.
The warra nty becomes void if batteries have leaked!
A reliabl e p ower suppl y i s crucial for the safe operation. Please refer to th e d etailed i nstructions in the
Application Safety Guide .
(www.barryvox.com or www.mammut.ch/barryvox)
2.1.2 Device Setup
When turn ing the device on for t he first time and
switching to SEND, the user langu age must be selected. Pres s t he -key to change the current selection
and confi rm by p ressing t he -key.
The compa ss calibra tion is performed next. Please
follo w the instruct ions on the display and in the chapter «Cali brate Comp ass».
You can customize y our Barryv ox with your personal
infor mation , such as name, address, and phone number. T his way your device is identifiable as yours.
Pleas e r efer to the instructions in the chapter
«Owne r.»
Verify if your PULSE Barryvox®is set to the appropr iate W-Link regi on for your countr y (wireless r adio
link) . Please see chapter «W-Link». For countries
witho ut W- Link appro val transmission and reception
of vital data is not possible . (C hapter «Tria ge Criteria
and Vital Data»).
Adjus t t he carrying system to your size.

7
2.4.2 Carryin g the Trans ceiver in a Pock et
(with out vital data
detec tion)
If you carry the B arryvo x
in a pant pocket, the zipper must rema in closed
for the duration of the trip.
Always use a secured
pocke t ( see illustration). If
possi ble, attach the wrist
loop to your pant s o r
secur e i t around your belt.
2.5 Turning the Device On
When the main switch is moved from the O FF to t he
SEND or SEARCH positions, the transceiver is turned on.
While starting, the device condu cts a s elf-test.
The micro processor, the antennas, the sensors, and
the displ ay are checked. If the battery level is lo w,
the self- test will not run.
If the self-t est is completed successf ully, t he display
will show «OK» and the transce iver will beep three
times .
The remaining battery level is displayed as a percentage.
If the self-t est fails, an error message is displayed for
20 second s a long with an acoustic warning .
The meani ngs of the different error messag es are
descr ibed in the chapte r « Troubleshooting» .
Test your Barryvox at home prior to your trip. Turn the
trans ceiver on an d m onitor the s elf-test and the battery level. T his gives you the opportunity to re place
low batteries and have an ev entual defect repair ed
befor ehand.
6
Setup
2.2 Handling the Barr yvox
As all transc eivers, the Barryvox contains shock-se nsitiv e f errite antennas. Therefore, you should handle it
with utmo st care!
Store the device and the carry ing system in a dry
spot that is protected from extreme cold or h eat and
direc t s unshine.
It is recomme nded that you have the functionality
teste d a t regular intervals (see chapter « Periodic
Check s»).
2.3 Interferen ces
As a matter of princi ple, avoid havi ng other electronic
devic es (e.g. mobile phon es, radios, headlamps),
metal objects (pocket knives, magn etic buttons), or
other transceivers close to your runni ng avalanc he
trans ceiver. T he PULSE Barryvox®conta ins a m agnetic compas s. You should not wear clothing wit h
magne tic but tons! Users of pacemakers are
advis ed to ca rry the device on their right side
(adju st the l ength o f the ca rrying straps ). Consult
the manufacturer’s instructions with regard to the
impact on pacemakers.
When sear ching, hold the devi ce at a minimum of
50c m a way from these objects and turn off a ny electroni c d evices, if possible. It is highly recommend ed
to turn off mobil e p hones!
The Applic ation Safety Guide of the Barryv ox contains
an exhaus tive list of allowed equipment as well as a
detai led list of possible limitations.
(www.barryvox.com or www.mammut.ch/barryvox)
2.4 Carrying Po sitions
Regar dless of the carry ing position, the d isplay
shoul d a lways face your body!
The de tectio n of vit al data is o nly pos sible if you
carry the de vice in the carrying s ystem.
(Chap ter «Triage Criteria an Vital Data»)
Befor e y ou use the device for the first time in the outdoors , o r when you decide to carry the transcei ver in
a differe nt manner, we recommen d t hat you test the
vital data sensor (Cha pter «Vita l S ensor Test»).
2.4.1 Carryin g Syste m
(Reco mmended Carryin g Position )
The carrying system has to be put on your innermost
layer of clothing prio r t o beginning t he trip (see illustration) and has to be worn on your body for the duration of the trip. The transcei ver sha ll always
remai n cover ed by one layer of cloth ing. The
devic e i tself is inserted into the carrying system
accor ding to the illustration. It shou ld always rema in
ancho red to the base plate of the carrying system
using the red h ook on the wrist loop.

9
After 5 minutes in the group check, the transcei ver
autom atical ly switche s t o t he SEND mode. The user is
warne d a head of time by an acoustic alarm. This
autom atic switching can be prevented by pressing
any button within 20 seconds. Aft er the group check,
the trans ceiver must be s witched t o t he SEND mode
by pressi ng any button.
Two-Way Group Check
We recomme nd you perform a two -way group check
in which the SEND and t he SEARCH functionali ty are
check ed individually!
The membe rs of t he party activate the group check
on their tran sceivers or set them to a lo w r eceive volume. The leader s witches his or h er transceiver to
the SEND mode and e nsures that all party members
can recei ve. Subseque ntly, t he party members switch
their transceivers to SEND, and the leader activates
the group check or sets the transceiver to a low
recei ve volume. The SEND mode of all transc eivers is
check ed, and ultimately the leader swit ches his or
her trans ceiver to SEND.
8
Setup
2.6 Battery Le vel Ind icator
The follo wing table gives you average values for the
battery levels.
The remai ning batte ry level can only be displ ayed
corre ctly if batter ies are used according to the chapter «Inse rt / Re place Batt eries» Low t empera tures,
age, and brand can h ave a negative impact on the
battery life and the accuracy of the battery level indication.
100%: At least 200 hrs in SEND
mode and 1 hr in SEARCH
mode.
less than T he batteri es must be
20% or repla ced as soon as
battery icon possi ble!
displ ayed: Emergency reserve at 20 %:
Max. 20 hrs in SEND mode
and max. 1 hr in SEARCH
mode left .
The trans ceiver sounds a warning if the battery level
is below 20% a t s tartup .
2.7 Group Check
Befor e a party takes off, the trans ceivers o f a ll the
party members must be ch ecked. To con duct this
test, the function group chec k i s a ctivat ed on a sin gle
trans ceiver within the party. Activate the group check
by switching the device from OFF to S END and pressing eithe r o f the keys within the first 5 seconds. After
a few seconds , the device will automatically activ ate
the group check. Make sure all the other transceivers
of the party are in SEND mode.
The test is succe ssful if all the member s of the party
can clearl y hear beeps within the range indica ted on
the displ ay. The members of the party must be spread
out appropriately to avoid mutual interference. If the
indiv iduals are t oo close to each other, the group
check ’s re sults become increasi ngly unreliable.
If no tone is hear d withi n the in dicated range, the
devic e may no t be use d, and the device or its batterie s must b e inspe cted further, as nee ded.
Group Check
Group Check
Group Check
Start Two-Way
Group Check
Start One-Way
Group Check

In case of a burial (or whenever the transce iver stops
movin g), the device recor ds the burial duration and
detec ts vital data. These are displayed on the buried
devic e a nd transmitted via W-Link to all other transceive rs capable of re ceiving v ital data. See chapter
«Buri al and Vital Duration».
10
SEND Mode SEARCH Mode
11
3. SEND Mo de
The SEND mode is th e normal opera ting mode outdoors or in all other situations in which there i s a risk
of avalanches.
Each indi vidual signal pulse is tested. If the test is
succe ssful, this is confi rmed by a b link of the red
SEND- Control LED.
The LCD displ ay is a utomat ically deactivated in the
SEND mode , but c an be a ctivat ed any time by pressing eith er of t he keys.
4. SEARCH Mode
Elect ronic d evices and metal objec ts can i nterfe re
with t he sear ch or ma ke it im possib le.
See chapter «Interf erences».
Altho ugh the aval anche t ransceiver is easy to use,
its ef fectiv e use re quires proper trai ning. We r ecommen d that y ou prac tice transceiver sear ches
regul arly.
4.1 Search Phases
In an avalanche search, the follo wing phase s are d istingu ished:
●
Prima ry search phase
●
Secon dary searc h phase
Primary
search phase
Secondary
search phase
Coarse search
Pinpointing

13
4.1.2 Secondary Sear ch Phase
The basic pattern of the prima ry search is suspended
and the signa l i s followed to the buried subject.
• Coars e Searc h: From where t he signal is first
detec ted to the approximate locat ion of the
burie d s ubject.
• Pinpo inting Phase: Pinpointin g o ccurs in the
immed iate proxi mity of the buried subject using
the trans ceiver together with a probe pole.
4.2 Auto-Rever t to SEN D
Auto- revert to SE ND automatically switches the
trans ceiver from the SEARCH mode to the SEND
mode if no user interaction or movement occurs during a certain amount of time (default 8 minutes) .
Prior to revertin g, the device will soun d a n audible
alarm . Reverting can be a voided if either of the keys
is presse d w ithin 20 seconds of the alarm.
This sett ing automa tically reverts a transceive r, which
was unint entionally left in SEARCH mode (after a
searc h o r an exercise ), back to the SEND mode.
In case rescu ers are buried in a second avalanche,
this func tion allow s t hem to be l ocated using transceive rs.
4.3 Analog Search Tone
Just as in traditional analog transceivers, the analog
tone is just received by one antenna. The change in the
distance indication can therefore deviate from the
change in tone volume. Depending on the relative orientation of the transmitter to the receiver, the tone volume
and the distance indication may both decrease while
approaching the buried subject.
4.4 Standard Mode
As soon as the device is switched to SEARCH, it is
operating in standard mode. This mode enormously
facilitates a rapid location of a buried subject.
12
SEARCH Mode
4.1.1 Primary Sea rch Pha se
From the start of the search until you cl early hear the
first tone, you are in the primary search phase.
Durin g t he primary search, the avala nche surface is
searc hed systematically until you pick up a signal.
The objec tive of the primar y search phase is to detect
a signal.
The PU LSE Bar ryvox®uses t he symb ol as a
gener ic inst ruction to apply one of the following
searc h patte rns for new signals!
To optimi ze the r ange, rotate the transc eiver
aroun d all ax es.
Once a signal is re ceived, maintain the devi ce orientation and continue walking until the signal can be
heard clearly. Th e p rimary search phase is concluded.
Regar dless of the opera ting mode, the follo wing
searc h s trateg ies apply:
Optimization of the range
Search strategy if the last seen point isunknown.
All distances in meters
Single rescuer Multiple rescuers
5
0
M
e
t
e
r
s
Last seen point
Search strategy if the
last seen point is
known. The primary
search strip extends
downhill from the last
seen point in the direction of the slide.

1514
SEARCH Mode
4.4.1 Transceiver Ope ration 4.4.2 Search for a Single Buried Subject
Using the Sta ndard Mode
Coars e S earch
The analo g t one is the first signal that is received a t
long dist ance.
If the distan ce to t he buried subject is less than
approx. 6 0 m eters, the dista nce and direction are displaye d. The sensitiv ity (volume) of t he receiver is
adjus ted automa tically to o ptimize the processi ng of
the signa l. The distance can n ever be determined
exact ly. The numbers must be interpr eted as relati ve
dista nces. Whether the numbers are increasi ng or
decre asing is more important than the abso lute numbers. The closer you are to t he transmitting devic e,
the more prec ise the indicated distance is.
Hold t he tran sceiver horizontally in fron t of you
and pr oceed i n the di rection indicated by the
arrow. If the dis tance i ncreases, you ar e moving
away from the victim. Continue the search in the
oppos ite dir ection. The transceiver will lead you to
the burie d s ubject quickly and relia bly.
Do not move backwards, otherwise the direction
indic ation w ill be i ncorrect.
The -key is used to manually select a specific buried subject.
If none of the buried subjects
are selected, the device
displays the symbol for the primary search phase and
advises you to search the avalanche for additional signals.
If you are in close proximity of a
buried subject, you can mark
that location by pressing the
-key.
Start
Above approx . 60 mete rs:
Prima ry search with analog ton es
Above 3 meters:
Secon dary search with
dista nce and dir ection
indic ation
Below 3 me ters:
Pinpo inting with
cross bra cketing
User inte rface in
the stand ard mode

17
Erase Mark
A mark can be removed by se lecting t he buried subject with the -key and selecti ng «Erase mark» with
the -key. You c an only remove the mark if you are
in the immedi ate vicinity (<6m) of the buried subject.
Deep Buri als
If a buried subje ct is m arked with a distance reading
above 3m, an addition al safety dialog appears asking
you to confir m t he successful location of the subject.
Marki ng a bu ried subject in more the 6 m eters depth
is not possib le.
16
SEARCH Mode
Start the search at a high speed and reduce t his
speed as you close in on the buried subje ct. Operate
the trans ceiver in a quiet a nd concentrated manner avoid rapid movements. This way, you w ill reach the
objec tive in the quickest and easiest mann er!
Pinpo inting
At thi s point , you must hold the transceiver jus t
above the snow surface and determin e the po int
with t he smal lest di stance reading by brac keting .
Withi n t he pinpointing range, i.e. withi n t he immediate proximity of the buried subject (< 3 meters) , the
Barryvox provid es you with a digital distancedepen dent tone while pinpoint ing.
Use the avalanche probe to co mplete locating the
burie d s ubject (See chapter «Companion Rescue») .
A located subject should only be marked using the
✓-Mark function after his or her location has been
verif ied using a probe pole!
Do not place the Barr yvox on the snow surface again
for this purp ose!
After marking a subject’s location, th e Barryvox
searc hes for other possible burial s, displayi ng the primary search symbol and advising you to search
the rest of the avala nche (See chap ter «Primary
Searc h P hase»).
Flux line search
Hold the transceiver
directly above the snow
surface while pinpointing!
Exact pinpointing with
the avalanche probe
Don’t mark the location of
a buried subject until the
location has been confirmed using a probe pole!
Do not place the Barryvox
on the snow surface
again for this purpose!
Search for further buried
subjects
1.
2.
3.
4.
✓

1918
SEARCH Mode
4.4.3 Search for Multiple Bur ied Sub jects
Using the Sta ndard Mode
In standa rd mode, the transce iver attempts to analyze
all the detec table signals and to determin e t he number of buried subjects. This is po ssible, bec ause all
the signa ls from one transmitter displ ay characteristics, which are distinguishab le from the signals from
other transmitters. The more unique the sign al character istics are, the more accurat ely the signals c an
be distin guished and located (pattern recognition). By
autom atical ly associa ting the signals with their
respe ctive sources, multiple burial situa tions can be
solve d w ithout applying specific search tactic s.
List of Burie d S ubjects
The burie d s ubjects a re listed based on the distance s.
Proce dure
1.
The devic e f avors the closest subje ct first. Locate the
vario us buried subjects using the tran sceiver and
probe pole (Chapte r « Search for a Single Buried S ubject usin g t he Standard M ode»).
2.
As soon as you mark an individual subjec t, t he transceive r t akes you to the nearest, un marked buried
subje ct.
3.
Conti nue this procedure until all subj ects are located
and marke d.
4.
The rescu er now searche s f or additional buried subjects while the display shows the symbol f or the primary search phase to indicate that the rest of the
avalanche surfa ce must be searched (Chapter
«Prim ary Search Phase»).
Procedure for multiple burials

21
If the + sign appears for an extended period of time,
this indi cates that not all the buried subje cts can be
located using the stand ard mode. In this case, it is
advis ed to s witch to the analog mode.
4.5 Analog Mode
In the analog mode, the transcei ver shows distance
and direc tion to the subject with the stronge st signal
and provi des an analog tone. The ana log mod e is
mostl y used w hen a clear dist inction of mul tiple
buria ls is no lon ger pos sible in standard mode.
Switc hing from standard mode to analog mode is
achie ved by pressing and holding both keys at the
same time for t hree seconds.
In analog mode, the directio n i ndicat ion always points
forwa rd, never backwa rds. Monitor the d istance i ndication to ensure you are approaching the buried subject!
4.5.1 Multiple Buried Sub jects i n Analo g Mode
If multip le burials are detected in analog mode, an
icon symb olizing multiple burials is shown on the display . Additionally, you can a lso hear the analog
tones . Thes e are h elpful in di stinguishing the signals
acous tically. The device favors the closest subject.
The detec tion of multiple burials may vary based on
the subje ct’s orientation and distan ce relativ e t o the
rescu er.
Turn off the transceivers of the excavated subjects to
facil itate the furt her search. If you don’ t k now the
numbe r o f buried subjects, you must search the
entir e a valanc he path using the sear ch pattern s
descr ibed in the chapte r « Primar y Search Phase».
20
SEARCH Mode
Vital Data Display
If it is not possible to lo cate and dig out all burie d
subje cts at the same time, the buried subjects with
highe r c hances of su rvival, in dicate d b y the symbo l, should be located and excavat ed first.
You can find more information on triag e c riteria a nd
vital data in the chapter «Triage Criteria and Vital
Data». The actual priori tizati on of c ertain buried subjects over others is up to the rescuer.
4.4.4 Limitations
The large r t he number of buried subjects is, th e more
diffi cult and time-consumi ng the exact analysis of the
situa tion gets, because of overlapp ing signals. The
more sign als there are, the longer t he signal overlaps
can last. The capabi lity to automa tically detect and
isola te signals from multiple buried subje cts is therefore limi ted.
Numbe r o f Burials
The calcu lated numb er of b urials is di splayed below
the list of burie d s ubjects. If the transcei ver detects
more sign als than buried subjects in the list, a + sign
is added behi nd the number.
Searc h S uspens ion
Durin g t he search for multiple subjec ts, signals may
overl ap making it impos sible to analyze the signal of
a single buri ed subject. If the signal overl ap lasts
sever al seconds, the rescuer has to interrupt the
proce ss temporarily to avoid deviating from the optimal searc h p ath. The PULSE Barr yvox®will indi cate
the neces sity to suspend the search by displa ying the
word «Sto p». Stand still, and do not move until the
word «Sto p» disappe ars, at which time you can continue to search.
Analo g Tone
Outside of the pinpointing range, the Barryvox alway s
provides the analog tone allowing th e rescuer to verify
the number of signals detected by the device. Counting the number of different to nes provides the number
of buried subjects.
Analo g M ode
If the rescue r d etects problems with the analysis of a
multi ple burial situation, he or she can always switch
to the analog mode (see chapte r « Analog Mode»).
The list of burie d s ubjects i s d eleted at th is time.

2322
SEARCH Mode
4.5.2 Search Tactics with Multip le, Widely
Scatt ered Bu rials
1.
Mark the loca tion on the avalan che where the «multiple buria l» icon appeared on the display or wh ere
you left the prim ary search pattern.
2.
Searc h f or the first buried subject using the informa tion on the displ ay along with the analo g tones. Once
this subj ect is located , you or o ther rescuers should
dig him or her out immediately.
3.
Conti nue to search for other buried subje cts by
retur ning to the previously marked point.
4.
Stric tly adhere to the p rimary search pattern and
conti nue down the avala nche path until you are led to
the next subj ect. Initial ly, the transcei ver will want to
take you to the previously located subject , be cause
he or she is still the closest . Ignore these indi cators
until you notice that the tran sceiver is p ursuing a new
subje ct.
Search tactics with multiple, widely scattered burials in analogmode

2524
SEARCH Mode
4.
Maint ain the orientation of the transceiver during this
phase and concentrate on the increase or d ecrease of
the dista nce indica tion as well as the volume of the
analo g t ones.
5.
At the point with the l owest distance reading, you
leave the micro search strip patter n t o pinpoint the
burie d s ubject through bracketing. Once the subject
is located, y ou return to the location where you left
off in order to continue the pattern.
6.
The more buri ed subjects there are and the closer
these are, the tighter the micro search strip grid on
the poten tial search area should be. As a rule of
thumb , the s earch strip width should be between 2
and 5 meters.
7.
Conti nue the patter n, until the distan ce reading in an
entir e s trip never drops below 15. Then revert to the
prima ry search pattern and searc h the rest of t he
avalanche.
The avalanche probe is ve ry helpful in locatin g m ultiple burie d s ubjects i n cl ose proximity.
There are at le ast three buried
subje cts within 15 me ters.
Search tactics with multiple burials in close proximity in analog mode
4.5.3 Search Tactics with Multip le Buri als
in Clo se Prox imity
The inter pretat ion of the acoustic signals is extremely
impor tant in this situa tion. These must be interp reted
in connec tion with the distance readin gs.
Examp le:
You hear three beeps and t he distance reading jumps
betwe en 3.5 and 4.8 m. Therefor e, three buried subjects can be ex pected within a radius of 5 m.
Searc h U sing Micro Search Strips
If you have multi ple bur ials wi thin less than 10 t o
15 met ers, you search using micro se arch st rips.
1.
Locate and dig out the first buried subject.
2.
Back up until the display shows 15 and search the
area in front of you in parallel search strips.
3.
As soon as the distan ce indication reads 15, you have
reach ed the side of the search strip . Advance 2 to 5
meter s a nd return on the next parallel search strip
until this search strip ends as well (distan ce indication > 15).

2726
SEARCH Mode Advanced F e a t u r e s
4.5.4 Further Search Meth ods
There are further methods to search for multi ple
burie d s ubjects i n close proxim ity.
One metho d u ses concentric, circular search strip s
with radi uses of three, six, and nine meter s around
the first located subj ect. A s w ith the micro search
strip s, the locations with the stronge st signal strength
are of intere st. From there the subjec ts are located
using a tradition al bracketing method.
5. Advanced Feat ures
5.1 Manual Volume Contr ol in An alog Mo de
(Anal og Mode = M anual)
In the analog mode (with activated manual volume
contr ol), the receive r s ensitivity (volum e) can be set
manua lly. Thi s m akes acoustic searche s p ossibl e, as
condu cted with traditional transceivers.
Burie d s ubjects a re located based on the acoustic
chang e i n intensity o f t he received signal. The use of
this mode requires intensive training .
In order to be able to use the manual volume contro l
in analog mode, you must enable it in the «Settings»
by choosi ng «Manual» in t he setting «Analog mode» .
When u sing th e manua l volum e control in analog
mode, the display can be disabled , in order to
signi ficantly increase the ran ge. By pressing the
-key for + on v olume l evel 8, the display is
deact ivated; sub sequently pressing th e - key
for – act ivates t he disp lay aga in.
By act ivating the man ual vol ume control in analog
mode, an analog tone is used for the g roup check,
as wel l.
Once your Barryvox is configured accordingly, y ou
can toggl e b etween standard and analog mode with
manua l v olume control by briefly pressing and holding both keys at the same time for three seco nds.
The sensi tivity of the r eceiver is i nitially controll ed
autom atical ly.
The user can manu ally change the sensitiv ity by
press ing the - key for + and the -key for –.
A1 represents the shortest, A8 the greatest distance to
the buried subject.
As soon as the volume is se t manually, a border is
displ ayed around the volume bar. The a utomatic volume contr ol is d isabled. If the volume is set too high
or too low, the distance and direction i ndicat ions
becom e u nreliable, and a blinking display prompts
the user to adjus t t he volume.
To return to the standa rd mode, both keys must be
press ed simultaneously.
Ortho gonal Search System
(Seco ndary Sear ch Phase)
Ortho gonal search system with manu al selection of
the recei ver sensitivity:
1.
Maxim um tone
Searc h f or the loudest tone on a straight line.
2.
Reduc e v olume
Reduc e v olume until t he tone is barely audib le.
3.
Turn 90°
Searc h a t a 90° a ngle to the previous directio n.
Display in analog mode
(on the second lowest
volume setting)

29
Inter pretation of the Test Results:
No tone:
The trans ceiver cannot detect any vital data.
Slow series of tones:
Vital data are being detec ted.
Rapid series of tones:
The senso r i s detecting e xtensive motion, as experienced in ascent or descent. Avoid any movement to
test the vita l d ata detect ion reliably!
5.3. Settings
The defau lt settings of t he device are confi gured optimally for normal use. Advanced and professi onal
users have the possibi lity to activa te additional functions and customize the Barryvo x t o their needs
Most c ustomi zable features mak e the Ba rryvox a
sophi sticated device. You should only change the
defaul t setti ngs if y ou have a sp ecific reason to
do so.
To access the «Sett ings», switch the transcei ver from
OFF to SEND and press any key. The confi rmatio n
«acti vated» appears at the bottom of the screen. Wait
until the entry «Group Check» appears. Press the
-key, twice to get to the menu item «Settings».
Confi rm your selection by pressing the -key.
See the menu over view on the inside of the cover.
28
Advanced F e a t u r e s
Remem ber
●
Hold the tran sceiver vertical ly.
●
Searc h q uickly.
The volum e o nly changes
if you are moving .
●
Searc h q uietly.
This way you can detect
diffe rences in vo lume easier.
5. 2 Vital S ensor Test
The PULSE Barryvox®uses a highly sensitive motion
senso r t o detect vital data in buried subjects.
To test the vital senso r, swit ch the transceiver from
OFF to SEND and press any key. The confi rmatio n
«acti vated» appears at the botto m of the screen. Wait
until the group check appe ars. Press the -key
once to get to the menu item «Vital Sensor Test».
Confi rm your selection by pressing the -key.
Positi on the transceiver the way you will be carrying
it in the outdoor s. (It is imperative to use the same
clothi ng!) Lay yourself on the floor so that your body
press es the Barryvo x downward s and avoid any
inten tional movements .
The current status is constantly displayed during the
vital data test.

31
5.3.7 Owner
The Barryvox allows you to e nter your name, add ress,
and other informat ion, such as your phone number or
email address. This information is displayed every
time the tran sceiver is t urned on, so that the owner
can be identi fied immediately anytime. We r ecommend that you enter this infor mation .
Due to restri ctions in the n umber characters per line
and overa ll space, the data enter ed must be limited
to inform ation nece ssary to identify the devi ce and
retur n i t to its owner.
By pressi ng the -key brief ly, the cursor on the bottom line move s t o the r ight. By pressin g the -key
longe r, the cursor moves to the left. Pressing the
-key conf irms your selection.
Bewar e o f the meaning of the follo wing icons:
30
Advanced F e a t u r e s
5.3.1 Language
This sett ing allows you t o select the language of your
trans ceiver’s user interfac e.
5.3.2 Analog Mode
The analo g m ode allows the rescuer to solve even
most comp lex multiple burial situa tions and make s
the PULSE Barryvox®a full-fl edged aval anche transceive r. If the analog mode is set to «Manual», the
exper ienced rescuer can adjus t the v olume manually,
which can be ve ry advantageous in certain situa tions.
5.3.3 Audio Support During Pi npoint ing
(< 3 Meters)
Durin g t he pinpointing phase, the search can be supporte d w ith an acoustic t one, which leads you i n t he
right direction. Rescuers who p refer alwa ys to h ear
the analo g t one can disable this feature.
5.3.4 Pinpoint View (< 3 Meters)
Withi n p inpointing range, the Barryvox supports you
with a cross symb ol for bracketing, which allows f or
user-friendly pinpointing. Users who are very familiar
with the flux line pattern in close proximi ty of t he
trans mitter and p refer to see the direct ion arrow can
disab le this featur e.
5.3.5 Aut o-Revert to SEND
Auto- revert to SE ND switches t he transceiver from
SEARC H m ode to SEND mode if there is no user interactio n o r major motion for a specific amount of time.
The defau lt setting of 4 minutes is appropriate for
most user s. Only change this setting if you have an
impor tant reason to d o s o. The setting is critical for
your pers onal safety! If you disable this setting, you
will always see the warning symbol in SE ARCH
mode.
5.3.6 Vital Data
Your PULSE Barryvox®detec ts your vital data while
you are burie d a nd transmits these via the W-Link
radio connection to the rescuers (default setting). In
SEARC H m ode, the Barryv ox displays the vital status,
provi ded the sender has enabled the W-Link and the
abili ty to t ransmit v ital data.
If you do not wish to have these data transmit ted, you
can disab le this featur e. Only change this setting if
you have an important reason to do so. Thi s setting
can affec t y our chances o f s urvival in a complete
buria l s ituati on as well as t hose of buried subjects
you are searc hing for.
New line
Move cursor to the left
Move cursor to the right
Backspace
Save and exit

33
5.3.1 1 Reset Dev ice
The funct ion «Reset device» allows you to restore all
the defau lt factory settings . All modi fied settings as
well as owner data are lost.
6. Additional In formation
6.1 Tone-only Mode (TO M)
If the display is defect, you ha ve to sea rch using the
tone-only mode. Turn the transceiver off. Press both
keys while turning the transceiver back on. The sensitivity of the receiver can be manually adjusted by using
the - key= + and - key = –. The analog tone is
used to locate buried subjects.
6.2 Earphones
The use of earpho nes in avalanche rescue is especiall y a dvanta geous in high-noise envir onments
(wind , helicopte rs, etc.).
Stand ard (Walkman) earphones can be used. As soon
as earpho nes are plugged in, the internal speaker is
muted so that other rescu ers are not disturbed.
32
Advanced F e a t u r e s
5.3.8 W- Link
The PULSE Barryvox®uses a W-Link radio transmission.
Different countries have varying frequency regulations.
The following world map shows the frequencies used in
the individual countries. Note that specific frequencies
may not be used in certain countries. The frequency
is factory set depending on the country of sale. The
manufacturer declines all liability in the case of
after-sale frequency modifications.
5.3.9 Calibrate Compa ss
The elect ronic compass provide s a rapid adjust ment
of the direct ion indica tor and extends the display
range to 360 degrees. To fun ction properly, t he compass must be ca librat ed. The need to calibrat e the
compa ss is a utomat ically detected when the batteries
are repla ced. T his is, however, not the case if you
travel a long distance .
Rotate the horizont al transceiver slowly and with constant speed around its a xis until the message «Compass cali brated » a ppears .
5.3.1 0 Maint enance
Variou s pieces of information can be displayed, such
as the date of the next check as well as the software
(SW) and hard ware (HW) version.
Additional Information
Frequency setting:
light grey = Region A
dark grey = Region B
black = W-Link not
allowed
white = unknown

3534
Additional Information
6.3 Use in the Dark
If you use the transceiver in the dark, the display is
autom atical ly backlit.
6.4 Test and Configuratio n Adapt er
There are various test and c onfiguration adapters
available for the PULSE Barryvox®, w hich allow
advan ced functions to be configur ed or restricted.
Test, configuration, and update capabilitie s v ia the WLink make the PULSE Barryvox®the ideal choice for
fleet use.
6.5 Maintenanc e and Re pair
Barryvox transc eivers , which do not function correctly, despite full and properly inserted batterie s ( e.g.
probl em listed under troubles hooting, no signal during the group check, mechani cal defects) must be
sent to a service center listed on the inside of the
cover.
6.6 Periodic Checks
To ensure the prope r f unctionality of the transceiver,
it is highly reco mmended that you send your device
to a service center listed on the inside of the cover
once ever y three years for a functiona l t est. There is
a service c harge involved. This functiona l test is far
more c ompreh ensive than the self-test or g roup
check . Preferabl y, you will have the periodic check
condu cted during the summer month s, s o t hat your
Barryvox is ready at the begin ning of the winter season. The recommended date of the next check can be
viewe d u nder «Maintenance».
6.7 Preventati ve Main tenance for Frequent User s
There is a 5-year warran ty on t he avalanc he transceive r. If the transcei ver is used frequently, preventative main tenance a t the u ser’s expense is r ecommende d e very three years. This applies to u sers who
use their transceivers more than 1,500 hours over the
cours e o f three years. The objective is to ensure the
high reli ability of t he device for the next three years
and to test all the components and funct ions. To further opti mize the safe application o f t he device, especiall y i n professional settin gs, please refer to the
Application Safety Guide .
(www.barryvox.com or www.mammut.ch/barryvox)
6.8 Troubleshooti ng
Error mes sage / fa ilure d escription Solut ion
Transcei ver doesn’t turn on / 1. Check and replace batteries.
No sel f-test at s tartup 2. If this doesn’t help, the device must be repaired.
Devic e malfu nction! 1. Turn the transcei ver off for 1 m inute and turn it back on.
2. If this doesn’t help, the device must be repaired.
Batte ry empty! The batteries must be replaced as soon as possible.
Empty bat tery icon Refer to the instruction in the chapters «Insert / Replace
Batteries» and «Battery Level Indicator».
457 SE ND failu re! 1. Make sure that no metal objects or electron ic devices
SEND L ED does n’t bli nk are close to the transmit ter.
2. Check and replace batteries.
3. If this doesn’t help, the device must be repaired.
457 SE ARCH fai lure! 1. Mak e s ure that no metal objects or electronic device s
are close to the transmit ter.
2. Turn the transcei ver off for 1 m inute and turn it back on.
3. If this doesn’t help, the device must be repaired.
g-sen sor fail ure! 1. Turn the transcei ver off for 1 m inute and turn it back on.
2. If this doesn’t help, the device must be repaired.
W-Link failure! 1. Turn t he transceiver off for 1 minute and turn it back on.
2. If this doesn’t help, the device must be repaired.
Compa ss failu re! 1. Make sure that no metal objects or electron ic
devic es are close to the transmitter.
2. Turn the transcei ver off for 1 m inute and turn it back on.
3. If this doesn’t help, the device must be repaired.

6.9 Warranty
There is a 5-year warranty on the Barryvox transceiver
(excluding the batteries, the carrying system, and t he
wrist loop) from the date of purchase shown on the
purchase receipt. In case of a warranty claim, a ll parts
that can be sho wn to have material or production
defects will be replaced free of cha rge. Damage that
can be traced to incorrect handling or normal wear and
tear is excluded. The warrant y is voided if the buyer or
any non-authorized third party opens the dev ice. This
is also the case for devices that ha ve b een used with
spare parts or accessories, which are not original and
are not recommended by the manufacturer. A fee will
be charged for the dia gnostic test of a transceiver not
needing any repair. Warranty repairs do not extend the
duration of the warranty. There is a six-month warranty
on spare parts. Warran ty repairs will only be conducted
if the device is sent in along with the receipt. The
owner will b e charged for the shipping. The manufacturer explicitl y excludes any additional warranties or
liability for immediate and consequential damage.
36
Additional Information
37
6.10 Technica l Data
Transmit ter frequency 457 kHz (Inte rnatio nal standard)
W-Link frequency Regio n A: 869.8 MHz
Regio n B : 91 6 – 926 MHz
Freque ncy setting see c hapter «5.3.8 W-Link»
Power supply 3 x IEC – LR03 1.5 V Alkaline (AAA)
Initi al set of b atteri es Duracell Ultra M3 Alkaline
Battery life min. 200 h
Maxim um range Norma lly 60 m in standard mode, 90 m in a nalog mode
Searc h s trip width 50 m
The searc h s trip width has b een calculated based on the
metho d G ood
Opera ting tempe rature range –20° to +45° C
Dimen sions (L x W x H) 113 x 75 x 27 mm
Weight 210 g (incl. batterie s)
Earph one jack for stand ard Hi-Fi earphones
The PULSE Barryvox®compl ies with the EN 300718 standard
All infor mation provided without liabi lity. Status July 2007. Technical data and speci ficati ons are subject to
chang e w ithout notice in future transceiv ers.
USA/Canada
IC: 6628A-PULSE
FCC ID: UD9PULSE-B-462002
This device complies with part 15 of the FCC Rules
and RSS-210 of industry Canada.
Operation is subject to the following conditions:
쐃 This device may not cause (harmful) interference, and
This device must accept any interference received, inclu-
ding interferences that may cause undesired operation of
the device.
Manufacturer Ascom (Switzerland) Ltd Type PULSE Barr yvox
®
Country of origin Switzerland Code number N11394
6.11 Appro val / Co nformity (see also chapter «Declarations of Conform ity»)

39
7.3 Emergency P lan
The emerg ency plan shows the elementary steps for a successful compani on rescue.
Depen ding on the situat ion at hand, the procedu re must be adapted .
38
Companion Rescue
7. Companion Res cue
Compa nion rescue means that buried subjects are
located and excavated by members of their party
immed iately after the avalan che slide. Avalanche rescue is a race against time! While most burie d subjects can be re scued within the first 15 minutes , the
chanc es of s urvival decrease rapidly afte rwards.
Compa nion rescue, th erefore, provides the g reates t
chanc es of s urvival for a buried subjec t.
7.1 If an Avalanc he Occu rs
As a Victim:
● Escape to the side
● Discard skis, snowb oards, and poles
➜
ancho r e ffect
● Try to stay on top
● Close your mouth; place your hands in front of
your face
➜
clear airway when the avala nche stops
Separ ate instru ctions apply for the use of specialized
safet y e quipment, such as the h ighly efficient avalanch e a irbag.
As a Witness:
● Memorize the last seen point as well as the
direc tion of the avalan che
➜
prima ry search strip
(See chapter «Prima ry Search» ).
7.2 Rescue Equipment
Carrying the proper personal safety equipment is critical for effe ctive companion rescu e. A trans ceiver, a
shove l, and a probe pole are necess ary to localize
and excavate a buried subje ct quickly and e fficiently.
Mammu t o ffers a variety o f s uitable probe poles and
shove ls.
Carrying a radio or a mobile phone to call for help is
highl y r ecommended.
The use of the transceiver precedes the use of the probepole and
the use of the probe pole precedes the use of thesho vel.
Prima ry
Searc h P hase:
Search pattern
for one rescuer
Probe / Mark / Excavate
Checklist for
companion rescue
Tone-Only mode instruc-
tions (without display)
Search pattern for
multiple rescuers
Secon dary
Searc h P hase:
Coarse search
Pinpointing

41
The data are displaye d on the buried subje ct’s transceive r a nd also sent across the W-Link radio connection to the trans ceivers of the rescuers. Ba sed on the
list of burie d s ubjects, the rescuer decides in which
order he or she will locate and dig them out. Using
vital data as a triage criteria shorten s t he burial duration for thos e s ubjects h aving hi gher chances of
survival. This improve s the o verall rescue efficiency.
The vi tal dat a do not pro vide an assess ment of
the he alth of the bur ied sub ject. The y do not sub stitu te an as sessment by medically traine d personne l (phys ician).
Only r escuer s using a tr ansceiver with a W-Link
radio con nection are able to receive vital data.
The range of th e W-L ink depends o n t errain and b ody
inter ference, on the physical characteristics of the
avalanche debri s a s well as o n the orientat ion and
dista nce to the buried subject. The range of the W-
Link i s there fore li mited.
40
Companion Rescue
7.4 Triage Criteria an d Vital D ata
7.4.1 Triage
With limited resources (few re scuers) it is not possible
to locate and dig out all the buried subjects at the
same time. The question arises in which o rder the
buried subjects shall be rescued. Subjec ts with hi gh-
er chan ces of sur vival sho uld be located and dug
out fir st. Besid es simple terrain factors, e.g. drop
over a cliff, the bu rial depth and vital data are an
important triage criteri a.
7.4.2 Vital Data Detection
The PULSE Barryvox®conta ins highly sensitive sensors (g-s ensor) that can detect slight motion of the
body, such as a p umping heart or breathing lungs.
Any motion within a certain maximum lag time is
inter preted as vi tal data. The buried subject belongs
to the category with high chances of survival. It
can be assume d t hat buried subjects, which have
survived the first 35 min, are still able to breat he (air
pocke t), and therefor e h ave increa sed chances of
survival. At the same time, the detectability of vital
data decreases due to hypother mia. T herefore, b uried
subje cts who have trans mitted vital data for the first
35 min a re considered to belong to the catego ry
with high chances of survival for the rest of their burial duration.
All the burie d s ubjects, whose transc eivers are
techn ically not c apable of de tecting v ital data or
canno t d etect any for whatever reason, belong to
the category wit h u nknown chances of survival.
If you car ry the transceiver in a trouser’s pocket,
the de tectio n of vit al data is n ot poss ible due to
the al most no n-exist ent movements .

43
7.6 Rescue – Excavating the Buried Subject
Size the area to be dug out generously. Pay attention
to the presen ce of a n a ir pocket and avoi d t rampling
on top of the buried subject. A ccess the buried subject laterally. Digging must be p ractic ed as w ell. It
takes by far the most time.
Cut out blocks of snow with the shovel. The lead shoveler of the group should be relieved from time to time.
Rotating clockwise at given i ntervals is easiest.
42
Companion Rescue
7.5 Pinpointin g with Tran sceiver and Probe Pole
Pinpo inting the l ocatio n o f a buried subje ct is n ot
possi ble with a transceiver alone. The burial depth
and the orien tation of th e subject can be determined
easil y a nd quickly with a pr obe pole. Starti ng at the
point with the lowest dist ance reading or loudest
tone, appl y a spiral search p attern. Always probe at a
right angle to the snow surfac e.
If the buried subject is hit with the probe pole, the
pole is left in the snow. It serves as a guid e w hile
excavating the buried subje ct.
The buria l d epth is also a triage crit erion. In situations with limited resources deep burials are located
later.

44
Companion Rescue
45
7.7 Burial and Vital Dur ation
In case of a burial, the transc eiver records the burial
duration and detect s v ital data.
The Barryvox automatically displays the burial duration
as soon as the transceiver stops being moved. The
burial duration is displayed in hours and minutes along
with the time during which vital data was detected.
The display of the burial duration is also activated, if
the Barryvox stops moving outside of an a valanche.
By pressi ng any key in the SEND mode, you can recall
the buria l d ata of the five last resti ng periods of the
trans ceiver. T he resting periods are numbe red:
-1 most recent resting period
-2 second last resting period
-3 third last restin g p eriod
-4 fourth last resting period
-5 oldest restin g p hase
The curre nt resting phase is not numbered .
In multip le burial situations, the transceiver of a rescued subject should be turned off as soon as possibl e.
7.8 First Aid
Patient assessme nt, ABCs, and Basic Life Suppo rt
A Airway?
Clear the airway (snow ?)
B B reathi ng?
Perfor m rescue breat hing as necessary
C Circulation
Perfor m CPR as necessar y
Basic Life Support
● Depending on ABCs , continue rescue breath s
or CPR on patient .
● Prevent furthe r heat loss.
● If pati ent is responsive and can control
his/h er airway, administer warm fluids
● Handle patient very gently.
● Evacuate by helicopter whene ver possible.
7.9 Notificati on
It is not possibl e t o p rovide a com plete list of al l
mount ain and helicopter rescue services in this
manua l. Please infor m yourself prior to your trip
about the local rescue services and t heir phone numbers and radi o f requencies.
Messa ge:
Who – is calling ?
What – happened?
Where – is t he accident site?
When – did it happen?
How many
– casual ties (natu re of i njuries) /
how many rescuers?
Weathe r – at the accident site?
Alpin e D istres s S ignal
If you cannot call for help using a radio or phone, you
shoul d t ry to communicate the emerge ncy using the
alpin e d istress s ignal.
We need help 6x/minut e
Help i s on the way 3x/minute
In visual contact with a hel icopter:
Help! No help needed!
Burial duration: 25min
Vital data:
entire burial duration
Burial duration: 47min
Vital data: first 22min

47
Human s a s Trigg er of t he Trap
The steep er and more shaded the slope is, the
greater the likelih ood of releasing a slab avalanche.
The likel ihood increases with larg e g roups without
spaci ng, frequent turns, and especia lly with falls or
jumps over cornices or o ther shock loading. Remote
trigg ering is possible startin g w ith the danger level
CONSI DERABLE, i. e. t he person triggering the avalanch e c an be standing dozens of meters outside of
the fract ure zone. This is fatal at the bottom of a
slope , because the entir e slope above can be
relea sed!
Note: Lig ht forest (with trees far apart enough to ski
or ride throu gh) will not protect you from slab avalanch es. Even rock outcropping s w ill not prevent t he
relea se of s lab avalan ches.
8.3 Precautions
8.3.1 Standard Safety Pre cautions
The follo wing stand ard safety precautio ns should
always be taken regard less of the danger level:
●
Avala nche transceiver on SEND,
along with a pr obe pole and shovel
●
Avoid fresh wind-deposite d snow
●
Consi der daily fluctuations in temperature,
espec ially in the spring
●
Const antly assess the conditio ns
throu ghout the trip
46
Introduction to Ava l a n c h e T h e o r y
8. Introduction to Avalanche Theory
We would like to provide you with some basics on
this comp lex topic and recommend thoro ugh initial
and ongoi ng advanced a valanche training .
The Slab Avalanche: The Set Trap
Most wint er outdoor travelers trigger their own avalanch es. The snowpack is fragile. Slab avalanches
resem ble set traps: If we trigger it, th e t rap snaps.
Remem ber that a small slab of 100m3weigh s a bout
25 tons!
8.1 Hazard identifica tion
Very critical weathe r situations
The avalanche dange r i ncreases rapidly after storms
with new snow, wind, an d cold tempera tures. Slope s
with wind -drifted snow are especially danger ous!
Snow can also be moved by wind during nice weather. Th e f irst nice day after a snow event is particularly
dange rous. Most accid ents occur when a cold front
with stro ng winds and snow moves i n a fter days of
blue skie s a nd cold temperatures! In t his situat ion,
new snow amounts of 10 – 20 cm can constitu te a
criti cal situat ion that can last several days.
Rapid and strong warmi ng (downsl ope wind, rain) can
also caus e a n increase in avalanch e d anger, which
decre ases again with falling temperatures. If the
snowpack is uneven and weak, the danger is hard to
perce ive. T his is often the case with shallow snow
packs in the beginning o f w inter or during p eriods of
littl e p recipitation. In spring, the danger usually
incre ases as the day progresses: from low in the
morni ng followi ng a cle ar night to considerable in the
after noon.
8. 2 Risk A ssessment
Criti cal amounts of n ew snow
With the foll owing amou nts of new snowfall w ithin
1 – 3 days, the danger level is at least
CONSI DERABLE:
10–20 cm with adverse condi tions
20–30 cm with average cond itions
30–50 cm with favorable conditions
Adver se conditions
● Strong wind (> 50 km/h)
● Low temperat ures (< -8° C)
● Slope seldom traveled
Favora ble conditions
● Light wind
● Temperatures little below 0°C
● Slope traveled frequently

4948
Introduction to Ava l a n c h e T h e o r y
8.3.2 Minimize Stress on the Snow pack
Adequ ate spacin g i s an effectiv e m ethod to minimize
stres s o n the snowpack . Asce nding, the spaci ng
shoul d b e approxim ately 10 meters; desce nding
approximately 30 – 50 meters, due to the additional
stres s. Danger zones should be travel ed one person
at a time. Minimize t he stress on the snowpack by
makin g l ong turns. Avoid jumping!
8.3.3 Renunciation in the Terrai n
(Basi c R eduction Method, W. Munte r)
Dange r Level Skiab le/ridable slope angl e
2-Mod erate less than 40 de grees
3-Con siderable l ess than 35 degrees
4-Hig h less than 30 degrees
●
Untra cked steep slopes (> 30 degrees) :
➜
spaci ng of a t least 10 m.
●
Outsi de of t he forecasted aspect or altitude
range s:
➜
the danger level is generally one level lower.
●
At the edge of the forecasted aspect or altitude
range s:
➜
Do not approach the limits
8.4 Avala nche Fo recast Centers
It is impossi ble to publish a list o f a ll the avalanc he
forec ast centers in t his user manual.
Curre nt informa tion about all the avalanche forecast
cente rs worldwide can be found at the CyberSpace
Avala nche Center website at ht tp://www.csac.org
Example:
black=Considerable
→ white≈Moderate
00
81 m
N
3
8.5 Internatio nal Avalanche Danger Sc ale
Danger Level Snowpack Typical Indications Tours
쐃 Snowpack None. Generally favorable
LOW generally well conditions.
bonded.
쐇 On some steep Difficult Generally favorable conditions.
MOD ERAT E slopes snowpack to recognize. Careful choice of route on steep
only moderately slopes of aspect and altitude
bonded. No alarm signals. as given in the avalanche forecast.
쐋 On many steep «Whumphing» noises. Partly unfavorable conditions.
CON SID ER- slopes medium Some spontaneous ava- Experience in assessing avalanche
ABL E to poor snowpack. lanches. Remote triggering risk required.Wherever possible avoid
bonding only. at the foot of slopes. steep slopes of aspect and altitude
as given in the avalanche forecast.
쐏 Poor bonding Spontaneous Unfavorable conditions.
HIG H of snowpack avalanches. Tours only in moderately steep
on most steep Remote triggering. terrain < 30º. Be aware
slopes. of avalanche runout zones.
쐄 Generally poor Spontaneous avalanches Very unfavorable conditions.
EXT REM E bonding of snowpack, avalanches and remote Refrain from tours.
mostly unstable. triggering on a large scale.

N
O
Off . . . . . . . . . . . . . . . . . . . . . . 1 .1/7.7
Ortho gonal search system. . . . . . . . 5.1
Owner . . . . . . . . . . . . . . . . . . . . . 5.3.7
P
Pacem aker. . . . . . . . . . . . . . . . . . . 2.3
Perio dic c hecks . . . . . . . . . . . . . . . 6.6
Perso nal i dentific ation . . . . . . . . . 5.3 .7
Pinpo inting . . . . 4.1. 2/4.4.2/ 5.3.3/5 .3.4
Pinpo inting view . . . . . . . . . . . . . 5.3.4
Pocke t . . . . . . . . . . . . . . . . . . . . 2.4.2
Preve ntative Maintenan ce. . . . . . . . 6.7
Prima ry s earch phase . . . . . . . . . 4.1.1
Probe pole. . . . . . . . . . . . 7 .5/4.4. 2/7.2
Q
R
Radio . . . . . . . . . . . . . . . . . 2.3 /7.2/7.9
Recha rgeable batteries . . . . . 2.1.1/2. 6
Reduc tion method . . . . . . . . . . . . 8 .3.3
Reset . . . . . . . . . . . . . . . . . . . . 5.3.11
Rescu e . . . . . . . . . . . . . . . . . . . . 7/7. 6
Rescu e equ ipment . . . . . . . . . . . . . 7.2
Risk assessment . . . . . . . . . . . . . . 8.2
S
Safet y pre cautions . . . . . . . . . . . . 8.3.1
SEARC H . . . . . . . . . . . . . . . . . . . 1.1 /4
Searc h mod e. . . . . . . . . . . . . . . . . . . 4
Secon dary search phase . . . . . . . 4.1 .2
Self- test. . . . . . . . . . . . . . . . . . 2.5/6 .6
SEND . . . . . . . . . . . . . . . . . . . . . 1.1/3
Setti ngs . . . . . . . . . . . . . . . . . . . . . 5.3
Shove l . . . . . . . . . . . . . . . . . . . . . . 7.6
Slab avalanche . . . . . . . . . . . . . . . . . 8.
Stand ard . . . . . . . . . . . . . . . . . . . 6.1 0
Stand ard m ode. . . . . . . . . . . . . . . . 4.4
Stora ge. . . . . . . . . . . . . . . . . 2.1.1 /2.2
Stop . . . . . . . . . . . . . . . . . . . . . . 4.4.4
Summe r . . . . . . . . . . . . . . . . . . . 2.1 .1
Suspe nsion . . . . . . . . . . . . . . . . . 4.4 .4
Switc h . . . . . . . . . . . . . . . . . . . . . . 1.1
T
Techn ical data . . . . . . . . . . . . . . . 6.10
Test . . . . . . . . . . . . . . . 2.5/2.7/ 5.2/6.6
Test adapter. . . . . . . . . . . . . . . . . . 6 .4
Tone- only mode . . . . . . . . . . . . . . . 6.1
Triag e, tri age c riteria . . . . . . . 7 .4/7.4. 1
Troub leshooti ng . . . . . . . . . . . . . . . 6 .8
Turn on . . . . . . . . . . . . . . . . . . 1.1/2.5
Turn off. . . . . . . . . . . . . . 1.1/4.5.1/ 7.7
U
V
Vital data . . 5.2/5.3.6/ 7.4/7.4 .2/7.7/2 .4
Vital data d etectio n. . . . . . . 5.3 .6/7.4. 2
Vital sensor test. . . . . . . . 2.1.2/2. 4/5.2
W
Warra nty . . . . . . . . . . . . . . . . . . . . 6.8
W-Lin k . . . . . . . . . 5.3.8/6.4/ 6.10/7.4 .2
X
Y
Z
A
ABCs . . . . . . . . . . . . . . . . . . . . . . . 7 .8
Addre ss . . . . . . . . . . . . . . . . . . . 5.3.7
Air pocket . . . . . . . . . . . . 7.1 /7.4.2/ 7.6
Alpin e dis tress signal . . . . . . . . . . . 7.9
Analo g mod e . . . . . 4.5 /4.4.4/5 .1/5.3. 2
Analo g ton e . . . . . . . 4.1.1/4. 4.2/4.4 .4/
4.5/5 .1/5.3.2 /6.1
Ancho r eff ect . . . . . . . . . . . . . . . . . 7.1
Appro val . . . . . . . . . . . . . . . . . . . 6.11
Area last se en . . . . . . . . . . . 4.1.1/ 7.1
Audio support
durin g pin pointing . . . . . . . . . . . . 5 .3.3
Auto- revert to SEND . . . . . . . . 4.2 /5.3.5
Autom atic volume control . . . . . . . . 5.1
Avala nche airbag . . . . . . . . . . . . . . 7.1
Avala nche release . . . . . . . . . . . . . 7 .1
Avala nche danger scale . . . . . . . . . 8.5
Avala nche forecast . . . . . . . . . . . . . 8.4
Avala nche forecast center. . . . . . . . 8.4
Avala nche theory. . . . . . . . . . . . . . . . 8
B
Backl it . . . . . . . . . . . . . . . . . . . . . . 6.3
Basic reduction method . . . . . . . . 8.3 .3
Batte ries . . . . . . . . . . . . . . . . 2.1.1/2.6
Batte ry t est . . . . . . . . . . . . . . . 2.5/2 .6
Batte ry l evel indicato r. . . . . . . . 2.5 /2.6
Brack eting . . . . . . . . . . . . . . 4.4.2/5.1
Buria l dep th . . . . . . . 4.4. 2/7.4/7 .5/7.6
Buria l dur ation . . . . . . . . . . . . . . 7/7.7
C
Calib rate compass . . . . . . . 2.1.2/5.3. 9
Call for hel p . . . . . . . . . . . . . . . . . . 7.9
Carry ing positions . . . . . . . . . . . . . 2.4
Carry ing system . . . . . . . . . . . . . 2.4.1
Coars e sea rch . . . . . . . . . . 4.1.2/4. 4.2
Compa nion rescue. . . . . . . . . . . . . . . 7
Compa ss ca librati on . . . . . . 2.1 .2/5.3. 9
Confi guratio n ada pter . . . . . . . . . . . 6 .4
Confo rmity . . . . . . . . . . . . . . . . . . 6.11
Criti cal n ew sn ow. . . . . . . . . . . . . . 8.2
D
Dange r des criptors . . . . . . . . . . . . . 8.5
Darkn ess . . . . . . . . . . . . . . . . . . . . 6.3
Defau lt se ttings . . . . . . . . . . . . . 5.3.11
Devic e mal function . . . . . . . . . . . . . 6.8
Diagn ostics . . . . . . . . . . . . . . . . . . 6 .6
Direc tion indicatio n . . . . . . . . . . . 4.4.2
Displ ay . . . . . . . . . . . . . . . . . . 2.4 /6.3
Dista nce i ndicati on . . . . . . . . . . . 4.4.2
E
Earph one . . . . . . . . . . . . . . . . . . . . 6.2
Ease of use . . . . . . . . . . . . . . . . . . 1.2
Emerg ency p lan . . . . . . . . . . . . . . . 7.3
EN 300718 . . . . . . . . . . . . . . . . . . 6.1 0
Error messages . . . . . . . . . . . . 2.5/6. 8
F
First Aid . . . . . . . . . . . . . . . . . . . . . 7.8
G
g-sen sor . . . . . . . . . . . . . . . . 7.4.2/6.8
Group check. . . . . . . . . . . . . . . . . . 2.7
H
Hazar d ide ntifica tion. . . . . . . . . . . . 8.1
Headl amp . . . . . . . . . . . . . . . . . . . 2.3
I
Inter ferences . . . . . . . . . . . . . . . . . 2.3
J
K
Keys . . . . . . . . . . . . . . . . . . . . . . . 1.2
L
Langu age . . . . . . . . . . . . . . 2.1.2/5.3. 1
Last seen po int . . . . . . . . . . . 4.1.1/7.1
Leaki ng ba tteries . . . . . . . . . . . . . 2.1.1
M
Magne tic b uttons . . . . . . . . . . . . . . 2 .3
Main switch . . . . . . . . . . . . . . . . . . 1.1
Maint enance . 2.2 /5.3.10/6.4/6.5/6. 6/6.7
Malfu nction . . . . . . . . . . . . . . . . . . 6.8
Mark . . . . . . . . . . . . . . . . . . . . . . 4.4.2
Metal . . . . . . . . . . . . . . . . . . . . . . 2.3
Micro search strips . . . . . . . . . . . 4.5 .3
Mobil e pho ne . . . . . . . . . . . . . . 2.3/7.2
Moist ure . . . . . . . . . . . . . . . . . . . 2.1 .1
Multi ple b urials. . . . . . . 4 .4.3/4. 5.1/7.4
50
Index
51

52
Declarations o f C o n f o r m i t y
– Re orient or reloc ate th e rece iving antenna.
– Inc rease the separ ation between t he equ ipment and rece iver.
– Con nect t he equ ipment into an outlet on a c ircuit different from
that to which the re ceiver is conne cted.
– Con sult t he dea ler or an exp erienced radio/TV technicia n for
help.
This device c omplies with Par t 15 of the FCC Rules . Opera tion i s
subjec t to the foll owing two condi tions:
(1) T his de vice m ay not cause h armful interferen ce, and (2) thi s
device must a ccept any int erferenc e rece ived, in cluding interference that may cause undesired operation .
FCC Caution: Any changes or modif ication s not expressly approved
by t he par ty res ponsible for co mpliance could v oid th e user 's
author ity to operate this eq uipment.
Federal Commun ication Comm ission Inte rference Sta tement
This equipment has bee n test ed and found t o comp ly wit h the limits for a C lass B digital device, p ursuant to Part 15 of the FCC
Rules. These l imits a re des igned to provid e reas onable protection
again st har mful i nterferen ce in a resid ential installati on. This
equipm ent ge nerates, uses an d can radiate radio fre quency energy
and, if not installed and used in acc ordance with th e inst ructions ,
may cause har mful i nterfere nce to radio c ommunica tions. However, the re is no guar antee that in terferenc e will not oc cur in a particula r inst allatio n. If this equ ipment does cau se har mful i nterference to radio or tel evision reception, which ca n be determined by
turnin g the equipment off and on, the user is encourag ed to try to
correc t the interfere nce by one of the fol lowing measures:
[ Photo: Rainer Eder ]
 Loading...